


HELICOPTER Q6
User Manual
English
Español
Français
Nederlands
LASER LIGHT
AVOID DIRECT EYE EXPOSURE
CLASS 3R LASER PRODUCT
CLASSIFIED PER EN/IEC 60825-1:2007 Complies with FDA performance standards for laser products except for deviations pursuant to Laser Notice No. 50, dated June 24, 2007.

|
TABLE OF CONTENTS |
TABLE OF CONTENTS |
|
1. Before You Begin ....................................................................... |
1 |
What Is Included ........................................................................................... |
1 |
Unpacking Instructions.................................................................................. |
1 |
Claims ................................................................................................................ |
1 |
Text Conventions .......................................................................................... |
1 |
Symbols ........................................................................................................ |
1 |
Disclaimer ..................................................................................................... |
1 |
Product at a Glance ...................................................................................... |
2 |
Safety Notes.................................................................................................. |
2 |
Non-Interlocked Housing Warning ..................................................................... |
3 |
Laser Safety Notes........................................................................................ |
3 |
Laser Exposure Warning.................................................................................... |
4 |
Laser Emission Data .......................................................................................... |
4 |
Laser Compliance Statement............................................................................. |
4 |
Laser Safety Label Reproduction....................................................................... |
5 |
2. Introduction ....................................................... |
......................... 6 |
Product Overview.......................................................................................... |
6 |
Product Dimensions...................................................................................... |
6 |
3. Setup ........................................................................ |
................... 7 |
AC Power...................................................................................................... |
7 |
Fuse Replacement ............................................................................................. |
7 |
Power Linking..................................................................................................... |
7 |
Mounting ....................................................................................................... |
8 |
Orientation.......................................................................................................... |
8 |
Rigging ............................................................................................................... |
8 |
Proper Usage................................................................................................ |
8 |
4. Operation ........................................................... |
......................... 9 |
Control Panel Operation................................................................................ |
9 |
Menu Map ..................................................................................................... |
9 |
Configuration (DMX) ..................................................................................... |
9 |
Starting Address................................................................................................. |
9 |
DMX Channel Assignments and Values ....................................................... |
10 |
Zones for DMX Control (16CH).......................................................................... |
10 |
16CH .................................................................................................................. |
10 |
3-CH................................................................................................................... |
12 |
Configuration (Standalone) ........................................................................... |
13 |
Automatic Programs........................................................................................... |
13 |
Auto-Program Speed ......................................................................................... |
13 |
Sound-Active Mode............................................................................................ |
13 |
Static Color Mode............................................................................................... |
13 |
Rotation Mode.................................................................................................... |
13 |
IRC-6 Infrared Remote Control ..................................................................... |
14 |
IRC-6 Operation ................................................................................................. |
14 |
Master/Slave Mode ....................................................................................... |
15 |
5. Technical Information ................................................................ |
16 |
Product Maintenance .................................................................................... |
16 |
6. Technical Specifications ........................................................... |
17 |
Returns......................................................................... |
................... 18 |
Contact Us ................................................................... |
................... 19 |
i |
Helicopter Q6 User Manual Rev. 1 |

TABLE OF CONTENTS
1. Antes de Empezar ...................................................................... |
20 |
Qué va Incluido ............................................................................................. |
20 |
Instrucciones de Desembalaje...................................................................... |
20 |
Reclamaciones................................................................................................... |
20 |
Convenciones del Manual............................................................................. |
20 |
Símbolos ....................................................................................................... |
20 |
Exención de responsabilidad ........................................................................ |
20 |
El producto de un vistazo.............................................................................. |
21 |
Notas de Seguridad ...................................................................................... |
21 |
Advertencia sobre Carcasa no Cerrada............................................................. |
22 |
Notas de Seguridad sobre Láser .................................................................. |
22 |
Advertencia sobre Exposición al Láser .............................................................. |
23 |
Datos de Emisión Láser ..................................................................................... |
23 |
Declaración de Conformidad Láser.................................................................... |
23 |
Reproducción de la Etiqueta de Seguridad del Láser........................................ |
24 |
2. Introducción................................................................................ |
25 |
Vista general del producto ............................................................................ |
25 |
Dimensiones del producto............................................................................. |
25 |
3. Instalación................................................................................... |
26 |
Corriente alterna ........................................................................................... |
26 |
Sustitución del fusible ........................................................................................ |
26 |
Alimentación en cadena..................................................................................... |
26 |
Montaje ......................................................................................................... |
27 |
Orientación......................................................................................................... |
27 |
Colocación ......................................................................................................... |
27 |
Uso Adecuado............................................................................................... |
27 |
4. Funcionamiento.......................................................................... |
28 |
Funcionamiento del panel de control ............................................................ |
28 |
Mapa de menú .............................................................................................. |
28 |
Configuración (DMX)..................................................................................... |
28 |
Dirección de inicio .............................................................................................. |
28 |
Valores y asignaciones de canal DMX.......................................................... |
29 |
Zonas para control DMX (16CH)........................................................................ |
29 |
16CH .................................................................................................................. |
29 |
3-CH................................................................................................................... |
31 |
Configuración (Independiente)...................................................................... |
32 |
Programas automáticos ..................................................................................... |
32 |
Velocidad del programa automático................................................................... |
32 |
Modo Activo por sonido...................................................................................... |
32 |
Modo Color estático ........................................................................................... |
32 |
Modo de rotación ............................................................................................... |
32 |
Control remoto por infrarrojos IRC-6............................................................. |
33 |
Funcionamiento IRC-6 ....................................................................................... |
33 |
Modo Maestro/Esclavo.................................................................................. |
34 |
5. Información Técnica .................................................................. |
35 |
Mantenimiento del producto.......................................................................... |
35 |
6. Especificaciones Técnicas........................................................ |
36 |
Devoluciones .................................................................................. |
37 |
Contacto.......................................................................................... |
38 |
Helicopter Q6 User Manual Rev. 1 |
ii |

|
TABLE OF CONTENTS |
1. Avant de commencer ................................................................. |
39 |
Ce Qui Est Compris ...................................................................................... |
39 |
Instructions Relatives au Déballage.............................................................. |
39 |
Réclamations ..................................................................................................... |
39 |
Conventions manuelles................................................................................. |
39 |
Symboles ...................................................................................................... |
39 |
Clause de Non-Responsabilité...................................................................... |
39 |
Bref descriptif de l'unité................................................................................. |
40 |
Consignes de Sécurité.................................................................................. |
40 |
Avertissement: Boîtier non Verrouillable ............................................................ |
41 |
Consignes de Sécurité Relatives au Laser ................................................... |
41 |
Avertissement d'Exposition au Laser ................................................................. |
42 |
Données d'émission laser .................................................................................. |
42 |
Déclaration de Conformité Laser ....................................................................... |
42 |
Reproduction de l’Étiquette de Sécurité Laser................................................... |
43 |
2. Introduction ................................................................................ |
44 |
Vue d'ensemble du produit ........................................................................... |
44 |
Dimensions du produit .................................................................................. |
44 |
3. Configuration.............................................................................. |
45 |
Alimentation CA ............................................................................................ |
45 |
Remplacement des fusibles ............................................................................... |
45 |
Connexion électrique ......................................................................................... |
45 |
Installation..................................................................................................... |
46 |
Orientation.......................................................................................................... |
46 |
Suspension ........................................................................................................ |
46 |
Utilisation Adéquate ...................................................................................... |
46 |
4. Fonctionnement ......................................................................... |
47 |
Utilisation du panneau de commande........................................................... |
47 |
Plan du menu................................................................................................ |
47 |
Configuration (DMX) ..................................................................................... |
47 |
Adresse de départ.............................................................................................. |
47 |
Affectation de canaux DMX et valeurs.......................................................... |
48 |
Zones pour le contrôle par DMX (16CH)............................................................ |
48 |
16CH .................................................................................................................. |
48 |
3-CH................................................................................................................... |
51 |
Configuration (autonome) ............................................................................. |
52 |
Programmes automatiques ................................................................................ |
52 |
Vitesse de programme automatique .................................................................. |
52 |
Mode d'activation par le son............................................................................... |
52 |
Mode de couleurs statiques ............................................................................... |
52 |
Mode de rotation ................................................................................................ |
52 |
Télécommande infrarouge IRC-6.................................................................. |
53 |
Fonctionnement avec IRC-6 .............................................................................. |
53 |
Mode maître/esclave..................................................................................... |
54 |
5. Information Technique............................................................... |
55 |
Entretien de l'appareil ................................................................................... |
55 |
6. Spécificités Techniques ............................................................ |
56 |
Renvois ........................................................................ |
................... 57 |
Nous Contacter............................................................................... |
58 |
iii |
Helicopter Q6 User Manual Rev. 1 |

TABLE OF CONTENTS
1. Erste Schritte .............................................................................. |
59 |
Packungsinhalt.............................................................................................. |
59 |
Anweisungen für das Auspacken.................................................................. |
59 |
Schadensmeldung ............................................................................................. |
59 |
Konventionen des Handbuchs ...................................................................... |
59 |
Symbole ........................................................................................................ |
59 |
Haftungsausschluss...................................................................................... |
59 |
Produktüberblick ........................................................................................... |
60 |
Sicherheitshinweise ...................................................................................... |
60 |
Achtung! Kein Schutz bei geöffnetem Gehäuse ................................................ |
61 |
Hinweise zur Lasersicherheit ........................................................................ |
61 |
Laserexposition – Warnung ............................................................................... |
62 |
Laseremissions-daten ........................................................................................ |
62 |
Laser-Konformitäts-erklärung............................................................................. |
63 |
Warnund Sicherheitsschilder auf dem Lasergerät ........................................... |
63 |
2. Einleitung .................................................................................... |
64 |
Produktübersicht ........................................................................................... |
64 |
Produktabmessungen ................................................................................... |
64 |
3. Einrichten des Geräts ................................................................ |
65 |
Wechselstrom ............................................................................................... |
65 |
Auswechseln der Sicherung............................................................................... |
65 |
Reihenschaltung der Geräte .............................................................................. |
65 |
Montage ........................................................................................................ |
66 |
Montagerichtung ................................................................................................ |
66 |
Hängende Montage............................................................................................ |
66 |
Bestimmungsgemäße Verwendung .............................................................. |
66 |
4. Betrieb ......................................................................................... |
67 |
Betrieb des Bedienfeldes .............................................................................. |
67 |
Menüstruktur ................................................................................................. |
67 |
Konfiguration (DMX)...................................................................................... |
67 |
Startadresse....................................................................................................... |
67 |
DMX-Kanal – Zuordnungen und Werte......................................................... |
68 |
Zonen zur DMX-Ansteuerung (16 Kanäle)......................................................... |
68 |
16CH .................................................................................................................. |
68 |
3-CH................................................................................................................... |
71 |
Konfiguration (Stand-alone) .......................................................................... |
72 |
Auto-Programme................................................................................................ |
72 |
Geschwindigkeit des Auto-Programms .............................................................. |
72 |
Musiksteuerungs-Modus .................................................................................... |
72 |
Statischer Farb-Modus....................................................................................... |
72 |
Rotationsmodus ................................................................................................. |
72 |
IRC-6 (Infrarot-Fernbedienung)..................................................................... |
73 |
IRC-6-Betrieb ..................................................................................................... |
73 |
Master/Slave-Modus ..................................................................................... |
74 |
5. Technische Informationen......................................................... |
75 |
Wartung des Geräts...................................................................................... |
75 |
6. Technische Daten....................................................................... |
76 |
Reklamationen................................................................................ |
77 |
Kontakt ............................................................................................ |
78 |
Helicopter Q6 User Manual Rev. 1 |
iv |

|
TABLE OF CONTENTS |
1. Voordat u begint......................................................................... |
79 |
Wat is er inbegrepen..................................................................................... |
79 |
Uitpakinstructies............................................................................................ |
79 |
Claims ................................................................................................................ |
79 |
Conventies van deze handleiding ................................................................. |
79 |
Symbolen ...................................................................................................... |
79 |
Disclaimer ..................................................................................................... |
79 |
Product in het kort......................................................................................... |
80 |
Veiligheidsinstructies..................................................................................... |
80 |
Niet-bevestigde waarschuwing op de behuizing ................................................ |
81 |
Veiligheidsinstructies voor de laser............................................................... |
81 |
Blootstellingswaarschuwing van de laser........................................................... |
82 |
Emissiegegevens van de laser .......................................................................... |
82 |
Nalevingsverklaring van de laser ....................................................................... |
83 |
Reproductie van veiligheidsetiket voor de laser................................................. |
83 |
2. Inleiding....................................................................................... |
84 |
Productoverzicht ........................................................................................... |
84 |
Productafmetingen........................................................................................ |
84 |
3. Instelling................................................................... |
................... 85 |
AC-stroom..................................................................................................... |
85 |
Vervangen van de zekering ............................................................................... |
85 |
Power Linking..................................................................................................... |
85 |
Montage ........................................................................................................ |
86 |
Oriëntatie............................................................................................................ |
86 |
Opbouw.............................................................................................................. |
86 |
Correct gebruik.............................................................................................. |
86 |
4. Werking ....................................................................................... |
87 |
Werking van het bedieningspaneel............................................................... |
87 |
Menumap ...................................................................................................... |
87 |
Configuratie (DMX) ....................................................................................... |
87 |
Startadres........................................................................................................... |
87 |
DMX-kanaaltoewijzingen en waarden........................................................... |
88 |
Zones voor DMX-regeling (16CH)...................................................................... |
88 |
16CH .................................................................................................................. |
88 |
3-CH................................................................................................................... |
91 |
Configuratie (losstaand)................................................................................ |
92 |
Automatische programma's................................................................................ |
92 |
Automatische programmasnelheid..................................................................... |
92 |
Geluidsactieve modus........................................................................................ |
92 |
Statische kleurenmodus..................................................................................... |
92 |
Rotatiemodus ..................................................................................................... |
92 |
IRC-6 infrarood afstandsbediening ............................................................... |
93 |
Gebruik IRC-6 .................................................................................................... |
93 |
Master/Slave-modus ..................................................................................... |
94 |
5. Technische informatie ............................................................... |
95 |
Productonderhoud......................................................................................... |
95 |
6. Technische Specificaties........................................................... |
96 |
Retouren....................................................................... |
................... 97 |
Neem contact op ............................................................................ |
98 |
v |
Helicopter Q6 User Manual Rev. 1 |
BEFORE YOU BEGIN
1. BEFORE YOU BEGIN
What Is Included
• |
Helicopter Q6 |
• |
Warranty Card |
• |
Power Cord |
• |
User Manual |
•Hanging Bracket with Mounting Hardware
Unpacking Instructions
Carefully unpack the product immediately and check the container to make sure all the parts are in the package and are in good condition.
Claims
If the box or the contents (the product and included accessories) appear damaged from shipping, or show signs of mishandling, notify the carrier immediately, not Chauvet. Failure to report damage to the carrier immediately may invalidate your claim. In addition, keep the box and contents for inspection.
For other issues, such as missing components or parts, damage not related to shipping, or concealed damage, file a claim with Chauvet within 7 days of delivery.
Text Conventions
CONVENTION |
MEANING |
1–512 |
A range of values |
50/60 |
A set of values of which only one can be chosen |
Settings |
A menu option not to be modified |
<ENTER> |
A key to be pressed on the product’s control panel |
ON |
A value to be entered or selected |
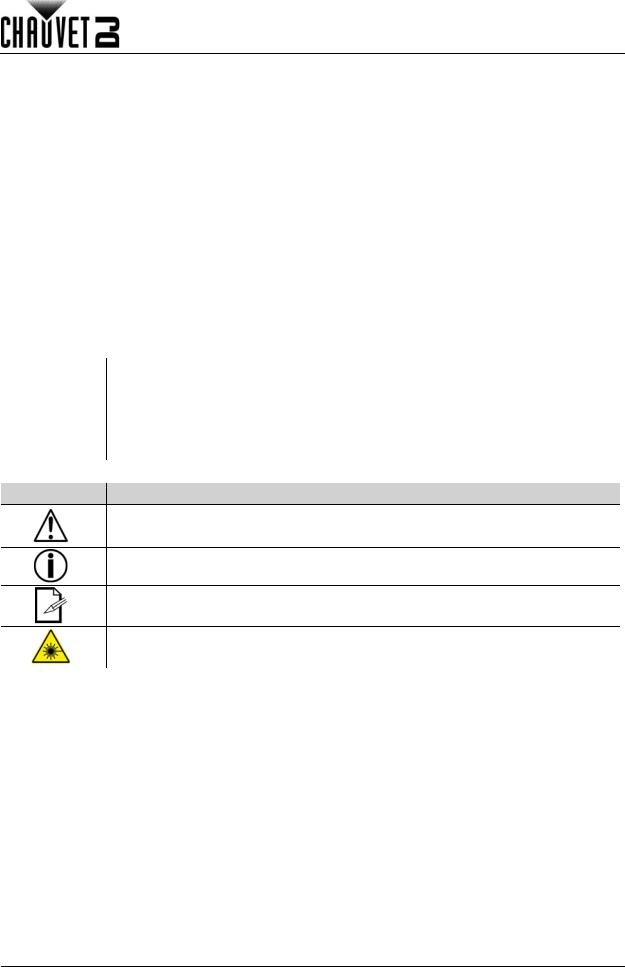
Symbols
SYMBOL MEANING
Critical installation, configuration, or operation information. Not following these instructions may make the product not work, cause damage to the product, or cause harm to the operator.
Important installation or configuration information. The product may not function correctly if this information is not used.
Useful information.
Laser safety information.
Disclaimer
Chauvet believes that the information contained in this manual is accurate in all respects. However, Chauvet assumes no responsibility and specifically disclaims any and all liability to any party for any loss, damage or disruption caused by any errors or omissions in this document, whether such errors or omissions result from negligence, accident or any other cause. Chauvet reserves the right to revise the content of this document without any obligation to notify any person or company of such revision, however, Chauvet has no obligation to make, and does not commit to make, any such revisions. Download the latest version from www.chauvetdj.com.
The works of authorship contained in this manual, including, but not limited to, all design, text and images are owned by Chauvet.
© Copyright 2016 Chauvet & Sons, LLC. All rights reserved.
Electronically published by Chauvet in the United States of America.
CHAUVET, the Chauvet logo, and Helicopter Q6 are registered trademarks or trademarks of Chauvet & Sons LLC (d/b/a Chauvet and Chauvet Lighting) in the United States and other countries. Other company and product names and logos referred to herein may be trademarks of their respective companies.
Helicopter Q6 User Manual Rev. 1 |
Page 1 of 98 |
BEFORE YOU BEGIN
Product at a Glance
Use on Dimmer |
|
|
|
Outdoor Use |
|
|
|
Sound-Active |
|
|
|
DMX |
|
|
|
Master/Slave |
|
|
|
Auto Programs |
|
|
|
Auto-ranging Power Supply |
|
|
|
Replaceable Fuse |
|
|
|
User-Serviceable |
|
|
|
|
|
Safety Notes
The Safety Notes include important laser system safety information. Read and understand all instructions before powering on the laser for the first time. Knowing these safety instructions is crucial to avoiding laser
eye injury and breaking the law. Keep this User Manual in a safe place for future reference.
STOP AND READ ALL LASER SAFETY DATA
•Lasers can be hazardous and have unique safety considerations. Permanent eye injury and blindness are possible if lasers are used incorrectly. Pay close attention to each safety REMARK and WARNING statement in this User Manual. Read all instructions carefully BEFORE operating this device.
•Always connect the product to a grounded circuit to avoid the risk of electrocution.
•Always disconnect the product from the power source before cleaning.
•Avoid direct eye exposure to the light source while the product is on.
•Make sure the power cord is not crimped or damaged.
•Never disconnect the product from power by pulling or tugging on the cord.
•If mounting the product overhead, always secure to a fastening device using a safety cable.
•Make sure there are no flammable materials close to the product when operating.
•Do not touch the product’s housing when operating because it may be very hot.
•This product is not intended for permanent installation.
•Always make sure that the voltage of the outlet to which you are connecting the product is within the range stated on the decal or rear panel of the product.
•The product is for indoor use only! (IP20) To prevent risk of fire or shock, do not expose the product to rain or moisture.
•Always install the product in a location with adequate ventilation, at least 20 in (50 cm) from adjacent surfaces.
•Be sure that no ventilation slots on the product’s housing are blocked.
•Never connect the product to a dimmer.
•Always use the mounting bracket to carry the product.
•Do not switch the product on/off in short intervals. This will reduce the laser diode life.
•Do not shake this product. Avoid brute force when mounting or operating this product.
•ALWAYS use a safety cable when mounting the product overhead.
•The ambient operating temperature for the laser is 59 °F to 95 °F (15 °C to 35 °C). Do not operate this product outside this range.
•In the event of a serious operating problem, stop using the product immediately.
•Never try to repair the product. Repairs carried out by unskilled people can lead to damage or malfunction. Contact the nearest authorized technical assistance center.
CAUTION! Use of controls, adjustments, or procedures other than THOSE specified IN THIS USER MANUAL may result in hazardous radiation exposure.
Page 2 of 98 |
Helicopter Q6 User Manual Rev. 1 |
BEFORE YOU BEGIN
•Avoid direct eye contact with laser light. Never intentionally expose your eyes or others to direct laser light.
•This laser product can potentially cause instant eye injury or blindness if laser light directly strikes the eyes.
•It is illegal and dangerous to shine this laser into audience areas, where the audience or other personnel could get direct laser beams or bright reflections into their eyes.
•It is a U.S. federal offense to shine any laser at aircraft.
•Use of controls, adjustments, or procedures other than those specified in this User Manual may result in hazardous radiation exposure.
•To eliminate wear and improve its lifespan, during periods of non-use completely disconnect from power via breaker or by unplugging it.
•DO NOT attempt any repairs. Repairs and servicing must be carried out by a certified technician. Unauthorized modifications are forbidden for safety reasons!
Keep this User Manual for future consultation. If transferring ownership of the product to another user, be sure this document is kept with the laser.
Non-Interlocked Housing Warning
•This unit contains high power laser devices internally.
•Do not open the laser housing, due to potential exposure to unsafe levels of laser radiation.
•The laser power levels, accessible if the unit is opened, can cause instant blindness, skin burns, and fires.
Laser Safety Notes
 STOP AND READ ALL THE LASER SAFETY NOTES BELOW
Laser light is different from any other light. Laser light can cause eye injury if the product is not set up and used properly. Laser light is a thousand times more concentrated than any other kind of light. This concentration can cause instant eye injuries by burning the retina (the light-sensitive portion at the back of the eye). The heat from a laser light cannot be felt, but it can still injure or blind product operators and the audience. Even very small amounts of laser light at long distances are potentially hazardous.
DO NOT assume that exposure to an individual laser beam is safe, even a tiny beam split off from a larger beam. This laser product uses dozens of milliwatts of laser power—Class 3B levels internally—and splits them into multiple beams—Class 3R levels. The individual Class 3R level beams are potentially hazardous to the eyes.
DO NOT assume that a moving laser light is safe. Laser light is never without risk. Since eye injuries can occur instantly, it is critical to prevent the possibility of ANY direct eye exposure. According to laser safety regulations, it is not legal to aim Class 3R lasers into areas where people can be exposed, even if the laser
is aimed below people’s faces, such as at a dance floor.
Helicopter Q6 User Manual Rev. 1 |
Page 3 of 98 |

BEFORE YOU BEGIN
•Do not operate the laser without first reading and understanding all the safety and technical data in this manual.
•ALWAYS set up and install all laser effects so that any laser light is at least 3 meters (9.8 feet) above the floor on which people are standing. See the Proper Usage section of this manual.
•After setup, and prior to public use, test the lasers to ensure they are functioning properly. Do not use the product if any defect is detected.
•DO NOT use laser if it is emitting only one or two beams, rather than dozens/hundreds, as this indicates damage to the diffraction grating optic, and allows emission of laser levels higher than Class 3R.
•DO NOT point lasers at people or animals.
•DO NOT look into the laser aperture or laser beams.
•DO NOT point lasers into areas where people could be exposed to them.
•DO NOT point lasers at highly reflective surfaces such as windows, mirrors, and shiny metal. Even laser reflections can be hazardous.
•Never point a laser at aircraft; this is a U.S. federal offense.
•Never point unterminated laser beams into the sky.
•Do not expose the output optic (aperture) to harsh cleaning chemicals.
•Do not use the laser if the housing is damaged, open, or if the optics appear damaged in any way.
•Never open the laser housing. The high laser power levels inside of the protective housing can start fires or burn skin, and will cause instant eye injury.
•Never leave this product running unattended.
•The operation of a Class 3R laser show is allowed only if the lasers are operated by a skilled and well-trained professional, who is familiar with the data included in this manual.
•The legal requirements for using laser entertainment products vary from country to country. The user is responsible for the legal requirements in the location/country of use.
CAUTION! Do not operate this device in ways not specified in this User Manual. Failure to follow the instructions will void the warranty, may damage the product, or injure the user or the audience.
CAUTION! This product cannot be discarded with household waste. Contact your local waste management service for electronic disposal regulations in your area.
Laser Exposure Warning
LASER LIGHT AVOID DIRECT EYE EXPOSURE
Further guidelines and safety programs for safe use of lasers can be found in the ANSI Z136.1 Standard “For Safe Use of Lasers”, available from the Laser Institute of America: www.lia.org. Many local governments, corporations, agencies, military, and others, require all lasers to be used under the guidelines of ANSI Z136.1. Laser Display guidance can be obtained via the International Laser Display Association: www.ilda.com.
Laser Emission Data
As measured under IEC measurement conditions for classification.
Laser Classification Class 3R
Green Laser Medium DPSS Nd:YVO4, 532 nm/30 mW Red Laser Medium LD GaAIAs, 650 nm/100 mW
Beam Diameter <5 mm at aperture
Pulse Data All pulses < 4 Hz (>0.25 sec)
Divergence (each beam) <2 mrad Divergence (total light) <160 degrees
Laser Power of Each Beam from Aperture* <5 mW
Laser Compliance Statement
This laser product complies with EN/IEC 60825-1 Ed 2, 2007-03, and U.S. FDA/CDRH FLPPS via the terms of Laser Notice No. 50 dated June 24, 2007. This laser device is classified 3R. (Class 3R is the international equivalent of U.S. Class IIIa.) No maintenance is required to keep this product in compliance with laser performance standards.
Page 4 of 98 |
Helicopter Q6 User Manual Rev. 1 |
BEFORE YOU BEGIN
Laser Safety Label Reproduction
Top
|
|
|
|
LASER LIGHT |
|
|
|
|
|
AVOID DIRECT EYE EXPOSURE |
|||
|
|
|
CLASS 3R LASER PRODUCT |
|||
|
|
|
30 mW, 532 nm / 100 mW, 650 nm |
|||
|
|
|
Classified per EN/IEC 60825-1:2007 |
|||
|
|
|
|
|
||
|
|
|
|
CHAUVET WORLDWIDE HEADQUARTERS |
||
|
|
|
|
|
RoHS |
SUNRISE, FLORIDA USA |
|
|
|
|
|
|
|
MODEL: |
HELICOPTERQ6 |
|
THIS APPLIANCE MUST BE GROUNDED |
|||
TYPE: |
|
|
CETTE UNITÉ DOIT ÊTRE RELIÉE À LA TERRE |
|||
|
|
USE ONLY FUSE OF SAME TYPE & RATING |
||||
ITEM CODE: |
10051300 |
|
N’UTILISER QUE DES FUSIBLES DU TYPE ET |
|||
|
DE L’AMPÉRAGE INDIQUÉ |
|||||
FUSE: |
F 1.6 A, 250 V |
|
||||
|
NOT FOR HOUSEHOLD USE |
|||||
MAX. OUTPUT CURRENT: |
.7 A (12 units @ 120 V) |
IMPROPRE A L’USAGE DOMESTIQUE |
||||
DRY LOCATIONS |
||||||
|
|
|
(23 units @ 230 V) |
EMPLACEMENTS SECS |
||
LIGHT SOURCE: |
LED, LASER - RED/GREEN |
DISCONNECT POWER BEFORE SERVICING |
||||
DÉBRANCHER AVANT TOUT ENTRETIEN |
||||||
ORIGIN: |
MADE IN P.R.C. |
|
FOR INDOOR USE ONLY |
|||
|
USAGE INTÉRIEUR UNIQUEMENT |
|||||
USA/CANADA |
|
WORLDWIDE |
|
|||
Power: AC 100-240 V, 50/60 Hz, 0.7 A, 41 W |
Power: AC 230 V, 50 Hz, 0.4 A, 44 W |
|||||
Bottom
Helicopter Q6 User Manual Rev. 1 |
Page 5 of 98 |

INTRODUCTION
2. INTRODUCTION
Product Overview
|
Carrying |
|
Handle |
Safety Loop |
Power In Fuse Holder Power Out DMX In/Out |
LED Indicators
DMX Auto
Sound Slave
 Microphone
 Sensitivity Knob
LED Display Menu Buttons
Laser Aperture
Infrared Sensor
SMD Strobes
Adjustable Heads 
Product Dimensions
15.4 in
390 mm
9.4 in
240 mm
Page 6 of 98 |
Helicopter Q6 User Manual Rev. 1 |
SETUP
3. SETUP
AC Power
The Helicopter Q6 has an auto-ranging power supply and it can work with an input voltage range of 100 to 240 VAC, 50/60 Hz. To determine the product’s power requirements (circuit breaker, power outlet, and wiring), use the current value listed on the label affixed to the product’s back panel, or refer to the product’s Technical Specifications. The listed current rating indicates the product’s average current draw under normal conditions.
•Always connect the product to a protected circuit (a circuit breaker or fuse). Make sure the product has an appropriate electrical ground to avoid the risk of electrocution or fire.
•To eliminate unnecessary wear and improve its lifespan, during periods of nonuse completely disconnect the product from power via breaker or by unplugging it.
Never connect the product to a rheostat (variable resistor) or dimmer circuit, even if the rheostat or dimmer channel serves only as a 0 to 100% switch.
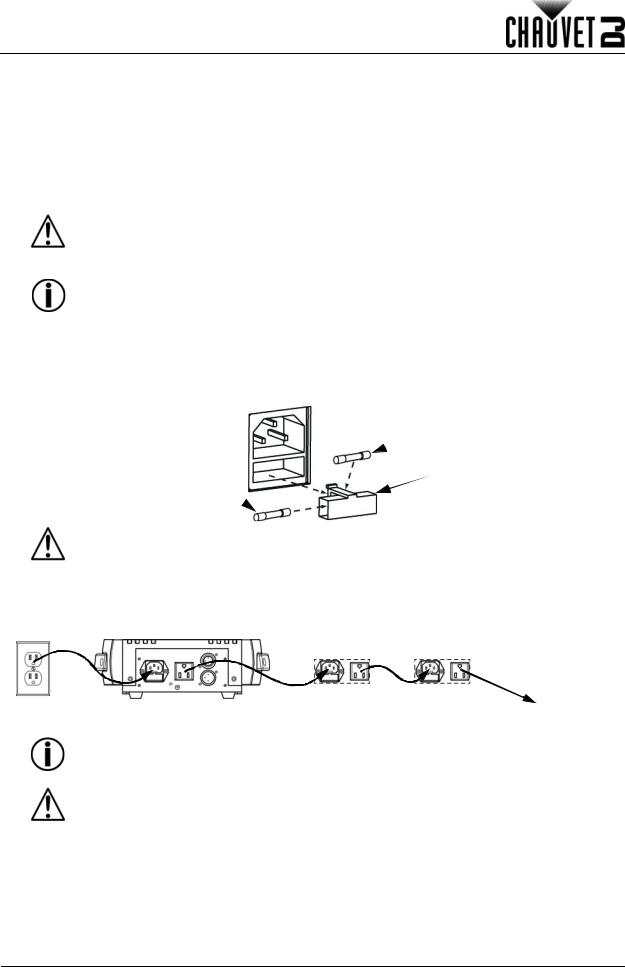
Fuse Replacement
1.Wedge the tip of a flat-head screwdriver into the slot of the fuse holder.
2.Pry the fuse holder out of the housing.
3.Remove the blown fuse from the holder and replace with a fuse of the exact same type and rating.
4.Insert the fuse holder back in place and reconnect power.
Installed fuse
(held by plastic clip)
Spare fuse holder
(inside safety cap) |
Safety cap |
|
Disconnect the product from the power outlet before replacing the fuse.
Power Linking
The product provides power linking via the Edison outlet located in the back of the product. Please see the diagram below for further explanation.
Power Linking Diagram
Power |
1st Product |
2nd Product |
3rd Product |
Additional |
Source |
|
|
|
Products |
You can power link up to 12 Helicopter Q6 products on 120 VAC or up to 23 Helicopter Q6 products on 230 VAC.
The power linking diagram corresponds to the North American version of the product ONLY! If using the product in other markets, you must consult with the local Chauvet distributor as power linking connectors and requirements may differ in your country or region.
Helicopter Q6 User Manual Rev. 1 |
Page 7 of 98 |
SETUP
Mounting
Before mounting the product, read and follow the safety recommendations indicated in the Safety Notes.
Orientation
The Helicopter Q6 must be mounted in a position that includes planning for safe laser usage.
Rigging
•Before deciding on a location, always make sure there is easy access to the product for maintenance and programming purposes.
•Make sure adequate ventilation is provided around the product.
•Make sure that the structure or surface onto which you are mounting the product can support the product’s weight. (see the Technical Specifications)
•When mounting the product overhead, always use a safety cable. Mount the product securely to a rigging point, whether an elevated platform or a truss.
•When rigging the product onto a truss, use a mounting clamp of appropriate weight capacity.
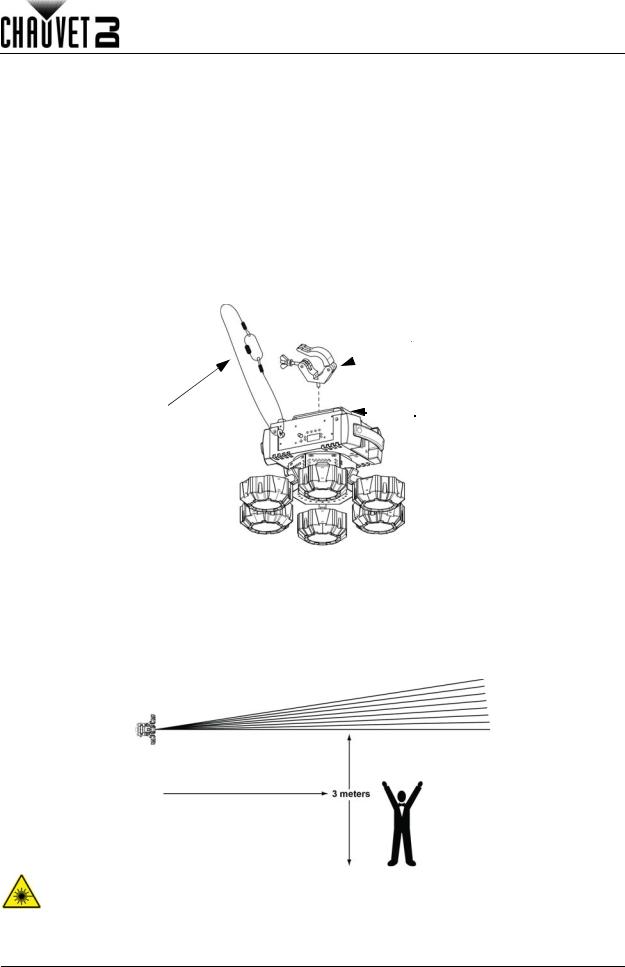
Mounting Diagram
|
Mounting Clamp |
|
(such as CLP-15 from Chauvet) |
Safety Cable |
Mounting Bracket |
(such as CH-05 from |
|
Chauvet) |
|
Proper Usage
This product is for overhead mounting only. For safety purposes, Chauvet recommends mounting lighting effect products on steady elevated platforms or sturdy overhead supports using suitable hanging clamps. In all cases, use safety cables. Obtain appropriate mounting hardware from your lighting vendor.
International laser safety regulations require that laser products must be operated in the fashion illustrated below, with a minimum of 3 meters (9.8 ft) of vertical separation between the floor and the lowest laser light. Additionally, 3 meters of horizontal separation is required between laser light and audience or other
public spaces.
CAUTION! Use of controls, adjustments, or procedures other than THOSE specified IN THIS USER MANUAL may result in hazardous radiation exposure.
Page 8 of 98 |
Helicopter Q6 User Manual Rev. 1 |

OPERATION
4. OPERATION
Control Panel Operation
To access the control panel functions, use the four buttons located underneath the display. Please refer to the Product Overview to see the button locations on the control panel.
BUTTON FUNCTION
<MENU> Press to find an operation mode or to back out of the current menu option <UP> Press to scroll up the list of options or to find a higher value
<DOWN> Press to scroll down the list of options or to find a lower value <ENTER> Press to activate a menu option or a selected value
Menu Map
MODE |
MAIN LEVEL |
PROGRAMMING LEVELS |
DESCRIPTION |
||
DMX Mode |
3-CH |
|
d001–510 |
3-channel DMX mode |
|
16CH |
|
d001–497 |
16-channel DMX mode |
||
|
|
||||
|
|
|
C 1 |
Static red |
|
Static Colors |
C-- |
|
C 2 |
Static green |
|
|
C 3 |
Static blue |
|||
|
|
|
|||
|
|
|
C 4 |
Static white |
|
Rotation |
Moto |
di-L |
|
S 0–99 |
Sets left rotation and speed |
Mode |
|
|
|
||
di-r |
|
Sets right rotation and speed |
|||
|
|
|
|||
Automatic |
P-- |
|
P 1–10 |
Automatic programs |
|
Programs |
|
||||
|
|
|
|
|
|
Auto Speed |
S-- |
|
S 01–99 |
Program speed for P1–10 |
|
Sound-Active |
Snd |
|
Sn 1–10 |
Sound-active programs |
|
Mode |
|
||||
|
|
|
|
|
|
Infrared |
SEt |
|
on |
Turns infrared on or off |
|
Mode |
|
|
|
||
|
oFF |
||||
|
|
|
|||
Configuration (DMX)
The Helicopter Q6 works with a DMX controller. Information about DMX is in the CHAUVET DMX Primer, which is available from the Chauvet website http://www.chauvetlighting.com/downloads/ DMX_Primer_rev05_WO.pdf.
Starting Address
When selecting a starting DMX address, always consider the number of DMX channels the selected DMX mode uses. If you choose a starting address that is too high, you could restrict the access to some of the product’s channels.
The Helicopter Q6 uses up to 16 DMX channels, which defines the highest configurable address as 497. If you are not familiar with the DMX protocol, download the DMX Primer from www.chauvetdj.com.
To select the starting address, do the following:
1.Press <MENU> repeatedly until 3-CH or 16CH shows on the display.
2.Press <ENTER>.
3.Use <UP> or <DOWN> to select the starting address, from d 1–510.
4.Press <ENTER>.
Helicopter Q6 User Manual Rev. 1 |
Page 9 of 98 |

OPERATION
DMX Channel Assignments and Values
Zones for DMX Control (16CH)
|
|
Pod 1 |
Pod 2 |
|
|
|
Pod 6 |
Pod 3 |
|
|
|
Pod 5 |
Pod 4 |
|
16CH |
|
|
|
|
|
|
|
|
|
CHANNEL |
FUNCTION |
|
VALUE |
PERCENT/SETTING |
|
|
|
|
|
|
|
|
000 012 |
No function |
|
|
|
013 066 |
Red 0–100% |
|
|
|
067 075 |
No function |
1 |
Pod 1 |
|
076 129 |
Green 0–100% |
|
130 138 |
No function |
||
|
|
|
||
|
|
|
139 192 |
Blue 0–100% |
|
|
|
193 201 |
No function |
|
|
|
202 255 |
White 0–100% |
|
|
|
000 012 |
No function |
|
|
|
013 066 |
Red 0–100% |
|
|
|
067 075 |
No function |
2 |
Pod 2 |
|
076 129 |
Green 0–100% |
|
130 138 |
No function |
||
|
|
|
||
|
|
|
139 192 |
Blue 0–100% |
|
|
|
193 201 |
No function |
|
|
|
202 255 |
White 0–100% |
|
|
|
000 012 |
No function |
|
|
|
013 066 |
Red 0–100% |
|
|
|
067 075 |
No function |
3 |
Pod 3 |
|
076 129 |
Green 0–100% |
|
130 138 |
No function |
||
|
|
|
||
|
|
|
139 192 |
Blue 0–100% |
|
|
|
193 201 |
No function |
|
|
|
202 255 |
White 0–100% |
|
|
|
000 012 |
No function |
|
|
|
013 066 |
Red 0–100% |
|
|
|
067 075 |
No function |
4 |
Pod 4 |
|
076 129 |
Green 0–100% |
|
130 138 |
No function |
||
|
|
|
||
|
|
|
139 192 |
Blue 0–100% |
|
|
|
193 201 |
No function |
|
|
|
202 255 |
White 0–100% |
Page 10 of 98 |
Helicopter Q6 User Manual Rev. 1 |

OPERATION
16CH (cont.)
CHANNEL |
FUNCTION |
VALUE |
PERCENT/SETTING |
|
|
|
000 012 |
No function |
|
|
|
013 066 |
Red 0–100% |
|
|
|
067 075 |
No function |
|
5 |
Pod 5 |
076 129 |
Green 0–100% |
|
130 138 |
No function |
|||
|
|
|||
|
|
139 192 |
Blue 0–100% |
|
|
|
193 201 |
No function |
|
|
|
202 255 |
White 0–100% |
|
|
|
000 012 |
No function |
|
|
|
013 066 |
Red 0–100% |
|
|
|
067 075 |
No function |
|
6 |
Pod 6 |
076 129 |
Green 0–100% |
|
130 138 |
No function |
|||
|
|
|||
|
|
139 192 |
Blue 0–100% |
|
|
|
193 201 |
No function |
|
|
|
202 255 |
White 0–100% |
|
7 |
Pod Dimmer |
000 255 |
0–100% |
|
|
|
000 |
No function |
|
|
|
001 080 |
Pulse effect 0–100%, slow to fast |
|
8 |
Pod Strobe |
|
|
|
081 160 |
Pulse effect 100–0%, slow to fast |
|||
|
|
161 240 |
Strobe, slow to fast |
|
|
|
241 255 |
Sound-active strobe |
|
|
|
000 |
No function |
|
|
|
001 025 |
Auto program 1 |
|
|
|
026 051 |
Auto program 2 |
|
|
|
052 077 |
Auto program 3 |
|
|
|
078 103 |
Auto program 4 |
|
9 |
SMD Strobe Auto Program |
|
|
|
104 129 |
Auto program 5 |
|||
|
|
130 155 |
Auto program 6 |
|
|
|
156 181 |
Auto program 7 |
|
|
|
182 207 |
Auto program 8 |
|
|
|
208 233 |
Auto program 9 |
|
|
|
234 255 |
Auto program 10 |
|
10 |
SMD Strobe Auto Speed |
000 255 |
Auto program speed, slow to fast |
|
|
|
000 009 |
No function |
|
|
|
010 049 |
Red |
|
|
|
050 089 |
Green |
|
11 |
Laser |
090 129 |
Red and Green |
|
|
|
130 169 |
Red on, Green strobes (CH12 must be active) |
|
|
|
170 209 |
Green on, Red strobes (CH12 must be active) |
|
|
|
210 255 |
Red and Green alternating strobe |
|
|
|
|
(CH12 must be active) |
Helicopter Q6 User Manual Rev. 1 |
Page 11 of 98 |

OPERATION
16CH (cont.)
CHANNEL |
FUNCTION |
VALUE |
PERCENT/SETTING |
|
|
|
000 009 |
No function |
|
12 |
Laser Strobe |
|
|
|
010 254 |
Strobe, slow to fast |
|||
|
|
255 |
Sound-active strobe |
|
|
|
000 004 |
No function |
|
13 |
Laser Effect Wheel |
005 127 |
Clockwise rotation, slow to fast |
|
128 133 |
Stop |
|||
|
|
|||
|
|
134 255 |
Counter-clockwise rotation, slow to fast |
|
|
|
000 004 |
No function |
|
14 |
Rotation |
005 127 |
Clockwise rotation, slow to fast |
|
128 133 |
Stop |
|||
|
|
|||
|
|
134 255 |
Counter-clockwise rotation, slow to fast |
|
|
|
000 005 |
No function |
|
|
|
006 041 |
Pods |
|
|
|
042 077 |
Laser |
|
15 |
Auto Program |
078 113 |
SMD Strobes |
|
114 149 |
Pods and Laser |
|||
|
|
|||
|
|
150 185 |
Pods and SMD Strobes |
|
|
|
186 221 |
Laser and SMD Strobes |
|
|
|
222 255 |
Pods, Laser, and SMD Strobes |
|
16 |
Auto Program Speed |
000 250 |
Auto program speed, slow to fast |
|
251 255 |
Sound-active program |
|||
|
|
|||
3-CH |
|
|
|
|
|
|
|
|
|
CHANNEL |
FUNCTION |
VALUE |
PERCENT/SETTING |
|
|
|
|
|
|
|
|
000 005 |
No function |
|
|
|
006 041 |
Pods |
|
|
|
042 077 |
Laser |
|
1 |
Auto Program |
078 113 |
SMD Strobes |
|
114 149 |
Pods and Laser |
|||
|
|
|||
|
|
150 185 |
Pods and SMD Strobes |
|
|
|
186 221 |
Laser and SMD Strobes |
|
|
|
222 255 |
Pods, Laser, and SMD Strobes |
|
2 |
Auto Program Speed |
000 250 |
Auto program speed, slow to fast |
|
251 255 |
Sound-active program |
|||
|
|
|||
|
|
000 004 |
No function |
|
3 |
Rotation |
005 127 |
Clockwise rotation, slow to fast |
|
128 133 |
Stop |
|||
|
|
|||
|
|
134 255 |
Counter-clockwise rotation, slow to fast |
Page 12 of 98 |
Helicopter Q6 User Manual Rev. 1 |

OPERATION
Configuration (Standalone)
Set the product in one of the standalone modes to control without a DMX controller.
Never connect a product that is operating in any standalone mode to a DMX string connected to a DMX controller. Products in standalone mode may transmit DMX signals that could interfere with the DMX signals from the controller.
Automatic Programs
To run the Helicopter Q6 in automatic mode, follow the instructions below:
1.Press <MENU> repeatedly until P-- shows on the display.
2.Press <ENTER>.
3.Use <UP> or <DOWN> to select an automatic program, from P 1–10.
4.Press <ENTER>.
Auto-Program Speed
To change the auto-program speed on the Helicopter Q6, do the following:
1.Press <MENU> repeatedly until S-- shows on the display.
2.Use <UP> or <DOWN> to increase or decrease the program speed, from S 01–99.
3.Press <ENTER>.
Sound-Active Mode
To run the Helicopter Q6 in sound-active mode, follow the instructions below:
1.Press <MENU> repeatedly until Snd shows on the display.
2.Press <ENTER>.
3.Use <UP> or <DOWN> to select a sound-active program, from Sn 1–10.
4.Press <ENTER>.
5.Turn the sensitivity knob up until the product responds to the beat of the music.
The product will only respond to low frequencies of music (bass and drums).
Static Color Mode
To run the Helicopter Q6 on a static color, do the following:
1.Press <MENU> repeatedly until C-- shows on the display.
2.Press <ENTER>.
3.Use <UP> or <DOWN> to select a static color, from C 1 (red), C 2 (green), C 3 (blue), or C 4 (white).
4.Press <ENTER>.
Rotation Mode
To control the direction and speed of the rotation when in static color mode, follow the instructions below:
1.Press <MENU> repeatedly until Moto shows on the display.
2.Press <ENTER>.
3.Use <UP> or <DOWN> to select a rotation direction, from di-L (left) or di-r (right).
4.Press <ENTER>.
5.Use <UP> or <DOWN> to increase or decrease the rotation speed, from S 0–99.
6.Press <ENTER>.
Helicopter Q6 User Manual Rev. 1 |
Page 13 of 98 |
OPERATION
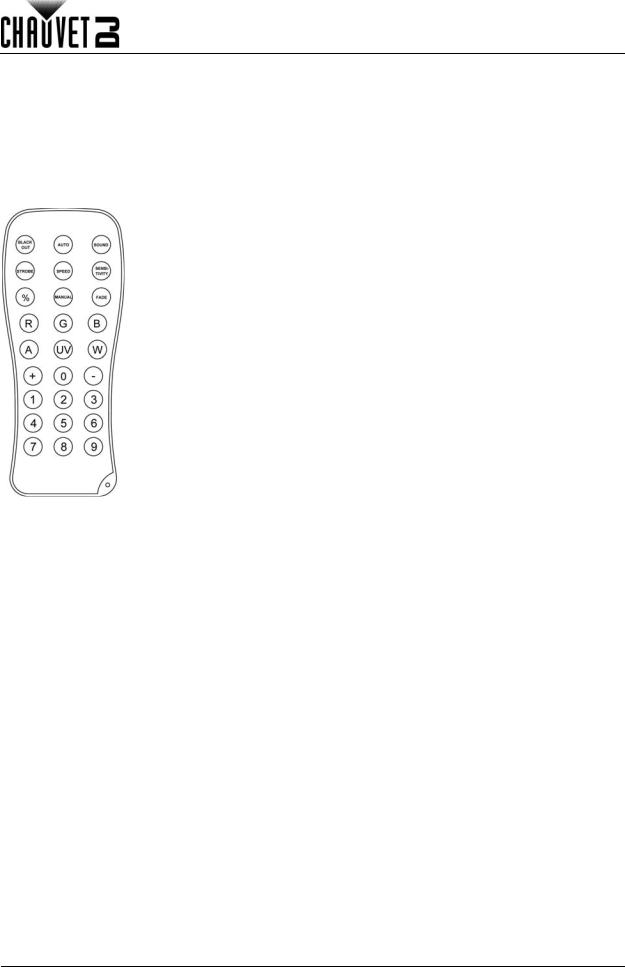
IRC-6 Infrared Remote Control
The Helicopter Q6 is compatible with the IRC-6 infrared remote control from Chauvet. To activate IR mode, follow the instructions below:
1.Press <MENU> repeatedly until SEt shows on the display.
2.Press <ENTER> to accept.
3.Press <UP> or <DOWN> to select on or oFF.
4.Press <ENTER>.
IRC-6 Operation
Automatic Mode
Automatic mode will enable you to run the automatic programs on the product. To turn on Automatic mode:
1.Press <AUTO> on the IRC-6.
2.Press <AUTO> repeatedly to cycle through auto programs, or Press <0>–<9> to choose an auto program.
To adjust the speed of the automatic program:
1.Press <SPEED> on the IRC-6.
2.Press <+> or <–> to increase or decrease the speed of the program.
Sound-Active Mode
Sound-Active mode will enable the product to respond to the music.
To turn on Sound-Active mode:
1.Press <SOUND> on the IRC-6.
2.Press <SOUND> repeatedly to cycle through programs, or Press <0>–<9> to choose a sound-active program.
Manual Mode
To set the Helicopter Q6 in manual mode and choose a static color with the IRC-6: 1. Press <R> (red), <G> (green), <B> (blue), or <W> (white) on the IRC-6.
To control the rotation direction with the IRC-6 in manual mode:
1. Press <A> to toggle clockwise or counter-clockwise rotation. To control the rotation speed with the IRC-6 in manual mode:
1.Press <SPEED> on the IRC-6.
2.Press <+> or <–> to increase or decrease the rotation speed. To adjust the strobe rate of the static color:
1.Press <STROBE> on the IRC-6.
2.Press <+> or <–> to increase or decrease the strobe rate.
Black Out
To black out the lights:
1.Press <BLACK OUT> on the IRC-6.
This will turn off all the lights until the button is pressed again.
NOTE: The IRC-6 will not respond to any inputs when Black Out is activated. If the remote does not respond when a button is pressed, try pressing <BLACK OUT>. You may have inadvertently activated Black Out.
Page 14 of 98 |
Helicopter Q6 User Manual Rev. 1 |
OPERATION
Master/Slave Mode
The Master/Slave mode allows a single Helicopter Q6 product (the “master”) to control the actions of one or more Helicopter Q6 products (the “slaves”) without the need of a DMX controller. The master product will be set to operate in either Stand-Alone mode or with the IRC-6, while the slave products will be set to operate in Slave mode. Once set and connected, the slave products will operate in unison with the master product.
Configure the products as indicated below.
Slave products:
1.Press <MENU> repeatedly until 3-CH or 16CH shows on the display.
2.Press <ENTER> to accept.
3.Set the DMX address to 001.
4.Connect the DMX input of the first slave product to the DMX output of the master product.
5.Connect the DMX input of the subsequent slave products to the DMX output of the previous slave product.
6.Finish setting and connecting all the slave products.
Master product:
1.Set the master product to operate in Stand-Alone mode or with the IRC-6.
2.Make the master product the first product in the DMX daisy chain.
•Configure all the slave products before connecting the master to the daisy chain.
•Never connect a DMX controller to a DMX string configured for Master/Slave operation because the controller may interfere with the signals from the master.
•Do not connect more than 31 slaves to the master.
Helicopter Q6 User Manual Rev. 1 |
Page 15 of 98 |

TECHNICAL INFORMATION
5. TECHNICAL INFORMATION
Product Maintenance
Dust build-up reduces light output performance and can cause overheating. This can lead to reduction of the light source’s life and/or mechanical wear. To maintain optimum performance and minimize wear, clean your lighting products at least twice a month. However, be aware that usage and environmental conditions could be contributing factors to increase the cleaning frequency.
To clean the product, follow the instructions below:
1.Unplug the product from power.
2.Wait until the product is at room temperature.
3.Use a vacuum (or dry compressed air) and a soft brush to remove dust collected on the external surface/vents.
4.Clean all transparent surfaces with a mild soap solution, ammonia-free glass cleaner, or isopropyl alcohol.
5.Apply the solution directly to a soft, lint free cotton cloth or a lens cleaning tissue.
6.Softly drag any dirt or grime to the outside of the transparent surface.
7.Gently polish the transparent surfaces until they are free of haze and lint.
Always dry the transparent surfaces carefully after cleaning them.
Page 16 of 98 |
Helicopter Q6 User Manual Rev. 1 |

TECHNICAL SPECIFICATIONS
6. TECHNICAL SPECIFICATIONS
Dimensions and Weight
LENGTH |
|
WIDTH |
HEIGHT |
|
|
|
WEIGHT |
||
15.4 in (390 mm) |
15.4 in (390 mm) |
9.4 in (240 mm) |
|
|
8.8 lb (4.0 kg) |
||||
Note: Dimensions in inches rounded to the nearest decimal digit. |
|
|
|
|
|||||
Power |
|
|
|
|
|
|
|
|
|
POWER SUPPLY TYPE |
RANGE |
|
|
VOLTAGE SELECTION |
|||||
|
|
|
|
|
|
||||
Switching (internal) |
100 to 240 VAC, 50/60 Hz |
|
Auto-ranging |
||||||
|
|
|
|
|
|
|
|||
|
PARAMETER |
120 V, 60 HZ |
|
230 V, 50 HZ |
|||||
|
|
|
|
|
|
|
|
||
Consumption |
41 W |
|
|
|
|
44 W |
|||
Operating Current |
0.7 A |
|
|
|
|
0.4 A |
|||
Power linking current (products) |
7 A (12 products) |
|
7 A (23 products) |
||||||
|
Fuse |
|
T 1.6 A, 250 V |
|
T 1.6 A, 250 V |
||||
|
|
|
|
|
|
|
|||
|
POWER I/O |
U.S./WORLDWIDE |
|
UK/EUROPE |
|||||
|
|
|
|
|
|
|
|
||
Power input connector |
IEC |
|
|
|
|
IEC |
|||
Power output connector |
Edison |
|
|
|
|
IEC |
|||
Power Cord plug |
Edison (U.S.) |
|
Local Plug |
||||||
Light Source |
|
|
|
|
|
|
|
|
|
TYPE |
COLOR |
QUANTITY |
POWER |
|
CURRENT |
|
LIFESPAN |
||
|
|
|
|
|
|
|
|
|
|
LED |
Quad-color |
6 |
6.9 W |
2 A |
|
50,000 hours |
|||
|
RGBW |
|
|||||||
|
|
|
|
|
|
|
|
|
|
SMD LED |
White |
24 |
1 W |
281 mA |
|
50,000 hours |
|||
|
|
|
|
||||||
LASER COLOR |
LASER POWER |
LASER WAVELENGTH |
|||||||
|
|
|
|
|
|
|
|
|
|
|
Red |
|
100 mW |
|
|
|
|
650 nm |
|
|
Green |
|
30 mW |
|
|
|
|
532 nm |
|
Photometrics |
|
|
|
|
|
|
|
|
|
STROBE RATE |
BEAM ANGLE (BEAM) |
|
|
|
|
|
|||
|
|
|
|
|
|
|
|
|
|
|
0 to 20 Hz |
|
3° |
|
|
|
|
|
|
Thermal |
|
|
|
|
|
|
|
|
|
LASER MAXIMUM EXTERNAL TEMP |
COOLING SYSTEM |
|
|
|
|
|
|||
|
|
|
|
|
|
|
|
||
|
95 °F (35 °C) |
Fan-assisted convection |
|
|
|
|
|||
DMX |
|
|
|
|
|
|
|
|
|
I/O CONNECTOR |
CHANNEL RANGE |
|
|
|
|
|
|||
|
|
|
|
|
|
|
|
|
|
|
3-pin XLR |
|
3 or 16 |
|
|
|
|
|
|
Ordering |
|
|
|
|
|
|
|
|
|
PRODUCT NAME |
ITEM CODE |
|
UPC NUMBER |
||||||
|
|
|
|
|
|||||
Helicopter Q6 |
10051300 |
|
|
781462216481 |
|||||
Helicopter Q6 User Manual Rev. 1 |
Page 17 of 98 |

RETURNS
RETURNS
In case you need to get support or return a product:
•If you are located in the U.S., contact Chauvet World Headquarters.
•If you are located in the UK or Ireland, contact Chauvet Europe Ltd.
•If you are located in Mexico, contact Chauvet Mexico.
•If you are located in Benelux, contact Chauvet Europe BVBA.
•If you are located in any other country, DO NOT contact Chauvet. Instead, contact your local distributor. See www.chauvetdj.com for distributors outside the U.S., UK, Ireland, Mexico, or Benelux.
If you are located outside the U.S., UK, Ireland, Mexico, or Benelux, contact your distributor of record and follow their instructions on how to return Chauvet products to them. Visit our website www.chauvetdj.com for contact details.
Call the corresponding Chauvet Technical Support office and request a Return Merchandise Authorization (RMA) number before shipping the product. Be prepared to provide the model number, serial number, and a brief description of the cause for the return.
To submit a service request online, go to www.chauvetdj.com/service-request.
Send the merchandise prepaid, in its original box, and with its original packing and accessories. Chauvet will not issue call tags.
Clearly label the package with the RMA number. Chauvet will refuse any product returned without an RMA number.
Write the RMA number on a properly affixed label. DO NOT write the RMA number directly on the box.
Before sending the product, clearly write the following information on a piece of paper and place it inside the box:
•Your name
•Your address
•Your phone number
•RMA number
•A brief description of the problem
Be sure to pack the product properly. Any shipping damage resulting from inadequate packaging will be your responsibility. FedEx packing or double-boxing are recommended.
Chauvet reserves the right to use its own discretion to repair or replace returned product(s).
Page 18 of 98 |
Helicopter Q6 User Manual Rev. 1 |

CONTACT US
CONTACT US
World Headquarters |
|
|
|
General Information |
Technical Support |
Address: 5200 NW 108th Ave. |
Voice: (844) 393-7575 |
Sunrise, FL 33351 |
Fax: (954) 756-8015 |
Voice: (954) 577-4455 |
Email: chauvetcs@chauvetlighting.com |
Fax: (954) 929-5560 |
|
Website |
|
Toll Free: (800) 762-1084 |
www.chauvetlighting.com |
|
|
EUROPE |
|
General Information |
Technical Support |
Address: Stokstraat 18 |
Email: eutech@chauvetlighting.eu |
9770 Kruishoutem |
|
Belgium |
|
Website |
|
Voice: +32 9 388 93 97 |
www.chauvetlighting.eu |
|
|
General Information |
Technical Support |
Address: Unit 1C |
Email: uktech@chauvetlighting.com |
Brookhill Road Industrial Estate |
|
Pinxton, Nottingham, UK |
|
Website |
|
NG16 6NT |
www.chauvetlighting.co.uk |
Voice: +44 (0) 1773 511115 |
|
Fax: +44 (0) 1773 511110 |
|
|
|
MEXICO |
|
General Information |
Technical Support |
Address: Av. de las Partidas 34 - 3B |
Email: servicio@chauvet.com.mx |
Zona Industrial Lerma |
|
Lerma, Edo. de México, CP 52000 |
|
Website |
|
Voice: +52 (728) 285-5000 |
www.chauvet.com.mx |
Visit the applicable website above to verify our contact information and instructions to request support. Outside the U.S., United Kingdom, Ireland, Mexico or Benelux, contact the dealer of record.
Helicopter Q6 User Manual Rev. 1 |
Page 19 of 98 |
ANTES DE EMPEZAR
1. ANTES DE EMPEZAR
Qué va Incluido
• |
Helicopter Q6 |
• |
Tarjeta de garantía |
• |
Cable de alimentación |
• |
Manual de usuario |
•Soporte para colgar con material de montaje
Instrucciones de Desembalaje
Desembale el producto con cuidado inmediatamente y compruebe la caja para asegurarse de que todas las partes están en el paquete y en buen estado.
Reclamaciones
Si la caja o el contenido (el producto y los accesorios incluidos) parecen dañados a cause del transporte o muestran signos de manipulación inadecuada, notifíqueselo inmediatamente al transportista, y no a Chauvet. Si no lo a hace oportunamente, puede quedar invalidada su reclamación al transportista. Además, guarde la caja y todo el material de embalaje para su inspección.
Para otras incidencias, como componentes o partes que falten, daños no relacionados con el transporte o daños no evidentes, presente una reclamación a Chauvet en el plazo de 7 días de la entrega.
Convenciones del Manual
CONVENCIÓN |
SIGNIFICADO |
1–512 |
Un rango de valores |
50/60 |
Un conjunto de valores de los cuales solo se pude escoger uno |
Settings |
Una opción de menú que so se puede modificar |
<ENTER> |
Una tecla que se tiene que se pulsar en el panel de control del producto |
ON |
Un valor que se tiene que introducir o seleccionar |
Símbolos
SÍMBOLO SIGNIFICADO
Instalación, configuración o información sobre funcionamiento crítica. Hacer caso omiso de esta información puede hacer que el producto no funcione, que se averíe, o causar daños al usuario.
Instalación o información de configuración importante. El producto puede no funcionar correctamente si esta información no se usa.
Información útil.
Notas de seguridad sobre láser.
Exención de responsabilidad
Chauvet cree que la información contenida en este manual es exacta en todos los aspectos. Sin embargo, Chauvet no asume responsabilidad alguna, y queda exenta específicamente de todas y cada una de las responsabilidades y obligaciones, de la clase que sean y para con cualquier parte, por pérdida, perjuicio o trastorno causados por cualquier error u omisión en este documento, tanto si tales errores y omisiones se deben a negligencia o accidente como a cualquier otra causa. Chauvet se reserva el derecho a revisar el contenido de este documento sin ninguna obligación de notificar dicha revisión a ninguna persona o empresa; sin embargo, Chauvet no está en absoluto obligado a hacerlo así, ni se compromete a realizar revisión alguna. Descargue la última versión de www.chauvetdj.com.
Las obras de autoría contenidas en este manual, incluyendo, pero sin limitarse a ellas, todos los dibujos, textos e imágenes, son propiedad de Chauvet.
© Copyright 2016, Chauvet & Sons, LLC. Todos los derechos reservados.
Publicado en formato electrónico por Chauvet en los Estados Unidos de América.
CHAUVET, el logotipo de Chauvet y Helicopter Q6 son marcas comerciales o marcas registradas de Chauvet & Sons Inc. (con nombres comerciales Chauvet y Chauvet Lighting) en los Estados Unidos y otros países. Otras empresas, nombres de productos y logotipos a los que se haga referencia aquí pueden ser marcas comerciales de sus respectivas empresas.
Page 20 of 98 |
Helicopter Q6 Manual de Usuario Rev. 1 |

ANTES DE EMPEZAR
El producto de un vistazo
Uso en atenuador |
|
|
|
Uso en exteriores |
|
|
|
|
|
Activo por sonido |
|
|
|
DMX |
|
|
|
Maestro/Esclavo |
|
Notas de Seguridad
|
Programas automáticos |
|
|
|
|
||
|
|
|
|
|
Fuente de alimentación con |
|
|
|
detección automática |
|
|
|
Fusible reemplazable |
|
|
|
|
|
|
|
Reparable por el usuario |
|
|
|
|
|
|
|
|
|
|
Las Notas de seguridad incluyen información importante sobre seguridad del sistema láser. Lea y comprenda todas las instrucciones antes de encender el láser por primera v. Conocer las instrucciones de seguridad es crucial para evitar lesiones oculares y para no infringir la ley. Mantenga este manual de
usuario en un lugar seguro para futuras consultas.
DETÉNGASE Y LEA TODOS LOS DATOS DE SEGURIDAD
•Los láseres pueden ser peligrosos y tienen consideraciones de seguridad particulares. Puede producirse lesión ocular permanente y ceguera si los láseres se usan incorrectamente. Ponga máxima atención a todos los COMENTARIOS y ADVERTENCIAS de seguridad de este manual de usuario. Lea atentamente todas las instrucciones ANTES de poner en funcionamiento este dispositivo.
•Conecte siempre el producto a un circuito con toma de tierra para evitar el riesgo de electrocución.
•Desconecte siempre el producto de la alimentación antes de limpiarlo.
•Evite la exposición directa de los ojos a la fuente de luz mientras es producto esté encendido.
•Asegúrese de que el cable de alimentación no está retorcido ni estropeado.
•Nunca desconecte este producto de la alimentación agarrando o tirando del cable.
•Si monta el producto en alto, asegure siempre a un dispositivo de seguridad usando cable de seguridad.
•Asegúrese de que no hay materiales inflamables cerca del producto cuando esté en funcionamiento.
•No toque la carcasa del producto cuando esté en funcionamiento, porque podría estar muy caliente.
•No quite el soporte en ningún momento. Este producto está concebido para usarse con este soporte.
•Este producto no está concebido para una instalación permanente.
•Asegúrese siempre de que la tensión del enchufe al que conecte el producto está en el rango establecido en el grabado o en el panel posterior del producto.
•¡El producto es para uso en interiores solamente! (IP20) Para evitar riesgos de incendio o descarga, no exponga el producto a la lluvia o la humedad.
•Instale siempre el producto en una ubicación con ventilación adecuada, al menos a 20'' (50 cm) de superficies adyacentes.
•Asegúrese de que ninguna ranura de ventilación en la carcasa del producto queda bloqueada.
•Nunca conecte el producto a un atenuador.
•Use siempre el soporte de montaje para trasladar el producto.
•No Apague/Encienda el producto a intervalos cortos. Esto acortará la vida del diodo láser.
•NO sacuda este producto. Evite usar la fuerza bruta cuando monte o maneje el producto.
•Use SIEMPRE un cable de seguridad cuando monte este producto en lo alto.
•La temperatura ambiente operativa para el láser es de 59 °F a 95 °F
•(15 °C a 35 °C). No haga funcionar este producto fuera de este rango.
•En caso de un problema grave de funcionamiento, deje de usar el producto inmediatamente.
•Nunca intente reparar el producto. Las reparaciones llevadas a cabo por personal no cualificado pueden provocar averías o funcionamiento defectuoso. Póngase en contacto con el centro de asistencia técnica autorizado más cercano.
Helicopter Q6 Manual de Usuario Rev. 1 |
Page 21 of 98 |
ANTES DE EMPEZAR
¡CUIDADO! El uso de controles, ajustes o procedimientos distintos a ESTOS que se especifican EN ESTE MANUAL DE USUARIO pueden causar exposición peligrosa a la radiación.
•Evite el contacto directo de los ojos con la luz del láser. Nunca exponga intencionadamente sus ojos o los de otras personas a la luz directa del láser.
•Este producto láser puede causar lesiones oculares al instante, o ceguera, si la luz del láser incide directamente en los ojos.
•Es ilegal y peligroso alumbrar con este láser zonas de espectadores en las que el público u otro personal pueda recibir rayos láser o reflejos de su brillo directamente en los ojos.
•En los EEUU es un delito federal dirigir cualquier láser hacia un avión.
•El uso de controles, ajustes o procedimientos distintos a los especificados en este manual de usuario pueden causar exposición peligrosa a la radiación.
•NO intente ninguna reparación. Las reparaciones y la asistencia deben ser llevadas a cabo por un técnico autorizado. ¡Las modificaciones no autorizadas están prohibidas por motivos de seguridad!
Guarde este manual de usuario para futuras consultas. Si este producto pasa a ser propiedad de otro usuario, asegúrese de que este documento acompaña al láser.
Advertencia sobre Carcasa no Cerrada
•Esta unidad contiene internamente dispositivos láser de alta potencia.
•No abra la carcasa del láser, debido a la potencial exposición a niveles no seguros de radiación láser.
•Los niveles de láser a los que se tiene acceso si se abre la unidad pueden causar ceguera instantánea, quemaduras en la piel e incendios.
Notas de Seguridad sobre Láser
DETÉNGASE Y LEA TODAS LAS NOTAS DE SEGURIDAD
SOBRE EL LÁSER SIGUIENTES
La luz láser es diferente de cualquier otra fuente de luz. La luz de este producto puede causar lesión ocular si el producto no se instala y usa adecuadamente. La luz láser es miles de veces más concentrada que la luz de cualquier otro tipo de fuente. Esta concentración de luz puede causar lesiones instantáneas en el ojo, fundamentalmente por quemadura de la retina (la zona sensible a la luz en la parte posterior del ojo). Aunque usted no pueda sentir el “calor” de un haz de láser, este puede aún potencialmente lesionar o cegarle a usted o al público. Incluso cantidades de luz láser muy pequeñas son potencialmente peligrosas, incluso a largas distancias. Las lesiones oculares por láser pueden ocurrir más rápido de lo que se tarda en parpadear.
NO dé por supuesto que porque estos productos recreativos de láser dividan el láser en cientos de haces, y porque el haz de láser se lance a alta velocidad, es segura la exposición del ojo a un haz individual de láser. Este producto de láser utiliza docenas de milivatios de potencia láser (niveles clase 3B internamente) antes de dividirlo en múltiples haces (niveles clase 3R). Muchos de los haces individuales son potencialmente peligrosos para los ojos.
NO asuma que porque la luz láser está en movimiento, es segura. La luz láser no está nunca libre de riesgo, ni aunque el haz se mueva siempre. Puesto que las lesiones oculares pueden producirse instantáneamente, es crítico prevenir la posibilidad de CUALQUIER exposición directa al ojo. Según las disposiciones de seguridad láser, no es legal apuntar con láseres Clase 3a hacia áreas en las que las personas puedan quedar expuestas. Esto se aplica incluso si se apunta con el láser por debajo de las
caras de la gente, por ejemplo hacia la pista de baile.
Page 22 of 98 |
Helicopter Q6 Manual de Usuario Rev. 1 |

ANTES DE EMPEZAR
•No ponga en funcionamiento el láser sin primero leer y comprender todos los datos técnicos y de seguridad de este manual.
•Ubique e instale todos los efectos láser SIEMPRE de forma que toda la luz láser está al menos a 3 m (9,8 pies) sobre el nivel del suelo en el que se encuentra la gente. Vea la sección Uso Adecuado de este manual.
•Después de la instalación, y antes de su uso público, pruebe el láser para asegurarse de que funciona adecuadamente. No lo use si detecta cualquier defecto.
•NO use el láser si este emite solo uno o dos haces en lugar de docenas/centenares, pues esto podría indicar una avería en la óptica de la rejilla de difracción, y podría permitir la emisión de niveles de láser por encima de la Clase 3R.
•NO apunte con láser a personas o animales.
•Nunca mire a la apertura del láser o a los haces de láser.
•NO apunte con el láser hacia áreas en las que las personas pudieran quedar expuestas, como balcones sin vigilancia, etc.
•NO apunte con láseres a superficies muy reflectantes como ventanas, espejos y metal pulido. Incluso los reflejos del láser pueden ser peligrosos.
•Nunca apunte con el láser a un avión, pues constituye delito según las leyes de EE.UU.
•Nunca apunte hacia el cielo con haces láser sueltos.
•No exponga la óptica de salida (apertura) a productos de limpia químicos.
•No use el láser si la carcasa está averiada o abierta, o si la óptica parece dañada de cualquier modo.
•Nunca abra la carcasa del láser. Los altos niveles de potencia láser dentro de la carcasa protectora pueden originar incendios o quemaduras en la piel y causarán lesiones oculares al instante.
•Nunca deje este producto en funcionamiento sin vigilancia.
•El funcionamiento de un láser de espectáculo de Clase 3R solo se permite si el espectáculo es controlado por un operador experimentado y bien formado, familiarizado con los datos contenidos en este manual.
•Los requisitos legales para usar productos de láser recreativo varían de un país a otro. El usuario es responsable de los requisitos legales del lugar/país en que lo utilice.
¡CUIDADO! NO ponga en funcionamiento este dispositivo en formas no especificadas en este manual de usuario. No seguir las instrucciones invalidará la garantía, podría dañar el producto o lesionar al usuario o al público.
¡CUIDADO! Este producto no se puede tirar con la basura doméstica. Póngase en contacto con el servicio de recogida para la eliminación de aparatos electrónicos de su zona.
Advertencia sobre Exposición al Láser
LUZ LÁSER EVITE LA EXPOSICIÓN DIRECTA AL OJO
Se pueden encontrar más directrices y programas de seguridad para el uso seguro de láseres en la Normativa ANSI Z136.1 “Para uso seguro de Láseres”, disponible en el Laser Institute of America: www.lia.org. Muchos gobiernos locales, corporaciones, agencias, ejército y otros requieren que todos los láseres se usen bajo las directrices de ANSI Z136.1. La guía Laser Display puede obtenerse `de la International Laser Display Association: www.ilda.com.
Datos de Emisión Láser
Según medida bajo condiciones de medición IEC para clasificación.
Clasificación láser Clase 3R
Láser Verde Medio DPSS Nd:YVO4, 532 nm/30 mW Láser Rojo Medio LD GaAIAs, 650 nm/100 mW Diámetro del haz <5 mm en la apertura
Datos de pulso Todos los pulsos < 4 Hz (>0,25 s)
Divergencia (cada haz) <2 mrad Divergencia (luz total) <160 grados
Potencia láser de cada haz en la apertura* <5 mW
Declaración de Conformidad Láser
Este producto láser cumple las directivas EN/IEC 60825-1 Ed 2, 2007-03, y U.S. FDA/CDRH FLPPS mediante las condiciones de Laser Notice No. 50 de fecha 24 de junio de 2007. Este dispositivo láser está clasificado como 3R. (La Clase 3R es el equivalente internacional a la Clase IIIa de EE. UU.). No es necesario ningún mantenimiento para que este producto siga cumpliendo los estándares de rendimiento láser.
Helicopter Q6 Manual de Usuario Rev. 1 |
Page 23 of 98 |
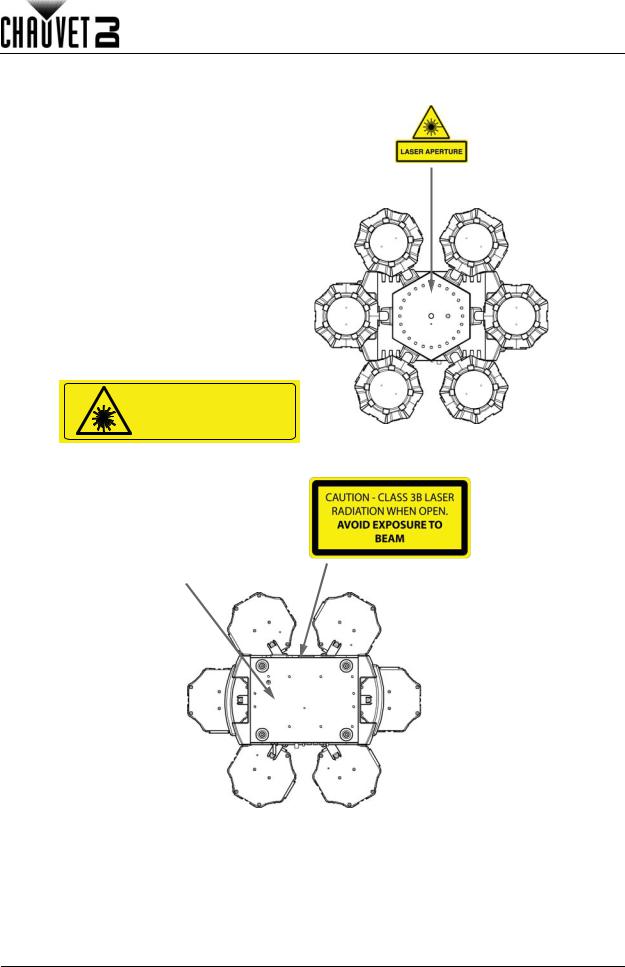
ANTES DE EMPEZAR
Reproducción de la Etiqueta de Seguridad del Láser
Arriba
|
|
|
|
LASER LIGHT |
|
|
|
|
|
AVOID DIRECT EYE EXPOSURE |
|||
|
|
|
CLASS 3R LASER PRODUCT |
|||
|
|
|
30 mW, 532 nm / 100 mW, 650 nm |
|||
|
|
|
Classified per EN/IEC 60825-1:2007 |
|||
|
|
|
|
|
||
|
|
|
|
CHAUVET WORLDWIDE HEADQUARTERS |
||
|
|
|
|
|
RoHS |
SUNRISE, FLORIDA USA |
|
|
|
|
|
|
|
MODEL: |
HELICOPTERQ6 |
|
THIS APPLIANCE MUST BE GROUNDED |
|||
TYPE: |
|
|
CETTE UNITÉ DOIT ÊTRE RELIÉE À LA TERRE |
|||
|
|
USE ONLY FUSE OF SAME TYPE & RATING |
||||
ITEM CODE: |
10051300 |
|
N’UTILISER QUE DES FUSIBLES DU TYPE ET |
|||
|
DE L’AMPÉRAGE INDIQUÉ |
|||||
FUSE: |
F 1.6 A, 250 V |
|
||||
|
NOT FOR HOUSEHOLD USE |
|||||
MAX. OUTPUT CURRENT: |
.7 A (12 units @ 120 V) |
IMPROPRE A L’USAGE DOMESTIQUE |
||||
DRY LOCATIONS |
||||||
|
|
|
(23 units @ 230 V) |
EMPLACEMENTS SECS |
||
LIGHT SOURCE: |
LED, LASER - RED/GREEN |
DISCONNECT POWER BEFORE SERVICING |
||||
DÉBRANCHER AVANT TOUT ENTRETIEN |
||||||
ORIGIN: |
MADE IN P.R.C. |
|
FOR INDOOR USE ONLY |
|||
|
USAGE INTÉRIEUR UNIQUEMENT |
|||||
USA/CANADA |
|
WORLDWIDE |
|
|||
Power: AC 100-240 V, 50/60 Hz, 0.7 A, 41 W |
Power: AC 230 V, 50 Hz, 0.4 A, 44 W |
|||||
Abajo
Page 24 of 98 |
Helicopter Q6 Manual de Usuario Rev. 1 |
 Loading...