


GW-1401-2
Operation Guide 3357
1
To do this:
Change the city code
Toggle between Daylight Saving Time
(ON) and Standard Time (OFF)
Toggle between 12-hour (
12H) and
24-hour (
24H) timekeeping
Do this:
Press D (east).
Press D.
Press D.
MO0405-EA
Getting Acquainted
Congratulations upon your selection of this CASIO watch. To get the most out of your
purchase, be sure to read this manual carefully and keep it on hand for later reference
when necessary.
Expose the watch to bright light to charge its battery before using it.
You can use this watch even as its battery is being charged by exposure to bright
light.
• Be sure to read “Power Supply” for important information you need to know
when exposing the watch to bright light.
If the digital display of the watch is blank...
If the Power Saving on indicator is flashing on the display,
it means that the Power Saving function has turned off the
display to conserve power. Power Saving automatically
turns off the display and enters a sleep state whenever
the watch is left for a certain period where it is dark.
• The initial factory default setting is P o wer Saving on.
• The watch will recover from the sleep state if you move it
to a well-lit area,
*
if you press any button, or if you angle
the watch towards your face for reading.
*
It can take up to two seconds for the display to turn on
.
• See “Po wer Saving” for more information.
Power saving on indicator
Digital display
About This Manual
• Button operations are indicated using the letters shown
in the illustration.
• Most of the display examples in this manual show only
the digital display, without the analog hands.
• Each section of this manual provides you with the
information you need to perform operations in each
mode. Further details and technical information can be
found in the “Reference” section.
Digital display
Hour hand
Minute hand
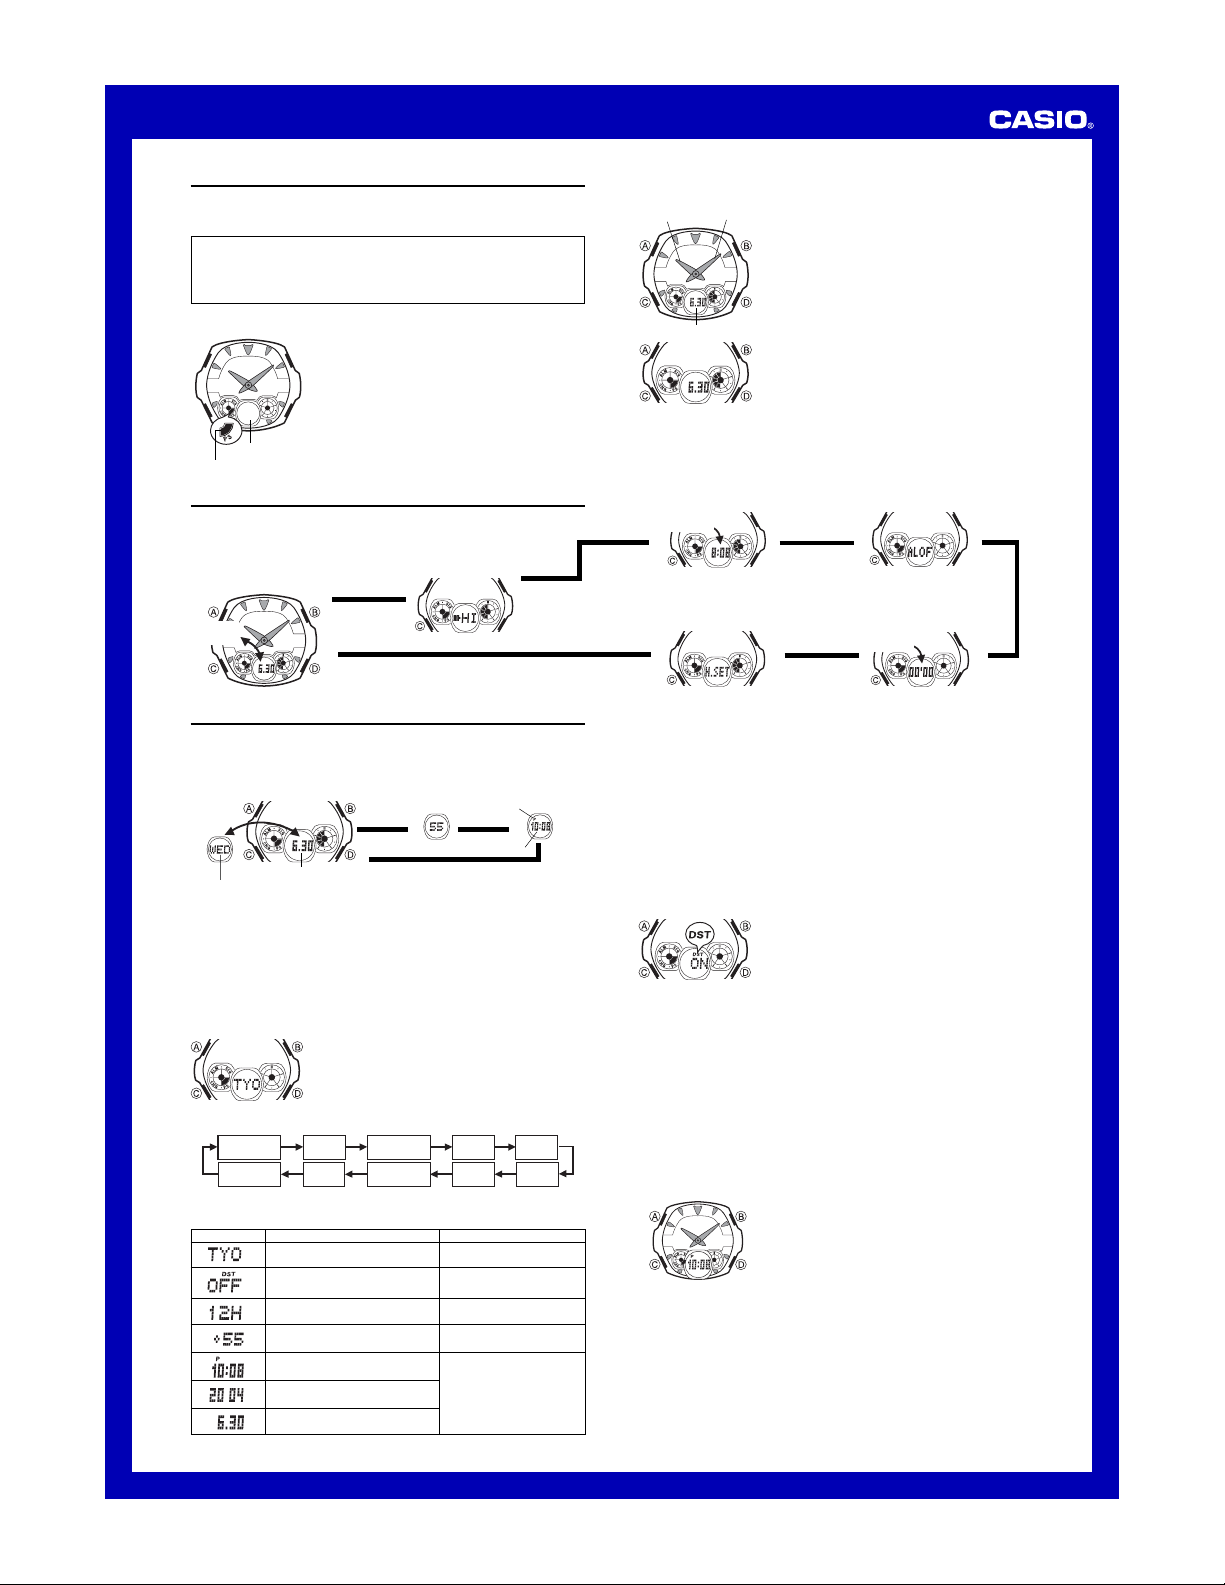
General Guide
• Press C to change from mode to mode.
• In any mode, press B to illuminate the face of the watch.
• The Battery Level Screen shows the current battery level. See “Battery Power
Levels” for more inf ormation.
WED
NYC
STW
▲
▲
▲
World Time Mode Alarm Mode
Stopwatch Mode
▲
Timekeeping Mode
Press C.
▲
▲
Battery Level Screen
Hand Setting Mode
Timekeeping
Use the Timekeeping Mode to set and view the current time and date.
• In the Timekeeping Mode, press A to cycle through the digital time screens as
shown below.
Time
SecondsDate
▲
Press A.
Month. Day
Hour : Minutes
PM indicator
Day of week
2 seconds
▲
▲
Setting the Digital Time and Date
This watch is preset with a number of city codes, each of which represents the time
zone where that city is located. When setting the digital time, it is important that you
select the correct city code for your Home City (the city where you normally use the
watch). If your location is not included in the preset city codes, select the preset city
code that is in the same time zone as your location.
• Note that all of the times for the World Time Mode city codes are displayed in
accordance with the digital time and date settings you configure in the Timekeeping
Mode.
To set the digital time and date
1. In the Timekeeping Mode, hold down A until the city
code starts to flash, which indicates the setting screen.
2.Press D to select the city code you want.
• Make sure you select your Home City code before
changing any other setting.
• See “City Code Table” for a complete list of available
city codes.
l
l
l
l
l
l
l
l
l
l
l
l
l
l
l
l
3. Press C to move the flashing in the sequence shown belo w to select other settings .
Seconds
Hour
Minutes
12/24-Hour
Format
Month Year
DST
Day
Power
Saving
City Code
4. When the setting you want to change is flashing, use D to change it as described
below.
• The following steps explain how to configure timekeeping settings only.
Screen
Reset the seconds to 00
Change the hour or minutes
Change the year
Change the month or day
Press D.
Press D(to increase).
5. Press A to exit the setting screen.
• When you exit the setting screen, the analog hands are adjusted automatically to
match the digital time. See “Analog Timekeeping” for more information.
• See “Daylight Saving Time (DST)” for details about the DST setting.
• For information about specifying how long the face of the watch remains illuminated,
see “To specify the illumination duration”.
• For details about configuring settings for the Power Saving feature, see “Power
Saving”.
Daylight Saving Time (DST)
Daylight Saving Time (summer time) advances the time setting by one hour from
Standard Time. Remember that not all countries or even local areas use Daylight
Saving Time.
To toggle the Timekeeping Mode digital time between DST and Standard Time
1.In the Timekeeping Mode, hold down A until the city
code starts to flash, which indicates the setting screen.
2. Press C once and the DST setting screen appears.
3. Press D to toggle between Daylight Saving Time (
ON
displayed) and Standard Time (
OFF
displayed).
4. Press A to exit the setting screen.
• The DST indicator appears on the display to indicate
that Daylight Saving Time is turned on.
l
l
l
l
l
l
l
l
l
l
l
l
l
l
l
Analog Timekeeping
The analog time of this watch is synchronized with the digital time. The analog time
setting is adjusted automatically whenever you change the digital time.
Note
• The hands for the analog timepiece move to adjust to a new setting whenever any of
the following occurs.
When you change the digital time setting
When you change the Home City code and/or DST setting
• If the analog time does not match the digital time for some reason, use the
procedure below to adjust the analog time to the digital time.
• Whenever you need to adjust both the digital and the analog time settings manually,
make sure you adjust the digital setting first.
• Depending on how much the hands have to move in order to adjust to the digital
time, it may take some time before they stop moving.
To adjust the analog time
1. In the Timekeeping Mode, press C five times to enter
the Hand Setting Mode.
2. Hold down A until the current digital time starts to
flash, which indicates the analog time setting screen.
3. Press D to advance the analog time setting by 20
seconds.
• Holding down D advances the analog time setting at
high speed.
• If you need to advance the analog time setting a long way, hold down D until the
time starts advancing at high speed, and then press B. This locks the high-speed
hand movement, so you can release the two buttons. High-speed hand movement
continues until you press any button. It will also stop automatically after the time
advances 12 hours or if an alarm starts to sound.
4. Press A to exit the setting screen.
• The minute hand will be adjusted slightly to match the seconds when you exit the
setting screen.
• To return to the Timekeeping Mode, press C.
l
l
l
l
l
l
l
l
l
l
l
l
l
l
l
l
l

Operation Guide 3357
2
World Time
World Time digitally displays the current time in 30 cities
(29 time zones) around the world.
• For full information on city codes, see the “City Code
Table”.
• All of the operations in this section are performed in the
World Time Mode, which you enter by pressing C.
NYC
City code
Current time in the
zone of the
selected city code
To view the time in another city
In the World Time Mode, press D to scroll eastwardly through city codes (time
zones).
• The city code is displayed for about two seconds, and then it is replaced with the
current time for that city code. Pressing A while the time is displayed in the World
Time Mode causes the city code of the currently selected zone to appear.
• When the currently selected time zone is one that includes mostly ocean, a value
indicating the zone's Greenwich Mean Time differential appears in place of a city
code.
• If the current time shown for a city is wrong, check your Home City time settings and
make the necessary changes.
To toggle a city code time between Standard Time and Daylight Saving Time
1. In the World Time Mode, use D to display the city
code (time zone) whose Standard Time/Daylight Saving
Time setting you want to change.
2.Hold down A to toggle between Daylight Saving Time
(DST indicator displayed) and Standard Time (DST
indicator not displayed).
• The DST indicator appears on the display whenever you
display a city code for which Daylight Saving Time is
turned on.
• You cannot toggle between Daylight Saving Time and Standard Time if the displayed
city code is
GMT
or the city code that is currently selected as the Home City in the
Timekeeping Mode. To change the DST setting of your Home City, use the
procedure under “To toggle the Timekeeping Mode digital time between DST and
Standard Time” .
• Note that the DST/Standard Time setting affects only the currently displayed city
code. Other city codes are not affected.
DST indicator
Alarm
When the alarm is turned on, the alarm sounds when the
alarm time is reached. You can also turn on an Hourly
Time Signal, which will cause the watch to beep twice
every hour on the hour.
• When the alarm is turned on, the alarm screen
alternates between
qmOo
(alarm on) and the current
alarm time (hour and minutes). When the alarm is off,
qmOw
(alarm off) remains on the alarm screen.
• All of the operations in this section are performed in the
Alarm Mode, which you enter by pressing C.
• Pressing D in the Alarm Mode toggles between the
alarm screen and Hourly Time Signal screen.
2 seconds
On/Off status
Alarm Screen
Hourly Time Signal Screen
▲
▲
Press D.
To set the alarm time
1.In the Alarm Mode, press D to display the alarm
screen.
2.Hold down A until the hour setting of the alarm time
starts to flash, which indicates the setting screen.
• This operation automatically turns on the alarm.
3.Press C to move the flashing between the hour and
minute settings.
4.While a setting is flashing, use D (+) and B (–) to
change it.
• When setting the alarm time using the 12-hour format,
take care to set the time correctly as a.m. (no
indicator) or p.m. (P indicator).
5.Press A to exit the setting screen.
Alarm Operation
The alarm sounds at the preset time for about 10 seconds, regardless of the mode the
watch is in.
l
l
l
l
l
l
l
l
l
l
l
Alarm time
(Hour : Minutes)
• To stop the alarm tone after it starts to sound, press any button.
• Alarm and Hourly Time Signal operations are performed in accordance with the
Timekeeping Mode digital time.
To test the alarm
In the Alarm Mode, hold down D to sound the alarm.
To turn the alarm and the Hourly Time Signal on and off
1.In the Alarm Mode, press D to select the alarm or the
Hourly Time Signal screen.
2.Press A to toggle the currently selected function on
(
Oo
displayed) and off (
Ow
displayed).
• The alarm on indicator and the Hourly Time Signal on
indicator remain on the display in all modes while these
functions are turned on.
Hourly time signal
on indicator
Alarm on indicator
On/Off status
Stopwatch
The stopwatch lets you measure elapsed time, split times,
and two finishes.
• The display range of the stopwatch is 59 minutes, 59.99
seconds.
• The stopwatch continues to run, restarting from zero
after it reaches its limit, until you stop it.
• Exiting the Stopwatch Mode while a split time is frozen
on the display clears the split time and returns to
elapsed time measurement.
• The elapsed time measurement operation continues
even if you exit the Stopwatch Mode.
• All of the operations in this section are performed in the
Stopwatch Mode, which you enter by pressing C.
STW
Minutes Seconds
Split Time
D
Start Split
*
2
➤
Split release Clear
A
➤
Stop
*
1
A
➤
D
➤
A
*
2Split times are displayed by cycling alternately through the split indicator (
SPL
),
a minute and seconds screen, and a 1/100 second screen.
l
l
l
l
l
l
l
l
l
l
l
l
l
l
l
l
l
l
l
D
Start Stop
*
1
Elapsed Time
➤
Re-start Clear
D
➤
Stop
*
1
D
➤
D
➤
A
*
1When elapsed time measurement is stopped, the display alternates between a
minute and seconds screen, and a 1/100 second screen at 2-second intervals.
To measure times with the stopwatch
1/100 secondMinutes’ Seconds
*
3When a split time operation is stopped, the display cycles through the same values
as those described in *2 above. In this case, however, the minute symbol (
'
) and
the seconds symbol (
''
) do not flash.
Two Finishes
D
Start Split
*
2
➤
Split stop
*
3
Clear
A
➤
Split release
*
1
D
➤
A
➤
A
First runner
finishes.
Display time of
first runner.
Second runner
finishes.
Display time of
second runner.
Illumination
Two LEDs (light-emitting diodes) illuminate the face of the
watch for easy reading in the dark. The watch's auto light
switch automatically illuminates the face when you angle
the watch towards your face.
• The auto light switch must be turned on (indicated by
the auto light switch on indicator) for it to operate.
• You can specify 1.5 seconds or 3 seconds as the
illumination duration.
• See “Illumination Precautions” for other important
information.
To illuminate the face of the watch manually
In any mode (except when a setting screen is on the display), press B to illuminate
the face of the watch.
• The above operation turns on illumination regardless of the current auto light switch
setting.
Auto light switch
on indicator
Parallel to
ground
More than
40
°
About the Auto Light Switch
Tur ning on the auto light switch causes the face to illuminate, whenever you position
your wrist as described below in any mode. Note that this watch features a “Full Auto
LED Light”, so the auto light switch operates only when available light is below a
certain level. It does not illuminate the face under bright light.
Moving the watch to a position that is parallel to the ground and then tilting it
towards you more than 40 degrees causes illumination to turn on.
• Wear the watch on the outside of your wrist.
Warning!
• Always make sure you are in a safe place whenever you are reading the face
of the watch using the auto light switch. Be especially careful when running or
engaged in any other activity that can result in accident or injury. Also take
care that sudden illumination by the auto light switch does not surprise or
distract others around you.
• When you are wearing the watch, make sure that its auto light switch is turned
off before riding on a bicycle or operating a motorcycle or any other motor
vehicle. Sudden and unintended operation of the auto light switch can create a
distraction, which can result in a traffic accident and serious personal injury.
To turn the auto light switch on and off
In any mode (except when a setting screen is on the display), hold down B for about
two seconds to toggle the auto light switch on (
displayed) and off ( not
displayed).
• The auto light switch on indicator (
) is on the display in all modes while the auto
light switch is turned on.
• The auto light switch turns off automatically whenever battery power drops to Level 3.
• The auto light switch is disabled, regardless of its on/off setting, when the Hand
Setting Mode’s setting screen.
 Loading...