


LH4-B814-1
INSTRUCTION
From the library of: Superior Sewing Machine & Supply LLC
FOR
MANUAL
BROTHER MODEL LH4-B814-1
,-2,-3
High
Speed
BROTHER
Buttonhole
NAGOYA,
Sewing
INDUSTRIES,
JAPAN.
Machine
LTD.
1 . F
From the library of: Superior Sewing Machine & Supply LLC
eatures and Spec
1.
Ma
in
Spec
2.
Sti
tch
formation
3.
Features
Se
tti
2 .
3 . H
4.
5 . Trouble s hooting .... ..
6. Parts li
ng
1.
How
2.
Setting the
ow
1.
Cl
ean
2.
Nee
3. Sel
4.
Winding
5.
Thr
6.
Regu lati
7. Inserting
8. Runni
9.
Operati
10.
Emergen
II.
Operating
Adjustme nt.
1.
Regulating upper
2. R
egulati
3. Tim
4. Adju s
5.
Buttonho
6.
Nun1ber of s
7.
Setting pos
8.
Adj usting
9. Replac
10. Adjusting
l
1.
Releas
12. Re
13.
Adju
14.
The
15. Ins
1.
l ' hr
2.
Stitch skipping
3. Irregular stitch
4.
Threadi
5.
Irregular sti
....
up
and running .......................
to fix
to
us e t
ing up
dle
and
ect
ion
eading
ng
ng .................
ng knife
cy
...............
ng
ing
the hoo k and needle ......
ting
ing l
ing tension
leasing
sti
ng
cutter
ta
lling
ead brea
ng of. .....................
st
...................................................
ificatinos
ifi
cations
..............
the
machine head
he
machine
...........
its settin
of thread t
lower thr
bobbin case
lower
bobb
in
sto
p ....... ....
manual
the
thread
the width of
le sl
ot
titche
iti on of
uppe
r thread tri
owe
r thread
automat
tension on
oiling ....... .
falls on
the
tape
ks ...... ......
...........................
es
tch
..................
.................................................................
........ .
......................
...
........
................. ...................
motor ................................
on
........................
..... .
..................
g .. .. ............
hread
ing .........
ead
.........................................................
..............................................................................................
thread
case into
locki
..........
thread
and length
s ..........
ic th r
on main
...........................
...
at beg
tension
hook
... ......
...........
ng d
evice
.......................
feedi
ng
lever
...............................................................................................
ten
sion
tak
e-up s
button
........
.....................................................
cutter
.................
mmer
trimm
ead bre
tension regul
low
er tension regulator
.......................
the sci
sso
wind
er ............
.......................................................
........................................
........................ .. .......
inni
ng
.....
............
.......... ..
.........
table
top
... ................
................
.......
.........................................................................
...... .............
................. ............................................. .......
.........................................
....................................................................................
........................................................................
pring
.......
........
hole and positi
.... .........
.........
...... ............. ......
er
... .... ....
akage
...... .
rs ..
....................... ....................
...............
...
..............
..................
.................................................................
... ....
...........................
......................
...............
.............................
........... ..
........ ...........
.....
..................................
....
...
.......
.................................................... .
.... .
...........................................
... .......
......
.........................
...............
....................................................................
......
........ .... ............... ....... ....
perceiving dev
ator
.................................................
..............................................
.........................
....................................
....................
........
...
.............................
.........................................
...........
...............
............
....
..........................................................
... ..... .........
on
of
buttonhole
......... ........ ..
........
.................................
.....
..................
...................
.............
........ ....
.... ...
.........
.... ....... ....
... .
....... ..... ......... ... ............ ...
......
... .....
......
.....
ice ........ .
.... ........
....
.......................
.....
...............................
.............................
...... ...
......................
....................................
...
......................
................
..........
.....
...........
...
................
........................
.................................
...........................
......
..................................
..........
..............
........
................................
....
........................
...... ..
.............
......
.........................
................
.......... .
....... ...
..............................
...... .
................................
..... .
............
...........
.... 1
..... ..... .
......... ')
........ ..... 2
.......... 4
...... ... ... ......... ·I
.... ............. ......... 4
........
.............. 5
.... 5
........ .. 6
........
... . 6
..........
..... 6
.....
......... .
.....
.......
.....
........... 7
.. ...... ......... 8
._
.......... 8
: .... 8
.......... 9
................
.................... 12
......
... ...... .......
...................
...
..............
...
......
......
.....
........ 13
........ l3
............... l-1
.........
........
........
.......... .....
............
......
............
.......
....
... IS
... I
1
1
2
4
6
7
7
7
10
10
11
12
12
l-1
15
15
IS
15
IS
()
1. FEATURES AND SPECIFICATIONS
From the library of: Superior Sewing Machine & Supply LLC
1. M a
in
Specifications
\l
ode
I
-class
Sub
Use
Max. se
Length of but
\\"idth of bu
Tape
wing
ttonhole
winding
spee
tonhole
Feeding mechanism
B
2.
uttonhole
I I e i
ght
Stit
ch formation
I) \\"hip s
of
upp
2)
Purl stitch
raised
Th
is
a ls.
with ,,-
stitch
of
presser foot
titch
.....
er
thread
.....
up
on the lo"·er
mod
el L! 14-8814 can
and
it
is
hip stitch
With this machine. if it is u
be clone
with ,,·hip s
As mentioned
It is
ver~·
easy
tension
on the
d
dc,·ice
es
same stitch
on
Stro
ng tension on
general!~
but
abO\·e. on
to
change
upper
general mater
6.-lmm-25mm
2mm- -lmm(
formation
lop
and
zigzag stit
thr
ead. This is
be done
·
used
,,·ith
tonhole
on
sed
tit
ch in
order to
the knitted
the stitch fo
thread
ten
- 1
(
%;"-\/'
t\il
upp
er
upp
er
either whip
purl
knitt
ed fabrics.
with
purl stit
fabrics and
sion
regulator.
Ll 1-1-B
Sl-1
single
needle
ials
1
"- 1 ") 6.-lmm-32mm(
•
1
) 2mm- 6mm(
general
3.
Equipped
upp
er &
60-%0
as
ordinar~
ch
of
thread
appli
stitch
be
able to get
rmati
·
lock
stitc
lower
thr
ead
appli
ed. thus.
ed for
buttonhole
stitch
or
buttonh
ch.
ole
both ends of
the
jers
eys
. it is r
on from purl s
purl stitch.
on shirt
lock s
titch
buttonhole
r
- 2 - 3
mate
300
s
pm
J,{
%;"
lo,,·er
stitc h
h zigzag
on
botto
the
\\·orks on shir
buttonho
beautiful
eco
tit
ch
to whip s
rials
''- I ),{" ) 6.-
1
-
~;n
es
formation.
m.
upper
dependi
s.
pyajamas and the like.
le.
and stable quali
mme
nded
knitted
lmm-32
2mm- 6mm(%;
upp
nam
thread
see
ts.
pyajamas
ng on,
porti
on
to
do
titch
o
nl~
Equipped
er & I
l 2.5mm(
ms
the
of
ty of
wi th
·
materal
mm(,l.{"- 1
''-').;';"
O\\·
Yz"
ely. z
igza
to
be straight
and
sewing
and use
bar
tacking can
butt
whip
by
changing
s
er
l
,g
sti
the
materi-
onh
stitch.
1
•1" )
)
lik
oles
the
tch
e.
d
.
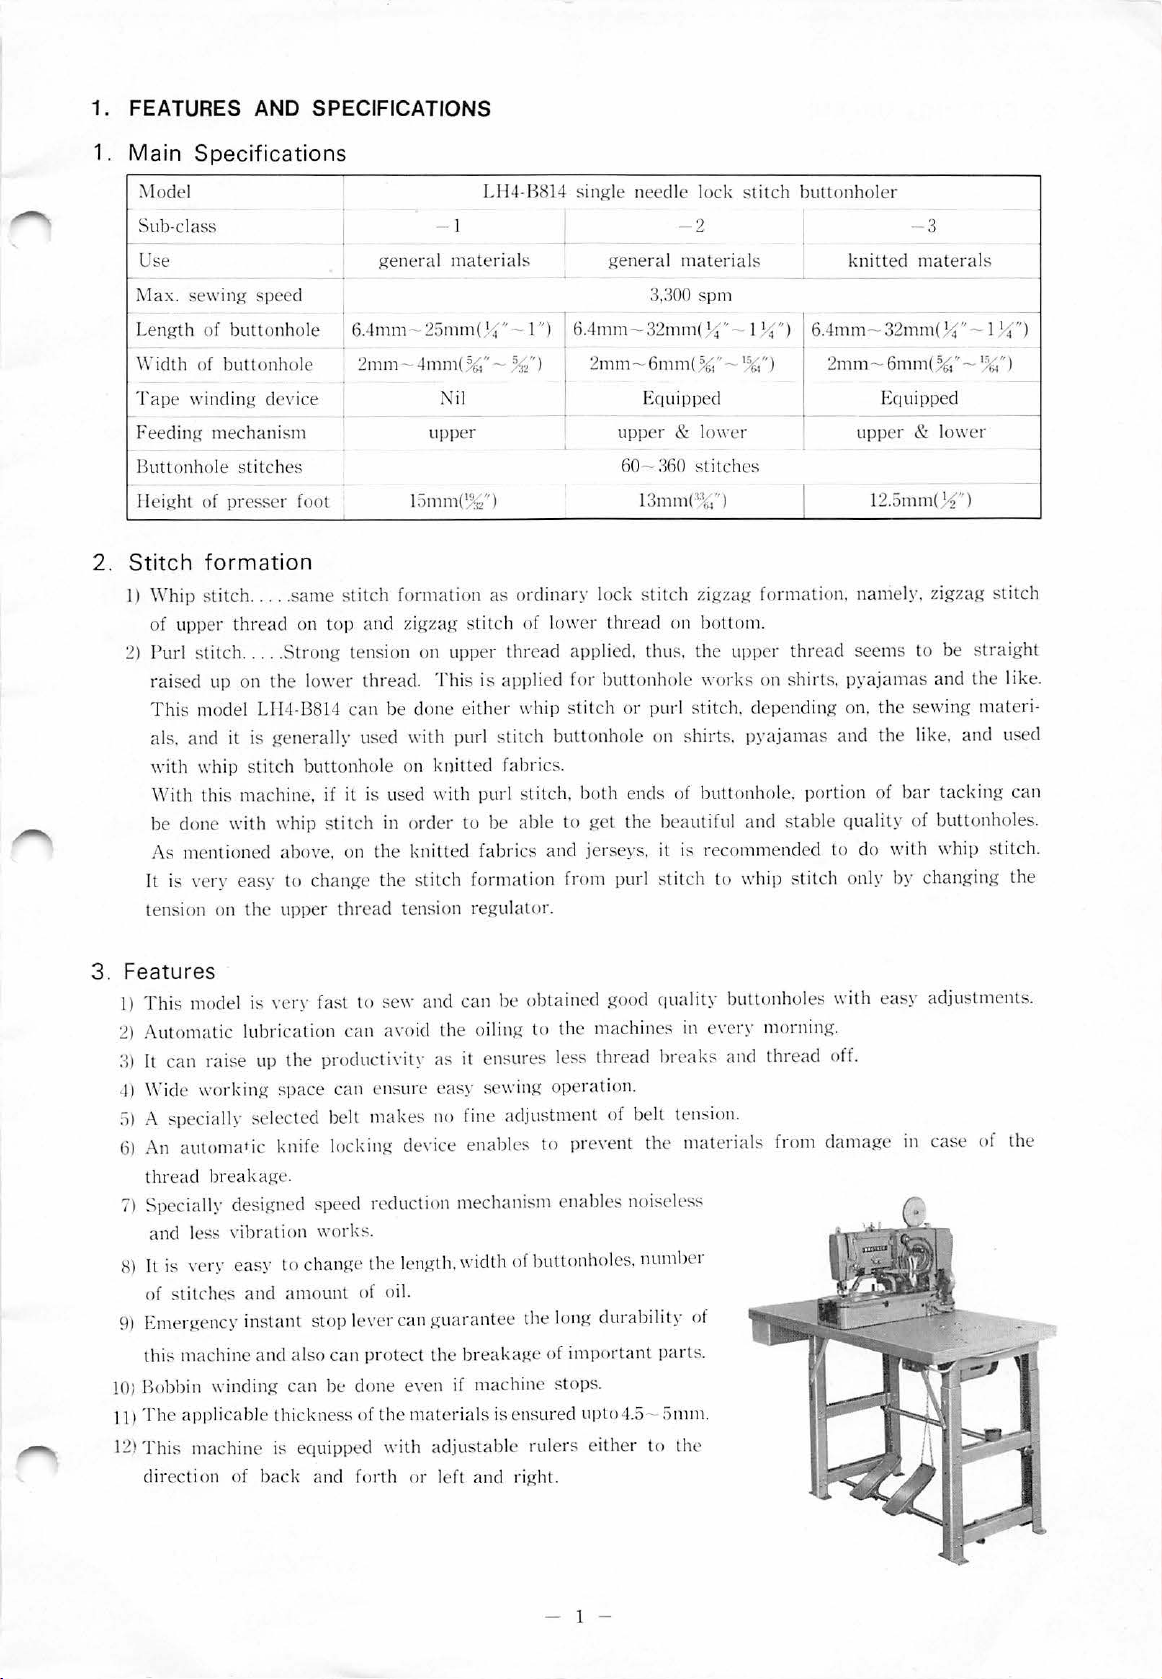
3 . F
eat
ure s
1)
T his
mod
2) Aut
omat
:1)
It
can
rai
-
1)
\ride wor
;)
) A sp
ec
ially
61
.-\n
automatic knife
thread
7)
Specially designed sp
Hl
It
and
is ,·cry
bre
less ,-
of stitches and
9) Emergen
th
is
machi
!O
J Bobbi n \\'inding
II) The
1
applicable thic
21 This ma
direc
tion
el is ,-cry
ic
lubricatio
se
up
the pro
king spa
sel
ce can
ected
akage.
ibrat
ion ,,·or
easy
to change
amount
cy
instant s
ne
and also can
can
kne
chin e is equ
of back
fast to se,,· and can
n c
an
a,·oid
the oiling
ducti,
·ity as it ensures less
ens
ure
easy s
belt
mak
es
no fine
loc
king
de,·ice
enabl
eed reduction mechan
ks.
the length. wid th of bu
of
oil.
top lever ca
n gu
arantee
protect the bre
be
clo
ne eYen if
ss
of
the
material
ipped
\\'i
lh
adjustab
and fo
rth
or left
be
ewi
adjustment
es
akage of
machi
s is
ensureclup
le rul
and
right.
obta
ined
to
the
ng ope
to pre,·e
ism
ena
tto
the long
important
ne s
top
ers
good qual
machines
thread
ra
lion.
of belt
nt the
ble
s nois
nholes. nu
dura
bility
s.
to4.5- Smm.
either
it~
-
buttonhol
es with
in e \·ery morning.
breaks and thread off.
tensio
n.
mate
ele
rials from
ss
damage
mber
of
part
s.
to t
he
easy
in ca
adju
se
stments.
of
the
- 1 -

2. SETTING
From the library of: Superior Sewing Machine & Supply LLC
1.
How
to
fix
UP
the
AND
motor
(Fig. 1)
RUNNING
1
357
As shown
me
nl
of
ning indu
(4 pole.
purchase
plea
induction
m
m
from o
follow
1.440/1,720 rpm, 250W).
se
use
ore
wattage
otor
mount ing br
ur Brot
the instruct
in
Fig
. 1,
it
is the m
the
location
ction motor, made
d this m
with the con stant running
motor
her motor,
of constant
by
Brothe
achine
and in this case, the
as head only.
of 4 pole. 250W
ack
et is
differ
thu
s, plea
ion below:
eas
If
ure·
run -
r.
you
or
ent
se
Fir
stly, put the two spe
the positi on
edge
of the
co
ndly,
Se
table top and m
The correct motor rota
the corr
2.
Setting
Put
2)
Put
3)
4)
Put
5) As s
Th
en, put the flat
apar
table top
put
ect rota tio
the mac
the hing
the tension pulley
the h
ead
how
n in Fig. 6,
~0
oW
(Fig.
ed pull
t 357
mm
to the end of pu lley as s
the mo
tor
oto
r mounting brack
tion is cou
n.
hine head on
(Fi
g. 4)
es
in
the
bed and pl
rest.
connect
belt between base pulley
I
2)
ey which is suppli ed
from the cen tre
to
table
top. Al that
et and
nter
clockw
table
ace
the m
as shown in Fig.
the oil tub
with
the m
of
the
machine. Set
hown in
time, please
faste
n securely with
ise
Fig 2. Drill the holes
\·i
ewed fro m the pulley side and if not. plea se gel
top
I) Set the
Put the base on the
b
elt
wit
diamete
-l
l ''s.
At the
wood
Unl
le
ach
5.
es
with
and
ba
se.
s as sho
h 42" for
r pulley. In the distri
pro
per
screw
s to
ess you
ssen th
e life of belts.
ine head
tube jo
int.
tension pulley as shown in Fig.
(Fig. 3)
ach
ine head to the motor shaft
the
position
make sure
set
bol ts.
tab
le lop as per Fi g. 4
wn
in Fig. 3. In the distri
larger
may
on
diam
eter pulley
ten
sion of t\\'O bells, fasten the ba se with
tab
le lop secur
put
the position correct
the base.
apart 107.5mm fr
at
to inse
ct
ely.
rt
of
60 H
the
correc
the was
ct
and
43" for
z,
ly, it cau
5.
hers betwee
of
use
and
om
t position.
and
put tw o
50 Hz,
smaller
wit
h both
ses
sel
the
n
use
lo
- 2 -
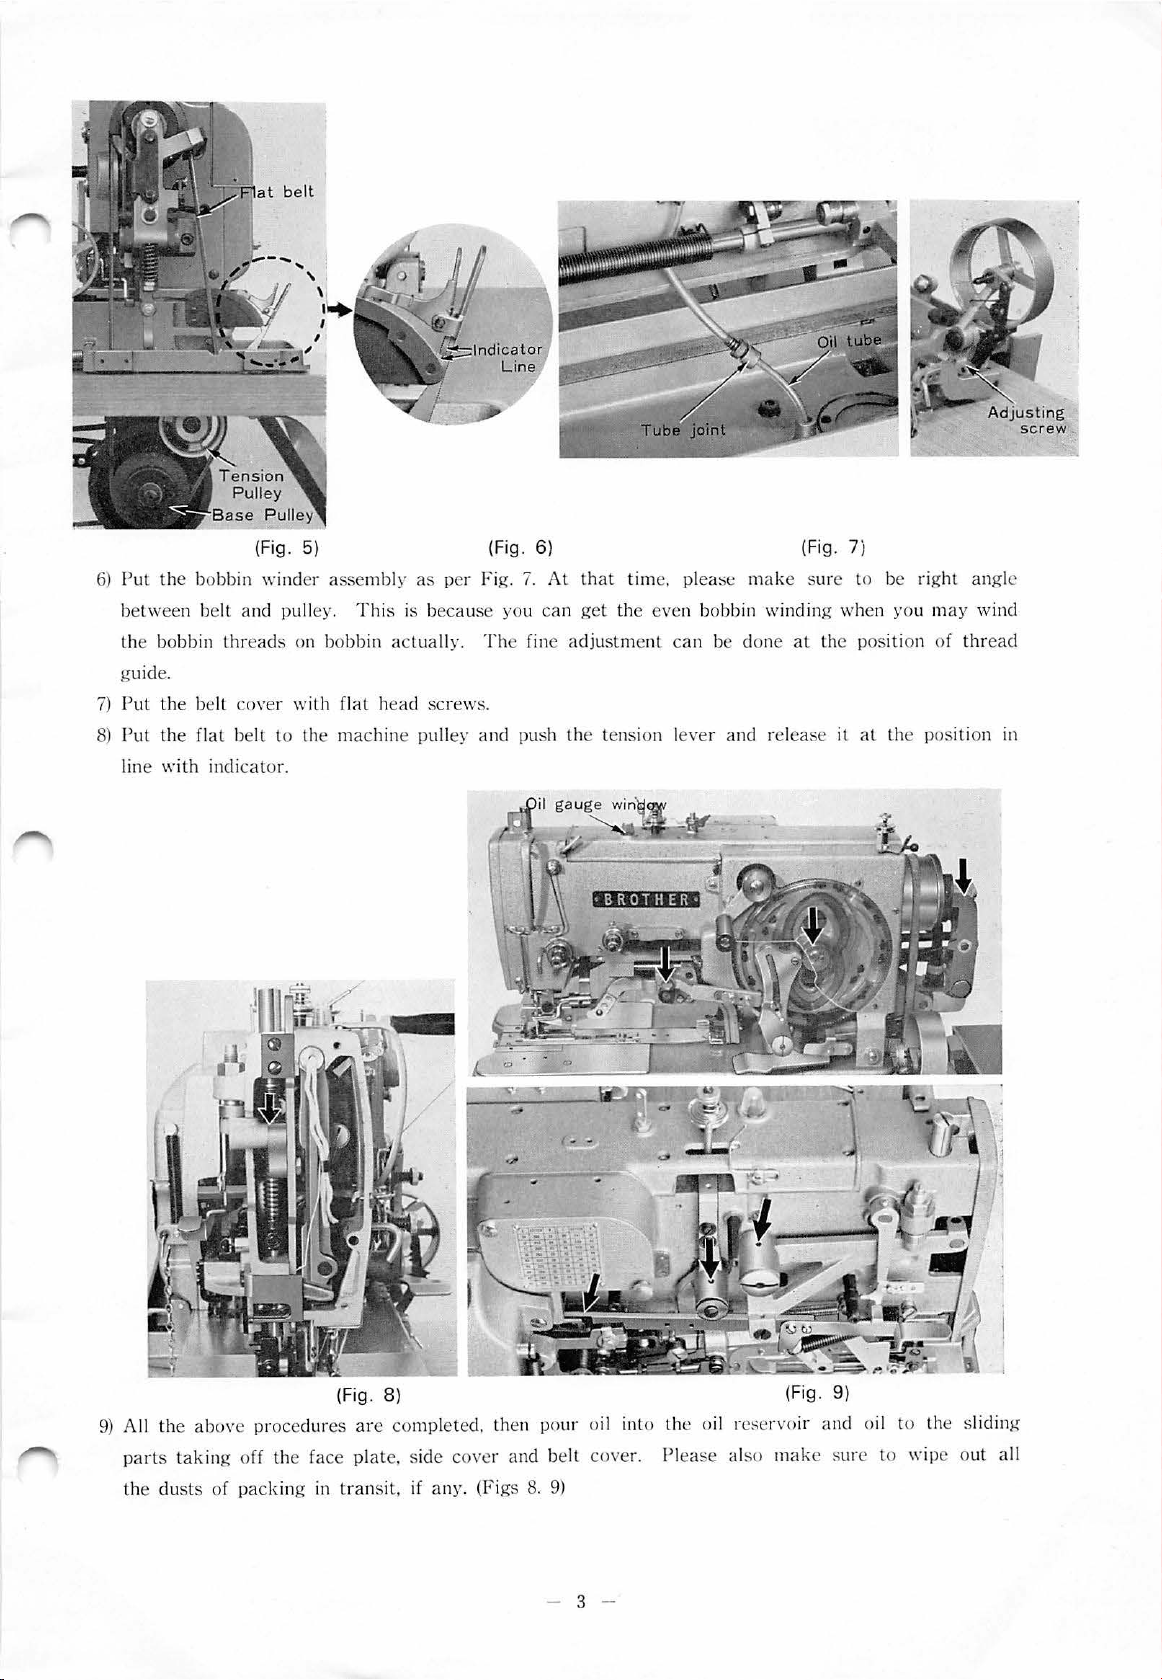
6)
From the library of: Superior Sewing Machine & Supply LLC
Put
etwee
b
the bobbin
guide.
7)
Put
8)
Put
line
(Fig. 5)
the
bobbin wind er
n belt and pull
thread
the
belt cover with
the
flat belt
"·ith
indicat
s on
to the
or.
assem
ey.
bobbin
flat
machine
(Fig. 6)
bly
as
per
Fig.
7.
Thi
s is
becau
se
you
actually. The fine adjus
head screws.
pulley
and
push the tension lever
At
can
that
get
(Fig. 7 j
time, pl
the
tme
ease
make
sure
to be
eve
n bobbin win di
nt can be clone a t the po sition of thread
and
rel
ng
ease
whe
it
n you
at
right
the
position in
may
angle
wind
8)
(Fig.
9) All
the
parts
the
taking
dust
above
s of
procedures
off the face
pac
king in
are completed . then
pla
tran
te, side
sit, if
any
cover
. (Fi
pour oil
and belt
gs
8.
9)
into the oil reservoir and o
cove
r.
Plea
se also mak
- 3 -
(Fig. 9)
il
e sure to \\·ipc
to
the sliding
out all
I I
From the library of: Superior Sewing Machine & Supply LLC
L
ower
(Fig
(Fig
line
. 1 0)
. 11 )
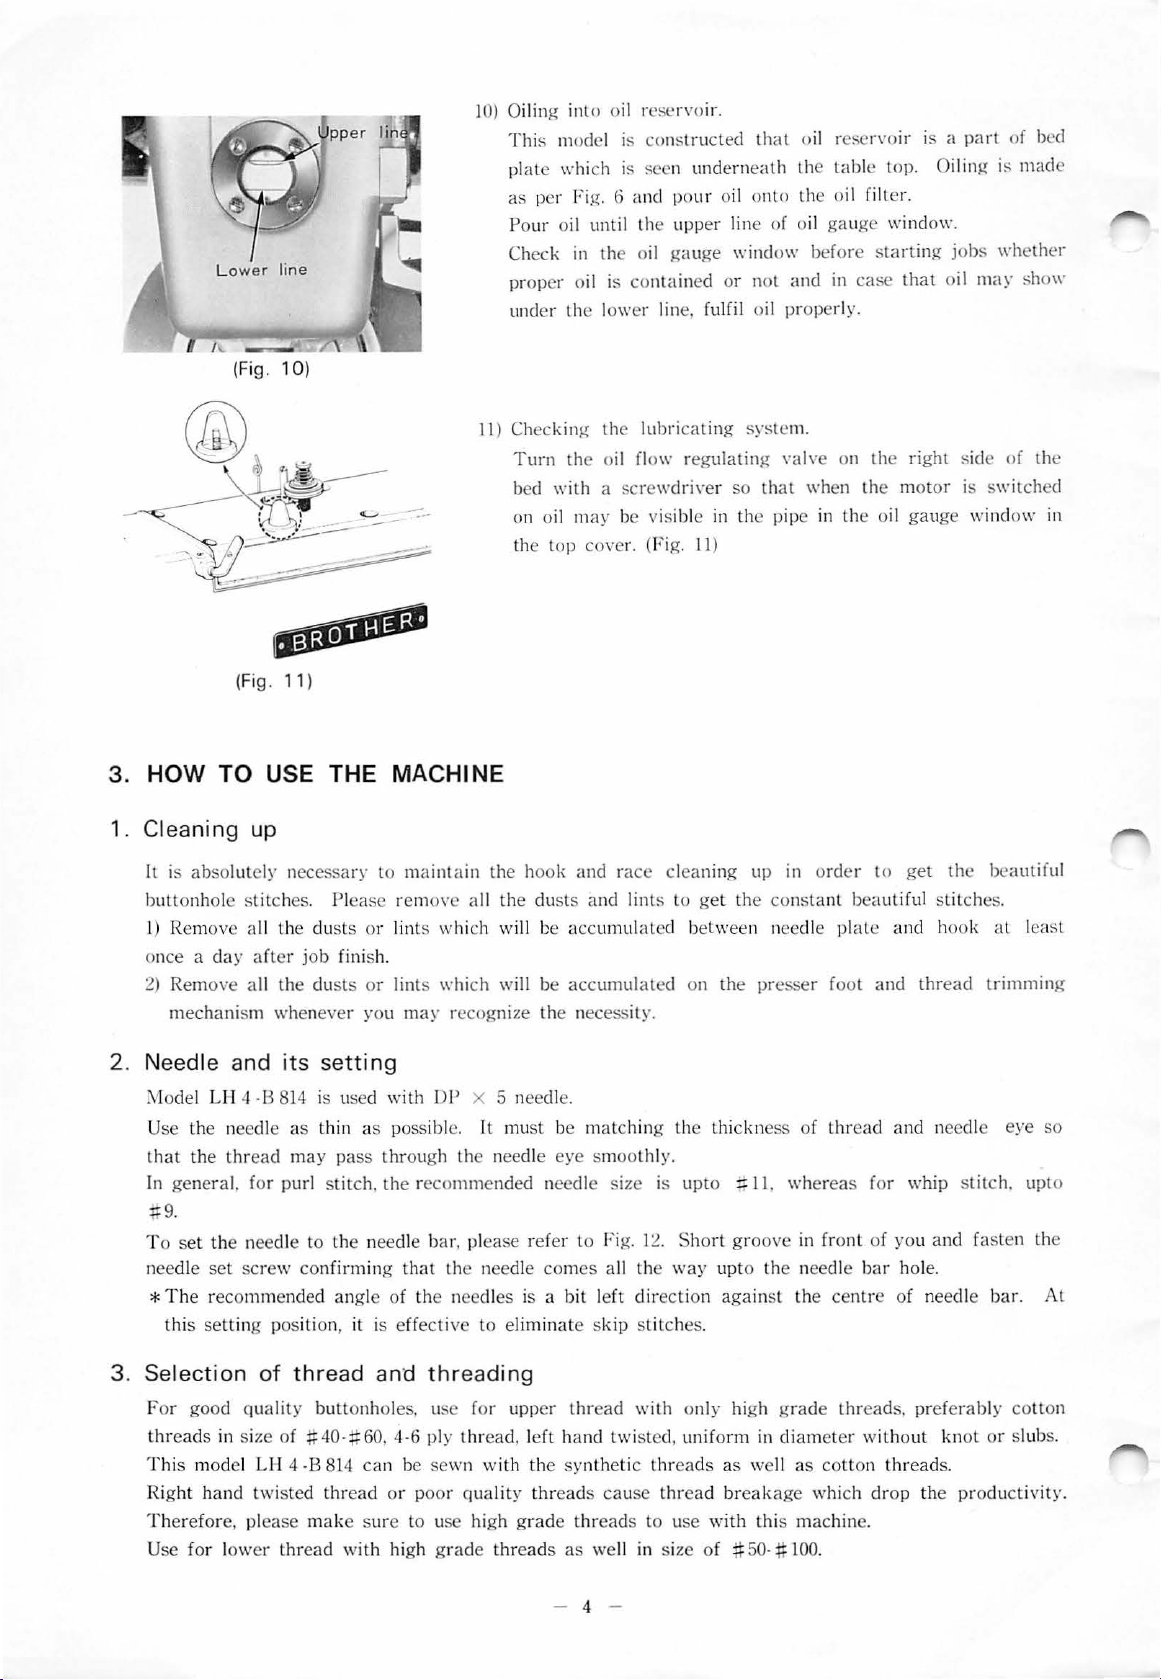
1
0)
Oili
n){
into o
mod
This
ate
pl
as
Pour oil until the
ec
Ch
proper
under the lower line,
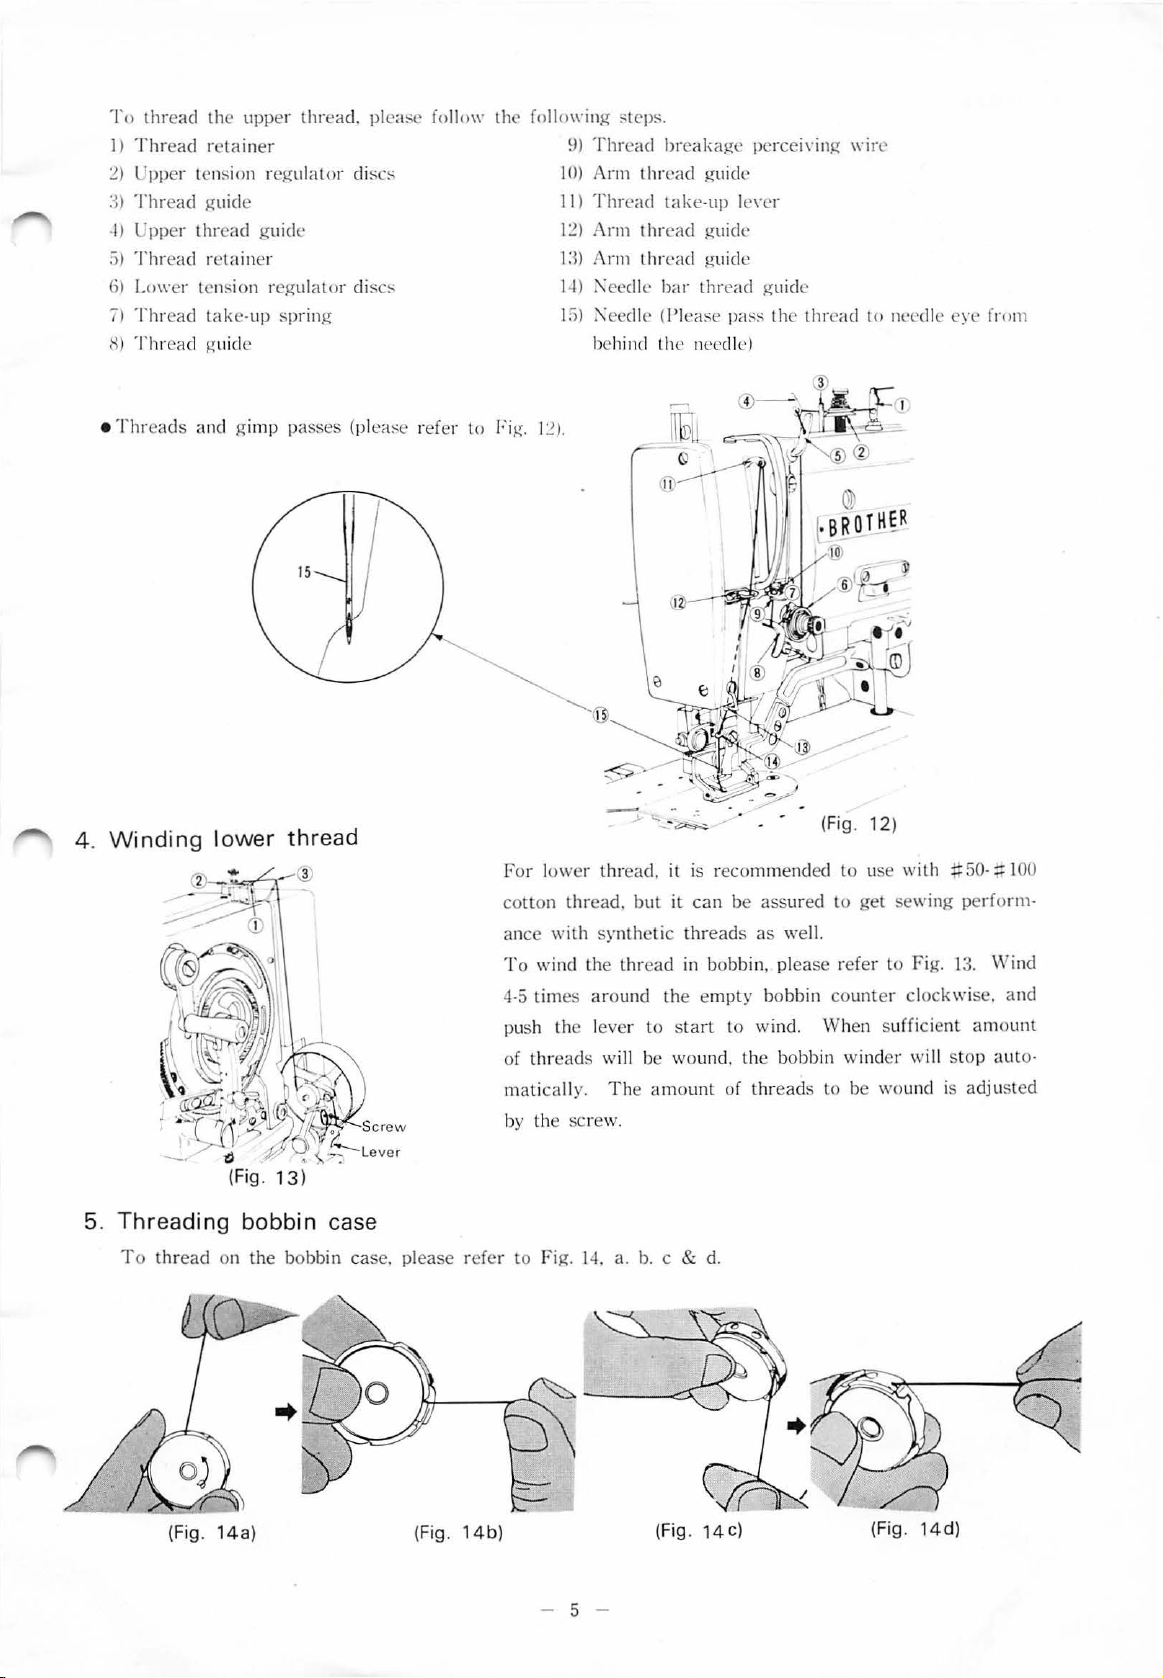
II)
Checking
Turn
bed \\'ith a
on oil
the l
el is constructed
which is seen
per Fig. 6 and po
k in the o
oil is
the
the
oil flo\\'
may
op
CO\·er.
il reservoi r.
that
oil r
underneath
ur oil
upper line of oil
il
gauge
contained
lubri
sc
rewdri\·er
be visible in the pipe in
(Fig.
\\'indo\\' bef
or
fulfil
cating
regulating
so
11
)
the tabl e top. Oili ng is
onto the oil
not
and
oil
prop
system.
\'ah·e
that
when the
ese
rvot r is a
filter.
gauge
windO\\'.
ore starting
in
case
erl
y.
on
the ri
motor
the oil gau
that
ght
part
job
s \\'hethcr
oil m
ay
side
is S\\'itched
ge
window
of bed
made
sho\\'
of
the
in
3 . HOW TO USE THE MACHINE
1. Cleaning up
It is abso
buttonhole
I) Remove a
on
ce a da
2) Remove all the du
2. Needle and
i\
lodel LH 4 -B 814 is used with
Use the n
th
at
In general. for purl stitch. the
;:9.
T o
needle
*The
this se tting position, it is effec tive to elimin
lutely nec
stitches. Plea
y after job finish.
mechanism whenever you may re
ee
dle
the
thr
ead
set
the need le to the needle
set scr
recommended angle
ll
ew
ess
ary
to
maintain
se
remove all the dusts and lints
the du
sts
or
lints which will be
sts
or
lints \\'hich will be
its
setting
as
thin
as
possible.
may
pass through th e needle
recomm
conf
irming
of
that
the
DP
bar
the needle com
the hook and race
cog
X 5 needle.
It
ended needle size is upto
, pl
ease
needles is a
nize
mu
the
st
refer
acc
umul
ated betwee
accumulated
necessit
be
eye smoothly.
to
es all
bit
ate skip sti
y.
matching
Fig. 12. Short
the
left
dir
ection agai nst the centre
tches.
clean
ing up in
to
get
the
on
the presser fo
the thickn
::II.
groove
way
upto the need le
order
lo
consta
nt
bea
utiful stit
n needle
ess
plat
e a
ol
and
of thr
ead
and
\\·hereas for whip stitc
in fr
ont
of
you and fasten
bar
hole.
of nee
get
the bea
nd
hook
thread
need le eye
dle bar.
ches
.
al least
trimming
h.
utiful
so
upt
o
the
Al
3.
Selection
For good
t
hread
Thi
s model LH 4
Right
refore, please
The
Use for l
of
thread
quality
s in si
xe
hand twisted th
ow
er
butt
of
~40-#60
-B
make sur
thread
and
onholes. u
814
can
read
wit
h high gr
threading
se
for upper
,
4-6 ply
or poor
e to use high g r
be s
thread,
ewn
with the synth
qua
lity thr
ade threa
thread
left h
and
eads cause
ade threads lo use with this
ds as well
- 4 -
with only high
twisted, uniform in di
etic threa
thr
ead
in size
ds as we
breakage
of
# 5
grade
ameter withou
ll
as cott
which
mac
0-#
100.
thr
eads.
on threa
hine.
preferably
t kn
ds.
drop the
cotton
ot
or
slubs.
productiv
ity.
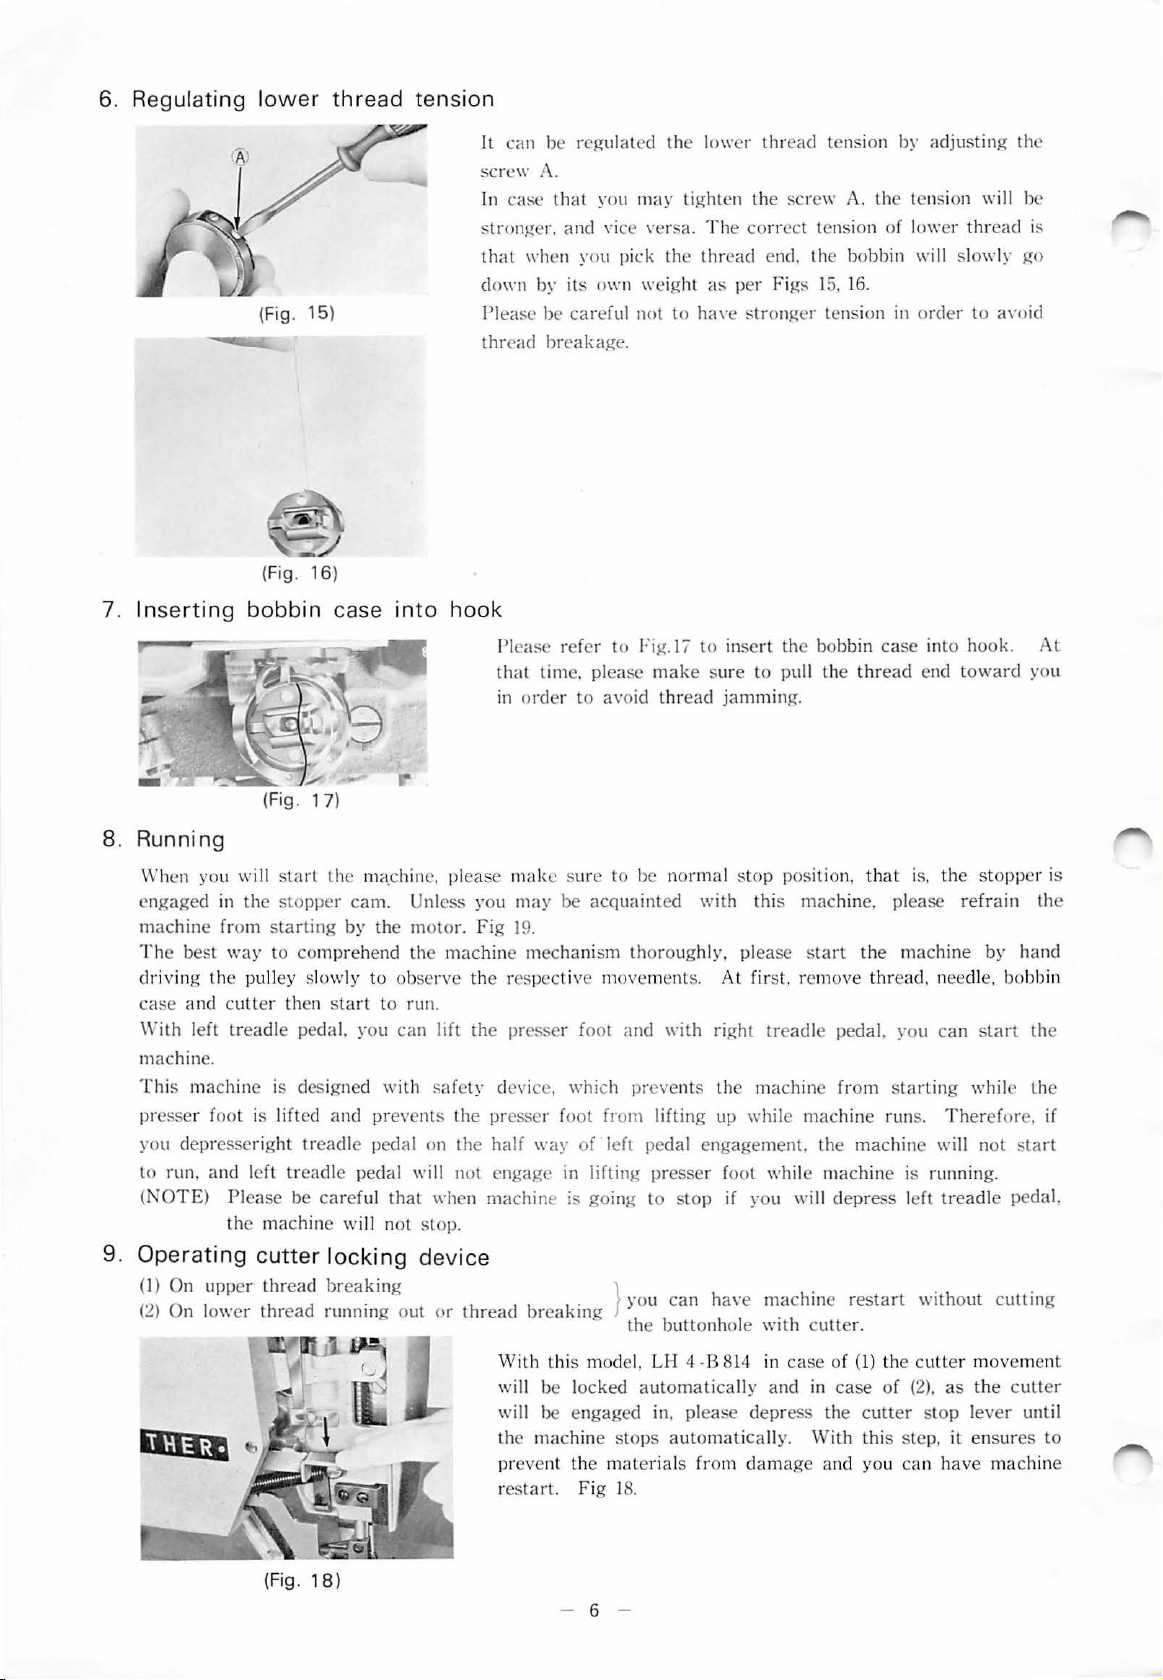
To
From the library of: Superior Sewing Machine & Supply LLC
thread
1)
Thread
2) l.;pper te nsi
:~)
Thr
·ll t.;pper
5)
Thread reta
6J
Lower tension
7)
Thread
H)
Thread
ead
the
retainer
guide
thread
ta
guide
upper
thread.
on
regulator
guide
iner
regulator
ke·up spring
please follow the following steps.
9)
Thread
discs
disc~
I
0)
Arm
II)
Thr
12)
Ann
I:~)
1\rm
II)
:'\
eedle
L))
l\ceclle
behind the nccclle)
thread
ead
thread
thread
breakage
guide
take·
up l
guide
guide
bar
thread
(!'lease
percetnng
e,·er
guide
pass
the
thread
wire
to needle
c~·e
from
Thread
•
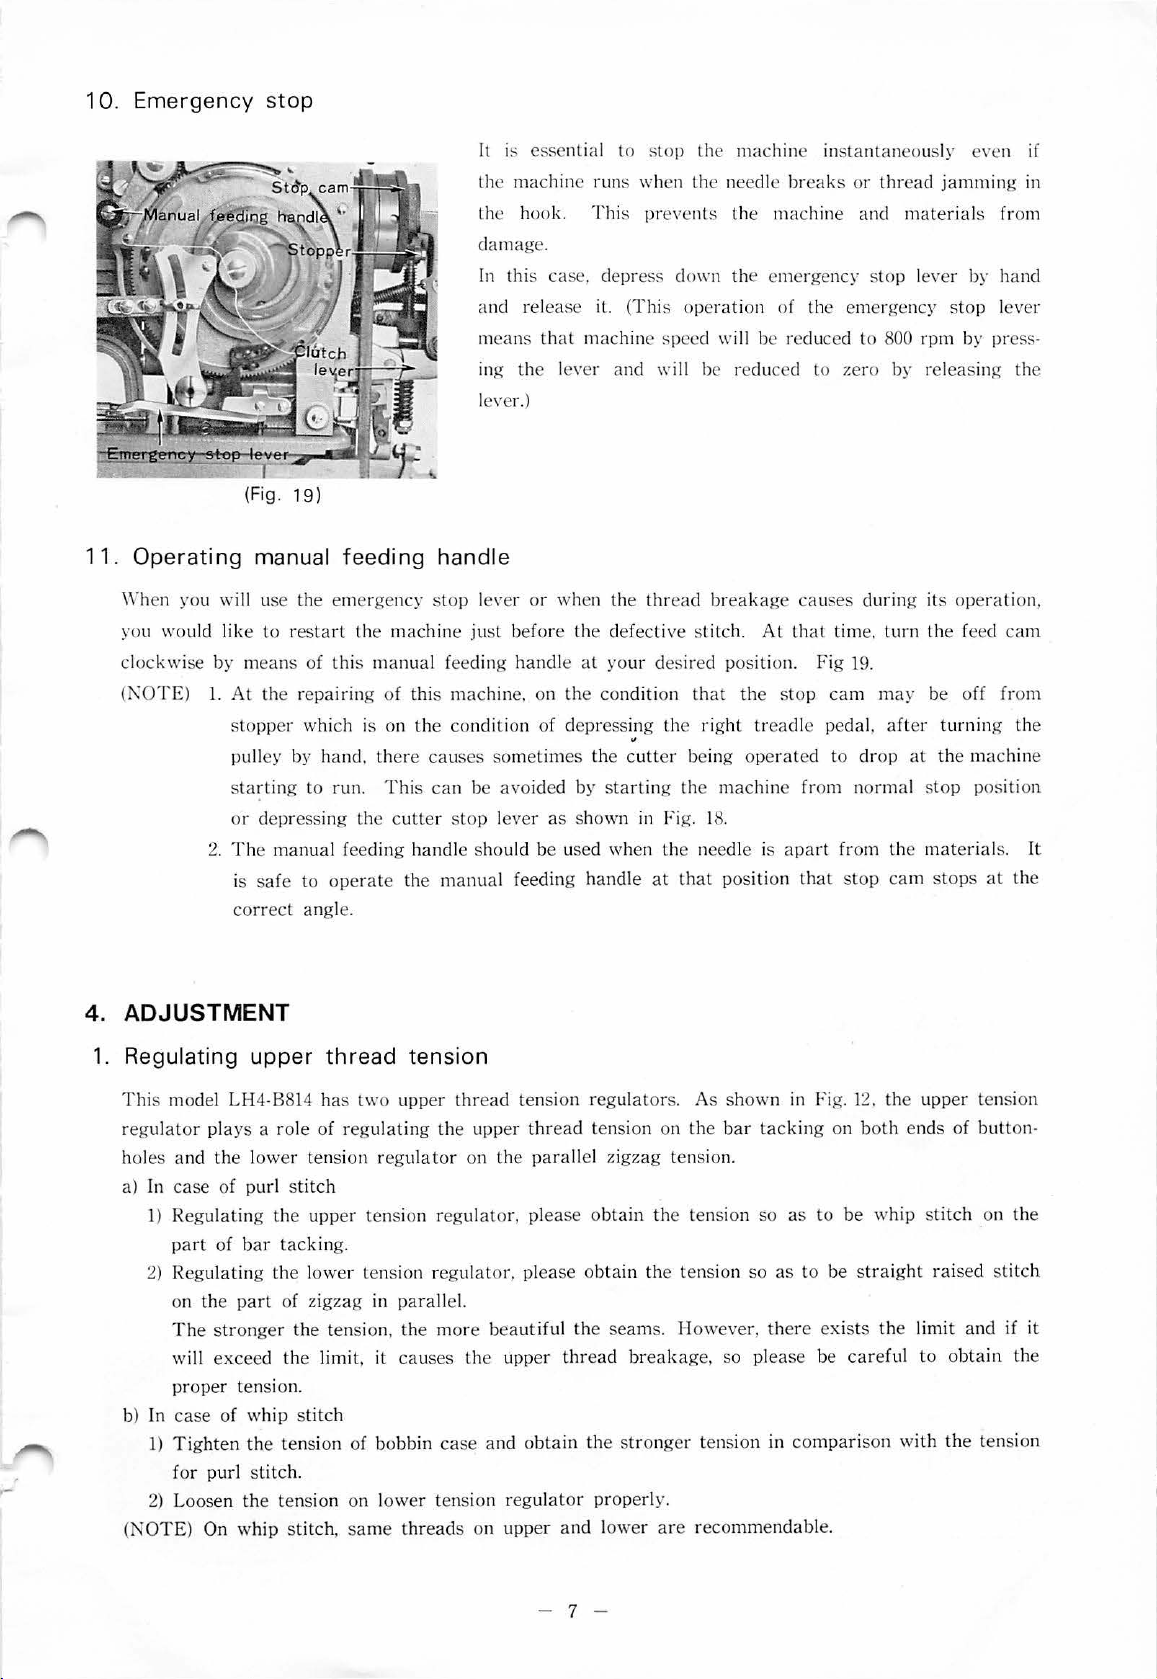
4.
Winding
s and
gimp passes (please r
lower
thr
ead
efer to Fig.
For
cotton
ance
To
4-5
push the l
of
matically.
by the screw.
1:!).
lower
thr
with
wind the
times
thread
s will
- - ->
t...
-
~
thread.
ead. but
synthet
it
it
ic
thread
around
the
ever to star
be
wound.
The
amou
.•
is r
ecom
can
be
assured
threads
as
in bobbin, pl
empty
(Fig. 12)
mended to use with
to
well.
ease
refer
bobbin
counter clockw
t to wind. When suffi
the
nt of
bobbin
threads
winder
to be wound is
get
sewing
to
Fig.
cient
will
±::
50·
::: I 00
perform·
13.
'vVind
ise.
amount
stop
auto-
adjusted
and
Thr
5.
To thread
eading
(Fig.
bobbin
on
the bobbin case.
14 a)
case
please
(F
ig. 1
refer
4b)
to
Fig. 1
4.
a.
b.
c & d.
(Fig . 14
- 5 -
C)
(Fig.
14d)
6. Regulati ng
From the library of: Superior Sewing Machine & Supply LLC
7. In
serting
lower
(Fig.
15
(Fig. 16)
bobbin
thread
)
case in
tension
It
scr
In
st
that
down
!'l
thread breakage
to
hook
can
be regulated
ew
A.
case
that
~
·ou
ronger.
ease
Pl
that
in
and
,·i
ce ,·ersa. The correct
when you pick the
by
its
own
be
careful
.
ease
refer
to Fig.
time. please
order
to
a void
the l
may
,,·eight
not
to
I/
mak
thread
owe
r thread
tight
en
the screw A. the tension will be
thread
ha,·e stronger
to inse
e sure
as
per Fi
to
jamming.
encl
rt t
tension
tension
. th e bobbin will slowly
gs
15
.
tension
he
bobbin
pull the
by
adjusting
of
low
er
16.
in o
rder
case
into
thread end tow
thread
to
hook.
the
a\·oicl
ard
is
go
At
you
8. Runn
9.
ing
When you will
gaged
en
machine
The best
driving
case
\\"ith left treadle pedal.
ma
Th
presser foo
you
to run ,
(NO
Operating
(I ) On upper
(2)
· n ower t
in the
from
way
the pull
and cull
chin
e.
is machi
depresseright
TE) Please
0
ne
t is lifted
and left treadle
the
I h
cutter
0\I::Wie
slarl
the
stopper
starting
to comprehend
ey slow ly
er then
is designed
machin
cam. Unl
by
star
you
and prevents
treadle
pedal will
be careful
e wi
locking
thread brea
rea
runnmg
d
ma.
chine.
the motor.
the machine m
to
observe
t to run.
can
with safe
pedal on t
that
when machi ne is going
ll not
slop.
please
ess you
lift
mak
may
Fig
19.
the
respect
the
presser
ly
devi ce, ,,·hich
the
presser
he
hal
f w
not
engage
e s
be
ech
ani
ive movements.
foot fr om lifting up while
ay
in lifting
device
kin
g }
· h d b k.
out
or t
rea rea
With this mod el,
will be l
will
the
preve
esta
r
·mg
be
machin
nt
rt. Fig 1
ure
to be no
acquainted
sm
thoroughly,
foot
and
preven
of left
you
the buttonhole
oc
ked
engage
d in, pl
e slops
the
mate
8.
rmal sto
with
with
ts the
pedal engagement.
presser
to
slop
can
Ll-1
4 -B
automatically
ease
automatically.
rials from
p positio n, that is, t
this machine. pl
please s
At firs
t. r
right
treadle
machine from
foot while machine is running.
if you w ill
ha\·e
mach
with
814
in
case
and
depress
damag
he
stopper
ease
refrain
tart
the machine
emove
mach
cutte
e and you can have machine
thread, needle, b
pedal. you can
sta
rting while
ine runs.
the
machine
depress left tread
ine
restart
r.
of
(1
in
case
the
'vVith th
without
) the
cutter
of
(2).
cutter slop lever
is step, it ensur
The
will
as
by
start
refore. if
not
le pedal.
movem
the cu
the
hand
obb
the
the
start
culling
ent
tte
until
es
is
in
to
r
(Fig. 18)
- 6 -
1 0. Emergency s
From the library of: Superior Sewing Machine & Supply LLC
(Fig.
top
19)
It
is
essent
ial to s
the ma chine run s when the needl e brea
lhc hook.
d
amag
In
this case, depress
and rel
m
ea
ns th
ing the leve r and
l
eve
r.)
This pr
e.
ease
il. (
at machine
lop the machine inst
events the machine and
dmm the
This opera
spee
d will be reduced to 800 rpm by press-
\\"ill
be reduce
emerge
tion of the emergency
d to ze ro by releasing
antan
eo us
ly
ks
or thread jamming
material
ncy sl
op leve
r by hand
stop
e\·en
s from
lever
the
if
in
11. Operating
\\"hen you wi
you wou
clockwi se by me
(l\O
TE)
manual feeding
ll
use the emergency
ld
like
to res
ans
1.
At
the
s
topper
ll
ey
pu
s
tartin
dep
or
2. The manual feeding handle shou
sa
fe to ope
is
orrect
c
4. ADJUSTMENT
1. Regulating
Thi
s model LH4-B814 has
ato
regul
holes and
ca
a) In
1)
Regulating the upper tension regulator, please
part
2) Regulati
on the part of zi
The stronger
will
proper
case
b) In
1)
Tighten
for purl s
2)
Loosen
(NOTE)
upper
r plays a role
the lower
se of purl stit
of
bar
tac
ng the l
exceed
ten
sion.
of whip s
the tension of bobbin case
tit
ch.
the
tension on l
On whip
handle
sto
tart
the machine just before the defecti ve stitc
of
this
man
ual feeding handle
repairing
which is on
by ha nd. th
g to run.
ressing the cutter
ang
of regulating the upper
tension regula
ch
king.
ower
gzag
the
the limit, it
tit
stitc
of this machine. on the condition
the
ere
cau
This can be
rate
the manual feeding
le.
thread
tension , the
ch
h, s
tension
t\\"O
upper
tor
tension regulator, please
in parall
more bea
causes the upper th
ower
tension regu l
ame
thread
p l
eve
r or when the thre
al your
condition of depressi.ng the right
ses
sometim
avoided by starting
stop lever
thread
on the
el.
and obtain the str
s on upper and
es
the
as
shown
ld
be use
d when the needle is
handle
tension regu l
thread
ut iful the seams. However, there exi
parall
ato
el zigzag
read
r properl
tension on the
obtain
obtain
lower
ad
breakage
desired position. Fig 1
that th
cutt
er being oper
the machine from normal
in
Fig. 1
8.
at that
ator
the
the tension so
breakage
onger
y.
are
position
s. As shown in Fig. 12. the up
tens
ion.
tension so
, so pl
tension in
recommendable.
h.
bar
causes
At
that
e stop
trea
dle pedal.
ated
apart
that
tack
ing on
as
as
to
ease
comparison with the
dur
time. turn the feed c
9.
cam
may
to
drop
from the
stop cam stops at the
both
to
be
whip stitch on the
be straight raised stit
sts
the limit
be
caref
ing its operation,
am
be off from
aft
er turning the
at the machine
sto
p position
mater
ial
s.
per
tension
ends
of
button-
ch
and if it
ul
to
obtain
the
tension
It
- 7 -
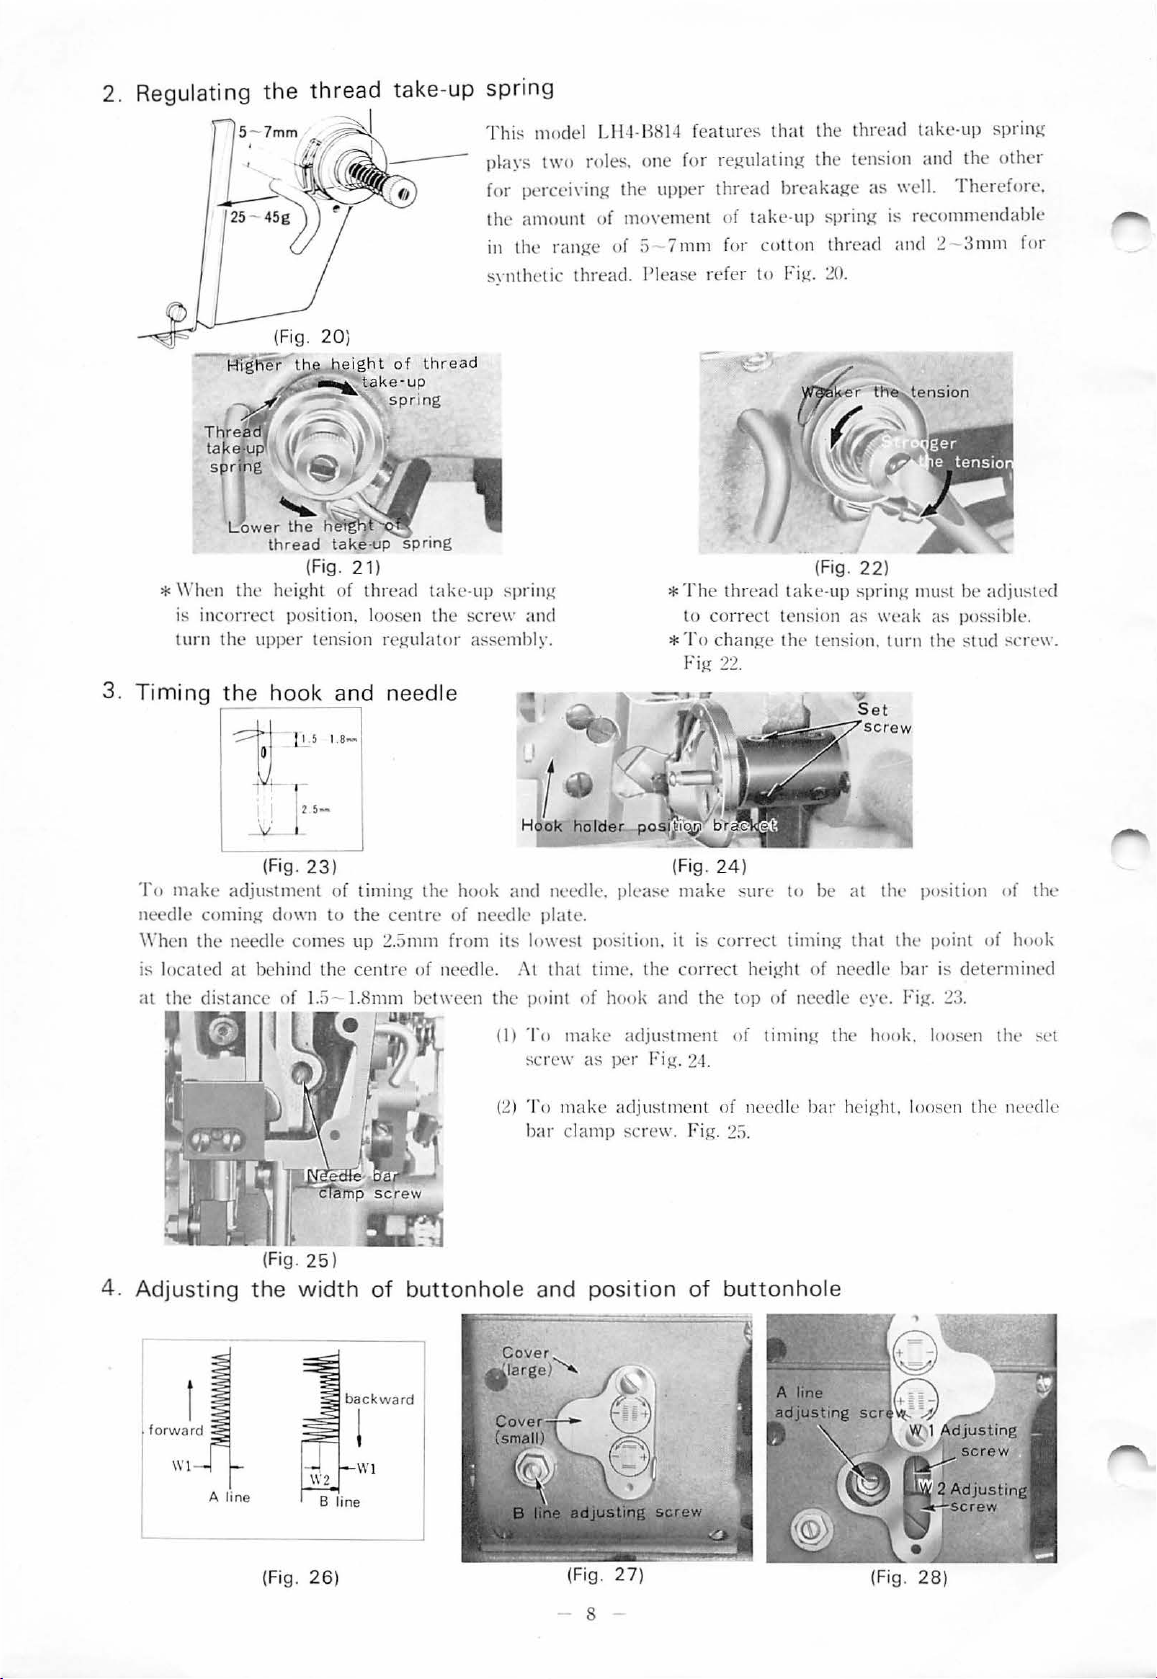
2. Regulating
From the library of: Superior Sewing Machine & Supply LLC
the
thread
take -up
spring
3.
-
f';l(g~
Lower
thread tak
*\\"hen
turn the
Timing
the
height of thr
is incorrect position. l
upp
the
hook
I
"the
he
ight
of threa
,
..... .---"-ta
the
(Fig. 21 )
er tension regulator
ke· up
sp
ring
h
e-up
ead
oose
n the
and needle
take-
T
hi
~
model Ll l
p~ay~
two
roles. one for
for percei,·ing the
the
amount
in the
sy
nthetic
d
up s
pring
screw
and
assembl~·.
of
range
thread
-I·BH14
upp
movement
of;)
7mm
. !'l
ease
*The thr
* T o
f
eatu
r
e~
that
the
thr
ead
take-up sprin
regulating the tension and the oth
er
thread
ref
to corre
change the
Fig
n
breakage
of
tak
e-up s
for cotton
er
to
Fig. 20.
ead
take-up spring
ct
tension
pring
thread
(Fig.
22)
as \\·e
tension.
as well.
is r
ecommendab
and 2-3mm
must be adjustl
ak
as
turn
the stud screw.
Theref
pos
sible.
g
er
ore.
le
for
'd
4.
1
L
To
make adjustment
needle
\\"hen
is
at
Adjust
coming
the
located
the
ing
needle
at
1.8-
"'
25-
-
\,,;
I
---'
(F
ig. 23) (Fig.
of
tJmm
.~~;
down
to
the cen
comes
behind the centr
(Fig. 25 )
the
1.:1
- l.Srnm
width
up
the hook
tre
2.5
mm
fr om its
e of needle. !
between the point of
of
buttonhole
of need
(I) T o
(2)
and
needle.
lc
plate.
lowest
\t
that
~cre
T o
bar clamp screw. Fig.
and posi
plea~c
position. it
tim
e.
hook
make
adjustme
w
as per Fig. 24.
mak
e adjustment of ne
tion
24
)
make sun:
i
~
correct timing
the correct hei
and the
top
nt
of timi ng the hook. lo
2:1.
of
buttonhole
to
be
at
the
pos
that
the
point
ght
of
needle
of needle eye. Fig. 23.
edle bar height.
bar
lo
is
osen the
o~e
iti
on
of
determin
n
th
e n
of
hook
eedle
the
ed
;:L't
backwa
rd
!
A line
B l
(Fig. 26)
ine
(Fi
g. 27)
8
(Fig. 28)
(!
From the library of: Superior Sewing Machine & Supply LLC
l :\cecile
This machine
on bo
<2l
.Adjusting
th
e zigz
narrower. (Fig
The width
you
If
hole
. (3)
Adjust
\\"h en
t
he zigzag width
zi
gzag
portions.
(
:\OTE)
S\\·tng
th end
zigzag
ag
will
without
(Fig. 29)
ing proce
the cull
in
parallel. Aft
(I)
(2}
mg.
swings the n
s. Fi g.
width
of
loosen
By
will
fo re. pl
This machine
therefore. please
zi
lin
After
and
·s
26.
width
\\"I
will
be
s.
27
. 28}
zigzag
bar
er
gzag
es
ition
and
conside
taking.
dure
goes
do\\
of par
allel. Then. adjust
er compldi
means of needle bar
make
adjustment
ease
adjust the corr
width
on
both bac
turning the
et
the mac
ed
in
the stopper. Then. s
eed
le
from
right
a
nd
\\
.:?
.
\\"ith
\\·
ici
er.
and
turn
tackin
g c
an
be
adjusted
rablr
the
adjusting scre w
*
l
~efer
l
oosening
screw
Turning the scr
and
*
l~
eference
turning the screw. Turning
line ri
(See
·n.
after
adjusting
on
of
abovc·men
mo\·emenl
b~·
t
urning the pull
ect position \\·ith
is designed
make sure the needle
of
-lmm
l\\
rar
pulley
hine to the normal
the needle s \\·inging much more th
or
more
d and for
by
hand.
to
left
eith
er
\\"I
and
\\" 2
adjusting scre,,·s.
to
left (co
e n ce
the
\\'ith a sc
turning
ghtward: and
Fig. 29)
the :-\
the
B line
and press
on
bar
ward zigzag
plea
stop
tart the machine.
unt
br
the
for
bar
line
A c
an
nut
rcwclri,·er inserted
ew clock\\
it the other "·ar
line B can be
line
not
not
ti oned
adjustment.
ing
ey
br
actual
not
to
hit
Lacking
width
se
mak
e s
position. namely.
goi
ng forward
er·clo
ckw
isc). the
adjusting screws
lacking.
be
with
turnin
so
so
the
hand.
the
portions
ure
~·ou
adju
ste
d
the
accessory
·ise
moves
111oves
adjusted
it cl
ock,,·ise
g it the
as
as
to break the se\\·n thre
se,,·ing
presser
of
to
other ,,·ar mo,·cs
to
break
adju
materials with
it
causes
.
or
after the
parallel po
usc
or
backwa
turn
to
rig
zigzag
to
be
larger
c
an obtain
by
opening
tool.
through
st the
an the
foot when
the
the
the
the refe
ren
it
righ
t\\·arcl.
by
loosen
111o,·es
the
sewn thread. adjust
width
thr
a slig
ht
dif
slot
rou
rel11o\·al
rtions.
enH.'rgenc~·
stopper cam bei
rd.
for tacki
ht (cloc
width
or s
the
gimp
the
small
and turn
hole
in the
ce
line
leftward:
(See
ing the
the
refe
it leftward.
ad
of
bar
ead. when
ference.
of wo
rk
mar set
of
sl
op
ng
kwi
se).
will be
mall
er.
button·
cover.
ing the
tool.
Fig.
29}
nut
and
ren
ce
of right
tack
ing
rou
there·
clamp
the
position
le,
·er
ng
po·
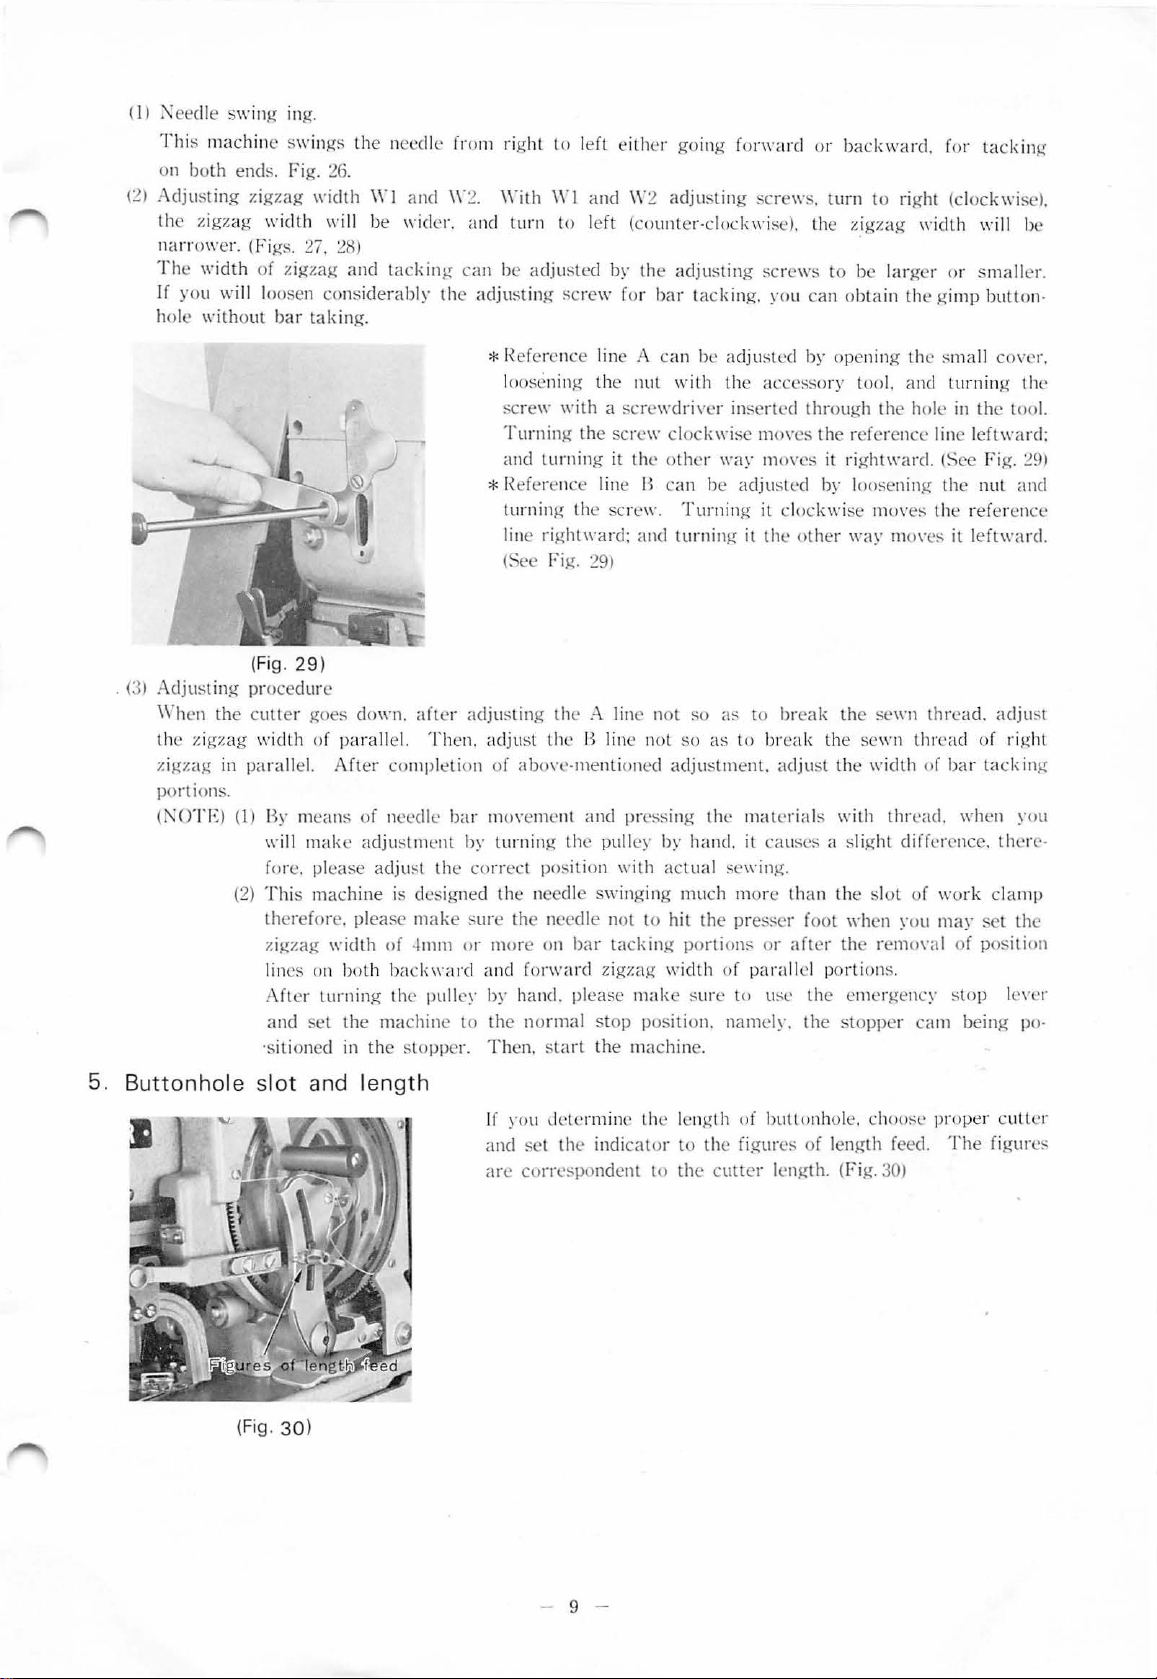
5.
Buttonho
le s
lot
(Fig. 30)
and le
ngth
If you
and
set
arc corr
determine the
the
indicator
espondent
9
to
len
gth
to
the figures
the
cutler
of butt
lengt
onh ole.
of len
h.
(Fig.
choose
gth
proper cutler
feed. The figures
30)
6. Number
From the library of: Superior Sewing Machine & Supply LLC
)
-+--+t---+--+-"11-
(I)
Chang
ing th e n
of
stitches
. ~ "
..
(Fig. 31 )
~s,
t ... "
JB
'I
umber
.
'¥
. .
..
of stitches
Pl
ease
cycle d
an
You c
the comb
31)
use
epend
obta
inati on
with
this
ing on the
in the pr
of
machi
the
ne in proper
leng
th of
buttonhole.
edete
rmin
ed
numb
gea
rs in cluding with this
numb
er
of s
ers of s
titches cha
machin
titche
s per
ngi
ng
e. (Fig.
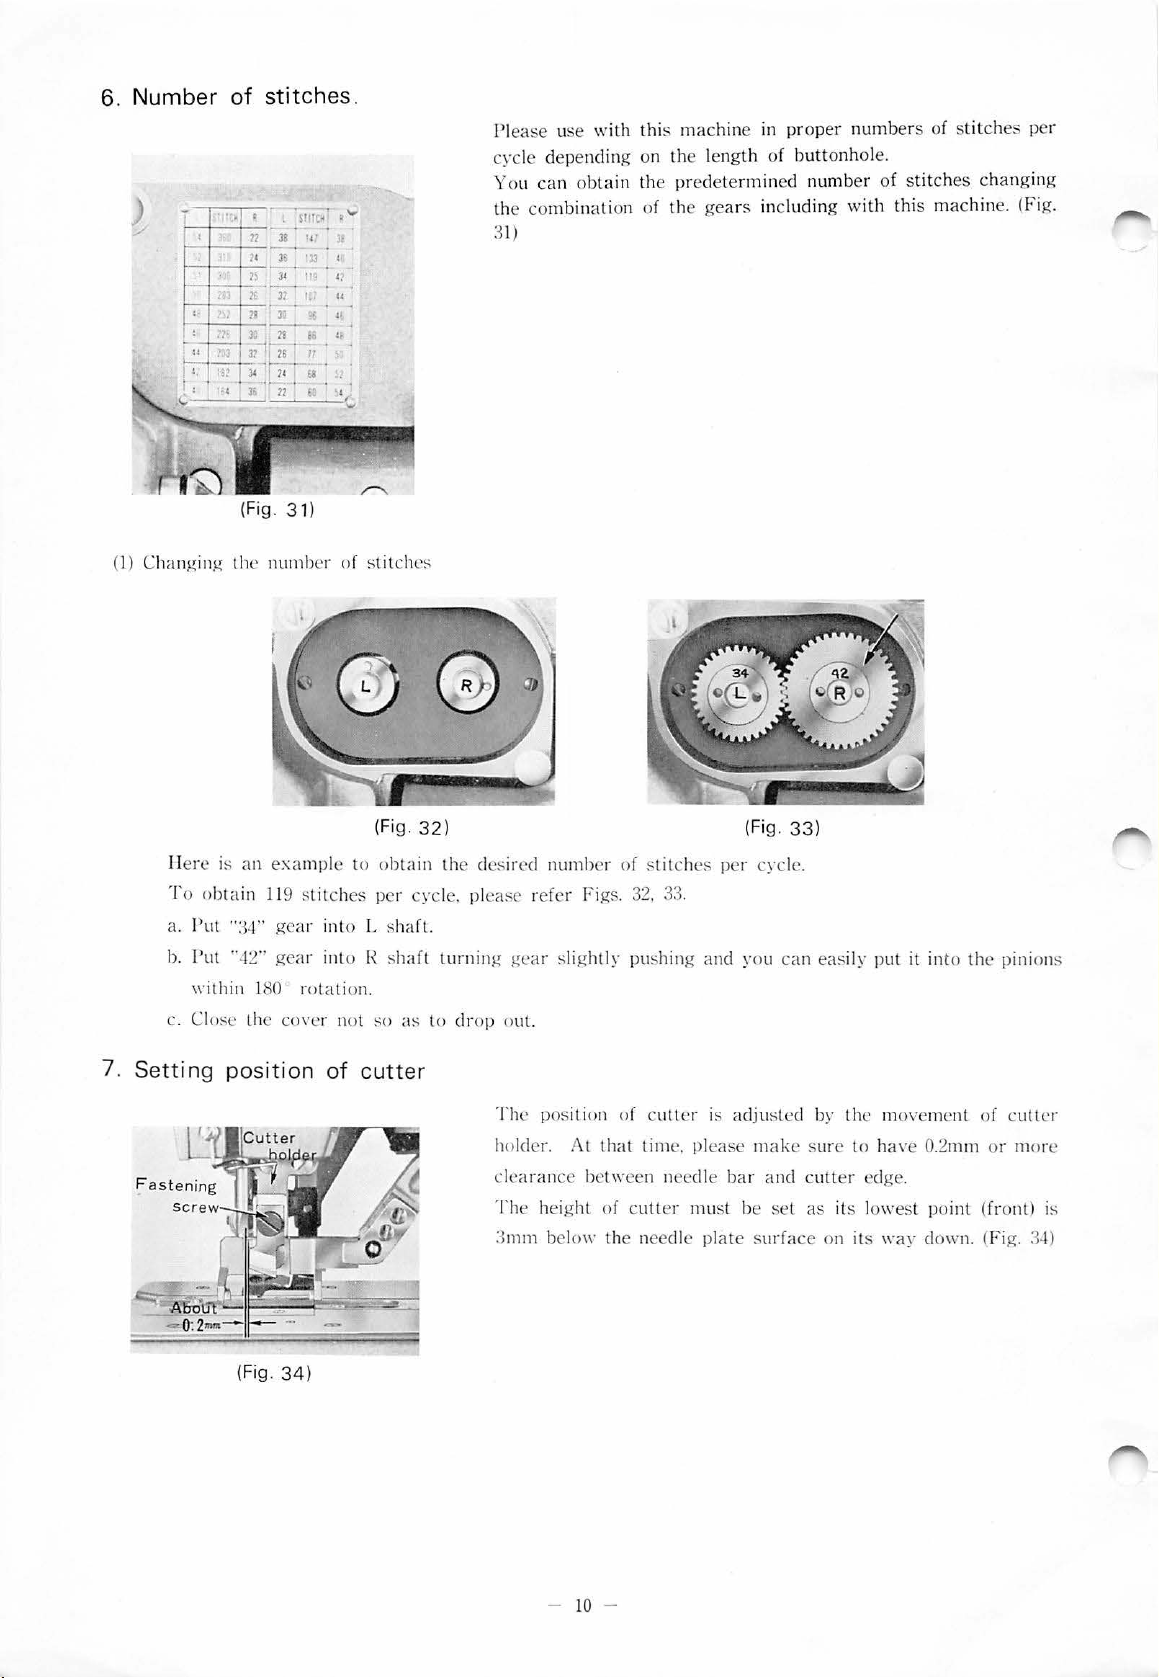
7.
Setting
ll
ere is
To obt
a.
Put
b.
l'ut
\\·ithin 180
c. Clo
se
an
ain
"3·1'
··
-12"
the c
pos
(Fig . 3
example
119
stitch
' ge
ar into L s
gea
r into
rotation
ove
iti
on
4)
(F
ig.
32)
to
obtain
es
per cycle. pl
haft.
I
~
shaft turning
.
r not so as to
of cut
ter
the desi red
ease refe
gea
drop
out.
Th
e posit ion of cutter is a
ho lder.
clearance
T he
:3
mm
numb
er of
r Figs.
r slightly
1\t
that
between nee
height
of c
belcl\\.
stitches
32
.
pushing
time. plea
utt
the nee
(Fi
per cycle.
3:3.
and
you
dju
se make sur
dle
bar
er must be s
dle
plate surfa
g.
33
)
can
easily put it into the pin i
sted
by
the moveme
e to ha\·e 0.2mm or more
and
cutter edge.
et
as
its l
owest
ce
on its \\
·ay clo\\'
nt
point
n.
of c
(front
(Fig.
utl
ons
er
) is
3-1)
10
-
 Loading...