


370 BVC
Series 33
Stapled booklet, 105 x 148 mm, 112 p (incl. 8 p cover), 2/2c = HKS43N + black
S
S
e
e
390cc-4
r
i
e
s
r
i
e
s
3
3
+
–
Type 5411, 5412
www.braun.com
370cc-4
350cc-4
390cc-4
Braun Infolines
English 6
Français 13
Polski 21
âesk˘ 30
Slovensk˘ 37
Magyar 44
Hrvatski 51
Slovenski 59
Türkçe 66
Română 73
кЫТТНЛИ 81
ì͇ªÌҸ͇ 90
108
Braun GmbH
Frankfurter Straße 145
61476 Kronberg/Germany
www.braun.com
UK 0800 783 7010
IE 1 800 509 448
FR 0 800 944 802
BE 0 800 14 592
PL 801 127 286
801 1 BRAUN
CZ 221 804 335
SK 02/5710 1135
HU (06-1) 451-1256
HR 091 66 01 777
SI 080 2822
TR 0 800 261 63 65
RO 021-224.00.47
RU 8 800 200 20 20
UA 0 800 505 000
HK 852-25249377
(Audio Supplies Company Ltd.)
www.service.braun.com
96314373/IV-13
GB/F/PL/CZ/SK/H/HR/SLO/TR/RO/
RUS/UA/Arab
1
+
–
3
9
0
c
c
4
S
e
r
i
e
s
3
S
e
r
i
e
s
3
2
3
r
i
e
e
s
r
i
e
e
S
s
S
3
3
4
+
5
6
–
+
–
11
390
370
7
8
3
9
0
cc-4
390
9
3
370
350
10
12
350
A
+
90°
B
f
ul
l
l
o
c
k
f
u
ll
4
•••
•••
1
2
l
oc
k
l
ock
C
l
o
c
k
1
2
3
4
a
•••
5
-
+
-
+
-
-
+
+
b
•••
c
-
+
5

English
Our products are designed to meet the highest standards of quality, functionality and design. We hope you enjoy your new Braun Shaver.
Read this instruction completely, it contains safety information. Keep it for
future reference.
Warnings
This appliance is suitable for cleaning under running
tap water. Detach the appliance from the power
supply before cleaning it with water.
Your shaving system is provided with a special cord set, which
has an integrated Safety Extra Low Voltage power supply.
Do not exchange or tamper with any part of it, otherwise
there is risk of an electric shock. Only use the special cord
set provided with your appliance.
Do not shave with a damaged foil or cord.
This appliance can be used by children aged from 8 years
and above and persons with reduced physical, sensory or
mental capabilities or lack of experience and knowledge if
they have been given supervision or instruction concerning
the safe use of the appliance and understand the hazards
involved. Children shall not play with the appliance. Cleaning
and user maintenance shall not be made by children unless
they are older than 8 years and supervised.
In order to avoid any leakage of the cleaning fluid, place the
appliance on a flat, stable surface. Do not tip, move suddenly
or transport in any way if a cleaning cartridge is installed.
Do not place the appliance in a mirror cabinet, nor store it
over radiators, nor place it on polished or lacquered surfaces.
Do not expose to direct sunlight.
6

The appliance contains highly flammable liquid. Keep it away
from sources of ignition. No smoking.
Keep out of reach of children. Do not refill cartridge. Use only
original Braun refill cartridge.
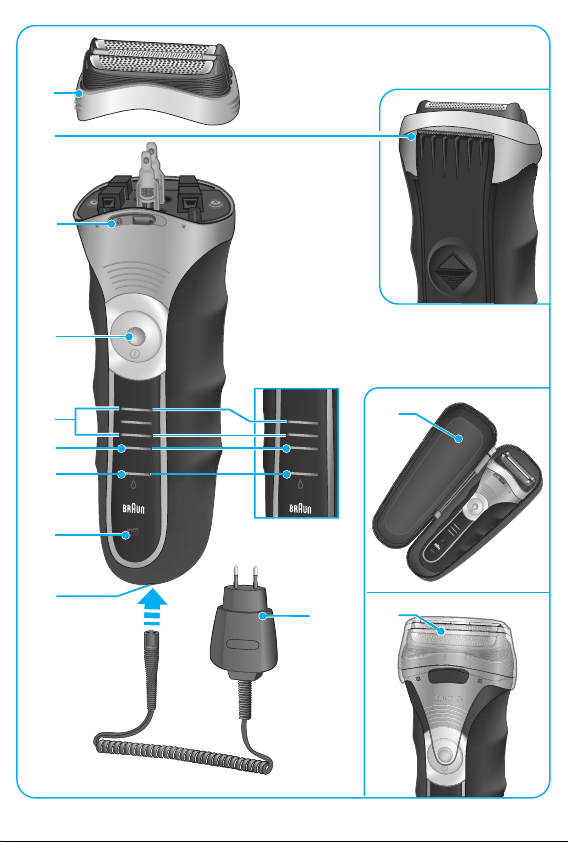
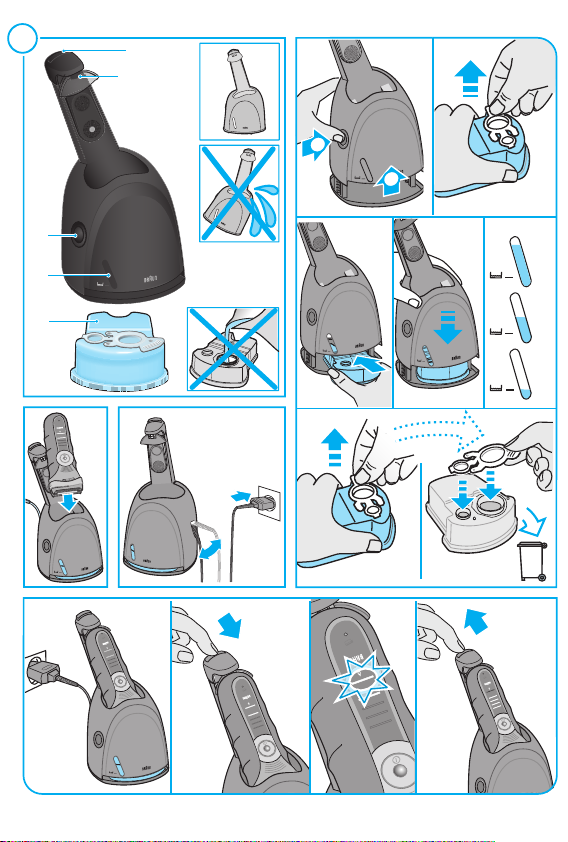
Description
1 Foil & Cutter cassette
2 Long hair trimmer
3 Precision setting switch (390cc/370cc only)
4 On/off switch
5 Charging lights (green)
6 Low-charge light (red)
7 Cleaning light (yellow)
8 Replacement light for shaving parts
9 Shaver power socket
10 Special cord set
11 Travel pouch (390cc/370cc only)
12 Foil protection cap (350cc only)
Charging
Recommended ambient temperature for charging is 5 °C to 35 °C. The battery
may not charge properly or at all under extreme low or high temperatures.
Recommended ambient temperature for shaving is 15 °C to 35 °C.
Do not expose the appliance to temperatures higher than 50 °C for extended
periods of time.
• Using the special cord set (10), connect the shaver to an electrical outlet
with the motor switched off.
• When charging for the first time or when the shaver is not used for a few
months, leave the shaver to charge continuously for 4 hours. Subsequent
charges will take about 1 hour.
• A full charge provides up to 45 minutes of cordless shaving time depending on your beard growth.
• Maximum battery capacity will only be reached after several charging/
discharging cycles.
• 5-minute quick charge with the special cord set (10) is sufficient for a shave.
• If the rechargeable batteries are discharged,
necting the shaver to an electrical outlet via the special cord set.
you may also shave by con-
7
Charging lights (5)
The green charging lights show the charge status of the batteries. The green
charging light blinks when the shaver is being charged or switched on. When
the battery is fully charged, all green charging lights shine permanently,
provided the shaver is connected to an electrical outlet.
Low-charge light (6)
The red low-charge light flashes when the battery is running low.
You should be able to finish your shave.
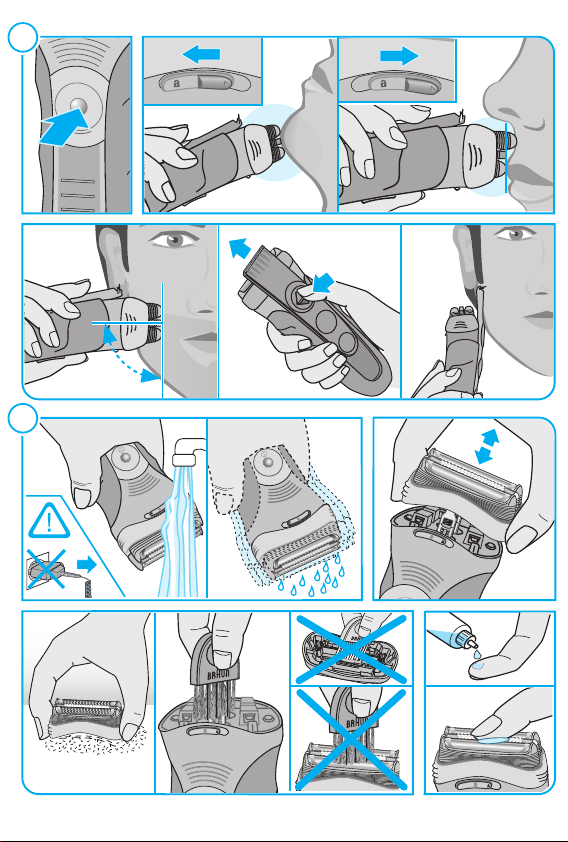
Shaving (A)
Press the on/off switch (4) to operate the shaver (picture A).
The flexible shaving foils automatically adjust to every contour of your face.
Long hair trimmer (2)
To trim sideburns, moustache or beard, slide the long hair trimmer upwards.
Precision setting switch
For precise handling in hard to shave areas (e.g. under the nose) slide the
switch (3) to the right to position . The centre trimmer and one foil will be
lowered.
Tips for the perfect dry shave
For best results, Braun recommends you follow 3 simple steps:
1. Always shave before washing your face.
2. At all times, hold the shaver at right angles (90°) to your skin.
3. Stretch your skin and shave against the direction of your beard growth.
(3) (390cc/370cc only)
Keeping your shaver in top shape (B)
Cleaning indicator
Your shaver should be cleaned daily in the Clean&Renew, and particularly
when the yellow cleaning light (7) shines constantly after shaving. If this is
not done, the yellow light will go off after some time. The shaver’s electronics
will then assume it has been cleaned manually and a new calculation of the
time when the next cleaning is required will be started. During the cleaning
process in the Clean&Renew the yellow light will flash and will go off after
approx. 4 hours when cleaning is finished.
Automatic cleaning
Once the shaver is put into the Clean&Renew, it is cleaned automatically
(see «Clean&Renew (C)»).
8

Manual cleaning is recommended only when the Clean&Renew is not
available, e. g. when travelling.
Manual cleaning
Regular cleaning ensures better shaving performance. Rinsing the shaver head
under running water after each shave is an easy and fast way to keep it clean:
• Switch the shaver on (cordless) and rinse the shaver head under hot running
water. You may use liquid soap without abrasive substances. Rinse off all
foam and let the shaver run for a few more seconds.
• Next, switch off the shaver, remove the Foil & Cutter cassette (1) and let it dry.
• If you regularly clean the shaver under water, then once a week apply a drop
of light machine oil onto the long hair trimmer (2) and Foil & Cutter cassette (1).
Alternatively, you may clean the shaver using a brush:
• Switch off the shaver. Remove the Foil & Cutter cassette and tap it out on
a flat surface.
• Using a brush, clean the inner area of the shaver head. However, do not
clean the Foil & Cutter cassette with a brush as this may damage it.
Replacement light for shaving parts/Reset
To maintain 100% shaving performance, replace the Foil & Cutter cassette
(1), when the replacement light for shaving parts (8) comes on (after about
18 months) or when worn.
The replacement light will remind you during the next 7 shaves to replace the
foil and cutter cassette. Then the shaver will automatically reset.
After you have replaced the Foil & Cutter cassette (1), press the on/off switch
(4) for at least 5 seconds to reset the counter.
While doing so, the replacement light blinks and goes off when the reset is
complete. The manual reset can be done at any time.
Preserving the batteries
In order to maintain the optimum capacity of the rechargeable batteries, the
shaver has to be fully discharged (by shaving) every 6 months approximately.
Then recharge the shaver to full capacity.
Environmental notice
This product contains rechargeable batteries. In the interest of
protecting the environment, please do not dispose of the product in
the household waste at the end of its useful life. Disposal can take
place at a Braun Service Centre or at appropriate collection sites
provided in your country.
9

Clean&Renew (C)
Braun Clean&Renew has been developed for cleaning, charging and storing
your shaver.
During the automated cleaning process, the shaver is switched on and off
at intervals to obtain best cleaning results. Since the specially formulated
cleaning fluid contains a small amount of oil, the cleaning procedure also
fulfils the lubrication needs of the shaver.
Clean your shaver daily in the Clean&Renew.
Description
1 Start/release button
2 Contact bow
3 Lift button for cartridge exchange
4 Level indicator
5 Cleaning cartridge
Installing the cartridge
• Press the lift button (3) to open the housing.
• Hold the cartridge down on a flat, stable surface (e.g. table). Carefully
remove the lid from the cartridge. Slide the cartridge into the base as
far as it will go.
• Slowly close the housing by pushing it down until it locks.
Replacing the cartridge
After having pressed the lift button to open the housing, wait for a few
seconds before removing the used cartridge.
Before discarding the used cartridge, make sure to close the openings
using the lid of the new cartridge, since the used cartridge will contain
contaminated cleaning solution.
The used cartridge can be disposed of in the household waste.
Operating your Clean&Renew
• Connect your Clean&Renew with the cord set to the mains electricity
supply. The special socket at the back is adjustable to save space. After
each shave, switch the shaver off and put it into the Clean&Renew, upside
down and with the front showing.
• Push the start/release button (1) to lock and connect the shaver. The
cleaning process will start. The yellow light on the shaver will flash during
the complete process.
10

• Do not interrupt the cleaning process, as it leaves the shaver wet and not
fit for use. If interruption is needed nonetheless, press the start/release
button (1).
• When cleaning is finished, the yellow light will go off. To release it, push the
start/release button.
• A cleaning cartridge should be sufficient for about 30 cleaning cycles.
When the level indicator (4) has reached the
the cartridge is sufficient for about 5 more cleaning cycles. Then the
cartridge should be replaced, when used daily approx. every 4 weeks.
• The hygienic cleaning cartridge contains ethanol or isopropanol
(dependent on country – specification see cartridge), which once opened
will naturally evaporate slowly into the surrounding air. Each cartridge, if
not used daily, should be replaced after approximately 8 weeks to ensure
optimal disinfection.
• The cleaning cartridge also contains lubricants, which may leave residual
marks on the shaver head after cleaning. However, these marks can be
removed easily by wiping gently with a cloth or soft tissue paper.
• Clean the housing from time to time with a damp cloth, especially the
opening where the shaver rests.
Accessories
Available at your dealer or Braun Service Centres:
• Foil & Cutter cassette: 32S/32B
• Cleaning cartridge Clean&Renew: CCR
Subject to change without notice.
For electric specifications, see printing on the special cord set.
Please do not dispose of the product in the household waste at the
end of its useful life. Disposal can take place at a Braun Service
Centre or at appropriate collection points provided in your country.
mark, the remaining fluid in
Guarantee
We grant 2 years guarantee on the product commencing on the date of
purchase. Within the guarantee period we will eliminate, free of charge, any
defects in the appliance resulting from faults in materials or workmanship,
either by repairing or replacing the complete appliance as we may choose.
This guarantee extends to every country where this appliance is supplied by
Braun or its appointed distributor.
11

This guarantee does not cover: damage due to improper use, normal wear
and tear (e.g. shaver Foil & Cutter cassette) as well as defects that have a
negligible effect on the value or operation of the appliance. The guarantee
becomes void if repairs are undertaken by unauthorised persons and if
original Braun parts are not used.
To obtain service within the guarantee period, hand in or send the complete
appliance with your sales receipt to an authorised Braun Customer Service
Centre (address information available online at www.service.braun.com).
For UK only:
This guarantee in no way affects your rights under statutory law.
12
Français
Nos produits sont conçus pour répondre aux normes les plus élevées en
matière de qualité, fonctionnalité et design. Nous espérons que vous
apprécierez votre nouveau rasoir Braun.
Lisez l’intégralité des instructions d‘utilisation, elles contiennent des
informations de sécurité. Conservez ce document pour le consulter
également ultérieurement.
Attention
La tête du rasoir peut être lavée sous l’eau chaude
courante. Débranchez toujours le rasoir de la prise
électrique secteur avant de nettoyer la tête sous l’eau.
Votre rasoir est livré avec un cordon d’alimentation basse
tension. Vous ne devez pas remplacer ou modifier ses
composants, afin d’éviter tout risque d’accident. Utilisez
uniquement le cordon d’alimentation fourni avec votre rasoir.
Ne vous rasez pas avec une grille ou un cordon endommagés.
Cet appareil peut être utilisé par des enfants de 8 ans et
plus et par des personnes dont les capacités physiques,
sensorielles ou mentales sont réduites, ou des personnes
dénuées d’expérience ou de connaissance, si elles ont pu
bénéficier, par l’intermédiaire d’une personne responsable de
leur sécurité, d’une surveillance ou d’instructions préalables
concernant l’utilisation de l’appareil en toute sécurité et les
dangers encourus. Les enfants ne doivent pas jouer avec
l’appareil. Le nettoyage et l’entretien ne doivent pas être
faits par des enfants, à moins qu’ils ne soient âgés de plus
de 8 ans et qu’ils ne soient sous surveillance.
Afin d’éviter tout débordement du liquide de nettoyage,
placez le système sur une surface plane et stable. Ne pas
l’incliner, le bouger brusquement ou le transporter de
13

quelque façon que ce soit quand il y a une cartouche de
liquide de nettoyage en place.
Ne pas mettre le système dans une armoire de toilette, ne
pas le ranger au dessus d’un radiateur, ni le placer sur une
surface polie ou vernie. Ne l’exposez pas directement à la
lumière du soleil.
Le système contient du liquide hautement inflammable. Gardez
le à l’écart des sources d’ignition. Ne fumez pas à proximité.
Gardez le hors de portée des enfants. Ne remplissez pas la
cartouche. Utilisez uniquement les cartouches de nettoyage
originales Braun.
Description
1 Cassette de rasage (grille et bloc-couteaux)
2 Tondeuse rétractable pour poils longs
3 Loquet de réglage de précision
4 Bouton marche/arrêt
5 Témoins lumineux de charge (vert)
6 Témoin lumineux de décharge (rouge)
7 Témoin lumineux de nettoyage (jaune)
8 Indicateur lumineux de remplacement de la cassette de rasage
9 Prise d’alimentation du rasoir
10 Cordon d’alimentation
11 Etui de voyage (390cc / 370cc uniquement)
12 Capot de protection (350cc uniquement)
(390cc/370cc uniquement)
Mise en charge du rasoir
La température ambiante recommandée pour charger le rasoir est comprise
entre 5 °C et 35 °C. La batterie peut ne pas se charger correctement ou pas
du tout à des températures extrêmement basses ou élevées. La température
ambiante recommandée pour se raser est comprise entre 15° C et 35 °C.
N’exposez pas votre rasoir à des températures supérieures à 50 °C pendant
une période prolongée.
14
• En utilisant le cordon d’alimentation (10), branchez le rasoir moteur arrêté
sur une prise électrique.
• Lors de la première charge, ou si le rasoir n’a pas été utilisé pendant
plusieurs mois, laissez le rasoir se charger pendant 4 heures. Les charges
suivantes prendront environ une heure.
• Une pleine charge procure jusqu’à 45 minutes d’autonomie en mode
rasage qui varie en fonction de l’épaisseur et de la densité de votre barbe.
• La capacité maximale de la batterie ne sera atteinte qu’après plusieurs
cycles de charge/décharge.
• Une charge rapide de 5 minutes avec le cordon d’alimentation spécial (10)
est suffisante pour un rasage.
• Si les batteries sont déchargées, vous pouvez aussi vous raser en
branchant le rasoir à une prise électrique via le cordon d’alimentation.
Témoins lumineux de charge (5)
Les témoins lumineux de charge indiquent le niveau de charge des batteries.
Le témoin lumineux vert de charge clignote lorsque le rasoir est en cours de
charge ou en marche. Quand la batterie est complètement chargée, tous les
témoins lumineux verts de charge sont allumés, que le rasoir soit branché
sur une prise électrique.
Témoin lumineux de décharge (6)
Le voyant lumineux rouge de faible charge clignote lorsque la batterie doit
être rechargée.
La charge restante est normalement suffisante pour que vous puissiez
terminer votre rasage.
Rasage (A)
Appuyez sur le bouton marche/arrêt (4) pour mettre en marche le rasoir
(cf. schéma A). Les grilles de rasage souples s’adaptent automatiquement
aux contours de votre visage.
Tondeuse rétractable pour poils longs (2)
Pour tailler les pattes, la moustache ou la barbe, faites glisser la tondeuse
rétractable vers le haut.
Loquet de réglage de précision
Pour une utilisation précise dans les zones difficiles à atteindre (par exemple,
sous le nez), poussez le loquet (3) vers la droite pour que se retrouve en
position centrale. La mini tondeuse de la cassette de rasage et une de ses
grilles seront alors abaissées.
(3)
(390cc/370cc uniquement)
15

Conseils pour un rasage parfait
Pour un résultat de rasage optimal, Braun vous recommande de suivre
3 étapes simples :
1. Rasez-vous toujours avant de vous laver le visage.
2. Tenez toujours le rasoir à angle droit (90°) par rapport à la peau.
3. Tendez votre peau et rasez-vous dans le sens opposé à la pousse du
poil.
Conserver votre rasoir en parfait etat (B)
Indicateur de nettoyage
Il est recommandé de nettoyer le rasoir après chaque rasage dans le système
autonettoyant Clean&Renew, et au plus tard quand le témoin lumineux de
nettoyage jaune (7) s’allume de façon continue. Si aucun nettoyage n’est fait,
le témoin lumineux jaune s’éteindra après un certain temps. Le système
électronique du rasoir supposera que le rasoir a été nettoyé manuellement
et un nouveau calcul du temps jusqu’au prochain nettoyage nécessaire sera
effectué. Pendant le cycle de nettoyage dans le système Clean&Renew, le
témoin lumineux jaune clignotera et s’éteindra après environ 4 heures, à la fin
du cycle de nettoyage.
Nettoyage automatique
Dès que le rasoir est mis dans le système Clean&Renew, il est nettoyé automatiquement (voir « Système de charge autonettoyant Clean&Renew (C) »).
Le nettoyage manuel est recommandé seulement si le système Clean&Renew
n’est pas disponible, par exemple pendant un voyage.
Nettoyage manuel
Un nettoyage régulier assure une meilleure performance de rasage. Nettoyer
la tête du rasoir sous l’eau après chaque rasage permet de garder le rasoir
propre simplement et rapidement :
• Mettez en marche le rasoir (sans cordon) et rincez la tête de rasage sous
l’eau chaude. Vous pouvez utiliser du savon liquide ne contenant pas de
substances abrasives. Rincez toute la mousse et laissez le rasoir en
marche pendant quelques secondes supplémentaires.
• Ensuite, arrêtez le rasoir, retirez la cassette de rasage (1) et laissez la sécher.
• Si vous nettoyez régulièrement votre rasoir sous l’eau, appliquez une fois
par semaine une goutte d’huile de machine à coudre sur la tondeuse
rétractable (2) et sur la cassette de rasage (1).
16

Vous pouvez également nettoyer le rasoir en utilisant une brossette :
• Arrêtez le rasoir. Enlevez la cassette de rasage et tapotez-la légèrement
sur une surface plane.
• A l’aide de la brossette, nettoyez l’intérieur de la tête du rasoir. Cependant,
ne nettoyez pas la cassette de rasage avec la brossette car cela risquerait
de l’endommager.
Témoin lumineux de remplacement de la cassette de rasage /
réinitialisation
Pour conserver 100% de la performance de votre rasoir, remplacez la cassette
de rasage (1) quand le témoin lumineux de remplacement des pièces de
rasage (8) s’allume (après environ 18 mois) ou quand elle est usée.
Le témoin lumineux de remplacement vous rappellera lors des 7 rasages
suivants qu’il faut remplacer la cassette de rasage. Ensuite, le rasoir
réinitialisera automatiquement l’affichage.
Après avoir remplacé la cassette de rasage (1), appuyez sur le bouton
marche/arrêt (4) pendant au moins 5 secondes afin de remettre manuellement le compteur à zéro.
Pendant ce temps là, le témoin lumineux de remplacement clignote et
s’éteint quand la réinitalisation est faite. La réinitialisation manuelle peut être
faite à n’importe quel moment.
Conservation des batteries
Pour maintenir la capacité optimale des batteries rechargeables, tous les
6 mois environ déchargez complètement, le rasoir en l’utilisant sans le
remettre en charge entre chaque rasage ; ensuite recharger le rasoir au
maximum.
Respect de l’environnement
Ce produit contient des batteries rechargeables. Dans un souci de
protection de l’environnement, veuillez ne pas jeter le produit avec les
ordures ménagères au terme de son cycle de vie. Vous pouvez
remettre ce produit aux centres service agréés Braun ou aux points
de collecte dans votre pays.
17

Système de charge autonettoyant Clean&Renew (C)
Le système Clean&Renew de Braun a été conçu pour nettoyer, charger et
ranger votre rasoir. Nettoyez votre rasoir quotidiennement dans le système
Clean&Renew.
Pendant le cycle de nettoyage automatique, la rasoir se met en marche
ponctuellement pour obtenir de meilleurs résultats. Le liquide de nettoyage,
de composition spécifique contient une petite quantité d’huile qui assure la
lubrification du rasoir.
Description
1 Bouton mise en marche / ouverture
2 Prise de connexion rasoir
3 Bouton poussoir d’ouverture boîtier pour remplacer la cartouche
4 Indicateur du niveau de liquide de nettoyage
5 Cartouche de liquide de nettoyage
Installation de la cartouche
• Appuyez sur le bouton poussoir (3) pour ouvrir le boîtier.
• Posez la cartouche sur une surface plate et stable (par exemple, une
table). Retirez doucement l’opercule de la cartouche puis l’installer en la
poussant jusqu’en butée dans la base du système autonettoyant.
• Abaisser le boîtier supérieur du Clean&Renew jusqu’à son verrouillage
pour le fermer.
Remplacement de la cartouche
Après avoir appuyé sur le bouton poussoir (3) pour ouvrir le boîtier, attendez
quelques secondes avant de retirer la cartouche usagée.
Avant de jeter la vieille cartouche qui contient du liquide de nettoyage usagé,
refermez-la en utilisant l’opercule de la nouvelle cartouche. La cartouche de
nettoyage usagée peut être jetée avec les ordures ménagères.
Installation de votre système autonettoyant
Clean&Renew
• Branchez votre système Clean&Renew avec le cordon d’alimentation à
une prise électrique. Le connecteur à l’arrière du boîtier est réglable pour
gagner de la place. Après chaque rasage, arrêtez le rasoir et mettez le
dans le système Clean&Renew, la tête de rasage vers le bas et la face
avant du rasoir vers vous.
18

• Appuyez sur le bouton marche/ouverture (1) pour bloquer et connecter le
rasoir. Le cycle de nettoyage commence. Le témoin lumineux jaune du
rasoir clignotera pendant la durée du nettoyage.
• N’interrompez pas le cycle de nettoyage, car le rasoir resterait mouillé et
ne sera pas prêt à être utilisé. Si vous devez cependant interrompre le
cycle, appuyez sur le bouton marche/ouverture (1).
• Lorsque le nettoyage est terminé, le témoin lumineux jaune s’éteint et le rasoir
est prêt à être utilisé. Pour libérer et sortir le rasoir, appuyer sur l’interrupteur
de mise en marche/ouverture.
• Une cartouche de liquide de nettoyage assure environ 30 cycles de
nettoyage. Quand l’indicateur de niveau du liquide de nettoyage (4) atteint le
niveau , le liquide restant est suffisant pour encore 5 cycles de nettoyage.
Ensuite, la cartouche doit être remplacée (remplacement environ toutes les
4 semaines pour une utilisation quotidienne).
• The hygienic cleaning cartridge contains ethanol or izopropanol (dependent
on country – specification see cartridge), which once opened will naturally
evaporate slowly into the surrounding air. Each cartridge, if not used daily,
should be replaced after approximately 8 weeks to ensure optimal
disinfection.
• La cartouche de liquide nettoyant contient un lubrifiant qui peut éventuellement laisser quelques traces résiduelles sur la tête du rasoir après le
nettoyage. Cependant, ces traces peuvent être enlevées facilement, en
essuyant à l’aide d’une lingette de tissu ou de papier.
• De temps en temps, nettoyez le bac de nettoyage du système autonettoyant
Clean&Renew avec un chiffon humide.
Pièces de rechange
Pièces de rechange disponibles auprès de votre revendeur ou de votre
centre service agréé Braun:
• Cassette de rasage (Foil & Cutter): 32S/32B
• Cartouche de liquide de nettoyage Clean&Renew: CCR
Sujet à toute modification sans préavis.
Voir les spécifications électriques mentionnées sur l’adaptateur basse tension.
A la fin de vie de votre appareil, veuillez ne pas le jeter avec vos
déchets ménagers. Remettez-le à votre Centre Service agréé
Braun ou déposez-le dans des sites de récupération appropriés
conformément aux réglementations locales ou nationales en vigueur.
19

Garantie
Nous accordons une garantie de 2 ans sur ce produit, à partir de la date
d’achat.
Pendant la durée de la garantie, Braun prendra gratuitement à sa charge la
réparation des vices de fabrication ou de matière en se réservant le droit de
décider si certaines pièces doivent être réparées ou si l‘appareil lui-même
doit être échangé.
Cette garantie s’étend à tous les pays où cet appareil est commercialisé par
Braun ou son distributeur exclusif.
Cette garantie ne couvre pas : les dommages occasionnés par une utilisation
inadéquate, l’usure normale (par exemple, grille et bloc-couteaux) ainsi que
les défauts d’usures qui ont un effet négligeable sur la valeur ou l’utilisation
de l’appareil. Cette garantie devient caduque si des réparations ont été
effectuées par des personnes non agréées par Braun et si des pièces de
rechange ne provenant pas de Braun ont été utilisées.
Pour toute réclamation intervenant pendant la période de garantie, retournez
ou rapportez lappareil ainsi que l’attestation de garantie à votre revendeur ou
à un Centre Service Agréé Braun.
Appelez au 0 800 944 802 (ou se référez à http://www.service.braun.com)
pour connaitre le Centre Service Agrée Braun le plus proche de chez vous.
Clause spéciale pour la France
Outre la garantie contractuelle exposée ci-dessus, nos clients bénéficient de
la garantie légale des vices cachés prévue aux articles 1641 et suivants du
Code civil.
20

Polski
Nasze produkty spełniają najwyższe standardy jakości, funkcjonalności i
designu. Mamy nadzieję, ze będziesz usatysfakcjonowany naszą nową
golarką Braun.
Prosimy uważnie przeczytać instrukcję przed zastosowaniem urządzenia,
zawiera informacje na temat bezpieczeństwa . Prosimy zachować instrukcję
do skorzystania w przyszłości.
Ostrzeżenie
Głowica golarki jest przystosowana do mycia pod
bieżącą wodą. Należy odłączyć golarkę od źródła
prądu, zanimużytkownik zacznie czyścić głowicę po
bieżącą wodą.
Twój system golący wyposażony jest w specjalną stację
ładującą. Nie należy samodzielnie wymieniać lub wymontowywać jakiejkolwiek jej części, gdyż grozi to porażeniem
prądem. Używaj golarki tylko z specjalny przewodem zasilającym dostarczonym wraz z urządzeniem.
Urządzenia nie należy używać z uszkodzoną folią golącą lub
kablem sieciowym.
To urządzenie jest przeznaczone do używania przez dzieci
w wieku od lat 8, a także przez osoby o ograniczonych
zdolnościach fizycznych, sensorycznych lub umysłowych oraz
osoby niemające wystarczającego doświadczenia ani wiedzy,
o ile są nadzorowane albo zostały poinstruowane w zakresie
bezpiecznego użytkowania tego urządzenia oraz świadome
istniejących zagrożeń. Nie wolno zezwalać dzieciom na
zabawę urządzeniem. Dzieci w wieku do lat 8 nie mogą czyścić
ani wykonywać konserwacji urządzenia bez nadzoru.
Aby uniknąć wyciekania płynu czyszczącego, należy
umieścić urządzenie na płaskiej, stabilnej powierzchni.
Nie należy trząść, obracać lub transportować bazy czyszcząco-
21

ładującej, szczególnie jeżeli jest w niej zamontowany cartridge
czyszczący.
Nie należy umieszczać urządzenia w lustrzanych pokojach,
w okolicy nadajników fal, na lakierowanych lub błyszczących
powierzchniach. Nie należy także wystawiać go na
bezpośrednie działanie promieni słonecznych.
Urządzenie zawiera łatwopalny płyn, więc należy je trzymać
z dala od źródeł ognia. Nie należy także palić papierosów w
jego pobliżu.
Należy trzymać z dala od dzieci. Zabronione jest samodzielne
napełnianie cartridga czyszczącego. Należy używać oryginalnych,
wymiennych cartridgy marki Braun.
Opis
1 Kaseta z systemem noży i folii golących
2 Trymer
3 Włącznik precyzyjnego golenia (tylko modele 390cc/370cc)
4 Przycisk/włącznik/wyłącznik
5 Wskaźnik naładowania baterii
6 Wskaźnik rozładowania baterii
7 Wskaźnik czyszczenia golarki
8 Wskaźnik wymiany elementów golących
9 Stacja ładowania golarki
10 Przewód zasilający
11 Etui podróżne (tylko modele 390cc/370cc)
12 Ochronna osłona na folię golącą (tylko modelu 350cc)
Ładowanie
Zalecana temperatura otoczenia podczas ładowania wynosi 5–35 °C.
Akumulator może nie naładować się prawidłowo lub wcale się nie naładować w
skrajnie niskich lub wysokich temperaturach. Zalecana temperatura podczas
golenia wynosi 15–35 °C.
Nie wolno przez dłuższy czas wystawiać urządzenia na działanie temperatur
wyższych niż 50 °C.
22

• Za pomocą dołączonego do zestawu przewodu zasilającego należy
podłączyć wyłączoną golarkę do gniazda elektrycznego.
• Pierwsze ładowanie lub nie używania jej przez kilka miesięcy, powinno
trwać co najmniej 4 godziny bez przerwy. Na kolejne wystarczy 1 godzina.
• W pełni naładowana bateria zapewnia do 45 minut bezprzewodowego
golenia, w zależności od rodzaju i długości zarostu.
• Maksymalna wydajność baterii zostanie osiągnięta jedynie po kilkakrotnych
cyklach pełnego jej naładowania i rozładowania.
• Szybkie, 5-minutowe ładowanie za pomocą przewodu zasilającego (10)
zapewnia czas pracy golarki wystarczający na jedno ogolenie.
• Jeżeli bateria golarki jest rozładowana, istnieje możliwość golenia z podłą-
czeniem za pomocą przewodu zasilającego bezpośrednio do gniazdka
elektrycznego.
Wskaźniki naładowania baterii (5)
Zielone wskaźniki pokazują stan naładowania baterii. Wskaźniki pulsują,
kiedy golarka jest w czasie ładowania, lub kiedy jest włączona. Jeżeli golarka
jest podłączona do źródła prądu, a bateria jest w pełni naładowana, wszystkie
zielone wskaźniki świecą światłem ciągłym.
Wskaźnik rozładowania baterii (6)
W przypadku, gdy bateria jest na wyczerpaniu zapala się czerwona kontrolka.
Powinno jednak wystarczyć energii na dokończenie golenia.
Golenie (A)
Należy włączyć golarkę za pomocą przycisku włącznik/wyłącznik (4).
Sprężyste folie golące dopasują się do kształtu każdej twarzy.
Trymer (2)
Służy do przycinania baczków, wąsów i dłuższej brody.
Włącznik precyzyjnego golenia (3) (tylko modele 390cc/370cc)
Ułatwia golenie trudnodostępnych miejsc np. pod nosem; należy przesunąć
blokadę w prawą stronę do pozycji , aby środkowa część trymera oraz
folia goląca zostały dla wygodniejszego golenia obniżone.
Porady dla najlepszych efektów golenia na sucho.
Dla najlepszych efektów golenia Braun poleca 3 proste zasady:
1. Należy się golić przed umyciem twarzy.
2. Golarka w czasie golenia zawsze powinna być prowadzona pod kątem
prostym w stosunku do golonej powierzchni.
3. Należy naciągnąć skórę i golić «pod włos», odwrotnie do kierunku
porostu włosów.
23

Jak utrzymać golarkę w najlepszym stanie (B)
Wskaźnik czystości
Golarka powinna być czyszczona codziennie przy pomocy bazy czyszcząco
ładującej (Clean&Renew), a już na pewno wtedy, kiedy żołta dioda (7) świeci
po goleniu ciągłym światłem. To znak, że użytkownik powinien wyczyścić
golarkę. Jeżeli czynność nie zostanie wykonana, dioda po jakimś czasie
przestanie sygnalizować konieczność mycia a elektroniczny system golarki
założy, że sprzęt został wyczyszczony ręcznie a nie przy pomocy bazy. Czas
odliczany do ponownego mycia będzie naliczany od nowa. W czasie procesu
samoczyszczenia w bazie czyszcząco-ładującej dioda będzie pulsować
żołtym światłem i wyłączy się dopiero wtedy, kiedy czyszczenie zostanie
zakończone, czyli po ok. 4 godzinach.
Automatyczne czyszczenie
Wystarczy umieścić golarkę w bazie czyszcząco-ładującej (Clean&Renew),
żeby została ona automatycznie (poniżej «Baza czyszcząco-ładująca
(Clean&Renew) (C)»). Ręczne mycie jest polecane jedynie wtedy, kiedy baza
jest niedostępna np. w czasie podróży.
Czyszczenie ręczne
Regularne czyszczenie zapewnia lepsze golenie. Opłukanie głowicy pod
bieżącą wodą po każdym goleniu, to najszybsza i najłatwiejsza droga do
utrzymania golarki w czystości i higienie.
• Należy włączyć golarkę (bezprzewodowo) i opłukać głowicę pod ciepłą,
bieżącą wodą. Można użyć mydła w płynie, jeżeli nie posiada żadnych
grudkowatych składników np. ziarenek do peelingu. Następnie należy
dokładnie opłukać głowicę z mydła i zostawić działającą golarkę na kilka
dodatkowych sekund.
• Kolejnym krokiem jest wyłączenie golarki oraz wyjęcie kasety z folią golącą
i nożykami (1). Należy pozostawić wyjęte elementy do wyschnięcia.
• Jeżeli golarka jest regularnie czyszczona pod bieżącą wodą, to wystarczy
raz na tydzień nanieść kroplę lekkiego oleju maszynowego na trymer (2)
oraz na kasetę z folią i nożykami (1). W ten sposób zostaną nasmarowane
elementy golące, które wymagają takiej ochrony.
Golarka mo˝e byç tak˝e czyszczona przy pomocy szczoteczki:
• Należy wyłączyć golarkę a następnie wyjąć kasetę z folią golącą i nożykami
(1). Delikatnie stukając kasetą o płaską powierzchnię, trzeba wysypać
wszelkie zanieczyszczenia.
24

• Używając szczoteczki należy oczyścić głowicę golarki oraz jej okolice.
Absolutnie nie należy używać szczoteczki do czyszczenia kasety z folią
i nożykami, gdyż można ją uszkodzić.
Wskaźnik wymiany elementów golących / reset
Aby golarka zawsze działała na 100% swoich możliwości, należy co
18 miesięcy wymieniać kasetę z foliami i nożami (1). Przypomina o tym
specjalny wskaźnik wymiany elementów golących (8). Jeżeli elementy golące
zużyją się wcześniej, wskaźnik także o tym poinformuje. W ciągu następnych
7 goleń specjalna dioda (8) będzie przypominać o konieczności wymiany.
Po tym czasie czyli po 7 goleniach, specjalny panel zostanie automatycznie
zresetowany a czas do następnej wymiany będzie naliczany na nowo.
Po wymianie kasety z folią golącą i blokiem ostrzy (1), należy wcisnąć przycisk
on/off (4) i przytrzymać przynajmniej przez 5 sekund, aby zresetować licznik.
W czasie wykonywania tej czynności wskaźnik będzie pulsować i wyłączy
się, kiedy reset golarki zostanie zakończony. Ręczne zresetowanie może być
przeprowadzone o każdej porze i w każdym momencie.
Konserwacja baterii
Aby zachować optymalną pojemność akumulatora golarki, należy go
formatować raz na 6 miesięcy, czyli rozładować w czasie golenia a następnie
naładować do pełna.
Ochrona środowiska
Produkt posiada akumulator. Kiedy przestanie on już być już użyteczny,
prosimy o zwrócenie go do jednego z punktów serwisowych Braun,
gdzie stara bateria, nie szkodząc środowisku, zostanie zutylizowana.
Zużyta bateria może zostać oddana także do specjalnego punktu
recyklingu. Traktowanie zużytych baterii jak zwykłych śmieci stwarza
zagrożenie dla naszego środowiska.
Baza czyszcząco-ładująca (Clean&Renew) (C)
Baza czyszcząco-ładująca została stworzona dla łatwiejszego czyszczenia,
ładowania i przechowywania golarki. System powinien być używany każdego
dnia.
W czasie automatycznego procesu czyszczącego, golarka jest włączana
i wyłączana w interwałach. W ten sposób zapewnia się najlepsze efekty
czyszczenia. Ponieważ specjalny płyn czyszczący zawiera niewielką ilość
oleju, proces czyszczenia zapewnia także odpowiednie nasmarowanie
poszczególnych części głowicy golarki.
25

Opis
1 Przycisk START
2 Stacja łącząca
3 Dźwignia do wymiany cartridga
4 Wskaźnik zużycia cartridga
5 Cartridge czyszczący
Instalacja cartridga
• Należy unieść dźwignię (3) aby otworzyć obudowę.
• Ustawić cartridge na płaskiej, poziomej powierzchni np. na stole. Należy
ostrożnie usunąć pokrywkę z cartridga a następnie delikatnie wsunąć
cartridge do samego końca bazy. Opór jest oznaką, ze cartridge został
wsunięty do końca.
• Powoli zamknąć obudowę.
Wymiana cartridga
Po otwarciu obudowy należy poczekać kilka sekund, zanim cartridge zostanie
usunięty. Przed wyjęciem cartridga z bazy, należy zdjąć pokrywkę nowego.
Pokrywka ta posłuży jako zamknięcie dla starego, zużytego wkładu, w którym
znajduje się zanieczyszczony płyn. Cartridge mogą być traktowane jak normalne, domowe odpadki. Nie ma konieczności przeprowadzania specjalnej
utylizacji.
Użytkowanie bazy czyszcząco-ładującej
• Należy podłączyć bazę czyszcząco-ładującą do źródła prądu za pomocą
dołączonego przewodu zasilającego. Po każdym goleniu należy golarkę
wyłączyć i umieścić do góry nogami, frontem do przodu w bazie systemu
Clean&Renew.
• Następnie należy wcisnąć przycisk START (1) bazy czyszcząco-ładującej
Clean&Renew, aby zablokować golarkę i połączyć ją z bazą. W tym
momencie rozpoczyna się pełny proces czyszczenia. Specjalny wskaźnik
golarki będzie pulsować żółtym światłem w czasie całego procesu
czyszczenia.
• Radzimy nie przerywać procesu, gdyż wtedy golarka będzie mokra i nie
będzie gotowa do użycia. Jeżeli jednak ingerencja jest nieunikniona, należy
ponownie nacisnąć przycisk START (1). To zatrzymuje proces.
• Proces czyszczenia jest zakończony wtedy, kiedy pulsująca żołtym kolorem
dioda golarki przestaje świecić. Aby odłączyć golarkę od bazy, należy
przycisnąć przycisk start/reset.
26
• Cartridge czyszczący wystarcza na ok. 30 cykli czyszczenia. Kiedy
wskaźnik zużycia catridga pokazuje znak « », oznacza to, że wkład
starczy jeszcze na ok. 5 cykli. Należy jednak pamiętać o wymianie
cartridga. Przeciętnie jeden cartridge wystarcza na 4 tygodnie codziennego
używania.
• Wkład czyszczący zawiera alkohol lub izopropanol (w zależności od kraju –
informacja ta jest podana na wkładzie), który po otwarciu w sposób
naturalny powoli odparowuje do atmosfery. Aby zapewnić optymalną
dezynfekcję, każdy wkład, który nie jest używany codziennie, należy
wymienić po około 8 tygodniach.
• Płyn czyszczący zawiera również substancje smarujące, które po
czyszczeniu mogą pozostawić ślady na ramce zewnętrznej folii. Ślady te
można jednak łatwo usunąć, delikatnie ścierając je kawałkiem materiału lub
chusteczką higieniczną.
• Obudowę bazy czyszcząco-ładującej powinno się czyścić co jakiś czas
wilgotną szmatką, szczególnie w miejscu, w którym styka się z golarką
Akcesoria:
Dostępne w centrach serwisowych Braun
• Kasety z foliami golącymi oraz nożykami: 32S/32B
• Cartridge bazy czyszcząco-ładującej: CCR
Powy˝sze informacje mogà ulec zmianie bez uprzedniego powiadomienia.
Specyfikacje elektryczne zosta∏y wydrukowane na specjalnym kablu
sieciowym.
Ten symbol oznacza, że zużytego sprzętu nie można wyrzucać łącznie
z odpadami socjalnymi. Zużyty produkt należy zostawić w jednym
z punktów zbiórki zużytego sprzętu elektrycznego i elektronicznego.
Odpowiednie przetworzenie zużytego sprzętu zapobiega potencjalnym
negatywnym wpływom na środowisko lub zdrowie ludzi, wynikającym
z obecności składników niebezpiecznych w sprzęcie.
Warunki gwarancji
1. Procter & Gamble International Operations SA z siedzibą w Route de
St-Georges 47, 1213 Petit Lancy 1 w Szwajcarii, gwarantuje sprawne
działanie sprzętu w okresie 24 miesięcy od daty jego wydania
Kupującemu. Ujawnione w tym okresie wady będą usuwane bezpłatnie,
przez autoryzowany punkt serwisowy, w terminie 14 dni od daty
27

dostarczenia sprzętu do autoryzowanego punktu serwisowego.
2. Kupujący może wysłać sprzęt do naprawy do najbliżej znajdującego się
autoryzowanego punktu serwisowego lub skorzystać z pośrednictwa
sklepu, w którym dokonał zakupu sprzętu. W takim wypadku termin
naprawy ulegnie wydłużeniu o czas niezbędny do dostarczenia i odbioru
sprzętu.
3. Kupujący powinien dostarczyć sprzęt w opakowaniu należycie
zabezpieczonym przed uszkodzeniem. Uszkodzenia spowodowane
niedostatecznym zabezpieczeniem sprzętu nie podlegają naprawom
gwarancyjnym. Naprawom gwarancyjnym nie podlegają także inne
uszkodzenia powstałe w następstwie okoliczności, za które Gwarant nie
ponosi odpowiedzialności, w szczególności zawinione przez Pocztę
Polską lub firmy kurierskie.
4. Niniejsza gwarancja jest ważna jedynie z dokumentem zakupu i
obowiązuje wyłącznie na terytorium Rzeczypospolitej Polskiej.
5. Okres gwarancji przedłuża się o czas od zgłoszenia wady lub
uszkodzenia do naprawy sprzętu i zwrotnego postawienia go do
dyspozycji Kupującego.
6. Naprawa gwarancyjna nie obejmuje czynności przewidzianych w
instrukcji, do wykonania, których Kupujący zobowiązany jest we
własnym zakresie i na własny koszt.
7. Ewentualne oczyszczenie sprzętu dokonywane jest na koszt Kupującego
według cennika danego autoryzowanego punktu serwisowego i nie
będzie traktowane jako naprawa gwarancyjna, chyba, że oczyszczenie
jest niezbędne do usunięcia wady w ramach świadczeń objętych
niniejszą gwarancją i nie stanowi czynności, o których mowa w p. 6.
8. Gwarancją nie są objęte:
a) mechaniczne uszkodzenia sprzętu spowodowane w czasie jego
użytkowania lub w czasie dostarczania sprzętu do naprawy;
b) uszkodzenia i wady wynikłe na skutek:
– używania sprzętu do celów innych niż osobisty użytek;
– niewłaściwego lub niezgodnego z instrukcją użytkowania,
konserwacji, przechowywania lub instalacji;
– używania niewłaściwych materiałów eksploatacyjnych;
– napraw dokonywanych przez nieuprawnione osoby; stwierdzenie
faktu takiej naprawy lub samowolnego otwarcia plomb lub innych
zabezpieczeń sprzętu powoduje utratę gwarancji;
– przeróbek, zmian konstrukcyjnych lub używania do napraw
nieoryginalnych części zamiennych;
c) części szklane, żarówki, oświetlenia;
d) ostrza i folie do golarek oraz materiały eksploatacyjne.
28

9. Bez nazwy, modelu sprzętu i daty jego zakupu potwierdzonej pieczątką i
podpisem sprzedawcy albo paragonu lub faktury zakupu z nazwą i
modelem sprzętu, karta gwarancyjna jest nieważna.
10. Niniejsza gwarancja na sprzedany towar konsumpcyjny nie wyłącza, nie
ogranicza ani nie zawiesza uprawnień Kupującego wynikających z
niezgodności towaru z umową.
29

Český
Naše výrobky jsou vyrobeny tak, aby splňovaly nejvyšší nároky na kvalitu,
funkčnost a design. Doufáme, že budete se svým novým holicím strojkem
Braun spokojeni.
Pozorně si přečtěte tyto pokyny, které obsahují informace týkající se
bezpečnosti. Tyto pokyny uchovejte pro případné budoucí použití.
Upozornění
Tento spotřebič je vhodný pro čištění pod tekoucí
vodou z kohoutku. Před čištěním ve vodě odpojte
tento spotřebič z elektrické sítě.
Tento holicí strojek je vybaven speciálním síťovým přívodem
s integrovaným bezpeč-nostním síťovým adaptérem.
Nevyměňujte ani nerozebírejte žádnou z jeho částí, jinak by
mohlo dojít k úrazu elektrickým proudem. Používejte pouze
speciální kabely, které jsou součástí balení tohoto spotřebiče.
Přístroj nepoužívejte, je-li poškozena planžeta nebo vadný
síťový přívod.
Děti starší 8 let a osoby se sníženou fyzickou pohyblivostí,
schopností vnímání či mentálním zdravím a osoby bez
zkušeností nebo odpovídajícího povědomí mohou tento
spotřebič používat pod dohledem nebo po obdržení pokynů k
jeho bezpečnému používání a seznámení se s možnými riziky.
Spotřebič není určen jako hračka pro děti. Děti bez dozoru
a mladší 8 let nesmí provádět čištění a údržbu přístroje.
Ujistěte se, že jste umístili čisticí stanici Clean&Renew na
rovný stabilní povrch, zabráníte tím úniku čisticí kapaliny.
Po instalaci čisticí kazety stanici nenahýbejte, nijak s ní
nepohybujte ani ji nepřemísťujte.
Stanici neumísťujte do zrcadlové skříňky, ani ji neskladujte
nad topným tělesem. Nepokládejte ji na leštěné či lakované
povrchy a nevystavujte ji přímému slunci.
30
 Loading...