


Dishwasher
Lave-vaiselle
SHE3AR7*UC
en-us Operating instructions fr-ca Notice d'utilisation
2
en-us
Table of contents
(Safety Definitions. . . . . . . . . . .5
(IMPORTANT SAFETY
INSTRUCTIONS . . . . . . . . . . . .6
ƒCauses of Damage . . . . . . . . . .9
*Getting Started . . . . . . . . . . . .10
,Rinse Aid. . . . . . . . . . . . . . . . .13
-Loading the Dishwasher . . . .15
.Detergent . . . . . . . . . . . . . . . .21
/Dishwasher Cycles . . . . . . . .23
0Dishwasher Cycle Options . .24
1Operating the Dishwasher. . .25
2Care and Maintenance . . . . . .29
3Troubleshooting. . . . . . . . . . .33
4Customer Service. . . . . . . . . .38
‡Statement of Limited Product
Warranty . . . . . . . . . . . . . . . . .39
3
en-us
'HDU 9DOXHG &XVWRPHU
7KDQN \RX IRU VHOHFWLQJ D %RVFK GLVKZDVKHU <RX KDYH MRLQHG WKH PDQ\ FRQVXPHUV ZKR GHPDQG TXLHW DQG VXSHULRU SHUIRUPDQFH IURP WKHLU GLVKZDVKHUV
7KLV PDQXDO ZDV ZULWWHQ ZLWK \RXU VDIHW\ DQG FRQYHQLHQFH LQ PLQG DQG WKH LQIRUPDWLRQ FRQWDLQHG KHUHLQ LV YHU\ LPSRUWDQW :H KLJKO\ UHFRPPHQG WKDW \RX UHDG WKLV PDQXDO EHIRUH XVLQJ \RXU GLVKZDVKHU IRU WKH ILUVW WLPH
7R OHDUQ PRUH DERXW \RXU GLVKZDVKHU DQG DYDLODEOH DFFHVVRULHV DV ZHOO DV PDQ\ RWKHU WRS TXDOLW\ %RVFK DSSOLDQFHV YLVLW RXU ZHE VLWH DW
ZZZ ERVFK KRPH FRP XV 86$
RU
ZZZ ERVFK KRPH FD &DQDGD
:KLOH WKHUH GRQ·W IRUJHW WR UHJLVWHU \RXU QHZ GLVKZDVKHU E\ FOLFNLQJ RQ WKH ´6XSSRUWµ WDE RU ILOOLQJ RXW WKH SURGXFW UHJLVWUDWLRQ FDUG HQFORVHG ZLWK \RXU QHZ XQLW
,I \RX KDYH DQ\ TXHVWLRQV RU FRPPHQWV SOHDVH FRQWDFW XV E\ SKRQH DW
RU ZULWH XV DW
%6+ +RPH $SSOLDQFHV &RUSRUDWLRQ0DLQ 6WUHHW 6XLWH ,UYLQH &$
4

Safety Definitions en-us
(Safety Definitions
9 WARNING
This indicates that death or serious injuries may occur as a result of non-observance of this warning.
9 CAUTION
This indicates that minor or moderate injuries may occur as a result of non-observance of this warning.
NOTICE
This indicates that damage to the appliance or property may occur as a result of non-compliance with this advisory.
Note: This alerts you to important information and/or tips.
5

9 IMPORTANT SAFETY INSTRUCTIONS
READ AND SAVE THESE INSTRUCTIONS
This dishwasher is provided with Installation Instructions and this Use and Care Manual. Read and understand all instructions before using the dishwasher.
This dishwasher is intended for use up to a maximum altitude of 13,000 ft (4,000 meters) above sea level.
To reduce the risk of fire, electrical shock, or serious injury, observe the following:
9 WARNING
RISK OF INJURY OR DEATH! Misuse of the dishwasher can result in serious injury or death. Do not use the dishwasher in any way not covered in this manual or for any purpose other than those explained in the following pages.
9 WARNING
RISK OF INJURY!
Severe injury and/or product damage could result from the use of unauthorized service technicians or non-original replacement parts. All repairs must be performed by an authorized service technician using only original equipment factory replacement parts.
9 WARNING
RISK OF ELECTRICAL SHOCK OR FIRE!
Electrical shock or fire could result if the electrical supply for the dishwasher covered in this manual is incorrectly installed or if the dishwasher has been improperly grounded. Do not use the dishwasher covered in this manual unless you are certain the electrical supply has been correctly installed and the dishwasher has been properly grounded.
9 WARNING
HEALTH HAZARD!
Never use harsh chemicals to clean your dishwasher. Some bleach-based products can damage your dishwasher and may present health hazards!
GROUNDING INSTRUCTIONS
This appliance must be grounded to a metal, permanent wiring system or an equipment grounding conductor must be run with the circuit conductors and connected to the equipment grounding terminal or lead on the dishwasher. See the Installation Instructions included with this dishwasher for more information on electrical requirements.
6

9 IMPORTANT SAFETY INSTRUCTIONS
READ AND SAVE THESE INSTRUCTIONS
9 WARNING
RISK OF ELECTRIC SHOCK! This appliance must be grounded. In the event of a malfunction or breakdown, grounding will reduce the risk of electric shock by providing a path of least resistance for electric current. This appliance is equipped with a cord having an equipment-grounding conductor.
Improper connection of the equipment-grounding conductor can result in risk of electric shock. Check with a qualified electrician if you are in doubt whether the appliance is properly grounded.
Safe Operation
Use this dishwasher only for its intended function, which is the washing of household dishware and kitchenware rated as dishwasher safe.
Use only detergents or rinsing agents recommended for use in a dishwasher, and keep them out of the reach of children.
9 CAUTION
When loading items to be washed:
■Locate sharp items so they are not likely to damage the door seal.
■Load knives and other sharp utensils with their HANDLES UP to reduce the risk of cut-type injuries.
■Do not wash plastic items unless they are marked “dishwasher safe” or the equivalent. For plastic items not so marked, check the manufacturer’s recommendations.
■Do not operate your dishwasher unless all enclosure panels are in place.
■Do not tamper with or override controls and interlocks.
Do not abuse, sit or stand on the door or dish racks of the dishwasher.
9 WARNING
RISK OF INJURY!
To avoid risk of injury, always use caution when opening the door during or following a wash cycle as hot water or steam may escape. Do not fully open the door until water noises have stopped and steam has subsided.
NSF/ANSI 184 Certified residential dishwashers are not intended for licensed food establishments.
Child Safety
To reduce risk of injury, do not allow children to play in or on the dishwasher.
When children become old enough to operate the appliance, it is the responsibility of the parents/legal guardians to ensure the children are instructed in safe practices by qualified persons.
7

9 IMPORTANT SAFETY INSTRUCTIONS
READ AND SAVE THESE INSTRUCTIONS
Proper Care and Maintenance
9 WARNING
RISK OF EXPLOSION! Under certain conditions,
hydrogen gas may be produced in a hot water system that has not been used for two weeks or more. Hydrogen gas is explosive. Before using a dishwasher that is connected to a hot water system that has been unused for two weeks or longer, turn on all hot water faucets and let the water flow from each for several minutes. This will release any accumulated hydrogen gas. As the gas is explosive, do not smoke or use an open flame during this time.
Remove the dishwasher door to the washing compartment when removing an old dishwasher for service or discarding.
To avoid floor damage and possible mold growth, do not allow wet areas to remain around or under the dishwasher.
To avoid dishwasher damage, do not allow water to remain in your dishwasher systems through extended periods of freezing temperatures. Freezing temperatures can damage the water fill valve and potentially other components of your dishwasher.
NOTICE
It is highly recommended for the end user to become familiar with the procedure to shut off the incoming water supply and the procedure to shut off the incoming power supply. See the Installation Instructions or contact your installer for more information.
State of California Proposition 65
Warning:
9 WARNING
This product can expose you to chemicals including vinyl chloride, which is known to the State of California to cause cancer and birth defects or other reproductive harm. For more information go to
www.P65Warnings.ca.gov.
8

Causes of Damage en-us
ƒCauses of Damage
NOTICES
■Never use steam cleaning products to clean your dishwasher. The manufacturer will not be liable for the possible damages or consequences.
■Bleach-based wipes can cause stainless-steel doors and tubs to rust.
■Using harsh chemicals
(e.g. bleach), abrasive cleaners, scouring pads (metal or plastic), or abrasive cloths/paper towels can damage your dishwasher’s exterior door panel, fascia panel and buttons.
■To avoid dishwasher damage, do not load the dishwasher with paper products, plastic bags, packing materials or anything other than normal, dishwasher safe dishware and kitchenware.
9

en-us Getting Started
*Getting Started
Appliance overview
|
|
|
|
|
6WDUW
5HVXPH
5HVHW VHF

 5HVHW VHF
|
|
|
|
|
|
|
10
Getting Started en-us
The dotted lines show optional features which may or may not be included with your dishwasher.
The numbers stated below refer to the overview images on the previous page of this manual.
Operating panel
( On/Off button 0 Sanitize option 8 Selection button < @ Sanitized indicator H Digital display
P Rinse aid refill indicator X Selection button >
` Delay start button h START button )" Wash cycles**
**number of wash cycles and options varies on specific model number
Dishwasher interior components
1" Upper rack
1* |
Upper spray arm |
12 |
Detergent tab tray |
1: Vent hole |
|
1B |
Lower spray arm |
1J |
Filters |
1R |
Silverware basket |
1Z |
Lower rack |
1b |
Rinse aid dispenser |
1j |
Detergent dispenser |
9" Lock for detergent dispenser 9* Rating plate
Display indicators
‹:‹‹ Cycle time remaining
Add Rinse Lights up when rinse aid is low
Aid
Sanitize Lights up when sanitation requirements are met
11
en-us Getting Started
Menu overview
The dishwasher has been preset with certain settings for your convenience. You can change these factory settings.
Use the function keys #, + and 3 to change the settings.
Setting |
Factory setting |
Description |
§Rinse aid |
§:‹† |
Amount of rinse aid affects drying. When using |
§:‹‹- §:‹‡ |
|
Multitabs, select setting 0. |
|
|
|
šIntensive drying |
š:‹‹/ Off |
Improved drying for glasses and plasticware. |
š:‹‹- š:‹‚ |
|
|
˜Auto power off |
˜:‹‹ |
Dishwasher switches off automatically after wash |
˜:‹‹- ˜:‹ƒ |
|
cycle is complete. |
|
|
|
|
|
|
12

,Rinse Aid
To achieve proper drying, always use a liquid rinse aid, even if your detergent contains a rinse aid or drying additive.
Note: The dishwasher indicates low rinse aid by turning on the Rinse Aid indicator. If this indicator lights up, you need to refill the rinse aid dispenser 1b by following the directions below.
Adding rinse aid
NOTICE
To avoid oversudsing or clogging, do not overfill the rinse aid
dispenser 1b. Wipe up any spills with a damp cloth.
1.Open the rinse aid dispenser 1b by pressing on the latch of the lid and pull it open.
|
|
Rinse Aid en-us
2.Add liquid rinse aid to the dispenser 1b until it is full. Do not overfill. Avoid spilling into air vent hole.
PD[ |
BJS |
WFOU |
3.Close the lid. Lid must be fully closed until it clicks in order to seal.
4.Wipe up any excess rinse aid that
may have puddled when the dispenser reservoir is full.
The indicator light will go out a few moments after the dishwasher door is shut.
Tip: For easier pouring, remove lid from the rinse aid bottle.
NOTICE
Do not fill the rinse aid dispenser 1b with detergent. Doing so will damage the dishwasher.
13

en-us Rinse Aid
Setting the amount of rinse aid used
The amount of rinse aid dispensed can be set from §:‹‹ to §:‹‡. The factory setting is §:‹†.
You should only change the setting if streaks remain on the dishes (lower the amount), or if dishes are not getting dry enough (increase the amount).
Setting |
Amount |
§:‹‹ |
dispenser is OFF |
§:‹‚ |
lowest setting |
§:‹ƒ |
low setting |
§:‹„ |
medium setting |
§:‹… |
medium/high setting |
§:‹† |
high setting |
§:‹‡ |
highest setting |
|
|
1.Press the On/Off button (.
2.Hold down the selection button > X and press the Start button h until the display H indicates •:‹x (x can be any number). Release both buttons.
3.Press the selection button > Xuntil the display H shows
§:‹†.
4.Press the selection button < 8to select the desired setting.
5.Press the Start button h to save the setting.
Turning off rinse aid indicator
Proceed as described in the section “Setting the amount of rinse aid used” and set value to §:‹‹. The rinse aid indicator is now turned off.
NOTICE
Using no rinse aid or setting the dispenser to §:‹‹ may result in longer cycle times consuming more energy and water. The higher temperatures and longer cycle times can damage fine china or glassware.
14

-Loading the Dishwasher
Dishware material
Note: Before using your dishwasher for the first time, check the information in this section. Some items are not dishwasher-safe and should be hand washed; others require special loading.
Recommended |
|
Aluminum |
Colored anodized alumi- |
|
num may fade over time. |
|
Minerals in your water may |
|
cause the aluminum to |
|
darken or spot. This can |
|
usually be removed with a |
|
soap-filled steel wool pad. |
China, Crystal, |
Some hand-painted utensils |
Stoneware |
may discolor, fade or spot. |
|
Hand wash these utensils. |
|
Position fragile glassware so |
|
that it will not topple over or |
|
come in contact with other |
|
utensils during the wash |
|
cycle. |
Glass |
Make sure to use dish- |
|
washer-safe glass. Milk |
|
glass may discolor or |
|
become yellow. |
Non-stick Coat- |
Apply a light coating of veg- |
ings |
etable oil to non-stick sur- |
|
faces after drying. |
Plastics |
Make sure the plasticware is |
|
dishwasher-safe. |
Stainless Steel, |
Load these so they do not |
Sterling Silver |
come in contact with other |
and Silver |
metals, stainless steel dish- |
Plates |
washer tub walls or the |
|
inner door. |
|
|
Loading the Dishwasher en-us
Not Recommended
Acrylic |
Crazing or small cracks |
|
throughout the acrylic, may |
|
occur. |
Adhesive- |
Adhesives that join materi- |
Joined Pieces |
als such as plastic, wood, |
|
bone, steel, copper, tin, etc. |
|
may loosen. |
Bone-Handled |
Handles may separate. |
Utensils |
|
Iron |
Iron will rust. Hand wash |
|
and dry immediately. |
Non-Dishware |
Your dishwasher is intended |
Items |
for use in cleaning ONLY |
|
standard household dish- |
|
ware and kitchenware. |
Pewter, Brass, |
These items will tarnish. |
Bronze |
Hand wash and dry immedi- |
|
ately. |
Tin |
Tin will stain. Hand wash |
|
and dry immediately. |
Wood |
Wooden bowls, wooden |
|
utensils and utensils with |
|
wooden handles can crack, |
|
warp and lose their finish. |
|
|
15

en-us Loading the Dishwasher
Loading the racks
For best dishwashing results, observe the following when loading the dishwasher:
■Do not pre-wash items with loosely attached food soil.
■Remove all food particles, bones, toothpicks and excessive grease.
■Pre-treat items having burned-on, baked-on or starchy soils.
■Load dishes in the dishwasher racks so the insides of bowls, pots and pans are facing the spray arms.
■Avoid nesting and contact points between dishes.
■Separate items of dissimilar metals. Use care to not block movement of the spray arms.
■Only wash household dishware and kitchenware rated as dishwasher-safe.
Refer to the Dishware Materials section for more information about dishware suitability.
NOTICE
To avoid dishwasher damage, do not load the dishwasher with paper products, plastic bags, packing materials or anything other than normal, dishwasher safe dishware and kitchenware.
Loading the upper rack
Ensure items do not protrude through the bottom of the racks and block the spray arms.
Note: When pushing the upper
rack 1" into the dishwasher, push it until it stops against the back of the tub so the upper rack spray
arm 1* connects to the water supply at the back of the tub. Do not push racks in using the door.
Loading the lower rack
Place large items in the lower
rack 1Z. Load pots, pans and bowls upside down. Do not block the vent hole 1: with tall baking sheets. Load these items on the right side of the dishwasher.
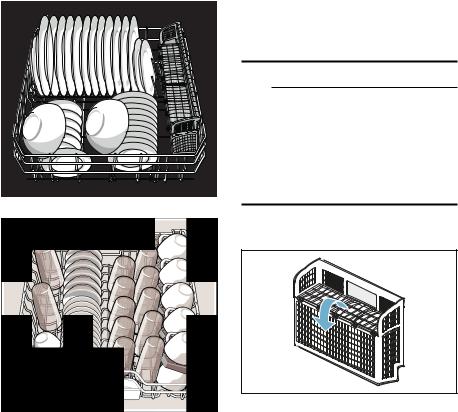
Suggested loading pattern
10 place setting Lower rack 1Z
Upper rack 1"
Note: Folding the cup shelves down will allow the cups to sit at an increased angle and reduce water pooling on cup bottoms.
16
Additional loading pattern
12 place setting Lower rack 1Z
Upper rack 1"
Note: Folding the cup shelves down will allow the cups to sit at an increased angle and reduce water pooling on cup bottoms.
Loading the Dishwasher en-us
Loading the silverware basket
Place knives and sharp utensils with their handles up and forks and spoons with their handles down. If large or oddly-shaped items are loaded in the silverware basket, be sure they do not nest together.
9 WARNING
RISK OF INJURY!
The sharp points and edges of knives and other sharp utensils can cause serious injury. Load knives and other sharp utensils with edges down. Do not allow children to handle or play near knives and sharp utensils.
Long silverware basket
Note: The silverware basket lid may also be folded downward in order to leave the basket open.
17

en-us Loading the Dishwasher
Suggested loading patterns


1Salad fork
2Teaspoon
3Dinner fork
4Knife
5Tablespoon
6Serving spoon
7Serving fork
|
|
|
|
|
|
|
|
|
|
|
|
|
|
|
|
|
|
|
|
|
|
|
|
|
|
|
|
|
|
|
|
|
|
|
|
|
|
||||
|
|
|
|
|
|
|
|
|
|
|
|
||
|
|
|
|
|
|
|
|
|
|
|
|
|
|
|
|
|
|
|
|
|
|
|
|||||
|
|
|
|
|
|
|
|
|
|
|
|
|
|
|
|
|
|
|
|
|
|
|
|
|
|
||
|
|
|
|
|
|
|
|
|
|
|
|
|
|
|
|
|
|
|
|
|
|
|
|
|
|
||
|
|
|
|
|
|
|
|
|
|
|
|
|
|
|
|
|
|
|
|
|
|
|
|
|
|
|
|
|
|
|
|
|
|
|
|
|
|||||
|
|
|
|
|
|
|
|
|
|
|
|
|
|
|
|
|
|
|
|
|
|
|
|
|
|
|
|
Unloading the dishwasher
9 CAUTION
Dishes can be very hot immediately after cycle ends. Open the door slightly and allow dishes to cool for a few minutes before unloading.
Note: Dishes are more likely to chip when unloading before cooling.
When unloading the dishwasher, to prevent water from dripping onto dry dishes, unload the lower
rack 1Z first. Next, unload the silverware basket 1R followed by the upper rack 1", and then the third rack (if equipped).
18

Adjustable Upper Rack
If desired, the height of the upper rack can be adjusted to accommodate larger items in the lower rack.
1.Pull the empty upper rack 1" out, tilt it up, and pull it all the way out until it is free of the roller guides.
2.Re-insert the rack with the other set of roller guides as shown below.
Loading the Dishwasher en-us
Rack accessories
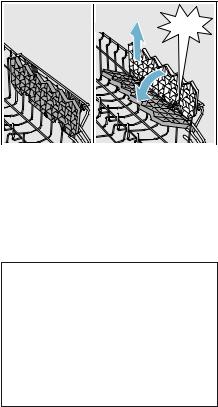
Flip tines*
The upper and lower rack are fitted with flip tines that can be folded down depending on what you may need to load in the rack.
Lower rack flip tines: To fold down, pull flip tine gently forward and release it from the notch. Push the flip tine downward. To fold up, push flip tines into an upright position until the holder engages in the notch.
|
|
Upper rack flip tines: To fold down, push flip tines downward with gentle pressure. To fold up, push flip tines into an upright position until the holder engages in the notch.
* optional feature which may or may not be included with your dishwasher.
19
en-us Loading the Dishwasher
Cup shelves*
The cup shelves and the space underneath them can be used for small cups or for larger serving utensils.
&/,&. |
* optional feature which may or may not be included with your dishwasher.
Utility rack *
Long knives and other utensils can be placed on the utility rack.
* optional feature which may or may not be included with your dishwasher.
20
.Detergent
Use only detergent specifically designed for dishwashers. For best results, use fresh powdered dishwashing detergent or detergent tabs.
NOTICE
To avoid damage to dishwasher or dishware:
■Do not use hand dishwashing products in your dishwasher.
■Do not use too much detergent if your water is soft. Using too much detergent with soft water may cause etching in glassware and fine china.
■To best protect glassware, use a wash cycle with low temperatures or a specific glass-care cycle (depending on the model) and use a detergent that includes etch protection.
Detergent en-us
This dishwasher uses less water than most, therefore, less detergent is required. With soft water,
1 tablespoon (15 ml) of detergent will clean most loads. The detergent dispenser cup has lines that measure detergent to 1 tablespoon (15 ml) and 1.75 tablespoons (25 ml).
3 tablespoons (45 ml) of detergent will completely fill the detergent dispenser.
Note: If you do not know the hardness of your water supply, use 15 ml of detergent. Increase the amount if necessary to the least amount required to get your kitchenware clean.
Use the measuring lines in the detergent dispenser cup as a guide to measure the amount of detergent recommended in the following table.
Wash Cycle |
Hard Water/ |
Medium Water/ |
Soft Water/ |
|
Heavy Soil |
Medium Soil |
Little Soil |
Heavy |
3 tbsp |
3 tbsp |
1.75 - 3 tbsp |
|
(45 ml) |
(45 ml) |
(25 - 45 ml) |
Auto |
1.75 - 3 tbsp |
1.75 tbsp |
1 - 1.75 tbsp |
|
(25 - 45 ml) |
(25 ml) |
(15 - 25 ml) |
Normal |
1.75 - 3 tbsp |
1.75 tbsp |
1 - 1.75 tbsp |
|
(25 -45 ml) |
(25 ml) |
(15 - 25 ml) |
Delicate |
1.75 tbsp |
1 - 1.75 tbsp |
1 tbsp |
|
(25 ml) |
(15 - 25 ml) |
(15 ml) |
Express |
1.75 tbsp |
1 - 1.75 tbsp |
1 tbsp |
|
(25 ml) |
(15 - 25 ml) |
(15 ml) |
Half Load |
1.75 tbsp |
1 - 1.75 tbsp |
1 tbsp |
|
(25 ml) |
(15 - 25 ml) |
(15 ml) |
|
|
|
|
21

en-us Detergent
Adding detergent
1.If the detergent dispenser 1j is still closed, push the button 9" to open it.
Note: Make sure the detergent dispenser is dry and clear of detergent residue.
2.When using detergent tabs, lay them such that they do not come in contact with the cover, insert a detergent tab flat, not on its side.
Note: Do not place detergent tabs or utensils in the detergent tab tray 12. Place tabs or other detergent forms directly in the detergent dispenser 1j.
Pour detergent into the dry detergent dispenser 1j only. Add detergent. Do not overfill the detergent dispenser.
PD[ |
WEVS PO |
WEVS PO |
WEVS PO |
Dosage: see manufacturer’s instructions on the packaging.
3.Close the lid by placing the finger on the lid as shown. Slide the lid closed until it clicks.
&/,&. |
The detergent dispenser will open automatically at the ideal time for the set cycle. The powder or liquid detergent is distributed in the appliance and is dissolved, detergent tabs will fall into the detergent tab tray 12 where it dissolves during the cycle.
Tip: If the dishware is only lightly soiled, slightly less than the indicated amount of detergent is usually adequate.
22

Dishwasher Cycles en-us
/Dishwasher Cycles
Wash cycle |
Recommended use |
Possible wash cycle option |
Heavy |
Best for cleaning items with baked-on |
all |
|
food or grease. These dishes would nor- |
|
|
mally require soaking or hand scouring. |
|
Auto |
Smartest cycle, with most flexible soil |
all |
|
sensing, which is ideal for mixed dishware |
|
|
and food soils. |
|
Normal |
Recommended for daily, regular or typical |
all |
(see note at bot- |
use to completely wash a full load of nor- |
|
tom of table) |
mally soiled dishes. |
|
Delicate |
Best for delicate dishes and glasses. This |
Delay |
|
cycle lowers temperature and cycle |
|
|
length to protect dishes and decrease |
|
|
energy usage. |
|
Express |
Cleans lightly soiled dishes and reduces |
Delay |
|
overall wash time. Use this cycle to clean |
|
|
glasses and dessert dishware that may |
|
|
need to be reused at the same event. |
|
Half Load |
Use this cycle if you have only a few items |
all |
|
to wash (e.g. glasses, cups, plates). Saves |
|
|
water, energy and time. It is recom- |
|
|
mended to put a little less detergent in the |
|
|
detergent dispenser than for a full load. |
|
|
|
|
Note: The Energy Guide label was based on the Normal soil sensing cycle as follows: The unit was tested without any rinse aid (liquid) in the rinse aid dispenser 1b. A single dose of detergent was inserted into the detergent dispenser 1j, with no detergent being used in the prewash. The unit was not subjected to truncated testing per the definitions in the test procedure. We recommend that dish loads such as the one in the energy certification test have the rack position set in the highest position.
23

en-us Dishwasher Cycle Options
0Dishwasher Cycle
Options
* Depending on the features of your dishwasher you can select various wash cycle options 0.
Delay
Allows you to delay the start time of your dishwasher up to 24 hours.
Sanitize
Increases the temperatures and retains them for an extra long time to obtain a defined disinfecting performance. Continuous use of this function increases the hygiene status. This additional option is ideal for cleaning items such as chopping boards and baby bottles.
The sanitize LED will light when sanitation requirements are met. Using the Sanitize option may also improve drying. There is a slight increase in energy consumption.
Wash Cycle Information
To save energy, this dishwasher has EcoSense where the sensors in the dishwasher automatically adjust the cycle length, temperature and water changes based on the amount of food soil and the incoming water temperature. The “Smart Control” makes decisions that can cause the cycle time and water usage to adjust intermittently. Wash cycle times are
based on 120°F (49° C) water supply. If your household water supply is different than 120°F (49° C), your dishwasher’s cycle times may be impacted.
|
Heavy |
Auto |
Normal |
Delicate |
Express |
Half Load |
Cycle time |
110 -130 |
115 -130 |
130 -135 |
80 - 85 |
30 |
95-115 |
min. |
|
|
|
|
|
|
Water usage |
5.7-7.3/ |
3.8-6.5/ |
3.0-5.7/ |
3 - 4.4 |
3.5/ |
2.9 - 4.6 |
gal/L |
21.5-27.7 |
14.4-24.5 |
11.3-21.5 |
11.2- 16.5 |
10.3 |
11.1- 17.4 |
Wash temp. |
151-160/ |
126-151/ |
122-131/ |
113-122/ |
113/ |
126-151 |
°F/°C |
66-71 |
52-66 |
50-55 |
45-50 |
45 |
52-66 |
|
|
|
|
|
|
|
Rinse temp. |
162/ |
154-162/ |
153-158/ |
144/ |
131/ |
162- |
°F/°C |
72 |
68-72 |
67-70 |
62 |
55 |
72 |
Sanitize |
|
|
|
|
|
|
|
|
|
|
|
|
|
Cycle time |
120-140 |
135-150 |
150-155 |
N/A |
N/A |
115 -135 |
min. |
|
|
|
|
|
|
Water usage |
5.7-7.3/ |
3.8-6.5/ |
3.0-5.7/ |
N/A |
N/A |
2.9 - 4.6 |
gal/L |
21.5-27.7 |
14.4-24.5 |
11.3-21.5 |
|
|
11.1- 17.4 |
Rinse temp. |
162/ |
162/ |
162/ |
N/A |
N/A |
162/ |
°F/°C |
72 |
72 |
72 |
|
|
72 |
|
|
|
|
|
|
|
Note: Only sanitizing cycles have been designed to meet the requirements of Section 6 of the NSF/ANSI Standard for Residential Equipment for soil removal and sanitization efficacy. There is no intention, either directly or indirectly, to imply that all cycles have passed sanitization performance tests.
24
1Operating the Dishwasher
9 WARNING
RISK OF INJURY!
To avoid risk of injury, always use caution when opening the door during or following a wash cycle as hot water or steam may escape. Do not fully open the door until water noises have stopped and steam has subsided.
Protection against unintentional operation
Your dishwasher is equipped with a function that helps to prevent unintentional operation (e.g. by children).
After setting the dishwasher, the dishwasher door has to be closed within 4 seconds, otherwise the operation will be paused. There will be a signal on the control panel advising you to press the Start button again and close the door.
This function will be activated when:
■pressing Start to begin a wash cycle
■setting Delay time and pressing Start
■opening the door while Delay time is active
■opening the door during a wash cycle.
Note: This function cannot be deactivated.
Operating the Dishwasher en-us
AquaSensor
The AquaSensor is an optical measuring device which measures the cleanliness of the rinse water.
The AquaSensor is used according to the wash cycle. If the AquaSensor is active, “clean” rinse water can be transferred to the next rinse and water consumption can be reduced by 0.8–1-5 gal (3–6 liters). If the rinse water is not yet clear, the water is drained and is replaced with fresh water. In the automatic wash cycles the temperature and running time can also be adjusted to the degree of soiling.
Switching the appliance on
1.Turn the water supply on fully.
2.Press the On/Off button (. The AUTO wash cycle has been preset as a default whenever the appliance starts. This wash cycle remains selected if no other wash cycle )" is selected.
Select any desired option.
3.Press Start button h.
Wash cycle sequence starts.
Note: Your dishwasher is protected against unintentional operation. If the appliance door remains open for more than 4 seconds after pressing the Start button, the operation will be paused. Close the appliance door and press the Start button h again.
Time display
When a wash cycle is selected the remaining wash cycle time is shown on the display H.
The wash cycle time is determined during the wash cycle by the water temperature, the amount of dishes, as well as the degree of soiling and may vary (depending on the selected wash cycle).
25
en-us Operating the Dishwasher
Delay start
You can delay the start of the cycle in one hour increments up to 24 hours.
œ:‹‚ 1 hour delay œ:ƒ… 24 hours delay
To set Delay start:
1.Press On/Off button (. Select a cycle.
2.Press Delay button ` until the displayed time corresponds with your requirements.
3.Press Start button h to activate Delay start.
To cancel Delay start:
1.Press Delay button `until œ:‹‹ is indicated on the digital
display H.
2.Press Start button h to save setting.
Note: Your dishwasher is protected against unintentional operation. If the appliance door remains open for more than 4 seconds after pressing the Start button, the operation will be paused. Close the appliance door and press the Start button h again.
Wash cycle end
The wash cycle has ended when the display H reads ‹:‹‹.
Auto power off
This setting determines the length of time the control panel stays illuminated after the cycle is complete. To save energy the recommended setting is ˜:‹‚.
This setting can be adjusted from
˜:‹‹ to ˜:‹ƒ.
˜:‹‹ dishwasher does not turn off automatically
˜:‹‚ dishwasher turns off automatically after 1 minute
˜:‹ƒ dishwasher turns off automatically after 120 minutes (2 hours)
To change the setting:
1.Press the On/Off button (.
2.Hold down the selection button > X and press the Start button h until the display H indicates š:‹x (x can be any number).
3.Release both buttons.
4.Press the selection button > Xuntil the display Hindicates ˜:‹x.
5.Press the selection button < 8 until the display corresponds with your requirements.
6.Press the Start button h.
26

Switching off the appliance
Short time after the end of the wash cycle:
1.Press On/Off button (.
2.Remove the utensils when they have cooled down.
9 WARNING
RISK OF INJURY!
To avoid risk of injury, always use caution when opening the door during or following a wash cycle as hot water or steam may escape. Do not fully open the door until water noises have stopped and steam has subsided.
Operating the Dishwasher en-us
Terminating the wash cycle (Reset)
1.Press and hold Start button h for approximately 3 seconds until the display reads ‹:‹‚.
2.Wait about 1 minute while the dishwasher drains.
3.Press On/Off button (.
You may now power the dishwasher back on and begin a new cycle if desired.
Changing the wash cycle
When the Start button ( has been pressed, the wash cycle cannot be changed. The only way a wash cycle can be changed is by terminating the wash cycle (Reset).
Interrupting the wash cycle
9 CAUTION
Expansion (overpressure) may cause the appliance door to open and/or water to escape! If the door was opened on an appliance which has a hot water connection or is heated, always leave the door ajar for several minutes and then close.
1.Press On/Off button (.
The LED’s go out. The wash cycle is saved.
2.To continue the wash cycle, close the door and press On/Off button ( again.
Note: Your dishwasher is protected against unintentional operation. If the appliance door remains open for more than 4 seconds after pressing the Start button, the operation will be paused. Close the appliance door and press the Start button h again.
Child Lock (panel lock)
The child lock will lock the panel while the dishwasher is in operation to prevent that a wash cycle is interrupted unintenionally (e.g. by children).
To set the panel lock:
1.Start the desired wash cycle.
2.Hold down the button with the / symbol over it for approximately 3 seconds until the display reads
’–.
The panel lock is active.
’– will be indicated now if any button is pressed and the program will not be reset.
To deactivate the panel lock hold down the button with the /over it for approximately 3 seconds until the display no longer reads ’–.
The panel lock is deactivated automatically when the wash cycle is completed. In case of a power outage the panel lock will remain active. The panel lock has to be activated with each new wash cycle.
27
 Loading...