


Dishwasher
415 203 (8811)
en Instructions for use
9000


en |
Index |
|
|
|
Safety instructions . . . . . . . . . . . . . |
4 |
Additional functions * . . . . . . . . . . . |
15 |
|
Getting to know your appliance . . |
6 |
Maintenance and care . . . . . . . . . . |
16 |
|
Adding rinse aid . . . . . . . . . . . . . . . |
7 |
Fault finding . . . . . . . . . . . . . . . . . . |
18 |
|
Not suitable for the dishwasher . . |
8 |
Customer Service . . . . . . . . . . . . . |
21 |
|
Detergents . . . . . . . . . . . . . . . . . . . |
11 |
Information . . . . . . . . . . . . . . . . . . . |
21 |
|
Programme overview . . . . . . . . . . |
13 |
Installation . . . . . . . . . . . . . . . . . . . . |
22 |
|
Washing dishes . . . . . . . . . . . . . . . |
14 |
Waste disposal . . . . . . . . . . . . . . . . |
23 |
|

en
Safety instructions
Delivery
Immediately check the packaging and dishwasher for any damage which may have been caused in transit. Do not use a damaged appliance, but consult your supplier.
Please dispose of packaging material properly.
Installation
Install and connect the appliance according to the installation and assembly instructions.
The dishwasher must NOT be connected to the power supply during installation.
Ensure that the protective conductor system of the domestic electricity supply has been installed correctly. Electrical connection conditions must correspond with the specifications on the rating plate of the dishwasher.
If the dishwasher is to be installed
in a high-sided unit, ensure that the unit is attached properly and also at the rear.
Built-under and built-in appliances should always be installed under a continuous work surface which is attached to the adjacent cupboards, in order to ensure that the appliance is entirely stable.
After the appliance has been installed, the mains plug should still be easily accessible.
Not on all models:
The plastic housing on the water input contains an electrically operated valve. The connecting wires are inside the inlet hose. Do not cut through this hose and do not immerse the plastic housing in water.
Warning
For safety reasons, if the appliance is not fitted in a recess, thereby making a side wall accessible, the door hinge area should be covered at the side.
(Risk of injury)
Covers are available as optional accessories from customer services or specialist stores.
en
Caution modification
This appliance is not intended for use by young children or infirm persons unless they have been adequately supervised by a responible person to ensure that they can use the appliance safely.
Young children should be supervised to ensure that they do not play with the appliance.
4

In daily use
Warning
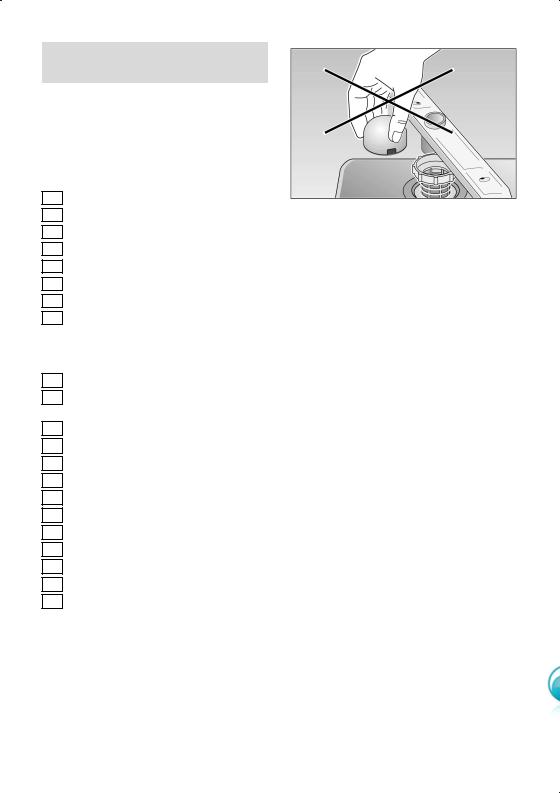
Knives and other sharp-pointed utensils must be placed with the points down
in the cutlery basket or horizontally in the utensils basket.
 Use the dishwasher only in the household and only for its designed purpose, i.e. for washing domestic dishes.
Do not lean or sit on the open door. The appliance could tip.
Please note that free-standing appliances may tip over if the baskets are overloaded.
The water in the appliance is not drinking water.
Do not add any solvents to the washing chamber. Danger of explosion!
Open the door carefully when
the programme is still running. There is a risk of hot water spraying out of the appliance.
To prevent injuries, e.g. caused
by stumbling, open the dishwasher only briefly in order to load and unload the dishwasher.
Read and observe the safety nformation and instructions for use on the packaging for cleaning and rinsing agents.
Children in the household
If fitted, use the childproof lock. An exact description can be found in the back of the envelope.
Do not allow children to play with or operate the appliance.
Keep children away from detergents and rinse aid. These may cause chemical burns in the mouth, throat and eyes or asphyxiation.
en
Keep children away from an open dishwasher. There could still be detergent residue inside.
If the appliance is installed at eye-level, ensure when opening and closing the door that children are not caught
or crushed between the appliance door and the cupboard door situated below.
Damage
The appliance may be repaired and opened up by a technician only. First disconnect the appliance from the power supply. Pull out the mains plug (do not tug the power cord!) or switch off the fuse. Turn off the tap.
Disposal
Make redundant appliances unusable to prevent subsequent accidents. Dispose of the appliance in an environmentally friendly manner.
Warning
Children could get locked in the appliance (risk of suffocation) or get stuck in other positions.
Therefore: Remove the mains plug, cut the mains wire and set aside. Damage the door lock so that the door can no longer be closed.
Before using for the first time
The appliance was checked before it left the works. In order to remove possible water test remains, use the appliance for the first time without any dishes, using the highest temperature. Also fill salt, rinse aid and detergent in the filling compartments.
5
en
Getting to know your appliance
Diagrams of the control panel and the interior of the appliance can be found in the envelope at the front.
Individual positions are referred to in the text.
Control panel
1Main switch
2Door Opener
3Programme selector (retractable*)
4Additional options*
5ªCheck water supplyº display
6Programme sequence display
7ªEnd of programmeº display
8Rinse-aid refill indicator
*some models
Appliance interior
20Top basket
21Additional cutlery basket for the top basket *
22Top spray arm
23Additional cup rack *
24Bottom spray arm
25Float **
26Bottom basket
27Filters
28Cutlery basket
29Dispenser for rinse aid
30Detergent dispenser
31Catch
32Rating plate
*some models
**The float ensures that the appliance interior is not overfilled. Only customer service may maintain, remove and install the float.
You will need to purchase the following before using the dishwasher for the first time:
±detergent
±rinse-aid
Only use products, which are suitable for dishwashers.
6
Adding rinse aid
The rinse aid is required for stain-free utensils and clear glasses.
Use only rinse aid for domestic dishwashers.
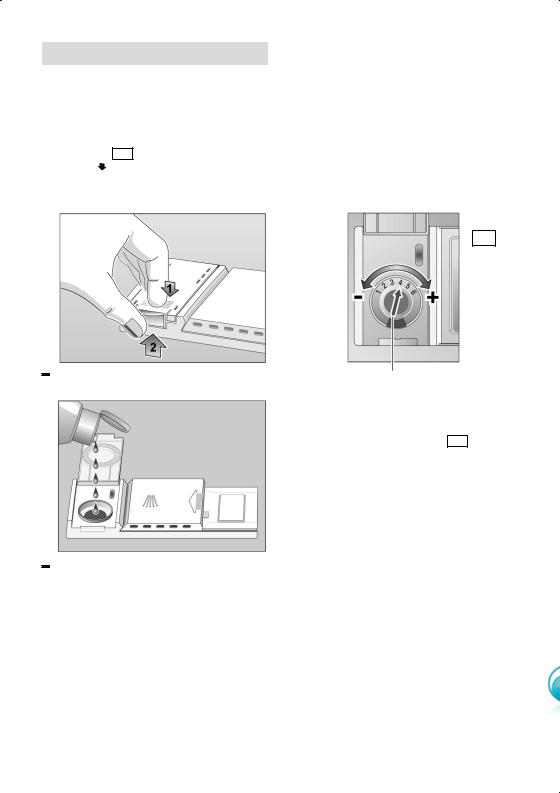
 Open the cover on the rinse-aid dispenser 29 . To do this, press the
mark (1 ) on the cover and simultaneously lift the cover on the
control plate (2 ).
).
Carefully pour in the rinse aid to just below the edge of the filler opening.
Close the lid, ensuring that you hear it snap closed.
To prevent excessive foam formation during the next rinse cycle, remove any rinse aid which has run over with a cloth.
en
Adjusting the amount of rinse-aid
The amount of rinse-aid added to the water can be varied by adjusting the stepless control. The rinse-aid control has been set to º4º in the factory.
Do not alter the setting of the rinse-aid control unless streaks (turn knob towards º±º) or water marks (turn knob towards º+º) are left on the dishes.
29
Rinse aid controller
Rinse-aid refill indicator
As soon as the rinse-aid refill indicator lights up on the control panel 8 , refill with rinse aid.
7

en
Not suitable for the dishwasher
The following should not be cleaned in the dishwasher:
Wooden cutlery and utensils ± these will leach out and become unsightly; even the utilised stickers are not suitable for the temperatures which occur.
Sensitive ornamental glasses, craft utensil and vases, special antique or irretrievable utensils. These ornaments are not dishwasher-proof.
Plastic parts sensitive to hot water.
Copper and tin utensils.
Utensils which are soiled with ash, wax, lubricating grease or ink.
Absorbent materials such as sponges and cloths.
Aluminium and silver parts have
a tendency to discolour and fade during the wash cycle. Even some types of glass (e.g. crystal glass objects) may turn cloudy after many wash cycles.
Recommendation:
In future buy utensils which are identified as dishwasher-proof.
Damage to glassware and other dishes
Possible causes:
type of glass or manufacturing process chemical composition of detergent water temperature and duration of dishwasher programme.
Suggested remedy:
Use glassware or porcelain dishes that have been marked 'dishwasher±proof' by the manufacturer.
Use a mild detergent that is described as 'kind to dishes'. If necessary, seek further information from detergent manufacturers.
Select a programme with as low a temperature and as short a duration as possible.
To prevent damage, take glass and cutlery out of the dishwasher as soon as possible after the programme has ended.
Loading the dishwasher
It is not necessary to rinse them off under running water.
When loading the dishwasher, ensure that
Dall utensils are secure and cannot fall over.
Dthe openings of all receptacles are face down.
Dcurved or indented utensils are at an incline, allowing water to drain.
Dthe two spray arms can rotate freely.
Very small items should not be washed in the dishwasher as they could easily fall out of the baskets.
Removing the dishes
To prevent water dripping from the top basket onto the dishes in the lower basket, we recommend that you empty the lower basket first and then the top basket.
Cups and glasses
Upper basket 20
* on applicable models
8

Pots and pans
Lower basket 26
Cutlery
Cutlery should be placed in the dishwasher always unsorted and with the eating surface pointing downwards. The spray jet is then better able to reach the individual parts.
To prevent injuries, place long, pointed accessories and knives on the étagère (some models) or on the knife shelf (available as an accessory).
Folding spikes *
* on applicable models
To improve stacking of pots and pans, the spikes can be folded down.
en
Shelf *
* not on all models
Lean tall glasses and those with long stems against the shelf ± not against other items to be washed.
The cup shelf can be inserted into either position 1 or 2 as shown in diagram. Note: With the cup shelf in position 2, the top basket must be locked into the upper position to prevent interference with each other.
Long items such as serving utensils, kitchen knives, etc should be place on the shelf and not in the cutlery baskets so they do not obstruct the rotation of the spray arms. When not in use the shelf can be fold back.
9
 Loading...