


1941
More of a video
person? Look for this
icon and go online
for an instructional
how-to video at
www.BISSELL.com
PETHAIR
ERASER
®
QUICK START/USER GUIDE
1941 Series
ENGINEERED FOR
HOMES WITH PETS
EN
www.BISSELL.com
2
IMPORTANT SAFETY INSTRUCTIONS
WARNING
TO REDUCE THE RISK OF FIRE,
ELECTRIC SHOCK, OR INJURY:
» This appliance can be used
by children aged from 8 years
and above and persons with
reduced physical, sensory or
mental capabilities or lack of
experience and knowledge
if they have been given
supervision or instruction
concerning use of the appliance
in a safe way and understand
the hazards involved. Children
shall not play with the
appliance. Cleaning and user
maintenance shall not be made
by children without supervision.
» Children should be supervised
to ensure that they do not play
with the appliance.
» If the supply cable is damaged
it must be replaced by the
manufacturer, its service agent,
or similarly qualified person in
order to avoid a hazard.
» Keep hair, loose clothing,
fingers, and all parts of body
away from openings and
moving parts of the appliance
and its accessories.
» Do not leave appliance when plugged in.
» Unplug from electrical socket when not in
use and before servicing.
» Do not allow to be used as a toy.
» Use only as described in this user guide.
» Use only manufacturer’s recommended
attachments.
» Do not use with damaged cable or plug.
» Do not immerse in water or liquid.
» If appliance is not working as it should,
has been dropped, damaged, left
outdoors, or dropped into water; do not
attempt to operate it and return it to
aservice center.
» Do not pull or carry by cable, use cable
as a handle, close door on cable, or pull
cable around sharp edges or corners.
» Do not run appliance over cable.
» Keep cable away from heated surfaces.
» Do not unplug by pulling on cable.
» To unplug, grasp the plug, not the cable.
» Do not handle plug or appliance with
wethands.
» Do not put any object into openings.
» Do not use with any opening blocked;
keep free of dust, lint, hair, and anything
that may reduce air flow.
» Turn off all controls before unplugging.
» Use extra care when cleaning on stairs.
» Do not use to pick up flammable or
combustible liquids, such as petroleum, or
use in areas where they may be present.
» Do not pick up toxic material (chlorine
bleach, ammonia, drain cleaner, etc.)
» Do not use appliance in an enclosed
space filled with vapours given off
by oil base paint, paint thinner, some
mothproofing substances, flammable
dust, or other explosive or toxic vapours.
» Do not pick up hard or sharp objects
such as glass, nails, screws, coins, etc.
» Use only on dry, indoor surfaces.
» Keep appliance on a level surface.
» Do not pick up anything that is burning
or smoking, such as cigarettes, matches,
or hot ashes.
» Do not use without dust bag and/or
filters in place.
» Do not use outdoors or on wet surfaces
» This appliance is provided with double
insulation. Use only identical replacement
parts.
» Do not leave machine running in the
same spot without handle fully upright.
» Unplug before connecting or
disconnecting the TurboBrush® Tool or
Pet TurboEraser® Tool.
» If your appliance is fitted with a non-
rewireable BS 1363 plug it must not be
used unless a 13 amp (ASTA approved
to BS 1362) fuse is fitted in the carrier
contained in the plug. (Spares may be
obtained from your BISSELL supplier).
Iffor any reason the plug is cut off, it
must be disposed of, as it is an electric
shock hazard should it be inserted into
amains socket.
READ ALL INSTRUCTIONS BEFORE USING YOUR UPRIGHT VACUUM.
Unplug from electrical socket when not in use and before cleaning, maintaining or servicing the appliance.
When using an electrical appliance, basic precautions should be observed, including the following:
WARNING
›› Plastic film can be dangerous. To avoid danger of suocation, keep away from children.
›› Do not plug in your vacuum cleaner UNTIL you are familiar with all instructions and
operating procedures.
›› To reduce the risk of electrical shock, turn power switch o and disconnect plug from
electrical outlet BEFORE performing maintenance or troubleshooting checks.
LED LIGHTED CREVICE TOOL WARNING
• Caution: Risk of fire and burns. Do not recharge, disassemble, heat above 60°c (140°F) or incinerate.
Keep batteries out of reach of children and in original package until ready to use. Dispose of used
batteries promptly.
• Never put batteries in mouth. If swallowed, contact your physician or local poison control.
• Replace Battery With CR1632 Only. USE OF ANOTHER BATTERY MAY PRESENT A RISK OF FIRE
OR EXPLOSION. CR1632 cells may be purchased anywhere batteries are sold.
READ OPERATOR’S MANUAL
SAVE THESE INSTRUCTIONS
FOR OPERATION ON A 220-240 VOLT A.C. 50-60 HZ POWER SUPPLY ONLY.
This model is for household use only.

3
www.BISSELL.com
Assembly
Quick Start Guide
REFER TO COMPLETE USER GUIDE FOR FULL INSTRUCTIONS, PRODUCT VIEW, AND IMPORTANT SAFETY NOTICES.
IMPORTANT REMINDER
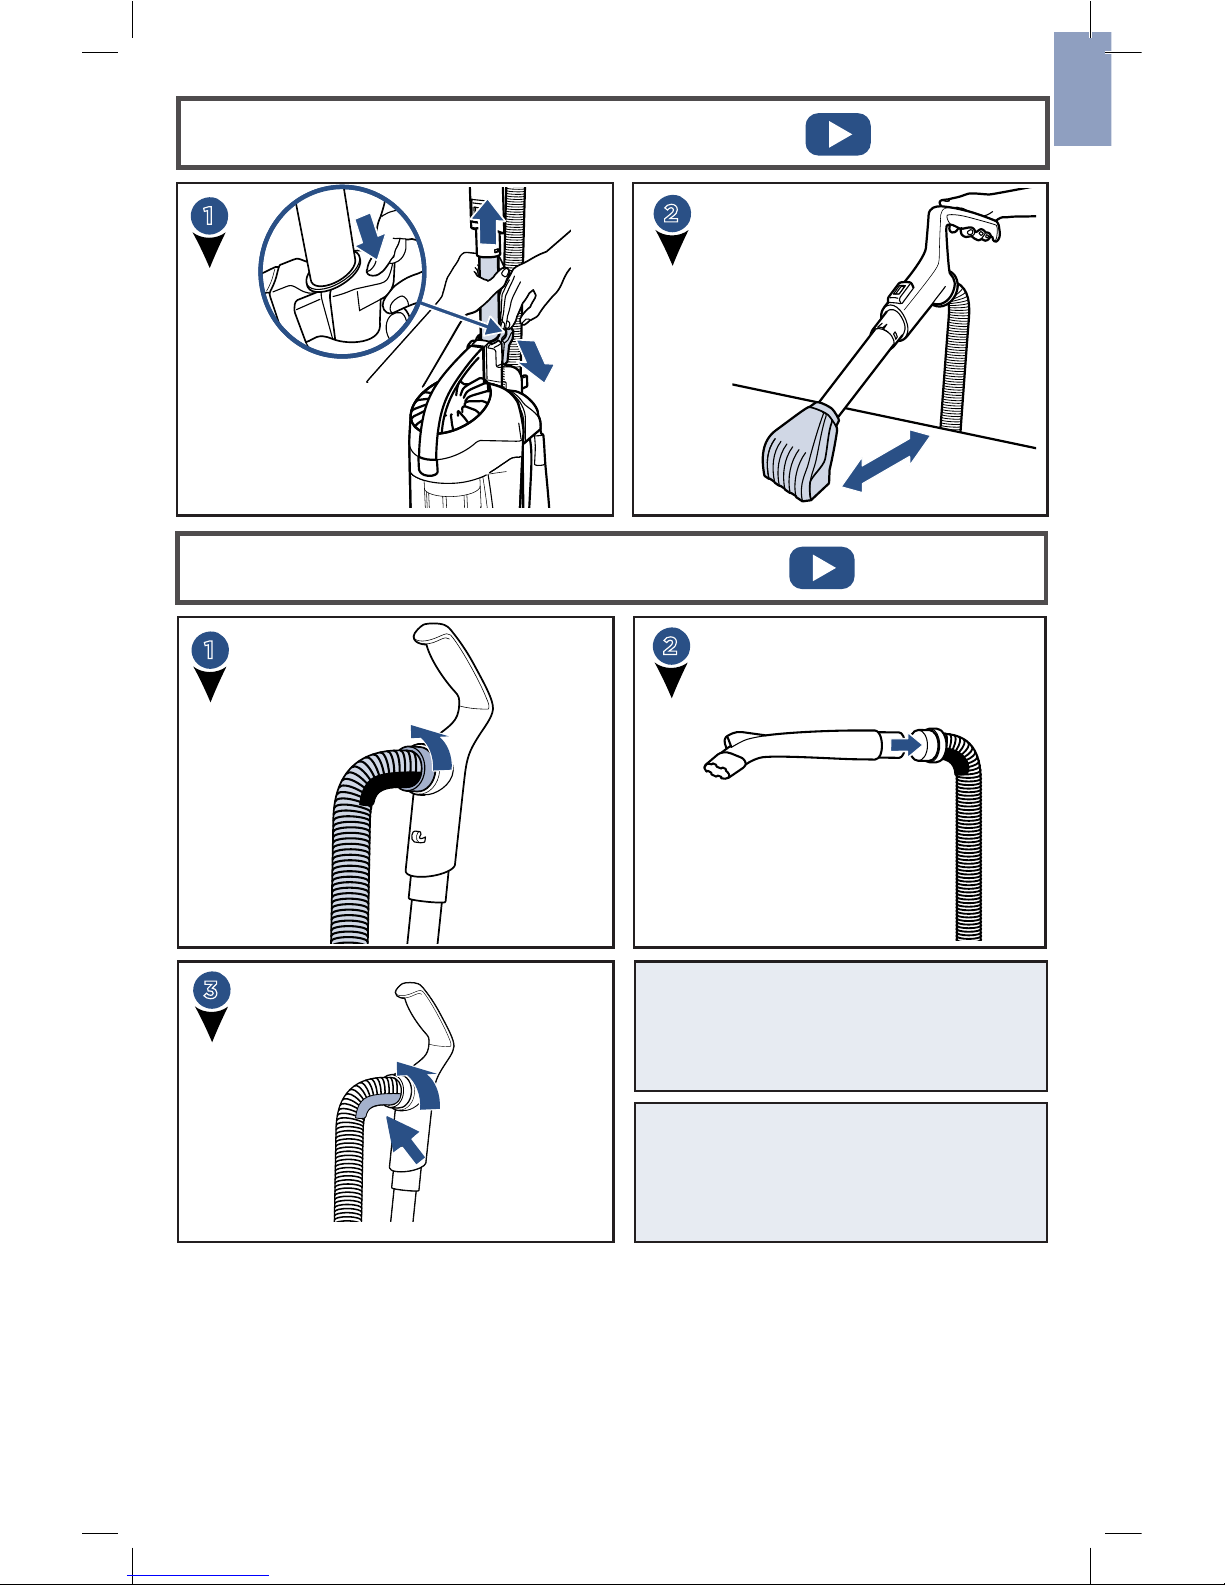
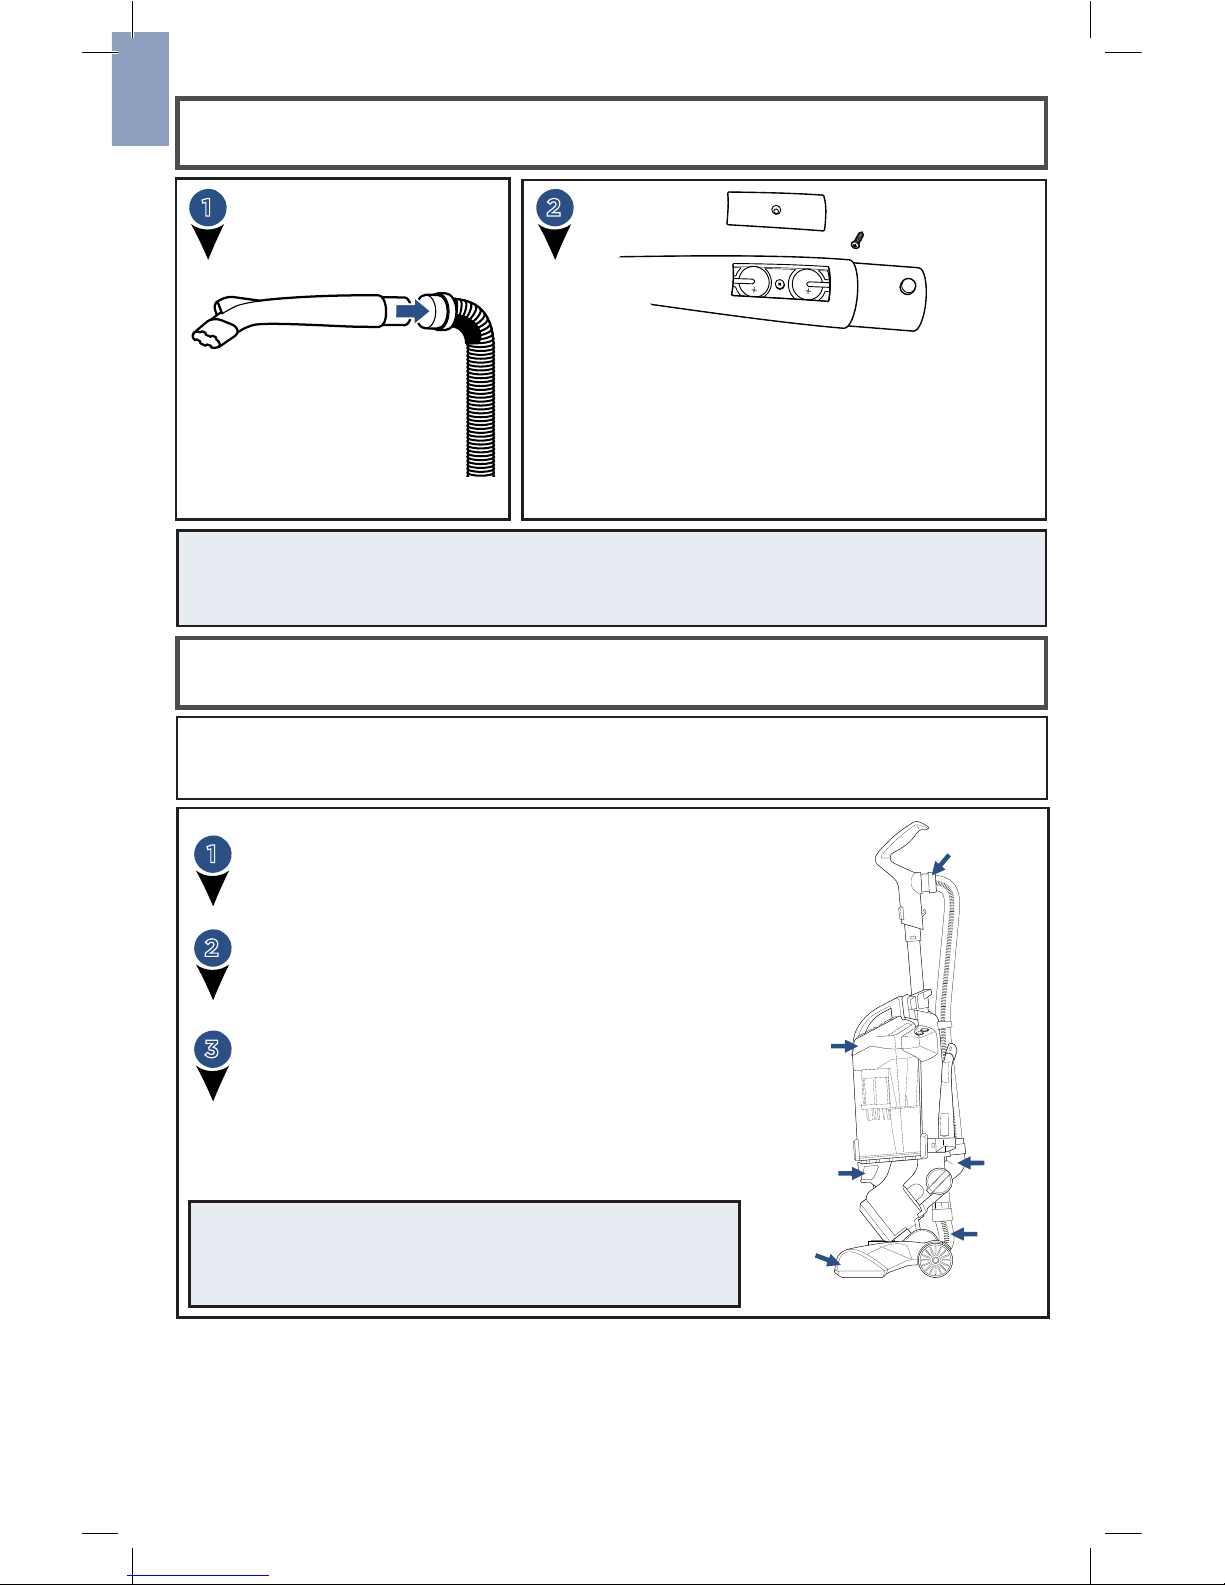
Insert end of Hose into vacuum
base by sliding the arms in and
down first. Press the bottom to
“click” in.
Push hose
into clip
“Click”
Slide End
of Wand
into top
of base. It
will “Click”
when
inserted
correctly.
2 31
4
Your vacuum came
infloor cleaning
mode, to use your
tools, be sure to turn
the Vacuum Suction
Knob to align arrow
with “hose/tool
suction.”
5
Insert Cord Wrap in firmly until
you hear “Click”. Wrap power
cord around cord wraps.
6
Store both the Flexible Crevice Tool
and the Pet TurboEraser Tool. Push
hard on the double tool caddy to
slide it on the base of the vacuum.
DOUBLE
TOOL CADDY
EN

www.BISSELL.com
4
1-1617-3233-4849-6465-80
ENDEESFRIT
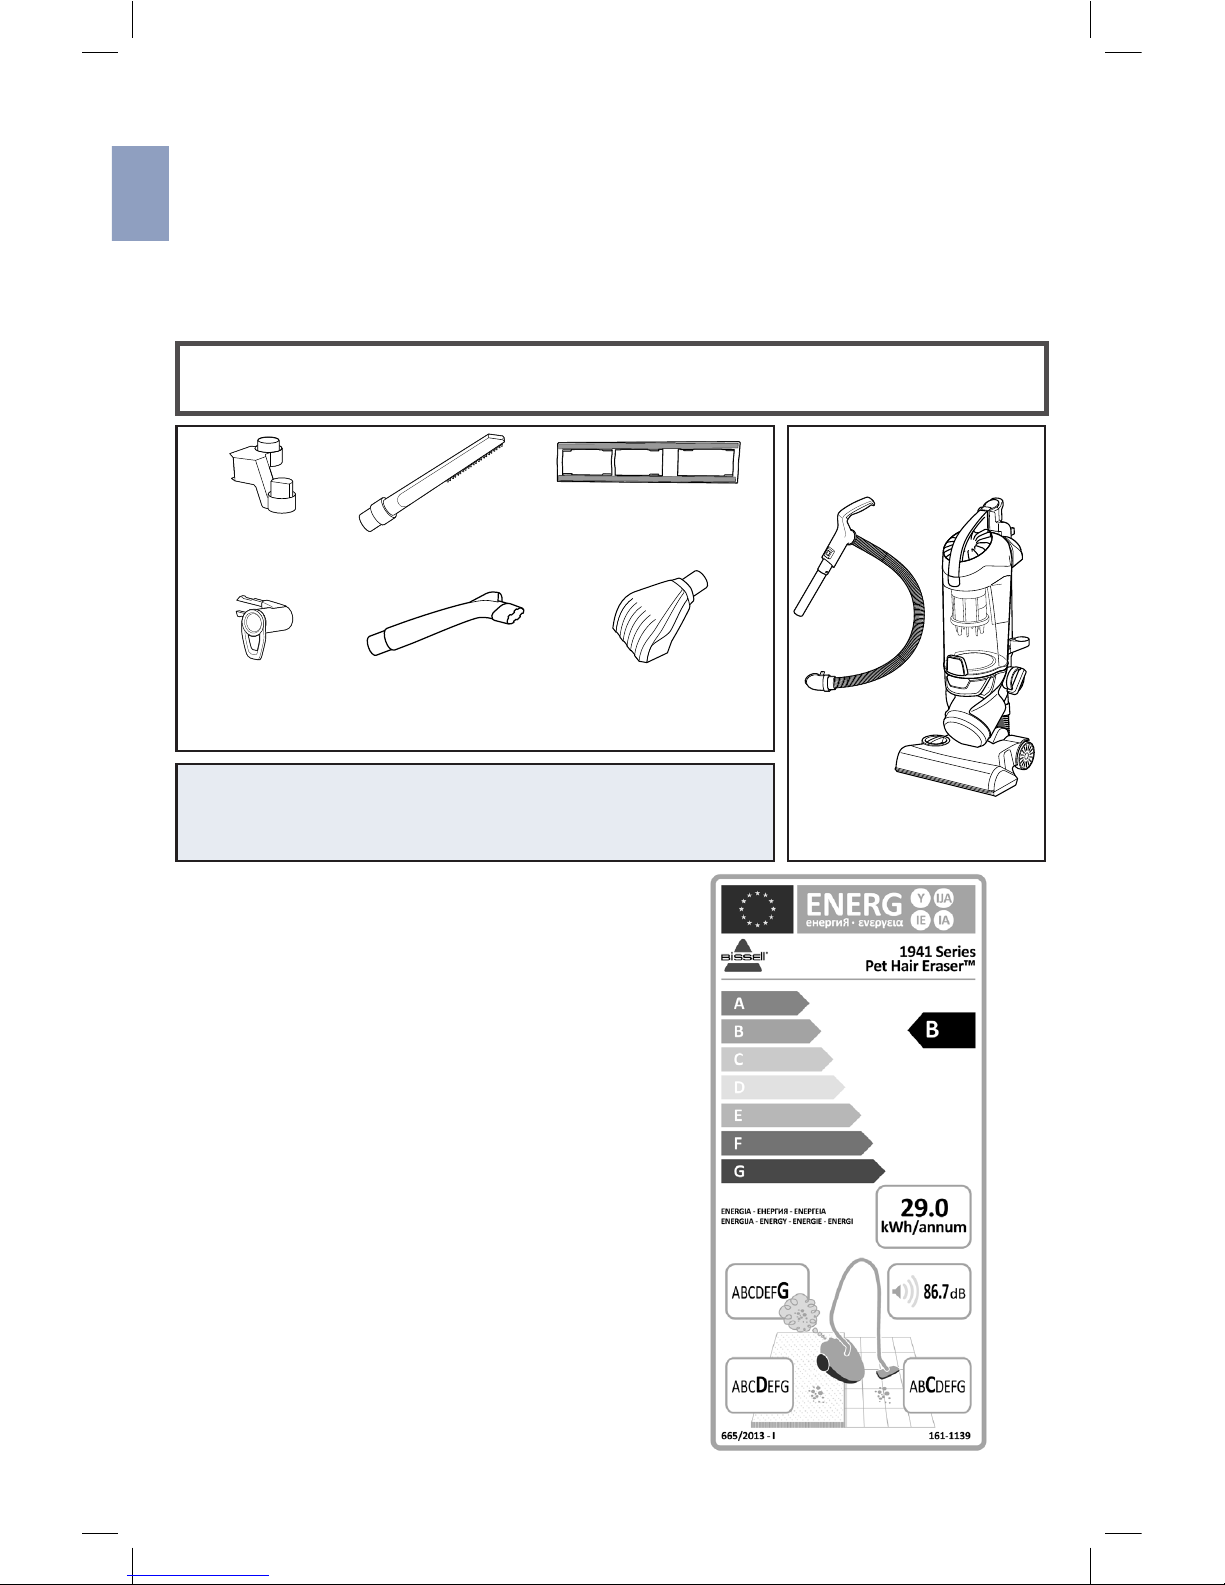
NOTE: Standard accessories may vary by model.To
identify what should be included with your purchase,
please refer to the “Carton Contents” list located on the
carton top flap.
Double Tool
Caddy
Lower Cord
Wrap
Pet TurboEraser®
Tool
LED Lighted
Crevice Tool
(select models)
What’s in the Box?
Vacuum
Base
Hose/
Wand
Thanks for buying a BISSELL vacuum!
We love to clean and we’re excited to share one of our new innovative
products with you. We want to make sure your vacuum works as well in
five years as it does today, so this guide has tips on using (pages 6-10),
maintaining (pages 11-14), and if there is a problem, troubleshooting (page 15).
Safety Instructions...........2
Quick Start / Assembly ......3
Product View................5
Operations ...............6-10
Maintenance & Care ......11-14
Troubleshooting ............15
Warranty ...................16
Service .....................16
Clip-on Hard Floor
Tool
Based on 3rd party testing of the lowest performing unit from internal testing of a 3 unit
sample in accordance with EU regulations 666/2013 and 665/2013.
Flexible
Crevice Tool

5
www.BISSELL.com
EN
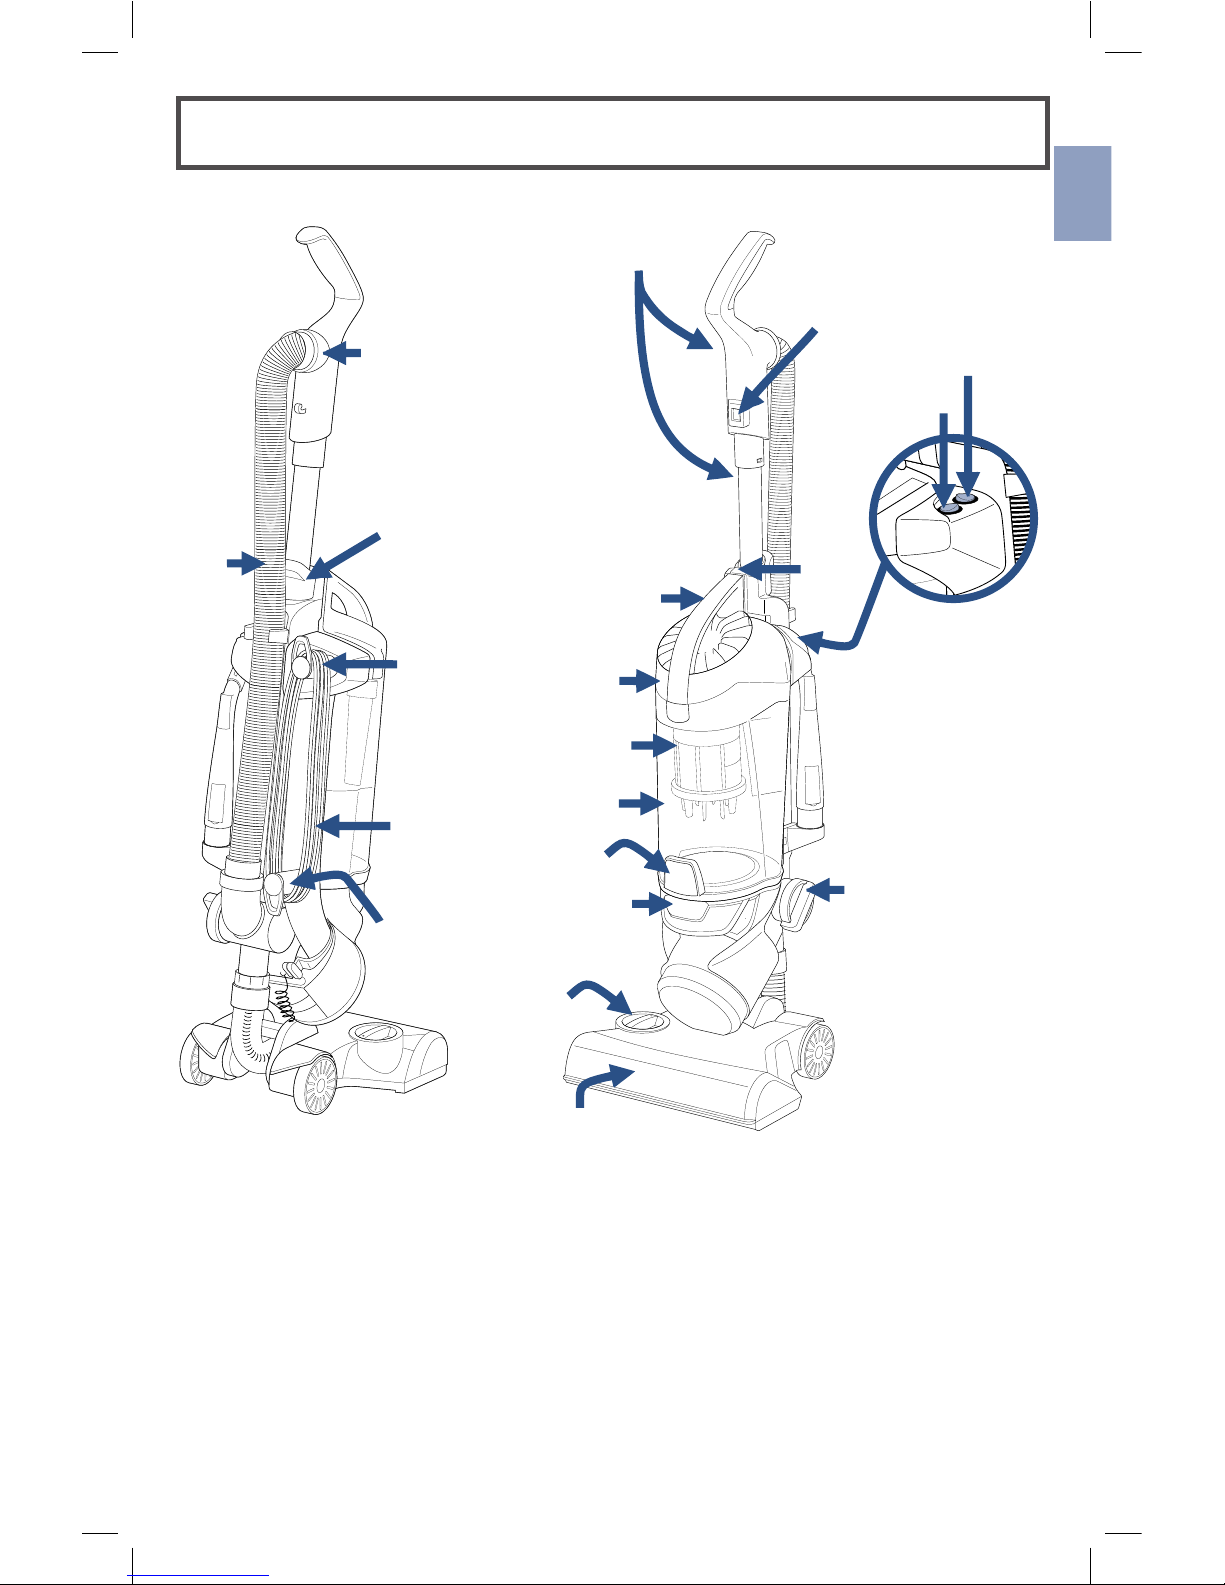
Product View
Cord
Lower
Cord
Wrap
Cord
Release
Handle & Wand
Wand Release
Latch
Handle
Release
Button
Carry
Handle
Pre-Motor
Filters
Dirt
Container
Inner Cyclone
Separator
Empty
Tank Button
Tank
Release
Button
Post-Motor
Filter
Brush Roll
Height
Adjustment
Knob
Main
Hose
Hose/Wand
& Vacuum
Suction
Knob
Hose
Connector
Brush Roll
On/O
Switch
Power
On/O
Switch

EN
www.BISSELL.com
6
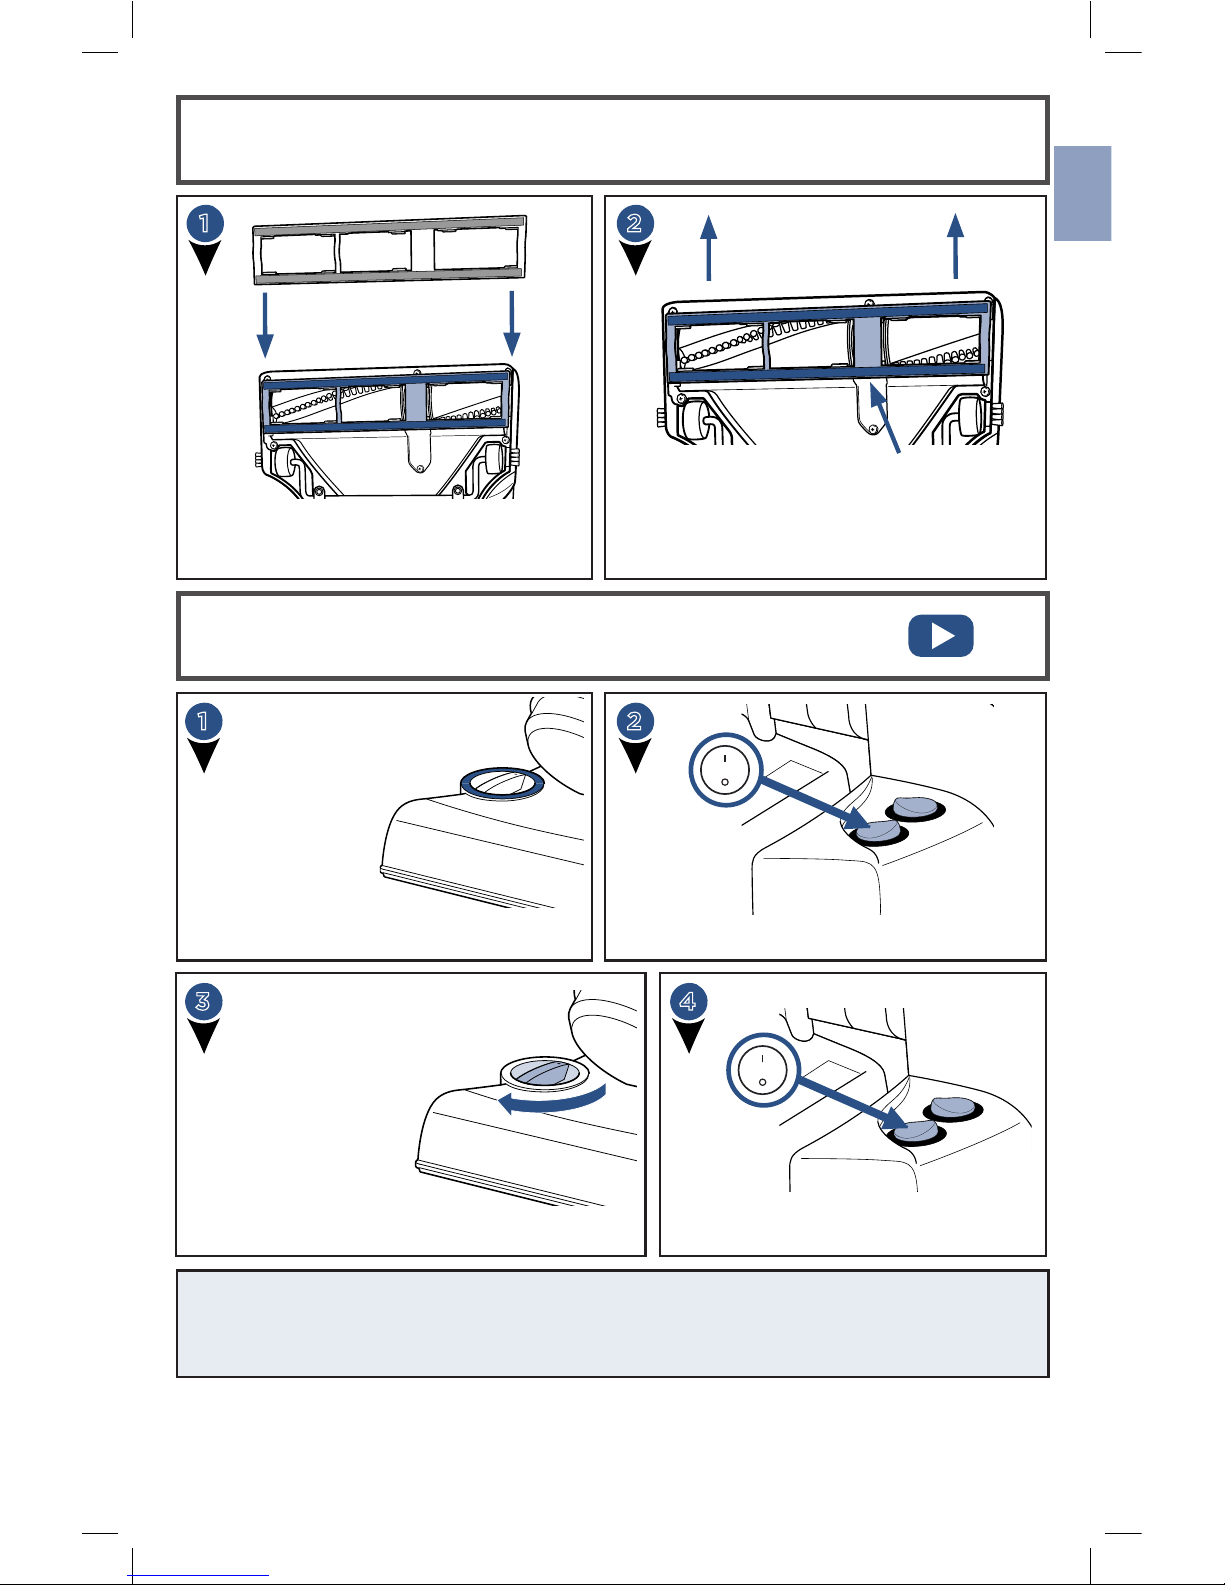
Tool Caddy Options
Getting Started
WARNING
Do not plug in your vacuum until you are familiar with all instructions and operating
procedures.
21
Step gently on base and pull back on
handle to recline.
3
Turn Height
Adjustment Knob
to desired carpet
cleaning level.
NOTE: For optimal carpet cleaning
performance, adjust to the lowest
practical setting. If your vacuum is dicult
to push, adjust to the next higher setting.
NOTE: Be sure the green suction knob on side of vacuum is turned to
“Floor Suction” before use.
NOTE: In the unlikely event that hair
wrapped around your brush roll, run vacuum
back and forth on clean carpet several times.
This will help release any wrapped hair.
Turn vacuum on by pressing Power Switch on
(I - ON and O - OFF). Press Brush roll switch to
run the PowerBrush for carpet cleaning (brush
roll is on when light on switch is illuminated).
NOTE: The brush roll will automatically shut off
when vacuum is locked in upright position,
recline to reactivate.
Store both the Flexible Crevice Tool
and the Pet TurboEraser Tool. Push
hard on the double tool caddy to
slide it on the base of the vacuum.
DOUBLE
TOOL CADDY
Brushroll
On/O
Switch
Power
On/O
Switch
EN
7
www.BISSELL.com
NOTE: Turn o the brush roll when vacuuming hard or delicate surfaces that may
be caught by the rotating brush. This could include hard wood, tiled floors, small
area rugs or frieze carpets that have long delicate fibers or threads.
Power
On/O
Switch
3 4
Brush Roll Safety Light
1 2
Put vacuum in upright position and turn it off.
It may have
tripped because
of use on premium
soft carpet. Turn
Height Adjustment
Knob to the “high
carpet” setting.
Also check if
debris is clogged
in brush roll. Clear
debris if necessary.
Turn vacuum back on and try again.
If red light
illuminates
around height
adjustment
knob, you
have tripped
your brush roll
motor safety
feature.
Power
On/O
Switch
Install the clip-on hard floor tool for
optimal cleaning on hard floors.
To remove the tool, place two fingers
in the recess on the foot and lift up on
the clip-on hard floor tool.
1 2
Attach Hard Floor Tool
Recessed Area
EN
www.BISSELL.com
8
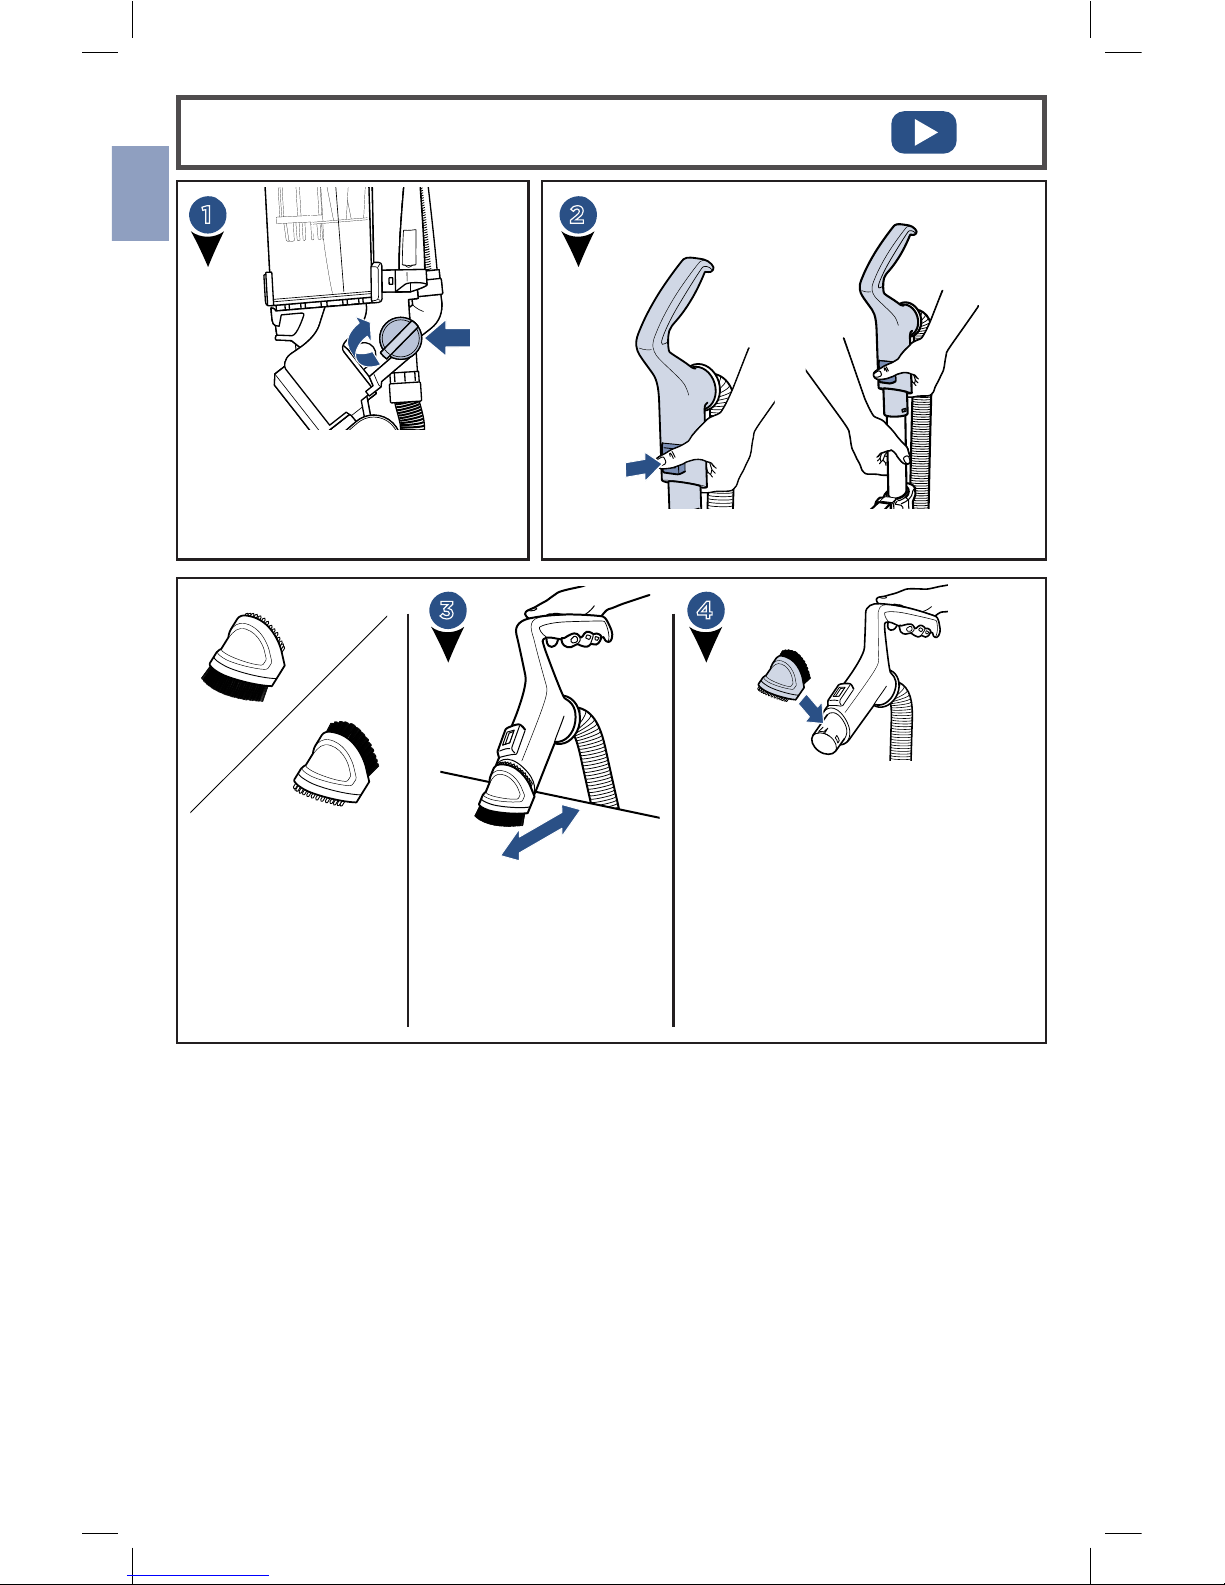
Above Floor Cleaning: Handle
To use tools and the hose/wand;
turn the green knob aligning
arrow with “hose/tool suction.”
2-in-1 Pet Brush has
white soft bristles
for those gentle uses
and rubber knobs for
embedded pet hair.
Use the collar with the
white soft bristles side for
delicate surfaces.
Un-click the collar and flip around to
use the rubber fingers for removing pet
hair from your furniture. Listen for 2
“clicks” when reattaching.
Once done using Handle, slide back on
to Wand until it “clicks.”
Be sure to turn the green knob back to
“Floor Suction” mode after using tools.
3
21
4
EN
9
www.BISSELL.com
NOTE:
The Pet TurboEraser® Tool and
LED Lighted Crevice Tool each fit any
of the above floor cleaning modes;
Handle, Wand, or Hose!
NOTE:
Be sure to always remember
to turn the green knob back to “Floor
Suction” mode after using tools.
Above Floor Cleaning: Wand
Attach
desired
tool to end
of wand.
To have more
reach, press down
on Wand Release
Latch and pull out
the handle.
2
1
Above Floor Cleaning: Hose
3
2
1
EN
www.BISSELL.com
10
LED Lighted Crevice Tool
Vacuum Motor Protection
Pull tab out of battery door
area before use to activate.
Connect to handle, wand or
hose and the LED Light will
automatically come on.
To replace LED battery, unscrew the small screw with
a Phillips head screw driver. Pull cover off to reveal
two batteries (CR1632 3V). Slide and pull out each
battery and replace with new. Be sure the “+” sign
onbattery is facing out.
Dispose of used battery promptly. Keep away from
children. Do not disassemble and do not dispose of
in fire.
Turn vacuum OFF and unplug from electrical outlet.
Possible areas that could clog.
2
2
1
1
NOTE:
When the small tab on the connection point of Crevice tool comes into contact
with the handle, wand, or hose; that triggers the LED light to come on. When using
with the Wand, be sure it does not pop through the opening at the end of the Wand.
NOTE: The thermal protector controls the main vacuum
motor only, not the brush motor. If the thermal protector
activates, the brush will continue to operate normally;
however, there will be no suction.
3
Filter
Filter
An internal thermal protector has been designed into your vacuum to protect it from
overheating. When the thermal protector activates, the main vacuum motor will stop
operating. If this happens, proceed as follows.
When the motor cools for approximately
30 minutes, the thermal protector automatically
resets and cleaning may continue. If the vacuum
will not turn on or the thermal protector continues
to activate, your vacuum may need servicing.
Call BISSELL Consumer Care.
Check for the source of overheating problem (full
dirt cup, dirty filters or, a clog) and fix by following
the maintenance instructions.
EN
11
www.BISSELL.com
WARNING
To reduce the risk of electrical shock, turn power switch o and disconnect polarized plug
from electrical outlet before performing maintenance or troubleshooting checks.
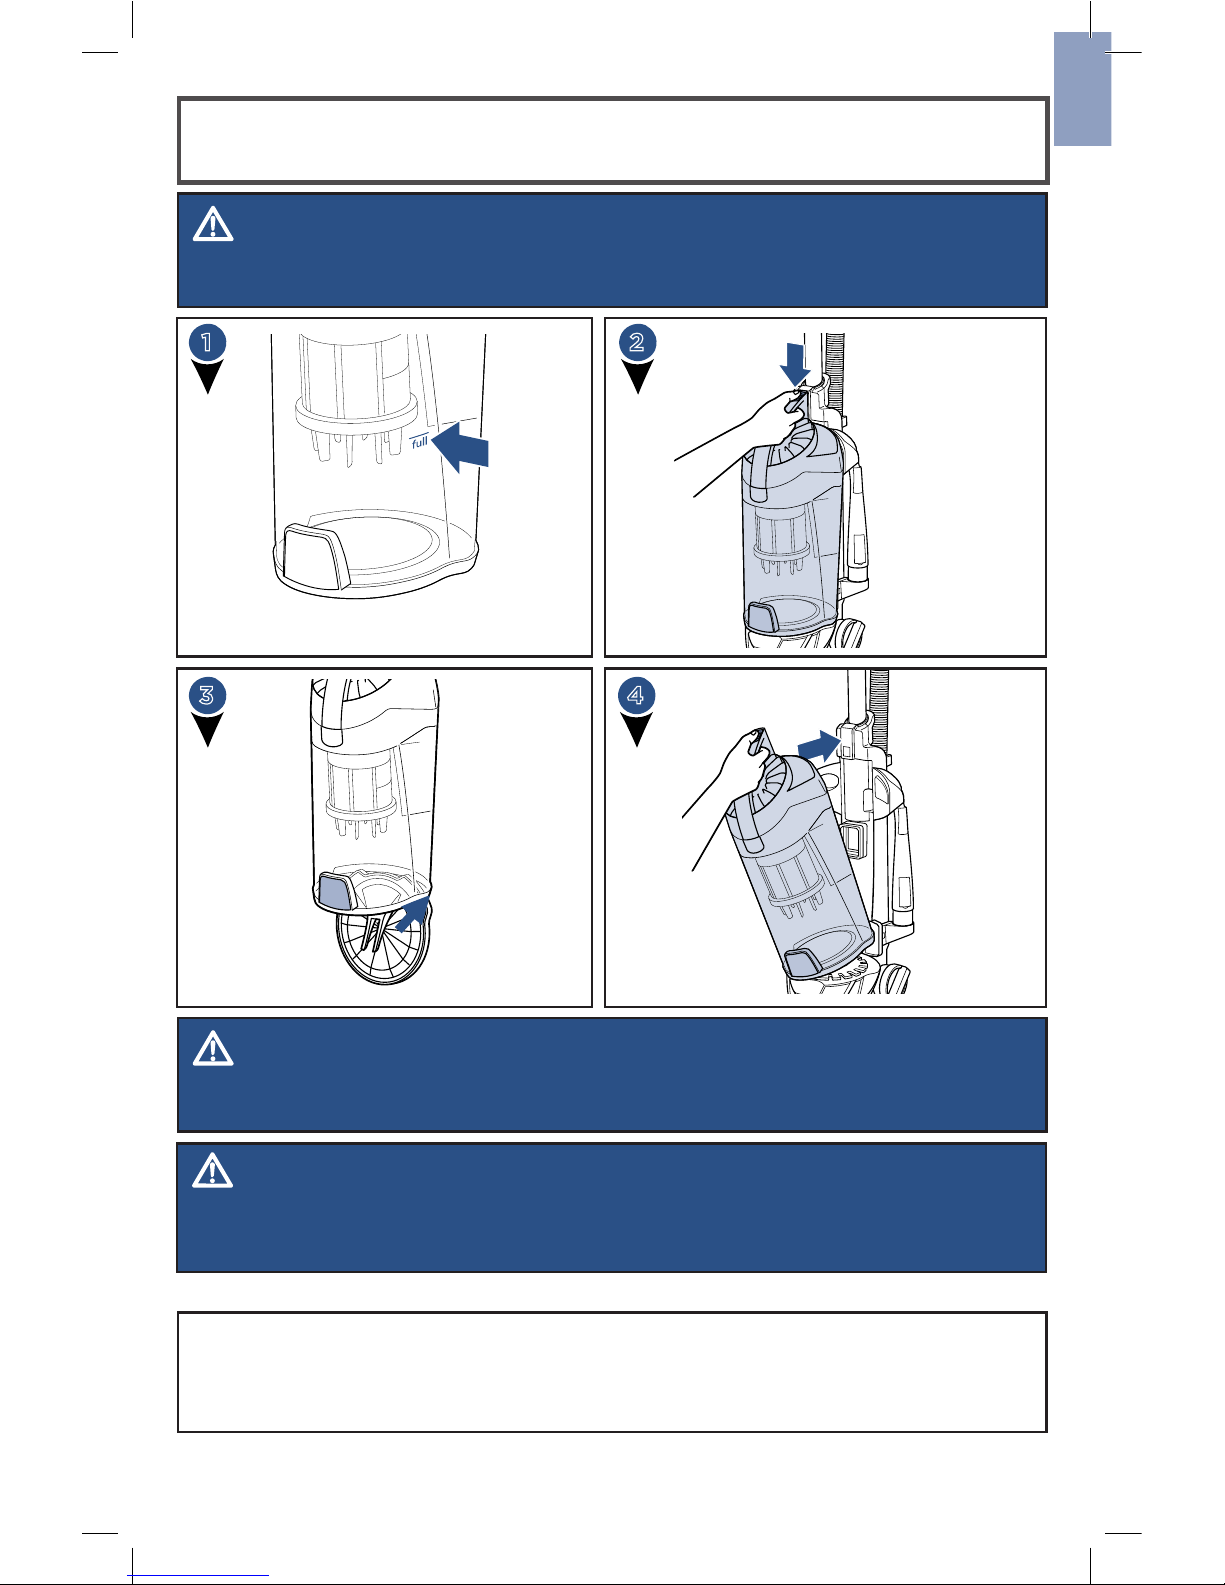
Remove/Empty Dirt Tank
1 2
WARNING
Do not operate vacuum with damp or wet filters. Allow components to dry before
reassembling the Dirt Container.
3
WARNING
Before using your vacuum, make sure that the dirt container is in locked position and
that all filters, both pre- and post-motor filters, are in place. DO NOT operate your vacuum
without these filters.
4
Parts & Supplies
For Parts and Supplies, go to www.BISSELL.com and enter
your model number in the search field.
EN
www.BISSELL.com
12
2
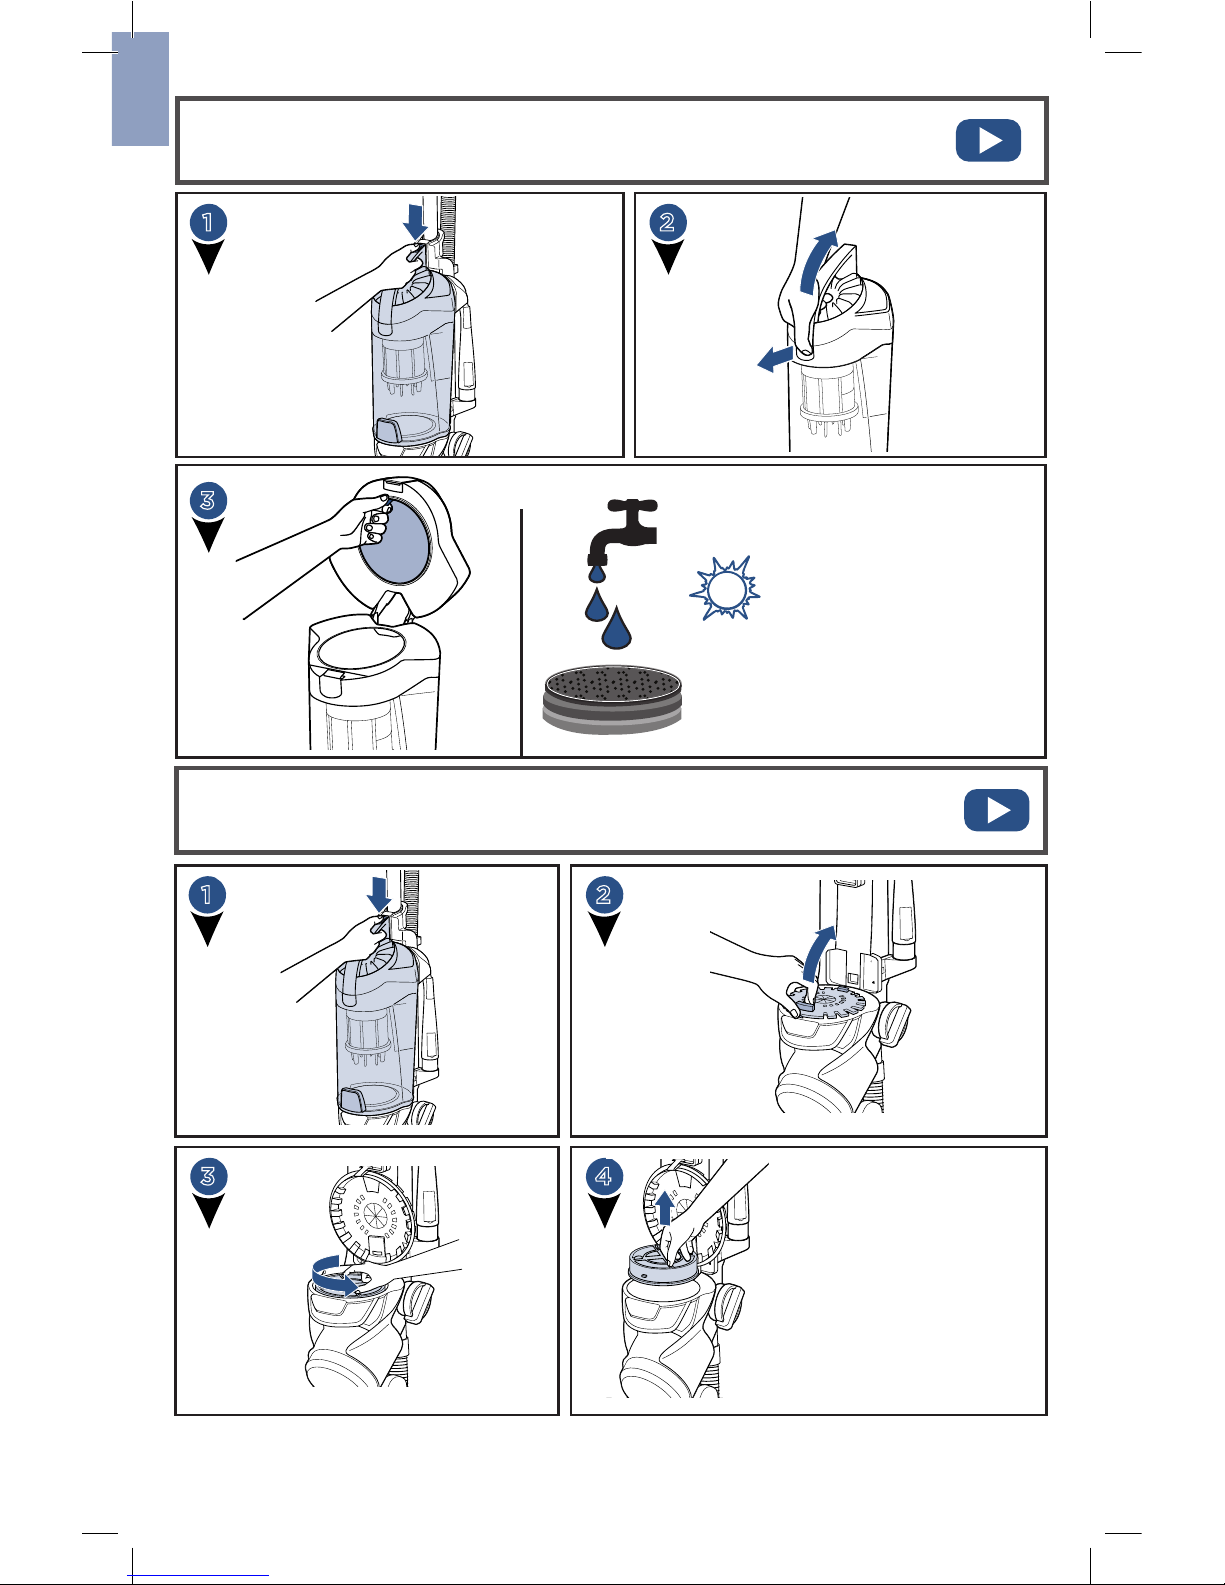
Clean & Replace Pre-Motor Filters
Both the Pre-Motor Mesh and
Foam filters are washable.
Clean with mild detergent,
rinse and squeeze all excess
water. Allow filters to dry
completely before reinserting.
Place dry pre-motor filters
back in the top of dirt
container placing the thick
foam filter last.
1
3
43
Clean & Replace Post-Motor Filter
21
Lift to remove filter.
When reassembling, place
filter back in unit and twist
clockwise to “click” into place.
The pleated filter may NOT
bewashed. If dust/debris
accumulates, gently tap the
filter on inside of a trash bin.
24
h

EN
13
www.BISSELL.com
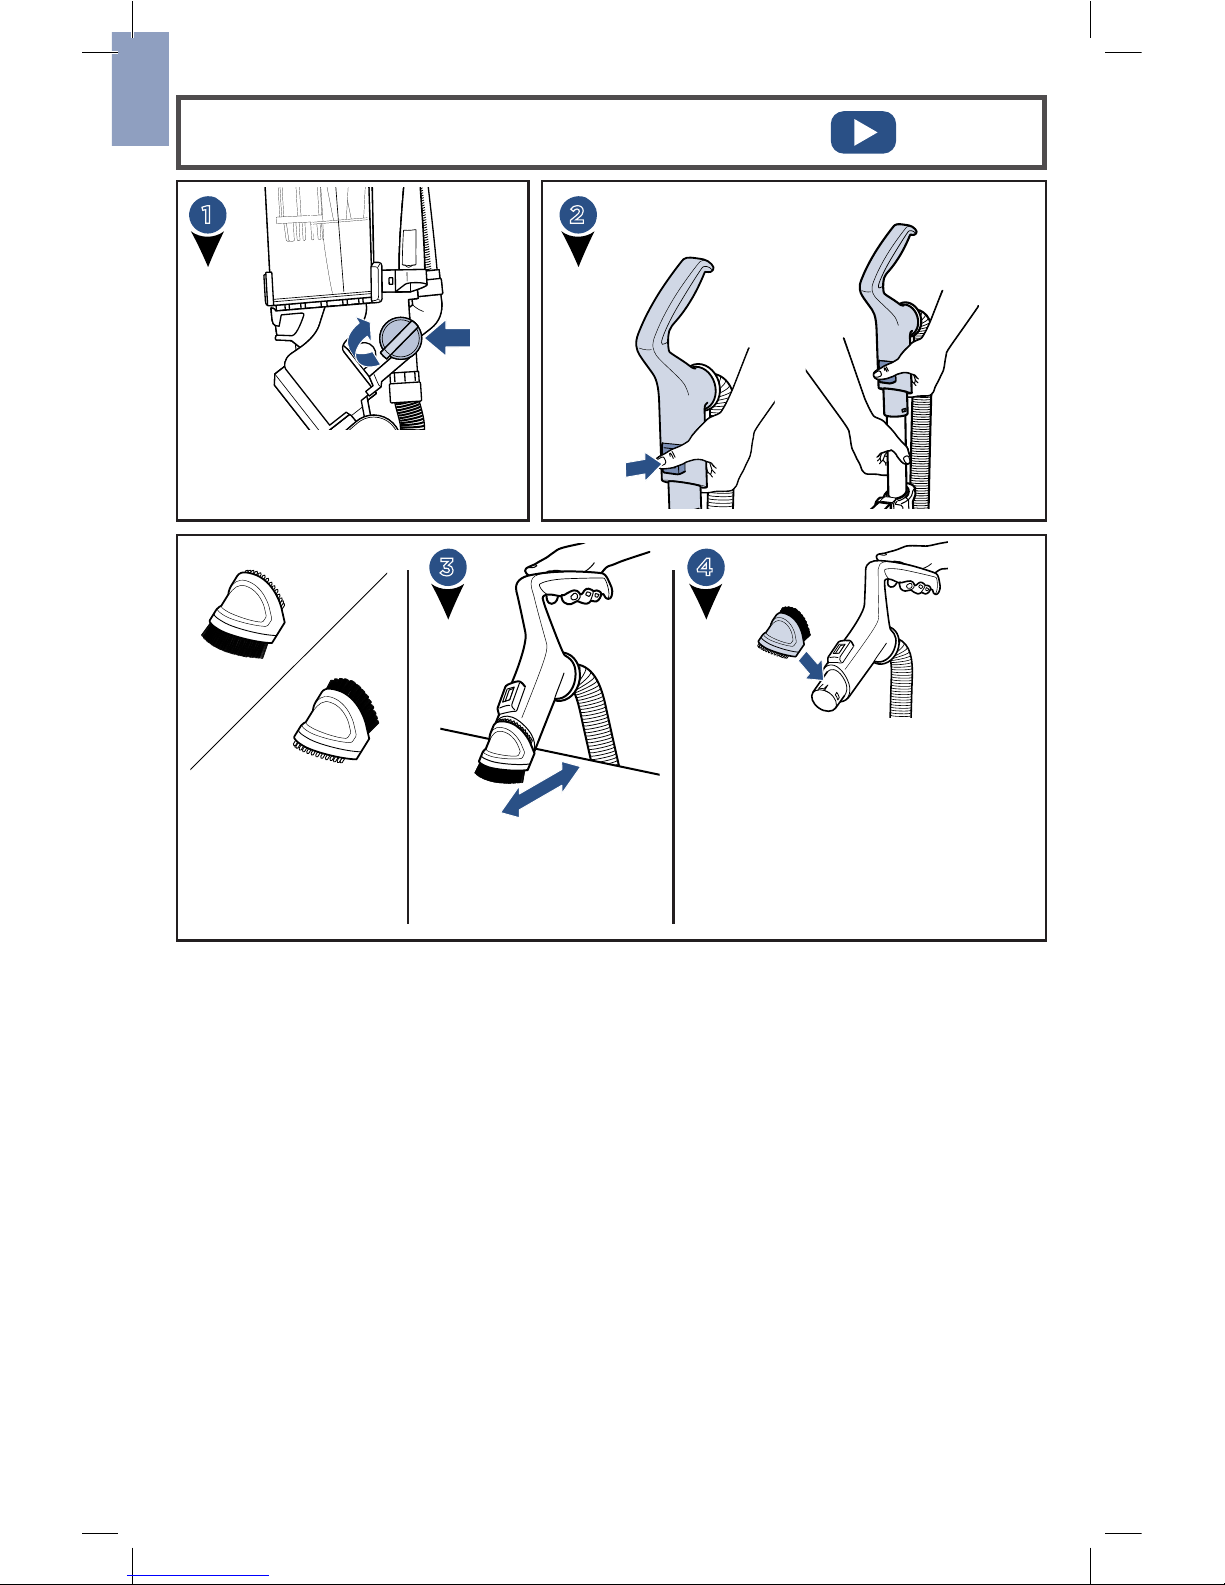
Maintain the Pet TurboEraser® Tool
1
3
2
Remove brush roll, belt, and paddle
wheel. Inspect for damages and replace
if necessary.
To reassemble, align two clips on each end
of paddle wheel with belt on and pop back
into place.
Place brush roll with belt back in.
Faceplate will not close properly if all parts
are not aligned correctly.
Paddle Wheel
Belt
Roller
4
Clean Inner Cyclone Separator
2
Tap separator against
inside of trash bin and
rinse under warm water if
necessary. Be sure to let
it completely dry before
placing back in Dirt
Container.
1
3

EN
www.BISSELL.com
14
Parts & Supplies
For Parts and Supplies, go to www.BISSELL.com and enter
your model number in the search field.
3
2
1
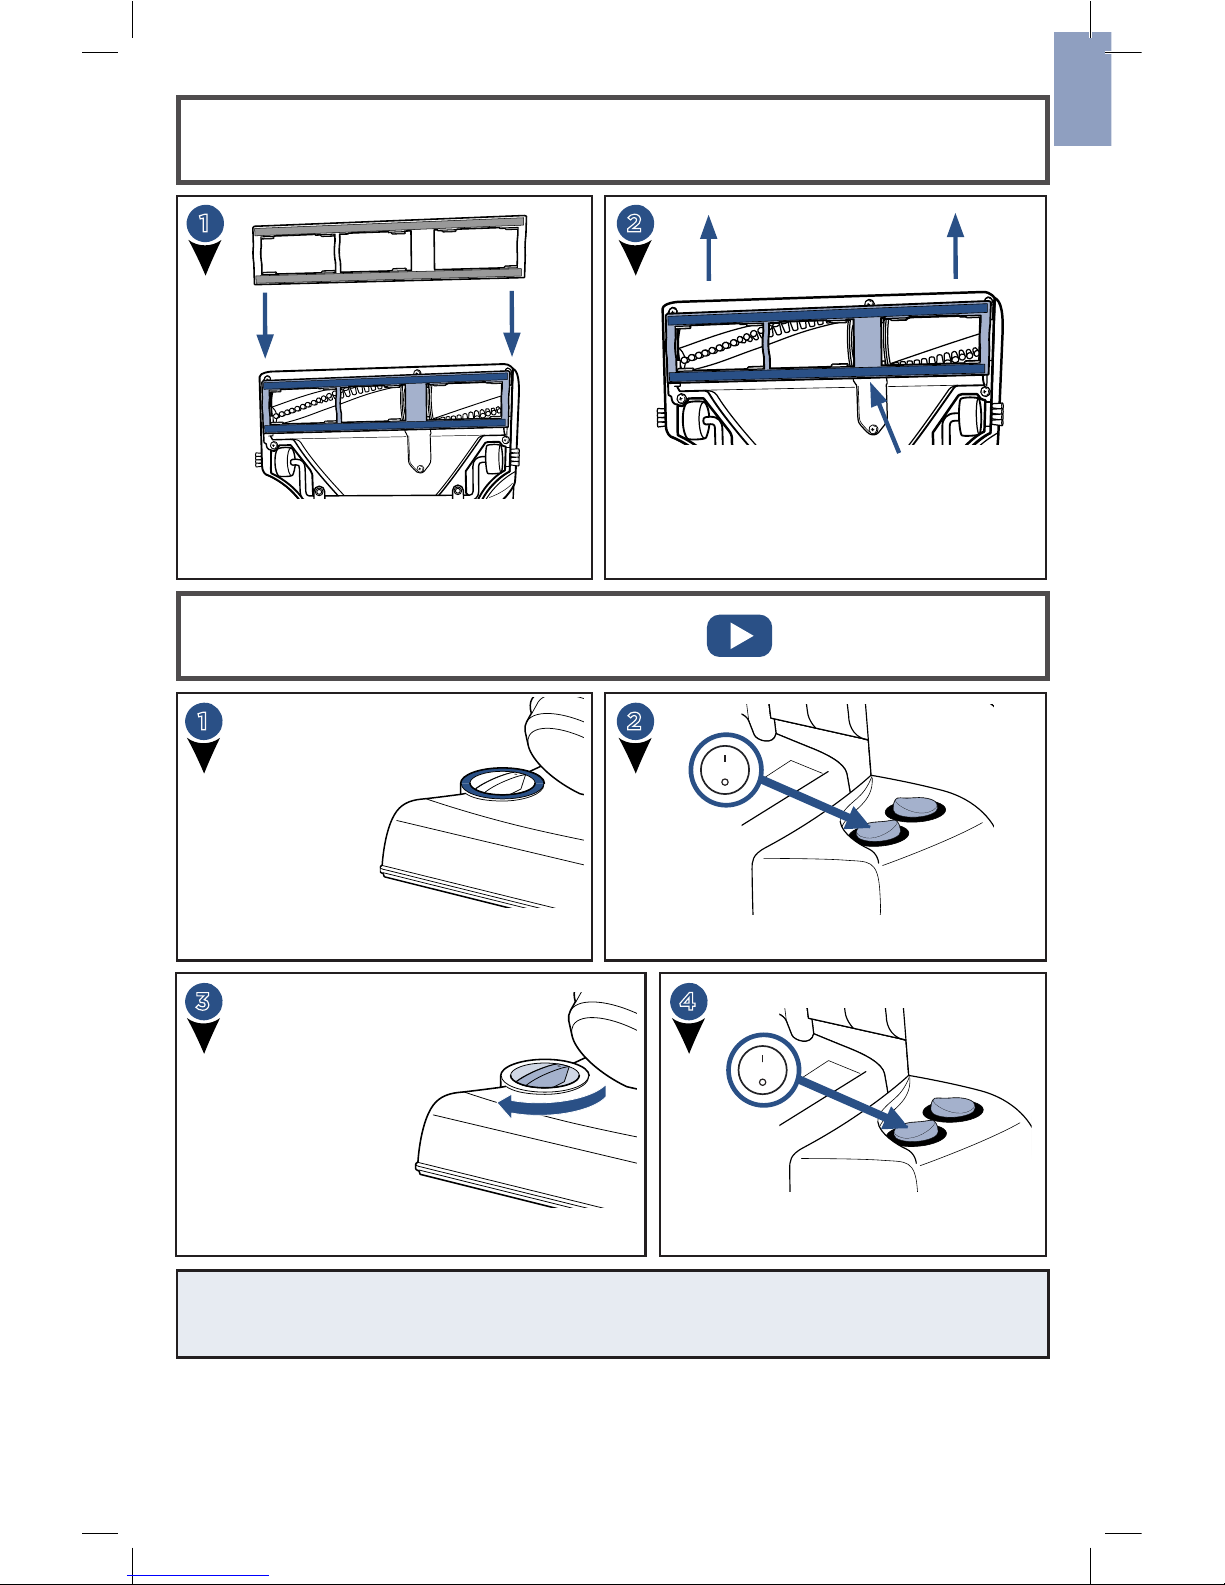
Replace the Brush & Belt
Unplug vacuum, turn over and
unscrew 9 Silver Phillips head
screws to remove bottom
cover.
Pull roller straight out
and slide belt off motor
gear. Replace roller and/
or belt.
1. Inspect brush roll by
placing it on its end and
spin. The brush roll should
spin freely, multiple times
by one flick. If it doesn’t,
replace brush roll.
2. Inspect belt, replace if
itappears damaged.
1. Place belt back on brush roll.
2. Pinch belt around brush roll & hook
back around the silver motor gear.
3. Rotate brush roll into place and line up
end caps.
4. Re-attach bottom cover with 9 screws.
NOTE: If an object becomes lodged in foot and brush shuts o, turn vacuum
o and unplug from electrical outlet. Remove obstruction and brush will
automatically reset when vacuum is plugged and turned back on.
4

EN
15
www.BISSELL.com
Troubleshooting
Problem Possible causes Remedies
Brush roll
doesn’t
rotate
Brush roll switch is turned off Make sure Brush Roll switch is ON
Vacuum is locked in upright
position
Recline vacuum and switch ON the Brush Roll
Vacuuming on Premium Soft
Carpet
Turn Height Adjustment Knob to “high carpet”
andturn vacuum off and back on
Brush roll safety feature
triggered (blue changes to red
light illuminating around height
adjustment knob)
Unplug, check for debris, and remove the debris
Brush roll has lodged debris or
other entanglements, keeping
the brush from rotating
Unplug, check for debris, and remove the debris
Vacuum
won’t pick
up dirt
Vacuum Suction Knob is in
“hose/tool suction” mode
Turn knob aligning arrow with “Floor Suction”
Filters are dirty Remove and rinse pre-motor filter; allow enough
time for it to dry properly before reinserting
Remove post-motor filter and knock it against a
trash can to remove debris; it should be replaced
every 3-6 months depending on level of use
There is a clog in the vacuum Remove debris and any other entanglements that
may be restricting the brush rolls rotation
Dirt Container is not seated
correctly
Press the Empty Button to release the Dirt
Container and reseat properly
There is a crack or hole in the
Main Hose
If there is a crack or hole, order a new Main Hose
from the BISSELL website
Main Hose is not connected Locate the Main Hose and reconnect by pushing
the hose connection to secure the latch
There is a clog in the hose or
wand
Check inside of hose for clogs by disconnecting
from handle; disassemble wand and check for
clogs
Hair wrapped around brush roll Run vacuum back and forth on clean carpet
several times to release wrapped hair
Dirt is
escaping
from the
vacuum
Dirt Container is full Empty the Dirt Container
Filters are missing Check to see if all of the Pre-Motor and Post-
Motor filters are in place
Hose won’t
pick up dirt
Vacuum Suction Knob is in
“Floor Suction” mode
Turn knob aligning arrow with “hose/tool
suction”
WARNING
To reduce the risk of electric shock, turn power switch o
and disconnect plug from electrical outlet before performing
maintenance or troubleshooting checks.
Please do not return this product to the store.
Other maintenance or service not included in the manual should be performed by an authorized
service representative. For any questions or concerns, BISSELL is happy to be of service.

EN
1616
©2017 BISSELL Homecare, Inc
Grand Rapids, Michigan
All rights reserved. Printed in China
Part Number 161-2477grar 04/17 RevA
Visit our website at: www.BISSELL.com
Csumer Guare
This Guarantee only applies outside of the USA and Canada. It is
provided by BISSELL International Trading Company BV (“BISSELL”).
This Guarantee is provided by BISSELL. It gives you specific rights.
It is offered as an additional benefit to your rights under law. You
also have other rights under law which may vary from country
to country. You can find out about your legal rights and remedies
by contacting your local consumer advice service. Nothing in this
Guarantee will replace or lessen any of your legal rights or remedies.
If you need additional instruction regarding this Guarantee or have
questions regarding what it may cover, please contact BISSELL
Consumer Care or contact your local distributor.
This Guarantee is given to the original purchaser of the product from
new and is not transferable. You must be able to evidence the date
of purchase in order to claim under this Guarantee.
Limited 5 Year Guarantee
from the date of purchase by
original purchaser
Subject to the *EXCEPTIONS AND EXCLUSIONS identified below,
BISSELL will repair or replace (with new or remanufactured
components or products), at BISSELL’s option, free of charge, any
defective or malfunctioning part or product.
BISSELL recommends that the original packaging and evidence
of the date of purchase be kept for the duration of the Guarantee
period in case the need arises within the period to claim on the
Guarantee. Keeping the original packaging will assist with any
necessary re-packaging and transportation but is not a condition of
the Guarantee.
If for your product is replaced by BISSELL under this Guarantee,
the new item will benefit from the remainder of the term of this
Guarantee (calculated from the date of the original purchase). The
period of this Guarantee shall not be extended whether or not
your product is repaired or replaced.
*EXCEPTIONS AND EXCLUSIONS FROM
THE TERMS OF THE GUARANTEE
This Guarantee applies to products used for personal domestic use and
not commercial or hire purposes. Consumable components such as
filters, belts and mop pads, which must be replaced or serviced by the
user from time to time, are not covered by this Guarantee.
This Guarantee does not apply to any defect arising from fair wear
and tear. Damage or malfunction caused by the user or any third
party whether as a result of accident, negligence, abuse, neglect, or
any other use not in accordance with the User Guide is not covered
by this Guarantee.
An unauthorised repair (or attempted repair) may void this Guarantee
whether or not damage has been caused by that repair/attempt.
Removing or tampering with the Product Rating Label on the
product or rendering it illegible will void this Guarantee.
SAVE AS SET OUT BELOW BISSELL AND ITS DISTRIBUTORS ARE NOT
LIABLE FOR ANY LOSS OR DAMAGE THAT IS NOT FORESEEABLE
OR FOR INCIDENTAL OR CONSEQUENTIAL DAMAGES OF ANY
NATURE ASSOCIATED WITH THE USE OF THIS PRODUCT INCLUDING
WITHOUT LIMITATION LOSS OF PROFIT, LOSS OF BUSINESS, BUSINESS
INTERRUPTION, LOSS OF OPPORTUNITY, DISTRESS, INCONVENIENCE OR
DISAPPOINTMENT. SAVE AS SET OUT BELOW BISSELL’S LIABILITY WILL
NOT EXCEED THE PURCHASE PRICE OF THE PRODUCT.
BISSELL DOES NOT EXCLUDE OR LIMIT IN ANY WAY ITS LIABILITY FOR
(A) DEATH OR PERSONAL INJURY CAUSED BY OUR NEGLIGENCE OR THE
NEGLIGENCE OF OUR EMPLOYEES, AGENTS OR SUBCONTRACTORS; (B)
FRAUD OR FRAUDULENT MISREPRESENTATION; (C) OR FOR ANY OTHER
MATTER WHICH CANNOT BE EXCLUDED OR LIMITED UNDER LAW.
Csumer Care
If your BISSELL product should
require service or to claim under our
limited guarantee, please contact us
as follows:
Website:
www.BISSELL.com
Email:
UKSupport@bissell.com
Telephone:
0344-888-6644
Write:
BISSELL Homecare (Overseas) Inc.
Ground Floor
226 Berwick Avenue
Slough, Berkshire, SL1 4QT
United Kingdom
Spares are available for purchase.
To purchase visit www.4bissell.co.uk
Visit the BISSELL website: www.BISSELL.com
When contacting BISSELL, have model number of cleaner available.
Please record your Model Number: _____________ Please record your Purchase Date: _____________
NOTE: Please keep your original sales receipt. It provides proof of the date
of purchase in the event of a Guarantee claim. See Guarantee for details.

Sie sehen sich
lieber Videos an?
Suchen Sie dieses
Symbol und sehen
Sie sich online ein
Schulungsvideo an:
www.BISSELL.com
PETHAIR
ERASER
®
SCHNELLSTARTANLEITUNG/
BENUTZERHANDBUCH
1941 Serie
ENTWICKELT FÜR
HAUSHALTE
MIT HAUSTIEREN

DE
www.BISSELL.com
18
WICHTIGE SICHERHEITSANWEISUNGEN
WARNUNG
UM DAS RISIKO EINES FEUERS,
ELEKTRISCHEN SCHOCKS ODER
VONVERLETZUNGEN ZU MINDERN:
» Dieses Gerät kann von Kindern
ab einem Alter von 8Jahren
genutzt werden und von Personen
mit eingeschränkten physischen,
sensorischen und mentalen
Fähigkeiten oder mangelnder
Erfahrung und mangelndem Wissen,
wenn sie dabei beaufsichtigt werden
oder ihnen Anweisungen bezüglich
der sicheren Gerätenutzung und der
einhergehenden Gefahren gegeben
wurden. Kinder dürfen nicht mit
demGerät spielen. Die Reinigung
und Benutzerwartung sollte
nicht von Kindern ohne Aufsicht
durchgeführt werden.
» Bei Kindern ist darauf zu achten,
dass sie nicht mit dem Gerät spielen.
» Sollte das Stromkabel beschädigt
sein, muss es durch den Hersteller,
seinen Kundendienst oder einer
ähnlich befähigten Person ersetzt
werden, um eine Gefährdung zu
vermeiden.
» Halten Sie Haare, lose Kleidung,
Finger und alle Körperteile von den
Öffnungen und beweglichen Teilen
des Geräts und seinem Zubehör fern.
» Lassen Sie das Gerät nicht unbeaufsichtigt, wenn
es eingesteckt ist.
» Stecken Sie das Gerät bei Nichtverwendung
odervor der Wartung aus der Steckdose aus.
» Das Gerät ist kein Spielzeug.
» Verwenden Sie es nur für die im
Benutzerhandbuch beschriebenen Zwecke.
» Benutzen Sie nur vom Hersteller empfohlenes
Zubehör.
» Benutzen Sie das Gerät nicht mit einem
beschädigten Kabel oder Stecker.
» Tauchen Sie es nicht in Wasser oder
Flüssigkeiten.
» Wenn das Gerät nicht ordnungsgemäß funkti-
oniert, es fallen gelassen, beschädigt, im Freien
gelassen oder in Wasser getaucht wurde, versu-
chen Sie nicht, es zu benutzen, und lassen Sie es
in einem autorisierten Servicecenter reparieren.
» Ziehen oder tragen Sie das Gerät nicht mit dem
Kabel, benutzen Sie das Kabel nicht als Griff,
klemmen Sie es nicht zwischen der Tür ein oder
ziehen Sie es nicht über scharfe Ecken oder
Kanten.
» Fahren Sie mit dem Gerät nicht über das Kabel.
» Halten Sie das Kabel von beheizten Flächen fern.
» Entfernen Sie es nicht aus der Steckdose, indem
Sie am Kabel ziehen.
» Greifen Sie zum Herausziehen den Stecker und
nicht das Kabel.
» Bedienen Sie den Stecker oder das Gerät nicht
mit feuchten Händen.
» Stecken Sie keine Objekte in die Öffnungen.
» Benutzen Sie das Gerät nicht mit blockierten
Öffnungen; halten Sie sie frei von Schmutz,
Fusseln, Haaren und allem, was den Luftfluss
reduzieren kann.
» Schalten Sie vor dem Ausstecken alle
Bedienelemente aus.
» Seien Sie beim Reinigen von Stufen besonders
vorsichtig.
» Benutzen Sie es nicht, um entflamm- oder
brennbare Flüssigkeiten wie Petroleum
aufzunehmen oder in Bereichen, wo jene
Flüssigkeiten vorkommen können.
» Nehmen Sie keine giftigen Materialien
(Chlorbleiche, Ammoniak, Abflussreiniger etc.) auf.
» Setzen Sie das Gerät nicht in einem geschlos-
senen Raum ein, in dem Dämpfe von Farben auf
Ölbasis, Farbverdünner, Mottenschutzsubstanzen,
brennbarer Staub oder andere explosive oder
giftige Dämpfe vorhanden sind.
» Nehmen Sie keine harten oder scharfen Objekte
wie Glas, Nägel, Schrauben, Münzen etc. auf.
» Verwenden Sie das Gerät nur auf trockenen
Oberflächen in Innenräumen.
» Halten Sie das Gerät auf einer ebenen
Oberfläche.
» Nehmen Sie keine brennenden oder rauchenden
Gegenstände oder Stoffe auf, z.B. Zigaretten,
Streichhölzer oder heiße Asche.
» Verwenden Sie das Gerät nicht ohne angebrach-
ten Staubbeutel und/oder Filter.
» Das Gerät darf nicht im Freien oder auf feuchten
Oberflächen verwendet werden.
» Dieses Gerät ist doppelt isoliert. Benutzen
Sie nurErsatzteile, die mit den Originalteilen
identisch sind.
» Betreiben Sie das Gerät nicht auf derselben
Stelle, wenn der Griff nicht vollständig
aufgestelltist.
» Stecken Sie das Gerät von der Steckdose ab,
bevor Sie das TurboBrush®-Zubehör oder das
PetTurboEraser®-Zubehör abnehmen.
» Falls Ihr Gerät mit einem nicht neu verdraht-
baren BS 1363-Stecker ausgestattet ist, darf
es nur dann eingesetzt werden, nachdem
eine13-Ampere-Sicherung (ASTA-zugelassen
für BS 1362) in den entsprechenden Träger im
Stecker eingesetzt wurde. (Ersatzteile sind bei
Ihrem BISSELL-Händler erhältlich.) Wird der
Stecker abgeschnitten, muss er entsorgt werden,
da in diesem Fall bei einem erneuten Einstecken
in eine Steckdose Stromschlaggefahr besteht.
LESEN SIE VOR EINSATZ IHRES STIELSTAUBSAUGERS ALLE ANWEISUNGEN.
Entfernen Sie den Stecker bei Nichtgebrauch und vor der Reinigung, Wartung oder Pflege des Geräts aus der
Steckdose. Bei der Nutzung eines elektrischen Geräts sollten grundsätzliche Vorkehrungen getroffen werden.
Dies beinhaltet Folgendes:
WARNUNG
›› Plastikfolie kann gefährlich sein. Halten Sie diese zur Vermeidung von Erstickungsgefahr von Kindern fern.
›› Schließen Sie den Staubsauger erst an die Netzversorgung an, WENN Sie mit allen Anweisungen und
Betriebsverfahren vertraut sind.
›› Um das Risiko eines Stromschlags zu minimieren, schalten Sie das Gerät aus und trennen es vom Strom,
bevor Sie Wartungen durchführen oder Fehler beheben.
LED-BELEUCHTETE WARNUNG FÜR DEN FLACHEN SAUGAUFSATZ
• Vorsicht: Brand- oder Verbrennungsgefahr. Nicht wiederaufladen, demontieren, über 60°C erwärmen oder verbrennen.
Batterien außer Reichweite von Kindern und bis sie einsatzbereit sind in der Originalverpackung aufbewahren.
Gebrauchte Batterien umgehend entsorgen.
• Nehmen Sie Batterien niemals in den Mund. Wenden Sie sich bei Verschlucken an Ihren Arzt oder Ihre lokale Giftnotrufzentrale.
• Batterie nur mit CR1632 ersetzen. DIE VERWENDUNG EINER ANDEREN BATTERIE KANN ZU BRAND- ODER
EXPLOSIONSGEFAHR FÜHREN. CR1632-Zellen können überall gekauft werden, wo Batterien verkauft werden.
LESEN SIE DAS BENUTZERHANDBUCH
BEWAHREN SIE DIESE ANWEISUNGEN AUF
FÜR BETRIEB BEI 220–240VOLT WECHSELSTROM. AUSSCHLIESSLICH 50–60HZ STROMVERSORGUNG.
Dieses Modell ist für den ausschließlichen Einsatz im Haushalt bestimmt.

19
www.BISSELL.com
Montage
Schnellstartanleitung
IM BENUTZERHANDBUCH FINDEN SIE VOLLSTÄNDIGE ANWEISUNGEN, EINE PRODUKTÜBERSICHT UND WICHTIGE
SICHERHEITSHINWEISE.
WICHTIGER HINWEIS
Stecken Sie das Ende des Schlauchs
in das Staubsaugergehäuse, indem
Sie die Halterungen hinein und nach
unten schieben. Drücken Siedie
Unterseite, um es einrasten zu
lassen.
Drücken Sie
den Schlauch
in die
Verriegelung.
„Klick“
Schieben Sie
das Ende des
Stabs oben in
das Gehäuse.
Sie hören ein
Klickgeräusch,
wenn er
korrekt
eingeführt
wurde.
2 31
4
Ihr Staubsauger wurde
im Bodenreinigungsmodus geliefert. Um Ihr
Zubehör zu verwenden, müssen Sie den
Vakuumansaugungsknopf
drehen, damit er sich in
der Position „Schlauch-/
Zubehöransaugung“
befindet.
5
Setzen Sie die Kabelumwicklung
fest ein, bis Sie ein Klickgeräusch
hören. Wickeln Sie das Netzkabel
um die Kabelaufwicklung.
6
Verstauen Sie das Flexible Crevice-Zubehör
und das Pet TurboEraser-Zubehör. Drücken
Sie die doppelte Zubehöraufbewahrung, um
sie auf das Staubsaugergehäuse zu schieben.
DOPPELTE
ZUBEHÖRAUFBEWAHRUNG
DE
DE
www.BISSELL.com
20
HINWEIS: Das Standardzubehör kann modellabhängig
abweichen.Um herauszufinden, was bei Ihrem Kauf beinhaltet
sein sollte, beziehen Sie sich bitte auf die „Kartoninhalt“-Liste
auf der Kartonoberklappe.
Doppelte
Zubehörauf-
bewahrung
Untere
Kabelumwicklung
Pet
TurboEraser®-
Zubehör
LED-beleuchteter
flacher Saugaufsatz
(nur bei bestimmten
Modellen)
Staubsaugergehäuse
Schlauch/
Stab
Vielen Dank für Ihren Kauf eines BISSELL-Staubsaugers!
Wir lieben das Reinigen, und wir freuen uns, eines unserer neuen innovativen
Produkte mit Ihnen zu teilen. Wir möchten sicherstellen, dass Ihr Sauger in fünf
Jahren noch genauso gut funktioniert wie heute. Deshalb enthält dieses Handbuch
Tipps zum Gebrauch (Seite
22–26
), zur Wartung (Seite
27–30
) und, sollte es ein
Problem geben, zu dessen Lösung (Seite31).
Sicherheitsanweisungen.........18
Schnellstartanleitung/Montage ..19
Produktübersicht ...............21
Betrieb .....................22–26
Wartung und Pflege ........27–30
Fehlerbehebung ................31
Garantie ........................32
Service .........................32
Anklemmbare
Hartbodenbürste
Basierend auf Tests durch Dritte der leistungsschwächsten Einheit bei internen Tests von
drei Einheiten gemäß der EU-Vorschriften 666/2013 und 665/2013.
Flexibler flacher
Saugaufsatz
Was ist enthalten?
DE
21
www.BISSELL.com
Produktübersicht
Kabel
Untere
Kabelumwicklung
Kabelentriegelung
Gri und Stab
Stab-Entriegelungstaste
GriEntriegelungsknopf
Tragegri
Motor-
Vorfilter
Staubbehälter
Innerer
Zyklonabscheider
Schalter zum
Leeren des
Behälters
Motor-Nachfilter
Bürstenrolle
Höhenverstellung
Haupt-
leitung
Schlauch/Stab und
Vakuumansaugungsknopf
Schlauchanschluss
Bürstenrolle-
Ein-/Ausschalter
Ein-/
Ausschalter
BehälterEntriegelungsknopf

DE
www.BISSELL.com
22
Zubehöraufbewahrungsoptionen
Erste Schritte
WARNUNG
Schließen Sie den Staubsauger erst an die Netzversorgung an, wenn Sie mit allen
Anweisungen und Betriebsverfahren vertraut sind.
21
Treten Sie sanft auf den Sockel und
ziehen Sie den Griff zurück.
3
Drehen Sie die
Höhenverstellung
auf die gewünschte
Teppichreinigungsstufe.
HINWEIS: Wählen Sie die niedrigste
Einstellung, um die optimale Reinigungsleistung zu erzielen. Wenn sich Ihr
Staubsauger nur schwer bewegen lässt,
wählen Sie die nächsthöhere Einstellung aus.
HINWEIS: Stellen Sie vor der Verwendung sicher, dass der grüne
Ansaugungsknopf auf „Bodenabsaugung“ eingestellt ist.
HINWEIS: In dem unwahrscheinlichen Fall,
dass sich Haare um die Bürstenrolle wickeln,
bewegen Sie den Staubsauger mehrere Male
über einen sauberen Teppich. Dadurch lösen
sich um die Rolle gewickelte Haare.
Schalten Sie den Staubsauger ein (I– EIN und
O – Aus). Drücken Sie den Bürstenrollenschalter,
um die PowerBrush für die Teppichreinigung zu
aktivieren (die Bürstenrolle ist aktiviert, wenn der
Schalter aufleuchtet).
HINWEIS: Die Bürstenrolle wird automatisch
ausgeschaltet, wenn sich der Staubsauger in aufrechter
Position befindet. Durch Neigen wird sie wieder aktiviert.
Verstauen Sie das Flexible Crevice-Zubehör
und das Pet TurboEraser-Zubehör. Drücken
Sie die doppelte Zubehöraufbewahrung,
um sie auf dasStaubsaugergehäuse zu
schieben.
DOPPELTE
ZUBEHÖRAUFBEWAHRUNG
Brushroll
On/O
Switch
Power
On/O
Switch
DE
23
www.BISSELL.com
HINWEIS: Schalten Sie die Bürstenrolle aus, wenn Sie auf harten oder
empfindlichen Oberflächen, die von der Bürstenrolle erfasst werden können,
saugen. Dazu zählen z.B. Hartholzböden, geflieste Böden, kleine Teppiche
oder Friesteppiche mit langen feinen Fasern oder Fäden.
Power
On/O
Switch
3 4
1 2
Bringen Sie den Staubsauger in aufrechte
Position und schalten Sie ihn aus.
Die Sicherheitsfunktion kann
durch Verwendung auf einem
weichen Teppich ausgelöst
worden sein. Drehen Sie
die Höhenverstellung
auf die Einstellung
„Hoher Teppich“.
Prüfen Sie
außerdem, ob
Rückstände die
Bürstenrolle blockieren. Entfernen
Sie bei Bedarf Rückstände.
Schalten Sie den Staubsauger wieder
ein und versuchen Sie es erneut.
Wenn ein rotes Licht um
die Höhenverstellung
leuchtet, haben Sie die
Sicherheitsfunktion
Ihres Bürstenrollenmotor
ausgelöst.
Power
On/O
Switch
Installieren Sie die anklemmbare
Hartbodenbürste für die optimale
Reinigung harter Böden.
Setzen Sie zwei Finger in die Vertiefung
auf dem Fuß und heben Sie ihn an der
anklemmbaren Hartbodenbürste nach
oben, um das Zubehör zu entfernen.
1 2
Anbringen der Hartbodenbürste
Vertiefte Fläche
Bürstenrollen-Sicherheitsleuchte
DE
www.BISSELL.com
24
Reinigung über dem Boden: Gri
Um Zubehör und Schlauch/Stab
zu verwenden, drehen Sie den
grünen Knopf so, dass sich der
Pfeil in der Position „Schlauch-/
Zubehöransaugung“ befindet.
21
Die 2-in-1 Pet Brush
hat weiße weiche
Borsten für schonende
Anwendungen und
Gumminoppen für
eingeschlossene
Tierhaare.
Verwenden Sie die
Manschette mit der Seite
mit weißen weichen
Borsten für empfindliche
Oberflächen.
Lösen Sie die Manschette und drehen
Sie sie, um die Gummifinger zum
Entfernen von Tierhaaren auf Möbeln
zu verwenden. Achten Sie auf zwei
Klickgeräusche, wenn Sie sie wieder
anbringen.
Sobald dies am Griff abgeschlossen ist,
schieben Sie sie wieder auf den Stab,
bis es „klickt“.
Drehen Sie den grünen Knopf nach der
Benutzung von Zubehör zurück auf
„Bodenabsaugung“.
3 4
 Loading...