


PROHEAT 2X® REVOLUTION™
Deep Cleaner
_______________
USER GUIDE
1858 SERIES

IMPORTANT SAFETY INSTRUCTIONS
READ ALL INSTRUCTIONS BEFORE USING YOUR DEEP CLEANER.
When using an electrical appliance, basic precautions should be observed, including the following:
 WARNING
To reduce the risk of fire, electric shock, or injury:
»Unplug from electrical socket when not in use and before cleaning, maintaining or servicing the appliance.
»This appliance can be used by children aged from 8 years and above and persons with reduced physical, sensory or mental capabilities or lack of experience and knowledge if they have been given supervision or instruction concerning use of the appliance in a safe way and understand the hazards involved. Cleaning and user maintenance shall not be made by children without supervision.
»Children should be supervised to ensure that they do not play with the appliance.
»If the supply cord is damaged, it must be replaced by the manufacturer, its service agent or similarly qualified persons in order to avoid a hazard.
»Do not run appliance over cord.
»Keep hair, loose clothing, fingers, and all parts of body away from openings and moving parts of the appliance and its accessories.
»Use only the type and amount of liquids specified under the Operations section of this guide.
»Do not leave appliance when plugged in.
»Always connect to a properly earthed electrical socket.
Do not modify earthed plug.
»Use indoors only.
»Do not allow to be used as a toy.
»Use only as described in the user guide.
»Use only manufacturer’s recommended attachments.
»Do not use with damaged cord or plug.
»Do not immerse in water or liquid.
»If appliance is not working as it should, has been dropped,
damaged, left outdoors, or dropped into water; do not attempt to operate it and have it repaired at an authorized service center.
»Liquid or steam must not be directed towards equipment containing electrical components.
»Do not pull or carry by cord, use cord as a handle, close door on cord, or pull cord around sharp edges
or corners.
»Keep cord away from heated surfaces.
»Do not unplug by pulling on cord.
»To unplug, grasp the plug, not the cord.
»Do not handle plug or appliance with wet hands.
»Do not put any object into openings.
»Do not use with any opening blocked; keep free of dust, lint, hair, and anything that may reduce air flow.
»Turn off all controls before unplugging.
»Use extra care when cleaning on stairs.
»Do not use to pick up flammable or combustible liquids, such as petrol, or use in areas where they may be present.
»Do not pick up toxic material (chlorine bleach, ammonia, drain cleaner, etc.)
»Do not use appliance in an enclosed space filled with vapors given off by oil base paint, some mothproofing substances, flammable dust, or other explosive or toxic vapors.
»Do not pick up hard or sharp objects such as glass, nails, screws, coins, etc.
»Keep appliance on a level surface.
»Do not carry appliance while in use.
»Unplug before attaching the TurboBrush™ tool.
»Do not pick up anything that is burning or smoking, such as cigarettes, matches, or hot ashes.
»If your appliance is fitted with a nonrewireable BS 1363 plug it must not be used unless a 13 amp (ASTA approved to BS 1362) fuse is fitted in the carrier
contained in the plug. Spares may be obtained from your BISSELL supplier. If for any reason the plug is cut off,
it must be disposed of, as it is an electric shock hazard should it be inserted into a mains socket.
 WARNING
TO REDUCE THE RISK OF FIRE AND ELECTRIC SHOCK, USE INDOORS ONLY . DO NOT IMMERSE. USE ONLY ON SURFACES MOISTENED BY THE CLEANING PROCESS. USE ONLY BISSELL CLEANING PRODUCTS INTENDED FOR USE WITH THIS MACHINE.
TO REDUCE THE RISK OF FIRE AND ELECTRIC SHOCK, ALWAYS INSTALL FLOAT BEFORE ANY WET PICK-UP OPERATION.
SAVE THESE INSTRUCTIONS
FOR OPERATION ON A 220-240 VOLT A.C. 50-60 HZ POWER SUPPLY ONLY.
This model is for household use only.
2 www.BISSELL.com

Thanks for buying a BISSELL deep cleaner!
We love to clean and we’re excited to share one of our innovative products with you. We want to make sure your deep cleaner works as well in
six years as it does today, so this guide has tips on using (pages 7-12), maintaining (pages 12-14), and if there is a problem, troubleshooting (page 15).
In just a few simple assembly steps, you’ll be ready to deep clean. Flip to page 5 and let’s get started!
What’s In The Box?
|
|
|
|
1. |
Upper Handle |
|
|
|
|
2. |
1 Screw attached to |
|
|
|
|
|
Upper Handle |
1. |
2. |
3. |
4. |
3. |
Base with Dirty Water Tank |
|
|
|
|
4. |
Clean Water Tank |
|
|
|
|
5. |
Carry Handle |
|
|
|
|
6. |
BISSELL 2X Professional |
|
|
|
|
|
Formula |
|
|
|
|
7. |
BISSELL Antibacterial |
|
|
|
|
|
Formula |
5. |
|
6. |
7. |
8. |
Accessory bag & hose |
|
9. |
Attachments/accessories |
|||
|
|
BISSELL |
|
|
(vary by model) |
|
|
|
10. Nozzle Clean Out Tool |
||
|
|
|
|
||
8. |
|
9. |
10. |
NOTE: Not all accessories |
|
|
|
|
|
come with every model. Be |
|
|
|
|
|
sure to check the carton for |
|
|
|
|
|
additional tools. |
|
Safety Instructions . . |
. . . 2 |
Troubleshooting . . . . . . 15 |
|
Product View . . . . |
. . . .4 |
Guarantee . . . . . . . . . 16 |
|
Assembly . . . . . . |
. . . . 5 |
Service . . . . . . . . . . 16 |
|
Cleaning Formulas . . |
. . . 6 |
Contact Information . . . . |
16 |
Operations . . . . . . |
. . 7-12 |
Parts & Supplies . . . . . . |
16 |
Maintenance & Care . |
. . 12-14 |
|
|
www.BISSELL.com 3
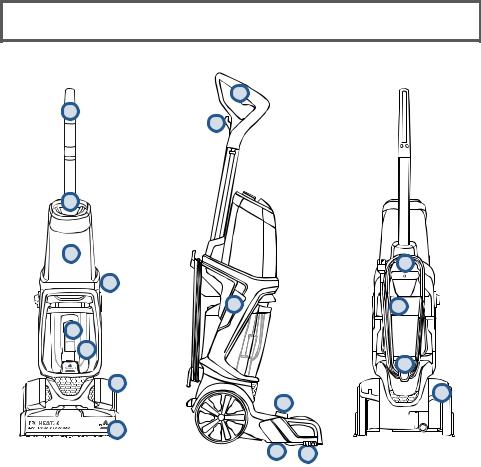
Getting to Know Your Deep Cleaner
9
1
10
2 |
|
|
|
3 |
|
|
15 |
|
|
|
|
|
4 |
|
|
|
11 |
|
16 |
5 |
|
|
|
6 |
|
|
|
|
|
|
17 |
|
7 |
|
18 |
|
|
|
|
|
|
|
12 |
|
8 |
|
|
|
|
|
14 |
1 |
Upper Handle |
11 |
Cleaning Mode Switch |
2 |
Easy Fill/Formula Cap |
12 |
Accessory Hose Door |
3 |
Clean Water Tank |
13 |
Belt/Brush Access Plate |
|
(3.7 Litre Capacity) |
14 |
EdgeSweep™ Brushes |
4 |
Power Button |
15 |
Carry Handle |
5 |
Float Stack |
16 |
Rubber Tab |
6 |
Dirty Water Tank |
|
(on Dirty Water Tank) |
7 |
Belt Access Door |
17 |
Quick Release for |
8 |
Foot |
|
Wrapped Cord |
9 |
Spray Trigger |
18 |
Recline Pedal |
10 |
In-Use Cord Clip |
|
|
4 www.BISSELL.com

Assembly
 WARNING
Do not plug in your deep cleaner until you are familiar with all instructions and operating procedures.
Your deep cleaner comes in four easy-to-assemble components and an accessory bag.
•Base
•Upper Handle
•Clean Water Tank
•Carry Handle
In step 3, you will need to use a Phillips screwdriver.
1 |
2 |
First, insert |
click |
Side |
View |
||
the upper |
|
|
handle at |
|
|
top of the |
|
|
base until |
|
Next, align the carry handle with the slots |
hear a “click” |
|
|
|
on either side of the base (behind the |
|
|
|
|
|
|
power switch and cleaning mode switch). |
|
|
The carry handle will “click” into place. |
|
|
Important: Do NOT put the clean tank on the machine until step 4. |
3
Using a Phillips screwdriver, secure the carry handle with the screw that’s taped to the upper handle.
4
Wrap the cord around
the carry handle and quick release hook.
5
Side
View
At the bottom of the upper handle, align the clean water tank with the grooves and slide the tank into place.
www.BISSELL.com 5
 Loading...