


MANUAL
Deckman

Deckman
User Manual
Premier Way
Abbey Park, Romsey
Hampshire, SO51 9DH, UK
www.BandG.com
© B&G Ltd. 2005
The copyright of this manual is the property of B&G Ltd.
HB-0914-02
Intentionally Left Blank
ii

Trademarks
All rights reserved. No part of this manual may be reproduced or transmitted in any form or by any means including photocopying and recording, for any purpose without the express written permission of B&G.
Information in this document is subject to change without notice. B&G reserves the right to change or improve its products and to make changes in the content without obligation to notify any person or organisation of such changes.
B&G, Deckman, Wave Technology Processor and WTP are all trademarks of Brookes & Gatehouse Ltd., and may not be used without the express permission of Brookes and Gatehouse Ltd.
SHOM tidal information © SHOM 2003. Reproduced with the permission of the Hydrographic and Oceanographic Service - France Contract no E32/2003 - www.shom.fr
The French Hydrographic and Oceanographic Service (SHOM) have not verified the data contained in this product and does not take responsibility for their accuracy of reproduction or freedom from modification.
The possession of this product from SHOM does not remove the obligation to use appropriate nautical documentation as required by national and international regulations.
iii

Product Liability and Safety Warnings
Product Liability
Brookes and Gatehouse Ltd. accept no responsibility for the use and/or operation of Deckman. It is the user’s responsibility to ensure that under all circumstances the product is used for the purposes for which it has been designed.
Warning - Calibration
The safe operation of Deckman is dependent on accurate and correct calibration. Incorrect calibration of this product may lead to false and inaccurate navigational readings placing the yacht into danger.
Warning – Dongle Security
The Dongle is a security device that renders the software inoperable when not plugged into the computer. As such, the Dongle is of significant importance and care must be taken to ensure that it does not become lost or stolen. Replacement of a Dongle will require the full purchase cost of Deckman, as well as the cost of any charts that may have been purchased to run with Deckman.
It is recommended that all original CD’s, chart codes and user documentation be kept together to allow the simple re-installation in the event of a fault occurring with your computer.
To facilitate the upgrade process of Deckman, or to purchase new charts, record the Dongle Serial Number below:
Dongle Serial Number:
iv

Preface
This manual is written in two parts: the first is a general introduction to Deckman. The second section contains instructions on how to use Deckman.
Part 1: In the first chapter, a general overview of the Deckman display screen is given with descriptions of the various parts.
Part 2: This section deals with the operation of Deckman. The first chapters cover the installation and general use of Deckman. After this, there are chapters dealing with specific features.
The manual includes a full Contents and Index. Since many things are referred to in more than one place, it is advisable to check these if the information you need is not immediately obvious.
v
Intentionally Left Blank
vi
Contents
Chapter 1 : Deckman Introduction_______ 1.1
Chapter 2 : Getting Started ____________ 2.1
Deckman Installation...................................................................... |
2.1 |
Installing charts .............................................................................. |
2.2 |
Connecting to the Instruments ....................................................... |
2.7 |
Direct connection of GPS............................................................... |
2.9 |
Show incoming data ....................................................................... |
2.9 |
Deckman re-installation over an existing version........................ |
2.9 |
Chapter 3 : Navigation ________________ 3.1
Introduction..................................................................................... |
3.1 |
Simulation ....................................................................................... |
3.3 |
Selecting a route ............................................................................. |
3.4 |
Quick route...................................................................................... |
3.6 |
Sailing the course ........................................................................... |
3.7 |
Set DR position ............................................................................... |
3.9 |
List Route......................................................................................... |
3.10 |
What If? ........................................................................................... |
3.11 |
Planning .......................................................................................... |
3.14 |
Edit Marks....................................................................................... |
3.20 |
Tides ................................................................................................ |
3.21 |
Navigation options.......................................................................... |
3.25 |
vii
Display time .................................................................................... |
3.28 |
General Layers ............................................................................... |
3.28 |
Chart options .................................................................................. |
3.30 |
Chart Layers ................................................................................... |
3.31 |
Zoom................................................................................................ |
3.33 |
Special chart views ......................................................................... |
3.34 |
Chapter 4 : Start display ______________ 4.1
Start information............................................................................. |
4.2 |
Setting the start ............................................................................... |
4.3 |
Set windward/leeward .................................................................... |
4.5 |
Start options .................................................................................... |
4.6 |
Start countdown .............................................................................. |
4.6 |
Hold wind........................................................................................ |
4.7 |
Wind calibration ............................................................................. |
4.8 |
Advanced options............................................................................ |
4.8 |
Chapter 5 : Data_____________________ 5.1
Time plot.......................................................................................... |
5.1 |
Wind Plot......................................................................................... |
5.2 |
Data Log.......................................................................................... |
5.4 |
Boat parameters.............................................................................. |
5.8 |
Extract logged data ........................................................................ |
5.11 |
Speed Test ....................................................................................... |
5.12 |
Show Data ....................................................................................... |
5.15 |
Data averages................................................................................. |
5.20 |
viii
User variables................................................................................. |
5.20 |
Chapter 6 : Polars____________________ 6.1
Understanding Polars .................................................................... |
6.1 |
Managing polars............................................................................. |
6.4 |
Chapter 7 : Instruments_______________ 7.1
Configure comms ............................................................................ |
7.1 |
WTP system ..................................................................................... |
7.2 |
h2000 Performance Unit................................................................ |
7.7 |
NMEA FFD/h1000 ......................................................................... |
7.10 |
Ockam Instruments ......................................................................... |
7.11 |
Silva NMEA..................................................................................... |
7.12 |
NKE NMEA ..................................................................................... |
7.13 |
NMEA Instrument System .............................................................. |
7.15 |
Chapter 8 : Wind calibration ___________ 8.1
Wind shear ...................................................................................... |
8.1 |
Wind speed and Wind angle........................................................... |
8.1 |
Chapter 9 : Wind and current forecasts ___ 9.1
GRIB viewer.................................................................................... |
9.1 |
Downloading GRIB forecasts ........................................................ |
9.4 |
GRIB tools....................................................................................... |
9.8 |
Making wind or current Grids ....................................................... |
9.11 |
GRIB routing................................................................................... |
9.18 |
ix
Chapter 10 : Competitors______________ 10.1
Time-on-time handicap .................................................................. |
10.1 |
Plotting competitors' positions ...................................................... |
10.3 |
Chapter 11 : Networking ______________ 11.1
Using the networked version.......................................................... |
11.1 |
Setup ................................................................................................ |
11.2 |
Two-boat telemetry across a network ........................................... |
11.4 |
Chapter 12 : Deckman files ____________ 12.1
deckman.ini ..................................................................................... |
12.1 |
Data files ......................................................................................... |
12.5 |
j_varsXX.d....................................................................................... |
12.7 |
User variables................................................................................. |
12.13 |
Example J_varsXX file ................................................................... |
12.27 |
x

Deckman Introduction
Chapter 1 : Deckman Introduction
Congratulations and thank you for choosing B&G Deckman, the world’s most advanced race navigation software. Deckman represents B&G’s commitment in providing software of the highest quality and performance.
To get the most from Deckman, take the time to carefully read this user manual so that you can fully appreciate its functionality.
Figure 1.1 shows a typical Deckman display and the table overleaf describes the functions of the labelled parts:
Figure 1.1
1.1

Chapter 1: Deckman Introduction
Data bar |
shows the value of any variable. You can select which |
|
variables you want displayed: simply click on the top |
|
half of a particular box and choose from the menu. You |
|
can display either the present or damped value (time |
|
specified in minutes; variable is shown underlined): |
|
choose when first selecting variables, or change by |
|
clicking on a displayed variable and then enter the |
|
averaging time. You can also arrange variables in the |
|
data bar using drag and drop. |
|
A new line of data boxes will appear when the last box |
|
on the previous line is filled, so make sure this is left |
|
empty if you do not want a new line of boxes. |
|
Can be toggled on and off by selecting |
|
menu>view>Data Bar. |
Tool bar |
gives shortcuts to frequently used tools. |
Icon bar |
clicking on an icon will either access a display window |
|
or provide a menu. |
Status bar |
bar along the bottom of the display. Shows the latitude |
|
and longitude of the present position of the cursor and |
|
also the range and bearing from the boat to the cursor |
|
(right hand side). |
|
Also provides information about the effects of some |
|
menu choices when the cursor is held over them (left |
|
hand side). |
|
Can be toggled on and off by selecting |
|
menu>view>Status Bar. |
When using the program it is generally found best to have it set up with the main Navigation window covering the majority of the display. Behind this, but accessible, you could have things such as What If?, Planning and a wind plot, as in Figure 1.1. That way, you can always see your position on a chart, but are able to get to other information as and when required.
1.2
Deckman Introduction
Clicking menu>refresh updates the display, thus getting rid of old or unwanted lines or marks. If, for example, you want to view only the isochrones from the present plan, this is a useful function.
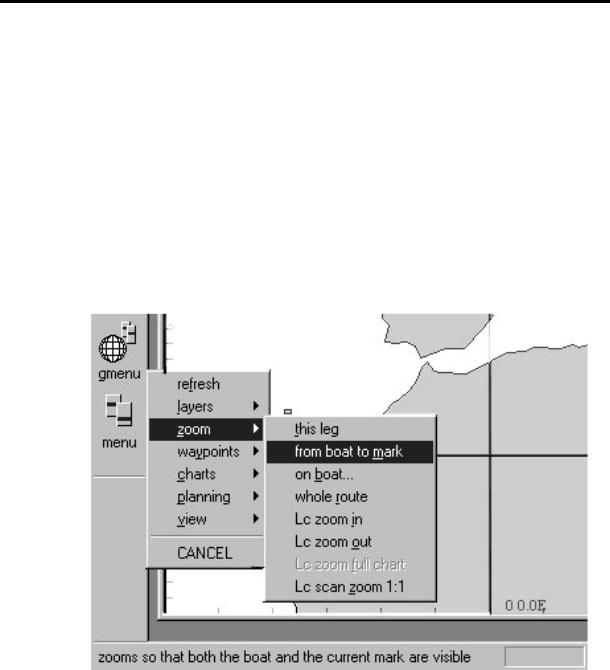
Throughout this manual, bold text is used when options—such as menu choices—are referred to. The > symbol is used when menu selections are being discussed. For instance, menu>zoom>from boat to mark would mean clicking on menu on the Icon bar and then selecting the zoom option from the pop-up menu, followed by from boat to mark— this is illustrated in Figure 1.2. Information regarding the effect of a particular command can be seen in the status bar.
Figure 1.2
Shortcuts
The following shortcut keys are available in Deckman:
F2 |
Next waypoint |
Sh+F2 |
Previous waypoint |
1.3

Chapter 1: Deckman Introduction
F6 |
Wind plot |
F7 |
Start display |
F8 |
Navigation display |
F9 |
Next window (the least recently used of all the |
|
windows currently open in Deckman) |
Sh+F9 |
Previous window (the most recently used of all the |
|
windows currently open in Deckman) |
Hint: using the F9 and Sh+F9 allows you to toggle between two windows.
1.4

Deckman Installation
Chapter 2 : Getting Started
Deckman Installation
As previously mentioned, there are currently two versions of Deckman that support either the C-Map or Euronav charting systems. The install for each version varies slightly as detailed below.
Install Deckman by running the SetupDeckman.exe installation program on the CD-ROM. Note that for a Euronav version, there are two parts to the installation: Deckman itself and the Euronav Charting System (ECS).
Deckman requires a security device known as a dongle, and this will need to be connected to either the parallel or USB port of your computer before you go any further. Having connected the dongle, run Deckman from the Start button. At this point Deckman should recognize this is a new installation and put up a dialog asking you to install the driver for the dongle: the installation procedure is slightly different for the two different types of dongle, but for both simply follow the on-screen prompts.
If installing a C-Map version, then the necessary drivers will be found on the Deckman CD so you simply tell Windows to search on your CD drive. The Euronav dongle drivers are installed onto your hard drive with the ECS.
Once you have installed the dongle drivers it may be necessary to restart your computer.
Start Deckman again. The program will now go through the complete startup routine, and then ask you for a 16-digit security code – enter the code you have been supplied, then click OK. You should then see the navigation window with some initial waypoints in the English Channel.
2.1

Chapter 2: Getting Started
Installing charts
Deckman works with a variety of different chart formats, both raster and vector, and the installation of each is slightly different, so make sure you refer to the correct section below. If installing ARCS or Livecharts then this can be done from within Deckman (assuming you are using Deckman version 4 or later). For C-Map and Maptech charts (BSB, PCX or REML formats) the installation is done without Deckman running.
When you first start the program after installing new charts the effect of updating the chart folio may not be immediately apparent because the supplied charts do not cover the area of the English Channel occupied by the default waypoints. Use the zoom out tool: this works in the opposite way to zoom in—the image you are looking at now will be zoomed to fit the rectangle which you define by clicking and dragging. Then use the panning tool (the hand) and drag to different areas of the chart.
Note. For Maptech charts, special action is required (see below).
C-Map
The installation of C-Map charts is via a separate CD which should have been supplied with Deckman. Note that you will need this CD to do any further chart installations, so make sure you keep it in a safe place. In addition, there are different CDs for different parts of the world so you may need more than one. Contact your agent or B&G if necessary.
Insert the CD into the drive. It should Autorun, but if not select setup.exe from the NT/PC Selector folder. Follow the on-screen instructions to install the C-Map NT/PC Chart Selector program, and then run this program. This program then contains everything you need to browse the charts, select the ones you wish to install and order from C-Map. Once you have completed the process, close the Chart Selector program, run Deckman in the normal way and the charts will be seen in the appropriate areas.
2.2

Installing charts
Livecharts
With Deckman version 4 or later, the complete catalogue of Livecharts is supplied on the program CD. Charts can then be enabled by obtaining an unlock code from your local agent or B&G.
For help in choosing the charts you require, view the chart catalogue: open Deckman, select menu>charts>chart interaction to stop the regular Deckman display updating and instead interact directly with the charting package. Hold down the right mouse button until a popup menu appears. Select Properties>Chart Settings (Global). Check the View box in the Chart catalog viewing and then click OK. Select Livecharts followed by OK and you will be presented with a toolbar that enables you to view details about different charts.
When you know the charts you wish to use, contact your local agent or B&G to obtain the unlock codes. Once you have the necessary codes, run the Unlock.exe program on your distribution CD from Windows Explorer. The path for this is:
D:\Livechart Archive\unlock (where 'D' is your CD drive)
The paths for the location of the charts on your CD and the desired destination should be displayed correctly automatically, but if not set these as follows:
Install |
charts |
D:\Livechart Archive\charts\live_b (where 'D' |
from |
|
is your CD drive) |
Install |
charts |
C:\Charts\Live_b (where 'C' is the drive where |
to |
|
Deckman is installed) |
For each chart you wish to install enter the unlock code (which will be supplied in four groups of characters) into the four boxes marked Code 1, Code 2 … etc and the name (e.g. BA2045) into the fifth box (if installing a folio of charts leave the final box empty). This procedure must be repeated for all the charts you wish to install.
2.3

Chapter 2: Getting Started
The next step is to tell the program where to find the charts. Choose menu>charts>chart settings. A dialog will pop up giving you all of the options for controlling the appearance of the charts. Select the Chart Directories tab and set the directory for Livecharts - Vector by hitting the Browse button. Move to the correct directory and then choose the Select Path button. The path for Livecharts should be:
C:\Charts\Live_b (where 'C' is the drive where Deckman is installed; if you specified an alternative destination for the charts in the Install charts to box above, this should be entered here)
Note If using versions 3 or earlier, the installation for Livecharts is as follows.
Close Deckman, enter the CD-ROM (or diskette) into the drive and follow the installation procedure. If you are prompted for a filename then use the 8 character names as follows: progra~1\BandG\deckman\charts\live_b. When you have finished, restart Deckman and select menu>charts>update folio to update the chart folio.
ARCS charts
Deckman needs to be running for this installation. The first task is to install the permits: put the permits floppy disk into the disk drive then choose menu>chart>install chart and you will be presented with a series of dialogs which help you do the installation.
Choose Yes to install new permits
Choose Skipper permits
Install permits from disk
Choose the PRESS to Install Permits button, then Next.
Now you will be asked to insert the CD-ROM (the CHART CD-ROM not the UPDATE). Select the PRESS to start installation button for the install to begin. In the summary information you will see that some of the charts require an update; after you have hit the Next button you will
2.4

Installing charts
be asked to insert the UPDATE CD-ROM. After clicking Finish you will be asked to update the folio again.
The next step is to tell the program where to find the charts. Choose menu>charts>chart settings. A dialog will pop up giving you all of the options for controlling the appearance of the charts. Select the Chart Directories tab and set the directory for HCRF - Raster by hitting the Browse button. Move to the correct directory and then select the Select Path button. The path for ARCS charts should be:
C:\Charts\ARCS (where 'C' is the directory where Deckman is installed)
Maptech charts
When using BSB, PCX or REML charts it is advised that these are copied onto the hard drive of your computer. It is possible to run Maptech charts directly from a CD-ROM, but Deckman will operate much more quickly if the charts are read from the hard drive. If you wish to read the Maptech charts directly from a CD, then go straight to Updating the Folio below. In this case the path to specify will be a folder on your CD.
If you wish to run the Maptech charts from your hard drive, copy the charts into a folder in the top level of the drive in which you installed the program, for instance:
Chart type |
Directory (where 'C' is the drive where the program is |
|
installed |
BSB |
C:\BSBChart |
PCX |
C:\PCX952 (see below for more information) |
REML C:\REMLChart
For BSB and REML charts simply copy the required charts into the folder and then go to Updating the Folio below.
For PCX charts, the simplest thing to do is to copy the entire contents of the CD into a folder in the top level of the drive on which Deckman is installed. It is advised that this folder is called something like PCXnnn (where nnn is a reference number from the particular CD: if installing
2.5
Chapter 2: Getting Started
charts from a number of different CDs, it is advised that these be installed into different folders each with appropriate names/numbers for recognition).
However, if you are short of memory space on your hard drive, it is possible to copy only certain charts. This is more complicated because of the way Deckman interacts with the PCX chart format. Each chart is stored in a folder which has a corresponding chart header in the folder
Figure 2.1
Charthdr on the CD-ROM. Both of these sections are required by Deckman and must be stored in the same structure as on the CD. You must therefore create a subfolder named Charthdr within the PCXChart folder on your hard drive. The required chart headers from the Charthdr folder on the CD must then be copied into here with the corresponding chart folders copied into the main PCX folder on your
2.6

Connecting to the Instruments
hard drive. An example of what a PCX folder might look like is shown in Figure 2.1.
Updating the Folio
Once all the required charts have been copied, run Deckman, select menu>charts>use Maptech charts and then check the Use Maptech charts in preference to others box to switch to using Maptech charts. Select menu>charts>update chart folio and you will be presented with a dialog in which you must specify the locations of the Maptech charts. Click Add and then browse through the tree structure to specify the directories in which the Maptech charts are installed. Once you have specified the directories for all the Maptech charts you have loaded, click Update and you will see Deckman running through all the charts.
Note. For PCX charts, select the Charthdr folder as the path.
Connecting to the Instruments
Initially Deckman uses the simulated yacht instruments which enable you to learn to use the program without having to be on the yacht. To change to use the boat instruments go to gmenu>change instruments and you will be presented with a dialog so that you can select your instrument type. After clicking on OK you will be asked to set up the communications (for further details see Part 2, Chapter 7 on Instruments).
Select the COM port which is connected to your instrument system (usually COM1 or COM2 but Deckman can use any port up to COM10). Then set the protocol according to the table below.
|
B&G |
Performance |
NMEA |
Ockam |
|
WTP |
Processor |
|
|
Baud rate |
9600 |
9600 |
4800 |
4800 |
Parity |
NONE |
EVEN |
NONE |
NONE |
Data bits |
8 |
7 |
8 |
8 |
Stop bits |
1 |
2 |
1 |
1 |
2.7

Chapter 2: Getting Started
Note. For connection to an NMEA FFD, h1000 or Silva NMEA, the connections are the same as for NMEA.
When you have specified the correct settings, click Next to specify the settings for your GPS (see below).
Note. To operate a working version in demonstration mode so that it may be used without a dongle see deckman.ini in Chapter 12.
Wiring
The following table details the connections between different instrument systems and Deckman:
|
Performance |
Ockam |
9-pin to |
|
Processor |
|
Deckman |
Instrument ground |
11 |
7 black |
5 |
Instrument transmit |
10 |
3 green |
2 |
Instrument receive |
9 |
2 blue |
3 |
|
join 7-8 |
|
join 4-6, |
|
|
|
7-8 |
Note. The instrument transmit is connected to receive on your computer and vice versa.
Setting up the instruments
You must configure your instrument system so that it outputs information in the correct format for Deckman.
Performance Processor
You must set the system to 9600 baud, EVEN parity, 7 data bits and 2 stop bits.
On an FFD, select waypoint>cross tr on one section of the display, and calibrate>cal val1 on the other. Set the value to 0.
2.8

Direct connection of GPS
Now select waypoint>cross tr on one section of the display, and calibrate>cal val2 on the other. Set the value to 6.2.
Ockam
To set the Ockam RS232 interface to 4800 baud, NO parity, 8 data bits and 1 stop bit, set both switches A and B to 9.
Direct connection of GPS
It is possible to connect your GPS directly to Deckman. The main advantage of this is that you can easily see if you lose GPS signal for any reason and Deckman may also receive the GPS data at a higher frequency.
After clicking Next to setup the communications with the instruments, you will be presented with a dialog which controls how your GPS is connected. Select Instrument System if your GPS is connected via your instruments or Deckman for a direct connection, followed by Finish.
Show incoming data
After you have connected and correctly configured your instruments, and possibly GPS (if going directly to Deckman as described above), you may wish to check that the instrument data is being received by Deckman. Click gmenu>show incoming data, select either Instrument Data or GPS Data followed by Start. You should then see the data in the window of this dialog.
Deckman re-installation over an existing version
Note. This section should be skipped if NOT installing over an existing version.
With Deckman running and with an instrument system connected, choose gmenu>configure comms and make a note of the settings in the Communications dialog. For the old style dongle (serial number beginning 1071) you must also make a note of parameters: in Notepad open the Deckman.ini file (see “deckman.ini” in Chapter 12) and note the [livechart] path. Close Notepad.
2.9

Chapter 2: Getting Started
Next, you must remove the existing version. Select the Start button and then Settings>Control Panel>Add/Remove Programs. For Euronav versions, both Deckman Vn.n (where n.n is the version number) and
Euronav Charting System must be uninstalled.
Run Windows Explorer and make copies of following files in the Data subdirectory (see page 12.5) to somewhere other than the Deckman directory:
Adjvt.d |
wind speed calibration |
|
adjwa.d |
wind angle calibration |
|
bgbounds.d |
B&G instruments |
data bounds |
Bgcalib.d |
|
Calibration |
Bgdamp.d |
|
Damping |
bgout.d |
|
Output |
databar.d |
Data bar settings |
|
diamonds.d |
Tidal stream data |
|
j_nav28.d |
Layers information |
|
j_way.d |
Waypoints file |
|
Navpol.d |
Navigation polar |
|
Ockcalib.d |
Ockam instruments |
Calibration |
Ockdamp.d |
|
Damping |
ockoptn.d |
|
Options |
ockout.d |
|
Output |
Perfpol.d |
Performance polar |
|
report.d |
Reports file |
|
shore.d |
Shoreline information |
|
Startpol.d |
Start polar |
|
Tides.d |
Tidal heights data |
|
Once all these files are backed up, delete the Deckman directory (before doing this, it is just worth checking that no charts have been installed here: chart directories should be as described in ‘Installing Charts’ above).
2.10

Deckman re-installation over an existing version
Install Deckman by running the SetupDeckman.exe installation program on the CD-ROM. There will be two sections to the installation: Deckman and the Euronav Charting System which is automatic after Deckman.
Once installation is complete, if using an old dongle (SN beginning 1071), you must set the [livechart] path in the Deckman.ini file to that noted above.
Copy the files you backed up above into the new Data directory, overwriting the files that have been installed with the new installation.
The remainder of the installation is as normal (as described at the beginning of this chapter). Run Deckman and connect to the appropriate instrument system. Select gmenu>configure comms and set the Communications protocol as noted in the first step.
2.11

Introduction
Chapter 3 : Navigation
Introduction
When you first run Deckman you will see a display something like that shown below in Figure 3.1
The best way to get to know how the program works is to run Simulation (see next page). Here you can practice and start to get to grips with some of the functions before trying to use them under pressure! If not already in Simulation mode select gmenu>change instruments and then check the Simulation box.
Figure 3.1
3.1

Chapter 3: Navigation
The numeric keypad
Whenever Deckman expects you to enter a numeric value a keypad will appear like the example in Figure 3.2. The number you enter is shown at the top in larger size; a message is shown below which usually gives the current value.
Figure 3.2
The keys down the right have the following functions:
Escape: this exits without making any changes
Backspace: deletes the last digit entered
Minus: makes any value entered negative. For inputting West longitudes or South latitudes as these are both considered negative on Deckman.
Enter or Return: tells Deckman to accept the value entered
3.2

Simulation
Simulation
When Simulation is running Deckman generates instrument data that you can use to practice running the other displays. In Simulation mode you can only control the boat's heading and the true wind speed/direction. Deckman then uses these to calculate boat speed and all the other variables.
As you will not be connected to any position fixer, such as GPS, when running in Simulation mode you will have to use Deckman's dead reckoning (DR) capabilities to set the position of the boat. This will be done automatically when you start the program.
When using DR, position is updated regularly according to the boat's speed and course and the tidal information. The DR position can also be set manually to the position of a mark or by specifying a latitude and longitude. The most useful function (especially in Simulation mode) is menu> waypoint>set DR>DR at waypoint to put the boat at the first mark. See Set DR position (on page 3.9) for more details on this.
To change the boat's heading or control the wind, choose gmenu>instruments control and you will be presented with the following dialog:
Figure 3.3
3.3
 Loading...