


 Sergers
Mastering
Your
BERNINA®
Mastering Your
Serger
Owner’s Workbook
MASTERING YOUR BERNINA® SERGERS 6/2006 |
1 |
©2006 BERNINA® of America, Inc.
Permission to copy and distribute in printed and electronic formats granted only to Authorized BERNINA® Dealers

 Sergers
Table of Contents
Mastering
Your
BERNINA®
Class 1 - General Information..................................................... |
3 |
Introduction ..................................................................................................... |
4 |
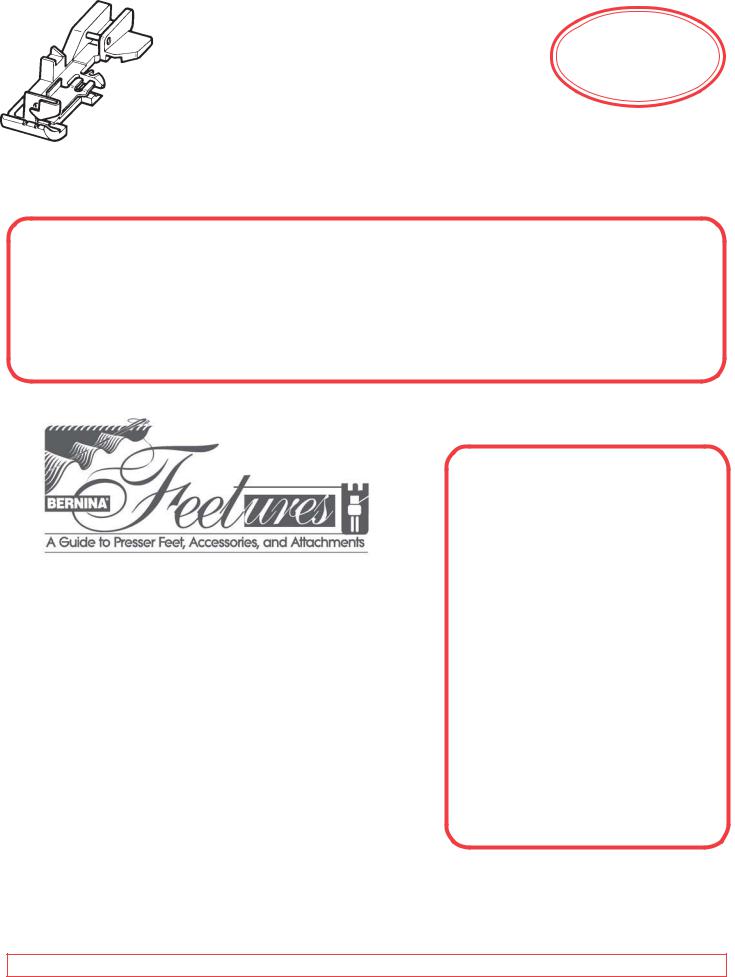
Presser Feet & Accessories............................................................................ |
5 |
Needles ........................................................................................................... |
6 |
Thread ............................................................................................................. |
8 |
Balanced 4-Thread Overlock ........................................................................ |
10 |
Adjusting Tensions ........................................................................................ |
12 |
Stitch Length ................................................................................................. |
18 |
Cutting Width................................................................................................. |
20 |
Differential Feed ............................................................................................ |
22 |
mtc - Micro Thread Control ........................................................................... |
28 |
Securing Ends............................................................................................... |
30 |
Serging a Tube .............................................................................................. |
32 |
Product Reference List ................................................................................. |
34 |
Class 2 - Four Thread Techniques ........................................... |
35 |
Serger Seams ............................................................................................... |
36 |
Seaming Knits ............................................................................................... |
38 |
Serger Piecing............................................................................................... |
46 |
Elasticator ..................................................................................................... |
50 |
Gathering Foot and Attachment .................................................................... |
52 |
Product Reference List ................................................................................. |
58 |
Class 3 - Three-Thread Techniques ......................................... |
59 |
3-Thread Overlock ........................................................................................ |
60 |
3-thread Overlock with mtc. .......................................................................... |
68 |
3-Thread Flatlock .......................................................................................... |
72 |
Blindstitch Foot .............................................................................................. |
78 |
3-Thread Rolled Hem .................................................................................... |
86 |
Cording Foot ................................................................................................. |
88 |
Product Reference List ................................................................................. |
92 |
Class 4 - Miscellaneous Techniques ....................................... |
93 |
3-Thread Super Stretch Stitch ....................................................................... |
94 |
2-Thread Flatlock .......................................................................................... |
98 |
2-Thread Flatlock with mtc. ........................................................................ |
102 |
2-Thread Rolled Hem .................................................................................. |
104 |
2-Thread Wrapped Edge ............................................................................ |
106 |
Multi-Purpose Foot with Guide .................................................................... |
108 |
Product Reference List ............................................................................... |
116 |
Class 5 - Cover & Chain ........................................................... |
117 |
Cover Stitch................................................................................................. |
118 |
Chain Stitch ................................................................................................. |
130 |
Combination Stitches (1300MDC only) ....................................................... |
136 |
Product Reference List ............................................................................... |
140 |
MASTERING YOUR BERNINA® SERGERS 6/2006 |
2 |
©2006 BERNINA® of America, Inc.
Permission to copy and distribute in printed and electronic formats granted only to Authorized BERNINA® Dealers

 Sergers
Class 1
General Information
Class Overview
Mastering
Your
BERNINA®
Machine Overview
Parts of the serger
Setting up the serger
Serger Accessories
Tweezers
Lower Looper Threader (700D only) Needle Threader
(optional for 700D & 800DL) Brush/Needle Insertion Tool Spool Caps
Spool Cones
Thread Nets
Thread
Good quality vs. poor quality
Construction/All-Purpose Thread
Decorative Thread
Needles
Types of Needles
Sizes of Needles
Parts of Needles
Matching Needle & Thread
Threading for Overlock Serging
The Threading Path Threading Order
First – Upper Looper (Blue) Second – Lower Looper (Red) Third – Right Needle (Green) Fourth – Left Needle (Yellow)
Test Serging
Basic Serging Samples
1Balanced 4-Thread Overlock
2Adjusting Tensions - Loopers
3Adjusting Tensions - Loopers
4Adjusting Tensions - Needles
5Stitch Length Adjustment
6Cutting Width Adjustment
7Differential Feed - Stretch
8Differential Feed - Pucker
9Differential Feed - Gathering & Easing
10Micro Thread Control - mtc
11Securing Serged Seams
12Serging a Tubular Project
Care & Cleaning
Removing Lint from Inside Serger
Oiling
Replacing the Cutting Knives
Yearly “Tune Up”
by Authorized BERNINA® technician
This class is formatted for owners of the following models of BERNINA® overlock machines:
•700D
•800DL
•1150MDA
•1300MDC
MASTERING YOUR BERNINA® SERGERS 6/2006 |
3 |
©2006 BERNINA® of America, Inc.
Permission to copy and distribute in printed and electronic formats granted only to Authorized BERNINA® Dealers

 Sergers
Introduction
Mastering
Your
BERNINA®
Congratulations on your purchase of a BERNINA® serger!
This workbook is designed to be used in conjunction with the Owners Classes you will take at your BERNINA® dealership, and contains a series of exercises intended to familiarize you with the features of your new BERNINA® overlock machine. In addition, you will learn about needles, threads, presser feet and accessories, all of which will increase your knowledge of serging and assist you in achieving success in all of your serging endeavors.
Once you have completed the exercises designated for your BERNINA® overlock machine, attach the sewn samples to the indicated pages and insert the pages into plastic page protectors and store them in a 3-ring binder. They can then be used as a reference tool in the future as you use your machine and explore the creative possibilities it affords you.
BERNINA® of America, Inc. strives to provide its customers not just with quality sewing and overlock machines, but with informative publications and classes. Along with providing
Owners Classes, your local BERNINA® dealer stocks BERNINA® books and magazines, such as Feetures, Serger Technique Reference Guide, and Through the Needle. Plus, BERNINA® of America, Inc. has a website – www.berninausa.com – offering free projects, basic sewing and serging information, a glossary of sewing terms, inspirational stories, interviews with creative stitchers, and a variety of articles and postings that appeal to all types of stitchers,
no matter which machines are their favorites.
Learn to use your BERNINA® serger to its full extent and enjoy being creative with fabric and thread!
My BERNINA® overlock machine model is: __________________
I purchased it on: ____________
at ________________________
__________________________
__________________________
MASTERING YOUR BERNINA® SERGERS 6/2006 |
4 |
©2006 BERNINA® of America, Inc.
Permission to copy and distribute in printed and electronic formats granted only to Authorized BERNINA® Dealers
 Sergers
Mastering
Your
BERNINA®
Presser Feet & Accessories
BERNINA® Presser Feet:
•are precision engineered for specific functions
•are, in some cases, modeled after commercial feet used in factories to increase speed and production with professional looking results
•do the job intended in relation to all types of sewing (ex. garment-making, quilting, home dec, etc.)
•are supported by the best and most complete educational materials in the industry, such as the Serging Technique Reference Guide, Feetures, and the BERNINA® website at www.berninausa.com
Additional Presser Feet & Accessories Available for BERNINA® Sergers:
• Blindhem Foot
• Cording Foot
• Elasticator
• Gathering Attachment
• Multi-Purpose Foot with Guide
• Standard Foot with Tape Guide
• Attachment Base
• Looper/Needle Threader
• Left Seam Guide
• Right Seam Guide
• Upper Looper Converter
• Waste Collector
• Serger Technique Reference Book
• Feet-ures Volume 2 (Unit M)
• Feet-ures Volume 3 (Unit P)
MASTERING YOUR BERNINA® SERGERS 6/2006 |
5 |
©2006 BERNINA® of America, Inc.
Permission to copy and distribute in printed and electronic formats granted only to Authorized BERNINA® Dealers
 Sergers
Needles
Along with thread, needles are very important to stitch formation. Many “mechanical” problems and damage to fabrics can be traced to a bent, damaged, or incorrect size or type needle. Approximately 60% of all needles made are discarded at some stage of production. When selecting the correct needle for any serging project, three things must be considered:
Needle system – 130/705H
Needle point – to assure stitch formation and avoid fabric damage Needle size – smaller for lightweight fabrics; larger for heavier ones
If the needle is:
Too small – the thread can’t stay in the groove to form a loop to be picked up by the looper
Bent – thread loop forms too far away from looper, which can’t enter loop to form stitch
Blunt – needle won’t pierce fabric so no thread loop forms to make a stitch
•Never use a needle bigger than size 90/14 in your serger; larger needles can interfere with looper movement and cause damage.
•Needle should be changed every 4-6 hours of sewing. The needle is the most inexpensive part in your serger but is one of the most crucial for getting good results and keeping your machine running well. Don’t let false economy keep you from doing what is best for your sewing projects and your machine.
•European needles are chrome-plated to glide through fabric easily.
•The selected thread should fit in the groove on the front of the needle. If it isn’t protected by the groove, a needle with a larger groove should be used.
•Always make sure needles are fully inserted as high as possible, with the flat side to the back.
Needle Size Conversion
European vs. Domestic |
|
||
60 = 8 |
90 = 14 |
Regardless of the system, the greater |
|
70 |
= 10 |
100 = 16 |
the number, the larger the diameter |
75 |
= 11 |
110 = 18 |
of the needle. Never use a needle |
80 |
= 12 |
120 = 19 |
larger than size 90/14 in your serger! |
Mastering
Your
BERNINA®
Notes
MASTERING YOUR BERNINA® SERGERS 6/2006 |
6 |
©2006 BERNINA® of America, Inc.
Permission to copy and distribute in printed and electronic formats granted only to Authorized BERNINA® Dealers
 Sergers
Needle Chart
Mastering
Your
BERNINA®
Never use a needle bigger than size 90/14 in your serger; larger needles can interfere with looper movement and cause damage.
|
Ball Point |
70-90 |
Has a rounded point. 70 for lingerie, nylon, jersey; |
|
|
|
80 for T-shirt; 90 for sweatshirt fleece. |
|
|
|
|
|
Stretch |
70-90 |
A stretch needle has a more rounded point and |
|
|
|
a blue anti-cling coating which helps to prevent |
|
|
|
skipped stitches in knits and elastic. Sometimes |
|
|
|
used on Ultrasuede®, vinyl, and plastic. |
|
|
|
|
|
|
|
A compromise between a sharp and a ballpoint |
|
Universal |
60-90 |
needle; can be used on both wovens and knits. |
|
|
|
60 – very fine batiste |
|
|
|
70 – broadcloth |
|
|
|
80 – trigger and gabardine |
|
|
|
90 – denim and twill |
|
|
|
|
|
Jeans |
70-90 |
Has a sharp point and a shaft that is less prone to |
|
|
|
flex. The sharpness of the needles makes it better for |
|
|
|
use on denim and woven fabrics where a clean stitch |
|
|
|
is desired. |
|
|
|
|
|
Microtex |
60-90 |
A sharp point with a thin shaft. 60-90 corresponds |
|
Sharp |
|
to the weight of the fabric; as the fabric gets heavier |
|
(Schmetz) |
|
or denser, the number is higher. Specially designed |
|
|
|
for microfiber fabrics. |
|
|
|
|
|
Microfiber |
assort’d |
The thin, tapered point of this needle causes less |
|
(Lammertz) |
(75 & 90) |
damage to fabric when seaming and cross seaming. |
|
Quilting |
|
|
|
|
|
|
|
Topstitch |
80-90 |
A sharp point with a large eye and deep groove. |
|
|
|
Use with heavier fabrics – the large groove cradles |
|
|
|
heavy threads. |
Embroidery 75-90
(Schmetz)
Metafil (Lammertz)
Sharp needle with a large eye and groove; also has a coating and a larger scarf. For use with embroidery thread – prevents shredding of rayon or metallic threads. Two threads may be used through the eye of an 80 or 90 needle.
Leather |
80-90 |
Point is a sharp cutting wedge. Used for leather only. |
|
|
Not for vinyl or simulated leathers. |
MASTERING YOUR BERNINA® SERGERS 6/2006 |
7 |
©2006 BERNINA® of America, Inc.
Permission to copy and distribute in printed and electronic formats granted only to Authorized BERNINA® Dealers
 Sergers
Thread
Poor quality or the wrong type of thread can cause poor stitches on any machine. Thread passes through the eye of the needle approximately 37 times in a “see-saw” action before it forms a single stitch. Poor quality thread results in crooked and looped stitches, puckered seams, frayed thread, and/or needle breakage. To achieve quality stitches, an overlock machine needs three things: correct thread, correct size needle, and properly adjusted settings.
Several factors such as the fiber, twist, ply, finish, and size of thread must be considered for use with today’s fabrics for fine stitches.
Staple – refers to the length of fibers used to twist together to form a single ply. Domestic thread fiber lengths are usually 1½” to 2½” long while European threads use 5½” to 6½” lengths.
Ply – number of strands twisted together to make a single thread.
Roll – the tendency of thread to roll to the right or left during stitching, causing the stitch to appear slightly crooked. Poor quality threads are more likely to roll.
Twist – the crimping of fibers which causes them to interlock firmly into a single ply. Thread should not untwist during stitching. This will cause skipped stitches, thread breakage, crooked stitches, and weak spots in seams.
Right twist – most American threads are twisted to the right, causing some rolling. This gives average stitch quality.
Left twist – Most commercial and imported threads are twisted to the left, giving better than average stitch quality. Left twist resists rolling and makes a larger loop for the hook point to enter, reducing skipped stitches.
Mastering
Your
BERNINA®
Notes
MASTERING YOUR BERNINA® SERGERS 6/2006 |
8 |
©2006 BERNINA® of America, Inc.
Permission to copy and distribute in printed and electronic formats granted only to Authorized BERNINA® Dealers

 Sergers
Thread
Mastering
Your
BERNINA®
Wearable art embellishment has necessitated the creation and marketing of many new thread types, such as rayons and metallics. Threads made in West Germany are left twist threads; Mettler and Isacord threads are also left twist. To test the twist of a thread: while holding the spool in the left hand, roll the strand of thread towards you with one thumb. Left twist will tighten, right twist will loosen.
Fiber – refers to the type of material used to produce the thread. Some commonly used threads:
•Polyester Overlock Thread – such as Mettler Metrocor Thinner than regular sewing thread, eliminating bulk in serger stitch formations. An excellent all-purpose serger thread.
•Texturized Nylon Thread – such as YLI Woolly Nylon
and Mettler Metroflock. A very elastic thread with excellent coverage; perfect for rolled edges and knit seams. Available in solid and variegated colors, and metallics.
• Polyester Topstitching Thread – such as YLI Jeans Stitch
&Mettler Cordonnet – this heavy thread is used for decorative stitching, such as flatlocked seams and overcast edges. Also nice for cover and chain stitching. Available in solid and variegated colors.
• Rayon Decorative Threads – such as YLI Pearl Crown Rayon
&YLI Designer 6 – shiny threads for decorative applications. Pearl Crown Rayon is twisted, while Designer 6 is untwisted. Available in solid and variegated colors.
• Metallic Decorative Threads – such as YLI Candlelight – adds a bit of glitz to seams and edgings.
• Decorative Sewing Threads – sewing machine threads can also be used in the serger, and are particularly effective when several are used together as one thread.
Storage of Thread
Thread does wear out and should be stored with care to keep it usable as long as possible. Extreme moisture may cause thread to swell while very dry conditions can leave it dry and brittle as it ages. Store thread in a covered container (thread box with a lid, cabinet with doors, or drawers that close) if possible to keep it dust-free.
Be wary of old spools of thread recovered from Grandma’s sewing box. The fibers may be so weak and brittle that even if it sews into a seam, it may be so unstable that the garment or project will not hold together and the life of the project may be considerably shortened.
Notes
MASTERING YOUR BERNINA® SERGERS 6/2006 |
9 |
©2006 BERNINA® of America, Inc.
Permission to copy and distribute in printed and electronic formats granted only to Authorized BERNINA® Dealers

 Sergers
Balanced 4-Thread Overlock
Fabric ........................................................................... |
firm fabric, 6” x 6” |
Needle ............................................................................. |
80/12 Universal |
Thread ............................................................... |
4 cones of serger thread |
.......................................................................... |
(yellow, red, green, blue) |
Presser Foot .............................................................................. |
standard |
Stitch ............................................................................ |
4-thread overlock |
Thread the serger for a 4 thread overlock stitch using thread colors to match the color-coded threading path on the serger.
Adjust all thread tension settings as indicated.
Fold the fabric in half to 3” x 6”.
To begin stitching, lift the front of the presser foot with your right thumb and slide the fabric under the presser foot. Release the tip of the presser foot and begin serging.
Serge to the end of the fabric. Continue stitching off the fabric until you have a 3”- 4” thread chain. Cut thread chain.
Examine the serger stitch formation and compare it to the balanced stitch graphic on page__ of your Owner's manual.
Read the information under Adjusting the Thread Tension on page__ of the Owner's manual for information about the stitch formation and correcting any stitch irregularities.
Make any necessary tension adjustments and serge another row of stitching.
Trim and mount the sample.
Record your serger’s “personal” tension settings for a balanced overlock in the chart below:
Balanced 4-Thread Overlock
Left Needle |
Right Needle Upper Looper Lower Looper |
Mastering
Your
BERNINA®
Notes
MASTERING YOUR BERNINA® SERGERS 6/2006 |
10 |
©2006 BERNINA® of America, Inc.
Permission to copy and distribute in printed and electronic formats granted only to Authorized BERNINA® Dealers
 Sergers
Balanced 4-Thread Overlock Sample
Mastering
Your
BERNINA®
Balanced 4-Thread Overlock
Upper Looper .............................. |
3-5 |
Cutting Width ............................... |
2-3 |
Lower Looper .............................. |
3-5 |
Stitch Length .......................... |
2.5mm |
Left Needle .................................. |
3-5 |
Differential Feed ............................ |
N |
Right Needle ............................... |
3-5 |
Stitch Selection Lever .................. |
|
MASTERING YOUR BERNINA® SERGERS 6/2006 |
11 |
©2006 BERNINA® of America, Inc.
Permission to copy and distribute in printed and electronic formats granted only to Authorized BERNINA® Dealers

 Sergers
Adjusting Tensions
Fabric ................................................... |
6 pieces firm fabric, each 3” x 6” |
......................................................... |
1 piece of lightweight cotton, 3” x 4” |
Needle ............................................................................. |
80/12 Universal |
Thread ............................................................... |
4 cones of serger thread |
.......................................................................... |
(yellow, red, green, blue) |
Presser Foot .............................................................................. |
standard |
Stitch ............................................................................ |
4-thread overlock |
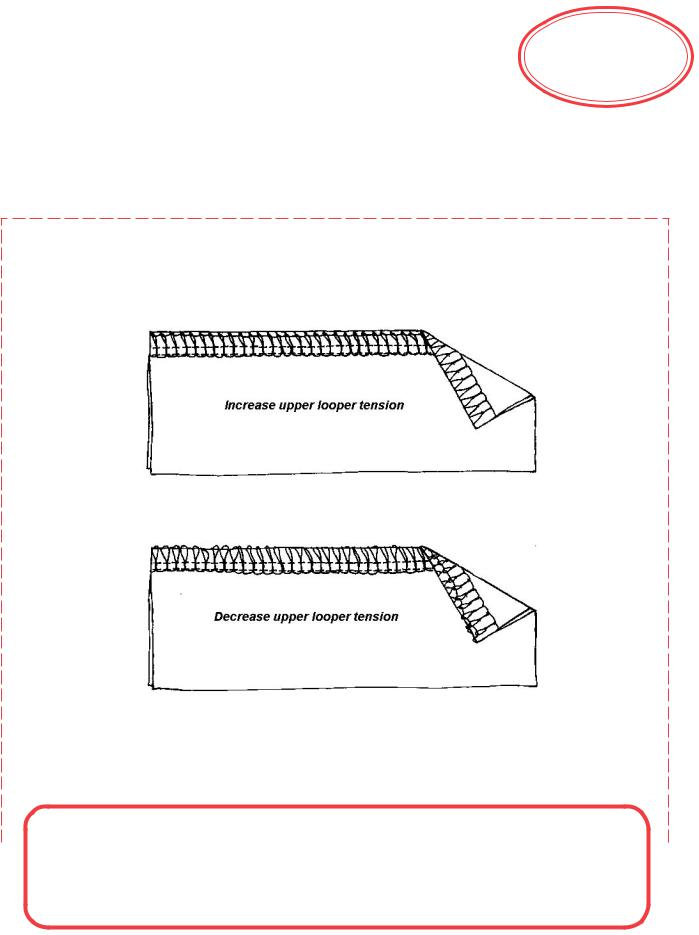
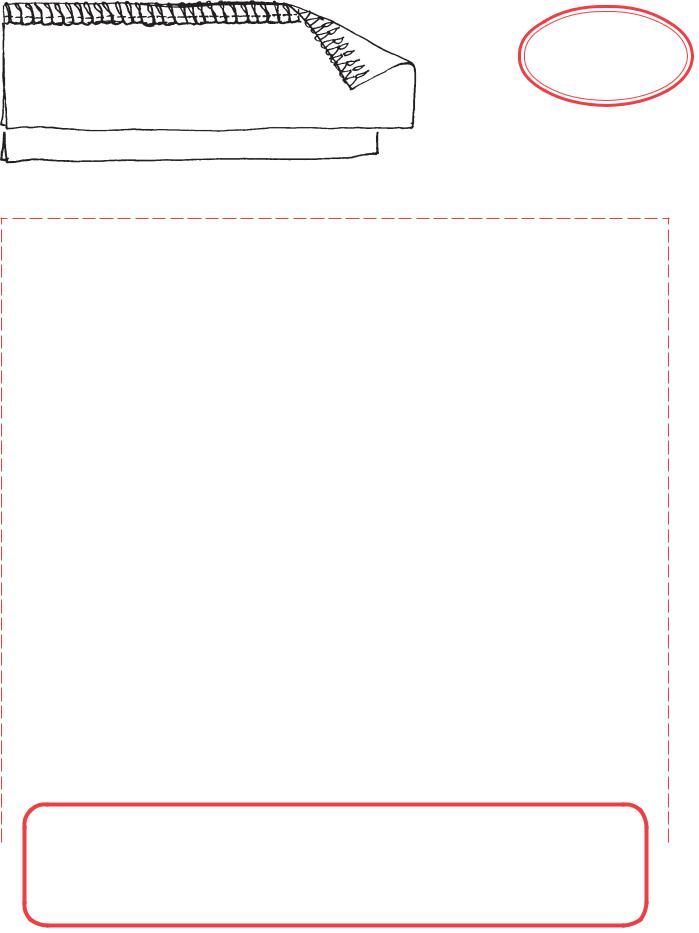
Lower Looper - Increased Tension
Thread the serger for a 4-thread overlock stitch using thread colors to match the color-coded threading path on the serger.
Fold each piece of the firm fabric to 1½” x 4” and set aside.
Locate the thread tension levers on the front of the serger. From left to right, these levers adjust tension for the Left Needle, Right Needle, Upper Looper, and the Lower Looper.
Adjust the lower looper thread tension lever to 7 to increase the tension on the looper thread.
Place the first piece of folded fabric under the presser foot with the fold to the right and serge to the end of the fabric, cutting off the fold.
Examine the sample. The looper threads do not lock on the edge of the fabric. The upper looper thread is pulled tightly to the back of the stitch. The left needle thread may be pulled to the back of the stitch.
Trim, label, and mount the sample.
Lower Looper - Decreased Tension
Change the lower looper thread tension lever to 2 to decrease the tension on the looper thread.
Serge the second piece of folded fabric, cutting off the fold.
Examine the sample. The looper threads do not lock on the edge of the fabric. The lower looper thread is visible on the face of the fabric. The looper threads are very loose.
Label, trim, and mount the sample. Return the thread tension levers to normal.
Mastering
Your
BERNINA®
Notes
MASTERING YOUR BERNINA® SERGERS 6/2006 |
12 |
©2006 BERNINA® of America, Inc.
Permission to copy and distribute in printed and electronic formats granted only to Authorized BERNINA® Dealers

 Sergers
Adjusting Tensions Samples
Mastering
Your
BERNINA®
Balanced 4-Thread Overlock
Upper Looper .............................. |
3-5 |
Cutting Width ............................... |
2-3 |
Lower Looper .............................. |
3-5 |
Stitch Length .......................... |
2.5mm |
Left Needle .................................. |
3-5 |
Differential Feed ............................ |
N |
Right Needle ............................... |
3-5 |
Stitch Selection Lever .................. |
|
MASTERING YOUR BERNINA® SERGERS 6/2006 |
13 |
©2006 BERNINA® of America, Inc.
Permission to copy and distribute in printed and electronic formats granted only to Authorized BERNINA® Dealers

 Sergers
Adjusting Tensions, continued
Upper Looper - Increased Tension
Adjust the upper looper thread tension lever to 7 to increase the tension on the looper thread.
Serge the third piece of folded fabric, cutting off the fold.
Examine the sample. The looper threads do not lock on the edge of the fabric. The lower looper thread is pulled tightly to the front of the stitch.
Label, trim, and mount the sample.
Upper Looper - Decreased Tension
Change the upper looper thread tension lever to 2 to decrease the tension on the looper thread.
Serge the fourth piece of folded fabric, cutting off the fold.
Examine the sample. The looper threads do not lock on the edge of the fabric. The upper looper thread is visible on the back of the fabric. The looper threads are very loose.
Label, trim, and mount the sample.
Return the thread tension levers to normal.
Mastering
Your
BERNINA®
Notes
MASTERING YOUR BERNINA® SERGERS 6/2006 |
14 |
©2006 BERNINA® of America, Inc.
Permission to copy and distribute in printed and electronic formats granted only to Authorized BERNINA® Dealers
 Sergers
Adjusting Tensions Samples
Mastering
Your
BERNINA®
Balanced 4-Thread Overlock
|
|
|
|
|
|
|
Upper Looper |
3-5 |
|
|
|
|
|
|
|
|
|
|
Cutting Width |
2-3 |
|
|
|
|
|
|
|||||||||||||||||||||||||||||||||||||||||||||||||||||
|
|
|
|
|
|
|
|
|
|
|
|
|
|
|
|
|
|
|
|
|
|
|
|||||||||||||||||||||||||||||||||||||||||||||||||||||||||
|
|
|
|
|
|
|
Lower Looper |
3-5 |
|
|
|
|
|
|
|
|
|
|
Stitch Length |
2.5mm |
|
||||||||||||||||||||||||||||||||||||||||||||||||||||||||||
|
|
|
|
|
|
|
|
|
|
|
|
|
|
|
|
|
|
||||||||||||||||||||||||||||||||||||||||||||||||||||||||||||||
|
|
|
|
|
|
|
Left Needle |
3-5 |
|
|
|
|
|
|
|
|
|
|
Differential Feed |
|
|
|
|
N |
|
||||||||||||||||||||||||||||||||||||||||||||||||||||||
|
|
|
|
|
|
|
|
|
|
|
|
|
|
|
|
|
|
|
|
|
|
||||||||||||||||||||||||||||||||||||||||||||||||||||||||||
|
|
|
|
|
|
|
Right Needle |
3-5 |
|
|
|
|
|
|
|
|
|
|
Stitch Selection Lever |
|
|
|
|
|
|||||||||||||||||||||||||||||||||||||||||||||||||||||||
|
|
|
|
|
|
|
|
|
|
|
|
|
|
|
|
|
|
|
|
|
|||||||||||||||||||||||||||||||||||||||||||||||||||||||||||
|
|
|
|
|
|
|
|
|
|
|
|
|
|
|
|
|
|
|
|
|
|
|
|
|
|
|
|
|
|
|
|
|
|
|
|
|
|
|
|
|
|
|
|
|
|
|
|
|
|
|
|
|
|
|
|
|
|
|
|
|
|
|
|
|
|
|
|
|
|
|
|
|
|
|
|
|
|
|
|
|
|
|
|
|
|
|
|
|
|
|
|
|
|
|
|
|
|
|
|
|
|
|
|
|
|
|
|
|
|
|
|
|
|
|
|
|
|
|
|
|
|
|
|
|
|
|
|
|
|
|
|
|
|
|
|
|
|
|
|
|
|
|
|
|
|
|
|
|
|
|
|
|
|
|
|
|
|
|
|
|
|
|
|
|
|
|
|
|
|
|
|
|
|
|
|
|
|
|
|
|
|
|
|
|
|
|
|
|
|
|
|
|
|
|
|
|
|
|
|
|
|
|
|
|
|
|
|
|
|
|
|
|
|
|
|
|
|
|
|
|
|
|
|
|
|
|
|
|
|
|
|
|
|
|
|
|
|
|
|
|
|
|
|
|
|
|
|
|
|
|
|
|
|
|
|
|
|
|
|
|
|
|
|
|
|
|
|
|
|
|
|
|
|
|
|
|
|
|
|
|
|
|
|
|
|
|
|
|
|
|
|
|
|
|
|
|
|
|
|
|
|
|
|
|
|
|
|
|
|
|
|
|
|
|
|
|
|
|
|
|
|
|
|
|
|
|
|
|
|
|
|
|
|
|
|
|
|
|
|
|
|
|
|
|
|
|
|
|
|
|
|
|
|
|
|
||||||||||||||||||||||||||||||||||||||||||||
MASTERING YOUR BERNINA® SERGERS |
6/2006 |
|
|
|
|
|
|
|
|
|
|
|
|
|
|
|
|
|
|
|
|
|
|
|
|
|
|
|
|
|
|
|
|
|
15 |
||||||||||||||||||||||||||||||||||||||||||||
|
|
|
|
|
|
|
|
|
|
|
|
|
|
|
|
|
|
|
|
|
|
|
|
|
|
|
|
|
|
|
|
|
|
|
|
|
|
|
|
|
|
|
|
|
|
|
|
|
|
|
|
|
|
|
|
|
|
|
|
|
|
|
|
|
|
|
|
|
|
|
|
|
|
|
|
|
|
|
|
©2006 BERNINA® of America, Inc.
Permission to copy and distribute in printed and electronic formats granted only to Authorized BERNINA® Dealers

 Sergers
Adjusting Tensions, continued
Right Needle - Decreased Tension
Adjust the right needle thread tension lever to 2 (down) to decrease the tension on the needle thread.
Serge the fifth piece of folded fabric, cutting off the fold.
Examine the sample. The needle thread forms large loops on the back of the fabric.
Label, trim, and mount the sample.
Left Needle - Decreased Tension
Adjust the left needle thread tension lever to 2 to decrease the tension on the needle thread.
Serge the sixth piece of folded fabric, cutting off the fold.
Examine the sample. The needle thread forms large loops on the back of the fabric.
Label, trim, and mount the sample.
Both Needles - Increased Tension
Adjust both the left and right needle thread tension levers to 7 to increase the tension on the needle threads.
Fold the piece of lightweight woven cotton fabric to 1½” x 4”.
Serge the folded fabric, cutting off the fold.
Examine the sample. The lower looper thread is pulled to the front of the sample and the stitch is puckering the fabric.
Label, trim, and mount the sample.
Return both needle thread tension levers to normal.
Mastering
Your
BERNINA®
Notes
MASTERING YOUR BERNINA® SERGERS 6/2006 |
16 |
©2006 BERNINA® of America, Inc.
Permission to copy and distribute in printed and electronic formats granted only to Authorized BERNINA® Dealers
 Sergers
Adjusting Tensions Samples
Mastering
Your
BERNINA®
increased left & right needle tensions
decreased right needle tension
decreased left needle tension
Balanced 4-Thread Overlock
|
|
|
|
|
|
|
Upper Looper |
3-5 |
|
|
|
|
|
|
|
|
|
|
|
Cutting Width |
2-3 |
|
|
|
|
|
|
||||||||||||||||||||||||||||||||||||||||||||||||||||
|
|
|
|
|
|
|
|
|
|
|
|
|
|
|
|
|
|
|
|
|
|
|
|
||||||||||||||||||||||||||||||||||||||||||||||||||||||||
|
|
|
|
|
|
|
Lower Looper |
3-5 |
|
|
|
|
|
|
|
|
|
|
|
Stitch Length |
2.5mm |
|
|||||||||||||||||||||||||||||||||||||||||||||||||||||||||
|
|
|
|
|
|
|
|
|
|
|
|
|
|
|
|
|
|
|
|||||||||||||||||||||||||||||||||||||||||||||||||||||||||||||
|
|
|
|
|
|
|
Left Needle |
3-5 |
|
|
|
|
|
|
|
|
|
|
|
Differential Feed |
|
|
|
|
N |
|
|||||||||||||||||||||||||||||||||||||||||||||||||||||
|
|
|
|
|
|
|
|
|
|
|
|
|
|
|
|
|
|
|
|
|
|
|
|||||||||||||||||||||||||||||||||||||||||||||||||||||||||
|
|
|
|
|
|
|
Right Needle |
3-5 |
|
|
|
|
|
|
|
|
|
|
|
Stitch Selection Lever |
|
|
|
|
|
||||||||||||||||||||||||||||||||||||||||||||||||||||||
|
|
|
|
|
|
|
|
|
|
|
|
|
|
|
|
|
|
|
|
|
|
||||||||||||||||||||||||||||||||||||||||||||||||||||||||||
|
|
|
|
|
|
|
|
|
|
|
|
|
|
|
|
|
|
|
|
|
|
|
|
|
|
|
|
|
|
|
|
|
|
|
|
|
|
|
|
|
|
|
|
|
|
|
|
|
|
|
|
|
|
|
|
|
|
|
|
|
|
|
|
|
|
|
|
|
|
|
|
|
|
|
|
|
|
|
|
|
|
|
|
|
|
|
|
|
|
|
|
|
|
|
|
|
|
|
|
|
|
|
|
|
|
|
|
|
|
|
|
|
|
|
|
|
|
|
|
|
|
|
|
|
|
|
|
|
|
|
|
|
|
|
|
|
|
|
|
|
|
|
|
|
|
|
|
|
|
|
|
|
|
|
|
|
|
|
|
|
|
|
|
|
|
|
|
|
|
|
|
|
|
|
|
|
|
|
|
|
|
|
|
|
|
|
|
|
|
|
|
|
|
|
|
|
|
|
|
|
|
|
|
|
|
|
|
|
|
|
|
|
|
|
|
|
|
|
|
|
|
|
|
|
|
|
|
|
|
|
|
|
|
|
|
|
|
|
|
|
|
|
|
|
|
|
|
|
|
|
|
|
|
|
|
|
|
|
|
|
|
|
|
|
|
|
|
|
|
|
|
|
|
|
|
|
|
|
|
|
|
|
|
|
|
|
|
|
|
|
|
|
|
|
|
|
|
|
|
|
|
|
|
|
|
|
|
|
|
|
|
|
|
|
|
|
|
|
|
|
|
|
|
|
|
|
|
|
|
|
|
|
|
|
|
|
|
|
|
|
|
|
|
|
|
|
|
|
|
|
|
|
|
|
|
||||||||||||||||||||||||||||||||||||||||||||
MASTERING YOUR BERNINA® SERGERS |
6/2006 |
|
|
|
|
|
|
|
|
|
|
|
|
|
|
|
|
|
|
|
|
|
|
|
|
|
|
|
|
|
|
|
|
|
17 |
||||||||||||||||||||||||||||||||||||||||||||
|
|
|
|
|
|
|
|
|
|
|
|
|
|
|
|
|
|
|
|
|
|
|
|
|
|
|
|
|
|
|
|
|
|
|
|
|
|
|
|
|
|
|
|
|
|
|
|
|
|
|
|
|
|
|
|
|
|
|
|
|
|
|
|
|
|
|
|
|
|
|
|
|
|
|
|
|
|
|
|
©2006 BERNINA® of America, Inc.
Permission to copy and distribute in printed and electronic formats granted only to Authorized BERNINA® Dealers

 Sergers
Stitch Length Adjustment
Fabric .......................................................................... |
firm fabric, 6” x 6” |
Needle ............................................................................. |
80/12 Universal |
Thread ............................................................... |
4 cones of serger thread |
.......................................................................... |
(yellow, red, green, blue) |
Presser Foot .............................................................................. |
standard |
Stitch ............................................................................ |
4-thread overlock |
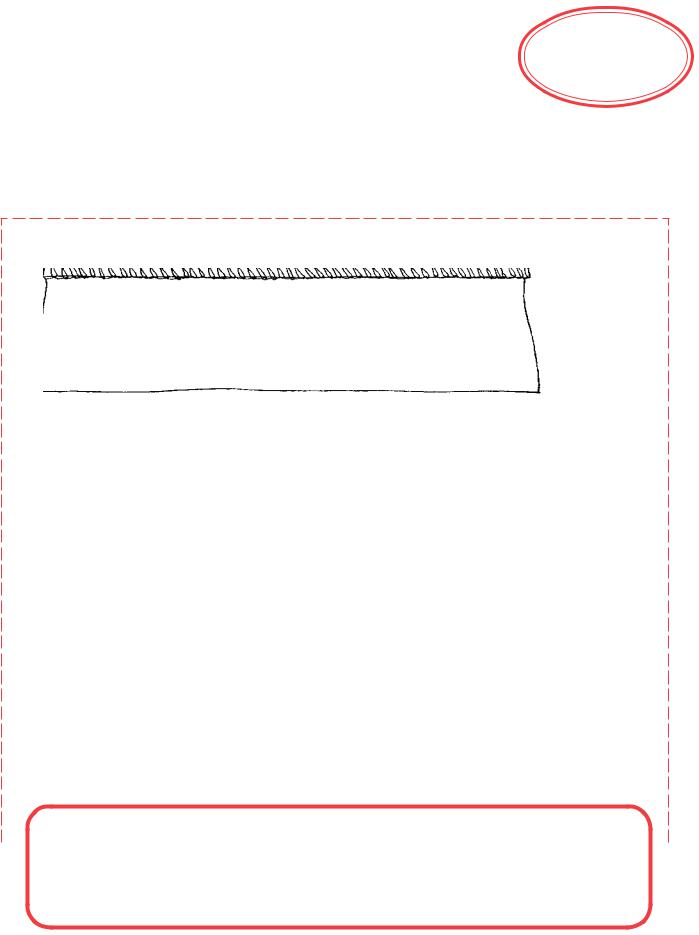
Fold fabric in half to 3” x 6”.
Using a fabric marker, divide the fabric into four equal sections along the folded edge.
Thread the serger for a four thread overlock stitch. Fine tune the settings as needed. Set the cutting width and the differential at their normal settings.
Adjust the stitch length to 4mm. Serge to the first mark along the folded edge, trimming the fold slightly.
Adjust the stitch length to 3mm and serge to the second mark.
Adjust the stitch length to 2mm and serge to the third mark.
Adjust the stitch length to 1mm and serge to the end.
Mark the stitch length settings on the fabric sample.
Trim and mount the sample.
Return stitch length to its normal setting, 2.5mm.
Mastering
Your
BERNINA®
Notes
MASTERING YOUR BERNINA® SERGERS 6/2006 |
18 |
©2006 BERNINA® of America, Inc.
Permission to copy and distribute in printed and electronic formats granted only to Authorized BERNINA® Dealers

 Sergers
Stitch Length Adjustment Sample
Mastering
Your
BERNINA®
4mm |
3mm |
2mm |
1mm |
|
|
|
|
|
|
|
|
Balanced 4-Thread Overlock
|
|
|
|
|
|
Upper Looper |
3-5 |
|
|
|
|
|
|
|
|
|
|
Cutting Width |
2-3 |
|
|
|
|
|
|
|
|||||||||||||||||||||||||||||||||||||||||||||||||||||
|
|
|
|
|
|
|
|
|
|
|
|
|
|
|
|
|
|
|
|
|
|
|
|||||||||||||||||||||||||||||||||||||||||||||||||||||||||
|
|
|
|
|
|
Lower Looper |
3-5 |
|
|
|
|
|
|
|
|
|
|
Stitch Length |
2.5mm |
|
|||||||||||||||||||||||||||||||||||||||||||||||||||||||||||
|
|
|
|
|
|
|
|
|
|
|
|
|
|
|
|
|
|||||||||||||||||||||||||||||||||||||||||||||||||||||||||||||||
|
|
|
|
|
|
Left Needle |
3-5 |
|
|
|
|
|
|
|
|
|
|
Differential Feed |
|
|
|
|
N |
|
|||||||||||||||||||||||||||||||||||||||||||||||||||||||
|
|
|
|
|
|
|
|
|
|
|
|
|
|
|
|
|
|
|
|
|
|||||||||||||||||||||||||||||||||||||||||||||||||||||||||||
|
|
|
|
|
|
Right Needle |
3-5 |
|
|
|
|
|
|
|
|
|
|
Stitch Selection Lever |
|
|
|
|
|||||||||||||||||||||||||||||||||||||||||||||||||||||||||
|
|
|
|
|
|
|
|
|
|
|
|
|
|
|
|
|
|
|
|||||||||||||||||||||||||||||||||||||||||||||||||||||||||||||
|
|
|
|
|
|
|
|
|
|
|
|
|
|
|
|
|
|
|
|
|
|
|
|
|
|
|
|
|
|
|
|
|
|
|
|
|
|
|
|
|
|
|
|
|
|
|
|
|
|
|
|
|
|
|
|
|
|
|
|
|
|
|
|
|
|
|
|
|
|
|
|
|
|
|
|
|
|
|
|
|
|
|
|
|
|
|
|
|
|
|
|
|
|
|
|
|
|
|
|
|
|
|
|
|
|
|
|
|
|
|
|
|
|
|
|
|
|
|
|
|
|
|
|
|
|
|
|
|
|
|
|
|
|
|
|
|
|
|
|
|
|
|
|
|
|
|
|
|
|
|
|
|
|
|
|
|
|
|
|
|
|
|
|
|
|
|
|
|
|
|
|
|
|
|
|
|
|
|
|
|
|
|
|
|
|
|
|
|
|
|
|
|
|
|
|
|
|
|
|
|
|
|
|
|
|
|
|
|
|
|
|
|
|
|
|
|
|
|
|
|
|
|
|
|
|
|
|
|
|
|
|
|
|
|
|
|
|
|
|
|
|
|
|
|
|
|
|
|
|
|
|
|
|
|
|
|
|
|
|
|
|
|
|
|
|
|
|
|
|
|
|
|
|
|
|
|
|
|
|
|
|
|
|
|
|
|
|
|
|
|
|
|
|
|
|
|
|
|
|
|
|
|
|
|
|
|
|
|
|
|
|
|
|
|
|
|
|
|
|
|
|
|
|
|
|
|
|
|
|
|
|
|
|
|
|
|
|
|
|
|
|
|
|
|
|
|
|
|
|
|
|
|
|
|
|
||||||||||||||||||||||||||||||||||||||||||||
MASTERING YOUR BERNINA® SERGERS |
6/2006 |
|
|
|
|
|
|
|
|
|
|
|
|
|
|
|
|
|
|
|
|
|
|
|
|
|
|
|
|
|
|
|
|
|
19 |
||||||||||||||||||||||||||||||||||||||||||||
|
|
|
|
|
|
|
|
|
|
|
|
|
|
|
|
|
|
|
|
|
|
|
|
|
|
|
|
|
|
|
|
|
|
|
|
|
|
|
|
|
|
|
|
|
|
|
|
|
|
|
|
|
|
|
|
|
|
|
|
|
|
|
|
|
|
|
|
|
|
|
|
|
|
|
|
|
|
|
|
©2006 BERNINA® of America, Inc.
Permission to copy and distribute in printed and electronic formats granted only to Authorized BERNINA® Dealers

 Sergers
Cutting Width Adjustment
Fabric .......................................................................... |
firm fabric, 6” x 6” |
Needle ............................................................................. |
80/12 Universal |
Thread ............................................................... |
4 cones of serger thread |
.......................................................................... |
(yellow, red, green, blue) |
Presser Foot .............................................................................. |
standard |
Stitch ............................................................................ |
4-thread overlock |
Fold the fabric in half to 3” x 6”.
Divide and mark the fabric into three equal sections along the folded edge.
Thread the serger for a 4-thread overlock stitch. Fine tune the tensions for a balanced overlock stitch (3-5).
Rotate the upper knife up. Adjust cutting width to 3. Rotate the upper knife down into cutting position.
Serge to the first mark on the fabric, stopping when the knife edge is on the mark.
Adjust cutting width to 2mm and serge to the second mark.
Adjust the cutting width to 1mm and serge to the end of the fabric.
Mark the cutting width settings on the sample.
Rotate the upper knife up. Return the cutting width to its normal setting, 2mm. Rotate the upper knife down into cutting position.
Compare the cutting width sample to the balanced 4-thread sample to see how cutting width affects the balance of the overlock stitch.
Mastering
Your
BERNINA®
Notes
MASTERING YOUR BERNINA® SERGERS 6/2006 |
20 |
©2006 BERNINA® of America, Inc.
Permission to copy and distribute in printed and electronic formats granted only to Authorized BERNINA® Dealers
 Sergers
Cutting Width Adjustment Sample
Mastering
Your
BERNINA®
|
3mm |
2mm |
1mm |
|
|
|
|
|
|
|
|
|
|
|
|
|
|
|
|
Balanced 4-Thread Overlock
|
|
|
|
|
|
Upper Looper |
3-5 |
|
|
|
|
|
|
|
|
|
|
Cutting Width |
2-3 |
|
|
|
|
|
|
|
|||||||||||||||||||||||||||||||||||||||||||||||||||||
|
|
|
|
|
|
|
|
|
|
|
|
|
|
|
|
|
|
|
|
|
|
|
|||||||||||||||||||||||||||||||||||||||||||||||||||||||||
|
|
|
|
|
|
Lower Looper |
3-5 |
|
|
|
|
|
|
|
|
|
|
Stitch Length |
2.5mm |
|
|||||||||||||||||||||||||||||||||||||||||||||||||||||||||||
|
|
|
|
|
|
|
|
|
|
|
|
|
|
|
|
|
|||||||||||||||||||||||||||||||||||||||||||||||||||||||||||||||
|
|
|
|
|
|
Left Needle |
3-5 |
|
|
|
|
|
|
|
|
|
|
Differential Feed |
|
|
|
|
N |
|
|||||||||||||||||||||||||||||||||||||||||||||||||||||||
|
|
|
|
|
|
|
|
|
|
|
|
|
|
|
|
|
|
|
|
|
|||||||||||||||||||||||||||||||||||||||||||||||||||||||||||
|
|
|
|
|
|
Right Needle |
3-5 |
|
|
|
|
|
|
|
|
|
|
Stitch Selection Lever |
|
|
|
|
|||||||||||||||||||||||||||||||||||||||||||||||||||||||||
|
|
|
|
|
|
|
|
|
|
|
|
|
|
|
|
|
|
|
|||||||||||||||||||||||||||||||||||||||||||||||||||||||||||||
|
|
|
|
|
|
|
|
|
|
|
|
|
|
|
|
|
|
|
|
|
|
|
|
|
|
|
|
|
|
|
|
|
|
|
|
|
|
|
|
|
|
|
|
|
|
|
|
|
|
|
|
|
|
|
|
|
|
|
|
|
|
|
|
|
|
|
|
|
|
|
|
|
|
|
|
|
|
|
|
|
|
|
|
|
|
|
|
|
|
|
|
|
|
|
|
|
|
|
|
|
|
|
|
|
|
|
|
|
|
|
|
|
|
|
|
|
|
|
|
|
|
|
|
|
|
|
|
|
|
|
|
|
|
|
|
|
|
|
|
|
|
|
|
|
|
|
|
|
|
|
|
|
|
|
|
|
|
|
|
|
|
|
|
|
|
|
|
|
|
|
|
|
|
|
|
|
|
|
|
|
|
|
|
|
|
|
|
|
|
|
|
|
|
|
|
|
|
|
|
|
|
|
|
|
|
|
|
|
|
|
|
|
|
|
|
|
|
|
|
|
|
|
|
|
|
|
|
|
|
|
|
|
|
|
|
|
|
|
|
|
|
|
|
|
|
|
|
|
|
|
|
|
|
|
|
|
|
|
|
|
|
|
|
|
|
|
|
|
|
|
|
|
|
|
|
|
|
|
|
|
|
|
|
|
|
|
|
|
|
|
|
|
|
|
|
|
|
|
|
|
|
|
|
|
|
|
|
|
|
|
|
|
|
|
|
|
|
|
|
|
|
|
|
|
|
|
|
|
|
|
|
|
|
|
|
|
|
|
|
|
|
|
|
|
|
|
|
|
|
|
|
|
|
|
|
||||||||||||||||||||||||||||||||||||||||||||
MASTERING YOUR BERNINA® SERGERS |
6/2006 |
|
|
|
|
|
|
|
|
|
|
|
|
|
|
|
|
|
|
|
|
|
|
|
|
|
|
|
|
|
|
|
|
|
21 |
||||||||||||||||||||||||||||||||||||||||||||
|
|
|
|
|
|
|
|
|
|
|
|
|
|
|
|
|
|
|
|
|
|
|
|
|
|
|
|
|
|
|
|
|
|
|
|
|
|
|
|
|
|
|
|
|
|
|
|
|
|
|
|
|
|
|
|
|
|
|
|
|
|
|
|
|
|
|
|
|
|
|
|
|
|
|
|
|
|
|
|
©2006 BERNINA® of America, Inc.
Permission to copy and distribute in printed and electronic formats granted only to Authorized BERNINA® Dealers

 Sergers
Differential Feed:
Fabrics that Stretch
Fabric .................................... |
3 pieces of ribbing, each 5” wide x 2” long |
Needle ............................................................................. |
80/12 Universal |
Thread ............................................................... |
4 cones of serger thread |
.......................................................................... |
(yellow, red, green, blue) |
Presser Foot .............................................................................. |
standard |
Stitch ............................................................................ |
4-thread overlock |
Thread the serger for a 4-thread overlock stitch. Fine tune the tensions for a balanced overlock stitch. Set the cutting width as needed and set the stitch length to 2.5mm.
With differential set at N, serge two of the ribbing pieces together along one 5” edge. If the fabric is stretchy enough you will have a wavy edge.
Adjust the differential to 2.0.
Stitching along the 5” side, serge the remaining ribbing to the other side of the piece, trimming slightly. With differential at a higher setting, the wavy edge should be eliminated.
Mark the differential settings on the fabric sample.
Compare the seams to see how the differential settings can affect stretching.
Trim and mount the sample. c
Return the differential feed setting to N (normal).
Mastering
Your
BERNINA®
Notes
MASTERING YOUR BERNINA® SERGERS 6/2006 |
22 |
©2006 BERNINA® of America, Inc.
Permission to copy and distribute in printed and electronic formats granted only to Authorized BERNINA® Dealers
 Sergers
Mastering
Your
BERNINA®
Differential Feed: Fabrics that Stretch Sample
N
2.0
Balanced 4-Thread Overlock
|
|
|
|
|
|
Upper Looper |
3-5 |
|
|
|
|
|
|
|
|
|
|
Cutting Width |
2-3 |
|
|
|
|
|
|
|
|||||||||||||||||||||||||||||||||||||||||||||||||||||
|
|
|
|
|
|
|
|
|
|
|
|
|
|
|
|
|
|
|
|
|
|
|
|||||||||||||||||||||||||||||||||||||||||||||||||||||||||
|
|
|
|
|
|
Lower Looper |
3-5 |
|
|
|
|
|
|
|
|
|
|
Stitch Length |
2.5mm |
|
|||||||||||||||||||||||||||||||||||||||||||||||||||||||||||
|
|
|
|
|
|
|
|
|
|
|
|
|
|
|
|
|
|||||||||||||||||||||||||||||||||||||||||||||||||||||||||||||||
|
|
|
|
|
|
Left Needle |
3-5 |
|
|
|
|
|
|
|
|
|
|
Differential Feed |
|
|
|
|
N |
|
|||||||||||||||||||||||||||||||||||||||||||||||||||||||
|
|
|
|
|
|
|
|
|
|
|
|
|
|
|
|
|
|
|
|
|
|||||||||||||||||||||||||||||||||||||||||||||||||||||||||||
|
|
|
|
|
|
Right Needle |
3-5 |
|
|
|
|
|
|
|
|
|
|
Stitch Selection Lever |
|
|
|
|
|||||||||||||||||||||||||||||||||||||||||||||||||||||||||
|
|
|
|
|
|
|
|
|
|
|
|
|
|
|
|
|
|
|
|||||||||||||||||||||||||||||||||||||||||||||||||||||||||||||
|
|
|
|
|
|
|
|
|
|
|
|
|
|
|
|
|
|
|
|
|
|
|
|
|
|
|
|
|
|
|
|
|
|
|
|
|
|
|
|
|
|
|
|
|
|
|
|
|
|
|
|
|
|
|
|
|
|
|
|
|
|
|
|
|
|
|
|
|
|
|
|
|
|
|
|
|
|
|
|
|
|
|
|
|
|
|
|
|
|
|
|
|
|
|
|
|
|
|
|
|
|
|
|
|
|
|
|
|
|
|
|
|
|
|
|
|
|
|
|
|
|
|
|
|
|
|
|
|
|
|
|
|
|
|
|
|
|
|
|
|
|
|
|
|
|
|
|
|
|
|
|
|
|
|
|
|
|
|
|
|
|
|
|
|
|
|
|
|
|
|
|
|
|
|
|
|
|
|
|
|
|
|
|
|
|
|
|
|
|
|
|
|
|
|
|
|
|
|
|
|
|
|
|
|
|
|
|
|
|
|
|
|
|
|
|
|
|
|
|
|
|
|
|
|
|
|
|
|
|
|
|
|
|
|
|
|
|
|
|
|
|
|
|
|
|
|
|
|
|
|
|
|
|
|
|
|
|
|
|
|
|
|
|
|
|
|
|
|
|
|
|
|
|
|
|
|
|
|
|
|
|
|
|
|
|
|
|
|
|
|
|
|
|
|
|
|
|
|
|
|
|
|
|
|
|
|
|
|
|
|
|
|
|
|
|
|
|
|
|
|
|
|
|
|
|
|
|
|
|
|
|
|
|
|
|
|
|
|
|
|
|
|
|
|
|
|
|
|
|
|
|
|
|
|
|
||||||||||||||||||||||||||||||||||||||||||||
MASTERING YOUR BERNINA® SERGERS |
6/2006 |
|
|
|
|
|
|
|
|
|
|
|
|
|
|
|
|
|
|
|
|
|
|
|
|
|
|
|
|
|
|
|
|
|
23 |
||||||||||||||||||||||||||||||||||||||||||||
|
|
|
|
|
|
|
|
|
|
|
|
|
|
|
|
|
|
|
|
|
|
|
|
|
|
|
|
|
|
|
|
|
|
|
|
|
|
|
|
|
|
|
|
|
|
|
|
|
|
|
|
|
|
|
|
|
|
|
|
|
|
|
|
|
|
|
|
|
|
|
|
|
|
|
|
|
|
|
|
©2006 BERNINA® of America, Inc.
Permission to copy and distribute in printed and electronic formats granted only to Authorized BERNINA® Dealers
 Sergers
Differential Feed:
Fabrics that Pucker
Fabric ................................................................... |
1 piece batiste, 3” x 6” |
Needle ............................................................................. |
80/12 Universal |
Thread ............................................................... |
4 cones of serger thread |
.......................................................................... |
(yellow, red, green, blue) |
Presser Foot .............................................................................. |
standard |
Stitch ............................................................................ |
4-thread overlock |
Thread the serger for a four thread overlock stitch. Fine tune tensions for a balanced overlock stitch. Adjust the stitch length to 2.5mm.
With differential set at N, serge on one 6” edge. If fabric is lightweight enough you will have a puckered edge.
Adjust the differential to 0.7.
Serge along the other edge, trimming slightly. With a low differential setting, the puckered edge should be eliminated.
Mark the differential settings on the fabric sample.
Trim and mount the sample.
Return the differential feed setting to N (normal).
Mastering
Your
BERNINA®
Notes
MASTERING YOUR BERNINA® SERGERS 6/2006 |
24 |
©2006 BERNINA® of America, Inc.
Permission to copy and distribute in printed and electronic formats granted only to Authorized BERNINA® Dealers

 Sergers
Mastering
Your
BERNINA®
Differential Feed: Fabrics that Pucker Sample
N
0.7
Balanced 4-Thread Overlock
|
|
|
|
|
|
Upper Looper |
3-5 |
|
|
|
|
|
|
|
|
|
|
Cutting Width |
2-3 |
|
|
|
|
|
|
|
|||||||||||||||||||||||||||||||||||||||||||||||||||||
|
|
|
|
|
|
|
|
|
|
|
|
|
|
|
|
|
|
|
|
|
|
|
|||||||||||||||||||||||||||||||||||||||||||||||||||||||||
|
|
|
|
|
|
Lower Looper |
3-5 |
|
|
|
|
|
|
|
|
|
|
Stitch Length |
2.5mm |
|
|||||||||||||||||||||||||||||||||||||||||||||||||||||||||||
|
|
|
|
|
|
|
|
|
|
|
|
|
|
|
|
|
|||||||||||||||||||||||||||||||||||||||||||||||||||||||||||||||
|
|
|
|
|
|
Left Needle |
3-5 |
|
|
|
|
|
|
|
|
|
|
Differential Feed |
|
|
|
|
N |
|
|||||||||||||||||||||||||||||||||||||||||||||||||||||||
|
|
|
|
|
|
|
|
|
|
|
|
|
|
|
|
|
|
|
|
|
|||||||||||||||||||||||||||||||||||||||||||||||||||||||||||
|
|
|
|
|
|
Right Needle |
3-5 |
|
|
|
|
|
|
|
|
|
|
Stitch SelectionLever |
|
|
|
|
|||||||||||||||||||||||||||||||||||||||||||||||||||||||||
|
|
|
|
|
|
|
|
|
|
|
|
|
|
|
|
|
|
|
|||||||||||||||||||||||||||||||||||||||||||||||||||||||||||||
|
|
|
|
|
|
|
|
|
|
|
|
|
|
|
|
|
|
|
|
|
|
|
|
|
|
|
|
|
|
|
|
|
|
|
|
|
|
|
|
|
|
|
|
|
|
|
|
|
|
|
|
|
|
|
|
|
|
|
|
|
|
|
|
|
|
|
|
|
|
|
|
|
|
|
|
|
|
|
|
|
|
|
|
|
|
|
|
|
|
|
|
|
|
|
|
|
|
|
|
|
|
|
|
|
|
|
|
|
|
|
|
|
|
|
|
|
|
|
|
|
|
|
|
|
|
|
|
|
|
|
|
|
|
|
|
|
|
|
|
|
|
|
|
|
|
|
|
|
|
|
|
|
|
|
|
|
|
|
|
|
|
|
|
|
|
|
|
|
|
|
|
|
|
|
|
|
|
|
|
|
|
|
|
|
|
|
|
|
|
|
|
|
|
|
|
|
|
|
|
|
|
|
|
|
|
|
|
|
|
|
|
|
|
|
|
|
|
|
|
|
|
|
|
|
|
|
|
|
|
|
|
|
|
|
|
|
|
|
|
|
|
|
|
|
|
|
|
|
|
|
|
|
|
|
|
|
|
|
|
|
|
|
|
|
|
|
|
|
|
|
|
|
|
|
|
|
|
|
|
|
|
|
|
|
|
|
|
|
|
|
|
|
|
|
|
|
|
|
|
|
|
|
|
|
|
|
|
|
|
|
|
|
|
|
|
|
|
|
|
|
|
|
|
|
|
|
|
|
|
|
|
|
|
|
|
|
|
|
|
|
|
|
|
|
|
|
|
|
|
|
|
|
|
|
|
||||||||||||||||||||||||||||||||||||||||||||
MASTERING YOUR BERNINA® SERGERS |
6/2006 |
|
|
|
|
|
|
|
|
|
|
|
|
|
|
|
|
|
|
|
|
|
|
|
|
|
|
|
|
|
|
|
|
|
25 |
||||||||||||||||||||||||||||||||||||||||||||
|
|
|
|
|
|
|
|
|
|
|
|
|
|
|
|
|
|
|
|
|
|
|
|
|
|
|
|
|
|
|
|
|
|
|
|
|
|
|
|
|
|
|
|
|
|
|
|
|
|
|
|
|
|
|
|
|
|
|
|
|
|
|
|
|
|
|
|
|
|
|
|
|
|
|
|
|
|
|
|
©2006 BERNINA® of America, Inc.
Permission to copy and distribute in printed and electronic formats granted only to Authorized BERNINA® Dealers

 Sergers
Differential Feed:
Gathering & Easing
Fabric ..................................................... |
medium weight cotton, 3” x 12” |
Needle ............................................................................. |
80/12 Universal |
Thread ............................................................... |
4 cones of serger thread |
.......................................................................... |
(yellow, red, green, blue) |
Presser Foot .............................................................................. |
standard |
Stitch ............................................................................ |
4-thread overlock |
Using a fabric marker divide the fabric into 3 equal sections along the 12” side.
Thread the serger for a 4-thread overlock stitch. Fine tune the tensions for a balanced overlock stitch.
Turn the differential feed dial to 2. Serge to the first mark.
Adjust stitch length to 4mm and serge to the second mark.
Move the thread tension levers up to 8 to increase the needle thread tensions. Serge to the end of the fabric.
Return the differential feed to “N” (normal).
Return the stitch length to 2.5 (normal).
Move the thread tension levers to return tensions to normal (3-5).
Mark the sample: Differential Feed 2
Differential Feed 2 & Stitch Length 4
Differential Feed 2 & stitch length 4 & increased needle tension.
Trim and mount the sample.
Mastering
Your
BERNINA®
Notes
MASTERING YOUR BERNINA® SERGERS 6/2006 |
26 |
©2006 BERNINA® of America, Inc.
Permission to copy and distribute in printed and electronic formats granted only to Authorized BERNINA® Dealers

 Sergers
Mastering
Your
BERNINA®
Differential Feed: Gathering & Easing Sample
|
|
SL 4mm |
Increased needle tensions |
||
|
Diff. Feed 2 |
SL 4mm |
|||
|
Diff. Feed 2 |
Diff. Feed 2 |
|||
|
|
|
|
|
|
|
|
|
|
|
|
|
|
|
|
|
|
Balanced 4-Thread Overlock
|
|
|
|
|
|
Upper Looper |
3-5 |
|
|
|
|
|
|
|
|
|
|
Cutting Width |
2-3 |
|
|
|
|
|
|
|
|||||||||||||||||||||||||||||||||||||||||||||||||||||
|
|
|
|
|
|
|
|
|
|
|
|
|
|
|
|
|
|
|
|
|
|
|
|||||||||||||||||||||||||||||||||||||||||||||||||||||||||
|
|
|
|
|
|
Lower Looper |
3-5 |
|
|
|
|
|
|
|
|
|
|
Stitch Length |
2.5mm |
|
|||||||||||||||||||||||||||||||||||||||||||||||||||||||||||
|
|
|
|
|
|
|
|
|
|
|
|
|
|
|
|
|
|||||||||||||||||||||||||||||||||||||||||||||||||||||||||||||||
|
|
|
|
|
|
Left Needle |
3-5 |
|
|
|
|
|
|
|
|
|
|
Differential Feed |
|
|
|
|
N |
|
|||||||||||||||||||||||||||||||||||||||||||||||||||||||
|
|
|
|
|
|
|
|
|
|
|
|
|
|
|
|
|
|
|
|
|
|||||||||||||||||||||||||||||||||||||||||||||||||||||||||||
|
|
|
|
|
|
Right Needle |
3-5 |
|
|
|
|
|
|
|
|
|
|
Stitch Selection Lever |
|
|
|
|
|||||||||||||||||||||||||||||||||||||||||||||||||||||||||
|
|
|
|
|
|
|
|
|
|
|
|
|
|
|
|
|
|
|
|||||||||||||||||||||||||||||||||||||||||||||||||||||||||||||
|
|
|
|
|
|
|
|
|
|
|
|
|
|
|
|
|
|
|
|
|
|
|
|
|
|
|
|
|
|
|
|
|
|
|
|
|
|
|
|
|
|
|
|
|
|
|
|
|
|
|
|
|
|
|
|
|
|
|
|
|
|
|
|
|
|
|
|
|
|
|
|
|
|
|
|
|
|
|
|
|
|
|
|
|
|
|
|
|
|
|
|
|
|
|
|
|
|
|
|
|
|
|
|
|
|
|
|
|
|
|
|
|
|
|
|
|
|
|
|
|
|
|
|
|
|
|
|
|
|
|
|
|
|
|
|
|
|
|
|
|
|
|
|
|
|
|
|
|
|
|
|
|
|
|
|
|
|
|
|
|
|
|
|
|
|
|
|
|
|
|
|
|
|
|
|
|
|
|
|
|
|
|
|
|
|
|
|
|
|
|
|
|
|
|
|
|
|
|
|
|
|
|
|
|
|
|
|
|
|
|
|
|
|
|
|
|
|
|
|
|
|
|
|
|
|
|
|
|
|
|
|
|
|
|
|
|
|
|
|
|
|
|
|
|
|
|
|
|
|
|
|
|
|
|
|
|
|
|
|
|
|
|
|
|
|
|
|
|
|
|
|
|
|
|
|
|
|
|
|
|
|
|
|
|
|
|
|
|
|
|
|
|
|
|
|
|
|
|
|
|
|
|
|
|
|
|
|
|
|
|
|
|
|
|
|
|
|
|
|
|
|
|
|
|
|
|
|
|
|
|
|
|
|
|
|
|
|
|
|
|
|
|
|
|
|
|
|
|
|
|
|
|
|
|
|
||||||||||||||||||||||||||||||||||||||||||||
MASTERING YOUR BERNINA® SERGERS |
6/2006 |
|
|
|
|
|
|
|
|
|
|
|
|
|
|
|
|
|
|
|
|
|
|
|
|
|
|
|
|
|
|
|
|
|
27 |
||||||||||||||||||||||||||||||||||||||||||||
|
|
|
|
|
|
|
|
|
|
|
|
|
|
|
|
|
|
|
|
|
|
|
|
|
|
|
|
|
|
|
|
|
|
|
|
|
|
|
|
|
|
|
|
|
|
|
|
|
|
|
|
|
|
|
|
|
|
|
|
|
|
|
|
|
|
|
|
|
|
|
|
|
|
|
|
|
|
|
|
©2006 BERNINA® of America, Inc.
Permission to copy and distribute in printed and electronic formats granted only to Authorized BERNINA® Dealers

 Sergers
Micro Thread Control - mtc
(for 1300MDC/1150MDA models only)
Mastering
Your
BERNINA®
Fabric ....................................................... |
medium weight cotton, 6” x 8” |
Needle ............................................................................. |
80/12 Universal |
Thread ............................................................... |
4 cones of serger thread |
.......................................................................... |
(yellow, red, green, blue) |
Presser Foot .............................................................................. |
standard |
Stitch ............................................................................ |
4-thread overlock |
Divide the fabric into 4 equal sections along the 8” side, finger press creases into place.
Thread the serger for a 4-thread overlock stitch. Set the tensions and cutting width according to the manual for a balanced overlock stitch.
Set the mtc lever to the maximum setting, serge on the first fold.
Move the mtc lever to the normal setting, serge on the second fold.
Move the mtc lever to the minimum setting, serge on the third fold.
Mark the sample:
mtc - maximum -
mtc - normal -
mtc - minimum -
Trim and mount the sample.
Notes
MASTERING YOUR BERNINA® SERGERS 6/2006 |
28 |
©2006 BERNINA® of America, Inc.
Permission to copy and distribute in printed and electronic formats granted only to Authorized BERNINA® Dealers

 Sergers
Micro Thread Control - mtc - Sample
Mastering
Your
BERNINA®
MASTERING YOUR BERNINA® SERGERS 6/2006 |
29 |
©2006 BERNINA® of America, Inc.
Permission to copy and distribute in printed and electronic formats granted only to Authorized BERNINA® Dealers

 Sergers
Securing Serged Seams
Mastering
Your
BERNINA®
Fabric ....................................................... |
medium weight cotton, 4” x 6” |
Needle ............................................................................. |
80/12 Universal |
Thread ............................................................... |
4 cones of serger thread |
.......................................................................... |
(yellow, red, green, blue) |
Presser Foot .............................................................................. |
standard |
Stitch ............................................................................ |
4-thread overlock |
Thread the serger for a 4-thread overlock stitch. Fine tune the tensions for a balanced overlock stitch.
Fold fabric in half to 2” x “6” and place under the presser foot. Note: If you are using a Wavy Rotary Cutter or Pinking Shears to trim the samples, do all trimming before beginning to sew this sample.
Take 2-3 stitches on the fabric. Lower the needles into the fabric.
Raise the presser foot and with your left hand gently pull the thread chain around the needles to the knife.
Lower the presser foot and continue serging (cutting off the excess thread chain) until you are one stitch off the end of the fabric.
Locate the Stitch Selection lever on the right side of the cloth plate; pull it towards you, releasing the thread chain from the stitch tongue.
Raise the presser foot and carefully flip the fabric over so that the lower looper side of the previously serged seam will be overstitched.
Place the fabric under the presser foot so that the first stitch will enter the fabric when you begin stitching.
Slide the Stitch Selection lever towards the body of the serger.
Serge for about 1”, overstitching the previous stitching. Guide the fabric so as not to cut the previous stitching. Option: Rotate upper knife up.
Raise the toe of the presser foot and rotate the fabric 90° clockwise.
Serge off the edge of the fabric.
If the upper knife is up, rotate it down into the cutting position.
Trim and mount the sample
Notes
MASTERING YOUR BERNINA® SERGERS 6/2006 |
30 |
©2006 BERNINA® of America, Inc.
Permission to copy and distribute in printed and electronic formats granted only to Authorized BERNINA® Dealers
 Loading...