


User Manual
MODEL D
Legendary Analog Synthesizer with 3 VCOs, Classic Ladder Filter, LFO, 16-Voice Poly Chain and Eurorack Format

2 MODEL D User Manual |
|
|
Table of Contents |
|
|
Thank you........................................................................ |
2 |
|
Important Safety Instructions....................................... |
3 |
|
Legal Disclaimer.............................................................. |
3 |
|
Limited warranty............................................................ |
3 |
|
About the MODEL D........................................................ |
4 |
|
1. Introduction................................................................ |
5 |
|
2. |
Features...................................................................... |
5 |
3. |
Controls....................................................................... |
7 |
4. |
Overview................................................................... |
12 |
5. |
Calibration................................................................ |
14 |
6. |
Hook-up examples................................................... |
26 |
7. System Exclusive Commands.................................. |
30 |
|
8. |
Eurorack Installation............................................... |
32 |
9. |
Specifications........................................................... |
34 |
10. Glossary................................................................... |
36 |
|
Thank you
Thank you very much for expressing your confidence in BEHRINGER products by purchasing the MODEL D analog synthesizer - with 3 VCOs, Classic Ladder Filter, LFO, 16-Voice Poly Chain and Eurorack Format
3 MODEL D User Manual
Important Safety
Instructions
Terminals marked with this symbol carry electrical current of sufficient magnitude to constitute risk of electric shock.
Use only high-quality professional speaker cables with ¼" TS or twist-locking plugs pre-installed. All other installation or modification should be performed only by qualified personnel.
This symbol, wherever it appears,
alerts you to the presence of uninsulated dangerous voltage inside the
enclosure - voltage that may be sufficient to constitute a risk of shock.
This symbol, wherever it appears, alerts you to important operating and maintenance instructions in the
accompanying literature. Please read the manual.
Caution
To reduce the risk of electric shock, do not remove the top cover (or the rear section).
No user serviceable parts inside. Refer servicing to qualified personnel.
Caution
To reduce the risk of fire or electric shock, do not expose this appliance to rain and moisture. The apparatus shall not be exposed to dripping
or splashing liquids and no objects filled with liquids, such as vases, shall be placed on the apparatus.
Caution
These service instructions are for use by qualified service personnel only.
To reduce the risk of electric shock do not perform any servicing other than that contained in the operation instructions. Repairs have to be performed by qualified service personnel.
1.Read these instructions.
2.Keep these instructions.
3.Heed all warnings.
4.Follow all instructions.
5.Do not use this apparatus near water.
6.Clean only with dry cloth.
7.Do not block any ventilation openings. Install in accordance with the manufacturer’s instructions.
8.Do not install near any heat sources such as radiators, heat registers, stoves, or other apparatus (including amplifiers) that produce heat.
9.Do not defeat the safety purpose of the polarized or grounding-type plug. A polarized plug has two blades with one wider than the other. A grounding-type plug has two blades and a third grounding prong. The wide
blade or the third prong are provided for your safety. If the provided plug does not fit into your outlet, consult an electrician for replacement of the obsolete outlet.
10.Protect the power cord from being walked on or pinched particularly at plugs, convenience receptacles, and the point where they exit from the apparatus.
11.Use only attachments/accessories specified by
the manufacturer.
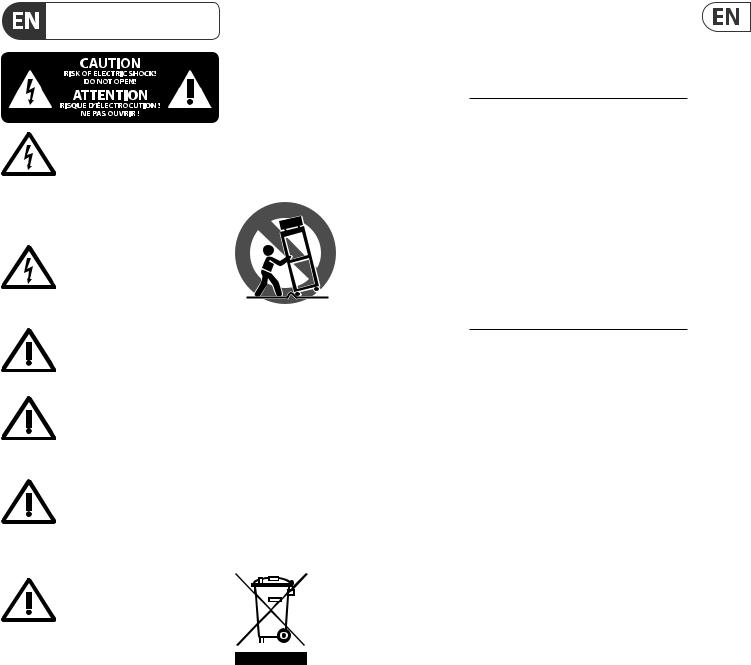
12. Use only with the cart, stand, tripod, bracket,
or table specified by the
manufacturer, or sold with the apparatus. When a cart is used, use caution when
moving the cart/apparatus combination to avoid
injury from tip-over.
13.Unplug this apparatus during lightning storms or when unused for long periods of time.
14.Refer all servicing to qualified service personnel. Servicing is required when the apparatus has been damaged in any way, such as power supply cord or plug is damaged, liquid has been spilled or objects have fallen into the apparatus, the apparatus has been exposed
to rain or moisture, does not operate normally, or has been dropped.
15.The apparatus shall be connected to a MAINS socket outlet with a protective earthing connection.
16.Where the MAINS plug or an appliance coupler is used as the disconnect device, the disconnect device shall remain readily operable.
17.Correct disposal of this product: This symbol indicates that this product must not be disposed of with household waste, according to the WEEE Directive (2012/19/EU) and
your national law. This product should be taken to a collection center licensed for the recycling of waste electrical and electronic equipment (EEE). The mishandling of this type of waste could have a possible negative impact on the environment and human health due to potentially hazardous substances that are generally associated with EEE. At the same time, your cooperation in the correct disposal of this product will contribute to the efficient use of natural resources. For more information about where you can take your waste equipment for recycling, please contact your local city office, or your household waste collection service.
18.Do not install in a confined space, such as a book case or similar unit.
19.Do not place naked flame sources, such as lighted candles, on the apparatus.
20.Please keep the environmental aspects of battery disposal in mind. Batteries must be disposed-of at a battery collection point.
21.Use this apparatus in tropical and/or
moderate climates.
LEGAL DISCLAIMER
MUSIC Tribe accepts no liability for any loss which may be suffered by any person who relies either wholly or in part upon any description, photograph, or statement contained herein. Technical specifications, appearances and other information are subject to change without notice. All trademarks are the property of their respective
owners. MIDAS, KLARK TEKNIK, LAB GRUPPEN, LAKE, TANNOY, TURBOSOUND, TC ELECTRONIC, TC HELICON, BEHRINGER, BUGERA and COOLAUDIO are trademarks or registered trademarks of MUSIC Group IP Ltd.
© MUSIC Group IP Ltd. 2018 All rights reserved.
LIMITED WARRANTY
For the applicable warranty terms and conditions and additional information regarding MUSIC Tribe’s
Limited Warranty, please see complete details online at music-group.com/warranty.

4 MODEL D User Manual
About the MODEL D
• Legendary analog synthesizer with triple VCO design allows for insanely fat music creation
• Authentic reproduction of original “D Type” circuitry with matched transistors and JFETs
• Ultra-high precision 0.1% Thin Film resistors and Polyphenylene Sulphide capacitors
• Pure analog signal path based on authentic VCO, VCF and VCA designs
• 5 variable oscillator shapes with variable pulse widths for ultimate sounds
• Classic 24 dB ladder filter with resonance for legendary sound performance
• Switchable low/high pass filter mode for enhanced sound creation
• Dedicated and fully analog triangle/square wave LFO
• 16-voice Poly Chain allows combining multiple synthesizers for up to 16 voice polyphony
• Semi-modular design requires no patching for immediate performance
• Overdrive circuit adds insane spice and edge to your sounds
• Noise generator dramatically expands waveform generation
• Complete Eurorack solution –main module can be transferred to a standard Eurorack case
• 48 controls give you direct and real-time access to all important parameters
• External audio input for processing external sound sources
• Low and high level outputs featuring highest signal integrity signal stages
• Comprehensive MIDI implementation with MIDI channel and Voice Priority selection
• 3-Year Warranty Program*
• Designed and engineered in the U.K.
*Warranty details can be found at music-group.com.
5MODEL D User Manual
1.Introduction
An ultra-affordable homage to an iconic synthesizer, with all the features of the original and then some, the BEHRINGER MODEL D lets you conjure up virtually any monophonic sound imaginable with incredible finesse and ease.
The pure analog signal path is based on authentic VCO, VCF, VCA and ladder filter designs in conjunction with a dedicated and fully analog triangle/ square wave LFO. And when it comes to protection and convenience, the MODEL D can even be mounted in a standard Eurorack, making it ideal for the studio and/or the road. Owning a MODEL D is like having your own personal time machine, enabling you to freely embrace the past – or shape the future!
Please read the manual carefully and keep it for future reference.
1.1 Before you get started
1.1.1 Shipment
The MODEL D was carefully packed in the factory to guarantee safe transport. Nevertheless, we recommend that you carefully examine the packaging and its contents for any signs of physical damage, which may have occurred during transit.
If the unit is damaged, please do NOT return it to us, but notify your dealer and the shipping company immediately, otherwise claims for damage or replacement may not be granted.
1.1.2 Initial operation
Be sure that there is enough space around the unit for cooling purposes and, to avoid over-heating, please do not place the MODEL D on high-temperature devices such as radiators or power amps.
WARNING: The MODEL D is supplied with a AC power adapter. It meets the required safety standards. Do not use any other power adapter.
WARNING: Please make sure that all units have a proper ground connection. For your own safety, never remove or disable the ground conductor from any units or AC power cords in your system.
1.2 The product manual
This product manual is designed to give you both an overview of the MODEL D analog synthesizer, as well as detailed information on each of the controls and parameters. You will find an overview of the physical control elements in the next chapter.
1.3 Preparation
CAUTION: Remember to turn your monitors / loudspeakers on last when powering up your system, and turn your monitors / loudspeakers off first when powering down your system.
2. Features
True to the Original
Great care has been taken in designing the MODEL D including the true to the original “D Type” circuitry with its matched transistors and JFETs, ultra-high precision 0.1% thin film resistors and polyphenylene sulphide capacitors. This highly-focused attention to detail is what gives the MODEL D its ultra-flexible sound shaping capability, which covers everything from super-fat bass and lead tones, stunning effects, progressive organ sounds – and all the way out to the otherworldly sounds of your imagination.
Big, Fat Tones
The inspired synthesizer tracks laid down in the 1970s and '80s are etched in the annals of progressive rock, wave and synth-pop music forever, making them truly classic in every sense of the word. MODEL D’s pure analog signal path with legendary VCO, VCF and VCA circuits, lets you recreate all of that magic – or design incredibly fat and original sounds that will make you a legend in your own right!
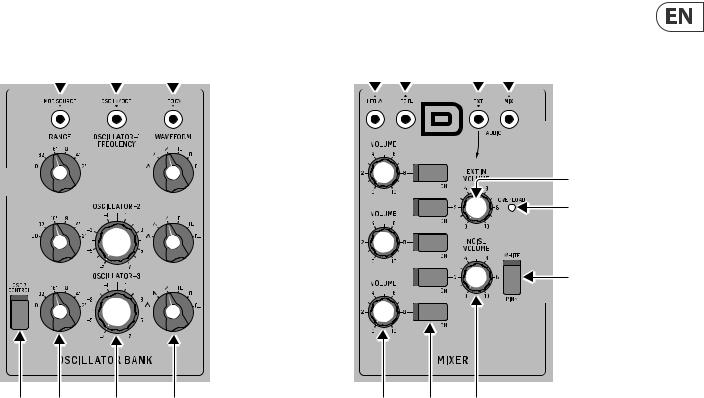
VCO Triple Play
MODEL D’s 3 highly-flexible Voltage Controlled Oscillators (VCOs) provide an incredible range of 5 waveforms for sculpting the perfect sound. Oscillators 1 and
2 options include: triangular; triangular/saw; saw; square; wide pulse; and narrow pulse, while OSC 3 features: triangular; reverse saw; saw; square; wide pulse; and narrow pulse. Additionally, all 3 VCOs can be adjusted across an extremely-wide, 6-octave range (LO, 32', 16', 8', 4', and 2'). This amazing flexibility gives you all the tools you need to be your creative best.
24 dB Ladder Filter and VCA
The very heart of MODEL D’s sound is its highly-flexible 24 dB Ladder Filter, which lets you freely experiment with the Cutoff Frequency, Emphasis, and Contour to dial in the perfect sound.
MODEL D’s Filter Mode switch can be set to either Loor Hi-pass for selecting the range of your choice. You can also adjust the Attack, Decay, and Sustain controls to affect the cutoff frequency with time. The VCA Decay switch lets you set the length of time the note lingers after the key has been released. Additionally, support for filter-keytracking allows you to select how much filtering is applied based on the note being played. And if you want to add modulation, just set the Filter Modulation switch to the On position and use the Controllers Mod Mix knob to make it so. The VCA can even be overloaded via MODEL D’s feedback circuit to add insane spice and edge to your sounds – without saying "goodbye" to your precious low-end content.
Making Waves
You are always in complete control of MODEL D’s onboard modulators, which feature: adjustable Tune; Mod Depth; LFO Rate; Glide (portamento); and Mod Mix knobs. A range of switches is provided for selecting between: triangle or square wave oscillation; modulation On or Off; OSC 3 or Filter EG (Filter Envelope); and Noise (Mod SRC) or LFO. The Tune knob is used to adjust the frequency of OSC 1, 2 and 3 (as long as the OSC 3 switch is turned off). The internal Noise generator, which is switchable between either Pink or White noise for dramatically expanded waveform generation, is the default modulation source, unless an external Mod Source is connected at the 3.5 mm input jack. The BEHRINGER MODEL D is the ultimate mono, all-analog synthesizer in its class – especially when it comes to sound quality, versatility and affordability.

6 MODEL D User Manual
16-Note Poly Chain Ready
While it is a monophonic instrument (one note at a time), MODEL D’s 16-note Poly Chain function lets you combine multiple synthesizers for up to 16-voice polyphony – plus it provides vastly improved reliability and stability over its 1970s and '80s predecessors.
Semi-Modular Design
Designed around an intuitively-linear workflow, MODEL D benefits greatly from its semi-modular design, which requires no patching for immediate performance. Just connect your favorite keyboard or computer via MIDI over DIN or USB – and start exploring the world of analog music synthesis right out-of- the-box.
Eurorack Ready
Designed to handle the rigors of life on the road or in the studio, your MODEL D can easily be transferred into a standard Eurorack case for the perfect integration into your existing system.
Controls and Connectivity
The MODEL D has 29 knobs and 19 switches, all laid out in a highly-intuitive format that puts the joy back into your music creation.
Input and output connections include: MIDI I/O and Thru over USB/MIDI DIN; modulation and audio inputs; OSC1 frequency control; external control of filter cutoff, resonance and contour; Main Out – and Phones, with its own dedicated Volume control.
Unleash Your Imagination
When it comes to not just pushing envelopes but creating them, MODEL D gives your imagination its voice – and it’s so very affordable. When modern
performance calls for classic analog sound – it calls for the BEHRINGER MODEL D!
You Are Covered
We always strive to provide the best possible Customer Experience. Our products are made in our own MUSIC Tribe factory using state-of-the-art automation, enhanced production workflows and quality assurance labs with the most sophisticated test equipment available in the world. As a result, we have one of the lowest product failure rates in the industry, and we confidently back it up with a generous Warranty program.

7MODEL D User Manual
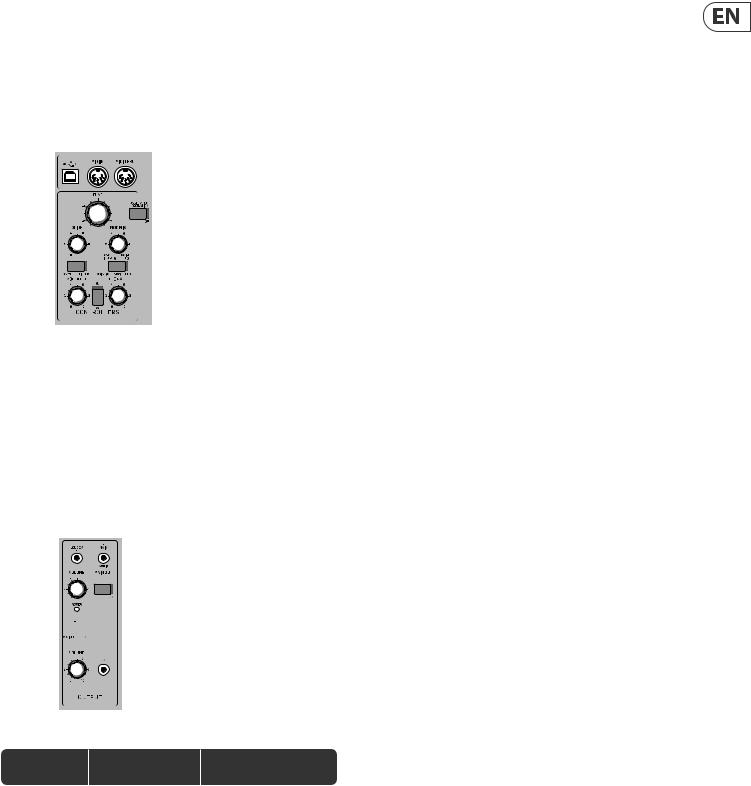
3.Controls
3.1 Top Controls
(1) |
(2) |
(3) |
(17) |
(18) |
(19) |
(26) (27) |
(28) (29) |
(6) |
(7) |
(25) |
|
(24) |
|||
|
|
||
(5) |
(8) |
|
|
(4) |
(9) |
(23) |
(10) |
(11) |
(12) |
(13) |
(14) |
(15) |
(16) |
(20) |
(21) |
(22) |
|
|
|
|
(37) (38) (39) (40) (41) |
|
(48) |
(49) |
||
|
|
(33) |
|
|
|
|
|
|
|
|
|
(32) |
|
|
|
(36) |
(44) |
|
(47) |
|
|
(31) |
|
|
|
|
(43) |
|
|
|
|
|
|
|
(35) |
(42) |
|
|
|
|
|
|
|
|
|
|
|
||
|
|
(30) |
|
|
|
(34) |
(45) |
|
(46) |
|
|
|
|
|
|
|
|||

8 MODEL D User Manual
3.1.1 MIDI Section |
3.1.2 Controllers Section |
(1)(2) (3)
(1)USB PORT - this USB type B jack allows connection to a computer. The MODEL D will show up as a class-compliant USB MIDI device, capable of supporting MIDI in and out.
USB MIDI IN - accepts incoming MIDI data from an application. USB MIDI OUT - sends MIDI data to an application.
(2)MIDI IN - this 5-pin DIN jack receives MIDI data from an external source. This will commonly be a MIDI keyboard, an external hardware sequencer, a computer equipped with a MIDI interface, etc.
(3)MIDI THRU - this 5-pin DIN jack is used to pass through MIDI data received at the MIDI INPUT. This will commonly be sent to another MODEL D synthesizer to run a Poly Chain or to a drum machine assigned to a different MIDI Channel.
(6)


 (7)
(7)
(5)


 (8)
(8)
(4)


 (9)
(9)
(10)(11) (12)
(4)OSC3/FILTER EG - switch between OSC3 or the Filter Envelope as a modulation source.
(5)GLIDE - adjust the amount of Glide (Portamento), between notes on the keyboard.
(6)TUNE - adjust the frequency of oscillators 1, 2, and 3. (OSC3 is not affected if the OSC3 CONTROL switch is off .)
(7)OSCILLATOR MODULATION - when ON, the three oscillators are modulated by the modulation mix, set by the MOD MIX knob.
(8)MOD MIX - adjust the modulation mix between OSC3/Filter EG and Noise/ LFO.
(9)NOISE (MOD SRC)/ LFO - switch between Noise (or external modulation source) or Low Frequency Oscillator (LFO) as a modulation source.
(10)MOD DEPTH - adjust the modulation depth from off to maximum. The modulation depth can also be adjusted using the modulation wheel on a MIDI keyboard.
(11)WAVE SHAPE - select the LFO wave shape from either triangular or square wave.
(12)LFO RATE - adjusts the frequency of the LFO.
9 |
MODEL D User Manual |
|
|
|
|
|
|
|
|
|
|
|
3.1.3 Oscillator Bank Section |
|
|
3.1.4 Mixer Section |
|
|
|
||||||
|
(17) |
(18) |
(19) |
(26) (27) |
(28) (29) |
|||||||
|
|
|
|
|
|
|
|
|
|
|
|
|
|
|
|
|
|
|
|
|
|
|
|
|
|
(25)
(24)
(23)
(13) |
(14) |
(15) |
(16) |
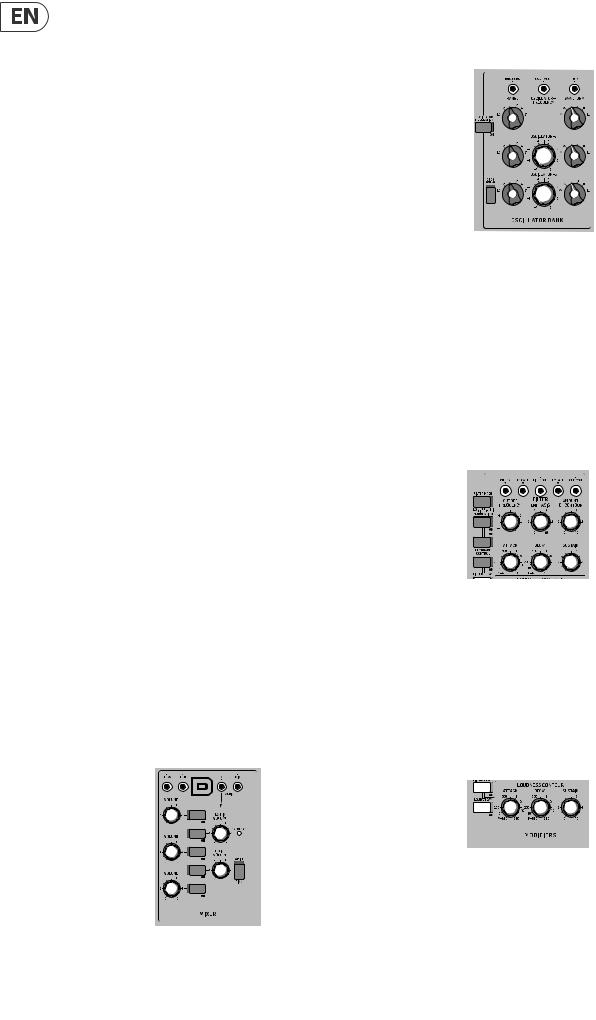
(13)OSC 3 CONTROL - when ON, the frequency of OSC 3 will vary with the keyboard. When OFF, the keyboard, Pitch wheel, and Modulation wheel, will have no effect on OSC 3.
(14)FREQUENCY RANGE - select from six frequency ranges of Oscillator 1, 2, or 3.
(15)FREQUENCY ADJUSTMENT - adjust the frequency of Oscillator 2 or 3.
(16)WAVE SHAPE - select the wave shape of Oscillator 1, 2, or 3 from: triangular, triangular/ sawtooth (OSC1 and 2), reverse sawtooth (OSC3), sawtooth, square, medium pulse, and narrow pulse.
(17)MOD SOURCE (INPUT) - allows connection of an external modulation source. If nothing is connected here, then the internal Noise generator is available as a modulation source.
(18)OSC 1V/OCT (INPUT) - this input allows the frequency of the three oscillators to be adjusted by an external control voltage (1 Volt input increase, will increase the frequency by one Octave).
(19)LFO CV (INPUT) - allows control of the LFO frequency by an external control voltage.
(20) (21) (22)
(20)VOLUME - adjust the volume of Oscillator 1, 2, or 3.
(21)ON/OFF - select the sources to play from OSC1, OSC2, OSC3, Noise, and External Input, or any combination of these 5 sources.
(22)NOISE VOLUME - adjust the level of the internal Noise source.
(23)WHITE/PINK - switch the internal Noise source from Pink noise to White noise.
(24)OVERLOAD - indicates when the audio levels of the mix are overloading the mixer section.
(25)EXT IN VOLUME - adjust the level of any external source playing into the External Input. If nothing is connected to the external input, then the main output is connected here and can be adjusted by this volume knob.
(26)LFO Triangular (OUTPUT) - outputs the internal LFO triangular-wave signal.
(27)LFO Square (OUTPUT) - outputs the internal LFO square-wave signal.
(28)EXT (INPUT) - connect any external line-level audio source to this 3.5 mm input. If nothing is connected here, then the main audio output is internally connected to this external input.
(29)MIX (OUTPUT) - outputs the final mix from this Mixer section.

10MODEL D User Manual
3.1.5Modifiers Section
(37)(38) (39) (40) (41)
(33) |
|
(32) |
(36) |
(31) |
(35) |
|
(30)


 (34)
(34)
(30)DECAY - when ON, the signal will decay during the time set by the DECAY TIME knob after a note or external trigger is released. When OFF, it will decay immediately after a note or external trigger is released.
LOUDNESS DECAY - affects the decay of volume level of the Loudness section.
FILTER DECAY - affects the decay of the cutoff frequency of the Filter section.
(31)KEYBOARD CONTROL - these switches vary the effect of the keyboard tracking, where the filter section is affected by the pitch of note played.
Switch 1 and 2 OFF - no keyboard tracking effect
Switch 1 and 2 ON - maximum effect
Switch 1 ON (only) - 1⁄3 of maximum effect
Switch 2 ON (only) - 2⁄3 of maximum effect
(32)FILTER MODULATION - when ON, the filter section is modulated by the modulation mix, set by the MOD MIX knob.
(33)FILTER MODE - select the filter between Low-Pass or High-Pass.
(34)LOUDNESS CONTOUR - these 3 knobs adjust the overall shape enveloping the audio after it has passed through the mixer section and filter section. The controls affect the change in volume (loudness) level with time.
ATTACK - adjust the time it takes for the signal to reach a maximum level after a note is played.
DECAY TIME - adjust the time for a signal to decay down to the sustain volume level after the attack time is over. If the LOUDNESS DECAY switch is ON, this is also how long it takes to decay to minimum once a note is released.
SUSTAIN - adjust the volume level that the signal is sustained after the attack time and initial decay time have been reached.
(35)FILTER ENVELOPE CONTROLS - these 3 knobs adjust the overall shape enveloping the filter section. The controls affect the change in cutoff frequency with time.
ATTACK - adjust the time for the cutoff frequency to increase from its set value and reach the frequency set by the AMOUNT OF CONTOUR control.
DECAY TIME - adjust the time for the cutoff frequency to decay down to the sustain frequency after the attack time is over. If the FILTER DECAY switch is ON, then this decay time is also how long it takes to decay from the sustain frequency once a note is released.
SUSTAIN - adjust the cutoff to a frequency which is sustained after the attack time and initial decay time have been reached.
(36)FILTER CONTROLS - the filter can be Low-Pass or High-Pass, depending on the setting of the FILTER MODE switch. In Low-Pass mode, audio frequencies above the cutoff frequency are attenuated. In High-Pass mode, audio frequencies below the cutoff frequency are attenuated.
CUTOFF FREQUENCY - adjust the cut-off frequency of the filter.
FILTER EMPHASIS - adjust the amount of volume level boost
(resonance) given at the cut-off frequency.
AMOUNT OF CONTOUR - adjust the amount of frequency shift given to the cutoff frequency.
(37)CUT CV (INPUT) - allows connection of a control voltage to control the cutoff frequency.
(38)FC GATE (INPUT) - allows an external trigger voltage to be applied to trigger the filter contour.
(39)FILT CONT (OUTPUT) - outputs the filter contour.
(40)LC GATE (INPUT) - allows an external trigger voltage to be applied to trigger the loudness contour.
(41)LOUD CONTOUR (OUTPUT) - outputs the loudness contour.
11MODEL D User Manual
3.1.6Output Section
3.2 Rear Panel
(48) (49)
(44)


 (47) (43)


 (42)
(42)


(45)


 (46)
(46)
(42)A-440 - use this to turn on an output tuning signal of 440 Hz concert pitch. This switch can also be used to enter various modes during turn-on (see the Overview section of this manual for more details).
(43)POWER LED - this LED shows when power is applied and the synthesizer is turned on. It is also used to indicate the current status when changing modes
(44)VOLUME - adjust the overall volume level of the synthesizer output.
(45)VOLUME (HEADPHONE) - adjust the overall volume level of the PHONES output.
(46)PHONES - connect your headphones to this 3.5 mm TRS output. Make sure the headphone volume is turned down before putting on headphones.
(47)ON - use this to quickly turn on or Mute the main audio output of the synthesizer.
(48)LOUD CV (INPUT) - allows connection of an external control voltage to control the Loudness Contour.
(49)MAIN (OUTPUT) - use this 3.5 mm TRS connection to output the main audio output. Typically it is patched to an audio input of the MODEL D or the audio inputs of other modular synthesizer equipment. If you are using the MODEL D in a Eurorack, then this is the main output, as the rear panel output connectors are not used.
|
(50) |
(51) |
(52) |
(53) |
1 |
2 |
3 |
|
4 |
5 |
6 |
7 |
|
8 |
9 |
10 |
11 |
12 |
|
13 |
14 |
15 |
16 |
|
(50)MAIN OUTPUT - connect these ¼” TRS outputs to the inputs of your external equipment as follows (note that they are both Mono, and not left/right):
LOW - this instrument-level mono output can connect to the instrument-level inputs of guitar amplifiers or mixers for example.
HIGH - this line-level mono output can connect to the line-level inputs of mixers, keyboard amplifiers, or powered speakers for example.
(51)MIDI CHANNEL - these 4 switches allow you to set the MIDI Channel number from 1 to 16 (see the table above). The MIDI channel can also be changed using MIDI SysEX commands, as shown in the MIDI SysEX tables later in this manual.
(52)POWER - turn the synthesizer on or off . Make sure all the connections are made, and the volume is turned down before turning on the unit.
(53)DC INPUT - connect the supplied 12V DC power adapter here. The power adapter can be plugged into an AC outlet capable of supplying from 100V to 240V at 50 Hz/60 Hz. Use only the power adapter supplied.
12MODEL D User Manual
4.Overview
This overview will help you set up the MODEL D analog synthesizer and briefly introduce its capabilities.
4.5 Oscillator Section
In the Oscillator section, adjust the Range knob and you will hear the sound of the various octaves. Adjust the wavetype and listen to the differences.
4.1 Connection
To connect the MODEL D to your system, please consult the hookup examples in this document.
Caution: Do not overload the 3.5 mm inputs. They can only accept the correct level of voltages as shown in the specification tables. The 3.5 mm outputs should only be connected to inputs capable of receiving the output voltages. Failure to follow these instructions may damage the MODEL D or external units.
4.2 Software Setup
The MODEL D is a USB Class Compliant MIDI device, and so no driver installation is required. The MODEL D does not require any additional drivers to work with Windows and MacOS.
4.3 Hardware Setup
Make all the connections in your system. Use the rear panel MIDI switches to set the MODEL D to a unique MIDI channel in your system. Connect the MIDI OUT output of an external MIDI keyboard directly to the MIDI IN 5-pin DIN type input of the MODEL D.
Apply power to the MODEL D using the supplied power adapter only. Ensure your sound system is turned down. Turn on the MODEL D rear panel power switch.
4.3.1 Warm Up Time
We recommend leaving 15 minutes or more time for the MODEL D to warm up before recording or live performance. (Longer if it has been brought in from the cold.) This will allow the precision analog circuits time to reach their normal operating temperature and tuned performance.
4.3.2 Initial Setup
A quick way of finding out if your external sound system is working, is to turn on the A-440 switch on the MODEL D and adjust the volume control. This will send a constant tone (440 Hz) to your external amplifier and speakers.
4.4 Mixer Section
The MODEL D has three oscillators, an internal Noise generator, and an external source input. Each of these, and any combination, are used by the MODEL D to generate sound.
The Mixer section allows you to turn each of these sources on or off , and adjust the volume of each to create an overall mix. Start by turning on the top switch for Oscillator 1, and turn off the others. Adjust the volume control of Oscillator 1. In the Output section, adjust the main volume. Now, if you play a note on your MIDI keyboard, you should hear the sound of Oscillator 1 only.
The oscillator modulation switch allows the oscillator frequency to be modulated by the modulation mix.
The OSC 3 switch allows its frequency to be affected by, or be independent of, the notes played on the keyboard, and the modulation and pitch wheels.
Note: The TUNE knob and OSCILLATOR-2 and -3 FREQUENCY knobs are marked in units of semitones as a general guide.
4.6 Filter Section
Play with the Cutoff Frequency, Emphasis, and Contour, and listen to their effects on the sound. Adjust the Attack, Decay, and Sustain; they affect the cutoff frequency with time, while a note is played.
The filter decay switch affects the decay after a note is released. The 2 keyboard switches affect how much the filter is affected by the frequency of notes that are played.
If the filter modulation switch is ON then the filter section is modulated by the modulation mix.
4.7 Loudness Contour Section
In this section, adjust the Attack, Decay, and Sustain; they affect the overall level with time, while a note is played. The loudness decay switch affects the decay in level after a note is released.
Turn on other oscillators and/or noise and adjust their volume controls to create a mix.
13MODEL D User Manual
4.8Controllers Section
First set the 2 switches to choose from internal LFO or internal Noise, OSC 3 or the filter envelope, and then use the MOD MIX knob to vary the mix between them.
You can experiment by first setting the left switch to OSC 3, and turning the MOD MIX knob to OSC 3. Then set the Oscillator 3 RANGE control to LO, and the Oscillator Modulation switch ON. You may now be able to hear the sound of the Oscillator 1 modulated by OSC 3. Use the MOD DEPTH knob, and/or the Modulation wheel of your keyboard to increase the effect.
If the Filter Modulation switch is ON, listen to the effect of modulation on the filter.
The Modulation Sensitivity curve can be chosen from hard, medium, or soft (the default), using the SysEx commands shown later in this manual.
4.9 Special Modes
The A-440 switch can be used to set the MODEL D into various modes of operation. This is done by turning the A-440 switch on and off a certain number of times within the first 5 seconds of turning on power to the MODEL D. The number of times determines the mode, as shown in the table below. The Power LED will show the current value by flashing fast or slow a number of times, as shown in the table below.
4.9.1 Multi-Triggering
Multi-triggering - On: playing a new note will change the pitch and also trigger the filter and loudness contour envelopes.
Multi-triggering - Off (default, Legato): playing a new note will change the pitch, but with no new triggering unless all notes are released. For example, you can play a note and hold it down, and any new note will play and use the envelopes of the note being held. The second note will often play after the attack and decay time of the held note has passed, so the second note will not have the sound that the attack and decay usually give.
4.9.2 Note Priority
Note Priority - if more than one note is played at the same time, this sets which note has priority: the last note played, the lowest (default), or the highest.
4.9.3 Poly Chain
Poly Chain - if you have multiple MODEL D units, you can connect them in a Poly Chain so that the first MODEL D plays the lowest note, the second MODEL D plays the second lowest note, and so on, to produce polyphonic sound.
Each MODEL D must have the same MIDI channel number set using the rear panel switches. The Poly Chain connections are shown in the diagram in the hookup diagrams of this manual.
Only set the Poly Chain ON for the first MODEL D. Turn it OFF if you no longer require a Poly Chain system.
If you are only using one MODEL D, then make sure the Poly Chain is OFF.
4.10 Eurorack
The MODEL D synthesizer can be taken out of its factory chassis and fitted into a standard Eurorack case (not supplied). Please see the details shown later in this manual.
A-440 


The special modes are: Multi-trigger, Note Priority, and Poly Chain operation.
Press the A-440 |
|
Mode |
|
Power LED FLashing |
switch: |
|
|
||
|
|
|
|
|
On and off |
|
Multi-trigger ON |
|
Flashing fast twice |
|
|
|||
|
|
|
|
|
|
|
Multi-trigger OFF |
|
Flashing slow twice |
On and off and on |
|
Note Priority |
|
Flashing 3 times |
|
|
LAST/LOW/HIGH |
|
|
|
|
|
|
|
On and off, |
|
Poly Chain ON |
|
Flashing fast four times |
On and off |
|
|
|
|
|
|
|
|
|
|
|
Poly Chain OFF |
|
Flashing slow four times |
|
|
|
|
|
4.11 Firmware Update
Please check our website behringer.com regularly for any updates to the firmware of your MODEL D synthesizer. The firmware file can be downloaded and stored on your computer, and then used to update the MODEL D. It comes with detailed instructions on the update procedure.
4.12 Have Fun
The MODEL D has various Gate and CV inputs and outputs that allow for further experimentation and expansion to other MODEL D units and modular synthesizer equipment.
The SysEx features of the MODEL D allow you to set and adjust various parameters to suit your preferences. Please see the SysEx information later in this manual.
Make copies of the patch sheet in this manual, and record your favorite settings.
With all these controls, the possibilities for musical creativity are endless, rather like an artist with a new box of paints. We hope that you will enjoy your new MODEL D.
14MODEL D User Manual
5.Calibration
The MODEL D synthesizer can be calibrated and checked occasionally to ensure that it is operating at peak perfomance. Analog circuitry can drift off with time and temperature, and as components age.
The main printed circuit board (PCB) of the MODEL D has various test points and miniature potentiometers (trimpots) that allow the various calibration and adjustment procedures to be carried out. This involves lifting up the front panel to allow access to the bottom side of the PCB.
Three main calibrations can be carried out:
1.The PITCH CV can be calibrated using a computer to send a SysEx command, an external keyboard, and a digital DC voltmeter. See section 5.2
2.The oscillators can be calibrated using the internally-generated A-440 concert pitch, and an external keyboard. See section 5.3
3.The Octave RANGE can be calibrated using an external keyboard. See section 5.4
We recommend that the following procedures are undertaken only by an experienced service technician, to prevent personal injury, or damage to the unit.
As the internal PCB trimpots are delicate, make sure the procedures are not undertaken too many times. Damage to the trimpots is not covered under warranty, so please take every care when adjusting them.
A-440 Reference
The MODEL D A-440 pitch is generated and regulated by the MCU and there is no adjustment required. This set frequency is used as a reference in the following procedure to calibrate OSC1.
Equipment required
• Small insulated trimpot screwdriver
• Small Phillips screwdriver
• A flat sheet of cardboard or other insulator as wide as the MODEL D. (This will help prevent damage to the top panel when it is inverted and resting on the bottom chassis)
The following equipment is required for the Oscillator adjustment and Octave Range adjustment:
• An external MIDI keyboard of at least 3 octaves including A2 and C6
• MIDI cable
• Pair of headphones or a sound system to monitor the main output
The following equipment for the Pitch CV adjustment:
• Digital DC Voltmeter with a scale that can display accurately to 0.001 V
• Laptop or desktop computer previously loaded with and running a MIDI utility that can send SysEx commands to the MODEL D
• USB type A to USB type B connection cable
Important Note about Reset
If you have previously adjusted the MIDI IN Transpose or MIDI Note Zero Volts, you MUST reset the MODEL D to its factory settings before doing the following procedures. The details of using SysEx to send the Reset command are shown on page 30.
Preparations
Before doing the PITCH CV calibrations, become familiar with, and practice the procedures for sending SysEx commands to the MODEL D. In this way, you will spend less time with the calibrations.
5.1 Preliminary Procedure
Follow all steps in the order in which they are presented.
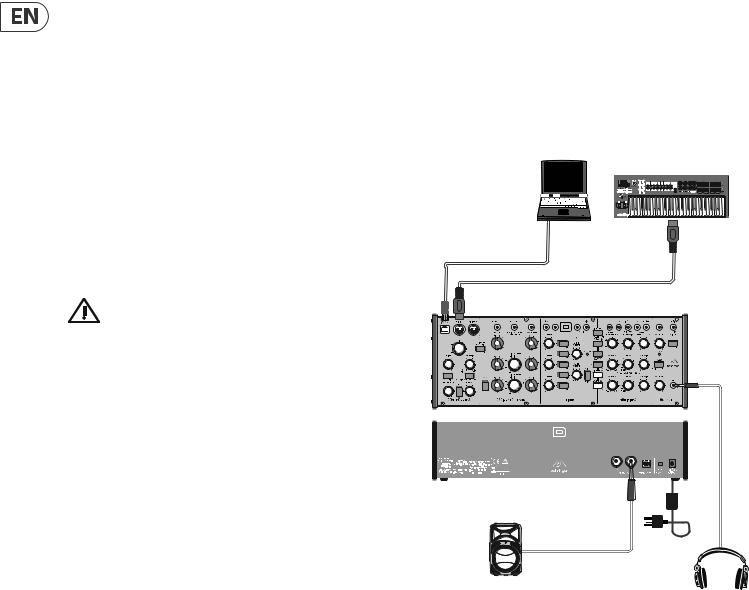
The diagram below shows the typical connections for this procedure.
MOTŌR49 MIDI Keyboard/Controller
Laptop or desktop computer
running a MIDI Utility to send SysEx messages
(for PITCH CV calibration)
USB A |
MIDI OUT |
USB B |
MIDI IN |
|
Power |
|
|
Adapter |
|
|
*Use Headphones or a Loudspeaker |
|
*Active Loudspeaker |
to listen to the output during |
|
the Oscillator calibration |
|
|
|
*Headphones |
|
|
|
5.1.1 Connections
1.Connect the external power supply adapter to the rear power input of the MODEL D.
2.Connect the MIDI output of an external keyboard to the MIDI IN connector of the MODEL D.
3.Connect a laptop or desktop computer to the MODEL D USB input. (This is only required if you are doing the PITCH CV calibration, or doing a Reset.)
4.Turn down the MODEL D headphone volume knob, and connect your headphones to the MODEL D headphones output connector. Alternatively, you can monitor the MODEL D output using the main outputs and a suitable sound system and speakers.
5.Turn on the MODEL D rear panel power switch and check that its Power LED comes on.
6.Important: Leave the MODEL D turned on for approximately 30 minutes. This will allow the circuits time to warm up and the components and performance to stabilise with temperature. Without this warm-up time, the calibrations will be inaccurate.
7.Set the MODEL D controls as shown on the next page.
continued on page 16
 Loading...