


DJX750
ENGLISH
This manual is available in English, German, French, Spanish,
Italian, Russian, Polish, Dutch, Finnish, Swedish, Danish,
Portuguese, Greek, Japanese and Chinese. There may also be
more current versions of this document. Download them by
going to the appropriate product page at:
www.behringer.com
A50-95630-08001
User Manual
PRO MIXER DJX750
Professional 5-Channel
DJ Mixer with
Advanced Digital
Eects and BPM Counter
Your purchase
of the BEHRINGER PRO MIXER DJX750 has put you at the
forefront of today’s trends in DJ mixing consoles. Numerous
features, such as beat counter, insert loop and digital effects pro-
cessor, enable you to work in completely new and creative ways.
The DJX750 is a mixer for professional use, it is extremely easy
to operate and it helps you give free rein to your creativity.
Time is tight and if you don’t want to be left in the dust, you’d
better get moving. To help you along, we have developed an
excellent DJ mixing console with the most popular new features
and technologies. It is perfectly suited for use in dance clubs or
for DJ systems and is sure to deliver tons of pure fun.
Be honest: who really likes to read manuals? We know you want
to get started right away, but it is only after reading these in-
structions that you will fully understand and be able to properly
use all the features your DJX750 has to offer.
Take the time to read everything through!
Table of Contents
Your purchase .............................................................. 1
Safety Instructions ...................................................... 2
Control elements ......................................................... 3
Stereo channels 1 to 4 ..........................................................................3
Microphone channel .............................................................................4
MONITOR section ...................................................................................4
MASTER section .......................................................................................4
Crossfader section ..................................................................................4
XPQ 3D surround eect .......................................................................5
Auto BPM counter ..................................................................................5
Internal eects processor ....................................................................5
Connections ................................................................. 6
Rear panel connectors .........................................................................6
Initial operation ........................................................... 7
Shipment ...................................................................... 7
Online Registration ..................................................... 8
Specications ............................................................... 8
Warranty ....................................................................... 9
Federal Communications Commission
compliance information ........................................... 10

ENGLISH
PRO MIXER DJX750 User Manual
2
Caution
*
This symbol, wherever it appears, alerts you to the presence
of uninsulated dangerous voltage inside the enclosure -
voltage that may be su cient to constitute a risk of shock.
Caution
!
This symbol, wherever it appears, alerts you to important
operating and maintenance instructions in the accompany-
ing literature. Please read the manual.
Caution
!
To reduce the risk of electric shock, do not remove the top
◊
cover (or the rear section). No user serviceable parts inside.
Refer servicing to quali ed personnel.
To reduce the risk of re or electric shock, do not expose
◊
this appliance to rain and moisture. The apparatus shall
not be exposed to dripping or splashing liquids and no
objects lled with liquids, such as vases, shall be placed on
the apparatus.
These service instructions are for use by quali ed service
◊
personnel only. To reduce the risk of electric shock do not
perform any servicing other than that contained in the
operation instructions. Repairs have to be performed by
quali ed service personnel.
Caution
!
Read these instructions.
{1}�
Keep these instructions.
{2}�
Heed all warnings.
{3}�
Follow all instructions.
{4}�
Do not use this apparatus near water.
{5}�
Clean only with dry cloth.
{6}�
Do not block any ventilation openings. Install in accordance with the manu-
{7}�
facturer’s instructions.
Do not install near any heat sources such as radiators, heat registers, stoves,
{8}�
or other apparatus (including ampli ers) that produce heat.
Do not defeat the safety purpose of the polarized or grounding-type plug. A
{9}�
polarized plug has two blades with one wider than the other. A grounding-
type plug has two blades and a third grounding prong. The wide blade or the
third prong are provided for your safety. If the provided plug does not t into
your outlet, consult an electrician for replacement of the obsolete outlet.
Place the power cord so that it is protected from being walked on and sharp
[10]�
edges. Be sure that the power cord is protected particularly at plugs, conve-
nience receptacles and the point where it exits from the apparatus.
The apparatus shall be connected to a MAINS socket outlet with a protective
[11]�
earthing connection.
Where the MAINS plug or an appliance coupler is used as the disconnect
[12]�
device, the disconnect device shall remain readily operable.
Only use attachments/accessories speci ed by the manufacturer.
[13]�
Use only with the cart, stand, tripod, bracket, or table
[14]�
speci ed by the manufacturer, or sold with the ap-
paratus. When a cart is used, use caution when moving
the cart/apparatus combination to avoid injury from
tip-over.
Unplug this apparatus during lightning storms or when unused for long
[15]�
periods of time.
Refer all servicing to quali ed service personnel. Servicing is required when
[16]�
the apparatus has been damaged in any way, such as power supply cord or
plug is damaged, liquid has been spilled or objects have fallen into the appa-
ratus, the apparatus has been exposed to rain or moisture, does not operate
normally, or has been dropped.
Safety Instructions
ENGLISH
PRO MIXER DJX750 User Manual
3
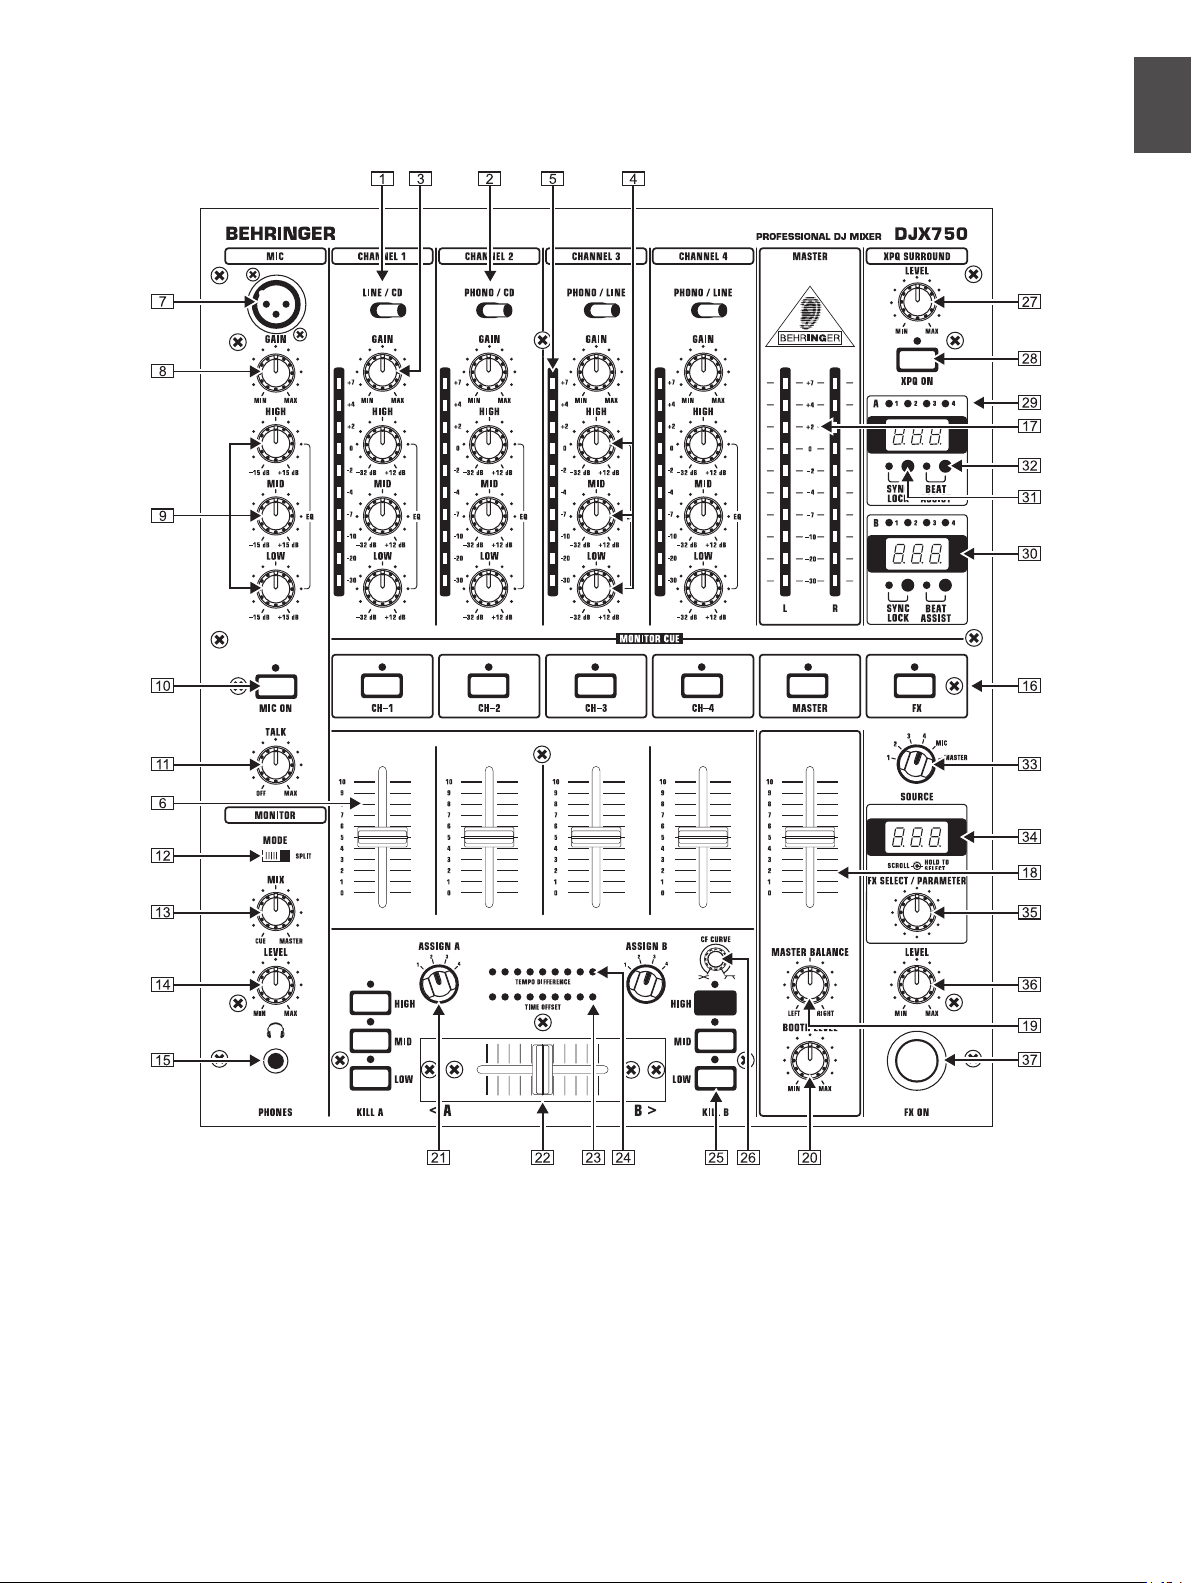
Control elements
Stereo channels 1 to 4
Use the LINE/CD switch to select the input signal for channel 1. Unlike other channels, channel 1 features two line inputs.
{1}
You determine the input signals for the channels 2 to 4 with the PHONO/CD i. e. PHONO/LINE switch (channels 3 and 4).
{2}
“Phono” is intended for connecting a turntable. “Line” i. e. “CD” must be selected for all other signal sources (e. g. CD or MD
players). The input sensitivity of the phono input can be switched to line level, allowing utmost exibility (see
[41]
).
Never connect devices with line level to the highly sensitive phono inputs! The output level of phono pick-up systems is
◊
measured in millivolts, whereas CD players and tape decks have levels measured in volts, i.e. the level from line signals
is up to 100 times higher than that of the phono inputs.
 Loading...