

Page 1

Installation and Operating instruction
C9900-G072 and C9900-G073
Push-button extension for 10.1-inch "Economy" built-in Panell
Version:
Date:
1.0
26.04.2019
Page 2

Page 3

Table of contents
Table of contents
1 Foreword ....................................................................................................................................................5
1.1 Notes on the documentation..............................................................................................................5
1.2 Safety instructions .............................................................................................................................6
2 Transport and unpacking..........................................................................................................................7
2.1 Transport ...........................................................................................................................................7
2.2 Unpacking..........................................................................................................................................7
3 Product description...................................................................................................................................8
3.1 Product overview ...............................................................................................................................8
3.2 Options ............................................................................................................................................10
3.3 Intended use....................................................................................................................................11
3.4 Accessing the connections ..............................................................................................................11
3.4.1 C9900-G072 connections ................................................................................................ 11
3.4.2 C9900-G073 connections ................................................................................................ 14
3.5 Accessories .....................................................................................................................................16
3.5.1 Push-button caps and labels ........................................................................................... 16
4 Mounting...................................................................................................................................................17
4.1 Installing the labels ..........................................................................................................................17
4.2 Installing the Wago picoMax® connector system............................................................................18
5 Operation..................................................................................................................................................19
5.1 Switching the Control Panel on and off ...........................................................................................19
5.1.1 Switching on .................................................................................................................... 19
5.1.2 Shutting down and switching off ...................................................................................... 19
5.2 Operation.........................................................................................................................................19
5.3 Maintenance ....................................................................................................................................19
5.3.1 Cleaning........................................................................................................................... 19
5.3.2 Maintenance .................................................................................................................... 19
5.3.3 Emergency procedures.................................................................................................... 20
5.3.4 Decommissioning ............................................................................................................ 20
6 TwinCAT System Manager......................................................................................................................21
7 Dimensional drawing...............................................................................................................................23
7.1 Dimensional drawing CP6x00 with C9900-G072 or C9900-G073...................................................23
8 Technical data..........................................................................................................................................25
9 Support and Service................................................................................................................................26
10 Approvals for USA and Canada .............................................................................................................27
10.1 FCC approvals for the United States of America.............................................................................27
10.2 FCC approvals for Canada..............................................................................................................27
C9900-G072 and C9900-G073 3
Version: 1.0
Page 4

Table of contents
Version: 1.0
C9900-G072 and C9900-G0734
Page 5

Foreword
1 Foreword
1.1 Notes on the documentation
This description is only intended for the use of trained specialists in control and automation engineering who
are familiar with the applicable national standards.
It is essential that the documentation and the following notes and explanations are followed when installing
and commissioning the components.
It is the duty of the technical personnel to use the documentation published at the respective time of each
installation and commissioning.
The responsible staff must ensure that the application or use of the products described satisfy all the
requirements for safety, including all the relevant laws, regulations, guidelines and standards.
Disclaimer
The documentation has been prepared with care. The products described are, however, constantly under
development.
We reserve the right to revise and change the documentation at any time and without prior announcement.
No claims for the modification of products that have already been supplied may be made on the basis of the
data, diagrams and descriptions in this documentation.
Trademarks
Beckhoff®, TwinCAT®, EtherCAT®, EtherCAT P®, Safety over EtherCAT®, TwinSAFE®, XFC® and XTS® are
registered trademarks of and licensed by Beckhoff Automation GmbH.
Other designations used in this publication may be trademarks whose use by third parties for their own
purposes could violate the rights of the owners.
Patent Pending
The EtherCAT Technology is covered, including but not limited to the following patent applications and
patents:
EP1590927, EP1789857, DE102004044764, DE102007017835
with corresponding applications or registrations in various other countries.
The TwinCAT Technology is covered, including but not limited to the following patent applications and
patents:
EP0851348, US6167425 with corresponding applications or registrations in various other countries.
EtherCAT® is registered trademark and patented technology, licensed by Beckhoff Automation GmbH,
Germany
Copyright
© Beckhoff Automation GmbH & Co. KG, Germany.
The reproduction, distribution and utilization of this document as well as the communication of its contents to
others without express authorization are prohibited.
Offenders will be held liable for the payment of damages. All rights reserved in the event of the grant of a
patent, utility model or design.
C9900-G072 and C9900-G073 5
Version: 1.0
Page 6

Foreword
1.2 Safety instructions
Safety regulations
Please note the following safety instructions and explanations!
Product-specific safety instructions can be found on following pages or in the areas mounting, wiring,
commissioning etc.
Exclusion of liability
All the components are supplied in particular hardware and software configurations appropriate for the
application. Modifications to hardware or software configurations other than those described in the
documentation are not permitted, and nullify the liability of Beckhoff Automation GmbH & Co. KG.
Personnel qualification
This description is only intended for trained specialists in control, automation and drive engineering who are
familiar with the applicable national standards.
Description of symbols
In this documentation the following symbols are used with an accompanying safety instruction or note. The
safety instructions must be read carefully and followed without fail!
DANGER
Serious risk of injury!
Failure to follow the safety instructions associated with this symbol directly endangers the life and health of
persons.
WARNING
Risk of injury!
Failure to follow the safety instructions associated with this symbol endangers the life and health of persons.
CAUTION
Personal injuries!
Failure to follow the safety instructions associated with this symbol can lead to injuries to persons.
NOTE
Damage to the environment or devices
Failure to follow the instructions associated with this symbol can lead to damage to the environment or
equipment.
Tip or pointer
This symbol indicates information that contributes to better understanding.
Version: 1.0
C9900-G072 and C9900-G0736
Page 7

Transport and unpacking
2 Transport and unpacking
2.1 Transport
Despite the robust design of the unit, the components are sensitive to strong vibrations and impacts. During
transport the device must therefore be protected from mechanical stress. Therefore, please use the original
packaging.
NOTE
Risk of damage to the device
If the device is transported in cold weather or is exposed to extreme variations in temperature, make sure that moisture (condensation) does not form on or inside the device.
2.2 Unpacking
Proceed as follows to unpack the unit:
1. Remove packaging.
2. Do not discard the original packaging. Keep it for future relocation.
3. Check the delivery for completeness by comparing it with your order.
4. Please keep the associated paperwork. It contains important information for handling the unit.
5. Check the contents for visible shipping damage.
If you notice any shipping damage or inconsistencies between the contents and your order, you should notify
Beckhoff Service.
C9900-G072 and C9900-G073 7
Version: 1.0
Page 8

Product description
3 Product description
3.1 Product overview
CP6x00
The C9900-G07x push-button extensions add an emergency stop button and three illuminated push-buttons
to the "Economy" built-in Panel PCs and Control Panels.
The push-button extension can be ordered ex factory for all Control Panels and Panel PCs of the "Economy"
family in size 10.1 inch (CP6600, CP6700 and CP6900).
C9900-G072 (USB version)
The actuation of the emergency stop and other push-buttons is transferred to the controller via USB and can
be read with TwinCAT. Optionally, customers may use the signals for additional purposes.
• The emergency stop button S1 has two NC contacts and one NO contact. The signal of the NO contact
is transferred to the controller. The two NC contacts can be used by the customer.
• The push-buttons S2 (green) and S4 (blue) each actuate two NO contacts, of which one is relayed to
the controller and one is available as a potential-free contact for use by the customer.
• The push-button S3 (red) actuates an NC contact and an NO contact. The NO contact is relayed to the
controller, the NC contact is available as a potential-free contact for use by the customer.
• The indicator lamps are only controlled via USB.
• All terminal strips are pluggable.
C9900-G073 (hard-wired version)
The actuation of the emergency stop and push-buttons is only queried via the terminal strip.
• The emergency stop button S1 actuates two NC contacts.
• The push-buttons S2 (green) and S4 (blue) each actuate two NO contacts.
• The push-button S3 (red) actuates two NC contacts.
• The indicator lamps can be controlled via the terminal strip. In this case, an additional 24 VDC power
supply is required at terminal strips X3.1 and X3.2.
• All terminal strips are pluggable.
Version: 1.0
C9900-G072 and C9900-G0738
Page 9

Product description
By default, the push-buttons are delivered with green, red and blue push-button caps. Other push-button cap
color options are available for retrofitting (see chapter Accessories [
A label sheet with 54 pre-punched button labels is available under order code C9900-Z260. Installation is
explained in chapter Installing the labels [
}17].
}16]).
C9900-G072 and C9900-G073 9
Version: 1.0
Page 10

Product description
3.2 Options
Options Description
C9900-G072 Push-button extension for CP6x00 with horizontal 10.1-inch display
• push-button extension on the bottom side
• 3 push-button keys with signal lamp, type RAFI RAFIX 22FS+, round, 30 mm
• 1 emergency stop button, type RAFI RAFIX 22FS+
• Labels for push-button caps for individual marking of each push-button can be ordered
as an option.
• The emergency stop key is wired with two normally-closed contacts, the red
illuminated key with one normally-closed contact and the remaining illuminated keys
with one normally-open contact each to a terminal row.
• Additionally, all push-buttons are queried with a normally-open contact via USB.
• The LEDs of the illuminated keys are only controlled via USB.
C9900-G073 Push-button extension for CP6x00 with horizontal 10.1-inch display
• push-button extension on the bottom side
• 3 push-button keys with signal lamp, type RAFI RAFIX 22FS+, round, 30 mm
• 1 emergency stop button, type RAFI RAFIX 22FS+
• Labels for push-button caps for individual marking of each push-button can be ordered
as an option.
• The emergency stop key and the red illuminated key are wired with two normallyclosed contacts each. The remaining illuminated keys are wired with two normallyopen contacts each to a terminal row.
• All LEDs of the illuminated keys are wired to a terminal row.
Version: 1.0
C9900-G072 and C9900-G07310
Page 11

Product description
X2 (Wago 6-
pin)
X1 (Wago 4-
pin)
3.3 Intended use
The C9900-G0xx built-in Panels with push-button extension are designed for industrial use in machine and
plant engineering applications. The push-button extension is located below the touchscreen.
NOTE
Risk of explosion
The built-in Panels must not be used in potentially explosive atmospheres.
3.4 Accessing the connections
The connections of the push-button extension for use by the customer are located at the bottom of the
housing.
3.4.1 C9900-G072 connections
C9900-G072 and C9900-G073 11
Version: 1.0
Page 12

Product description
3.4.1.1 C9900-G072 circuit diagram
Fig.1: C9900-G072
Version: 1.0
C9900-G072 and C9900-G07312
Page 13

Product description
3.4.1.2 Description of the C9900-G072 connections
Connection strip Terminal point Description
X1 1 X1.1 NO contact emergency stop
2 X1.2 NO contact emergency stop
3 X1.3 NO contact emergency stop
4 X1.4 NO contact emergency stop
Connection strip Terminal point Description
X2 1 X2.1 NO contact S4 blue
2 X2.2 NO contact S4 blue
3 X2.3 NC contact S3 red
4 X2.4 NC contact S3 red
5 X2.5 NO contact S2 green
6 X2.6 NO contact S2 green
NOTE
Electrical characteristic values of the operating elements
The electrical characteristic values of the emergency stop and push-button contacts must
not be exceeded. (see chapter Technical data [
}25]
C9900-G072 and C9900-G073 13
Version: 1.0
Page 14
Product description
X3 (Wago 12-
pin)
X2 (Wago 6-pin)
X1 (Wago 4-pin)
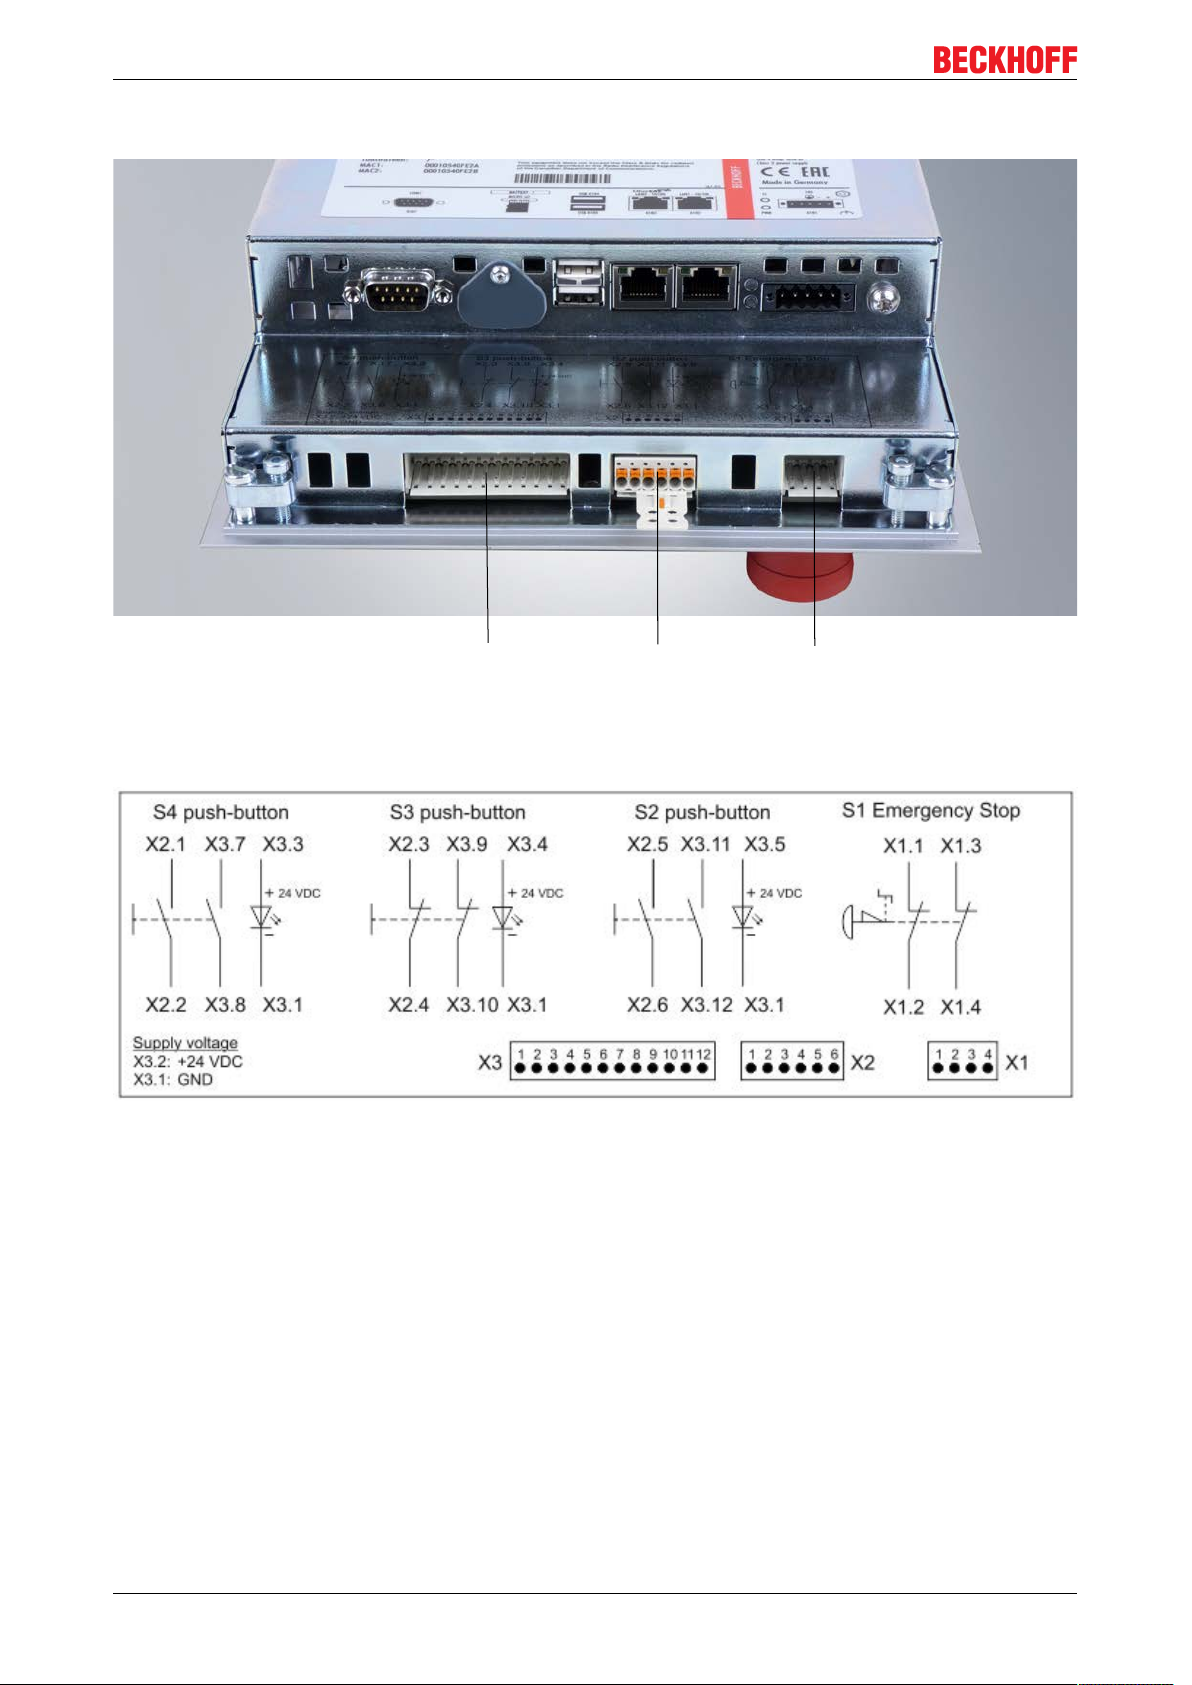
3.4.2 C9900-G073 connections
3.4.2.1 C9900-G073 circuit diagram
Fig.2: C9900-G073
Version: 1.0
C9900-G072 and C9900-G07314
Page 15

Product description
3.4.2.2 Description of the C9900-G073 connections
Connection strip Terminal point Description
X1 1 X1.1 NO contact emergency stop
2 X1.2 NO contact emergency stop
3 X1.3 NO contact emergency stop
4 X1.4 NO contact emergency stop
Connection strip Terminal point Description
X2 1 X2.1 NO contact S4 blue
2 X2.2 NO contact S4 blue
3 X2.3 NC contact S3 red
4 X2.4 NC contact S3 red
5 X2.5 NO contact S2 green
6 X2.6 NO contact S2 green
Connection strip Terminal point Description
X3 1 GND Supply Power
2 +24 V
3 X3.3 + 24 V LED blue
4 X3.4 + 24 V LED red
5 X3.5 + 24 V LED green
6 N.C.
7 X3.7 NO contact S4 blue
8 X3.8 NO contact S4 blue
9 X3.9 NC contact S3 red
10 X3.10 NC contact S3 red
11 X3.11 NO contact S2 green
12 X3.12 NO contact S2 green
Supply Power
DC
NOTE
Electrical characteristic values of the operating elements
The electrical characteristic values of the emergency stop and push-button contacts must
not be exceeded. (see chapter Technical data
C9900-G072 and C9900-G073 15
Version: 1.0
Page 16

Product description
3.5 Accessories
3.5.1 Push-button caps and labels
Options Description
C9900-Z255 Push-button cap (blue) for individual application to a C9900-G0xx push-button extension,
type Rafi FS+, diameter: 22.3 mm, 5 pcs.
C9900-Z256 Push-button cap (yellow) for individual application to a C9900-G0xx push-button
extension, type Rafi FS+, diameter: 22.3 mm, 5 pcs.
C9900-Z257 Push-button cap (green) for individual application to a C9900-G0xx push-button
extension, type Rafi FS+, diameter: 22.3 mm, 5 pcs.
C9900-Z258 Push-button cap (red) for individual application to a C9900-G0xx push-button extension,
type Rafi FS+, diameter: 22.3 mm, 5 pcs.
C9900-Z259 Push-button cap (clear) for individual application to a C9900-G0xx push-button
extension, type Rafi FS+, diameter: 22.3 mm, 5 pcs.
C9900-Z260 Transparent film for individual labeling of a C9900-G0xx- push-button extension, type
Rafi FS+, diameter: 22.3 mm, 1 sheet DIN A4, 54 pcs.
Version: 1.0
C9900-G072 and C9900-G07316
Page 17

Mounting
4 Mounting
4.1 Installing the labels
The blank label sheets for the push-buttons of the push-button extension offered under order code C9900Z260 can be printed with a conventional office printer and then inserted in the push-button extension.
C9900-G072 and C9900-G073 17
Version: 1.0
Page 18

Mounting
1
2
4.2 Installing the Wago picoMax® connector system
Plugged connection consists of male connector and
female connector with grip plate and release slide
Disconnect the plug connection with the release
slide.
1. Open the locking device (latch) by pushing down
the release slide on the grip plate.
2. Pull out the female connector with the grip plate
from the male connector.
Version: 1.0
C9900-G072 and C9900-G07318
Page 19

Operation
5 Operation
5.1 Switching the Control Panel on and off
5.1.1 Switching on
The Control Panel does not have its own mains switch. On switching on the power supply the Control Panel
will also be switched on.
5.1.2 Shutting down and switching off
Control software such as is typically used on Industrial PCs permits various users to be given different rights.
A user who is not permitted to close software may also not switch the Industrial PC off, as data can be lost
from the data storage device by switching off while software is running.
NOTE
First shut down, then switch off!
If the Industrial PC is switched off while the software is writing a file to the data storage device, this file will
be destroyed. Control software usually writes data to the data storage device automatically at intervals of a
few seconds, for which reason there is a very high probability of causing damage by switching off while
software is running.
NOTE
Switching off the Industrial PC
Once you have shut down the Industrial PC, you must switch it off for at least 10 seconds in order to be
able to restart it! After switching on the power supply again the Industrial PC starts automatically.
5.2 Operation
The Control Panel is operated via the touch screen.
NOTE
Damage to the touch screen
The touch screen may only be operated with your finger or the touch screen pen. The operator may wear
gloves but there must be no hard particles such as metal shavings, glass splinters embedded in the glove.
.
5.3 Maintenance
5.3.1 Cleaning
The device can be cleaned with a damp, soft cloth. Do not use any aggressive cleaning materials, thinners,
scouring material or hard objects that could cause scratches.
5.3.2 Maintenance
The Control Panel needs no maintenance.
C9900-G072 and C9900-G073 19
Version: 1.0
Page 20

Operation
5.3.3 Emergency procedures
In case of fire, the Control Panel should be extinguished with powder or nitrogen.
5.3.4 Decommissioning
5.3.4.1 Disposal
Observe national electronics scrap regulations
When disposing of the device follow the national electronic scrap regulations.
In order to dispose of the device, it must be removed and fully dismantled.
• Housing components (polycarbonate, polyamide (PA6.6)) are suitable for plastic recycling.
• Metal parts can be sent for metal recycling.
• Electronic parts such as disk drives and circuit boards must be disposed of in accordance with national
electronics scrap regulations.
Version: 1.0
C9900-G072 and C9900-G07320
Page 21

TwinCAT System Manager
6 TwinCAT System Manager
Before the push-button extension can be put into operation, it must first be configured in the TwinCAT
System Manager.
Proceed as follows:
1. Click at the top in the menu on File > New > Project and create a new TwinCAT XAE Project.
2. In the tree view on the left, click on I/O and then right-click on Device.
3. In the context menu click on Scan.
The New I/O Devices window appears. All available devices are displayed.
4. Select the devices you want to use and confirm the selection with OK.
5. Confirm the request with Yes, in order to look for boxes.
6. Confirm the request whether to enable FreeRun with Yes.
ð The device is inserted as a box in the tree view and displayed with the respective inputs and outputs
(e.g. Term 2 to 5). Label the inputs and outputs (Term 2 to 5) as follows.
C9900-G072 and C9900-G073 21
Version: 1.0
Page 22

TwinCAT System Manager
Term label after activating FreeRun Term label after processing
Version: 1.0
C9900-G072 and C9900-G07322
Page 23

Dimensional drawing
7 Dimensional drawing
7.1 Dimensional drawing CP6x00 with C9900-G072 or C9900-G073
Fig.3: External dimension
C9900-G072 and C9900-G073 23
Version: 1.0
Page 24

Dimensional drawing
Fig.4: Installation dimension
Version: 1.0
C9900-G072 and C9900-G07324
Page 25

Technical data
8 Technical data
NOTE
Risk of explosion!
The built-in Panels with push-button extension must not be used in potentially explosive atmospheres!
Properties Description
Supply voltage
Only for C9900-G073
Characteristic values emergency stop and push-buttons
Max. operating voltage AC/DC 35V
Max. operating current AC/DC 100 mA
Switching capacity max. 250 mW
Characteristic values Wago picoMax® connectors
Connection technology Cage Clamp
Conductor cross-section Solid wire 0.2 - 1.5 mm²
Conductor cross-section Stranded wire 0.2 - 1.5 mm²
Conductor cross-section Stranded wire 0.25 - 0.75 mm²
Conductor cross-section Stranded wire 0.25 - 1.5 mm²
Conductor (AWG) 24 - 14
Strip length 8 - 9 mm / 0.31 - 0.35 in
Properties of the push-button extension
Protection class Front IP54, rear IP20
Shock resistance
(sinusoidal vibration)
Shock resistance
(Shock)
EMC - interference immunity conforms to EN 61000-6-2
EMC interference emission conforms to EN 61000-6-4
Permissible ambient temperature 0 °C to + 55 °C (operation)
Permissible maximum air humidity Maximum 95%, no condensation
Transport and storage The same values for air humidity and shock
Certification CE
24V
(with ferrule with plastic collar)
(with ferrule without plastic collar)
EN 60068-2-6: 10 to 58 Hz: 0.035 mm 58 to
500 Hz: 0.5 G (~ 5 m/ s2)
EN 60068-2-27: 5 G (~ 50 m/s2 ), duration: 30 ms
-25°C to +65°C (transport / storage)
resistance are to be observed during transport and
storage as in operation. The vibration resistance
during transport can be improved by suitable
packaging of the Panels.
(20.4– 28.8VDC)
DC
C9900-G072 and C9900-G073 25
Version: 1.0
Page 26

Support and Service
9 Support and Service
Beckhoff and their partners around the world offer comprehensive support and service, making available fast
and competent assistance with all questions related to Beckhoff products and system solutions.
Beckhoff's branch offices and representatives
Please contact your Beckhoff branch office or representative for local support and service
products!
The addresses of Beckhoff's branch offices and representatives round the world can be found on her internet
pages:
http://www.beckhoff.com
You will also find further documentation for Beckhoff components there.
Beckhoff Headquarters
Beckhoff Automation GmbH & Co. KG
Huelshorstweg 20
33415 Verl
Germany
Phone: +49(0)5246/963-0
Fax: +49(0)5246/963-198
e-mail: info@beckhoff.com
Beckhoff Support
Support offers you comprehensive technical assistance, helping you not only with the application of
individual Beckhoff products, but also with other, wide-ranging services:
on Beckhoff
• support
• design, programming and commissioning of complex automation systems
• and extensive training program for Beckhoff system components
Hotline: +49(0)5246/963-157
Fax: +49(0)5246/963-9157
e-mail: support@beckhoff.com
Beckhoff Service
The Beckhoff Service Center supports you in all matters of after-sales service:
• on-site service
• repair service
• spare parts service
• hotline service
Hotline: +49(0)5246/963-460
Fax: +49(0)5246/963-479
e-mail: service@beckhoff.com
Version: 1.0
C9900-G072 and C9900-G07326
Page 27

Approvals for USA and Canada
10 Approvals for USA and Canada
10.1 FCC approvals for the United States of America
FCC: Federal Communications Commission Radio Frequency Interference Statement
This device was tested and complies with the limits for a digital device of class A, according part 15 of the
FCC regulations. These limits are designed to provide adequate protection against adverse interference, if
the device is used in a commercial environment. This device generates, uses and may emit radio frequency
energy and may cause adverse interference with radio communications, if it is not installed and used in
accordance with the operating instructions. If this device is used in a residential area it is likely to cause
adverse interference, in which case the user must take appropriate countermeasures in order to eliminate
the interference at his own expense.
Technical modifications
Technical modifications of the device may void the FCC approval.
10.2 FCC approvals for Canada
FCC: Canadian Notice
C9900-G072 and C9900-G073 27
Version: 1.0
 Loading...