

Page 1

OUTLOOK® ES SAFETY INFUSION SYSTEM
OPERATOR’S MANUAL
Rx Only
951128 Rev E (11/10)
Page 2

951128 Rev E (11/10)
Page 3

OUTLOOK® ES
OPERATOR’S MANUAL
THIS MANUAL MAY NOT, IN WHOLE OR IN PART, BE COPIED, PHOTOCOPIED, REPRODUCED, TRANSLATED, OR CONVERTED TO ANY ELECTRONIC
OR MACHINE-READABLE FORM WITHOUT PRIOR WRITTEN CONSENT OF B. BRAUN MEDICAL INC.
© 2008 B. B
UTLOOK IS A REGISTERED TRADEMARK AND DOSEGUARD, RATEGUARD, DOSESCAN, DOSECOM AND DOSETRAC ARE TRADEMARKS OF
O
B. B
RAUN MEDICAL INC. ALL RIGHTS RESERVED.
RAUN MEDICAL INC. AND ITS AFFILIATES.
951128 Rev E (11/10)
Page 4

951128 Rev E (11/10)
Page 5

Table of Contents
TABLE OF CONTENTS
About the Pump.................................................................................................................................1
Intended Use ..........................................................................................................................1
Epidural Administration.........................................................................................................1
Blood Infusion........................................................................................................................2
Icons .......................................................................................................................................2
Warnings............................................................................................................................................3
Cautions .............................................................................................................................................4
Attentions...........................................................................................................................................6
Chapter 1: Pump Description ..........................................................................................................7
Important Keys.......................................................................................................................8
Front View .............................................................................................................................9
Back View..............................................................................................................................9
Inside the Door View .............................................................................................................10
Chapter 2: Basic Pump Operation ..................................................................................................11
Pole Clamp Operation............................................................................................................12
Turning ON the Pump............................................................................................................12
Daisy Chaining.......................................................................................................................12
Battery Operation...................................................................................................................12
Priming the Tubing ................................................................................................................13
Loading the Tubing................................................................................................................13
Unloading the Tubing ............................................................................................................14
Turning OFF the Pump ..........................................................................................................14
Infusion Modes ......................................................................................................................15
Pump Behavior.......................................................................................................................16
Chapter 3: Information Screen & Menus.......................................................................................17
Information Screen.................................................................................................................18
Time Left ..................................................................................................................18
Total Infused .............................................................................................................18
Occlusion Limit ........................................................................................................18
Dose ..........................................................................................................................18
DoseGuard
RateGuard
Location Name..........................................................................................................19
Care Area Name........................................................................................................19
Working With Menus.............................................................................................................19
Main Menu................................................................................................................19
Alternate Menu .........................................................................................................19
Biomed Options Menu..............................................................................................20
Accessing Menus ......................................................................................................20
Chapter 4: STANDARD & Piggyback Modes................................................................................23
STANDARD Mode................................................................................................................24
Changing the Rate..................................................................................................................24
Changing the VTBD ..............................................................................................................25
PIGGYBACK Mode..............................................................................................................25
RateGuard
TM
Primary Channel RateGuardTM Infusions ...........................................................27
Piggyback Channel RateGuardTM Infusions.......................................................29
RateGuard
TM
TM
Limits ................................................................................................18
TM
Limits .................................................................................................19
Infusions ..........................................................................................................26
in Standard Mode ............................................................................................29
951128 Rev E (11/10) i
Page 6

OUTLOOK
®
ES OPERATOR’S MANUAL
Roller Clamp Reminder......................................................................................................... 30
Chapter 5: DOSE Mode ................................................................................................................... 33
DOSE Mode .......................................................................................................................... 34
Dose Data Entry Screen.........................................................................................................36
Changing DOSE Mode Rate..................................................................................................38
Changing DOSE Mode Dose................................................................................................. 39
Epidural in DOSE Mode........................................................................................................40
DoseGuard™ in DOSE Mode ...............................................................................................40
Accessing DOSE Mode When Infusing ................................................................................42
Exiting DOSE Mode.............................................................................................................. 42
Chapter 6: Bolus Delivery Modes ................................................................................................... 43
Bolus Deliveries .................................................................................................................... 44
Loading Dose.........................................................................................................................44
Loading Dose Setup...............................................................................................................45
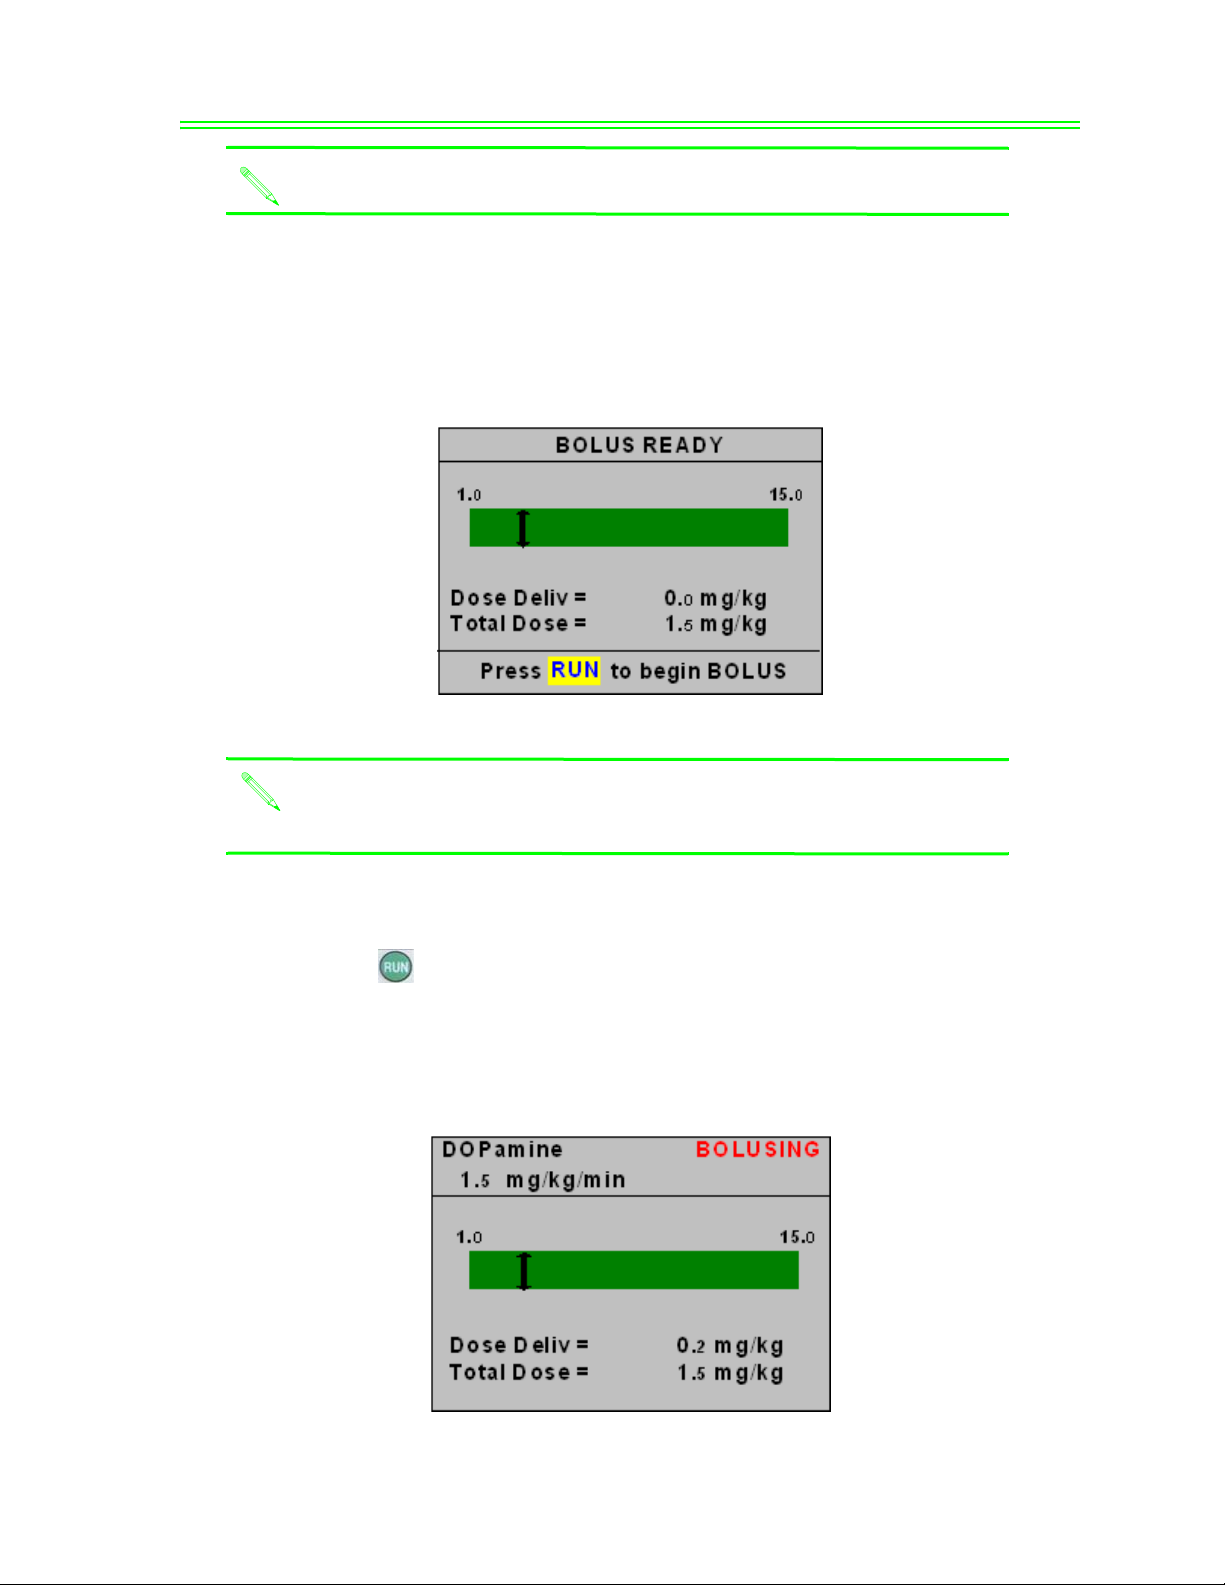
Bolus Ready Screen............................................................................................................... 47
Bolus Run Screen ..................................................................................................................47
Bolus Hold Screen................................................................................................................. 48
On-Demand Bolus .................................................................................................................49
Programming a Bolus............................................................................................... 49
RateGuard
TM
Bolus............................................................................................................... 50
Bolus Ready Screen............................................................................................................... 52
Bolus Run Screen ..................................................................................................................53
Bolus Hold Screen................................................................................................................. 53
Epidural Bolus Caution ......................................................................................................... 54
Chapter 7: DoseScan™ (Outlook
TM
DoseScan
..........................................................................................................................56
® 200ES and Above) ................................................................55
For STANDARD Mode & DOSE Mode Infusions...............................................................56
For Piggyback Infusions........................................................................................................57
For Labels with "0.0" and "Titrate" Bar Codes .....................................................................57
For Labels with "0.0" for Patient Weight ..............................................................................58
Titration Checking.................................................................................................................58
For Standard Mode Deliveries.................................................................................. 59
For Dose Mode Deliveries........................................................................................ 59
DoseGuard
TM
Matching........................................................................................................60
Single Care Area Match ........................................................................................... 61
Multiple Care Area Match........................................................................................62
RateGuard
TM
Matching......................................................................................................... 62
Single Care Area Match ........................................................................................... 64
Multiple Care Area Match........................................................................................64
Additional Scan Features....................................................................................................... 65
Scan Patient ID......................................................................................................... 65
Scan Authorized User ID..........................................................................................66
Run Authorization Scan ...........................................................................................66
DoseGuard
RateGuard
TM
Override Scan ...................................................................................67
TM
Override Scan ....................................................................................68
Bolus Authorization Scan.........................................................................................68
Critical Med (Dual Scan)..........................................................................................69
Chapter 8: DoseCom™ (Outlook
DoseCom
TM
..........................................................................................................................72
® 400ES Only) ..........................................................................71
ii 951128 Rev E (1110)
Page 7

Table of Contents
For STANDARD Mode & DOSE Mode Infusions ...............................................................72
For Piggyback Infusions ........................................................................................................73
For Data with "0.0" for Rate or Dose.....................................................................................73
For Data with "0.0" for Patient Weight..................................................................................74
Titration Checking .................................................................................................................74
For Standard Mode Deliveries ..................................................................................75
For Dose Mode Deliveries........................................................................................75
DoseGuard
RateGuard
Chapter 9: Profile Mode...................................................................................................................83
PROFILE Mode .....................................................................................................................84
Set PROFILE Parameters.......................................................................................................84
PROFILE Mode .....................................................................................................................84
Review/Change PROFILE.....................................................................................................85
Restart PROFILE ...................................................................................................................86
Immediate Ramp Down .........................................................................................................86
Exiting PROFILE Mode ........................................................................................................86
Chapter 10: PROGRAM Mode .......................................................................................................89
PROGRAM Mode..................................................................................................................90
Clearing Periods.....................................................................................................................91
Review/Change PROGRAM .................................................................................................91
Restart PROGRAM................................................................................................................92
Skip PROGRAM Periods.......................................................................................................92
Exiting PROGRAM Mode.....................................................................................................93
Chapter 11: q(x) Schedule................................................................................................................95
q(x) Schedule .........................................................................................................................96
To Change the Data................................................................................................................98
Exiting q(x) Schedule.............................................................................................................98
Chapter 12: Options..........................................................................................................................99
OPTIONS...............................................................................................................................100
Panel Lock Out Switch ..........................................................................................................100
Clear Total Infused.................................................................................................................100
Occlusion Limit......................................................................................................................100
Occlusion Warning ................................................................................................................101
Set Time and Volume ............................................................................................................102
Schedule Next Run.................................................................................................................102
Check Battery Level...............................................................................................................103
Change Alarm Volume ..........................................................................................................104
Select Max Pressure...............................................................................................................104
Micro Rate/Limit....................................................................................................................104
Hold Extender ........................................................................................................................105
Site Trend...............................................................................................................................106
TM
Matching ........................................................................................................76
Single Care Area Match............................................................................................77
Multiple Care Area Match ........................................................................................78
TM
Matching .........................................................................................................78
Single Care Area Match............................................................................................80
Multiple Care Area Match ........................................................................................80
To Change the Delay ................................................................................................102
To Change the Start Time.........................................................................................103
To Exit Micro Rate/Limit .........................................................................................105
To Change Graphical Resolution..............................................................................106
951128 Rev E (11/10) iii
Page 8

OUTLOOK
Chapter 13: Alarms & Troubleshooting.........................................................................................111
Chapter 14: Maintenance.................................................................................................................115
Chapter 15: Technical & Clinical Support ....................................................................................117
Chapter 16: Product Specifications ................................................................................................ 119
®
ES OPERATOR’S MANUAL
To Exit Site Trend ....................................................................................................107
Calculate BSA ....................................................................................................................... 107
Piggyback Callback ............................................................................................................... 107
Scrolling Dose Display..........................................................................................................108
Trailing Zeros ........................................................................................................................108
Nurse Call Interface...............................................................................................................108
Nurse Call Installation.............................................................................................. 109
Alarms: Causes & Corrections ..............................................................................................112
Cleaning................................................................................................................................. 116
Storage...................................................................................................................................116
Technical Support.................................................................................................................. 118
Clinical Support.....................................................................................................................118
Product Specifications ........................................................................................................... 120
Accuracy Test Trumpet Curves.............................................................................................122
Trumpet Curve Creation........................................................................................................122
Trumpet Curve Interpretation................................................................................................ 122
iv 951128 Rev E (11/10)
Page 9

About the Pump
ABOUT THE PUMP
INTENDED USE
The Outlook® ES is intended for use with B. Braun Medical Inc. Horizon® Pump IV Sets to
regulate the flow of primary and secondary fluids when positive pressure is required. The
infusion system is capable of delivering fluid from a negative head height (when the IV fluid
container is lower than the pump), and provides clinically accepted volumetric accuracy for
all standard IV fluids, including blood, lipids, and Total Parenteral Nutrition (TPN).
Positive pressure is frequently a necessity, but clinical experience shows that high pressure
limits may increase the severity of an infiltration without causing an alarm. Because there is a
need to control pump pressure settings, the Outlook ES has user-selectable Occlusion Limit
settings which start at 75 mmHg and extend to 500 mmHg. At rates of 400 ml/hr and higher,
the pressure setting is automatically increased to 400 mmHg. For epidural infusions which
require higher pressures, the pump has an extended occlusion limit setting of 750 mmHg.
The pump is equipped with distinct audible and visual alarm signals to indicate Keep Vein
Open (KVO), low battery, and other alarm conditions.
EPIDURAL ADMINISTRATION
The Outlook ES can be used for epidural administration of anesthetic and analgesic drugs.
For epidural administration of anesthetic drugs, use indwelling catheters specifically indicated
for short-term (96 hours or less) anesthetic epidural drug delivery.
For epidural administration of analgesic drugs, use indwelling catheters specifically indicated
for either short-term or long-term analgesic epidural drug delivery.
When the Outlook ES is being used for epidural infusions, the source container and
administration set should be clearly differentiated from source containers and administration
sets used for other routes of infusion.
Following an occlusion alarm, a small amount of fluid may be delivered. Use of a microbore
set assures this is less than 0.1 ml.
The administration of drugs is restricted to those anesthetic and analgesic drugs labeled for
continuous epidural administration.
951128 Rev E (11/10) 1
Page 10

OUTLOOK
®
ES OPERATOR’S MANUAL
BLOOD INFUSION
The Outlook® ES may be used for infusion of blood and blood products. For blood infusion,
a Horizon® Pump Blood Set should be used. Do not attempt to piggyback blood. The normal
saline roller clamp on the blood tubing set must be clamped off. The high viscosity of blood
will cause the saline to infuse before the blood if both clamps are left open.
ICONS
The following icons identify the supplemental information contained in this manual.
ATTENTION: This icon will direct the user to consult additional
information.
NOTE: This icon will provide additional information for a given topic
in this manual.
CAUTIONS or WARNINGS: This icon will provide safety
recommendations in order to prevent accident or injury to the user
or the patient.
2 951128 Rev E (11/10)
Page 11

Warnings
WARNINGS
The following warnings should be followed in order to avoid patient/user injury.
WARNING This Operator’s Manual contains detailed instructions and warnings on
the use of the Outlook® ES. Please read it completely prior to using
this device. This manual is intended to reinforce the teaching given to
the user by a trained health care professional or an authorized B. Braun
representative.
WARNING B. Braun will assume no responsibility for incidents which may occur
if the product is not used in accordance with product labeling.
WARNING The Outlook ES has been designed to stop fluid flow to the patient
under alarm conditions. Monitoring of the patient and infusion status is
necessary to ensure the infusion is being delivered as anticipated. Prior
to starting an infusion, verify no drops are falling in the drip chamber
and the programmed information is correct. If drops are falling and the
infusion has not begun, the set may be improperly loaded and further
use may result in inaccurate infusion.
WARNING Do not connect the IV administration set to the patient while priming,
as a bolus or over infusion may occur.
WARNING See EPIDURAL in DOSE Mode in Chapter 5: DOSE Mode for spe-
cific warnings and cautions related to epidural medication infusions.
WARNING To avoid mechanical or electronic damage, do not steam autoclave or
immerse the pump in any fluids or cleaning solutions. Always disconnect the electrical power cord from the outlet before cleaning to prevent
electrical shock.
ARNING Trained Biomedical professionals or B. Braun representatives must per-
W
form a full set-up of the pump before use in a clinical setting to ensure
proper programming and function of device.
W
ARNING Do not use in the presence of flammable anesthetics, as a possible
explosion hazard exists.
WARNING Avoid exposure to powerful sources of electromagnetic interference
and strong magnetic fields such as Magnetic Resonance Imaging
(MRI). Patient injury and equipment damage may result.
951128 Rev E (11/10) 3
Page 12

OUTLOOK
®
ES OPERATOR’S MANUAL
CAUTIONS
The following cautions should be followed in order to avoid patient/user injury.
CAUTION Before using the pump in a clinical setting, the user should become
thoroughly familiar with the proper use of the device as outlined in this
manual. The Outlook® ES is not intended to substitute for regular
patient observation and evaluation.
CAUTION The Outlook ES may have been damaged during shipping and han-
dling. Do not use the pump if it appears damaged or fails the initial self
test outlined in “Turning on the Pump” as patient injury or device damage may occur.
CAUTION To maintain stability, when attaching a single pump to a pole, it is rec-
ommended to place pump no higher than 40 inches above the ground
(measured from the bottom of the pump). When placing multiple
pumps on a pole it is recommended that the bottom pump be no higher
than 40 inches above the ground.
CAUTION It is not recommended to place more than five pumps together on one
IV pole as the pole may become unstable. When attaching this pump to
a pole, make sure it is clamped securely to avoid damage to the device
from falling.
CAUTION This device is intended for use with B. Braun Medical Inc. Horizon®
IV Pump Sets only. The use of other sets renders the device inoperable.
CAUTION Do not clean, disinfect, or sterilize any part of the device by autoclav-
ing or with ethylene oxide gas. Doing so may damage the device and
void the warranty. Only external parts of the pump should be disinfected. See Chapter 14: Maintenance, for suggested cleaning solutions.
AUTION The Outlook ES generates, uses and can radiate electromagnetic inter-
C
ference. Through testing to current US standards, the Outlook ES has
shown emission levels to be acceptable. Testing has also shown that the
device’s operation and performance is not adversely affected by electromagnetic interference. Given an environment in which the Outlook
ES infusion device is operated in close proximity to equipment that
emit high levels of radio frequency, it may be necessary to reorient or
reposition the pump away from the source of the emissions. Should
emissions from the Outlook ES adversely affect other equipment, it
may be necessary to increase the distance between devices, or operate
the Outlook ES on a separate power circuit from the affected device.
4 951128 Rev E (11/10)
Page 13

Cautions
CAUTION Unless the pump is plugged into a hospital-grade electrical outlet, the
reliability of the grounding cannot be assured.
CAUTION Perform testing and/or preventive maintenance as defined in the prod-
uct Service Manual. It is necessary to perform all testing and preventive
maintenance as defined in the product Service Manual, or the reliability
and proper functionality of the unit cannot be assured.
CAUTION Where several infusion lines are connected, the possibility of their
exerting a mutual influence on each other cannot be excluded.
951128 Rev E (11/10) 5
Page 14

OUTLOOK
ATTENTIONS
ATTENTION The Daisy Chain outlet is for use with Outlook® ES pumps for the pur-
ATTENTION The DB15 connector on the back of the Outlook ES pump is for use by
ATTENTION UL Classified Medical Equipment, with respect to Electrical Shock,
®
ES OPERATOR’S MANUAL
pose of daisy chaining only. Do not daisy chain more than 5 pumps, as
the total leakage current of a system containing more than 5 pumps
may exceed 300uA.
authorized personnel only.
Fire and Mechanical Hazards only, in accordance with UL2601-1,
CAN/CSA C22.2 No. 601.1.
6 951128 Rev E (11/10)
Page 15

Chapter 1: Pump Description
CHAPTER 1:
PUMP DESCRIPTION
IN THIS CHAPTER YOU WILL LEARN:
• The important keys used to operate the pump.
• The location of displays and other items needed to operate the pump.
951128 Rev E (11/10) 7
Page 16

OUTLOOK
®
ES OPERATOR’S MANUAL
IMPORTANT KEYS
An understanding of the function and location of these keys will assist in the use of the pump.
1. POWER turns the pump
on and off.
3. Channel Indicator keys
select either the Primary
or Piggyback channels
for data entry.
5. CURSOR keys move the
cursor bar on the Information Screen.
7. MENU lets the user see
other modes and options.
2. RUN keys begin the infusion of either the Primary or Piggyback
channels.
4. DATA keys allow input
of numbers.
6. ENTER accepts data or
the selection made.
8. HOLD silences an alarm,
stops an infusion,is a
quick escape from the
menu, and extends the
Hold state an additional
3 minutes every time it is
pushed.
1
2
3
4
8 951128 Rev E (11/10)
7 8 6 5
Page 17

Chapter 1: Pump Description
FRONT VIEW
1. AC power indicator 2. Battery Indicator
3. Hold Indicator 4. Run Indicators
5. Alarm Indicator 6. Door Lever
7. Pole Clamp 8. Information Screen
9. Primary Rate Display 10. Primary Volume to Be Delivered Display
11. Piggyback Rate Display 12. Piggyback Volume To Be Delivered Display
123 4 5
9
11
BACK VIEW
1. Daisy Chain Outlet Access Door 2. Pump Management Port
3. Panel Lock Out Switch
10
12
6
7
8
12
951128 Rev E (11/10) 9
3
Page 18

OUTLOOK
INSIDE THE DOOR VIEW
1. Cassette Alignment Pins 2. Air-In-Line Detector
3. Free Flow Protection Clip Receptacle
®
ES OPERATOR’S MANUAL
1 32
10 951128 Rev E (11/10)
Page 19

Chapter 2: Basic Pump Operation
CHAPTER 2:
BASIC PUMP OPERATION
IN THIS CHAPTER YOU WILL LEARN:
• How to put the pump on a pole.
• How to turn the pump on and off.
• How to Daisy Chain pumps together.
• About battery operation.
• How to prime the set and load the tubing.
• About the five infusion modes of the pump.
• About the four operating states of the pump.
951128 Rev E (11/10) 11
Page 20

OUTLOOK
®
ES OPERATOR’S MANUAL
POLE CLAMP OPERATION
1. Press down on the pole clamp lever.
2. Position the pump on the pole (make sure the pole is up against the slot of the pump).
3. Release the pole clamp lever.
4. Lock by rotating the pole clamp lever 1/4 turn toward the back of the pump.
5. To remove the pump from the pole, rotate the pole clamp lever 1/4 turn toward the front of
the pump to unlock it, then press down on the pole clamp lever.
TURNING ON THE PUMP
1. Plug the pump into a hospital-grade electrical outlet or the AC Receptacle on the back of
another Outlook® ES pump.
2. Press .
NOTE: The Outlook ES will perform a self test which ensures proper
system operation and alarm reporting. Within this process, the AC
Power Indicator will light up, the pump will beep, and the Information
Screen will light up. A successful self-test indicates operational
readiness of the device.
DAISY CHAINING
Daisy Chaining allows up to five (5) Outlook ES pumps to be plugged into each other with
only one pump plugged into a wall outlet. On the back of each Outlook ES is the access door
to an electrical outlet. Only another Outlook ES pump should be plugged into that outlet.
ATTENTION: The Daisy Chain outlet is for use with Outlook ES
pumps for the purpose of daisy chaining only. Do not daisy chain
more than 5 pumps, as the total leakage current of a system
containing more than 5 pumps may exceed 300 uA.
BATTERY OPERATION
The Outlook ES has been equipped with an internal, rechargeable battery which will power
the pump automatically if the plug is disconnected during use. Battery power is provided as a
back-up system only, and the length of the battery life is affected by the rate of delivery.
Whenever possible, the pump should remain plugged into an electrical outlet. The Battery
Indicator will be lit when the pump is operating on its battery.
The pump must remain plugged into a hospital-grade electrical outlet for at least 10 hours to
fully recharge the battery from a totally discharged condition.
A Low Battery Warning will be displayed when there is no less than 30 minutes of battery life
remaining. Every effort should be made to plug the pump into A/C power within this
12 951128 Rev E (11/10)
Page 21

Chapter 2: Basic Pump Operation
timeframe. If the pump is not plugged into A/C power within the Low Battery Warning
timeframe, a Plug In Alarm may be displayed. The Plug In Alarm alerts you to the fact that
there is only 3 minutes of battery life remaining and you should immediately plug the device
into an A/C outlet. If the battery discharges completely, the infusion will stop and you will
need to plug the pump into an A/C outlet to restart the infusion and recharge the battery.
NOTE: The Low Battery Warning will be displayed when there is no
less than 30 minutes of battery life remaining. Additional battery
life is possible based on battery condition, delivery rate and other
external factors but it is recommended that the pump be plugged
into A/C power within the 30 minute timeframe to avoid shutdown.
PRIMING THE TUBING
WARNING: Always read and follow the instructions which accompany
the source container and IV administration sets you are using.
Carefully follow the instructions for loading, removing and reloading
the set.
CAUTION: Administration sets should be changed at an interval not
to exceed 72 hours to maintain specified accuracy.
1. Close roller clamp on IV set.
2. Spike IV container and squeeze drip chamber until one-third or one-half full.
3. Prime the IV set by opening the roller clamp and letting fluid flow through the tubing with
the cassette inverted (the pointed end of the cassette should be up).
4. Ensure all air is expelled from the cassette and IV tubing, then close the roller clamp.
LOADING THE TUBING
CAUTION: Use only B. Braun Medical Inc. Horizon® Pump IV Sets.
1. Open the door on the front of the pump by pulling the Door Lever forward.
2. Position the cassette over the Cassette Alignment Pins, with the metal disc on the cassette
towards the pump.
3. Thread the tubing through the Air-In-Line Detector.
4. Insert and press the Free Flow Protection Clip into the Receptacle.
WARNING: Unrestricted fluid flow may occur if the Free Flow
Protection Clip is not properly installed in the Receptacle.
951128 Rev E (11/10) 13
Page 22

OUTLOOK
5. Close the door of the pump.
6. Open the roller clamp on the tubing.
®
ES OPERATOR’S MANUAL
NOTE: Do not use a pump with visible damage or with bent,
damaged, or missing components.
UNLOADING THE TUBING
1. Press to stop the infusion.
2. Close the roller clamp on the tubing.
3. Open the pump door.
4. Grasp the tubing on the left hand side of the pump.
5. Grasp and gently pull the Free Flow Protection Clip from the Free Flow Protection Clip
Receptacle while also pulling the tubing/cassette from the pump. Removing the Free Flow
Protection Clip in this manner will automatically stop the flow of fluid in the tubing.
6. If gravity infusion is desired, close the roller clamp, open the Free Flow Protection Clip,
and adjust the flow with the roller clamp.
TURNING OFF THE PUMP
The Outlook® ES must be stopped before turning the device off.
1. Press to stop current infusion.
2. Press .
14 951128 Rev E (11/10)
Page 23

Chapter 2: Basic Pump Operation
INFUSION MODES
Developed in response to the special needs of all caregivers in the medical setting, the
Outlook® ES has five different infusion modes which allow fluid delivery to be tailored to the
patient’s individual needs.
STANDARD Mode delivers a set volume of fluid at a constant rate. At
the end of the infusion, the pump automatically switches to Keep Vein
Open in order to maintain IV patency. In this mode, a secondary fluid,
such as an antibiotic, may be administered using PIGGYBACK delivery.
DOSE Mode calculates the concentration, rate, or dose information necessary with many critical drug infusions. The pump contains a library of
commonly dosed IV drugs. Titration of the medication rate automatically
leads to recalculation of the dosing parameter.
Infusion
KVO
Titration
PROFILE Mode is used primarily for TPN infusions which require a
ramping up phase, a flat rate during which the bulk of the infusion is
delivered, and a ramp down phase.
PROGRAM Mode allows up to 9 periods to be entered. Each period contains its own rate and volume. The pump automatically gives each programmed period one after the other without user intervention.This mode
is best suited for Intermittent, Variable, and Circadian infusions.
q(x) Schedule can be used for the intermittent infusion of antibiotics, chemotherapy, or other IV infusions according to a schedule set by the user.
Assure there is a maintenance IV infusion in the intervals between doses.
Flat
Ramp
Sequential Periods
Dose Dose Dose
Ramp
951128 Rev E (11/10) 15
Page 24

OUTLOOK
®
ES OPERATOR’S MANUAL
PUMP BEHAVIOR
The Outlook® ES behaves in any one of the following four ways.
Hold
In general, when is pressed, the infusion stops. Pressing will also silence an
alarm and stop the infusion. While in the menu system, pressing will exit the user
back to the current mode and stop the infusion (if running).
NOTE: In certain cases during programming, pressing the HOLD
key will generate a pop up message that will instruct the user to
continue programming or return the pump to the last accepted
infusion parameters. This is a useful feature when infusion
parameters need to be corrected or reinput during the
programming sequence.
Run
When the Run Indicators are blinking, the infusion is running at the entered rate. Pressing
PRIMARY or PIGGYBACK will begin an infusion as long as all required param-
eters are entered. If the RATE or VTBD (Volume To Be Delivered) fields have been left at
zero, the pump will alarm and prompt the user to enter a rate or volume to be delivered
value.
Alarm
The pump alarms when an error has occurred in the pumping process or when the Hold
Time has been exceeded. During an alarm, the pump stops the infusion and an audible
alarm sounds, different from the other audible tones of the pump.
KVO
Keep Vein Open (KVO) allows the pump to transition from its primary infusion to a low
delivery rate once the volume to be delivered value goes to zero. The pump will sound a
KVO alert tone which is different from the other alarm tones. Pressing will silence
the KVO alert tone and stop the infusion. The KVO rates are as follows:
Infusion Rate < 3.0 mL/hr : KVO Rate = last infusion rate
Infusion Rate >
3.0 mL/hr : KVO Rate = 3.0 mL/hr
16 951128 Rev E (11/10)
Page 25

Chapter 3: Information Screen & Menus
CHAPTER 3:
INFORMATION SCREEN & MENUS
IN THIS CHAPTER YOU WILL LEARN:
• What is displayed on the Information Screen during an infusion.
• About the 3 Menus in the pump.
951128 Rev E (11/10) 17
Page 26

OUTLOOK
®
ES OPERATOR’S MANUAL
INFORMATION SCREEN
During an infusion, the Information Screen may display one or more lines of data specific to
the infusion. The lines of data displayed are dependent on the Delivery Mode and are
described in the individual sections for each Mode.
Time Left
This displays the hours and minutes required to infuse the volume to be delivered at the
current rate. As the rate and volume to be delivered are changed, the Time Left will be
recalculated.
NOTE: If the Time Left is greater than 99 hours and 59 minutes, the
Information Screen will not display the Time Left =.
Total Infused
This displays the total volume infused in milliliters since the Total Infused value was last
cleared. The Total Infused may be cleared while the pump is running. To clear the Total
Infused, see “Clear Total Infused” in Chapter 12: Options.
Occlusion Limit
This displays the current Occlusion Limit setting. To change this setting see “Occlusion
Limit” in Chapter 12: Options.
Dose
This displays the current dose value with associated units. To change the current dose, see
”Changing DOSE Mode Rate” in Chapter 5: DOSE Mode.
DoseGuardTM Limits
In DOSE Mode, this display indicates the maximum and minimum dosage values assigned
to the current drug. Soft Limits will be displayed above the ends of the green indicator bar
and Hard limits, if assigned, will be displayed below the ends of the yellow indicator bar.
If no DoseGuard limits have been established, a white bar will appear in the with the
words “No Limits” displayed. If no hard MIN and MAX values have been programmed only
the green indicator bar with associated soft limit values will be displayed.
18 951128 Rev E (11/10)
Page 27

Chapter 3: Information Screen & Menus
RateGuardTM Limits
RateGuard Limits are displayed when a Standard Mode delivery is programmed using
solutions from the RateGuard Solution List. The display indicates the maximum and minimum rate values assigned to the current solution. Soft Limits will be displayed above the
ends of the green indicator bar and Hard limits, if assigned, will be displayed below the
ends of the yellow indicator bar. If no DoseGuard limits have been established, a white
bar will appear in the with the words “No Limits” displayed. If no hard
ues have been programmed only the green indicator bar with associated soft limit values
will be displayed.
MIN and MAX val-
Location Name
The Location Name can be assigned from the Location List. If assigned, the Location
Name will be displayed in the lower left corner of the Information Display. If not
assigned, this space will be blank.
Care Area Name
The Care Area Name is assigned via the DoseGuard Drug Library or RateGuard Solution
list. If a drug or solution is assigned to the infusion, the Care Area Name will be displayed
on the lower right corner of the Information Display. If not assigned, this space will be
blank.
WORKING WITH MENUS
There are three menus in which the special operating modes and other options available in the
Outlook® ES may be found.
Main Menu
The Main Menu is the first menu to appear when is pressed. This menu usually
contains the most frequently accessed modes and options.
Alternate Menu
Located second from the bottom of the Main Menu is the Alternate Menu. The Alternate
951128 Rev E (11/10) 19
Page 28

OUTLOOK
®
ES OPERATOR’S MANUAL
Menu commonly holds items which are less frequently accessed.
Biomed Options Menu
The Biomed Options Menu is located second from the bottom of the Alternate Menu and
contains programming information and settings. The Biomed Options Menu requires an
access code and is intended to be accessed only by those authorized to change the settings
of the device.
Accessing Menus
To access Menus complete the following steps:
1. Press to see the Main Menu list of options.
2. Use the to move the highlight and scroll through the list.
3. If the option desired is not found in the
Main Menu, highlight “Alternate Menu,”
then press .
4. Once you have found the desired mode or option, highlight it and press
.
NOTE: To exit the Menus quickly, press . This will also stop the
infusion.
NOTE: To scroll through a Menu a page at a time, press .
The following are modes and options which may be configured to either the Main or Alternate
Menus. In some cases, the facility may wish to disable a mode or option; the disabled item
would not appear in either the Main or Alternate Menus.
Modes
DoseCom
DoseScan
TM
TM
DoseGuardTM Drug Library
RateGuardTM Infusion
20 951128 Rev E (11/10)
Page 29

Chapter 3: Information Screen & Menus
Modes
DOSE Mode
Set Time and Volume
PROFILE Mode
PROGRAM Mode
q(x) Schedule
Options
Clear Total Infused Change Alarm Volume Site Trend
Occlusion Limit Select MAX Pressure Calculate BSA
Schedule Next Run Micro Rate/Limit Piggyback Callback
Check Battery Level Hold Extender
NOTE: Clear Total Infused and Occlusion Limit are not configurable
Menu Options. They are assigned to the Main Menu and are
displayed in the chart above to indicate their relative position when
other Options are assigned to the Main Menu
951128 Rev E (11/10) 21
Page 30

OUTLOOK
®
ES OPERATOR’S MANUAL
THIS PAGE INTENTIONALLY LEFT BLANK.
22 951128 Rev E (11/10)
Page 31

Chapter 4: Standard & Piggyback Modes
CHAPTER 4:
STANDARD & PIGGYBACK MODES
IN THIS CHAPTER YOU WILL LEARN:
• How to set up a STANDARD (continuous) infusion.
• How to change the rate of an infusion.
• How to change the volume of an infusion.
• How to set up a PIGGYBACK (secondary) infusion.
951128 Rev E (11/10) 23
Page 32

OUTLOOK
®
ES OPERATOR’S MANUAL
STANDARD MODE
STANDARD Mode allows for infusion of fluids when rate and volume to be
delivered data is entered. For the Outlook® ES, this delivery is also known as a
Basic Infusion. At the end of the infusion, the pump automatically switches to
Keep Vein Open in order to maintain IV patency. In this mode, secondary fluid,
such as an antibiotic, may be administered using a PIGGYBACK method of
delivery. Piggyback infusions are allowed only in STANDARD Mode.
Infusion
KVO
1. Press PRIMARY CHANNEL INDICATOR .
PRIMARY PRIMARY
2. Use the keys to enter the rate and volume to be
PIGGYBACK PIGGYBACK
delivered.
RATE ML/HR VOLUME TO BE DELIVERED ML
125.0 1000.0
RUN
RUN
3. Press PRIMARY to start the infusion. The green
Run Indicators will light up.
WARNING: After pressing PRIMARY , make sure drops are falling
in the drip chamber. If no drops are falling, make sure the roller
clamp is open. If the roller clamp is open and still no drops are
falling, remove and replace the set as it may be defective.
The Time Left, Total Infused, and Occlusion Limit are shown on the Information Screen.
Monitor the infusion according to hospital policy. After the infusion is complete, the pump
will alarm and go into KVO.
CHANGING THE RATE
With Pump Infusing
1. Press the
keys to change the rate.
2. Press or PRIMARY to confirm new rate.
NOTE: If or PRIMARY is not pressed within 4 seconds of
entering a new rate, a series of error beeps will occur and the rate
change will be cancelled. The pump will then display the message
“Rate change aborted,” and will continue to infuse at the old rate. An
intermittent alarm will continue to sound to notify the user that a rate
change has been attempted and cancelled. Pressing any key will
silence the alarm.
24 951128 Rev E (11/10)
Page 33

Chapter 4: Standard & Piggyback Modes
With Pump Stopped
1. Press the keys to change the rate.
2. Press PRIMARY to start the infusion.
CHANGING THE VTBD
With Pump Stopped
1. Press the keys to change the volume to be delivered.
2. Press PRIMARY to start the infusion.
PIGGYBACK MODE
inches
1. Prepare IV fluids according to set package. Use primary sets with check valves.
2. Connect the piggyback set to the upper injection site (the site above the pump) on the pri-
mary set.
3. Lower the primary bag at least 8 inches.
NOTE: To minimize or prevent fluid flow from the primary container
during a Piggyback infusion (sympathetic flow), it may be necessary
to lower the primary bag more than 8 inches or clamp off the
primary tubing. Sympathetic flow increases significantly when the
Piggyback rate is greater than 125 mL/hr, and clamping the primary
tubing is recommended at rates greater than 125 mL/hr.
951128 Rev E (11/10) 25
Page 34

OUTLOOK
4. Press PIGGYBACK CHANNEL INDICATOR .
5. Use the keys to enter the piggyback rate and volume to be delivered.
6. Press PIGGYBACK to start the infusion.
7. When the
Primary channel
®
ES OPERATOR’S MANUAL
NOTE: To prevent incorrect delivery, the programmed piggyback
volume to be delivered must be equal to the amount of fluid in the
piggyback container. Piggyback Mode is not intended for the
infusion of fluids requiring flushing before or after administration.
VTBD of the Piggyback channel goes to zero, the pump will change back to the
RATE and VTBD. Make sure the primary tubing is not clamped.
CAUTION: Do not attempt to infuse both primary and piggyback fluids
simultaneously using this method; sympathetic flow may result. Use
primary sets with check valves.
NOTE: The pump must be stopped to activate Piggyback Mode.
NOTE: If the piggyback container is not empty, the remaining
piggyback fluid will be delivered at the Primary channel rate after
the pump changes back to the Primary channel.
RATEGUARD™ INFUSIONS
The Outlook® ES has the ability to assign RateGuard™ rate limits to solutions contained in
the Solution Library. Rate limits can be assigned to solutions for both Primary and Piggyback
Infusions. Soft rate limits, those that the clinican can override, and hard limits, those rate
limits that the clinician cannot override, can be assigned to solutions contained in the Solution
Library. Like drugs contained in the DoseGuard™ Drug Library, unique RateGuard limits
can be assigned to the same solution in different Care Areas. Additional configuration options
are also available for solutions contained in the solution library. On-Demand Bolus
capabilities as well as additional scanning options can be configured on a per solution per
Care Area basis. For more information on solution configuration options, refer to the
Instruction for Use Guide for the Outlook ES Pump Configuration Editor. The following
sections will describe the steps required to program solution deliveries with RateGuard Rate
Limits:
26 951128 Rev E (11/10)
Page 35

Chapter 4: Standard & Piggyback Modes
Primary Channel RateGuard™ Infusions
To program a Primary Infusion with a Solution Name and RateGuard rate limits, perform
the following steps:
1. Press PRIMARY CHANNEL INDICA-
TOR
.
2. Press .
3. Use the to highlight “RateG-
uard Infusions,” then press .
4. Use the to highlight the Care
Area desired, then press .
NOTE: Pressing HOLD in the Select Care Area screen will generate
a pop up message that will allow the user to “start over” and/or
return the pump to the last accepted infusion parameters.
5. Use the to highligh the first
letter of the solution name you wish
to infuse, then press .
951128 Rev E (11/10) 27
Page 36

OUTLOOK
®
ES OPERATOR’S MANUAL
6. Use the to highlight the solution
name, then press to select the
solution.
7. Review the RateGuard limits for the
selected solution and press to
ACCEPT.
8. Press PRIMARY to begin the infusion.
NOTE: The Green bar displays the MIN/MAX rate limits for the
selected solution. The indicator bar shows the the programmed
rate for the infusion and will update dynamically during titration.
NOTE: You can program the Rate and/or VTBD either before or
after selecting the solution. If you press prior to programming
either the Rate or VTBD, an error message will be displayed
prompting you to program the missing infusion parameter(s).
28 951128 Rev E (11/10)
Page 37

Chapter 4: Standard & Piggyback Modes
Piggyback Channel RateGuard™ Infusions
Programming a RateGuard infusion on the Piggyback Channel is identical to the process
for the Primary Channel. The only difference is in Step 1. Change Step 1 to read as follows:
1. Press PIGGYBACK CHANNEL INDICATOR .
2. Complete the programming process as described in the previous section and
press PIGGYBACK to begin the infusion.
RATEGUARD™ IN STANDARD MODE
The Outlook® ES is equipped with a special feature which alerts the caregiver when a
solution infusion is being set outside the rate parameters specified by the institution. When the
user attempts to validate the rate by pressing , the pump will compare the programmed
rate against the RateGuard™ minimum and maximum parameters.
If the rate parameters are within the RateGuard limits, a
screen similar to the following will be displayed.
If the values are outside of the set parameters, a pop-up
screen will appear with a message:
After confirming the parameters are acceptable as entered, the caregiver may then select
“YES” to proceed with the infusion. The choice to override the RateGuard™ limit will
generate one of the following notification screens:
951128 Rev E (11/10) 29
Page 38

OUTLOOK
If the rate is less than the minimum RateGuard™
limit, the following screen will appear.
If the rate is greater than the maximum RateGuard
limit, the following screen will appear.
®
ES OPERATOR’S MANUAL
If no RateGuard limits have been specified, the
following screen will appear.
ROLLER CLAMP REMINDER
The Roller Clamp Reminder is a configuration option that will remind the user to open the
roller clamp on the secondary line prior to starting a piggyback infusion. It is a configuration
option in the Biomed Menu that, when activated, will display the Roller Clamp Reminder
message as shown below when PIGGYBACK is pressed.
30 951128 Rev E (11/10)
Page 39

Chapter 4: Standard & Piggyback Modes
NOTE: The Roller Clamp Reminder can be configured ON/OFF in
the Biomed Options Menu of the pump.
Press PIGGYBACK after the Roller Clamp Reminder message is displayed to begin the
secondary infusion.
951128 Rev E (11/10) 31
Page 40

OUTLOOK
®
ES OPERATOR’S MANUAL
THIS PAGE INTENTIONALLY LEFT BLANK.
32 951128 Rev E (11/10)
Page 41

Chapter 5: DOSE Mode
CHAPTER 5:
DOSE MODE
IN THIS CHAPTER YOU WILL LEARN:
• How to begin a DOSE Mode infusion.
• How to change the dose and have the rate automatically calculated.
• How to change the dosage, concentration and body weight units.
• About cautions and warnings for giving epidural drugs in DOSE Mode.
• What the DoseGuard™ default parameters are.
951128 Rev E (11/10) 33
Page 42

OUTLOOK
®
ES OPERATOR’S MANUAL
DOSE MODE
DOSE Mode calculates the concentration, rate, or dose information necessary
with many critical drug infusions. This data may include infusion specific
parameters such as patient weight, drug dosage, and drug concentrations.
Titration of the medication automatically leads to recalculation of the dosing
parameter. The pump contains a library of commonly dosed IV drugs which
may be customized into area specific categories and concentrations.
DOSE Mode may be used with or without a drug name label. Displaying the drug name, rate,
and dose allows the user to view valuable information. As a safety precaution, DOSE Mode
cannot be used with any other operating modes. The user must ACCEPT all data entries prior
to beginning an infusion.
NOTE: DOSE Mode is a calculation and labeling feature only.
Physician orders will always govern the appropriate patient
dosage.
Titration
NOTE: DOSE Mode may be placed in either the Main or Alternate
Menus.
1. Press .
2. Press .
3. Use the to highlight “DOSE Mode,” then press .
One of two screens will appear, depending on whether or not DOSE Mode was used
previously.
If the pump had the DOSE Mode used previously, a
screen similar to the following may appear:
TO ACCEPT THE CURRENT DRUG
1. Use the to highlight “
Accept,”
then press .
2. See “DOSE DATA ENTRY SCREEN.”
TO CHANGE TO A DIFFERENT DRUG
1. Use the to highlight “
Change,” then press .
34 951128 Rev E (11/10)
Page 43

Chapter 5: DOSE Mode
2. Use the to highlight the Care
Area desired, then press .
NOTE: Pressing HOLD in the Select Care Area screen will generate
a pop up message that will allow the user to “start over” and/or
return the pump to the last accepted infusion parameters.
HINT: To access the Care Area screen more directly you can use
the DoseGuard Drug Library option on the Main Menu as shown
below:
3. Use the to highlight the first
letter of the drug name you wish to
infuse.
NOTE: Only those drug names starting with the letters shown in
blue are contained in the selected Care Area. Black letters indicate
there are no drugs starting with that letter in the Care Area.
951128 Rev E (11/10) 35
Page 44

OUTLOOK
®
ES OPERATOR’S MANUAL
4. Use the to highlight the desired
drug name and dosage units, then press
.
5. Use the to highlight the desired
concentration, then press .
6. See “DOSE DATA ENTRY
SCREEN.”
NOTE: Pressing HOLD in the concentration screen will generate a
pop up message that will allow the user to “start over” and/or return
the pump to the last accepted infusion parameters.
NOTE: No data entry can be done on this screen. The concentration
may be changed later: see DOSE DATA ENTRY SCREEN.
NOTE: Changing to a different drug can also be performed from the
DOSE DATA ENTRY SCREEN; see “TO CHOOSE A DIFFERENT
DRUG” on page 38.
TO CLEAR THE CURRENT DRUG
1. Use the to highlight “
2. Use the to highlight “CLEAR DRUG,” then press .
3. See “DOSE DATA ENTRY SCREEN.”
Change”, then press .
NOTE: For drugs not appearing on the list, clear the drug name and
just use the DATA ENTRY SCREEN.
36 951128 Rev E (11/10)
Page 45

Chapter 5: DOSE Mode
If this is a new pump or a pump recently
serviced by Biomedical Services, a screen similar
to the following may appear.
1. Use the to highlight “DRUG,” then press
.
2. Follows steps 2-4 in To Change To A Differ-
ent Drug above, then press .
3. See “DOSE DATA ENTRY SCREEN.”
DOSE DATA ENTRY SCREEN
The DOSE DATA ENTRY SCREEN is the “worksheet” into which the dosing parameters are
entered. The fields to be completed will include concentration, dose and units, rate, and may
include height and/or weight. All fields may be changed when this screen is active.
NOTE: Concentration, dose, and rate are dependent on each other
for their numeric values. Specifying the amount of two of the
parameters causes the third parameter to be calculated.
1. Use the to highlight the field to be completed.
2. Use the keys to enter data.
3. Press key to move to the next field.
Example:
Specifying a weight of 70 kg, a concentration
of 400 mg of DOPamine in 250 ml of fluid at
a dose of 10.0 mcg/kg/min results in a calculated rate of 26.3 ml/hr.
4. Use the to highlight “
press .
5. Press PRIMARY to begin the infusion.
NOTE: Pressing HOLD in the Dose Data Entry screen will generate
a pop up message that will allow the user to “start over” and/or
return the pump to the last accepted infusion parameters.
ACCEPT,” then
951128 Rev E (11/10) 37
Page 46

OUTLOOK
TO CHOOSE ANOTHER PARAMETER TO BE CALCULATED
®
ES OPERATOR’S MANUAL
NOTE: Concentration, Dose, and Rate are dependent on each other
for their numeric values. Specifying the amount of two parameters
causes the third parameter to be calculated. Either the
Concentration (Conc), Dose, or Rate parameter is calculated. Rate
is the parameter calculated unless another parameter is chosen.
1. Use the left to highlight the parameter to be calculated (Conc, Rate,
or Dose).
2. Press the right . An underline will appear under the parameter to be
calculated.
3. Use the keys to enter data in all other required fields.
4. Press key to move to the next field.
TO CHOOSE A DIFFERENT DRUG
1. Use the to highlight “DRUG” then press .
2. Follow steps 2-5 in “To Change To A Different Drug” on page 34.
TO CHANGE UNITS ON THE DATA ENTRY SCREEN
Critical medications require units for calculation of doses, for example mcg/mg/min.
Three categories of units are Dosage, Concentration (Conc), and Body. Each of these can
be independently selected and changed. Match the dosage and concentration as ordered by
the physician.
1. Use the to highlight “
then press .
2. Use the left and right keys to
highlight the parameter to be changed.
3. Use the up and down keys to
change the parameter.
SETUP,”
4. Press .
38 951128 Rev E (11/10)
Page 47

Chapter 5: DOSE Mode
CHANGING DOSE MODE RATE
The rate may be titrated while the pump is infusing.
1. Use the keys to change the rate. The dose will be recalculated depending on the new
rate entered.
2. Press or PRIMARY to confirm the new rate and dose and begin the infusion.
NOTE: If or PRIMARY is not pressed within 4 seconds of
entering a new rate and dose, a series of error beeps occurs and
the rate/dose change is cancelled. The pump then displays the
message “Rate change aborted,” and continues to infuse at the old
rate. An intermittent alarm continues to sound to notify the user a
rate change was attempted and cancelled. Pressing any key will
silence the alarm.
CHANGING DOSE MODE DOSE
The dose can be titrated while the pump is infusing.
1. Use the to highlight the DOSE field in
the upper right corner of the Information Screen,
then press .
2. On the DOSE DATA ENTRY SCREEN, use
the to highlight the Dose field.
3. Use the keys to change the dose, then press
.
4. Use the to highlight “
depending on the new dose entered.
ACCEPT,” then press . The rate will be recalculated
951128 Rev E (11/10) 39
Page 48

OUTLOOK
®
ES OPERATOR’S MANUAL
EPIDURAL IN DOSE MODE
When the Epidural category from the Drug List is
selected, the following screen will appear:
CAUTION: Whenever a pump is used for epidural infusion, the
pump’s secondary features should not be used.
CAUTION: To prevent inadvertent infusion of drugs which are not
indicated for epidural use, only Horizon® micro-bore administration
sets without injection sites are specified for epidural administration
of drugs.
WARNING: Serious injury to the patient may result from epidural
administration of drugs other than those specifically labeled for
epidural use.
DOSEGUARD™ IN DOSE MODE
The Outlook® ES is equipped with a special feature which alerts the caregiver when a dosed
infusion is being set outside the infusion parameters specified by the institution. When the
user attempts to validate the Dose Data Entry screen, the pump will compare the entered dose
values against the DoseGuard™ minimum and maximum parameters.
If these dose parameters are within the DoseGuard
limits, a screen similar to the following will be
displayed.
40 951128 Rev E (11/10)
Page 49

Chapter 5: DOSE Mode
If the values are outside of the set parameters, a popup screen will appear with a message:
After confirming the parameters are acceptable as entered, the caregiver may then select
“YES” to proceed with the infusion. The selection to override the DoseGuard™ limit will
generate one of the following notifications screens:
If the dose value is less than the minimum DoseGuard
limit, the following screen will appear.
If the dose value is greater than the maximum
DoseGuard™ limit, the following screen will appear.
If no DoseGuard limits have been specified, the
following screen will appear.
951128 Rev E (11/10) 41
Page 50

OUTLOOK
®
ES OPERATOR’S MANUAL
NOTE: Changes to accepted infusion parameters made in the
DOSE Mode Data Entry or SETUP screen (e.g. concentration
units, patient weight units, etc.) may deactivate the DoseGuard
feature. If this occurs, the user will be notified via pop-up alert.
ACCESSING DOSE MODE WHEN INFUSING
DOSE Mode can be accessed while the pump is running in STANDARD Mode. This option
can be used to assign a drug label and dose to the current infusion. The STANDARD Mode
rate will be the default parameter in the DOSE Mode Data Entry screen.
The dose will be calculated based on the Drug and Concentration selected. Once confirmed
and accepted, the infusion will continue to run at the programmed rate.
NOTE: This option is not available if there are no drugs configured in
the Drug Library or if the STANDARD Mode rate is greater than the
micro-rate limit when a drug is selected from the Epidural category.
NOTE: Confirming a dose outside the assigned DoseGuard limits will
generate the DoseGuard Alert pop-up message.
EXITING DOSE MODE
1. Press .
2. Use the to highlight “Exit DOSE Mode,” then press .
42 951128 Rev E (11/10)
Page 51

Chapter 6: Bolus Delivery Modes
CHAPTER 6:
BOLUS DELIVERY MODES
IN THIS CHAPTER YOU WILL LEARN:
• How to perform a bolus delivery
• How to program a loading dose
• How to program an on-demand bolus for a drug
• How to program an on-demand bolus for a solution.
• How to place a bolus on Hold.
• How to cancel a bolus delivery
• How to change the dosage, concentration and body weight units.
• About cautions and warnings for bolus deliveries using drugs and
solutions in the Epidural Care Area.
951128 Rev E (11/10) 43
Page 52

OUTLOOK
®
ES OPERATOR’S MANUAL
BOLUS DELIVERIES
The Outlook® ES allows for programming bolus deliveries for both drugs contained in the
DoseGuard™ Drug Library and solutions contained in the RateGuard™ Solution List. For
more information on how to configure drugs and solutions for bolus delivery, refer to the
Instructions for Use manual of the Outlook ES Pump Configuration Editor application. The
following rules govern the use of the Bolus function:
1. Both Loading Dose and On-Demand bolus deliveries can be configured for
drugs contained in the DoseGuard Drug Library
2. Dose units for bolus deliveries for drugs configured in the DoseGuard Drug
Library can be the same or different dosing units than the continuous infusion.
3. Unique DoseGuard dose limits can be assigned to both a Loading Dose and
On-Demand bolus.
4. Only On-Demand bolus deliveries can be configured for solutions contained in
the RateGuard Solution List.
5. All units for bolus deliveries of solutions configured in the RateGuard Solution
List are in ml/hr.
6. Unique RateGuard rate limits can be assigned to On-Demand solution bolus
deliveries.
7. The time unit for all bolus programs is Min(utes).
8. Range checking for DoseGuard dose limits and RateGuard rate limits is performed after confirming the Total Dose or Total Volume values for the respective bolus.
LOADING DOSE
The Loading Dose option will allow you to automatically deliver a specific dose of
medication over a given period of time before beginning the continuous infusion.
NOTE: Valid infusion parameters must be entered for the
continuous infusion prior to programming dose and time data for a
loading dose.
If a drug is configured for a Loading Dose, the
following screen will be displayed when you
ACCEPT the continuous infusion data and press
.
1. Use to highlight YES.
2. Press .
44 951128 Rev E (11/10)
Page 53

Chapter 6: Bolus Delivery Modes
3. The following message will be displayed to
remind you to to confirm the Total Dose value
that you programmed per the Physician Order.
4. Press and the Loading Dose Setup
screen will be displayed.
LOADING DOSE SETUP
Loading doses can be programmed with or without patient weight units. The loading dose can
also be the same or different dosing units than the continuous infusion. Unique soft/hard
DoseGuard™ dose limits can also be assigned for loading Dose Deliveries. Examples of the
Loading Dose Setup Screens with and without patient weight units are shown below:
NOTE: If the continuous infusion is weight-based, the Pt Wt
(Patient Weight) field is pre-populated with the value from the
continuous infusion. You will not be able to change this value.
NOTE: If the continuous infusion is not weight-based but the
loading dose contains a Pt Wt (Patient Weight) field, the user must
input the patient weight (in kg) to complete the Loading Dose Setup
screen.
To program a Loading Dose:
1. Press to enter a Tot Dose (Total Loading Dose).
2. Press to highlight Time.
951128 Rev E (11/10) 45
Page 54

OUTLOOK
3. Press to enter a Time (in minutes).
4. If applicable, press to highlight the Pt Wt (Patient Weight) field.
5. Press to enter the patient weight in kg.
6. Press to highlight ACCEPT or...
7. Press to highlight BACK
8. Press to confirm your selection.
®
ES OPERATOR’S MANUAL
NOTE: “Eq Dose” is defined as the Equivalent Dose. This is a
calculated value derived from the data entered in the Loading Dose
Setup screen.
NOTE: The DoseGuard™ dose limits for the Loading Dose are in
the same units as the Eq Dose or Equivalent Dose.
NOTE: Selecting BACK will cancel the Loading Dose delivery and
return the screen to the previous continuous infusion display.
9. If the equivalent dose is within the limits will display the following confirmation screen:
10. Press to highlight ACCEPT or...
11. Press to highlight BACK
12. Press to confirm your selection.
46 951128 Rev E (11/10)
Page 55
Chapter 6: Bolus Delivery Modes
NOTE: Selecting BACK will cancel the Loading Dose delivery and
return the user to the Bolus Setup screen.
BOLUS READY SCREEN
When the loading dose parameters are confirmed, the pump will display the BOLUS READY
screen as shown below. For this example we are assuming a weight-based loading dose.
NOTE: The Dose Deliv(ered) for the Loading Dose will count UP
from 0.0 with the Total Dose value is the programmed dose for the
bolus and will remain static.
To start the Loading Dose:
1. Press PRIMARY .
BOLUS RUN SCREEN
After starting the Loading Dose, a screen similar to the one shown below will be displayed:
951128 Rev E (11/10) 47
Page 56

OUTLOOK
®
ES OPERATOR’S MANUAL
NOTE: The drug name and the bolus dose will be displayed with
the proper bolus units
NOTE: DoseGuard™ indicators specific to the loading dose will be
displayed on the indicator bar.
NOTE: During a Loading Dose or On-Demand bolus, the word
BOLUSING will appear in upper right hand corner of the display
NOTE: Although not shown in the example above, the drug name
on the Red LCD and the word “Bolusing” will alternately be
displayed until the bolus delivery is complete.
BOLUS HOLD SCREEN
To pause the bolus delivery perform the following steps:
1. Press to pause the bolus.
2. Press to RESUME the delivery.
3. If applicable, press to highlight CANCEL.
4. Press to cancel the bolus.
5. Press to start the selected infusion.
An example of the Bolus Hold Screen is shown below:
NOTE: Canceling the bolus will return the infusion to the continuous
infusion parameters and associated display.
48 951128 Rev E (11/10)
Page 57
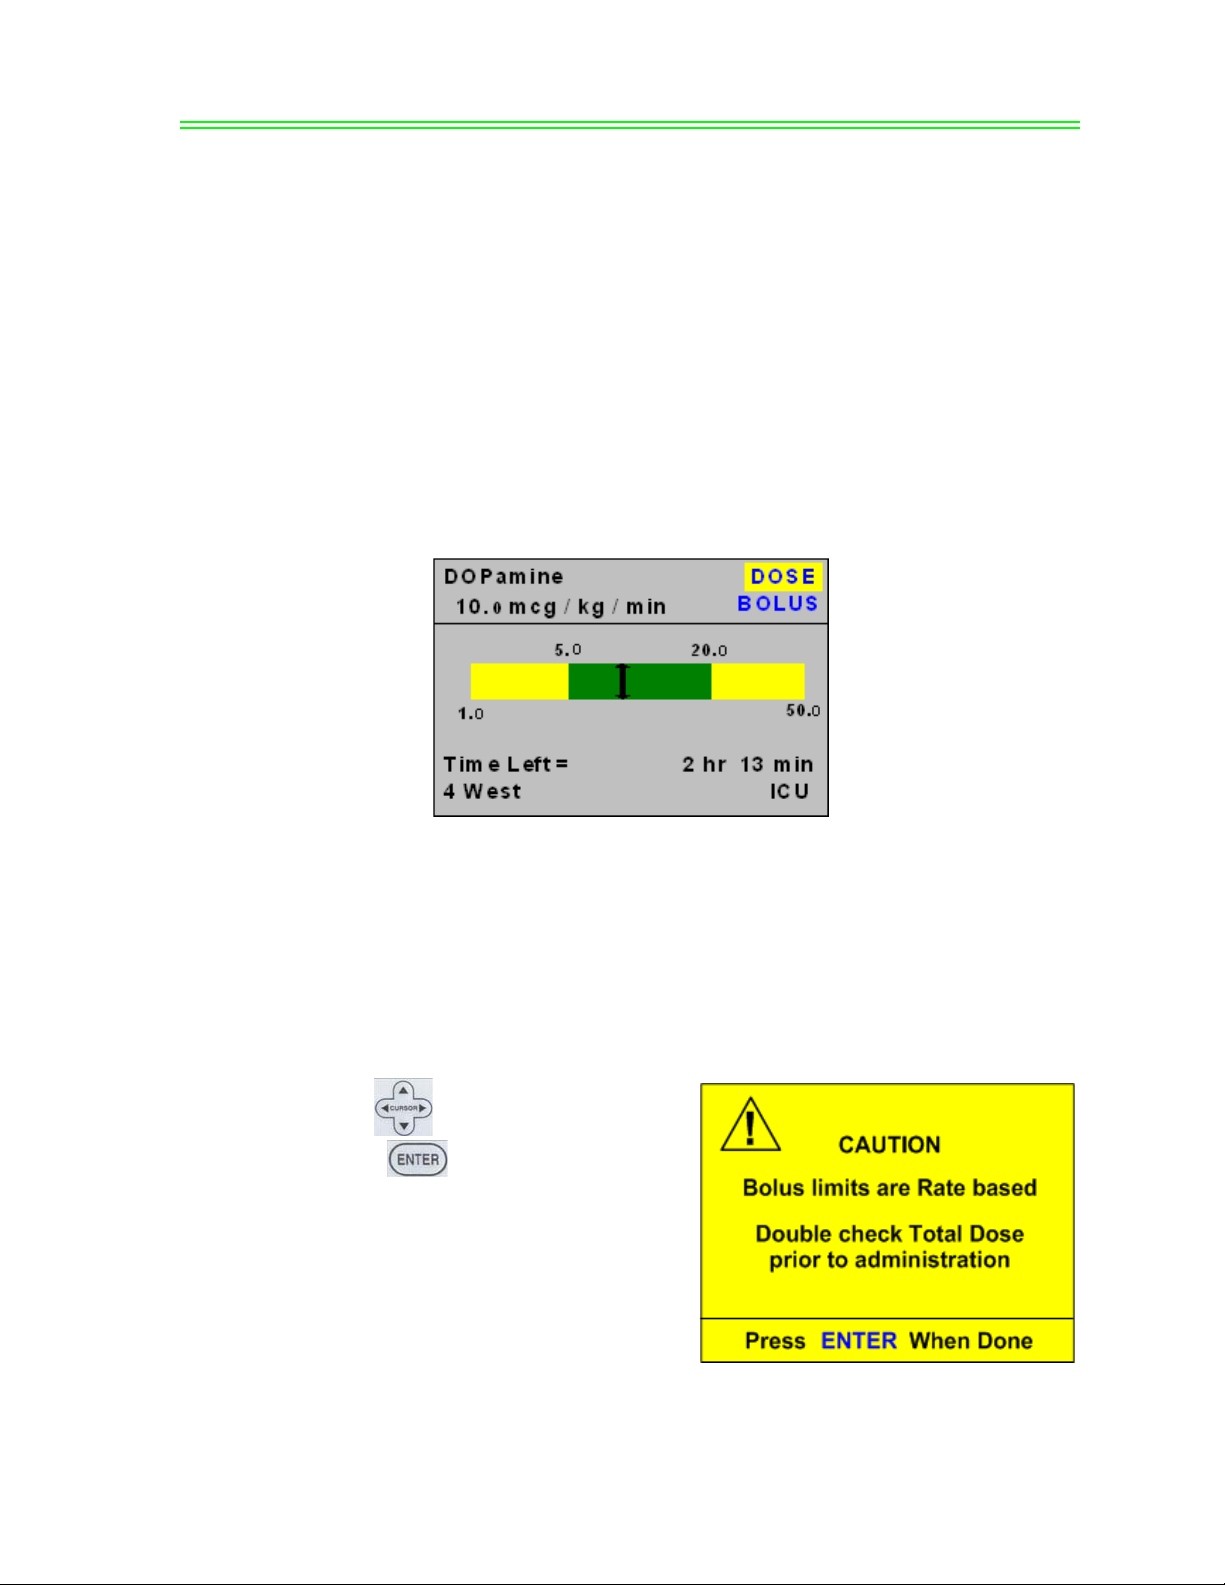
Chapter 6: Bolus Delivery Modes
ON-DEMAND BOLUS
The Outlook® ES also allows for programming both weight based and non-weight based “ondemand” bolus deliveries for both drugs contained in the DoseGuard™ Drug Library. In
contrast to a loading dose, on-demand boluses are those boluses initiated during the course of
the continuous infusion. Like Loading Dose, the On-Demand Bolus can be pre-programmed
with the same or different dosing units as the continuous infusion. Unique, soft and hard
DoseGuard™ dose limits can also be assigned to the On-Demand bolus. For more
information on how to configure drugs and solutions for On-Demand bolus delivery, refer to
the Instrustions for Use manual of the Outlook ES Pump Configuration Editor application.
A drug has been configured for an On-Demand Bolus if the word BOLUS appears below the
word DOSE in the DOSE Mode Run screen. See the example below:
The process to configure an On-Demand Bolus is very similar to the programming of a
Loading Dose. Many of the screens have the same look and feel and provide for consistent
bolus programming between the different bolus types. The next section will describe the steps
in detail.
PROGRAMMING A BOLUS
To program an On-Demand Bolus complete the following steps:
1. Use to highlight BOLUS.
2. Press .
3. The following message will be displayed to remind you to to confirm
the Total Dose value that you program per the Physician Order.
951128 Rev E (11/10) 49
Page 58

OUTLOOK
®
ES OPERATOR’S MANUAL
4. Press and the Bolus Setup
screen will be displayed.
5. Complete the programming sequence
as previously described in the
LOADING DOSE sections of this
Manual.
NOTE: If a bolus for the drug had been previously programmed, the
BOLUS SETUP screen will be pre-populated with the previous
values. Amend the values as required for the new bolus delivery.
RATEGUARD™ BOLUS
On-Demand bolus deliveries can also be initiated for solutions contained in the RateGuardTM
solution list. Unique soft and hard RateGuard rate limits can be assigned to the solution bolus.
If a solution is configured for a (On-Demand) bolus, the word BOLUS will appear on the
continuous infusion run screen as shown below:
NOTE: Loading Dose Bolus deliveries are not configurable for
solutions contained in the RateGuard solution list.
NOTE: All infusion parameters for RateGuard solutions and (OnDemand bolus deliveries will be in ml/hr.
To Program a solution bolus, complete the following steps:
50 951128 Rev E (11/10)
Page 59

Chapter 6: Bolus Delivery Modes
1. Press .
2. The following message will be dis-
played to remind you to to confirm the
Total Volume that you program per the
Physician Order.
3. Press and the Bolus Setup
screen will be displayed.
4. The Bolus Setup screen requires a total
bolus volume and time.
5. Press to enter a bolus volume.
6. Press to highlight Time.
7. Press to enter the duration of the
bolus in minutes.
8. Press to highlight ACCEPT or...
9. Press to highlight BACK.
10. Press to confirm your selection.
NOTE: The bolus delivery rate is a calculated field derived from the
volume and time data entered.
NOTE: Selecting BACK will cancel the bolus delivery and return
the screen to the previous continuous infusion display.
951128 Rev E (11/10) 51
Page 60

OUTLOOK
®
ES OPERATOR’S MANUAL
11. Pressing ACCEPT will display the following confirmation screen:
12. Press to highlight ACCEPT or...
13. Press to highlight BACK
14. Press to confirm your selection.
BOLUS READY SCREEN
When the bolus parameters are confirmed, the pumps will display the BOLUS READY screen
as shown below:
NOTE: The Bolus Vol(ume) Deliv(ered) counts UP from zero while
the Total Bolus Vol(ume) is the programmed volume for the bolus
and will remain static.
To start the bolus:
1. Press .
52 951128 Rev E (11/10)
Page 61

Chapter 6: Bolus Delivery Modes
BOLUS RUN SCREEN
After initiating the bolus, the Bolus Run Screen shown below will be displayed:
NOTE: DoseGuard™ indicators specific to the bolus will be
displayed on the indicator bar.
NOTE: During a bolus, the word BOLUSING will appear in upper
right hand corner of the display
NOTE: Although not shown in the example above, the solution
name on the Red LCD and the word “Bolusing” will alternately be
displayed until the bolus delivery is complete.
BOLUS HOLD SCREEN
To pause the bolus delivery perform the following steps:
1. Press to pause the bolus.
2. Press to RESUME the delivery.
3. If applicable, press to highlight CANCEL.
4. Press to cancel the bolus.
5. Press to start the selected infusion.
An example of the Bolus Hold Screen is shown below:
951128 Rev E (11/10) 53
Page 62

OUTLOOK
®
ES OPERATOR’S MANUAL
NOTE: Canceling the bolus will return the infusion to the continuous
infusion parameters and associated display.
EPIDURAL BOLUS CAUTION
The Micro Rate Limit feature is automatically invoked when as drug or solution is
programmed from the Epidural Care Area of the Drug Library. The Micro Rate Limit feature
limits the delivery rate of either the continuous infusion or bolus delivery to a maximum of
99.9 ml/hr. Your facility may have set a lower Micro Rate limit. It also automatically
increases the delivery pressure to 750 mmHg. If the programmed rate exceed the Micro Rate
limit a warning screen will be displayed similar to the screen shown below:
54 951128 Rev E (11/10)
Page 63

Chapter 7: DoseScan™
CHAPTER 7:
DOSESCAN™
IN THIS CHAPTER YOU WILL LEARN:
• How to set up an infusion using DoseScan™.
951128 Rev E (11/10) 55
Page 64
OUTLOOK
®
ES OPERATOR’S MANUAL
DOSESCAN™ (OUTLOOK® 200ES AND ABOVE)
The DoseScan™ safety feature was designed to reduce the potential for IV medication errors
by reducing the number of manual keystrokes required to program infusion parameters. This
is especially beneficial when infusing critical medications that require the use of more
advanced programming features like those contained in DOSE Mode.
DoseScan activates either the bar code scanner located in the handle of the
pump or an optional hand held scanner. Information contained on the bar
coded drug label will be used to configure the infusion in STANDARD Mode
(Primary and Piggyback infusions), or DOSE Mode. The facility has the
option to choose if an Authorized User ID and Patient ID are required for data
entry. The pump only prompts the user to scan in required information.
NOTE: The DoseScanTM option can only be activated while the
pump is in either STANDARD or DOSE Mode Hold state.
Doe, John Q.
Normal Saline
125 ml/hr
Use of controls or adjustments or performance of procedures other
than those specified herein may result in hazardous radiation
exposure.
FOR STANDARD MODE & DOSE MODE INFUSIONS
1. Press .
2. Use the to highlight “DoseScan™” then press .
NOTE: If the hand held scanner is used, press the trigger on the
scanner after each line is successfully scanned. The scanner will
only remain active for 30 seconds. If the scanner turns off, the user
will need to reactivate the scanner.
NOTE: SCANNING SEQUENCE:
1) Authorized User ID, and/or
2) Patient Identification, and/or
3) Patient Identification on Medication Label, and/or
4) Medication Information
NOTE: An audible tone will sound after all the data is scanned to
confirm the data has been accepted.
3. Scan Authorized User identification.
56 951128 Rev E (11/10)
Page 65

Chapter 7: DoseScan™
4. The Information Display will ask if this is a new patient. Use the to highlight
either “YES” or “NO”, then press .
5. Scan Patient identification.
6. Scan Patient identification information on the medication label.
7. Scan the IV medication data on the medication label. The infusion data will be displayed
on the Information Display.
8. Review the data, highlight “ACCEPT”, then press .
9. Press to start the infusion.
NOTE: Any modifications made to the infusion parameters after
accepting scanned bar code data may result in the deactivation of
certain features (e.g. DoseGuardTM dose limits, drug name display,
etc.).
FOR PIGGYBACK INFUSIONS
1. Scan in Primary Infusion data as directed above.
2. Press PIGGYBACK CHANNEL INDICATOR .
3. Press .
4. Use the to highlight “DoseScan™,” then press .
5. Follow steps 4-8 in STANDARD & DOSE Mode Infusions above to scan in the Piggy-
back infusion data.
6. Press PIGGYBACK .
FOR LABELS WITH "0.0" AND "TITRATE" BAR CODES
The DoseScan™ feature has the ability to accept
both 0.0 and Titrate bar codes in those cases where
the starting infusion rate or dose has not been
specified. After completing the scanning sequence
described in the previous section, one of the
following validation screens will appear.
951128 Rev E (11/10) 57
Page 66

OUTLOOK
If either the starting infusion rate or dose is 0.0, the
appropriate field will be highlighted when the scan
is complete. The following steps should be
completed to proceed with the infusion
programming sequence.
1. Enter a valid, non-zero value for rate or dose (as
applicable)
2. Use the to highlight "Accept", then press
®
ES OPERATOR’S MANUAL
.
NOTE: The highlight cursor will return to the appropriate rate or
dose field if the 0.o value has not been changed to a valid, nonzero value.
FOR LABELS WITH "0.0" FOR PATIENT WEIGHT
The DoseScan™ feature also has the ability to
accept a 0.0 (zero) value for patient weight in those
cases where the patient weight has not been
specified. After completing the scanning sequence
described in the previous section, the following
validation screens will appear.
The following steps should be completed to proceed
with the infusion programming sequence.
1. Enter a valid, non-zero value for Body Weight.
2. Use the to highlight "Accept", then press .
NOTE: The highlight cursor will return to the weight field if the 0.o
value has not been changed to a valid, non-zero value.
TITRATION CHECKING
The DoseScan™ feature also has the ability to check scanned information with the previous
infusion parameters. This is especially useful in those circumstances where multiple bags of
the same medication are sent to the care unit for sequential delivery. Changes in rate or dose
could be an indication of a titration. Titration checking provides a means to confirm the
proper rate or dose for the scanned medication. The process is completed as follows:
58 951128 Rev E (11/10)
Page 67

Chapter 7: DoseScan™
1. Scan the IV medication label as described in the DoseScan™ section outlined on page 26.
2. Enter a valid, non-zero value for rate or dose if applicable.
3. Validate the scanned information by moving the Cursor to Accept and press .
4. The titration checking routine commences as follows:
For Standard Mode Deliveries
• If the Patient ID and Drug Name match the previous infusion information, the rate
value is compared.
• If the rate values are equal, the rate and VTBD are displayed as scanned and the
infusion can be started by pressing .
• If the rate values are not equal, the following
Titration Alert will be displayed:
1. Use the to highlight the cor-
rect rate, then press .
2. Begin the infusion by pressing .
For Dose Mode Deliveries
• If the Patient ID, Drug Name, Dose units, and Drug Concentration match the previous
infusion information, the dose value is compared.
• If the dose values are equal, the scanned information is displayed and the infusion can
be started by pressing .
• If the dose values are not equal, the following
Titration Alert will be displayed:
1. Use the to highlight the cor-
rect dose, then press .
2. Begin the infusion by pressing .
951128 Rev E (11/10) 59
Page 68

OUTLOOK
®
ES OPERATOR’S MANUAL
DOSEGUARDTM MATCHING
The DoseScanTM feature provides the clinician the ability to assign DoseGuardTM dose limits
to scanned medications. For more information on DoseGuard, refer to “DoseGuard™ in
DOSE Mode” on page 40.
If the DoseGuard Matching feature is turned ON under DoseScan options in the BIOMED
menu, scanned medications will be compared with those medications configured in the drug
library. If DoseGuards are assigned to those medications, the dose limits or Care Areas will be
displayed for selection and assignment.
If the scanned solution is not contained in the drug
library or there are no DoseGuards assigned, the
following screen will be displayed.
• Choosing “Accept” will accept the scanned
data without DoseGuard protection.
• Choosing “Exit” will reject all the scanned
data.
If, however, the scanned drug matches the name, concentration and dose units of a medication
configured in the drug library, one of the following notification messages will be displayed.
This message will be displayed if the scanned drug
matches a medication in a configured Care Area.
60 951128 Rev E (11/10)
Page 69

This message will be displayed if the scanned drug
matches a medication configured in more than one
Care Area.
Single Care Area Match
If the scanned drug matches a medication configured in one Care Area, the Care Area, drug
name, and dose limits will be displayed for
selection by the clinician. A screen similar to the
following will be displayed.
Chapter 7: DoseScan™
• Choosing “Accept” will assign the
programmed DoseGuards to the scanned
medication.
• Choosing “Exit” will generate the notification
message shown.
951128 Rev E (11/10) 61
Page 70

OUTLOOK
Multiple Care Area Match
If the scanned drug matches a medication configured in multiple Care Areas, the Care Areas
will be displayed for viewing and selection. A
screen similar to the one shown will be displayed.
• Use the to highlight the appropriate
• Press to review the Dose limits.
Once a Care Area is selected, the clinician has
the ability to “Accept” or “Exit” as described in
the Single Care Area Match.
The clinician also has the option to go “Back” to
choose another Care Area to review alternate
dose limits as shown in the example screen.
®
ES OPERATOR’S MANUAL
Care Area.
NOTE: The pump will transition into the KVO state when the infusion
has been completed. Pressing HOLD to silence the KVO alarm will
deactivate the drug name display if no DoseGuardTM match exists
or if no DoseGuard limits have been assigned to the scanned
medication.
RATEGUARDTM MATCHING
DoseScan feature provides the clinician the ability to assign RateGuardTM rate limits to
scanned medications. For more information on RateGuard, refer to “DoseGuard™ in DOSE
Mode” on page 40.
If the RateGuard Matching feature is turned ON under DoseScan options in the BIOMED
menu, scanned medications will be compared with those medications configured in the
solution list. If RateGuards are assigned to those solutions, the rate limits or Care Areas will
be displayed for selection and assignment.
62 951128 Rev E (11/10)
Page 71

If the scanned solution is not contained in the
solution list or there are no RateGuards assigned, the
following screen will be displayed.
• Choosing “Accept” will accept the scanned
TM
data without RateGuard
protection.
Chapter 7: DoseScan™
• Choosing “
Exit” will reject all the scanned
data.
If, however, the scanned solution matches the name of a solution configured in the solution
list, one of the following notification messages will be displayed.
This message will be displayed if the scanned
solution matches a solution in a configured Care
Area.
This message will be displayed if the scanned
solution matches a solution configured in more than
one Care Area.
951128 Rev E (11/10) 63
Page 72

OUTLOOK
Single Care Area Match
If the scanned soluton matches a solution configured in one Care Area, the Care Area, solution
name and rate limits will be displayed for selection by the clinician. A screen similar to the following will be displayed.
• Choosing “Accept” will assign the
• Choosing “Exit” will generate the notification
®
ES OPERATOR’S MANUAL
programmed RateGuards to the scanned
solution.
message shown.
Multiple Care Area Match
If the scanned solution matches a solution configured in multiple Care Areas, the Care Areas
will be displayed for viewing and selection. A
screen similar to the one shown will be displayed.
• Use the to highlight the appropriate
Care Area.
• Press to review the Rate limits.
64 951128 Rev E (11/10)
Page 73

Once a Care Area is selected, the clinician has
the ability to “Accept” or “Exit” as described in
the Single Care Area Match.
The clinician also has the option to go “Back” to
choose another Care Area to review alternate
RateGuardTM limits as shown in the example
screen.
Note: The pump will transition into the KVO state when the infusion
has been completed. Pressing HOLD to silence the KVO alarm will
deactivate the drug name display if no RateGuard
or if no RateGuard limits have been assigned to the scanned
medication.
Chapter 7: DoseScan™
TM
match exists
ADDITIONAL SCAN FEATURES
The Outlook® 200ES and above have additional scan features that can be configured
individually or in tandem with other scan options. Some features are Menu configurable and
some are configurable per drug or solution per Care Area to enable specific scans for
individual drugs. These features are enabled outside the standard DoseScanTM steps and can
help add bar code safety to your infusion programming protocols. The following sections list
those additional scan features and provide instructions on how to access and perfom each
function.
Scan Patient ID
The Scan Patient ID feature is located in the Main Menu. The purpose of this Scan is to
‘attach’ or associate a Patient ID with a specific infusion. The Patient ID is stored in the
data log of the pump and is transmitted as part of the outbound data stream in the Outlook
300ES and 400ES. To Scan Patient ID, perform the following steps:
1. Press to place pump on Hold.
2. Press to display the Main
Menu.
3. Press to highlight Scan
Patient ID
4. Press .
5. At the prompt, Scan the Patient ID.
6. Press to Accept the New ID.
951128 Rev E (11/10) 65
Page 74

OUTLOOK
Scan Authorized User ID
The Scan Authorized User ID feature is located in the Main Menu. The purpose of this
Scan is to ‘attach’ or associate an Authorized User ID with a specific infusion. The
Authorized User ID is stored in the data log of the pump and is transmitted as part of the
outbound data stream in the Outlook® 300ES and 400ES. To Scan Authorized User ID,
perform the following steps:
®
ES OPERATOR’S MANUAL
Note: When the scan is accepted, the New Patient ID will be
displayed on the Red LCD on the left hand side of the pump to
allow you to confirm the ID number prior to accepting the scan.
Note: Like DoseScanTM options, three invalid scans will terminate
the Scan Patient ID option and return the user to the Main Menu.
The user will be prompted to rescan the Patient ID if the scan was
invalid.
1. Press to place pump on Hold.
2. Press to display the Main
Menu.
3. Press to highlight Scan
Authorized User ID
4. Press .
5. At the prompt, Scan the Authorized
User ID.
6. Press to Accept the New ID.
Note: When the scan is accepted, the New Authorized User ID will
be displayed on the Red LCD on the left hand side of the pump to
allow you to confirm the ID number prior to accepting the scan.
Note: Like DoseScanTM options, three invalid scans will terminate
the Scan Authorized User ID option and return the user to the Main
Menu. The user will be prompted to rescan the Authorized User ID
if the scan was invalid.
Run Authorization Scan
The Run Authorization Scan is a “global” scanning option. Every time the clinician
presses the key they will be prompted to Scan their Authorized User ID. The steps
are similar to those as described in Scan Authorized User ID above but once the Autho-
66 951128 Rev E (11/10)
Page 75

Chapter 7: DoseScan™
rized User ID has been validated the infusion will automatically start.
Note: The Run Authorization Scan has an “Override” option that
will allow the user to begin the infusion without scanning their
Authorized User ID. This option is for those emergency cases
where the Authorized User ID may not be readily accessible.
Note: “Override” events are logged in the Operations Log of the
infusion device.
The following Scan Features are activated per Drug and/or Solution using the Outlook ES
Pump Configuration Editor. For additional information on how to configure drugs and
solutions for these options, refer to the Instructions for Use guide that accompanies the
application.
DoseGuardTM Override Scan
The DoseGuard Override Scan is a drug specific, Care Area specific scan configuration.
This option can be enabled for a specific drug in one or more Care Areas. For example,
you may choose to not activate this option for DOPamine in the ICU Care Area, but you
may want additional authorization to override the dose limits for DOPamine used in the
MED SURG Care Area. If activated for a particular drug, the user will be prompted to
scan their Authorized User ID when they override hospital defined dose limits.
Note: DoseGuard Override scans are logged in the Operations Log
of the infusion device.
Note: Exiting the DoseGuard Override Scan prompt will invalidate
the override and return the user to the previous delivery
parameters.
Note: Three invalid scans will also invalidate the override and
return the user to the previous delivery parameters.
951128 Rev E (11/10) 67
Page 76

OUTLOOK
RateGuardTM Override Scan
The RateGuard Override Scan is a solution specific, Care Area specific scan configuration. This option can be enabled for a specific solutions in a one or more Care Areas. For
example, you may choose not to activate this option for KCl in the ICU Care Area, but
you may want additional authorization to override the rate limits for KCl used in the MED
SURG Care Area. If activated for a particular solution, the user will be prompted to scan
their Authorized User ID when they override hospital defined dose limits.
®
ES OPERATOR’S MANUAL
Note: RateGuard Override scans are logged in the Operations Log
of the infusion device.
Note: Exiting the RateGuard Override Scan prompt will invalidate
the override and return the user to the previous delivery
parameters.
Note: Three invalid scans will also invalidate the override and
return the user to the previous delivery parameters.
Bolus Authorization Scan
If a drug or solution is configured for a Loading Dose or On-Demand Bolus they can also
be configured to require an Authorization Scan to initiate the bolus delivery. When
is pressed to initiate a bolus from the LOADING DOSE READY or BOLUS READY
screen, the user will be prompted to scan their Authorized User ID. Upon successful validation of the ID scan the bolus infusion will begin.
Note: Bolus Authorization scans are logged in the Operations Log
of the infusion device.
68 951128 Rev E (11/10)
Page 77

Chapter 7: DoseScan™
Note: Exiting the Bolus Authorization Scan prompt will invalidate
the override and return the user to the previous delivery
parameters.
Note: Three invalid scans will also invalidate the override and
return the user to the previous delivery parameters.
Critical Med (Dual Scan)
The Critical Med or Dual Scan is configured for those drugs or solutions where verification of the infusion parameters is required prior to initiating the infusion. If a drug or solutions is configured for a Critical Med scan perform the following steps to complete the
infusion.
1. Press to begin the infusion.
2. Scan the Primary Authorized User
ID. The check mark will change
color from red to green to indicate a
successful scan.
3. Scan the Secondary Authorized User
ID as shown in the figure. The check
mark will change color from red to
green to indicate a successful scan.
4. After two successful scans, the infu-
sion will begin.
951128 Rev E (11/10) 69
Page 78

OUTLOOK
®
ES OPERATOR’S MANUAL
Note: Critical Med scans require two (2) unique Authorized User ID
numbers. Scanning the same ID twice will invalidate this option
and return the user to the previous state.
Note: Critical Med scans are logged in the Operations Log of the
infusion device.
Note: Exiting the Critical Med Scan prompt at any point will
invalidate the infusion and return the user to the previous state.
Note: Three invalid scans of either the Primary or Secondary
Authorized User ID will also invalidate the override and return the
user to the previous delivery parameters.
70 951128 Rev E (11/10)
Page 79

Chapter 8: DoseCom™
CHAPTER 8:
DOSECOM™
IN THIS CHAPTER YOU WILL LEARN:
• How to set up an infusion using DoseCom™.
951128 Rev E (11/10) 71
Page 80

OUTLOOK
®
ES OPERATOR’S MANUAL
DOSECOM™ (OUTLOOK® 400ES)
The DoseCom™ feature was designed to enable the user to program the infusion parameters
using information transmitted from a hospital’s bedside medication administration system.
The DoseCom feature helps reduce the number of manual keystrokes required to program
infusion parameters. This is especially beneficial when infusing critical medications that
require the use of more advanced programming features like those contained in DOSE Mode.
Activating the DoseCom feature puts the pump in
“receive” mode, awaiting properly formatted
infusion data to be transmitted to the identified
Outlook® 400ES infusion device. Information
contained in the transmitted data will be used to
configure the infusion in STANDARD Mode
(Primary and Piggyback infusions), or DOSE Mode.
The facility has the option to choose if a User ID,
Patient ID, Patient ID on the medication label and/or
medication data are included in the data stream. The
pump prompts the user to confirm the infusion
information after all the properly formatted data is
received and displayed.
NOTE: The DoseComTM option can only be activated while the
pump is in either STANDARD or DOSE Mode Hold state.
FOR STANDARD MODE & DOSE MODE INFUSIONS
1. Press .
2. Use the to highlight “DoseCom™” then press .
NOTE: The wireless receiver will only remain active for 30 seconds.
If the receiver turns off, the user will need to reactivate the
DoseCom option.
NOTE: An audible tone will sound after all the data is transmitted to
confirm the data has been accepted.
3. Access the specific patient’s order from the hospital’s bedside medication administration
system.
4. Press or activate the “Send Data to Pump” (or similar function) on the hospital’s bedside
medication administration system.
5. The infusion data will populate the display of the Outlook 400ES.
72 951128 Rev E (11/10)
Page 81

Chapter 8: DoseCom™
6. Review the data, highlight “ACCEPT”, then press .
7. Press PRIMARY to start the infusion.
NOTE: The exact programming sequence of your hospital’s bedside
medication administration system may vary. For example, you may
be asked to scan the serial number or IP address of the specific
infusion device you wish to program as part of the infusion data
transmission sequence.
NOTE: Any modifications made to the infusion parameters after
accepting transmitted data may result in the deactivation of certain
features (e.g. DoseGuardTM dose limits, drug name display, etc.).
FOR PIGGYBACK INFUSIONS
1. Press PIGGYBACK CHANNEL INDICATOR .
2. Press .
3. Use the to highlight “DoseCom™,” then press .
4. Follow steps 3-6 in STANDARD & DOSE Mode Infusions above to scan in the Piggy-
back infusion data.
5. Press PIGGYBACK to start the infusion.
FOR DATA WITH "0.0" FOR RATE OR DOSE
The DoseCom™ feature has the ability to accept a
0.0 value for those cases where the starting infusion
rate or dose has not been specified. After
completing the sequence described in the previous
section, one of the following validation screens will
appear.
951128 Rev E (11/10) 73
Page 82

OUTLOOK
If either the starting infusion rate or dose is 0.0, the
appropriate field will be highlighted when the
transmission is complete. The following steps
should be completed to proceed with the infusion
programming sequence.
1. Enter a valid, non-zero value for rate or dose (as
applicable)
2. Use the to highlight "Accept", then press
®
ES OPERATOR’S MANUAL
.
NOTE: The highlight cursor will return to the appropriate rate or
dose field if the 0.o value has not been changed to a valid, nonzero value.
FOR DATA WITH "0.0" FOR PATIENT WEIGHT
The DoseCom™ feature also has the ability to
accept a 0.0 (zero) value for patient weight in those
cases where the patient weight has not been
specified. After completing the programming
sequence described in the previous section, the
following validation screens will appear.
The following steps should be completed to proceed
with the infusion programming sequence.
1. Enter a valid, non-zero value for Body weight.
2. Use the to highlight "Accept", then press
.
NOTE: The highlight cursor will return to the wieght field if the 0.0
value has not been changed to a valid, non-zero value.
TITRATION CHECKING
Like the DoseScan™ feature, the DoseCom™ feature also has the ability to check transmitted
information with the previous infusion parameters. This is especially useful in those
circumstances where multiple bags of the same medication are sent to the care unit for
74 951128 Rev E (11/10)
Page 83

Chapter 8: DoseCom™
sequential delivery. Changes in rate or dose could be an indication of a titration. Titration
checking provides a means to confirm the proper rate or dose for the titrated medication. The
process is completed as follows:
1. Transmit the infusion data to the pump as described in the previous sections.
2. Enter a valid, non-zero value for rate or dose if applicable.
3. Validate the transmitted infusion data by moving the Cursor to Accept and press .
4. The titration checking routine commences as follows:
For Standard Mode Deliveries
• If the Patient ID and Drug Name match the previous infusion information, the rate
value is compared.
• If the rate values are equal, the rate and
VTBD are displayed as transmitted and the
infusion can be started by pressing .
• If the rate values are not equal, the following
Titration Alert will be displayed:
1. Use the to highlight the cor-
rect rate, then press .
2. Begin the infusion by pressing .
For Dose Mode Deliveries
• If the Patient ID, Drug Name, Dose units, and Drug Concentration match the previous
infusion information, the dose value is compared.
• If the dose values are equal, the infusion
information is displayed and the infusion can
be started by pressing .
• If the dose values are not equal, the following
Titration Alert will be displayed:
1. Use the to highlight the cor-
rect dose, then press .
2. Begin the infusion by pressing .
951128 Rev E (11/10) 75
Page 84

OUTLOOK
®
ES OPERATOR’S MANUAL
DOSEGUARDTM MATCHING
The DoseComTM feature provides the clinician the ability to assign DoseGuardTM dose limits
to transmitted medications. For more information on DoseGuard, refer to “DoseGuardTM in
DOSE Mode” on page 40.
If the DoseGuard Matching feature is turned ON under DoseCom options in the BIOMED
menu, transmitted medications will be compared with those medications stored in the drug
library. If DoseGuards are assigned to those medications, the dose limits or Care Areas will
be displayed for selection and assignment.
If the transmitted drug is not contained in the drug
library or there are no DoseGuards assigned, the
following screen will be displayed.
• Choosing “Accept” will accept the transmitted
data without DoseGuard protection.
• Choosing “Exit” will reject all the transmitted
data.
If, however, the transmitted drug matches the drug name, dose units and concentration of a
medication configured, one of the following notification messages will be displayed.
This message will be displayed if the transmitted
drug matches a medication in a configured Care
Area.
76 951128 Rev E (11/10)
Page 85

This message will be displayed if the transmitted
drug matches a medication configured in more than
one Care Area.
Single Care Area Match
If the transmitted drug matches a medication
configured in one Care Area, the Care Area,
drug name, and dose limits will be displayed for
selection by the clinician. A screen similar to the
following will be displayed.
• Choosing “Accept” will assign the
programmed DoseGuards to the transmitted
medication.
Chapter 8: DoseCom™
• Choosing “Exit” from the DoseGuardTM
matching screen will generate the notification
message shown.
• Choosing “Accept” will accept the transmitted
data without DoseGuard protection.
• Choosing “
data.
Exit” will reject all the transmitted
951128 Rev E (11/10) 77
Page 86

OUTLOOK
Multiple Care Area Match
If the transmitted drug matches a medication
configured in multiple Care Areas, the Care
Areas will be displayed for viewing and selection. A screen similar to the one shown will be
displayed.
• Use the to highlight the appropriate
• Press to review the Dose limits.
Once a Care Area is selected, the clinician has
the ability to “Accept” or “Exit” as described in
the Single Care Area Match.
The clinician also has the option to go “Back” to
choose another Care Area to review alternate
DoseGuard limits as shown in the example
screen.
®
ES OPERATOR’S MANUAL
Care Area.
NOTE: The pump will transition into the KVO state when the infusion
has been completed. Pressing HOLD to silence the KVO alarm will
deactivate the drug name display if no DoseGuardTM match exists
or if no DoseGuard limits have been assigned to the transmitted
medication.
RATEGUARDTM MATCHING
The DoseComTM feature also provides the clinician the ability to assign RateGuardTM rate
limits to transmitted medications. For more information on RateGuard, refer to “DoseGuard™
in DOSE Mode” on page 40.
If the RateGuard Matching feature is turned ON under DoseScan options in the BIOMED
menu, transmitted medications will be compared with those medications configured in the
solution list. If RateGuards are assigned to those solutions, the rate limits or Care Areas will
be displayed for selection and assignment.
78 951128 Rev E (11/10)
Page 87

If the transmitted solution is not contained in the
solution list or there are no RateGuards assigned, the
following screen will be displayed.
• Choosing “Accept” will accept the transmitted
TM
data without RateGuard
protection.
Chapter 8: DoseCom™
• Choosing “
Exit” will reject all the transmitted
data.
If, however, the transmitted solution matches the name of a solution configured in the solution
list, one of the following notification messages will be displayed.
This message will be displayed if the transmitted
solution matches a solution in a configured Care
Area.
This message will be displayed if the transmitted
solution matches a solution configured in more than
one Care Area.
951128 Rev E (11/10) 79
Page 88

OUTLOOK
Single Care Area Match
If the transmitted soluton matches a solution
configured in one Care Area, the Care Area,
solution name and rate limits will be displayed
for selection by the clinician. A screen similar to
the following will be displayed.
• Choosing “Accept” will assign the
• Choosing “Exit” will generate the notification
®
ES OPERATOR’S MANUAL
programmed RateGuards to the transmitted
solution.
message shown.
Multiple Category Match
If the transmitted solution matches a solution
configured in multiple Care Areas, the Care
Areas will be displayed for viewing and selection. A screen similar to the one shown will be
displayed.
• Use the to highlight the appropriate
Care Area.
• Press to review the Rate limits.
80 951128 Rev E (11/10)
Page 89

Once a Care Area is selected, the clinician has
the ability to “Accept” or “Exit” as described in
the Single Care Area Match.
The clinician also has the option to go “Back” to
choose another Care Area to review alternate
RateGuardTM limits as shown in the example
screen.
Note: The pump will transition into the KVO state when the infusion
has been completed. Pressing HOLD to silence the KVO alarm will
deactivate the drug name display if no RateGuard
or if no RateGuard limits have been assigned to the transmitted
medication.
Chapter 8: DoseCom™
TM
match exists
951128 Rev E (11/10) 81
Page 90

OUTLOOK
®
ES OPERATOR’S MANUAL
THIS PAGE INTENTIONALLY LEFT BLANK.
82 951128 Rev E (11/10)
Page 91

Chapter 9: Profile Mode
CHAPTER 9:
PROFILE MODE
IN THIS CHAPTER YOU WILL LEARN:
• How to set up a PROFILE Mode (or TPN) infusion.
• How to set the PROFILE Parameters.
• How to review, change, or restart PROFILE Mode.
• About the Immediate Ramp Down feature.
951128 Rev E (11/10) 83
Page 92

OUTLOOK
®
ES OPERATOR’S MANUAL
PROFILE MODE
The PROFILE Mode is designed to deliver infusions with gradual ramp up and taper down
rates. The pump automatically calculates the rate increase and decrease required to match the
total volume, time and ramp up / ramp down time parameters. First the PROFILE Parameters
must be set, then PROFILE Mode can be accessed.
NOTE: PROFILE Mode may only be entered when the pump is
stopped in STANDARD Mode.
NOTE: PROFILE Mode and Set PROFILE Parameters may be
found in either the Main or Alternate Menus, or may have been
disabled and therefore unavailable.
SET PROFILE PARAMETERS
1. Press .
2. Use the to highlight “Set PROFILE Parameters,” then press .
3. Use the keys to enter the Ramp Up time in
hours and minutes.
4. Use the to highlight the Ramp Down
fields.
5. Use the keys to enter the Ramp Down time in
hours and minutes.
6. Use the to highlight the
7. Use the keys to enter the maximum rate at which the Profile infusion may run.
8. Use the to highlight “
Max Rate field.
ACCEPT Parameters,” then press .
NOTE: The minimum Ramp time is 10 minutes; the maximum Ramp
time is 2 hours. The maximum Max Rate is 400 ml/hr.
84 951128 Rev E (11/10)
Page 93

Chapter 9: Profile Mode
PROFILE MODE
1. Press .
2. Use the to highlight “PROFILE Mode,”
then press .
3. Use the keys to enter the total volume of the
infusion.
4. Use the cursor to highlight the Time field.
5. Use the data keys to enter the total time of the
infusion.
6. Use the to highlight “ACCEPT PROFILE,” then press .
7. Press PRIMARY .
8. The GRAPH field in the upper right corner of the Information Screen is highlighted; press
. A graph of the infusion will be displayed.
9. The TEXT field in the upper right corner of the Information Screen is highlighted; press
. The text display will return.
10. If the pump is turned off while in PROFILE Mode, the Information Display will indicate
“PROFILE Operation was Interrupted” when the pump is turned back on. Use the to
highlight one of the following, then press .
• Resume current PROFILE
• Restart PROFILE
• Exit PROFILE Mode
REVIEW/CHANGE PROFILE
1. Press .
2. Use the to highlight “
3. Use the to highlight the
NOTE: The PROFILE Volume cannot be changed after PROFILE
Mode has been started.
Review/Change PROFILE,” then press .
Volume field.
4. Use the keys to enter the new volume.
951128 Rev E (11/10) 85
Page 94

OUTLOOK
®
ES OPERATOR’S MANUAL
5. Use the to highlight the Time field.
6. Use the keys to enter the new time.
7. Use the to highlight “ACCEPT PROFILE,” then press .
RESTART PROFILE
NOTE: Choosing Restart PROFILE will cancel the present infusion and
the pump will begin at the beginning of the Profile run.
1. Press .
2. Press .
3. Use the to highlight “Restart PROFILE,”
then press .
4. A screen will appear with the message: The
“Restart PROFILE” option will cancel the present run.
Is this OK?
Use the to highlight “YES,”
then press .
IMMEDIATE RAMP DOWN
1. Press .
2. Press .
3. Use the to highlight “Immediate Ramp Down,” then press .
IMMEDIATE RAMPDOWN is displayed on the Information Screen.
NOTE: The Immediate Ramp Down Time is 30 minutes or less.
EXITING PROFILE MODE
The infusion must be stopped in order to exit PROFILE Mode.
1. Press .
86 951128 Rev E (11/10)
Page 95

Chapter 9: Profile Mode
2. Press .
3. Use the to highlight “Exit PROFILE Mode,” then press enter.
4. A screen may appear with the message: The “Exit PROFILE Mode” option will cancel the
present run. Is this OK?
5. Use the to highlight “YES,” then press .
951128 Rev E (11/10) 87
Page 96

OUTLOOK
®
ES OPERATOR’S MANUAL
THIS PAGE INTENTIONALLY LEFT BLANK.
88 951128 Rev E (11/10)
Page 97

Chapter 10: Program Mode
CHAPTER 10:
PROGRAM MODE
IN THIS CHAPTER YOU WILL LEARN:
• How to set up a PROGRAM Mode infusion.
• How to clear periods.
• How to review and change a PROGRAM.
• How to restart PROGRAM Mode.
• How to skip periods.
951128 Rev E (11/10) 89
Page 98

OUTLOOK
®
ES OPERATOR’S MANUAL
PROGRAM MODE
This mode is for infusions requiring a non-standard delivery pattern.
PROGRAM Mode allows up to 9 periods to be entered. Each period contains
its own rate and volume. The pump automatically gives each programmed
period, one after the other.
NOTE: PROGRAM Mode may only be entered when the pump is
stopped in STANDARD Mode.
NOTE: PROGRAM Mode may be found in either the Main or
Alternate Menus, or may have been disabled and therefore
unavailable.
1. Press .
2. Use the to highlight “PROGRAM Mode,”
then press .
3. Use the keys to enter the rate and volume for
Sequential Periods
the first period.
4. Use the down to highlight the next Rate
and Volume fields.
5. Use the keys to enter the rate and volume.
6. Repeat steps 4 and 5 until all of the infusion information is entered.
NOTE: If less than 9 steps of infusion information entered, the last
line of data will always be zero. The total volume infused will be
displayed.
7. Use the to highlight “ACCEPT TOT=,” then press .
8. Press
PRIMARY .
NOTE: The pump will begin infusing the Period 1 volume at the
Period 1 rate. The pump will then go to Period 2 and so forth
without user intervention.
90 951128 Rev E (11/10)
Page 99

Chapter 10: Program Mode
NOTE: ACCEPT cannot be selected when 0 data is present in the
middle of a program. For example, Pd. 1 and 3 may have data, but
Pd. 2 is zeros. The pump will not allow ACCEPT to be selected with
zero values in the middle of the program.
9. Use the to highlight the GRAPH field in the upper right corner of the Information
Screen, then press . A graph of the infusion will be displayed.
NOTE: Each period is represented by a vertical bar which fills as the
fluid is infused. The height of the bar represents the rate of infusion
in that particular period. The period presently being infused is
displayed in the upper left corner. If the vertical bar appears to be
missing, the rate in that period is much less compared to the other
periods.
10. Use the to highlight the TEXT field in the upper right corner of the Information
Screen, then press . The text display will return.
11. If the pump is turned off while in PROGRAM Mode, the Information Display will indicate “PROGRAM Operation was Interrupted” when the pump is turned back on. Use the
to highlight one of the following, then press .
• Resume current PROGRAM
•Restart PROGRAM
• Exit PROGRAM Mode
CLEARING PERIODS
The periods in PROGRAM Mode may be cleared.
1. Use the to highlight ZERO at the end of the period line to be cleared then press
.
2. Repeat step 1 until all periods are cleared.
REVIEW/CHANGE PROGRAM
NOTE: Program Volumes cannot be changed after PROGRAM
Mode has been started.
951128 Rev E (11/10) 91
Page 100

OUTLOOK
®
ES OPERATOR’S MANUAL
1. Press .
2. Use the to highlight “Review/Change PROGRAM,” then press .
3. Use the to highlight the Rate field of the period to be changed.
4. Use the keys to enter the new rate.
5. Use the to highlight “ACCEPT,” then press .
RESTART PROGRAM
NOTE: Choosing Restart PROGRAM will cancel the present infusion
and the pump will begin infusing at Period 1 again.
1. Press .
2. Press .
3. Use the to highlight “Restart PRO-
GRAM
,” then press .
4. A screen will appear with the message: The
“Restart PROGRAM” option will cancel the present
run. Is this OK?
Use the to highlight
“YES,” then press .
SKIP PROGRAM PERIODS
This option allows a portion (volume) of the mode to be skipped. The pump must be stopped
in order to skip periods.
1. Press .
2. Press .
3. Use the to highlight “
Skip PROGRAM
Periods
,” then press .
4. Use the keys to enter the volume to be
skipped, then press .
92 951128 Rev E (11/10)
 Loading...