

Page 1

Omnitest
Blood Glucose Monitoring System
®
5
Page 2

2
Page 3

Important notes
The Omnitest® 5 system provides a quick and easy way to
measure the blood glucose level. It can be used for selfmonitoring of blood glucose levels by patients with diabetes.
Omnitest® 5 is not intended for any purpose other than measuring the blood glucose level and is intended for use exclusively
with fresh capillary or venous whole blood samples. It should
not be used to diagnose diabetes or for newborn testing
(neonates). Omnitest® 5 is intended for use outside the body
(in vitro diagnostic use only).
NOTE
Prior to use, read all of the instructions in this manual for
the Omnitest® 5 meter and the additional information in the
test strip instructions for use. Practice the correct and safe
procedure for measuring blood glucose. You should follow the
recommendations of your diabetes care professional for correct
use of this meter and daily management of your diabetes. Do
not change your treatment based on the Omnitest® 5 blood
glucose readings without consulting your physician beforehand.
3
Page 4

Table of Contents
Overview 6
Omnitest® 5 Set 8
Blood glucose meter Omnitest® 5 10
Display symbols 12
Test strips Omnitest® 5 14
Lancing device Omnican® Lance 16
Measuring blood glucose 18
Preparing for the measurement 20
Collecting blood with the lancing device 22
Measuring blood glucose 28
Marker function and display 37
Target level deviation indicator 42
Lighting the display 43
Stored readings 44
Displaying stored readings 46
Transferring readings 48
4
Page 5

Settings 50
Time and date 53
Acoustic signal 54
Timer 55
Target level 56
Alarms 57
Exit settings 60
Functional check 62
Check strip 64
Control solution 66
Appendix 72
Error messages and troubleshooting 74
Maintaining your Omnitest® 5 82
Changing batteries 84
Technical data and tips 86
Conversion table mg/dL – mmol/L 90
5
Page 6

Nutzung
Overview
6
Page 7
Contents
Omnitest® 5 Set
Blood glucose meter Omnitest® 5
Display symbols
Test strips Omnitest® 5
Lancing device Omnican® Lance
7
Page 8
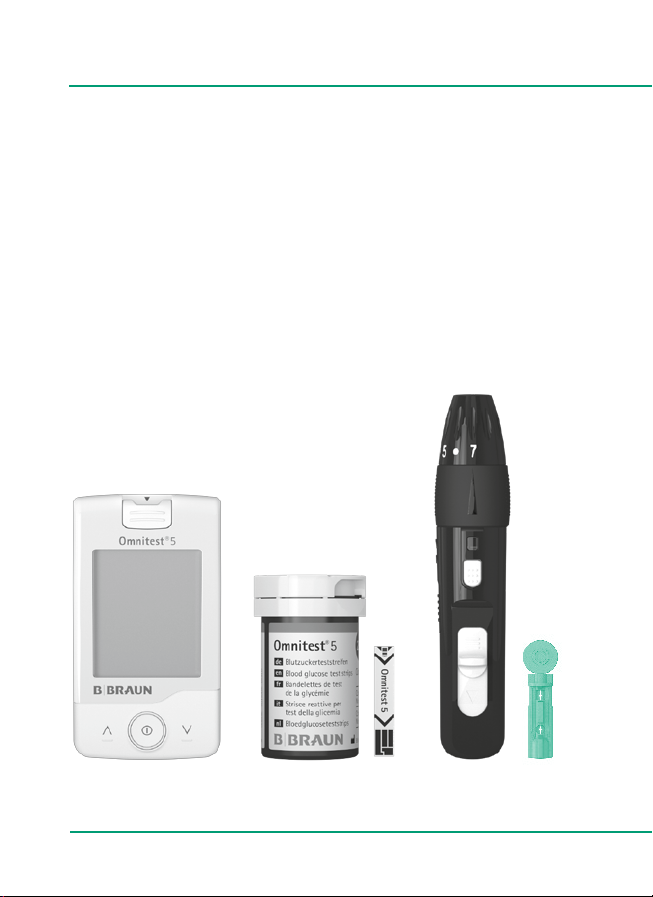
Omnitest® 5 Set
Components of the Omnitest® 5 Set:
Protective meter case
Omnitest® 5 blood glucose meter incl. 2 batteries
Omnitest® 5 test strips
Omnican® Lance lancing device with
Omnican® Lance soft lancets
Check strip
User manual and quick reference guide
Blood glucose meter Test strips
8
Lancing device with lancet
Page 9

The blood glucose meter case offers many benefits for daily use:
You can leave the meter in the case when measuring.
All functions are easily accessible when in the case.
The lancing device has a fixed place in the pouch and can
be used inside and outside of the pouch.
The test strip vial is safely secured against falling out.
Overview
9
Page 10
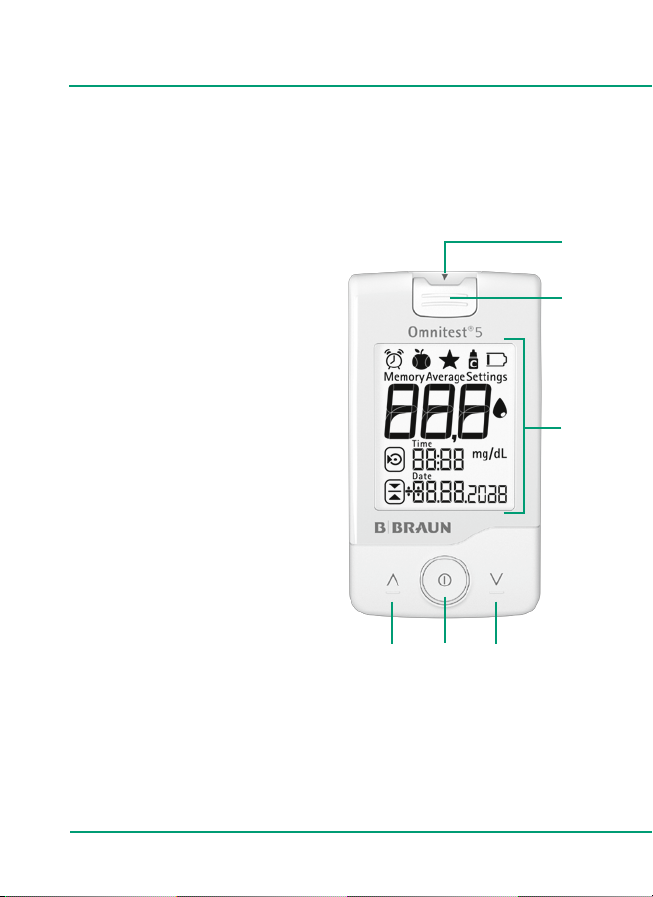
Blood glucose meter Omnitest® 5
1
Front
1
Illuminated test strip port
2
Eject button
3
Illuminated display
4
Up and Down button
5
ON/OFF and
selection button
2
3
4 45
10
Page 11

Back
6
Product label
7
Battery cover
Overview
8
Strap holder
9
Data transfer port
(Micro-USB port)
6
7
8
9
11
Page 12
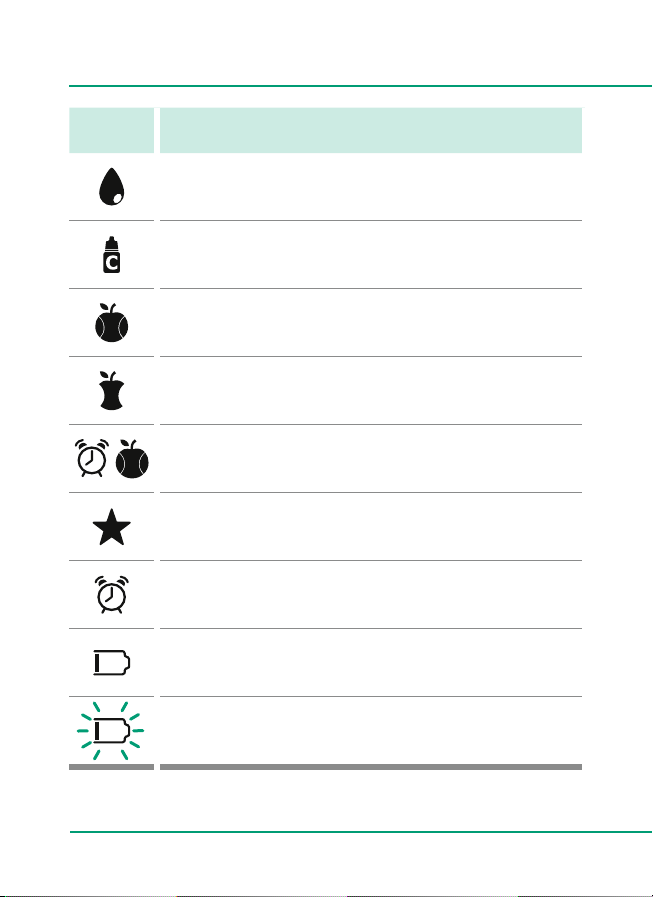
Display symbols
Symbol Meaning
Drop flashing – Omnitest® 5 is ready for measuring.
Drop lit up – Test was performed.
Test was performed with control solution.
Test was preprandial (before meal).
Test was postprandial (after meal).
Timer (Reminder for follow-up test) is activated.
Test is associated with a special event
(e.g. perceived low blood sugar).
One or more alarms are active.
Up to 5 alarms can be set in the Omnitest® 5.
12
Indicator lit: Battery voltage is low.
Change the batteries without delay.
Indicator flashing: Battery voltage not sufficient to perform
test. Change the batteries without delay.
Page 13
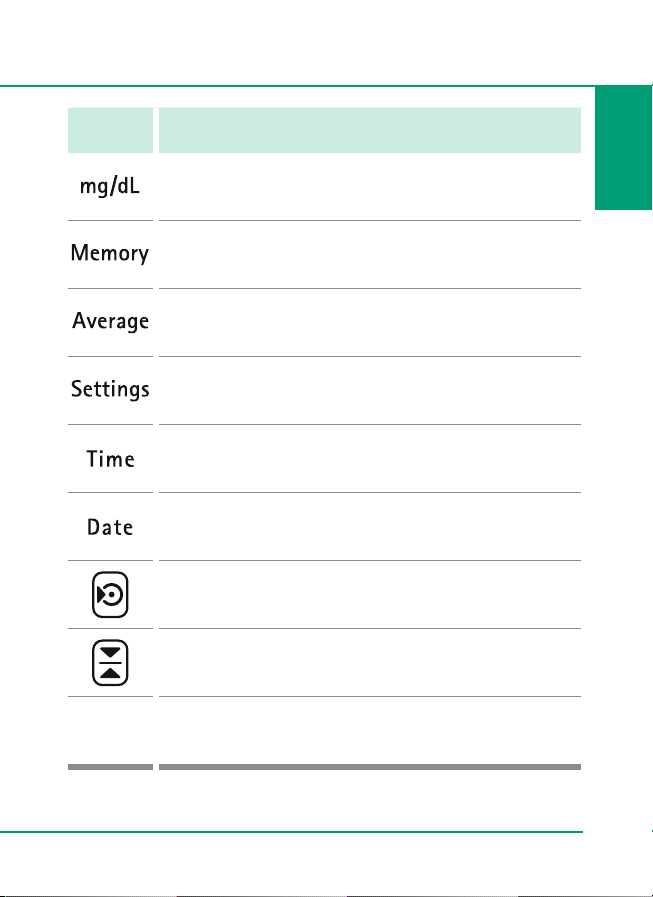
Symbol Meaning
Unit of measure display. NOTE: The unit of measure is preset
at the factory and cannot be changed.
Displaying stored readings. Up to 500 readings can be stored.
Display of average levels. The average levels for 7 days,
30 days and 90 days are displayed.
Basic settings for the Omnitest® 5 and personal setting
options for the user.
Time
Date
Preset target level (= optimal level)
Deviation from the target level: Plus levels show a deviation
upwards, minus levels show a deviation downwards.
Overview
13
Page 14
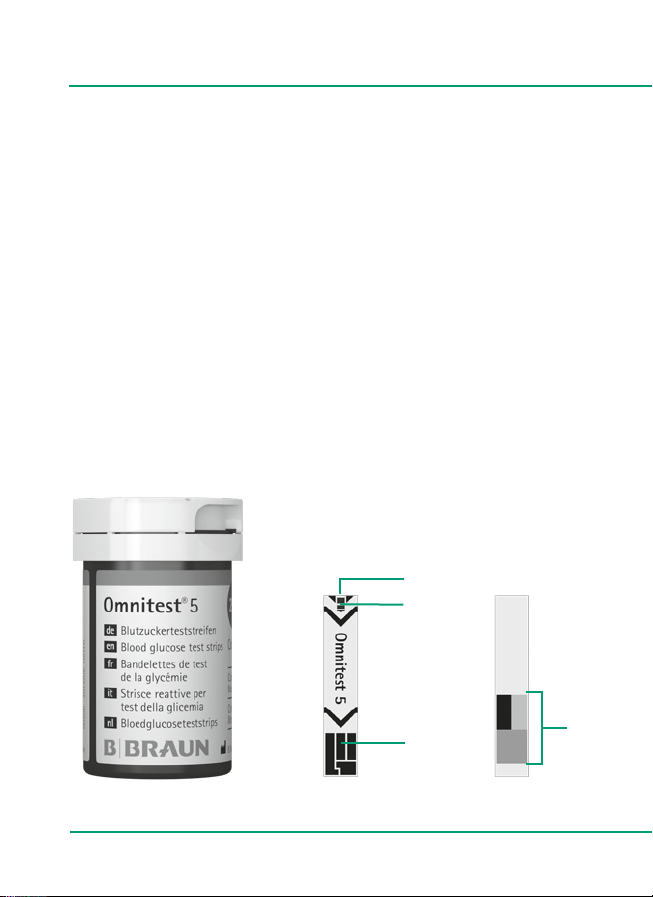
Test strips Omnitest® 5
Use of Omnitest® 5 test strips
For accurate analysis of your blood glucose level, the
Omnitest® 5 blood glucose meter must be used with the
Omnitest® 5 blood glucose test strips.
1
Opening of the measuring chamber
2
Confirmation window
3
Meter contacting leads
4
Auto-coding label
1
2
14
3
Front Back
4
Page 15

Prior to first use, check that the vial is undamaged and
closed.
Store the test strips in the original vial in a cool, dry place
between +2 °C to +30 °C (+36 °F to +86 °F).
Close the vial cap immediately after removing a test strip and
use the test strip immediately.
Do not use test strips after the expiration date.
Avoid getting dirt, food or water on the test strip. All parts
of the test strip could be touched with dry and clean fingers.
Do not bend, cut or alter an Omnitest® 5 test strip and coding
on the backside.
Blood glucose tests may only be performed between
+10 °C and +40 °C (+50 °F and +104 °F) and at a relative
humidity of less than 90 %.
Overview
NOTE
Keep the test strip bottle away from children. A child could
choke on the cap or the test strips. The test strips and the
vial cap contain agents that may be harmful if swallowed.
15
Page 16

Lancing device Omnican® Lance
Use of Omnican® Lance lancing device
In combination with Omnican® Lance soft lancets, the
Omnican® Lance lancing device is your reliable partner for a soft
blood collection.
Dialable tip with numbers for
adjusting penetration depth
Recessed
grips
Window
Slide for
16
Lancet
ejector
loading
Release button
Batch
(to read, pull back the slider)
Protective
cap
LancetLancing device
Page 17

Use a new sterile Omnican® Lance soft lancet for blood
collection after every use to ensure as little pain as possible.
If used multiple times, the tip of the lancet becomes increasingly blunt and supports the formation of calluses as
well as the risk of infection.
Clean the Omnican® Lance lancing device on a regular basis
and whenever blood or other contamination is present after
taking a sample to prevent from the transmission of infectious
diseases.
Further handling instructions can be found starting of page 20.
Additional cleaning instructions can be found on page 27.
NOTE
To avoid transmission of infectious diseases, the lancing
device must only be used for one patient.
Overview
17
Page 18

Measuring
blood glucose
18
Page 19

Contents
Preparing for the measurement
Collecting blood with the lancing device
Measuring blood glucose
Marker function and display
Target level deviation indicator
Lighting the display
19
Page 20
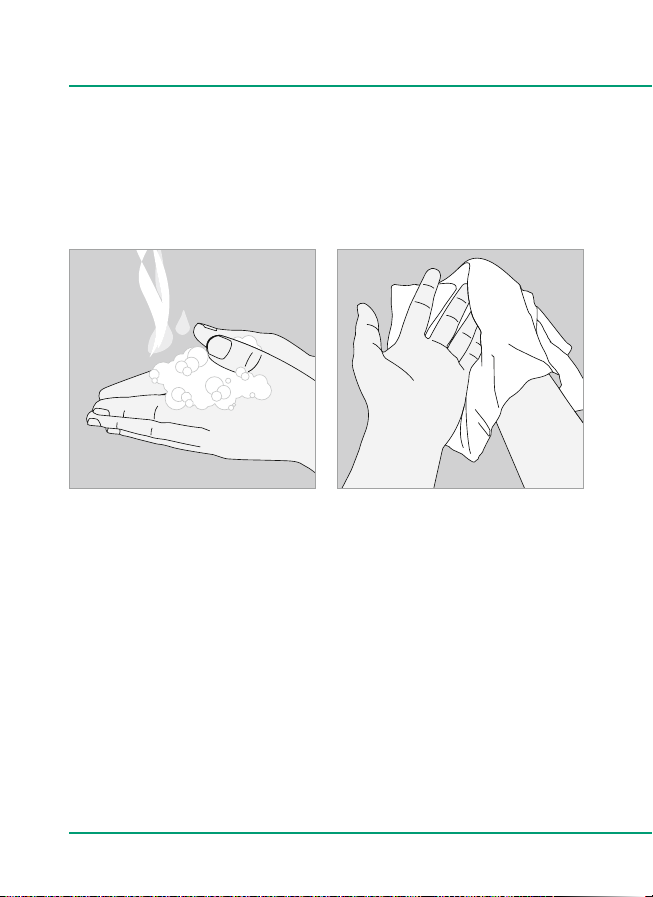
Preparing for the measurement
Cleanliness
The easiest way of collecting a blood drop is by firstly washing
the hands with warm and soapy water, let them dry completely
afterwards. This supports blood circulation in the finger tips.
The puncture site can alternatively be wiped with an alcoholsoaked swab. Please ensure that the site is completely dry before
collecting the blood sample.
Taking the blood sample from clean finger tips prevents incorrect
blood glucose measurements due to residues on skin surface of
the fingertip. E.g. contact with food (especially fruits), alcohol,
sweat and dirt before testing can distort the results.
20
Page 21

Blood collection
Prepare the lancing device and lancet. Use a new sterile lancet
for every blood sample. The lancing device is determined for
one's personal use only or for use with only one patient since
its tip may be contaminated after use.
Further information on blood collection can be found starting
on page 22.
NOTE
Please read the additional information in the test strip
instructions for use.
Your diabetes care professional will tell you your optimal
blood glucose ranges. Consult your physician before making
any changes to your diabetes therapy.
21
Mea sur ing
blood glucose
Page 22
Collecting blood with the lancing device
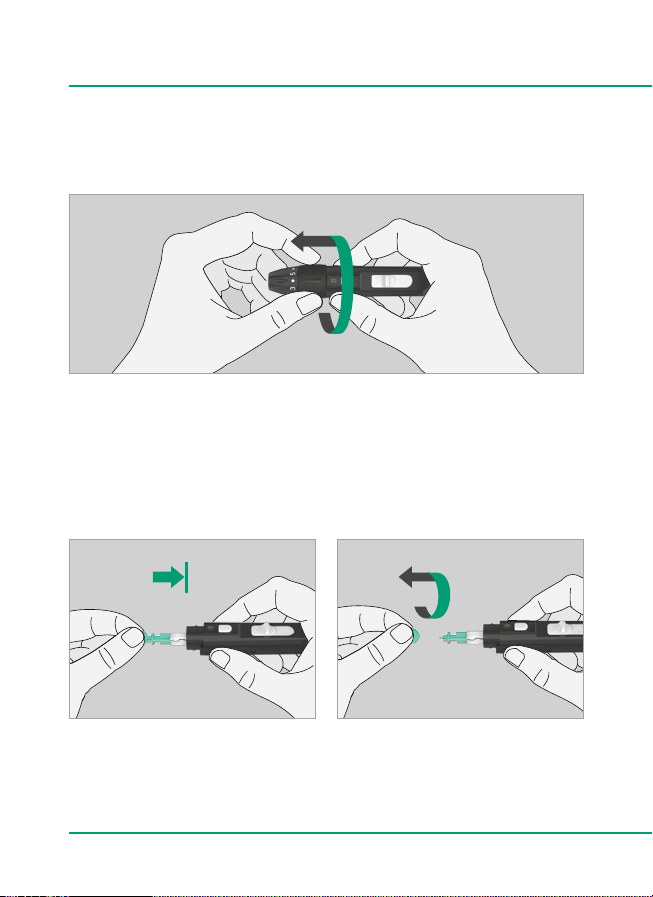
Preparing the lancing device
Unscrew the cap of the Omnican® Lance device.
Firmly insert a new Omnican® Lance soft lancet into the lancet
holder. Remove the protective cap from the Omnican® Lance soft
lancet carefully in straight direction. Take care not to harm the
delicate tip.
22
Page 23
Screw the cap of Omnican® Lance on the device again.
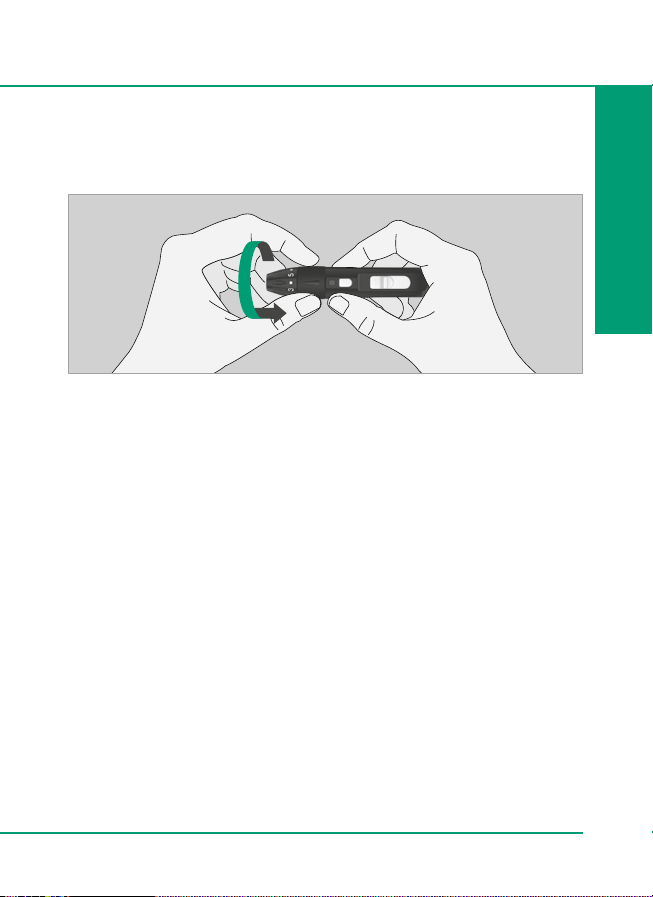
The dialable tip of Omnican® Lance provides 7 finely graduated
settings of penetration depths. Setting 1 is for most shallow,
setting 7 for deepest penetration depth. Choose the penetration
depth that is most suitable for your personal condition of skin:
1-3 for soft or thin skin,
4 for normal skin,
5-7 for thick or calloused skin.
In order to adjust penetration depth, hold the device with one
hand at recessed grips and turn the dialable tip with number
values with the other hand. Turn it until the marking arrow
points at the desired number.
Mea sur ing
blood glucose
23
Page 24
Collecting blood with the lancing device
Loading the lancing device
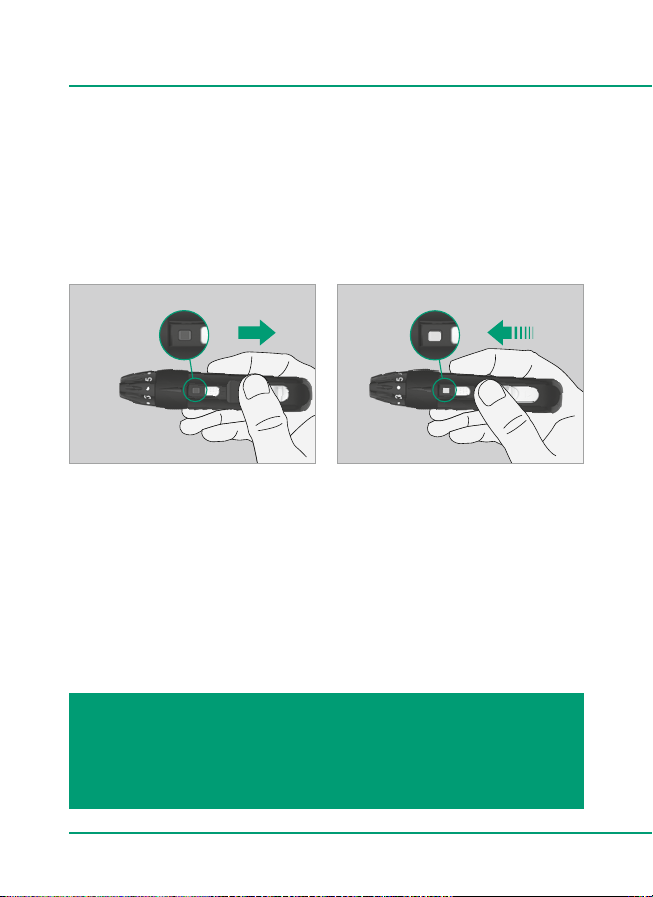
To load the lancing device, push the slide for loading backwards.
You can hear that the tensioning spring snaps into place whilst
the window turns red. The Omnican® Lance lancing device is
now ready to use.
NOTE
The batch code for the device is printed under the slide for
loading. It becomes visible when the slide is moved backwards.
24
Page 25
Releasing the lancing device
Take the Omnican® Lance lancing device and place it on the
side of your finger tip. The device should lay flatly and without
too much pressure against the surface of your skin. Press the
release button and lift off the lancing device.
It is less painful if you use the side of your fingertip for
puncturing.
Place the Omnican® Lance device aside and wait seconds for
a blood drop to form. You can improve the flow of blood by
keeping your hands warm, lowering them to hip height and
massaging the finger softly.
25
Mea sur ing
blood glucose
Page 26

Collecting blood with the lancing device
Removing the used lancet
To remove the Omnican® Lance soft lancet, unscrew the
cap of the Omnican® Lance lancing device. Push the lancet
ejector with your thumb forward until the lancet is completely ejected.
NOTE
For safety reasons and to prevent from cross-contamination, dispose of the used lancet in a suitable container for
sharps or for hazardous biological waste according to local
guidelines.
26
Page 27

Cleaning the lancing device
The Omnican® Lance device may only be wiped on the
outside with a mild soap and water solution. You may
additionally unscrew the cap to clean the cap inside.
Leave the device to dry properly afterwards.
NOTE
Replace your Omnican® Lance device with a new one
after 10,000 times of usage or not later than 5 years after
first use.
Mea sur ing
blood glucose
27
Page 28
Measuring blood glucose
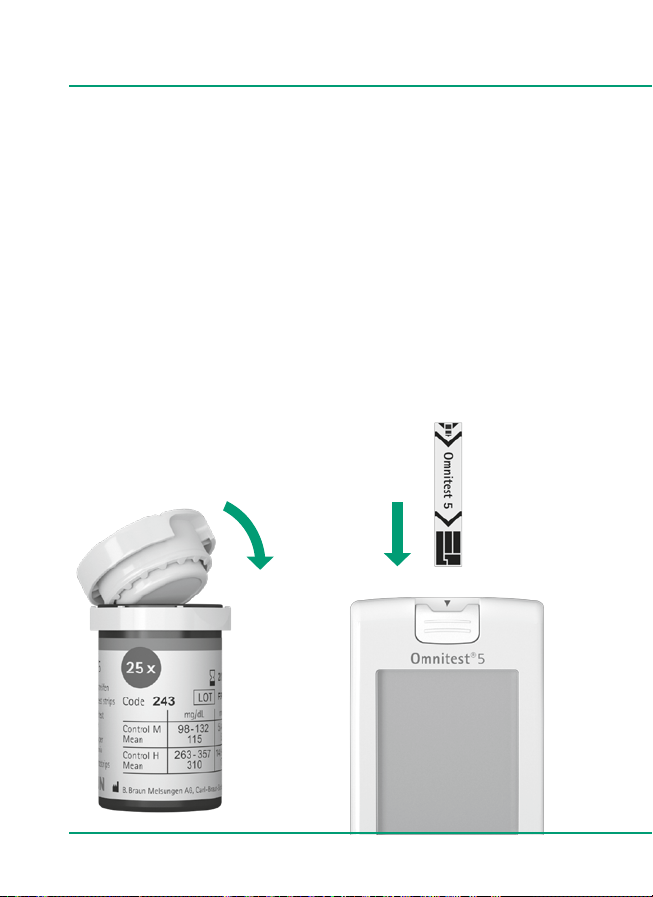
Inserting the test strip
Remove a test strip from the test strip vial and check it
for any damage. Close the vial again immediately to protect the
remaining test strips from moisture.
Insert the test strip into the meter unit as far as it will go,
without bending the test strip. The meter now switches on
automatically.
28
Page 29

Display test
Every time the test strip is inserted and the device switches
on, a self-test of the electronics occurs. The entire display is
shown for 3 seconds to check the display elements. If there is
a problem, an error message appears.
NOTE
The battery segment is displayed as part of the display test.
It does not reflect the current battery status. Notes on the
low battery indicator can be found on page 84.
Mea sur ing
blood glucose
29
Page 30

Measuring blood glucose
Code detection
The test strip code detection occurs automatically and is
displayed for checking. Check to ensure the codes match between
the test strip vial and the display.
NOTE
If the code numbers do not match, the blood glucose will
not be measured accurately. Make sure to compare the
code number with the correct test strip vial. Check that the
coloured fields on the back of the test strip are undamaged.
4
30
Page 31

Ready to measure
If the blood symbol
is flashing on the display, the Omnitest® 5
is ready to measure. Date and time are displayed on the lower
edge.
NOTE
The meter switches off after 3 minutes automatically if no
test was performed with the test strip. When this happens,
the test strip must be reinserted.
Mea sur ing
blood glucose
31
Page 32

Measuring blood glucose
Applying blood
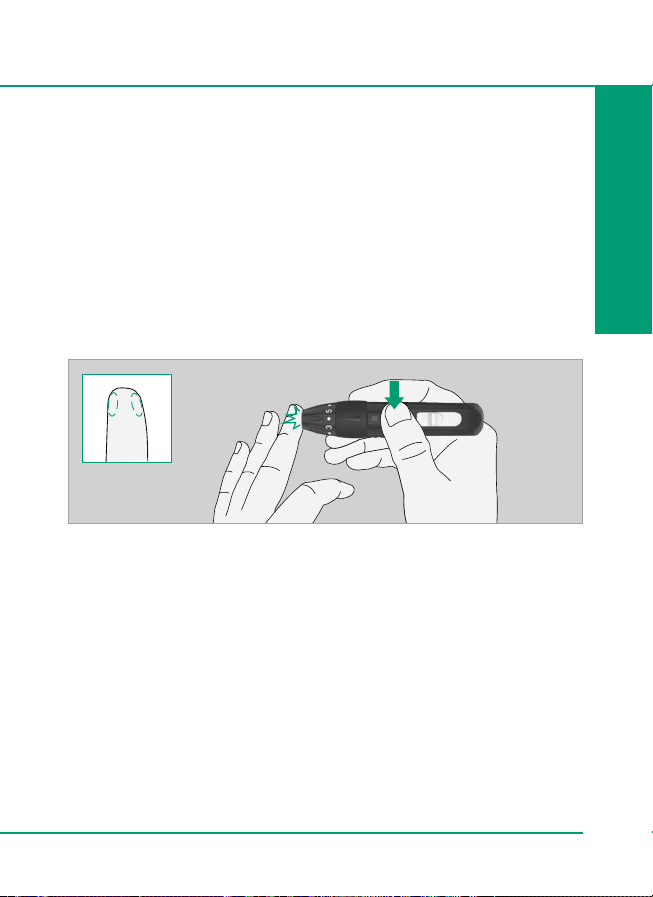
Touch your finger to the tip of the Omnitest® 5 test strip.
Ensure that blood is not applied from above.
The measurement chamber of the test strip will draw automatically the blood of your finger. Your finger should remain still,
until the confirmation window is completely filled. The minimal
sample volume is 0.5 μL.
NOTE
Do not squeeze the fingertip. Do not attempt to apply a
smeared blood sample. The measuring chamber must be filled
in one draw. Reapplying can lead to incorrect readings.
Do not force your finger against the test strip, the test strip
must not be bent.
32
Page 33

Measuring process
After a sufficient volume of blood has been absorbed into the
test strip, a signal beeps and the test starts automatically.
beep
Remove your finger from the test strip as soon as you hear the
"beep".
NOTE
Do not add blood to the test strip after the "beep” sound.
Ensure that no blood flows from the test strip into the device.
The device may no longer be used if blood, control solution
or other fluids penetrate the test strip port.
33
Mea sur ing
blood glucose
Page 34

Measuring blood glucose
Measuring process
During the measuring process, the remaining seconds are
displayed on the display until it has ended. The result appears
after 5 seconds.
34
Page 35

Reading display
The reading is displayed in mg/dL (milligrams of glucose per
decilitre of blood). You cannot alter the unit of measure.
The Omnitest® 5 meter can display results between 10 and
600 mg/dL.
NOTE
Your meter was preset and is
locked to display results in
mg/dL. If your display shows
mmol/L instead of mg/dL,
contact our customer service.
The use of the wrong unit of
measure can lead to a misinterpretation of the blood glucose
levels and result in incorrect
treatment.
Mea sur ing
blood glucose
35
Page 36

Measuring blood glucose
Removing the used test strip
To remove the test strip from the meter, push the ejector
button forwards while the meter is directed downwards.
Discard the used test strip and the lancet in accordance with
local regulations.
36
Page 37

Marker function and display
Enter marker
After testing, press the buttons or to select one of the
following markers:
Test with control solution
Test before meal (preprandial)
Test after meal (postprandial)
Timer activated
(Reminder for a follow-up test)
General markings
(Special circumstances)
To select, press the button . The result is automatically saved
with the marker displayed.
37
Mea sur ing
blood glucose
Page 38

Marker function and display
Mark reading as “Test with control solution”
After testing, choose the symbol with or . The symbol
for the control solution flashes. Confirm your choice with the
button . The device switches off.
38
Page 39

Mark the reading as “Test before/after a meal”
After testing, choose the symbol with or . The symbol
for a test before a meal (preprandial) flashes. Confirm by
pressing . The device switches off.
You additionally have the option to activate the timer (see
page 40).
For a test after a meal (postprandial), choose the symbol
with
or and confirm your choice with the button .
Mea sur ing
blood glucose
Test before a meal
(preprandial)
Test after a meal
(postprandial)
39
Page 40

Marker function and display
Activate timer
The timer can help to remember a follow-up test after
mealtimes. After testing, choose the symbol with or .
Press the button to activate the timer. The timer
alarm is preset to one hour after the current test. To lengthen or
shorten the preset time, press the button or to change it in
15-minute intervals.
Press the button again briefly to start the timer.
The device switches off.
40
Page 41

Mark reading as “General Marking”
The result is marked to indicate special circumstances or
an exceptional reading. More detailed information about this
can be noted in your diabetes diary.
After testing, choose the symbol with or . The symbol
for general marking flashes. Confirm your choice with the
button . The device switches off.
Mea sur ing
blood glucose
41
Page 42

Target level deviation indicator
Target level deviation indicator
By pressing the buttons or the target level and deviation
from the target level are shown according to your settings.
NOTE
To display the target level and the deviation from the target
level, the target level must be defined and activated in the
Omnitest® 5 (see page 56).
Enter the target level only in consultation with your physician
or your diabetes educator.
Defined target level
42
Deviation of the current
measured level from the
target level
Page 43

Lighting the display
Lighting the display
The display illuminates and the test strip port switches on
shortly after inserting the test strip. If nothing else happens,
the backlight turns off to reduce power consumption after
a short time. By pressing a button, the backlight can be
switched back on.
After 3 minutes of inactivity, the device shuts off entirely.
To switch it on again, remove the unused test strip and reinsert it.
Mea sur ing
blood glucose
43
Page 44

Stored
readings
44
Page 45

Contents
Displaying stored readings
Transferring readings
45
Page 46

Displaying stored readings
Displaying stored readings
When the device is off press the button to bring up your
stored readings on the meter.
Omnitest® 5 stores 500 readings. The newest reading is displayed
first. The button allows you to search for an older reading.
After 500 data entries, the oldest readings are replaced by the
newest.
46
Page 47

Display of average levels
Use the buttons or to change between individual stored
readings. After the last reading or before the first reading, the
calculated average levels are displayed for different time periods
consecutively:
Average level for 7 days
Average level for 30 days
Average level for 90 days
In the example shown, within the past 7 days (7 d) 35 tests
(35 n) performed and gives the average blood glucose level
of 108 mg/dL.
Stored readingS
47
Page 48

Transferring readings
Data transfer of stored readings
Readings can be transferred from the Omnitest® 5 to a
computer for further analysis. A PC connection cable (standard
USB to micro-USB connector) is needed to be able to use this
function. The cable can also be purchased as an accessory. The
device cannot be charged via the cable. Directions for changing
the battery can be found on page 84.
When connected to your PC, the Omnitest® 5 display shows PC .
Your data remains stored on the Omnitest® 5.
NOTE
Due to the risk of
electric shock, blood
glucose testing must
not be performed
when the device is
connected to a PC.
48
Page 49

The data transfer proceeds as follows:
Connect the PC connection cable to your computer
Then connect your Omnitest® 5 to the PC connection cable
Start the data transfer according to the instructions in the
software
Compatible diabetes diary software is required to display your
readings.
An overview of compatible electronic diaries can be found at
www.bbraun.com/diabetes-datamanagement
Stored readingS
49
Page 50

Settings
50
Page 51

Contents
Time and date
Acoustic signal
Timer
Target level
Alarms
Exit settings
51
Page 52

Settings
Changing the device settings
To change the device settings, press the button and hold for
more than 3 seconds until the symbol SEt flashes.
When adjusting the settings, Settings is continuously shown at
the top of the main display.
The following pages show the setting options that can be
selected for the blood glucose meter.
Use the button
After changing the batteries, the device settings are also called
up automatically.
to switch between the setting options.
52
Page 53

Time and date
Time and date
Press the button to set the hours, minutes, year, month
and day one after another. With the buttons or you can
change the flashing value.
SettingS
53
Page 54

Acoustic signal
Acoustic signal
Acoustic signals (bEEP) are activated by default on the
Omnitest® 5. Press the button or to change the status from
On to OFF. Confirm your choice with the button .
54
Page 55

Timer
Timer
Use the timer as a reminder for a follow-up test after a meal.
The preset alarm time for the timer is one hour. To
lengthen or shorten the preset alarm time, push the button
or to change it in 15-minute intervals. Press the button
to save the alarm time for the timer.
SettingS
55
Page 56

Target level
Display and setting target level
The display of the target level and deviation from the target
level can generally be switched on or off.
If the display is activated, you can change the preset target
level of 100 mg/dL using the buttons and to increase or
reduce it.
Afterwards press the button to confirm the target level.
56
Page 57

Alarms
Switch off all alarms
You can deactivate all alarms in the Omnitest® 5 without
deleting them.
Alternate with the buttons or between On and OFF and
confirm your choice with the button .
If an alarm time is set, but the alarm sound is switched off,
before a test the symbol OFF appears.
SettingS
57
Page 58

Alarms
Setting alarms
In the Omnitest® 5, up to 5 alarms can be set, which can be
individually activated/deactivated. An activated alarm signals
every day at the preset time. Deactivated alarms are not deleted.
58
Page 59

Select with the buttons and an alarm and confirm your
choice with the button to activate it.
Afterwards you can use the buttons and to set the alarm
time and save this time with the button before setting the
next alarm.
NOTE
Press any button to end an alarm.
When performing a blood glucose test, the alarm does not
work. The volume of the alarm is designed to remind you of
the next blood glucose measurement, but not to wake you
from a deep sleep.
SettingS
59
Page 60

Exit settings
Exit settings
After exiting the settings, the display flashes End and the
Omnitest® 5 switches off. If you wish to alter more settings, start
the settings again.
NOTE
You can exit device settings at any time by holding the
button for longer than 3 seconds.
60
Page 61

61
SettingS
Page 62

Functional
check
62
Page 63

Contents
Check strip
Control solution
63
Page 64

Check strip
Monitoring with the check strip
The check strip verifies whether the Omnitest® 5 meter is
working properly. Insert the check strip into the meter. The meter
switches on automatically.
64
Page 65

If an error message appears on the display, repeat the
procedure 2 to 3 times. If an error message continues to be
displayed, the meter may not be used for measuring blood
glucose levels. Contact your local representative for warranty
services.
It is recommended to perform this test before the first use
and after any a malfunction is suspected.
Meter is in proper order
and switches off again.
Meter is defective.
Er 1 is displayed.
Functional check
65
Page 66

Control solution
Verification with control solution
The control solution Omnitest® 5 Control verifies that the blood
glucose monitoring system is functioning properly.
The control solution should be used in the following cases:
For any suspected malfunction of the device or test strips
If your blood glucose readings do not match your symptoms or
if you suspect that the readings are not accurate
If the meter was dropped
For quality control in professional applications
For training purposes and when learning to operate the
system
66
NOTE
Use only Omnitest® 5 Control for
the Omnitest® 5 monitoring system.
The control solution is sold
separately.
Page 67

Preparation of the verification
Control solution tests must be performed within a temperature
range of +20 °C to +25 °C (+68 °F to +77 °F).
If the control solution is cold, do not use it until it has warmed
to room temperature.
Insert a test strip as far as possible into the meter without
bending it. The meter switches on automatically.
Functional check
67
Page 68

Control solution
Applying the control solution
Gently shake the control solution. Remove the cap and squeeze
the container. Discard the first drop and wipe the tip of the
bottle with a clean tissue to ensure an accurate result. Squeeze
the container again to release a drop.
Apply a drop of control solution to a clean and none absorbing
base. Guide the tip of the test strip towards the drop until it is
drawn up by the test strip.
68
Page 69

You will hear the signal tone when the test strip is completely
filled with the control solution. The meter counts down from
5 to 1 and then displays the result.
Compare the displayed result with the range printed on the
test strip vial. The result should fall within the range. Repeat
the test if the level displayed falls outside the range.
4
Functional check
69
Page 70

Control solution
Mark reading
When you have performed a test with control solution, you can
now use the button or to mark the measured level with the
symbol and confirm it.
NOTE
Control solution labelled results are not included in the
calculation of average levels.
70
Page 71

Results that fall outside of the range can be caused by one
or more of the following reasons:
Error when performing the test
Control solution was not shaken
Expired or contaminated control solution
Control solution too warm or too cold
First drop of control solution was not discarded or the tip
of the container was not wiped clean
Meter malfunction
Damaged test strip
Do not use the system to test your blood glucose until you
get a control solution test result that falls within the specified
range.
Functional check
71
Page 72

Nutzung
Appendix
72
Page 73

Contents
Error messages and troubleshooting
Maintaining your Omnitest® 5
Changing batteries
Technical data and tips
Conversion table mg/dL – mmol/L
73
Page 74

Error messages and troubleshooting
Error message Cause What to do
There is a problem with the meter.
An incorrect signal from the check strip occurred.
The error message may have been caused by a
used or wet test strip.
There was not enough blood or control solution
applied.
There is a problem with the test strip. The test strip is damaged. Repeat the test with a new test strip.
74
The blood sample or control solution was applied
before the symbol
was shown on the display.
Page 75

Remove both batteries and insert them again. Repeat the test with
the check strip. If the error message continues to be displayed, the
meter must be replaced.
Repeat the test with a new test strip.
Repeat the test with a new test strip and sufficient volume of
blood or control solution.
Repeat the test with a new test strip. Apply blood or control
solution only after the symbol
has been shown on the display.
75
Appendix
Page 76

Error messages and troubleshooting
Error message Cause What to do
There is a problem with automatic code detection. Repeat the test with a new test strip. If the problem persists,
The ambient temperature is too high or too low. Put the meter in a location within the operating temperature range
There is a problem with automatic code detection.
The Omnitest® 5 contains no readings. The memory for the measurement results is empty until you
76
Page 77

contact the B. Braun representative in your area.
(+10 °C to +40 °C / +50 °F to +104 °F) for at least 10 minutes and
repeat the test.
If the display alternates displaying Sun and Er6, avoid direct
sunlight entering the test strip port and repeat the test.
have performed the first blood glucose test.
77
Appendix
Page 78

Error messages and troubleshooting
Error message Cause What to do
The reading is above 600 mg/dL. In case of doubt with regard to the blood glucose level, check
The reading is below 10 mg/dL. In case of doubt with regard to the blood glucose level, check
Low battery voltage indicator.
The battery symbol is displayed during use.
The battery voltage is no longer sufficient to turn
on the Omnitest® 5. The battery symbol flashes if a
button is pushed or if a test strip is inserted.
78
Page 79

the meter with the control solution. If the result is normal, re-test
with a blood sample 2 to 3 times. If the
please consult a physician promptly for assistance.
the meter with the control solution. If the result is normal, re-test
with a blood sample 2 to 3 times. If the
consult a physician promptly for assistance.
Change the batteries immediately.
Change the batteries immediately.
Hi (high) message persists,
Lo (low) message persists,
79
Appendix
Page 80

Error messages and troubleshooting
Problem Cause What to do
Different readings in
comparison to another
device.
The meter does not
turn on.
After applying the sample
the test does not start.
The result is doubtful. There is a potential problem
The other device has been calibrated
to whole blood while the Omnitest® 5 is
calibrated to plasma.
The blood samples were not collected
at the same time.
The puncture site was not cleaned. Repeat the test with a blood sample from a clean puncture site.
The blood sample was smeared or could
not be taken in one draw from the test
strip.
The battery voltage is not adequate or
there is a problem with the meter.
The sample volume is not adequate or
there is a problem with the test strips or
the meter.
with the test strips.
The meter code and the code printed
on the test strip vial differ.
80
Page 81

To check the accuracy of your system, please use the control
solution Omnitest® 5 Control or compare readings to a laboratory
device that works with plasma.
Repeat the test and take the blood samples at the same time
for comparison.
Repeat the test with a sufficiently large fresh blood sample.
Change the batteries. If the problem persists, contact your retailer
or B. Braun representative in your area.
Apply a sufficient sample volume to the new test strip and repeat
the test. Perform a test with the control solution or the check strip.
Repeat the test with a new test strip. Test with control solution.
Repeat the test with a new test strip. If the problem persists,
contact your retailer or B. Braun representative in your area.
81
Appendix
Page 82

Maintaining your Omnitest® 5
Cleaning
Wash and dry your hands before use to prevent damage to the
meter and test strips. The meter should be cleaned with a soft
cloth or paper towel if necessary.
Meters that come into contact with blood present a potential risk
of transmitting infectious diseases. If necessary, an alcohol-soaked
swab can also be used to clean the external surfaces of the meter.
NOTE
DO NOT use chemical solvents such as benzene or acetone
because these may corrode the surface of the Omnitest® 5
and damage it.
DO NOT apply pure alcohol directly to the meter for cleaning.
Instead, use a tissue that has been moistened with a small
amount of alcohol. Allow the meter to dry completely after
cleaning in a cool location away from direct sunlight. The meter
and test strips must not be immersed in water or other fluids.
82
Page 83

Storage
Do not store the meter and test strips near open flames
or microwave ovens. Strong electromagnetic fields (e.g. from
mobile phones, microwave ovens) can interfere with the
measurement function.
After testing, store the Omnitest® 5 components in its case in
a cool dry place out of the reach of children. Do not refrigerate.
Keep out of direct sunlight.
Detailed storage instructions for the Omnites® 5 test strips can
be found in the Omnitest® 5 test strips instructions for use.
Discard used objects/materials in accordance with local
guidelines for contaminated materials.
83
Appendix
Page 84

Changing batteries
Information on changing the batteries
Discharged batteries are shown by the illuminated battery
symbol on the top right of the display. Change the batteries
immediately when this occurs.
The meter requires two 3V lithium batteries (CR2032) that are
supplied with the meter. Open the battery cover on the back of
the unit and insert two new batteries. Ensure that the batteries
are inserted in the right direction (imprinted plus sign to the
top).
84
Page 85

After inserting new batteries, all elements are initially shown
on the display. After a few seconds, an internal test of the
electronics is performed. The numbers shown only represent
the internal electronic tests. You will be automatically moved
to the settings (SEt). Correct the time setting and date from
there.
Further information on device settings can be found starting
on page 52.
NOTE
Without correctly setting the date, the correct values for the
average blood glucose level and the results in the memory
will not be displayed correctly. It is strongly recommended to
set the meter before use and to check the time after inserting a new battery. A blood glucose test is not possible when
the settings mode is activated.
Appendix
85
Page 86

Technical data and tips
Risk of infection and cross-contamination
To prevent infections and/or cross-contamination, strictly
observe hand hygiene and clean your Omnitest® 5 as well as the
corresponding accessories regularly.
System limitations
For more information on system limitations or factors which
could impact test results, please read the Omnitest® 5 test strips
instructions for use. The Omnitest® 5 blood glucose monitoring
system complies with EN ISO 15197 requirements. Replace the
blood glucose meter with a new device after a maximum of
5000 tests or at the latest 5 years after the first use.
86
Page 87

Test principle
The FAD-glucose dehydrogenase enzyme on the test strips
reacts specifically with glucose in blood. The current generated
is converted and displayed as a blood glucose value.
The Omnitest® 5 system is plasma-calibrated to allow easy
comparison of results with laboratory methods. Blood glucose
meters which are calibrated against a whole blood method may
have different results in comparison to the Omnitest® 5 results.
The laboratory system used to calibrate the Omnitest® 5 system
is YSI 2300 STAT plus, which is equipped with a glucose oxidase
system.
Instructions for disposal of defective meters
Remove the batteries and send these for recycling according to
local provisions.
Used meters can be soiled with blood and must therefore be
discarded according to the different local regulations for disposal
of contaminated medical devices.
87
Appendix
Page 88

Technical data and tips
Specifications
Measurement range 10 – 600 mg/dL
Measurement time 5 seconds
Memory capacity
Operating temperature
Operating humidity 10 – 90 %
Sample type
Sample volume 0.5 μL
Screen type Backlit LCD
Dimensions (L x W x H) 78 mm x 43 mm x 16 mm
Weight incl. batteries 45 g
Power supply Two 3V lithium batteries (CR2032)
Battery life min. 1,000 tests
500 readings with
date, time and additional data
between +10 °C and +40 °C
(+50 °F and +104 °F)
Fresh capillary or
venous whole blood
88
Page 89

Symbols and labels
Consult instructions for use
Use by ...
This product fulfils the requirements of Directive
98/79/EC on in vitro diagnostic medical devices
In vitro diagnostic medical device
Batch code
Catalogue number
Serial number
Temperature limitation
Do not reuse
Use within 3 or 6 months after first opening
Direct current
Biohazard. Device could be contaminated with
infectious material after use
Responsible manufacturer
Omnican® Lance soft: Do not use if the
protective cap is missing or damaged.
Appendix
89
Page 90

Conversion table mg/dL – mmol/L
Blood glucose levels conversion table (mg/dL in mmol/L)
mg/dL
mmol/L
mg/dL
mmol/L
mg/dL
mmol/L
10 15 20 25 30 35 40 45
0.6 0.8 1.1 1.4 1.7 1.9 2.2 2.5
95 100 110 120 130 140 150 160
5.3 5.6 6.1 6.7 7.2 7.8 8.3 8.9
260 270 280 290 300 325 350 375
14.4 15.0 15.5 16.1 16.7 18.0 19.4 20.8
90
Page 91

Conversion factor:
1 mg/dL = 0.0555 mmol/L resp. 1 mmol/L = 18.018 mg/dL
50 55 60 65 70 75 80 85 90
2.8 3.1 3.3 3.6 3.9 4.2 4.4 4.7 5.0
170 180 190 200 210 220 230 240 250
9.4 10.0 10.5 11.1 11.7 12.2 12.8 13.3 13.9
400 425 450 475 500 525 550 575 600
22.2 23.6 25.0 26.4 27.8 29.1 30.5 31.9 33.3
91
Appendix
APPENDIX
Page 92

For further questions on using the Omnitest® 5 system, contact the
B. Braun representative in your area or visit us at www.bbraun.com.
B. Braun Melsungen AG
Carl-Braun-Str. 1
34212 Melsungen
Germany
www.bbraun.com
01864 2016/07/25 O5MMGPH
 Loading...