

Page 1
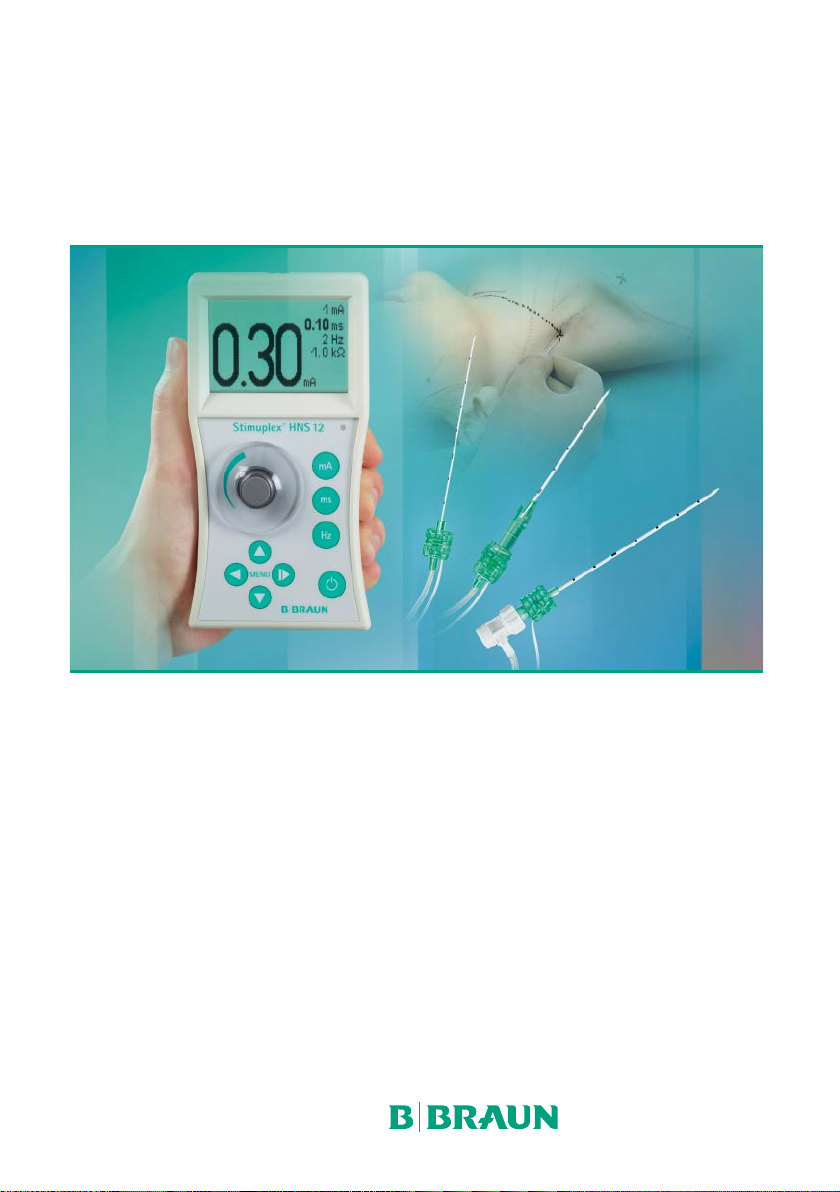
Stimuplex®HNS 12
Regional Anesthesia
Nerve Stimulator
for Peripheral Regional Anesthesia
User manual
Page 2

2
Manufacturer: Distributor:
STOCKERT GMBH B. Braun Melsungen AG B. Braun Medical Inc.
Bötzinger Straße 72 Hospital Care Division 824 Twelfth Avenue
79111 Freiburg 34209 Melsungen P.O. Box 4027
Germany Germany Bethlehem, PA 18018
Telefon: +49-(0)761-20716-0 Telefon: +49-(0)5661-71-0 Phone: 1-800-854-6851
Telefax: +49-(0)761-20716-20 Telefax: +49-(0)5661-71-4845 Fax: 1-610-758-9020
Email: Info@stockert.de Email: Email: inquiry@bbraunusa.com
http://www.stockert.de
Caution:
The Stimuplex® HNS 12 may only used in applications for which this product is intended.
Federal (US) law restricts this device to sale by or on the order of a physician.
Stimuplex® HNS 12 User manual
Order number: 604 3570 – Rev. B – valid for software version 1.002.x
Stimuplex® and Contiplex® are protected trademarks of B. Braun Melsungen AG
StimuplexHNS12@bbraun.com
http://www.bbraun.com
In the US and Canada distributed by:
http://www.bbraunusa.com/stimuplex
Page 3

Contents
Contents Page
Preface..........................................................................................................................................................5
1. Principles of peripheral electrical nerve stimulation (PNS)...................................................6
1.1 Area of application ...................................................................................................................................6
1.2 Indications...................................................................................................................................................7
1.3 Contraindications ......................................................................................................................................7
1.4 Warnings......................................................................................................................................................7
1.5 Constant voltage or constant current...............................................................................................11
2. Description of the device..................................................................................................................13
2.1 Checks before start-up..........................................................................................................................15
2.2 Technical description..............................................................................................................................17
2.2.1 Plug Connections.....................................................................................................................................17
2.2.2 Current regulator (dial and keys) .......................................................................................................18
2.2.3 Single-handed remote control (Stimuplex® Remote Control)...................................................19
2.2.4 Sound..........................................................................................................................................................19
2.2.5 LED...............................................................................................................................................................20
2.2.6 Display modes...........................................................................................................................................21
2.2.7 Menu structure........................................................................................................................................22
3
3. Operation of the Stimuplex® HNS 12.........................................................................................24
3.1 Switch on / Switch off (ON/OFF)........................................................................................................24
3.2 Selecting the current adjustment range..........................................................................................25
3.3 Selecting the stimulation current......................................................................................................25
3.4 Selecting the stimulus duration .........................................................................................................26
3.5 Selecting the stimulation frequency.................................................................................................27
3.6 Current threshold display .....................................................................................................................27
3.7 Checking the battery voltage..............................................................................................................28
3.8 Additional information – Menu info.................................................................................................28
4. Setting parameters and options for future switch-on procedures..................................29
4.1 Setting switch-on values for stimulation parameters.................................................................29
4.1.1 Current adjustment range....................................................................................................................29
4.1.2 Stimulus duration ...................................................................................................................................30
4.1.3 Frequency ..................................................................................................................................................30
4.1.4 Current threshold display .....................................................................................................................30
4.2 Setup...........................................................................................................................................................31
4.2.1 Tone.............................................................................................................................................................31
4.2.2 Dial turns ...................................................................................................................................................31
4.2.3 Contrast on the LCD display................................................................................................................32
Page 4

4
Contents Page
14.2.4 Automatic switch off.............................................................................................................................32
14.2.5 Date and time ..........................................................................................................................................32
14.2.6 Language ...................................................................................................................................................33
14.2.7 Options.......................................................................................................................................................33
14.2.7.1 Factory standard......................................................................................................................................33
14.2.7.2 Displaying the electrical charge of the stimulation pulse (electrical charge nC)...............34
14.2.7.3 Current adjustment................................................................................................................................34
14.2.7.4 Additional stimulus duration...............................................................................................................34
15. Initial setup, maintenance and notes...........................................................................................35
15.1 Testing the Stimuplex® HNS 12 .........................................................................................................35
15.2 Special technical features....................................................................................................................35
15.3 Technical data ..........................................................................................................................................36
15.4 Battery........................................................................................................................................................36
15.5 Cleaning and disinfecting the Stimuplex® HNS 12......................................................................37
15.6 Maintenance and safety checks.........................................................................................................37
15.7 Safety inspections according to Section 6 of the German Medical Devices
Operator Ordinance (MPBetreibV)......................................................................................................37
15.8 Equipment logbook.................................................................................................................................37
15.9 Notices, warranty....................................................................................................................................38
15.10 Error messages.........................................................................................................................................38
15.11 Instruments and accessories................................................................................................................40
Stimuplex® HNS 12 and Accessories, Stimuplex® und Contiplex® needles .................40
16. References ...............................................................................................................................................43
17. Appendix ..................................................................................................................................................44
18. Symbols on Stimuplex® HNS 12.....................................................................................................51
19. Electromagnetic compatibility (EMC)..........................................................................................52
10. Specific requirements for the US market ..................................................................................57
10.1 Addition to Page 37 of the Manual – “5.6 Maintenance and safety checks”......................57
10.2 Change from Page 38 of the Manual – “5.9 Notices, warranty” .............................................58
10.3 Change from Page 38 of the Manual- “5.9 Notices, warranty”...............................................58
10.4 Change from pages 40 and 41 of the User manual -..................................................................60
"Stimuplex® HNS12 and Accessories, Stimuplex® and Contiplex® needles"
Page 5

Preface
With your purchase of the Stimuplex® HNS 12 nerve stimulator, you have acquired a device that is
easy to operate and provides you with a straightforward array of all the functions you need to perform peripheral nerve blocks.
The following chapters describe the operation of Stimuplex® HNS 12.
The use of the stimulation needles required for performing stimulation is described in the instructions
for use accompanying the needles, which are not part of this user manual.
Chapter 1 describes the basic functions of unipolar nerve stimulation including a discussion of the
principle of constant current stimulation.
For your study of its operational fundamentals, we recommend that you have Stimuplex® HNS 12
with all its accessories ready at hand and functional so that you can learn about the functions in
practical exercises.
Here it is helpful to simulate the patient with a wet paper tissue or a small sponge soaked in saltwater. The saline solution is required to produce electrical conductivity.
The device may only be operated in compliance with the user manual.
If you have further questions, the people at B. Braun Melsungen AG and STOCKERT GmbH are happy
to be at your service.
5
Your
B. Braun Melsungen AG
STOCKERT GmbH
Page 6

6
1.1 Area of application
Peripheral nerve stimulation facilitates the performance of peripheral nerve and plexus blocks. The
user no longer needs to rely on feedback from the patient about paresthetic sensations. The danger
of mechanical nerve lesions is mostly eliminated.
When the stimulation needle is placed sufficiently close to the target nerve, predefined electrical
pulses generate muscle contractions at motor efferent fibers and electrically elicited paresthesias at
sensory afferent fibers. During this procedure, direct contact of the injection needle with the nerve is
intentionally avoided.
Since peripheral electrical nerve stimulation (PNS) is no substitute for the anatomical knowledge required to perform regional anesthesia, accurate knowledge of the topography and nerve
distribution area is prerequisite.
Advantages of nerve stimulation:
• Objective muscle response is obtained without the user having to rely on information or
cooperation from the patient
• No direct needle-nerve contact, no painful paresthesias, no mechanical nerve lesions,
and no intraneural injections.
1. Principles of peripheral electrical nerve stimulation
Permissible and possible options:
• Sedation and analgesia prior to blockade depending the patient’s needs
• General anesthesia prior to blockade
• Blockades distal to the previous site of a regional anesthesia procedure in anesthetized
or partially anesthetized regions
• Extension of the indication spectrum
• Enhancement of safety standards
The resting potential at the nerve membrane is around 80 mV. The cell’s interior is negatively charged
compared to the surrounding medium. Sufficiently large ion movement reduces the membrane potential to 55 mV, making the membrane freely permeable and generating an action potential.
The various types of nerve fiber differ with regard to their sensitivity to electrical stimulation. The Aalpha motor fibers have the shortest chronaxia (50–100 µs). The afferent fibers that transmit pain
sensation (Aδ and C-fibers) require a longer pulse (150 and/or 400 µs) at a minimum current. Mixed
peripheral nerves can be localized using short pulses (0.10 ms) without triggering pain sensations. For
pure sensory nerves, a longer pulse is recommended (0.30 ms, 0.50 ms or 1.00 ms).
When unipolar needles (insulated and with conductive tip) are used, the current necessary to trigger
muscular contractions (= pulse amplitude) correlates with the distance from the tip of the needle to
the nerve. The lower the current, the more accurately the target nerve can be localized. This allows
quicker onset and ensures a more reliable success of the blockade.
Page 7

Nevertheless, it is important to observe and stay within the predefined threshold currents so as
to avoid a too close proximity to the nerve and prevent nerve damage.
The shorter the electrical pulse (= pulse width), the faster is the rise in current to the nerve. This
allows better discrimination by the physician as to whether the needle tip is sufficiently close to the
nerve. The stimulation needle should always be connected to the negative pole. If the needle is connected to the positive pole, higher currents are required.
The conductive tip of the stimulation needle affects the geometry of the electrical field. The smaller
the emission site of the electrons at the tip of the needle, the higher is the current density at this
point and the lower the threshold level once the nerve has been localized exactly.
1.2 Indications
• Surgical interventions on the upper and lower extremity
• Patients with high aspiration risk
• Hemodynamically unstable patients
• Postoperative analgesia to allow early mobilization and physical therapy
• Replantation surgery
• Diagnostic and therapeutic blockades
7
1.3 Contraindications
• Refusal of regional anesthesia by the patient
• Infection at the puncture site
• Preoperatively known neurological dysfunctions
• Anatomical abnormalities
• Severe coagulation disorders
• Insufficient liver function
1.4 Warnings
Warnings and precautionary measures
General precautionary measures:
The connecting socket of the stimulation needle may only be connected to the counter plug of the
connecting cable. The connecting cable plug may only be connected to the nerve stimulator and the
clip may only be connected to the skin electrode on the skin of the patient. Under no circumstances
should you allow these plugs/connections to come in contact with voltage channeling components
(e.g. electrical outlets) or metallic objects.
Page 8

8
To prevent anesthesia gases from exploding or flammable liquids from igniting, Stimuplex® HNS 12
may not be used in hazardous areas. To avoid injury to the patient, all ported equipment in the vicinity of the patient must comply with the applicable rules and regulations. All equipment and accessories must show compliance with EN 60601-1, EN 60601-1-1 as well as the applicable collateral
standards. The user should be aware that, even when all rules are complied with for each piece of
equipment, under worst circumstances, all leakage currents or auxiliary patient-coupled currents can
add up and produce unacceptably high levels that can endanger the patient. The user must therefore
check in advance whether the interconnected equipment might exceed allowable limits under certain
circumstances. Devices and equipment (system building) assembled improperly can cause life-threatening injury to the patient.
The patients themselves should not come into contact with metallic objects that are grounded
or produce an electrical conductive connection with other equipment and/or enable capacitive
coupling. On these grounds, we recommend that an adequately insulated, antistatic pad be placed on
the operating table.
Warnings and precautionary measures for Stimuplex® HNS 12
Under no circumstances may the device be operated with other accessories than those released
and supplied by the manufacturer or listed in Section 5.11 “Instruments and accessories”.
These accessories are EMC tested and approved. Any other accessories can lead to serious
impairment of the device and system properties and cause permanent injury to the patient, user
or device.
Whenever high frequency surgical equipment is used simultaneously, there is an acute danger of
severe burns occurring at the Stimuplex® HNS 12 connection ports, the connecting cable, the tip of
the needle and at the skin electrode. It is therefore imperative to disconnect all connections to
Stimuplex® HNS 12 before using high frequency surgical equipment and to also remove the stimulation needle from the tissue. The stimulation needle with its connecting cable acts like an antenna for
high-frequency energy; this can generate very high current densities at the needle tip and cause irreversible destruction to the nerve fibers in this proximity. At the same time, the ported stimulator can
rectify the high frequency energy, which leads to extremely high direct currents and voltage potentials at the electrodes. The direct current stimulation generated as a result can be very painful and
strong, and trigger irreversible electrophysiological reactions.
To prevent poor contact of the skin electrode (red clip) from leading to a malpositioning of the stimulation needle, the user must make sure that the skin electrode, which functions like a neutral electrode here, shows sufficiently safe contact with low tissue impedance. Fatty tissue, hair, dirt, repeatedly-used skin electrodes and electrodes of poorer quality can negatively impact tissue impedance,
thereby incurring the risk of neural damage. It is therefore recommended to select the contact surface carefully in well-vasculated muscular areas only. Clean, shave and degrease the skin. At the same
Page 9

time, do not position the skin electrode too far away from the puncture site. However, thoracic application of the skin electrode is to be avoided.
The skin electrodes must not be applied to areas of injury.
Only use high-grade, commercially available, CE-marked EKG single-use skin electrodes with
silver/silver chloride sensors precoated with gel. To achieve optimum nerve stimulation always make
sure the electrodes are undamaged and not dried out.
The nerve stimulator should not be used on patients with implanted electrical devices (e.g. cardiac
pacemakers) without prior consultation with an appropriate medical specialist. The stimulation current may cause interference with the implanted devices and thereby put the patient at risk. The
perithoracic application of electrodes (around the ribcage, heart) can increase the risk of cardiac fibrillation.
The stimulation current should not drop below a specific value. By activating the option “Current
threshold” (see Section 3.6), the Stimuplex® HNS 12 alerts you with an optical and acoustic warning
whenever the stimulation current is out of tolerance.
If the stimulator shows a direct current or an offset direct current at the outlet, the stimulator may
no longer be used and must be sent back for repair.
9
The special precautionary measures specified by the EMC standard apply to electrical medical devices.
Portable and mobile HF communication devices can affect Stimuplex® HNS12 which can lead to functional failure of the device and/or system.
Dynamic electrical and dynamic magnetic interference fields can cause interactions between device
and system to occur and which can impact the actual stimulation current measurement and, in
extreme cases, lead to error messages and possibly to activation of a safety shut-off on the device.
Do not use Stimuplex® HNS 12 in the proximity of equipment that produces strong electromagnetic
fields such as cordless phones, HF high frequency surgical equipment, short-wave or microwave medical equipment. The stimulation needle may pick-up high frequency currents, which could cause damage to nerves.
Do not connect Stimuplex® HNS 12 to other devices. If Stimuplex® HNS 12 is operated near another
device, the user must monitor the equipment or system and check that the configuration used in this
way is operated properly and as intended.
Other devices can interfere with Stimuplex® HNS 12 or the system, even if they show compliance with
the applicable CISPR emission requirements. Interference impulses greater than 3 V/m within the frequency range up to 100 MHz can be picked up by the stimulation current detector and thereby trigger an error display and, if appropriate, a safety shutoff.
Page 10

10
Operation of other devices or systems with Stimuplex® HNS 12 accessories can increase emissions or
reduce immunity to interference on devices or systems. Observe the supplied EMC instructions concerning installation, initial setup and operation of the device or system (see Section 9.
Electromagnetic compatibility (EMC)).
To avoid damage to the connecting cable and the device, do not hold or carry the device by its connecting cables and/or its accessories. Do not wrap the cable around the device or around other equipment.
Wrapping the connecting cable during normal operation of the stimulator generates inductive components and, at very short stimulation pulses, can lead to a reduction in stimulation efficacy and/or
false measurements of the actual stimulation current. False interpretations of the indicated values
can be the result.
For safety reasons, never operate Stimuplex® HNS 12 if the battery is leaking, but return it to the
manufacturer for proper cleaning. The same applies if any liquid soaks through!
Do not continue to operate the device if repeated error messages appear. The device must be returned
to the manufacturer for proper repair.
Avoid contamination at the connections. Water and dirt impair the contact properties of the plug
connections and lead to undesired short circuits or leakage currents. This can lead in part or even fully
to channeling of the stimulation currents, which impairs or even cancels out the stimulation effect
completely. In this event, the device can no longer properly indicate the actual current flowing to the
patient.
To prevent damage to the device and its accessories, never use aggressive cleaning agents. For further details, see Section 5.5 ”Cleaning and disinfecting the Stimuplex® HNS 12”. All accessories have
to be visually inspected at regular intervals. The insulation for cable and plug connections must not
exhibit any damage.
The user must follow the instructions for use when operating Stimuplex® HNS 12 and its corresponding accessories. When using sterile accessories, always comply with standard sterile precautionary
measures.
Avoid any inadvertent contact of the stimulation needle with bone, since this could irreversibly damage the needle and consequently traumatize the tissue.
Page 11

11
Keep accessories and device away from voltage-conducting objects. The electrostatic and electromagnetic fields they radiate can impact the stimulation outcome and, under certain circumstances,
themselves even lead to adverse stimulation effects in the tissue.
Before and during use, the device, the connecting cable and their plugs must be kept completely clean
and dry. Moisture and contamination will impair the function of the nerve stimulator and/or the stimulation outcome.
Be aware of the position of metallic implants in the tissue (e.g. plates or electrode cables), which may
potentially channel stimulation signals to other sites where it can cause damaging effects. Implanted
electronic equipment can be impaired by the stimulation current, which, in turn, will lead to malfunctions of the implants or even destroy them.
To avoid malfunctions of Stimuplex® HNS 12, check all functions prior to the intervention and make
sure that the accessories are in functional order. The accessories must meet safety class type BF.
Inspect all parts for any visible damage or manipulations. Never use any damaged or manipulated
parts!
To protect the patient from electrophysiological shocks through electrostatic discharges (ESD), it is
necessary for them to wear the appropriate clothing and to move around in an appropriately secured
environment. An electrostatic discharge (ESD) at the tip of the needle can cause extremely high current densities to occur which can damage the surrounding tissue.
Conformity with the following standards:
EN 60601-1; EN 60601-1-1; EN 60601-1-2; EN 60601-1-4; EN 60601-1-6; EN 60601-1-8; EN
60601-2-10; UL 60601; 60812 (FMEA); 9001 : 2000; 13485 : 2003; 14971 : 2000; MPG/Council
Directive 93-42-EEC; FDA 510 (k) approved.
1.5 Constant voltage or constant current
According to Ohm’s Law I ~ U it is possible to use both voltage as well as current to measure the
intensity (amplitude) of the electrical stimulation. One speaks of constant voltage or constant current
devices.
The electrical resistance (impedance) in the circuit of a stimulation, which comprises the sum of skin,
tissue, needle, electrode cable resistance, etc., fluctuates within a large range. It can move between
<1 kΩ and infinity. Factors such as skin moisture, conductivity of the skin and tissue and the potential resistance of the skin electrode can hardly be influenced.
Page 12

12
If voltage (V) is selected as a measure of the intensity of the stimulation pulse, currents can flow during treatment that differ greatly depending on the impedance and in accordance with Ohm’s Law.
Therefore, it is better to use a nerve stimulator that allows the user to select the desired current (mA)
exactly between the two electrodes – skin electrode (anode) and stimulation needle (cathode).
Nevertheless, a stimulator with constant current settings must be equipped with a very high output
impedance – ideally infinity – to reduce the resistances possible in the external circuit to negligible
levels and to display the actually flowing current accurately. In recent years, constant current devices,
which allow selection of the desired current (mA) for the stimulation pulse, have become established.
On the Stimuplex® HNS 12, the external load resistance can be up to 12 k. If this load resistance is
exceeded, the nominal current flowing to the patient (actual stimulation current) may be less than
the set target stimulation current. In this case, the target stimulation current and the actual stimulation current are displayed separately, and optical and acoustic warning messages are given off.
Moreover, the applied impedance is calculated constantly and indicated in the LCD display.
Page 13

2. Description of the device
Stimuplex® HNS 12 is a precision instrument for localizing neuronal pathways in the human body. It
was specifically designed to stimulate nerve fibers in living organisms with special nerve stimulation
needles that conventionally show a very high contact impedance with the aim of determining their
spatial position relative to the tip of the needle. The stimulation needles are constructed in such a
way that a local anesthetic can be injected near the nerve fiber, which reversibly interrupts stimulus
conductance.
The Stimuplex® HNS 12 nerve stimulator should be used only by a physician with an appropriate
knowledge in peripheral nerve blocks. The physician is responsible for the correct usage of the nerve
stimulator.
The functions of Stimuplex® HNS 12, Stimuplex® and Contiplex® stimulation needles as well as the
connecting cable by B. Braun are designed to work in perfect harmony. Only in this way an optimum
of precision and reliability can be achieved.
For more in-depth knowledge about the use of this device and its risks and side effects we recommend studying in detail the relevant literature cited in the ”References” Section.
Stimuplex® HNS 12 is supplied with the following basic equipment:
– Stimuplex® HNS 12 nerve stimulator
– 9-volt block battery
– Cable for connecting B. Braun stimulation needles (cable length 1.25 m)
–10 k test resistance
– User manual (this document)
– Brief instructions for use
– Storage case for keeping Stimuplex® HNS 12 and accessories
13
The Remote Control Stimuplex® DIG RC, the control knob for sterile handling and the Stimuplex® Pen
can be purchased separately as accessories and kept safely in the storage case in the intended
compartments.
Page 14
14
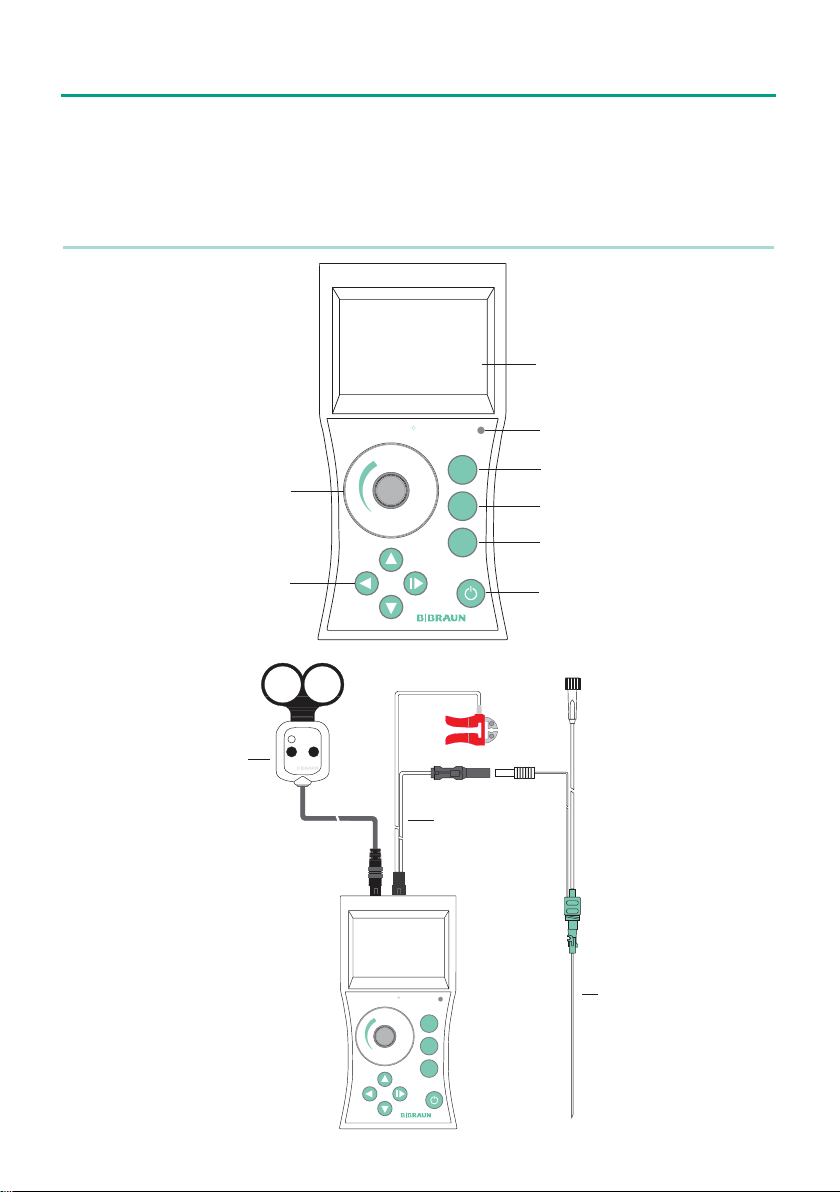
Overview of the Stimuplex® HNS 12 Nerve Stimulator
R
Stimuplex HNS 12
LCD display
LEDs
Dial for regulating
the target
stimulation current
Single-handed remote
control (optional) for
sterile operation
MENU
Stimuplex DIG RC
MENU
R
Stimuplex HNS 12
MENU
mA
ms
Hz
Connecting
cable
mA
ms
Hz
Current adjustment range
Stimulus duration
Stimulation frequency
- On/off
- Home
Stimulation needle
Page 15

15
Manufacturer’s factory settings configured on delivery (preset in the menu).
Max. desired current - 5.00 mA
Stimulus duration - 0.10 ms
Stimulation frequency - 2 Hz
Impedance - kΩ (is calculated automatically)
Range (not displayed) - 1 turn (can only be changed in the menu)
2.1 Checks before start-up
The Stimuplex® HNS 12 is a class lla medical device according to Council Directive 93/42/EEC. The
device may not be put into operation until the supplier has subjected the device to an on-site function test and has instructed the persons responsible for operating the device about the device’s handling with the aid of the user manual.
Before putting the Stimuplex® HNS 12 into operation, carry out the following tests.
Carry out a visual inspection of the electrode cable. Damaged cables must not be used. Connect the
electrode cable for connection with the stimulation needle to the front of the nerve stimulator (to
the middle 4-polar plug). The plug connector configuration prevents wrong polarity connection.
Check if the battery is installed.
Press the ”ON/OFF” key to switch on the Stimuplex® HNS 12. While you are holding down the
”ON/OFF” key to switch on Stimuplex® HNS 12, important equipment parameters are indicated in the
unit’s display. After releasing the key, the device automatically runs a self-test. If the self-test detects
a defective function, an error code will appear in the LCD display that switches off automatically after
8 seconds.
A battery symbol appears in the right lower corner of the LCD display that allows a check of the battery voltage. The symbol flashes when the battery voltage drops below 7 V.
The device automatically shuts off when the battery voltage reaches < 6 V.
If no display appears when the Stimuplex® HNS 12 is switched on, change the battery immediately.
(Refer to the “Battery” section).
Whenever the battery symbol is flashing, a new 9 V alkaline block battery should be installed
immediately to avoid having to abort a stimulator treatment.
Connect the red clip for the skin electrode and the insulated 2-mm male plug for the stimulation needle with the 10 kΩ test resistance (included in the equipment supplied).
Page 16
16
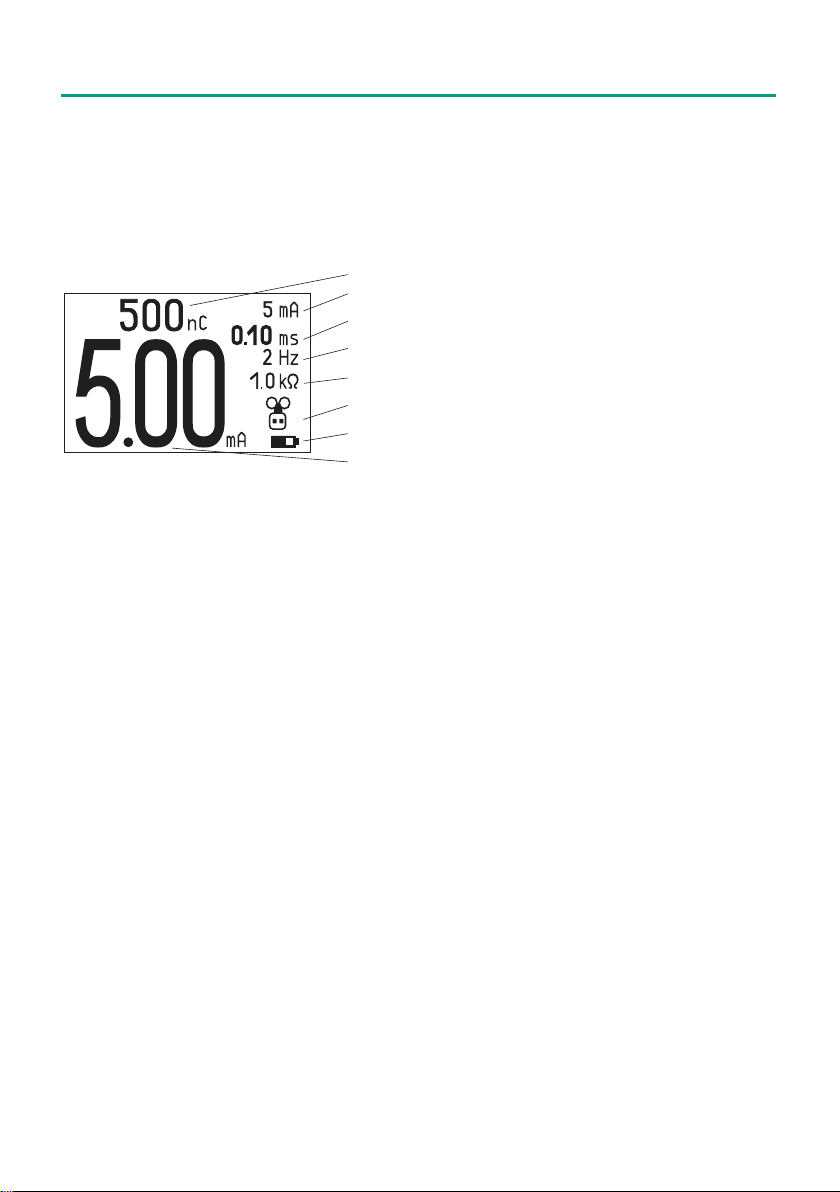
The LCD display shows the current operating conditions:
Electrical charge (when option is activated)
Maximum current adjustment range
Stimulus duration
Stimulation frequency
Impedance
when Remote Control is activated
Symbol for battery voltage
Desired target stimulation current
After switching on Stimuplex® HNS 12, the target stimulation current is zero; in other words, no stimulation pulse is generated and the LED is not flashing. If the target stimulation current is > 0.00 mA
and the actual stimulation current flowing does not deviate by more than 0.04 mA from the target
stimulation current, the green LED lights up (or yellow, if the optionally adjustable current threshold
has been undershot) and a stimulation frequency sound becomes audible. The actual current is
indicated automatically and only indicated as a warning when it deviates from the target current. In
this state, the LED will light up red and a higher-pitch warning signal will be sounded.
Use the dial to set the maximum current of 5.00 mA. No error message should appear at a load resistance of 10 kΩ (see accessories). The LED flashes green at the selected stimulation frequency. The
sound is dependent on the preselected stimulation current, when ”sound variable” has been configured in the sound-menu.
Now release the connection between clip and male plug. The warning message ”actual current is less
than target current” appears, both stimulation currents are displayed (see Section 2.2.6.2 Stimulation
mode with warning), the LED flashes red because no current is flowing, and the click or beep sound
starts ticking louder at a higher pitch.
To switch off the nerve stimulator, hold down the ”ON/OFF” key until the display disappears (switchoff time = 2 seconds). If the key is released during this switch-off phase, the device switches back to
„ON“ status. Refer specifically to the Section ”Warning and Safety information” before using the
Stimuplex ® HNS 12 on a patient. If the device does not behave as previously described, it may not
be put into operation. Please contact the manufacturer or distributor listed.
Maintenance on medical equipment may only be performed by the manufacturer himself or
persons explicitly authorized by him.
Stimuplex® HNS 12 is designed for regional anesthesia to optimally localize peripheral nerves.
Page 17
17
2.2 Technical description
Stimuplex® HNS 12 generates square pulses with selectable stimulus duration and continuously
adjustable stimulation current.
The range of adjustment of the pulse current from 0.00 to 5.00 mA peak-to-peak can be reduced to
0.00 to 1.00 mA with the ”mA” button. This 1 mA range allows extremely precise adjustments of the
stimulation current. The stimulation frequency and stimulus duration can be varied for different
applications. The Stimuplex® HNS 12 nerve stimulator features the option of selecting a frequency of
either 1 Hz or 2 Hz and a stimulus duration of 0.05 ms – 0.10 ms – 0.30 ms – 0.50 ms – 1.00 ms.
The Stimuplex® HNS 12 measures the tissue impedance and displays it in kΩ. This measurement
allows for a quick check and visualization of the current state of the circuits.
The Stimuplex® HNS 12 is very user friendly in its handling. It features a menu structure with ”Main
Menu” and ”Setup” with which the user can configure user settings, such as switch-on settings, volume
and tone pitch, dial resolution, display contrast, automatic switch-off time, date, time and language as
well as further options. Navigation through these menus is done with the arrow keys.
Right arrow:
Is used to activate the Main Menu or submenus and select or confirm an option.
Up and down arrows (Up and down keys):
Are used to select a menu item or option and/or changes values.
Fast selection or change by holding down the up/down key.
Left arrow:
Is used to jump back one menu level
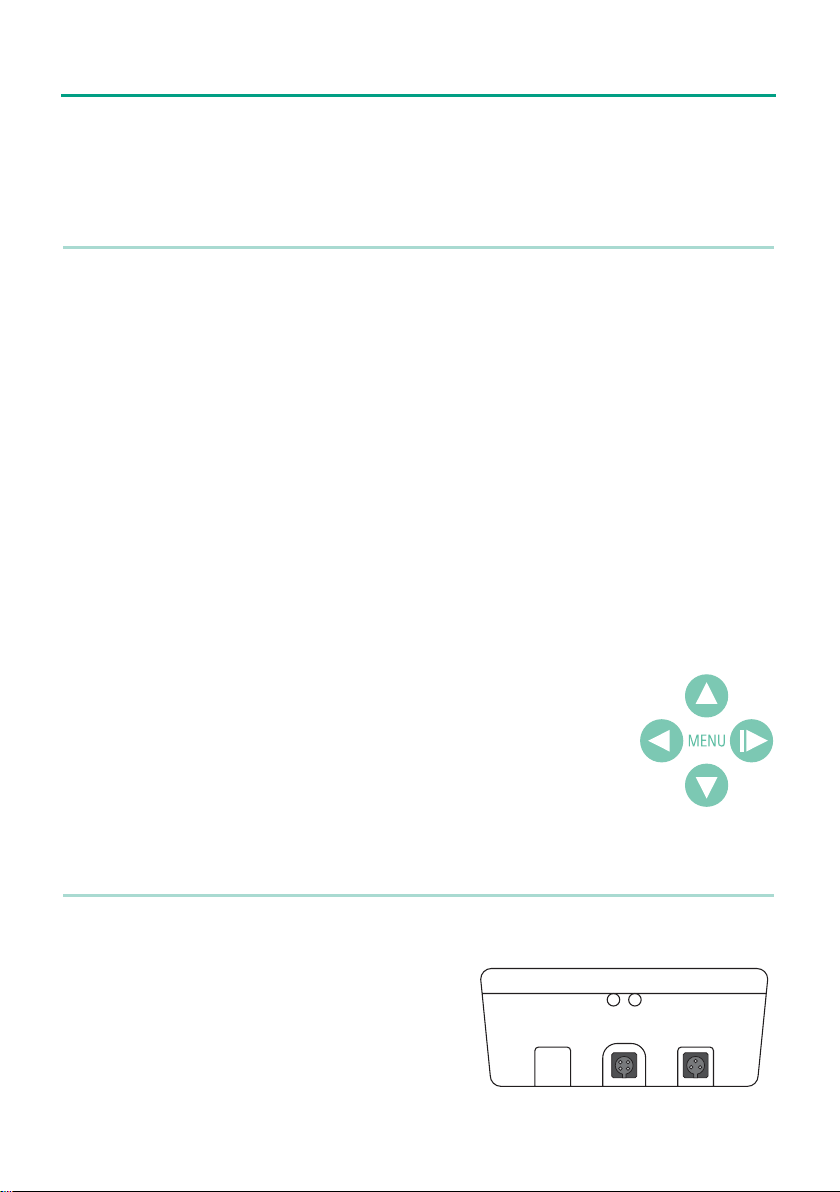
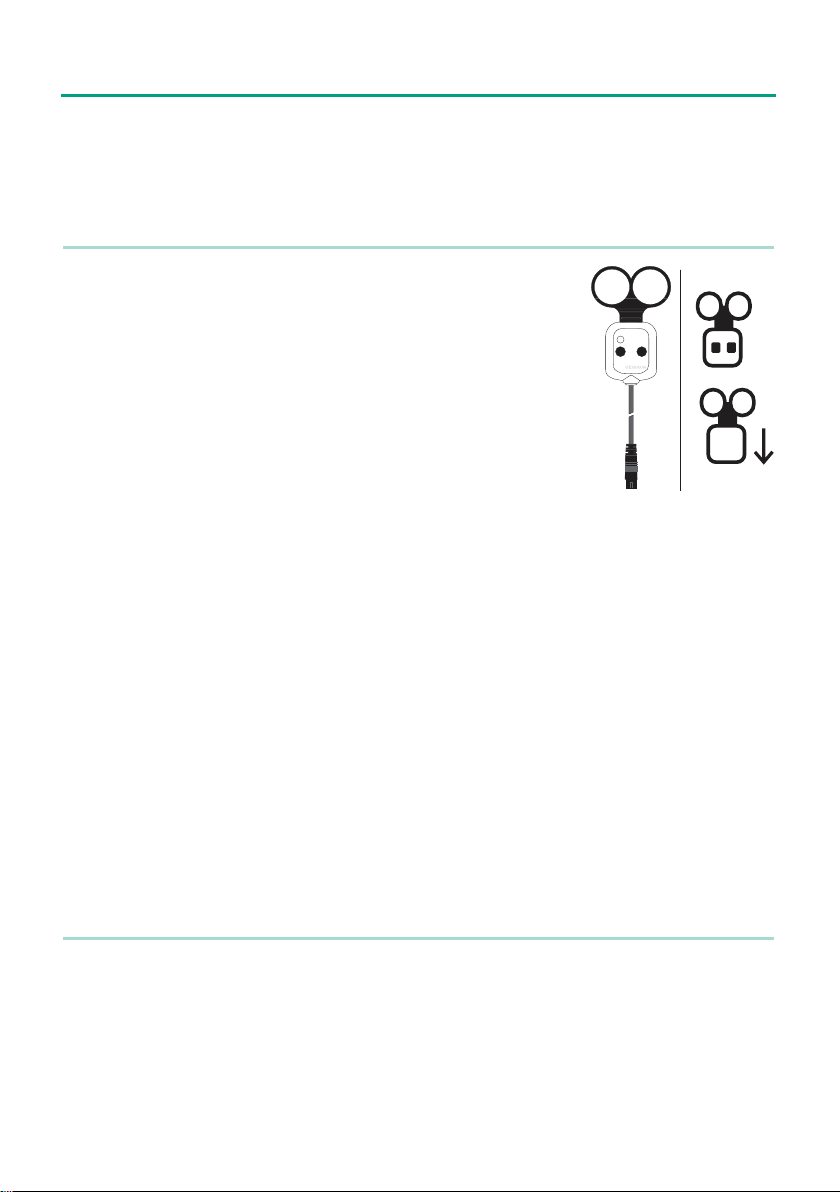
2.2.1 Plug Connections
Two polarized plug connections are located on the front of the nerve stimulator:
- 3-polar plug for connecting single-handed remote control
(Stimuplex DIG RC can be operated under sterile
conditions)
- 4-polar plug for connecting the electrode cable
to the stimulation needle and skin electrode.
Page 18

18
Hz
ms
MENU
mA
R
Stimuplex HNS 12
2.2.2 Current regulator (dial and keys)
Current regulator (dial):
The current regulator (dial) is used to adjust the target stimulation
current. The dial has no stop. The maximum currents (5 or 1 mA)
can be achieved either with 2 turns, or 1 Dial (factory setting).
The settings 1 or 2 dial turns are configured in the ”Setup” menu,
”Dial turns”. When set at 2 dial turns, a higher resolution is
achieved (setting accuracy).
1 Dial turn
5.00 mA range - Resolution = 0.02 mA from 0.00 mA to 0.50 mA
- Resolution = 0.10 mA from 0.50 mA to 2.00 mA
- Resolution = 0.25 mA from 2.00 mA to 5.00 mA
1.00 mA range - Resolution = 0.02 mA
2 Dial turns
5.00 mA range - Resolution = 0.01 mA of 0.00 mA to 0.55 mA
- Resolution = 0.10 mA of 0.60 mA to 5.00 mA
1.00 mA range - Resolution = 0.01 mA
Keys:
• ”mA” key: Sets the desired stimulation current range.
• ”ms” key: Sets the desired stimulus duration.
• ”Hz” key: Sets the desired stimulation frequency.
• MENU arrow keys: For navigation and settings in the menu.
• ”ON/OFF” key: On and off switch for the Stimuplex® HNS 12.
Briefly press the ”ON/OFF” key: To jump from the menu mode to the normal stimulation
mode or to immediately delete a potentially existing
marking in the stimulation mode (e.g. 5.00 mA).
Page 19
19
2.2.3 Single-handed remote control (Stimuplex® Remote Control)
As an alternative to the dial, the target stimulation current can also be
set using the single-handed remote control, available as an optional
accessory. With this feature, Stimuplex® HNS 12 can be easily operated
under standard sterile conditions without an additional person.
The device recognizes the single-handed remote control automatically as
soon as it is used. A symbol for the single-handed remote control appears
in the LCD display above the battery symbol (activated when dots appear,
inactivated when no dots and the downward arrow are displayed).
For safety reasons, the single-handed remote control is not activated by
the device until the target stimulation current has been set to zero with both the dial as well as with
the single-handed remote control. Afterwards it is possible to set the target stimulation current with
the remote control. If required, please press the unlabelled key on the single-handed remote control
(= lowers the value) until the symbol without dots disappears. The single-handed remote control is
released when the target stimulation current is set to 0.00 mA and the remote control symbol is invisible.
Stimuplex DIG RC
When single-handed remote control is activated (symbol with 2 dots), the dial has no function. For
safety reasons, neither the current range nor the stimulus duration can be increased when the single-handed remote control is activated, without having previously set the target current to zero. The
automatic current adjustment (option) is also turned off. When the single-handed remote control is
in use, the smallest adjustable stimulation current is approx. 0.09 mA due to technical reasons.
Attention! The target stimulation current can be modified during menu navigation, if the remote
control is activated.
For safety reasons, if the single-handed remote control is disconnected from the Stimuplex® HNS 12,
the device automatically resets the stimulation current back to zero and the dial is reactivated for
setting the stimulation current.
2.2.4 Sound
Each stimulation pulse (preset stimulation current is flowing) generates a clear click or beep sound.
The volume increases from a low pitch during maximum stimulus current to a high-pitch tone to
audibly signal that the current threshold is being approached. However, changes in sound pitch can
also be turned off in the ”Setup” menu, ”Tone”, ”Variable tone” so that the same sound is always heard
regardless of the respective stimulation current.
The type of sound can be selected in the ”Setup” menu, ”Tone”, ”Mode”. The user can choose between
a click and a beep sound. When warnings actual stimulation current < target stimulation current,
Page 20

20
target stimulation current < current threshold, automatical switch off, EEPROM) and errors are signalled, the click or beep changes to a louder and higher alarm pitch. Whenever any key is operated,
a short, clear beep is audible. The volume can be adjusted in the ”Setup” menu, ”Tone”, ”Volume” at
settings ranging from 0 (a very quiet ticking sound in the stimulus frequency; warning signals remain)
to 8 (max. volume).
2.2.5 LED
• Green LED: Actual stimulation current = target stimulation current
• Yellow LED: Actual stimulation current = target stimulation current,
below the threshold current (if current threshold activated is, see Section 3.6)
• Red LED: deviation actual stimulation current < target stimulation current
(starting from a deviation of – 0.04 mA), errors.
Page 21

2.2.6 Display modes
The Stimuplex® HNS 12 has 4 basic display modes:
1. Stimulation mode
- Without or with electrical charge (nC) display
- Without or with single-handed remote control
2. Stimulation mode with warning
(Actual stimulation current less than target
stimulation current)
3. Menu mode
In the menu mode, various submenus and options can be
selected by using the up and down arrows. The checkmark
(√) symbolizes the selected value and/or the selected option.
Each selection (displayed by a ”>”) can be changed by using
the up and down arrow keys and must be confirmed by
pressing the right arrow key, if applicable. The checkmark (√)
then appears at the corresponding position.
21
4. Error display mode
(For example, indicating that the stimulation voltage is too
low.)
If an error message appears in the LCD display, the device is
automatically switched off within 8 seconds. During this
process, the target stimulation current is set to zero and the
stimulation voltage turned off.
Page 22

22
2.2.7 Menu structure
Main Menu (arrow keys MENU)
Current range: 0.00 - 5.00 mA
0.00 - 1.00 mA
Stimulus duration: 1.00 ms
0.50 ms (optional)
0.30 ms
0.10 ms
0.05 ms (optional)
Frequency: 2 Hz
1 Hz
Current threshold: On (√) or Off (no √)
Info: Battery level, date, serial no., version
Distributor
Manufacturer
USER INFO 1 (future option, not available at the moment)
USER INFO 2 (future option, not available at the moment)
Activate infrared interface (future option, not available at the moment)
Setup: Tone: Volume: from 0 to 8
Mode: (click or beep)
Variable tone: On (√) or Off (no √)
Dial turns: 1 or 2
Contrast: 0 to 8
Automatic switch off: 0 to 10 min. (in min. increments)
15 to 30 min. (in 5 min. increments)
Date HH:MM - YYYY.MM.DD
Language GB – English
D – German
F – French
E – Spanish
I – Italian
P – Portuguese
S – Swedish
Page 23

Setup: Sprache NL – Dutch
DK – Danish
N – Norwegian
FIN – Finnish
GR – Greek
RUS – Russian
H – Hungarian
RO – Romanian
CZ – Czech
SK – Slovak
SLO – Slowenian
PL – Polish
TR – Turkish
EST – Estonian
LV – Latvian
LT – Lithuanian
BG – Bulgarisan
CN – Chinese
J – Japanese
23
Options: Factory standard: Yes (Y?)
Confirm using the right
arrow key
El. charge nC: On (√) or Off (no √)
Auto adjust current: On (√) or Off (no √)
Add. stimulus duration: On (√) or Off (no √)
Page 24

24
The device is configured with the following factory settings on delivery:
Maximum current: 5.00 mA
Stimulus duration: 0.10 ms
Stimulation frequency: 2 Hz
Impedance: kΩ (is calculated)
Scale range (not displayed): 1 turn (can only be changed in the menu)
Auto switch off: 20 min. (can only be changed in the menu)
Current threshold: Off (changes only possible in the menu,
Language: English (can only be changed in the menu,
3.1 Switch on / Switch off (ON/OFF)
Switch on:
Press the ON/OFF key. After the key is released a self-test (not displayed) is run, the stimulation mode
is displayed and the device is ready for operation.
(from the numerical series 0.10 ms, 0.30 ms, and 1.00 ms)
is not reset by the option ”Factory setting”)
is not reset by the ”factory setting” option)
3. Operation of the Stimuplex® HNS 12
or:
Hold down the ON/OFF key – the equipment data are displayed. After the key is released, a self-test
is run as described above and the device is ready for operation.
Switch off:
Hold down the ON/OFF key (for approx. 2 sec.). After the display of a progress bar is completed, the
display disappears. The device is switched off.
Please do not replace the battery while the device is turned on as this can otherwise
damage the LCD display.
If the key is released within the 2-second switch-off phase, the device remains turned on and switches into the stimulation mode (home function).
If neither the dial nor the keys are operated for a period of 20 minutes, the stimulator switches off
automatically. An audible warning signal will sound (4 Hz rhythm) during the last minute. In the
”Setup” menu, ”Auto switch off”, the automatic switch-off time can be set to between 1 and 30
minutes using the up and down keys.
Page 25

3.2 Selecting the current adjustment range
Factory setting on delivery: 0.00 to 5.00 mA max.
The two ranges are selectable: – 0.00 to 5.00 mA
– 0.00 to 1.00 mA
The current range can be changed in two ways:
1. Selecting the current range for future switch-on procedures:
Switch on the device. Activate the Main Menu using the right arrow key and activate ”Current
range” using the right arrow key. Select the desired range using the up or down key (indicated
by > on the left) and confirm with the right arrow key (√ appears on the right next to the
selection). Switch off the device. The current range now selected will be configured when
the device is switched on the next time.
2. Changing the current range during the application:
Press the mA key (the displayed value is highlighted by a border) and press the mA key again
immediately (the second possible value is set and highlighted). This value is now activated for
this application (the border disappears after approx. 3 sec.). If the mA key is pressed repeatedly
while the border is activated, each of the other current ranges is set.
25
If the current range is changed during the application and a target current has been set, the
target current may be reduced slightly automatically for technical reasons.
3.3 Selecting the stimulation current
The amplitude of the stimulation current (desired current) is set using the dial.
The resolution of the regulator increments is dependent on whether one or two dial turns have been
set in the ”Setup” menu (see Section 2.2.2).
When the single-handed remote control is connected and active, operation using the dial is not
possible. The ”automatic current adjustment” (see Section 4.2.7.3) is then likewise no longer active.
Page 26

26
3.4 Selecting the stimulus duration
Factory setting on delivery: 0.10 ms.
Stimulus duration values can be selected from two numerical series:
– The first series includes 0.10 ms, 0.30 ms and 1.00 ms.
(these values are equivalent to those on Stimuplex® HNS 11.)
If these 3 values are not sufficient for your application, you can activate the menu item ”Add.
stimulus duration” in the menu ”Setup”, ”Options” (√ appears next to ”Add. stimulus duration”
on the right). You can then choose between the values from the second series (below).
– The second series includes 0.05 ms, 0.10 ms, 0.30 ms, 0.50 ms and 1.00 ms.
The stimulus duration setting can be changed in three ways:
1. Changing the stimulus duration for future switch-on processes:
Switch on the device and activate the Main Menu using the right arrow key. Use the down key
to select ”Stimulus duration” and activate the menu page using the right arrow key. Use the up
or down key to highlight the desired ms value; select and confirm using the right arrow key
(√ appears on the right). Switch off the stimulator. The value now selected will be set when
device is switched on the next time.
2. Changing the configured setting during an application (1st possible way):
Press the ms key. The current value is highlighted by a border. By repeatedly pressing the ms key,
the next higher value appears from the numerical series selected above. Repeatedly press the
ms key to switch on all values consecutively. The displayed value is immediately active. The border disappears after approx. 3 seconds.
3. Changing the configured setting during an application (2nd possible way):
Press the ms key. The current value is highlighted by a border. The stimulus duration can be
extended or shortened with the up or down arrow keys in accordance with numerical series
selected above. The new value is immediately active. The highlighting disappears after 3 seconds
or when the ms key is pressed again or the ON/OFF key is pressed briefly.
Page 27

3.5 Selecting the stimulation frequency
Factory setting on delivery: 2 Hz.
The selectable options are 2 Hz or 1 Hz.
Two setting options are available to change the stimulation frequency:
1. Changing the stimulation frequency for future switch-on processes:
Switch on the device and activate the Main Menu using the right arrow key. Use the down key
to highlight ”Frequency” and activate the menu page using the right arrow key. Select 1 Hz
using the down key and confirm it using the right arrow key (√ appears on the right). The value
now selected will be set when device is switched on the next time.
2. Changing the configured setting during an application:
Press the Hz key. The set value is highlighted by a border. By repeatedly pressing the Hz key,
the other value appears. Repeatedly pressing the Hz key switches on the values alternately. The
displayed value is now active for this application, the highlighting disappears after approx.
3 seconds.
3.6 Current threshold display
27
Highlight the option ”Current threshold” in the ”Main Menu” and confirm using the right arrow key
(√ appears on the right).
This option can be used to visually and acoustically indicate when the stimulus duration-dependent
current threshold goes out-of-tolerance.
• Visual warning:
The full digits of the target current display are converted to
contoured digits when the current threshold drops below
the preset level.
The LED flashes yellow (instead of green).
• Acoustic warning:
A warning signal is additionally sounded.
Stimulus duration ms 0.05 0.10 0.30 0.50 1.00
Current threshold mA 0.50 0.30 0.20 0.15 0.10
Page 28

28
3.7 Checking the battery voltage
The battery level is displayed as a symbol in the stimulation mode on the bottom right of the LCD
display. The filling level of the symbol indicates the battery’s state of charge. The battery’s state of
charge is additionally indicated in the menu under the item ”Info” (see below) in volt and percent.
Press the right arrow key to activate the menu. Navigate with the up/down keys until the highlighting arrow „>“ is in front of the menu item ”Info”. Press the right arrow key to open the ”Info” menu.
In the upper row, the battery’s state of charge is indicated in % and volt.
3.8 Additional information – Menu info
The menu ”Info” has 6 pages. With the up/down keys you can scroll through these pages.
The version number format has the following meaning:
Version 1.002.x
1 = hardware revision number
002 = software revision number
x = language module revision number
In addition to the equipment data, distribution and manufacturer information is displayed. You can
configure the two User Info pages yourself using an infrared interface (available as an accessory
together with the corresponding service software) via a PC. The infrared interface (future option, not
available at the moment) is activated by selecting the „Infrared“ page using the up/down keys in the
“Info“ menu.
Page 29

4. Setting parameters and options for future switch-on procedures
The parameters and options desired by the user, which should be available
when the device is switched on, can be configured via the menu.
The arrow keys up/down and right/left are used for navigating through the
menu structure.
These keys have the following functions:
Left arrow key: Go back one menu level
Right arrow key: Go down one menu level or select/confirm the highlighted value
Up key: Jump to the upper menu items or increase the highlighted value
Down key: Jump to the lower menu items or reduce the highlighted value
Please keep in mind that the desired and set values are immediately saved with the checkmark
(√). If you forget this and Stimuplex® HNS 12 meanwhile switches off automatically, the previous values remain configured.
4.1 Setting switch-on values for stimulation parameters
Press the right arrow key MENU to activate the Main Menu.
29
4.1.1 Current adjustment range
The desired switch-on value for the current range can be set under the menu item ”Current range”.
Navigate with the up/down keys until the marking arrow (>) is in front of the menu item ”Current
range”. Press the right arrow key to confirm the menu item, thereby the desired switch-on value is
activated for the current range. The switch-on value is indicated by a checkmark (√).
Changing this menu item during an application has no impact on the previously set values. The changes will not be active until Stimuplex® HNS 12 has been switched off and back on.
Page 30

30
4.1.2 Stimulus duration
The desired switch-on value for the stimulus duration can be set under the menu item „Stimulus
duration“.
Navigate with the arrow up/down keys until the marking arrow (>) is in front of the menu item
”Stimulus Duration”. Press the right arrow key to confirm the menu item and thereby activate the
adjustable stimulus duration values. Using the arrow up/down keys you can now select the desired
switch-on value for the stimulus duration. Confirm your selection with the right arrow key. The
switch-on value is now indicated by a checkmark (√).
Changes to the stimulus duration values in the menu item ”Stimulus Duration” will not be active until
Stimuplex® HNS 12 has been switched off and back on. Changing this menu item during an application has no impact on the currently set values.
4.1.3 Frequency
The desired switch-on value for the stimulation frequency can be set under the menu item
”Frequency”.
Navigate with the up/down keys until the marking arrow (>) is in front of the menu item ”Frequency”.
Press the right arrow key to confirm the menu item, thereby activating the desired switch-on value
for the stimulation frequency. The switch-on value is indicated by a checkmark (√).
Changing this menu item during an application has no impact on the current settings. The changes
will not be active until Stimuplex® HNS 12 has been switched off and back on.
4.1.4 Current threshold display
The desired current threshold warning (visual and acoustical) can be activated or deactivated under
”Main Menu” ”Current threshold”.
Highlight ”Current threshold” using the arrow up/down keys and confirm and activate (√ appears on
the right) or deactivate (√ disappears) with the right arrow key.
Page 31

31
4.2 Setup
Press the right menu arrow key to go to the Main Menu.
Using the up/down keys, choose ”Setup”.
With the right arrow key, open the „Setup“ menu and you can select from the following menu items:
Tone – Dial turns – Contrast – Auto switch off – Date – Language – Options.
4.2.1 Tone
The desired volume, the sound mode and the dependency of the tone pitch on the target stimulation
current can be set in this menu. On the menu page ”Tone”, use the up/down keys to highlight the
submenu item ”Volume” by opening it with the right arrow key. With the up/down keys, the volume
can be set between 0 (lowest volume) and 8 (loudest volume). The setting is immediately active.
Additional confirmation is not required.
In the submenu ”Mode”, the type of sound, i.e. click or beep, can be set with the up/down keys.
Additional confirmation is not required here.
Use the option ”Variable tone” to set whether the tone pitch should be dependent on the target
stimulation current, or whether you desire a consistent stimulation tone over the entire setting range.
Activate this option with the right arrow key (√ appears on the right) or inactivate it (√ disappears).
The setting is active immediately.
4.2.2 Dial turns
The setting accuracy can be adjusted to suit to your needs by configuring the number of dial turns
(one or two turns) for the entire current range of 1.00 mA or 5.00 mA.
In the Main Menu, select the item ”Setup” and open it with the right arrow key. Highlight the option
”Dial turns” and open it with the right arrow key. With the up or down key, select 1 or 2 turns and
activate this selection at the same time. Additional confirmation is not required. For safety
reasons, the stimulation current is always reset to zero during this procedure.
Page 32

32
4.2.3 Contrast on the LCD display
The contrast on the LCD display can be changed under the menu item ”Contrast”.
Open the ”Setup” menu, select ”Contrast” and open with the right arrow key. The contrast can be set
from 0 to 8. The factory setting is 5.
When you change the value with the up or down keys, you can see the changes in the display contrast by checking the BIBRAUN logo. The displayed value is immediately activated and remains set
after you have exited the menu.
4.2.4 Automatic switch off
The set time interval for the automatic switch off applies from the last time the stimulator has been
operated. It is factory set to 20 minutes on delivery. Nevertheless, the switch-off time can be set to
between 1 and 30 minutes. If the value is set to 0, the device does not switch off automatically.
Open the ”Setup” menu, select the option ”Auto switch off” and open it with the right arrow key.
Using the up or down key, set the desired automatic switch-off time. The increment is 1 minute between 1 and 10 minutes; above this the increment is 5 minutes. Each setting is immediately activated.
4.2.5 Date and time
After every battery replacement, the date and time must be reset.
Open the ”Setup” menu, highlight ”Date” and open with the right arrow key.
Order for the setting:
: 00 0000 . 00 . 00
00
Hour
Set the hour using the Up/down keys.
With the right arrow key, move the cursor (underline) to the next position.
The minutes are displayed. Set the minutes with the arrow up/down keys.
With the cursor over the right arrow key, go to the next position „Year“ and set it with the up/down
keys.
Afterwards, set month and day as described above.
The changes are immediately active.
Page 33

33
4.2.6 Language
The desired language for menus and warning messages can be configured under the menu item
”Language”.
With the right arrow key, activate ”Main Menu”, highlight the ”Setup” menu with the down key and
open with the right arrow key. With the up or down key, highlight the menu ”Language” and open
with the right arrow key. Now, you have the option of highlighting the desired language with the up
or down key and activating your selection with the right arrow key (√ appears on the right).
4.2.7 Options
This menu page offers the following options:
1. Factory standard restores factory settings.
2. Electrical charge nC – additional display of the amount of electricity to be given off in nanocoulomb.
3. Auto current adjustment – the current is adjusted automatically when the stimulus duration
is changed.
4. Add. stimulus duration – additional stimulus duration parameters.
Use the right arrow key to activate (√ appears on the right) or deactivate these options (√ not visible).
4.2.7.1 Factory standard
Activation of this menu item resets all of the parameters back to the manufacturer’s declared factory settings on delivery (see Section 3). However, this does not change the language setting or the current threshold display.
In the ”Setup” menu, open the ”Options” submenu. The ”Factory standard” option is automatically
highlighted and can be activated with the right arrow key. First, Y? appears to ask the user whether
they really want to activate the factory settings. The factory standard are not reset until the right
key is pressed once more and √ appears on the right. Now, the following parameters are
arrow
immediately
Current range: 5.00 mA Dial turns: 1
Stimulus duration: 0.10 ms Contrast: 5
Frequency: 2 Hz Autom. switch off: 20 Min.
Tone: Beep El. charge nC: Off
Volume: 5 Auto adjust current: On
Variable tone: On Add. stimulus duration: Off
activated:
Page 34

34
4.2.7.2 Displaying the electrical charge of the stimulation pulse (electrical charge nC)
By activating this menu item, the electrical charge to be given off per stimulation pulse in nC is additionally displayed in the upper line on the LCD display (el. Charge [nC]=current[µA] x stimulus duration[ms], 1 nC = 10
In the ”Setup” menu, open „Options“, highlight „El. charge nC“ and activate with the right arrow key
(√ appears on the right).
4.2.7.3 Current adjustment
This option allows automatic adjustment of the set stimulation current to the new settings when the
stimulus duration is increased during an application. This prevents the set stimulation current from
suddenly being given off for too long when the stimulus duration is increased without the stimulation current having been turned back to 0.00 mA.
Caution!
When the stimulus duration is lowered with the ms key and then increased again without the
dial being operated in the interim, the target stimulation current is turned up to the old value
again.
-9
As).
In the „Setup“ menu, open ”Options”, highlight ”Auto adjust current” and activate (√) or deactivate
with the right arrow key.
4.2.7.4 Additional stimulus duration
With this option, you can add the stimulus durations 0.05 ms and 0.50 ms to the selection series (see
Section 3.4). In ”Setup”, open „Options“, highlight ”Add. stimulus duration” and activate (√) or deactivate with the right arrow key.
Page 35

5. Initial setup, maintenance and notes
5.1 Testing the Stimuplex® HNS 12
A device check may be conducted as follows:
- Switch on the Stimuplex® HNS 12. After the ”ON/OFF” key has been released and the self-test
successfully completed, the device is ready for operation.
- With the stimulus duration set at 0.30 ms and the current adjustment range at 5.00 mA and the
circuit open, check that the actual current equals zero over the entire adjustment range from 0.10
to 5.00 mA. (The warning ”Patient current lower than your setting” must appear in the display, the
warning signal must be audible and the LED in the stimulation frequency must light up red).
- Now, connect the electrodes (clip and plugs) using the 10 kΩ resistance supplied as an accessory.
At this time, recheck the entire adjustment range to make sure that no warning is displayed, the
LED lights up green or yellow, if applicable, and the sound is audible at the pitch of the selected
stimulation frequency.
If the user wants to perform a safety check it is recommended to follow the test instructions in the
Technical Service Manual.
5.2 Special technical features
35
The electrode connection is configured to prevent the electrode cable for the stimulation needles
from being plugged in incorrectly and thereby creating the wrong polarity.
This reliable plug connection system ensures the correct polarity of the stimulation needle (negative)
and skin electrode (positive).
As a result of the high peak stimulation voltage, the working spectrum is extremely broad, even when
extremely small stimulation electrodes are used (fully insulated needles with pinpoint electrode). The
Stimuplex® HNS 12 generates a negative, current-stabilized square pulse. Unlike conventional instruments of this type, the pulse of Stimuplex® HNS 12 is shaped by extremely fast active pulse drivers
at both slopes. An output amplifier specially designed for this application has an extraordinarily wide
dynamic range and generates reproducible settings even below 0.10 mA.
The latest microcomputer technology has made it possible to integrate performance features into the
Stimuplex® HNS 12 that – until now – could only be provided by large and expensive systems. Some
examples of the integrated features include the exact measurement of actual current and battery voltage, display of tissue impedance, menu structure and error messages available in various languages,
configuration of user-specific options, the infrared interface, and the large high-contrast and userfriendly graphic display.
The internal quartz time base ensures precise stimulus durations and stimulus frequencies.
Page 36

36
5.3 Technical data
Type: Stimuplex® HNS 12
Instrument type: BF
Battery: 9V (alkaline)
Power consumption: 6 mA (8 mA max.)
Stimulation current: Î = 5 mA (max.) (0–12 Ω)
Stimulation voltage: Û = 95 V (max.)
Stimulation frequency: 1 Hz / 2 Hz ±1%
Stimulus duration: 0.05 ms – 0.10 ms – 0.30 ms – 0.50 ms – 1.00 ms ±1%
Allowable load impedance: 0 Ω–12 Ω
Current measuring accuracy: ± 0.02 mA
Impedance measuring range: 1 kΩ – 90 kΩ for target stimulation current > 0.5 mA
Impedance measuring accuracy: ±10% / ±20% for target stimulation current > 1mA / <= 1mA
Sound pressure level: 51 dB / 54 dB / 63 dB for stimulation / warning / error
Weight: 250g
Operational environmental conditions: 0 – 50° C, max. 90 % relative humidity, no condensation
5.4 Battery
The battery charge status must be checked regularly. The battery should be replaced immediately
whenever the battery symbol is flashing.
Please do not replace the battery when the device is turned on as otherwise the LCD display can
become damaged.
When the battery voltage drops below 6 V, the nerve stimulator stops operating and issues an error
message. Change the battery. While not performing a stimulation, you can save battery power by setting the stimulation current to 0.00 mA.
If the Stimuplex® HNS 12 nerve stimulator is not intended to be used for a long period of time, the
battery must be removed to prevent leakage.
The battery compartment is located in the base of the nerve stimulator. Open the compartment. Change the battery - ensuring correct polarity. Then, close the compartment.
BATTERY
9V ALKALI
Use only 9 V alkaline manganese batteries (e.g. VARTA 4922, DURACELL MN 1604). These
will provide you with an optimum operating time .
WARNING!
If the battery is leaking, the Stimuplex® HNS 12 should no longer be operated on the grounds of safety. Acid penetrating the inside of the instrument can damage or impair essential circuitry. It must be
returned to the manufacturer for correct cleaning and a safety check.
Page 37

37
5.5 Cleaning and disinfecting the Stimuplex® HNS 12
Use only soft, damp cloths to clean and disinfect the Stimuplex® HNS 12 and the electrode cable.
Water or soap are particularly suitable for this purpose. Ensure that no moisture penetrates the
Stimuplex® HNS 12.
Use only wipe disinfection, no spray disinfection! Avoid condensation!
White spirit or commercially available methanol-free
used for disinfection.
Meliseptol® or white spirit can be used or wipe disinfection.
Caution! The following substances must not be used: trichloroethylene, acetone, butanone, benzene
methyl ethyl ketone, benzene, methanol, cellulose thinner, and 2-propanol or any other organic solvents, acids and sodium hydroxide solution. Disinfectants containing iodine or dyes can discolor the
housing and should therefore not be used.
5.6 Maintenance and safety checks
Check the serviceable condition of the Stimuplex® HNS 12 and accessories on each occasion before
use. A defective instrument must not be used. Electromedical equipment may only be repaired by the
manufacturer or by an organization expressly authorized by the manufacturer. An order for repairs
must be accompanied by a detailed description of the fault.
disinfectant in an ethyl alcohol base can be
5.7 Safety inspections according to Section 6 of the German Medical Devices Operator
Ordinance (MPBetreibV)
According to Section 6 of the German Medical Devices Operator Ordinance (MPBetreibV), the manufacturer/distributor does not conduct safety check.
5.8 Equipment logbook
1. The operator is required to keep an equipment logbook on medical-technical devices according
to MPG Class II.
2. Mandatory entries in the logbook include:
2.1 Designation and other information for identification of the device
2.2 Certification about the function testing performed and instructions given in accordance
with Section 5, para. 1 of the German Medical Devices Operator Ordinance (MPBetreibV)
2.3 Name of the officer authorized in accordance with Section 5 para. 1 no. 2, time of instruc-
tional training and the name of the instructed persons.
2.4 Deadlines and dates for performing prescribed safety checks and mechanical inspections
and their results and the date of maintenance work including the name of the person or
company responsible for carrying out these measures.
Page 38

38
5.9 Notices, warranty
General notes
The cables of the nerve stimulator Stimuplex® HNS 12 should be positioned in such a way that they
do not contact either the patient or other cables.
All accessories have to be visually inspected at regular time intervals. The insulation of the cables and
plug connections must not exhibit any damage.
Only original accessories from B. Braun labeled with the CE sign should be used.
All electrical and electronic equipment provided with systems released after 13 August 2005, are
marked with a symbol indicating that this equipment must undergo separate collection for disposal.
Figure:
Separate collection for electrical and electronic equipment
(currently applicable to EU community only).
In order to ensure an appropriate disposal of the device you have the possibility to give your device
back to your B. Braun contact person or to return the device to Stockert GmbH free of charge.
Please decontaminate the device before shipping (see page 37).
Storage and shipping conditions:
0–50 °C, up to 90 % relative humidity, no condensation.
Warranty
Stimuplex® HNS 12 is guaranteed for two years against defects in material and workmanship provided that the device is used in accordance with the operating instructions. Accessories and wear parts,
such as electrode cables, batteries, etc. are not covered by this warranty.
In addition, relevant sections of our General Sales Conditions apply, specifically Chapter IV No. 8.
Do not attempt to remove the control knob from the Stimuplex HNS12 for any purpose. Properly attaching the knob requires a special tool. This will void your warranty and result in a chargeable repair
event, or replacement with a refurbished unit without warranty (if available) at B. Braun’s sole discretion.
The Stimuplex HNS12 unit case should not be opened for any purpose. Opening the unit (even for
inspection by Biomedical Engineering) will void your warranty. Malfunctions arising from opening the
unit will result in a chargeable repair event, or replacement with a refurbished unit without warranty (if available) at B. Braun’s sole discretion.
Page 39

39
5.10 Error messages
Stimuplex® HNS 12 checks the battery voltage periodically. If the voltage is less than 6.00 V, an error
message will be displayed and the device will switch off automatically. The used battery must be
replaced immediately.
Caution!
An empty battery can leak, damaging the device and making it unusable. If the device is not used for
a longer period of time, it is imperative that the battery is removed. Any damage caused by a leaking
battery is not covered under the warranty.
Stimuplex® HNS 12 conducts safety checks periodically.
In the event of the following malfunctions, the device switches off automatically within 8 seconds.
During this time, the cause of the error is displayed.
1. Actual stimulation current > target stimulation current + tolerance
tolerance = 0.10 mA in the target current range = 0.00 .. 0.50 mA
tolerance = 0.20 mA in the target current range = 0.50 .. 2.00 mA
tolerance = 0.50 mA in the target current range = 2.00 .. 5.00 mA
2. Max. stimulation voltage of the stimulation pulse less than 50 V
3. RAM (memory) error
4. CPU (computer) error
5. ROM (program memory) error
6. ADC (analog digital converter) error
7. Frequency error
If such an error occurs, the device may no longer be used and must be sent in for repairs.
In the event of malfunctions that have no impact on the functional safety of the device, e.g. a deviation between internal parameters, Stimuplex® HNS 12 will first try to reconstruct these parameters.
During this procedure, the message ”EEPROM Corrrection” appears. The display automatically disappears after the error has been corrected successfully and the device is again ready for operation.
If the error cannot be corrected, the factory set default values are used. The error message
”K(U) EEPROM INIT” then appears during every switch-on procedure. In this case, the device might run
at slightly changed stimulation settings. Please send in the device immediately to the manufacturer
or distributor for repairs or testing.
Page 40

40
Loading a language
If an error occurs when changing the language, the device will automatically switch back to English.
During this procedure, the LCD may briefly go blank.
5.11 Instruments and accessories
The Stimuplex® HNS 12 should only be operated with the accessories and instruments referred to in
this user manual.
Before every use check the accessories and instruments to make sure they are in serviceable condition and follow the care and disinfection instructions supplied (see 5.5).
Stimuplex® HNS 12 and Accessories, Stimuplex® and Contiplex® needles
Product description Needle Code no. Sales unit/
Ø x length pcs.
Stimuplex® HNS 12 Nerve Stimulator 4892098B 1
- with electrode cable for Stimuplex® D,
Stimuplex® A and Contiplex® D needles
Special knob for sterile handling 4892283B 1
Stimuplex® Pen for percutaneous nerve mapping L = 1.25 m 4892099B 1
Stimuplex® Remote Control for sterile L = 1.6 m 4892216B 1
one-hand operation
Finger rings for Stimuplex® Remote Control 4892224B 1
Test resistance for Stimuplex® HNS 12 4892096B 1
Electrode cable for Stimuplex® D, 4892070B 1
Stimuplex® A and Contiplex® D needles
Connection cable for Contiplex® A needles 4892925B 1
Stimuplex® D needles, 15° bevel
1
/3
D 25/035; 25 G x 1
D 25/055; 25 G x 2
D 26/040; 23 G x 1
D 26/070; 23 G x 2
D 27/050; 22 G x 2“ 0.7 x 50 mm 4894146N 25
D 27/080; 22 G x 3
D 27/120; 22 G x 4
D 29/150; 20 G x 6“ 0.9 x 150 mm 4894170N 25
“ 0.5 x 35 mm 4894103N 25
1
/8
“ 0.5 x 55 mm 4894111N 25
1
/2
“ 0.6 x 40 mm 4894120N 25
3
/4
“ 0.6 x 70 mm 4894138N 25
1
/8
“ 0.7 x 80 mm 4894154N 25
3
/4
“ 0.7 x 120 mm 4894162N 25
Page 41

Product description Needle Code no. Sales unit/
Ø x length pcs.
Stimuplex® D needles, 30° bevel
1
D 17/040; 22 G x 1
/2
“ 0.7 x 40 mm 4894189N 25
D 17/050; 22 G x 2“ 0.7 x 50 mm 4894197N 25
1
D 17/080; 22 G x 3
/8
“ 0.7 x 80 mm 4894200N 25
Stimuplex® A needles, 30° bevel
A 25; 24 G x 1“ 0,55 x 25 mm 4894251N 25
A 25; 22 G x 1“ 0,70 x 25 mm 4894539N 25
A 50; 22 G x 2“ 0,70 x 50 mm 4894502N 25
A 50; 21 G x 2“ 0,80 x 50 mm 4894375N 25
A 100; 21 G x 4“ 0,80 x 100 mm 4894260N 25
A 150; 20 G x 6“ 0,90 x 150 mm 4894278N 25
Contiplex® D needles, 15° bevel
1
/8
D 28/055/C; 18 G x 2
D 28/110/C; 18 G x 4
“ 1,3 x 55 mm 4894219N 25
3
/8
“ 1,3 x 110 mm 4894294N 25
Contiplex® D needles, 30° bevel
1
/8
D 18/055/C; 18 G x 2
“ 1,3 x 55 mm 4894227N 25
Contiplex® D catheter set
- with polyamide catheter 0.41 x 0.71 x 400 mm
Needle D 20/033/C; 20 G; 15° bevel 1,1 x 33 mm 4892402N 10
Needle D 20/055/C; 20 G; 15° bevel 1,1 x 55 mm 4892410N 10
with polyamide catheter 0.45 x 0.85 x 400 mm
-
Needle D 28/055/C; 18 G; 15° bevel 1,3 x 55 mm 4894235N 10
Needle D 18/055/C; 18 G; 30° bevel 1,3 x 55 mm 4894243N 10
with polyamide catheter 0.45 x 0.85 x 1000 mm
-
Needle D 28/80/C; 18 G; 15° bevel 1,3 x 80 mm 4895819N 10
Needle D 28/110/C; 18 G; 15° bevel 1,3 x 110 mm 4894391N 10
Contiplex® A needles, 30° bevel
3
A 45/C; 18 G x 1
A 55/C; 18 G x 2
/4
“ 1,3 x 45 mm 4893611N 25
1
/8
“ 1,3 x 55 mm 4893643N 25
Contiplex® A catheter set
with polyamide catheter 0.45 x 0.85 x 400 mm
-
Needle A 45/C; 18 G x 1
Needle A 55/C; 18 G x 2
3
/4“ 1,3 x 45 mm 4893603N 10
1
/8
“ 1,3 x 55 mm 4893638N 10
41
Page 42

42
Product description Needle Code no. Sales unit/
Ø x length pcs.
Contiplex® Tuohy set
with polyamide catheter 0.45 x 0.85 x 1000 mm and sideport
-
insulated Tuohy type CNB 150; 18 G 1,3 x 38 mm 331695 / 331695N 12 / 10
insulated Tuohy type CNB 200; 18 G 1,3 x 52 mm 331691 / 331691N 12 / 10
insulated Tuohy type CNB 400; 18 G 1,3 x 102 mm 331693 / 331693N 12 / 10
insulated Tuohy type CNB 600; 18 G 1,3 x 152 mm 331694 / 331694N 12 / 10
Page 43

6. References
1. Moore DC (1965) Regional Block. A handbook for use in the clinical practice of medicine and
surgery. Thomas, Springfield III. (4th ed.)
2. Ford DJ, Pither CE, Raj PP (1984) Electrical characteristics of peripheral nerve stimulators.
Implications for nerve localization. Reg Anesth 9:73
3. Ford DJ, Pither CE, Raj PP (1984) Comparison of insulated and uninsulated needles for locating
peripheral nerves with a peripheral nerve stimulator. Anesth Analg 63:925
4. Kaiser H, Niesel HC, Klimpel L (1988) Einfluß der Reizstromstärke der Nervenstimulation auf
Latenz und Erfolg der hinteren Ischiadikusblockade. Regional-Anaesthesie 11:92
5. Kaiser H, Niesel HC, Hans V (1990) Grundlagen und Anforderungen der peripheren elektrischen
Nervenstimulation. Regional-Anaesthese 13:143
6. Kaiser H, Niesel HC, Hans V, Klimpel L (1990) Untersuchungen zur Funktion peripherer Nerven-
stimulatoren für die Durchführung von Nerven- und Plexusblockaden. RegionalAnaesthesie 13:172
7. März P (1990) Kann bei der elektrischen Nervenstimulation aus der Intensität der Muskelkontrak-
tion auf den Abstand zum Nerven geschlossen werden? Regional-Anaesthesie 13:179
43
8. Selander D, Edshage S, Wolff T (1979) Paraesthesiae or no paraesthesiae: nerve lesions after
axillary block. Acta anaesthesiol. scand. 23:27
Additional reading:
Kaiser H: Die periphere Nervenstimulation.
In: Niesel HC (Hrsg) Regionalanästhesie, Lokalanästhesie, Regionale Schmerztherapie.
Thieme-Verlag Stuttgart New York (1994) 186 - 207
Kaiser H. Periphere elektrische Nervenstimulation 139 – 160
G. Meier / J. Büttner Allgemeine Aspekte peripherer Nervenblockaden der Extremitäten / Nervenblockaden an den oberen und unteren Extremitäten 237 - 401
in H.C. Niesel / H. van Aken Lokalanästhesie, Regionalanästhesie, Regionale Schmerztherapie – Thieme
Verlag Stuttgart New York (2003)
Prithvi Raj P (Editor), Clinical practice of regional anaesthesia.
Churchill Livingstone New York (1991)
Pinncock CA, Fischer HBJ, Jones RP, Peripheral nerve blockade.
Churchill Livingstone New York (1996)
Scott DB, Introduction to regional anaesthesia. Mediglobe Fribourg (1989)
Page 44

44
Appendix A (per IEC 60601-2-10 : 2000 + A1:2001 (Section 6.8.2.aa)a):
Output curve shape: rectangle negative, constant current
Output voltage
Output current
Stimulus pulse
duration
Stimulus period
where Stimulus duration = 0.05 ms or 0.10 ms or 0.30 ms or 0.50 ms or 1.00 ms
Stimulation frequency = 1 Hz or 2 Hz
Output voltage Û = 95 V (without load, open)
Output impulse current Î = maximal 1.00 mA or 5.00 mA (short circuit)
7. Appendix
Page 45

Conversion table: stimulation current [mA] and pulse width [ms] in charge (nanocoulomb, nC)
Amplitude Pulse Width Charge Pulse Width Charge Pulse Width Charge
mA ms nC ms nC ms nC
0.1 0.1 10 0.3 30 1.0 100
0.2 0.1 20 0.3 60 1.0 200
0.3 0.1 30 0.3 90 1.0 300
0.4 0.1 40 0.3 120 1.0 400
0.5 0.1 50 0.3 150 1.0 500
0.6 0.1 60 0.3 180 1.0 600
0.7 0.1 70 0.3 210 1.0 700
0.8 0.1 80 0.3 240 1.0 800
0.9 0.1 90 0.3 270 1.0 900
1.0 0.1 100 0.3 300 1.0 1000
1.2 0.1 120 0.3 360 1.0 1200
1.6 0.1 160 0.3 480 1.0 1600
1.8 0.1 180 0.3 540 1.0 1800
2.0 0.1 200 0.3 600 1.0 2000
2.5 0.1 250 0.3 750 1.0 2500
3.0 0.1 300 0.3 900 1.0 3000
3.5 0.1 350 0.3 1050 1.0 3500
4.0 0.1 400 0.3 1200 1.0 4000
4.5 0.1 450 0.3 1350 1.0 4500
5.0 0.1 500 0.3 1500 1.0 5000
45
Page 46

46
Appendix B:
Load impedance as a function of battery voltage
Setting: stimulation current = 5.00 mA
16
14
12
10
8
6
4
2
Load impedance [kΩ]
0
6 6.5 7 7.5 8 8.5 9 9.5 10
Battery voltage [V]
Load impedance as a function of battery voltage
Setting: stimulation current = 1.00 mA
90
80
70
60
50
40
30
20
Load impedance [kΩ]
10
0
6
6.5 7 8 9 107.5 8.5 9.5 10.5
Battery voltage [V]
line1
Page 47

Actual stimulation current as a function of load impedance
Setting: target stimulation current = 5.00 mA, battery voltage = 9.0 V
6.00
5.00
4.00
3.00
2.00
1.00
0.00
Patient stimulus current [mA]
0
10 20 30 40 50 60 70 80 90 100 11 0
Load impedance [kΩ]
47
Output voltage as a function of load impedance
10.0
90.0
80.0
70.0
60.0
50.0
40.0
30.0
20.0
Stimulus voltage [V]
10.0
0.0
0.0 10.0 20.0 30.0 40.0 50.0 60.0 70.0
Load impedance [kΩ]
5.00 mA
1.00 mA
0.50 mA
Page 48

48
Target stimulation current as a function of adjustment control setting (relative to 0°)
Setting: 1 turn
6
5
4
3
2
1
Stimulation current [mA]
0
0.0
20.0 40.0 60.0 80.0 100.0 120.0 140.0 160.0 180.0 200.0 220.0 240.0 260.0 280.0 300.0 320.0 340.0 360.0 380.0 400.0
Setting: 2 turns
6
5
4
3
2
1
0
Stimulation current [mA]
0.0
50.0 100.0 150.0 200.0 250.0 300.0 350.0 400.0 450.0 500.0 550.0 600.0 650.0 700.0 750.0 800.0
Dial position [°]
Dial position [°]
5 mA
1 mA
5 mA
1 mA
Page 49

Appendix C (per Section 6.8.2.aa) b) IEC 50501-2-10 : 2000 + A1:2001):
Bare and insulated needles
10
9
8
Stimulation
current
[mA]
7
6
5
4
3
Current density
Bare
uncoated
needle
Insulated
needle
2
1
0
-10 0 +10
Bevel uncoated
Stimuplex® A
Contiplex® A
Distance from the nerve [mm]
49
Stainless
steel needle
Plastic
insulation
Stimuplex® D and Contiplex® D needles (Patent DE 3919666)
0.2 or 0.05 mA threshold
current required only
4
Stimulation
current
[mA]
3
2
1
0
-10 0 +10
Fully insulated
Stimuplex® D
Distance from the nerve [mm]
needle with
bare tip
Contiplex® D
blunt
30°
pointed
15°
Page 50

50
Appendix D:
Page 51

8. Symbols on Stimuplex® HNS 12
51
Display symbols
Battery
Target stimulation current
Actual stimulation current
Stimulus duration
1 Hz
2 Hz
Infrared transmission
Volume
Shut-off procedure
Remote control active
(Single-handed remote control
active)
Remote control inactive
(Single-handed remote control
inactive)
Symbols on device rear panel
BF
Application part, type BF
Refer to accompanying
documents
Remote Control
(Single-handed remote
control)
Stimulation current instrument
(needle)
MD...
BATTERY
9V ALKALI
Battery
Date of
manufacture/year/month
MEDICAL ELECTRICAL
EQUIPMENT CLASSIFIED BY
UNDERWRITERS
LABORATORIES INC.® WITH
RESPECT TO ELECTRIC SHOCK,
FIRE, AND MECHANICAL
HAZARDS ONLY IN
ACCORDANCE WITH
UL 60601-1 AND CAN/CSA
C 22.2 NO. 601.1 40 GF
Patient-coupled circuit open
Separate collection for
electrical and electronic
equipment (currently applicable
to EU community only)
Page 52

52
Table 1
Guidelines and manufacturer’s declaration concerning electromagnetic emissions
Stimuplex® HNS12 is intended for use in an environment as stated below. The customer or user of
Stimuplex® HNS 12 should ensure that the device is operated in this type of environment.
Emitted interference Compliance Electromagnetic
HF emissions according to CISPR 11 Group 1 The Stimuplex® HNS 12 utilizes HF energy
HF emissions according to CISPR 11 Class B The Stimuplex® HNS 12 is suitable for use
Harmonic current emissions Not applicable environments and such facilities that are
according to IEC 61000-3-2 directly connected to a public mains
Voltage fluctuations, flicker Not applicable network that also supplies buildings used
emissions according to for domestic purposes.
IEC 61000-3-3
9. Electromagnetic compatibility (EMC)
environment guidelines
for its internal function exclusively.
Therefore, its HF emissions are very low
and are unlikely to interfere with
electronic equipment in the proximity.
in other facilities than the residential
Page 53

53
Table 2
Guidelines and manufacturer’s declaration concerning electromagnetic immunity to interference
Stimuplex® HNS12 is intended for use in an environment as stated below. The customer or user of
Stimuplex® HNS 12 should ensure that the device is operated in this type of environment.
Immunity IEC 60601 Compliance Electromagnetic
tests test level level environment guidelines
Electrostatic discharge ±6 kV Contact ±6 kV Contact The floors should be made
(ESD) according to discharge mode discharge mode of wood or cement or
IEC 61000-4-2 paved with ceramic tiles.
If the floor is made of
±8 kV ±8 kV synthetic material, the
relative humidity must be
Air discharge mode Air discharge a minimum of 30%.
mode
Fast transient electrical ±2 kV for Not applicable Not applicable
disturbances/bursts mains power lines
according to ±1 kV for in and
IEC 61000-4-4 output lines
Surges according ±1 kV Not applicable Not applicable
to IEC 61000-4-5 Differential mode voltage
±2 kV
Common mode voltage
Voltage dips < 5% U
(> 95% dip Not applicable Not applicable
T
and interruptions in UT) for
according to 1/2 period
IEC 61000-4-11
(60% dip
40% U
T
in UT) for 5 periods
(30% dip
70% U
T
in UT) for 25 periods
< 5% U
(> 95% dip
T
in UT) for 5 s
Page 54

54
Immunity IEC 60601 Compliance Electromagnetic
tests test level level environment guidelines
Power frequency 3 A/m 3 A/m Power frequency
magnetic fields magnetic fields should
(50/60 Hz) according to correspond to the
IEC 610004-8 values typical to
those found in
commercial and
hospital environments.
Remark: U
is the mains alternating currents prior to use at the test level.
T
Page 55

55
Table 3
Guidelines and manufacturer’s declaration concerning electromagnetic immunity to interference
Stimuplex® HNS12 is intended for use in an environment as stated below. The customer or user of
Stimuplex® HNS 12 should ensure that the device is operated in this type of environment.
Immunity IEC 60601 Compliance Electromagnetic environment guidelines
tests test level level
Mobile and portable radio frequency
communication equipment should not be used at
a lesser distance to Stimuplex® HNS 12 including
its lines than the recommended separation
distance which is calculated according to the
equation applicable to the modulation frequency.
Recommended separation distances:
d = 3,5/V1 P for 150 kHz to 80 MHz
d = 3,5/E1 P for 80 MHz to 800 MHz
d = 7/E1 P for 800 MHz to 2,5 GHz
HF conducted 3 Veff Not with P as rated power of the transmitters in watts
disturbances 150 kHz to applicable according to the transmitter manufacturer’s
according to (W) 60 MHz information and d as recommended separation
IEC 61000-4-6 distance in meters (m).
HF radiated- 3 V/m 4 V/m The field strength of stationary radio transmitters
disturbances 80 MHz to should be less than the compliance level at all
according to 2,GHz frequencies based on on-site
a
testingb.
IEC 61000-4-3
test methods Malfunctions are possible in the
environment of equipment that bears
this symbol.
Remark 1: The higher frequency range is applicable at 80 MHz and 800 MHz.
Remark 2: These regulations may not apply in all cases. The distribution of electromagnetic
fields is affected by absorptions and reflections of buildings, objects and persons.
a The field strength of stationary transmitters, such as base stations for mobile phones and mobile
land (radio) telephones, amateur radio stations, AM and FM radio broadcasting and television
transmitters, can in theory not be exactly determined beforehand. An inspection of the location
should be considered to determine whether there are any stationary transmitters creating an electromagnetic environment. If the measured field strength at the location where Stimuplex® HNS 12
is operated exceeds the above-stated compliance level, Stimuplex® HNS 12 should be monitored
Page 56

56
to verify that it functions properly. If abnormal performance features are observed, additional measures may be required, such as changing the orientation of Stimuplex® HNS 12 or moving it to
another location.
b The field strength should be less than 3 V/m over a frequency range of 150 kHz to 80 MHz.
Table 4
Recommended separation distances between portable and mobile HF telecommunication devices and Stimuplex® HNS 12.
Stimuplex® HNS12 is intended for operation in an electromagnetic environment in which HF disturbances are controlled. The user of the Stimuplex® HNS 12 can help prevent electromagnetic malfunctions by maintaining a minimum distance between portable and mobile HF telecommunications
equipment (transmitters) and the Stimuplex® HNS 12, dependent on the output power of the communications equipment as listed below.
Rated power of the Separation distance as a function of modulation frequency (m)
transmitter (W) 80 MHz to 800 MHz 800 MHz to 2.5 GHz
d = 0.88 P d = 1.75 P
0.01 0.09 0.18
0.1 0.28 0.55
1 0.88 1.75
10 2.77 5.53
100 8.75 17.5
For transmitters whose maximal rated power is not listed in the table above, the recommended separation distance d in meters (m) can be calculated by applying the equation that belongs to each
column, where P is the maximum rated power of the transmitter in watts (W) as stated in the transmitter manufacturer’s information.
Remark 1: The higher frequency range applies at 80 MHz.
Remark 2: These regulations may not apply in all cases. The distribution of electromagnetic fields
is affected by absorptions and reflections of buildings, objects and persons.
Page 57

10. Specific requirements for the US market
To U.S.A/Canada Customers:
The user manual packaged with the nerve stimulator includes all the procedures and requirements for
operation the Stimuplex® HNS 12 Nerve Stimulator. Please heed all warnings and recommendations
presented in the manual. For our US and Canada customers only, the following revisions and/or additions should be used in place or in conjunction with the information provided within the manual.
Thank you.
B. Braun Medical Inc.
10.1 Addition to Page 37 of the Manual – “5.6 Maintenance and safety checks”
Service and Technical Support:
If, during the initial warranty period, the Stimuplex® HNS 12 fails to respond to the operating or troubleshooting procedures listed in this manual and the cause cannot be determined, discontinue using
the unit and contact B. Braun Medical Customer Service for further instruction regarding Warranty
Service Support and Repair:
57
B. Braun Medical Inc.
824 Twelfth Avenue
Bethlehem, PA 18018-0027
Ph: 1-800-345-7744
Should it be necessary to return the unit for repair, Customer Service will provide at Returned Goods
Authorization (RGA) number and instruction for the return. Carefully package the unit (preferably in
the original case), mark it with the RGA number and ship according to Customer Service instruction.
B. Braun Medical cannot assume any responsibility for loss and damage to returned units while they
are in transit.
Please contact B. Braun Medical Clinical and Technical Support with product function complaints:
B. Braun Medical Inc.
Clinical and Technical Support
824 Twelfth Avenue
Bethlehem, PA 18018-0027
Ph: 1-800-854-6851
Fax: 1-610-758-9020
Page 58

58
You will be asked to provide the following information with each complaint:
1. Unit Serial Number
2. Verification of last battery replacement date
3. Verification of completion of unit Short Test
4. contact name, address, phone number and e-mail address
5. Account name and /or number
6. Any information which might aid in the investigation of the complaint
Also please note that no Inspection Sheet has been included with this unit as it does not contain any
pertinent information to our U.S.A. customers.
10.2 Change from Page 38 of the Manual – “5.9 Notices, warranty”
Stated in manual: “Only original accessories from B. Braun labeled with the CE sign should be used”.
Revision: Braun of America does not have or require the CE mark on its product packaging. However,
only stimulation needles and HNS 12 Accessories offered by B. Braun and labeled with B. Braun logos
should be utilized with this nerve stimulator.
10.3 Change from Page 38 of the Manual- “5.9 Notices, warranty”
The existing warranty statement should be replaced in whole with the following:
B. Braun Medical Inc., hereby warrants to the original Customer that each Stimuplex® HNS 12 shall
be free from defects in material and workmanship when used and maintained in accordance with the
Operation Manual. All warranties shall expire two years from the date of shipment from B. Braun.
B. Braun’s sole obligation, and Customer’s sole remedy, for a breach of the foregoing warranty shall
be, at B. Braun Medical’s option, either to repair or replace the defective Stimuplex® HNS 12 at no
charge.
Customer shall bear all risk of loss or damage to returned goods while in transit. In the event no
defect or breach of warranty is discovered by B. Braun upon receipt of the product, the product will
be returned to Customer at Customer’s expense and Customer will reimburse B. Braun for the transportation charges, labor and associated charges incurred in testing the allegedly defective product.
The defective product should be returned promptly to B. Braun Medical properly packaged, postage,
prepaid, with appropriate identification per the instructions of B. Braun Medical Customer Service. All
repairs or services, not covered under the warranty, will be billed at B. Braun’s then current rates.
Page 59

59
B. Braun’s warranty hereunder shall not apply if: (i) the Stimuplex® HNS 12 is not used in accordance
with the instruction in the Operation Manual; (ii) any repairs, alterations or other work has been performed by Customer or others on such item, other than work performed with B. Braun’s authorization and according to its approved procedures; (iii) the alleged defect is a result of abuse, misuse,
improper maintenance, accident or the negligence of any party other than B. Braun; or (iv) used with
any needles or devices not manufactured by B. Braun Medical or not intended for use with the
Stimuplex® HNS 12. The warranty set forth herein is conditioned upon proper storage, installation,
use and maintenance in accordance with applicable written recommendations of B. Braun.
Except as expressly provided herein, B. Braun makes no warranty of any kind, expressed or implied,
with respect to the Stimuplex® HNS 12, including; but not limited to, the implied warranties merchantability and fitness for a particular purpose. The sole and exclusive remedy for breach of any warranty is limited to the remedies provided in the above paragraphs.
B. Braun shall not be liable to customer for any indirect, incidental, special, consequential or punitive
damages (including any damage for lost profits) arising out of or in connection with furnishing of the
Stimuplex® HNS 12 or service hereunder, or the performance, use of, or inability to use the
Stimuplex® HNS 12, or otherwise, whether based on contract, warranty, tort, including without limitation, negligence or any other legal or equitable theory.
Page 60

60
10.4 Change from pages 40 and 41 of the User manual -
10.4 "Stimuplex® HNS12 and Accessories, Stimuplex® and Contiplex® needles"
Cross Reference Guide for USA Re-Order Numbers
Product description Needle Code no. Sales unit/ USA Reorder USA Units
Stimuplex® HNS 12 Nerve Stimulator 4892098B 1 4892098 1
- with electrode cable for Stimuplex® D,
Stimuplex® A and Contiplex® D needles
Special knob for sterile handling 4892283B 1 333578 1
Stimuplex® Pen for percutaneous L = 1.25 m 4892099B 1 4892099 1
nerve mapping
Remote Control for sterile one-hand L = 1.6 m 4892216B 1 333559 1
operation
Finger rings for remote control RC 4892224B 1 333551 1
Electrode cable for Stimuplex® D, 4892070B 1 333576 1
Stimuplex® A and Contiplex® D needles
Connection cable for Contiplex® A needles 4892925B 1 333545 1
Ø x length pcs. Number per Case
Stimuplex® D needles, 15° bevel
1
D 25/035; 25 G x 1
D 25/055; 25 G x 2
D 26/040; 23 G x 1
D 26/070; 23 G x 2
D 27/050; 22 G x 2“ 0.7 x 50 mm 4894146N 25 N/A N/A
D 27/080; 22 G x 3
D 27/120; 22 G x 4
/3“ 0.5 x 35 mm 4894103N 25 333670 25
1
/8“ 0.5 x 55 mm 4894111N 25 N/A N/A
1
/2“ 0.6 x 40 mm 4894120N 25 N/A N/A
3
/4“ 0.6 x 70 mm 4894138N 25 333672 25
1
/8“ 0.7 x 80 mm 4894154N 25 333674 25
3
/4“ 0.7 x 120 mm 4894162N 25 333676 25
D 29/150; 20 G x 6“ 0.9 x 150 mm 4894170N 25 N/A N/A
Stimuplex® D needles, 30° bevel
1
D 17/040; 22 G x 1
D 17/050; 22 G x 2“ 0.7 x 50 mm 4894197N 25 333689 25
D 17/080; 22 G x 3
/2“ 0.7 x 40 mm 4894189N 25 N/A N/A
1
/8“ 0.7 x 80 mm 4894200N 25 333684 25
Stimuplex® A needles, 30° bevel
A 25; 24 G x 1“ 0.55 x 25 mm 4894251 25 333694 25
A 25; 22 G x 1“ 0.70 x 25 mm 4894539 25 333691 25
A 22; 22 G x 13/8“ 0.70 x 35 mm 4894367 25 333693 25
A 50; 22 G x 2“ 0.70 x 50 mm 4894502 25 333690 25
A 50; 21 G x 2“ 0.80 x 50 mm 4894375 25 N/A N/A
A 100; 21 G x 4“ 0.80 x 100 mm 4894260 25 333686 25
A 150; 20 G x 6“ 0.90 x 150 mm 4894278 25 333680 25
Page 61

10.4 Change from pages 40 and 41 of the User manual -
10.4 "Stimuplex® HNS12 and Accessories, Stimuplex® and Contiplex® needles"
Cross Reference Guide for USA Re-Order Numbers
Product description Needle Code no. Sales unit/ USA Reorder USA Units
Ø x length pcs. Number per Case
61
Contiplex® D needles, 15° bevel
1
D 28/055/C; 18 G x 2
D 28/110/C; 18 G x 4
/8“ 1,3 x 55 mm 4894219N 25 N/A N/A
3
/8“ 1,3 x 110 mm 4894294N 25 N/A N/A
Contiplex® D needles, 30° bevel
1
D 18/055/C; 18 G x 2
/8“ 1,3 x 55 mm 4894227N 25 N/A N/A
Contiplex® D catheter set
- with polyamide catheter
- 0.41 x 0.71 x 400 mm
Needle D 20/033/C; 20 G; 15° bevel 1,1 x 33 mm 4892402N 10 331681 12
Needle D 20/055/C; 20 G; 15° bevel 1,1 x 55 mm 4892410N 10 331686 12
with polyamide catheter
-
-
0.45 x 0.85 x 400 mm
Needle D 28/055/C; 18 G; 15° bevel 1,3 x 55 mm 4894235N 10 331680 12
Needle D 18/055/C; 18 G; 30° bevel 1,3 x 55 mm 4894243N 10 331685 12
-
with polyamide catheter
-
0.45 x 0.85 x 1000 mm
Needle D 28/80/C; 18 G; 15° bevel 1,3 x 80 mm 4895819N 10 N/A N/A
Needle D 28/110/C; 18 G; 15° bevel 1,3 x 110 mm 4894391N 10 331687 12
Contiplex® A Kanülen, 30° bevel
3
A 45/C; 18 G x 1
A 55/C; 18 G x 2
/4“ 1,3 x 45 mm 4893611N 25 N/A N/A
1
/8“ 1,3 x 55 mm 4893643N 25 N/A N/A
Contiplex® A catheter set
with polyamide catheter
-
-
0.45 x 0.85 x 400 mm
Needle A 45/C; 18 G x 13/4“ 1,3 x 45 mm 4893603N 10 N/A N/A
Needle A 55/C; 18 G x 2
1
/8“ 1,3 x 55 mm 4893638N 10 331692 12
Contiplex® Tuohy set
with polyamide catheter
-
-
0.45 x 0.85 x 1000 mm and sideport
insulated Tuohy type CNB 150; 18 G 1,3 x 38 mm 331695 / 331695N 12 / 10 331695 12 / 10
insulated Tuohy type CNB 200; 18 G 1,3 x 52 mm 331691 / 331691N 12 / 10 331691 12 / 10
insulated Tuohy type CNB 400; 18 G 1,3 x 102 mm 331693 / 331693N 12 / 10 331693 12 / 10
insulated Tuohy type CNB 600; 18 G 1,3 x 152 mm 331694 / 331694N 12 / 10 331694 12 / 10
Page 62

Page 63

Page 64

W. 01.12.05/2 Nr. 6043570
B. Braun Melsungen AG
Carl-Braun-Straße 1
34212 Melsungen
Germany
Tel +49 (0) 56 61-71-0
www.bbraun.com
 Loading...