

Page 1
B. Braun Vet Care
Instructions for use/Technical description
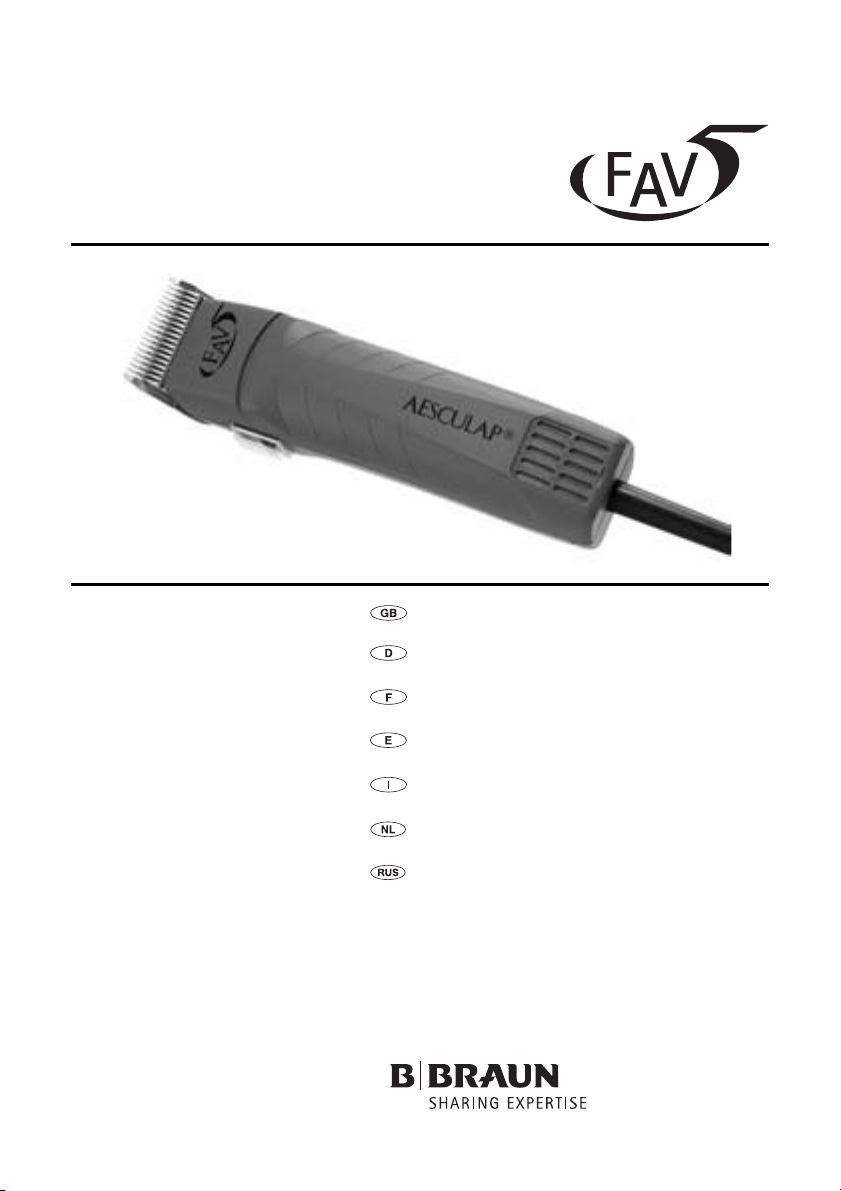
Clipper FAV5
Gebrauchsanweisung/Technische Beschreibung
Schermaschine FAV5
Mode d’emploi/Description technique
Tondeuse FAV5
Instrucciones de manejo/Descripción técnica
Esquiladora FAV5
Istruzioni per l’uso/Descrizione tecnica
Tosatrice FAV5
Gebruiksaanwijzing/Technische beschrijving
Scheermachine FAV5
Инструкция по примению/Техническое
описание
Машинка для стрижки FAV5
Page 2

1
2
3
4
6
5
4
7
7
Page 3
9
12
9
8
10
11
11
Page 4
B. Braun Vet Care
Clipper FAV5
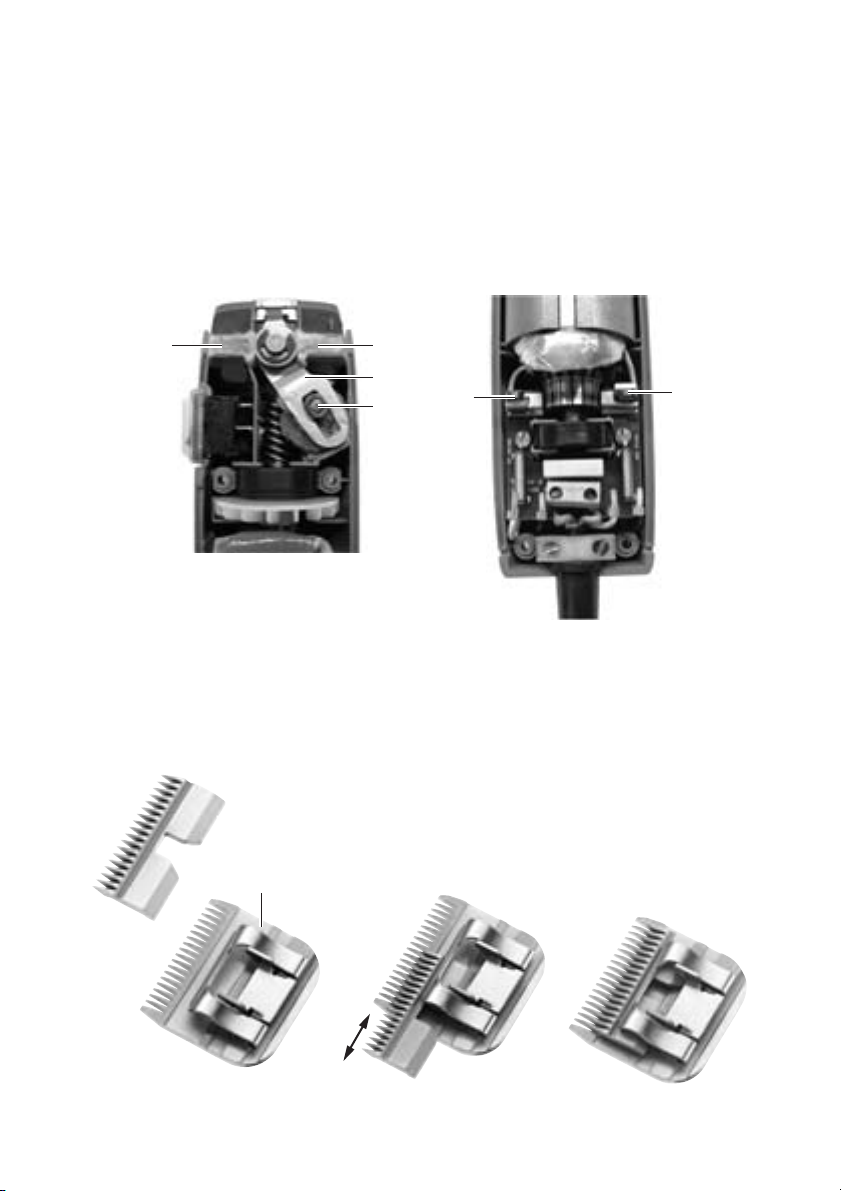
Legend
1 Hinge (complete)
2 Shearing head lock
3 ON/OFF switch
4 Screws (x4)
5 Type plate
6 Upper housing shell
7 Air filter
8 Rocker arm
9 Oil felts
10 Guide piece
11 Carbon brush
12 Shearing head
Symbols on product
Adhere to instructions for use
Labeling of electric and
electronic devices according to
directive 2002/96/EC (WEEE),
see Chapter Disposal
Contents
1. Safe handling ........................................................... 3
2. Product description ................................................ 3
2.1 System components ...............................................3
2.2 Components necessary for use ........................... 3
2.3 Intended use of Clipper FAV5 .............................. 3
2.4 Operating principle of Clipper FAV5 .................. 3
3. Preparation and setup ........................................... 4
4. Working with Clipper FAV5 ................................. 4
4.1 System set-up .......................................................... 4
4.1.1 Accessories................................................................ 4
4.1.2 Attaching the shearing head ............................... 5
4.2 Function checks for Clipper FAV5 ......................5
4.3 Treatment of the cutting set ............................... 6
4.3.1 Sharpening the cutting plate.............................. 6
4.3.2 Changing the shearing head................................ 6
4.3.3 Lubricating the shearing head............................ 6
5. Processing ................................................................. 7
5.1 Cleaning/Disinfecting ............................................ 7
5.2 Control, care and inspection ............................... 7
6. Maintenance ............................................................8
7. Troubleshooting list ...............................................9
8. Technical Service ..................................................10
9. Accessories/Spare parts ......................................10
9.1 Shearing heads ......................................................11
10. Technical specifications ......................................11
10.1 Clipper FAV5 ...........................................................11
10.2 Declaration of conformity ..................................11
11. Disposal ...................................................................12
11.1 For EU countries only ..........................................12
12. 2 Years warranty ................................................... 12
2
Page 5
1. Safe handling
2. Product description
Risk of death by electric shock!
¾ Do not open the product.
DANGER
¾ Prior to use, check for proper condition and
functioning of the product.
¾ Observe our “Notes on Electromagnetic
Compatibility (EMC)“.
¾ To prevent damage caused by improper setup or
operation, and in order not to compromise
warranty and manufacturer liability:
– Use the product only according to these
instructions for use.
– Observe all safety information and maintenance
advisories.
– Ensure the manufacturer’s approval before using
accessories that are not mentioned in the
instructions for use.
¾ Ensure that the product and its accessories are
operated and used only by persons with the
requisite training, knowledge or experience.
¾ Keep the instructions for use accessible for the
user.
¾ Always adhere to applicable standards.
¾ Ensure that the electrical facilities in the room in
which the device is being used conform to IEC
norms.
¾ Unplug the device by pulling the plug, but never by
pulling the power cord.
¾ Do not operate the product in explosion-hazard
areas.
¾ Do not use the product if it is damaged or
defective. Set aside the product if it is damaged.
¾ Only ever connect the product
to power mains with equipment
grounding conductor.
2.1 System components
Designation Art. no.
Clipper FAV5 GT105G
GT105J
GT105K
GT330 #10 (USA+UK)
Instructions for use TA012748
Note
The shearing head GT330 #10 (USA+UK) for Clipper
FAV5 is included in the scope of delivery. Various
shearing heads (SNAP ON type) can be used for
different applications!
2.2 Components necessary for use
• Clipper FAV5
• Shearing head
2.3 Intended use of Clipper FAV5
Note
This machine is intended exclusively for cutting animal
hair!
The Clipper FAV5 is used for clipping small animals.
The Clipper FAV5 is used with a shearing head to be
selected according to the respective application.
2.4 Operating principle of Clipper FAV5
The Clipper FAV5 is switched on (off) by pushing the
ON/OFF switch up (down).
3
Page 6

B. Braun Vet Care
Clipper FAV5
3. Preparation and setup
Non-compliance with these rules will result in
complete exclusion of liability on the part of Aesculap.
¾ When setting up and operating the product, always
observe:
– national regulations for installation and
operation,
– the national regulations on fire and explosion
protection,
– operating advisories according to IEC-/VDE
regulations.
¾ Prior to connecting the Clipper to mains power,
ensure that the voltage specified on type plate 5
matches the mains voltage.
Fire and explosion hazard!
¾ Do not operate the product in
explosion-hazard areas.
DANGER
Malfunction of, or damage to the
product caused by improper setup!
¾ Do not expose the product to
CAUTION
direct sunlight or moisture.
¾ Do not cover the ventilation
slots of the product.
¾ Ensure that the mains power
socket used for supplying the
product is freely accessible.
4. Working with Clipper FAV5
4.1 System set-up
4.1.1 Accessories
Combinations of accessories that are not mentioned in
the present instructions for use may only be employed
if they are specifically intended for the respective
application, and if they do not compromise the
performance and safety characteristics of the
products.
¾ Please contact your B. Braun/Aesculap Partner or
Aesculap Technical Service (address: see Chapter
Technical Service) with any inquiries in this
respect.
4
Page 7
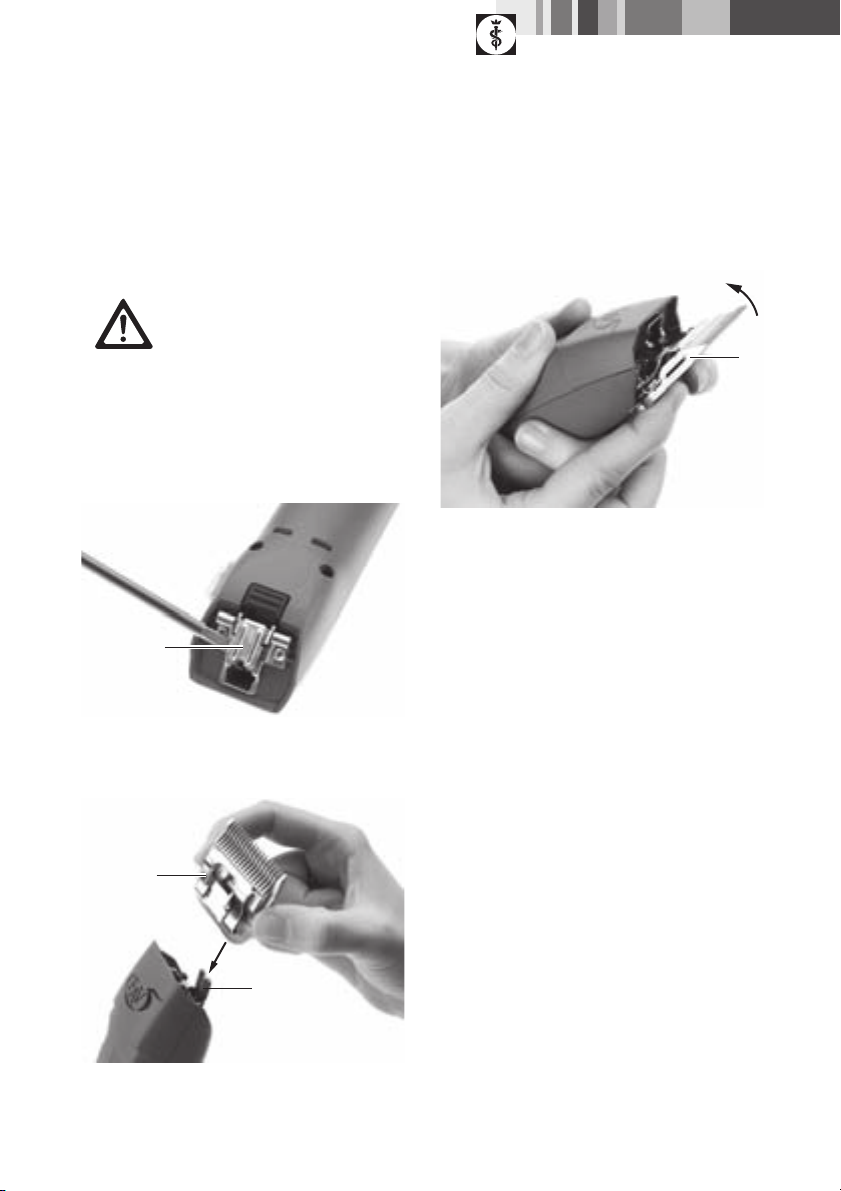
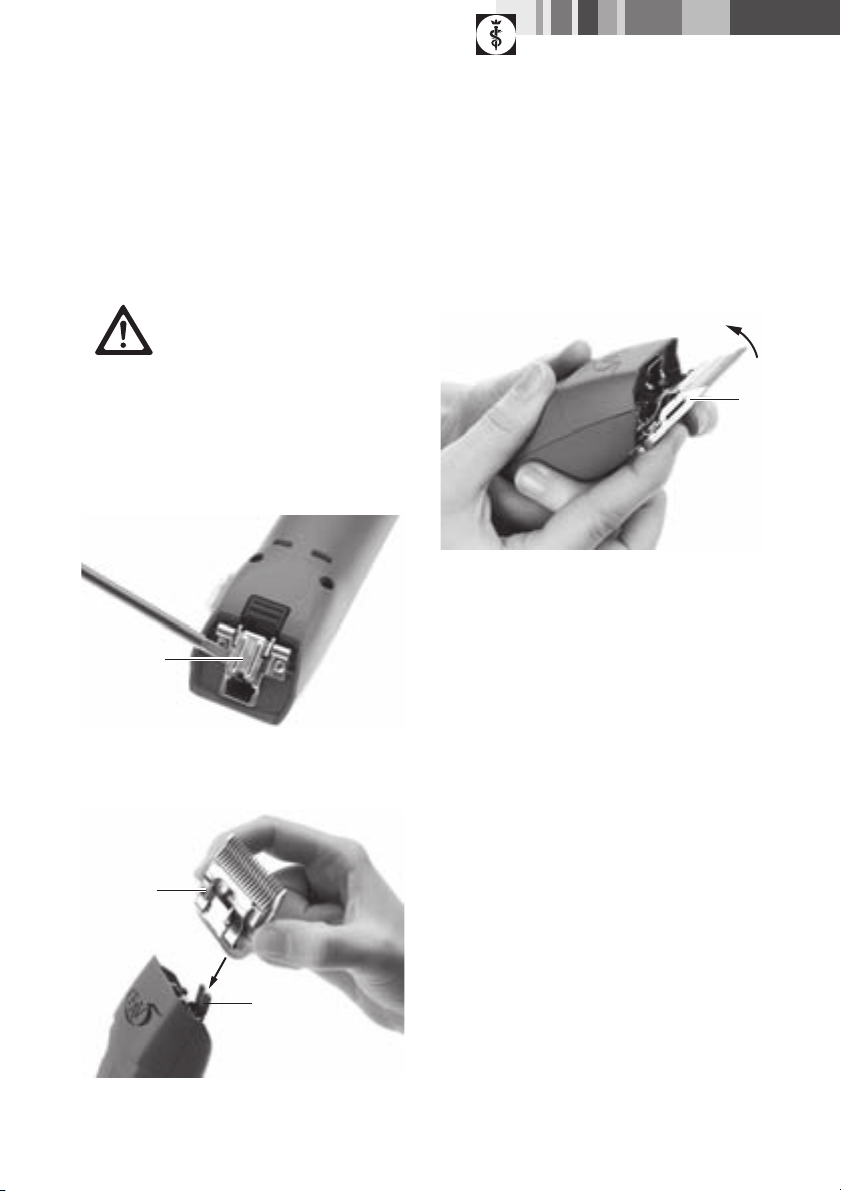
4.1.2 Attaching the shearing head
Risk of injury caused by sharp cutting plates!
¾ Handle the shearing head of
WARNING
Note
The shearing head GT330 #10 (USA+UK) for Clipper
FAV5 is included in the scope of delivery. Various shearing heads are available for different applications!
Clipper FAV5 with appropriate
caution.
1
Fig. 1
¾ If the hinge is closed: Open hinge 1 with a
screwdriver, see Fig. 1.
¾ Press ON/OFF switch 3.
12
Fig. 3
¾ Slightly push shearing head 12 towards Clipper
FAV5, see Fig. 3.
Shearing head 12 will click into position.
¾ Check that shearing head 12 is correctly seated on
Clipper FAV5.
4.2 Function checks for Clipper FAV5
¾ Carry out a visual inspection.
¾ Check the switch position.
¾ Install the cutting set correctly and lubricate it if
necessary, see Chapter Treatment of the cutting
set.
¾ Clean the Clipper FAV5 prior to use, see Chapter
Cleaning/Disinfecting.
12
1
Fig. 2
¾ Install shearing head 12 on open hinge 1, see Fig. 2.
5
Page 8

B. Braun Vet Care
Clipper FAV5
4.3 Treatment of the cutting set
4.3.1 Sharpening the cutting plate
Note
For sharpening the cutting plate, please contact
Technical Service, see Chapter Technical Service.
4.3.2 Changing the shearing head
Risk of injury caused by sharp
cutting plates!
¾ Handle the shearing head of
WARNING
Clipper FAV5 with appropriate
caution.
2
3
12
3
Fig. 5
¾ Press forward shearing head 12, see Fig. 5.
¾ Detach shearing head 12.
¾ Clean open hinge 1 with a brush.
¾ Install shearing head 12 on hinge 1.
¾ Plug in the power cord of Clipper FAV5.
¾ Press ON/OFF switch 3.
¾ Slightly push shearing head 12 towards Clipper
FAV5.
Shearing head 12 will click into position.
¾ Check that shearing head 12 is correctly seated on
Clipper FAV5.
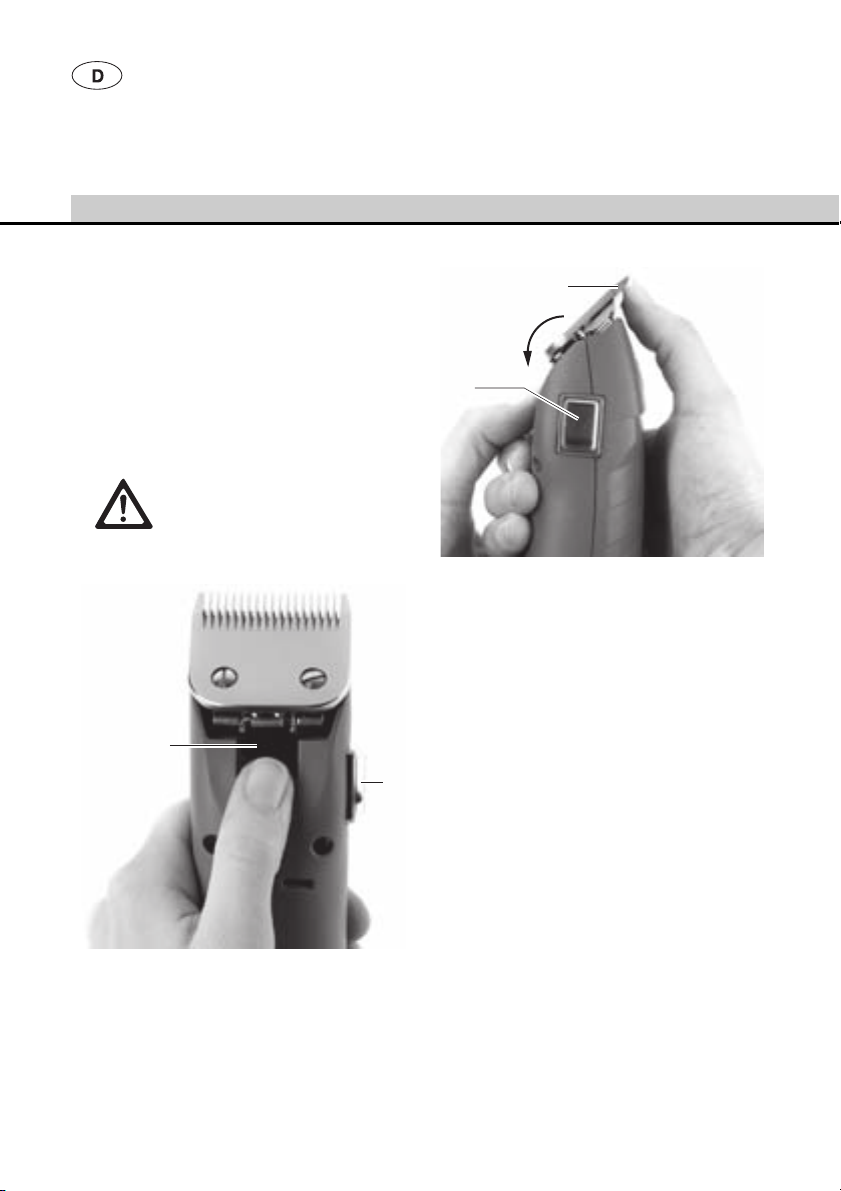
Fig. 4
¾ Press ON/OFF switch 3 to switch off Clipper FAV5,
see Fig. 4.
¾ Press shearing head lock 2, see Fig. 4.
6
4.3.3 Lubricating the shearing head
¾ Clean the upper and lower cutting plates with a
soft cloth or brush. Make certain that the gaps
between the cutting teeth are cleaned properly.
¾ Slightly lubricate the upper and lower cutting plates
with special lubricant for shearing heads GT604.
Page 9
5. Processing
Damage to, or destruction of the
product caused by mechanical
cleaning/disinfecting or steriliza-
CAUTION
tion!
¾ Only clean and disinfect the
product manually.
¾ Do not sterilize the product
under any circumstances.
¾ Wipe the shell of the product with a lint-free cloth
moistened with a commercial disinfectant for wipe
disinfection.
¾ If necessary, after the appropriate exposure time,
wipe off any residue of the cleaning/disinfecting
agent with a lint-free cloth moistened with clean
water.
¾ Dry the product with a clean, lint-free cloth.
¾ If necessary, repeat the cleaning/disinfecting
process.
Cleaning the air filter
5.1 Cleaning/Disinfecting
Note
Always follow disposal and hygiene instructions and
regulations!
Manual cleaning/disinfecting
Risk of electric shock and fire
hazard!
¾ Unplug the unit before cleaning.
DANGER
CAUTION
¾ Make certain that no fluids will
penetrate the product.
¾ Leave the product exposed to
air for at least 1 minute after
cleaning/disinfecting.
Damage to the product due to
incorrect cleaning or inappropriate
cleaning/disinfecting agents!
¾ Use any commercial detergent
for surface cleaning.
¾ Never immerse the product in
water or detergent.
¾ Do not introduce any fluid into
the charging bays.
¾ Clean the contacts in the charg-
ing bays, applying extreme care.
Note
The air filter must be cleaned once a week or whenever
necessary!
¾ Slide back and remove air filter 7.
¾ Blow through or wash air filter 7.
¾ Slide dry air filter 7 into its seating.
5.2 Control, care and inspection
¾ Allow the product to cool down to room
temperature.
¾ Inspect the product after each cleaning and
disinfecting cycle to be sure it is clean, functional
and undamaged.
¾ Lubricate the shearing head as appropriate, see
Chapter Lubricating the shearing head.
¾ Check the product for any damage, a typical
running noise, overheating or excessive vibration.
¾ Inspect the cutting set for broken, damaged or
blunt cutting edges.
¾ Set aside the product if it is damaged.
7
Page 10

B. Braun Vet Care
Clipper FAV5
6. Maintenance
To ensure reliable operation, Aesculap recommends
servicing the product at least once a year.
For services to that end, please contact your national
B. Braun/Aesculap agency, see Chapter Technical
Service.
Service addresses
In the UK
KG PRODUCTS
243-251 City Road, Fenton
Stoke-on-Trent, Staffs
ST4 2PX
United Kingdom,
Phone (44) - 01782 844 866
DIAMOND EDGE
126 Gloucester Rd.
Brighton, BN1 4BU.
United Kingdom
Phone (44) - 01273 605 922
Or in Germany
Aesculap Suhl GmbH
Fröhliche-Mann-Straße 15
98528 Suhl / Germany
Phone: +49 (0) 3681 49820
Fax: +49 (0) 3681 498234
E-Mail: suhl@aesculap.de
Other service addresses can be obtained from the
address indicated above.
8
Page 11
7. Troubleshooting list
Malfunction Finding Cause Remedy
Shearing head not moving
Clipper FAV5 cutting
poorly or not at all
Motor of Clipper FAV5
not running
Motor of Clipper FAV5
running very slowly
Shearing head jammed Shearing head not prop-
Clipper FAV5 not cutting Cutting edges of shearing
Cutting performance
insufficient
Overheating of shearing
head
Shearing head jammed Animal hair jammed in
Clipper FAV5 not cutting Debris on electric con-
Smell of burning from
the machine housing
Shearing head jammed Debris in shearing head Clean and lubricate the
Atypical motor noises Lack of lubrication of
erly engaged in its seating
Rocker arm defective Replace rocker arm
head blunted
Animal hair too wet Only cut dry animal hair
Shearing head lacking
shearing pressure
Cutting edges of cutting
head not honed correctly
Lack of lubrication of
shearing head edges
shearing head
tacts
Motor/Electronics defective
Motor burnt Have product repaired by
shearing head edges
Properly engage the shearing head, see Chapter
Attaching the shearing
head
Have product repaired by
the manufacturer
Have product repaired by
the manufacturer
Have product repaired by
the manufacturer
Lubricate cutting edges of
shearing head, see Chapter
Lubricating the shearing
head
Demount shearing head and
remove animal hair
Switch off Clipper FAV5 and
clean the contacts
Have product repaired by
the manufacturer
the manufacturer
shearing head, see Chapter
Lubricating the shearing
head
Lubricate cutting edges of
shearing head, see Chapter
Lubricating the shearing
head
9
Page 12
B. Braun Vet Care
Clipper FAV5
8. Technical Service
For service, maintenance or repairs, please contact
your national B. Braun/Aesculap agency.
Modifications carried out on medical technical
equipment may result in loss of guarantee/warranty
rights and forfeiture of applicable licenses.
Service addresses
In the UK
KG PRODUCTS
243-251 City Road, Fenton
Stoke-on-Trent, Staffs
ST4 2PX
United Kingdom,
Phone (44) - 01782 844 866
DIAMOND EDGE
126 Gloucester Rd.
Brighton, BN1 4BU.
United Kingdom
Phone (44) - 01273 605 922
Or in Germany
Aesculap Suhl GmbH
Fröhliche-Mann-Straße 15
98528 Suhl / Germany
Phone: +49 (0) 3681 49820
Fax: +49 (0) 3681 498234
E-Mail: suhl@aesculap.de
Other service addresses can be obtained from the
address indicated above.
9. Accessories/Spare parts
Art. no. Designation
GT604 Lubricant
GT605 Grease
GT104614 Carbon brushes
GT104803 Air filter
GT105808 Rocker arm
GT105415 Hinge (complete)
10
Page 13
9.1 Shearing heads
10. Technical specifications
Shearing head (complete) Size EU
GT305 0,2 mm
GT310 0,25 mm
GT315 0,5 mm
GT317 0,5 mm
GT320 0,8 mm
GT323 0,8 mm
GT326 1,2 mm
GT330 1,5 mm
GT333 2,0 mm
GT336 2,4 mm
GT339 2,4 mm
GT341 2,8 mm
GT343 3,2 mm
GT345 3,2 mm
GT349 3,2 mm
GT353 2,4 mm
GT357 6,3 mm
GT360 6,3 mm
GT366 9,5 mm
Note
Detailed descriptions of the shearing heads can be
found in brochure V06902.
10.1 Clipper FAV5
Model GT105
Stroke rate 2 300 1/min
Protection class
(acc. to IEC 60601-1)
Weight
(without shearing head)
II
approx. 800 g
10.2 Declaration of conformity
We declare under our sole
responsibility that this product
conforms to the following standards or
other normative documents:
2006/95/EC EC Low Voltage Directive
EN 60335-1
EN 60335-2-8 Safety of household
and similar electrical appliances
Aesculap Suhl GmbH
11
Page 14

B. Braun Vet Care
Clipper FAV5
11. Disposal
Power tools, accessories and packaging should be
recycled through environmentally compatible
processes.
11.1 For EU countries only
Do not dispose of power tools with
household waste!
According to European Directive
2002/96/EG on waste electric and
electronic devices, and its
implementation in national
legislation, power tools that have
reached the end of their service life
must be collected separately and
recycled through environmentfriendly processes.
12. 2 Years warranty
Dear customer,
Thank you for choosing one of our products. The
Aesculap brand has been trusted for quality and firstclass service for many years. Aesculap Suhl GmbH is
certified according to DIN EN ISO 9001. We are known
to provide innovative, high-performance products for
our customers.
Aesculap produces top-quality devices and promises to
use only high-grade materials and meticulous
manufacturing. As the manufacturer, we undertake
warranty covering any quality defects of the product
for a period of 2 years from the date of purchase
(invoice date).
In addition to your contractual and statutory warranty
rights, Aesculap offers manufacturer’s warranty on the
following terms:
The present manufacturer’s warranty will be valid for
2 years from the date of purchase. It applies to faults
or defects caused by deficiencies of materials or
manufacturing of the product.
The following instances are excluded from our
manufacturer’s warranty:
Faults caused by improper use, normal wear,
inappropriate intervention in the product by
unauthorized persons, or assembling of the product
using third-party products that do not fit or function
properly. Also excluded are defects that do not, or not
significantly affect the value or usability of the
product.
Should a fault or defect covered by the manufacturer’s
warranty arise within the warranty period of 2 years,
starting from the purchase date, we will either repair
or replace, according to our discretion, the faulty or
defective product.
Our manufacturer’s warranty is subject to receipt of
the product and proof of purchase (invoice) by the
respective Aesculap national distribution agency or
service center.
12
Page 15

For addresses of our service centers, see Chapter
Technical Service.
Naturally, independent of our manufacturer’s
warranty, you can still claim warranty rights against
the vender, e.g. cure (amendment, repair or
replacement), cancellation or price reduction, as far as
such claims are within your statutory or contractual
rights. These rights are not affected by our additional
manufacturer’s warranty.
13
Page 16

B. Braun Vet Care
Schermaschine FAV5
Legende
1 Messerscharnier (komplett)
2 Scherkopf-Verriegelung
3 Ein-/Aus-Schalter
4 Schrauben (4 Stück)
5 Typenschild
6 Gehäuseoberschale
7 Luftfilter
8 Schwinghebel
9 Ölfilze
10 Gleitstein
11 Kohle
12 Scherkopf
Symbole am Produkt
Gebrauchsanweisung einhalten
Kennzeichnung von Elektround Elektronikgeräten entsprechend Richtlinie 2002/96/EG
(WEEE), siehe Kapitel Entsorgung
Inhaltsverzeichnis
1. Sichere Handhabung ............................................15
2. Gerätebeschreibung .............................................15
2.1 Lieferumfang ..........................................................15
2.2 Zum Betrieb erforderliche Komponenten ......15
2.3 Verwendungszweck Schermaschine FAV5 .....15
2.4 Funktionsweise Schermaschine FAV5 .............15
3. Vorbereiten und Aufstellen ................................ 16
4. Arbeiten mit der Schermaschine FAV5 ...........16
4.1 Bereitstellen ........................................................... 16
4.1.1 Zubehör.................................................................... 16
4.1.2 Scherkopf aufstecken........................................... 17
4.2 Funktionsprüfung Schermaschine FAV5 ......... 17
4.3 Handhabung Schneidsatz ...................................18
4.3.1 Schneidplatte schleifen....................................... 18
4.3.2 Scherkopf austauschen....................................... 18
4.3.3 Scherkopf ölen....................................................... 18
5. Aufbereitung ..........................................................19
5.1 Reinigung/Desinfektion .......................................19
5.2 Kontrolle, Pflege und Prüfung ...........................19
6. Wartung ..................................................................20
7. Fehler erkennen und beheben ...........................21
8. Technischer Service ..............................................22
9. Zubehör/Ersatzteile ..............................................22
9.1 Scherköpfe ..............................................................23
10. Technische Daten ..................................................23
10.1 Schermaschine FAV5 ...........................................23
10.2 Konformitätserklärung ........................................23
11. Entsorgung ..............................................................24
11.1 Nur für EU-Länder ................................................ 24
12. 2 Jahre Gewährleistung ......................................24
14
Page 17

1. Sichere Handhabung
2. Gerätebeschreibung
Lebensgefahr durch elektrischen
Stromschlag!
¾ Produkt nicht öffnen.
GEFAHR
¾ Vor der Anwendung des Produkts Funktionsfähig-
keit und ordnungsgemäßen Zustand prüfen.
¾ „Hinweise zur elektromagnetischen Verträglichkeit
(EMV)“ beachten.
¾ Um Schäden durch unsachgemäßen Aufbau oder
Betrieb zu vermeiden und die Gewährleistung und
Haftung nicht zu gefährden:
– Produkt nur gemäß dieser Gebrauchsanweisung
verwenden.
– Sicherheitsinformationen und Instandhaltungs-
hinweise einhalten.
– Zubehör, das nicht in der Gebrauchsanweisung
erwähnt wird, nur mit Zustimmung des Herstellers
verwenden.
¾ Produkt und Zubehör nur von Personen betreiben
und anwenden lassen, die die erforderliche Ausbildung, Kenntnis oder Erfahrung haben.
¾ Gebrauchsanweisung für den Anwender zugäng-
lich aufbewahren.
¾ Gültige Normen einhalten.
¾ Sicherstellen, dass die elektrische Installation des
Raums den IEC-Anforderungen entspricht.
¾ Netzverbindungen durch Ziehen am Gerätestecker
lösen, nie durch Ziehen am Kabel.
¾ Produkt nicht in explosionsgefährdeten Bereichen
einsetzen.
¾ Kein beschädigtes oder defektes Produkt verwen-
den. Beschädigtes Produkt sofort aussortieren.
¾ Produkt nur an ein Versorgungs-
netz mit Schutzleiter anschließen.
2.1 Lieferumfang
Bezeichnung Art.-Nr.
Schermaschine FAV5 GT105G
GT105J
GT105K
GT330 #10 (USA+GB)
Gebrauchsanweisung TA012748
Hinweis
Der Scherkopf GT330 #10 (USA+GB) der Scherma-
schine FAV5 ist im Lieferumfang enthalten. Je nach
Anwendung können verschiedene Scherköpfe (Typ
SNAP ON) eingesetzt werden!
2.2 Zum Betrieb erforderliche Komponenten
• Schermaschine FAV5
• Scherkopf
2.3 Verwendungszweck Schermaschine
FAV5
Hinweis
Die Maschine ist nur zum Schneiden von Tierhaaren
vorgesehen!
Die Schermaschine FAV5 wird zum Scheren von Kleintieren verwendet.
Die Schermaschine FAV5 muss je nach Anwendung mit
einem Scherkopf eingesetzt werden.
2.4 Funktionsweise Schermaschine
FAV5
Die Schermaschine FAV5 wird mit dem Ein-/AusSchalter nach oben eingeschaltet und nach unten ausgeschaltet.
15
Page 18
B. Braun Vet Care
Schermaschine FAV5
3. Vorbereiten und Aufstellen
Wenn die folgenden Vorschriften nicht beachtet werden, übernimmt Aesculap insoweit keinerlei Verantwortung.
¾ Beim Aufstellen und Betrieb des Produkts einhal-
ten:
– die nationalen Installations- und Betreiber-Vor-
schriften,
– die nationalen Vorschriften über Brand- und
Explosionsschutz,
– Anwendungshinweise gemäß IEC-/VDE-Bestim-
mungen.
¾ Vor dem Anschluss der Schermaschine an das
Stromnetz sicherstellen, dass die Spannung, die auf
dem Typenschild 5 angegeben ist, mit der Netzspannung übereinstimmt.
Brand- und Explosionsgefahr!
¾ Produkt nicht in explosionsge-
fährdeten Bereichen einsetzen.
GEFAHR
Beeinträchtigung der Funktion oder
Beschädigung des Produkts durch
unsachgemäße Aufstellung!
VORSICHT
¾ Produkt keiner direkten Son-
neneinstrahlung oder Nässe
aussetzen.
¾ Lüftungsschlitze des Produkts
nicht abdecken.
¾ Sicherstellen, dass die Netz-
steckdose des Versorgungsnetzes, die zur Spannungsversorgung des Produkts genutzt wird,
frei zugänglich ist.
4. Arbeiten mit der Schermaschine FAV5
4.1 Bereitstellen
4.1.1 Zubehör
Zubehörkombinationen, die nicht in der Gebrauchsanweisung erwähnt sind, dürfen nur verwendet werden,
wenn sie ausdrücklich für die vorgesehene Anwendung
bestimmt sind. Leistungsmerkmale sowie Sicherheitsanforderungen dürfen nicht nachteilig beeinflusst
werden.
¾ Bei Fragen wenden Sie sich an Ihren B. Braun/
Aesculap-Partner oder den Aesculap Technischen
Service, Adresse siehe Kapitel Technischer Service.
16
Page 19
4.1.2 Scherkopf aufstecken
Verletzungsgefahr durch scharfe
Schneidplatten!
¾ Scherkopf der Schermaschine
WARNUNG
Hinweis
Der Scherkopf GT330 #10 (USA+GB) der Scherma-
schine FAV5 ist im Lieferumfang enthalten. Je nach
Anwendung können verschiedene Scherköpfe eingesetzt werden!
FAV5 vorsichtig behandeln.
1
Abb. 1
¾ Bei geschlossenem Messerscharnier: Messerschar-
nier 1 mit Schraubendreher aufklappen, siehe Abb. 1.
12
¾ Scherkopf 12 auf geöffnetes Messerscharnier 1
stecken, siehe Abb. 2.
¾ Ein-/Aus-Schalter 3 drücken.
12
Abb. 3
¾ Scherkopf 12 leicht in Richtung Schermaschine
FAV5 drücken, siehe Abb. 3.
Der Scherkopf 12 rastet hörbar ein.
¾ Sicherstellen, dass der Scherkopf 12 korrekt auf der
Schermaschine FAV5 sitzt.
4.2 Funktionsprüfung Schermaschine
FAV5
¾ Sichtprüfung durchführen.
¾ Schalterstellung prüfen.
¾ Schneidsatz korrekt aufstecken und ggf. ölen, siehe
Kapitel Handhabung Schneidsatz.
¾ Schermaschine FAV5 vor Gebrauch reinigen, siehe
Kapitel Reinigung/Desinfektion.
Abb. 2
1
17
Page 20
B. Braun Vet Care
Schermaschine FAV5
4.3 Handhabung Schneidsatz
4.3.1 Schneidplatte schleifen
Hinweis
Zum Schleifen der Schneidplatte an den Technischen
Service wenden, siehe Kapitel Technischer Service.
4.3.2 Scherkopf austauschen
Verletzungsgefahr durch scharfe
Schneidplatten!
¾ Scherkopf der Schermaschine
WARNUNG
FAV5 vorsichtig behandeln.
2
3
12
3
Abb. 5
¾ Scherkopf 12 nach vorne aufklappen, siehe Abb. 5.
¾ Scherkopf 12 abnehmen.
¾ Aufgeklapptes Messerscharnier 1 mit Pinsel reini-
gen.
¾ Scherkopf 12 auf Messerscharnier 1 stecken.
¾ Netzanschlussleitung der Schermaschine FAV5
einstecken.
¾ Ein-/Aus-Schalter 3 drücken.
¾ Scherkopf 12 leicht in Richtung Schermaschine
FAV5 drücken.
Der Scherkopf 12 rastet hörbar ein.
¾ Sicherstellen, dass der Scherkopf 12 korrekt auf der
Schermaschine FAV5 sitzt.
Abb. 4
¾ Ein-/Aus-Schalter 3 drücken, um Schermaschine
FAV5 auszuschalten, siehe Abb. 4.
¾ Scherkopf-Verriegelung 2 drücken, siehe Abb. 4.
18
4.3.3 Scherkopf ölen
¾ Mit weichem Lappen oder Pinsel obere und untere
Schneidplatte reinigen. Dabei sicherstellen, dass
die Lücken zwischen den Zähnen sauber sind.
¾ Obere und untere Schneidplatte leicht mit Spezialöl
für Schneidköpfe GT604 einölen.
Page 21
5. Aufbereitung
Beschädigung oder Zerstörung des
Produkts durch maschinelle Reinigung/Desinfektion oder Sterilisa-
VORSICHT
5.1 Reinigung/Desinfektion
Hinweis
Entsorgungs- und Hygienevorschriften einhalten!
Manuelle Reinigung/Desinfektion
GEFAHR
VORSICHT
tion!
¾ Produkt nur manuell reinigen/
desinfizieren.
¾ Produkt niemals sterilisieren.
Stromschlag- und Brandgefahr!
¾ Vor der Reinigung Netzstecker
ziehen.
¾ Sicherstellen, dass keine Flüs-
sigkeit in das Produkt eindringt.
¾ Nach der Reinigung/Desinfek-
tion mindestens 1 Minute
ablüften lassen.
Schäden am Produkt durch falsche
Reinigung oder falsches Reinigungs-/Desinfektionsmittel!
¾ Für die Flächenreinigung han-
delsübliches Mittel verwenden.
¾ Produkt nie in Wasser oder Rei-
nigungsmittel legen.
¾ Keine Flüssigkeit in die Lade-
schächte einbringen.
¾ Kontakte in den Ladeschächten
mit größter Sorgfalt reinigen.
¾ Gehäuse des Produkts mit einem flusenfreien Tuch,
das mit einem handelsüblichen Mittel zur Wischdesinfektion befeuchtet ist, abwischen.
¾ Bei Bedarf Rückstände des Reinigungs- und Desin-
fektionsmittels nach dessen Einwirkzeit mit einem
in sauberem Wasser angefeuchteten, flusenfreien
Tuch abwischen.
¾ Zum Trocknen sauberes, flusenfreies Tuch verwen-
den.
¾ Falls nötig, Reinigung/Desinfektion wiederholen.
Luftfilter reinigen
Hinweis
Der Luftfilter muss entweder wöchentlich oder nach
Bedarf gereinigt werden!
¾ Luftfilter 7 nach hinten schieben und abnehmen.
¾ Luftfilter 7 ausblasen/auswaschen.
¾ Trockenen Luftfilter 7 aufschieben.
5.2 Kontrolle, Pflege und Prüfung
¾ Produkt auf Raumtemperatur abkühlen lassen.
¾ Produkt nach jeder Reinigung und Desinfektion
prüfen auf: Sauberkeit, Funktion und Beschädigung.
¾ Scherkopf bei Bedarf ölen, siehe Kapitel Scherkopf
ölen.
¾ Produkt auf Beschädigungen, unregelmäßige Lauf-
geräusche, übermäßige Erwärmung oder zu starke
Vibration prüfen.
¾ Schneidsatz auf abgebrochene, beschädigte und
stumpfe Schneiden kontrollieren.
¾ Beschädigtes Produkt sofort aussortieren.
19
Page 22

B. Braun Vet Care
Schermaschine FAV5
6. Wartung
Um einen zuverlässigen Betrieb zu gewährleisten,
empfiehlt Aesculap eine Wartung im Jahr.
Für entsprechende Serviceleistungen wenden Sie sich
an Ihre nationale B. Braun/Aesculap-Vertretung, siehe
Kapitel Technischer Service.
Service-Adressen
Aesculap Suhl GmbH
Fröhliche-Mann-Straße 15
98528 Suhl / Germany
Phone: +49 (0) 3681 49820
Fax: +49 (0) 3681 498234
E-Mail: suhl@aesculap.de
Weitere Service-Adressen erfahren Sie über die oben
genannte Adresse.
20
Page 23

7. Fehler erkennen und beheben
Störung Erkennung Ursache Behebung
Scherkopf bewegt sich
nicht
Schermaschine FAV5
schneidet schlecht oder
gar nicht
Motor der Schermaschine FAV5 läuft nicht
Motor der Schermaschine FAV5 läuft sehr
langsam
Scherkopf ist blockiert Scherkopf ist nicht kor-
Schermaschine FAV5
schneidet nicht
Schneidleistung ist unzureichend
Starke Erwärmung des
Schneidkopfs
Scherkopf ist blockiert Tierhaare sind im Scher-
Schermaschine FAV5
schneidet nicht
Brandgeruch aus dem
Gehäuse
Scherkopf ist blockiert Scherkopf ist verschmutzt Scherkopf reinigen und
Ungewöhnliche Motorengeräusche
rekt eingerastet
Schwinghebel defekt Schwinghebel ersetzen
Schneiden des Scherkopfs
sind stumpf
Tierhaare sind zu nass Nur trockene Tierhaare
Scherkopf hat zu wenig
Scherdruck
Schneiden des Scherkopfs
sind nicht korrekt
geschliffen
Schneiden des Scherkopfs
sind nicht geölt
kopf eingeklemmt
Kontakte sind verschmutzt
Motor/Elektronik defekt Vom Hersteller instand set-
Motor ist verbrannt Vom Hersteller instand set-
Schneiden des Scherkopfs
sind nicht geölt
Scherkopf korrekt einrasten,
siehe Kapitel Scherkopf
aufstecken
Vom Hersteller instand setzen lassen
scheren
Vom Hersteller instand setzen lassen
Vom Hersteller instand setzen lassen
Schneiden des Scherkopfs
ölen, siehe Kapitel Scherkopf ölen
Scherkopf demontieren und
Tierhaare entfernen
Schermaschine FAV5 ausschalten und Kontakte reinigen
zen lassen
zen lassen
ölen, siehe Kapitel Scherkopf ölen
Schneiden des Scherkopfs
ölen, siehe Kapitel Scherkopf ölen
21
Page 24
B. Braun Vet Care
Schermaschine FAV5
8. Technischer Service
Für Service, Wartung und Reparatur wenden Sie sich
an Ihre nationale B. Braun/Aesculap-Vertretung.
Modifikationen an medizintechnischer Ausrüstung
können zu einem Verlust der Garantie-/Gewährleistungsansprüche sowie eventueller Zulassungen führen.
Service-Adressen
Aesculap Suhl GmbH
Fröhliche-Mann-Straße 15
98528 Suhl / Germany
Phone: +49 (0) 3681 49820
Fax: +49 (0) 3681 498234
E-Mail: suhl@aesculap.de
Weitere Service-Adressen erfahren Sie über die oben
genannte Adresse.
9. Zubehör/Ersatzteile
Art.-Nr. Bezeichnung
GT604 Öl
GT605 Fett
GT104614 Kohlen
GT104803 Luftfilter
GT105808 Schwinghebel
GT105415 Messerscharnier (komplett)
22
Page 25

9.1 Scherköpfe
10. Technische Daten
Scherkopf (komplett) Größe EU
GT305 0,2 mm
GT310 0,25 mm
GT315 0,5 mm
GT317 0,5 mm
GT320 0,8 mm
GT323 0,8 mm
GT326 1,2 mm
GT330 1,5 mm
GT333 2,0 mm
GT336 2,4 mm
GT339 2,4 mm
GT341 2,8 mm
GT343 3,2 mm
GT345 3,2 mm
GT349 3,2 mm
GT353 2,4 mm
GT357 6,3 mm
GT360 6,3 mm
GT366 9,5 mm
Hinweis
Weitere Details zu den Scherköpfen sind im Prospekt
V06902 beschrieben!
10.1 Schermaschine FAV5
Gerätetyp GT105
Hubzahl 2 300 1/min
Schutzklasse
(gemäß IEC 60601-1)
Gewicht
(ohne Scherkopf)
II
ca. 800 g
10.2 Konformitätserklärung
Wir erklären in alleiniger Verantwortung, dass dieses Produkt mit den folgenden Normen oder normativen
Dokumenten übereinstimmt:
2006/95/EG EG-Niederspannungsrichtlinie
EN 60335-1
EN 60335-2-8 Sicherheit elektrische
Geräte für den Hausgebrauch und
ähnliche Zwecke
Aesculap Suhl GmbH
23
Page 26

B. Braun Vet Care
Schermaschine FAV5
11. Entsorgung
Elektrowerkzeuge, Zubehör und Verpackung sollen
einer umweltgerechten Wiederverwertung zugeführt
werden.
11.1 Nur für EU-Länder
Werfen Sie Elektrowerkzeuge nicht in
den Hausmüll!
Gemäß der Europäischen Richtlinie
2002/96/EG über Elektro- und Elektronik-Altgeräte und ihrer Umsetzung
in nationales Recht müssen nicht
mehr gebrauchsfähige Elektrowerkzeuge getrennt gesammelt und einer
umweltgerechten Wiederverwertung
zugeführt werden.
12. 2 Jahre Gewährleistung
Sehr geehrte Kundin, sehr geehrter Kunde,
herzlichen Dank, dass Sie sich für ein Produkt aus
unserem Hause entschieden haben. Der Name
Aesculap steht seit Jahrzehnten für geprüfte Qualität
und erstklassigen Service. Die Aesculap Suhl GmbH ist
zertifiziert nach DIN EN ISO 9001. Unseren Kunden
bieten wir innovative und leistungsfähige Produkte.
Aesculap stellt hochwertige Geräte her und sichert
Ihnen die Verwendung hochwertigen Materials und
sorgfältiger Herstellung zu. Bei Qualitätsmängeln an
dem Produkt übernehmen wir die Gewährleistung für
zwei Jahre nach dem Erwerb (ab Rechnungsdatum).
Zusätzlich zu den Ihnen vertraglich und gesetzlich
zustehenden Gewährleistungsrechten bietet Ihnen
Aesculap eine Herstellergewährleistung zu folgenden
Bedingungen an:
Diese Herstellergewährleistung gilt für zwei Jahre ab
dem Kaufdatum. Sie gilt für Mängel (Fehler, Defekte),
die auf Material- oder Herstellungsfehlern beruhen.
Von unserer Herstellergarantie sind ausgenommen:
solche Mängel, die durch unsachgemäßen Gebrauch,
normalen Verschleiß oder dadurch zustande kommen,
dass nicht autorisierte Personen fehlerhafte Eingriffe
in das Produkt vornehmen oder bei der Montage nicht
passende oder nicht einwandfrei funktionierende
Fremdprodukte eingesetzt werden. Ebenfalls ausgenommen sind Mängel, die den Wert oder die
Gebrauchstauglichkeit nicht oder nur unerheblich
beeinflussen.
Sollte während unseres Gewährleistungszeitraums von
zwei Jahren nach dem Kaufdatum ein Mangel entstehen, für den unsere Herstellergewährleistung gilt, werden wir nach unserer Wahl das mangelhafte Produkt
reparieren oder durch ein anderes austauschen.
Voraussetzung für unsere Herstellergewährleistung ist,
dass Sie uns das Produkt und den Kaufnachweis (Rechnung) innerhalb der Gewährleistungsfrist übersenden
oder übergeben, und zwar an die nationalen Vertriebsgesellschaften von Aesculap oder den national zuständigen Kundendienst.
24
Page 27

Die Adressen unserer Kundendienstcenter, siehe Technischer Service.
Sie können selbstverständlich auch unabhängig von
unserer Herstellergewährleistung gegenüber dem Verkäufer Gewährleistungsrechte geltend machen, etwa
Nacherfüllung (Nachbesserung, Reparatur oder Austausch), Rücktritt oder Kaufpreisminderung, soweit
Ihnen diese Rechte gesetzlich oder vertraglich zustehen. Diese Rechte werden von unserer zusätzlichen
Herstellergarantie nicht berührt.
25
Page 28

B. Braun Vet Care
Tondeuse FAV5
Légende
1 Charnière de lame (au complet)
2 Verrouillage de tête de tonte
3 Interrupteur Marche/Arrêt
4 Vis (4 pièces)
5 Plaque signalétique
6 Coque supérieure du boîtier
7 Filtre à air
8 Levier oscillant
9 Feutres huilés
10 Coulisseau
11 Charbons
12 Tête de tonte
Symboles sur le produit
Respecter le mode d’emploi
Marquage des appareils
électriques et électroniques
conformément à la directive
2002/96/CE (DEEE), voir
Chapitre Sort de l’appareil
usagé
Sommaire
1. Manipulation sûre ................................................27
2. Description de l’appareil .....................................27
2.1 Etendue de la livraison ........................................27
2.2 Composants nécessaires à l’utilisation ...........27
2.3 Champ d’application de la tondeuse FAV5 .... 27
2.4 Mode de fonctionnement de
la tondeuse FAV5 ..................................................27
3. Préparation et installation .................................28
4. Utilisation de la tondeuse FAV5 ....................... 28
4.1 Mise à disposition .................................................28
4.1.1 Accessoires.............................................................. 28
4.1.2 Montage de la tête de tonte.............................. 29
4.2 Contrôle du fonctionnement de
la tondeuse FAV5 ..................................................29
4.3 Manipulation du module de coupes ................ 30
4.3.1 Affûtage de la plaque de coupe........................ 30
4.3.2 Remplacement de la tête de tonte.................. 30
4.3.3 Huilage de la tête de tonte................................ 30
5. Traitement stérile ..................................................31
5.1 Nettoyage/Décontamination .............................31
5.2 Vérification, entretien et contrôle ...................32
6. Maintenance ..........................................................32
7. Identification et élimination des pannes ....... 33
8. Service technique .................................................34
9. Accessoires/Pièces de rechange ........................34
9.1 Têtes de tonte ........................................................ 35
10. Caractéristiques techniques ..............................35
10.1 Tondeuse FAV5 ...................................................... 35
10.2 Déclaration de conformité ................................. 35
11. Sort de l’appareil usagé ......................................36
11.1 Uniquement pour les pays de l’UE ...................36
12. 2 ans de garantie ..................................................36
26
Page 29

1. Manipulation sûre
2. Description de l’appareil
Danger mortel par électrocution!
¾ Ne pas ouvrir le produit.
DANGER
¾ Vérifier le bon fonctionnement et le bon état du
produit avant de l’utiliser.
¾ Respecter les “remarques sur la compatibilité
électromagnétique (CEM)“.
¾ Pour éviter les dommages provoqués par un
montage ou une utilisation incorrects et ne pas
remettre en cause les droits à prestations de
garantie et de responsabilité:
– N’utiliser ce produit que conformément au
présent mode d’emploi.
– Respecter les informations sur la sécurité et les
consignes de maintenance.
– N’utiliser les accessoires non mentionnés dans le
mode d’emploi qu’avec l’accord du fabricant.
¾ Confier le fonctionnement et l’utilisation de
l’appareil et des accessoires uniquement à des
personnes disposant de la formation, des
connaissances ou de l’expérience requises.
¾ Conserver le mode d’emploi en un lieu accessible à
l’utilisateur.
¾ Respecter les normes en vigueur.
¾ Veiller à ce que l’installation électrique du local
soit conforme aux prescriptions IEC.
¾ Toujours débrancher les connexions au réseau en
tirant sur la prise de l’appareil et jamais en tirant
sur le câble.
¾ Ne pas utiliser le produit dans des zones à risque
d’explosion.
¾ Ne jamais utiliser un produit endommagé ou
défectueux. Mettre immédiatement au rebut le
produit endommagé.
¾ Ne raccorder le produit qu’à un
réseau d’alimentation avec fil de
protection.
2.1 Etendue de la livraison
Désignation N° d'art.
Tondeuse FAV5 GT105G
GT105J
GT105K
GT330 #10 (USA+GB)
Mode d'emploi TA012748
Remarque
La tête de tonte GT330 #10 (USA+GB) de la tondeuse
FAV5 fait partie des éléments livrés. Selon l’application,
différentes têtes de tonte (type SNAP ON) peuvent être
utilisées!
2.2 Composants nécessaires à
l’utilisation
• Tondeuse FAV5
• Tête de tonte
2.3 Champ d’application de la tondeuse
FAV5
Remarque
L'appareil est uniquement prévu pour tondre du pelage
animal!
La tondeuse FAV5 est utilisée pour tondre de petits
animaux.
La tondeuse FAV5 doit être utilisée avec une tête de
tonte en fonction de l’application.
2.4 Mode de fonctionnement de la
tondeuse FAV5
La tondeuse FAV5 est mise en marche en poussant
l’interrupteur Marche/Arrêt vers le haut et en coupure
en le poussant vers le bas.
27
Page 30

B. Braun Vet Care
Tondeuse FAV5
3. Préparation et installation
Aesculap n’assume aucune responsabilité dans la
mesure où les obligations suivantes ne sont pas
respectées.
¾ Pour installer et faire fonctionner le produit,
observer:
– les directives nationales relatives à l’installation et
à l'exploitation,
– les réglementations nationales relatives à la
protection contre les incendies et les explosions,
– Consignes d’utilisation conformément aux
dispositions IEC/VDE.
¾ Avant de raccorder la tondeuse au réseau
électrique, s’assurer que la tension indiquée sur la
plaque signalétique 5 correspond à la tension du
secteur.
Risque d’incendie et d’explosion!
¾ Ne pas utiliser le produit dans
des zones à risque d’explosion.
DANGER
Risque de perturbation du fonctionnement ou d’endommagement
du produit en cas d’installation
ATTENTION
impropre!
¾ Ne pas soumettre le produit au
rayonnement direct du soleil ou
à l’humidité.
¾ Ne pas recouvrir les fentes
d’aération du produit.
¾ S’assurer que la prise
d’alimentation au réseau utilisée
pour l’alimentation électrique
du produit est librement
accessible.
4. Utilisation de la tondeuse
FAV5
4.1 Mise à disposition
4.1.1 Accessoires
Les combinaisons d’accessoires non mentionnées dans
le mode d’emploi ne peuvent être utilisées que si elles
sont expressément prévues pour l’application projetée.
Ceci ne doit pas porter préjudice aux caractéristiques
de puissance ni aux exigences de sécurité.
¾ Pour toutes questions, adressez-vous à votre
partenaire B. Braun/Aesculap ou au Service
Technique Aesculap, voir l’adresse voir Chapitre
Service technique.
28
Page 31

4.1.2 Montage de la tête de tonte
Risque de blessure par des plaques
de coupe acérées!
¾ Manipuler avec précautions la
AVERTISSEMENT
Remarque
La tête de tonte GT330 #10 (USA+GB) de la tondeuse
FAV5 fait partie des éléments livrés. Selon l’application,
différentes têtes de tonte peuvent être utilisées!
tête de tonte de la tondeuse
FAV5.
1
Fig. 1
¾ La charnière de lame étant fermée: déployer la
charnière de lame 1 avec le tournevis, voir Fig. 1.
12
¾ Ficher la tête de tonte 12 sur la charnière de lame
ouverte 1, voir Fig. 2.
¾ Appuyer sur l’interrupteur Marche/Arrêt 3.
12
Fig. 3
¾ Presser légèrement la tête de tonte 12 en direction
de la tondeuse FAV5, voir Fig. 3.
La tête de tonte 12 s’engage de façon audible.
¾ Vérifier que la tête de tonte 12 est correctement
placée sur la tondeuse FAV5.
4.2 Contrôle du fonctionnement de la
tondeuse FAV5
¾ Effectuer un contrôle visuel.
¾ Contrôler la position de l’interrupteur.
¾ Placer correctement le module de coupe et le huiler
si nécessaire, voir Chapitre Manipulation du
module de coupes.
¾ Nettoyer la tondeuse FAV5 avant l’usage, voir
Chapitre Nettoyage/Décontamination.
Fig. 2
1
29
Page 32

B. Braun Vet Care
Tondeuse FAV5
4.3 Manipulation du module de coupes
4.3.1 Affûtage de la plaque de coupe
Remarque
Pour affûter la plaque de coupe, s’adresser au Service
Technique, voir Chapitre Service technique.
4.3.2 Remplacement de la tête de tonte
Risque de blessure par des plaques
de coupe acérées!
¾ Manipuler avec précautions la
AVERTISSEMENT
tête de tonte de la tondeuse
FAV5.
2
3
12
3
Fig. 5
¾ Déployer la tête de tonte 12 vers l’avant, voir Fig. 5.
¾ Retirer la tête de tonte 12.
¾ Nettoyer la charnière de lame ouverte 1 avec un
pinceau.
¾ Ficher la tête de tonte 12 sur la charnière de lame 1.
¾ Raccorder le câble de branchement au réseau de la
tondeuse FAV5.
¾ Appuyer sur l’interrupteur Marche/Arrêt 3.
¾ Presser légèrement la tête de tonte 12 en direction
de la tondeuse FAV5.
La tête de tonte 12 s’engage de façon audible.
¾ Vérifier que la tête de tonte 12 est correctement
placée sur la tondeuse FAV5.
Fig. 4
¾ Appuyer sur l’interrupteur Marche/Arrêt 3 pour
éteindre la tondeuse FAV5, voir Fig. 4.
¾ Presser le verrouillage de tête de tonte 2, voir Fig. 4.
30
4.3.3 Huilage de la tête de tonte
¾ Nettoyer la plaque de coupe supérieure et
inférieure avec un chiffon doux ou un pinceau.
Vérifier ce faisant que les espaces entre les dents
sont propres.
¾ Huiler légèrement la plaque de coupe supérieure et
inférieure avec l’huile spéciale pour têtes de tonte
GT604.
Page 33

5. Traitement stérile
Risque d’endommagement ou de
détérioration irrémédiable du
produit par un nettoyage/une
ATTENTION
décontamination en machine ou par
stérilisation!
¾ Ne nettoyer/décontaminer le
produit que manuellement.
¾ Ne jamais stériliser le produit.
5.1 Nettoyage/Décontamination
Remarque
Respecter les consignes d’hygiène et d’évacuation!
Nettoyage/décontamination manuels ¾ Essuyer le boîtier du produit avec un chiffon non
Risque d’électrocution et
d’incendie!
¾ Retirer la prise avant le nettoy-
DANGER
age.
¾ Contrôler qu’aucun liquide ne
pénètre dans le produit.
¾ Laisser aérer pendant au moins
1 minute après le nettoyage/la
décontamination.
ATTENTION
pelucheux imbibé d’un produit d’usage courant
dans le commerce pour la décontamination par
essuyage.
¾ Si nécessaire, éliminer les résidus de produit de
nettoyage et de décontamination après sa durée
d’action avec un chiffon non pelucheux humidifié
à l’eau propre.
¾ Pour le séchage, utiliser un chiffon propre non
pelucheux.
¾ Si nécessaire, répéter le nettoyage/la
décontamination.
Risque de détériorations sur le produit en cas de nettoyage impropre
ou de produit de nettoyage/décontamination inadéquat!
¾ Utiliser un produit d’usage cou-
rant dans le commerce pour le
nettoyage des surfaces.
¾ Ne jamais plonger le produit
dans de l’eau ou dans un produit
nettoyant.
¾ Ne pas faire pénétrer de liquide
dans les compartiments de
recharge.
¾ Nettoyer avec le plus grand soin
les contacts dans les compartiments de recharge.
Nettoyage du filtre à air
Remarque
Le filtre à air doit être nettoyé une fois par semaine ou
en cas de besoin!
¾ Pousser le filtre à air 7 vers l’arrière et le retirer.
¾ Nettoyer le filtre à air 7 par soufflage/rinçage.
¾ Remonter un filtre à air sec 7.
31
Page 34

B. Braun Vet Care
Tondeuse FAV5
5.2 Vérification, entretien et contrôle
¾ Laisser refroidir le produit à la température
ambiante.
¾ Après chaque nettoyage et décontamination,
vérifier sur le produit les éléments suivants:
propreté, bon fonctionnement et absence de
détériorations.
¾ Huiler la tête de tonte si nécessaire, voir Chapitre
Huilage de la tête de tonte.
¾ Contrôler sur le produit l’absence de détériorations,
de bruits de course irréguliers, d’échauffement
excessif et de trop fortes vibrations.
¾ Vérifier que les tranchants du module de coupe ne
sont pas rompus, endommagés ou émoussés.
¾ Mettre immédiatement au rebut le produit
endommagé.
6. Maintenance
Pour garantir un fonctionnement fiable, Aesculap
recommande une maintenance par an.
Pour des prestations de service en ce sens, veuillez
vous adresser à votre représentation nationale
B. Braun/Aesculap, voir Chapitre Service technique.
Adresses de service
Aesculap Suhl GmbH
Fröhliche-Mann-Straße 15
98528 Suhl / Germany
Phone: +49 (0) 3681 49820
Fax: +49 (0) 3681 498234
E-Mail: suhl@aesculap.de
Pour obtenir d’autres adresses de service, contactez
l’adresse ci-dessus.
32
Page 35

7. Identification et élimination des pannes
Problème Identification Cause Elimination
La tête de tonte ne
bouge pas
La tondeuse FAV5 tond
mal ou pas du tout
Le moteur de la tondeuse FAV5 ne fonctionne pas
Le moteur de la tondeuse FAV5 fonctionne
très lentement
La tête de tonte est bloquée
La tondeuse FAV5 ne
tond pas
La performance de coupe
est insuffisante
Fort échauffement de la
tête de tonte
La tête de tonte est bloquée
La tondeuse FAV5 ne
tond pas
Odeur de brûlé émanant
du boîtier
La tête de tonte est bloquée
Bruits de moteur inhabituels
La tête de tonte n’est pas
bien engagée
Levier oscillant défectueux
Les tranchants de la tête
de tonte sont émoussés
Les poils de l’animal sont
trop mouillés
La tête de tonte a une
pression de tonte trop
faible
Les tranchants de la tête
de tonte sont mal affûtés
Les tranchants de la tête
de tonte ne sont pas huilés
Les poils de l’animal sont
coincés dans la tête de
tonte
Les contacts sont encrassés
Moteur/Electronique
défectueux
Le moteur a brûlé Réparation par le fabricant
La tête de tonte est
encrassée
Les tranchants de la tête
de tonte ne sont pas huilés
Faire s'engager correctement la tête de tonte, voir
Chapitre Montage de la tête
de tonte
Remplacer le levier oscillant
Réparation par le fabricant
Tondre uniquement des
pelages secs
Réparation par le fabricant
Réparation par le fabricant
Huiler les tranchants de la
tête de tonte, voir Chapitre
Huilage de la tête de tonte
Démonter la tête de tonte
et retirer les poils
Eteindre la tondeuse FAV5
et nettoyer les contacts
Réparation par le fabricant
Nettoyer et huiler la tête de
tonte, voir Chapitre Huilage
de la tête de tonte
Huiler les tranchants de la
tête de tonte, voir Chapitre
Huilage de la tête de tonte
33
Page 36

B. Braun Vet Care
Tondeuse FAV5
8. Service technique
Pour le service, la maintenance et la réparation,
veuillez vous adresser à votre représentation nationale
B. Braun/Aesculap.
Les modifications effectuées sur les équipements
techniques médicaux peuvent entraîner une perte des
droits à garantie de même que d’éventuelles
autorisations.
Adresses de service
Aesculap Suhl GmbH
Fröhliche-Mann-Straße 15
98528 Suhl / Germany
Phone: +49 (0) 3681 49820
Fax: +49 (0) 3681 498234
E-Mail: suhl@aesculap.de
Pour obtenir d’autres adresses de service, contactez
l’adresse ci-dessus.
9. Accessoires/Pièces de
rechange
N° d'art. Désignation
GT604 Huile
GT605 Graisse
GT104614 Charbons
GT104803 Filtre à air
GT105808 Levier oscillant
GT105415 Charnière de lame (au complet)
34
Page 37

9.1 Têtes de tonte
10. Caractéristiques techniques
Tête de tonte (au complet) Taille EU
GT305 0,2 mm
GT310 0,25 mm
GT315 0,5 mm
GT317 0,5 mm
GT320 0,8 mm
GT323 0,8 mm
GT326 1,2 mm
GT330 1,5 mm
GT333 2,0 mm
GT336 2,4 mm
GT339 2,4 mm
GT341 2,8 mm
GT343 3,2 mm
GT345 3,2 mm
GT349 3,2 mm
GT353 2,4 mm
GT357 6,3 mm
GT360 6,3 mm
GT366 9,5 mm
Remarque
Pour davantage de détails sur les têtes de tonte,
consulter le prospectus V06902!
10.1 Tondeuse FAV5
Type d’appareil GT105
Nombre de courses 2 300 1/min
Classe de protection
(suivant IEC 60601-1)
Poids
(sans tête de tonte)
II
env. 800 g
10.2 Déclaration de conformité
Nous déclarons sous notre propre
responsabilité que le présent produit
est conforme aux normes et
documents normatifs suivants:
2006/95/CE directive sur la basse
tension CE
EN 60335-1
EN 60335-2-8 Appareils
électrodomestiques et analogues Sécurité
Aesculap Suhl GmbH
35
Page 38

B. Braun Vet Care
Tondeuse FAV5
11. Sort de l’appareil usagé
Les appareils électriques, les accessoires et l’emballage
doivent être acheminés à un recyclage respectueux de
l’environnement.
11.1 Uniquement pour les pays de l’UE
Ne jetez pas les appareils électriques
avec les déchets ménagers!
Conformément à la Directive
européenne 2002/96/CE sur les
appareils électriques et électroniques
usagés et sa transposition dans le
droit national, les appareils
électriques inutilisables doivent être
collectés séparément et acheminés à
un recyclage respectueux de
l’environnement.
12. 2 ans de garantie
Chère cliente, cher client,
Nous vous remercions d’avoir acheté un de nos
produits. La marque Aesculap est synonyme depuis des
décennies de qualité contrôlée et de service
remarquable. La société Aesculap Suhl GmbH est
certifiée selon la norme DIN EN ISO 9001. Nous
offrons à nos clients des produits innovateurs et
performants.
Aesculap fabrique des appareils de qualité supérieure
et vous garantit l’utilisation de matériaux de qualité
supérieure et une fabrication consciencieuse. En cas de
défauts de qualité sur le produit, nous accordons une
garantie de deux ans après l’achat (à partir de la date
d’achat sur la facture).
En plus des droits à la garantie légaux et contractuels,
Aesculap vous fournit une garantie constructeur aux
conditions suivantes:
Cette garantie constructeur est valable pendant deux
ans à partir de la date d’achat. Elle s’applique aux
défauts (erreurs, imperfections) qui sont dus aux
erreurs de matériaux ou de fabrication.
Notre garantie constructeur n’inclut pas:
les défauts qui résultent d’une utilisation incorrecte,
d’une usure normale ou qui sont dus au fait que des
personnes non autorisées ont réalisé des interventions
incorrectes sur le produit ou que des produits d’autres
marques ne fonctionnant pas parfaitement ou non
adéquats ont été utilisés lors du montage. Les défauts
qui n’influencent pas ou très peu la valeur ou l’aptitude
à l’emploi de l’appareil sont également exclus.
Pendant cette période de garantie de deux ans après la
date d’achat, un défaut survient pour lequel notre
garantie constructeur s’applique, nous réparerons le
produit défectueux ou le remplacerons par un autre.
Pour que la garantie constructeur s’applique, il
convient de renvoyer ou remettre le produit et la
preuve d’achat (facture) au sein du délai de garantie
aux sociétés de distribution nationales de Aesculap ou
au service après-vente national concerné.
Pour les adresses de notre service après-vente, voir
Chapitre Service technique.
36
Page 39

Indépendamment de notre garantie constructeur, vous
pouvez aussi faire valoir vos droits de garantie auprès
du vendeur, à savoir réclamer une nouvelle livraison
(suppression du défaut, réparation ou remplacement),
résilier votre achat ou demander une diminution du
prix d’achat, pour autant que vous disposiez
légalement ou contractuellement de ces droits. Notre
garantie constructeur supplémentaire ne remet pas en
cause ces droits.
37
Page 40

B. Braun Vet Care
Esquiladora FAV5
Leyenda
1 Bisagra del cabezal (completa)
2 Bloqueo del cabezal de corte
3 Interruptor
4 Tornillos (4 unidades)
5 Placa de identificación
6 Parte superior de la carcasa
7 Filtro de aire
8 Palanca oscilante
9 Espuma de cierre de aceite
10 Piedra deslizante
11 Escobillas
12 Cabezal de corte
Símbolos en el producto
Tener en cuenta las
instrucciones de manejo
Identificación de equipos
eléctricos y electrónicos de
acuerdo con la directiva 2002/
96/CE (RAEE), ver Capítulo
Eliminación de residuos
Índice
1. Manejo correcto ....................................................39
2. Descripción del aparato ......................................39
2.1 Volumen de suministro .......................................39
2.2 Componentes necesarios para la
puesta en servicio ................................................. 39
2.3 Uso previsto de la esquiladora FAV5 ...............39
2.4 Modo de funcionamiento de la
esquiladora FAV5 .................................................. 39
3. Preparación e instalación ...................................40
4. Aplicación de la esquiladora FAV5 ..................40
4.1 Puesta a punto ......................................................40
4.1.1 Accesorios ............................................................... 40
4.1.2 Colocación del cabezal de corte ....................... 41
4.2 Prueba de funcionamiento de la
esquiladora FAV5 .................................................. 41
4.3 Manejo del cabezal de corte .............................42
4.3.1 Afilado de la placa de corte............................... 42
4.3.2 Cambio del cabezal de corte.............................. 42
4.3.3 Lubricación del cabezal de corte...................... 42
5. Trato y cuidado ......................................................43
5.1 Limpieza/Desinfección .........................................43
5.2 Control, conservación e inspección .................44
6. Mantenimiento ...................................................... 44
7. Identificación y subsanación de fallos ...........45
8. Servicio de Asistencia Técnica ..........................46
9. Accesorios/Piezas de recambio .........................46
9.1 Cabezales de corte ...............................................47
10. Datos técnicos .......................................................47
10.1 Esquiladora FAV5 ..................................................47
10.2 Declaración de conformidad ..............................47
11. Eliminación de residuos ......................................48
11.1 Sólo para países de la UE ...................................48
12. 2 años de garantía ................................................48
38
Page 41

1. Manejo correcto
2. Descripción del aparato
Peligro de muerte por descarga
eléctrica.
¾ No abrir el producto.
PELIGRO
¾ Antes de utilizar el producto comprobar que
funcione y que se encuentre en perfecto estado.
¾ Respetar las "Instrucciones sobre compatibilidad
electromagnética (CEM)".
¾ Para evitar daños causados por un montaje o uso
inadecuados y conservar así los derechos de
garantía y responsabilidad del fabricante:
– Utilizar el producto sólo conforme a estas
instrucciones de manejo.
– Respetar la información sobre las medidas de
seguridad y las instrucciones de mantenimiento.
– Los accesorios que no se incluyan en las
instrucciones de manejo se utilizarán sólo con
autorización expresa del fabricante.
¾ Confiar la aplicación y el uso del producto y de los
accesorios exclusivamente a personal con la
formación requerida para ello o que disponga de
los conocimientos o experiencia necesarios.
¾ Conservar las instrucciones de manejo en lugar
accesible para el operario.
¾ Cumplir con las normas vigentes.
¾ Asegurarse de que la instalación eléctrica de la sala
cumpla con los requisitos IEC.
¾ Para desconectar el aparato de la red, tirar del
enchufe, nunca del cable.
¾ No utilizar el producto en lugares expuestos a
peligro de explosión.
¾ No utilizar ningún producto dañado o defectuoso.
Retirar inmediatamente el producto si está dañado.
¾ Conectar el producto única-
mente a redes de suministro con
puesta a tierra.
2.1 Volumen de suministro
Descripción Nº art.
Esquiladora FAV5 GT105G
GT105J
GT105K
GT330 #10 (EE.UU.+GB)
Instrucciones de manejo TA012748
Observación
La esquiladora FAV5 se suministra con el cabezal de
corte GT330 #10 (EE.UU.+GB). Se pueden utilizar
distintos cabezales de corte (del tipo SNAP ON) en
función de la aplicación.
2.2 Componentes necesarios para la
puesta en servicio
• Esquiladora FAV5
• Cabezal de corte
2.3 Uso previsto de la esquiladora FAV5
Observación
La máquina está prevista exclusivamente para cortar el
pelaje de animales.
La esquiladora FAV5 se utiliza para esquilar animales
pequeños.
La esquiladora FAV5 se debe utilizar con un cabezal de
corte adecuado a la aplicación.
2.4 Modo de funcionamiento de la
esquiladora FAV5
La esquiladora FAV5 se enciende accionando la parte
superior del interruptor y se apaga presionando la
parte inferior de éste.
39
Page 42

B. Braun Vet Care
Esquiladora FAV5
3. Preparación e instalación
Si no se observan las normas siguientes Aesculap no
asumirá ningún tipo de responsabilidad.
¾ Al instalar y poner en funcionamiento el producto,
deberán respetarse:
– los reglamentos de instalación y operación
vigentes a nivel nacional,
– las normas nacionales sobre prevención de
incendios y explosiones
– Instrucciones de utilización según las normas IEC/
VDE.
¾ Antes de conectar la esquiladora a la red eléctrica,
asegurarse de que la tensión indicada en la placa
de identificación 5 coincide con la tensión de red.
Peligro de incendio y de explosión.
¾ No utilizar el producto en
lugares expuestos a peligro de
PELIGRO
ATENCIÓN
explosión.
El producto no funcionará bien o se
dañará si no coloca en el lugar
adecuado.
¾ No exponer el producto a la
radiación directa del sol ni a la
humedad.
¾ No cubrir las ranuras de
ventilación del producto.
¾ Asegurarse de que la toma de
corriente de la red de suministro
de la tensión de alimentación
del producto se encuentre
accesible.
4. Aplicación de la esquiladora
FAV5
4.1 Puesta a punto
4.1.1 Accesorios
Las combinaciones de accesorios no mencionadas en
las instrucciones de manejo sólo podrán utilizarse si se
indica expresamente que son adecuadas para la
utilización prevista. No deben influir negativamente en
las características de rendimiento ni los requisitos de
seguridad.
¾ En caso de duda, consulte a la persona de contacto
correspondiente de B. Braun/Aesculap o al Servicio
de Atención al Cliente de Aesculap, dirección ver
Capítulo Servicio de Asistencia Técnica.
40
Page 43

4.1.2 Colocación del cabezal de corte
Peligro de lesiones por el filo
cortante de las hojas de corte.
¾ Manipular con cuidado el
ADVERTENCIA
Observación
La esquiladora FAV5 se suministra con el cabezal de
corte GT330 #10 (EE.UU.+GB). Se pueden utilizar
distintos cabezales de corte en función de la aplicación.
cabezal de corte de la
esquiladora FAV5.
1
Fig. 1
¾ Si la bisagra del cabezal está cerrada: abrir la bisagra
del cabezal 1 con un destornillador, ver Fig. 1.
12
¾ Conectar el cabezal de corte 12 a la bisagra del
cabezal 1 abierta, ver Fig. 2.
¾ Accionar el interruptor 3.
12
Fig. 3
¾ Empujar suavemente el cabezal de corte 12 hacia
la esquiladora FAV5, ver Fig. 3.
El cabezal de corte 12 se enclava de forma audible.
¾ Comprobar que el cabezal de corte 12 se asienta
correctamente en la esquiladora FAV5.
4.2 Prueba de funcionamiento de la
esquiladora FAV5
¾ Realizar una inspección visual.
¾ Comprobar la posición del selector.
¾ Conectar correctamente el cabezal de corte y, si es
necesario, lubricarlo, ver Capítulo Manejo del
cabezal de corte.
¾ Limpiar la esquiladora FAV5 antes de utilizarla, ver
Capítulo Limpieza/Desinfección.
Fig. 2
1
41
Page 44

B. Braun Vet Care
Esquiladora FAV5
4.3 Manejo del cabezal de corte
4.3.1 Afilado de la placa de corte
Observación
En caso de que sea necesario afilar la hoja de corte,
diríjase al Servicio de Asistencia Técnica, ver Capítulo
Servicio de Asistencia Técnica.
4.3.2 Cambio del cabezal de corte
Peligro de lesiones por el filo
cortante de las hojas de corte.
¾ Manipular con cuidado el
ADVERTENCIA
cabezal de corte de la
esquiladora FAV5.
2
3
12
3
Fig. 5
¾ Empujar el cabezal de corte 12 hacia delante, ver
Fig. 5.
¾ Retirar el cabezal de corte 12.
¾ Limpiar con un pincel la bisagra del cabezal 1.
¾ Conectar el cabezal de corte 12 a la bisagra del
cabezal 1.
¾ Enchufar el cable de red de la esquiladora FAV5.
¾ Accionar el interruptor 3.
¾ Empujar suavemente el cabezal de corte 12 hacia
la esquiladora FAV5.
El cabezal de corte 12 se enclava de forma audible.
¾ Comprobar que el cabezal de corte 12 se asienta
correctamente en la esquiladora FAV5.
Fig. 4
¾ Accionar el interruptor 3 para apagar la
esquiladora FAV5, ver Fig. 4.
¾ Presionar el bloqueo del cabezal de corte 2, ver Fig. 4.
42
4.3.3 Lubricación del cabezal de corte
¾ Limpiar las hojas de corte inferior y superior con un
trapo suave o con un pincel. Asegurarse de que los
espacios entre los dientes quedan bien limpios.
¾ Lubricar las hojas superior e inferior ligeramente con
el aceite especial para cabezales GT604.
Page 45

5. Trato y cuidado
El producto se dañará o se destruirá
si se somete a una limpieza/
desinfección o esterilización
ATENCIÓN
5.1 Limpieza/Desinfección
Observación
Respetar las normas higiénicas y de eliminación de
residuos.
Limpieza/desinfección manuales
PELIGRO
automática.
¾ Limpiar/desinfectar el producto
sólo manualmente.
¾ No esterilizar nunca el producto.
Riesgo de descargas eléctricas e
incendios.
¾ Desconectar el aparato del
enchufe de red antes de limpiar.
¾ Asegurarse de que no penetra
ningún líquido en el producto.
¾ Tras la limpieza/desinfección,
dejar ventilar al menos durante
1 minuto.
Peligro de dañar el producto debido
una limpieza incorrecta o al uso de
desinfectantes/agentes de limpieza
ATENCIÓN
¾ Limpiar la carcasa del producto con un paño sin
pelusa humedecido con un desinfectante
convencional.
¾ Eliminar los posibles restos del agente de limpieza
y desinfección una vez finalizado su tiempo de
actuación con un paño sin pelusa humedecido en
agua clara.
¾ Para el secado, utilizar un paño limpio y sin pelusa.
¾ Si es necesario, repetir la limpieza/desinfección.
Limpieza del filtro de aire
Observación
El filtro de aire debe limpiarse semanalmente, o bien
cuando sea necesario.
no adecuados.
¾ Utilizar un producto de limpieza
convencional para la limpieza de
la superficie.
¾ No sumergir nunca el producto
en agua o en el agente de limpieza.
¾ No introducir líquidos en los
compartimentos de carga.
¾ Limpiar los contactos de los
compartimentos de carga con
sumo cuidado.
¾ Desplazar el filtro de aire 7 hacia atrás y extraerlo.
¾ Limpiar con aire a presión/lavar el filtro de aire 7.
¾ Colocar el filtro de aire 7 seco.
43
Page 46

B. Braun Vet Care
Esquiladora FAV5
5.2 Control, conservación e inspección
¾ Dejar que el producto se enfríe a temperatura
ambiente.
¾ Tras limpiar y desinfectar el producto, comprobar
que: esté limpio, funcione debidamente y no tenga
defectos.
¾ Si es necesario, lubricar el cabezal de corte, ver
Capítulo Lubricación del cabezal de corte.
¾ Comprobar que el producto no presenta daños,
ruidos de funcionamiento anormales,
sobrecalentamiento ni una vibración excesiva.
¾ Comprobar que las hojas de corte no están
fragmentadas, dañadas ni desafiladas.
¾ Retirar inmediatamente el producto si está dañado.
6. Mantenimiento
Para garantizar un funcionamiento fiable, Aesculap
recomienda realizar un mantenimiento una vez al año.
Si el producto necesita alguna reparación debe
dirigirse al representante de B. Braun/Aesculap de su
país, ver Capítulo Servicio de Asistencia Técnica.
Direcciones de la Asistencia Técnica
Aesculap Suhl GmbH
Fröhliche-Mann-Straße 15
98528 Suhl / Germany
Phone: +49 (0) 3681 49820
Fax: +49 (0) 3681 498234
E-Mail: suhl@aesculap.de
En la dirección especificada anteriormente se le
facilitará información sobre otras direcciones de
Asistencia Técnica.
44
Page 47

7. Identificación y subsanación de fallos
Fallo Identificación Causa Subsanación
El cabezal de corte no se
mueve
La esquiladora FAV5
corta mal o no corta en
absoluto
El motor de la esquiladora FAV5 no funciona
El motor de la esquiladora FAV5 funciona a
una velocidad muy lenta
El cabezal de corte está
bloqueado
La esquiladora FAV5 no
corta
Potencia de corte insuficiente
Sobrecalentamiento del
cabezal de corte
El cabezal de corte está
bloqueado
La esquiladora FAV5 no
corta
La carcasa desprende
olor a quemado
El cabezal de corte está
bloqueado
El motor emite ruidos
extraños
El cabezal de corte no se
ha encajado correctamente
Palanca oscilante defectuosa
Las hojas de corte están
desafiladas
El pelo del animal está
mojado
La presión sobre las hojas
de corte del cabezal es
demasiado baja
Las hojas de corte no
están bien afiladas
No se han lubricado las
hojas de corte
Ha quedado pelo del animal aprisionado en el
cabezal de corte
Los contactos están
sucios
Motor/sistema electrónico
defectuosos
El motor se ha quemado Hacer que el fabricante lo
El cabezal de corte está
sucio
No se han lubricado las
hojas de corte
Encajar correctamente el
cabezal de corte, ver Capítulo Colocación del cabezal
de corte
Sustituir la palanca oscilante
Hacer que el fabricante lo
repare
Esquilar sólo animales con
el pelo seco
Hacer que el fabricante lo
repare
Hacer que el fabricante lo
repare
Lubricar las hojas de corte,
ver Capítulo Lubricación del
cabezal de corte
Desmontar el cabezal de
corte y retirar el pelo del
animal
Apagar la esquiladora FAV5
y limpiar los contactos
Hacer que el fabricante lo
repare
repare
Limpiar y lubricar el cabezal
de corte, ver Capítulo Lubricación del cabezal de corte
Lubricar las hojas de corte,
ver Capítulo Lubricación del
cabezal de corte
45
Page 48

B. Braun Vet Care
Esquiladora FAV5
8. Servicio de Asistencia Técnica
Para asistencia técnica, mantenimiento y reparaciones,
diríjase a su distribuidor nacional de B. Braun/
Aesculap.
Si se realizan modificaciones en el equipo médico
técnico, se extinguirá la garantía y el derecho de
garantía, así como las posibles homologaciones.
Direcciones de la Asistencia Técnica
Aesculap Suhl GmbH
Fröhliche-Mann-Straße 15
98528 Suhl / Germany
Phone: +49 (0) 3681 49820
Fax: +49 (0) 3681 498234
E-Mail: suhl@aesculap.de
En la dirección especificada anteriormente se le
facilitará información sobre otras direcciones de
Asistencia Técnica.
9. Accesorios/Piezas de
recambio
Nº art. Descripción
GT604 Aceite
GT605 Grasa
GT104614 Escobillas
GT104803 Filtro de aire
GT105808 Palanca oscilante
GT105415 Bisagra del cabezal (completa)
46
Page 49

9.1 Cabezales de corte
10. Datos técnicos
Cabezal de corte (completo) Tamaño EU
GT305 0,2 mm
GT310 0,25 mm
GT315 0,5 mm
GT317 0,5 mm
GT320 0,8 mm
GT323 0,8 mm
GT326 1,2 mm
GT330 1,5 mm
GT333 2,0 mm
GT336 2,4 mm
GT339 2,4 mm
GT341 2,8 mm
GT343 3,2 mm
GT345 3,2 mm
GT349 3,2 mm
GT353 2,4 mm
GT357 6,3 mm
GT360 6,3 mm
GT366 9,5 mm
Observación
El prospecto V06902 contiene más información sobre
los cabezales de corte.
10.1 Esquiladora FAV5
Tipo de aparato GT105
Velocidad 2 300 1/min
Clase de protección
(según IEC 60601-1)
Peso
(sin cabezal de corte)
II
aprox. 800 g
10.2 Declaración de conformidad
Declaramos, bajo responsabilidad
propia, que este producto cumple las
siguientes normas o documentos
normativos:
Directiva CE de baja tensión 2006/95/
CE
EN 60335-1
EN 60335-2-8 Seguridad de los
aparatos electrodomésticos y
analógicos
Aesculap Suhl GmbH
47
Page 50

B. Braun Vet Care
Esquiladora FAV5
11. Eliminación de residuos
Reciclar de forma ecológica las herramientas
eléctricas, sus accesorios y sus envases.
11.1 Sólo para países de la UE
No deseche las herramientas
eléctricas con la basura doméstica.
En virtud de la Directiva europea
2002/96/CE sobre residuos de
aparatos eléctricos y electrónicos, y su
transposición, las herramientas
eléctricas que han dejado de ser aptas
para el uso deben eliminarse mediante
una recogida selectiva y reciclarse de
forma ecológica.
12. 2 años de garantía
Apreciado cliente, apreciada clienta:
Le damos las gracias por haber elegido un producto de
nuestra casa. Ya desde hace varias décadas, se asocia la
marca Aesculap con productos de acreditada calidad y
con un excelente servicio técnico. Aesculap Suhl GmbH
cuenta con la certificación DIN EN ISO 9001.
Ofrecemos a nuestros clientes productos innovadores y
con elevadas prestaciones.
Aesculap fabrica aparatos de primera calidad y le
garantiza el empleo de materiales de alta calidad, así
como un proceso de producción impecable. Cubrimos
los posibles defectos de nuestros productos con una
garantía de dos años a partir de la fecha de compra
(fecha factura).
Además de los derechos de garantía contractuales y
legales, Aesculap le ofrece una garantía de fabricante
con las siguientes condiciones:
La garantía de fabricante tiene una validez de dos años
a partir de la fecha de compra y cubre todos los
defectos (fallos, averías) derivados de fallos de
material o de fabricación.
Quedan excluidos de la garantía de fabricante:
los defectos derivados del uso no adecuado o del
desgaste natural del producto, de la manipulación del
producto por personas no autorizadas, y de la
incorporación al producto de productos de terceros no
adecuados o que no funcionan correctamente.
Asimismo, quedan excluidos aquellos defectos que no
afectan o sólo afectan de forma insignificante al valor
o la aptitud para el uso del producto.
Si durante el periodo de garantía de dos años después
de la fecha de compra surgiera cualquier defecto en el
producto cubierto por nuestra garantía de fabricante,
nos reservamos el derecho de decidir si reparamos el
producto o lo sustituimos por otro.
Como condición previa para hacer valer la garantía del
fabricante, debe entregar el producto y el comprobante
de compra (factura) dentro del periodo de garantía al
distribuidor o al servicio técnico de Aesculap de su
país.
48
Page 51

Para las direcciones de nuestros centros de atención al
cliente, ver Capítulo Servicio de Asistencia Técnica.
Independientemente de nuestra garantía de
fabricante, puede reclamar su derechos legales o
contractuales ante el vendedor, por ejemplo, de
subsanación (corrección, reparación o sustitución),
rescisión o rebaja en el precio. Nuestra garantía de
fabricante no afecta a estos derechos.
49
Page 52

B. Braun Vet Care
Tosatrice FAV5
Legenda
1 Cerniera delle lame (completa)
2 Bloccaggio della testa di tosatura
3 Interruttore di accensione/spegnimento
4 Viti (4 pezzi)
5 Targhetta di omologazione
6 Parte superiore della scocca
7 Filtro dell’aria
8 Leva oscillante
9 Feltrini dell’olio
10 Pietra scorrevole
11 Carboncino
12 Testa di tosatura
Simboli del prodotto
Rispettare le istruzioni per l'uso
Marchio degli apparecchi
elettrici ed elettronici conformi
alla direttiva 2002/96/CE
(RAEE), vedere Capitolo
Smaltimento
Indice
1. Manipolazione sicura ..........................................51
2. Descrizione dell’apparecchio .............................51
2.1 Corredo di fornitura .............................................51
2.2 Componenti necessari alla messa
in funzione ..............................................................51
2.3 Destinazione d’uso della tosatrice FAV5 ........51
2.4 Funzionamento della tosatrice FAV5 ..............51
3. Preparazione ed installazione ...........................52
4. Operatività con la tosatrice FAV5 ....................52
4.1 Preparazione ...........................................................52
4.1.1 Accessori.................................................................. 52
4.1.2 Inserimento della testa di tosatura.................. 53
4.2 Controllo del funzionamento della
tosatrice FAV5 .......................................................53
4.3 Manipolazione del set di taglio ........................54
4.3.1 Affilatura dei pettini............................................ 54
4.3.2 Sostituzione della testa di tosatura................. 54
4.3.3 Oliatura della testa di tosatura......................... 54
5. Preparazione sterile ..............................................55
5.1 Pulizia/Disinfezione .............................................. 55
5.2 Controllo, cura e verifica ....................................55
6. Manutenzione ........................................................56
7. Identificazione ed eliminazione dei guasti .... 57
8. Assistenza tecnica ................................................58
9. Accessori/Ricambi .................................................58
9.1 Teste di tosatura ................................................... 59
10. Specifiche tecniche ..............................................59
10.1 Tosatrice FAV5 .......................................................59
10.2 Dichiarazione di conformità ..............................59
11. Smaltimento ...........................................................60
11.1 Soltanto per i paesi CE ........................................60
12. 2 anni di garanzia ................................................. 60
50
Page 53

1. Manipolazione sicura
2. Descrizione dell’apparecchio
Le scosse elettriche comportano
pericolo di morte!
¾ Non aprire il prodotto.
PERICOLO
¾ Prima di utilizzare il prodotto verificarne l’idoneità
funzionale ed accertarsi che sia in perfette
condizioni.
¾ Rispettare le “Avvertenze sulla compatibilità
elettromagnetica (CEM)”.
¾ In questo modo è possibile evitare danni dovuti ad
un montaggio o un esercizio non corretto e che,
come tali, pregiudicano la garanzia:
– Utilizzare il prodotto solo in conformità alle
presenti istruzioni per l’uso.
– Rispettare le istruzioni sulla sicurezza e le
indicazioni sulla manutenzione.
– Gli accessori non menzionati nelle istruzioni per
l'uso possono essere usati solo con il consenso del
produttore.
¾ Far usare il prodotto e gli accessori solo a personale
che disponga di corrispondente formazione,
conoscenze ed esperienze.
¾ Conservare le istruzioni per l’uso in modo che siano
accessibili per l’utente.
¾ Rispettare le norme vigenti.
¾ Accertarsi che l’impianto elettrico dell’ambiente
sia conforme ai requisiti CEI.
¾ Staccare la spina dalla presa di rete afferrando
sempre la spina, mai tirando il cavo.
¾ Non utilizzare il prodotto in settori a rischio di
esplosione.
¾ Se il prodotto è guasto o danneggiato, non
utilizzarlo. Se il prodotto è danneggiato, scartarlo
immediatamente.
¾ Utilizzare il prodotto soltanto su
una rete elettrica con
conduttore di protezione.
2.1 Corredo di fornitura
Descrizione Cod. art.
Tosatrice FAV5 GT105G
GT105J
GT105K
GT330 #10 (USA+GB)
Istruzioni per l’uso TA012748
Nota
La testa di tosatura GT330 #10 (USA+GB) della
tosatrice FAV5 è compresa nel corredo di fornitura.
Possono essere impiegate teste di tosatura diverse
(modello SNAP ON) a seconda dell’applicazione!
2.2 Componenti necessari alla messa in
funzione
• Tosatrice FAV5
• Testa di tosatura
2.3 Destinazione d’uso della tosatrice
FAV5
Nota
La macchina è concepita soltanto per tagliare peli di
animali!
La tosatrice FAV5 serve a tosare piccoli animali.
La tosatrice FAV5 deve essere utilizzata con una testa
di tosatura adatta all’applicazione.
2.4 Funzionamento della tosatrice
FAV5
La tosatrice FAV5 si accende portando l’interruttore di
accensione/spegnimento sulla posizione superiore e si
spegne portando tale interruttore sulla posizione
inferiore.
51
Page 54

B. Braun Vet Care
Tosatrice FAV5
3. Preparazione ed installazione
Il mancato rispetto delle seguenti disposizioni fa sì che
Aesculap non si assuma alcuna garanzia in merito.
¾ Nell’installazione e l’esercizio del prodotto è
necessario rispettare:
– le norme nazionali sull'installazione ed i gestori,
– la normativa nazionale sulla protezione da incendi
ed esplosioni,
– Avvertenze per l’impiego come da disposizioni
CEI/VDE.
¾ Prima di collegare la tosatrice alla rete elettrica
accertarsi che la tensione indicata sulla targhetta
di omologazione 5 coincida con quella della rete
elettrica.
Pericolo di incendi ed esplosioni!
¾ Non utilizzare il prodotto in
settori a rischio di esplosione.
PERICOLO
Compromissioni del funzionamento
o danni al prodotto causati da
installazioni non idonee!
ATTENZIONE
¾ Non esporre il prodotto a
radiazioni solari dirette o
all’umidità.
¾ Non coprire la feritoia di
ventilazione del prodotto.
¾ Accertarsi che la presa della rete
di alimentazione usata per il
prodotto sia liberamente
accessibile.
4. Operatività con la tosatrice
FAV5
4.1 Preparazione
4.1.1 Accessori
Le combinazioni di accessori non menzionate nelle
istruzioni per l’uso possono essere utilizzate soltanto
se espressamente destinate all’applicazione prevista.
Caratteristiche e sicurezza non devono risultare
pregiudicate.
¾ Per eventuali domande rivolgersi al partner
B. Braun/Aesculap o all’Assistenza Tecnica
Aesculap, indirizzo vedere Capitolo Assistenza
tecnica.
52
Page 55

4.1.2 Inserimento della testa di tosatura
Pericoli di lesioni causate dai
pettini taglienti!
¾ Maneggiare la testa di tosatura
AVVERTENZA
Nota
La testa di tosatura GT330 #10 (USA+GB) della
tosatrice FAV5 è compresa nel corredo di fornitura.
Possono essere impiegate teste di tosatura diverse a
seconda dell’applicazione!
della tosatrice FAV5 con
estrema cautela.
1
¾ Inserire la testa di tosatura 12 sulla cerniera delle
lame 1 aperta, vedere Fig. 2.
¾ Premere l’interruttore di accensione/spegnimento 3.
12
Fig. 3
¾ Spingere leggermente la testa di tosatura 12 nella
direzione della tosatrice FAV5, vedere Fig. 3.
La testa di tosatura 12 scatta in posizione con un
rumore percettibile.
¾ Accertarsi che la testa di tosatura 12 sia
correttamente posizionata sulla tosatrice FAV5.
Fig. 1
¾ Con la cerniera delle lame chiusa: Aprire la cerniera
delle lame 1 con il cacciavite, vedere Fig. 1.
12
1
Fig. 2
4.2 Controllo del funzionamento della
tosatrice FAV5
¾ Eseguire un controllo visivo.
¾ Verificare la posizione dell’interruttore.
¾ Inserire correttamente ed eventualmente oliare il
set di taglio, vedere Capitolo Manipolazione del set
di taglio.
¾ Prima dell’uso pulire la tosatrice FAV5, vedere
Capitolo Pulizia/Disinfezione.
53
Page 56

B. Braun Vet Care
Tosatrice FAV5
4.3 Manipolazione del set di taglio
4.3.1 Affilatura dei pettini
Nota
Per affilare i pettini rivolgersi all’Assistenza Tecnica,
vedere Capitolo Assistenza tecnica.
4.3.2 Sostituzione della testa di tosatura
Pericoli di lesioni causate dai
pettini taglienti!
¾ Maneggiare la testa di tosatura
AVVERTENZA
della tosatrice FAV5 con
estrema cautela.
2
3
12
3
Fig. 5
¾ Aprire la testa di tosatura 12 tirandola in avanti,
vedere Fig. 5.
¾ Rimuovere la testa di tosatura 12.
¾ Pulire la cerniera delle lame 1 spazzolandola con
un pennello.
¾ Inserire la testa di tosatura 12 sulla cerniera delle
lame 1.
¾ Collegare la linea di allacciamento alla rete della
tosatrice FAV5.
¾ Premere l’interruttore di accensione/spegnimento 3.
¾ Spingere leggermente la testa di tosatura 12 nella
direzione della tosatrice FAV5.
La testa di tosatura 12 scatta in posizione con un
rumore percettibile.
¾ Accertarsi che la testa di tosatura 12 sia
correttamente posizionata sulla tosatrice FAV5.
Fig. 4
¾ Per disattivare la tosatrice FAV5 premere
l’interruttore di accensione/spegnimento 3, vedere
Fig. 4.
¾ Premere il bloccaggio della testa di tosatura 2,
vedere Fig. 4.
54
4.3.3 Oliatura della testa di tosatura
¾ Pulire pettine e contropettine con un panno o un
pennello morbido, assicurandosi che gli spazi
interdentali siano ben puliti.
¾ Oliare leggermente pettine e contropettine con olio
speciale per teste di tosatura GT604.
Page 57

5. Preparazione sterile
Danni o distruzioni del prodotto
causati dalla pulizia/disinfezione
automatica o la sterilizzazione!
ATTENZIONE
5.1 Pulizia/Disinfezione
Nota
Rispettare la normativa sullo smaltimento e l’igiene!
Pulizia/disinfezione manuali
PERICOLO
ATTENZIONE
¾ Pulire/disinfettare il prodotto
solo manualmente.
¾ Non sterilizzare mai il prodotto.
Pericolo di scosse elettriche ed
incendi!
¾ Prima della pulizia staccare la
spina dalla presa di rete.
¾ Accertarsi che nel prodotto non
penetri alcun liquido.
¾ Dopo la pulizia/disinfezione
aerare per minimo 1 minuto.
Danni al prodotto causati da pulizie
errate o da detergenti/disinfettanti
non idonei!
¾ Per pulire le superfici usare i
normali prodotti reperibili in
commercio.
¾ Non immergere mai il prodotto
in acqua o detergente.
¾ Non introdurre liquidi nei
pozzetti di carica.
¾ Pulire i contatti dei pozzetti con
la massima cura.
¾ Passare la scocca del prodotto con un telo non
sfilacciante inumidito con un normale prodotto
idoneo per la disinfezione per strofinamento.
¾ Se necessario, dopo il relativo tempo d’azione
eliminare i residui di detergenti e disinfettanti con
un telo non sfilacciante inumidito con acqua
pulita.
¾ Per asciugare usare un telo non sfilacciante pulito.
¾ Se necessario, ripetere la pulizia/disinfezione.
Pulizia del filtro dell’aria
Nota
Il filtro dell’aria deve essere pulito settimanalmente
oppure al bisogno!
¾ Spingere il filtro dell’aria 7 verso dietro e
rimuoverlo.
¾ Soffiare con aria compressa/sciacquare il filtro
dell’aria 7.
¾ Rimontare il filtro dell’aria 7 asciutto.
5.2 Controllo, cura e verifica
¾ Far raffreddare il prodotto a temperatura
ambiente.
¾ Dopo ogni pulizia e disinfezione, verificare che il
prodotto sia pulito, perfettamente funzionante e
non danneggiato.
¾ Se necessario oliare la testa di tosatura, vedere
Capitolo Oliatura della testa di tosatura.
¾ Controllare che il prodotto non presenti danni,
rumori da funzionamento anomali,
surriscaldamenti eccessivi o vibrazioni troppo forti.
¾ Sottoporre il set di taglio a un controllo mirante ad
escludere che i taglienti siano rotti, danneggiati e
smussi.
¾ Se il prodotto è danneggiato, scartarlo
immediatamente.
55
Page 58

B. Braun Vet Care
Tosatrice FAV5
6. Manutenzione
Per garantire un funzionamento affidabile, Aesculap
raccomanda una manutenzione annuale.
Per i relativi interventi di assistenza rivolgersi alla
rappresentanza nazionale B. Braun/Aesculap, vedere
Capitolo Assistenza tecnica.
Indirizzi dei centri assistenza
Aesculap Suhl GmbH
Fröhliche-Mann-Straße 15
98528 Suhl / Germany
Phone: +49 (0) 3681 49820
Fax: +49 (0) 3681 498234
E-Mail: suhl@aesculap.de
Gli altri indirizzi dell'assistenza possono essere
richiesti all'indirizzo predetto.
56
Page 59

7. Identificazione ed eliminazione dei guasti
Anomalia Identificazione Causa Rimedio
La testa di tosatura non
si muove
La tosatrice FAV5 taglia
male o non taglia
affatto
Il motore della tosatrice
FAV5 non funziona
La testa di tosatura è
bloccata
La tosatrice FAV5 non
taglia
La pressione di taglio è
insufficiente
Forte surriscaldamento
della testa di tosatura
La testa di tosatura è
bloccata
La tosatrice FAV5 non
taglia
Puzza di bruciato proveniente dalla scocca
La testa di tosatura è
bloccata
La testa di tosatura non è
correttamente scattata in
posizione
Leva oscillante guasta Sostituire la leva oscillante
I taglienti della testa di
tosatura sono smussi
I peli dell’animale sono
troppo bagnati
La testa di tosatura ha
una pressione insufficiente per la tosatura
I taglienti della testa di
tosatura non sono correttamente affilati
I taglienti della testa di
tosatura non sono oliati
Peli incastrati nella testa
di tosatura
I contatti sono sporchi Spegnere la tosatrice FAV5
Motore/elettronica guasti Far riparare dal produttore
Il motore è bruciato Far riparare dal produttore
La testa di tosatura è
sporca
Far scattare correttamente
in posizione la testa di
tosatura, vedere Capitolo
Inserimento della testa di
tosatura
Far riparare dal produttore
Tosare solo animali con pelo
asciutto
Far riparare dal produttore
Far riparare dal produttore
Oliare i taglienti della testa
di tosatura, vedere Capitolo
Oliatura della testa di tosatura
Smontare la testa di tosatura e rimuovere i peli
e pulire i contatti
Pulire ed oliare la testa di
tosatura, vedere Capitolo
Oliatura della testa di tosatura
57
Page 60

B. Braun Vet Care
Tosatrice FAV5
Anomalia Identificazione Causa Rimedio
Il motore della tosatrice
FAV5 funziona molto
lentamente
Rumori del motore
inconsueti
I taglienti della testa di
tosatura non sono oliati
Oliare i taglienti della testa
di tosatura, vedere Capitolo
Oliatura della testa di tosatura
8. Assistenza tecnica
Per qualsiasi intervento di assistenza, manutenzione e
riparazione rivolgersi alla rappresentanza B. Braun/
Aesculap nazionale competente per territorio.
Eventuali modifiche delle attrezzature medicochirurgiche possono comportare il decadere dei diritti
di garanzia e delle omologazioni.
Indirizzi dei centri assistenza
Aesculap Suhl GmbH
Fröhliche-Mann-Straße 15
98528 Suhl / Germany
Phone: +49 (0) 3681 49820
Fax: +49 (0) 3681 498234
E-Mail: suhl@aesculap.de
Gli altri indirizzi dell'assistenza possono essere
richiesti all'indirizzo predetto.
9. Accessori/Ricambi
Cod. art. Descrizione
GT604 Olio
GT605 Grasso
GT104614 Carboncini
GT104803 Filtro dell’aria
GT105808 Leva oscillante
GT105415 Cerniera delle lame (completa)
58
Page 61

9.1 Teste di tosatura
10. Specifiche tecniche
Testa di tosatura (completa) Formato EU
GT305 0,2 mm
GT310 0,25 mm
GT315 0,5 mm
GT317 0,5 mm
GT320 0,8 mm
GT323 0,8 mm
GT326 1,2 mm
GT330 1,5 mm
GT333 2,0 mm
GT336 2,4 mm
GT339 2,4 mm
GT341 2,8 mm
GT343 3,2 mm
GT345 3,2 mm
GT349 3,2 mm
GT353 2,4 mm
GT357 6,3 mm
GT360 6,3 mm
GT366 9,5 mm
Nota
Ulteriori dettagli relativi alle teste di tosatura sono
illustrati nel prospetto V06902!
10.1 Tosatrice FAV5
Modello di apparecchio GT105
Cadenza 2 300 1/min
Classe di protezione
(a norma CEI 60601-1)
Peso
(senza testa di tosatura)
II
circa 800 g
10.2 Dichiarazione di conformità
Dichiariamo, sotto nostra esclusiva
responsabilità, che questo prodotto è
conforme alle seguenti norme o
documenti normativi:
Direttiva CE sulla bassa tensione 2006/
95/CE
EN 60335-1
EN 60335-2-8 Sicurezza degli
apparecchi elettrici d’uso domestico e
similare
Aesculap Suhl GmbH
59
Page 62

B. Braun Vet Care
Tosatrice FAV5
11. Smaltimento
Gli elettroutensili, gli accessori e l’imballo devono
essere conferiti ad un impianto di riciclaggio
ecocompatibile.
11.1 Soltanto per i paesi CE
Non gettare gli elettroutensili nei
rifiuti domestici!
In ottemperanza alla Direttiva
Europea 2002/96/CE sui rifiuti da
apparecchiature elettriche ed
elettroniche e la relativa attuazione
nell’ambito della legislazione
nazionale, gli elettroutensili giunti a
fine vite devono essere raccolti
separatamente e conferiti ad un
impianto di riciclaggio
ecocompatibile.
12. 2 anni di garanzia
Gentile/egregio cliente,
grazie per aver preferito un prodotto della nostra
azienda. Da decenni il nome Aesculap è sinonimo di
qualità controllata e servizio di prima classe. La
Aesculap Suhl GmbH è certificata a norma
DIN EN ISO 9001. Ai nostri clienti offriamo prodotti
innovativi e prestanti.
Aesculap fabbrica apparecchi di alta qualità e assicura
l'impiego di materiali di qualità e una fabbricazione
accurata. In caso di vizi qualitativi del prodotto
forniamo una garanzia di due anni dall’acquisto (data
della fattura).
Oltre ai diritti di garanzia contrattuali e legali,
Aesculap offre una garanzia del produttore alle
seguenti condizioni:
Tale garanzia del produttore ha una validità di due anni
dalla data di acquisto. Essa copre i vizi (guasti, difetti)
imputabili a difetti dei materiali e di fabbricazione.
Dalla nostra garanzia del produttore sono esclusi:
i vizi insorgenti a causa di utilizzi non consoni, normale
usura o a seguito di interventi eseguiti sul prodotto da
persone non autorizzate o ancora del montaggio di
prodotti di terzi non idonei o non perfettamente
funzionanti. Sono inoltre esclusi i vizi che non
influenzano o influenzano solo minimamente
l’idoneità all’uso del prodotto.
Qualora durante la nostra garanzia di due anni dalla
data di acquisto dovesse manifestarsi un vizio coperto
dalla nostra garanzia del produttore, procederemo, a
nostra discrezione, a riparare il prodotto difettoso o a
sostituirlo con un altro.
Premessa per usufruire della nostra garanzia del
produttore è che ci inviate o consegnate il prodotto e
la comprova dell’acquisto (fattura) presso i distributori
nazionali Aesculap o il servizio clienti nazionale
competente.
Per gli indirizzi dei nostri centri assistenza clienti,
vedere Capitolo Assistenza tecnica.
60
Page 63

Ovviamente, a prescindere dalla nostra garanzia del
produttore, i diritti di garanzia possono essere
rivendicati anche rispetto al venditore, sotto forma di
adempimento successivo (eliminazione dei vizi,
riparazione o sostituzione), recesso o riduzione del
prezzo d’acquisto, sempre che tali diritti spettino di
legge o per contratto. Detti diritti non sono
pregiudicati dalla nostra garanzia del produttore
aggiuntiva.
61
Page 64

B. Braun Vet Care
Scheermachine FAV5
Legende
1 Messcharnier (compleet)
2 Scheerkop-vergrendeling
3 Aan/Uit-schakelaar
4 Schroeven (4 stuks)
5 Typeplaatje
6 Bovenschaal behuizing
7 Luchtfilter
8 Aandrijfarm
9 Viltblokje
10 Aandrijfklosje
11 Koolborstel
12 Scheerkop
Symbolen op het product
Volg de gebruiksaanwijzing
Markering van elektrische en
elektronische apparaten
conform richtlijn 2002/96/EG
(WEEE), zie Paragraaf
Verwijdering
Inhoudsopgave
1. Veilig gebruik .........................................................63
2. Beschrijving van het apparaat ..........................63
2.1 Inhoud levering ..................................................... 63
2.2 Benodigde componenten voor het gebruik ...63
2.3 Gebruiksdoel scheermachine FAV5 ..................63
2.4 Werking scheermachine FAV5 ..........................63
3. Voorbereiding en opstelling ...............................64
4. Gebruik van de scheermachine FAV5 ..............64
4.1 Klaarmaken .............................................................64
4.1.1 Accessoires.............................................................. 64
4.1.2 Scheerkop monteren............................................ 65
4.2 Functietest scheermachine FAV5 ..................... 65
4.3 Behandeling van de scheerkop .........................66
4.3.1 Scheerkop slijpen .................................................. 66
4.3.2 Scheerkop verwisselen......................................... 66
4.3.3 Scheerkop smeren................................................. 66
5. Reiniging en sterilisatie ......................................67
5.1 Reiniging/Desinfectie ........................................... 67
5.2 Controle, onderhoud en inspectie ....................67
6. Onderhoud ..............................................................68
7. Opsporen en verhelpen van fouten ..................69
8. Technische service ................................................70
9. Accessoires/Reserveonderdelen ........................70
9.1 Scheerkoppen .........................................................71
10. Technische specificaties ......................................71
10.1 Scheermachine FAV5 ...........................................71
10.2 Verklaring van conformiteit ...............................71
11. Verwijdering ...........................................................72
11.1 Alleen voor EU-landen ........................................72
12. 2 Jaar garantie .......................................................72
62
Page 65

1. Veilig gebruik
2. Beschrijving van het apparaat
Levensgevaar door elektrocutie!
¾ Product niet openen.
GEVAAR
¾ Controleer voor u dit product gebruikt of het
correct werkt en in goede staat is.
¾ Volg de aanwijzingen met betrekking tot
elektromagnetische compatibiliteit (EMC).
¾ Om beschadiging ten gevolge van een
onoordeelkundige montage of foutief gebruik te
vermijden en de garantie en aansprakelijkheid niet
in het geding te brengen:
– Gebruik dit product enkel volgens deze
gebruiksaanwijzing.
– Volg de veiligheidsinformatie en de
onderhoudsinstructies.
– Accessoires die niet in deze gebruiksaanwijzing
worden vermeld, mogen enkel met toestemming
van de fabrikant worden gebruikt.
¾ Laat dit product en zijn accessoires enkel bedienen
en gebruiken door personen die daartoe over de
nodige opleiding, kennis en ervaring beschikken.
¾ Bewaar deze gebruiksaanwijzing op een plaats die
toegankelijk is voor de gebruiker.
¾ Respecteer de toepasselijke normen.
¾ Zorg ervoor dat de elektrische installatie op de
plaats van gebruik aan de IEC-normen voldoet.
¾ Trek de voedingskabel altijd aan de stekker uit het
stopcontact en nooit aan de kabel zelf.
¾ Gebruik dit product niet in een explosiegevaarlijke
ruimte.
¾ Gebruik geen beschadigde of defecte producten.
Sorteer beschadigde producten onmiddellijk uit.
¾ Sluit dit product alleen aan op
een voedingsnet met
aardingsleiding.
2.1 Inhoud levering
Benaming Art.nr.
Scheermachine FAV5 GT105G
GT105J
GT105K
GT330 #10 (USA+GB)
Gebruiksaanwijzing TA012748
Opmerking
De scheerkop GT330 #10 (USA+GB) van scheermachine
FAV5 wordt standaard meegeleverd. Afhankelijk van de
toepassing kunnen er verschillende scheerkoppen (type
SNAP ON) worden gebruikt!
2.2 Benodigde componenten voor het
gebruik
• Scheermachine FAV5
• Scheerkop
2.3 Gebruiksdoel scheermachine FAV5
Opmerking
De machine is enkel bedoeld om dierenhaar te scheren.
De scheermachine FAV5 wordt gebruikt om kleine dieren te scheren.
De scheermachine FAV5 moet worden gecombineerd
met een scheerkop voor de specifieke toepassing.
2.4 Werking scheermachine FAV5
De scheermachine FAV5 wordt met de Aan/Uitschakelaar ingeschakeld (naar boven) en uitgeschakeld
(naar beneden).
63
Page 66

B. Braun Vet Care
Scheermachine FAV5
3. Voorbereiding en opstelling
Wanneer de volgende voorschriften niet worden
nageleefd, wijst Aesculap elke aansprakelijkheid van
de hand.
¾ Bij de opstelling en het gebruik van dit product
dient u de volgende voorschriften na te leven:
– de nationale installatie- en
gebruikersvoorschriften,
– de nationale voorschriften aangaande brand- en
explosiepreventie,
– Gebruiksinstructies conform de IEC-/VDE-
bepalingen.
¾ Controleer alvorens de scheermachine op het
stroomnet aan te sluiten of de spanning die op het
typeplaatje 5 staat overeenstemt met de
netspanning.
Brand- en explosiegevaar!
¾ Gebruik dit product niet in een
explosiegevaarlijke ruimte.
GEVAAR
Slechte werking of beschadiging
van het product door
onoordeelkundige opstelling!
VOORZICHTIG
¾ Stel het product niet bloot aan
direct zonlicht of vocht.
¾ Dek de verluchtingsgleuf van
het product niet af.
¾ Zorg ervoor dat het stopcontact
van het voedingsnet waarop het
product wordt aangesloten goed
toegankelijk is.
4. Gebruik van de
scheermachine FAV5
4.1 Klaarmaken
4.1.1 Accessoires
Combinaties van accessoires die niet in deze
gebruiksaanwijzing worden vermeld, mogen enkel
worden gebruikt als ze uitdrukkelijk voor de geplande
toepassing bestemd zijn. De vermogenskenmerken en
veiligheidsaspecten mogen daarbij niet nadelig
worden beïnvloed.
¾ Als u nog vragen hebt, kunt u contact opnemen
met uw B. Braun/Aesculap-partner of de
Technische Service van Aesculap, adres zie
Paragraaf Technische service.
64
Page 67

4.1.2 Scheerkop monteren
Gevaar voor verwonding door
scherpe snijplaten!
¾ Behandel de scheerkop van
WAARSCHUWING
Opmerking
De scheerkop GT330 #10 (USA+GB) van scheermachine
FAV5 wordt standaard meegeleverd. Afhankelijk van de
toepassing kunnen er verschillende scheerkoppen
worden gebruikt!
scheermachine FAV5 voorzichtig.
1
Afb. 1
¾ Bij gesloten messcharnier: Klap het messcharnier 1
open met de schroevendraaier, zie Afb. 1.
12
¾ Steek de scheerkop 12 op het geopende
messcharnier 1, zie Afb. 2.
¾ Druk op de Aan/Uit-schakelaar 3.
12
Afb. 3
¾ Druk de scheerkop 12 licht naar de scheermachine
FAV5 toe, zie Afb. 3.
De scheerkop 12 klikt hoorbaar vast.
¾ Controleer of de scheerkop 12 correct op de
scheermachine FAV5 zit.
4.2 Functietest scheermachine FAV5
¾ Voer een visuele inspectie uit.
¾ Controleer de stand van de schakelaar.
¾ Breng de scheerkop correct aan en smeer deze
eventueel, zie Paragraaf Behandeling van de
scheerkop.
¾ Reinig de scheermachine FAV5 voor het gebruik, zie
Paragraaf Reiniging/Desinfectie.
Afb. 2
1
65
Page 68

B. Braun Vet Care
Scheermachine FAV5
4.3 Behandeling van de scheerkop
4.3.1 Scheerkop slijpen
Opmerking
Laat de scheerkop slijpen door de Technische Service,
zie Paragraaf Technische service.
4.3.2 Scheerkop verwisselen
Gevaar voor verwonding door
scherpe snijplaten!
¾ Behandel de scheerkop van
WAARSCHUWING
scheermachine FAV5 voorzichtig.
2
3
12
3
Afb. 5
¾ Klap de scheerkop 12 naar voren open, zie Afb. 5.
¾ Verwijder de scheerkop 12.
¾ Maak het opengeklapte messcharnier 1 schoon
met een borsteltje.
¾ Steek de scheerkop 12 op het messcharnier 1.
¾ Steek de voedingskabel van de scheermachine
FAV5 in het stopcontact.
¾ Druk op de Aan/Uit-schakelaar 3.
¾ Druk de scheerkop 12 licht naar de scheermachine
FAV5 toe.
De scheerkop 12 klikt hoorbaar vast.
¾ Controleer of de scheerkop 12 correct op de
scheermachine FAV5 zit.
Afb. 4
¾ Druk op de Aan/Uit-schakelaar 3 om
scheermachine FAV5 uit te schakelen, zie Afb. 4.
¾ Druk op de scheerkop-vergrendeling 2, zie Afb. 4.
66
4.3.3 Scheerkop smeren
¾ Maak de bovenste en onderste snijplaat schoon
met een zachte doek of borsteltje. Let erop dat de
spleten tussen de tanden goed schoon worden.
¾ Smeer de bovenste en onderste snijplaat met een
beetje speciale olie voor scheerkoppen GT604.
Page 69

5. Reiniging en sterilisatie
Beschadiging of vernieling van het
product door machinale reiniging/
desinfectie of sterilisatie!
VOORZICHTIG
5.1 Reiniging/Desinfectie
Opmerking
Volg de voorschriften inzake verwijdering en hygiëne!
Handmatige reiniging/desinfectie
GEVAAR
VOORZICHTIG
¾ Reinig/desinfecteer het product
uitsluitend handmatig.
¾ Steriliseer het product nooit.
Gevaar voor elektrocutie en brand!
¾ Trek de netstekker uit voor de
reiniging.
¾ Let erop dat er geen vloeistof in
het product binnendringt.
¾ Laat het product na de
reiniging/desinfectie minstens
1 minuut luchten.
Beschadiging van het product door
verkeerde reiniging of gebruik van
verkeerd reinigings-/desinfectiemiddel!
¾ Voer de oppervlaktereiniging uit
met in de handel verkrijgbare
reinigingsmiddelen.
¾ Dompel het product nooit onder
in water of reinigingsmiddel.
¾ Laat geen vloeistof in de
laadschacht lopen.
¾ Reinig de contacten in de laad-
schachten uiterst zorgvuldig.
¾ Wis de behuizing van het product schoon met een
pluisvrije doek, bevochtigd met een in de handel
verkrijgbaar desinfectiemiddel.
¾ Wis de resten van het reinigings- en
desinfectiemiddel na de inwerkingstijd af met een
pluisvrije doek, bevochtigd met zuiver water.
¾ Droog het product af met een schone, pluisvrije
doek.
¾ Herhaal de reiniging/desinfectie, indien nodig.
Luchtfilter reinigen
Opmerking
Het luchtfilter moet wekelijks of volgens behoefte
worden gereinigd!
¾ Schuif het luchtfilter 7 achteruit en verwijder het.
¾ Blaas/was het luchtfilter 7 schoon.
¾ Breng een droog luchtfilter 7 aan.
5.2 Controle, onderhoud en inspectie
¾ Laat het product afkoelen tot kamertemperatuur.
¾ Controleer het product telkens nadat het gereinigd
en gedesinfecteerd is, op: reinheid, goede werking
en beschadigingen.
¾ Smeer de scheerkop indien nodig, zie Scheerkop
smeren.
¾ Inspecteer het product op beschadigingen,
abnormale geluiden, overmatige opwarming of te
sterke trillingen.
¾ Inspecteer de scheerkop op afgebroken,
beschadigde en botte sneden.
¾ Sorteer beschadigde producten onmiddellijk uit.
67
Page 70

B. Braun Vet Care
Scheermachine FAV5
6. Onderhoud
Om een betrouwbare werking te garanderen, beveelt
Aesculap een jaarlijks onderhoud aan.
Doe voor alle servicewerken een beroep op uw
nationale B. Braun/Aesculap-vestiging, zie Paragraaf
Technische service.
Service-adressen
Aesculap Suhl GmbH
Fröhliche-Mann-Straße 15
98528 Suhl / Germany
Phone: +49 (0) 3681 49820
Fax: +49 (0) 3681 498234
E-Mail: suhl@aesculap.de
Andere service-adressen zijn verkrijgbaar op het
bovengenoemde adres.
68
Page 71

7. Opsporen en verhelpen van fouten
Storing Opsporing Oorzaak Remedie
Scheerkop beweegt niet Scheerkop is geblokkeerd Scheerkop is niet correct
Scheermachine FAV5
snijdt slecht of helemaal niet
Motor van de scheermachine FAV5 draait niet
Motor van de scheermachine FAV5 draait erg
langzaam
Scheermachine FAV5
snijdt niet
Slechte snijprestaties Sneden van de scheerkop
Sterke opwarming van de
snijkop
Scheerkop is geblokkeerd Dierenhaar zit vast in de
Scheermachine FAV5
snijdt niet
Brandgeur uit de behuizing
Scheerkop is geblokkeerd Scheerkop is verontrei-
Motor maakt abnormaal
geluid
vastgeklikt
Aandrijfarm defect Aandrijfarm vervangen
Sneden van de scheerkop
zijn bot
Dierenhaar is te nat Scheer alleen droog dieren-
Scheerkop heeft te weinig scheerdruk
zijn niet juist geslepen
Sneden van de scheerkop
zijn niet gesmeerd
scheerkop
Contacten zijn vuil Scheermachine FAV5 uit-
Motor/elektronica defect Door de fabrikant laten
Motor is verbrand Door de fabrikant laten
nigd
Sneden van de scheerkop
zijn niet gesmeerd
Scheerkop correct vastklikken, zie Paragraaf Scheerkop monteren
Door de fabrikant laten
repareren
haar
Door de fabrikant laten
repareren
Door de fabrikant laten
repareren
Sneden van de scheerkop
smeren, zie Paragraaf
Scheerkop smeren
Scheerkop demonteren en
dierenhaar verwijderen
schakelen en contacten reinigen
repareren
repareren
Scheerkop reinigen en smeren, zie Paragraaf Scheerkop smeren
Sneden van de scheerkop
smeren, zie Paragraaf
Scheerkop smeren
69
Page 72

B. Braun Vet Care
Scheermachine FAV5
8. Technische service
Doe voor alle service, onderhoud en reparaties een
beroep op uw nationale B. Braun/Aesculap-vestiging.
Wijzigingen aan medisch-technische uitrusting
kunnen leiden tot het verlies van elke aanspraak op
garantie en de nietigheid van eventuele
goedkeuringen.
Service-adressen
Aesculap Suhl GmbH
Fröhliche-Mann-Straße 15
98528 Suhl / Germany
Phone: +49 (0) 3681 49820
Fax: +49 (0) 3681 498234
E-Mail: suhl@aesculap.de
Andere service-adressen zijn verkrijgbaar op het
bovengenoemde adres.
9. Accessoires/
Reserveonderdelen
Art.nr. Benaming
GT604 Olie
GT605 Vet
GT104614 Koolbostels
GT104803 Luchtfilter
GT105808 Aandrijfarm
GT105415 Messcharnier (compleet)
70
Page 73

9.1 Scheerkoppen
10. Technische specificaties
Scheerkop (compleet) Maat EU
GT305 0,2 mm
GT310 0,25 mm
GT315 0,5 mm
GT317 0,5 mm
GT320 0,8 mm
GT323 0,8 mm
GT326 1,2 mm
GT330 1,5 mm
GT333 2,0 mm
GT336 2,4 mm
GT339 2,4 mm
GT341 2,8 mm
GT343 3,2 mm
GT345 3,2 mm
GT349 3,2 mm
GT353 2,4 mm
GT357 6,3 mm
GT360 6,3 mm
GT366 9,5 mm
Opmerking
Meer informatie over de scheerkoppen vindt u in de
catalogus V06902!
10.1 Scheermachine FAV5
Toesteltype GT105
Aantal slagen per
minuut
Beschermingsklasse
(volgens IEC 60601-1)
Gewicht
(zonder scheerkop)
2 300 1/min
II
ca. 800 g
10.2 Verklaring van conformiteit
Wij verklaren in eigen naam dat dit
product in overeenstemming is met de
volgende normen en normatieve
documenten:
2006/95/EG EG-laagspanningsrichtlijn
EN 60335-1
EN 60335-2-8 Veiligheid van
huishoudelijke en soortgelijke
elektrische toestellen
Aesculap Suhl GmbH
71
Page 74

B. Braun Vet Care
Scheermachine FAV5
11. Verwijdering
Elektrisch gereedschap, accessoires en verpakking
moeten op een milieubewuste manier worden
gerecycled.
11.1 Alleen voor EU-landen
Elektrisch gereedschap hoort niet bij
het huishoudelijk afval!
Volgens de Europese Richtlijn 2002/
96/EG inzake afgedankte elektrische
en elektronische apparaten en de
overeenkomstige nationale
voorschriften moet afgedankt
elektrisch gereedschap gescheiden
worden verzameld en op een
milieuverantwoorde wijze worden
gerecycled.
12. 2 Jaar garantie
Beste klant,
hartelijk dank dat u voor een product van Aesculap
hebt gekozen. De naam Aesculap staat al decennialang
borg voor bewezen kwaliteit en voortreffelijke service.
Aesculap Suhl GmbH is gecertificeerd volgens
DIN EN ISO 9001. Wij bieden onze klanten innovatieve
producten die topprestaties garanderen.
Aesculap produceert kwaliteitsapparaten, die met de
grootste zorg worden gefabriceerd uit hoogwaardige
materialen. Op kwaliteitsgebreken aan het product
bieden wij twee jaar garantie vanaf de aankoopdatum
(de facturatiedatum).
Bovenop de consumentenrechten die u contractueel
en wetelijk geniet, biedt Aesculap u een
fabrikantengarantie met de volgende voorwaarden:
Deze fabrikantengarantie geldt gedurende twee jaar
vanaf de aankoopdatum. Ze geldt voor gebreken
(storingen, defecten) die het gevolg zijn van materiaalof fabricagefouten.
De volgende gebreken zijn uitgesloten van onze
fabrikantengarantie:
gebreken die voortvloeien uit een onoordeelkundig
gebruik of normale slijtage, gebreken die ontstaan
doordat onbevoegde personen verkeerde ingrepen aan
het product uitvoeren of doordat bij de montage
gebruik wordt gemaakt van niet-passende of niet
correct werkende producten van derde fabrikanten.
Eveneens uitgesloten zijn gebreken die geen of
nauwelijks invloed hebben op de waarde of goede
werking van het product.
Indien er tijdens de garantieperiode van twee jaar
vanaf de aankoopdatum een gebrek ontstaat dat onder
onze fabrikantengarantie valt, zullen wij het product,
volgens ons oordeel, repareren of door een ander
product vervangen.
Om aanspraak te maken op deze garantie, dient u het
product met het aankoopbewijs (factuur) binnen de
garantieperiode naar ons terug te sturen of te brengen,
meer bepaald naar de nationale verkoopmaatschappijen van Aesculap of de bevoegde nationale klantendienst.
72
Page 75

Voor de adressen van onze klantendienst-centra, zie
Paragraaf Technische service.
Onze fabrikantengarantie doet uiteraard geen afbreuk
aan de rechten op prestaties onder garantie die u ten
overstaan van de verkoper geniet, met name het recht
op verbetering, reparatie of vervanging, het recht om
af te zien van de koop of een korting te bedingen, in
zoverre deze rechten u wettelijk of contractueel
toekomen. Onze fabrikantengarantie heeft geen enkele
invloed op deze rechten.
73
Page 76

B. Braun Vet Care
Машинка для стрижки FAV5
Легенда
1 Шарнир ножа (в сборе)
2 Фиксатор стригущей головки
3 Переключатель "Вкл/Выкл"
4 Винты (4 штуки)
5 Фирменная табличка
6 Верхняя часть корпуса
7 Воздушный фильтр
8 Качающийся рычаг
9 Сукно для масла
10 Ползун
11 Угольная щетка
12 Стригущая головка
Симбольи на продукт
Соблюдайте требования
руководства по
эксплуатации
Маркировка
электрических и
электронных приборов в
соответствии с
директивой 2002/96/ЕС
(WEEE), см. Раздел
Утилизация
Содержание
1. Правильное обращение с
устройством ..................................75
2. Описание устройства .....................75
2.1 Комплект поставки .........................75
2.2 Компоненты, необходимые
для эксплуатации устройства .........76
2.3 Назначение машинки для
стрижки FAV5 .................................76
2.4 Принцип работы машинки для
стрижки FAV5 .................................76
3. Подготовка и установка ..................76
4. Работа с машинкой для
стрижки FAV5 .................................77
4.1 Подготовка ....................................77
4.1.1Принадлежности............................ 77
4.1.2Надеть стригущую головку............. 77
4.2 Проверка работоспособности
машинки для стрижки FAV5 ............78
4.3 Обслуживание ножевого блока ......78
4.3.1Заточка ножа ................................. 78
4.3.2Замена стригущей головки ............ 78
4.3.3Смазка стригущей головки
маслом .......................................... 79
5. Подготовка ....................................79
5.1 Очистка/дезинфекция ....................80
5.2 Контроль, уход и проверка .............80
6. Техническое обслуживание ............81
7. Распознавание и устранение
неисправностей .............................82
8. Сервисное обслуживание ..............84
9. Принадлежности/запасные части ..84
9.1 Стригущие головки ........................84
10. Технические характеристики ..........85
10.1 Машинка для стрижки FAV5 ............85
10.2 Заявление о соответствии .............85
11. Утилизация ....................................85
11.1 Только для стран ЕС .......................85
12. Гарантия 2 года ..............................86
74
Page 77

1. Правильное
обращение с
устройством
Опасность для жизни из'за
поражения электрическим
током!
ОПАСНОСТЬ
¾ Перед применением устройства
проверить его на работоспособность и
надлежащее состояние.
¾ „Соблюдать указания по
электромагнитной совместимости
(ЭМС)“.
¾ Чтобы избежать повреждений,
являющихся результатом неправильного
монтажа или эксплуатации, и сохранить
право на гарантию, необходимо:
– использовать устройство только в
соответствии с руководством по
эксплуатации,
– соблюдать указания по технике
безопасности и техническому
обслуживанию,
– Принадлежности, не упомянутые в
руководстве по эксплуатации, можно
использовать только с согласия
производителя.
¾ Устройство и принадлежности
разрешается приводить в действие и
использовать только лицам, имеющим
соответствующее образование, знания
или опыт.
¾ Не открывать
устройство.
¾ Подключать устройство
только к сети питания с
защитным проводом.
¾ Руководство по эксплуатации должно
храниться в доступном для
пользователей месте.
¾ Соблюдать действующие нормы.
¾ Убедиться, что электропроводка
помещения соответствует стандартам
IEC (Международной комиссии по
электротехнике).
¾ Отсоединять устройство от сети,
вытягивая вилку, ни в коем случае не
тянуть за кабель.
¾ Не использовать изделие во
взрывоопасных зонах.
¾ Нельзя использовать поврежденное или
неисправное изделие. Поврежденное
изделие необходимо сразу же
выбраковать.
2. Описание устройства
2.1 Комплект поставки
Наименование Номер артикула
Машинка для
стрижки FAV5
Руководство по
эксплуатации
Указание
Стригущая головка GT330 #10 (USA+GB)
машинки для стрижки FAV5 входит в
комплект поставки. В зависимости от
области применения можно использовать
разные стригущие головки (тип SNAP ON)!
GT105G
GT105J
GT105K
GT330 #10
(USA+GB)
TA012748
75
Page 78

B. Braun Vet Care
Машинка для стрижки FAV5
2.2 Компоненты, необходимые
для эксплуатации
устройства
• Машинка для стрижки FAV5
• Стригущая головка
2.3 Назначение машинки для
стрижки FAV5
Указание
Машина предназначена только для стрижки
шерсти у животных!
Машинка для стрижки FAV5 применяется
для стрижки мелких домашних животных.
В зависимости от области применения
нужно использовать машинку для стрижки
FAV5 с определенной стригущей головкой.
2.4 Принцип работы машинки
для стрижки FAV5
Машинка для стрижки FAV5 включается
перемещением переключателя "Вкл/Выкл"
вверх и выключается перемещением
переключателя вниз.
3. Подготовка и
установка
Фирма Aesculap снимает с себя всякую
ответственность, если не выполняются
перечисленные ниже предписания.
¾ При установке и эксплуатации изделия
должны соблюдаться:
– предписания по установке и
эксплуатации, принятые в конкретной
стране,
– национальные предписания по
противопожарной защите и
взрывозащите,
– предписания по эксплуатации в
соответствии с положениями IEC/VDE.
¾ Перед подключением машинки для
стрижки к электрической сети
проверить, совпадает ли напряжение,
указанное на заводской табличке 5, с
напряжением сети.
Опасность пожара и
взрыва!
ОПАСНОСТЬ
ОСТОРОЖНО
¾ Не и спользовать изделие
во взрывоопасных зонах.
Нарушение
функционирования или
повреждение изделия в
результате неправильного
монтажа!
¾ Не подвергать изделие
воздействию прямых
солнечных лучей или
влаги.
¾ Не закрывать
вентиляционные щели
изделия.
¾ Убедиться, что к розетке
сети питания,
используемой для
подачи электроэнергии к
изделию, имеется
свободный доступ.
76
Page 79

4. Работа с машинкой для
стрижки FAV5
4.1 Подготовка
4.1.1 Принадлежности
Комбинации принадлежностей, о которых
не упоминается в данном руководстве по
эксплуатации, разрешаются к применению
лишь в том случае, если они определенно
предназначены для предполагаемого
использования. Не разрешаются какие
либо действия, оказывающие негативное
влияние на характеристики мощности, а
также требования по технике безопасности.
¾ При возникновении вопросов
обращайтесь к партнеру фирмы B.
Braun/Aesculap или в отдел технического
обслуживания Aesculap, адрес см.
Раздел Сервисное обслуживание.
4.1.2 Надеть стригущую головку
1
Рис. 1
¾ При закрытом шарнире ножа: Открыть
шарнир ножа 1 отверткой, см. Рис. 1.
12
Опасность получения
травмы из'за острых
ножей!
BHИMAHИЕ
Указание
Стригущая головка GT330 #10 (USA+GB)
машинки для стрижки FAV5 входит в
комплект поставки. В зависимости от
области применения можно использовать
различные стригущие головки!
¾ Со стригущей головкой
машинки для стрижки
FAV5 следует
обращаться осторожно.
1
Рис. 2
¾ Насадить стригущую головку 12 на
открытый шарнир ножа 1, см. Рис. 2.
¾ Нажать на переключатель "Вкл/Выкл" 3.
77
Page 80

B. Braun Vet Care
Машинка для стрижки FAV5
12
4.3 Обслуживание ножевого
блока
4.3.1 Заточка ножа
Указание
Для заточки ножа следует обратиться в
отдел технического обслуживания, см.
Раздел Сервисное обслуживание.
4.3.2 Замена стригущей головки
Рис. 3
¾ Слегка нажать на стригущую головку 12 в
направлении машинки для стрижки FAV5,
см. Рис. 3.
Стригущая головка 12 фиксируется со
слышимым звуком.
¾ Убедиться в том, что стригущая
головка 12 правильно установлена на
машинке для стрижки FAV5.
4.2 Проверка
работоспособности
машинки для стрижки FAV5
¾ Провести визуальную проверку.
¾ Проверить положение переключателя.
¾ Правильно насадить ножевой блок и, при
необходимости, смазать маслом, см.
Раздел Обслуживание ножевого блока.
¾ Перед использованием почистить
машинку для стрижки FAV5, см. Раздел
Очистка/дезинфекция.
BHИMAHИЕ
Рис. 4
Опасность получения
травмы из'за острых
ножей!
¾ Осторожно обращаться
со стригущей головкой
машинки для стрижки
FAV5.
2
3
78
Page 81

¾ Нажать на переключатель "Вкл/Выкл" 3,
чтобы выключить машинку для стрижки
FAV5, см. Рис. 4.
¾ Нажать на фиксатор стригущей
головки 2, см. Рис. 4.
12
4.3.3 Смазка стригущей головки
маслом
¾ Почистить верхний и нижний нож мягкой
тряпкой или кисточкой. При этом
убедиться в том, что впадины между
зубьями чистые.
¾ Слегка смазать верхний и нижний нож
специальным маслом для режущих
головок GT604.
3
Рис. 5
¾ Откинуть стригущую головку 12 вперед,
см. Рис. 5.
¾ Снять стригущую головку 12.
¾ Почистить кисточкой открытый шарнир
ножа 1.
¾ Насадить стригущую головку 12 на
шарнир ножа 1.
¾ Вставить провод для присоединения к
сети машинки для стрижки FAV5.
¾ Нажать на переключатель "Вкл/Выкл" 3.
¾ Слегка нажать на стригущую головку 12 в
направлении машинки для стрижки FAV5.
Слышно, как стригущая головка 12
зафиксировалась.
¾ Убедиться в том, что стригущая
головка 12 правильно установлена на
машинке для стрижки FAV5.
5. Подготовка
Опасность повреждения
или разрушения изделия
при проведении машинной
ОСТОРОЖНО
очистки/дезинфекции или
стерилизации!
¾ Выполнять очистку/
дезинфекцию изделия
только вручную.
¾ Никогда не
стерилизовать изделие.
79
Page 82

B. Braun Vet Care
Машинка для стрижки FAV5
5.1 Очистка/дезинфекция
Указание
Соблюдать предписания по утилизации и
санитарные правила!
Ручная очистка/дезинфекция
Опасность удара током и
возникновения пожара!
ОПАСНОСТЬ
ОСТОРОЖН О
¾ Перед очисткой вытянуть
штепсельную вилку.
¾ Убедиться, что в изделие
не попадает жидкость.
¾ После очистки/
дезинфекции оставить
изделие проветриваться
в течение не менее
1минуты.
Ненадлежащая очистка или
применение
неподходящего чистящего/
дезинфицирующего
средства могут привести к
повреждению устройства!
¾ Применять стандартное
средство для чистки
поверхностей.
¾ Никогда не помещать
изделие в воду или
чистящий раствор.
¾ Не допускать попадания
жидкости в зарядные
гнезда.
¾ Чистку контактов в
зарядных гнездах
выполнять с
максимальной
осторожностью.
¾ Протереть корпус изделия безворсовой
салфеткой, смоченной стандартным
средством для дезинфекции.
¾ При необходимости, вытереть остатки
чистящего и дезинфицирующего
средства по истечении времени его
воздействия безворсовой салфеткой,
смоченной чистой водой.
¾ Для протирки насухо использовать
чистую безворсовую салфетку.
¾ При необходимости, провести
повторную очистку/дезинфекцию.
Чистка воздушного фильтра
Указание
Воздушный фильтр необходимо чистить
раз в неделю или по мере необходимости!
¾ Сдвинуть воздушный фильтр 7 назад и
снять его.
¾ Продуть/промыть воздушный фильтр 7.
¾ Надеть сухой воздушный фильтр 7.
5.2 Контроль, уход и проверка
¾ Дать изделию остыть до комнатной
температуры.
¾ Каждый раз после проведения очистки и
дезинфекции проверять изделие на
чистоту, функционирование и наличие
повреждений.
¾ При необходимости смазать маслом
стригущую головку, см. Раздел Смазка
стригущей головки маслом.
¾ Проверить изделие на наличие
повреждений, возникновение
посторонних шумов при работе,
чрезмерного нагрева или слишком
сильной вибрации.
80
Page 83

¾ Проверить ножевой блок на наличие
отломанных, поврежденных и тупых
ножей.
¾ Поврежденное изделие необходимо
немедленно выбраковать.
6. Техническое
обслуживание
Для обеспечения надежной работы изделия
фирма Aesculap рекомендует проводить
техническое обслуживание ежегодно.
Для проведения соответствующего
сервисного обслуживания обращайтесь в
представительство фирмы B. Braun/
Aesculap в Вашей стране, см. Раздел
Сервисное обслуживание.
Адреса сервисных центров
Aesculap Suhl GmbH
Fröhliche-Mann-Straße 15
98528 Suhl / Germany
Phone: +49 (0) 3681 49820
Fax: +49 (0) 3681 498234
E-Mail: suhl@aesculap.de
Адреса других сервисных центров можно
узнать по вышеуказанному адресу.
81
Page 84

B. Braun Vet Care
Машинка для стрижки FAV5
7. Распознавание и устранение неисправностей
Неисправность Распознавание Причина Устранение
Не перемещается
стригущая головка
Машинка для
стрижки FAV5 плохо
стрижет или не
стрижет вообще
Заблокирована
стригущая головка
Машинка для
стрижки FAV5 не
стрижет
Недостаточная
режущая
способность
Сильный нагрев
режущей головки
Заблокирована
стригущая головка
Стригущая головка
зафиксирована
неправильно
Неисправен
качающийся рычаг
Затупились ножи
стригущей головки
Шерсть животного
слишком влажная
Слишком низкий
нажим стригущей
головки
Неправильно
заточены ножи
стригущей головки
Ножи стригущей
головки не смазаны
маслом
В стригущей головке
защемлена шерсть
животного
Правильно
зафиксировать
стригущую головку,
см. Раздел Надеть
стригущую головку
Заменить качаю щийся
рычаг
Отдать в ремонт
фирмеизготовителю
Стричь только сухую
шерсть
Отдать в ремонт
фирмеизготовителю
Отдать в ремонт
фирмеизготовителю
Смазать маслом ножи
стригущей головки,
см. Раздел Смазка
стригущей головки
маслом
Разобрать стригущую
головку и извлечь
шерсть
82
Page 85

Неисправность Распознавание Причина Устранение
Не работает
двигатель машинки
для стрижки FAV5
Машинка для
стрижки FAV5 не
стрижет
Загрязнены
контакты
Неисправность
двигателя/
Выключить машинку
для стрижки FAV5 и
почистить контакты
Отдать в ремонт
фирмеизготовителю
электроники
Запах гари из
корпуса
Заблокирована
стригущая головка
Сгорел двигатель Отдать в ремонт
фирмеизготовителю
Загрязнена
стригущая головка
Почистить и смазать
маслом стригущую
головку, см. Раздел
Смазка стригущей
головки маслом
Двигатель машинки
для стрижки FAV5
работает очень
медленно
Необычные шумы в
двигателе
Ножи стригущей
головки не смазаны
маслом
Смазать ножи
стригущей головки
маслом, см. Раздел
Смазка стригущей
головки маслом
83
Page 86

B. Braun Vet Care
Машинка для стрижки FAV5
8. Сервисное
обслуживание
Для проведения сервисных работ,
технического обслуживания и ремонта
обращайтесь в представительство фирмы
B. Braun/Aesculap в Вашей стране.
Модифицирование медикотехнического
оборудования может привести к потере
права на гарантийное обслуживание, а
также к прекращению действия
соответствующих допусков к эксплуатации.
Адреса сервисных центров
Aesculap Suhl GmbH
Fröhliche-Mann-Straße 15
98528 Suhl / Germany
Phone: +49 (0) 3681 49820
Fax: +49 (0) 3681 498234
E-Mail: suhl@aesculap.de
Адреса других сервисных центров можно
узнать по вышеуказанному адресу.
9. Принадлежности/
запасные части
Номер
артикула
GT604 Масло
GT605 Консистентная смазка
GT104614 Угольные щетки
GT104803 Воздушный фильтр
GT105808 Качающийся рычаг
GT105415 Шарнир ножа (в сборе)
Наименование
9.1 Стригущие головки
Стригущая головка
(в сборе)
GT305 0,2 мм
GT310 0,25 мм
GT315 0,5 мм
GT317 0,5 мм
GT320 0,8 мм
GT323 0,8 мм
GT326 1,2 мм
GT330 1,5 мм
GT333 2,0 мм
GT336 2,4 мм
GT339 2,4 мм
GT341 2,8 мм
GT343 3,2 мм
GT345 3,2 мм
GT349 3,2 мм
GT353 2,4 мм
GT357 6,3 мм
GT360 6,3 мм
GT366 9,5 мм
Указание
Дополнительная подробная информация о
стригущих головках содержится в
проспекте V06902!
Размер ЕС
84
Page 87

10. Технические
характеристики
10.1Машинка для стрижки FAV5
Тип инструмента GT105
Число ходов 2 300 1/мин
Класс защиты
(согласно IEC 606011)
Вес
(без стригущей головки)
10.2Заявление о соответствии
Мы, под собственную
ответственность, заявляем,
что данное изделие
соответствует следующим
нормам или нормативным
документам:
2006/95/ЕС директива ЕС о
низковольтном оборудовании
EN 603351
EN 6033528 "Безопасность
бытовых и аналогичных
электрических приборов"
Aesculap Suhl GmbH
II
около 800 г
11.1Только для стран ЕС
Не выбрасывать
электроинструменты в
бытовые отходы!
В соответствии с Европейской
директивой 2002/96/ЕС об
отслуживших свой срок
электрических и электронных
приборах и ее реализацией в
национальном праве
электроинструменты, больше
не пригодные к эксплуатации,
должны собираться отдельно
и сдаваться для экологически
целесообразного вторичного
использования.
11. Утилизация
Электроинструменты, комплектующие и
упаковка должны сдаваться для
экологически целесообразного вторичного
использования.
85
Page 88

B. Braun Vet Care
Машинка для стрижки FAV5
12. Гарантия 2 года
Уважаемый покупатель,
большое спасибо за то, что Вы выбрали
изделие, производимое нашей фирмой.
Название Aesculap уже несколько
десятилетий является синонимом
проверенного качества и первоклассного
обслуживания. Фирма Aesculap Suhl GmbH
сертифицирована согласно
DIN EN ISO 9001. Мы предлагаем нашим
клиентам инновационное и
производительное оборудование.
Фирма Aesculap производит
высококачественное оборудование и
гарантирует применение
высококачественных материалов и
точность изготовления. При дефектах
качества изделия предоставляется
гарантия сроком на два года с момента его
приобретения (начиная с даты выставления
счета).
В дополнение к правам на гарантийное
обслуживание, имеющимся у покупателя
согласно договору и по закону, фирма
Aesculap предоставляет гарантию
изготовителя на следующих условиях:
Данная гарантия изготовителя действует в
течение двух лет с даты совершения
покупки. Она распространяется на
недостатки (повреждения, дефекты),
вызванные браком материала или
производственным браком.
Из нашей гарантии исключены:
такие недостатки, которые возникают
вследствие ненадлежащей эксплуатации,
обычного износа или вследствие
неграмотного вмешательства в изделие
неуполномоченных лиц или использования
при монтаже неподходящей или
небезупречно функционирующей
продукции других производителей.
Также исключены недостатки, которые не
оказывают или же оказывают
незначительное влияние на стоимость или
пригодность к эксплуатации.
При возникновении во время гарантийного
периода (в течение двух лет с даты
совершения покупки) недостатка, на
который распространяется наша гарантия
изготовителя, мы, на свой выбор,
производим ремонт или замену дефектного
изделия.
Условием предоставления нашей гарантии
изготовителя является пересылка или
передача нам изделия и документа,
подтверждающего совершение покупки
(счетафактуры), в течение гарантийного
срока, а именно, в компании, продающие
технику фирмы Aesculap в Вашей стране,
или в отдел обслуживания клиентов,
отвечающий за определенную страну.
Адреса наших центров обслуживания
клиентов, см. Раздел Сервисное
обслуживание.
Разумеется, Вы также можете заявить
продавцу свои права на гарантийное
обслуживание независимо от нашей
гарантии изготовителя, а именно, права на
последующее исполнение (устранение
недостатков, ремонт или замену), отказ от
договора или снижение продажной цены,
если такие права полагаются Вам по закону
или согласно договору. Эти права не
затрагиваются нашей дополнительной
гарантией изготовителя.
86
Page 89

Page 90

Technical alterations reserved
Technische Änderungen vorbehalten
Sous réserve de modifications techniques
Sujeto a modificaciones técnicas
Con riserva di modifiche tecniche
Technische wijzigingen voorbehouden
Мы оставляем за собой право вносит ь технические изменения
TA-Nr. 012748 08/11 Änd.-Nr. 43733
Aesculap Suhl GmbH
Fröhliche-Mann-Straße 15
98528 Suhl / Germany
Phone +49 3681 49820
Fax +49 3681 498234
E-mail suhl@aesculap.de
 Loading...