


 Loading...
06/06 Rev. 3.05-01 |
OPERATING MANUAL |
|
ALX 92x |
Setup |
|
Winding pattern ............................................. |
2 |
Selecting the printing material ....................... |
4 |
Thermal transfer / direct thermal printing |
.. 4 |
Label material ............................................ |
4 |
Thermal transfer ribbon ............................. |
5 |
Inserting label material .................................. |
6 |
Removing spent backing paper ................. |
6 |
Removing glue residue ............................. |
6 |
Inserting a new label roll ........................... |
7 |
Inserting ribbon ............................................ |
11 |
Removing spent ribbon ............................ |
11 |
Inserting a new ribbon roll ........................ |
12 |
Settings ....................................................... |
13 |
Ribbon tension ......................................... |
13 |
Label sensor ............................................ |
14 |
Adjustment button for printhead pressure 15 |
|
Dispensing edge ...................................... |
16 |
Dispenser parameters ............................. |
16 |
Material Parameters ................................ |
17 |
Index ............................................................ |
18 |

2
06/06 Rev. 3.05-01 |
OPERATING MANUAL |
Setup |
ALX 92x
Winding pattern
The winding diagram shows the winding direction of material and ribbon through the ALX 92x.
Follow this basic scheme when inserting/changing material and ribbon. Only specially trained staff to insert and change the ribbons and material.
|
|
|
|
|
|
|
8 |
|
|
|
|
|
|
|
7 |
|
Z0189.cdr |
|
|
|
|
|
|
|
1 |
2 |
3 |
4 |
5 |
|
|
|
|
|
|
|
|
|
6 |
24 |
|
|
|
|
|
|
|
23 |
|
|
|
|
|
|
9 |
22 |
|
|
15 |
|
|
|
|
|
|
|
|
|
|
||
21 |
|
|
|
|
|
|
|
20 |
19 |
18 17 16 14 13 12 |
11 |
5 |
10 |
||
[1] Material and ribbon path in the ALX 92x (left version).

3
06/06 Rev. 3.05-01 |
|
OPERATING MANUAL |
|
Setup |
|
|
ALX 92x |
|
|
Names of parts |
|
|
|
|
No. |
Name |
No. |
Name |
|
|
1 |
Adjustment knob for printhead |
13 |
Feed roller |
|
|
pressure |
|
|
|
|
|
|
|
|
2 |
Ribbon rewinding mandrel |
14 |
Deflection roll |
|
3 |
Ribbon unwinding mandrel |
15 |
Material guide |
|
|
|
|
|
|
4 |
Operation panel |
16 |
Opener |
|
5 |
Deflection roll |
17 |
Brake roller |
|
|
|
|
|
|
6 |
Material dancer arm |
18 |
Adjustment wheel for label |
|
|
|
|
sensor |
|
7 |
Material unwinder |
19 |
Print roller |
|
|
|
|
|
|
8 |
Guiding rod |
20 |
Dispensing edge |
|
9 |
Backing paper rewinder |
21 |
Printhead |
|
|
|
|
|
|
10 |
Backing paper dancer arm |
22 |
Ribbon deflection axle |
|
11 |
Pressure roller |
23 |
Ribbon deflection roller with |
|
|
|
|
stress relief |
|
|
|
|
|
|
12 |
Lever for pressure roller |
24 |
Ribbon roller |
|
|
|
|
|
[Tab. 1] ALX 92x operating parts

4
06/06 Rev. 3.05-01 |
OPERATING MANUAL |
Setup |
|
ALX 92x |
|
Selecting the printing material |
|
|
|
Thermal transfer / direct thermal printing |
|
|
The ALX 92x can print onto label material using the direct thermal mode or |
|
|
thermal transfer mode. |
|
Direct thermal |
Direct thermal printing is done without ribbon. The direct thermal process |
|
|
requires label material with a temperature-sensitive coating. The printout is |
|
|
produced by applying precise bursts of heat to the material under the |
|
|
printhead. This changes the colour of the coating. |
|
Thermal |
Thermal transfer printing is done with (thermal transfer) ribbon on “normal” |
|
transfer |
label material. The printout is produced by applying precise bursts of heat to |
|
|
the thermal transfer ribbon under the printhead. This transfers the colour |
|
|
particles to the label. |
|
|
Label material |
|
|
The ALX 92x was developed for printing on self-adhesive stock. |
|
|
Pay attention to the following factors when selecting label material: |
|
• |
The roughness of the material surface |
|
• |
The printhead temperature required for the colour transfer |
|
• |
Size of the material roll. The following dimensions need to be checked: |
|
|
Outside-/inside diameter of the material roll and the material width |
|
Material |
If the material is very rough, the printhead will be worn down more quickly |
|
roughness |
than when using a smooth material. This is an important aspect of thermal |
|
|
printing. With thermal transfer printing, this doesn’t pose such a problem, |
|
|
because you can – and indeed should – select a ribbon that is wider than the |
|
|
material. This means that the printhead is protected over the entire width of |
|
|
the material. |
|
Printhead |
High printhead temperatures can similarly cause problems. The material and |
|
temperature |
the ribbon take longer to cool. As a result, the print quality may degrade – |
|
|
particularly at high print speeds. The printhead also wears down more |
|
|
quickly. |
|
|
The printing result is highly dependent on the right combination of label |
|
|
material and thermal transfer ribbon. The surface of the label material |
|
|
determines which thermal transfer ribbons produces the best adhesion. |
|
|
Unsuitable ribbons can lead to poor printing results. |
|
Π Further information can be found in the topic section Technical data, section “Label material”.

5
06/06 Rev. 3.05-01 |
OPERATING MANUAL |
Setup |
|
ALX 92x |
|
Thermal transfer ribbon
The following is recommended for thermal transfer ribbons:
• The back of the ribbon should be coated so that it produces no static or friction (Backcoating). If this isn’t the case, the printhead may be damaged by static discharge coming off the ribbon surface.
• The ribbons need to be designed for “corner edge” printheads.
• Ribbons should be able to handle print speeds of up to 400 mm/s (16 ips).
• Size of the ribbon roll: The following dimensions need to be checked: outside/ inside diameter of the ribbon roll, ribbon width.
CAUTION! - Thermal transfer ribbons without these properties can degrade the performance of the printer and the print quality as well as damage the printhead!
Armor APR 600 (Avery part no. 2240-600-xxx) is a recommended ribbon type.
The thermal transfer ribbon should only be slightly wider than the label material.
•If an overly narrow ribbon is used, the border of the label material interferes with the printhead – which wears it down more quickly.
•If an overly wide ribbon is used, creasing may occur in the ribbon. This can led to poor printing results.
ΠFor more details on the permissible dimensions of ribbon rolls, refer to Technical data, “Thermal Transfer Ribbon”.
6
06/06 Rev. 3.05-01 |
OPERATING MANUAL |
Setup |
|
ALX 92x |
|
Inserting label material
WARNING!
•Rotating parts can trap items and draw them in!
When working on the device, do not wear loose jewellery, long sleeves, long hair, and similar. Close the devices cover before printing.
•During operation, the printhead can become hot.
Be careful when touching the printhead!
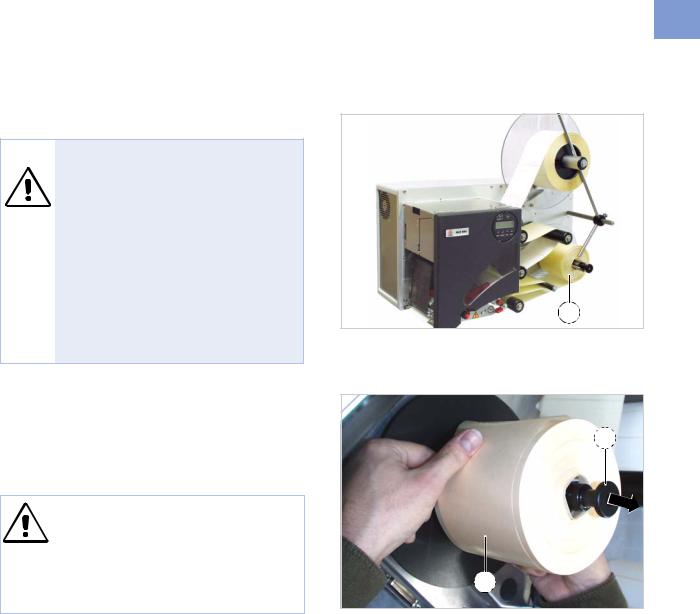
A
[1] Rewound backing paper on the ALX 92x (A).
Removing spent backing paper
The backing paper rewinder can exactly rewind the amount of backing paper remaining from a material roll with 300 mm diameter [2A].
CAUTION! - A backing paper roll exceeding the diameter limit can stall and damage the machine!
Always remove the backing paper from the rewinder if you insert a new material roll!
Assuming backing paper has gathered on the rewinder:
1.Pull out the release button [2B].
The tensioning mechanism of the rewinder is slackened.
2.Remove the rewound backing paper.
Removing glue residue
If necessary, clean the following components:
•Printhead
•Dispensing plate
•Deflection rollers
•Drive roller
•Pressure rollers
ΠFollow the directions provided in topic section Maintenance and Cleaning.
B
A
[2]Removing rewound backing paper. A Backing paper roll
B Release button
Loading...