


 Loading...
System Administrator's Guide
|
Pathfinder® 6057 |
|
|
|
|
028028 |
Printer |
|
|
|
|
|
|
653258 |
|
||
|
04/18/07 |
7512 |
|||
|
|
$15.50 |
|||
|
SALE |
|
|
|
|
|
4 58523 32232 |
9 |
|
|
|
|
$25.00 |
|
|
||
|
PEARL EARRINGS |
||||
|
8 |
99565 45453 |
9 |
||
|
04/18/07 |
7512 |
|||
|
$200.00 |
||||
TC6057SA Rev. AC 7/12 |
©2011 Avery Dennison Corp. All rights reserved. |

Each product and program carries a respective written warranty, the only warranty on which the customer can rely. Avery Dennison reserves the right to make changes in the product, the programs, and their availability at any time and without notice. Although Avery Dennison has made every effort to provide complete and accurate information in this manual, Avery Dennison shall not be liable for any omissions or inaccuracies. Any update will be incorporated in a later edition of this manual.
2011 Avery Dennison Corporation. All rights reserved. No part of this publication may be reproduced, transmitted, stored in a retrieval system, or translated into any language in any form by any means, without the prior written permission of Avery Dennison.
Trademarks
Avery Dennison® and Pathfinder® are trademarks of Avery Dennison Corporation. Microsoft and Windows are trademarks of Microsoft Corporation.
Summit Data Communications is a trademark of Summit Data Communications, Inc. Bluetooth and the Bluetooth logos are trademarks owned by Bluetooth SIG, Inc., U.S.A. All other brand and product names are trademarks of their respective holders.
Avery Dennison
170 Monarch Lane
Miamisburg, OH 45342
T A B L E O F C O N T E N T S
Introduction ................................................................................................................................. |
1-1 |
Using This Manual .................................................................................................................... |
1-1 |
Audience ................................................................................................................................. |
1-1 |
Using the Display ..................................................................................................................... |
1-1 |
Reading the Task Bar ............................................................................................................ |
1-2 |
Using the Input Panel ............................................................................................................... |
1-2 |
Entering Data Using the Input Panel ....................................................................................... |
1-3 |
Administrative Tools .................................................................................................................... |
2-1 |
Setting the Date and Time ......................................................................................................... |
2-1 |
Setting the Time Zone .............................................................................................................. |
2-2 |
Setting the Internet Time........................................................................................................... |
2-2 |
Using Asset Tracking ................................................................................................................ |
2-3 |
Editing Owner Data ............................................................................................................... |
2-3 |
Importing/Exporting Asset Tracking Files ................................................................................. |
2-4 |
Printing an Asset Tracking Label ............................................................................................ |
2-4 |
Changing the Power Properties.................................................................................................. |
2-4 |
Changing the Input Panel Options .............................................................................................. |
2-6 |
Using the System Lockdown Option............................................................................................ |
2-8 |
Locking the System ............................................................................................................... |
2-8 |
Unlocking the System ............................................................................................................ |
2-8 |
Locking the USB Ports........................................................................................................... |
2-9 |
Changing the PC Connection ..................................................................................................... |
2-9 |
Adding Notification Events ...................................................................................................... |
2-10 |
Testing the Speaker ............................................................................................................... |
2-12 |
Viewing the System Properties ................................................................................................ |
2-12 |
Viewing the Printer’s Software Version ..................................................................................... |
2-13 |
Resetting the Printer .............................................................................................................. |
2-13 |
Soft Reset Using the Start Menu........................................................................................... |
2-13 |
Hard Reset Using the Power Button ...................................................................................... |
2-13 |
Bootloader & Factory Default Using the Control Panel ............................................................ |
2-14 |
Using the Summit Client Utility..................................................................................................... |
3-1 |
Finding a Network .................................................................................................................... |
3-2 |
Creating a Profile ..................................................................................................................... |
3-3 |
Setting a Password................................................................................................................... |
3-4 |
Using Bluetooth ........................................................................................................................... |
4-1 |
Making the Printer Discoverable ................................................................................................ |
4-1 |
Pairing the Printer .................................................................................................................... |
4-1 |
Using Wavelink Avalanche............................................................................................................ |
5-1 |
Starting the Utility .................................................................................................................... |
5-1 |
Closing the Utility ..................................................................................................................... |
5-1 |
Table of Contents i
Using Printer Diagnostics............................................................................................................. |
6 |
-1 |
Error Reporting ........................................................................................................................ |
6 |
-1 |
Accessing Printer Diagnostics ................................................................................................... |
6 |
-2 |
Checking Machine Totals ....................................................................................................... |
6 |
-2 |
Printing Diagnostic Labels ..................................................................................................... |
6 |
-3 |
Checking the Stock Registration ............................................................................................. |
6 |
-5 |
Testing the Sensors .............................................................................................................. |
6 |
-6 |
Testing the Printhead ............................................................................................................ |
6 |
-8 |
Configuring the Scanner .............................................................................................................. |
7 |
-1 |
Setting Scanner Options ........................................................................................................... |
7 |
-1 |
Setting a Tone for Good or Bad Scans .................................................................................... |
7 |
-3 |
Enabling Specific Bar Codes ..................................................................................................... |
7 |
-4 |
Configuring UPC/EAN Bar Codes ............................................................................................ |
7 |
-4 |
Configuring Code 39 Bar Codes.............................................................................................. |
7 |
-6 |
Configuring Code 128 Bar Codes ............................................................................................ |
7 |
-6 |
Configuring I 2 of 5 Bar Codes ............................................................................................... |
7 |
-7 |
Configuring MSI Bar Codes .................................................................................................... |
7 |
-7 |
Configuring Codabar Bar Codes ............................................................................................. |
7 |
-8 |
Configuring Code 93 Bar Codes.............................................................................................. |
7 |
-8 |
Configuring D 2of5 Bar Codes ................................................................................................ |
7 |
-9 |
Configuring RSS Bar Codes ................................................................................................... |
7 |
-9 |
Scannable Bar Codes vs. Printable Bar Codes .......................................................................... |
7-10 |
|
Using Scanner Diagnostics ...................................................................................................... |
7-11 |
|
Setting 2D Scanner Options (Factory Installed Option) ........................................................... |
7-11 |
|
Configuring PDF417 ............................................................................................................ |
7-11 |
|
Configuring Data Matrix ....................................................................................................... |
7-12 |
|
Configuring Maxicode .......................................................................................................... |
7-13 |
|
QR Code ............................................................................................................................ |
7-13 |
|
Index .......................................................................................................................................... |
A-1 |
|
ii Table of Contents

I N T R O D U C T I O N |
|
1 |
The Pathfinder® 6057 printer prints, scans bar codes, collects data, and
communicates with other devices. The printer operates on a Microsoft® Windows-based CE platform.
Note: Before you begin, review the safety information in the Regulatory Compliance document included with your printer.
U s i n g T h i s M a n u a l
Following is a summary of the contents of this manual.
|
Chapter |
Contents |
1 |
Introduction |
Information you should know before using the printer. |
|
|
Using the control panel to set various options, including asset tracking |
2 |
Administrative Tools |
|
|
|
and system lockdown. |
3 |
Wireless Configuration |
Setting communications between your wireless printer and network. |
|
|
Using printer diagnostics to print test labels, check sensors, view inches |
4 |
Printer Diagnostics |
|
|
|
printed, etc. |
5 |
Scanner Configuration |
Configuring the scanner to accept certain bar codes and using scanner |
|
|
diagnostics. |
A u d i e n c e
This manual is for the System Administrator who configures the printer and scanner and performs diagnostics.
A Quick Reference ships with each printer. Additional documentation can be found on our Web site.
U s i n g t h e D i s p l a y
The printer has a touch screen display, similar to a hand held computer. Touch the screen to select the option you want.
Note: Only use YOUR FINGER on the screen. Pens and other items can cause damage and do not work. Use distilled water and a soft cloth to clean the screen. Do not use household cleaners.
The display also uses a feature called “gesturing.”
When you see a scroll bar, quickly swipe your finger across the display to scroll.
You may be able to use a gesture for a Space, Backspace, Shift, or Enter key when entering data. See “Changing the Input Panel Options” for more information.
Introduction 1-1

To Access the Start Menu, touch the Emerald key.
Reading the Task Bar
The Task Bar has the following indicators:
Icon |
Description |
|
|
|
|
|
Wired/Wireless Connection |
|
|
|
Task Bar |
|
|
|
|
Wireless Signal Strength |
|
Battery Status
Emerald Key
U s i n g t h e I n p u t P a n e l
 Input Panel
Diamond Key
1-2 System Administrator’s Guide

To access the printer’s input panel, touch the Diamond key.
Key(s) |
Description |
|
Accepts data or menu selection. |
|
|
|
Closes any open windows. |
|
|
|
Displays upper-case or lower-case alphabetic input panel. |
or |
|
|
Displays numeric input panel. |
|
|
|
Displays special character and symbol input panel. |
|
|
Entering Data Using the Input Panel
When prompted to enter data:
1.Touch the field where you need to enter data and then touch the Diamond key to show the input panel.
2.Enter the data. Move the input panel out of the way or touch the Diamond key to hide the input panel.
Note: You do not need to press Enter on the input panel to save your data.
3.Touch the next field where you need to enter data.
4.If necessary, touch the Diamond key to show the input panel. Enter the data.
5.When finished entering data, touch the Diamond key to hide the input panel.
Introduction 1-3
1-4 System Administrator’s Guide
A D M I N I S T R A T I V E T O O L S |
|
2 |
Use these tools to
set the date and time, time zone, and Internet time
identify and track your printers
change the Power and Input Panel properties
lock the system to restrict user access
change the PC connection
add user notification events
test the speaker
view the System properties and Software version.
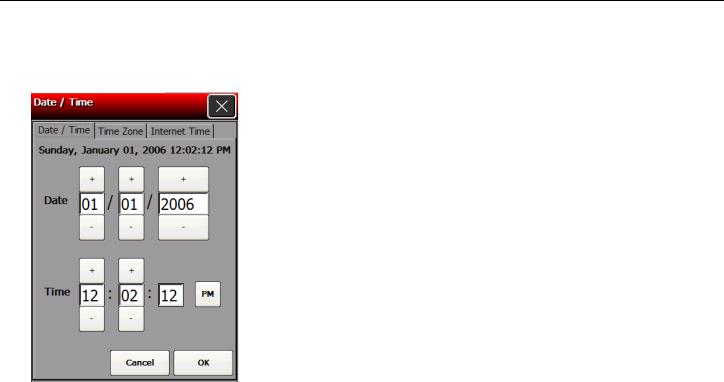
S e t t i n g t h e D a t e a n d T i m e
1. Touch the Emerald key to access the Start Menu, select Settings, Control Panel, and Date/Time Properties.
2. Touch the + or – buttons to set the correct date and time. Touch the AM/PM button to toggle between the two settings.
3. Touch OK.
Administrative Tools 2-1
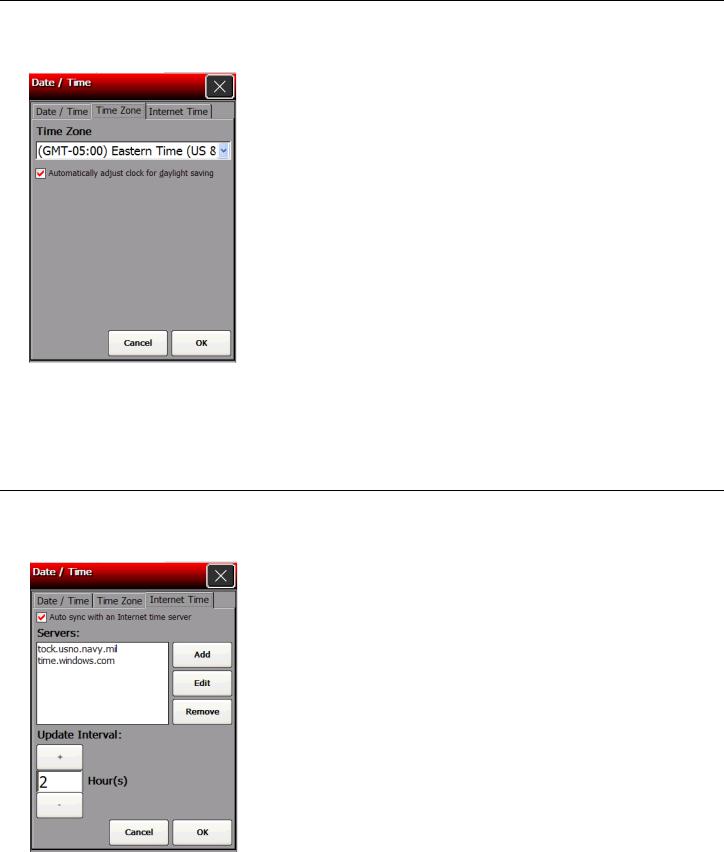
S e t t i n g t h e T i m e Z o n e
1.Touch the Emerald key to access the Start Menu, select Settings, Control Panel, and Date/Time Properties.
2.Touch the Time Zone tab.
3.Choose your time zone from the drop down list.
4.Place a checkmark in the box if you want your printer’s time setting to automatically adjust when daylight savings changes occur.
5.Press OK.
S e t t i n g t h e I n t e r n e t T i m e
1.Touch the Emerald key to access the Start Menu, select Settings, Control Panel, and Date/Time Properties.
2.Touch the Internet Time tab.
3.Place a checkmark in the box if you want your printer to automatically sync with an Internet time server.
2-2 System Administrator’s Guide
4.Touch Add to add a new Internet time server.
5.Enter the server address. Touch the Diamond key to show the input panel if it does not automatically appear.
6.Touch OK.
7.Touch the + or – buttons to select the interval at which your printer corresponds with the server for updates.
8.Touch OK.
Note: Touch Edit to make changes to an existing server address. Touch Remove to remove an address from the list of servers.
U s i n g A s s e t T r a c k i n g
Asset tracking contains the manufacturer’s product ID and serial number, and the owner’s product ID and serial number. A password is required to edit this data. You can print an asset tracking label that contains the product IDs and serial numbers for your records.
Editing Owner Data
Review how to enter data using the input panel before continuing. See “Entering Data Using the Input Panel” for more information.
1.Touch the Emerald key to access the Start Menu, select Settings, Control Panel, and Asset Tracking.
2.Touch Edit.
3.Enter the password. The default password is 123321. Touch the Password window and touch OK.
4.Select the Owner Product ID field.
5.Use the input panel or scan a bar code to enter a new Product ID.
6.Select the Owner Serial Number field.
7.Use the input panel or scan a bar code to enter a new Serial Number.
Note: You can only edit owner data. The OEM Product ID and Serial Number cannot be changed.
8. Touch OK.
Administrative Tools 2-3

Importing/Exporting Asset Tracking Files
Use Import to retrieve an asset tracking backup file (.XML extension) from your PC or server. Use Export to create a backup file (.XML extension) of the asset tracking information.
Export saves the .XML file on the root of the printer. Touch the Device icon on the desktop and look for AssetTracking.XML. Any time you touch Export, this file is overwritten. A sample asset tracking file is shown below:
<?xml version="1.0" ?> <AssetTracking> <OEMProductID>M06057</OEMProductID>
<OEMSerialNumber>11050056</OEMSerialNumber>
<OwnerProductID>M06057</OwnerProductID>
<OwnerSerialNumber>11050056</OwnerSerialNumber>
</AssetTracking>
1.Touch the Emerald key to access the Start Menu, select Settings, Control Panel, and Asset Tracking.
2.Touch Import to retrieve a backup file from your PC or server.
3.Enter the password. The default password is 123321. Touch the Password window and touch OK.
4.Touch Export to create a backup file of the new data on your PC or server, then touch OK. Export saves the AssetTracking.XML file on the root of the printer.
Printing an Asset Tracking Label
1. From the Asset Tracking window, touch Print.
A label prints with the OEM and Owner Product IDs and Serial Numbers and their corresponding bar codes.
Note: You may want to keep this label in a safe place for future reference.
2.Touch OK to exit the application and touch X to close the Control Panel.
C h a n g i n g t h e P o w e r P r o p e r t i e s
Asset Tracking Label
To conserve battery power, you may want to change the power properties settings. The backlight dims, turns off, or you can suspend the printer after a specified amount of user inactivity time.
Note: The timer resets between each power mode. See the following example:
Mode |
Setting |
Current Time is 9:00 |
|
User Idle |
2 |
minutes |
9:02 – printer enters User Idle mode |
System Idle |
5 |
minutes |
9:07 – printer enters System Idle mode |
Suspend |
30 minutes |
9:37 – printer enters Suspend mode |
|
2-4 System Administrator’s Guide

There are several ways to “wake up” the printer:
touch the display (first touch “wakes up” the printer; touch the display again to perform the action shown on the display, for example, OK.) This is recommended for User or System Idle mode.
touch a key (first touch “wakes up” the printer; touch the key again to perform the key’s action – for example, touching the Home key.) This is recommended for User or System Idle mode.
press the trigger (also activates the scanner).
press the power button. This is the only way to “wake up” the printer when the printer is in Suspend mode.
1. Touch the Emerald key to access the Start Menu, select Settings, Control Panel, and Power.
Three tabs appear: Battery, Schemes, and Device Status. The Battery tab displays the current power levels for the main battery and backup battery. The Device Status tab displays the current power levels of various devices.
2. Touch the Schemes tab to change the User and System Idle settings.
Administrative Tools 2-5
3.Select the Power Scheme to change: Battery Power or AC Power. AC Power is used when the printer is connected to the 6054 Network Control Module with the 6055 Docking Module.
4.Select the User Idle time. In User Idle time, the display goes dim after the specified amount of user inactivity time.
5.Select the System Idle time. In System Idle time, the display turns off after the specified amount of user inactivity time, but the printer remains on. The LED may begin blinking, depending on how User Notifications events are set. See “Adding Notification Events” for more information.
6.Select the Switch state to Suspend time. In Suspend mode, the printer is at low power usage after the specified amount of user inactivity time. Press the power button to turn on the printer.
7.Touch OK to save the settings and return to the Control Panel.
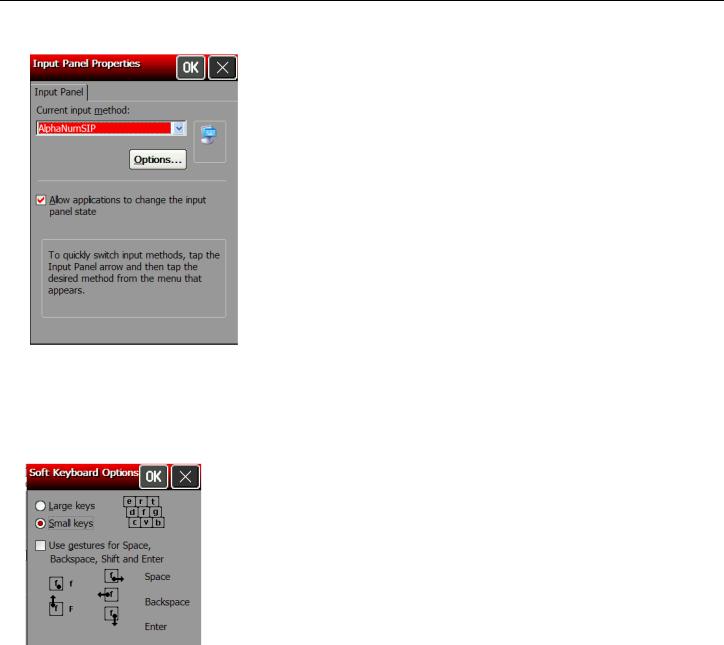
C h a n g i n g t h e I n p u t P a n e l O p t i o n s
1.Touch the Emerald key to access the Start Menu, select Settings, Control Panel, and Input Panel.
2.Select the Current input method: AlphaNumSIP or Keyboard.
3.Touch Options.
Keyboard Options
1. Select Large or Small keys.
2-6 System Administrator’s Guide
Large Keys |
Small Keys |
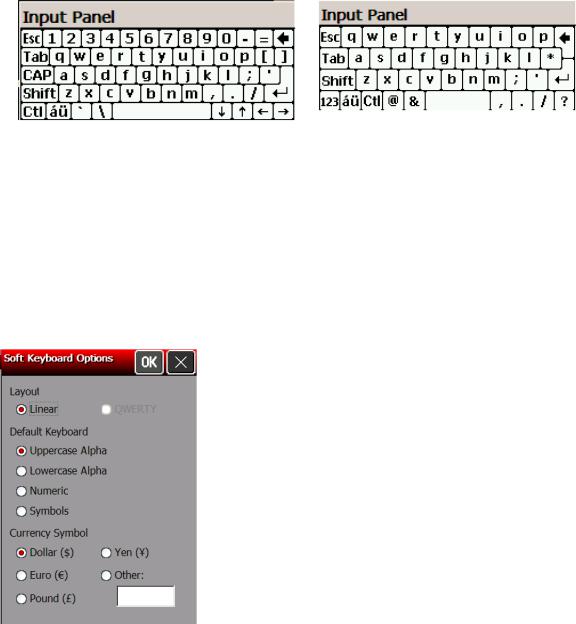
2.Check if you want to use gestures for Space, Backspace, Shift and Enter when using the Keyboard input panel.
3.Touch OK to return to the Input Panel Properties window.
4.Check to allow applications to change the input panel state.
5.Touch OK to return to the Control Panel.
AlphaNumSip Options
1.Select the Default Keyboard you want.
2.Select the Currency Symbol you want.
3.Touch OK to return to the Input Panel Properties window.
4.Check to allow applications to change the input panel state.
5.Touch OK to return to the Control Panel.
Administrative Tools 2-7
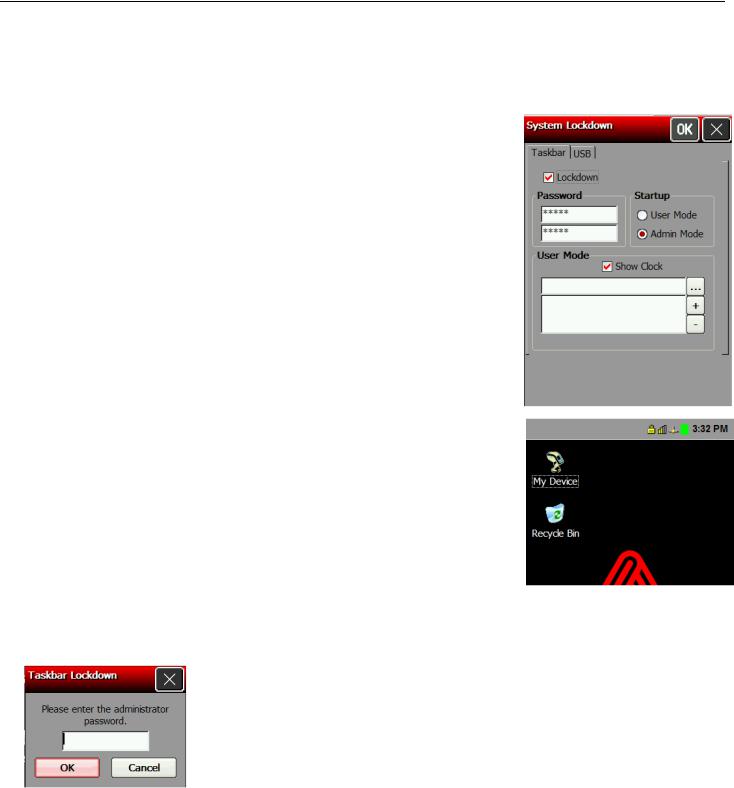
U s i n g t h e S y s t e m L o c k d o w n O p t i o n
The System Lockdown option password protects access to the Start Menu or any unspecified applications. The System Administrator selects which applications are accessible when the system is locked. To make an application accessible, add it to the list. Applications not listed are not accessible. Review how to enter data using the input panel before continuing. See
“Entering Data Using the Input Panel” for more information.
Locking the System
1.Touch the Emerald key to access the Start Menu, select
Settings, Control Panel, and System Lockdown.
2.Check Lockdown under the Taskbar tab.
3.Select the Startup Mode for the user or administrator.
To disable the clock display on the taskbar, uncheck Show Clock.
4.Enter and confirm a password. The default password is 12321.
Note: Make a note of the password if you change it. You must have the current password to unlock the system.
5.Touch the browse button (…) and select an application the user has permission to run.
6.Touch OK. The selected application path appears in the browse field.
7.Touch + (plus sign). The application appears in the list.
To remove an application, select it and touch – (minus sign).
8.When you are finished, touch OK.
9.A small padlock icon shows in the task bar. When you touch the Emerald key, the printer prompts you to enter the administrator password.
Unlocking the System
To unlock the system:
1.Touch the Emerald key. This opens a prompt for the
administrator password. Touch the Diamond key to show the input panel if it does not automatically appear.
2.Enter the administrator password.
3.Touch OK.
4.Touch the Emerald key to access the Start Menu, select Settings, Control Panel, and
System Lockdown.
5.Uncheck Lockdown under the Taskbar tab and make any other lockdown changes. Touch OK when finished.
2-8 System Administrator’s Guide
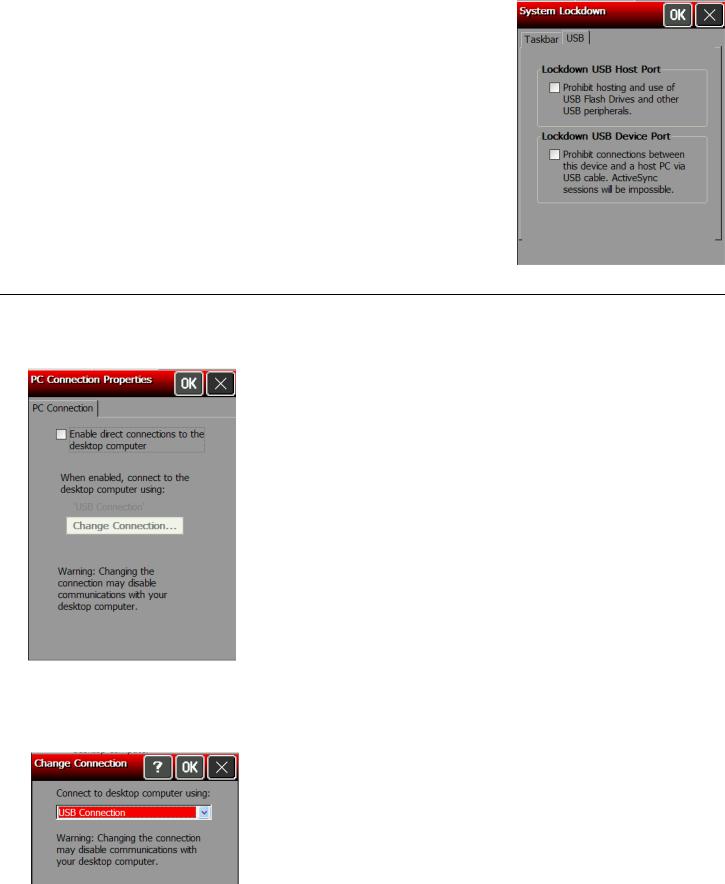
Locking the USB Ports
The printer contains two USB ports. The smaller USB port is the Device Port, which is used to connect the printer to a PC. The larger port is the Host Port, which is used to transfer data with a flash drive.
1.Touch the Emerald key to access the Start Menu, select
Settings, Control Panel, and System Lockdown.
2.Touch the USB tab.
3.You can lockdown the USB Host Port and the USB Device Port by checking the boxes.
Note: If Lockdown USB Device Port is already selected, you may have disabled “Enable direct connections to the desktop computer” from the PC Connection Properties window. See “Changing the PC Connection” for more information.
4.When you are finished, touch OK.
5.A small padlock icon shows in the task bar. When you touch the Emerald key, the printer prompts you to enter the administrator password.
C h a n g i n g t h e P C C o n n e c t i o n
To enable or disable direct connections to the desktop computer (printer), follow these steps:
1.Touch the Emerald key to access the Start Menu, select Settings, Control Panel, and PC Connection.
2.Check the box to enable direct connections to the desktop computer (printer).
If you disable this option, it enables “Lockdown USB Device Port” on the System Lockdown USB tab. See “Locking the USB Ports” for more information.
3.Touch Change Connection to change the USB connection.
Administrative Tools 2-9
4.Select how to connect to the printer.
5.Touch OK to return to the PC Connection properties window.
6.Touch OK to return to the Control Panel.
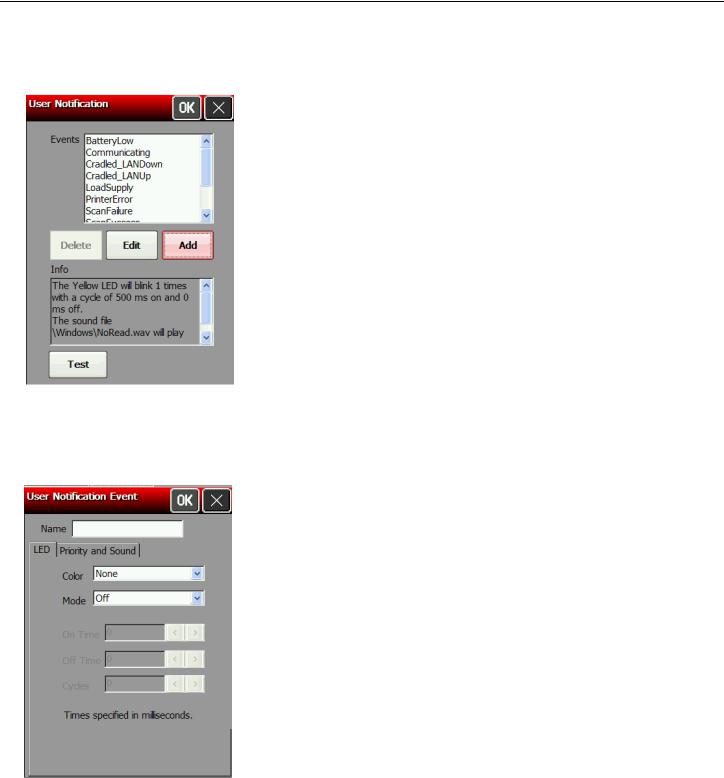
A d d i n g N o t i f i c a t i o n E v e n t s
Review how to enter data using the input panel before continuing. See “Entering Data Using the Input Panel” for more information.
1.Touch the Emerald key to access the Start Menu, select Settings, Control Panel, and User Notification.
2.Touch Add.
3.Touch the Name box. Touch the diamond key to display the input panel if it does not automatically appear. Enter the name. Touch the diamond key to hide the input panel.
4.Set the LED settings (Color, Mode, ON/OFF Time and Cycles).
2-10 System Administrator’s Guide
Loading...