


 Loading...
System Administrator’s
Guide
Monarch® FreshMarx® 9417 Food Freshness System
TC9417SA Rev. AC 1/2015
©2013 Avery Dennison Corp. All rights reserved.

Each product and program carries a respective written warranty, the only warranty on which the customer can rely. Avery Dennison reserves the right to make changes in the product, the programs, and their availability at any time and without notice. Although Avery Dennison has made every effort to provide complete and accurate information in this manual, Avery Dennison shall not be liable for any omissions or inaccuracies. Any update will be incorporated in a later edition of this manual.
©2013 Avery Dennison Corporation. All rights reserved. No part of this publication may be reproduced, transmitted, stored in a retrieval system, or translated into any language in any form by any means, without the prior written permission of Avery Dennison.
WARNING
This equipment has been tested and found to comply with the limits for a Class A digital device, pursuant to Part 15 of the FCC Rules. These limits are designed to provide reasonable protection against harmful interference when the equipment is operated in a commercial environment. This equipment generates, uses, and can radiate radio frequency energy and, if not installed and used in accordance with the instruction manual, may cause harmful interference to radio communications. Operation of this equipment in a residential area is likely to cause harmful interference in which case the user will be required to correct the interference at his own expense.
CANADIAN D.O.C. WARNING
This digital apparatus does not exceed the Class A limits for radio noise emissions from digital apparatus set out in the Radio Interference Regulations of the Canadian Department of Communications. Le présent appareil numérique n’émet pas de bruits radioélectriques dépassant les limites applicables aux appareils numériques de la classe A prescrites dans le Réglement sur le brouillage radioélectrique édicte par le ministère des Communications du Canada.
Trademarks
FreshMarx®, Monarch®, and Avery Dennison® are registered trademarks of Avery Dennison Corporation
Avery Dennison
170 Monarch Lane
Miamisburg, OH 45342
T A B L E O F C O N T E N T S
INTRODUCTION ............................................................................................................................. |
1-1 |
Audience .................................................................................................................................. |
1-1 |
About the Printer ....................................................................................................................... |
1-1 |
About the Setup Wizard ............................................................................................................. |
1-3 |
Using the Keypad ...................................................................................................................... |
1-3 |
SETTING THE TIME AND DATE ....................................................................................................... |
2-1 |
Adjusting the Time and Date ...................................................................................................... |
2-1 |
Formatting the Time and Date .................................................................................................... |
2-2 |
SETTING UP THE PRINTER ............................................................................................................ |
3-1 |
Adjusting the Print Settings ........................................................................................................ |
3-1 |
Adjusting the Backlight .............................................................................................................. |
3-3 |
Changing the Administrator’s Password....................................................................................... |
3-3 |
Setting the Options .................................................................................................................... |
3-4 |
Adjusting the Language Settings................................................................................................. |
3-6 |
Selecting a System Language ................................................................................................. |
3-6 |
Alternate Button Names .......................................................................................................... |
3-7 |
Adjusting the Network Settings ................................................................................................... |
3-8 |
To automatically obtain an IP Address: .................................................................................... |
3-9 |
To enter an IP Address: .......................................................................................................... |
3-9 |
Selecting your Network Time Server ....................................................................................... |
3-10 |
EDITING PRODUCT DATA .............................................................................................................. |
4-1 |
Entering Edit Mode .................................................................................................................... |
4-1 |
Adding and Removing Products .................................................................................................. |
4-2 |
To add a product button: ......................................................................................................... |
4-2 |
To remove a product button: ................................................................................................... |
4-4 |
Editing Product Descriptions ...................................................................................................... |
4-4 |
Editing the Use First Button ....................................................................................................... |
4-5 |
Editing Category Buttons ........................................................................................................... |
4-6 |
Assigning a Label Format ........................................................................................................... |
4-8 |
Editing Tab Names .................................................................................................................... |
4-9 |
Adding Timers .......................................................................................................................... |
4-10 |
Setting a Timer ........................................................................................................................ |
4-12 |
Viewing Timers ......................................................................................................................... |
4-13 |
Removing a Timer .................................................................................................................... |
4-13 |
Exiting Edit Mode ..................................................................................................................... |
4-14 |
BATCH PRINTING .......................................................................................................................... |
5-1 |
Creating a Batch ....................................................................................................................... |
5-1 |
Editing a Batch .......................................................................................................................... |
5-3 |
Renaming a Batch ..................................................................................................................... |
5-4 |
Deleting a Batch ........................................................................................................................ |
5-4 |
i
USING THE EDIT UTILITY ............................................................................................................... |
6-1 |
System Requirements ................................................................................................................ |
6-1 |
Installing the Edit Utility ............................................................................................................. |
6-1 |
Creating a New Product Data File ............................................................................................... |
6-1 |
Configuring the Network Settings ................................................................................................ |
6-2 |
Entering the Printer’s IP Address in the Edit Utility: .................................................................. |
6-2 |
Specifying the Printer’s Type ...................................................................................................... |
6-2 |
Enabling Alternate Button Names................................................................................................ |
6-2 |
Specifying the Product Data File Format ..................................................................................... |
6-2 |
Uploading the Product Data File ................................................................................................. |
6-3 |
Editing the Data File .................................................................................................................. |
6-4 |
Editing Category Buttons ........................................................................................................ |
6-5 |
Editing the Use First Button .................................................................................................... |
6-6 |
Editing Tabs .......................................................................................................................... |
6-6 |
Creating and Editing Product Buttons ...................................................................................... |
6-6 |
Adding Timers ........................................................................................................................... |
6-8 |
Updating the Product Data File ................................................................................................... |
6-8 |
Updating the Application’s Software ............................................................................................ |
6-9 |
UPDATING THE PRINTER ............................................................................................................... |
7-1 |
Updating Your Product Data File via USB .................................................................................... |
7-1 |
Updating Your Application Software via USB ............................................................................... |
7-2 |
Updating the Printer via FTP ...................................................................................................... |
7-3 |
PERFORMING MAINTENANCE ........................................................................................................ |
8-1 |
Printing Diagnostic Labels .......................................................................................................... |
8-1 |
Version Information ................................................................................................................ |
8-2 |
Network Information ............................................................................................................... |
8-2 |
Gray Scale ............................................................................................................................ |
8-2 |
Checkerboard ........................................................................................................................ |
8-3 |
Copying a Data File to a USB Flash Drive ................................................................................... |
8-3 |
Calibrating the Supply................................................................................................................ |
8-4 |
Calibrating the Sensor ............................................................................................................... |
8-5 |
Calibrating the Touch Screen ..................................................................................................... |
8-6 |
Performing a Factory Reset ........................................................................................................ |
8-7 |
LABEL FORMATS .............................................................................................................................. |
1 |
Format 1 ...................................................................................................................................... |
1 |
Format 2 ...................................................................................................................................... |
1 |
Format 3 ...................................................................................................................................... |
2 |
Format 4 ...................................................................................................................................... |
3 |
Format 5 ...................................................................................................................................... |
4 |
Format 6 ...................................................................................................................................... |
5 |
Format 7 ...................................................................................................................................... |
6 |
Format 8 ...................................................................................................................................... |
7 |
ii System Administrator’s Guide

I N T R O D U C T I O N |
1 |
Use the Monarch® FreshMarx® 9417 Food Freshness System for product freshness and
to label inventory. The printer is available as a single printer (left printer only) or dual printer (left and right printer).
You may have a custom application that differs slightly from the examples in this manual. The screens and labels shown are for reference only of the dual printer.
This manual describes the features available in Version 2.2.
A u d i e n c e
This manual is for the System Administrator who configures and updates the printer. For information on printing labels and the printer’s care and maintenance, refer to the Operator’s Handbook.
A b o u t t h e P r i n t e r
The printer has a touch screen and a built-in FreshMarx application. The printer is available as a single printer (left printer only) or dual printer (left and right printer). You may have a custom application that differs slightly from the examples in this manual. The screens shown are for reference only of the dual printer.
The printer includes eight formats. You can configure the dual printer to print one size supply on the Left printer and a different size supply on the Right printer. For example, load 1.2” wide by 1.1” long labels in the Left printer and 2.2” wide by 3.0” long labels in the Right printer. The Left printer could print Format 1 and Format 8. The Right printer could print Format 5 and Format 7. See Appendix A, “Label Formats” for the size and content of each format.
If your dual printer application only uses one size supply and one format, you could configure the printer to print all formats on the Left printer and use the Right printer as a backup.
Note: Load the same size supply in both the Left and Right printers.
If you want the operator to select which printer (Left or Right) to use when a product button is pressed, assign all categories to the same format (1-8) and the same printer (left or right). See “Editing Category Buttons” in Chapter 4 for more information.
Introduction 1-1
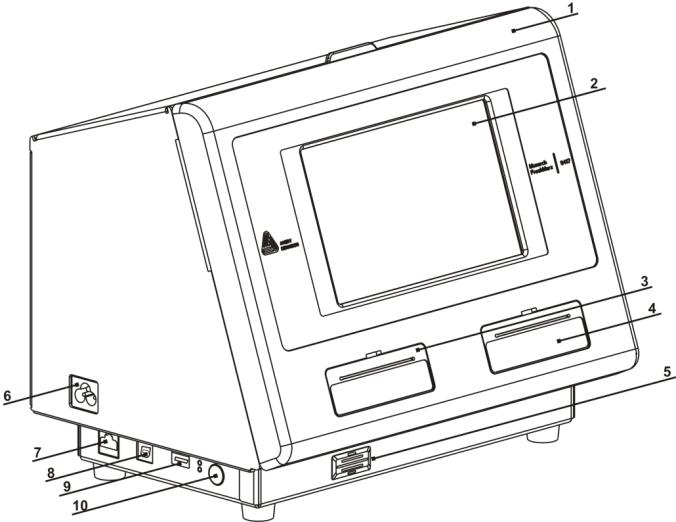
1 |
Cover |
6 |
Power Cord Connection |
|
|
|
|
2 |
Display |
7 |
Ethernet Port |
|
|
|
|
3 |
Left Printer |
8 |
USB (Type B) Port |
|
|
|
|
4 |
Right Printer |
9 |
USB (Type A) Port |
|
|
|
|
5 |
Speaker |
10 |
Power Button |
|
|
|
|
1-2 System Administrator’s Guide

A b o u t t h e S e t u p W i z a r d
When the 9417 printer is powered on for the first time or after updating the software, a setup wizard appears. The wizard guides you through important tasks such as setting the printer’s language and setting the time and date. An administrator can run the setup wizard at any time by selecting Tools, Admin, System Settings, Startup Wizard.
U s i n g t h e K e y p a d
♦The default keypad is lowercase alphabetic. Press the Shift button  to use uppercase alphabetic characters.
♦Press the 12? Button to use numeric characters or symbols. Press the 1/2 Button to see the second page of symbols; press the 2/2 Button to return to the first page of symbols. Press the aBc Button to return to the lowercase alphabetic keypad.
♦ Press and hold a key to use symbols and accented characters.
Introduction 1-3
1-4 System Administrator’s Guide
S E T T I N G T H E T I M E A N D D A T E |
|
2 |
This chapter tells you how to
♦set the time and date.
♦format the time and date.
Note: You may have a custom application that differs slightly from the examples in this manual. The screens and labels shown are for reference only of the dual printer.
A d j u s t i n g t h e T i m e a n d D a t e
You can set the system time and date, format the time and date, select your time zone, and establish network time.
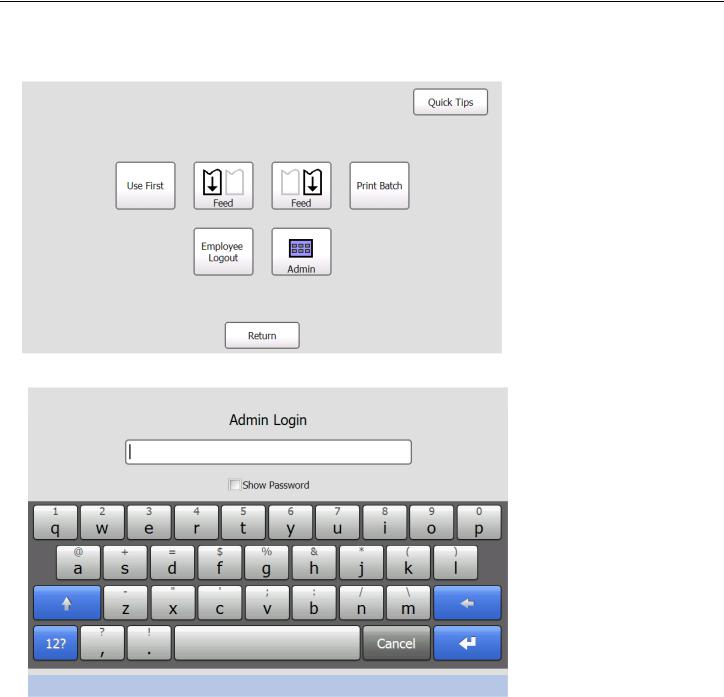
1. Press the Tools  button.
2. Press Admin.
3. Enter the Admin password and press Enter. The default password is 1234.
Setting the Time and Date 2-1
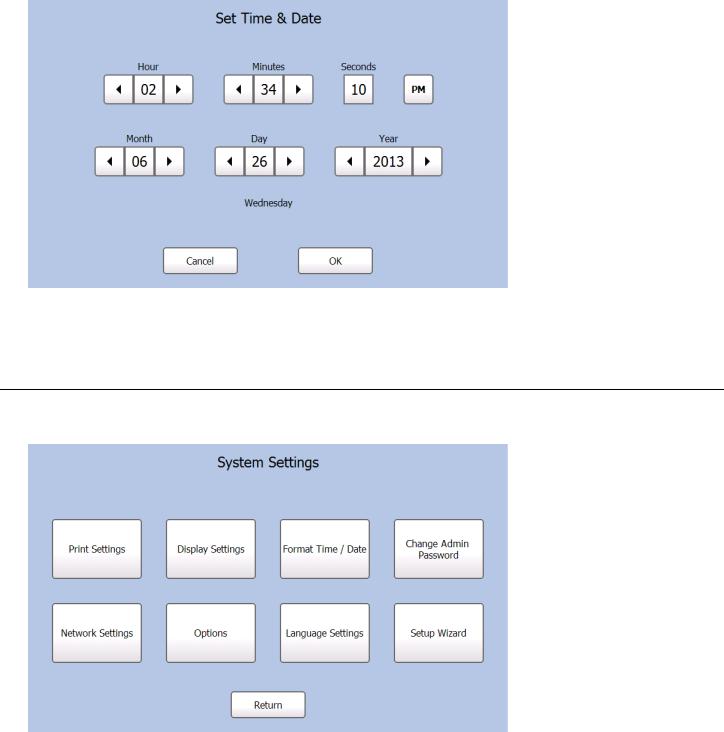
4. Press Set Time / Date.
Use and to set the time and date.
Touch AM/PM to toggle the setting between AM and PM. 5. Press OK when you are finished.
F o r m a t t i n g t h e T i m e a n d D a t e
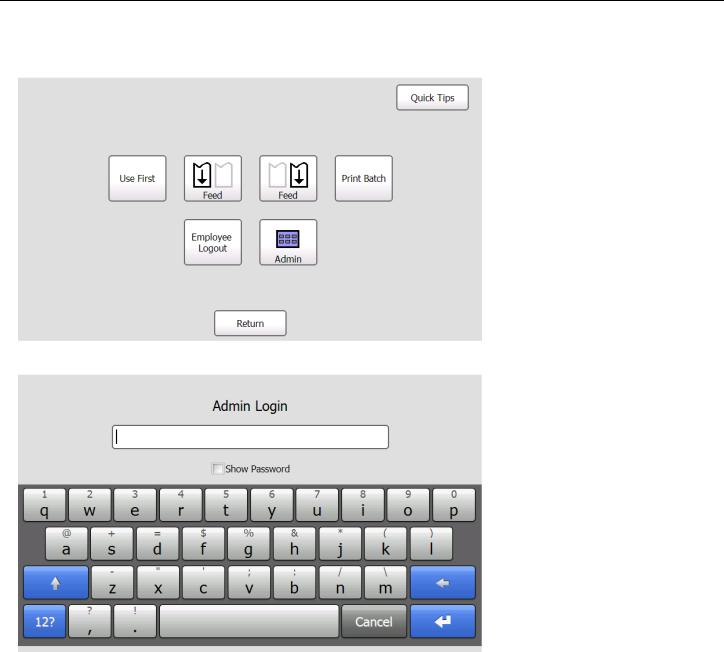
To change the way the time/date appears on printed labels: 1. From the Admin Tools screen, press System Settings.
2-2 System Administrator’s Guide
2. Press Format Time / Date.
3.Select the checkbox if you want to use a 24-hour clock. For example, 4:00 p.m. would appear as 16:00. Use the drop down menu to select the time separator to place between the hour, minute, and seconds (colon, period, comma, blank).
4.Use the drop down menus to select the date format and the date separator (slash, hyphen, period, comma, blank). The date separator is placed between the year, month, and day.
5.Use the and buttons to select your Time Zone.
6.Select the checkbox if you want the printer to automatically adjust the time for Daylight Saving Time.
7.Press OK when you are finished.
Setting the Time and Date 2-3
S E T T I N G U P T H E P R I N T E R |
|
3 |
This chapter tells you how to
♦adjust where data prints on the label.
♦adjust the backlight.
♦change the Administrator’s Password.
♦set the options.
♦adjust the network settings.
♦use a network time server.
Note: You may have a custom application that differs slightly from the examples in this manual. The screens and labels shown are for reference only of the dual printer.
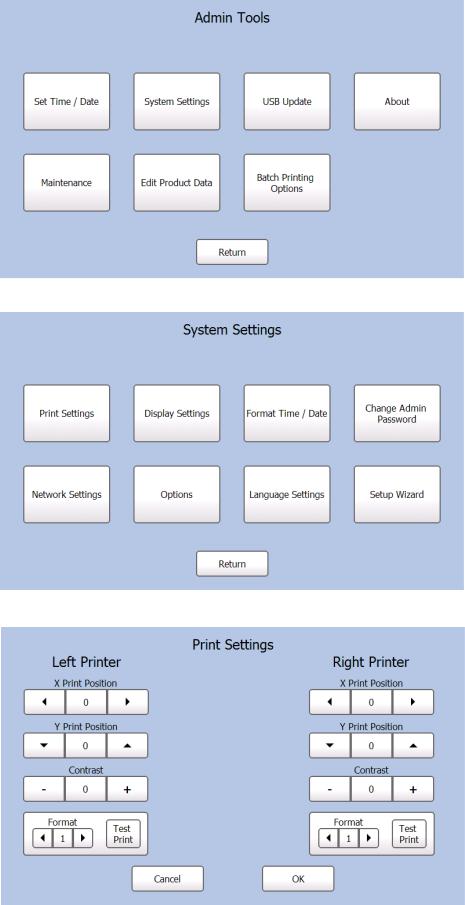
A d j u s t i n g t h e P r i n t S e t t i n g s
You can adjust the horizontal (X) and vertical (Y) print position of data on a label and set the print contrast. The Contrast controls the darkness of the printing.
1. Press the Tools  button.
2. Press Admin.
Note: Select Show Password to see the characters while entering the password.
Setting Up the Printer 3-1
3. Enter the Admin password and press Enter. The default password is 1234.
4. Press System Settings.
5. Press Print Settings. Adjust the print settings for the Left and Right Printer:
3-2 System Administrator’s Guide
6.Use the and buttons to adjust the X Print Position. Increasing the value moves the printed text to the right. Decreasing the value moves the printed text to the left. The range is -100 to 100 and the default is 0.
7.Use the and buttons to adjust the Y Print Position. Increasing the value moves the printed text up. Decreasing the value moves the printed text down. The range is
-128 to 127 and the default is 0.
8.Use the - and + buttons to adjust the Contrast. Increasing the value makes the print darker. Decreasing the value makes the print lighter. The range is -100 to 100 and the default is 0.
9.Use the and buttons to select a format and click Test Print to check your print settings. The label prints. Make adjustments if necessary. See Appendix A, “Label Formats” for the size and content of each format.
10.Press OK when you are finished.
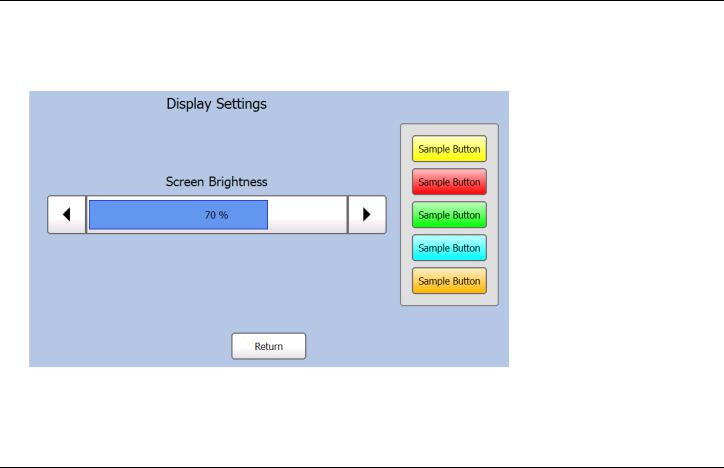
A d j u s t i n g t h e B a c k l i g h t
You can adjust the brightness of the screen. The range is 0 to 100 percent.
1.From the Admin Tools screen, press System Settings.
2.Press Display Settings.
3.Use and to adjust the screen brightness. The Sample Buttons at the right show how the colors appear at the various brightness settings.
4.Press Return when you are finished.
C h a n g i n g t h e A d m i n i s t r a t o r ’ s P a s s w o r d
To change the administrator’s password:
1.From the Admin Tools screen, press System Settings.
2.Press Change Admin Password.
3.Enter the new password. As you enter the password, the characters are replaced with “” in the text. Select Show Password if you want the characters to appear in the text box.
4.Press Enter. The password has been changed.
Make a note of your new password. If you forget your password, call Service.
Setting Up the Printer 3-3
S e t t i n g t h e O p t i o n s
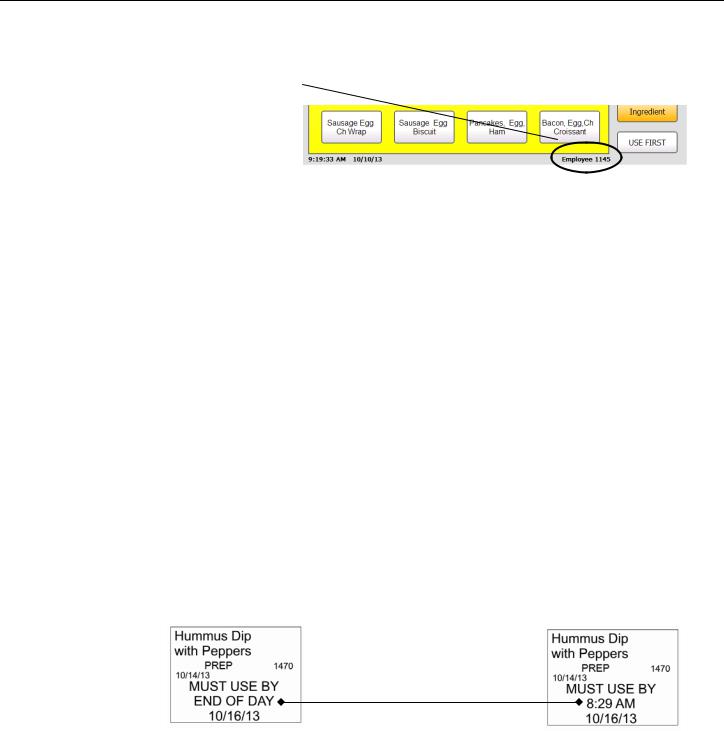
The options allow users to enable/disable employee login, recreate an old label, use “end of day” expiration, or print “end of day” on labels.
Enable Employee |
Prompts users for an employee login. Login must be 2-10 alphanumeric |
Login |
characters. The ID displays on the screen and prints on freshness |
|
labels. |
Note: Once Employee Login is enabled, you see “Enter Employee ID” and must login before continuing.
Recreate Label |
Users may need to reprint a freshness label if a label is torn or missing |
||||
|
from a product. The user enters the original Use By time and date. |
||||
|
Note: An asterisk (*) prints after the date or time, indicating a |
||||
|
reprinted label. |
|
|
|
|
Use “End of Day” |
Use for products that expire at the end of each day or in a set number |
||||
expiration mode |
of days from the first use. |
|
|
|
|
|
Enter product expiration values in multiples of 1 day. For example, |
||||
|
0 day expires today; 1 day expires tomorrow, etc. |
|
|
||
|
Note: If the expiration time contains any hours and/or minutes, the |
||||
|
printer uses normal date/time mode for that product. |
||||
|
For more information about expiration dates, see the table |
||||
|
below. |
|
|
|
|
|
|
|
|
|
|
|
End of Day Expiration |
0 Day |
1 Day |
2 Day |
|
|
|
Expiration |
Expiration |
Expiration |
|
|
Current Date: |
End of Day |
End of Day |
End of Day |
|
|
May 1 |
5/1/13 |
5/2/13 |
5/3/13 |
|
Print “End of Day” Enables or disables printing the words “End of Day” on the label when on Label. using “End of Day” expiration mode. Only the date is printed, not the
time.
End of Day |
Normal Expiration |
|
Expiration Mode |
||
Mode |
||
|
3-4 System Administrator’s Guide
1. From the Admin Tools screen, press System Settings.
2.Press Options.
3.Select the options you need.
4.Press OK when you are finished.Note: When Employee Login is enabled, you see “Enter Employee ID”. You must login to continue.
Setting Up the Printer 3-5

A d j u s t i n g t h e L a n g u a g e S e t t i n g s
Use the Language Settings menu to set a primary system language, enable/disable alternate button names, and set an alternate system language.
1.Press the Tools button.
2.Press Admin.
3.Enter the Admin password and press Enter. The default password is 1234.
4.Press System Settings.
5. Press Language Settings.
Selecting a System Language
Press the language box under Select System Language to select a System Language. The system language is the language you want to use for all printer prompts and buttons.
3-6 System Administrator’s Guide
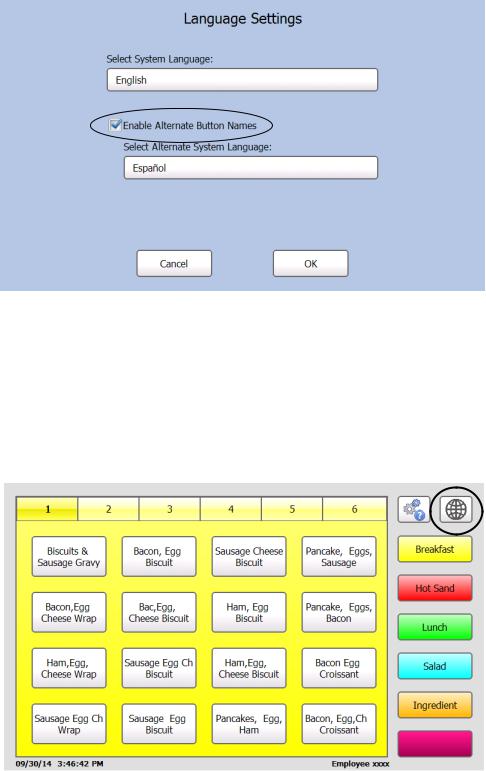
Alternate Button Names
When you enable alternate button names, you can enter the product button names in a second language (Alternate System Language). Press the Language Toggle Button to switch between the primary and secondary languages. For more information, see Chapter 4, “Using the Edit Mode” or Chapter 5, “Using the Edit Utility”.
Alternate System Language
With alternate button names enabled, press the language box under Select Alternate System Language to select an Alternate System Language. The Alternate System Language is the secondary language in which all printer prompts and buttons appear. Press the Language Toggle Button to switch between the primary and secondary languages.
Language Toggle Button
When alternate button names is enabled, you see a Language Toggle button next to the Tools button. Press the Language Toggle Button to switch between the primary and secondary languages.
Setting Up the Printer 3-7
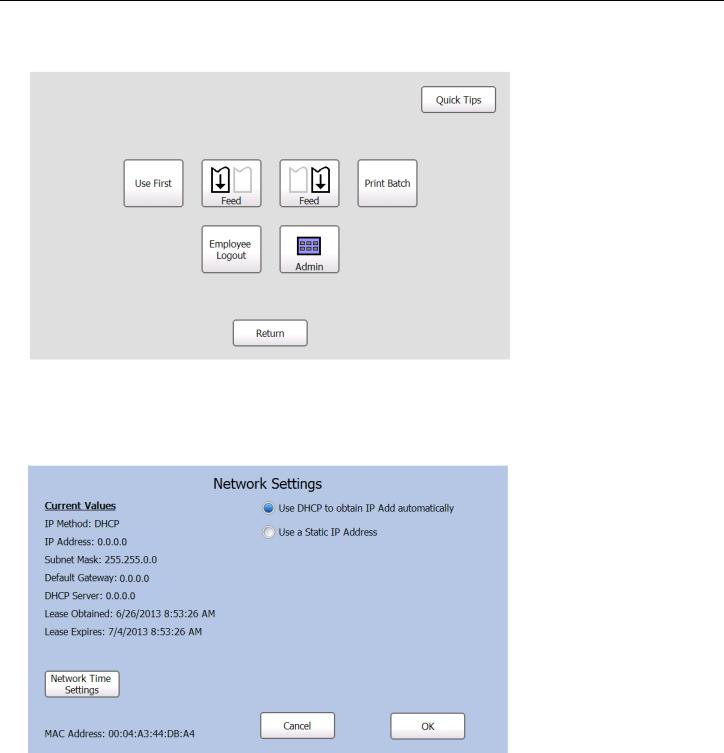
A d j u s t i n g t h e N e t w o r k S e t t i n g s
Use the Network Settings menu to view the network settings or set an IP Address. The printer’s current network settings are displayed.
1. Press the Tools button.
2.Press Admin.
3.Enter the Admin password and press Enter. The default password is 1234.
4.Press System Settings.
5.Press Network Settings. The current network settings appear.
3-8 System Administrator’s Guide
To automatically obtain an IP Address:
You can use DHCP to automatically obtain the printer’s IP Address.
1. From the Network Settings screen, select Use DHCP to obtain IP Add automatically.
2. Press OK.
To enter an IP Address:
You can assign the printer a static IP Address.
1. From the Network Settings screen, select Use a Static IP Address.
2.Touch the text box next to each field to enter the information as needed on the keypad.
3.Press Enter on the keypad each time you complete a field.
4.Press OK when you are finished.
Setting Up the Printer 3-9
Loading...