

Page 1

Getting Started with
Timbuktu for Windows, version 9.0
Copyright © 2002-2010 Motorola, Inc. All Rights Reserved.
Last Modified August, 2010
Page 2

Copyright notice
Copyright © 2002-2010 Motorola, Inc. v. 08.2010
All rights reserved.
This manual and any associated artwork, software, product designs or design concepts are copyrighted
with all rights reserved. Under the copyright laws this manual or designs may not be copied, in whole or
part, without the written consent of Motorola. Under the law, copying includes translation to another
language or format.
Motorola, Inc.
1101 Marina Village Parkway, Suite 200
Alameda, CA 94501
USA
Part Number
This manual is Motorola part number 578135-001-00 (released August, 2010).
Page 3

Contents
Chapter 1: Introduction and Feature Overview ...................................................................... 5
What Timbuktu Can Do for You....................................................................................... 5
Timbuktu Features..................................................................................................... 6
New in Timbuktu for Windows, Version 9: The Timbuktu Host and Timbuktu Guest............... 6
Timbuktu Services............................................................................................ 6
Connecting with Timbuktu ........................................................................................... 7
Timbuktu Security...................................................................................................... 7
Timbuktu System Requirements...................................................................................... 7
Minimum Hardware Requirements......................................................................... 7
Minimum Software Requirements.......................................................................... 8
Compatibility.................................................................................................. 8
Chapter 2: Installing and Starting Timbuktu .......................................................................... 9
Installing Timbuktu..................................................................................................... 9
Starting and Shutting Down Timbuktu ............................................................................. 10
Starting the Timbuktu Host ................................................................................ 10
Starting the Timbuktu Guest............................................................................... 10
Shutting Down the Timbuktu Host ........................................................................ 10
Shutting Down the Timbuktu Guest....................................................................... 10
Removing Timbuktu ................................................................................................... 11
Chapter 3: Configuring the Timbuktu Guest ........................................................................ 13
Configuration Options ................................................................................................ 13
Setting Timbuktu Guest Preferences ................................................ ....... ....... ........ ....... .. 13
The General Tab .............................................................. ....... ....... ........ ....... .. 14
The Observe/Control Tab.......................................................................... ....... .. 15
The LDAP Tab................................................... ....... ........ ....... ....... ........ ....... .. 16
The Logging Tab...................................................................... ....... ........ ....... .. 17
Configuring Incoming Access ........................................................................................ 18
Making Connections............................... ....... ........ ....... ....... ........ ....... ....... ........ ....... .. 18
Chapter 4: Configuring the Timbuktu Host .......................................................................... 19
Configuration Requirements and Options.......................................................................... 19
Setting Timbuktu Host Preferences................................................................................. 19
The General Tab .............................................................. ....... ....... ........ ....... .. 21
The Guest User Tab................................................................................. ....... .. 22
The NT Users Tab ............................................................................................ 23
The Registered Users Tab................................................................................... 24
The Remote Control Tab............................................. ........ ....... ....... ........ ....... .. 25
The Send Tab................................................... ....... ........ ....... ....... ........ ....... .. 27
The Notify Tab ...................................................................................... ....... .. 28
The LDAP Tab................................................... ....... ........ ....... ....... ........ ....... .. 29
The Logging Tab...................................................................... ....... ........ ....... .. 30
The Sitekey Tab............................................................................. ........ ....... .. 30
| iii
Page 4

iv | Contents
Managing User Accounts .... ....... ....... ........ ....... ........ ....... ....... ........ ....... ....... ........ ....... .. 31
Before You Create User Accounts ......................................................................... 31
Guest Users, NT Users, and Registered Users.................... ........ ....... ....... ........ ....... .. 31
Working with the Timbuktu Host.................................................................................... 32
Chapter 5: Making Connections ....................................................................................... 33
The Timbuktu Guest Window........................................................................................ 33
Timbuktu Menus ............................................................................................. 34
Timbuktu Service Toolbar .................................................................................. 34
Connection Tabs ............................................................................................. 34
Status Bar..................................................................................................... 34
The Timbuktu Connection Process.................................................................................. 34
Step 1: Selecting the Remote Computer................................................................. 35
Step 2: Selecting the Timbuktu Service.................................................................. 39
Step 3: Entering Access Credentials and Completing the Connection............................... 39
Chapter 6: Timbuktu Services ......................................................................................... 41
The Control and Observe Services: Controlling or Observing Another Computer ........................... 41
The Screen-Sharing Window ... ........ ....... ........ ....... ....... ........ ....... ....... ........ ....... .. 41
User Account Control, Fast User Switching, and the Secure Desktop ............................... 42
Using the Capture Frame................................................................................... 42
Controlling a Macintosh Computer................................................ ....... ........ ....... .. 43
The Exchange Service: Copying and Moving Files Between Computers....................................... 43
The Send Service: Sending Messages and Files to Another Computer......................................... 44
The Notify Service: Requesting Notification When Another User is Active................................... 45
Chapter 7: Managing the Timbuktu Host ............................................................................ 47
Using Timbuktu Services as a Host.................................................................................. 47
Responding to Ask for Permission Requests.............................................................. 47
Using Screen-Sharing Services............................................................................. 48
Receiving Messages.......................................................................................... 48
Responding to Notify Requests ............................................................................ 49
Controlling and Monitoring Incoming Access...................................................................... 49
Monitoring Remote Connections........................................................................... 49
Logging........................................... ........ ....... ....... ........ ....... ....... ........ ....... .. 49
Chapter 8: Getting Help ................................................................................................. 51
Getting Help with Timbuktu......................................................................................... 51
Opening Timbuktu’s Online Help.......................................................................... 51
Contacting Motorola .................................................................................................. 51
Appendix A: Key Mapping and Service Icons ........................................................................ 53
Timbuktu Keyboard Mapping......................................................................................... 53
Icon Legend ............................................................................................................ 53
Index ........................................................................................................................ 55
Page 5

Chapter 1: Introduction and Feature Overview
Welcome to Timbuktu for Windows™, version 9.0!
Timbuktu gives you total access to your network. Computers across the country and around the world—
Windows and Macintosh—are now as accessible to you as the computer sitting on your desk! You can use
Timbuktu to control and observe other computers, transfer files, and send instant messages.
What Timbuktu Can Do for You
When you’re at the office, Timbuktu runs over your organization’s local network for easy conferencing
and information sharing. When you’re home or traveling, you can use Timbuktu to take direct control of
your office computer.
Once you connect to a remote computer with Timbuktu, you can run software at its normal speed, dramatically decreasing network-related delays of applications such as relational databases and electronic
mail. Timbuktu gives you full access to remote resources, but transfers only screen, keyboard, and
mouse information—you don’t have to move large amounts of data over slow network connections.
With Timbuktu, you can
• Save technical support time and money by taking control of a remote user’s computer and solving
the problem without leaving your desk.
• Train employees and customers alike for a fraction of the usual time and cost. Demonstrate the lat-
est applications or products while a remote user watches. Then observe and help as the user practices. Provide individual attention for all remote trainees, and save the time and expense of travel.
• Work remotely from wherever you are. Harness the power of remote control to share information,
transfer files, access databases, and send messages across your network. Y ou’ll discover many ways
to work easier and smarter.
• Collaborate with remote colleagues in real time. Share screens, documents, and information with
both Windows and Macintosh computers, and use text-based conferencing to confer with your colleagues as you work.
• Run “LAN-locked” network applications such as databases without the frustration of slow run-time
over remote links. Applications run on the remote computer, not across your network, reducing processing time dramatically.
• Protect your own computer from unauthorized access. You can grant custom combinations of
Timbuktu services to individual NT User and Registered User accounts, allow access only when you
approve it, or prevent all incoming Timbuktu connections.
| 5
Page 6

6 | Chapter 1: Introduction and Feature Overview
Timbuktu Features
New in T imbuktu for Windows, Version 9: The Timbuktu Host and Timbuktu Guest
Timbuktu for Windows, version 9 has been entirely rebuilt to provide native Timbuktu support on Windows Vista and Windows 7.
Windows Vista introduced several architectural changes that conflicted with Timbuktu’s implementation
of screen sharing and user management. Microsoft provided a compatibility shim that mitigated some of
the Vista-related changes, but Timbuktu was unable to interact correctly with the User Account Control
or Windows secure desktop. True compatibility required significant changes to the Timbuktu
architecture. In particular, session-0 Isolation, User Account Control restrictions, and always-on and
domain-aware Fast User Switching required an entirely new implementation of Timbuktu’s screen sharing and user management.
Timbuktu for Windows, version 9 addresses these issues through one significant change: the single Timbuktu application is now two separate components, the Timbuktu Guest and the Timbuktu Host. The
Timbuktu Host listens for and accepts incoming Timbuktu connections, and the Timbuktu Guest establishes outgoing connections to other Timbuktu computers.
The separation of the Timbuktu Host and the Timbuktu Guest has several important ramifications. The
Timbuktu Guest can run with the permissions of the current Windows user, allowing it to sidestep many
problematic architectural issues. The Timbuktu Host is comprised of several different executables,
which resolves other architectural issues. Together, the Timbuktu Host and Timbuktu Guest provide a
more secure, robust, and reliable system.
You will configure the Timbuktu Guest with the Preferences dialog box. Because the Timbuktu Host has
no main application window, its settings are managed with the new Timbuktu Host Configuration Utility .
When you install Timbuktu, you will have the option to install the Timbuktu Host, the Timbuktu Guest,
or both.
Timbuktu Services
The simple, powerful Timbuktu application includes multiple services. Each service provides you with a
different way to access a remote computer, collaborate with its user, or enable incoming access to your
own computer. Together, they help you make the most of your network.
• With the Control and Observe services, you can view another Timbuktu computer’s desktop in the
screen-sharing window on your computer. The window is continually updated as the other computer’s desktop changes.
• With the Exchange service, you can copy and move files and folders in both directions between your
computer and another Timbuktu computer.
• With the Send service, you can send text-based messages and attachments, similar to electronic
mail, to other Timbuktu computers.
• With the Notify service, you can query another computer to determine whether its user is present.
Page 7

Connecting with Timbuktu
Timbuktu communicates with other Timbuktu computers over TCP/IP networks using the same protocol
as any basic Internet or intranet connection. If you have a wired or Wi Fi connection to the Internet, you
can use Timbuktu services to collaborate with other Timbuktu users around the world.
Timbuktu Security
Timbuktu offers multiple levels of security that help you restrict access to the different Timbuktu services on your computer.
• Other Timbuktu user can connect to your computer with several different levels of user access priv-
ileges: Guest Users, Ask For Permission Users, NT Users, and Registered Users. You can grant different levels of access to each type of user. Whether you create user accounts that grant specific
privileges or allow incoming access only when you actively approve it, no other Timbuktu user can
access your computer without your permission.
• The Timbuktu Host and Timbuktu Guest applications can be installed separately. Install only the
Timbuktu Host to allow the computer to receive Timbuktu connections, but not establish them.
Install only the Timbuktu Guest to allow the computer to make Timbuktu connections, but not
accept them.
Connecting with Timbuktu | 7
• T imbuktu makes it easy for you to monitor and track the T imbuktu users who access your computer
and the services they use. When remote users access your computer, the Timbuktu icon in the system tray on the taskbar alternates with a service icon indicating the presence of a remote user. Y o u
can disconnect remote users at any time. The activity log keeps a record of all remote computers
that access your computer, along with the services used.
Timbuktu System Requirements
To run Timbuktu for Windows, your computer must meet the following hardware, software, and compatibility requirements.
Minimum Hardware Requirements
Timbuktu requires the same minimum hardware that is required by your Windows OS. In addition, you’ll
need
• 20 MB of available disk space; 50MB are required for the network installation process.
• To make Timbuktu connections, a TCP/IP network or WiFi connection to the Internet or the local
network.
Page 8

8 | Chapter 1: Introduction and Feature Overview
Minimum Software Requirements
• Windows 7, Windows Server 2008, Windows Vista, Windows Server 2003, Windows Server 2003 R2,
and Windows XP SP2 or later.
If you install Timbuktu on Windows Server 2008 or Windows Serve r 2003 with DEP enabled, you must
disable DEP or set an exception for Timbuktu.
• Timbuktu is not fully supported on 64-bit operating systems, including Windows Server 2008 R2. If
you wish to install Timbuktu on Windows Server 2008 R2, disable DEP or set an exception before you
install Timbuktu.
• One copy of T imbuktu software on each comp uter that is to make or receive T i mbuktu connections.
Compatibility
Timbuktu for Windows, version 9 is compatible with Timbuktu for Windows 8.0 and later, and Timbuktu
for Macintosh 8.0 and later. Older versions of Timbuktu are not officially supported.
Page 9

Chapter 2: Installing and Starting Timbuktu
This chapter will guide you as you install or remove Timbuktu on a local computer.
Installing Timbuktu
The MSI installer included in your distribution package will install, modify, and remove Timbuktu. When
you have completed the installation, save the MSI installer in a safe location in case you need to modify
or remove Timbuktu later.
To install Timbuktu on Windows XP, or on a Windows 7 or Windows Vista computer with UAC disabled,
you must be logged on to Windows with Administrator privileges.
To install Timbuktu
1. Run the Timbuktu.msi file included in your distribution package.
2. In the Timbuktu Setup Wizard, click Next. Then accept the license agreement and click Next again.
3. On the Custom Setup screen, select the features to install. Note that you may install the Timbuktu
Host, the Timbuktu Guest, or both.
The Timbuktu Host and Timbuktu Guest are two separate applications that replace the single appli-
cation that comprised previous versions of Timbuktu. The Timbuktu Host listens for and accepts
incoming Timbuktu connections, and the Timbuktu Guest establishes outgoing connections to other
Timbuktu computers.
4. When you have made your selections, click Next.
5. On the Ready to Install screen, click Install.
The installation will proceed automatically. When it is complete, the Timbuktu Setup Wizard will
notify you that the installation was successful. Click Finish to close the Setup Wizard.
Once you have completed the installation process,
• The Timbuktu Host application will start automatically.
By default, the Timbuktu Host will not allow incoming connections. To configure the Timbuktu Host
for incoming access, see chapter 4, “Configuring the Timbuktu Host.”
• To establish Timbuktu connections to other computers, you must start the Timbuktu Guest applica-
tion. From the Windows Start menu, choose ProgramsT imbuktu for WindowsTimbuktu Guest.
| 9
Page 10

10 | Chapter 2: Installing and Starting Timbuktu
Starting and Shutting Down Timbuktu
The Timbuktu Host will start automatically when you start Windows. Its icon is placed in the system tray
on the taskbar. You will st art the Timbuktu Guest yourself when you wish to make an outgoing Timbuktu
connection.
When you wish to prevent all incoming connections or are finished working with Timbuktu, shut down
the Timbuktu Host or Timbuktu Guest. The Timbuktu Host and Timbuktu Guest can run separately; you
may shut down one or both.
Starting the Timbuktu Host
If the Timbuktu Host is shut down, you can manually start it at any time. From the Windows Start menu,
choose ProgramsTimbuktu for WindowsStart Timbuktu Host.
Starting the Timbuktu Guest
The Timbuktu Guest is not launched automatically when you start Windows. When you wish to make a
Timbuktu connection, you will start the Timbuktu Guest as you would start any other application. From
the Windows Start menu, choose ProgramsTimbuktu for WindowsTimb uktu Guest. The Timbuktu
Guest window opens.
Shutting Down the Timbuktu Host
When the Timbuktu Host is running, it listens for and accepts incoming Timbuktu connections. To prevent all incoming connections, shut down the Timbuktu Host. When you shut down the T imbuktu Host, it
no longer runs in the background and users can no longer connect to your computer.
To shut down the Timbuktu Host, click the Timbuktu icon in the system tray on the taskbar. From the
shortcut menu, choose Shutdown Timbuktu Host. Or, from the Windows Start menu, choose Pro-
gramsTimbuktu for WindowsShutdown Timbuktu Host.
Shutting Down the Timbuktu Guest
The Timbuktu Guest functions as an y other Windows application, and you do not need to leave it running
when you are finished working with other computers. To shut down the Timbuktu Guest, open the File
menu and click Exit.
Page 11

Removing Timbuktu
Should you wish to remove Timbuktu from your computer, it is important to follow the correct removal
procedure.
To remove Timbuktu
1. Run the Timbuktu.msi file included in your distribution package.
2. In the Timbuktu Setup Wizard, click Next.
3. On the Change, Repair, or Remove Installation screen, click Remove.
4. On the Ready to Remove Timbuktu screen, click Remove.
The removal will proceed automatically. When it is complete, the Timbuktu Setup Wizard will
notify you that the removal was successful. Click Finish to close the Setup Wizard.
Removing Timbuktu | 11
Page 12

12 | Chapter 2: Installing and Starting Timbuktu
Page 13

Chapter 3: Configuring the Timbuktu Guest
Once you have installed Timbuktu, you can review and change your configuration settings. This chapter
describes configuration options for the Timbuktu Guest. Timbuktu Host configuration is discussed in the
following chapter, “Configuring the Timbuktu Host.”
Configuration Options
The Timbuktu Guest establishes outgoing Timbuktu connections. In most cases, you can begin working
with the Timbuktu Guest immediately, using its default settings. To best customize the Timbuktu Guest
for your needs, however, you may wish to configure
• The appearance and behavior of the screen-sharing window, which you use when you establish a
Control or Observe connection to a host computer. You can set options that may affect screensharing performance and security, as well as manage your personal preferences.
• Settings and access credentials for the LDAP (Lightweight Directory Access Protocol) server, which
can allow you to locate other Timbuktu computers by searching their user information.
• Options for logging your Timbuktu activity locally or to a central server.
Setting Timbuktu Guest Preferences
The Preferences dialog box lets you specify a number of configuration options for the Timbuktu Guest.
To open the Preferences dialog box, click the Setup menu and choose Preferences. The tabs in the Preferences dialog box are as follows:
• General—Sets the Timbuktu computer name. See page 14.
• Remote Control—Sets screen-sharing window preferences for when your computer acts as the guest
computer for an outgoing Control or Observe connection. See page 15.
Note that you may also set Timbuktu Host preferences for the Control and Observe connections you
receive. Timbuktu Host preferences are managed with the Timbuktu Host Configuration Utility. See
“The Remote Control Tab” on page 25.
•LDAP—Enables the LDAP integration and manages LDAP server connection settings. See page 16.
• Logging—Manages logging options. See page 17.
The following sections describe each of these tabs.
| 13
Page 14
14 | Chapter 3: Configuring the Timbuktu Guest
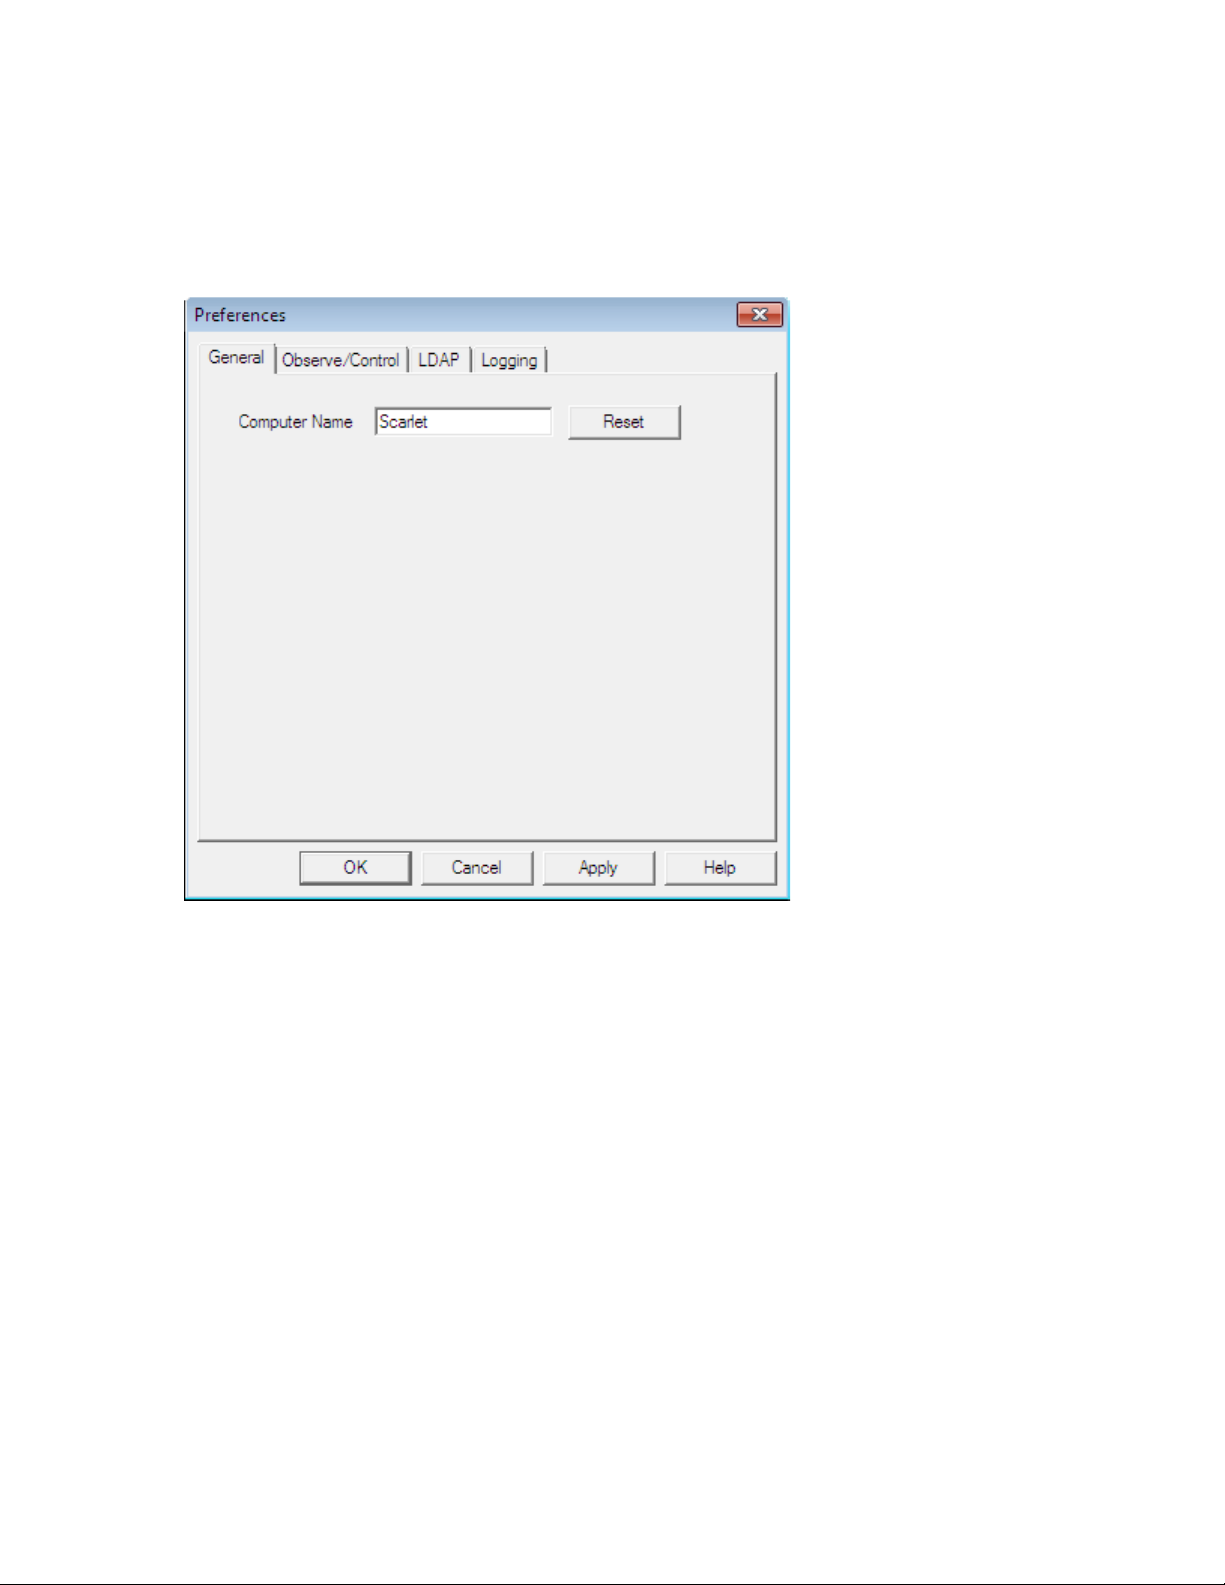
The General Tab
On the General tab, you can set the Timbuktu computer name. By default, Timbuktu uses your computer’ s W indows name as its computer name. However, you may set the computer name to anything that
will help identify your computer to other Timbuktu users.
Page 15
Setting Timbuktu Guest Preferences | 15
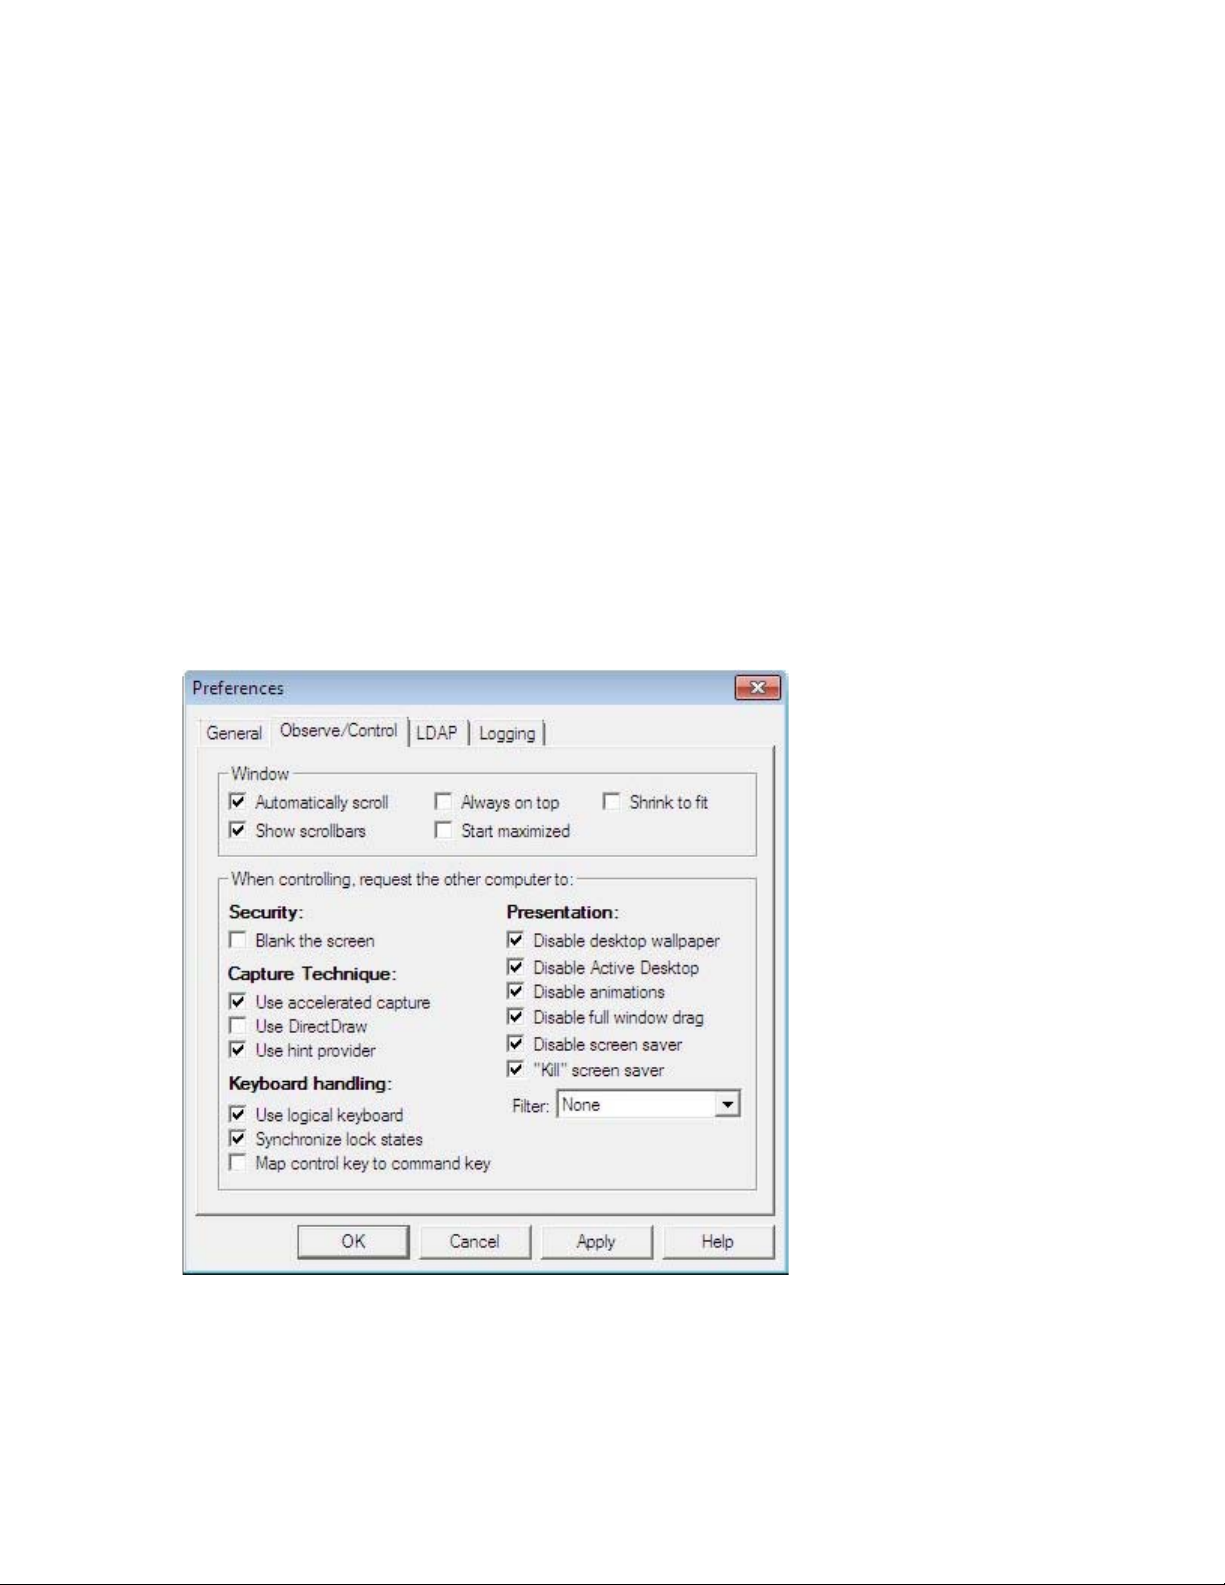
The Observe/Control Tab
Timbuktu Control and Observe sessions take place in a screen-sharing window, which displays the host
computer’s desktop on your screen. The Observe/Control Guest tab in the Preferences dialog box lets
you control the appearance and behavior of the screen-sharing window . You can also specify options that
may improve screen-sharing performance and security during screen-sharing sessions.
• In the Window area, you can specify a number of options for the screen-sharing window, including
scrolling behavior and the size of the image of the remote desktop.
• Timbuktu supports secure screen blanking, which prevents unauthorized viewing of a computer’s
screen while it is being controlled by a remote Timbuktu user. Secure screen blanking is usually controlled by the host computer settings, but the Blank the Screen option allows you to request it (but
not force it to occur) as the guest user.
For more information about the security provided by secure screen blanking, see “Secure Screen
Blanking” on page 25.
• The Keyboard Handling area includes options for how your keystrokes are translated by the host
computer.
• Screen-sharing performance can be affected by the options you select in the Capture Technique
and Presentation lists.
Page 16
16 | Chapter 3: Configuring the Timbuktu Guest
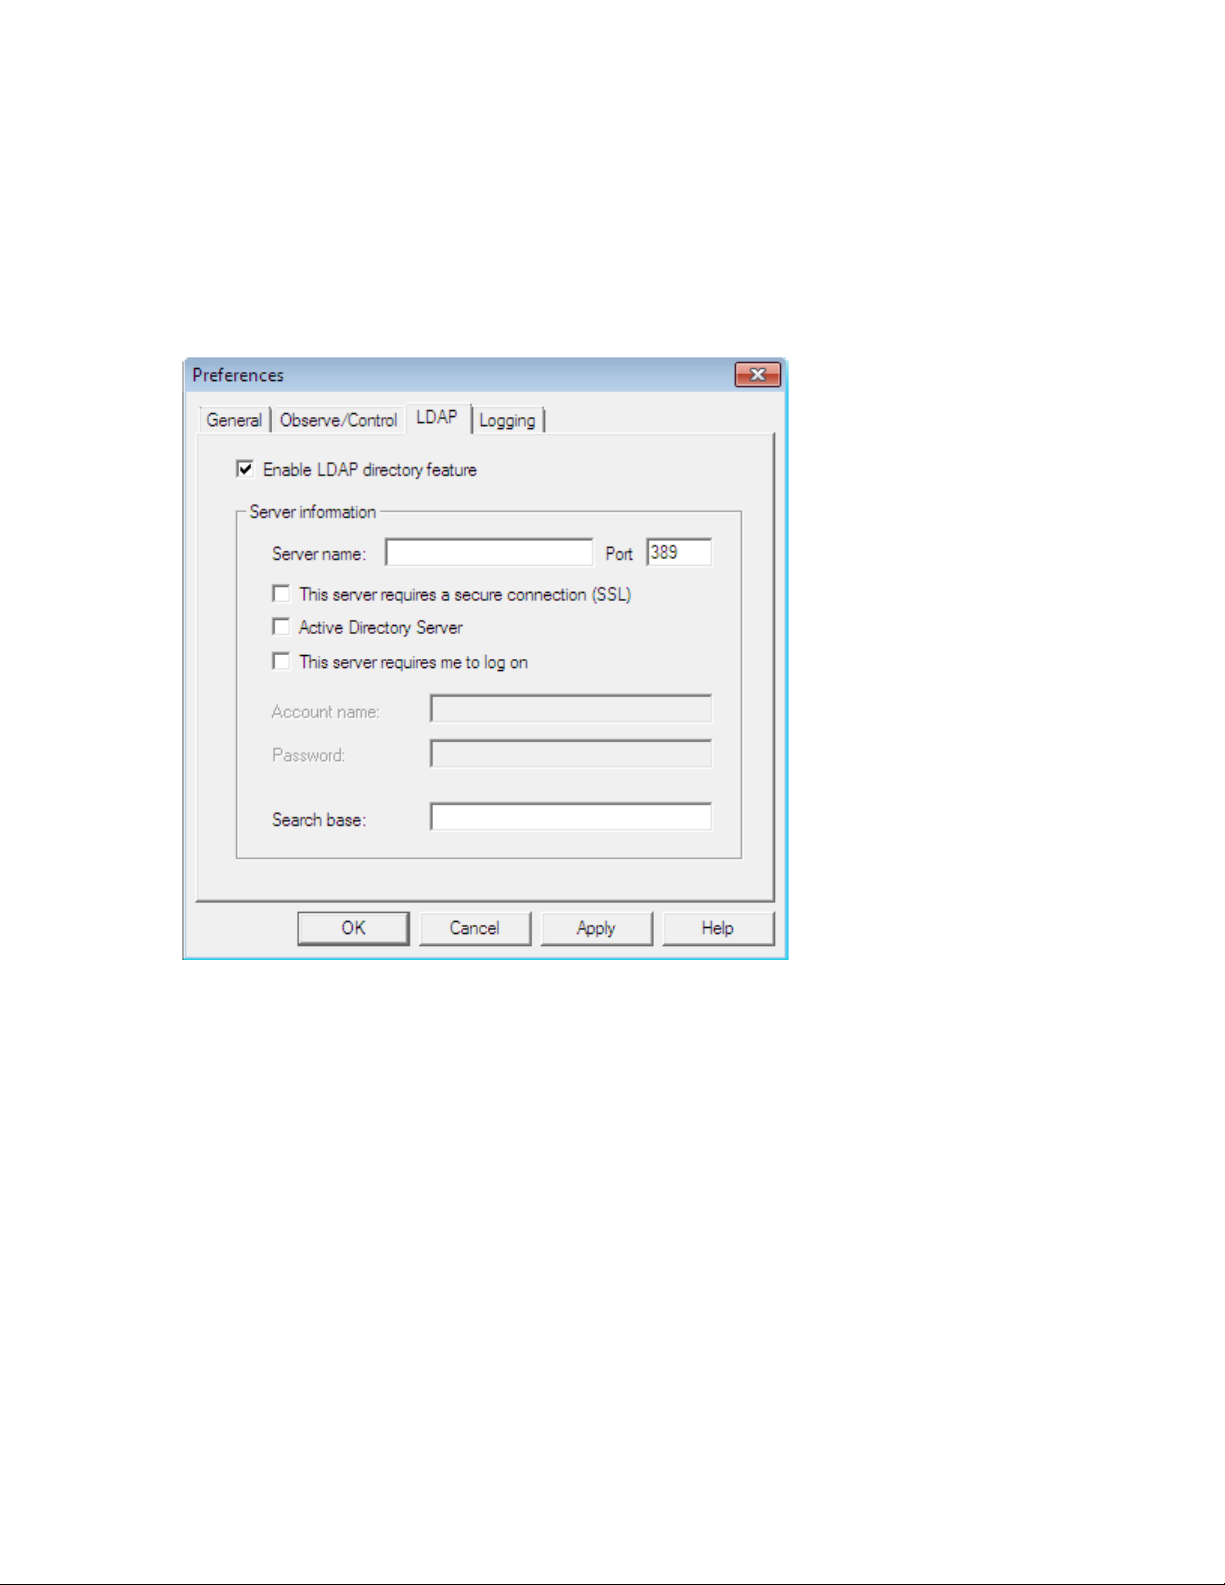
The LDAP Tab
Timbuktu’s LDAP support allows Timbuktu users to find other T imbuktu computers without knowing their
IP addresses. You can search for other LDAP-enabled Timbuktu computers by their user information,
including the computer name, user name, email address, and location.
To use the LDAP server’s search functionality, you must configure options on the LDAP tab. You can
enable the LDAP functionality and specify LDAP server information.
Note: If you wish to provide your own user information to the search tools on the server, you can do so
with the Timbuktu Host Configuration Utility. See “The LDAP Tab” on page 29.
Page 17
Setting Timbuktu Guest Preferences | 17
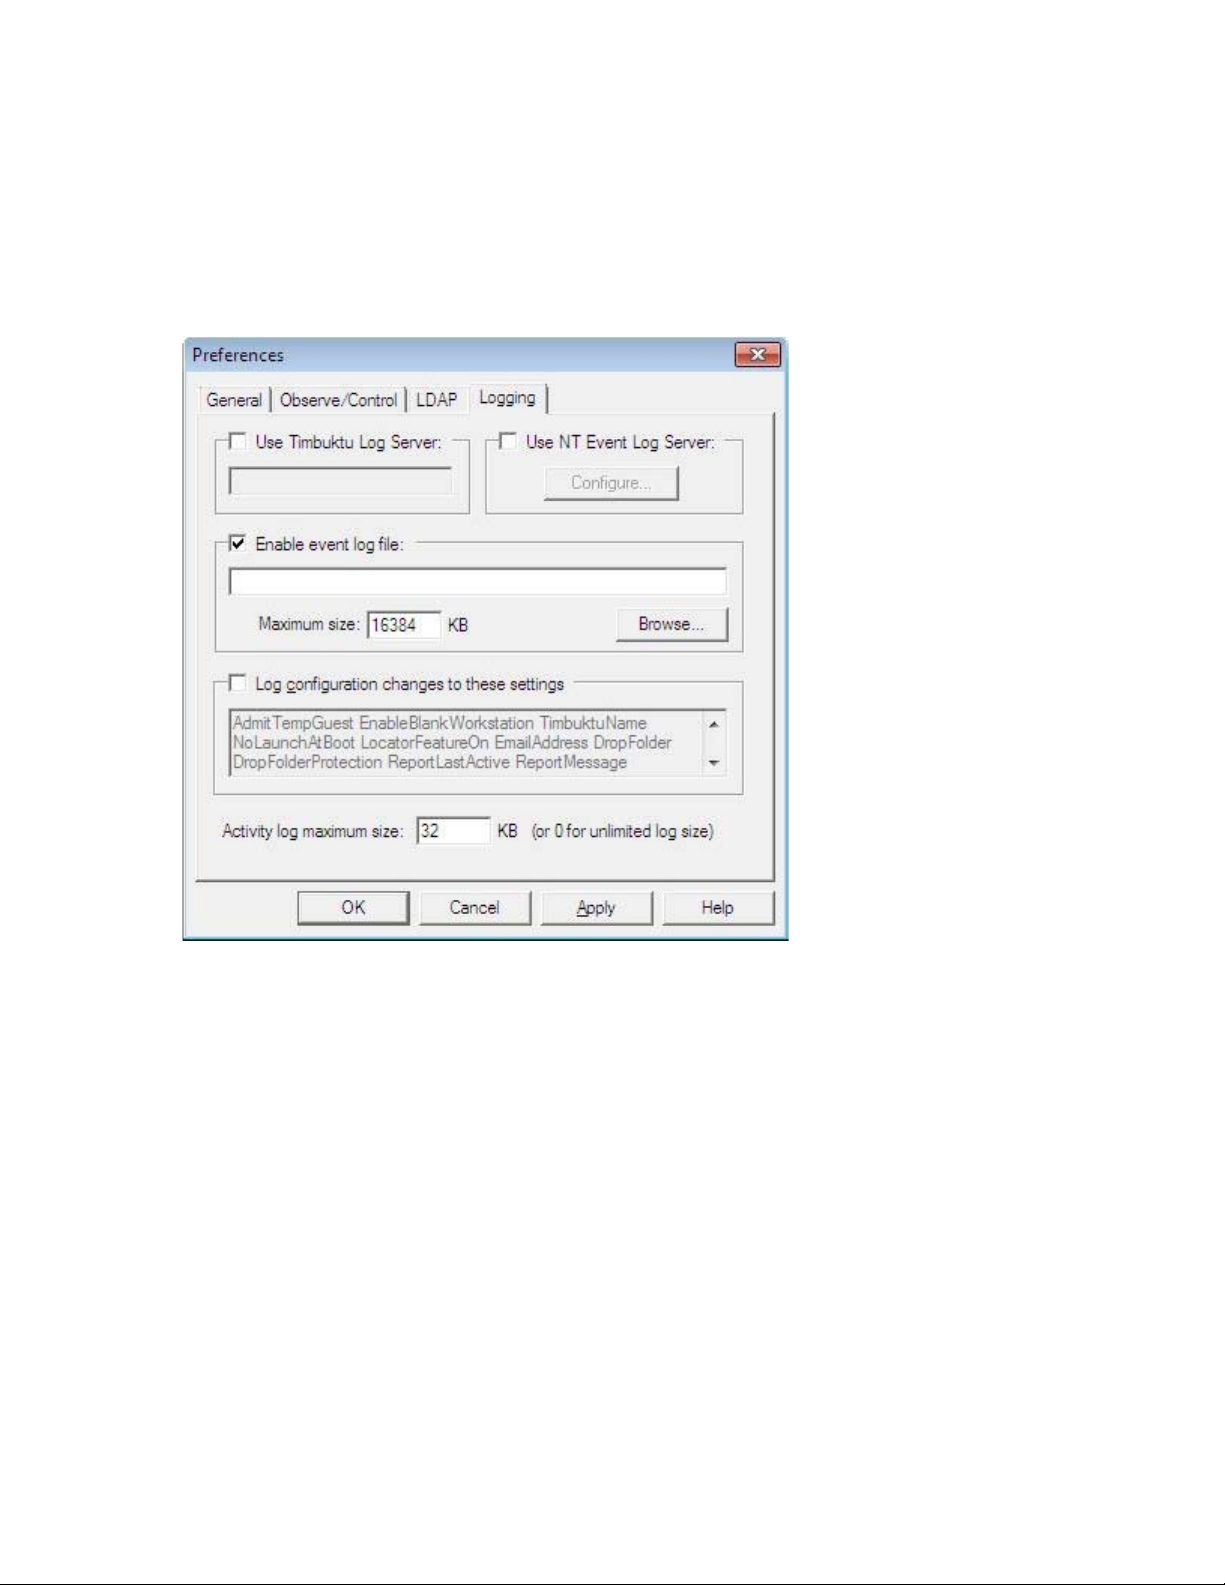
The Logging Tab
Timbuktu supports multiple options for local and centralized event logging.
Among other options, you may specify the maximum size for your log files. When the maximum size for
a log file is reached, its contents are copied to a backup file and removed from the primary file. This
allows the primary file to remain small, which may improve performance if you use centralized logging.
For information about logging options, see “Logging” on page 49.
Page 18

18 | Chapter 3: Configuring the Timbuktu Guest
Configuring Incoming Access
Because the Timbuktu Host is a separate application from the Timbuktu Guest, the Timbuktu Host settings are not available in the Timbuktu Guest application. Instead, T i mbuktu Host settings are managed
with the Timbuktu Host Configuration Utility. See chapter 4, “Configuring the Timbuktu Host.”
Making Connections
When you have finished configuring the Timbuktu Guest or confirmed its default settings meet your
needs, you are ready to make connections to other Timbuktu computers. For information about making
connections and the Timbuktu services you can use, see chapter 5, “Making Connections,” and
chapter 6, “Timbuktu Services.”
Page 19

Chapter 4: Configuring the Timbuktu Host
Once you have installed Timbuktu, you can review and change your configuration settings. This chapter
describes configuration options for the Timbuktu Host.
In Timbuktu for Windows, version 9, the Timbuktu Host is now a separate application from the Timbuktu
Guest, and the Timbuktu Host settings are no longer available in the Timbuktu Guest application.
Instead, Timbuktu Host setting s are managed with the new Timbuktu Host Configuration Utility.
Configuration Requirements and Options
The Timbuktu Host listens for and accepts incoming Timbuktu connections. By default, the Timbuktu
Host will not allow incoming connections. To fully enable incoming Timbuktu access, you must configure
• Discovery option s. Other Timbuktu computers can search for your computer in several different
ways: with the Scanner, the Internet Locator, and with an LDAP server. You can configure Internet
Locator and LDAP options.
If you do not configure the Internet Locator or LDAP, the Scanner may still discover your computer
when the Timbuktu Host is running. Other Timbuktu users who know your computer’s IP address,
WINS name, or DNS name may also enter it directly on the TCP/IP tab in the Timbuktu Guest
window.
• User accounts. No other Timbuktu computer can connect to your computer without your prior
authorization. There are several levels of remote access: you may assign privileges to all Guest
Users, allow remote users to ask for permission to use unassig ned services, and c reate NT Users and
Registered Users with specific privileges.
• Timbuktu service options. You can control certain aspects of how your Timbuktu handles incoming
connections that use the Control, Observe, Send, and Notify services.
Setting Timbuktu Host Preferences
With the Timbuktu Host Configuration Utility, you can manage numerous configuration options for the
Timbuktu Host. To open the Timbuktu Host Configuration Utility, click the Timbuktu icon in the system
tray on the taskbar. From the shortcut menu, choose Open Host Settings.
The tabs in the Timbuktu Host Configuration Utility window are as follows:
• General—Sets the Timbuktu Host computer name and Internet Locator information. See page 21.
•Guest User—Specifies the Timbuktu services that can be used by Guest Users, and whether Guest
Users can ask for permission to use other services. See page 22.
| 19
Page 20

20 | Chapter 4: Configuring the Timbuktu Host
•NT Users—Creates and assigns access privileges to NT User accounts. Because NT Users are authen-
ticated when they log on to Windows, they are not required to provide an additional password
before connecting to your computer. See page 23.
•Registered Users—Creates and assigns access privileges to Registered User accounts. Registered
Users must supply a user name and password to access your computer. See page 24.
• Remote Control—Sets screen-sharing window preferences for when your computer acts as the host
computer for an incoming Timbuktu connection. See page 25.
Note that you may also set Timbuktu Guest preferences for the Control and Observe sessions you
initiate. These preferences are managed with the Preferences dialog box in the Timbuktu Guest.
See “The Observe/Control Tab” on page 15.
• Send—Sets preferences for the Send service, including the way messages are treated when they
arrive on your computer. See page 27.
• Notify—Sets preferences for the Notify service, including a message your computer will display on
the remote computer in response to incoming Notify requests. See page 28.
•LDAP—Enables the LDAP integration, manages LDAP server connection settings, and sets user infor-
mation for the LDAP server’s search functionality. See page 29.
• Logging—Manages logging options. See page 30.
• Sitekey—Manages your Sitekey and allows you to manage Site Administrator privileges. Note that
the Sitekey tab will appear only if your Timbuktu installation uses a Sitekey. See page 30.
Depending on your Timbuktu installation, some of these tabs may not appear in the Timbuktu Host Configuration Utility.
Page 21

Setting Timbuktu Host Preferences | 21
The General Tab
On the General tab, you can enter an email address for the Internet Locator, which allows other Timbuktu users to find your computer by entering your email address, and specify a computer name.
By default, Timbuktu uses your computer’s Windows name as its computer name. However, you may set
the computer name to anything that will help identify your computer to other Timbuktu users.
The Internet Locator
Timbuktu’s Internet Locator feature allows Timbuktu users to locate and connect to other Timbuktu
computers by entering the host computer’s email address instead of its IP address. This can be particularly helpful when the host computer is connected to a network that assigns dynamic IP addresses.
To register your computer with the Internet Locator, enable the In ternet Locator and enter an email
address in the Email Address box. Every time the Timbuktu Host is started, the email address and your
computer’s current IP address are automatically sent to the Internet Locator server. When another Timbuktu user enters the email address on the TCP/IP tab, the Internet Locator server translates the email
address to the correct IP address and Timbuktu completes the connection.
Motorola maintains an Internet Locator server for public use. (Its DNS name is findme.netopia.com.)
Your Timbuktu administrator may also configure your Timbuktu installation to use a different server.
Page 22

22 | Chapter 4: Configuring the Timbuktu Host
The Guest User Tab
Use the Guest User tab to assign Timbuktu service privileges to the Guest User account—a single Timbuktu account that does not require the user to supply access credentials, and whose access privileges
are available to anyone who connects to your computer with Timbuktu. All Timbuktu users that do not
have NT User or Registered User accounts are treated as Guest Users. Because no authentication is
required, you should exercise caution when granting a service to Guest Users.
For more information about Guest Users and assigning access privileges, see “Guest Users and Ask for
Permission Users” on page 31.
Page 23

Setting Timbuktu Host Preferences | 23
The NT Users Tab
On the NT Users tab, you can assign Timbuktu services to NT Users—users and members of user groups
on your Windows network who have been authenticated by logging on to the Windows network. Because
they have already been authenticated by the operating system, NT Users do not need an additional password to access your computer. If desired, you can require NT Users to ask for permission after they have
been authenticated but before they can connect to your computer.
For more information about creating NT User accounts and assigning access privileges, see “NT Users”
on page 32.
Page 24

24 | Chapter 4: Configuring the Timbuktu Host
The Registered Users Tab
On the Registered Users tab, you can assign Timbuktu services to R egistered Users—Timbuktu users who
must supply a user name and password to access your computer. You can create Timbuktu accounts for
as many Registered Users as you wish, and assign each user a specific set of access privileges. If desired,
you can require Registered Users to ask for permission after they have been authenticated but before
they can connect to your computer.
For more information about creating Registered User accounts and assigning access privileges, see “Reg-
istered Users” on page 32.
Page 25

Setting Timbuktu Host Preferences | 25
The Remote Control Tab
Timbuktu Control and Observe sessions take place in a screen-sharing window, which displays the host
computer’s desktop on the guest computer’s screen. The Remote Control tab in the T imbuk tu Host Configuration Utility lets you specify options that may improve security and screen-sharing performance
when other Timbuktu users use the Control or Observe service with your computer.
• As a security enhancement, Ti mbuktu supports secure screen blanking during incoming Control and
Observe sessions. Secure screen blanking is a Timbuktu security feature that prevents unauthorized
viewing of your computer’s screen while it is being controlled by a remote user. Set secure screen
blanking options in the Security area on the Remote Control tab. For more information, see the
following section, “Secure Screen Blanking.”
• The remote-control Capture Frame is an additional security measure that allows you to restrict a
remote user’s view of your desktop to only the area you wish to share. See “Enabling the Capture
Frame” on page 26 for details.
• Screen-sharing performance for the guest computer can be affected by the options you select in
the Capture Technique and Presentation areas.
Secure Screen Blanking
Secure screen blanking is a Timbuktu security feature that prevents unauthorized viewing of your computer screen while a remote user is controlling your computer. When secure screen blanking is active, no
one will be able to see what is happening on your computer’s desktop. (Note than an observer may be
able to see the cursor move and hear any audio the computer generates.)
Page 26

26 | Chapter 4: Configuring the Timbuktu Host
Secure screen blanking works differently depending on whether you are working at your computer when
the other user takes control.
• If you are working at your computer and another user controls it—for example, a member of your
organization’s technical support team takes control to troubleshoot a problem you’re having—the
screen will not blank. You will be able to watch the other user’s actions and, if necessary, disconnect the user from your computer.
• If your computer is locked and another user controls it, the screen will blank. You will not be able
to unlock your computer until the other user ends the Control session. When the other user disconnects, you can unlock your computer normally.
Enabling the Capture Frame
When you enable the Use Capture Frame option on the Remote Control tab in the Timbuktu Host Configuration Utility, the Capture Frame will open on your desktop when another Timbuktu user establishes
a Control or Observe connection to your computer.
The screen-sharing session will begin when you click the Play button in the upper-left corner of the Capture Frame. This allows you to position the Capture Frame on your desktop before screen-sharing
begins. During the screen-sharing session, only the portion of your desktop that appears in the Capture
Frame is displayed in the screen-sharing window on the guest computer.
Note: Do not enable the Use Capture Frame option if anyone will need to use the Control or Observe
service to access your computer when you are not present. Because you must click the Play button to
allow the screen-sharing session to proceed, you must be physically present at the host computer.
For additional information about using the Capture Frame, see “Using the Capture Frame” on page 42.
Page 27

Setting Timbuktu Host Preferences | 27
The Send Tab
The Send service lets Timbuktu users send messages to other Timbuktu computers. On the Send tab, you
can control whether Timbuktu notifies you of an incoming message by displaying the message in a fullsized window or as a minimized icon on the taskbar. You can also designate how much of your disk space
should be protected from temporary storage of mess ages and their enclosures and the d irectory in which
they will be stored.
Page 28

28 | Chapter 4: Configuring the Timbuktu Host
The Notify Tab
The Notify service lets Timbuktu users query another computer to determine whether its user is present.
On the Notify tab, you can control how your computer responds when other Timbuktu users send notification requests.
Page 29

Setting Timbuktu Host Preferences | 29
The LDAP Tab
Timbuktu’s LDAP support allows Timbuktu users to find other T imbuktu computers without knowing their
IP addresses. You can search for other LDAP-enabled Timbuktu computers by their user information,
including the computer name, user name, email address, and location.
To use the LDAP server’s search functionality, you must configure options on the LDAP tab. You can
enable the LDAP functionality, specify LDAP server information, and provide your own user information
to the search tools on the server.
Page 30

30 | Chapter 4: Configuring the Timbuktu Host
The Logging Tab
Timbuktu supports multiple options for local and centralized event logging. You can enable and disable
logging options on the Logging tab.
Among other options, you may specify the maximum size for your log files. When the maximum size for
a log file is reached, its contents are copied to a backup file and removed from the primary file. This
allows the primary file to remain small, which may improve performance if you use centralized logging.
For information about logging options, see “Logging” on page 49.
The Sitekey Tab
The Sitekey tab displays information about your computer’s Timbuktu Sitekey and allows you to manage
Site Administrator privileges.
The Sitekey tab will appear only if your Timbuktu installation uses a sitekey.
Page 31

Managing User Accounts
Before your computer will allow incoming Timbuktu connections, you must grant user access to one or
more Timbuktu services. Use the Guest User, NT Users, and Registered Users tabs in the T imbuktu Host
Configuration Utility to create user accounts and assign access privileges. You can allow one-time-only
access by enabling the Ask for Permission feature, assign certain services to all Guest Users, and grant
permanent access privileges to individual NT Users and Registered Users. You can add or remove access
privileges or user accounts at any time.
Note that having a Timbuktu account on one computer does not give a user the ability to connect to any
other Timbuktu computer. Each Timbuktu Host controls its own access permissions.
Before You Create User Accounts
As you configure the Guest User and individual user accounts, keep the following points in mind.
• The Control service allows the other Timbuktu user to perform any of the tasks that you can per-
form when you are logged on to your computer. This means that a user with the Control privilege
may be able to run applications; create, modify, or delete files without restriction; and erase data
from your computer. The Control privilege, therefore, should be granted with caution.
Managing User Accounts | 31
• If you grant Ask for P ermission access to a user requesting the Exchange service, you automatically
grant the user access to all three Exchange sub-services: Exchange (Read), Exchange (Write) and
Exchange (Delete).
• If you decide that a certain service—for example, Control or Exchange—should not be available to
any user at any time, you must remove that service from Guest User access and from the list of
privileges for every user account. You may also disable the Ask for Permission feature.
• The services you assign to Guest Users are automatically assigned to NT Users and Registered Users
as well. You cannot withhold a privilege from a NT User or Registered User if that privilege is
assigned to Guest Users.
When you have finished configuring Timbuktu user accounts, shut down and restart the T imbuktu Host as
described in “Starting and Shutting Down Timbuktu” on page 10. When it restarts, the Timbuktu Host
will apply your new settings and resume listening for incoming connections.
Guest Users, NT Users, and Registered Users
Timbuktu allows you to specify many different levels of remote-user access. You can allow all Timbuktu
users to access certain services, and limit other services to password-authenticated users or make them
entirely inaccessible.
Guest Users and Ask for Permission Users
All Timbuktu users that do not have NT User or Registered User accounts are treated as Guest Users. The
Guest User is a single account that does not require the user to supply access credentials, and whose
access privileges are available to anyone who connects to your computer with T imbuktu. For this reason,
Guest Users are usually assigned a limited range of Timbuktu services. Services such as Send and Notify,
which allow minimal remote interaction with your computer, are often assigned to Guest Users. Services
such as Control and Exchange, which may allow complete access to your computer, are almost never
assigned to Guest Users. Exercise caution when granting a service to Guest Users.
Page 32

32 | Chapter 4: Configuring the Timbuktu Host
If desired, assign Timbu ktu services to Guest Users on the Guest Users tab. Recall that the services you
assign to Guest Users are automatically assigned to NT Users and Registered Users as well. You cannot
withhold a privilege from a NT User or Registered User if that privilege is assigned to Guest Users.
If you enable the Guests May Ask for Permission to Use Unchecked Services option, a Timbuktu user
who does not have permission to use a particular Timbuktu service can request permission to use that
service on a one-time-only basis. When a user asks for permission, the Ask for Permission dialog box will
appear on your screen. (A similar dialog box will appear if you have enabled the Ask for Host Permission
option for an NT User or Registered User.) You can allow or deny the request.
Note that when a Guest User has connected to your computer, the Timbuktu icon in the system tray will
indicate that a user has connected to your computer (see “Monitoring Remote Connections” on page 49).
NT Users
NT Users are users, user groups, or security principals on your Windows network who have been granted
permission to use specific Timbuktu services on your computer. Because NT Users are authenticated
when they log on to the Windows network, Timbuktu does not require them to use an additional password when they connect to your computer. Note, however, that this does not grant Timbuktu access to
all Windows users on your network. You still must create an NT User account and assign privileges for
each Windows user you wish to allow.
To allow Windows-authenticated users access to your computer, create NT User accounts on the NT
Users tab. Each account allows you to assign a unique set of Timbuktu privileges to a user or user group
on your Windows network. You can create as many NT User accounts as you wish. An NT User can access
the services you have assigned to the NT User account anytime the Timbuktu Host is running on your
computer. However, you may require individual NT Users to ask for permission before they can connect
to your computer. The ask for permission requirement can be enabled on a service-by-service basis, and
you can choose whether the default response (if you are not present) is to allow or deny access.
Regis tered Users
Like NT Users, Registered Users have password-protected access to your computer, but they are not
authenticated by Windows. Instead, they must supply a user name and password, which you assign,
before they can connect to your computer.
Use the Registered Users tab to create Registered User accounts and assign Timbuktu services to each
user. You can create T imbuktu accounts for as many Registered Users as you wish, and assign each user a
different set of access privileges. A Registered User can access the services you have assigned to the
Registered User account anytime the Timbuktu Host is running on your computer. However, you may
require individual Registered Users to ask for permission before the Timbuktu connection is completed.
Registered Users may change their own passwords. When you create a Registered User account, you may
also assign password restrictions to increase the security of the passwords your Registered Users can
create.
Working with the Timbuktu Host
When you have finished configuring the Timbuktu Host, you can close the Timbuktu Host Configuration
Utility. The Timbuktu Host itself will continue listening for incoming connections. For information about
working with Timbuktu services as the host computer and monitoring incoming access, see chapter 7,
“Managing the Timbuktu Host.”
Page 33

Chapter 5: Making Connections
This chapter discusses how you can use the connection tabs in the T imbuktu Guest window to connect to
other Timbuktu computers.
The Timbuktu Guest Window
When you start the Timbuktu Guest, the Timbuktu Guest window opens on your desktop.
| 33
Page 34

34 | Chapter 5: Making Connections
Timbuktu Menus
Use the menus at the top of the window to make connections, customize the Timbuktu Guest, and view
the activity log.
Timbuktu Service Toolbar
Use the service buttons on the Timbuktu Service Toolbar, located below the menu bar, as shortcuts to
launch the Timbuktu services listed in the Services menu. The service buttons will remain dimmed until
you have entered or selected an address on one of the connection tabs.
Connection Tabs
You will use the connection tabs in the middle of the Timbuktu Guest window to specify or select the
other Timbuktu computers to which you will connect. To bring a tab to the front, click it.
Note that when a computer is listed or displayed on one of the connection tabs, this does not automatically enable you to connect to that computer. Addresses remain visible in the Address Books and Recent
Connections tabs even when the computers at those addresses are not running the Timbuktu Host or are
shut down.
Status Bar
The status bar at the bottom of the T imbuktu Guest window contains two information panels. The panel
on the right displays your computer’s TCP/IP address. If the Timbuktu Host is installed on your computer,
other Timbuktu users will use this address to connect to you.
The Timbuktu Connection Process
Before you can use any Timbuktu service with a remote computer, you must establish a connection with
the computer. The connection process occurs in the following sequence.
1. Select or specify a remote computer.
You may enter a computer’s name or IP address on the TCP/IP tab or search for other Timbuktu
computers with the Scanner or LDAP. You may also use an address book or re-establish a previous
connection on the Recent Connections tab.
2. Choose a Timbuktu service.
Once you have specified or selected the remote computer you want, you must choose the service
you wish you use.
• Click a service button on the Services toolbar.
• Choose a service from the Services menu.
3. Provide access credentials.
If required, you must enter your access credentials or ask for permission.
Page 35

The Timbuktu Connection Process | 35
As long as you have been granted access as a Guest User , Ask for Permission User, Registered User, or NT
User, you can connect to any Timbuktu computer on your TCP/IP network.
Step 1: Selecting the Remote Computer
Each connection tab in the Timbuktu Guest provides a different way for you to select or specify the
remote computer. If you have not connected to the computer before, you will need to locate it.
You can establish a Timbuktu connection to a computer you haven’t used before in a number of ways.
• Enter the computer’s IP address, WINS or DNS name, or email address on the TCP/IP Tab.
If you enter the computer’s email address, the Internet Locator server will translate the email
address to the computer’ s correct IP address. See “The Internet Locator” on page 21 for more information about the Internet Locator.
If you use the TCP/IP tab to specify the remote computer, you may use SSH to secure your connection. See “Connecting Securely with SSH” on page 38.
Page 36

36 | Chapter 5: Making Connections
• Use the Scanner tab to search your network for active Timbuktu computers.
Timbuktu will scan your local network and return a list of the Timbuktu computers it finds. Select
the desired computer to connect without leaving the Scanner tab.
Note: By default, the Scanner scans the local TCP/IP subnet. Your system administrator can customize and extend the range of the search.
• Search for remote computers meeting specific criteria on the LDAP tab.
Page 37

The Timbuktu Connection Process | 37
When you don’t know a computer’s IP address and it isn’t located on a network the Scanner can
access, enter search criteria on the LDAP tab. Select the desired computer to connect without
leaving the LDAP tab.
If you have connected to the desired computer before, you have additional connection options:
• If you have saved the computer to an address book, open the address book on the Address Books
tab and select the computer.
An address book is a collection of saved computers to which you can quickly establish a Timbuktu
connection. Each saved address includes the computer name, its connection address, and a default
service—the Timbuktu service that is used when you double-click the address. Once you have added
an address to your address book, you don’t have to re-enter the address each time you connect to
that computer.
For more information about using address books and saving computers to them, see “Address
Books” on page 38.
• The Recent Connections tab displays a record of your previous Timbuktu connections, including
the date and time of the most recent connection and the Timbuktu service you used. You can establish the new connection using the same service as before, or you can select a new one.
Page 38

38 | Chapter 5: Making Connections
When you establish a connection from the Recent Connections tab, you can use the same Timbuktu
service as before or select a different service.
• The TCP/IP Address drop-down list on the TCP/IP tab lists the 20 most recent connections you have
made from the TCP/IP tab. (Connections made from other connection tabs are not listed.) Select
the desired computer from the list to begin the connection process.
On most connection tabs, you can select multiple computers. When you select more than one computer,
the same Timbuktu service will be invoked for each one.
Connecting Securely with SSH
If you use the TCP/IP tab to specify the remote computer, you may use SSH to secure your connection.
To complete an SSH connection, you must have operating-system-level access credentials—either
Windows or Mac OS X—for the remote computer. If the remote computer is a Macintosh, the Mac’s local
user must also assign you a Mac OS X Registered User account that allows you access.
SSH connections use an SSH gateway to secure your Timbuktu connection. Note that the connection is
encrypted only between your computer and the SSH gateway. The connection from your computer is
decrypted at the SSH gateway, and the connection between the gateway and the host Timbuktu computer is not encrypted.
Address Books
A Timbuktu address book is a collection of saved computers to which you can quickly establish a Timbuktu connection. Once you have added a computer to your address book, you don’t have to re-enter its
address each time you connect.
By default, Timbuktu includes one address book, called Personal. You can create other address books to
group addresses into convenient clusters: for example, business contacts, friends, and family. Use the
Page 39

The Timbuktu Connection Process | 39
Address Books tab to view the contents of your address books and connect to the computers you have
saved.
To save a computer to an address book, select it on the TCP/IP or Recent Connections tab and click the
Copy to Address Book button. You may also save the list of computers found by the Scanner and copy
addresses from one address book to another.
Note: In some situations, such as if your organization uses dynamic TCP/IP addressing, a remote computer’s TCP/IP address may change frequently. In this situation, you may not want to store IP addresses
in Timbuktu’s address books. Use the Internet Locator email address instead.
Step 2: Selecting the Timbuktu Service
Once you have selected the computer to which you wish to connect, select a Timbuktu service from the
Services menu or click a service button on the Timbuktu Service Toolbar to connect to the selected
computer using that service. You may also right-click the target computer to open a shortcut menu,
from which you can choose the service to launch.
If you have saved the remote computer to an address book, or if it appears on the Recent Connections
tab, you can also connect to the computer by double-clicking it. The Timbuktu connection will then be
established using the default service. In an address book, the default service is the service specified in
the computer’s connection properties. On the Recent Connections tab, the default service is the service used during the last connection.
Step 3: Entering Access Credentials and Completing the Connection
Once you have selected a computer and a Timbuktu service, the connection process will begin. If the
service you have selected is assigned to your NT User account, the connection will be completed automatically. Otherwise, the Log In dialog box will appear on your screen.
Page 40

40 | Chapter 5: Making Connections
• If you have a Registered User account on the other computer, select the Log In as Registered User
radio button. Enter your user name and password and click OK. (You may also change your password
if desired or if prompted to do so.)
• If the service you wish to use is available to the Guest User account, select the Log In as Guest
radio button and click OK. (With some services, the Log In dialog box will not appear and the Guest
User connection will be completed automatically.)
• If you do not have a Registered User account, you may be able to ask for permission to access the
other computer. Select the Ask for Permission radio button and click OK. If the computer’s local
user grants your request, you will be admitted.
The user of the other computer may also have chosen to disable the Ask for Permission option. If
the Ask for Permission radio button is not available, you must use other means to contact the
other user to be granted access.
Page 41

Chapter 6: Timbuktu Services
This chapter introduces you to each of the many Timbuktu services: Control, Observe, Exchange, Send,
and Notify. Each Timbuktu service allows you to interact with other computers and other users in a different way. Together, they help you make the most of your network.
This chapter focuses on using Timbuktu services with the Timbuktu Guest. For information about working with Timbuktu services as the host computer, see chapter 7, “Managing the Timbuktu Host.”
The Control and Observe Services: Controlling or Observing Another Computer
With the Control and Observe services, you can view another computer’s desktop in the screen-sharing
window on your own computer. The window is continually updated as the other computer’s desktop
changes.
• When you control another computer, you can use your mouse and keyboard to work with the remote
computer as if you were working locally. While you are controlling another computer, you can perform any of the tasks that you could perform on your own computer, including opening applications
and creating, modifying, and deleting files.
• When you observe another computer, you can see the activity on its screen, but you cannot control
it. This privilege may be useful for diagnosing problems on a remote computer or viewing a
presentation.
The Control and Observe services are collectively known as Remote Control or screen-sharing services.
To control or observe another computer, select the computer on any of the connection tabs in the Tim-
buktu Guest window. Then click the Control or Observe service button on the main toolbar.
The Screen-Sharing Window
When you begin a Control or Observe session, the screen-sharing window opens on your desktop. If you
are using the Control service, move your cursor into the screen-sharing window to begin working with
the other computer. If you are using Observe, use the screen-sharing window to watch the other user’s
activity.
When the screen-sharing window is not maximized, you can choose whether the window will scroll automatically or only when you click scroll bars at the side and bottom of the window. Use the Preferences
dialog box (see page 15) to choose the method you prefer for most situations; you can change your preference for the active screen-sharing session with the system menu (see the following section, “The
Screen-Sharing Window System Menu”).
| 41
Page 42

42 | Chapter 6: Timbuktu Services
When you maximize the screen-sharing window, your preferred behavior will occur unless the remote
computer’s screen resolution is higher than yours. In this case, the window will scroll automatically
when your cursor reaches the edge of the window, enabling you to view the entire remote desktop.
The Screen-Sharing Window System Menu
During a screen-sharing session, the Control or Observe icon is shown in the upper-left corner of the
screen sharing window . Click the icon to op en the screen-sharing window’s system menu, which includes
a number of options to manage settings for the screen-sharing window and how keyboard input is sent to
the host computer.
Changing Screen-Sharing Settings for the Current Session
If you wish to change your guest preferences during an active screen-sharing session, open the system
menu and choose Host Settings. With the Host Settings dialog box, you can change your guest prefer-
ences for the current screen-sharing session. Changes you make in the Host Settings dialog box are not
applied to subsequent screen-sharing sessions.
Sending CTRL+ALT+DEL to the Remote Computer
If you use the Control service to connect to a computer that is locked, or if you wish to log on as a different Windows user, you cannot display the logon screen by pressing the
computer. Instead, open the system menu and choose Send Ctrl+Alt+Del to Remote Computer.
CTRL+ALT+DEL keys on your
User Account Control, Fast User Switching, and the Secure Desktop
When you Control a Windows computer running Windows 7 or Windows Vista, Timbuktu fully supports
User Account Control, Fast User Switching, and the secure desktop.
• When you run an application that requires User Account Control authorization, the UAC prompt is
displayed normally in the screen-sharing window. You can use the Control service to interact with
the UAC application.
• If you wish to log on to the host computer as a different Windows user, the Control service supports
Fast User Switching. As described in the previous section, however, you cannot open the logon
screen by pressing the
choose Send Ctrl+Alt+Del to Remote Computer. You can then enter the new user’s logon creden-
tials, and the Control session will continue normally.
• Similarly, if you wish to enter the Windows secure desktop, you must use the Send Ctrl+Alt+Del to
Remote Computer command.
CTRL+ALT+DEL keys on your computer. Instead, open the system menu and
Using the Capture Frame
When the Use Capture Frame option is enabled on the host computer, the screen-sharing window on the
guest computer displays only the portion of the host computer’s desktop that appears within the Capture Frame on the host computer. (See “Enabling the Capture Frame” on page 26 for more information
about the Capture Frame.)
Page 43

The Exchange Service: Copying and Moving Files Between Computers | 43
Using the Capture Frame as a Guest
To begin any outgoing Control or Observe session, launch the service normally. If the Use Capture Frame
option is enabled on the host computer, the screen-sharing window will be blank until the user of the
host computer clicks the Play button in the Capture Frame. Once the session begins, the screen-sharing
window will display only the portion of the host computer’s desktop that appears inside the Capture
Frame. The host user may move or resize the Capture Frame at any time.
When the Capture Frame is enabled, you will be able to use the Control and Observe services normally.
The only exception is that you will not be able to move or resize the Capture Frame, even when you control the host computer.
Using the Capture Frame as a Host
When you have enabled the Use Capture Frame option on your computer, you must be present to allow
the an incoming Control or Observe session to proceed. For details, see “Working with the Capture
Frame” on page 48.
Controlling a Macintosh Computer
Controlling a Macintosh computer is usually the same as controlling a Windows computer. However, Windows and Mac keyboards are slightly different. If you need to send a Command (
intosh, press the Window key on your Windows computer.
You may also use the Map Ctrl-> Cmd option, which appears on the screen-sharing window’s system
menu when you control a Macintosh. If you enable this option, press
send the equivalent of a Command keystroke to the Macintosh. If you disable this option, pressing
on your Windows keyboard will send
CTRL to the Macintosh.
CTRL on your Windows keyboard to
a) keystroke to the Mac-
The Exchange Service: Copying and Moving Files Between Computers
Use the Exchange service to copy and move files and folders in both directions between your computer
and another Timbuktu computer. Exchange provides more flexibility than Send, but it also allows the
guest user to view and navigate the host computer’s file system.
The full Exchange service is a combination of three sub-services: Exchange (R ead), Exchange (W rite) and
Exchange (Delete). The user of the host computer may grant you any combination of these sub-services.
For example, you may be able to view (Read) files on the remote computer or copy (Write) files to it,
but may not have permission to delete files.
CTRL
Page 44

44 | Chapter 6: Timbuktu Services
To copy files and folders between computers, select the computer on any of the connection tabs in the
Timbuktu Guest window. Then click the Exchange service button on the main toolbar.
The Send Service: Sending Messages and Files to Another Computer
With the Send service, you can send messages similar to electronic mail to another computer. You can
attach files and folders to your messages, making it possible for you to quickly transfer files much larger
than your email system may be able to handle.
When you send a message, Timbuktu temporarily stores it, along with any files you send, in a specific
folder on the remote computer. Likewise, the files that other Timbuktu users send you will be stored
only in the folder you specify on the Send tab in the Timbuktu Host Configuration Utility (see page 27).
Once you receive the files, you can save them to any directory you wish.
Unlike the Exchange file-transfer service, Send does not allow other Timbuktu users to view the file system on your computer.
To send a message to another computer, select the computer on any of the connection tabs in the Timbuktu Guest window. Then click the Send service button on the main toolbar.
Page 45

The Notify Service: Requesting Notification When Another User is Active | 45
The Notify Service: Requesting Notification When Another User is Active
Timbuktu’s Notify service lets you query another computer to determine whether its user is present. On
the other Timbuktu computer, the Request for Notification dialog box opens to inform the user that you
have requested notification. When the user acknowledges the request, the message in your Notify window changes to indicate that the user is present.
The Notify service is a useful way to find out when the person with whom you want to communicate is
available, or when the user is present to grant incoming access for other Timbuktu services. Once you
have been notified that the other user is present, you can close the Notify window and contact the other
user or start a Timbuktu connection with the service that requires authorization.
To request notification of another user’s presence, select the computer on any of the connection tabs in
the Timbuktu Guest window. Then click the Notify service button on the main toolbar.
Page 46

46 | Chapter 6: Timbuktu Services
Page 47

Chapter 7: Managing the Timbuktu Host
Most of your interactions with Timb uktu services will be as the guest computer, using services to connect
to host computers. However, the host computer interacts with certain services as well. As the user of
the host computer, you will also be able to monitor the activity of guest users on your computer.
Using Timbuktu Services as a Host
As the user of a host Timbuktu computer, you must at times grant access to other Timbuktu users or
respond to their usage of Timbuktu services with your computer.
Responding to Ask for Permission Requests
If you enable the Guests May Ask for Permission to Use Unchecked Services option on the Guests tab
in the Timbuktu Host Configuration Utility, other Timbuktu users can ask for permission to use services
that you have not assigned them. When a user asks for permission, the Ask for Permission dialog bo x will
open on your screen. (A similar dialog box will appear if you have enabled the Ask for Host Permission
option for a specific NT User or Registered User.)
| 47
Page 48

48 | Chapter 7: Managing the Timbuktu Host
The Ask for Permission dialog box provides the name of the computer requesting the connection and the
service that the remote user wishes to use. Click OK to accept the connection, or click Cancel to deny
the remote user’s request.
Using Screen-Sharing Services
Timbuktu’s Control and Observe services allow the greatest interaction between the host and guest
users. As the host of an incoming Observe session, you still have complete control of your own computer; you may be giving a presentation or performing a demonstration. As the host of a Control session,
you may wish to closely monitor the activity of the incoming user on your computer. You still have the
final level of control: you may disconnect the other user at any time. For additional security, however,
you may also use the Capture Frame to constrain the other user’s activity to only a certain area of your
desktop.
If a remote user is controlling or observing your computer while Timb uktu is minimized, the regular Timbuktu icon in the system tray on the taskbar is replaced with an icon that alternates between the r eg ular Timbuktu icon and a service icon that indicates the presence of an incoming user.
Working with the Capture Frame
When you enable the Use Capture Frame option on the Remote Control tab in the Timbuktu Host Configuration Utility, the Capture Frame will open on your desktop when another Timbuktu user establishes
a Control or Observe connection to your computer.
The Capture Frame restricts the other user’s view of your desktop. During the screen-sharing session,
only the portion of your desktop that appears in the Capture Frame is displayed in the other user’s
screen-sharing window . Position and resize the Capture Frame as needed, and then click the Play button
in the upper-left corner of the Capture Frame. (Until you click the Play button, the other user’s screensharing window is blank.)
During the screen-sharing session, you may increase or decrease the size of the Capture Frame or move
the Capture Frame around your computer’ s desktop. The remote user will not be able to move or resize
the Capture Frame, even with the Control service.
To close the incoming connection, close the Capture Frame.
Note: Do not enable the Use Capture Frame option if anyone will need to use the Control or Observe
service to access your computer when you are not present. Because you must click the Play button to
allow the screen-sharing session to proceed, you must be physically present at your computer.
For information about using the Capture Frame when you are the guest, see “Using the Capture Frame
as a Guest” on page 43
Receiving Messages
With the Send service, you can send text-based messages, similar to electronic mail, to other Timbuktu
computers. When another Timbuktu user sends a message or files to your computer, they are stored in
the folder you specify on the Send tab in the Timbuktu Host Configuration Utility (see page 27). Y ou can
leave the message and files in this location or save them to any directory you wish.
When you receive a message, it will open in a full-sized window or appear as a minimized icon on the
Windows taskbar. You can specify your preference with the Send tab in the Timbuktu Host Configuration
Utility.
Page 49

Controlling and Monitoring Incoming Access | 49
Re sponding to Notify Requests
When another user uses the Notify service to request notification of your presence at your computer, the
Request for Notification dialog box opens on your computer. The dialog box indicates that the specified
user is asking for notification and provides several options for you to respond. If you click the Acknowl-
edge button, the other user is notified that your are working at your computer. If you click Ignore, the
other user will not be notified that you are present or that you have returned to work.
Use the Notify tab in the Timbuktu Host Configuration Utility to specify a message that Timbuktu will
display to other users when they request notification. See “The Notify Tab” on page 28.
Controlling and Monitoring Incoming Access
There are several ways of maintaining security and restricting access to your computer by other Timbuktu computers. First and foremost, one can connect to your computer without your prior authorization. There are several levels of remote access: you may assign privileges to all Guest Users, allow
remote users to ask for permission to use unassigned services, and create NT Users and Registered Users
with specific privileges. These options are discussed in “Managing User Accounts” on page 31.
To completely prevent any incoming connections, you can shut down the Timbuktu Host.
As an administrator, you may also use Active Directory Group Policies and Site Keys to control security
settings on your entire network. Full documentation for Timbuktu with Active Directory is available.
Monitoring Remote Connections
There are a number of ways to keep track of and control Timbuktu connections to your computer.
When another computer connects to your computer, the Timbuktu icon in the system tray on the taskbar
alternates between the application icon and a service icon that indicates the presence of an incoming
user and the service being used. (For a list of icons, see “Icon Legend” on page 53.) Click the Timbuktu
icon to display a a shortcut menu that includes a list of current users and the services they are using, as
well as a list of previous users. To remove names from the Previous User list, click Clear Previous User
List.
You can disconnect any or all users at any time. Open the shortcut menu and choose the specific user
you wish to disconnect. Or choose Disconnect All Users.
Logging
Timbuktu supports a number of different logging features to allow you to track and record the T imbuktu
activity on your computer.
• The Activity Log maintains a list of the all incoming and outgoing Timbuktu connections on your
computer.
• The Event Log file is a text document which records the same information that Timbuktu records in
the Windows Application Event Log.
• The Windows Application Event Log also logs guest and host service events.
Page 50

50 | Chapter 7: Managing the Timbuktu Host
Timbuktu also supports centralized logging for all the Timbuktu computers on your network: the NT
Event Log Server allows you to copy information about Timbuktu events from your Windows Application
Event Log to the Application Event Log on another Timbuktu computer.
You may specify the maximum size for your log files, and you may specify that certain configuration
changes are recorded in the log files.
To set up your logging options, use the Logging tab in the Timbuktu Guest’s Preferences dialog box (see
page 17) or the Timbuktu Host Configuration Utility (see page 30). See the following sections for more
information about each type of log.
The Activity Log
The activity log maintains a list of the all incoming and outgoing Timbuktu connections on your computer. The activity log is a useful record of Timbuktu activities. You can also use the activity log to diagnose problems you encounter when using Timbuktu.
Each line of the activity log contains a date, a time, and the activity that was carried out—for example,
the Timbuktu application was launched. Th e activity log also contains the T imbuktu computer name and
IP address of each remote user that connects to your computer, records when the user connected, and
specifies which services the user accessed. For file transfers using the Send and Exchange services, the
file name and the local directory involved in the transfer are logged on both computers. For Exchange
file transfers, the guest computer also logs the remote directory.
Finally, the activity log reports when Timbuktu was loaded and shut down, and when previous users were
cleared from the system tray shortcut menu.
To view the activity log, open the Connections menu and choose Activity Log. You may save the activity
log to a TXT file at any time. The text document can then be opened and printed by a word processing
application such as Notepad, or imported into a spreadsheet or database document.
The activity log can preserve up to 32K of activity information before it begins to discard its oldest
records.
The Event Log File
The Event Log file is a text document which records the same information that Timbuktu records in the
Windows Application Event Log. The text file format allows you to easily search the log for events you
wish to review. You can specify the location and size of the Event Log file on the Logging tab in the
Timbuktu Guest’s Preferences dialog box (see page 17) or the Timbuktu Host Configuration Utility (see
page 30).
The Windows Application Event Log
Timbuktu also logs guest and host service events to the Windows Application Event Log.
To see these events in the Windows Application Event Log, open the Windows Start menu.
• In Windows 7 and Windows Vista, choose Control PanelSystem and SecurityAdministrative
ToolsEvent Viewer and choose the Applications and Services Logs option.
• In Windows XP, open the Windows Start menu. Choose ProgramsAdministrative ToolsEvent
Viewer and choose the Application option.
Page 51

Chapter 8: Getting Help
Timbuktu was designed to be as intuitive and easy to use as possible. This manual and the online Help
should answer most of your questions. If you are still unable to solve your problem after referring to all
the documentation, you may contact Motorola Technical Support.
Getting Help with Timbuktu
Timbuktu’s comprehensive online Help provides a variety of ways to answer your questions, including
step-by-step instructions for all common procedures. You can navigate through the online Help using the
Table of Contents and hyperlinks between Help topics, and full-text Search is available.
You may also wish to view the Timbuktu Release Notes, which may contain feature and troubleshooting
information that was not available at the time this document was created.
Opening Timbuktu’s Online Help
In the main Timbuktu window, click the Help menu and choose Contents. Or press F1 from anywhere
within Timbuktu for context-sensitive Help. If a Help button is available in a window or dialog box, click
it to display the online Help topic associated with that area of the Timbuktu user interface.
Contacting Motorola
When you contact Motorola technical support, please provide the following information for both the
host and guest computers to assist us.
• Timbuktu version and build number. To find the build number, open the Help menu and select
About Timbuktu.
• Windows version, and any Service Packs installed.
• Error message or symptom.
• Steps to reproduce the error.
• Relevant system information:
• PC manufacturer and model
• Video card manufacturer and model
• Video device driver version
• CPU speed
• Amount of RAM installed
Motorola’s Timbuktu Web site is at http://www.motorola.com/timbuktu.
| 51
Page 52

52 | Chapter 8: Getting Help
Page 53

Appendix A: Key Mapping and Service Icons
Timbuktu Keyboard Mapping
Controlling a Macintosh computer is usually identical to controlling a Windows computer. However, Windows and Macintosh keyboards are slightly different. The following table shows how keys are mapped
across platforms.
Cross-platform control keys
Windows Keys Macintosh Keys
ALT Option
CTRL Control
CTRL+ALT+DEL Control+Option+Delete
Right-click (on mouse) a (Command)
Window a (Command)
When you control a Macintosh, the Map Ctrl-> Cmd option appears on the system menu in the screensharing window. (To ope n the system menu, click the Control icon in the upper-left corner of the screensharing window.) If you enable this option, pressing
alent of a
Note: If you type a keyboard shortcut while you are controlling another computer and the Control window is active, the shortcut is carried out only on the remote computer.
COMMAND keystroke to the Macintosh.
Icon Legend
Timbuktu’s service icons allow you to quickly identify its many services.
The Timbuktu icon is displayed in the system tray on the Windows taskbar whenever Timbuktu is run-
ning. When another Timbuktu user connects to your computer, the standard Timbuktu icon alternates
with a service icon indicating the service in use. If the service icon is in color, the Timbuktu connection
is active. If the service icon is gray, the connection has been closed.
Timbuktu Icons
User Icon Meaning
CTRL on your Windows keyboard will send the equiv-
A remote user is using the Control service with your computer.
A remote user is using the Observe service with your computer.
| 53
Page 54

54 | Appendix A: Key Mapping and Service Icons
Timbuktu Icons
User Icon Meaning
A remote user is using the Exchange service with your computer.
A remote user is using the Send service with your computer.
A remote user is using the Notify service with your computer.
Page 55

Index
A
activity log 50
Activity Log option 50
Ask for Permission access
Log In dialog box 39
requesting 39
Ask for Permission dialog box 32, 47
Ask for Permission Users 7, 32, 47
asking for permission 39
granting access 47, 48
Log In dialog box 39
asking for permission 39
Log In dialog box 39
B
blanking the screen. See secure screen blanking
C
Capture Frame 26, 42, 48
enabling 26
starting session 43
using 42
working with 48
changing
general preferences 14
LDAP options 16
logging preferences 17
screen-sharing preferences 15
checking for remote users 49
checking the activity log 50
Clear Previous User List option 49
clearing the user list 49
communication protocols 7
compatibility between Timbuktu versions 8
connecting to remote computers 34 to 40
connection tabs 34
Address Books 37
LDAP tab 36
Recent Connections tab 37
Scanner 36
TCP/IP tab 35
Connections menu
Activity Log option 50
clearing users 49
disconnecting remote users 49
Control service 41
Capture Frame 26, 42, 48
controlling another computer 41
copying files from another computer 43
CTRL+ALT+DEL, sending to remote computers 42
D
deleting files from another computer 43
disconnecting remote users 49
disk space required for installation 7
E
email addresses, using for search
change service 43
Ex
subservices 31
exchanging files with another computer 43
F
features
activity log 50
cross-platform connections 8
secure screen blanking 25
file transfer 43
files
copying between computers 43
exchanging with another computer 43
sending to another computer 44
files received folder 44
flashing Timbuktu icon 48
G
general preferences, changing 14
General tab (Preferences dialog box) 14
General tab (Timbuktu Host Configuration Utility)
21
getting Help 51
Guest Users 7
defined 31
Guest Users tab (Timbuktu Host Configuration
Utility) 22
H
hardware requirements 7
Help 51
21
| 55
Page 56

Index | 56
I
icons 53
incoming access
configuring 19
notification 48
Internet Locator 21
K
keyboard shortcuts 53
L
LDAP preferences, changing 16
LDAP server 29
finding remote computers 36
user profile 29
LDAP tab (Preferences dialog box) 16
LDAP tab (Timbuktu Guest window) 36
LDAP tab (Timbuktu Host Configuration Utility) 29
Log In dialog box 39
logging preferences, changing 17
Logging tab (Preferences dialog box) 17
Logging tab (Timbuktu Host Configuration Utility) 30
logon dialog box, displaying 42
M
making a Timbuktu connection 34 to 40
moving files between computers 43
N
Notify service 45
Notify tab (Timbuktu Host Configuration Utility) 28
NT Users 7, 32
authenticating 32
defined 32
NT Users tab (Timbuktu Host Configuration Utility) 23
O
Observe service 41
Capture Frame 26, 42, 48
Observe/Control tab (Preferences dialog box) 15
observing another computer 41
online Help 51
P
Preferences dialog box 13
General tab 14
LDAP tab 16
Logging tab 17
Observe/Control tab 15
Preferences dialog box (T imbuktu Host). See Timbuktu
Host Configuration Utility
previous users
activity log 50
clearing 49
R
Recent Connections tab 37
Registered Users 7, 32
defined 32
Log In dialog box 39
Registered Users tab (T imbuktu Host Configuration
Utility) 24
remote computers
connecting to 34
finding with LDAP 36
remote connections, monitoring 49
remote control 41
Remote Control tab (Timbuktu Host Configuration
Utility) 25
remote users
checking for 49
disconnecting 49
removing remote users 49
requesting access as an Ask for Permission User 39
requests for permission, granting 47, 48
requirements
compatibility 8
hardware 7
software 8
S
screen blanking, secure. See secure screen blanking
screen-sharing preferences, changing 15
screen-sharing window 25, 48
Capture Frame 26, 42, 48
searching for remote computers 36
LDAP tab 29
Scanner 36
secure screen blanking 25
security
Capture Frame 26, 42, 48
checking for remote users 49
configuring incoming access 19
disconnecting remote users 49
NT Users 32
Registered Users 32
secure screen blanking 25
Send service 44
files received folder 44
Send tab (Timbuktu Host Configuration Utility) 27
sending files to another computer 44
service icons 48, 53
services 41 to 46
Control 41
Exchange 31, 43
Notify 45
Observe 41
Send 44
to 40
Page 57

shortcuts, keyboard 53
software requirements 8
starting Timbuktu 10
startup, starting Timbuktu 10
T
tabs. See connection tabs
TCP/IP address 34
TCP/IP tab
making a new connection 35
reestablishing a connection 38
Timbuktu connection tabs 34
Timbuktu Guest
configuring 13
starting 10
Timbuktu Guest window 33
Timbuktu Host
configuring 19
starting 10
Timbuktu Host Configuration Utility 19
General tab 21
Guest Users tab 22
LDAP tab 29
Logging tab 30
Notify tab 28
NT Users tab 23
opening 19
Registered Users tab 24
Remote Control tab 25
Send tab 27
Sitekey tab 30
Timbuktu icons 48, 53
Timbuktu services 41 to 46
Timbuktu users 7
transferring files 43
Index | 57
W
Windows
logging on 42
sending CTRL+ALT+DEL 42
Windows Application Event Log 50
Windows logon dialog box, displaying 42
 Loading...