

Page 1
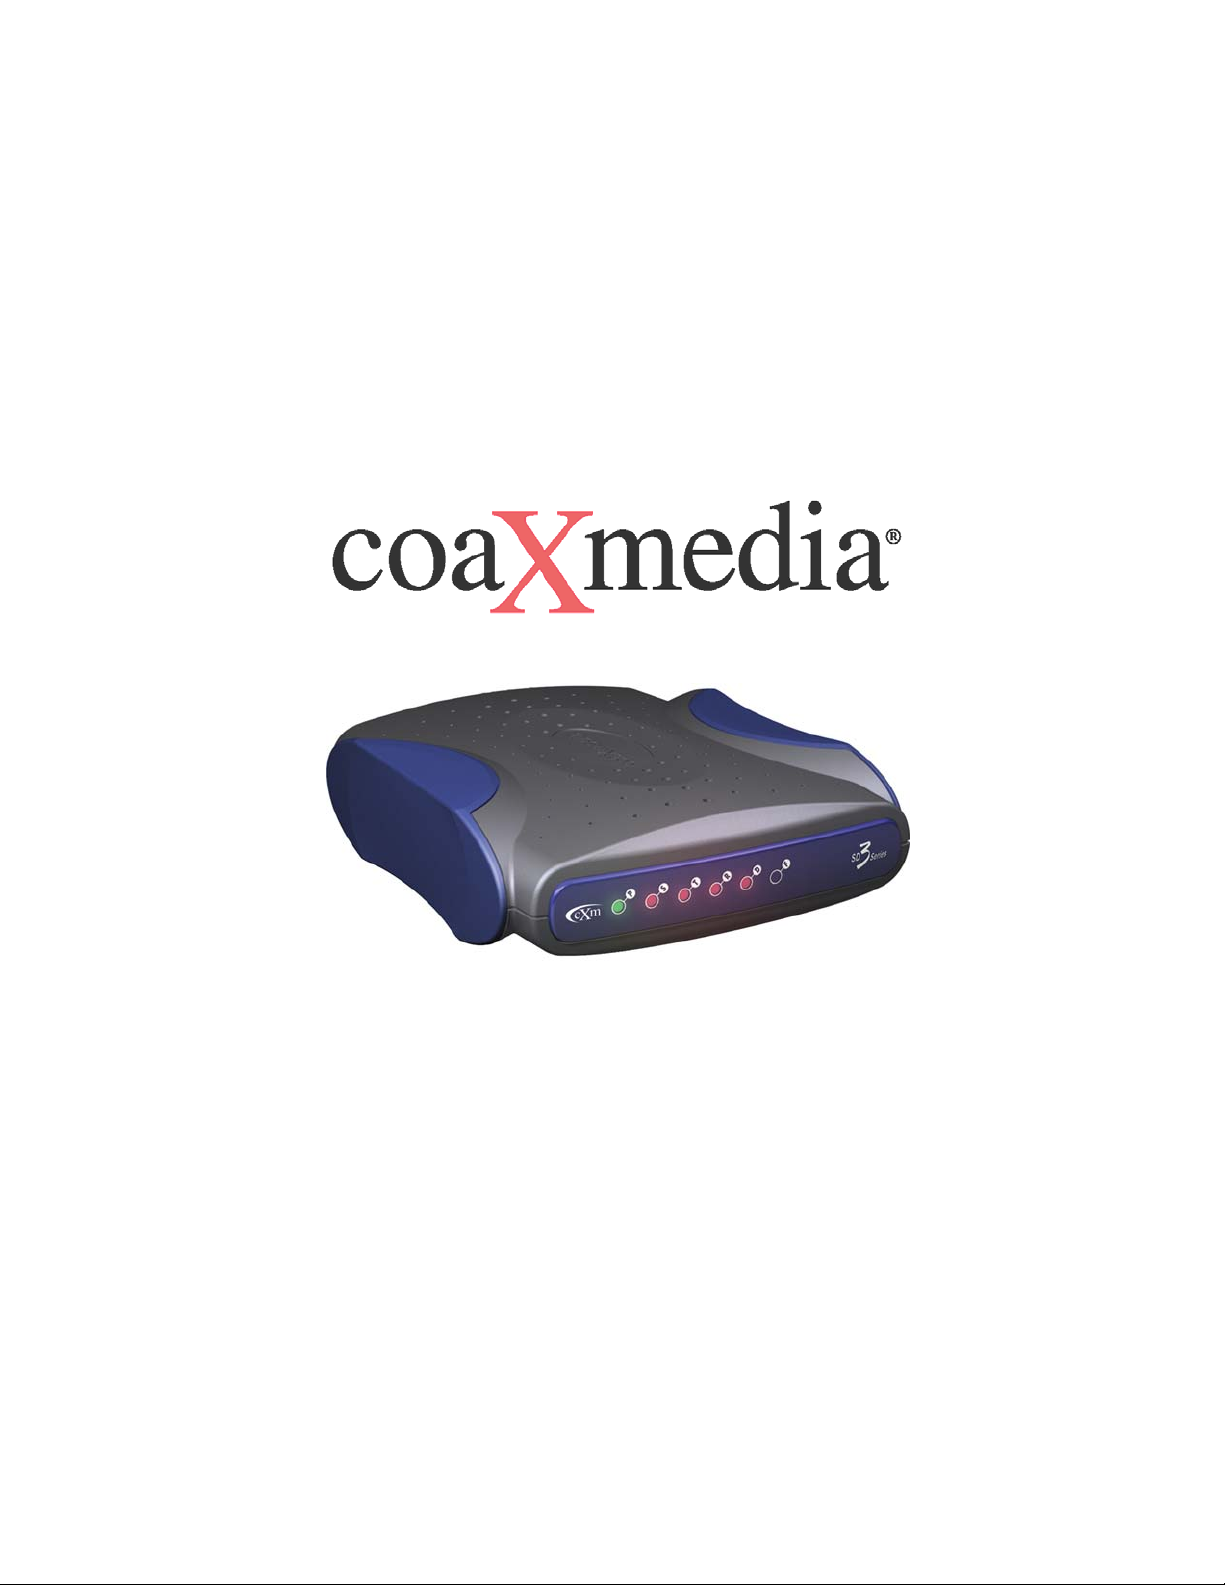
SD301
Access Appliance
User’s Guide
Revision A
May 2003
601013-002
Page 2

Warning: This product may not be exported outside the United States and
Canada without authorization from the U.S. Department of Commerce, Bureau of
Export Administration. Any export or re-export by the purchaser, directly or
indirectly, in contravention of U.S. Export Administration Regulation is prohibited.
This document may not be reproduced, in whole or part, without the written
permission of coaXmedia, Inc. The contents of this document are subject to
change without notice. coaXmedia, Inc. assumes no liability for damages
resulting from the use of this product or for the information contained in this
manual.
coaXmedia and the coaXmedia logo are trademarks of coaXmedia, Inc.
All trademarked products mentioned in this document are trademarks of their
respective companies.
© Copyright 2000-2003 coaXmedia, Inc. All rights reserved.
Printed in U.S.A.
Page 3

Limited Warranty
coaXmedia guarantees that every SD3-Series Access Appliance will be free
from physical defects in material and workmanship under normal use for one (1)
year from the date of purchase. If the product is determined to be defective
during the warranty period, please call coaXmedia’s or your equipment provider’s
Customer Support to obtain a Returned Material Authorization (RMA) number.
The RMA number should be clearly marked on the outside of the package, when it
is shipped. If returned product is determined to be functioning properly, a nominal
processing fee may be charged to cover shipping and handling.
This product contains no end-user serviceable parts; authorized technicians
should perform all service.
IN NO EVENT WILL COAXMEDIA BE LIABLE FOR ANY DIRECT, INDIRECT,
CONSEQUENTIAL, INCIDENTAL, SPECIAL OR EXEMPLARY DAMAGES ARISING
OUT OF THE USE, INABILITY TO USE, OR PERFORMANCE OF THE COAXMEDIA
PRODUCT (S), ITS ACCOMPANYING SOFTWARE, OR DOCUMENTATION,
INCLUDING WITHOUT LIMITATION DAMAGES FOR LOSS OF BUSINESS PROFITS
OR BUSINESS INTERRUPTION, BASED UPON PRINCIPLES OF CONTRACT,
WARRANTY, NEGLIGENCE, STRICT LIABILITY OR OTHER TORT, BREACH OF ANY
STATUTORY DUTY, PRINCIPLES OF INDEMNITY OR CONTRIBUTION, EVEN IF
COAXMEDIA HAS BEEN ADVISED OF THE POSSIBILITY OF SUCH DAMAGES.
Furthermore, coaXmedia makes no warranty or representation (expressed,
implied, or statutory) with respect to its products, accompanying software, or
documentation, or to their use, as well as disclaims against their quality,
performance, merchantability, or fitness for any particular purpose. Therein,
coaXmedia does not warranty that the products will be error free or will operate
without interruption.
coaXmedia reserves the right to revise or update its products, software, or
documentation without obligation to notify any individual or entity.
Page 4

FCC Compliance
This device complies with Part 15 of the FCC Rules. Operation is subject to the
following two conditions: (1) this device may not cause harmful
interference, and (2) this device must accept any interference received,
including interference that may cause undesired operation.
Note: This equipment has been tested and found to comply with the limits for a
Class B personal computer and peripherals, pursuant to Part 15 of the FCC Rules.
These limits are designed to provide reasonable protection against harmful
interference in a residential installation. This equipment generates, uses, and can
radiate radio frequency energy, and, if not installed and used in accordance with
the instructions, may cause harmful interference to radio communications.
However, there is no guarantee that interference will not occur in a particular
installation. If this unit does cause harmful interference to radio or television
reception, which can be determined by turning the unit off and on, the user is
encouraged to try to correct the interference by one of more of the following
measures:
• Reorient or relocate the receiving antenna
• Increase the separation between the equipment and the receiver.
• Connect the equipment into an outlet on a circuit different from that to which
the receiver is connected
• Consult the dealer or experienced radio/TV technician for help.
Warning
: FCC Regulations state that any unauthorized changes or modifications to
this equipment not expressly approved by the manufacturer could void the user's
authorization to operate this equipment.
Canadian Compliance
This Class B digital apparatus complies with Canadian ICES-003.
Cet appareil numérique de classe B est conforme à la norme Canadienne NMB-
003.
NEC Compliance
The SD301 Access Appliance is intended to be connected to a cable system, which
has been properly grounded in accordance with the National Electric Code.
UL Compliance
To insure proper operation and UL compliance of the SD301 Access Appliance in
the USA, only use a GlobTek model 48-5-1000R power supply
Page 5

SD301 Access Appliance
Table of Contents
Table of Contents ......................................................................... i
Contact Information .................................................................... 1
1 Important Rules for Safe Operation...................................... 2
1.1 Service ................................................................................. 3
2 Introduction .......................................................................... 4
2.1 Features ............................................................................... 4
2.2 What You Have ..................................................................... 5
2.3 What You Need..................................................................... 5
2.3.1 Building Requirements .................................................... 5
2.3.2 Personal Computer Requirements .................................... 5
Using this Guide.............................................................................. 6
3 About the Access Appliance ..................................................7
3.1 Front Panel ........................................................................... 7
3.2 Rear Panel ............................................................................ 8
4 Installing the Access Appliance ............................................9
4.1 Overview .............................................................................. 9
4.1.1 Before Installing ............................................................. 9
4.1.2 Building Requirements .................................................... 9
4.1.3 PC Requirements ............................................................ 9
4.1.4 Review the Safety Recommendations............................... 9
4.1.5 Gather Tools .................................................................. 9
4.1.6 Select Location ............................................................. 10
4.2 Connecting the Access Appliance.......................................... 11
4.3 Step by Step ....................................................................... 12
5 Configuring Your PC............................................................14
5.1 How to Configure your PC for DHCP ..................................... 14
6 Using your Access Appliance............................................... 16
6.1 Using the Connection........................................................... 16
6.2 Disconnecting ..................................................................... 16
7 Troubleshooting Connection Problems ............................... 17
8 Specifications ...................................................................... 18
9 Optional Equipment and Replacement Parts ......................19
Table of Contents i
Page 6

SD301 Access Appliance
Contact Information
If after reading through the provided documentation you still have
questions regarding your Access Appliance, please contact your service
provider
See your Service Contract/Agreement for the appropriate customer service
or technical support phone numbers.
User’s Guide 1
Page 7

SD301 Access Appliance
1 Important Rules for Safe Operation
The Access Appliance has been engineered with both
Check power sources. Plug this device only into the recommended
power source indicated on the product’s marking label. If you are not
sure what type of power source is provided at your location, consult your
local power company or other certified expert.
Always use the provided power adapter. Always use the power
adapter provided with the product. And do not use any substitutes. If
the provided adapter becomes damaged or misplaced, see page 19.
Be careful of overloading. Do not overload wall outlets or extension
cords, as this can result in the risk of fire or electric shock. Don’t use any
frayed power cords. Don’t stretch cords to reach the appliance or other
devices: tension at the connectors is a fire hazard.
Avoid damaging power cords. Arrange power supply cords so that
they are out of the way. Route them through areas where it is unlikely
they will be walked on or objects rolled over them.
Avoid placing the product near any heat source. Never place this
product near any heat source. This includes any kitchen appliances
(ovens, toasters, etc.), heating vents, or any other heat source. This is a
fire hazard.
Do not use the product near water. Never use this product anywhere
near a water source or in a damp area. Don’t use it near bathroom or
kitchen water sources such as sinks or washing appliances. Don’t use it
near pools. Don’t use it in a damp area such as a basement.
Avoid stacking. Avoid stacking this item on top of or under other
devices that can generate or radiate heat. Such stacking can concentrate
heat sources in a small area and creates a fire hazard.
Use caution when moving the product. Use caution whenever
moving the Access Appliance. If dropped, resulting damage could render
the appliance inoperable or a fire hazard.
performance and safety in mind. However, safety is also your
responsibility. Read and observe all these recommended
safety precautions.
2 User’s Guide
Page 8

SD301 Access Appliance
Ground the cable system. Be sure the outside cable system is
grounded to provide some protection against voltage surges and built-up
static charges. Section 810 of the National Electric Code, ANSI/NFPA No.
70-1984 (section 54 of the Canadian Electrical Code, Part 1) provides
information with respect to proper grounding of the cable system. Always
refer to local building codes to ensure compliance with all applicable
grounding requirements.
Do not connect or disconnect the RF coax cable to or from your
access appliance while it is plugged into the power source.
Unplug the power adaptor before cleaning. Do not use liquid
cleaner or any aerosol cleaner. Use only a damp cloth for cleaning.
Protect from lightning. For added protection for this product during a
lightning storm, unplug the all devices from the coaxial cable and power
sources when they are not in use, especially for any extended time.
Wait at least 10 seconds after disconnecting the power adaptor
before re-connecting it.
1.1 Service
Do not remove covers from or attempt to service the product
yourself. Opening or removing covers may expose you to dangerous
voltage or other hazards and void the product warranty.
Refer servicing of this product to qualified service personnel under the
conditions listed here:
• When the power supply or cord is damaged.
• If liquid has been spilled onto or objects have fallen onto the product.
• If the product has been exposed to rain or water.
• If the product does not operate normally by following the operating
instructions.
• If the product had been dropped or its enclosure has been damaged.
• When the product exhibits a distinct change in performance, such as
the inability to perform basic functions, indicating a need for service.
User’s Guide 3
Page 9

SD301 Access Appliance
2 Introduction
CoaXmedia welcomes you to the world of Broadband. Through the use of
our SD301 Access Appliance and your PC, you can take advantage of the
many Internet services available today, and will be ready with high-speed
connectivity that is required for the services of tomorrow.
The SD301 Access Appliance was designed with the general computer
user in mind, to insure fast, easy installation and operation. CoaXmedia
has alleviated the typical concerns of installing new computer equipment,
making this product’s setup easier than that of a VCR. And once it’s set
up, using the product is as simple as double-clicking an icon.
2.1 Features
• Provides access to Broadband services
• Easy to install and use
• Doesn’t require opening the PC or changing existing network settings
• Unique geometric design with clearly marked status indicators
• Multiple units can operate in a single building or within a single
dwelling
• Operates over existing cable TV or CATV wiring without interfering
with reception or other services in any way
• Utilizes patented transmission techniques specifically designed to
overcome topology issues commonly found in the on-premises cable
distributions networks of Multi-Dwelling Units (MDUs)
4 User’s Guide
Page 10

SD301 Access Appliance
2.2 What You Have
Check the SD301 Access Appliance package. In addition to this
Guide (CD),
the package should contain:
User’s
• 1 Access Appliance
• 1 Ethernet PC cable
• 2 coaxial cables
• 1 Diplex-Filter or splitter (depending on SD model)
• 1 power adapter with attached power cord
If you are missing an item, please contact your service provider.
2.3 What You Need
In addition the Access Appliance package, you will need the following:
• 1 Personal Computer - see requirements below
7
• 1
/16” or adjustable wrench (optional) — may be needed to loosen
and tighten cable connections.
• 1 CATV wall outlet
2.3.1 Building Requirements
This unit will only operate in buildings utilizing coaXmedia Internet Access
Solutions.
2.3.2 Personal Computer Requirements
The Personal Computer (PC) must meet the following:
• Have an available Ethernet communications port.
• Microsoft Internet Explorer 4.0 or later, or Netscape Navigator 4.0 or
later
User’s Guide 5
Page 11
SD301 Access Appliance
Using this Guide
This
User’s Guide
operation of your Access Appliance. Throughout this guide, special icons
have been used to highlight specific points. Although many of these
highlights are simply informative in nature, several denote points of user
safety and should be read thoroughly and understood. The icons used in
this manual are defined below:
Important Notes or Required Reading Note
Warnings and Safety Information
Stop, review before proceeding
has been provided to assist you in the installation and
6 User’s Guide
Page 12
SD301 Access Appliance
3 About the Access Appliance
3.1 Front Panel
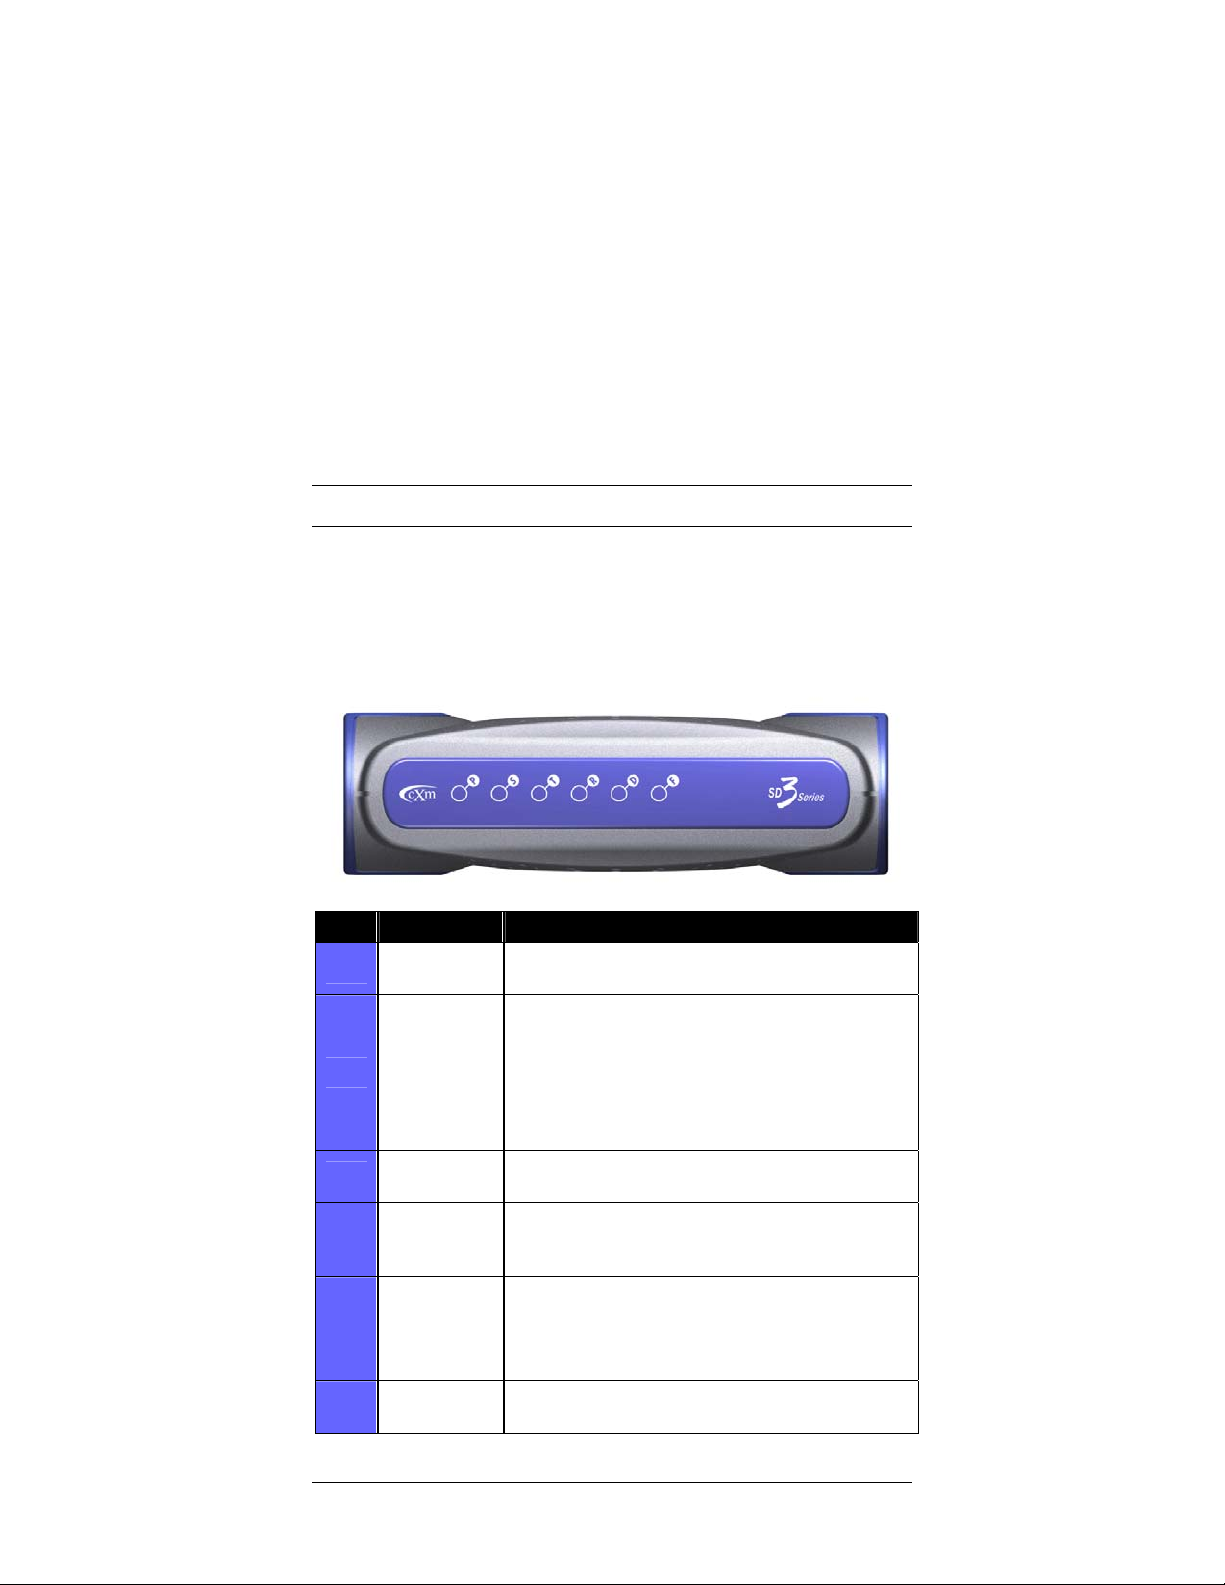
The LED indicators on the front of the Access Appliance indicate its
current operation status. These five indicators are described below.
LED Description Operation
P Power
S Sync
T
R Receive Data
D Disable
F Fault
Transmit
Data
On when power is being provided by the power
adapter
Off when the Access Appliance is not receiving a
service signal from the central access equipment
Blinks when the Access Appliance has not been
activated by the central access equipment
On steadily when the Access Appliance has been
recognized by the central access equipment
On when data is ready to be transmitted. (May
blink fast when sending streams of data.)
On when the Access Appliance is waiting for the
PC to read data. (May blink fast when receiving
streams of data.)
On when the Access Appliance is disabled –
preventing access to the Internet
On when maintenance or diagnostics is being
performed by the central access equipment
Blinks randomly if a fault is detected by the
Access Appliance
User’s Guide 7
Page 13
SD301 Access Appliance
3.2 Rear Panel
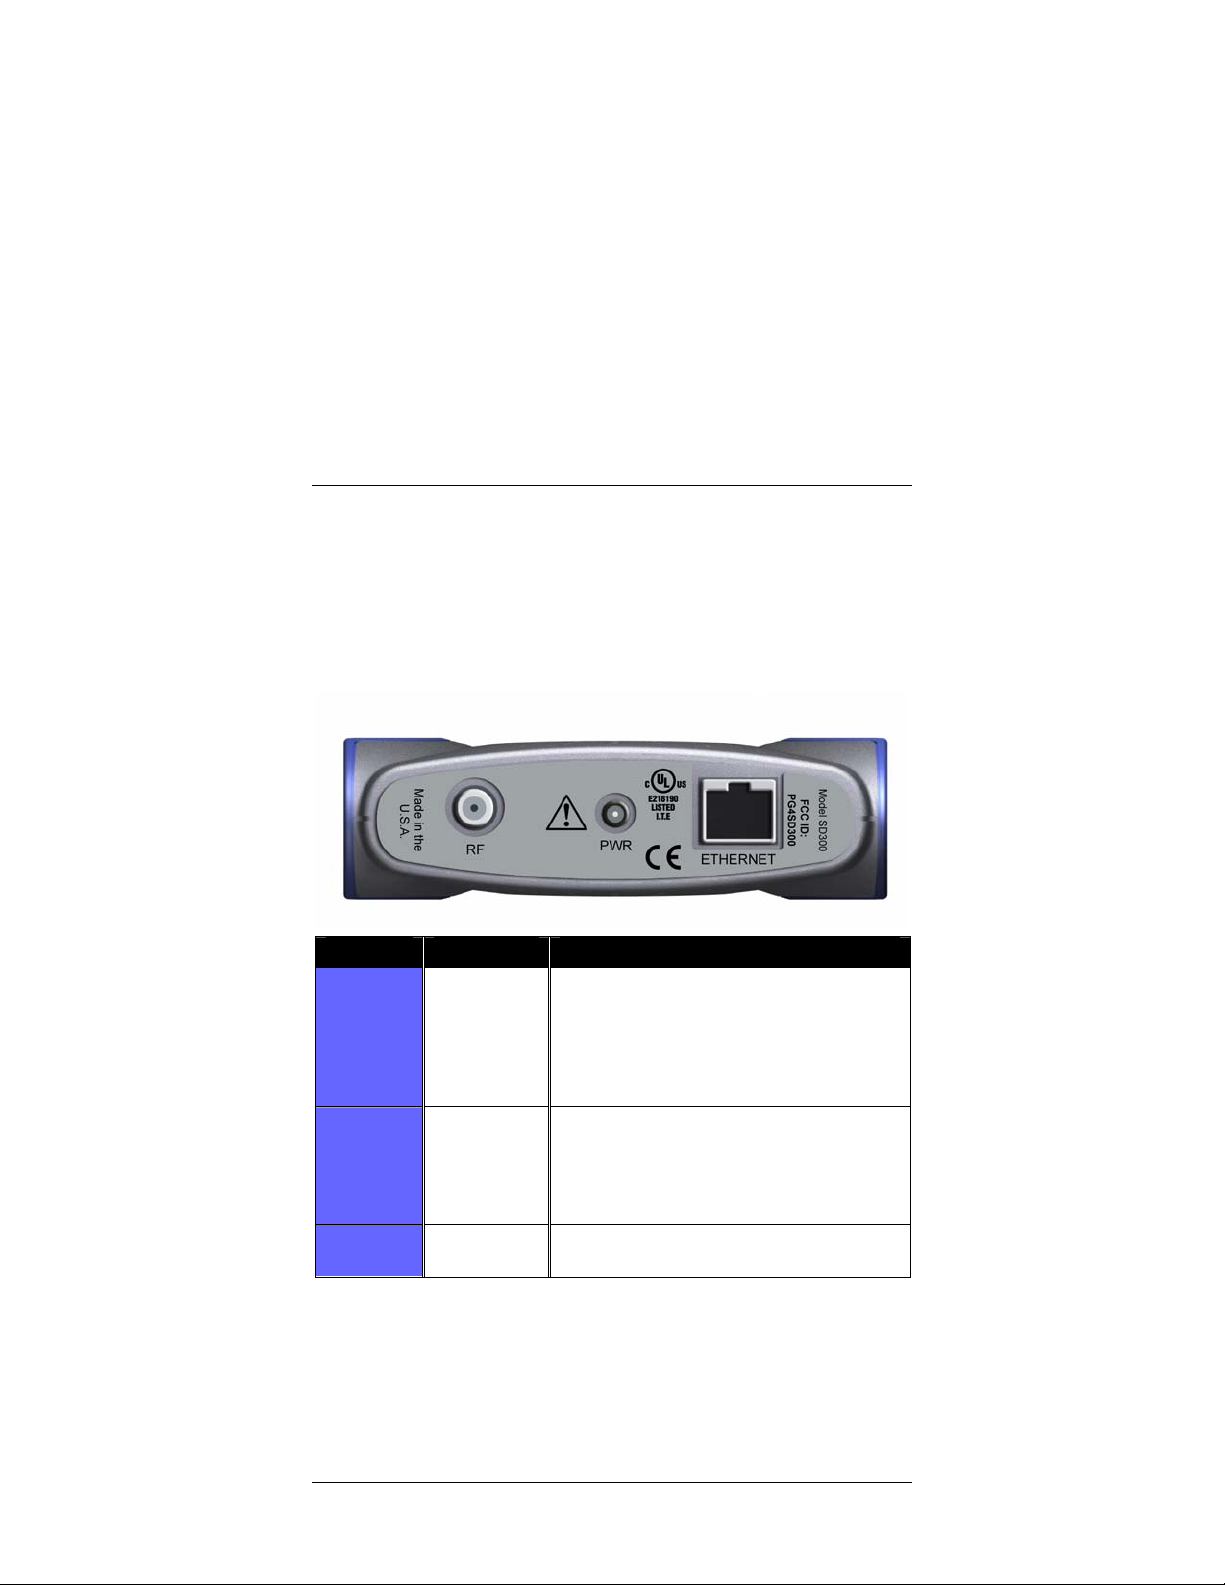
The ports at the back of the Access Appliance connect the appliance to
your computer, power, and to coax network. When making these
connections, the TV/VCR and computer should be unplugged from the
power source as a precaution.
Port Description Usage
Used for connecting the Appliance to the
coax network via the coaxial cable. The
RF
PWR Power
Ethernet
Coax
Connector
Ethernet
Connector
other end of this cable connects to the
diplex-filter connector labeled X. (The
diplex-filter is in turn connected by cable
to the existing TV coax cable.)
Used to provide power to the unit. One
end of the power cord should be attached
to the Access Appliance and the
transformer end plugged into a wall power
outlet.
Used to connect Access Appliance to the
PC for Ethernet operation.
8 User’s Guide
Page 14
SD301 Access Appliance
4 Installing the Access Appliance
These sections provide step-by-step instructions on installing you Access
Appliance.
4.1 Overview
The SD301 Access Appliance is easy to install; taking an average of 15
minutes to setup. However, before getting started, it is important for you
to read the following information.
4.1.1 Before Installing
4.1.2 Building Requirements
This unit will only operate in buildings utilizing coaXmedia
Internet Access Solutions.
4.1.3 PC Requirements
The SD301 Access Appliance requires the use of a
Network Interface Card installed in your PC
does not have a Network Interface Card, one must be
installed before you can use the Access Appliance. Many
computer retail stores and service centers can perform this
task, if you require assistance.
4.1.4 Review the Safety Recommendations
It is important to review the Safety Recommendations to
insure the proper installation and operation of your Access
Appliance. See the Safety Recommendations Section of this
User’s Guide.
; if you PC
4.1.5 Gather Tools
Although most installations do not require any special tools, it
may be necessary to use a 7/16” wrench or pliers to loosen
an existing coax cable connection on a TV or CATV wall
outlet. It is also desirable to lightly tighten all coax cable
connections associated with installing the Access Appliance to
insure solid, reliable connections; this can be done with a
wrench, with pliers or by hand.
User’s Guide 9
Page 15

SD301 Access Appliance
Select Location
The first aspect of installing your new Appliance will be
selecting a CATV outlet that is located near your computer.
When making your selection, consider where you use your
PC/laptop and the distance between that location and the
CATV outlet. Although coaxial cables are provided with your
Appliance, they may not be long enough for your installation;
if this is the case, longer cables can be obtained at a local
store (RG-6 or RG-59 with F-type connectors).
10 User’s Guide
Page 16
SD301 Access Appliance
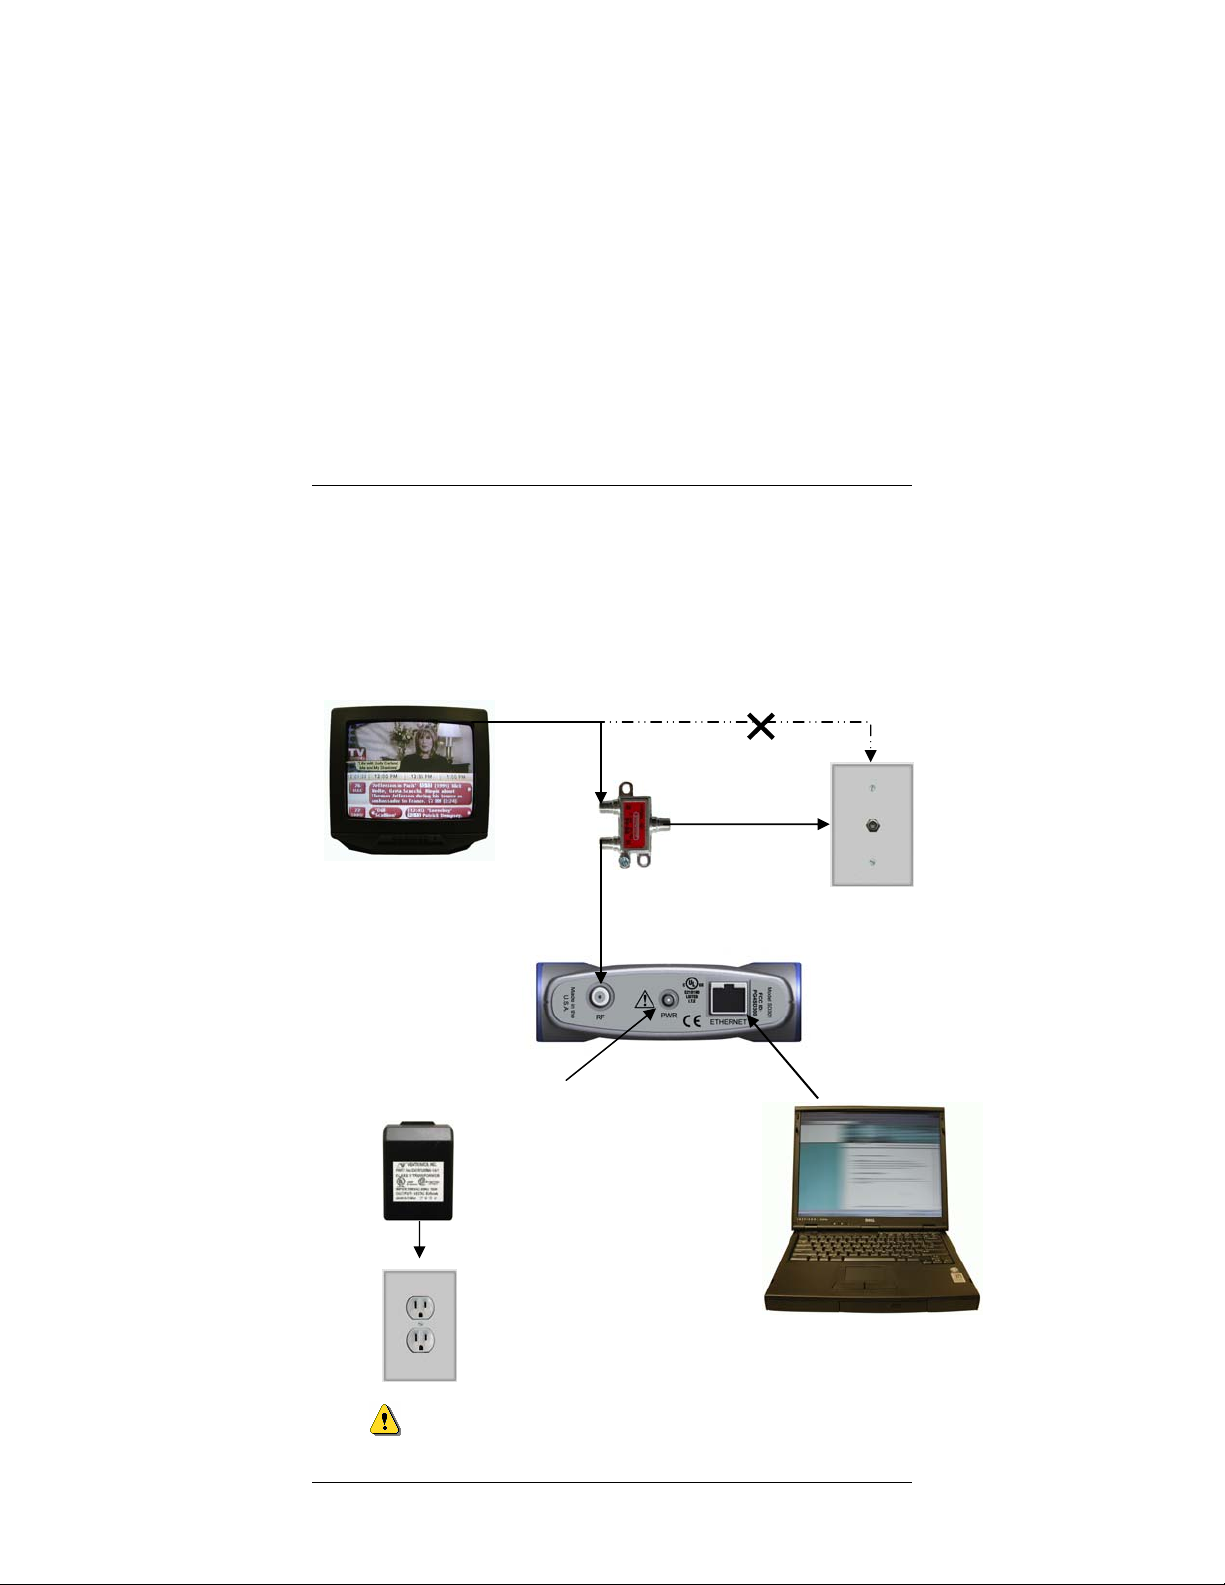
4.2 Connecting the Access Appliance
This illustration diagrams the series of steps involved in connecting the
parts together. Many parts have labeled connectors; those labels are in
bold type. Two pieces of cable come packaged with the appliance; they
are referred to as the “provided” cables.
Plug cable into
one of the
splitter’s OUT
connectors
Use the 8 ft. coaxial cable
(provided) to connect from the
splitter’s remaining OUT
connector to the Access
Plug the
transformer cord
into the Access
Appliance ‘s PWR
connector
With all other
connections
secure, plug
the
transformer
into the wall
power outlet
Unplug the TV (VCR) cable from
the room’s cable outlet
Use the 2 ft. coaxial
cable (provided) to
connect from the
splitter’s IN
connector to the wall
outlet
Use the provided
PC cable to
connect from the
Access Appliance
connector labeled
ETHERNET to the
appropriate
connector at
the back of the
computer
Note: To ensure proper operation and UL compliance of product
in the USA, only use GlobTek model 48-5-1000R power supply
User’s Guide 11
Page 17
SD301 Access Appliance
Turn off power to the computer and TV (or VCR)
before
connecting up the cables as a precaution. It is recommended to
disconnect them from the wall power outlets
.
4.3 Step by Step
1 Disconnect the TV from the CATV Outlet
Locate the cable connecting your TV (or VCR) to the wall cable
TV/CATV outlet. Unscrew the end from the wall connector. Leave
the other end connected to the TV/VCR. If you aren’t using a TV in
the room, just skip this step.
2 Connect the TV to the Splitter
Connect the end of the coaxial cable that was unscrewed from the
TV/CATV outlet to one of the OUT ports of the included splitter. If a
TV or other device is not being used, the splitter can be omitted from
the installation; simply connect the Access Appliance directly to the
CATV outlet.
If you use one or more cable splitters
in the room,
you may continue to use them; however, you should
verify they are rated for 1GHz or better to minimize the
loss to the Access Appliance.
If a TV or other device is not being used
, the splitter
can be omitted from the installation; simply connect the
Access Appliance directly to the CATV outlet.
3 Connect the Splitter to the CATV Outlet
a) Locate the shortest coaxial cable included with the Access
Appliance and connect one end to the IN port of the splitter.
b) Connect the loose end of that coaxial cable to the CATV wall
Outlet.
4 Connect the Access Appliance to the Splitter
a) Locate the remaining coaxial cable included with the Access
Appliance and connect one end to an unused OUT port on the
splitter.
b) Connect the loose end of that coaxial cable to the RF port of the
Access Appliance.
12 User’s Guide
Page 18
SD301 Access Appliance
Make sure are all connections are secure; if necessary, use
a wrench or pliers to lightly tighten the connections.
5 Connect PC Cable
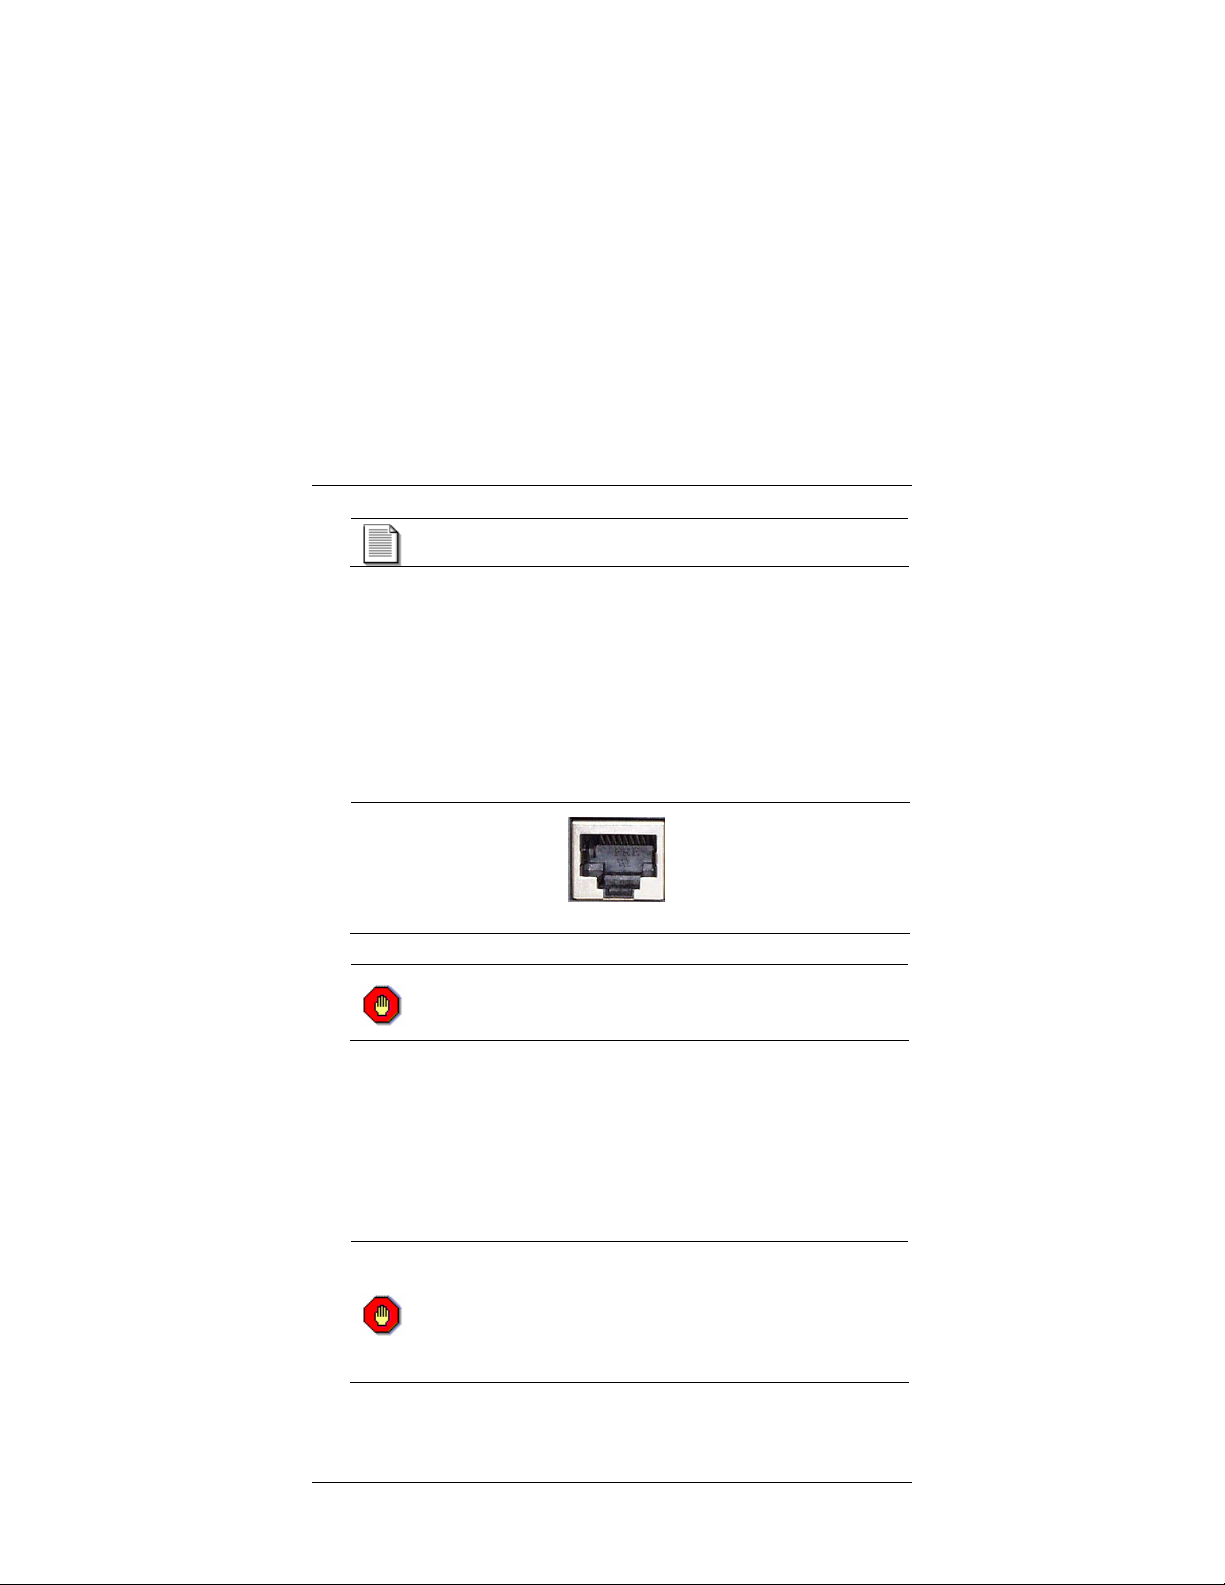
a) Locate the Ethernet PC cable included with the Access Appliance
and connect it to the Access Appliance’s Ethernet port.
b) Connect the loose end of that cable into an active Ethernet port
on your PC. If your PC does not have a Network Interface Card,
one must be installed before you can use the Access Appliance.
Many computer retail stores and service centers can perform this
task, if you require assistance.
PC Ethernet Port
Do not attempt to insert the supplied Ethernet cable
into a dial-up modem.
modem port and/or the Ethernet cable.
Doing so could damage your
6 Connect the Power Adapter to the Appliance
Locate the included power adapter and connect the appropriate end
to the PWR port on the Access Appliance.
7 Apply Power to the Access Appliance
Before plugging the adapter into the power outlet, consult these
important notes:
Please check the voltage requirements printed on
the power adapter before plugging it into an AC
power outlet.
specification does not match what is being provided at
your AC outlet, contact your service provider or coaXmedia
for a replacement.
If the power adapter’s input voltage
User’s Guide 13
Page 19
SD301 Access Appliance
Power can now be applied to the Appliance by plugging the power
adapter into a unused AC power outlet (on a wall, power strip, surge
protector, or UPS).
The P indicator on the Appliance front panel should light
up when power is applied. (See also a description of the
front panel lights on page 17.)
Now that the Access Appliance setup has been completed, you can set up
your computer to use the connection.
5 Configuring Your PC
Now that all the necessary hardware connections have been made, your
computer’s network configuration may need to be adjusted. Often
hen using the Ethernet connection, Internet Service Providers
w
require your Ethernet card to be configured to obtain an IP
address automatically (DHCP). Instructions for making the
necessary adjustment can be found below, however your
service provider may supply you with additional instructions that should
take precedence. Please refer to these instructions if supplied.
Internet
5.1 How to Configure your PC for DHCP
The following DHCP configuration procedure applies to the following
Operating Systems:
Windows 98 Windows 2000
Windows M
For Windows 98:
1. Click on
2. Double-click on the
3. Double-click on
below.
4. At the
Address automatically
14 User’s Guide
e
Start, Settings
TCPIP
IP Address
Windows XP
, then
Control Panel
Network
tab, place a check in the
icon.
. Select the
circle.
IP Address
.
tab. *
See note
Obtain an IP
Page 20

SD301 Access Appliance
5. Click
OK,
then on
to reboot, please do so now.
OK
once more. If the computer prompts you
For Windows 2000 and Windows ME:
1. C
lick on
Start, Settings
2. Double-click on the
3. Right-click on the
Properties
4. Double-click on
below.
5. At the
General
automatically
6. Place a check in the
automatically
7. Click
Apply
reboot, please do so now.
.
Internet Protocol (TCP/IP). *See note
tab, place a check in the
circle.
circle.
, and then click
, then
Control Panel.
Network and Dial-Up Connections
Local Area Connection
Obtain DNS server address
OK.
If the computer prompts you to
For Windows XP:
1. For Windows XP
2. Click on
Network and Internet Connections
, click on
Network Connection
3. Right-click on the
Properties
4. Double-click on
below.
5. At the
General
automatically
6. Place a check in the
automatically
7. Click
Apply
reboot, please do so now.
Local Area Connection
.
Internet Protocol (TCP/IP). *See note
tab, place a check in the
circle.
circle.
, and then click
Start, Settings
.
Obtain DNS server address
OK.
If the computer prompts you to
icon.
icon and select
Obtain an IP Address
, then
Control Panel
then click on
icon and select
.
Obtain an IP Address
User’s Guide 15
Page 21
SD301 Access Appliance
Note: If information is already entered in these fields, be sure
to write down all this information before making any changes.
You will need to reenter this after you’re done using the
coaXmedia SD301. Under Windows 2000, you must be logged
in using an account with administrators’ rights in order to make
the necessary changes.
For Unlisted Operating Systems:
If you are using a PC with an Apple, Linux or any other operating
systems not mentioned previously, please refer to your operating
system’s documentation for instructions on how to enable DHCP
client operation.
6 Using your Access Appliance
6.1 Using the Connection
Your Access Appliance provides you with an “Always-On” connection to
the Internet so simply start up your e-mail client, Web browser,
newsgroup reader, or other Internet applications and use them as usual.
Note: If you are concerned that someone may attempt to access your
computer via the Internet, you can use any number of firewall or Internet
security software tools to prevent remote access. Another solution is to
disconnect the computer cable or disconnect power from your Access
Appliance.
6.2 Disconnecting
If you have any security concerns about leaving your PC connected while
it is not in use, firewall software or equipment can be purchased at many
computer retailers; or you can simply unplug the Ethernet cable from the
PC until you need to access the Internet again.
16 User’s Guide
Page 22

SD301 Access Appliance
7 Troubleshooting Connection Problems
The P (Power) and S (Sync) LEDs should be ON; and you should see the
T (Transmit) and R (Receive) LEDs flash when you attempt to browse the
Internet.
If the S or F LED is blinking or no LEDs are on, check all the hardware
connections and cables (refer to
If the P, S, and D LED is ON, then the Access Appliance is functioning
correctly; but it has not been enabled and you should contact your service
provider for service activation.
If this problem persists, contact your service provider for assistance. (See
also page 7 for a description of the Front Panel status LEDs.)
Connecting to the Access Appliance
).
User’s Guide 17
Page 23

8 Specifications
Client Interface
Ethernet transfer speed
Indicators
Cable Connectivity RJ-45-Ethernet
Front panel LEDs
Electrical Specifications
AC Adaptor Option 1
Up to typical 10/100BaseT speeds
Inputs: 120VAC 50/60 Hz
Operating Ranges: 108-132 VAC
Output: 5VDC, 1A
Option 2
Inputs: 240VAC 50/60 Hz
Operating Ranges: 220-240 VAC
Output: 5VDC, 1A
SD301 Access Appliance
Environmental Specifications
Operating temperature
Storage temperature
Humidity 10% to 90% non-condensing
0° to +40° C
-40° to +75° C
Physical Specifications
Dimensions
4.26”wide, 5.32” deep, 1.24” height
Agency and Regulatory Compliance
Certifications
FCC
Canadian
UL / ULc
18 User’s Guide
Page 24
SD301 Access Appliance
9 Optional Equipment and Replacement Parts
Many optional and replacement parts are available for the SD301 access
appliance.
If you need to replace or add a part, consult the service provider from
whom you obtained this product.
These appliance options and replacements are available. Specify the part
number(s) as well as description(s) of any part when ordering to ensure
correct identification of the item.
Sales Part # Description
CB201-001 Ethernet Cable – 10ft
PS200-001 SD20x/30x AC Power Adaptor – Plug Type: North
America (GlobTek 48-5-1000R)
PS200-002 SD20x/30x AC Power Adaptor – Plug Type: Australia
(GlobTek WR37A1000LCP-N or equivalent)
PS200-003 SD20x/30x AC Power Adaptor – Plug Type: Europe
(GlobTek WR23A1000LCP-N or equivalent)
PS200-004 SD20x/30x AC Power Adaptor – Plug Type: UK
(GlobTek WR35A1000LCP-N or equivalent)
PS200-005 SD20x/30x AC Power Adaptor – Plug Type: Japan
(GlobTek WR49A1000LCP-N or equivalent)
CD300-001 SD3-SERIES Access Appliance User’s Guide CD
User’s Guide 19
 Loading...