


iWeb
Getting Started
Get to know iWeb and learn how
to create your own website

Contents
1
Preface 4 Welcome to iWeb
4
About This Document
5
About iWeb
5
iWeb Highlights
6
Useful Words to Know
7
For More Information
Chapter 1 8 Creating a Website With iWeb
8
What You’ll Learn
8
Before You Begin
9
Overview of Creating a Website
10
Create a Website
13
14
16
18
20
21
23
Add Your Own Text and Graphics
Add a Photo Page
Add a Blog
Organize Your Website
Add Links
Publish Your Website on the Internet
Next Steps
Chapter 2 24 Inspectors and Other Windows
at a Glance
24
The Inspector Window
25
26
27
28
30
31
32
33
33
34
2
The Site Inspector
The Page Inspector
The Blog & Podcast Inspector
The Text Inspector
The Graphic Inspector
The Metrics Inspector
The Link Inspector
The Media Browser
Photos Pane
Movies Pane

35
36
Audio Pane
The Adjust Image Window
Contents
3

Welcome to iWeb
This document will help you quickly create a website using
iWeb.
If you’ve always wanted your own website but weren’t sure how to create one, iWeb is
an easy and fun way to accomplish that goal. If you already have a website but you
want a new look for it, or an easier way to update it, you can use iWeb to re-create a
professional-looking, easy-to-manage website.
About This Document
This document contains two chapters, which you can use in the order that suits you:
Â
Chapter 1, “Creating a Website With iWeb,”
through the process of creating a website using iWeb.
Completing the tutorial—using your own photos, movies, and so on—is a great way
to learn your way around the basic features of iWeb, so that you can confidently
explore from there. The tutorial also provides tips for using iWeb and how to find
more detailed information.
Â
Chapter 2, “Inspectors and Other Windows at a Glance,”
and windows you’ll use in iWeb. You can use this chapter as a handy reference as you
create your own websites and webpages.
is a tutorial that takes you step by step
briefly describes the tools
Preface
Throughout the document are sidebars—such as “About Templates” on page 10—that
provide background or related information.
4

About iWeb
iWeb is the easiest way to create and publish great-looking websites. You see what
each webpage will look like as you work on it—you don’t have to know anything about
programming or web-authoring languages such as HTML.
iWeb Highlights
Â
Apple-designed templates.
provides an elegant starting point for any website. Templates have been specially
designed for photo pages, blogs, and more. Each template comes with coordinated
layouts, background images, and other formatting already set. Use the templates as
they are or customize them.
Â
Worry-free navigation.
automatically updates the navigation menu (the website’s clickable table of contents)
for you.
Â
Easy blogs.
journal; see “What Is a Blog?” on page 16) that make it easy to set one up. iWeb also
provides a Subscribe button so that your visitors can be automatically notified
whenever you update your blog.
Â
Podcasts.
create in GarageBand and video podcasts you create in iMovie directly to iWeb. You
can also easily submit your podcast to the online iTunes Music Store.
Â
Easy-to-incorporate website features.
a visitor counter, an Email Me button, buttons for subscribing to blogs and podcasts,
and more.
Â
iLife integration.
websites. Export photos or a whole album from iPhoto directly to iWeb. Add a link to
subscribe to a photocast. Create a movie webpage with a single click in iMovie.
Â
One-click publishing.
a button, and your site is stored on .Mac, visible to anyone who knows the web
address (URL). (To publish to .Mac, you need at least a free trial .Mac membership.) If
you prefer, you can easily make the website accessible only to people who know the
user name and password, or who belong to a particular .Mac group. You can also
publish your site to a folder on your computer so that you can upload it to the server
of your choice.
iWeb provides special templates for creating blogs (a
Create your own radio or TV show. You can export audio podcasts you
Easily add photos and other graphics, movies, and music to your
The collection of templates that comes with iWeb
As you add, remove, and rearrange webpages, iWeb
blog
is a web
iWeb provides ready-to-use elements such as
When you’re ready to share your website on the web, just click
Preface
Welcome to iWeb
5

Useful Words to Know
Here are brief definitions of some of the terms you’ll see as you work with iWeb.
Â
Blog:
A web-based journal that can contain text, photos, and other media. For more
information, see “What Is a Blog?” on page 16.
Â
Browser:
called Safari.)
Â
Hyperlink:
another webpage or opening a document. Most text hyperlinks (also called
look different from surrounding text (they are underlined or a different color) to
indicate that you can click them.
Â
Internet:
communicate with one another and share information.
Â
.Mac:
email address, file sharing with iDisk online storage, groups for coordinating events
and communicating with friends and family, and more. .Mac is where your iWeb sites
are stored. For more information, visit www.mac.com.
Â
Navigation menu:
page in your website as a link that visitors can click to go to that page. iWeb
automatically creates a navigation menu on each page in your website.
Â
Photocast:
photocasts to receive the latest photos when the album is modified.
Â
Podcast:
computer. You can listen and subscribe to podcasts with iTunes. You can add a
podcast to your blog for your visitors to listen to at their convenience.
Â
RSS:
visitors can subscribe to your blog so that they’ll know when you post new entries.
When you create a blog or a podcast, iWeb provides a Subscribe button
automatically. (
Â
Start page:
the
Â
URL:
typical URL looks like this:
http://www.apple.com
Â
Video podcast:
subscribe to video podcasts with iTunes. You can also transfer video podcasts to an
iPod that supports video.
Â
Web:
use
An application you use to visit websites. (Mac OS X comes with a browser
Text or an object you can click to initiate an action, such as going to
links
A worldwide network of computers that makes it possible for people to
A membership-based service that provides such features as an ad-free .Mac
The website table of contents. The navigation menu lists each
An iPhoto photo album that's been published. Others can subscribe to
An audio file that’s been set up so that it can be easily downloaded to a
A subscription service that many websites offer. For example, your website
RSS
stands for “really simple syndication.”)
The page that appears first when you visit a website. Sometimes called
home page or default page
The website address, which you enter in a browser to go to the website. A
A podcast that contains video as well as audio. You can listen and
A part of the Internet that supports graphics in addition to text. Many people
the web
(also called the World Wide Web) and
.
the Internet
interchangeably.
)
6 Preface
Welcome to iWeb

Â
Website:
A collection of information—usually including graphics and hyperlinks to
other parts of the website or to other websites—made available on the Internet. A
website, or
Â
Webpage:
site,
consists of one or more
webpages
that are linked together.
Most websites are organized into webpages, or pages, that are linked
together.
For More Information
To get the most out of iWeb, consult these resources:
Â
Onscreen help:
iWeb. To open the help, open iWeb, click the Help menu, and choose iWeb Help.
iWeb Help also provides access to the following items:
Â
What Is iWeb?
Â
iWeb tutorial:
some languages only.)
Â
iWeb website
about iWeb.
Â
Hot Tips website
working more effectively in iWeb.
Â
Support website
solving problems.
Â
Help tags
rest over an item for a few seconds.
iWeb Help provides detailed instructions for accomplishing tasks in
A brief overview that shows you what you can do with iWeb.
A multimedia tutorial to help you learn to use iWeb. (Available in
(www.apple.com/ilife/iweb/): The latest news and information
(www.apple.com/support/iweb/hottips/): Great ideas for
(www.apple.com/support/iweb/): Detailed information about
are available for many onscreen items. To see a help tag, let the pointer
Preface
Welcome to iWeb
7

1 Creating a Website With iWeb
1
This tutorial takes you step by step through the process of
creating a simple website.
What You’ll Learn
In this tutorial, you’ll learn to do the following:
 Create a website that has three different webpages—a welcome page, a photo page,
and a blog (a web journal—see “What Is a Blog?” on page 16).
 Add a link to another website.
 Add an Email Me button, so that your visitors can contact you.
 Publish your website, so that anyone with access to the Internet—or only people
who know the user name and password, if you set it up that way—can visit it.
8
Before You Begin
To make it easier to complete this tutorial, you may want to print it.
In many tasks shown in the tutorial (and in iWeb Help), you need to choose menu
commands, which look like this:
Choose Edit > Copy.
The first word after Choose is the name of a menu in the iWeb menu bar. The next word
(or words) indicates the item to choose from that menu.
Make sure you save your work from time to time by choosing File > Save.
You can stop doing the tutorial at any time by choosing iWeb > Quit iWeb. You can
save the work you’ve done so far and continue whenever you want.

Overview of Creating a Website
Step 1: Plan your website.
A website consists of one or more webpages, which can contain text, graphics, video,
audio, and more. The number of webpages in your website depends on what you are
going to use the website for. Do you want to share photos? Write a travel journal?
Display a portfolio of your work?
With iWeb, it’s easy to modify, add, or remove webpages at any time, so you don’t have
to decide every detail before you begin. It’s also easy to create multiple websites so
that you can, for example, have a personal website, a website for a .Mac group, and one
for your business.
Step 2: Create your website.
In this step, you assemble and organize your website content—write your text, add
photos and other graphics, set up links to other websites, and so on.
Step 3: Publish your website on the Internet.
Your website isn’t visible to the public until you publish it. With iWeb, this step is as
easy as clicking a button.
Note: To complete step 3 using the instructions in this tutorial, you need at least a trial
.Mac membership and enough available iDisk storage space for your webpages,
including your media (the movies, photos, and so on that you add to your website). If
you don’t have a .Mac account, you can sign up for one (a free 60-day trial or a paid
yearly membership) by opening System Preferences and clicking .Mac (or by going to
www.mac.com).
If you’re not sure exactly what you want to put on your website (step 1), you can still go
through the tutorial and learn how to use iWeb (step 2). Then, when you’re ready to “go
live” with your website, you can publish it (step 3).
Chapter 1 Creating a Website With iWeb 9
Create a Website
To get started, you’ll create a website that consists of one page (a welcome page).
To create a website:
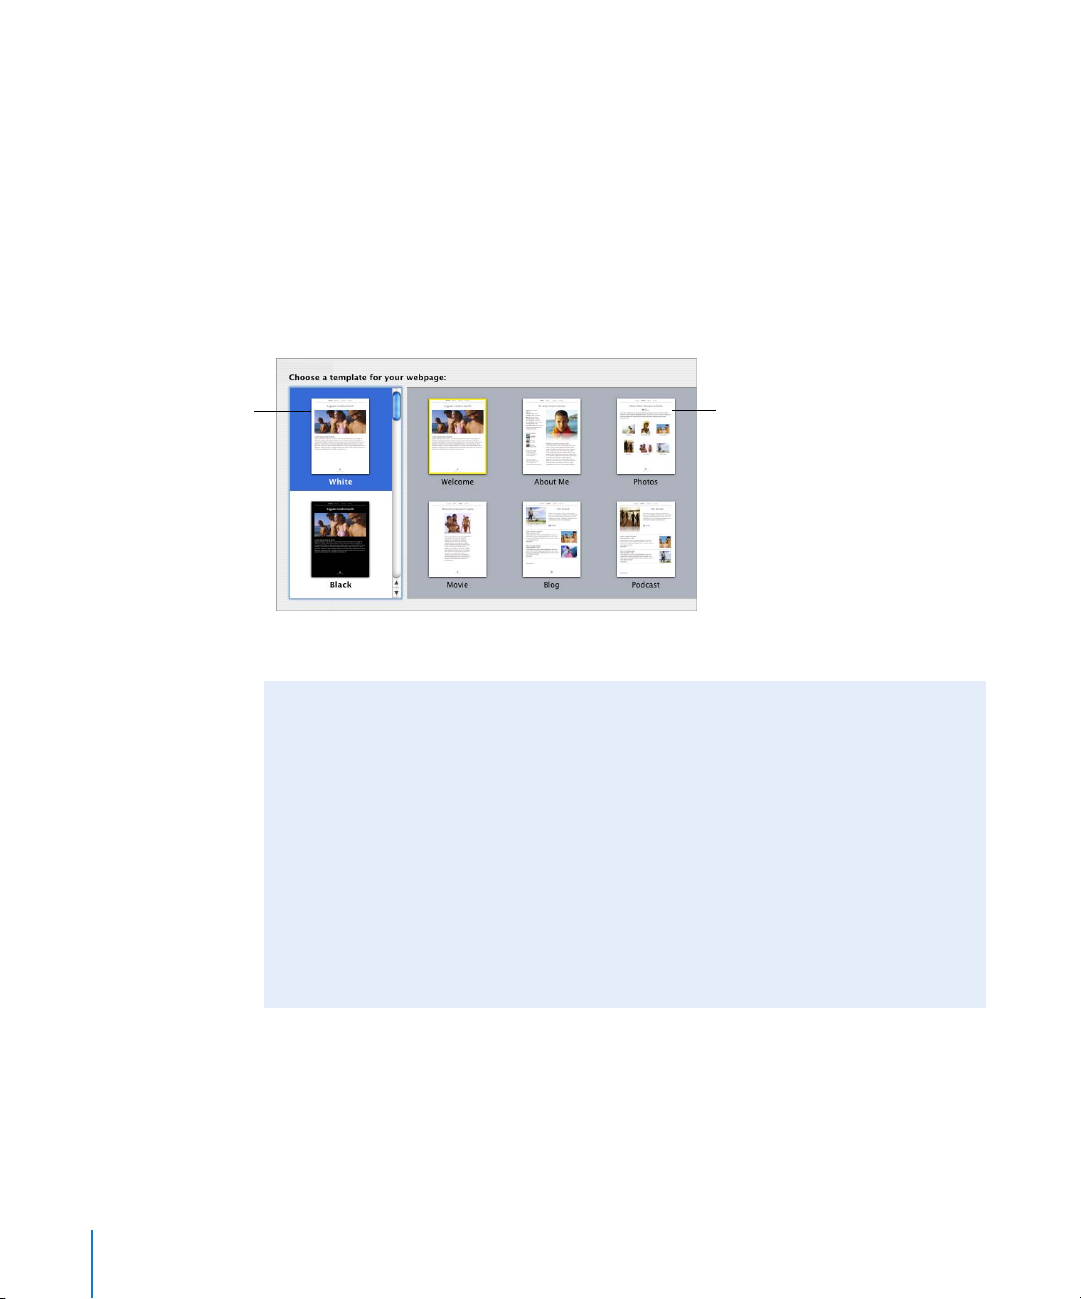
1 If iWeb isn’t open, double-click the iWeb application icon in your Applications folder. If
iWeb is already open, and you don’t see the template chooser shown below, click the
Add Page (+) button at the bottom of the iWeb window (or choose File > New Page).
In the template chooser that appears, click Freestyle on the left. In the thumbnails on
the right, the Welcome template should already be selected for you (the selected
templae has a yellow border around it).
Select a template here.
Select a webpage type here.
2 Click Choose.
About Templates
Each time you add a new webpage, you select the page’s template.
A template is a predesigned page with placeholders for text and graphics; you can
easily replace the placeholders with your own text and graphics.
iWeb provides templates designed for specific categories of webpages. For example,
the Photos templates contain placeholders for photos and captions. By using the
iWeb templates, you can create an attractive webpage without having to do any
design work.
Your website can use as many or as few of the templates as you want, depending on
the content you put on your site.
10 Chapter 1 Creating a Website With iWeb

The site organizer
All the websites (globes)
and webpages
(rectangles) you create
with iWeb appear here.
Click a page to display it
in the webpage canvas.
The webpage canvas
This area shows what the
webpage looks like. Edit
the webpage here—
customize the text, add
graphics and movies,
arrange items
on the page,
add links, and more.
Now you have your first webpage. The iWeb window looks like this:
The navigation menu
All of the pages in the site are
listed here. Visitors click these
links to view your webpages.
Placeholder text
and graphics
Click the
placeholder
heading to type a
title for your
webpage. Click the
body text to replace
it with your own.
The Site Organizer
As you create websites and webpages, they appear in this list. Click the small triangles
to show or hide pages in a site (or sub-pages in a blog). You can rearrange pages by
dragging them in the list. You can even drag a page from one website to another.
The Webpage Canvas
The webpage canvas is where you create the content for a webpage. You can easily
drag graphics files, movie files, and sound files to the canvas to add them to your
website.
The webpage canvas comprises four different regions. For more information, see
“Moving objects around on the webpage canvas” in iWeb Help.
Chapter 1 Creating a Website With iWeb 11

Add Page button
Add a new webpage
to a website.
The iWeb Toolbar
The toolbar at the bottom of the iWeb window gives you one-click access to many of
the actions you’ll perform as you create webpages.
Open windows to add
Add text and
predrawn shapes that
you can modify.
Publish your site to .Mac
to make your website
available on the web.
Visit published websites.
Move objects up or
down in a stack. Mask
(crop) or unmask images.
photos, songs, or movies;
adjust images; perform tasks;
change colors and fonts.
The Inspector Window
The inspectors make it easy to perform many tasks in iWeb.
To open the Inspector window:
m Click the Inspector button in the toolbar (or choose View > Show Inspector).
Click the buttons at the
top of the window to
open the different
inspectors.
Quitting and Reopening iWeb
When you quit iWeb, all of your webpages and websites are saved with the
application. To work on your sites later, open the iWeb application; your sites and
pages appear in the site organizer.
Closing the iWeb window (by choosing File > Close or clicking the red close button in
the upper-left corner of the window) is the same as choosing iWeb > Quit iWeb.
12 Chapter 1 Creating a Website With iWeb

Add Your Own Text and Graphics
Each template contains text boxes, with placeholder text, for different elements on the
page. If you click the text, the entire text box is selected and selection handles appear.
You can drag the text box to reposition it, and you can resize it by dragging a handle.
Drag one of these
handles to resize the
text box.
Experiment with adding your own text.
To replace placeholder text with your own text:
m Click the placeholder text and start typing.
When you start typing, the placeholder text is replaced by what you type.
∏ Tip: Choose View > Show Layout to see all the text boxes.
Similar to placeholder text, graphics placeholders indicate the size and placement of
graphics in a template. If you click one, selection handles appear so that you can resize
the placeholder. You can drag your own image to the placeholder to replace it.
About Graphics: Inline Versus Fixed Objects
There are two ways to place an object (including photos and other graphics) in
relation to text: as an inline object or as a fixed object.
Inline objects are inserted within text and get pushed along as the text grows.
Fixed objects are inserted outside of text boxes. You can drag a fixed object
anywhere on the page and it won’t affect text or be affected by text (or other
objects).
If you place an object inside a text box, it must be an inline object. You can wrap text
only around inline objects. For more information, see the topics in “Working with
shapes and other objects” in iWeb Help.
Chapter 1 Creating a Website With iWeb 13

Add a Photo Page
Now you’ll add more pages to your website. You can add pages in any order; it’s easy to
rearrange them at any time by dragging them in the site organizer (see “Organize Your
Website” on page 18).
iWeb provides special templates for pages that contain mainly photos instead of text.
The Photos templates include a photo grid that automatically sizes and positions each
photo as you add it, and provides a placeholder caption for each photo. The Photos
templates also include a Start Slideshow button that your visitors can click to view your
photos as a slideshow.
Note: You can add photos and other images to any webpage (not just the Photos
templates) by simply dragging them to the page.
To add a photo webpage:
1 Click the Add Page (+) button (or choose File > New Page).
2 In the template chooser, select Travel in the list on the left, select Photos from the
thumbnails on the right, and then click Choose.
The new page contains a photo grid with placeholder photos, which you can replace
with your own.
If you haven’t used iPhoto to store your photos, drag any image file to the photos page
you just created.
14 Chapter 1 Creating a Website With iWeb

If you have used iPhoto to store photos, you can access them using the Media Browser.
Click this button in the
toolbar to open the
Media Browser.
Click Photos.
Drag a photo from
the Media Browser
to your webpage.
To add photos using the Media Browser:
1 If the Media Browser isn’t open, click Media in the toolbar (or choose View > Show
Media Browser).
2 In the Media Browser, click Photos.
3 Drag a photo from the Media Browser to any image on the photos page.
As you drag a photo over the page, the blue rectangle highlights to indicate the area of
the photo grid. (You can drag a photo outside the photo grid, but it won’t be resized or
include a photo caption.) The first photo you add replaces all the photos on the page.
4 Continue dragging photos to the photo grid.
You can add up to 99 photos. You can also drag an entire photo album created in
iPhoto; the first 99 photos in the album are added.
You can rearrange photos on the page by dragging them. You can also change the
style of the picture frame around each photo. For instructions, see “Changing the
appearance of photos in a photo grid” in iWeb Help.
Chapter 1 Creating a Website With iWeb 15

To add a caption to a photo:
m Click the placeholder text below a photo and type a caption.
Add a Blog
iWeb provides two kinds of blog templates: Blog and Podcast. You can add multimedia
content (podcast, audio, video) to both.
What Is a Blog?
A blog is a journal that’s posted on the web for others to read. (The word blog is short
for web log.) New entries are added periodically; the previous entries (the archive) are
always available as well. Typically, blogs are organized so that the newest entries
appear first.
Here’s an example of why you might create a blog: While you are traveling, you could
create a blog of your journey. Each day—or whenever you felt like it—you would
write a new blog entry, describing what you’d seen and done. You could add digital
photos and video to your blog so that friends and family could follow your trip by
visiting your website.
Or you could create a blog for your opinions about current events. Or your blog
could be an ongoing journal of progress on a particular project. You can use the blog
format for anything you like, and you can have multiple blogs on the same website.
To add a blog:
1 Click the Add Page (+) button (or choose File > New Page).
2 In the template chooser, select Travel in the list on the left, select Blog from the
thumbnails on the right, and then click Choose.
16 Chapter 1 Creating a Website With iWeb

This page is the one your
website visitors see. It
displays excerpts of your
most recent blog entries
and a link to the archive.
The first blog entry appears, with the current date. Double-click the placeholder text to
create your own title and body text.
All of your entries
are listed here.
Click an entry to
display it below.
Drag an image, audio
file, or movie to this
media placeholder.
Type your entry
title here.
Create your current
blog entry here, or
edit a previous entry.
You write and edit your
entries by clicking Entries.
The archive contains
entries that don’t appear
on the main page.
When you add a page using one of the blog templates (Blog or Podcast), three icons
appear in the site organizer:
 Blog is the page that your website visitors see. It contains excerpts (the opening text)
from your most recent blog entries. You determine how much of each entry appears;
visitors can click “Read more” to see the whole entry. By default, the five most recent
entries appear on this page (you can change the number in the Blog & Podcast
Inspector); all your entries, however, are available to visitors in the archive.
Customize the main page by replacing the placeholder text and graphic. You can edit
your overall blog title and description on this page, but you can’t edit blog entries
here (you do that on the Entries page).
 Entries is where you create and manage your blog entries. Your website visitors won’t
see this page, but if they click an excerpt on the main blog page, they’ll see the full
entry.
 Archive contains all your entries, including those that don’t appear on the main
page. The blog templates include a link to the archive on the main blog page.
Chapter 1 Creating a Website With iWeb 17

To add a blog entry:
1 In the site organizer, click Entries.
2 Click the Add Blog Entry button.
The date appears automatically above each blog entry. You can give each blog entry its
own title.
To change the title of a blog entry, do one of the following:
 Double-click the placeholder title text and type the title.
 Double-click the entry in the Title list and type the title.
To edit a blog entry:
m On the Entries page, click an entry in the Title list.
The entry appears below the Title list so that you can edit the entry.
For more information about creating blogs—for example, how to change the length of
the excerpts and import podcasts—see the “Creating blogs and podcasts” topics in
iWeb Help.
Organize Your Website
iWeb automatically creates a navigation menu—a table of contents that appears on
every page of your website. Users click a page title in the navigation menu to go to
that page.
You determine the order of items in the navigation menu by rearranging pages in the
iWeb site organizer.
Drag pages in
the site organizer to
reorder them.
The first page in the site organizer is the website’s start page (the first page visitors
see). To make a different page the start page, simply drag it to the top of the list, just
below the website.
18 Chapter 1 Creating a Website With iWeb
The navigation menu on
each page of your website
updates automatically
when you reorder pages in
the site organizer.

When you add a new webpage to a site, iWeb automatically adds a link for it to the
navigation menu. You can prevent a page from appearing in the navigation menu
using the Page Inspector. For more information, see “Setting up the navigation menu
(table of contents)” in iWeb Help.
Deleting Webpages and Websites
You can delete a webpage or website at any time by selecting it in the site organizer
and pressing Delete. (The content is permanently deleted unless you choose Edit >
Undo Delete immediately.)
When you delete a webpage, it is automatically removed from the navigation menu.
A website must contain at least one webpage, so if you try to delete the only page in
a site, the template chooser appears.
If you already published a website to .Mac, deleting the site or one of its pages in
iWeb doesn't delete it from the web. Your website on .Mac is updated the next time
you publish another site using iWeb.
When you delete a published website (and don’t republish a site with the same site
name), anyone who tries to visit the site (by typing in the URL or using a bookmark)
sees a message that the site couldn't be found.
For more information, see “Unpublishing a site” in iWeb Help.
Rename a Website or Webpage
When you add a new website or webpage, iWeb gives it a default name; you can
rename it at any time.
The site name appears in your website’s URL:
http://web.mac.com/YourMemberName/iWeb/SiteName
The page name appears at the top of the visitor’s browser window:
The webpage name you specify
here appears in the title bar of
the browser window when
someone visits your website.
To rename a webpage or website:
m Double-click the name in the site organizer and type the new name.
If you hear a beep, you can’t use the character you typed.
Chapter 1 Creating a Website With iWeb 19

For website and webpage names, avoid non-Roman characters, spaces, tabs, and
returns. Other characters—including backward slash (\), brackets ([ ]), exclamation
point (!), “at” sign (@), number sign (#), dollar sign ($), ampersand (&), asterisk (*), and
colon (:)—are not recommended. Using these characters may result in names with
strange numbers in them. For more information, see the topics “Renaming a website”
and “Renaming a webpage” in iWeb Help.
Add Links
On any of your webpages, you can add hyperlinks that your website visitors can click to
open:
 Another webpage on any of your iWeb sites. Drag the page you want to link to from
the site organizer to the webpage canvas.
 Another website. In Safari, select the website URL (in the address bar at the top of
the browser) and drag it to the webpage canvas.
You can also add links to open a file or a song in the iTunes Music Store. For more
information, see the hyperlinks topics in iWeb Help.
To provide visitors with a way to contact you, insert an Email Me button on any page
by choosing Insert > Button > Email Me. When visitors click the button, they’ll see a
new email message addressed to your .Mac email address. (If you don’t publish your
site to .Mac, the address on the Me card in Address Book is used.) You can specify a
different address using the Link Inspector. For more information, see the hyperlinks
topics in iWeb Help.
You Can Turn Anything Into a Hyperlink
In addition to creating text hyperlinks, you can make any image, photo, or shape
initiate one of the actions available in the Link To pop-up menu in the Link Inspector.
For example, you could insert an arrow shape and then make it a link that visitors can
click to go to the next page. For information about creating these kinds of hyperlinks,
see “Making an object a hyperlink” in iWeb Help.
20 Chapter 1 Creating a Website With iWeb

Publish Your Website on the Internet
In this section of the tutorial, you’ll publish your website to .Mac so that others can visit
your site.
To publish your site to .Mac, you must have at least a free trial .Mac membership. You
(and others) can access your iWeb website until the trial period expires; as soon as you
become a .Mac member, you can publish your site site again. To get a free or full .Mac
membership, visit www.mac.com.
To publish your website to .Mac:
m Click Publish (or choose File > Publish to .Mac).
When you see the message that your site has been published, you can go to the site (in
your web browser) by clicking Visit Page Now. To send an email notifying people about
your website, click Announce.
When you publish your website to .Mac, anyone who has access to the Internet can
visit your site. People who know the URL can go directly to your website, or your
website might appear as a search result (someone searching for your name on the
Internet might find your website, for example). If you don’t want your website to be
visible to just anyone on the Internet, you can set up your website so that only people
who know the user name and password can visit it.
The Site Inspector button
To make your site visible only to visitors who know the user name and password:
1 If the Site Inspector isn’t open, click Inspector in the toolbar (or choose View >
Show Inspector), and then click the Site Inspector button.
2 Click Password.
3 Select the “Make my published site private” checkbox.
4 Type a user name and password in the fields.
Everyone to whom you want to allow access to your site uses the same user name and
password.
Chapter 1 Creating a Website With iWeb 21

Important: Don’t enter your .Mac user name and password; create a name and
password that would be hard to guess (they don’t have to be real words, but could be a
combination of letters and numbers).
5 Publish your website by clicking the Publish button.
When you click Announce, the email message includes the user name and password
you specified.
If you belong to a .Mac group, you can also publish a site so that only group members
can see it. For instructions, see “Publishing a site to a .Mac group” in iWeb Help.
If you don’t publish to .Mac, you can also publish your website to a folder on your
computer so that you can upload it to a server. For instructions, see “Publishing a site to
a server instead of to .Mac” in iWeb Help.
If You Already Have HomePage Content on Your .Mac Site
If you have previously published webpages using HomePage, they are still
available at:
http://homepage.mac.com/YourMemberName
Websites you create in iWeb are available at:
http://web.mac.com/YourMemberName/iWeb/SiteName
You may want to set up links on your HomePage sites to go to your iWeb sites,
and vice versa. For instructions, see “Add Links” on page 20 or the hyperlinks topics
in iWeb Help.
Note: You can’t edit HomePage sites in iWeb.
When you publish a site, all the sites and pages you changed since the last time you
published are published. In other words, you can't publish only selected websites or
webpages; each time you click Publish (or choose one of the Publish commands in the
File menu), your published websites will match the sites and pages in iWeb.
22 Chapter 1 Creating a Website With iWeb

Next Steps
Congratulations! You’ve completed the tutorial.
You will probably want to further customize your website content, add more photos
and other graphics, and include special elements such as an automatic visitor counter.
As you get more comfortable with iWeb, you might want to include other templates on
your website.
If you have questions as you explore the other features of iWeb, choose Help >
iWeb Help.
Chapter 1 Creating a Website With iWeb 23

2 Inspectors and Other Windows
at a Glance
This chapter describes the controls you’ll use in iWeb.
You can use this chapter to get familiar with the iWeb interface and learn the names of
the iWeb controls. Use this chapter as a reference while you work and as you follow the
instructions in the tutorial (Chapter 1, “Creating a Website With iWeb,” on page 8) and
in iWeb Help.
The Inspector Window
The Inspector window puts formatting tools and other commands at your fingertips.
Click one of the buttons at the top to display that inspector.
2
24

The Site Inspector
Use the Site Inspector to change settings that apply to the selected website.
A
B
C
D
E
F
G
A Site Name field: If you have more than one website, you can name them so that you’ll know
which one is which while working in iWeb. The site name you specify here is part of your
website’s URL.
Some characters are not recommended for use in website names. For more information, see
“Renaming a website” in iWeb Help.
B “Publish to a group” checkbox and pop-up menu: If you are a member of a .Mac group, you
can select the group in this menu to publish your site so that only other group members can
visit it.
C iDisk Storage: Look here to see how much space you have remaining on your iDisk.
D Buy More button: If you want more space on your iDisk, you can purchase more by clicking this
button (which opens the .Mac website).
E “Make my published site private” checkbox: Select to make your website accessible only to
people who know the user name and password.
F User Name field: Create the user name visitors will need to know to visit your website (all
visitors use the same user name). Note: Don’t use your .Mac user name; make up something that
would be hard to guess.
G Password field: Type the password required to visit your website. Don’t use your .Mac password.
Chapter 2 Inspectors and Other Windows at a Glance 25

The Page Inspector
Use the Page Inspector to change settings that apply to the selected webpage.
A
B
C
D
E
A Page Name field: The name you specify here appears in the title bar of the browser window
when someone visits your website.
Some characters are not recommended for use in webpage names. For more information, see
“Renaming a webpage” in iWeb Help.
B “Include page in navigation menu” checkbox: To prevent the title of this page from appearing
in the navigation menu (the clickable table of contents on every page in your website), deselect
this checkbox. When a page doesn’t appear in the navigation menu, visitors can visit the page
using its URL or by clicking a link to it on another page.
C Page Size: Change the viewable area of a webpage (including headers and footers). For pages
that have headers or footers, change their height.
D Page Background: Make the webpage background a color or an image. Click the color well to
choose a color.
E Browser Background: Your webpage content is a fixed size (see Page Size above), but people
can resize their browser windows to extend beyond the page dimensions you specify. Click the
Browser Background well to change the color that appears around your webpage content.
26 Chapter 2 Inspectors and Other Windows at a Glance

The Blog & Podcast Inspector
Use the Blog & Podcast Inspector to change blog and podcast settings.
A
B
A “Number of excerpts to show” field: Change the number of entries displayed on your blog.
B Excerpt Length slider: Drag the slider to make blog excerpts shorter or longer.
C Series Artist field: Set the artist name for this podcast series.
D Contact Email field: If you submit your podcast to the iTunes Music Store, you can provide the
music store with a way to contact you or your podcast’s artist. This information is not visible in
iTunes.
E Parental Advisory pop-up menus: Include a Clean or Explicit label in the iTunes directory for a
series or an episode. (There are two pop-up menus—one for a podcast series and one for a
podcast episode.)
F “Allow podcast in iTunes Music Store” checkboxes: There are two of these checkboxes—one
for a podcast series and one for a podcast episode. If you are submitting a series to the iTunes
Music Store, you can exclude specific episodes. You can also use this checkbox to prevent a
series from being published to the iTunes Music Store, and to remove a published podcast from
the iTunes Music Store.
G Episode Artist field: Set the artist name for this podcast episode.
C
D
E
F
G
Chapter 2 Inspectors and Other Windows at a Glance 27

The Text Inspector
Use the Text Inspector to adjust text properties such as color, alignment, and spacing.
B
A
D
E
G
A Color well: Click to change the color of selected text.
B Horizontal alignment buttons: Click to align selected text left, right, center, or to the left and
right (justified).
C Vertical alignment buttons: Click to align text to the top, center, or bottom of a text box or
shape.
D Background Fill checkbox: Select the checkbox to put a color behind text in a text box. Click
the color well to change the color.
E Character and Line sliders and fields: Drag the sliders (or click the arrows) to adjust character,
line, and paragraph spacing for selected text.
F Line spacing pop-up menu: Choose a line spacing option.
 Single: Standard space between lines of text.
 Double: Adds a blank line between each line of text.
 Multiple: Set line spacing values between single and double, or greater than double.
 At Least: The distance between lines is never less than the value you specify, but it may be
more to prevent larger fonts from overlapping. Use this option when the distance between
lines should remain fixed, but you don’t want the text to overlap when it gets large.
 Between: The value you specify is added to (or subtracted from) the font size. As font size
changes, the distance between lines changes too. Use this option to set a specific distance
between ascenders and descenders, regardless of font size.
G Inset Margin slider and field: Drag the slider (or click the arrows) to adjust the amount of space
between text and the inside borders of text boxes and shapes.
C
F
28 Chapter 2 Inspectors and Other Windows at a Glance

The Wrap Pane (Text Inspector)
Use the Wrap pane to adjust the way text wraps around an inline object, such as a
shape or photo.
A
B
C
A “Object causes wrap” checkbox: Select to make text wrap around the selected object.
Note: Only inline objects can have text wrapped around them.
B Text wrap alignment buttons: Click to select how you want the text to wrap around the object.
The first button wraps text to the right of the object. The second button wraps text around the
left side of the object.
C Extra Space field: Set how much space to leave between the object and the surrounding text.
The List Pane (Text Inspector)
Use the List pane to create and modify bulleted or numbered lists.
A
B
C
F
A Bullets & Numbering pop-up menu: Choose the bullet type (regular text bullets or an image)
or choose to use numbers. If your list uses numbers, you see different options (see I, above).
B Bullet style pop-up menu: Choose a bullet or type a character (or characters) to use as a bullet.
C Bullet color well: Click to change the bullet color.
D Align field: Set the vertical alignment of a bullet relative to its text.
E Size field: Set the bullet size.
F “Scale with text” checkbox: Select to maintain the bullet-to-text ratio specified in the Size field,
even if you change the font size.
G Bullet Indent field: Set the distance the bullet indents. (Note: “px” means pixels.)
H Text Indent field: Set the distance between the bullet and its text.
I Number controls: If your list uses numbers instead of bullets, you can choose the number style
from the pop-up menu, and indicate when to start a new list.
I
D
E
G
H
Chapter 2 Inspectors and Other Windows at a Glance 29

The Graphic Inspector
Use the Graphic Inspector to change object properties such as fill, stroke (line width),
shadow, and opacity.
A
B
C
D
E
F
G
B
A Fill pop-up menu: Fill an object with a solid color, a color gradient, an image, or a tinted image
(an image with a wash of color over it).
B Color wells and gradient controls: If you choose Gradient Fill from the Fill pop-up menu, click
each color well to choose a color. Click the double-headed arrow to invert the gradient. Set the
direction of the gradient with the Angle wheel, or type a value in the field. If you choose Image
Fill, you have other options; see “Image Fill settings,” below.
C Stroke settings: Choose a line style from the pop-up menu. Click the color well to choose a line
color. Enter the line thickness in the field (or click the arrows to adjust the thickness). Choose a
style for line endpoints from the pop-up menus.
D Shadow checkbox: Select the checkbox to add a shadow to the selected object. Change the
angle of the shadow (the apparent position of the light source) with the Angle wheel (or enter
an angle in the field). Click the color wheel to change the shadow color.
E Offset, Blur, and Opacity fields: Change the look of a shadow.
 Offset: The higher the value, the greater the perceived distance between the object and its
shadow.
 Blur: The lower the value, the sharper the shadow’s edges are.
 Opacity: The higher the value, the less transparent the shadow is.
F Reflection checkbox: Select to make the selected object have a reflection.
H
30 Chapter 2 Inspectors and Other Windows at a Glance

G Opacity slider and field: Drag the slider (or enter a value in the field) to make the selected
object more or less transparent.
H Image Fill settings: To change the image, drag a file to the image well or click Choose. Choose a
scaling option from the pop-up menu.
 Scale to Fit resizes the image to fit the object’s dimensions as well as possible. If the object’s
shape is different from that of the original image, parts of the image may not appear; blank
space may also appear around the image.
 Scale to Fill makes the image appear larger or smaller, sizing it to leave no space around the
image, even if the object and image have different shapes.
 Stretch sizes the image to fit the object’s dimensions but distorts it if the object has a shape
different from the original image.
 Original Size places the image inside the object without altering its original dimensions. If the
image is larger than the object, you see only a part of the image in the object. If the image is
smaller than the object, there is blank space around it.
 Tile repeats the image inside the object, if the image is smaller than the object. If the image is
larger than the object, you see only part of the image inside the object.
For examples of these settings, see “Filling a shape with a color or an image” in iWeb Help.
The Metrics Inspector
Use the Metrics Inspector to change an object’s orientation, size, or position.
A
B
C
D
E
G
F
A File Info field: The filename of the selected image, movie, or imported file appears here.
B Size fields: Resize objects to exact dimensions by specifying height and width.
C “Constrain proportions” checkbox: Select to maintain the width-to-height ratio when you
resize an object.
D Original Size button: Click to return the selected object to the size it was when it was originally
imported.
E Position fields: Place an object at a specific location by specifying X and Y coordinates on the
webpage (0,0 is the top-left corner).
F Rotate controls: Drag the wheel to rotate an object, or specify an angle in the Angle field.
G Flip buttons: Flip an image horizontally or vertically.
Chapter 2 Inspectors and Other Windows at a Glance 31

The Link Inspector
Use the Link Inspector to create hyperlinks users can click to open a webpage, file, or
email message.
A
B
C
A “Enable as a hyperlink” checkbox: Select to make the selected text or object a hyperlink.
B Link To pop-up menu: Choose what you want the link to open.
 One of My Pages: Choose one of your websites or webpages from the Page pop-up menu
(the Page pop-up menu appears when you choose “One of My Pages” from the Link To pop-up
menu).
 An External Page: To create a link to a page on the web, type its address in the URL field.
 A File: Download a file to the visitor’s hard disk when the visitor clicks the link. Click the
Choose button to change the file.
 An Email Message: Open a preaddressed email message.
C “Make all hyperlinks inactive” checkbox: By default, all hyperlinks are turned off so that you
can edit hyperlink text easily. You can deselect this checkbox to make hyperlinks active as you
work in iWeb. When you publish a site, hyperlinks become active even if this checkbox was
selected at the time of publishing.
32 Chapter 2 Inspectors and Other Windows at a Glance
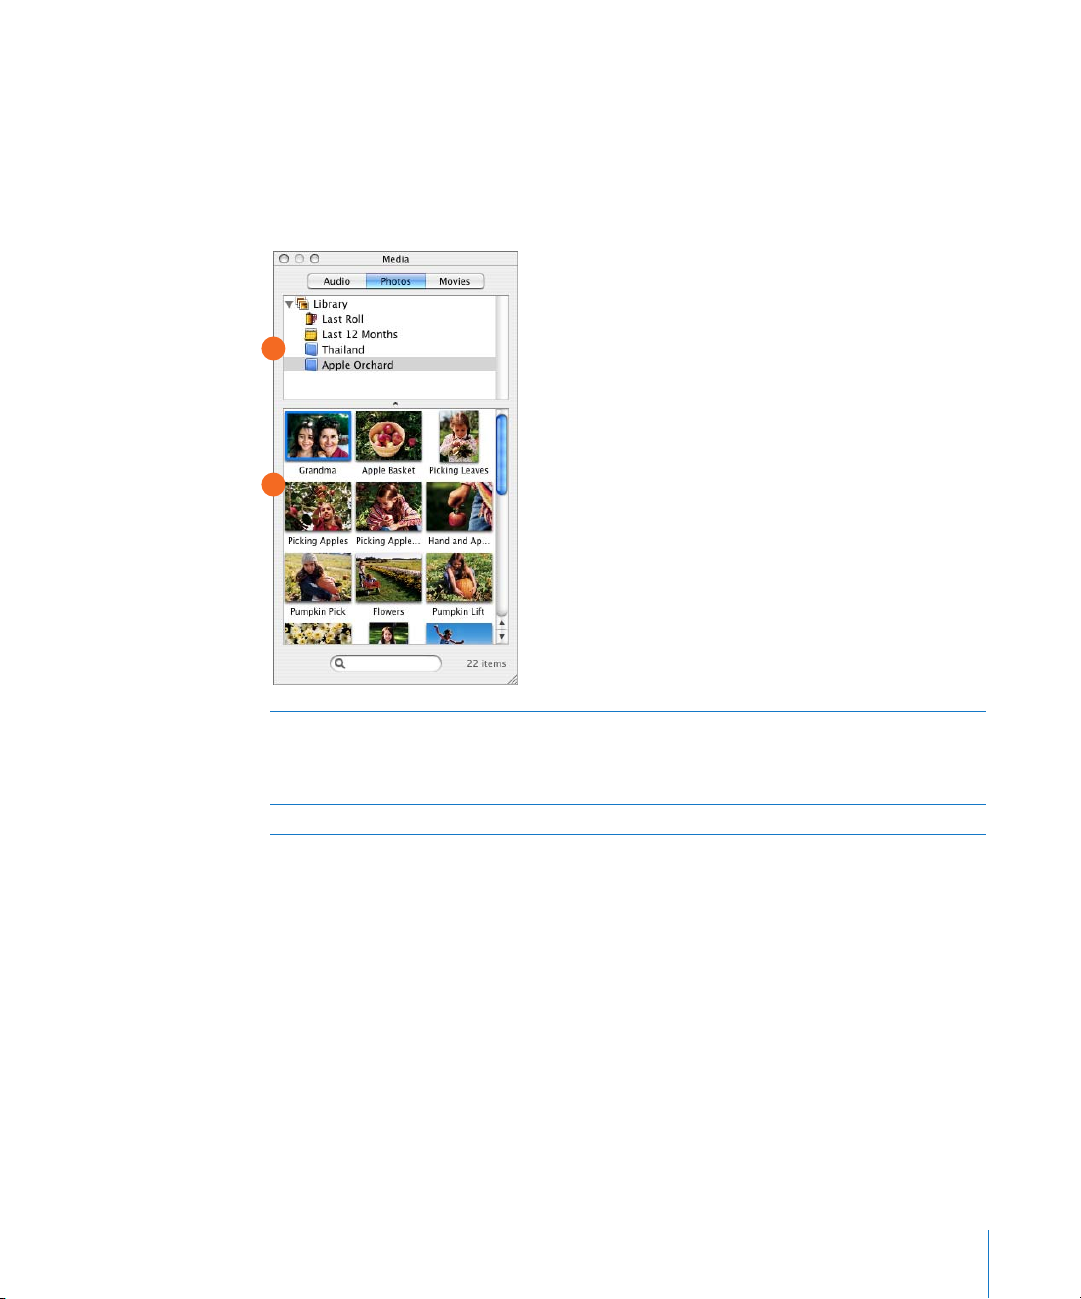
The Media Browser
The Media Browser gives you easy access to all the photos in your iPhoto library, as well
as all the music in your iTunes library and the movies stored in your Movies folder.
Photos Pane
All the photos in your iPhoto library appear here.
A
B
A iPhoto albums list: Photo albums you’ve created in iPhoto appear here. You can drag an album
to the webpage canvas in the iWeb window to add all the photos in the album to the webpage.
Note: You can drag individual photos to any webpage, but if you want to add a whole album,
use a Photos template.
B Photo thumbnails: Drag a photo from here to a webpage.
Chapter 2 Inspectors and Other Windows at a Glance 33

Movies Pane
Movies stored in the Movies folder on your hard disk appear here.
A
B
C
A Movie folders list: Folders in your Movies folder, iPhoto library, and iTunes library appear here.
Click a folder to see the movies it contains.
B Movie thumbnails: Drag a movie from here to a webpage.
C Play button: Click to play the selected thumbnail movie. Click again to stop playing.
D Search field: Type a movie name here to locate the movie.
D
34 Chapter 2 Inspectors and Other Windows at a Glance

Audio Pane
Here you can see all the music in your iTunes library, as well as podcasts you create in
GarageBand.
A
B
A Source list: Choose to display podcasts you’ve created in GarageBand, all the songs in your
iTunes library, or playlists you created in iTunes.
B Songs list: Drag a podcast, song, or playlist from here to a webpage for visitors to listen to.
Note: Songs purchased from the iTunes Music Store must be authorized to play on the visitor’s
computer.
Chapter 2 Inspectors and Other Windows at a Glance 35

The Adjust Image Window
Click the Adjust button in the toolbar for advanced controls that adjust image
properties such as brightness, saturation, and sharpness.
A
B
C
D
E
F
A Brightness and Contrast controls:
 Brightness: Make the overall image lighter or darker.
 Contrast: Make different parts of the image stand out. You can make shadows darker, sharpen
the edges of objects, and make colors stand out more. If you increase the contrast of a photo a
lot, it looks more like an illustration.
B Saturation, Temperature, and Tint controls:
 Saturation: Make colors deeper.
 Temperature: Acts as a “white balance” corrector. Use to introduce more warmth (orange
tones) or coolness (blue tones).
 Tint: Change the amount of red or green tones in the image.
C Sharpness slider: Sharpen or soften the image’s focus.
D Exposure slider: Lighten an underexposed image or increase the details of an overexposed
image.
E Photo histogram: Displays the relationship between shadows (depicted on the left side of the
display) and highlights (depicted on the right side) in your image. You can use the sliders below
the histogram to change the tonal range by changing the amount of black (left slider) or white
(right slider) in the image.
F Auto Levels button: Automatically enhance colors.
G Reset Image button: Reset the image to its original settings.
G
36 Chapter 2 Inspectors and Other Windows at a Glance

www.apple.com/iweb
© 2006 Apple Computer, Inc. All rights reserved.
Apple, the Apple logo, iLife, iMovie, iPhoto, iTunes, Mac, the Mac logo, and Mac OS
are trademarks of Apple Computer, Inc., registered in the U.S. and other countries.
Finder, GarageBand, iWeb, and Safari are trademarks of Apple Computer, Inc.
iTunes is a service mark of Apple Computer, Inc., registered in the U.S. and other
countries. .Mac is a service mark of Apple Computer, Inc.
019-0537-A
 Loading...