

Page 1

Service Source
iMac G5, 20-inch (Ambient Light
Sensor)
Updated 1 October 2007
© 2005 Apple Computer, Inc. All rights reserved.
Page 2

iMac G5, 20-inch (Ambient Light Sensor)
iMac G5, 20-inch -
1
Page 3

Service Source
Take Apart
iMac G5, 20-inch, Ambient Light
Sensor
© 2005 Apple Computer, Inc. All rights reserved.
Page 4

General Information
What’s New
October 2007
Updated Logic Board replacement procedure. A “caution” was added to notify service
providers not to twist, flex, or bend the iMac G5 logic as you install to board into the
chassis. Flexing the board may jeopardize the thermal interface between the heatsink and
the processor. Refer to the iMac logic board inbox notice 073-1158 for additional
information.
November 2006
On November 2, 2006, Apple announced the iMac G5 Repair Extension Program (REP)
for Power Supply Issues. Information on the Repair Extension Program for Power Supply
Issues has been added to the take apart and troubleshooting chapters.
This REP is a worldwide program that applies to iMac G5 20-inch (Ambient Light Sensor)
models sold worldwide between May 2005 and October 2005 that feature a 2.0GHz G5
processor and that have power-related issues as a result of a specific component failure
within the computer's power supply. Refer to the “iMac G5 Repair Extension Program
(REP) for Power Supply Issues” document at the begining of the manual for more
information.
Note
July 2006
A diecut piece of microfoam (922-7671) is included with all replacement optical drives and
display bezels. It should be installed in between the disc drive and the display bezel to
prevent optical media from ejecting out of the system and dropping to the desktop. Only
one diecut of microfoam should be used per system. Refer to the replacement procedures
in Take Apart for either the optical drive, display bezel, or microfoam shim for more
information.
Display/Bezel Assembly Elimination
Effective July 24, 2006, the Display and Bezel assembly module will no longer be available
as a single service part for the iMac G5 (17- and 20-inch models). The Display and Bezel
are now available as two separate service parts (see below) to simplify inventory and
General Information
: The iMac G5 power supply is no longer available as a Do-It-Yourself (DIY) part.
iMac G5, 20-inch, Ambient Light Sensor Take Apart -
1
Page 5

reduce repair costs.
• 922-6817 Front Cover Assy,w/Optical Slot, iMac G5 20"
• 661-3622 Panel, Display w/Brackets, iMac G5 20"
Tools Required
The following tools are required to service the computer:
• Phillips #2 screwdriver
• Phillips #1 screwdriver
• Flat-blade screwdriver
• Torx T6, T8, and T10 screwdriver
• Jeweler’s flat-blade screwdriver
• Nylon probe tool (black stick 922-5065)
• Needlenose pliers
• Soft cloth (to protect removed parts from scratches)
New Procedures and Service Parts (May 2005)
• Fans, Upper
• Fan, Lower
• Logic board
• Speakers
• Microphone
• AirPort/Bluetooth card
• Modem
• Chassis
• Antennas
• LED light pipe
2 -
iMac G5, 20-inch, Ambient Light Sensor Take
General Information
Page 6

Important Things to Know
1. These instructions cover the iMac G5, 20-inch, Ambient Light Sensor model;
however, the procedures from the original 20-inch model are very similar. In
some steps graphics from the original model may be used.
2. All customer removable screws are brass colored (except for some fan screws
on earlier units which use torx screws). Do not remove screws unless they are
brass colored, or you will void your warranty.
3. Ground yourself when working on the computer. The procedure will show you how to
ground yourself.
4. A magnetized “L”-shaped Phillips screwdriver is included with the replacement part.
5. The following items are no longer offered as a Do-it-Yourself repair:
• midplane
• display/bezel
• power supply
6. Additional items are included with these service parts.
Back Cover
• Two blank labels are included with the replacement back cover. Copy the serial
number and Ethernet number off the bottom of the computer’s foot and attach the
new labels to the bottom of the replacement foot. The back cover take apart
procedure will show you where to attach the labels.
Logic Board
• The LED gasket and light pipe are included
• Syringe with thermal compound
• Alcohol cleaning wipe
• A new pre-printed Ethernet label is included with the midplane. Attach the sticker to
the bottom of the computer’s foot, above the existing label.
• A blank serial number label is included with the midplane. Copy the serial number
off the bottom of the computer’s foot and attach the new label to the midplane. The
midplane take apart procedure will show you where to attach the label.
7. Do not pull on individual wires when disconnecting a part; pull on the connector.
8. A screw chart is attached at the end of this document. Use the chart to identify screw
type and screw locations.
General Information
iMac G5, 20-inch, Ambient Light Sensor Take Apart -
3
Page 7
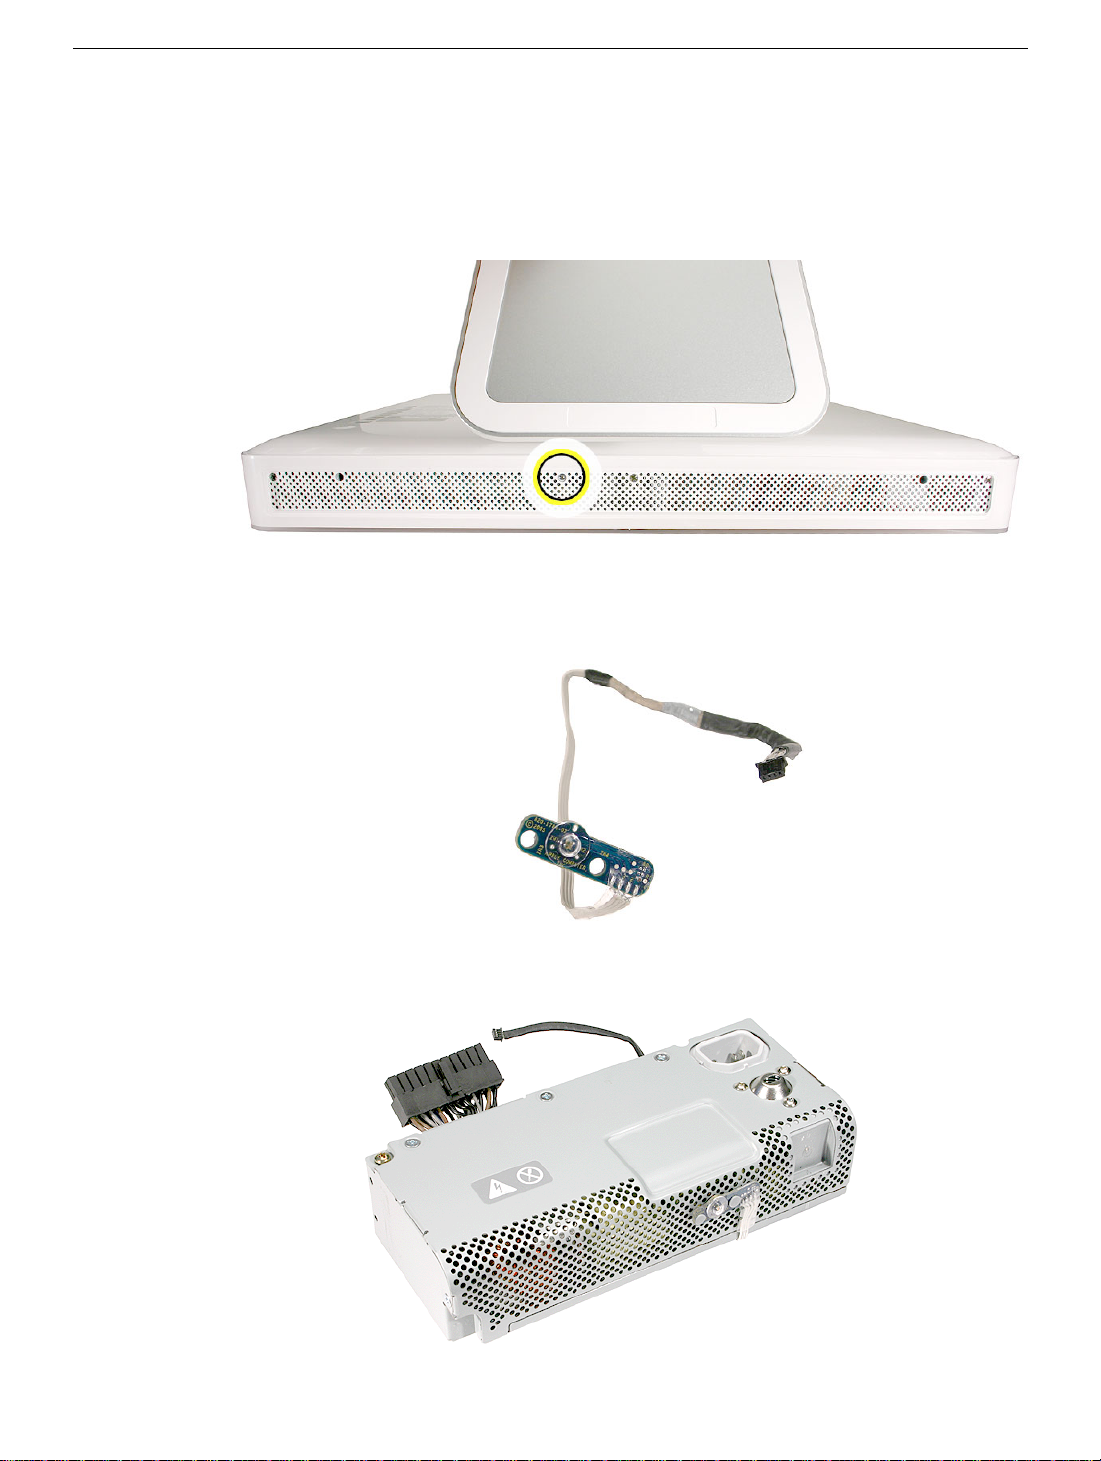
Ambient Light Sensor
The new iMac G5 has an ambient light sensor. It’s located on the bottom of the display
bezel, near the case screws. Look at the picture below. Next to the middle screw is a small
bump protruding from the case. This is the ambient light sensor.
The ambient light sensor attaches to the power supply with two plastic rivets.
The ambient light sensor cable runs under the power supply and attaches to the logic
board.
4 -
iMac G5, 20-inch, Ambient Light Sensor Take
General Information
Page 8
Removing the Back Cover
Tools Required
The only tool required is a Phillips #2 screwdriver
Part Location
Removing the Back Cover
iMac G5, 20-inch, Ambient Light Sensor Take Apart -
5
Page 9
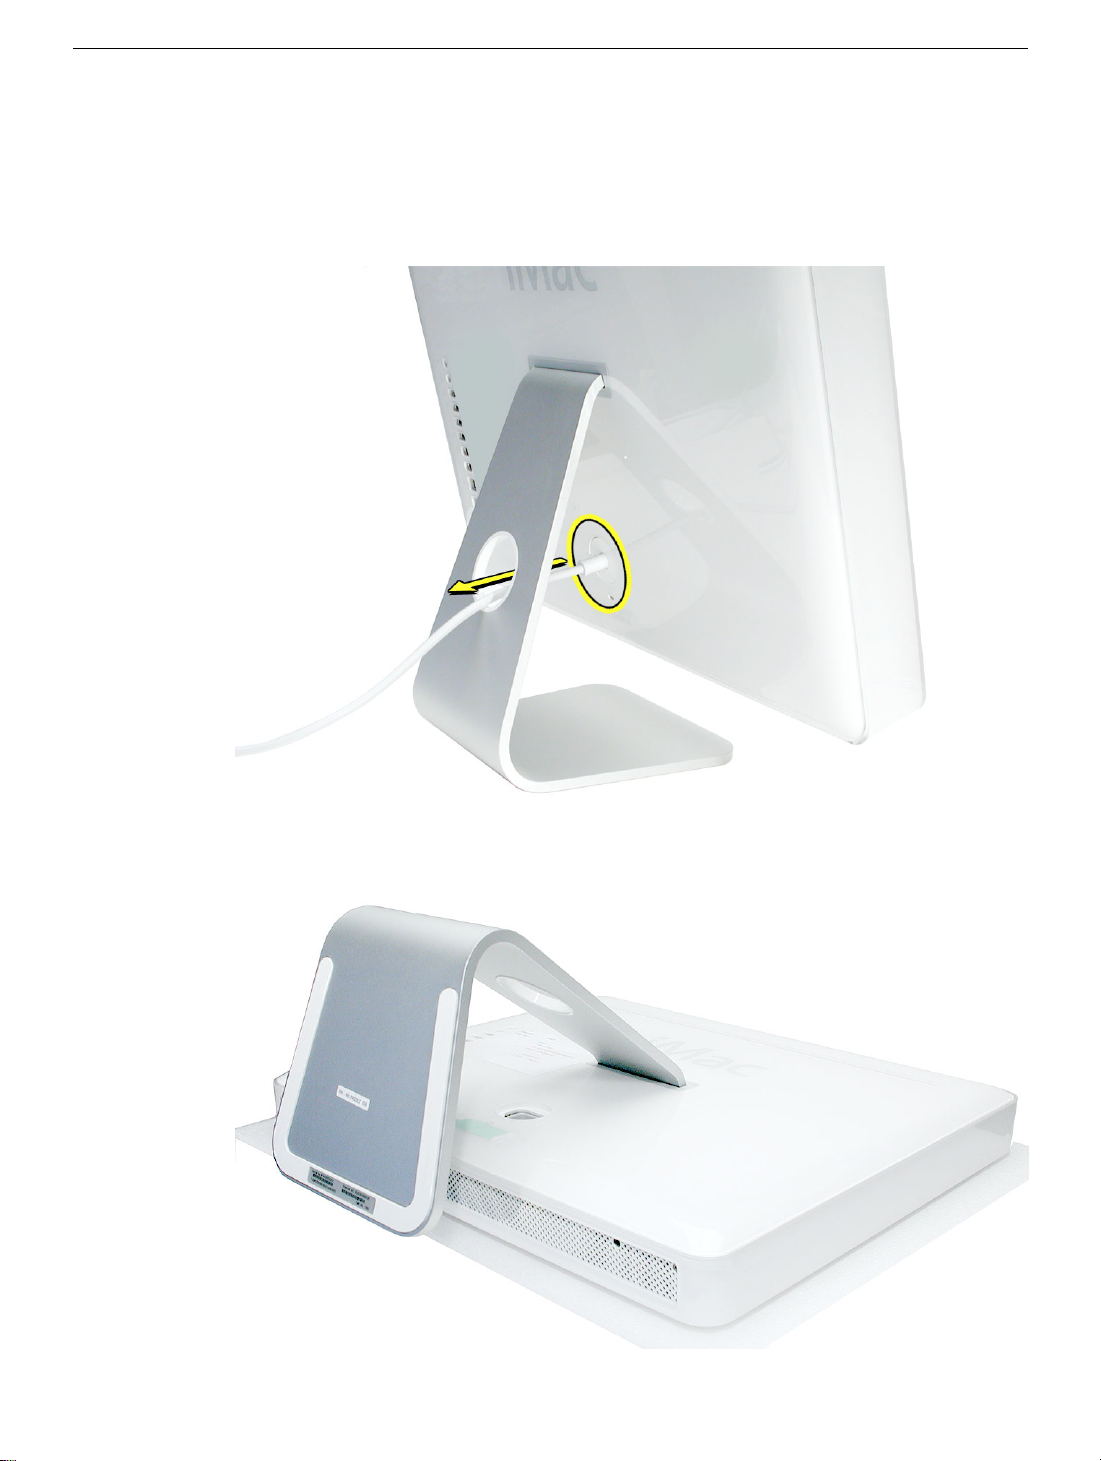
Procedure
1. Turn your computer off by choosing Shut down from the Apple (K) menu.
2. Disconnect all cables, and unplug the power cord from your computer. Put on your
ESD Wrist strap.
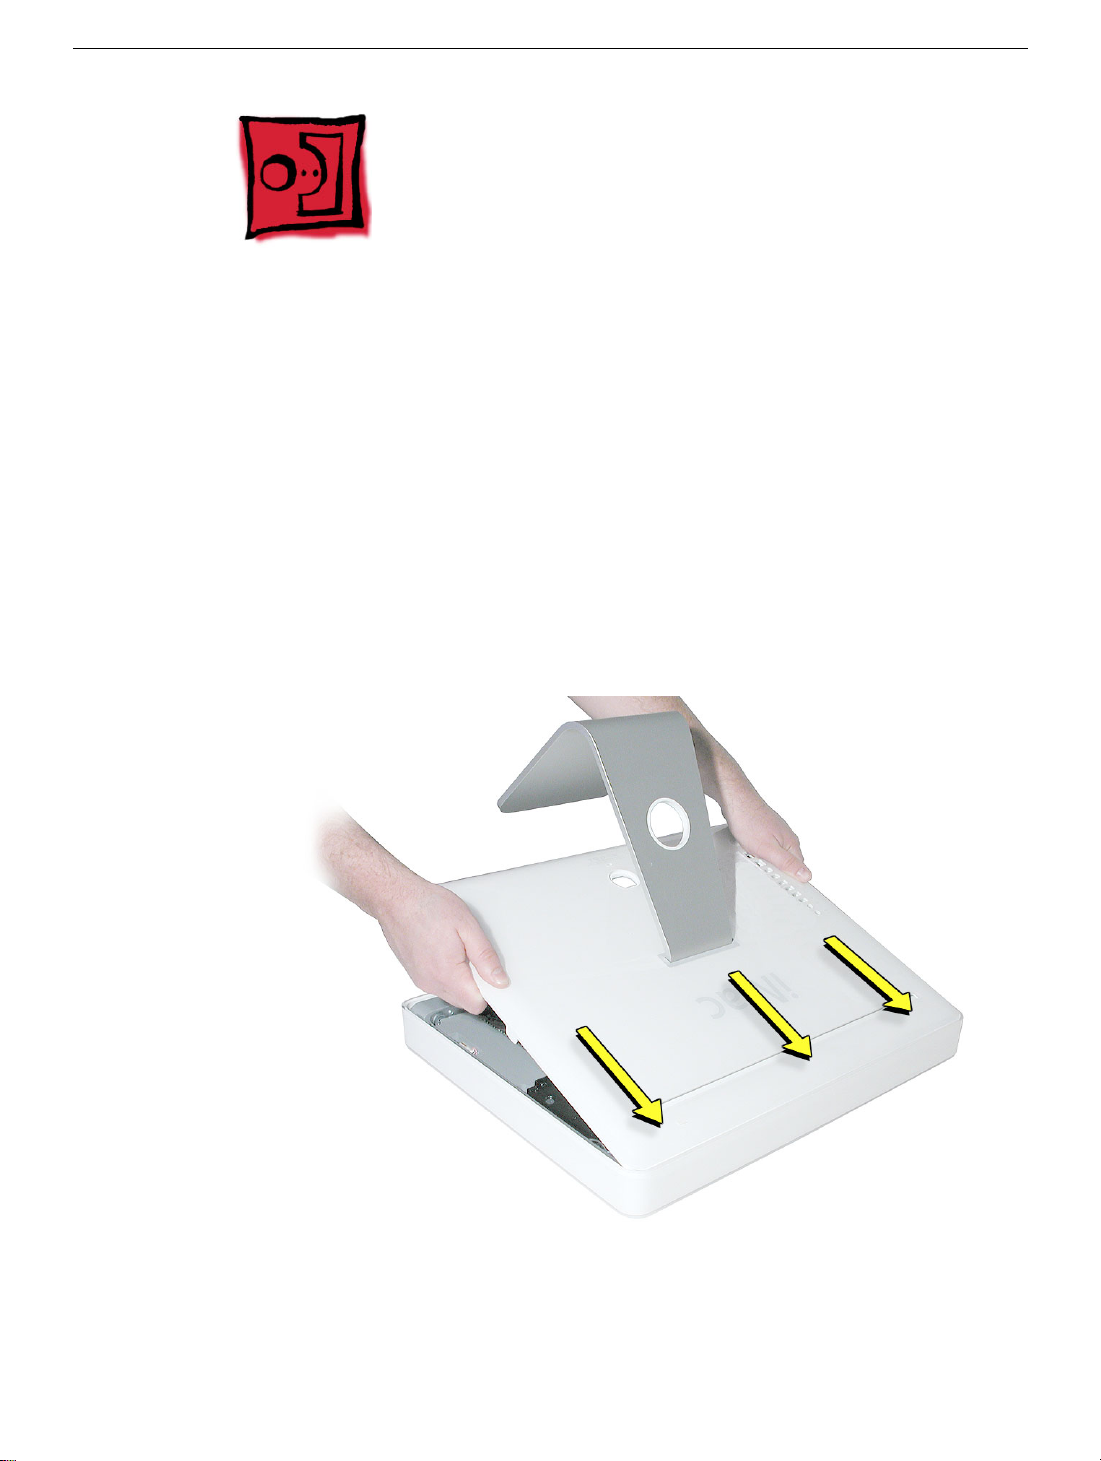
3. Place a soft, clean towel or cloth on the desk or surface. Hold the sides of the
computer and slowly lay the computer face down as shown.
6 -
iMac G5, 20-inch, Ambient Light Sensor Take
Removing the Back Cover
Page 10
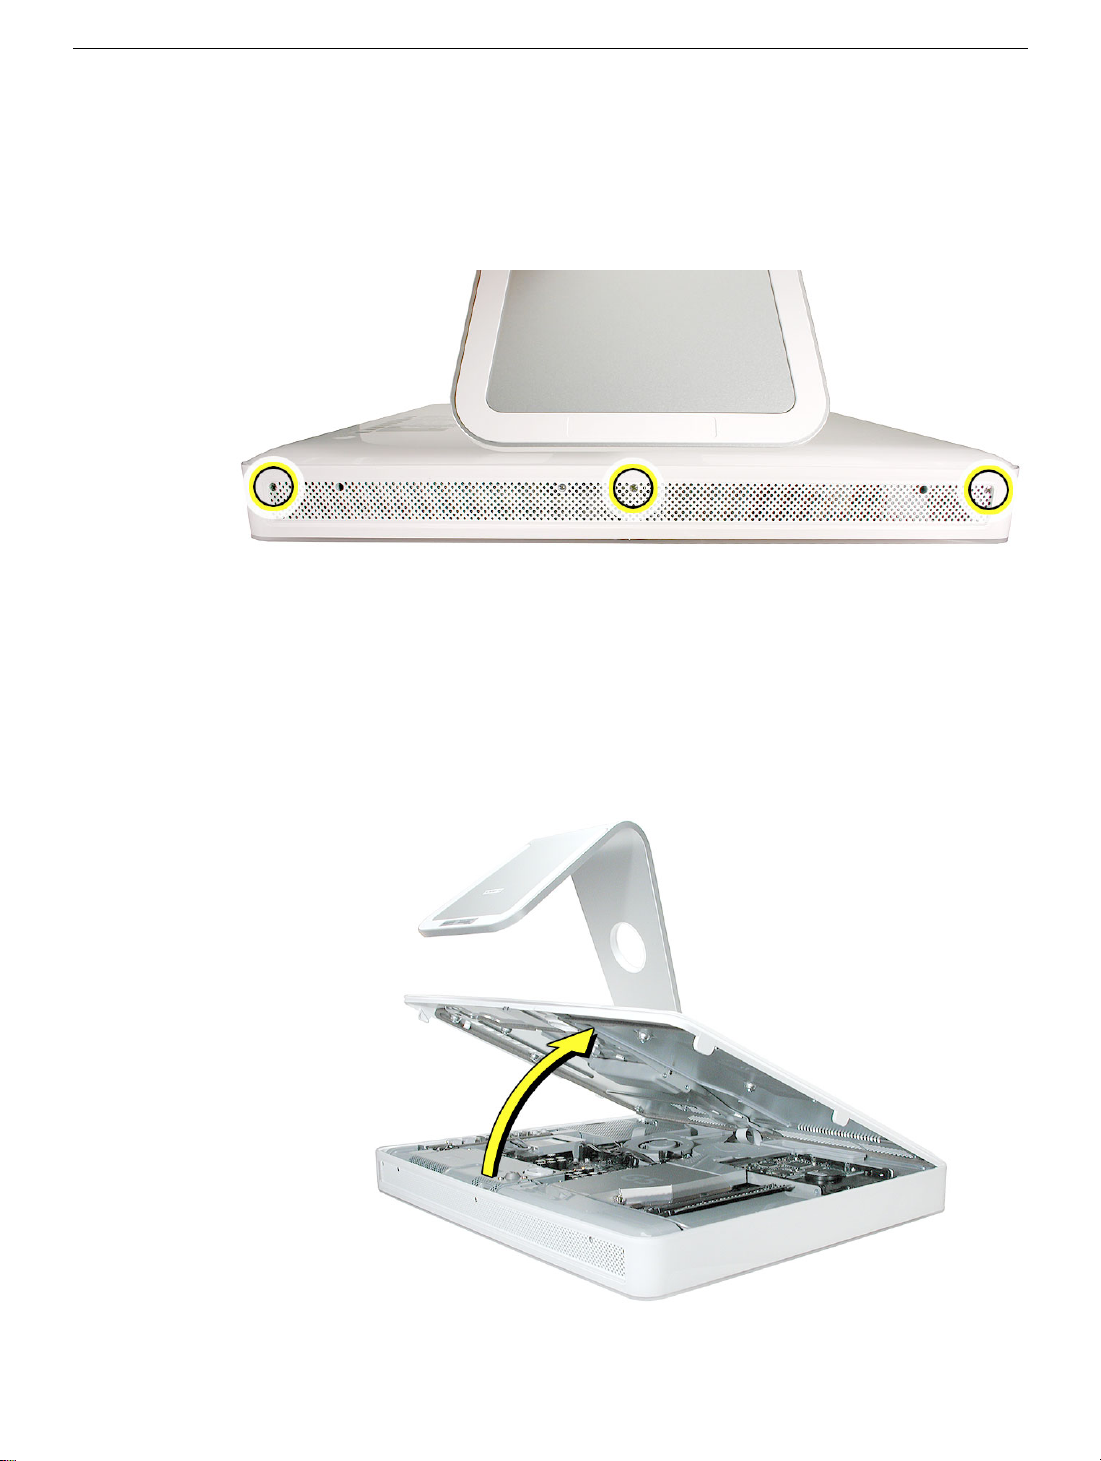
4. Locate the three silver case screws circled below. You may have to lift the stand to
locate the middle case screw.
display/bezel assembly and cannot be removed.
Using a Phillips #2 screwdriver, loosen the three captive screws. Turn the screws to
the left until they stop turning.
Note:
These screws are captive; they are part of the
Don’t force the screws once they stop turning.
5. Holding the back cover by the metal foot, tilt the cover up and lift it off the computer.
Set the back cover aside.
Removing the Back Cover
iMac G5, 20-inch, Ambient Light Sensor Take Apart -
7
Page 11
Replacing the Back Cover
Tools Required
The only tool required is a Phillips #2 screwdriver.
Procedure
1. Remove the replacement back cover and foot from its packaging.
2. Replace the cover so that the slots on the top edge of the back cover mate with the
tabs on the display housing.
8 -
iMac G5, 20-inch, Ambient Light Sensor Take
Replacing the Back Cover
Page 12

3. Lower and press the cover into place until it fits snugly on the computer.
4. Tighten the case screws by turning them to the right.
Replacing the Back Cover
iMac G5, 20-inch, Ambient Light Sensor Take Apart -
9
Page 13
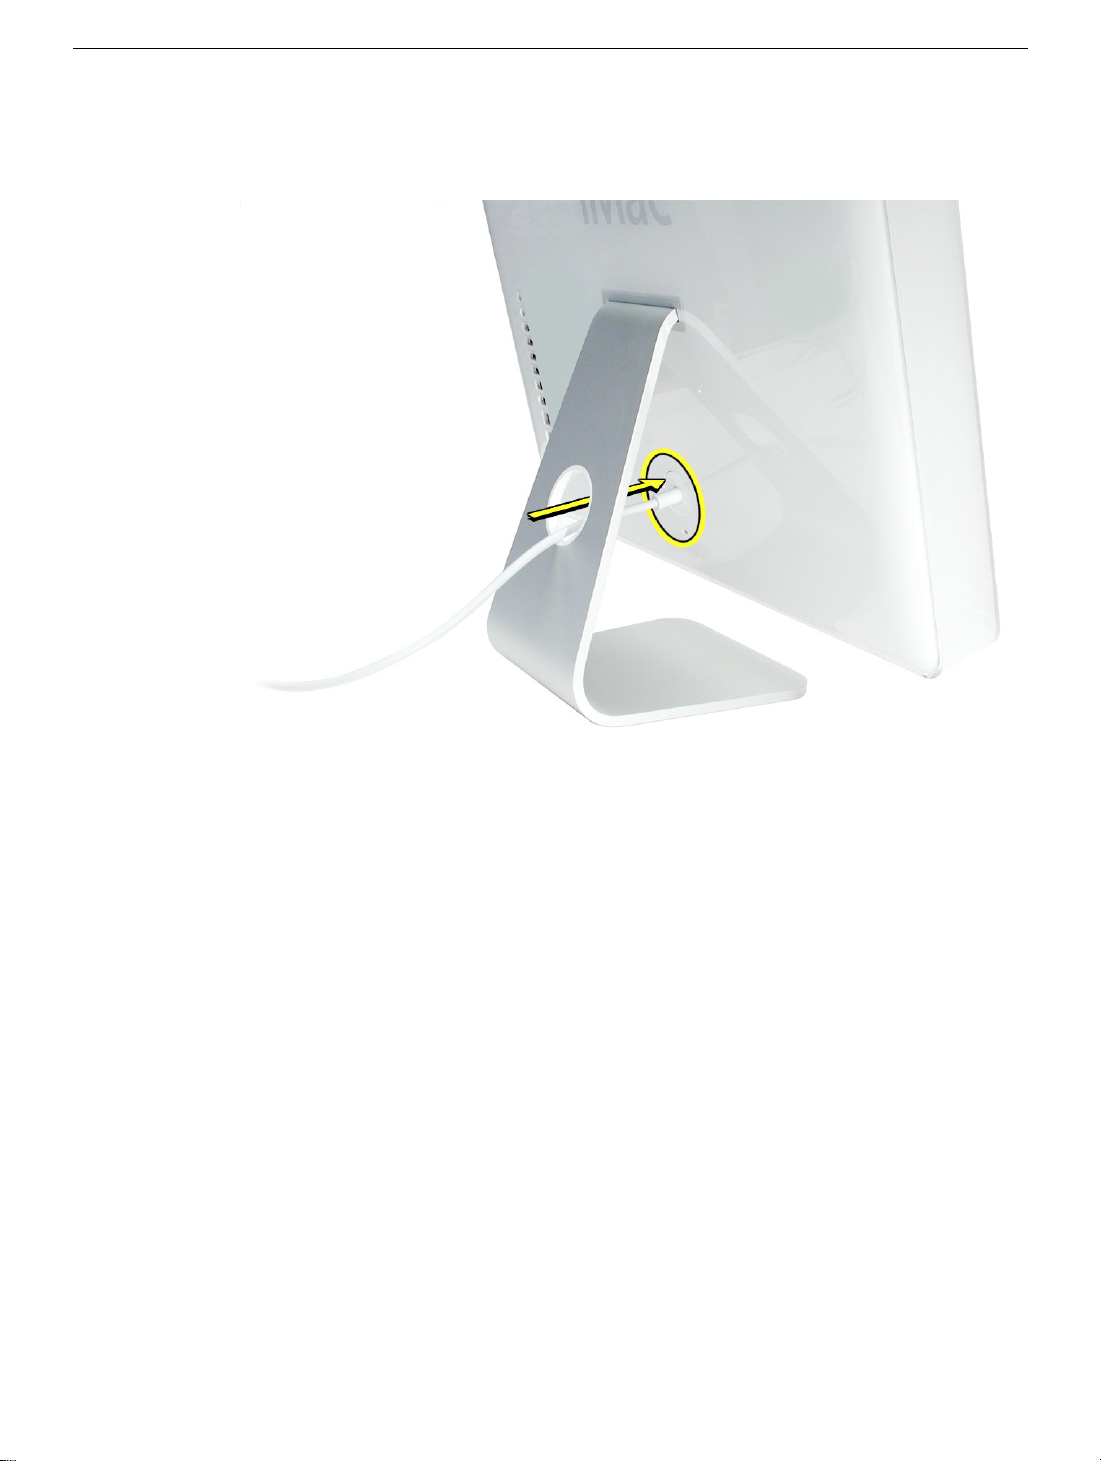
5. Position the computer in the upright position. Reconnect the power cord and
remaining cables. Power on the computer.
10 -
iMac G5, 20-inch, Ambient Light Sensor Take
Replacing the Back Cover
Page 14
Grounding Yourself
Tools Required
• Phillips #2 screwdriver, preferably with a magnetized tip
Preliminary Steps
Before you begin, remove the back cover.
Grounding Yourself
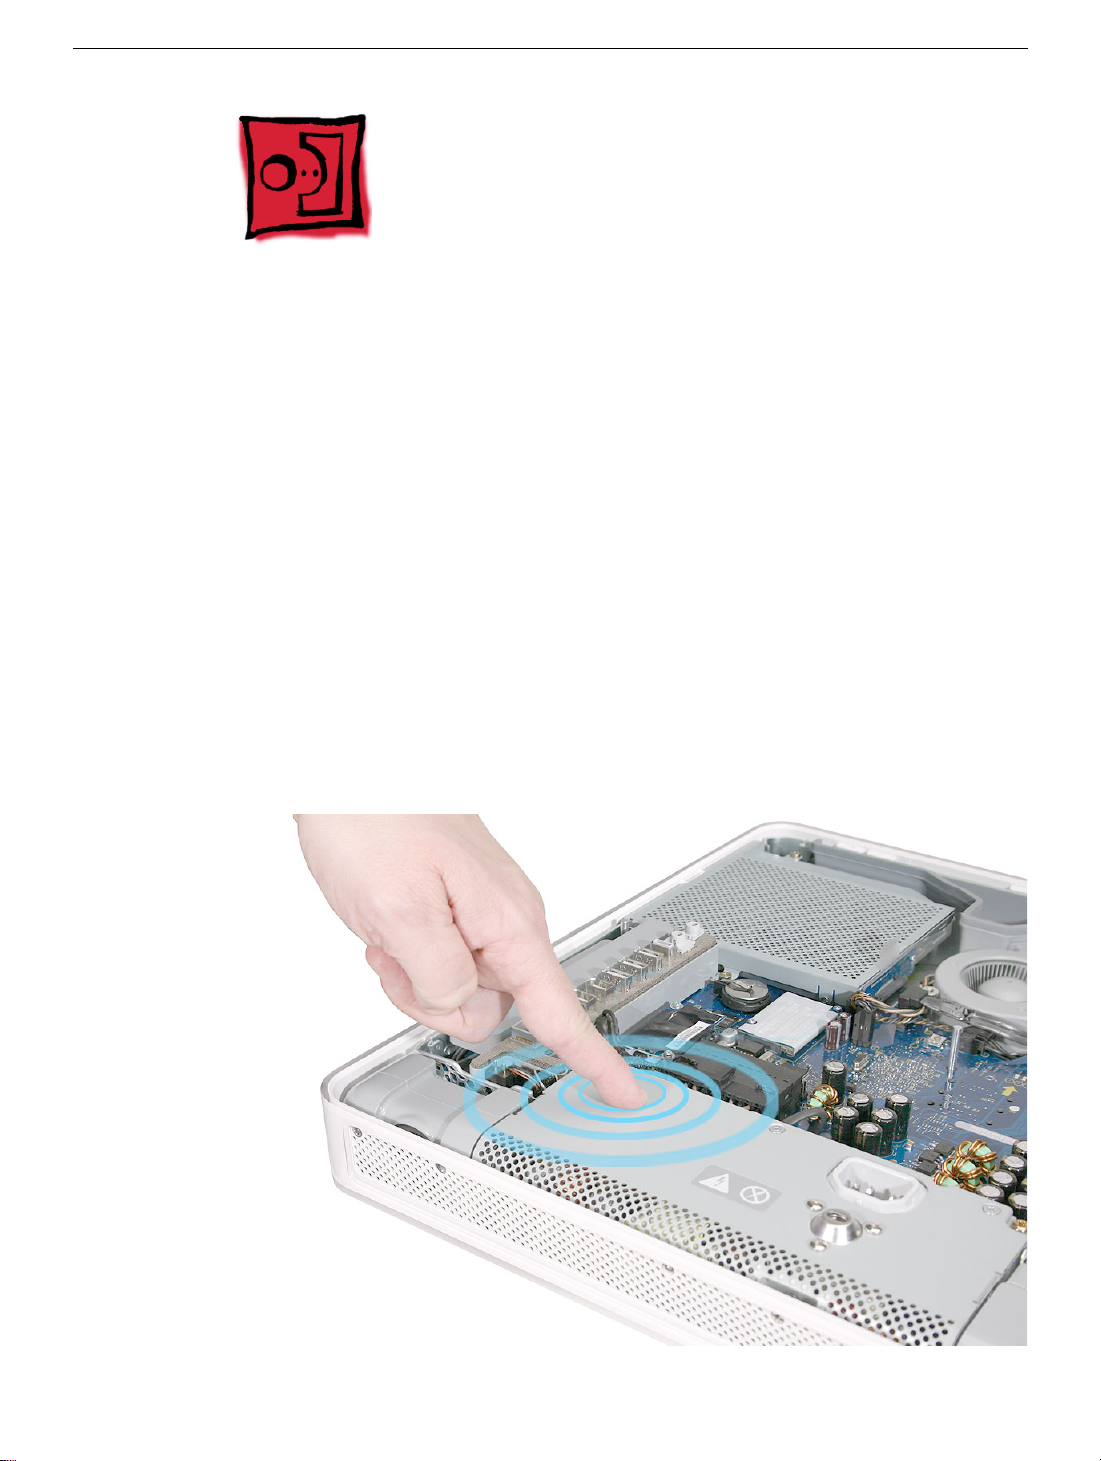
1. Touch the metal surface (as shown below) on the inside of the computer to discharge
any static electricity.
Warning: Always discharge static electricity before you touch any parts or
install any components inside the computer. To avoid generating static
electricity, do not walk around the room until you have finished installing the
part and closed the computer
.
Grounding Yourself
iMac G5, 20-inch, Ambient Light Sensor Take Apart -
11
Page 15

Hard Drive
Tools Required
• Phillips #2 screwdriver, preferably with a magnetized tip
• Needlenose pliers
• Screw tray or equivalent to hold the screws
Preliminary Steps
Before you begin, remove the back cover.
Part Location
12 -
iMac G5, 20-inch, Ambient Light Sensor Take
Hard Drive
Page 16
Removing the Serial ATA Hard Drive
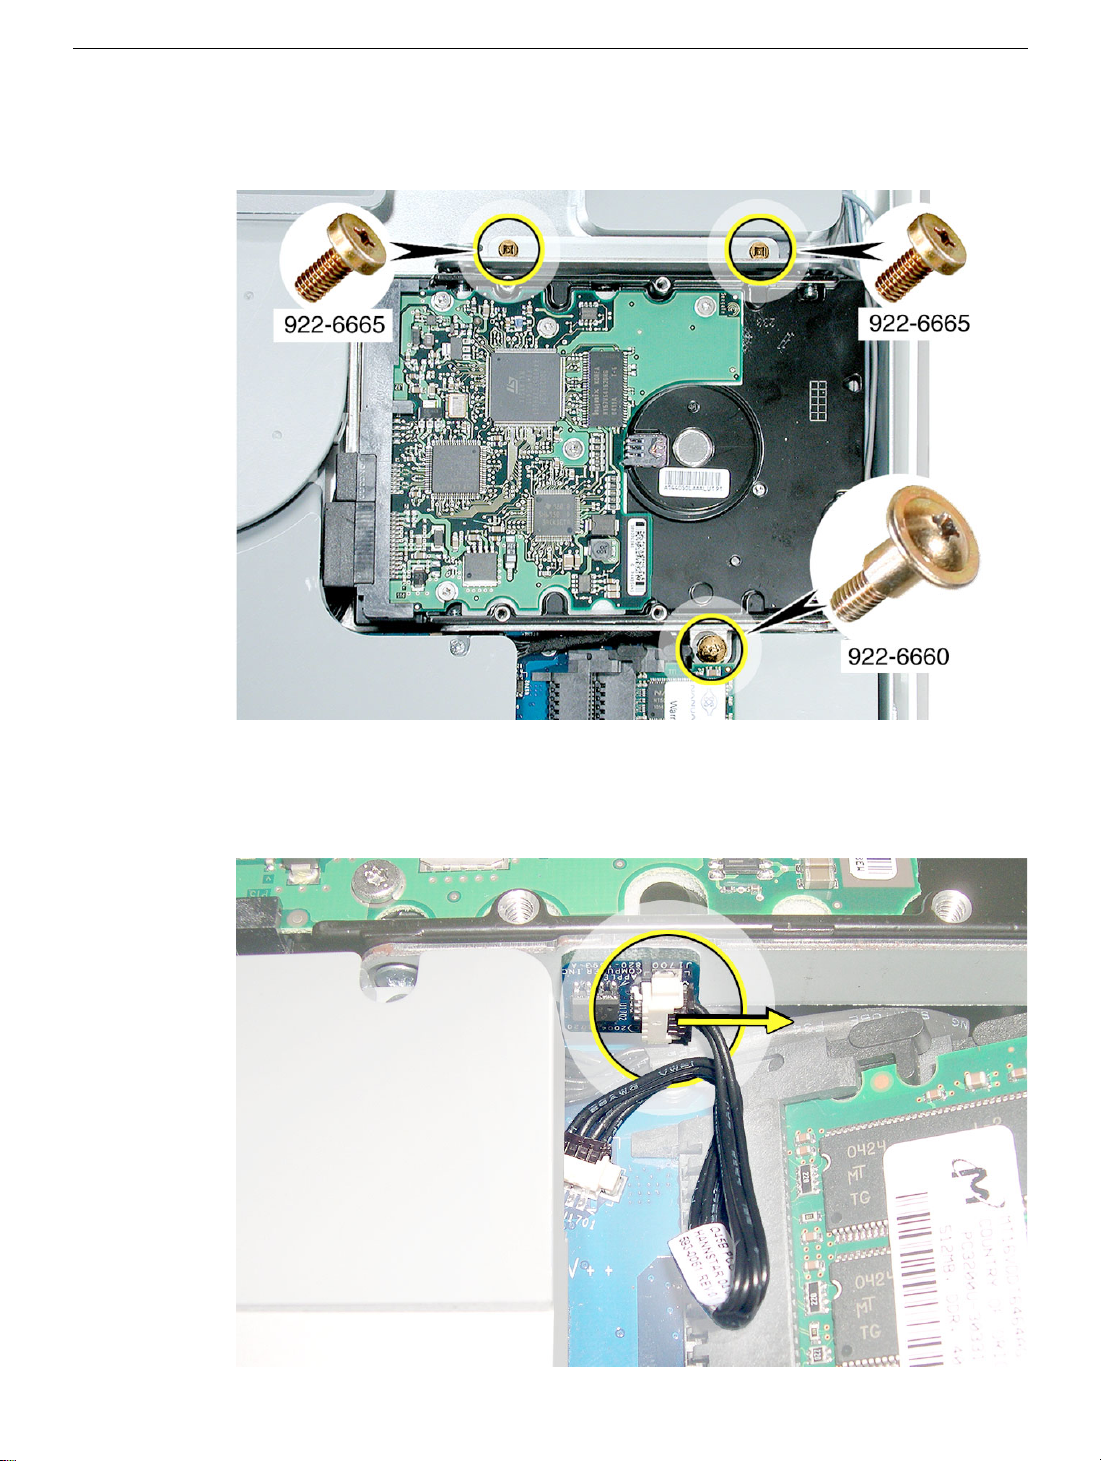
1. Remove the three hard drive screws. Set the screws aside.
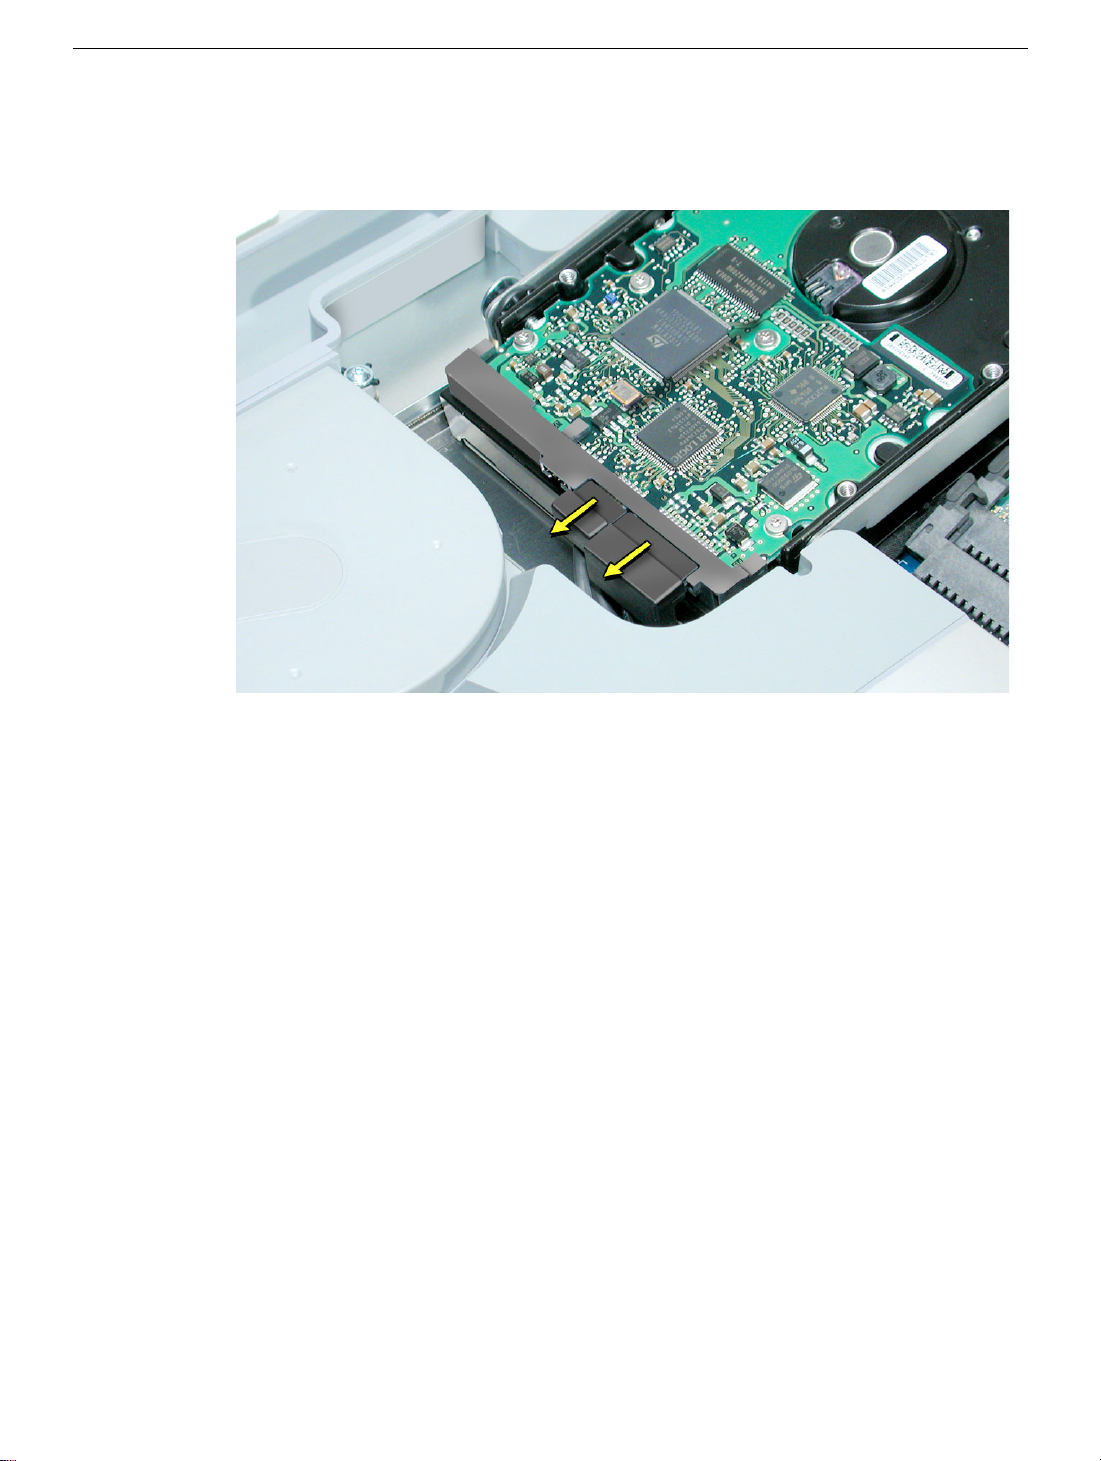
2. Lift the hard drive straight up, about one inch, to access the connector shown below.
Disconnect the black connector from the side of the hard drive.
disconnect the other end of the cable from the board.
Note:
Do not
Hard Drive
iMac G5, 20-inch, Ambient Light Sensor Take Apart -
13
Page 17
3. Using your fingers, disconnect the drive data cable and power cable from the hard
drive. Lift the hard drive up and out of the midplane assembly.
hard drive to Apple in the packaging provided.
Important:
Return this
14 -
iMac G5, 20-inch, Ambient Light Sensor Take
Hard Drive
Page 18

Replacing the Serial ATA Hard Drive
1. Remove the replacement hard drive from its packaging.
2. Connect the drive data cable and power cable to the hard drive. Lower the hard drive
into place on the midplane.
3. Connect the hard drive thermal sensor to the sensor board on the side of the hard
drive.
Hard Drive
iMac G5, 20-inch, Ambient Light Sensor Take Apart -
15
Page 19
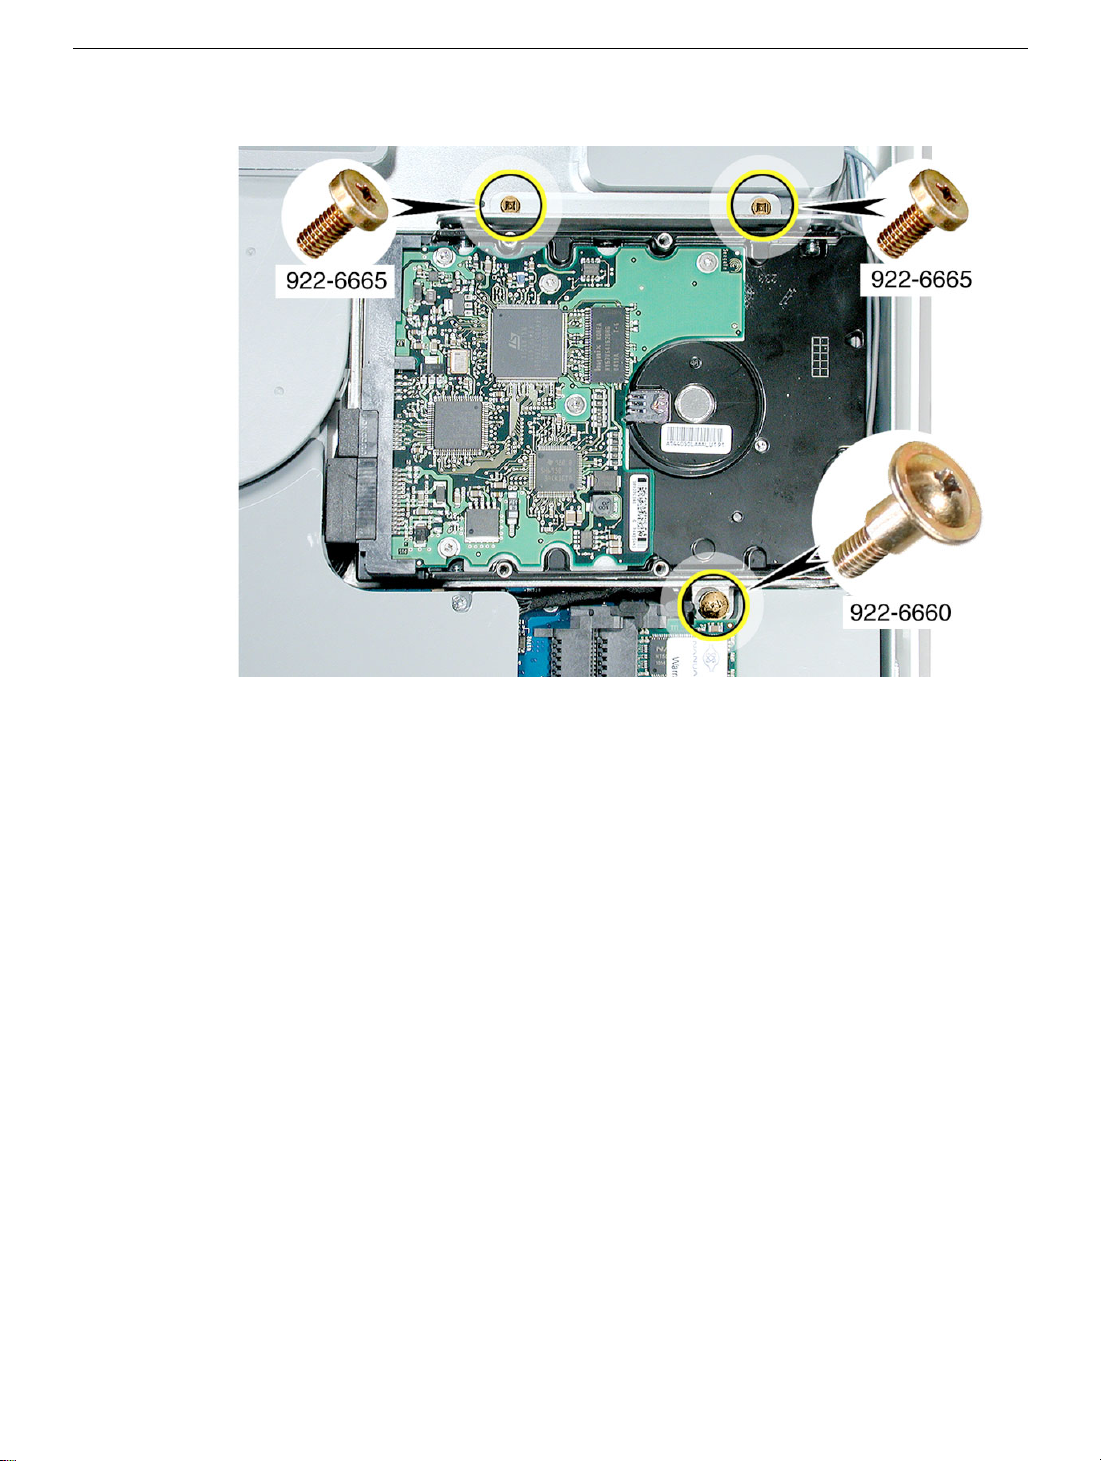
4. Replace the three hard drive screws.
16 -
iMac G5, 20-inch, Ambient Light Sensor Take
Hard Drive
Page 20
Optical Drive
Tools Required
• Phillips #2 screwdriver, preferably with a magnetized tip
• Screw tray or equivalent to hold the screws
Preliminary Steps
Before you begin, remove the back cover.
Part Location
Optical Drive
iMac G5, 20-inch, Ambient Light Sensor Take Apart -
17
Page 21
Removing the Optical Drive
1. Using a Phillips #2 screwdriver, remove the four optical drive screws circled below. Set
the screws aside.
2. Pull the optical drive tab straight up and then to the right. Set the optical drive aside.
18 -
iMac G5, 20-inch, Ambient Light Sensor Take
Optical Drive
Page 22
Replacing the Optical Drive
1.
Note:
A microfoam insert is included with the replacement optical drive and should be
installed using the instructions included below. The microfoam insert will prevent
optical media from ejecting out of the system and dropping to the desktop. Only one
microfoam insert should be used per system
2. Locate the enclosed piece of white microfoam and the two white posts (circled) on the
bezel.
3. With the shiny side of the microfoam facing the bezel, slide the holes of the microfoam
onto the two white posts on the bezel.
Optical Drive
iMac G5, 20-inch, Ambient Light Sensor Take Apart -
19
Page 23
4. Tuck the mircofoam into place before installing the optical drive.
5. Remove the replacement optical drive from its packaging.
6. Slide the optical drive into the display bezel and press down near the tab to reconnect
the drive.
20 -
iMac G5, 20-inch, Ambient Light Sensor Take
Optical Drive
Page 24
7. Replace the four optical drive screws. Replace the back cover. Return the optical drive
to Apple in the packaging provided.
8. Replace the back cover.
9. Make sure no microfoam is sticking out of the bezel.
computer, partially insert an optical disc to make sure it inserts smoothly.
Note:
Before reassembling the
Optical Drive
iMac G5, 20-inch, Ambient Light Sensor Take Apart -
21
Page 25

22 -
iMac G5, 20-inch, Ambient Light Sensor Take
Optical Drive
Page 26
Microfoam Shim
Tools Required
• Use the screwdriver provided, or a Phillips #2 screwdriver, preferably with a
magnetized tip
• Screw tray or equivalent to hold the screws
Preliminary Steps
Before you begin, remove the back cover and the optical drive.
Part Location
Microfoam Shim
iMac G5, 20-inch, Ambient Light Sensor Take Apart -
23
Page 27
Installing the Microfoam onto the Bezel
1. Locate the piece of microfoam and the two white posts (circled) on the bezel.
2. With the shiny side of the microfoam facing the bezel, slide the holes of the microfoam
onto the two white posts on the bezel.
24 -
iMac G5, 20-inch, Ambient Light Sensor Take
Microfoam Shim
Page 28
3. Tuck the mircofoam into place before installing the optical drive.
4. Replace the optical drive in the direction of the arrow, lining up the white posts on the
bezel with the holes on the optical drive bezel.
Microfoam Shim
iMac G5, 20-inch, Ambient Light Sensor Take Apart -
25
Page 29
5. Slide the optical drive into place and press down near the tab to reconnect the drive.
6. Make sure no microfoam is sticking out of the bezel.
computer, partially insert an optical disc to make sure it inserts smoothly.
Note:
Before reassembling the
7. Replace the optical drive screws.
8. Replace the back cover.
26 -
iMac G5, 20-inch, Ambient Light Sensor Take
Microfoam Shim
Page 30
Inverter
Tools Required
• Phillips #2, preferably with a magnetized tip
• Needlenose pliers
• Screw tray or equivalent to hold the screw
Preliminary Steps
Before you begin, remove the back cover.
Part Location
Inverter
iMac G5, 20-inch, Ambient Light Sensor Take Apart -
27
Page 31

Removing the Inverter
1. Locate the hard drive near the top right corner.
2. Disconnect the thermal sensor cable from the sensor board on the side of the hard
drive.
Note:
Do not disconnect the other end of the cable. Leave the hard drive in
place.
28 -
iMac G5, 20-inch, Ambient Light Sensor Take
Inverter
Page 32

3. Locate the memory module(s) in the bottom right corner. You must remove the
memory to gain access to the inverter.
4. Rotate the computer counterclockwise so the memory is in the position shown below.
5. To release the memory from its slot, push down on the two side latches (circled
below). Then pull the memory module out of the slot. Repeat this step if you have a
second memory module.
Inverter
iMac G5, 20-inch, Ambient Light Sensor Take Apart -
29
Page 33

6. Locate the gray plastic module on the right side of the computer. This is the inverter.
7. Remove the three inverter screws (circled below).
30 -
iMac G5, 20-inch, Ambient Light Sensor Take
Inverter
Page 34

8. Slide the inverter out at an angle. Locate the colored cables connected on the right
side of the inverter.
9. Rotate the computer clockwise so you see the inverter cables as shown below. Tilt the
inverter to access the two white cable connectors with the pink and blue cables.
10. Disconnect the cables by pulling on the connector, not on the cables. Disconnect the
larger connector first.
Inverter
iMac G5, 20-inch, Ambient Light Sensor Take Apart -
31
Page 35

11. Lift the inverter out of the computer. Disconnect the black connector (circled below)
located
connector.
12. This picture shows a close up of the connector (from the previous step) which is
located under the fan duct.
under
the gray fan duct. Gently pull the black cable to disconnect the
32 -
iMac G5, 20-inch, Ambient Light Sensor Take
Inverter
Page 36

13. Locate the small, gray inverter cable cover in the top right corner.
14. To unhook the cover, pull it in the direction of the arrow shown below.
Inverter
iMac G5, 20-inch, Ambient Light Sensor Take Apart -
33
Page 37

15. Disconnect the two white connectors underneath the cover. Pull on the connectors,
not on the cables. Free the cables from the clips inside the cover. Set the inverter and
cable cover aside.
16. Turn over the inverter. Using a flatblade screwdriver, remove the gray plastic inverter
cover from the inverter. Pry the tabs (circled below) away from the board. Remove the
board from the plastic cover.
34 - iMac G5, 20-inch, Ambient Light Sensor Take
Inverter
Page 38

17. Set the plastic cover aside. Note: This cover will be placed on the replacement
inverter board.
18. Return just the inverter board to Apple in the packaging provided.
Inverter
iMac G5, 20-inch, Ambient Light Sensor Take Apart - 35
Page 39

Replacing the Inverter
1. Remove the replacement inverter from its packaging.
2. Locate the gray plastic cover you set aside.
36 - iMac G5, 20-inch, Ambient Light Sensor Take
Inverter
Page 40

3. Install the plastic cover on the replacement inverter board. Gently squeeze the board
near each tab (circled) until all six tabs snap onto the board.
4. Locate the inverter cable cover. Connect the inverter cables as shown, making sure
the connectors lie flat inside the cable cover.
Inverter
iMac G5, 20-inch, Ambient Light Sensor Take Apart - 37
Page 41

5. Lower the cable cover, pressing down steadily until the tabs lock the cover into place.
6. Press in the latches on the memory slots in and route the black inverter cable along
the side of the hard drive and memory slots. Using a needlenose pliers, connect the
black inverter connector (circled) to the connector under the gray fan duct. Note: The
connector is keyed; it can plug in only one way. The teeth on the connector face up.
Tuck the remaining black cables under the memory slots (shown by the arrows).
38 - iMac G5, 20-inch, Ambient Light Sensor Take
Inverter
Page 42

7. Connect the inverter cables, connecting the smaller connector first. Note: The
connectors are keyed, and plug in only one way.
8. Connect the black thermal sensor cable to the sensor board on the side of the hard
drive.
Inverter
iMac G5, 20-inch, Ambient Light Sensor Take Apart - 39
Page 43

9. Slide the inverter partially into place. Note: The shorter cable tucks under the
memory slots.
10. Replace the three inverter screws.
40 - iMac G5, 20-inch, Ambient Light Sensor Take
Inverter
Page 44

11. Tuck the inverter cables along the edge of the hard drive and next to the memory tabs.
12. Replace the memory module(s).
13. Replace the back cover.
Inverter
iMac G5, 20-inch, Ambient Light Sensor Take Apart - 41
Page 45

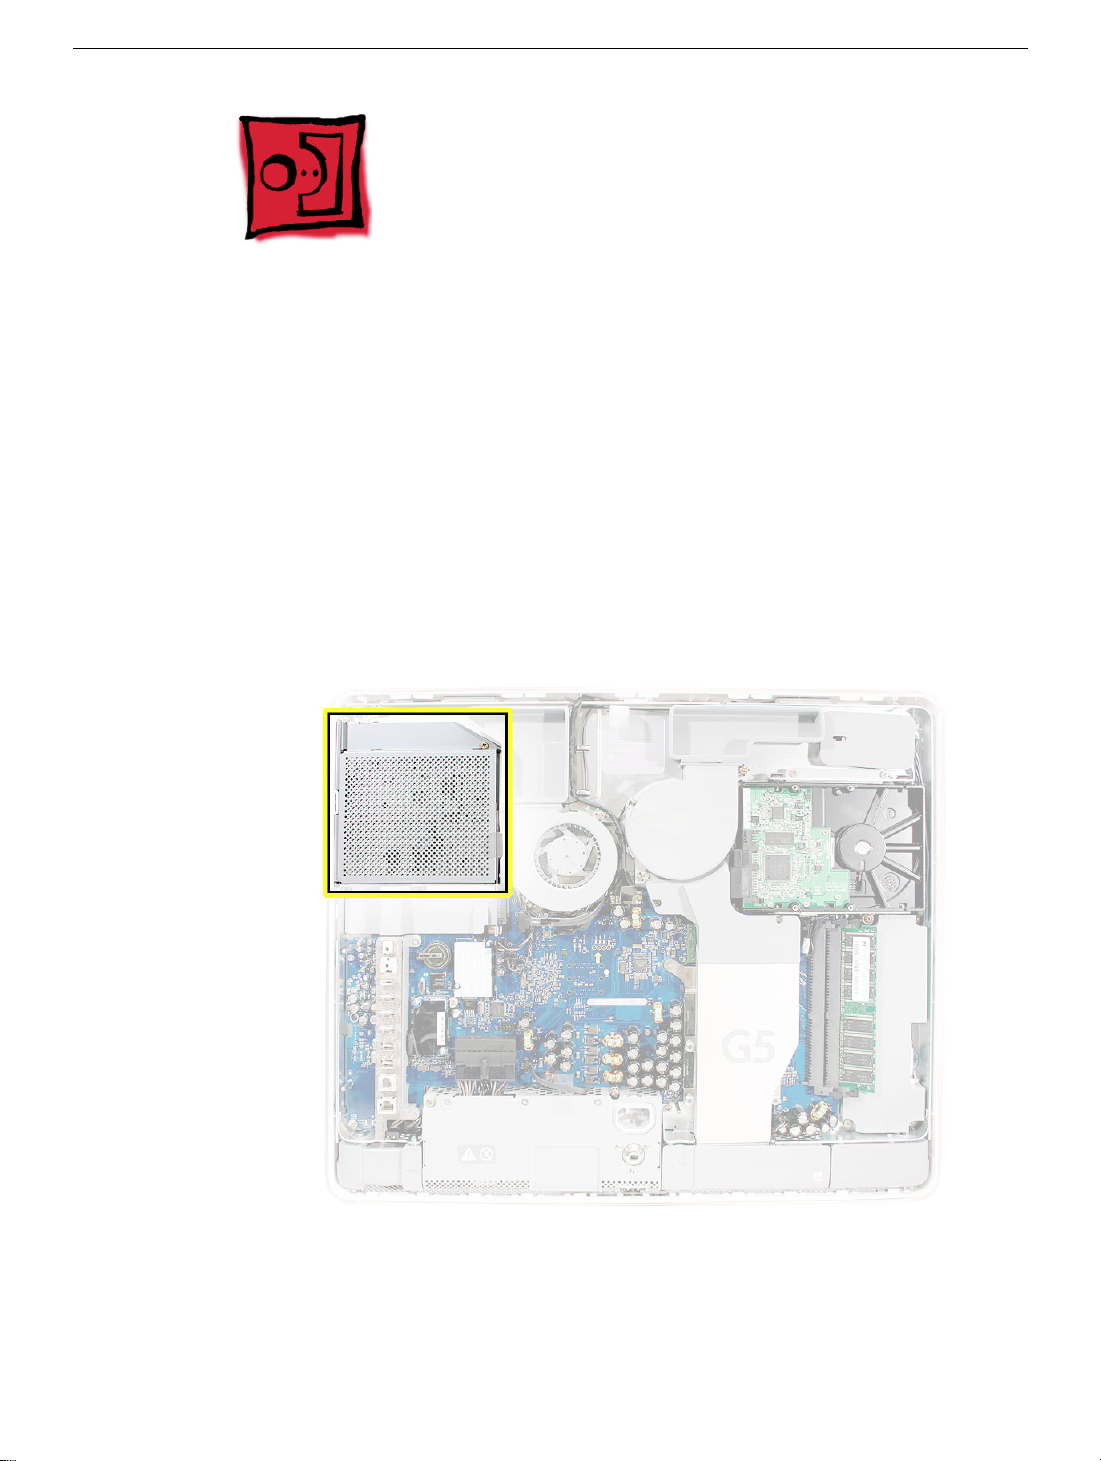
Fans, Upper
Tools Required
• Phillips #2 screwdriver
• Screw tray or equivalent to hold the screws
Preliminary Steps
Before you begin, remove the back cover.
Part Location
42 - iMac G5, 20-inch, Ambient Light Sensor Take
Fans, Upper
Page 46

Removing the Fans
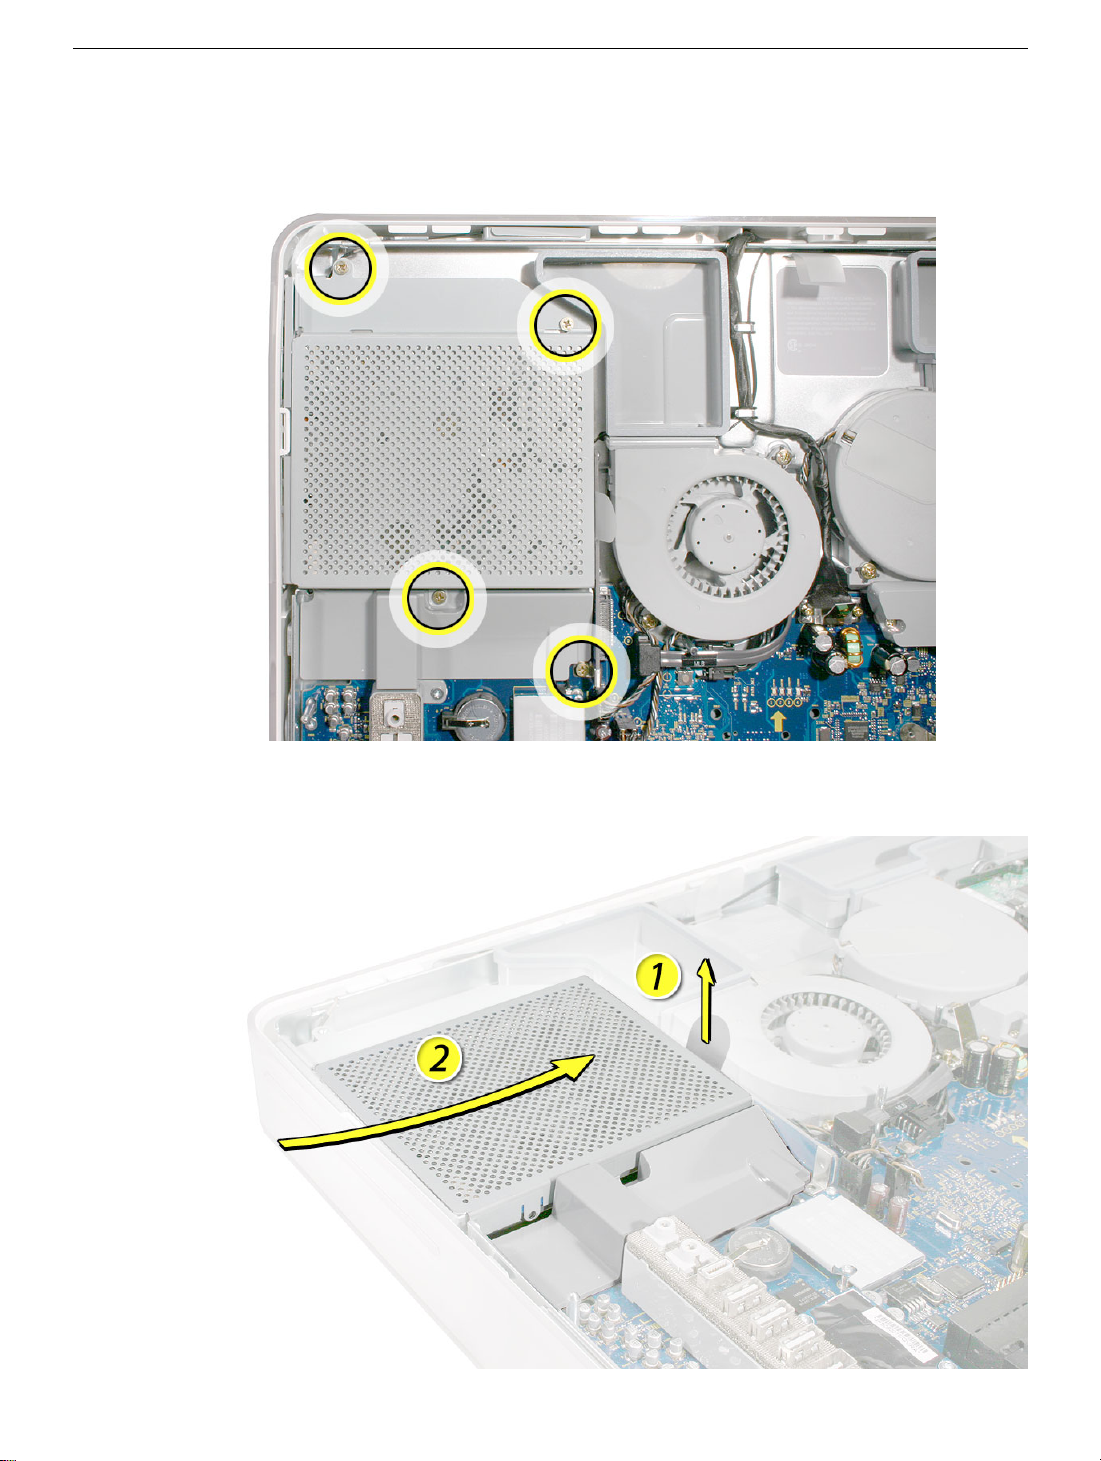
1. Locate the fan duct near the hard drive and fan. Remove the two screws. Lift the duct
off the board.
2. Remove the two screws connecting the video cable to the logic board and release the
video cable from the metal clips.
Fans, Upper
iMac G5, 20-inch, Ambient Light Sensor Take Apart - 43
Page 47

3. Loosen the two fan screws. Note: You don’t have to remove the screws from the
rubber grommets to remove the fan, just loosen the screws.
4. Disconnect the fan cable from the connector on the logic board. Pull on the black
connector, not on the wires.
5. Lift the fan out of the computer.
44 - iMac G5, 20-inch, Ambient Light Sensor Take
Fans, Upper
Page 48

6. If you are replacing the fan, remove the screws from the fan grommets. Using a
screwdriver, push the fan screws out of the grommets and set them aside. Use these
screws on the replacement fan.
7. Go on to the next step to remove the second fan.
8. Loosen the two screws. Note: You don’t have to remove the screws from the rubber
grommets to remove the fan, just loosen the screws.
Fans, Upper
iMac G5, 20-inch, Ambient Light Sensor Take Apart - 45
Page 49

9. Disconnect the fan cable from the connector on the logic board. Pull on the black
connector, not on the cable.
10. LIft the fan out of the computer.
11. Remove the screws from the fan grommets. Using a screwdriver, push the fan screws
out of the grommets and set them aside. Use these screws on the replacement fan
46 - iMac G5, 20-inch, Ambient Light Sensor Take
Fans, Upper
Page 50

Replacing the Fans
1. Connect the fan cable to the logic board. Route the cable under the black hard drive
cable.
2. Place the screws into the rubber grommets and tighten the screws.
Fans, Upper
iMac G5, 20-inch, Ambient Light Sensor Take Apart - 47
Page 51

3. Route the fan cable around the side of the fan you just replaced. Connect the fan
cable to the logic board.
4. Place the two screws into the grommets on the fan. Lower the fan into the computer,
making sure the bottom end of the fan tucks under the logic board. Tighten the two
fans screws.
48 - iMac G5, 20-inch, Ambient Light Sensor Take
Fans, Upper
Page 52

5. Replace the two screws connecting the video cable to the logic board and place the
video cable under the metal clips.
6. Replace the fan duct and replace the two screws.
Fans, Upper
7. Replace the back cover.
iMac G5, 20-inch, Ambient Light Sensor Take Apart - 49
Page 53

Memory (DIMMs)
Tools Required
Use a Phillips #2 screwdriver
Preliminary Steps
Before you begin, remove the back cover.
Part Location
50 - iMac G5, 20-inch, Ambient Light Sensor Take
Memory (DIMMs)
Page 54

Removing the Memory
1. Locate the memory module(s) in the bottom right corner of the computer.
2. Rotate the computer counterclockwise so the memory is in the position shown below.
3. To release the memory from its slot, push down on the two side latches. Then pull the
memory module out of the slot. Repeat this step if you have a second memory
module. Important: Return the memory to Apple in the packaging provided.
Memory (DIMMs)
iMac G5, 20-inch, Ambient Light Sensor Take Apart - 51
Page 55

Replacing the Memory
1. Remove the replacement memory module from its packaging.
2. Replace the memory module(s) by lining up the notch on the module with the notch on
the slot. Press firmly on the memory module until it clicks into place. Use your thumb
and index finger to push the module into the slot.
3. Replace the back cover.
52 - iMac G5, 20-inch, Ambient Light Sensor Take
Memory (DIMMs)
Page 56

Power Supply
Tools Required
• Phillips #2 screwdriver, preferably with a magnetized tip
• Flat-blade screwdriver
• Screw tray or equivalent to hold the screws
Preliminary Steps
Before you begin, remove the back cover.
Part Location
Power Supply
iMac G5, 20-inch, Ambient Light Sensor Take Apart - 53
Page 57

Removing the Power Supply
1. Important: If you are replacing a defective power supply, review the “iMac G5 Repair
Extension Program for Power Supply Issues” topic at the begining of this manual
before proceeding to the next step.
2. Remove the screw on the far right and loosen the other two captive screws. Note: The
captive screws remain attached to the power supply, do not remove them.
3. Disconnect the ambient light sensor located next to the power supply connector.
4. Disconnect the power supply cable by pressing the connector release tab and using a
wide, flat-blade screwdriver to pry apart the connector.
54 - iMac G5, 20-inch, Ambient Light Sensor Take
Power Supply
Page 58

5. Pull on the connector, not on the cables.
6. Lift up the power supply at the sides approximately five mm or until it touches the
middle case screw.
Power Supply
iMac G5, 20-inch, Ambient Light Sensor Take Apart - 55
Page 59

7. Tilt up the power supply until it clears the edge of the main circuit board. Lift it out of
the computer and set it aside.
56 - iMac G5, 20-inch, Ambient Light Sensor Take
Power Supply
Page 60

Replacing the Power Supply
1. Remove the replacement power supply from its packaging.
Note: The replacement power supply has an ambient light sensor attached with two
plastic rivets.
2. As you lower the power supply into the front bezel, line up the ambient light sensor (on
the power supply) with the hole in the display bezel.
3. Tilt up the power supply until it clears the edge of the logic board. Lower it into place.
Power Supply
iMac G5, 20-inch, Ambient Light Sensor Take Apart - 57
Page 61

4. When the power supply is installed properly it should be flush with the gray plastic
parts on the right and left sides of the power supply. Note: The ambient light sensor
cable should fit into the cut-out on the logic board.
5. Make sure the ambient light sensor is seated into the hole on the display bezel. You
should be able to feel a bump (circled) when you run your finger across the bottom of
the display bezel. If it’s not in position, reseat the power supply before replacing the
back cover.
58 - iMac G5, 20-inch, Ambient Light Sensor Take
Power Supply
Page 62

6. Connect the ambient light sensor cable to the connector on the logic board.
7. Connect the black power supply connector
Power Supply
iMac G5, 20-inch, Ambient Light Sensor Take Apart - 59
Page 63

8. Tighten the two captive screws and replace the screw on the right.
9. Replace the back cover.
60 - iMac G5, 20-inch, Ambient Light Sensor Take
Power Supply
Page 64

AirPort/Bluetooth Card
Tools Required
• Torx T6 screwdriver
Preliminary Steps
Before you begin, remove the back cover.
Part Location
AirPort/Bluetooth Card
iMac G5, 20-inch, Ambient Light Sensor Take Apart - 61
Page 65

Removing the AirPort/Bluetooth Card
1. Remove the air deflector (gray plastic) by pulling it off the logic board. It’s attached by
double-stick tape.
2. Remove the two T6 screws on the AirPort/Bluetooth card. Lift the card off the board.
3. Turn over the AirPort/Bluetooth card. Disconnect the two antennas.
62 - iMac G5, 20-inch, Ambient Light Sensor Take
AirPort/Bluetooth Card
Page 66

Replacing the AirPort/Bluetooth Card
1. Remove the replacement AirPort/Bluetooth card from its packaging.
2. Replace the two T6 screws.
3. Replace the air deflector.
4. Replace the back cover.
AirPort/Bluetooth Card
iMac G5, 20-inch, Ambient Light Sensor Take Apart - 63
Page 67

Battery
Tools Required
• Flat-blade screwdriver or the nylon probe tool
Preliminary Steps
Before you begin, remove the back cover.
Part Location
64 - iMac G5, 20-inch, Ambient Light Sensor Take
Battery
Page 68

Removing the Battery
1. WIth a flat-blade screwdriver, plastic tool, thumb, or finger, push the battery in the
direction of the arrow to free the battery from the metal clip.
Battery
iMac G5, 20-inch, Ambient Light Sensor Take Apart - 65
Page 69

Replacing the Battery
1. Holding the battery positive side up, push the battery (in the direction of the arrow)
under the metal clip. The battery should slip into place under the clip.
2. Replace the back cover.
66 - iMac G5, 20-inch, Ambient Light Sensor Take
Battery
Page 70

Midplane Assembly
Tools Required
• Phillips #1 and #2 screwdriver
• Flat-blade screwdriver
• Screw tray or equivalent to hold the screws
Preliminary Steps
Before you begin, remove the following:
• Back cover
• Optical drive
• Inverter
Part Location
Note: The midplane is no longer offered as a service module. Order the components
on the midplane individually.
Midplane Assembly
iMac G5, 20-inch, Ambient Light Sensor Take Apart - 67
Page 71

Removing the Midplane Assembly
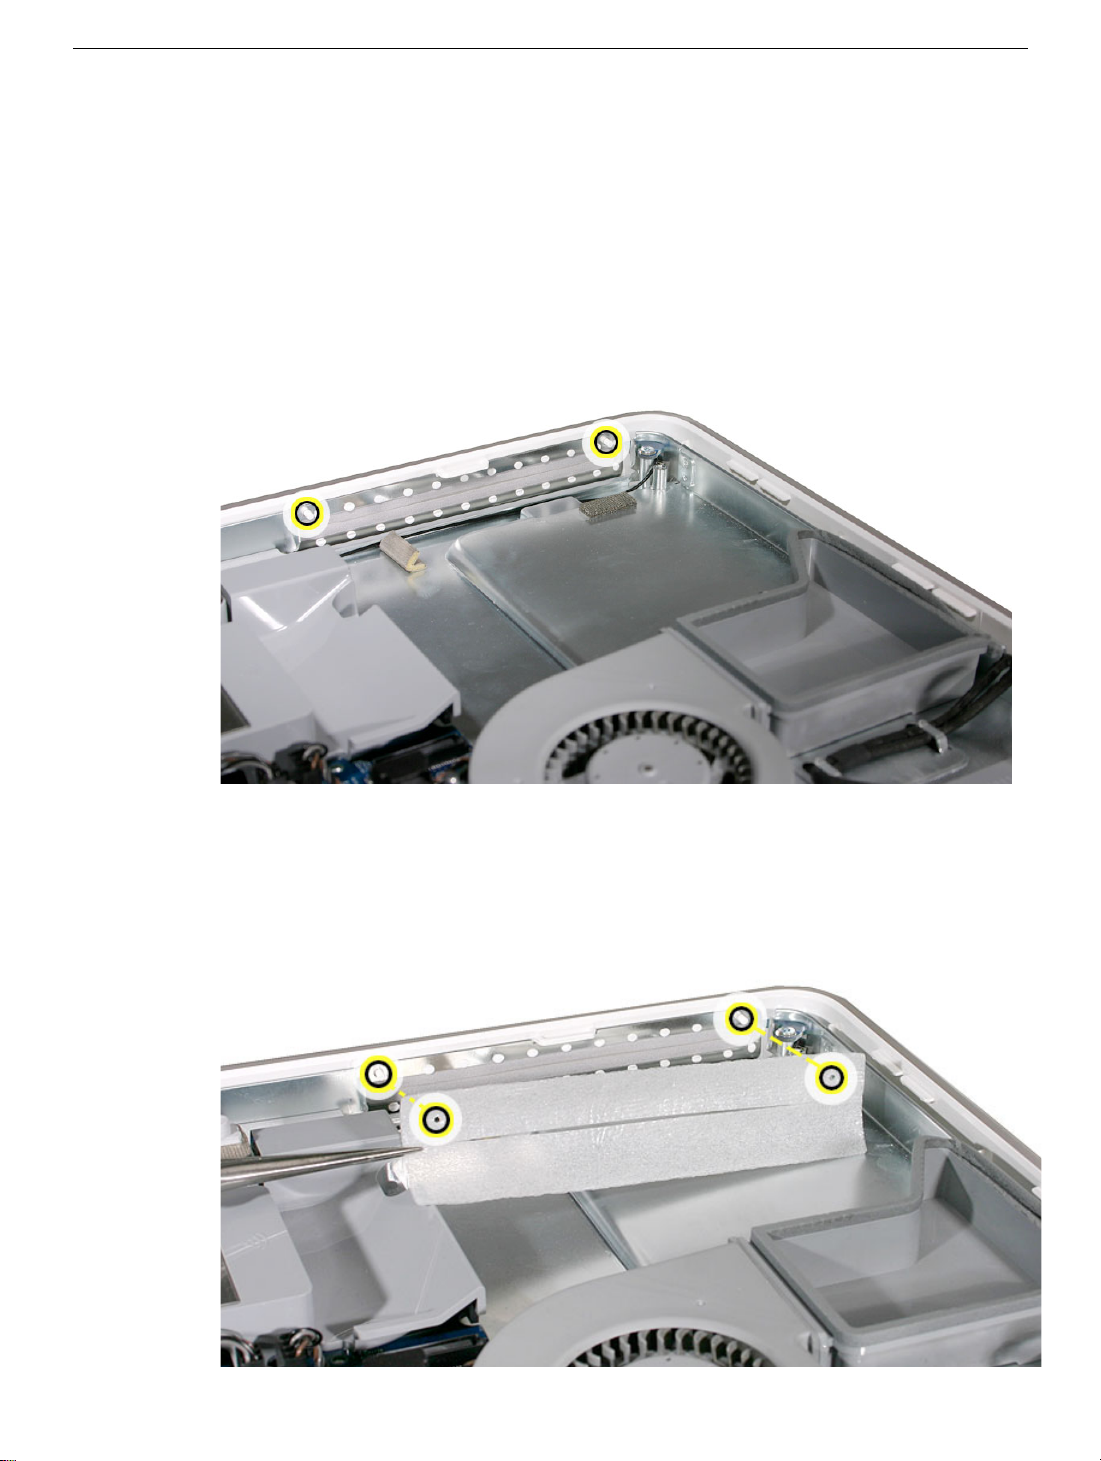
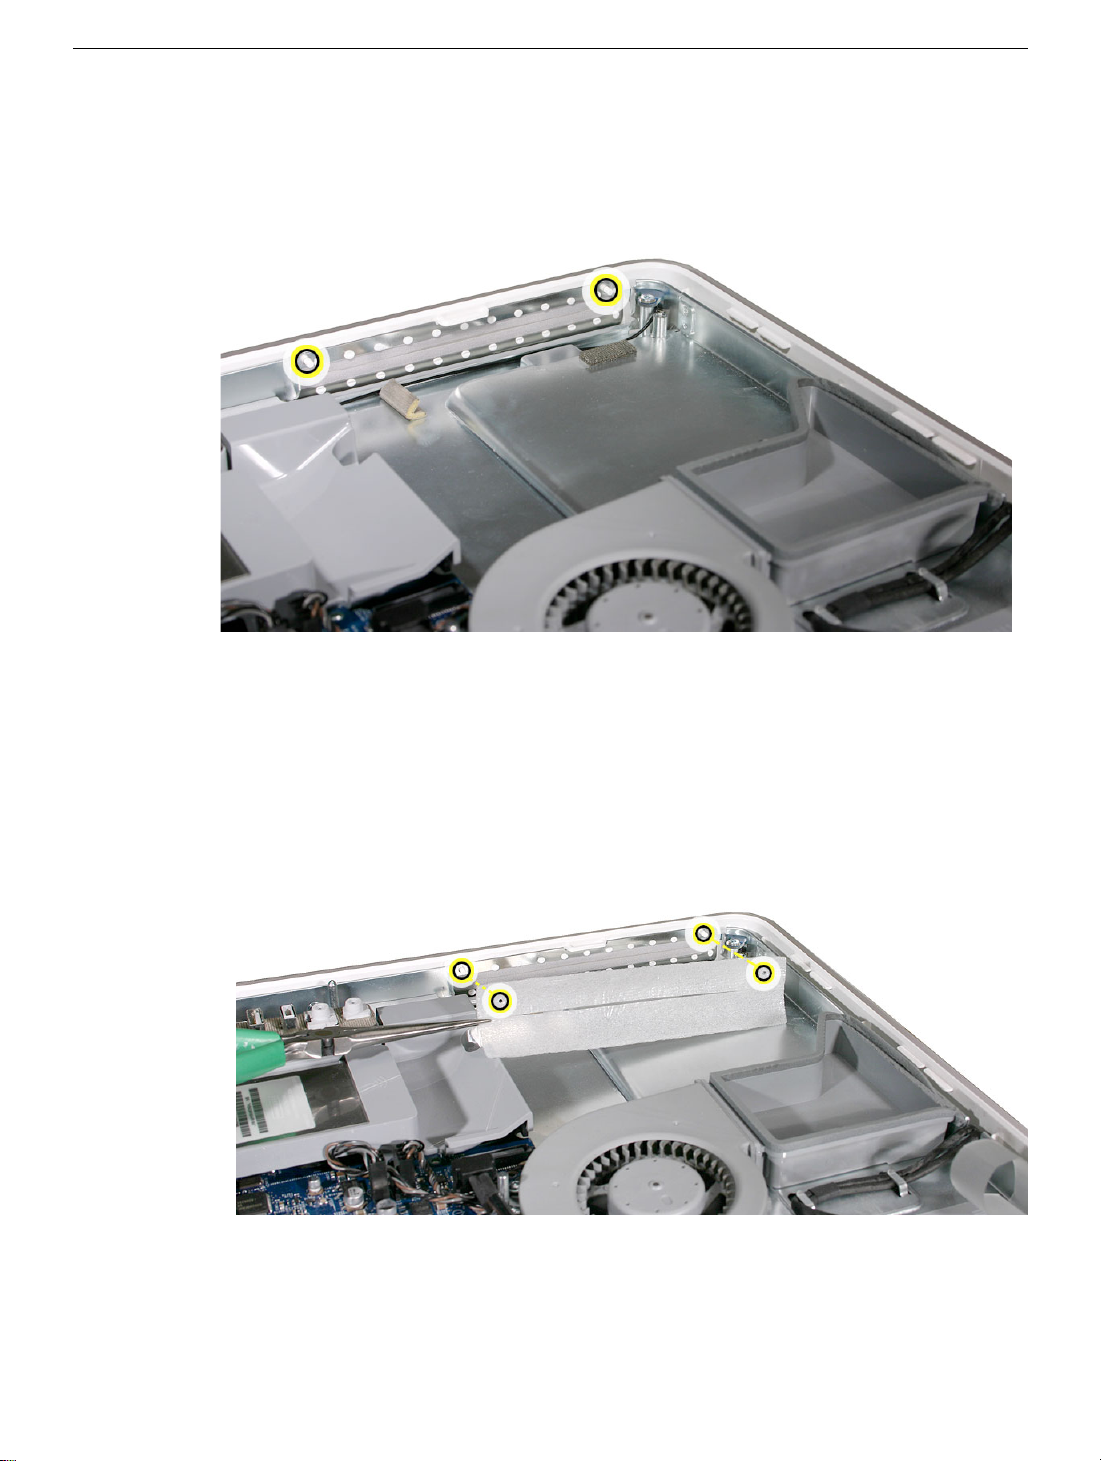
1. Remove the video screws and release the cables from the metal clips. Pull up on the
black video tab.
2. Flip the cable back, so it is out of the way for the next step.
68 - iMac G5, 20-inch, Ambient Light Sensor Take
Midplane Assembly
Page 72

3. Loosen the captive power supply screw. Note: You do not need to remove the power
supply.
4. Remove the six screws attaching the midplane to the display/bezel.
Midplane Assembly
iMac G5, 20-inch, Ambient Light Sensor Take Apart - 69
Page 73

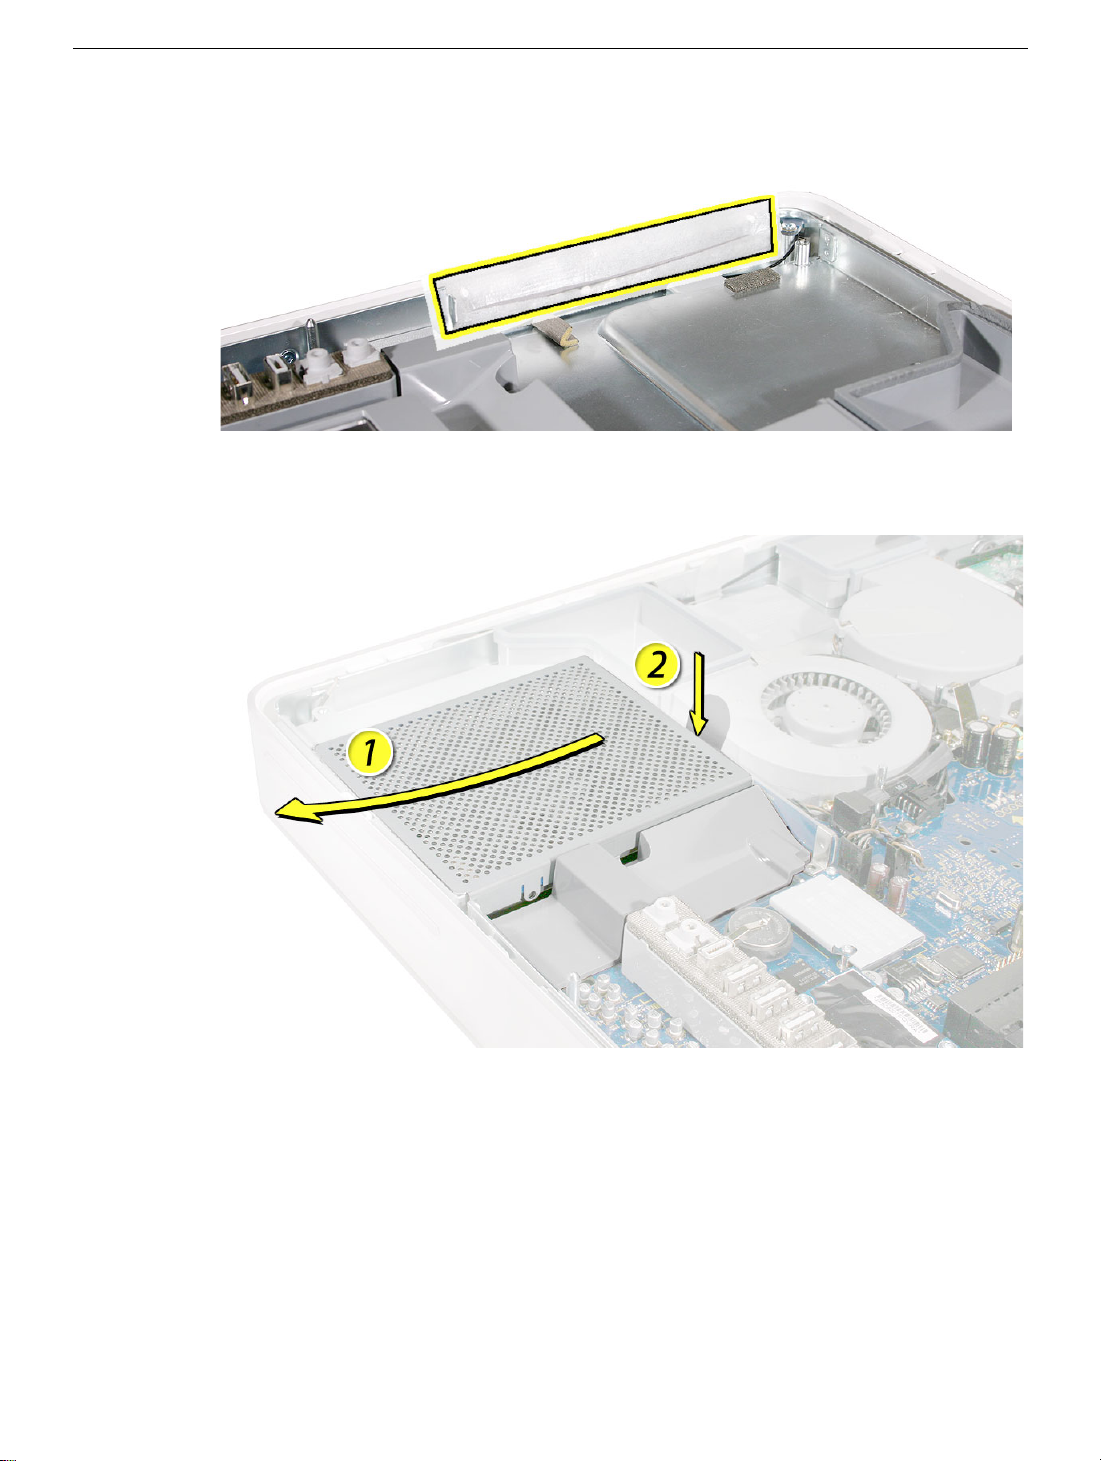
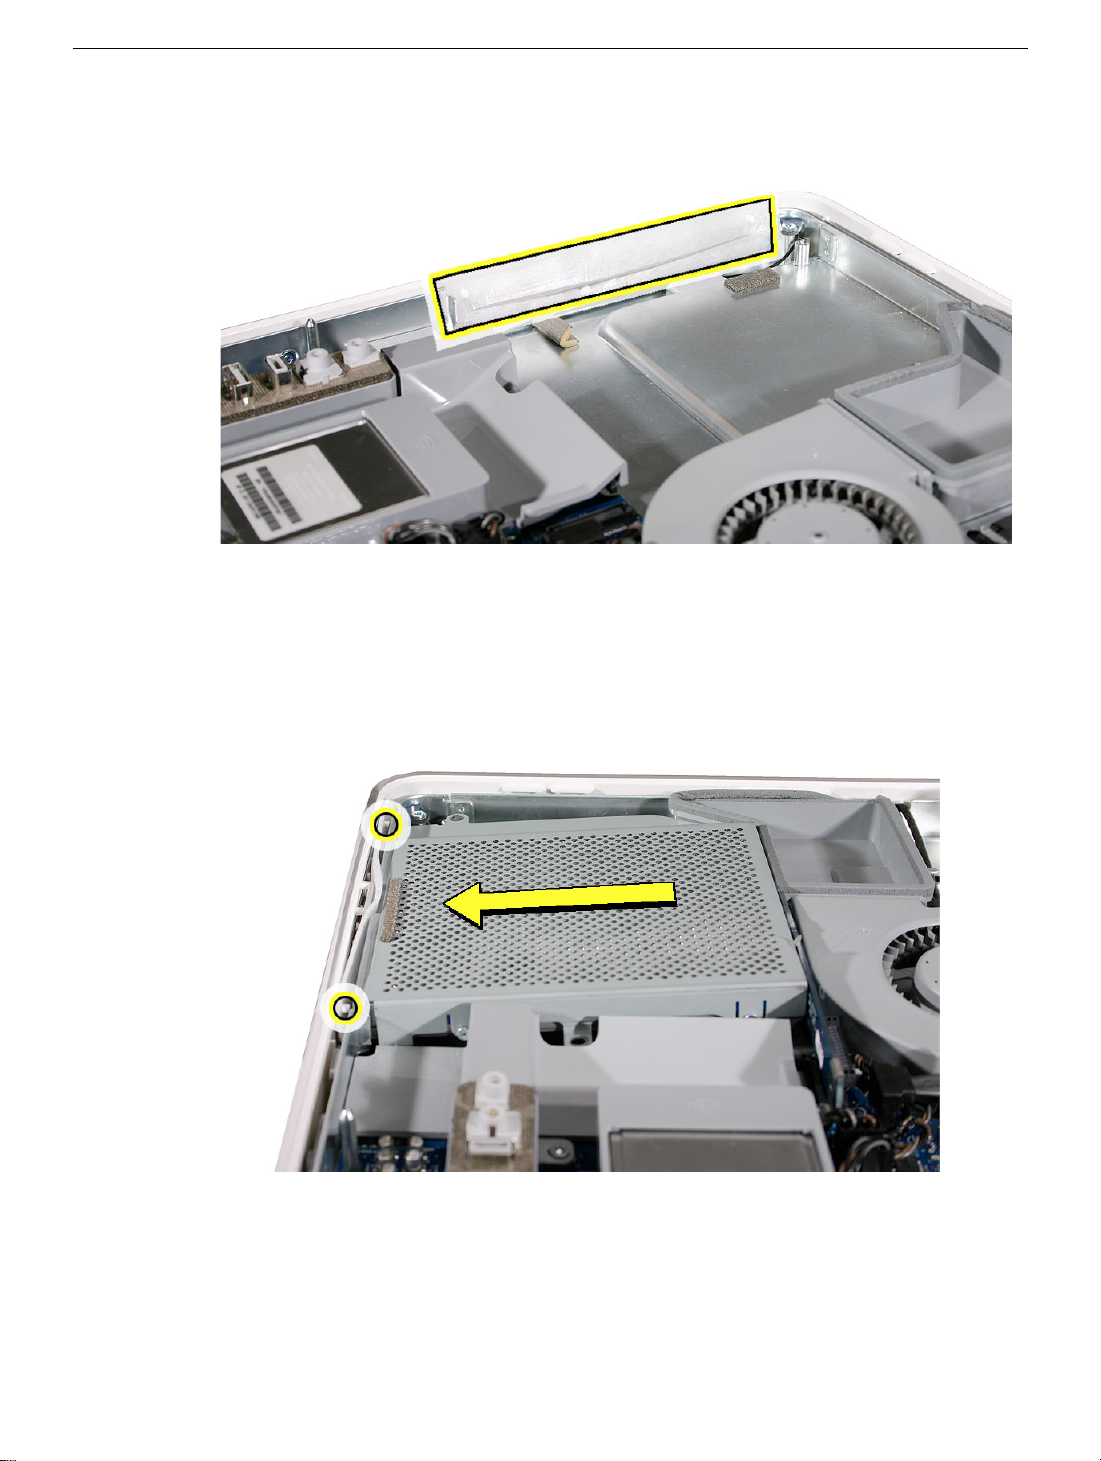
5. Locate the pull tab at the top of the computer above the fans. Pull the tab up to release
the midplane assembly. Grab the midplane by the sides and lift in the direction of the
arrow.
6. Push the inverter cables down through the openings on the midplane assembly.
70 - iMac G5, 20-inch, Ambient Light Sensor Take
Midplane Assembly
Page 74

Replacing the Midplane
1. Position the display/bezel assembly with the display face down on a clean soft cloth.
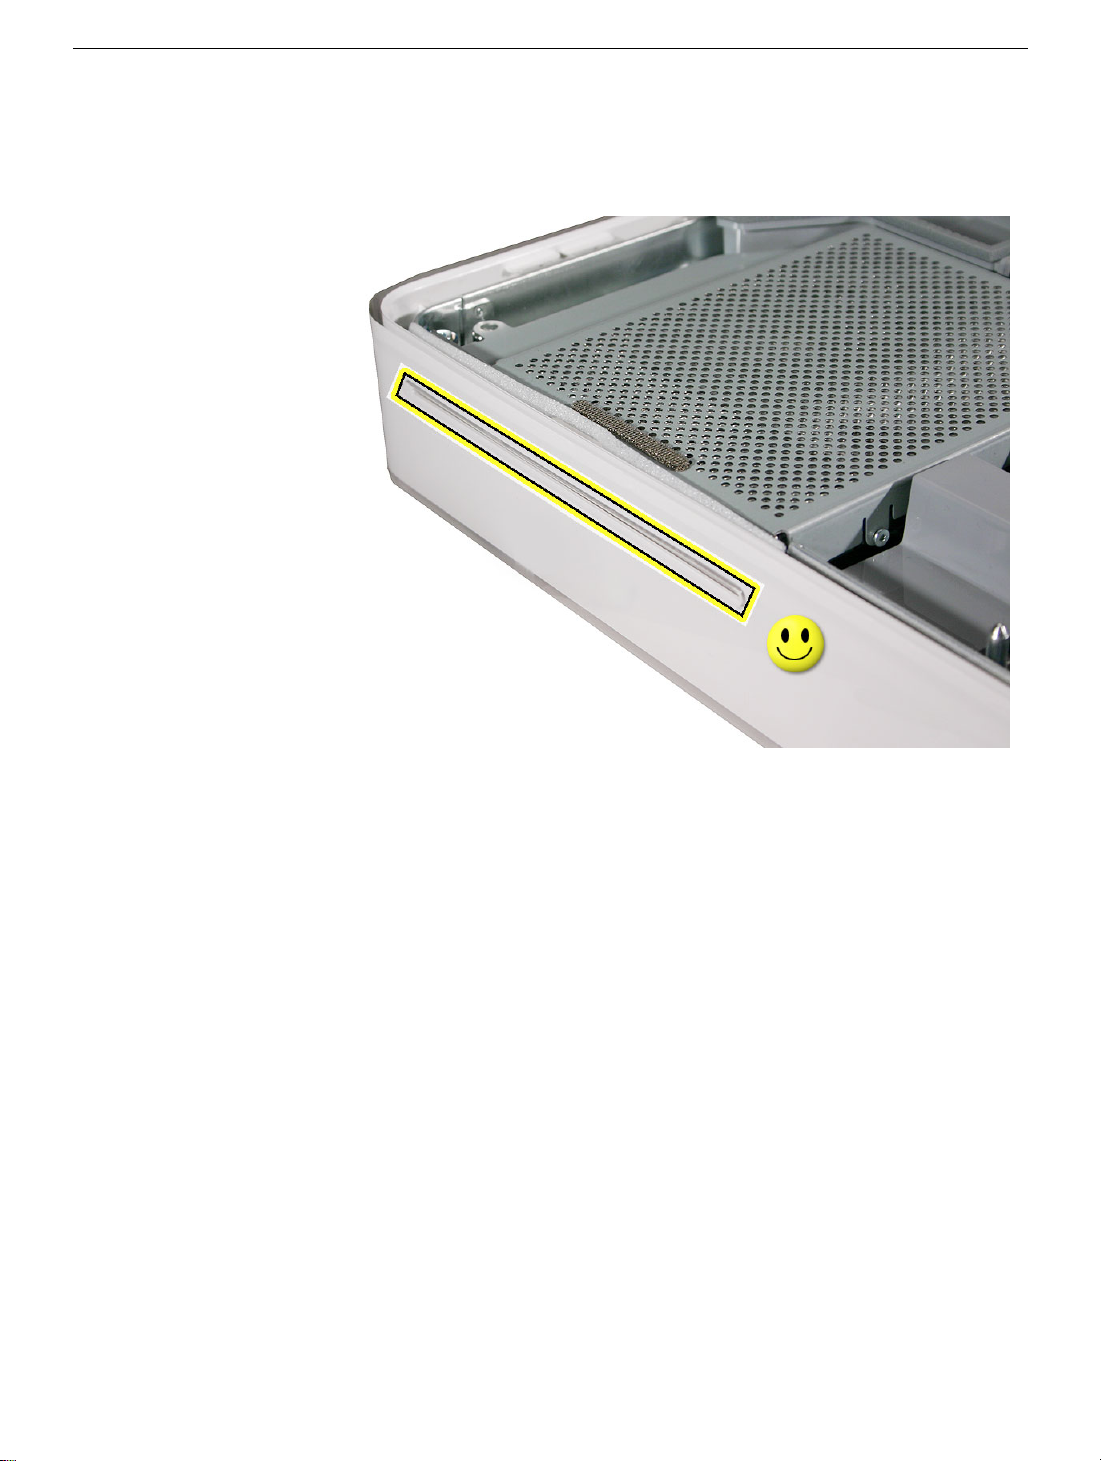
2. Make sure that the black video cable is tucked into the groove on the bezel as shown.
Use the screw hole (smaller circle) as a guide for the cable placement.
Midplane Assembly
iMac G5, 20-inch, Ambient Light Sensor Take Apart - 71
Page 75

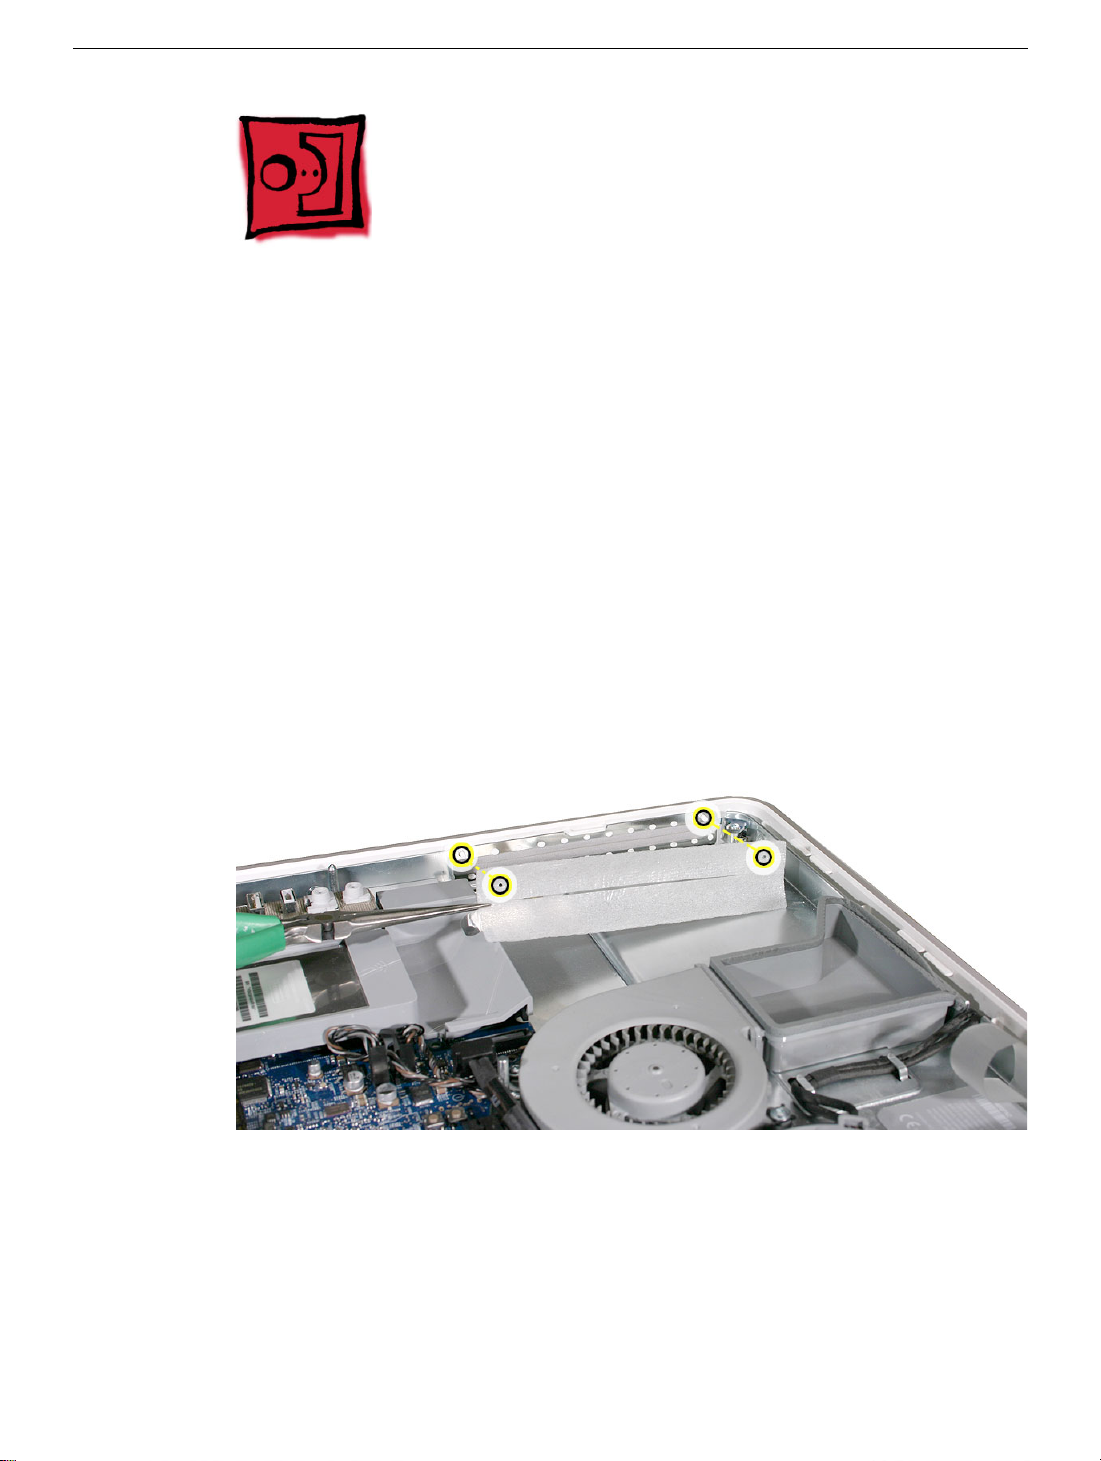
3. Position the midplane over the replacement display/bezel assembly housing.
4. Lower the midplane into the display/bezel assembly housing.
5. As you lower the midplane, pull the inverter cables through the openings on the right
side of the midplane.
72 - iMac G5, 20-inch, Ambient Light Sensor Take
Midplane Assembly
Page 76

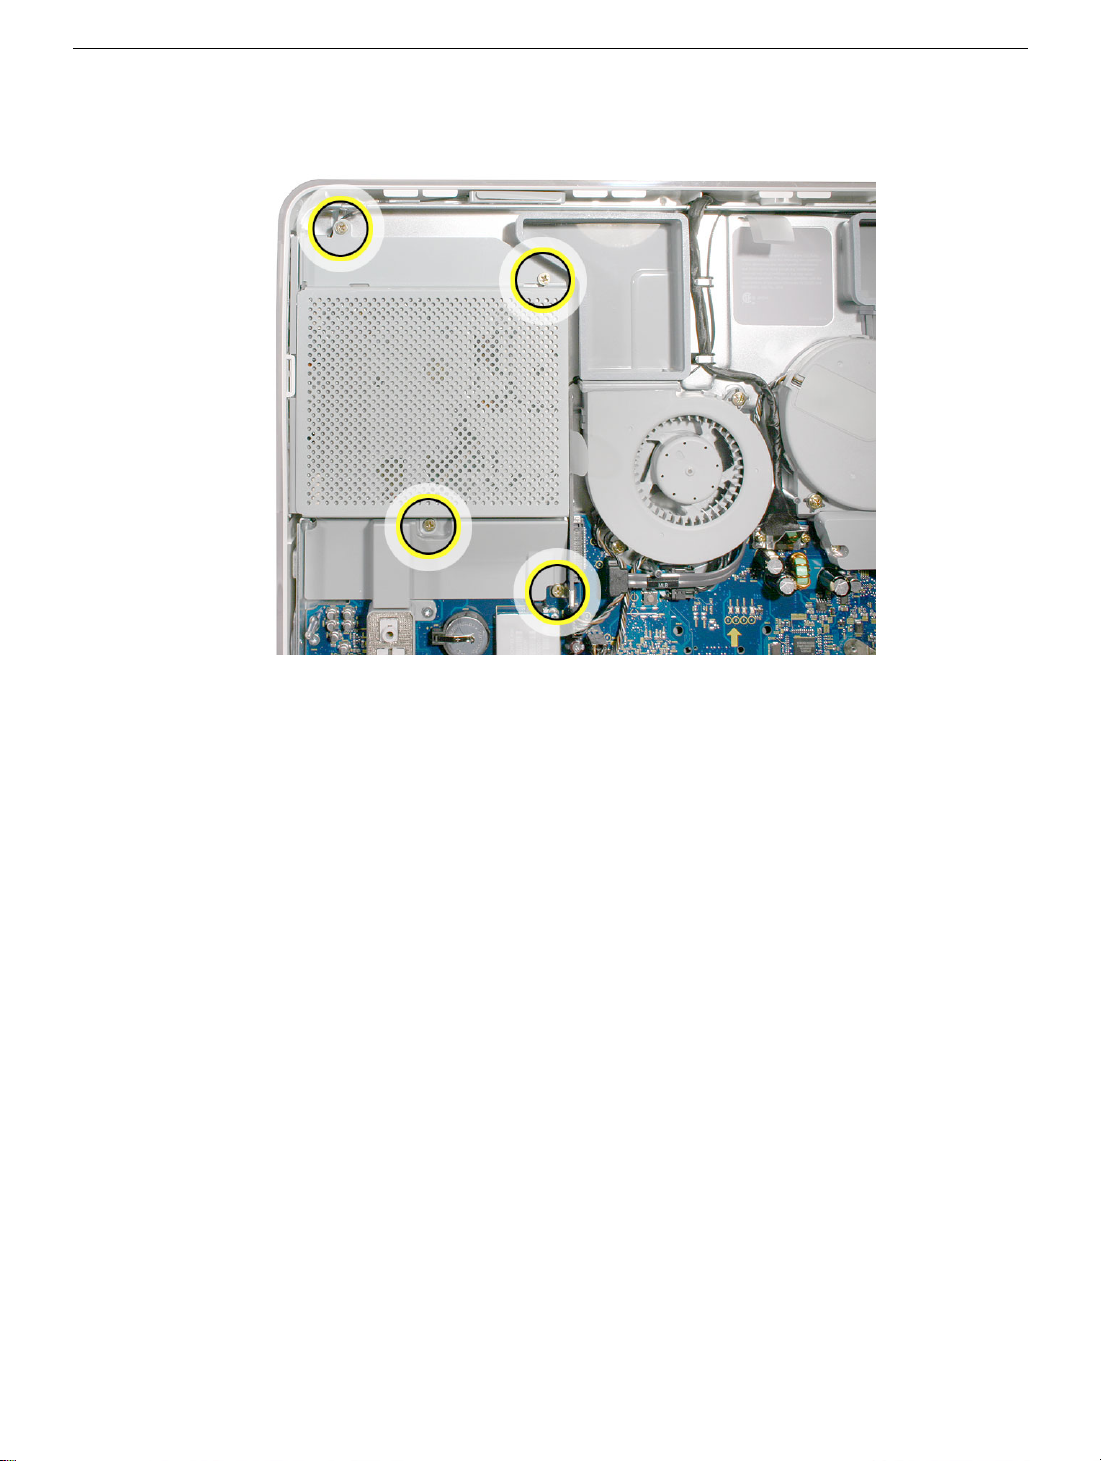
6. Replace the six midplane screws,
7. Tighten the captive power supply screw.
Midplane Assembly
iMac G5, 20-inch, Ambient Light Sensor Take Apart - 73
Page 77

8. Connect the video cable and replace the two screws.
9. Replace the inverter.
10. Replace the optical drive.
11. Replace the back cover.
74 - iMac G5, 20-inch, Ambient Light Sensor Take
Midplane Assembly
Page 78

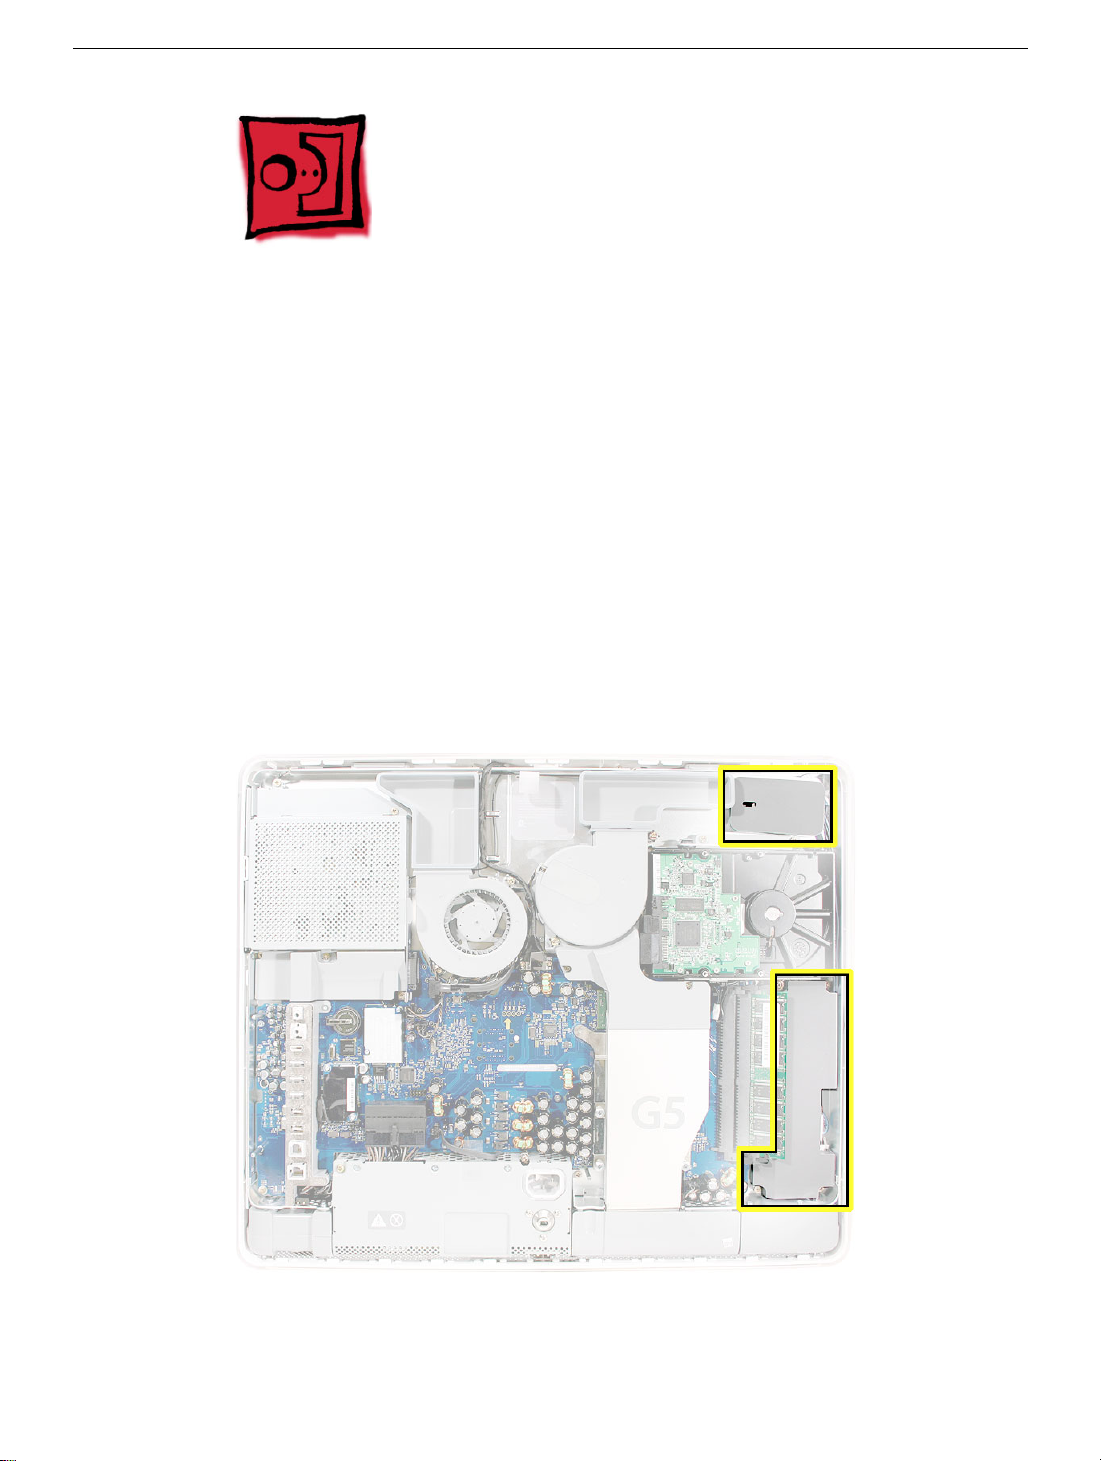
Logic Board
Tools Required
• Phillips #2 screwdriver
• Torx T10 screwdriver
• Torx T6 screwdriver
• Flat-blade screwdriver
• Screw tray or equivalent to hold the screws
Preliminary Steps
Before you begin, do the following:
• Remove the back cover
• Remove the optical drive
• Remove the memory
Part Location
Logic Board
iMac G5, 20-inch, Ambient Light Sensor Take Apart - 75
Page 79

Removing the Logic Board
1. Remove the air deflector located above the I/O ports. There are no screws, it’s held in
place with double-stick tape.
2. Remove the two T6 screws on the AirPort/Bluetooth card.
3. Disconnect the antennas from the AirPort/Bluetooth card.
76 - iMac G5, 20-inch, Ambient Light Sensor Take
Logic Board
Page 80

4. Disconnect the two hard drive cables and the two fan cables. Remove the two fan
screws and the two video cable screws.
Logic Board
iMac G5, 20-inch, Ambient Light Sensor Take Apart - 77
Page 81

5. Remove the two fan duct screws. Set the fan duct off to the side.
6. To the right of the fan duct, disconnect the hard drive sensor cable and the inverter
cable from the logic board.
78 - iMac G5, 20-inch, Ambient Light Sensor Take
Logic Board
Page 82

7. Disconnect the lower fan cable from the logic board.
8. Loosen the middle power supply captive screw.
Logic Board
iMac G5, 20-inch, Ambient Light Sensor Take Apart - 79
Page 83

9. Disconnect the power supply cable and the ambient light sensor.
10. Disconnect the speaker and microphone cables in the bottom left corner of the logic
board. Remove the two screws on the modem (T6) and disconnect the modem cable.
80 - iMac G5, 20-inch, Ambient Light Sensor Take
Logic Board
Page 84

11. Remove the hard drive screw near the memory slot so you can lift the hard drive up a
bit when the logic board is removed.
12. Using a T10 screwdriver, remove six silver logic board screws and with a Phillips #2
screwdriver, remove one brass screw in the bottom left corner of the midplane.
Logic Board
iMac G5, 20-inch, Ambient Light Sensor Take Apart - 81
Page 85

13. Lift the board toward you, and at the same time tilt the hard drive up a bit so the logic
board clears the thermal sensor on the side of the hard drive.
14. Carefully lift the logic board off the midplane chassis. Return the logic board to Apple
in the packaging provided.
15. Look on the back of the logic board for the light pipe and light pipe gasket. If they’re
stuck to the logic board, remove them. Install a new gasket and light pipe only if you
replace the logic board.
82 - iMac G5, 20-inch, Ambient Light Sensor Take
Logic Board
Page 86

Replacing the Logic Board
1. Remove the replacement logic board from its packaging.
2. Locate the cleaning wipe and syringe in the replacement logic board box.
3. Clean the heatpad (circled) using the enclosed alcohol wipe.
Logic Board
iMac G5, 20-inch, Ambient Light Sensor Take Apart - 83
Page 87

4. Whenever you remove the logic board clean the U3 chip (circled) and reapply thermal
grease.
5. Add 1 1/2 to 2 syringes of thermal grease to the U3 chip to ensure sufficient cooling.
Spread the paste evenly across the surface of the chip.
84 - iMac G5, 20-inch, Ambient Light Sensor Take
Logic Board
Page 88

6. Install a new gasket and light pipe if you replace the logic board.
7. Before placing the logic board into the midplane chassis, tape the cables out of the
way so they don’t get stuck under the logic board.
Logic Board
iMac G5, 20-inch, Ambient Light Sensor Take Apart - 85
Page 89

8. Lower the logic board into the chassis. Caution: Do not twist, bend or flex the board
as you lower it into the chassis. Flexing the board may jeopardize the thermal interface
between the heartsink and the processor. Make sure the light pipe seats properly into
the bottom left corner and that the cables are not caught under the board..
86 - iMac G5, 20-inch, Ambient Light Sensor Take
Logic Board
Page 90

9. Using a T-10 screwdriver, replace the logic board screws. Install the screws in the
numbered sequence shown below, starting with the screws nearest the heatsink.
Note: The logic board shown is the iMac G5 20-inch. The iMac G5 20-inch, Ambient
Light Sensor board is very similar. One or two screw locations may be slightly different
from the picture shown below.
10. Connect the speaker and microphone cables in the bottom left corner of the midplane.
Connect the modem cable to the modem and replace the modem screws.
Logic Board
iMac G5, 20-inch, Ambient Light Sensor Take Apart - 87
Page 91

11. Tighten the captive power supply screw.
12. Connect the power supply cable and the ambient light sensor.
88 - iMac G5, 20-inch, Ambient Light Sensor Take
Logic Board
Page 92

13. Connect the lower fan cable.
14. Replace the hard drive screw.
Logic Board
iMac G5, 20-inch, Ambient Light Sensor Take Apart - 89
Page 93

15. Connect the hard drive sensor cable and the inverter cable to the logic board.
16. Replace the two fan duct screws.
90 - iMac G5, 20-inch, Ambient Light Sensor Take
Logic Board
Page 94

17. Connect the hard drive cables and the fan cables. Replace the fan screws and the
video cable screws.
Logic Board
iMac G5, 20-inch, Ambient Light Sensor Take Apart - 91
Page 95

18. Connect the antennas to the AirPort/Bluetooth card.
19. Replace the screws on the AirPort/Bluetooth card. Route the antenna cables under
the cut-out area on the logic board.
92 - iMac G5, 20-inch, Ambient Light Sensor Take
Logic Board
Page 96

20. Replace the air deflector located above the I/O ports. There are no screws, it’s held in
place with double-stick tape
21. Replace the memory.
22. Replace the optical drive.
23. Replace the back cover.
Logic Board
iMac G5, 20-inch, Ambient Light Sensor Take Apart - 93
Page 97

LCD Panel
Tools Required
• Torx T10 screwdriver, preferably with a magnetized tip
• Clean, soft, lint-free towel or blanket
• Screw tray or something equivalent to hold the screws
Preliminary Steps
Before you begin, remove the following:
• Back cover
• Midplane
Part Location
94 - iMac G5, 20-inch, Ambient Light Sensor Take
LCD Panel
Page 98

Removing the LCD Panel
1. Place the display bezel/LCD panel assembly face-down on a clean, soft, lint-free
folded towel or blanket.
2. Remove the six screws at the LCD panel brackets.
3. Touching only the top edge of the LCD panel, lift the panel out of the bezel.
LCD Panel
iMac G5, 20-inch, Ambient Light Sensor Take Apart - 95
Page 99

Replacing the LCD Panel
1. Check the routing of the LCD panel cables.
Note: The replacement LCD panel includes the brackets, cables, tape, and gaskets,
as shown.
2. Lower the panel into the bezel. Replace the screws.
96 - iMac G5, 20-inch, Ambient Light Sensor Take
LCD Panel
Page 100

3. Turn over the display bezel/LCD panel assembly, and check that there are no uneven
gaps between the bezel and the display. If there are noticeable gaps, loosen the
screws, reseat the panel, and retighten the screws.
4. Replace the midplane.
5. Replace the back cover.
LCD Panel
iMac G5, 20-inch, Ambient Light Sensor Take Apart - 97
 Loading...