

Page 1

AppleWorks 5
User’s Manual
Includes instructions for using your software
FOR WINDOWS 95 / NT 4.0
Page 2

K Apple Computer, Inc.
© 1998 Apple Computer, Inc. All rights reserved.
Under the copyright laws, this manual may not be copied, in whole or in part, without the written consent of Apple. Your rights to the
software are governed by the accompanying software license agreement.
The Apple logo is a trademark of Apple Computer, Inc., registered in the U.S. and other countries. Use of the “keyboard” Apple logo
(Option-Shift-K) for commercial purposes without the prior written consent of Apple may constitute trademark infringement and unfair
competition in violation of federal and state laws.
Every effort has been made to ensure that the information in this manual is accurate. Apple is not responsible for printing or clerical
errors.
Apple Computer, Inc.
1 Infinite Loop
Cupertino, CA 95014-2084
408-996-1010
http://www.apple.com
Apple, the Apple logo, AppleWorks and the AppleWorks design, Claris, and QuickTime are trademarks of Apple Computer, Inc.,
registered in the U.S. and other countries.
Other company and product names mentioned herein are trademarks of their respective companies. Mention of third-party products is
for informational purposes only and constitutes neither an endorsement nor a recommendation. Apple assumes no responsibility with
regard to the performance or use of these products.
Simultaneously published in the United States and Canada.
Equation Editor in AppleWorks
Equation Editor in AppleWorks 5 is a special version of MathType™ by Design Science. If you frequently create documents with
equations, you may find MathType is better suited to your needs. MathType is as easy to use as Equation Editor and has many extra
features to help you save time and create more complex mathematical formulas in documents.
For further information about upgrading Equation Editor to MathType, contact your software dealer or Design Science directly:
Design Science, Inc.
4028 Broadway
Long Beach, CA 09803
To ll Free: 800-827-0685
International: 562-433-0685
FAX: 562-433-6969
e-mail: info@mathtype.com
Web site: http://www.mathtype.com
Page 3

Contents
III
Chapter 1: Introduction
Registration and customer support 1-1
How to start 1-1
Using Help and the User’s Manual together 1-2
Using AppleWorks Help 1-3
Opening and closing AppleWorks Help 1-3
Using the Help contents 1-4
Navigating AppleWorks Help 1-4
Using the onscreen Help index 1-5
Learning more about onscreen Help 1-7
Getting additional help 1-7
Working with AppleWorks 1-8
What’s a document? 1-8
Document types 1-8
Text (word processing) documents 1-9
Draw documents 1-10
Paint documents 1-11
Spreadsheet documents 1-11
Database documents 1-12
Communications documents 1-13
Where to go from here 1-14
Chapter 2: Creating, opening, and printing documents
Starting AppleWorks 2-1
Creating a document 2-1
Creating a blank document 2-2
Using an Assistant 2-3
Using stationery 2-5
Saving a document 2-7
Opening a document 2-8
Finding documents 2-9
Linking to other documents 2-9
Page 4

IV AppleWorks 5 User’s Manual
Saving document formatting as templates (stationery) 2-10
Setting up regular stationery 2-10
Setting up default stationery 2-11
Creating stationery 2-11
Opening stationery 2-12
Identifying your documents 2-13
Protecting documents with passwords 2-14
Importing and exporting documents 2-15
Closing a document and leaving AppleWorks 2-16
Printing a document or Help topic 2-16
Chapter 3: Basics
Working with windows 3-1
Viewing windows 3-2
Arranging windows 3-3
Going to a page 3-4
Using the tool panel 3-4
Using the button bar 3-5
Switching button bars 3-5
Showing, hiding, and positioning the button bar 3-6
Customizing the button bar 3-6
Adding and removing buttons 3-6
Creating your own button bar 3-7
Using palettes 3-7
Working with frames 3-9
Working in an AppleWorks document 3-10
Cutting, copying, and pasting 3-10
Changing your mind 3-10
Previewing pages for printing 3-11
Using rulers 3-12
Creating headers and footers 3-12
Adding a date or time 3-14
Numbering pages 3-15
Setting margins 3-16
Changing the page orientation and size 3-16
Page 5

Using libraries 3-17
Creating, opening, and saving libraries 3-18
Working with the library palette 3-18
Duplicating, deleting, and moving library items 3-19
Viewing library items 3-19
Setting preferences 3-20
Chapter 4: Text (word processing)
When to use a word processing document 4-1
Text basics 4-2
Creating a word processing document or frame 4-2
About the word processing window 4-2
Working with text frames 4-3
Typing text 4-4
Typing equations 4-5
Selecting text 4-5
Cutting, copying, and pasting text 4-6
Showing formatting characters 4-6
Changing text appearance 4-7
Changing paragraph formats 4-8
Setting and changing tabs 4-10
Indenting paragraphs 4-10
Adding bullets, numbers, and checkboxes to paragraphs 4-11
Aligning paragraph text 4-12
Changing line and paragraph spacing 4-12
Copying text ruler settings 4-13
Sorting paragraphs 4-13
Outlining 4-13
Creating an outline 4-14
Modifying and removing outline labels 4-15
Rearranging outline topics 4-16
Collapsing and expanding outline topics 4-16
Modifying an outline style 4-17
Creating tables 4-18
Working with pages 4-19
Contents V
Page 6

VI AppleWorks 5 User’s Manual
Creating a title page 4-19
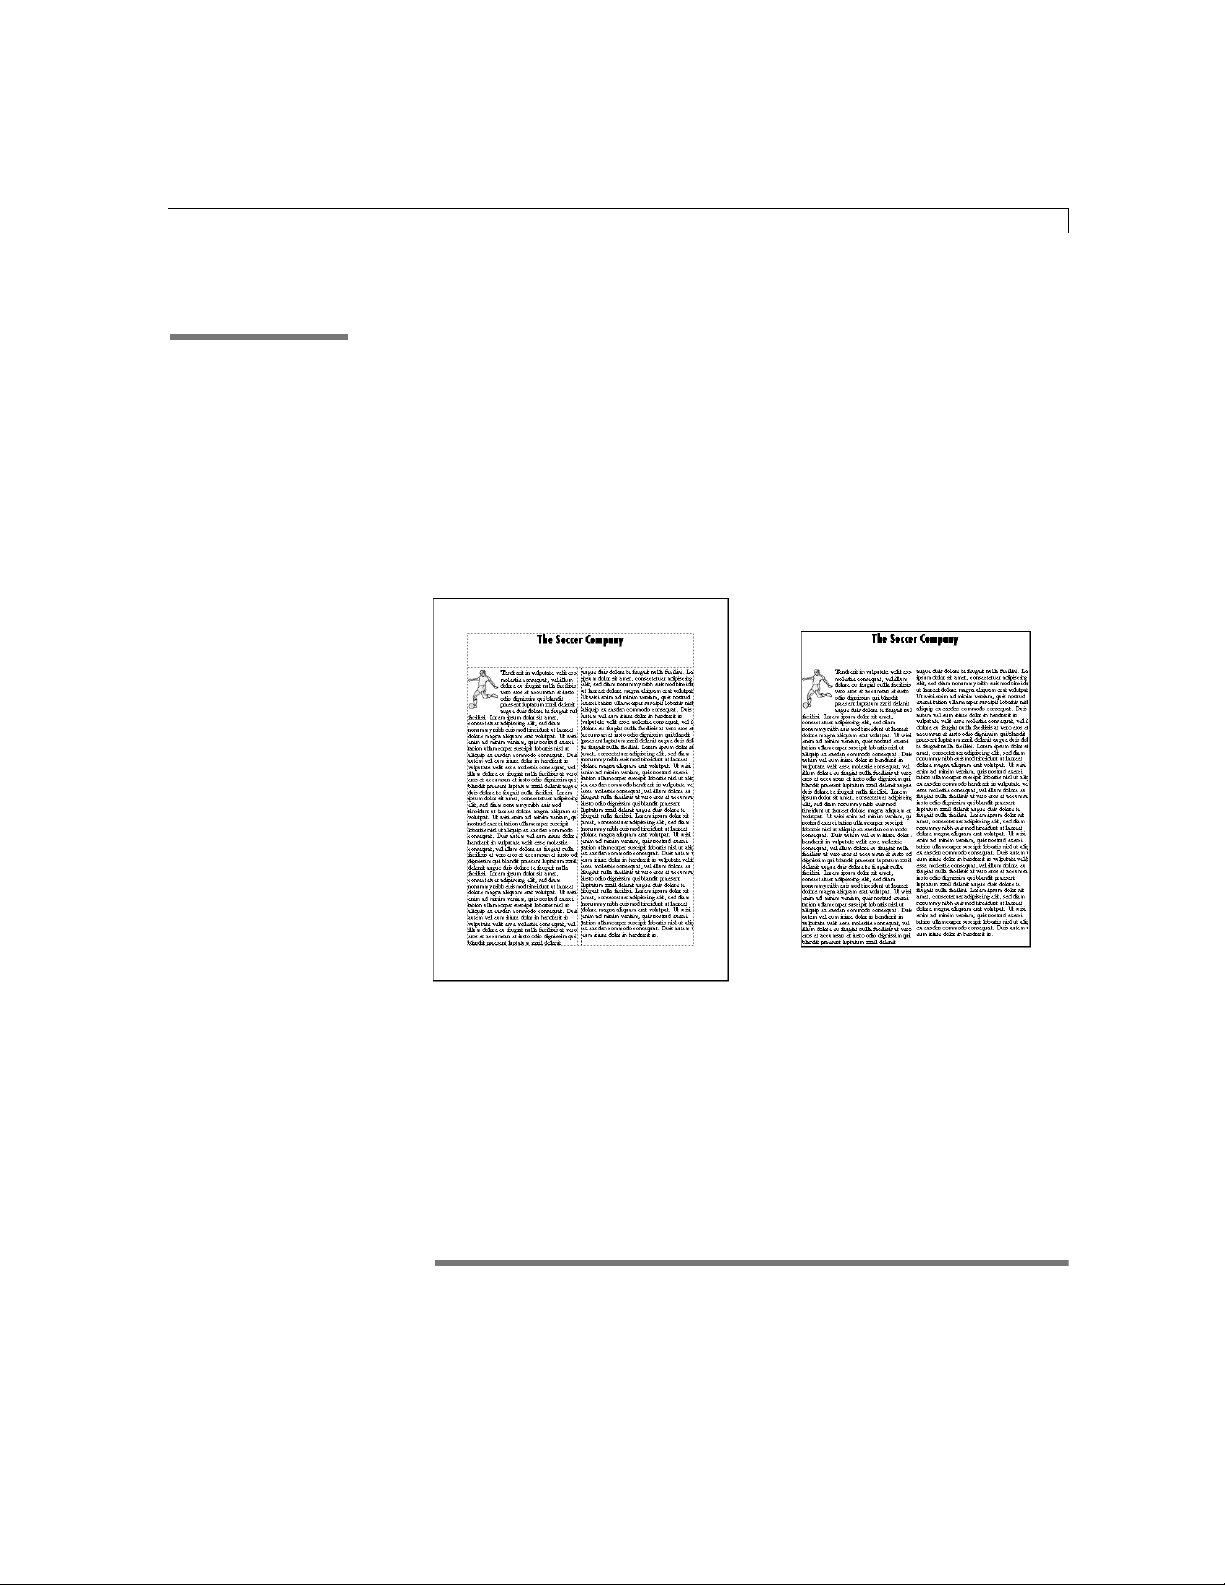
Creating and changing columns 4-20
Breaking a page or column 4-21
Scrolling pages 4-22
Dividing a document into sections 4-22
Inserting and deleting a section 4-23
Formatting sections 4-23
Varying the number of columns on a page 4-25
Numbering sections 4-25
Adding footnotes and endnotes 4-26
Finding and changing text 4-27
Finding special characters 4-28
Using writing tools 4-28
Checking your spelling 4-29
Hyphenating words 4-30
Finding synonyms 4-30
Changing dictionaries 4-31
Counting words 4-31
Adding pictures and frames to text 4-31
Wrapping text around pictures 4-32
Creating links in word processing documents 4-34
Chapter 5: Drawing
When to use a drawing 5-1
Drawing basics 5-2
Creating a drawing 5-2
About the draw window 5-2
What are objects? 5-3
Using the drawing tools 5-3
Selecting and deselecting objects 5-6
Using the graphics ruler and grids 5-7
Moving objects 5-7
Duplicating, copying, and deleting objects 5-8
Changing the appearance of objects 5-9
Changing lines, borders, colors, patterns, and textures 5-9
Page 7

Contents VII
Copying an object’s attributes 5-11
Resizing objects 5-12
Reshaping and smoothing objects 5-13
Connecting objects 5-13
Arranging objects 5-15
Locking objects to prevent changes 5-16
Creating a master page 5-17
Adding pages to a draw document 5-18
Creating custom colors, patterns, gradients, and textures 5-18
Adding clip art 5-19
Adding text, spreadsheet, or paint frames 5-19
Creating links in draw documents 5-21
Chapter 6: Painting
When to use a painting 6-1
Painting basics 6-2
Creating a painting 6-2
About the paint window 6-3
Working with paint frames 6-3
Working with images 6-4
Using the painting tools 6-4
Setting lines, colors, patterns, and textures 6-6
Selecting and moving images 6-7
Deleting, copying, and duplicating images 6-8
Magnifying an image 6-9
Transforming a selection 6-9
Reshaping a selection 6-9
Resizing or turning a selection 6-10
Coloring and tinting images 6-10
Replacing images 6-11
Adding text and spreadsheets 6-12
Adding clip art 6-13
Customizing resolution and depth 6-13
Working with large files 6-13
Changing the size of a painting 6-14
Page 8

VIII AppleWorks 5 User’s Manual
Creating links in paint documents 6-14
Chapter 7: Spreadsheet
When to use a spreadsheet 7-1
Spreadsheet basics 7-2
Creating a spreadsheet 7-3
About the spreadsheet window 7-3
Working with spreadsheet frames 7-4
Typing in a spreadsheet 7-5
Selecting cells and ranges 7-5
Modifying cell data 7-6
Editing data 7-6
Moving data 7-7
Copying and deleting data 7-8
Filling a range of cells 7-8
Formatting cell data 7-9
Sorting cell data 7-11
Locking cell data 7-12
Naming cells and ranges 7-12
Assigning names to cells 7-13
Editing and deleting names 7-13
Using named cells in formulas 7-14
Replacing cell references with named cells 7-14
Example 1: Using cell names in a formula 7-15
Example 2: Replacing named cells with cell references 7-16
Changing cells, rows, and columns 7-16
Resizing or hiding rows and columns 7-16
Inserting and deleting cells, rows, and columns 7-17
Changing the number of rows and columns 7-18
Adding borders, colors, and patterns to cells 7-18
Locking row and column titles 7-19
Adding and removing page breaks 7-19
Changing the display 7-19
Printing a spreadsheet document 7-20
Working with formulas 7-20
Page 9

Understanding formulas 7-21
Cell references in formulas 7-22
Entering formulas 7-23
Calculating formula results 7-24
Making corrections 7-24
Examples: Entering formulas 7-25
Working with functions 7-26
Entering functions 7-27
Example: Using the AVERAGE function 7-27
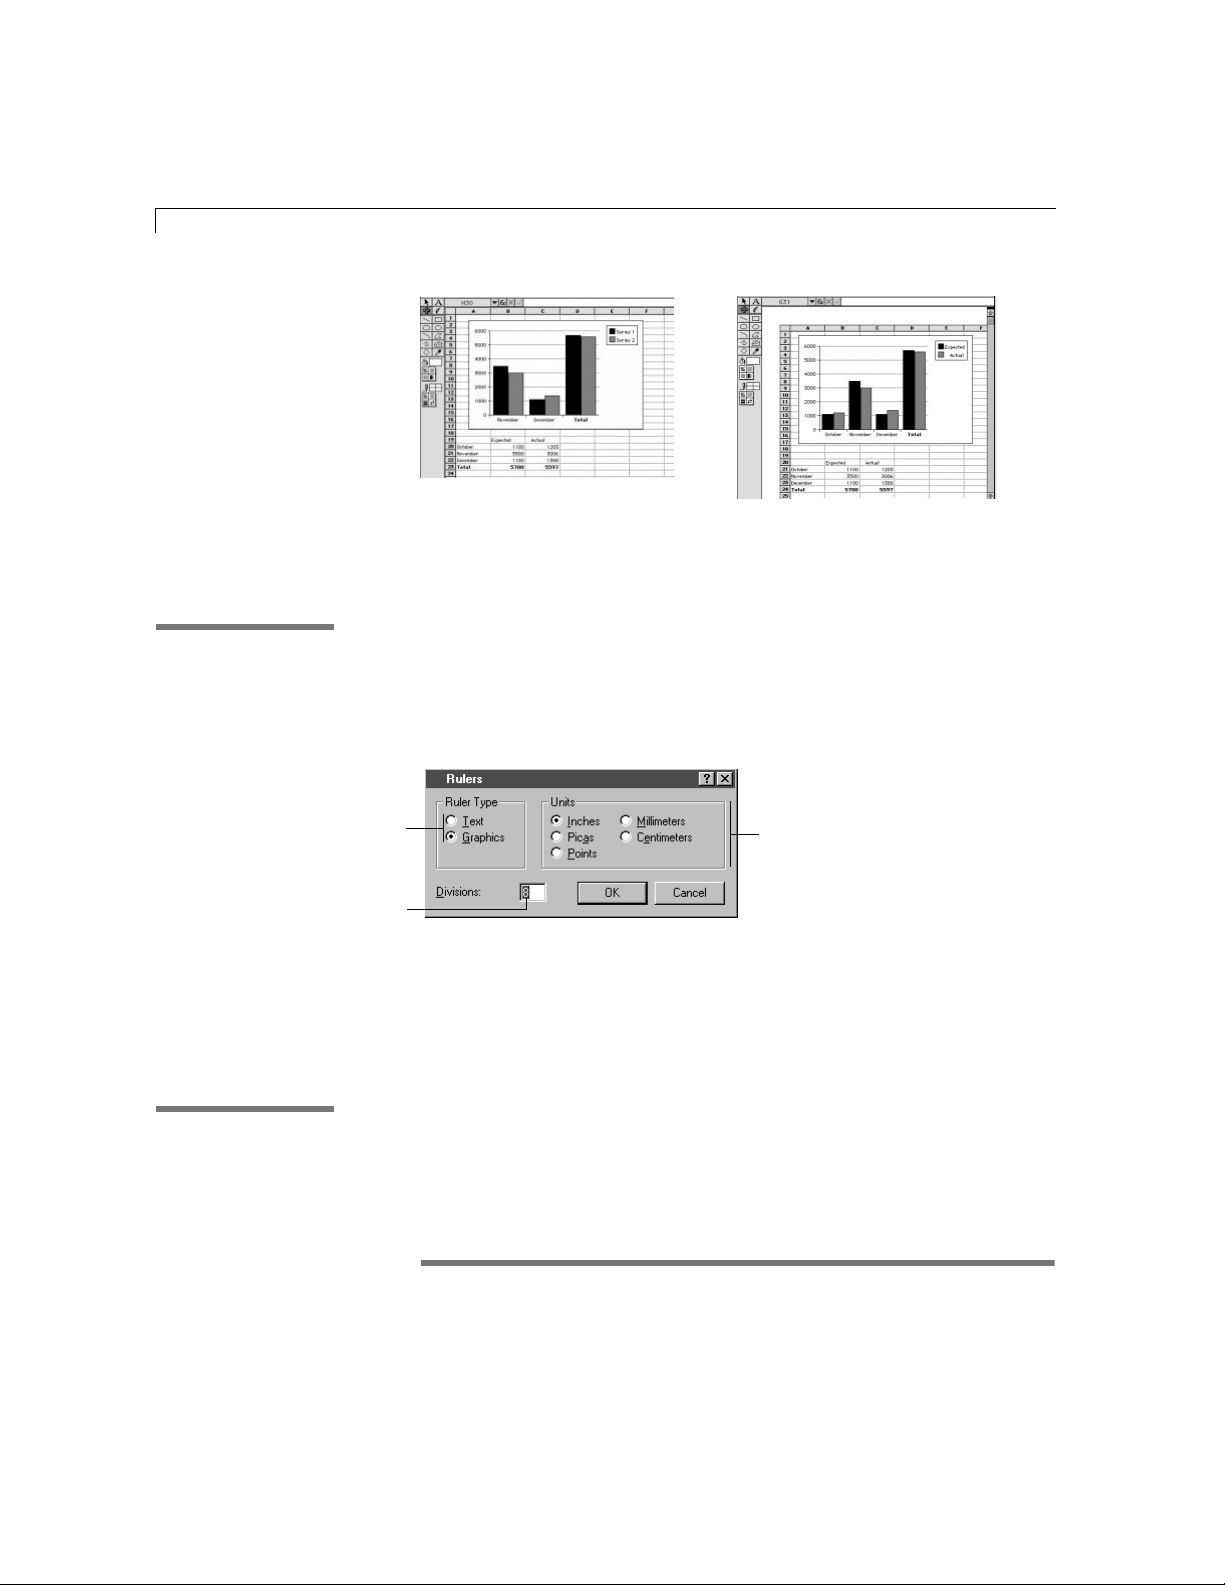
Displaying data in charts (graphs) 7-28
Making charts 7-29
Changing chart options 7-29
Deleting, copying, or moving a chart 7-30
Enhancing a chart’s appearance 7-31
Adding pictures or a text frame 7-32
Creating links in spreadsheet documents 7-34
Chapter 8: Database
When to use a database 8-1
Database basics 8-1
What’s a database? 8-1
Using Browse, List, Find, and Layout modes 8-2
Creating a database document 8-3
Example: Creating a simple database 8-4
Part 1: Start a new database document 8-4
Part 2: Define two fields 8-4
Part 3: Enter two values into the fields 8-5
Part 4: Make new records 8-5
Part 5: Finish entering data in the new records 8-5
Part 6: Close the database 8-5
Designing a database 8-6
Defining database fields 8-7
Adding fields to an existing database 8-7
Assigning field types 8-7
Checking or entering data automatically 8-9
Contents IX
Page 10

X AppleWorks 5 User’s Manual
Defining calculation and summary fields 8-10
Adding, changing, and deleting fields 8-12
Entering data in fields 8-12
Adding records 8-14
Changing the tab order 8-14
Duplicating, deleting, and moving records 8-15
Moving through records 8-15
Viewing records 8-16
Playing movies in multimedia fields 8-17
Working with rows and columns in List mode 8-17
Selecting rows and columns 8-18
Resizing rows and columns 8-18
Moving columns and formatting data 8-19
Selecting and hiding records 8-20
Sorting records 8-21
Finding information 8-23
Finding text 8-23
Finding records with a find request 8-23
Saving a find request (named search) 8-25
Matching records 8-26
Working with layouts 8-27
Understanding layouts 8-27
Creating a layout 8-29
Editing a layout 8-31
Deleting, duplicating, and renaming a layout 8-32
Changing the appearance of data 8-32
Presenting and summarizing data with parts 8-34
Copying summary data 8-36
Resizing and deleting parts 8-36
Creating reports 8-36
Importing data from other documents 8-37
Printing a database document 8-38
Printing labels 8-39
Closing up space when you print 8-39
Page 11

Chapter 9: Beyond the basics
Creating links 9-1
Creating book marks 9-2
Creating document links 9-2
Editing links 9-3
Deleting links 9-4
Going to a specific link 9-4
Sorting links 9-5
Using styles 9-5
About the stylesheet palette 9-6
Styles in documents and frames 9-7
Applying a style 9-8
Creating a style 9-9
Turning off a style 9-11
Example: Applying and creating styles 9-11
Editing styles 9-13
Copying, pasting, and deleting styles and properties 9-15
Importing and exporting styles 9-16
Creating a slide presentation 9-16
Creating slides 9-16
Setting up slides 9-17
Reordering slides 9-19
Showing the slides 9-19
Merging data into documents (mail merge) 9-19
Setting up the database 9-20
Preparing the merge document 9-21
Printing the merge documents 9-22
Addressing envelopes 9-22
Using the Envelope Assistant 9-23
Setting up and creating envelope stationery 9-23
Addressing an envelope 9-24
Linking frames 9-24
Working with movies 9-26
Adding a movie to a document 9-27
Contents XI
Page 12

XII AppleWorks 5 User’s Manual
Playing a movie 9-27
Creating and editing custom buttons 9-28
Using macros 9-29
Including other applications in your documents (OLE) 9-30
Understanding Object Linking and Embedding 9-30
Inserting OLE objects 9-31
Working with OLE objects 9-32
Chapter 10: Communications
When to use a communications document 10-1
Communications basics 10-1
What you need 10-1
Communications terms and concepts 10-2
Creating a communications document 10-2
About the communications window 10-3
Connecting to another computer 10-3
Changing the communications program 10-4
Chapter 11: AppleWorks and the Internet
About the Internet and the Web 11-1
About browsers 11-2
Selecting a browser 11-2
Connecting to the Web 11-3
Creating a Web page 11-3
Designing your Web page 11-3
Creating an HTML file 11-4
Adding pictures 11-5
Linking Web pages 11-5
Saving a document in HTML format 11-9
Opening and editing HTML files 11-9
Working with electronic mail 11-10
Index
Page 13

Chapter 1: Introduction
This User’s Manual introduces you to the AppleWorks 5 application from
Apple Computer, Inc. AppleWorks is an all-in-one software package
offering seamless integration of word processing, outlining, presentations,
drawing, painting, spreadsheet computation and charting, database
management, and communications, including support for HTML and linking
to the Internet.
Registration and customer support
Please take the time to mail the product registration card included with
AppleWorks or register your copy of AppleWorks at the following Web site:
1 http://www.applereg.com
For information about customer support, see the Apple Service Directory
included with your copy of AppleWorks or see the following Web site:
1 http://support.info.apple.com/support/supportoptions/
supportoptions.html
For information about AppleWorks, see the following Web site:
How to start
1 http://www.apple.com/appleworks
This User’s Manual is designed to get you started quickly, whether you’re a
new or experienced AppleWorks user.
If Do this
You’re new to AppleWorks
or want a complete
understanding of
AppleWorks
Become familiar with Windows 95 techniques, such as using
the mouse and saving documents. For such information, see the
documentation that comes with your computer.
View the onscreen tour, “Introduction to AppleWorks,” to
understand what AppleWorks is all about. To begin the tour,
click the Start menu and choose Programs. Then choose
Introduction to AppleWorks from the AppleWorks menu.
Start AppleWorks (click the Start menu, choose Programs, and
then choose AppleWorks from the AppleWorks menu) and
practice using AppleWorks while reading this User’s Manual
and referring to onscreen Help.
Page 14

1-2 AppleWorks 5 User’s Manual
If Do this
You’ve used AppleWorks
before
Read the rest of this chapter to learn how to use this User’s
Manual and AppleWorks Help together.
Start AppleWorks (see “Starting AppleWorks” on page 2-1 if
you need help). Then review the list of new features in
AppleWorks (see the AppleWorks 5 Installation Manual, or
choose AppleWorks Help Contents from the Help menu, and then
click New features in AppleWorks).
As necessary, review AppleWorks Help topics and the chapters
in this book to learn more about specific procedures.
Using Help and the User’s Manual together
This User’s Manual and AppleWorks Help, a comprehensive onscreen Help
system, are designed to work together.
Text marked with a bar, in the margin or within the text, lists index entries
to AppleWorks Help topics. These Help topics provide more information
about a feature.
For information on In the Help index,* see:
In the Help index,* see:
E index entries relating to the
current section are listed here
an AppleWorks feature
E index entries for relevant topics are listed here
To look up an index entry in AppleWorks Help, start AppleWorks, choose
AppleWorks Help Index from the Help menu, and then scroll to the entry. For
complete instructions for using the index to onscreen Help, see “Using the
onscreen Help index” on page 1-5.
Special information in this User’s Manual looks like this:
Note, Tip, or titled messages give extra or helpful information about a subject.
Important messages alert you to situations that require attention, such as an
action that you can’t undo.
Glossary terms are defined in this manual and AppleWorks Help. They
appear in italic in the this manual, and underlined with a dotted line in Help.
Glossary terms are also listed in the this manual’s index. For example, to find
the definition of cell range, look up Cell range, described.
Page 15
Using AppleWorks Help
AppleWorks Help completely documents all AppleWorks features. As you
become comfortable working with AppleWorks, you’ll be able to find all the
information you need in AppleWorks Help.
Opening and closing AppleWorks Help
To open Help when AppleWorks is running, click in the AppleWorks
window. Then press F1 to display the Contents screen, or choose a command
from the Help menu.
To see Choose
Topic titles in a table of contents AppleWorks Help Contents
An alphabetical list of index entries AppleWorks Help index
Information on navigating and using
AppleWorks Help
In many dialog boxes you see a button. You can click the button to get
Help for the task you’re performing. (You can also press F1 for the current
task when the dialog box is displayed.)
Introduction 1-3
AppleWorks Help Contents, and then click Getting Help
Click this button (or
press F1) for Help for
the current task
Note Whenever you open AppleWorks Help, you start the Windows Help
application, which runs independently of AppleWorks. This means you can
open AppleWorks Help even when AppleWorks isn’t running. To do so,
click the Start menu and choose Programs. Then choose AppleWorks Help from
the AppleWorks menu.
Page 16
1-4 AppleWorks 5 User’s Manual
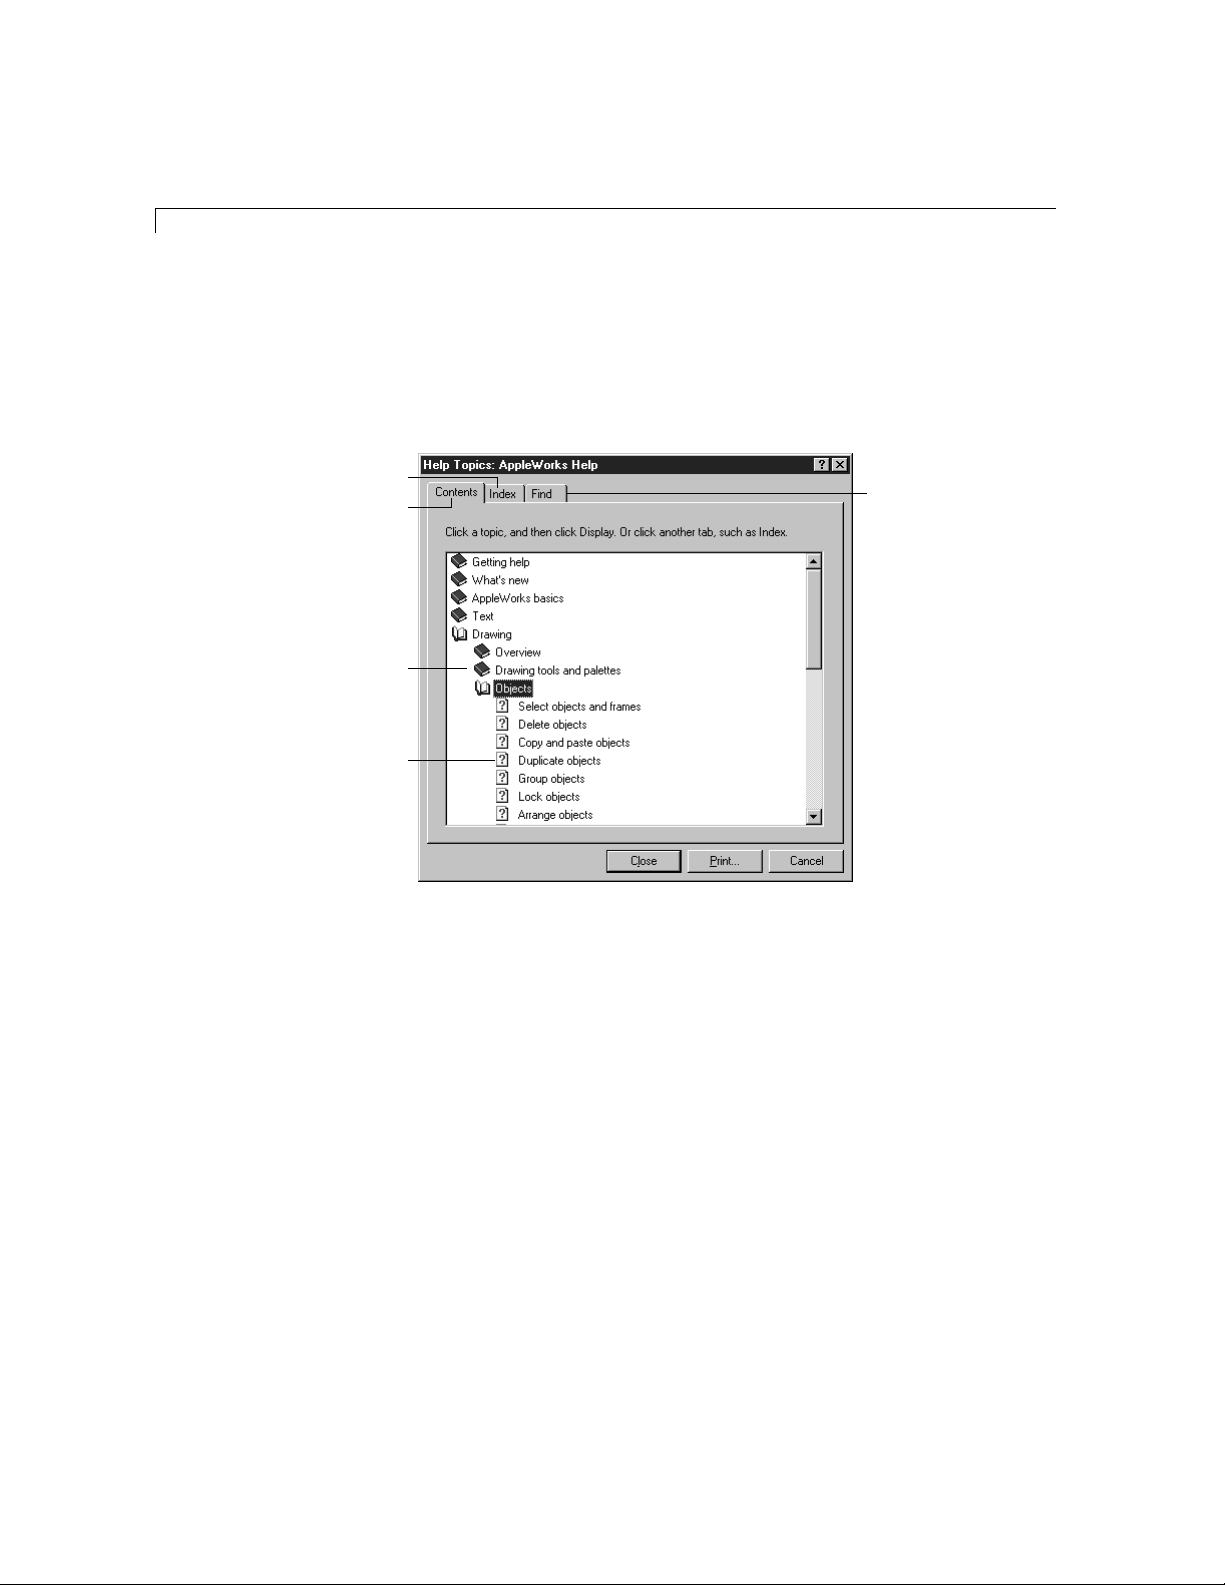
Using the Help contents
When you open AppleWorks Help, you see a list of Help topics, much like
the table of contents in a book.
Click to see the index
Click any time to return
to the contents window
Double-click a book icon
to see a list of subtopics
Double-click a topic
you want to see
Navigating AppleWorks Help
When you select a topic, you see the AppleWorks Help window. To navigate
AppleWorks Help, click buttons and underlined text.
Click to search for specific
words in the AppleWorks
Help topics
Page 17
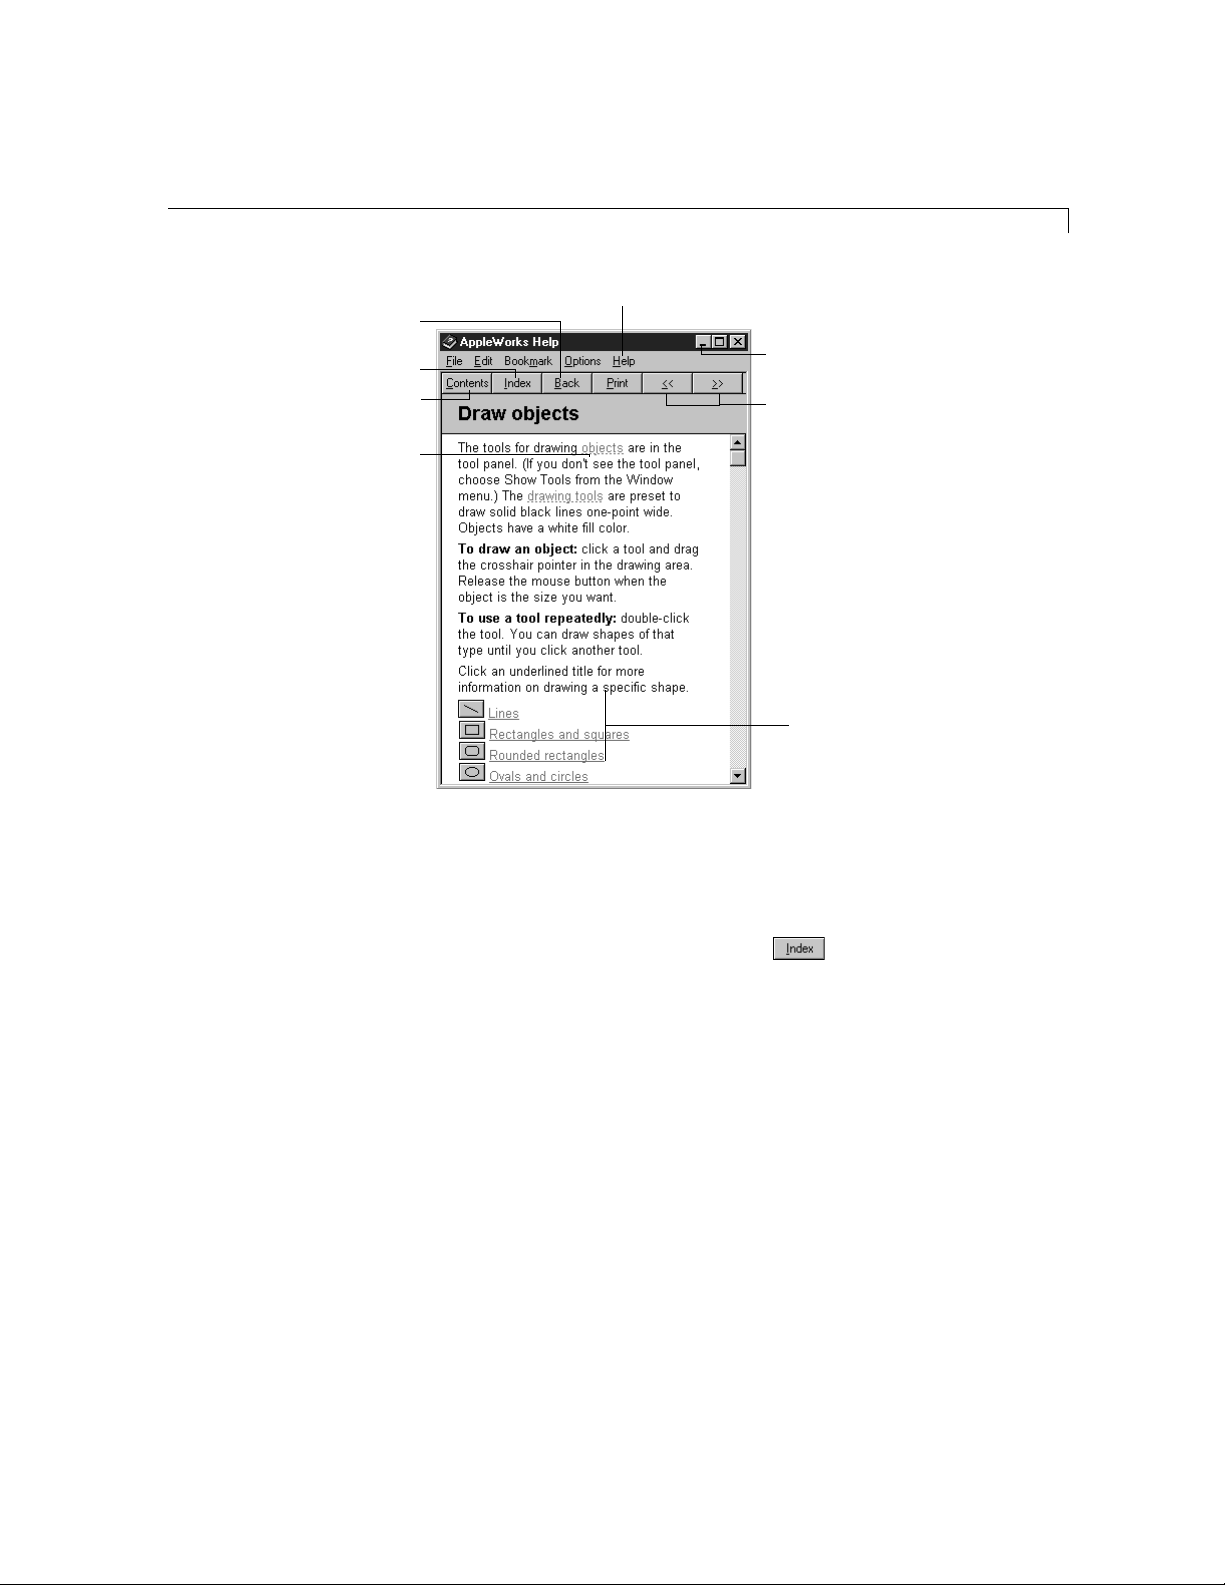
Introduction 1-5
Click to retrace your
path through Help
Click to see the
index
Click to see the
table of contents
Click dotted text to
see a definition
Click to print the current topic
Click to minimize onscreen
Help and le
Click to move to the next
or previous related topic
Click underlined text to
jump to a topic or see a
list of related topics
Tip To see a sequential list of topics you’ve viewed, choose Display History
Window from the Help window’s Options menu.
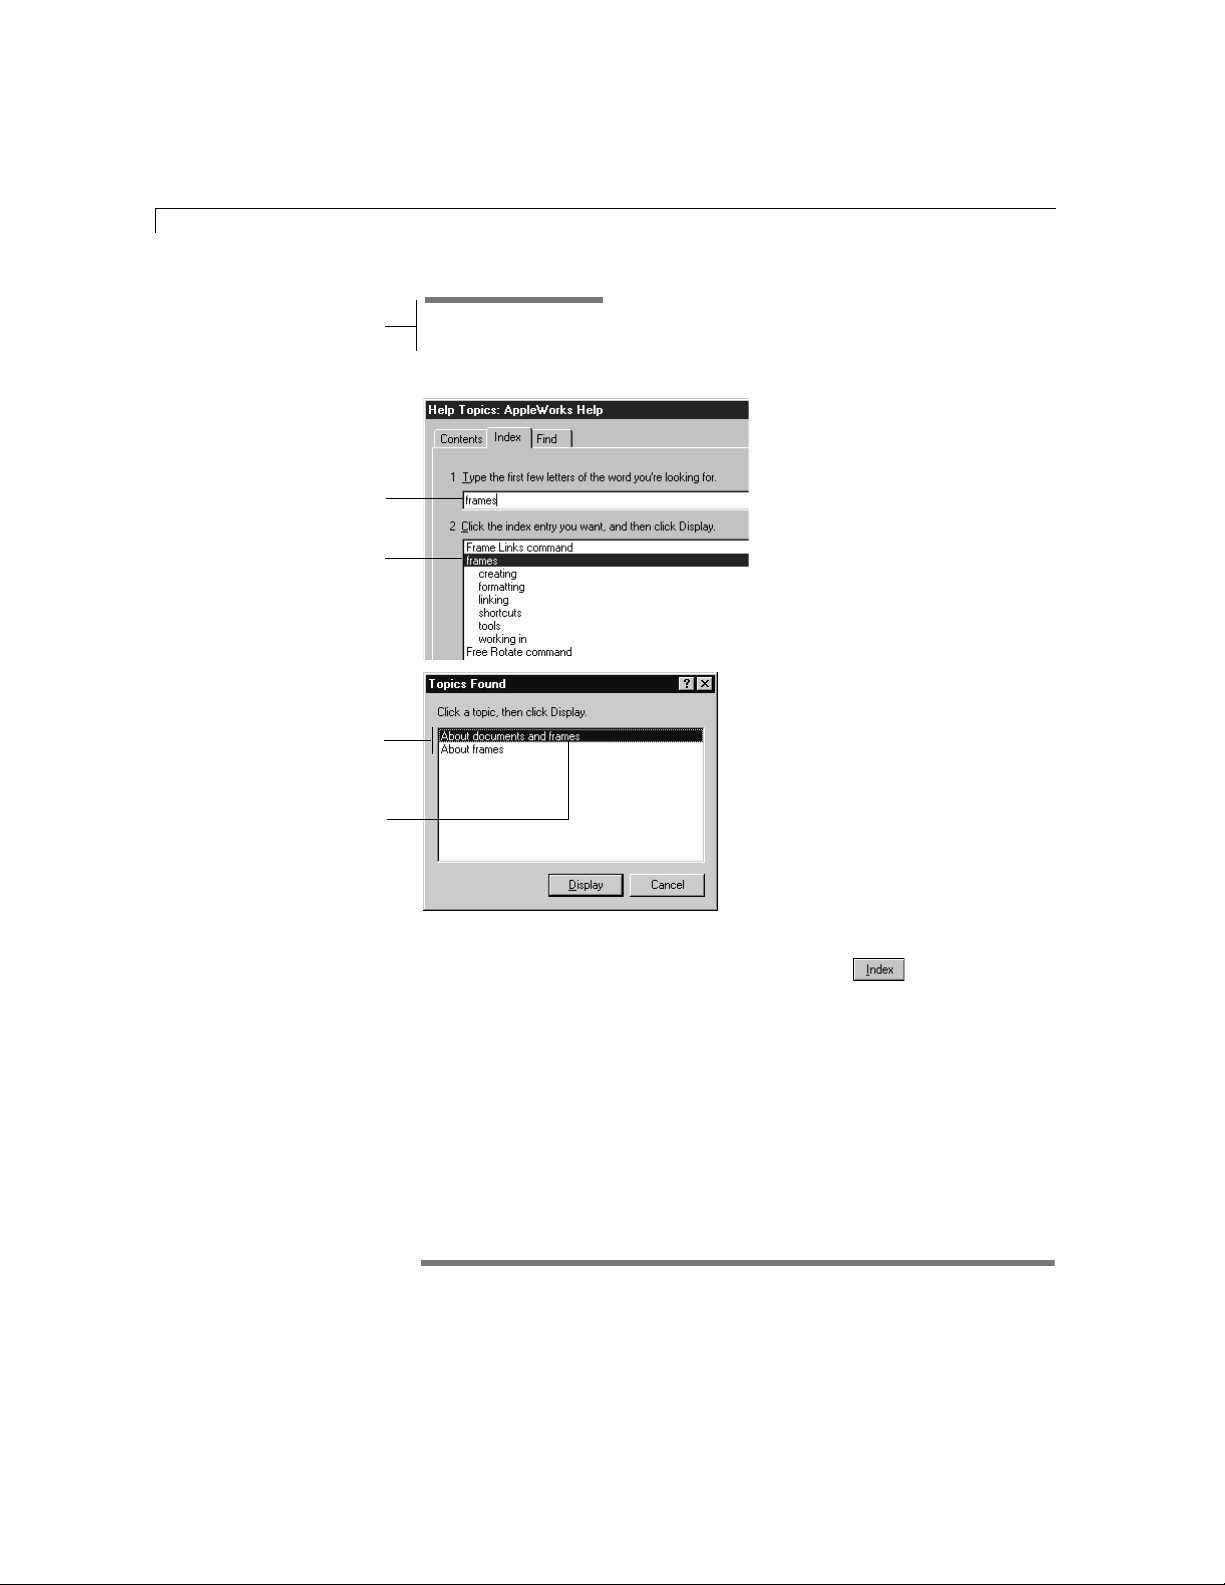
Using the onscreen Help index
To browse through the index, click the button in the AppleWorks
Help window or the Index tab in the Contents window, and then scroll
through the alphabetical list. To go to a specific index entry—for example,
if you’re using the index entry in this manual to direct you to a topic in
Help—type the first few letters of the entry. (To see one screen of entries at
a time, press Page Up or Page Down.)
Page 18
1-6 AppleWorks 5 User’s Manual
You see this in the User’s Manual
Type all or part of
the index entry
Then double-click the
entry to select it
You see a list of topics (if
there’s only one topic for that
entry, you see the topic)
Double-click a topic
you want to see
In the Help index,* see:
E frames
To return to the same place in the index, click the button.
Choose Index from theHelp menu and type the first few letters of the entry. Double-click the
*
entry and then double-click a topic.
Page 19

Learning more about onscreen Help
Refer to AppleWorks Help for more tips on locating information and
customizing onscreen Help.
Introduction 1-7
For information on In the Help index,
Adding your own notes to a Help topic
Copying Help topics into an existing document
Finding text within a Help topic
Marking topics you use often
Printing one or more Help topics
Referring to a glossary of AppleWorks terms
Getting additional help
Here are more ways to learn about AppleWorks:
To Do this
Take an onscreen tour of the most important
AppleWorks features and concepts
Use automated assistance in creating
various types of documents (such as
newsletters and presentations)
Use automated assistance in performing
complex tasks (such as adding footnotes
or tables to a document)
Use Tool Help to see the names of
AppleWorks tools, controls, and buttons
(when they’re displayed)
See brief descriptions of AppleWorks
menu commands, tools, controls, and
buttons (when they’re displayed)
* see:
E Help, customizing
E Help, copying
E Help, finding
E Help, customizing
E Help, printing
E glossary
Choose Introduction to AppleWorks from the
AppleWorks Help menu.
Choose New from the File menu, and then select
Use Assistant or Stationery. Choose a category from the
pop-up menu, and then select an Assistant from
the scrolling list. (For more information about
Assistants, see “Using an Assistant” on page 2-3.)
Choose AppleWorks Assistants from the AppleWorks
Help menu.
Hold the pointer over the item for a few seconds.
For tools, controls, and buttons, you see a pop-up
label.
Hold the pointer over the item for a few seconds.
You see information about the item in the status
bar, at the bottom of the window.
Tip To show or hide Tool Tips or the status bar, choose Preferences from the
Edit menu. In the Preferences dialog box, choose General from the Topic
pop-up menu, and then select or deselect Tool Tips or Show Status Bar.
Choose Index from theHelp menu and type the first few letters of the entry. Double-click the
*
entry and then double-click a topic.
Page 20

1-8 AppleWorks 5 User’s Manual
Working with AppleWorks
With the AppleWorks application, you can do all the jobs you perform most
often on a personal computer: word processing, outlining, drawing and
painting, presentations, spreadsheet computation and charting, database
management, and telecommunications. The rest of this chapter describes the
different types of work you can do with AppleWorks.
First go through the introductory material (both in print and onscreen) that
you received with your computer. When you’re ready to learn about
AppleWorks, start by running the onscreen tour, “Introduction to
AppleWorks.” For instructions on starting AppleWorks and running the
onscreen tour, see “How to start” on page 1-1. The tour is an easy way to see
what AppleWorks can do for you.
What’s a document?
You use the AppleWorks application to create documents. A document is a
computer file in which you enter information. You can create, open, change,
save, print, delete, and duplicate documents. When saved, a document
appears as an icon in a folder.
Document types
When you create a document, it appears in its own window, with the tools
needed for that document type.
When a document is open, you see its contents (such as a letter or a drawing)
displayed in the window. When printed, a document looks just as it does on
the screen.
You can create six different types of documents with AppleWorks—
word processing, drawing, painting, spreadsheet, database, and
communications. As you look at the document windows on the following
pages, notice that each document type has its own menus and tools.
While each type of document is mainly for a certain type of work such as
writing a letter or drawing a picture, you can use AppleWorks to combine
different kinds of work within a single document by using a frame, a view of
one document within a different type of document. For example, you can add
a spreadsheet to a letter without first creating a spreadsheet document.
Page 21
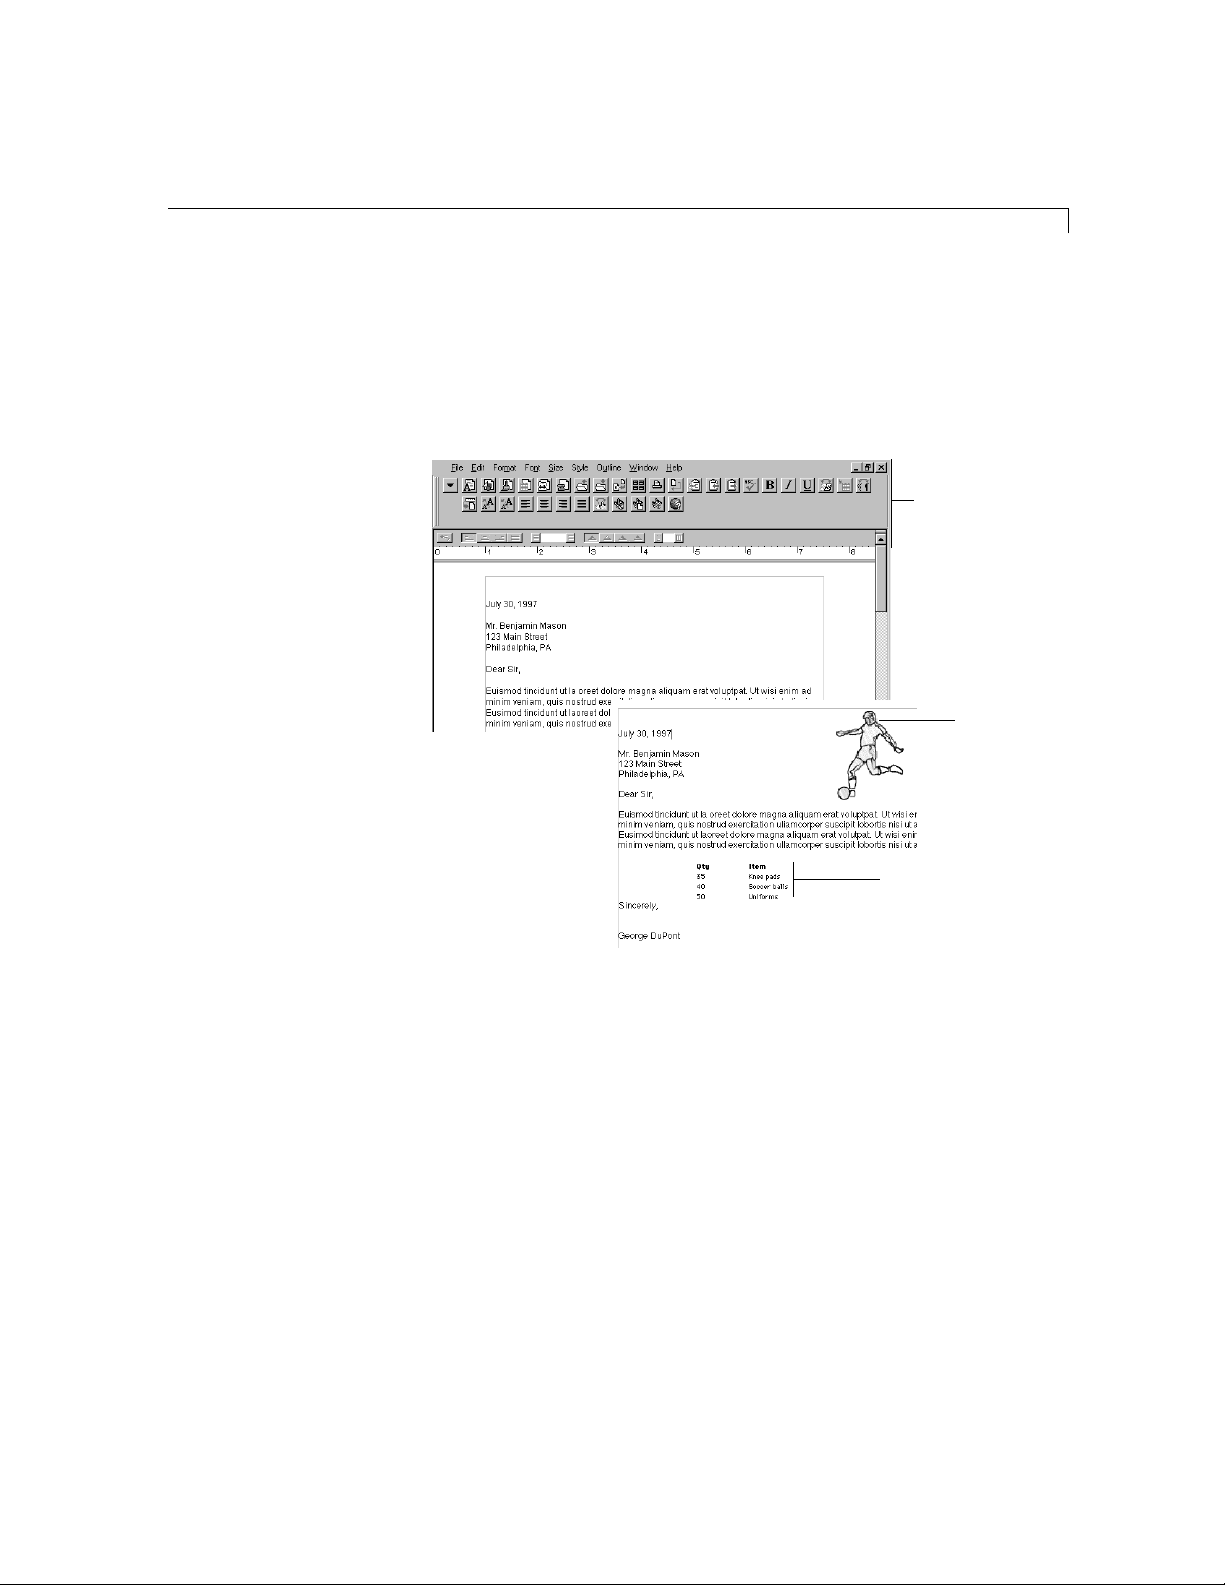
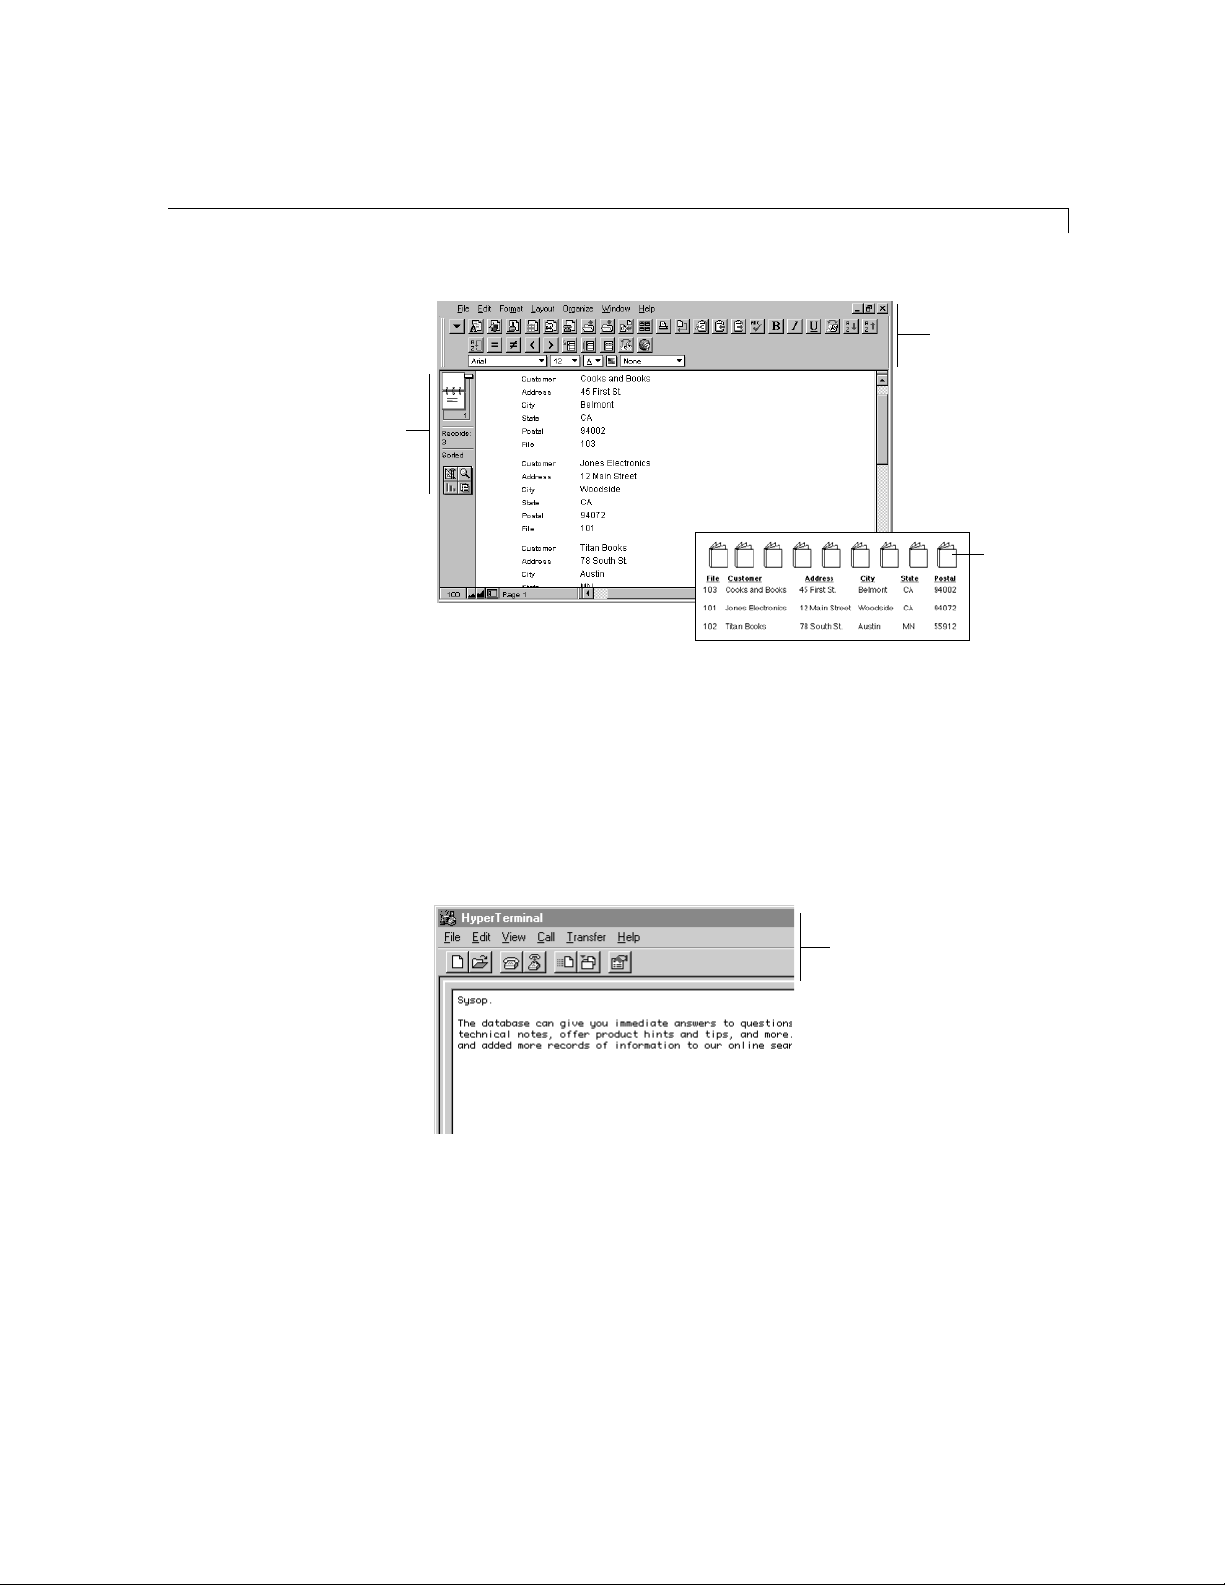
Text (word processing) documents
Use a word processing document to write a letter, report, story, outline, form
letter, or other project that is mostly text. If you want to add a spreadsheet or
pictures, you can do so without leaving the word processing document by
creating a spreadsheet frame or drawing directly in the letter.
Write a letter in a word
processing document
Introduction 1-9
Word processing menus,
button bar, and ruler
Draw a logo
Create a table in a
spreadsheet frame
Add a drawing and a spreadsheet frame
AppleWorks word processing documents give you great flexibility in the
way you present what you write. Using multiple columns, for example, you
can create professional-looking catalogs and reports. You can write better
research papers by using AppleWorks to outline your ideas and to add
footnotes or endnotes that number and renumber automatically. You can
format documents in sections (like chapters in a book), each with its own
header, footer, column configuration, and page numbering.
See chapter 4, “Text (word processing),” for more information about what
you can do with word processing documents and text frames.
Page 22
1-10 AppleWorks 5 User’s Manual
Draw documents
Drawing tools and palettes
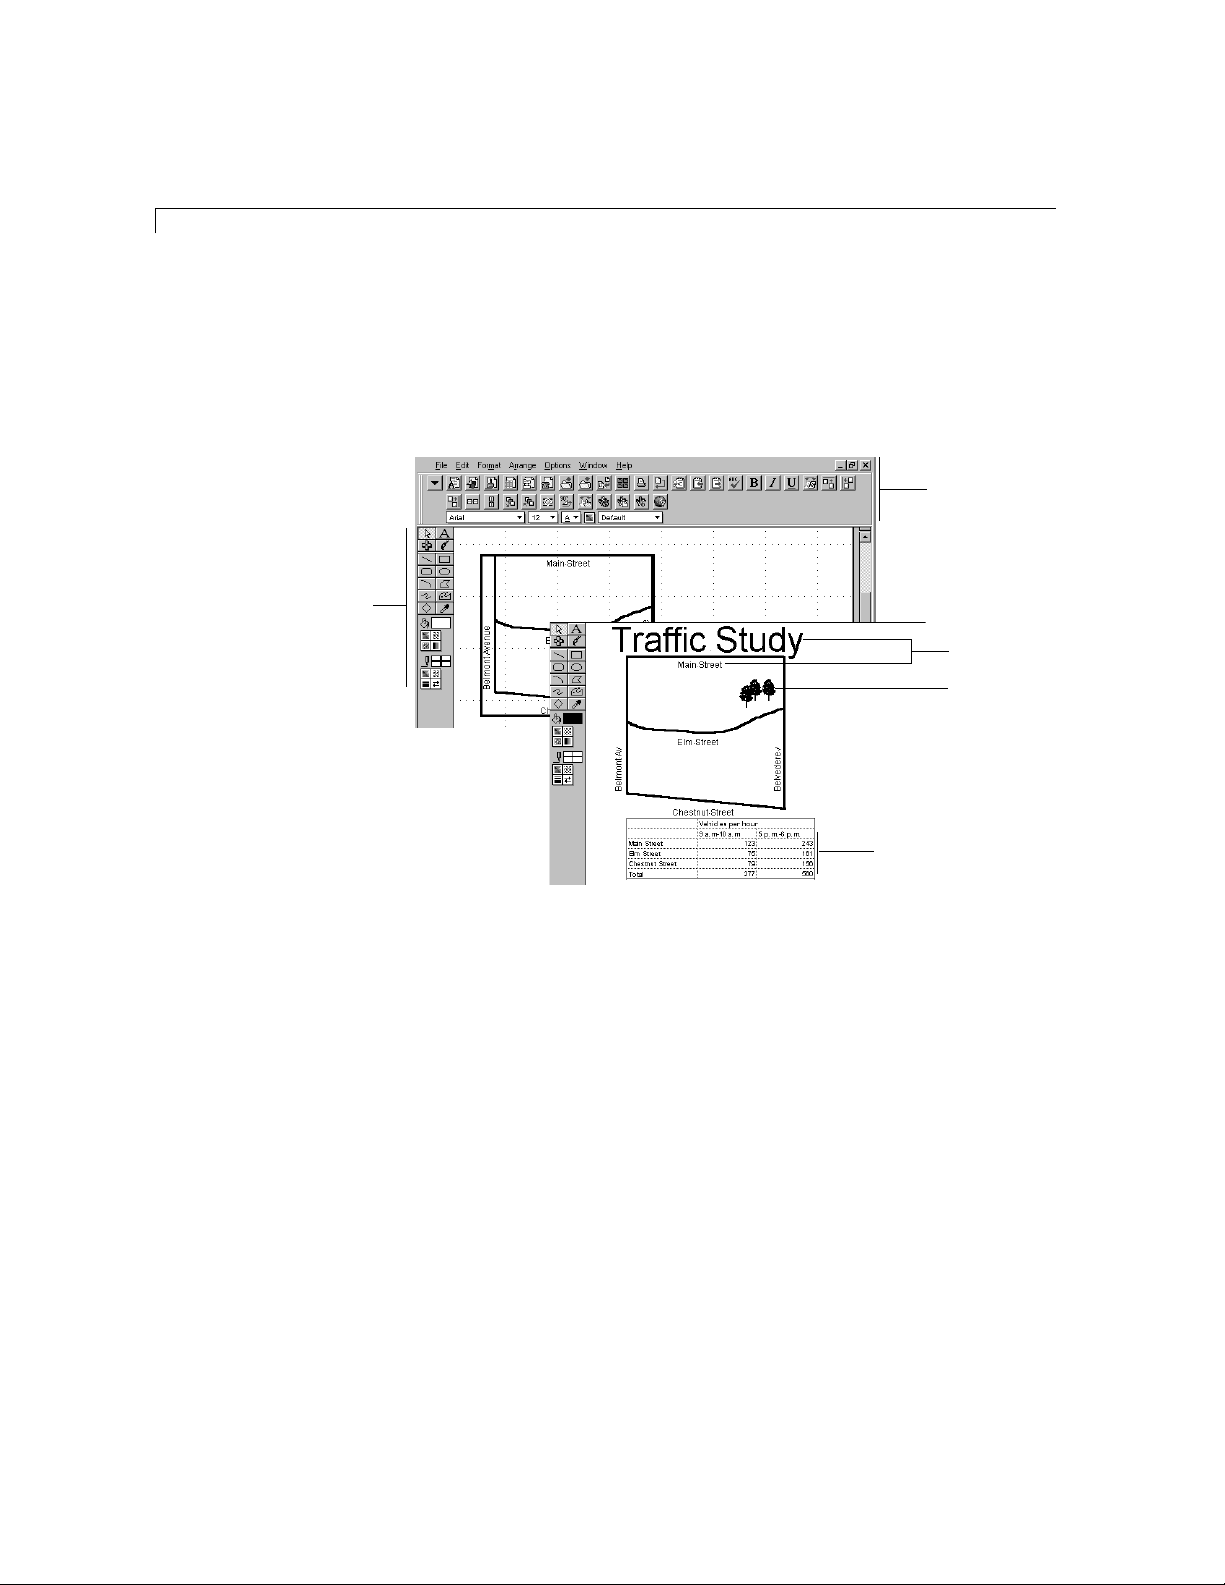
Use a draw document for artwork and page layout. A draw document
includes objects (such as rectangles, circles, and lines) that you can create,
select, move, and modify. If you want to add text, a spreadsheet, or clip art,
you can do so in the same document.
Draw menus and
button bar
Text frames
Clip art
Create a map in a
draw document
Spreadsheet frame
Add text and data to create a presentation
Draw documents are useful for creating presentations, newsletters, maps,
organizational charts, and illustrations. Draw documents are especially
useful for complex page layouts—you can link text frames in a draw
document so the text flows from one frame to the next.
See chapter 5, “Drawing,” for more information about what you can do with
draw documents and using drawing tools in all types of documents. For
information on linking frames, see chapter 9, “Beyond the basics.”
Page 23
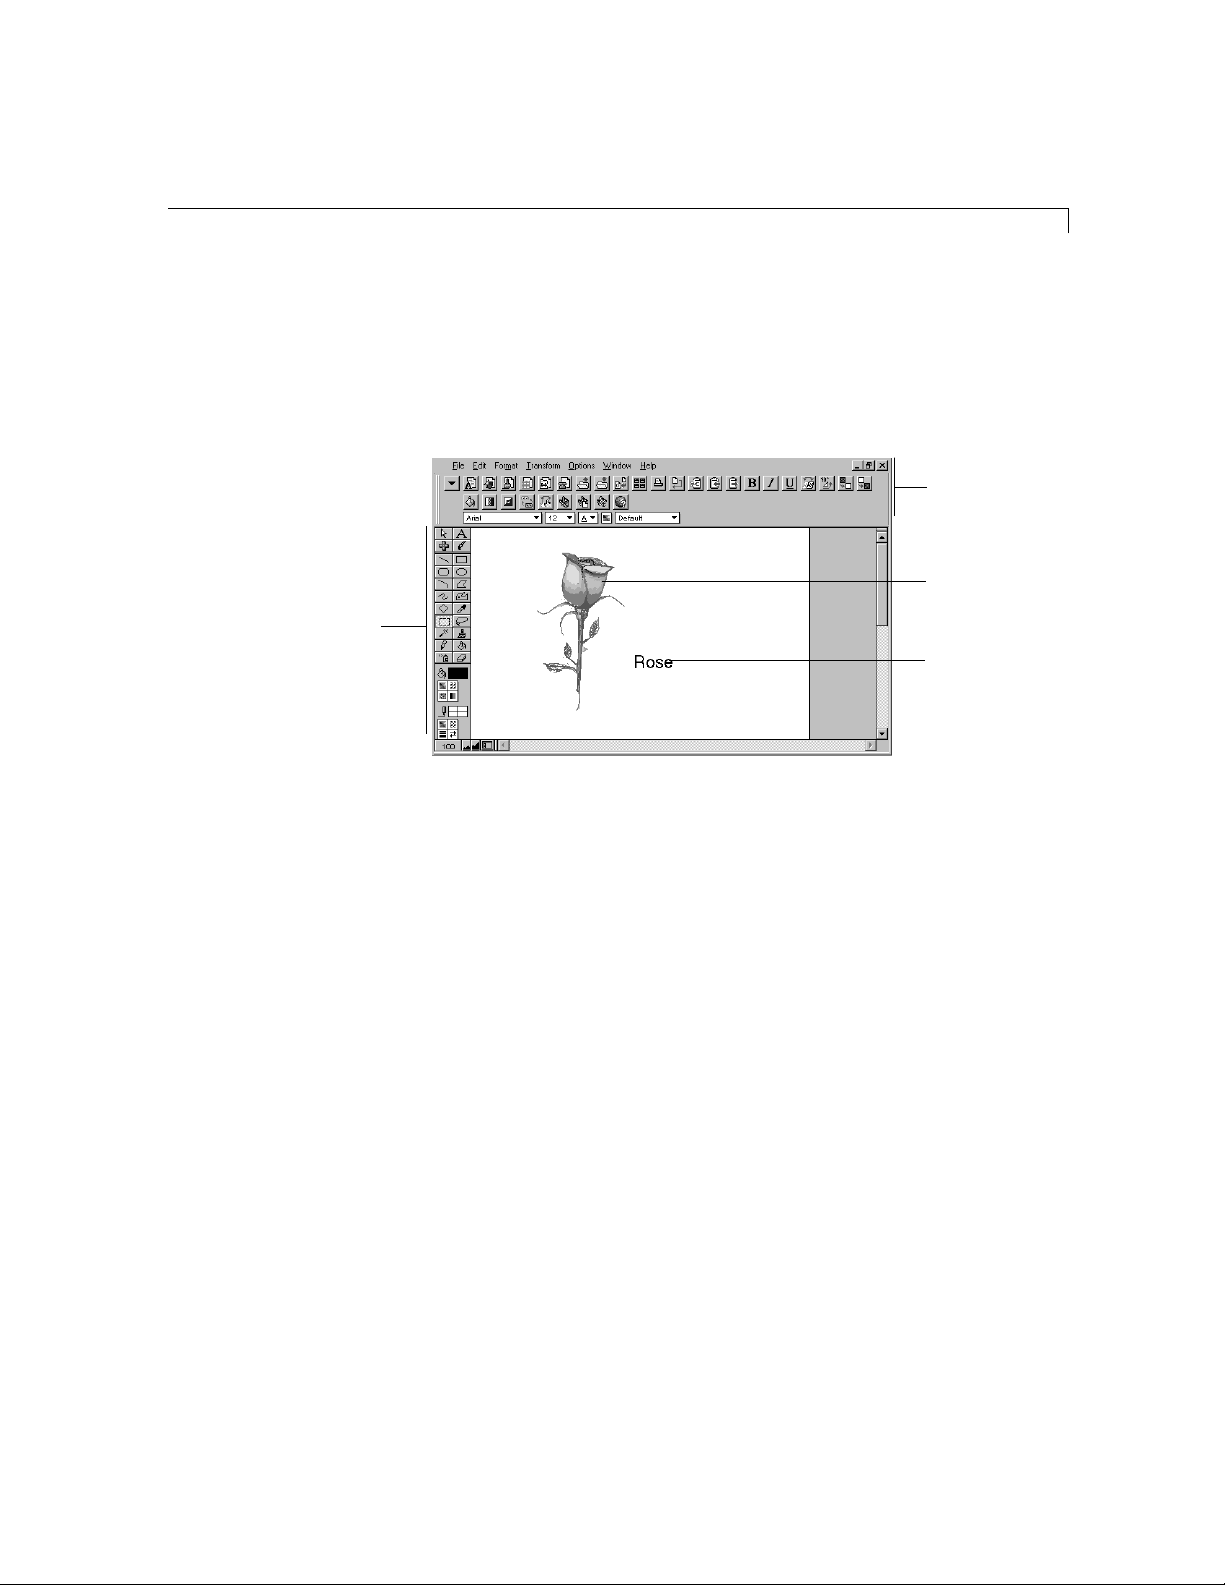
Paint documents
Painting tools and palettes
Introduction 1-11
Use a paint document primarily for creating illustrations. You can use the
same tools you use to create drawings, plus a set of tools for special effects
like paintbrush strokes and spray paint. If you want to add a spreadsheet,
text, or clip art, you can do so without leaving the paint document.
Paint menus
and button bar
Paint image
Text frame
A picture in a paint document
See chapter 6, “Painting,” for more information about what you can do with
paint documents and paint frames.
Spreadsheet documents
Use a spreadsheet document to organize numeric information, make
calculations, and create professional-looking reports. You can also use a
spreadsheet for any type of information (such as a schedule) that you want
to present in a columnar format. You can add a headline or pictures, or turn
the numbers into charts to aid comprehension, right in the spreadsheet
document.
Page 24
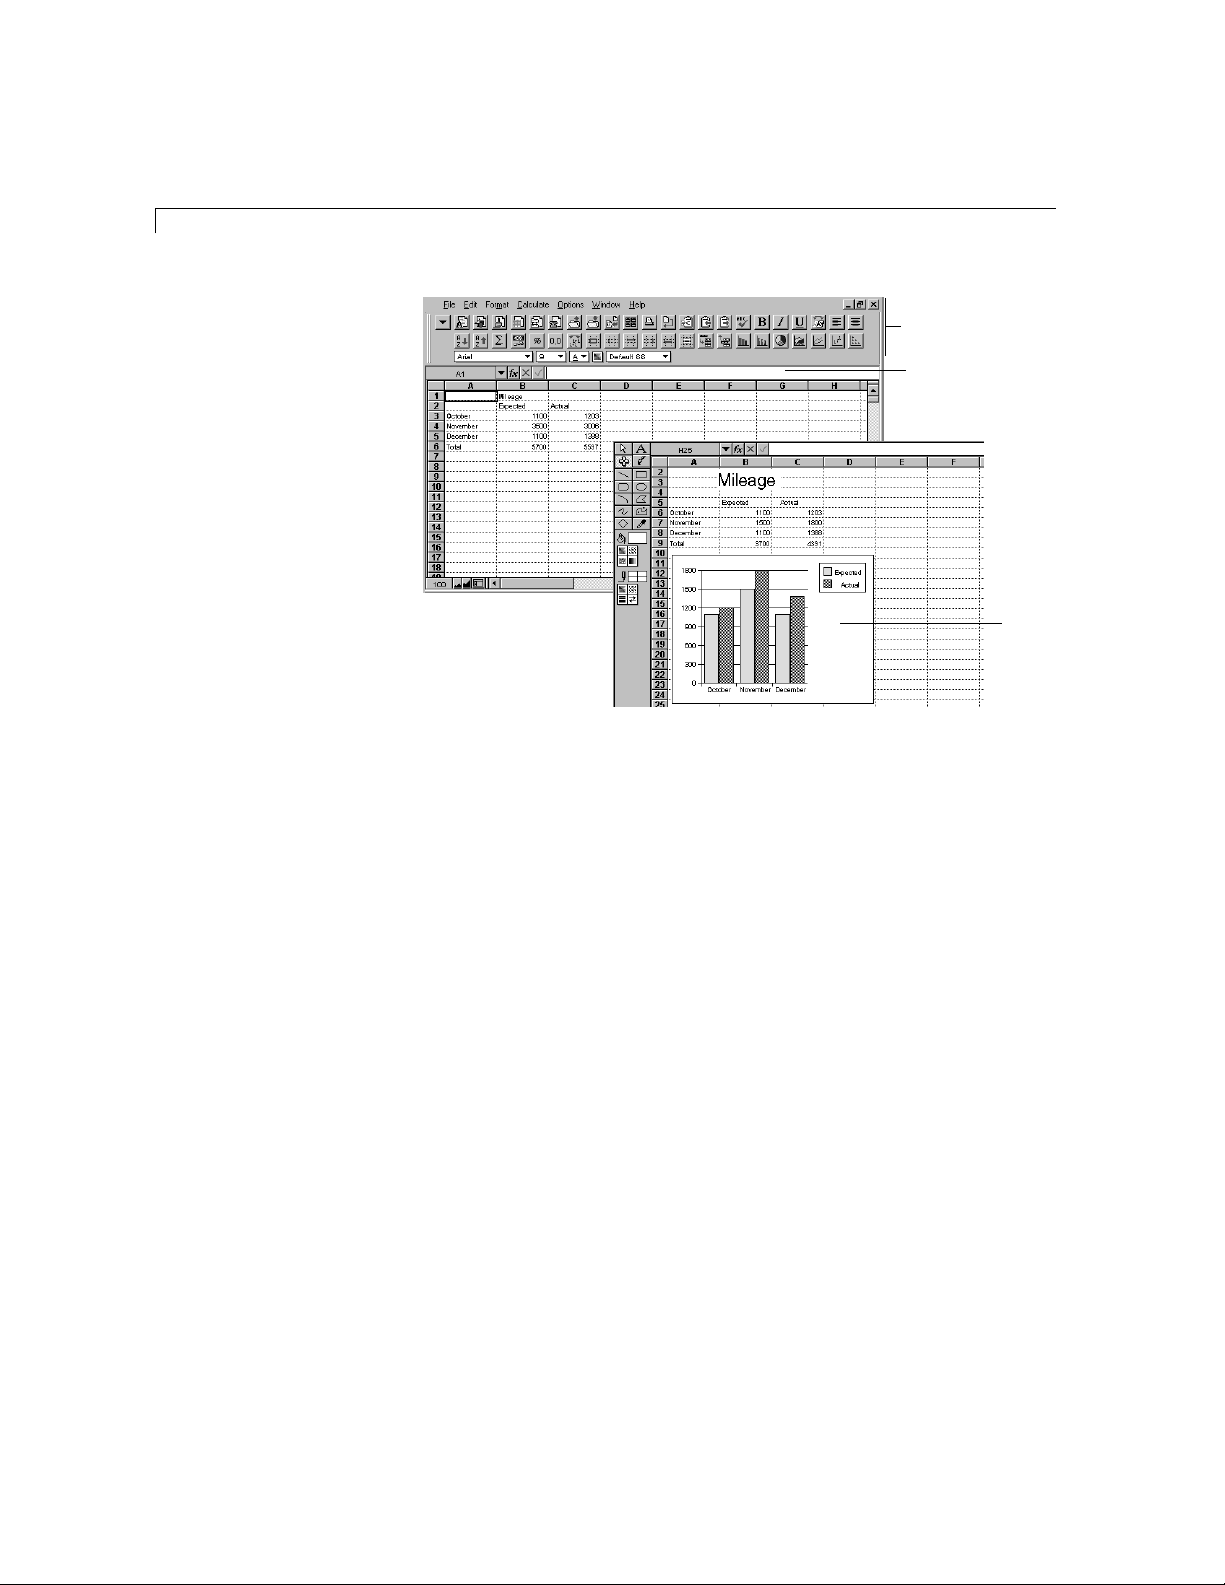
1-12 AppleWorks 5 User’s Manual
Spreadsheet menus
and button bar
Entry bar
Add data to a spreadsheet
document
See chapter 7, “Spreadsheet,” for information about what you can do with
spreadsheet documents and spreadsheet frames.
Database documents
Database documents are useful for managing and organizing collections of
information, such as address lists, student or customer records, or research
notes. In a database document you can accumulate information, sort it, and
print attractive reports. You can also perform sophisticated searches to find
and work with only the information you want. By creating different layouts
(views) of the data, you can organize and present the same data in many
different ways. You can also enhance the data by adding pictures, patterned
lines, or other objects to the database document.
Chart
Create a chart to add clarity or show data in perspective
Page 25
Database controls
Enter names and addresses
in a database document
See chapter 8, “Database,” for more information about database documents.
Communications documents
A communications document is different from other AppleWorks
documents. It uses the HyperTerminal application to connect your computer
to an online information service, a bulletin board, or another computer.
Introduction 1-13
Database menus
and button bar
Clip art
Alphabetize the list and add a picture
Communications
menus and button bar
A Windows HyperTerminal document
With a communications document, you can connect to a remote computer
and receive, send, and save data. For information on HyperTerminal, see
chapter 10, “Communications,” and the HyperTerminal documentation that
comes with your computer.
Page 26

1-14 AppleWorks 5 User’s Manual
Where to go from here
Now you’re ready to start AppleWorks and create some documents of your
own. If you haven’t looked over the section “How to start” on page 1-1, do
so now. It shows you how to use the User’s Manual and the onscreen Help
system together to find information. Then go to “Starting AppleWorks” on
page 2-1.
Page 27

Chapter 2: Creating, opening, and printing documents
This chapter provides basic information about using AppleWorks that in
general applies to all document types. These topics are covered:
1 starting and stopping AppleWorks
1 creating and saving documents
1 printing documents
For information on working with windows, pages, libraries, and buttons, see
chapter 3, “Basics.” For information unique to a particular type of document
or frame, see the appropriate chapter in this User’s Manual.
In the Help index,* see:
E Help, finding
All features, including procedures and shortcuts, are described completely in
onscreen Help. See “Using AppleWorks Help” on page 1-3 if you are not
familiar with onscreen Help or how this User’s Manual and Help work
together.
Starting AppleWorks
To start AppleWorks, click the Start menu and choose Programs. Then choose
AppleWorks from the AppleWorks 5 menu.
If you’re new to AppleWorks or unfamiliar with the new features in
AppleWorks, run the onscreen tour. You can run the tour at any time by
choosing Introduction to AppleWorks from the Help menu in the AppleWorks
window.
Creating a document
In the Help index,* see:
E documents, creating
To create a document, you can:
1 start with a blank document
1 use the AppleWorks Assistants, which help you create specific
1 open custom templates, called stationery
documents to meet your home and office needs
Choose Index from theHelp menu and type the first few letters of the entry. Double-click the
*
entry and then double-click a topic.
Page 28
2-2 AppleWorks 5 User’s Manual
Creating a blank document
In the Help index,* see:
E New command
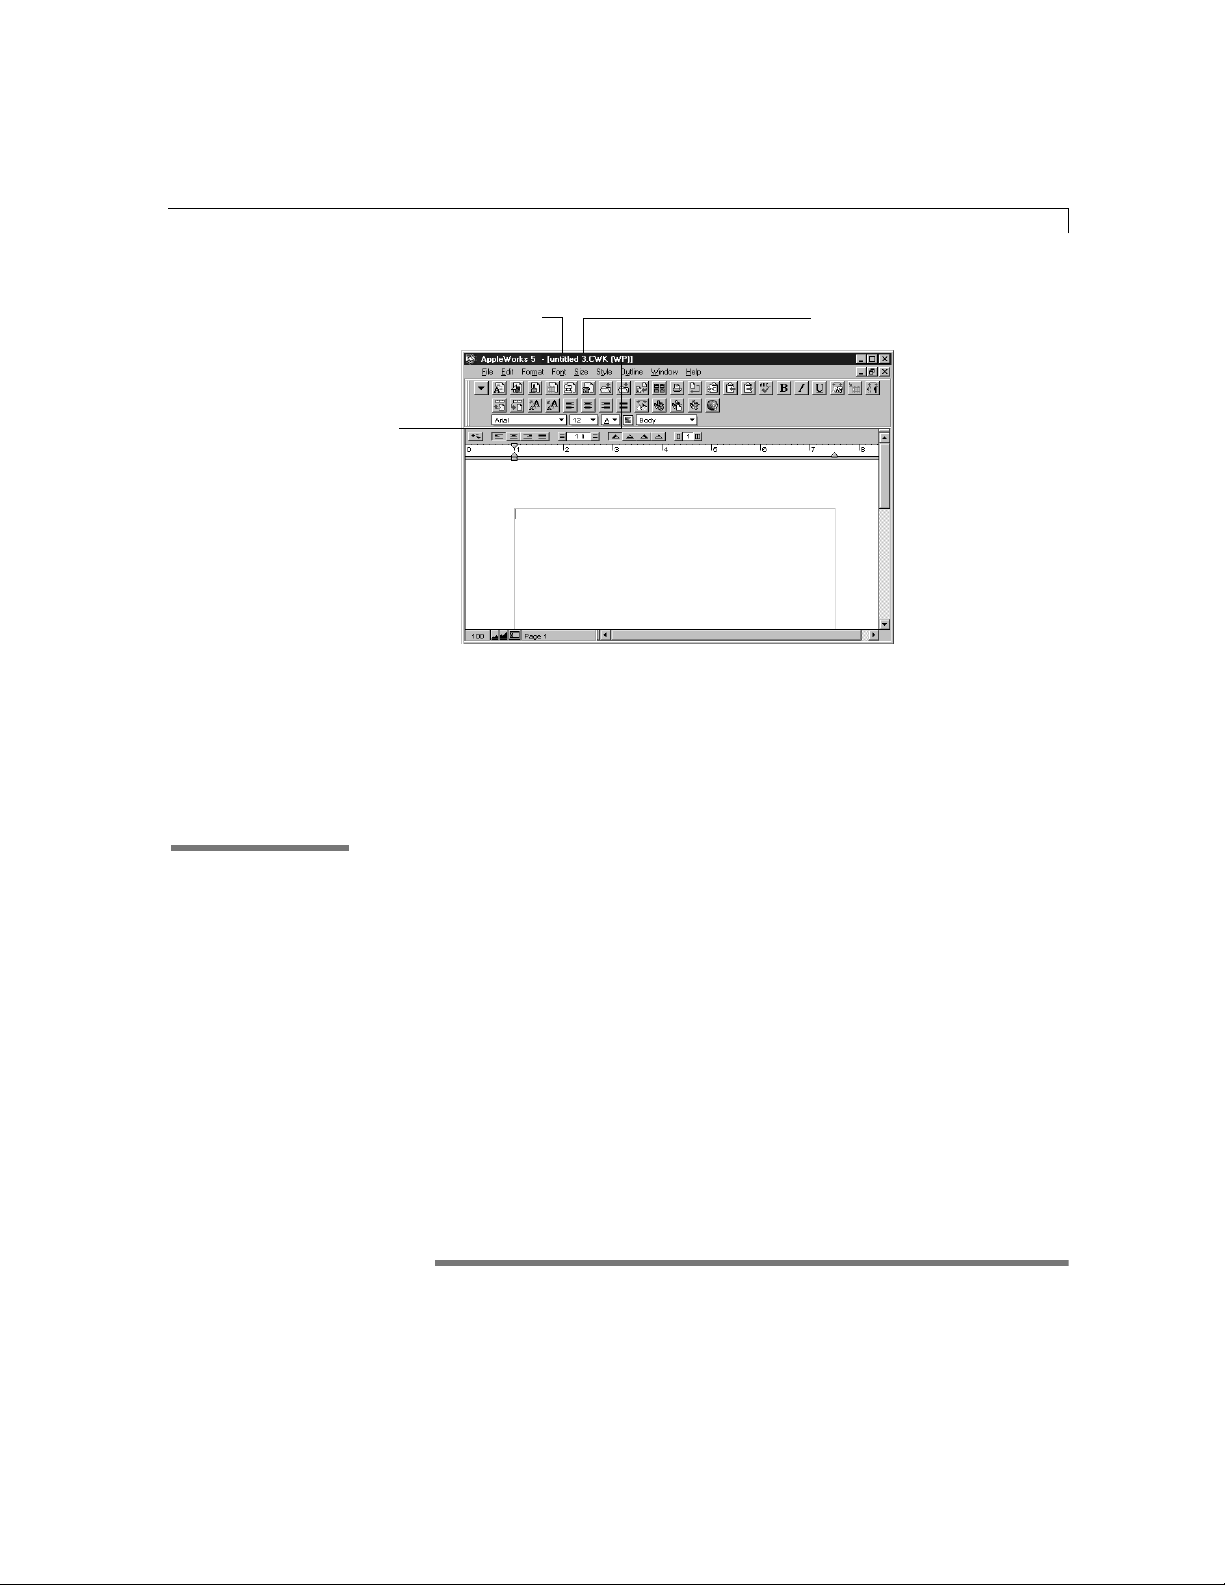
You can create a document when you start AppleWorks or when
AppleWorks is already running. To create a document when AppleWorks is
running, choose Newfrom the File menu. Or, click the appropriate button in
the Default button bar. (If you don’t see the button bar, choose Show Button Bar
from the Window menu.)
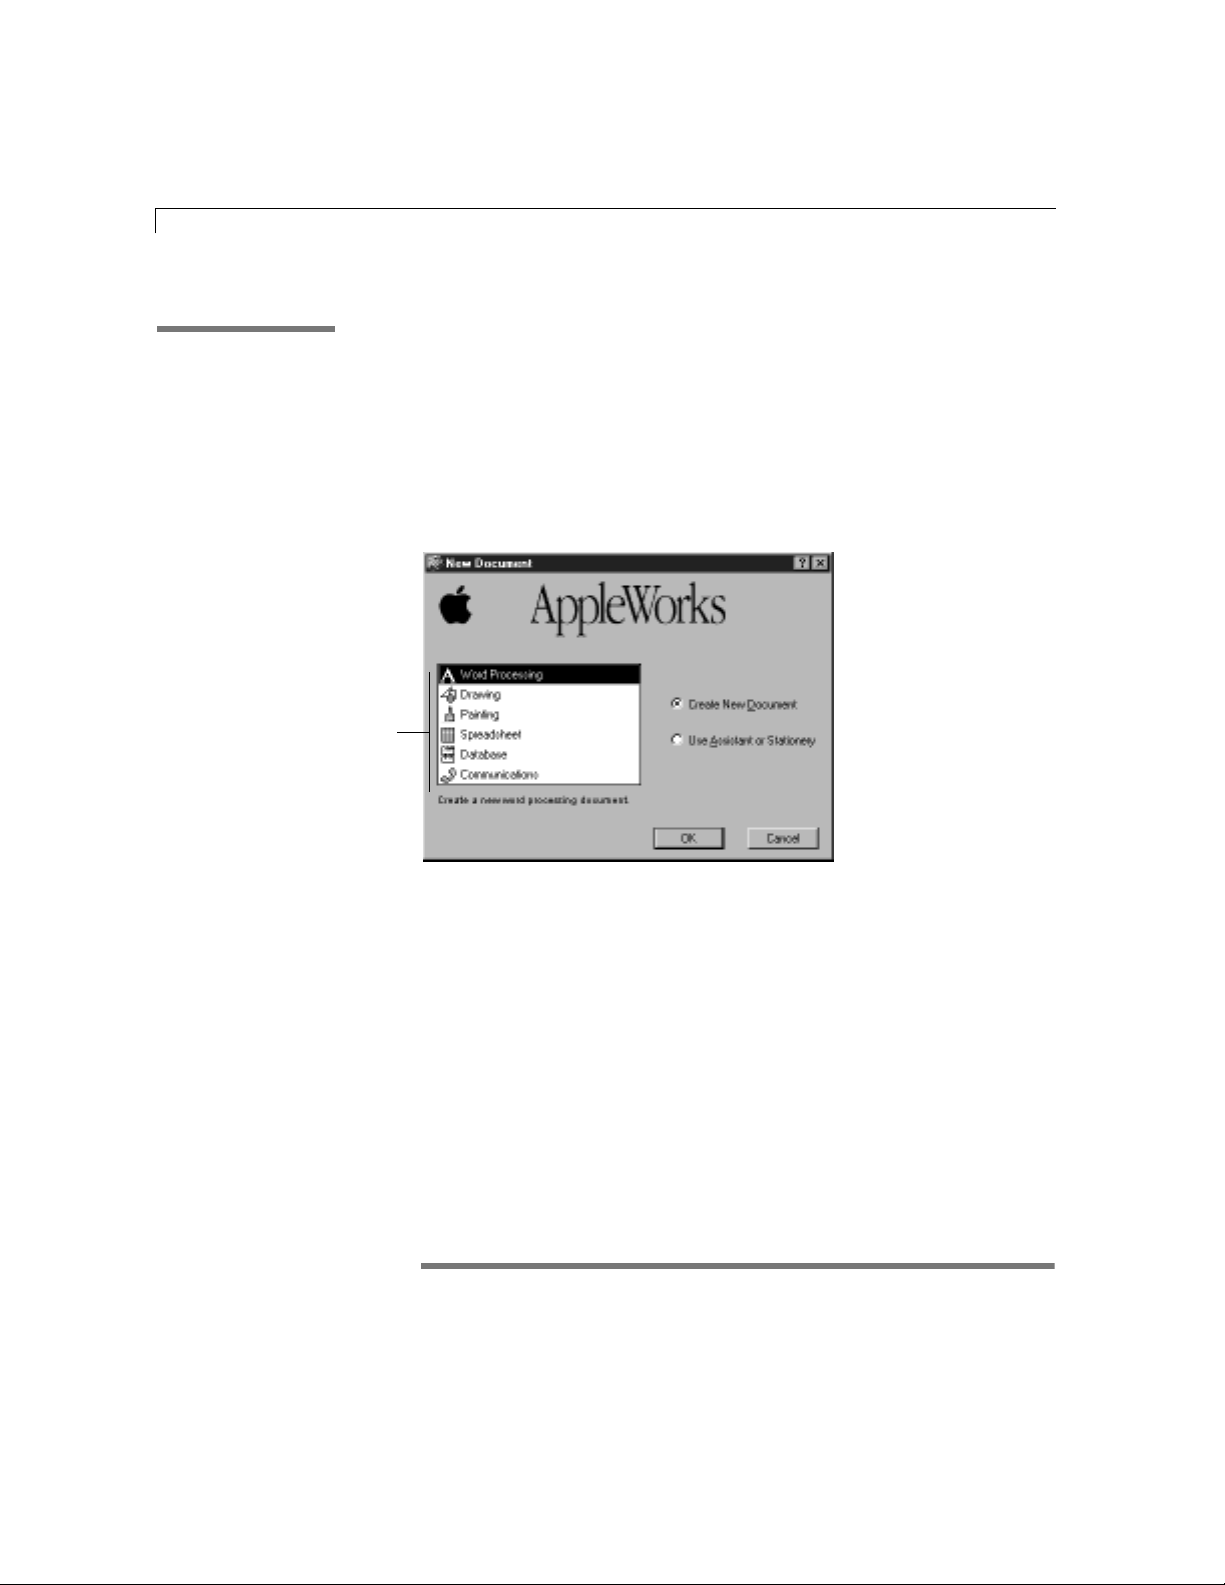
Select a document type
If you selected
New from the File menu, you see the New Document
dialog box.
When you create a document, you see the window for the selected
document type.
Choose Index from theHelp menu and type the first few letters of the entry. Double-click the
*
entry and then double-click a topic.
Page 29
Creating, opening, and printing documents 2-3
Document type:
WP for Word Processing
DR for Draw
PT for Paint
SS for Spreadsheet
DB for Database
CM for Communications
Using an Assistant
In the Help index,* see:
E Assistants
Document name, which you
can change
The order in which the
document was created
The margins, page numbering, and display are set up for each type of
document. You can change these settings by choosing Document from the
Format menu.
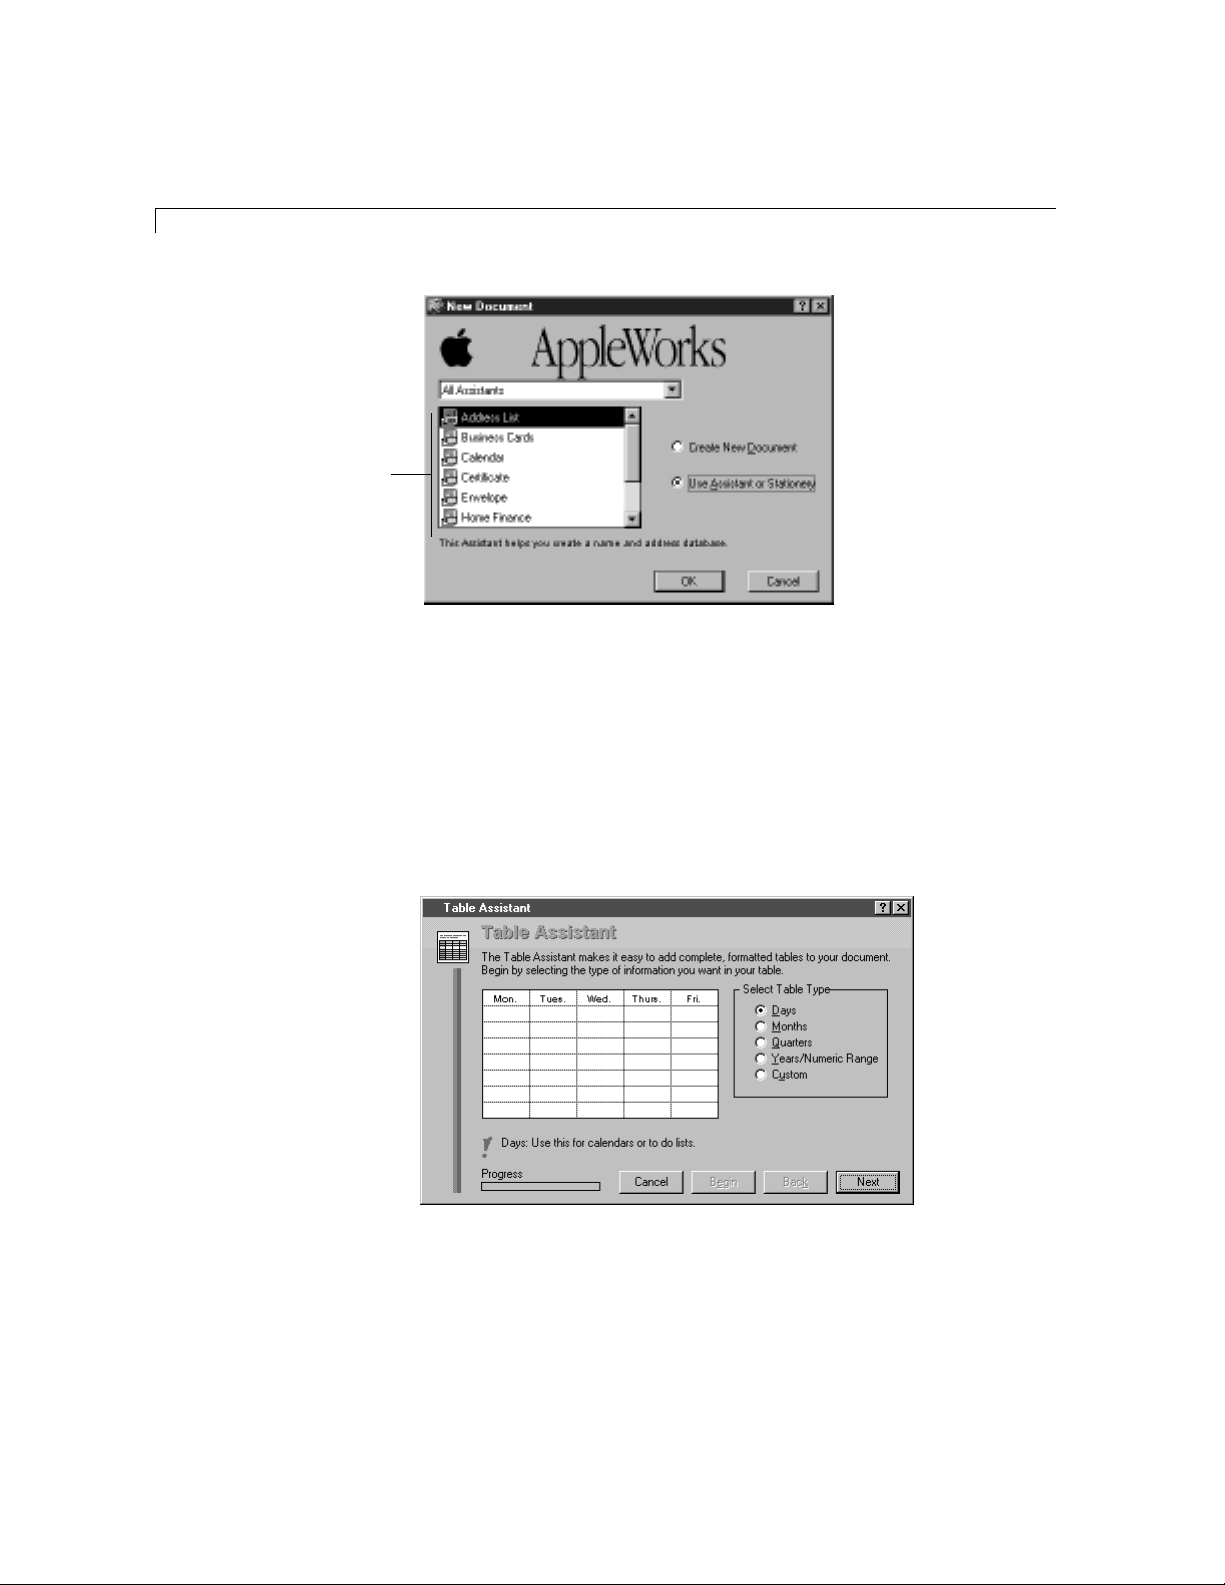
Use an Assistant to lead you step-by-step in creating specific documents,
such as a document for addressing envelopes. Some Assistants are
available when you first create a document, and others are available while
you’re working with a document.
To use an Assistant when you first create a document, choose New from the
File menu. In the New Document dialog box, select Use Assistant or
Stationery. Choose a category from the pop-up menu, and then select an
Assistant name from the scrolling list.
Choose Index from theHelp menu and type the first few letters of the entry. Double-click the
*
entry and then double-click a topic.
Page 30
2-4 AppleWorks 5 User’s Manual
Select an Assistant
You can use other Assistants to help you perform a specific task in a
document you’ve already opened. These Assistants are available in certain
types of documents only. For example, the Assistant for creating tables is
available with draw and word processing documents.
To use an Assistant for the current document, choose AppleWorks Assistants
from the Help menu in the AppleWorks window. Select an Assistant, and
then click OK.
Assistant for creating tables
Page 31

Creating, opening, and printing documents 2-5
An Assistant prompts you to supply information. Based on that information,
AppleWorks creates the document for you.
This Assistant Helps you to
Address List Create a database listing of names and addresses for
Business Cards Create business cards for business or personal use
Calendar Create a monthly calendar
Certificate Create certificates, awards, or diplomas
Create Labels Assistant Create a database layout for labels
Envelope Position and print addresses (including return addresses) on
Home Finance Examine home finance questions, such as determining your
Insert Footnote Place a footnote in a document. For more information, see
Make Table Insert and format a table within a document. For more
Newsletter Create newsletters for your club, school, or business
Paragraph Sorter Sort paragraphs alphabetically within a document. For more
Presentation Create presentations to view on a computer or overhead
business, personal, or student information
envelopes. For more information, see “Addressing
envelopes” on page 9-22.
net worth, buying a home, or taking out a loan
“Adding footnotes and endnotes” on page 4-26.
information, see “Creating tables” on page 4-18.
information, see “Sorting paragraphs” on page 4-13.
projector, or on paper
Using stationery
In the Help index,* see:
E stationery, using
To use stationery (a template with preformatted settings and options), choose
New from the File menu, and then select Use Assistant or Stationery. Choose a
category from the pop-up menu, and then select a stationery name from the
scrolling list. For information about setting up stationery, see “Saving
document formatting as templates (stationery)” on page 2-10.
Choose Index from theHelp menu and type the first few letters of the entry. Double-click the
*
entry and then double-click a topic.
Page 32

2-6 AppleWorks 5 User’s Manual
Select a stationery document
A description for the currently
selected stationery appears here
Use stationery to create a document using a template such as a letterhead, an
envelope, or a fax cover sheet that you customize for your own use.
Page 33
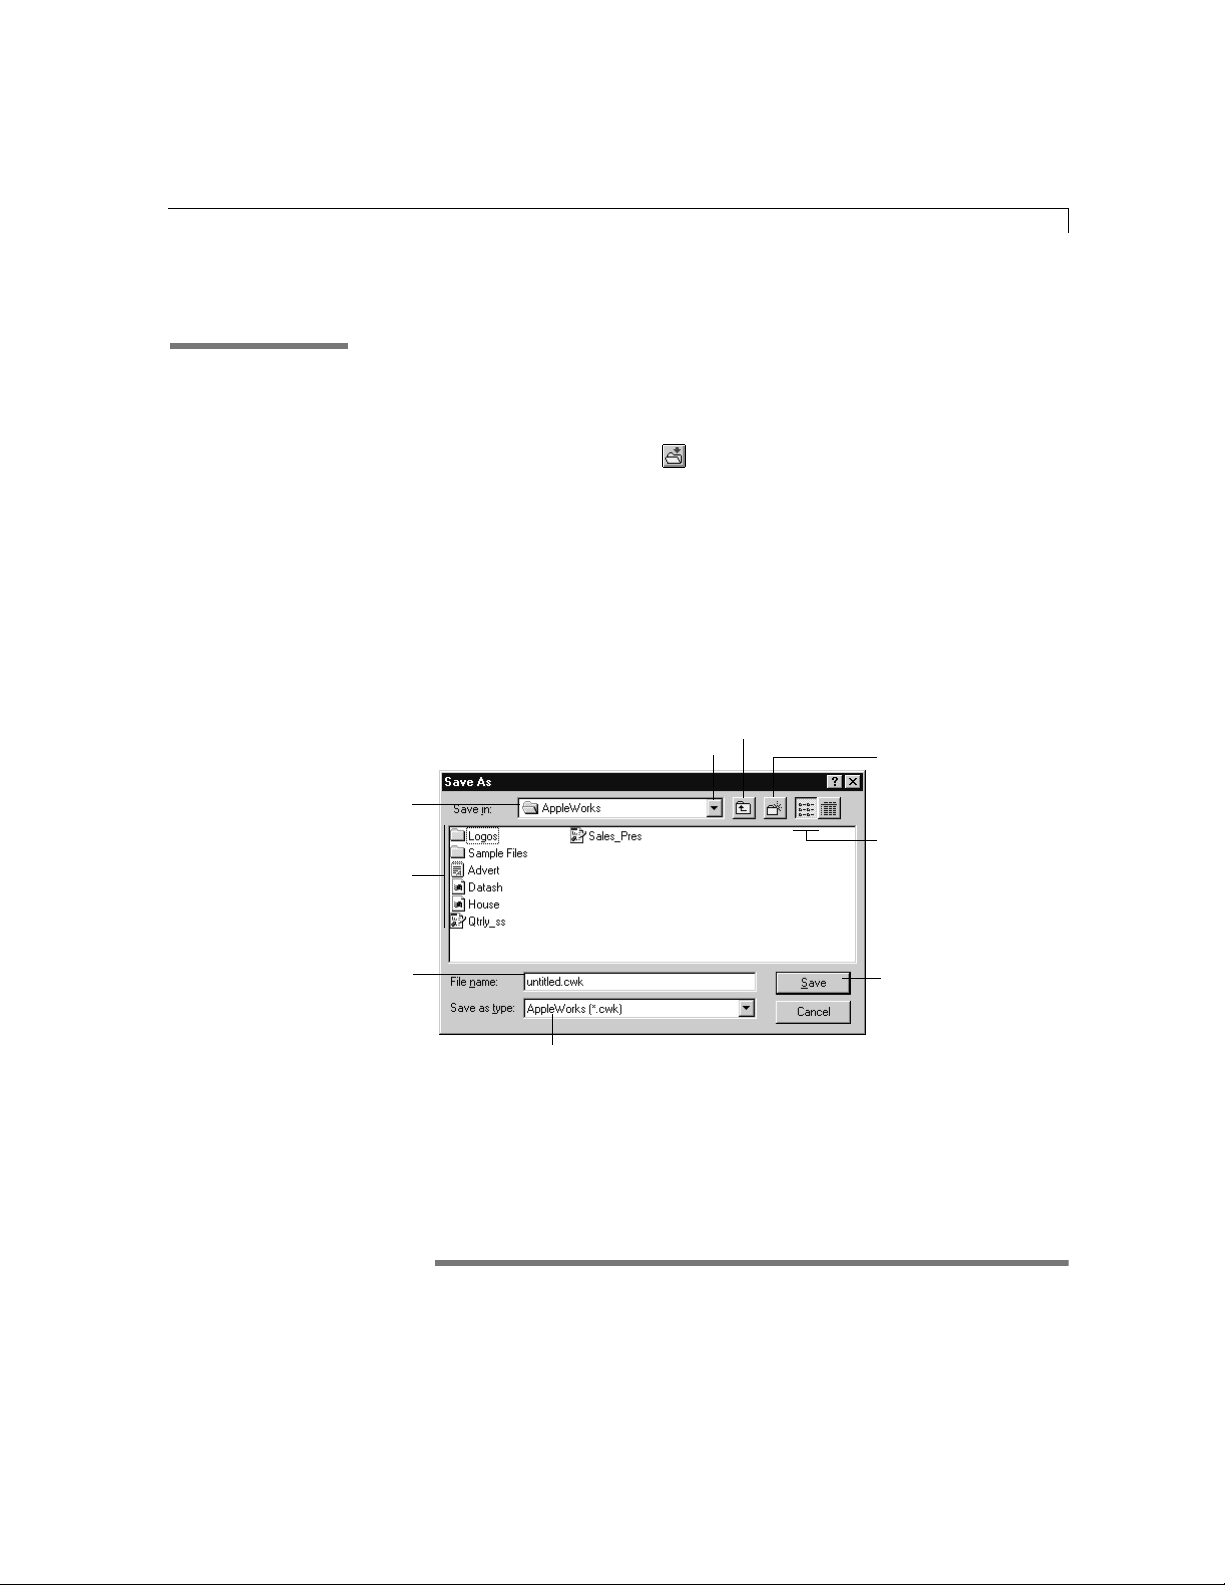
Saving a document
In the Help index,* see:
E saving
E stationery
Creating, opening, and printing documents 2-7
When you finish working with a document, you save it to retain all your
changes. You can also save text, draw objects, paint images, formatting, and
settings in stationery (templates) that you can later reuse. See “Saving
document formatting as templates (stationery)” on page 2-10.
To save a document, click on the Default button bar, or choose Save or
Save As from the File menu.
1 Choose Save to save changes to a document you’ve previously saved.
1 Choose Save As to save another version of a document with a new name, in
a different format, or in a separate location.
You see the Save As dialog box any time you choose Save As from the File
menu. In the Save As dialog box, type a name for the document, and then
click Save.
Currently open folder
Contents of the selected
folder or drive (double-click
a folder to make it the
selected location)
Type a new name for the
document
See all your
folders and drives
Choose a file format
Move up one level in the folder hierarchy
Create a new folder in the
selected folder or drive
Show or hide file
and folder details
Click to save the
document
If you try to save a document with the same name as another document in the
same folder, you see a message asking if you want to replace the existing
document with the current document.
Choose Index from theHelp menu and type the first few letters of the entry. Double-click the
*
entry and then double-click a topic.
Page 34

2-8 AppleWorks 5 User’s Manual
After you save a document for the first time, you can:
1 resave it periodically to keep your work up to date
1 save it with a different name to create two identical documents
1 make a backup copy regularly to protect your data
Opening a document
When you open a document, it looks like it did when you last saved it. For
In the Help index,* see:
E opening
information about opening and using stationery, see “Saving document
formatting as templates (stationery)” on page 2-10.
To Do this
Open an AppleWorks document
from within AppleWorks
Open an AppleWorks document
from Windows
Open a document created by
AppleWorks for Mac OS
software
Click on the Default button bar or choose Open from the
File menu, choose the document, and then click Open. (The
names of the last four documents you opened or saved
appear at the bottom of the File menu. To open one of these
documents, select its name.)
If you’re asked for a password, type the password, and
then click OK. (For more information about passwords, see
“Protecting documents with passwords” on page 2-14.)
Double-click the document icon in Windows Explorer, or
My Computer, or click the Start menu, choose Documents,
and then choose the document name. AppleWorks starts
up (if it’s not already running) and opens the document.
If you’re asked for a password, type the password, and
then click OK. (For more information about passwords, see
“Protecting documents with passwords” on page 2-14.)
There are many ways to open documents from Windows.
For more information, see the documentation that comes
with your computer.
Choose Open from the File menu, choose Show All Files (*.*)
from the Files of type pop-up menu, choose the document,
and then click Open.
If you’re asked for a password, type the password, and
then click OK.
In the Open dialog box, you can search for a document and choose the type
of document you want to open.
Choose Index from theHelp menu and type the first few letters of the entry. Double-click the
*
entry and then double-click a topic.
Page 35
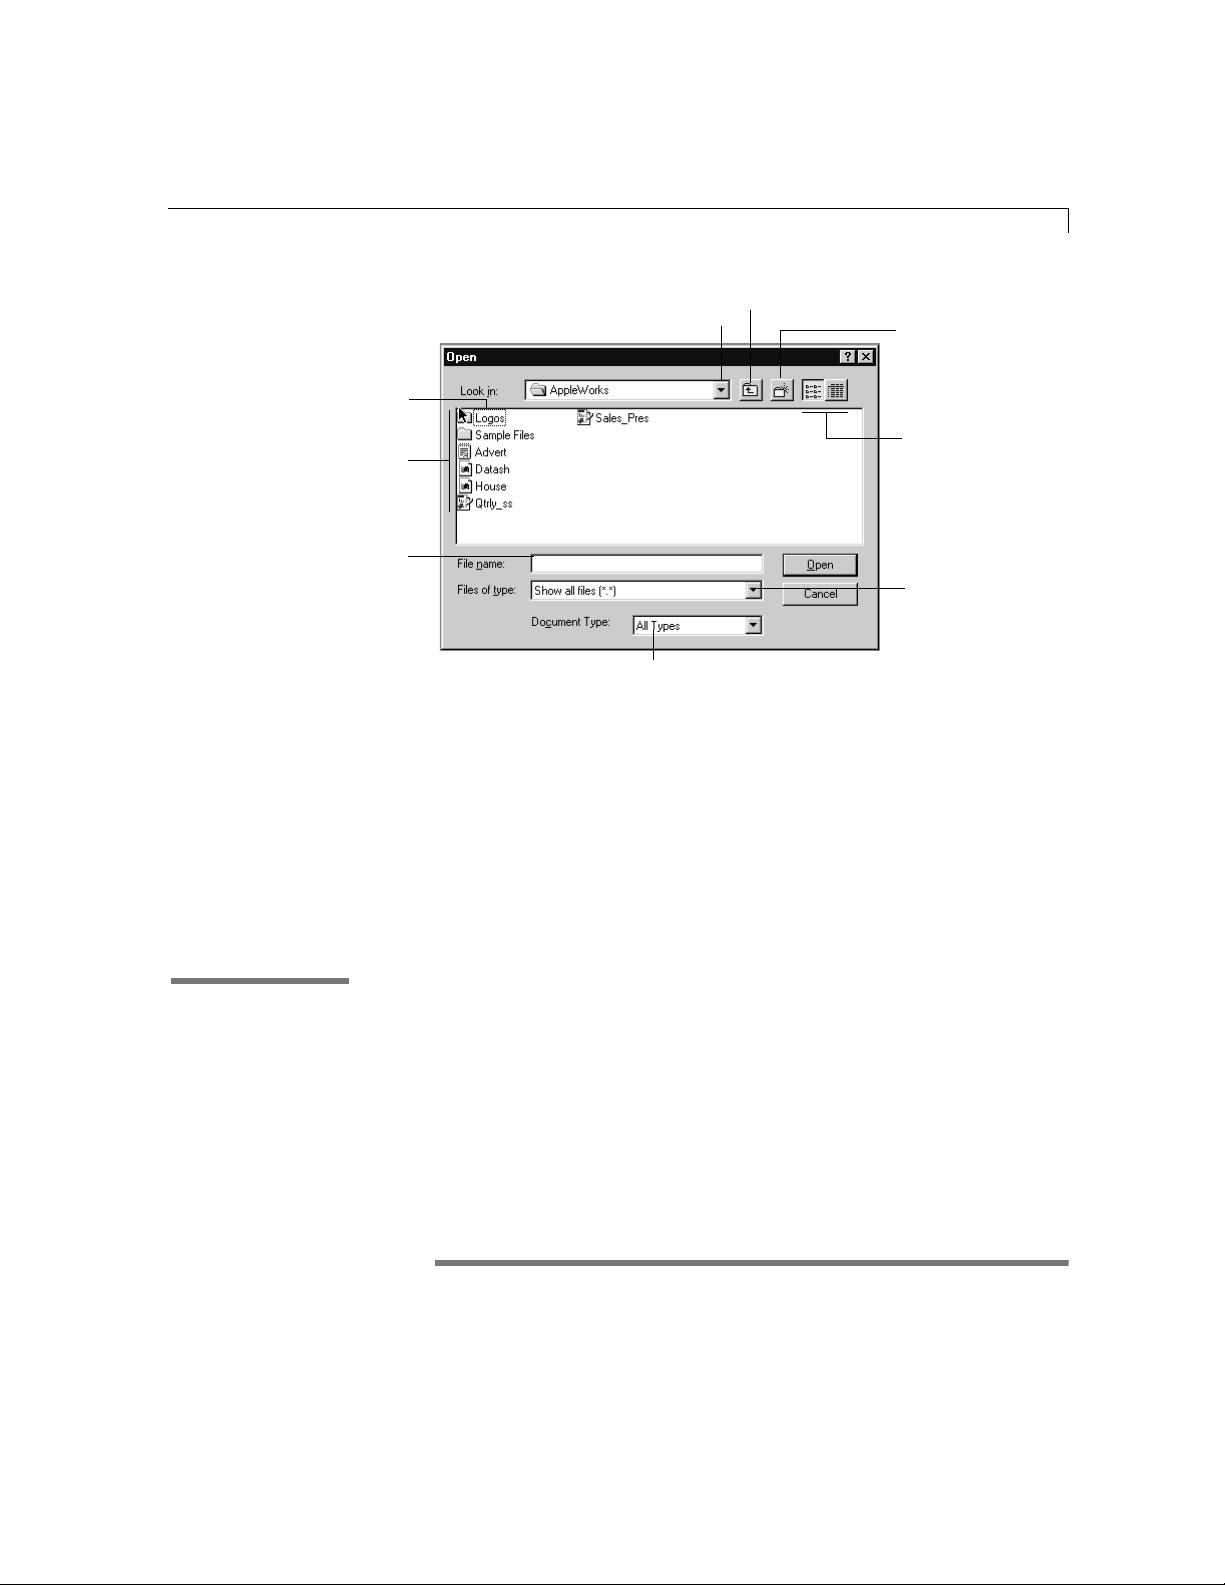
Creating, opening, and printing documents 2-9
M
Ch
Selected folder or drive
Contents of the selected
folder or drive (double-click a
folder to select it)
Type the name of the document to
open (or double-click its icon)
Finding documents
documents and folders in that location
oose a folder or disk to see
Choose the type of document to open
(such as Painting)
ove up one levelin thefolderhierarchy
Create a new folder in the
selected folder or drive
Show or hide
file and folder
details
Choose the file type for
the document to open
(such as GIF)
When you need help locating a document on your computer, or in your
computer system when you have external drives, use the Find AppleWorks
Documents Assistant. For more information, see “Using an Assistant” on
page 2-3.
Linking to other documents
When you plan to use an AppleWorks document onscreen or on the Internet
In the Help index,* see:
E links
E URL buttons
or World Wide Web, you can create a link (a connection or jump) from an
area in a document to a:
1 different document
1 different area of the same document
1 Uniform Resource Locator (URL), the address of a document,
application, or other information on the Internet
Choose Index from the Help menu and type the first few letters of the entry. Double-click the
*
entry and then double-click a topic.
Page 36

2-10 AppleWorks 5 User’s Manual
You select the text, object (such as a graphic object in a drawing),
spreadsheet cell, paint image, or frame from which to create the link, and
then specify the location to link to. For more information, see “Creating
links” on page 9-1. To create a link to information on the Internet, see
“Linking Web pages” on page 11-5.
Saving document formatting as templates (stationery)
Stationery is a template that you create once and then reuse many times. Save
In the Help index,* see:
E stationery
Setting up regular stationery
In the Help index,* see:
E stationery, creating
a document as stationery whenever you spend time customizing a document
and think you may want to use the same settings again. For example, you can
create stationery to design your own custom letterhead, a monthly
newsletter, or a customer tracking database that you and the rest of your
company can use regularly. Stationery can contain text, draw objects, paint
images, formatting, and other options you routinely use. There are two ways
to set up stationery in AppleWorks: regular and default.
If you plan to reuse the same combinations of text, objects, or settings, you
can create templates, called regular stationery, for specific uses. For
example, you might want to create regular stationery for your letterhead or a
newsletter.
You can set up regular stationery to open from the New Document dialog
box or from the Open dialog box. Stationery set up to open from the New
Document dialog box can be organized into categories to make it easier
to find.
To assign a category to a regular stationery document:
1. Choose Document Summary from the File menu.
2. Type a brief label in the Category box, and enter any other summary
information you want to save with the stationery.
If you don’t provide a category label, AppleWorks assigns the stationery
document to the None category.
Choose Index from theHelp menu and type the first few letters of the entry. Double-click the
*
entry and then double-click a topic.
Page 37

Setting up default stationery
In the Help index,* see:
E stationery, creating
Creating stationery
In the Help index,* see:
E stationery, creating
In the Help index,* see:
E documents, creating
Creating, opening, and printing documents 2-11
3. Click OK.
Your label shows in the Category pop-up menu in the New Document
dialog box (click Use Assistant or Stationery to see the Category pop-up menu).
For more information about entering document summary information, see
“Identifying your documents” on page 2-13.
If you plan to use certain settings every time you create a document, set up a
document as default stationery (or Options stationery) that opens
automatically whenever you create a new document of that type. For
example, you might want to change the default font used in a new word
processing document.
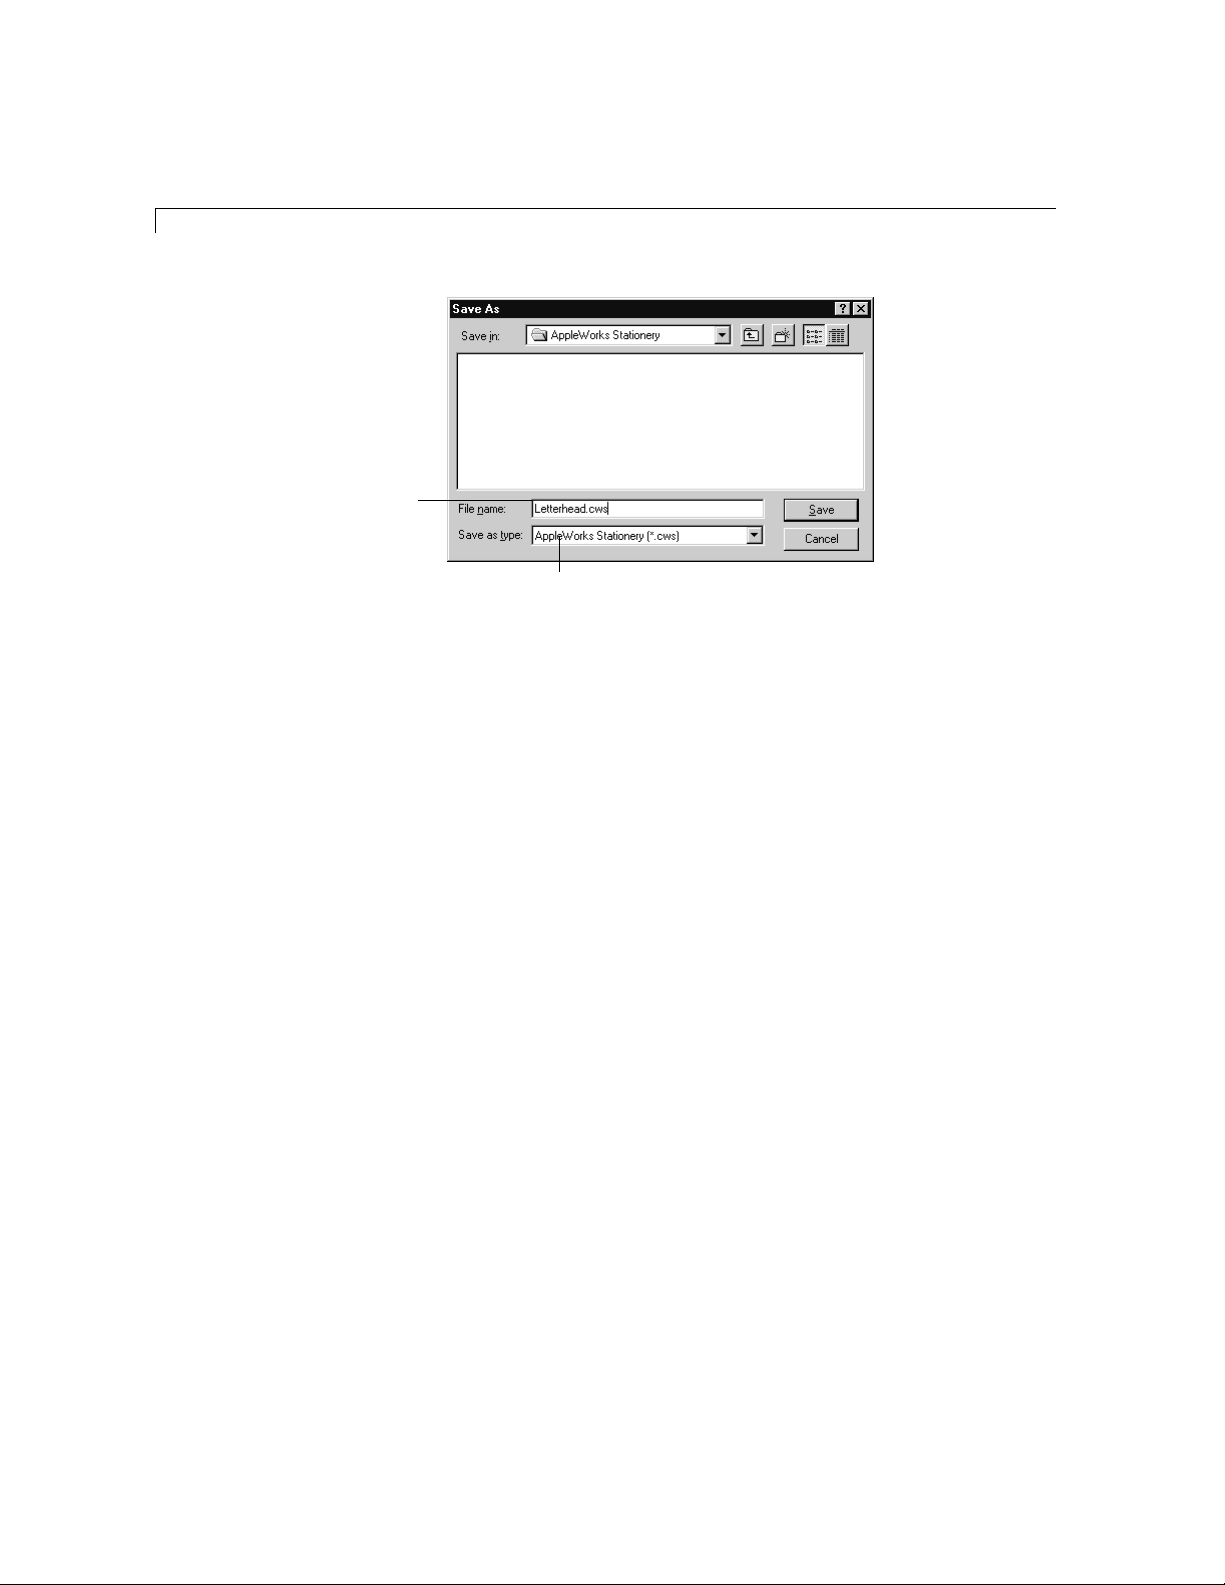
To create a stationery document, prepare a document with the settings and
information you want to save as stationery, and then follow these steps to
save the document:
1. Choose Save As from the File menu.
2. In the Save as dialog box, type a name for the document in the File name box.
1 If you’re setting up default stationery, there are specific naming
conventions you must use.
For this document type Use this filename
Word processing WPOPTION.CWS
Draw DROPTION.CWS
Paint PTOPTION.CWS
Spreadsheet SSOPTION.CWS
Database DBOPTION.CWS
1 If you’re setting up regular stationery, you can save the document as
any name. It’s best to give regular stationery a name that you can easily
identify later (such as Letterhead).
3. From the Save as type pop-up menu, choose AppleWorks Stationery (*.cws).
AppleWorks adds the .CWS extension to the filename.
Choose Index from theHelp menu and type the first few letters of the entry. Double-click the
*
entry and then double-click a topic.
Page 38
2-12 AppleWorks 5 User’s Manual
Type a name for the document
Choose the AppleWorks Stationery file format
4. Select the folder into which you want to save the stationery.
1 If you’re creating default stationery, or if you plan to open stationery
from the New Document dialog box, save the stationery in the
AppleWorks Stationery folder (which is in the AppleWorks 5 folder).
1 If you’re setting up regular stationery to open from the Open dialog
box, you can save the stationery in any folder.
5. Click Save.
Opening stationery
When you open a stationery (template) document, AppleWorks opens it as a
new, untitled document, and the original document remains unaffected. You
change the document as necessary and then assign it a new name when you
save it.
To open default stationery:
1. Choose New from the File menu.
2. Select the type of document to open (such as Word Processing or Drawing), and
then Click OK.
Note To create a document without the default stationery settings, select a
standard document type (such as Standard Word Processing) from the scrolling
list in the New Document dialog box.
Page 39

You can open regular stationery from the New Document dialog box or from
the Open dialog box.
To open regular
stationery from the Do this
In the Help index,* see:
New Document dialog box Choose New from the File menu, and then select Use
E stationery, using
Open dialog box Choose Open from the File menu, select the drive or
Identifying your documents
Save a description of your document when you want to include notes to
In the Help index,* see:
E Document Summary Info
command
yourself about the document’s contents or when you plan to save the
document as regular stationery. (See “Saving document formatting as
templates (stationery)” on page 2-10.) To save a description of a document,
choose Document Summary from the File menu, and then type the information.
Creating, opening, and printing documents 2-13
Assistant or Stationery. Choose a category from the Category
pop-up menu, select the stationery name in the scrolling
list, and then click OK.
folder containing the stationery, select the stationery
name in the scrolling list, and then click Open.
Keep track of different
versions of a document
Identify important
information in the
document
When you save a document as regular stationery and store it in the
AppleWorks Stationery folder, you see the document’s summary
information in the New Document dialog box.
Choose Index from theHelp menu and type the first few letters of the entry. Double-click the
*
entry and then double-click a topic.
Page 40

2-14 AppleWorks 5 User’s Manual
What you enter for Appears in the New Document dialog box as the
Title Document name (in the scrolling list)
Category Category name
Description Document’s description
Note You can enter more than one category. For example, if you enter
Business, Home, Education, the document appears in the Business
category, the Home category, and the Education category.
Protecting documents with passwords
You can protect a document or stationery by setting a password, which you
In the Help index,* see:
E passwords
(and other users) must type before you can open the document or stationery
using AppleWorks.
1. Choose Document Summary from the File menu.
2. Click Set Password, type a password (up to 255 characters of letters, numbers, or
symbols), and then click OK.
3. In the confirmation dialog box, type the password again, and then click OK.
Important Keep the following points in mind:
1 If you set a password for default (Options) stationery, you must type the
password each time you open the stationery document. If you don’t type
the correct password when you try to open the document, AppleWorks
opens a blank document of the same type.
1 To maintain security, consider doing the following:
1 Make passwords easy to remember, but not so easy that someone can
guess them.
1 If you write down passwords, store them in a secure place away from
your computer.
1 Change passwords often.
1 Passwords provide a minimum level of security to your documents and
should not be used to protect sensitive information. Setting a password
does not encrypt the file. To protect sensitive documents, consider taking
additional security measures.
Choose Index from theHelp menu and type the first few letters of the entry. Double-click the
*
entry and then double-click a topic.
Page 41

Importing and exporting documents
You can share AppleWorks documents with other applications by importing
In the Help index,* see:
E exchanging data
to or exporting from AppleWorks documents.
To import and export documents, the AppleWorks application uses
translators, special files that translate information for many popular
software applications. These files, which come with AppleWorks, are in
your AppleWorks 5 folder.
To Do this
Export a document so it can
be read by an application
other than AppleWorks
Import (convert) a
document created with a
different application
Insert an entire document,
such as clip art
(commercially produced
graphics) into an
AppleWorks document
Open a document created by
AppleWorks for Macintosh
Choose Save As from the File menu, and then choose a file
format, such as *.WMF, from the Save as type pop-up menu.
(If the file format you want to use isn’t listed, try using one of
the commonly accepted formats—Text, DBF, DIF, Microsoft
Excel, or SYLK—to save the document. You may be able to
open the document in any application that supports that
format.)
Choose Open from the File menu. In the Open dialog box, select
the appropriate document type from the Document Type and
Files of type pop-up menus. Select the file, and then click Open.
The original document is unchanged.
In the AppleWorks document, click where you want to insert
the file, and then click on the Default button bar, or
Insert from the File menu. In the Insert dialog box, select the file
type from the Files of type pop-up menu, choose the file, and
then click Open. (To insert information into fields of an
AppleWorks database, see “Importing data from other
documents” on page 8-37.)
Click on the Default button bar, or choose Open from the
File menu, choose Show All Files (*.*) from the Files of type
pop-up menu, choose a document, and then click Open.
Creating, opening, and printing documents 2-15
choose
You can import documents created in other applications using Object
Linking and Embedding (OLE). For more information, see “Including other
applications in your documents (OLE)” on page 9-30.
Choose Index from theHelp menu and type the first few letters of the entry. Double-click the
*
entry and then double-click a topic.
Page 42

2-16 AppleWorks 5 User’s Manual
Closing a document and leaving AppleWorks
Always close documents and windows before you leave AppleWorks or turn
off your computer.
To Do this
In the Help index,* see:
E closing
E Exit command
Close a document Choose Closefrom the File menu.
Close all documents Hold down the Alt key while you choose
Close from the File menu.
Leave AppleWorks Choose Exit from the File menu.
If you haven’t saved changes in open documents, AppleWorks asks if you
want to save the new version.
Printing a document or Help topic
To print the current document, click on the Default button bar, or choose
In the Help index,* see:
E documents, printing
E Help, printing
Printfrom the File menu. To print a current Help topic, choose Print Topic from
the File menu.
AppleWorks uses the default printer and print settings in Windows Control
Panel. You can change these settings for printing in AppleWorks, if necessary.
Before you print, you can preview a document on the screen and make
necessary adjustments.
To Do this in AppleWorks
Choose a printer Choose Print Setup from the File menu.
Change the page orientation,
page size, and other print settings
Preview a draw, spreadsheet,
database, or paint document on
the screen
Choose Print Setup from the File menu.
Choose Page View from the Window menu.
Word processing documents always appear in page view.
For instructions on hiding the margins and page guides in
a word processing document, see “Previewing pages for
printing” on page 3-11.
For more information about printing these document types, see “Printing a
spreadsheet document” on page 7-20 and “Printing a database document” on
page 8-38.
Choose Index from theHelp menu and type the first few letters of the entry. Double-click the
*
entry and then double-click a topic.
Page 43

Chapter 3: Basics
This chapter provides basic information about working with windows and
documents; using libraries to store drawings, images, frames, and text that
you can reuse later; and using the button bar to speed up your work. The
information in this chapter applies in general to all document types. For
information unique to a particular document type, see the appropriate
chapter in this User’s Manual.
All features, including procedures and shortcuts, are described completely in
onscreen Help. See “Using AppleWorks Help” on page 1-3 if you are not
familiar with onscreen Help or how this manual and Help work together.
Working with windows
Each document appears in a window, which contains standard elements for
working with applications. You also see elements unique to AppleWorks.
Horizontal
pane
control
Zoom percentage box
Zoom controls
Page indicator
Show/hide tools control
Vertical pane control
The status bar at the bottom of the AppleWorks window provides
information about your document.
Text ruler
Status bar
Page 44

3-2 AppleWorks 5 User’s Manual
Viewing windows
In the Help index,* see:
E viewing documents
When you work with objects and frames, this code
changes to show the type of menus currently available
Displays information as you move the
pointer over a tool or menu command
“Modified” means you
have unsaved changes
When you record or play a macro,
you see REC or PLAY here
Current date and time
Tip As you work in AppleWorks, click the right mouse button to see a menu
of appropriate commands.
You can view a window and its contents in different ways. For example, to
see a drawing in detail, you can enlarge your view of it (zoom in). When you
finish, zoom out to return to its original size.
To Do this Example
Zoom in or out,
or choose a
zoom
percentage
Split a window
vertically or
horizontally to
display different
parts of a
document at one
time
Click to zoom in, click
to zoom out, or click the zoom
percentage box and select a
percentage.
Click the horizontal pane
control in the upper-right
corner, or the vertical pane
control at the bottom of the
window, and then drag the bar
to a new position.
Zoom out
Zoom in
Drag down
Drag right
Restore a split
window
Choose Index from the Help menu and type the first few letters of the entry. Double-click the
*
entry and then double-click a topic.
Double-click the vertical or
horizontal line between the
panes.
Double-click to restore
the window
Page 45

Arranging windows
In the Help index,* see:
E Cascade command
Basics 3-3
AppleWorks can tile or cascade open document windows so they are
arranged neatly on the screen.
To Do this Example
Tile windows in a grid Click on the
Cascade (layer) windows Choose Cascadefrom
Default button bar,
or
choose Tile from
the Window menu.
the Window menu.
Tiled windows
Cascaded windows
Arrange minimized
AppleWorks documents
neatly at the bottom of the
AppleWorks window
Choose Arrange Icons
from the Window
menu.
Arranged icons
Tip To bring a document to the front, choose its name from the
Window menu.
Choose Index from the Help menu and type the first few letters of the entry. Double-click the
*
entry and then double-click a topic.
Page 46

3-4 AppleWorks 5 User’s Manual
Going to a page
In the Help index,* see:
E going to a page
Using the tool panel
In the Help index,* see:
E tools
To go directly to a page, double-click the page indicator at the bottom of the
window, type the number of the page you want, and then click OK. If you
don’t see the page indicator, choose Page View from the Window menu.
Page indicator
The tool panel contains icons that represent the tools used to work in
AppleWorks. You use these tools to paint images, draw objects and frames
(a special type of object), and change the appearance of objects and frames.
(For more information on frames, see the next section.)
Use the arrow pointer to
select, move, and reshape
objects and frames
Use the spreadsheet tool to
create spreadsheet frames
Use the painting and drawing
tools to paint images in a
paint document or frame
Pen sample
Use the pen sample and
palettes to select attributes
for lines and borders of
objects and images
Use the text tool to create
text frames and type text
Use the paint tool to create
paint frames
Use the drawing tools to draw
objects in documents and frames
Fill sample
Use the fill sample and
palettes to select the fill color,
pattern, gradient, or texture
for objects and images
If you don’t see the tool panel, click the show/hide tools control or
choose Show Tools from the Window menu.
Choose Index from the Help menu and type the first few letters of the entry. Double-click the
*
entry and then double-click a topic.
Page 47

Using the button bar
In the Help index,* see:
E button bars
Click to see options
for customizing the
button bar
Basics 3-5
When you open an AppleWorks document, you see the button bar at the top
of the document window (below the menu bar). The button bar saves time by
providing shortcuts to activities that would otherwise take several steps to
complete. The button bar is preset to include buttons for some common
AppleWorks actions.
The Default button bar for word processing documents
To change the way you work with the button bar, you can:
1 show or hide it
1 change its position
1 customize its appearance
1 add or remove buttons
1 create your own buttons to perform the tasks you choose (see “Creating
and editing custom buttons” on page 9-28).
There are several preset button bars. You can switch to a different one or
create your own button bar. For more information, see “Creating your own
button bar” on page 3-7.
Switching button bars
You can display only one button bar at a time, and the buttons on the button
bar change depending on the type of document. The Default button bars
include buttons for the most common actions for the current document type.
Choose Index from the Help menu and type the first few letters of the entry. Double-click the
*
entry and then double-click a topic.
Page 48
3-6 AppleWorks 5 User’s Manual
Showing, hiding, and positioning the button bar
Customizing the button bar
AppleWorks provides specialized button bars. For example, the Assistant
button bar includes all the Assistants for the document type. To switch to a
specialized button bar, choose the name of the button bar you want to display
from the menu on the button bar.
AppleWorks is preset to show the button bar above the document window.
To hide or show the button bar, choose Hide Button Bar or Show Button Bar from
the Window menu.
You can position the button bar above, below, or to the left or right of the
document window, or as a floating palette. To change the button bar, drag it
so it becomes a free-floating palette. To change its size, hold the mouse
button down over the lower-right corner of the palette, and then drag the
corner diagonally until the button bar is the size you want. To change its
position, drag it to where you want it to go. You can also choose Button Bar
Setup from the menu on the button bar, and then choose an option from
the Position pop-up menu.
To customize the button bar, choose Button Bar Setup from the menu on the
button bar, and then choose one of these actions:
Adding and removing buttons
In the Help index,* see:
E buttons
To Do this
Increase or decrease the number
of rows or columns of buttons
Show or hide the palettes or
pop-up menus on the button bar
Tip To move a button to a new location on the button bar, hold down
Type a number for rows or columns, up to 20.
In the Show Popups and Indicators areas, select or deselect
options.
Ctrl+Alt and drag the icon to where you want it.
To add or remove buttons, choose Edit Button Bars from the menu on the
button bar. In the Edit Button Bars dialog box, choose the name of the button
bar you want to edit, and then click Modify. In the dialog box, add and remove
buttons, and then click OK.
Choose Index from the Help menu and type the first few letters of the entry. Double-click the
*
entry and then double-click a topic.
Page 49
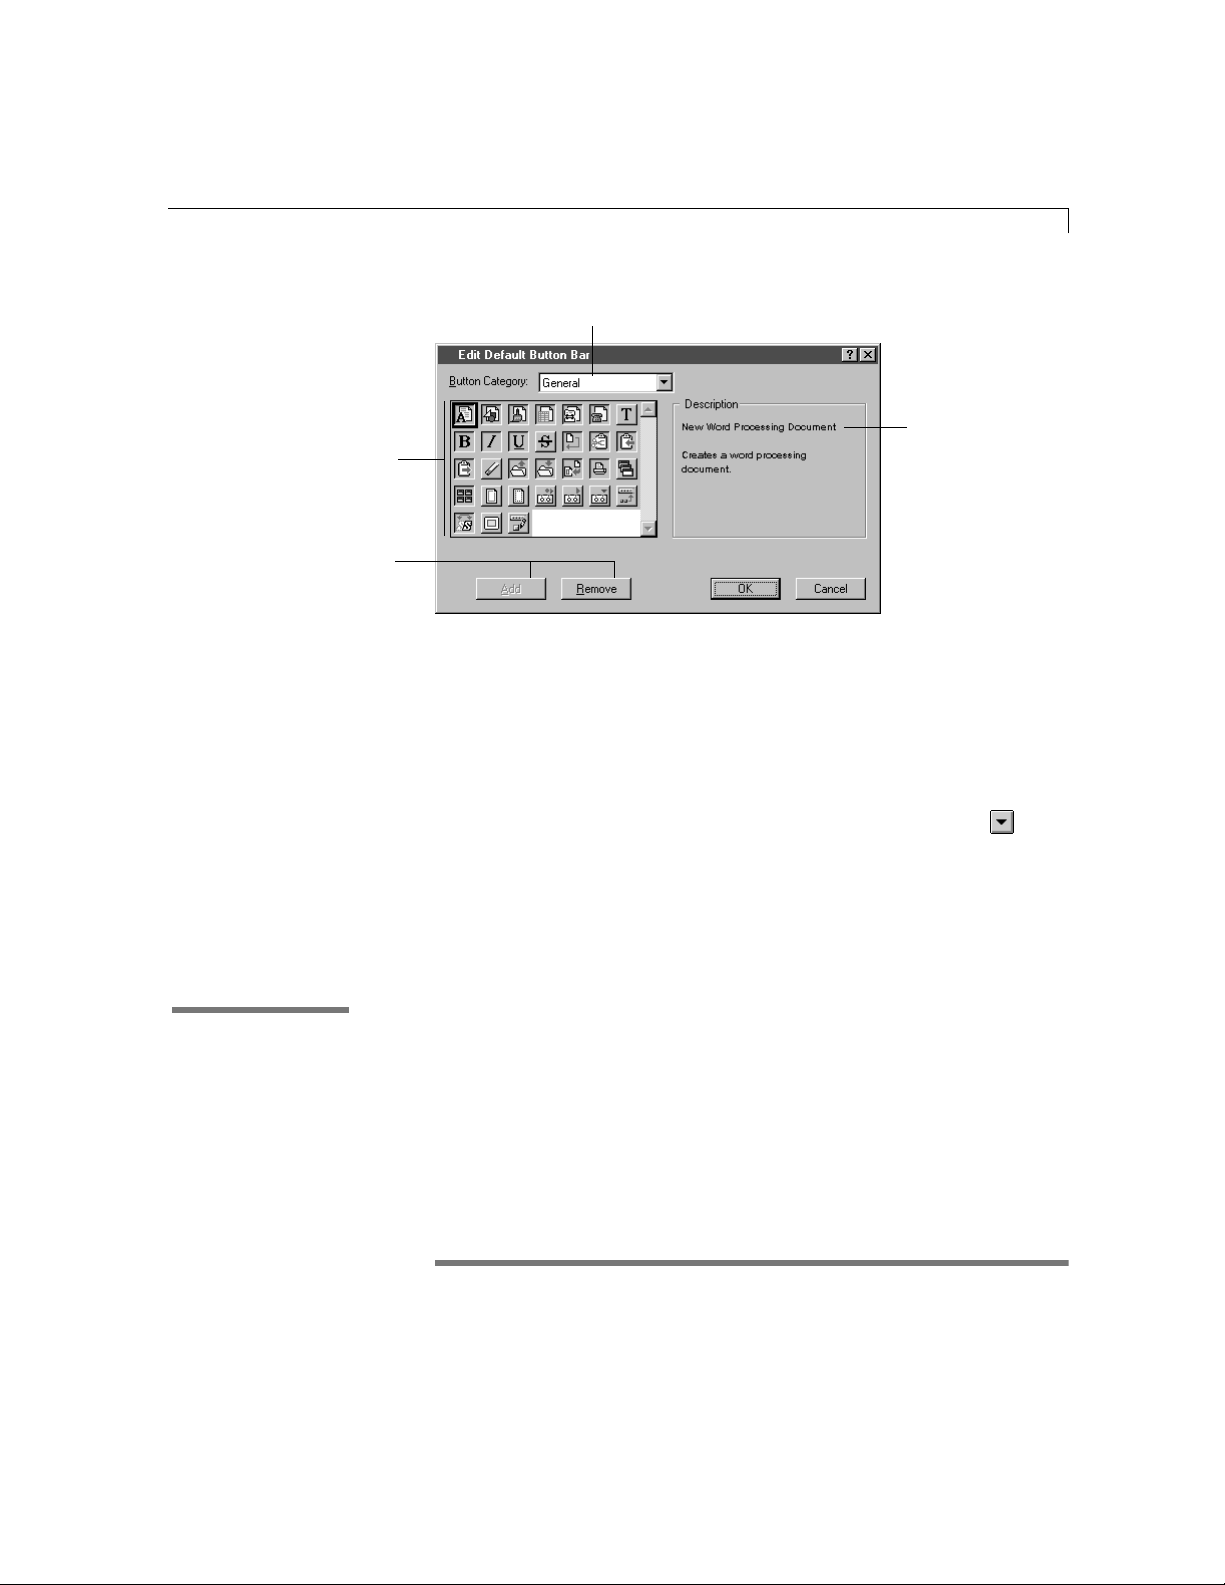
Double-click a button to
add it to the button bar
Select a button to add or
remove and then click to add or
remove the selected button
Creating your own button bar
Basics 3-7
Select a category from which you want
to add or remove buttons
Shows a brief
description of the
button’s purpose when
you click a button
Note The buttons you see in the button bar depend on the type of document
or frame you’re working in. For example, you see the button for rotating
objects 90 degrees only when you’re working in a paint document or frame.
You might want to create a new button bar with the buttons you use most
often. To create your own button bar, choose New Button Bar from the menu
on the button bar. In the New Button Bar dialog box, type a name for the
button bar, add buttons, and then click OK. For information on adding and
removing buttons, see the previous section.
Using palettes
In the Help index,* see:
E palettes, types
E palettes, using
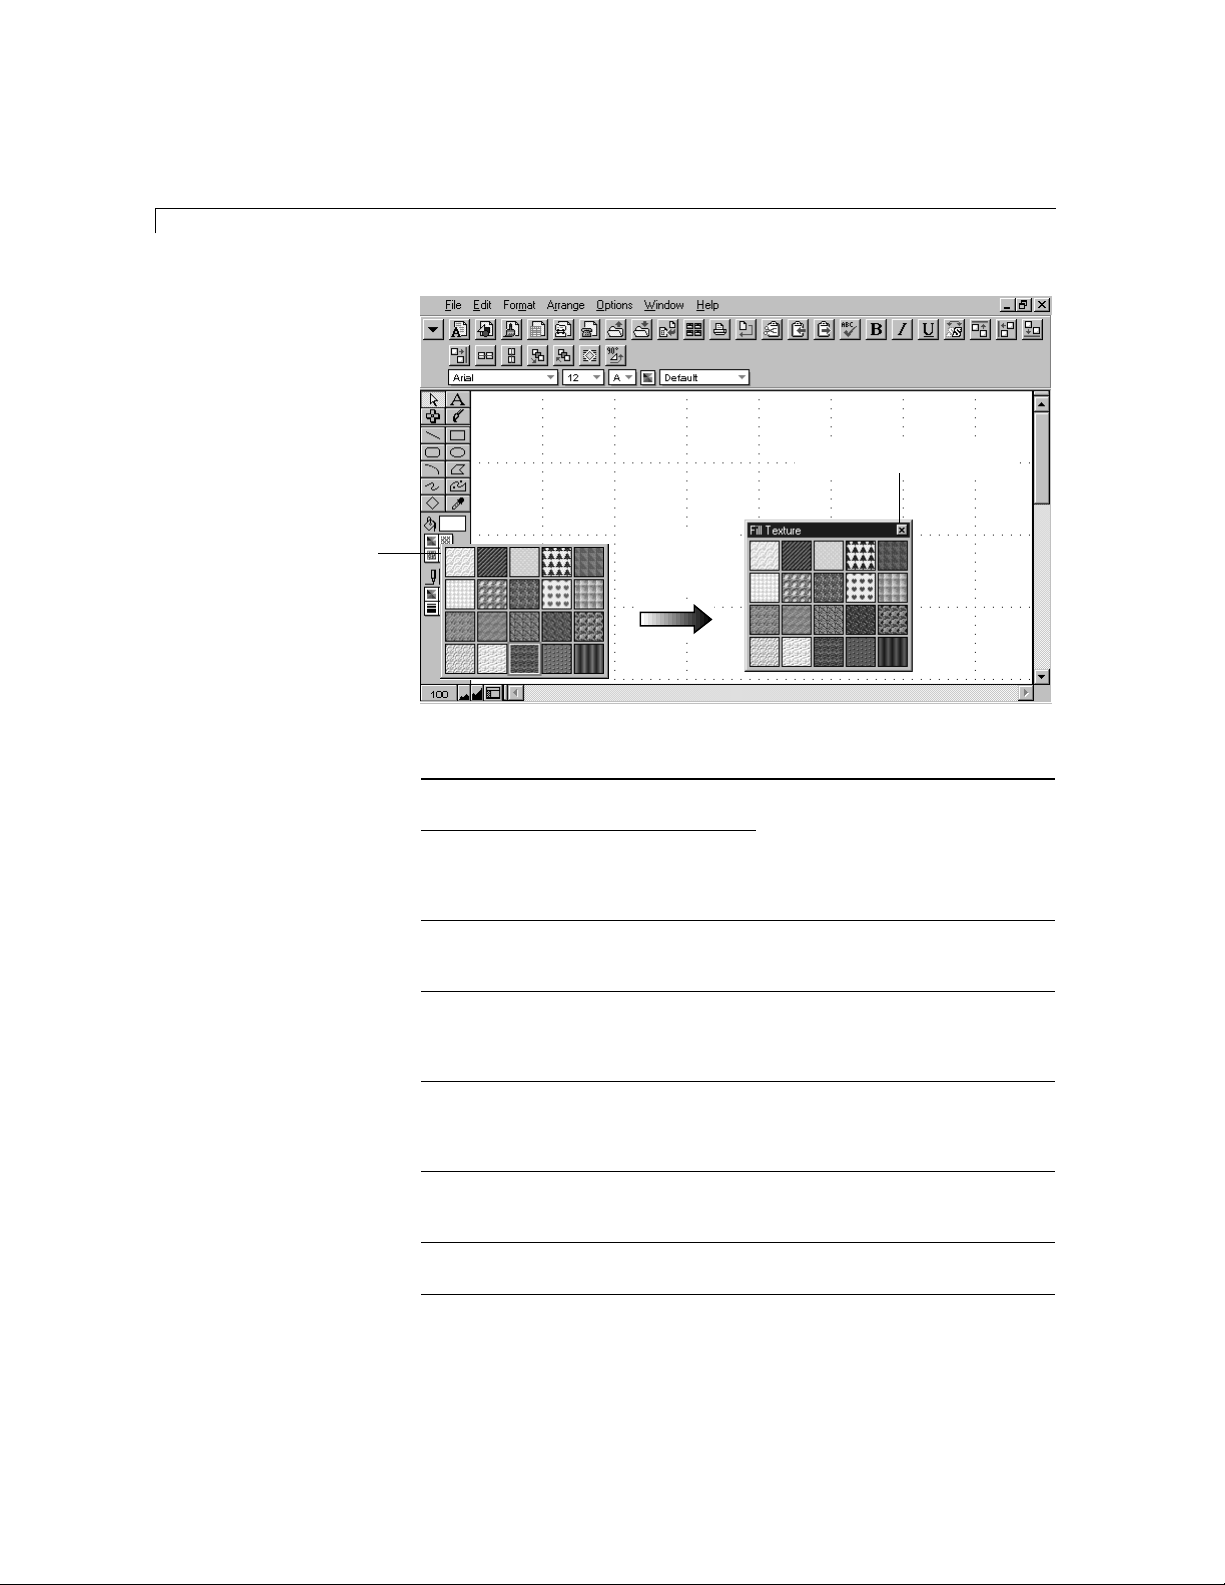
A palette is a window with options you can apply to documents, frames, and
objects. You can open and close palettes, such as the fill, pen, library, and
stylesheet palettes.
Note You can resize some palettes, such as the library and stylesheet
palettes. To resize a palette, hold the mouse button down over the lower-right
corner of the palette, and then drag the corner diagonally until the palette is
the size you want.
Choose Index from the Help menu and type the first few letters of the entry. Double-click the
*
entry and then double-click a topic.
Page 50
3-8 AppleWorks 5 User’s Manual
Click to view the palette
and select an option
Click to close the palette
(Ctrl+click closes all open palettes)
Drag the palette
onto the working
area to keep it open
while you work
Use the To For more information, see
Fill palettes Fill an object with a color,
pattern, gradient, or texture
“Changing the appearance of objects” on
page 5-9
Pen palettes Change the color, pattern, or
width of a line or an object’s
border, or add arrowheads to a
line
Library palette Add AppleWorks clip art to a
“Using libraries” on page 3-17
document, or store items that
you want to reuse
Mail merge
palette
Merge database information
with a word processing or
“Merging data into documents (mail
merge)” on page 9-19
spreadsheet document, or a
text frame in a draw document
Stylesheet
palette
Create, apply, and edit styles
for formatting text,
“Using styles” on page 9-5
paragraphs, spreadsheets,
outlines, and graphic objects
Links palette Create and edit links
“Creating links” on page 9-1
(document links, URL links,
and book marks)
OLE Tool
palette
Edit OLE objects
E Object Linking and Embedding (OLE)
in the Help index
Page 51
Working with frames
In the Help index,* see:
E frames, tools
E frames, creating
Basics 3-9
In AppleWorks, you can add different types of information (spreadsheet
data, text, and paint images) to the same document. These different types of
information are stored in special objects called frames. A frame is an object
that acts like a window to another type of document. You can draw frames
in every type of document.
To create a frame, click to select a frame tool in the tool panel, position the
pointer over the page, and then hold down the mouse button and drag the
pointer until the frame is the size you want. You can now work in the frame,
and you see the appropriate menu commands for that frame (for example,
you see spreadsheet commands when you work in a spreadsheet frame).
Tip Look in the status bar at the bottom of the application window for the
two-letter code (WP for word processing, DR for drawing, and so on) that
tells you which commands are currently available. You can also click the
right mouse button to see a menu of appropriate commands.
Use the text tool to
draw a text frame
Choose Index from the Help menu and type the first few letters of the entry. Double-click the
*
entry and then double-click a topic.
Use the spreadsheet tool to
draw a spreadsheet frame
Use the paint tool to
draw a paint frame
Page 52
3-10 AppleWorks 5 User’s Manual
Working in an AppleWorks document
This section describes methods you can use to work with most AppleWorks
documents.
Cutting, copying, and pasting
In AppleWorks you can cut, copy, and paste text, objects, or images within
a document or frame, between AppleWorks documents, and between an
AppleWorks document and another application’s document.
To Do this For this result
Copy Select the text, object, or
image to copy and click on
the Default button bar, or
choose Copy from the Edit
menu.
Cut Select the text, object, or
image to cut and click on
the Default button bar, or
choose Cutfrom the Edit menu.
Paste Position the insertion point
where you want to place the
cut or copied text, object, or
image, and click on the
Default button bar, or choose
Pastefrom the Edit menu.
Puts a copy of the selected text, object, or
image on the Clipboard. The original item
stays in the document or frame.
Removes the selected text, object, or
image from a document or frame and
places it on the Clipboard.
Places the cut or copied text, object, or
image at the insertion point, or the last
place you clicked.
Note You can’t paste objects into a spreadsheet cell. In a database document,
you can paste objects only in Layout mode or into a multimedia field.
Changing your mind
If you make a mistake or change your mind while you’re working in
AppleWorks, you can undo the latest change or go back to the last saved
version of your document.
To Do this
Undo your most recent action Click on the Default button bar, or choose Undofrom
Remove all the changes you’ve
made since you last saved the
document
the Edit menu.
Choose Revert from the File menu.
Page 53
Previewing pages for printing
In the Help index,* see:
E pages, viewing
E Show Margins command
Basics 3-11
You can preview a document on the screen in page view before actually
printing it. In page view, you see the margins, headers, footers, and page
numbers, if there are any.
For information on printing a document, see “Printing a document or Help
topic” on page 2-16.
Word processing documents always appear in page view. To preview a word
processing document without margins and page guides, choose Document
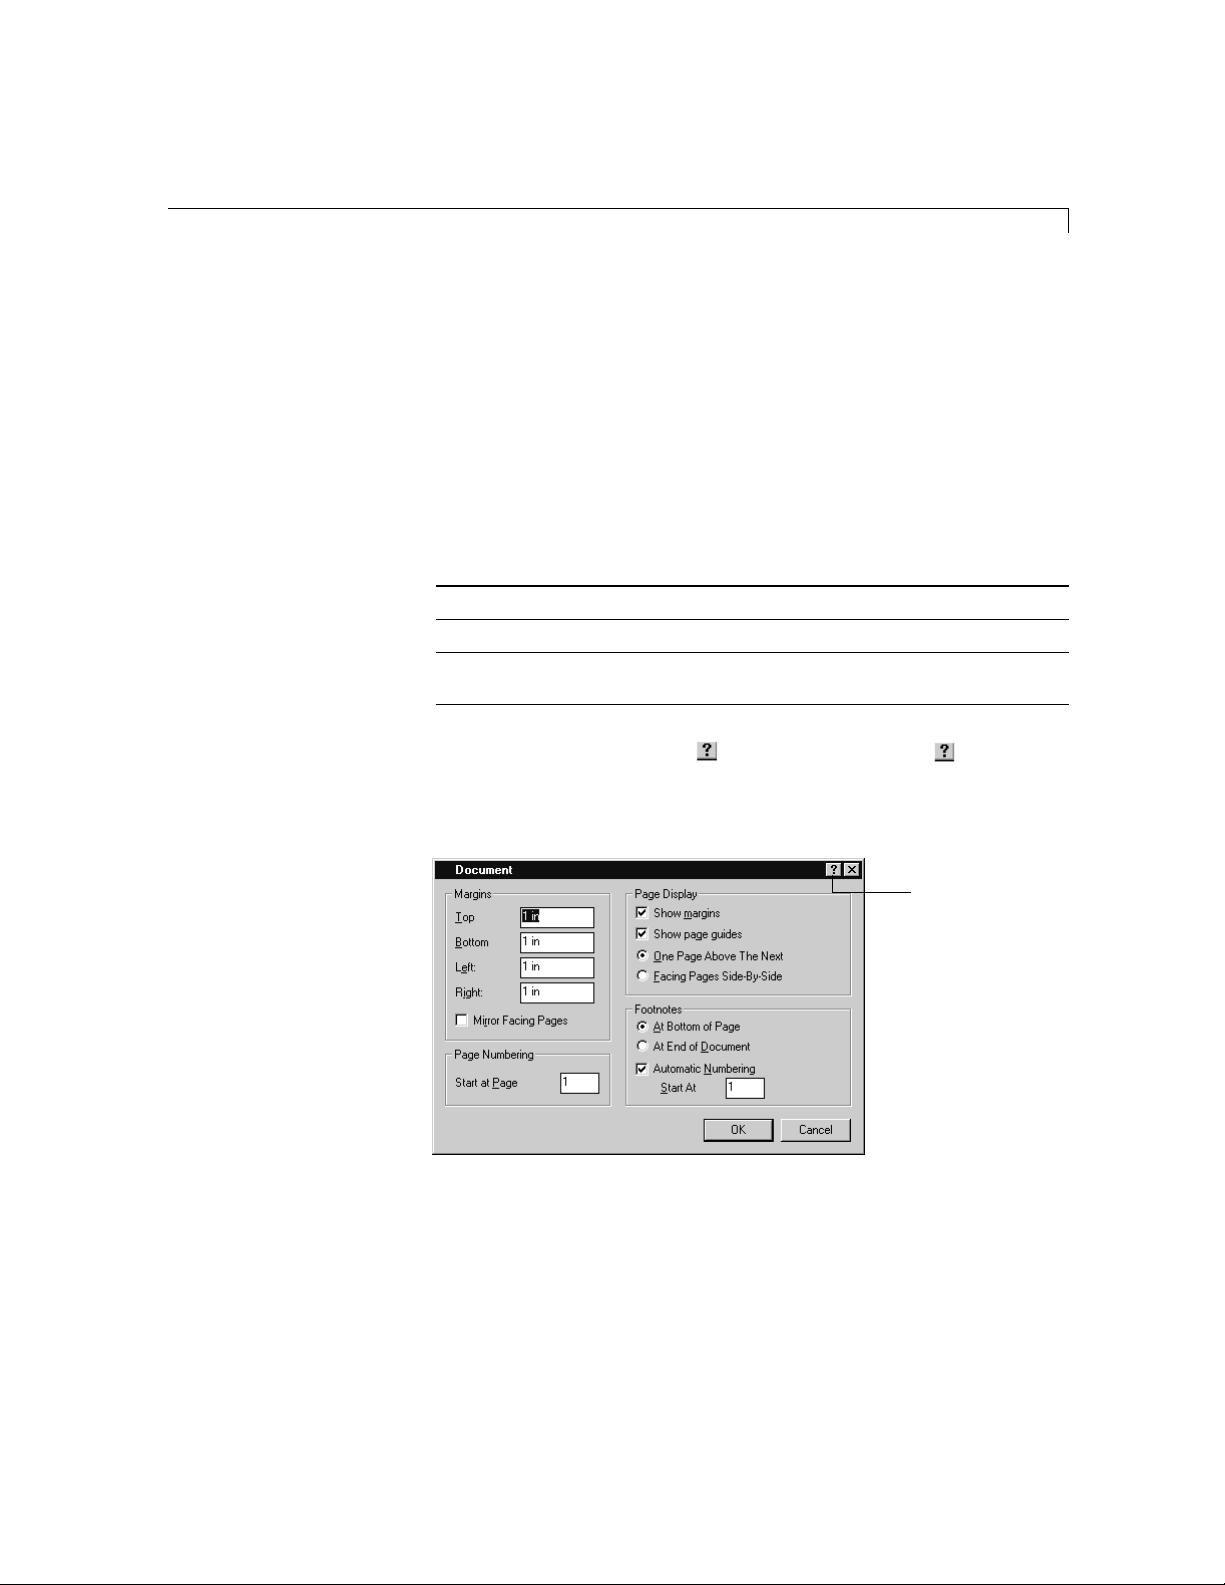
from the Format menu, and then deselect Show margins and Show page guides.
View without margins and page
Normal view showing margins
and page guides
guides
To preview a draw, paint, database, or spreadsheet document, choose
Page View from the Window menu.
Choose Index from the Help menu and type the first few letters of the entry. Double-click the
*
entry and then double-click a topic.
Page 54
3-12 AppleWorks 5 User’s Manual
Using rulers
In the Help index,* see:
E rulers
Normal view
Page view
The text ruler and graphics ruler help you measure and align text, objects,
and frames. You can show one ruler at a time. To show or hide a ruler,
choose Show Rulers or Hide Rulers from the Window menu. To change the ruler
settings, choose Rulers from the Format menu, and then select the settings you
want in the Rulers dialog box.
Change between text
and graphics rulers
Specify the number of
divisions per unit
Creating headers and footers
In the Help index,* see:
E headers
Select the unit of measure
For more information about rulers, see “Changing paragraph formats” on
page 4-8 and “Using the graphics ruler and grids” on page 5-7.
You can have a document display the same information at the top or bottom
of every page in a header or footer. To create a header or footer, choose
Insert Header or Insert Footer from the Format menu.
Choose Index from the Help menu and type the first few letters of the entry. Double-click the
*
entry and then double-click a topic.
Page 55

Basics 3-13
Type or insert header
text here
Type or insert footer
text here
In headers and footers you can:
1 type text
1 use the text ruler to set indentation, tabs, justification, and line spacing
1 include other elements such as a page number, date, or graphics
The footer displays
the page number
For example, you can create a header to display a chapter title at the top of
each page, and create a footer to display the current page number at the
bottom of each page.
The header displays the
same text at the top of
each page
Title page contains no
header or footer
Page 56
3-14 AppleWorks 5 User’s Manual
Date inserted in document or frame
Adding a date or time
In the Help index,* see:
E headers
E Insert Date command
You see the header and footer on the page when you print and on the screen
when you’re in page view. See “Previewing pages for printing” on page 3-11
for more information.
To remove a header or footer, choose Remove Header or Remove Footer from the
Format menu.
Note You can divide a word processing document into sections, each with its
own distinct header and footer. See “Dividing a document into sections” on
page 4-22. Headers and footers, if any, do not appear on the first page of a
word processing document (or section) that has a title page. See “Creating a
title page” on page 4-19.
You can display the current date or time on any page of a document.
AppleWorks updates the date and time with the current date and time when
you close and reopen the document.
To change the format for the date, see “Setting preferences” on page 3-20.
Important Dates and times in this documentation are shown in U.S formats,
using U.S. conventions. In English-speaking countries other than the United
States, dates and times might be formatted differently.
To repeat the date or time on every page of a document, put it in a header
or footer. See “Creating headers and footers” on page 3-12 for more
information.
To insert Do this Example
The current date or time in a
text frame or word
processing document
The current date or time in a
header or footer
Choose Index from the Help menu and type the first few letters of the entry. Double-click the
*
entry and then double-click a topic.
Place the insertion point in the
document or frame and choose
Insert Date or Insert Time from the
Edit menu.
Dates and times are updated
when you close and reopen the
document.
Place the insertion point in the
header or footer and choose
Insert Date or Insert Time from the
Edit menu.
Date inserted in header
Page 57
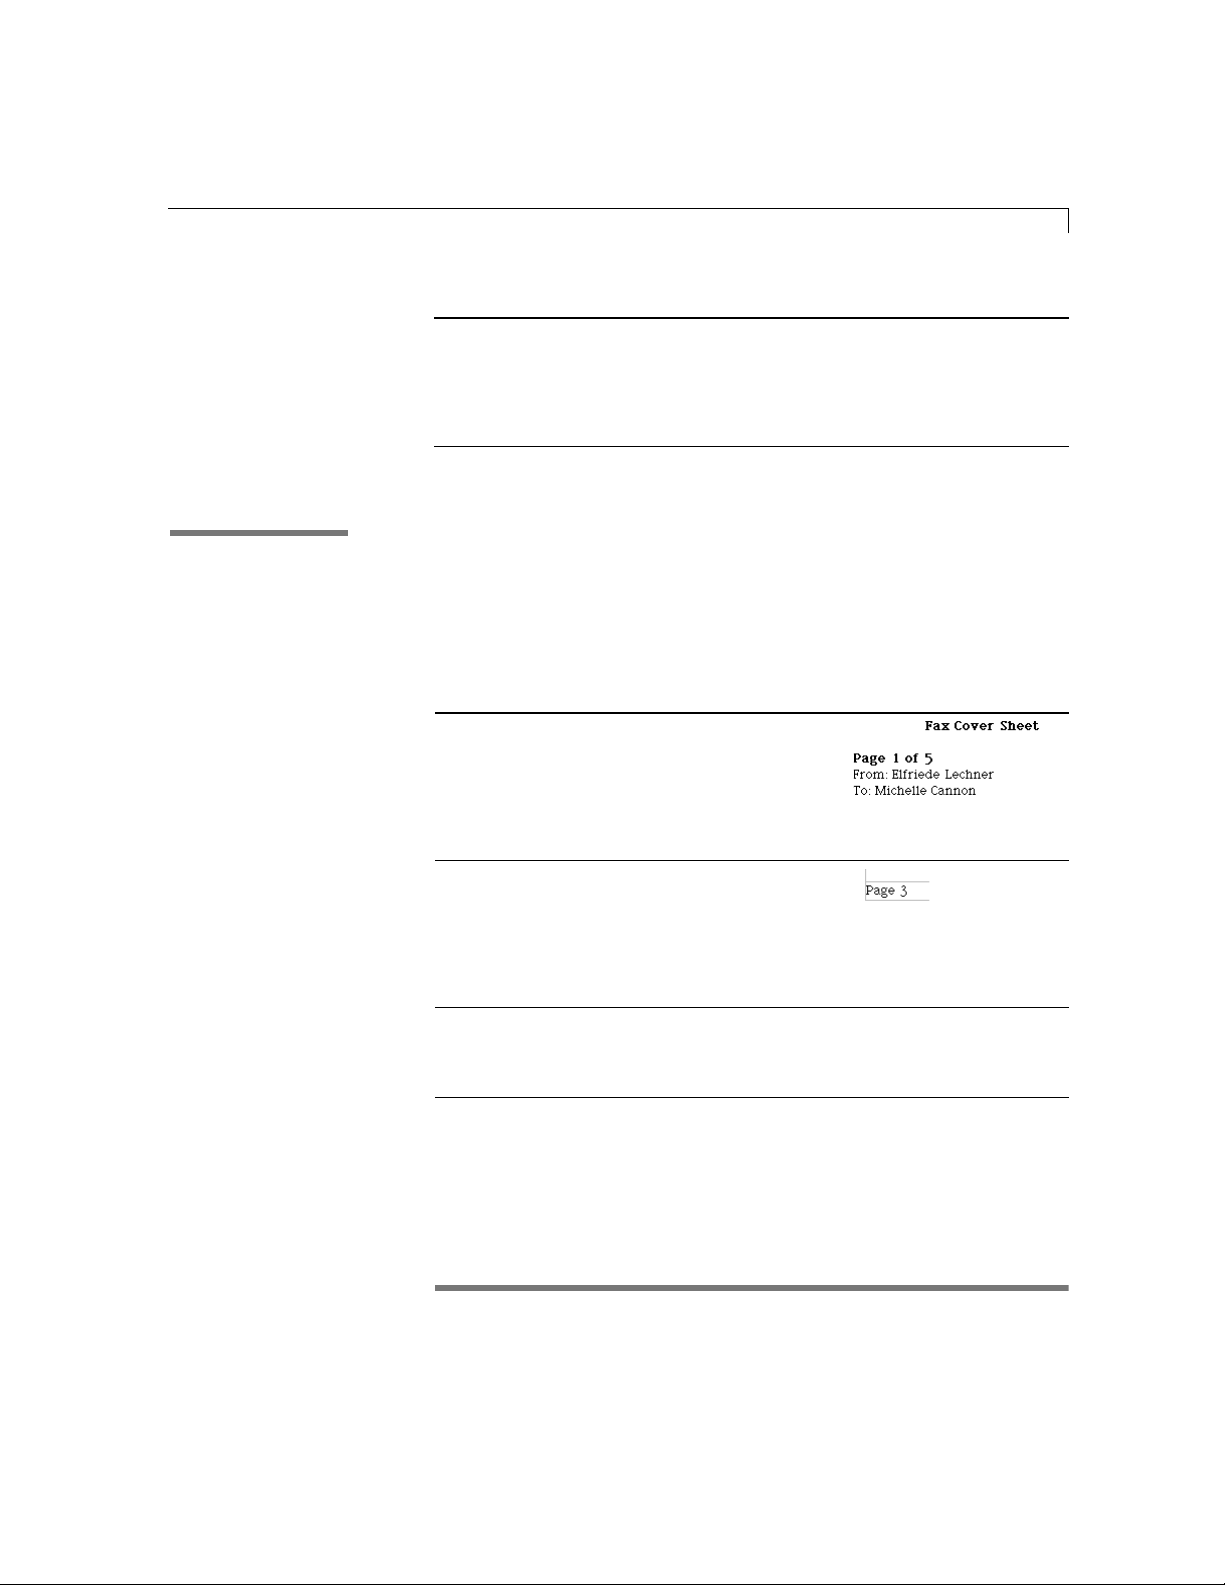
Numbering pages
Page number and document
page count shows a range
Page number inserted in a footer
In the Help index,* see:
E Insert Page # command
Basics 3-15
To insert Do this Example
A fixed date or time (one
that does not update when
you close and reopen the
document) in a text frame,
word processing document,
header, or footer
Hold down Alt as you choose
Insert Date or Insert Time from the
Edit menu.
You can display the current page number or page count on any page of a
document. The page number is updated when you add or remove pages, or
change the starting page number.
To repeat the page number on every page of a document, put it inside a
header or footer. See “Creating headers and footers” on page 3-12.
To insert Do this Example
The current page
number or page count
in a text frame or word
processing document
The current page
number or page count
in a header or footer
A fixed page number
that does not update
whenever pages are
added or removed
Place the insertion point in the
document or frame and choose
Insert Page # from the Edit menu.
Then select Page Number to insert the
page number, or Document Page Count
to insert the total number of pages
in the document.
Place the insertion point in the
header or footer and choose Insert
Page # from the Edit menu. Then
select Page Number to insert the page
number, or Document Page Count to
insert the total number of pages in
the document.
Hold down Alt as you choose Insert
Page # from the Edit menu.
AppleWorks is preset to paginate a document using numbers. To use Roman
numerals or letters, choose an option from the Representation pop-up menu
in the Insert Page Number dialog box.
Choose Index from the Help menu and type the first few letters of the entry. Double-click the
*
entry and then double-click a topic.
Page 58

3-16 AppleWorks 5 User’s Manual
Setting margins
In the Help index,* see:
E Show Margins command
To set the starting page number, choose Document from the Format menu,
enter a number for Start at Page in the Document dialog box, and then click OK.
You can also number sections in a word processing document. See
“Numbering sections” on page 4-25.
AppleWorks presets the margins for each type of document.
For these document types Margins are set to
Word processing 1 inch on all sides
Spreadsheet 0.5 inch on all sides
Draw, paint, database The smallest possible margin for the type of printer
you’ve chosen
To change the margins for a document, choose Document from the Format
menu to show the Document dialog box. Type the margin widths you want
in the Top, Bottom, Left, and Right margin boxes, and then click OK.
To show or hide the margins and page guides, select or deselect Show margins
and Show page guides in the Document dialog box. These options are available
only when page view is on. (To turn on page view, choose Page View from the
Window menu.)
Changing the page orientation and size
In the Help index,* see:
E paper size
You can change how the page is oriented in the document. You can also
change the page size.
1 To change the page size, choose Print Setup from the File menu, choose
paper options from the pop-up lists, and then click OK. Your paper size
options depend on the type of printer you’re using.
1 To change the page orientation, choose Print Setup from the File menu,
select an orientation, and then click OK.
Choose Index from the Help menu and type the first few letters of the entry. Double-click the
*
entry and then double-click a topic.
Page 59

Using libraries
In the Help index,* see:
E libraries, overview
Basics 3-17
Portrait orients the page so it’s tall
Landscape orients the page so it’s wide
Note Page Setup options may vary with different systems or printers. For
more information about Print Setup options, see the documentation that
comes with your computer and printer.
A library is a palette that stores items you can reuse in a document. Libraries
are useful if you want to store copies of items you’ve created. A library can
contain draw objects, spreadsheet cells, text, paint images, movies, and
frames. You can add clip art (commercially produced graphics) to a library,
or you can add items you create yourself.
Tip AppleWorks includes several libraries with ready-made objects. If
the libraries are installed on your hard drive, you can find them in the
AppleWorks Libraries folder in the AppleWorks 5 folder.
Drag the selection
from the library into
the document
Click to see fewer options
Click to close the library
Scroll to see more items
Choose Index from the Help menu and type the first few letters of the entry. Double-click the
*
entry and then double-click a topic.
Page 60

3-18 AppleWorks 5 User’s Manual
Creating, opening, and saving libraries
In the Help index,* see:
E libraries, creating
E libraries, opening
You create and open libraries as you do other AppleWorks documents.
To From the File menu, choose
Create a library Library, and then choose New. AppleWorks opens a new library and names
Open a library Library, and then choose a library from the submenu. If you don’t see the
it Library, followed by a number.
library you want, choose Open, and then locate the AppleWorks Libraries
folder (in the AppleWorks 5 Folder). Select a library and click Open.
To save or close a library, you choose commands from the File menu on the
library palette.
To From the library palette’s File menu, choose
Save a copy of a library or rename
a library
Save a library you’ve previously
saved
Close a library Close
Save As
Save
Working with the library palette
In the Help index,* see:
E libraries, items in
Tip You can open libraries more quickly if you store them in the Library
folder. If a library is in the AppleWorks Libraries folder (in the same folder
as the AppleWorks application), you can open that library by choosing Library
from the File menu, and then choosing the name of the library.
To Do this
Add an item to a library Select the item in the document and click Add on the
Use a library item in a document Select the item from the library palette and click Use.
Choose Index from the Help menu and type the first few letters of the entry. Double-click the
*
entry and then double-click a topic.
library palette.
(You can also drag the item from the library to the
document.)
Page 61

Duplicating, deleting, and moving library items
In the Help index,* see:
E libraries, items in
Basics 3-19
To Do this
Find a library item If necessary, click the triangle in the lower-left corner of the
Rename a library item If necessary, click the triangle in the lower-left corner of
library palette to expand the palette. Type the item’s name
(or a partial name) in the Name box, and then click Find.
the library palette to expand the palette. Select the item
in the library palette, type a new name in the Name box,
and then click Rename.
To duplicate or delete library items, or move them between libraries, select
a library item. (Shift-click to select more than one item.) To deselect selected
items, or to select noncontiguous items, Ctrl+click the items. To select every
item in a library, choose Select All from the library palette’s Edit menu.
Select the object(s) and from the
To
Duplicate library items Duplicate
Delete library items Delete
Move items between libraries Cut or Copy, and then open the other library and choose
library palette’s Edit menu, choose
Paste from that library palette’s Edit menu. Or you can
drag library items between libraries.
Viewing library items
In the Help index,* see:
E libraries, palette
Choose a command from the library palette’s View menu to change the way
items are shown on the library palette.
To From the library palette’s View menu, choose
View library items as pictures By Object
View library items as a list By Name (when you view by name, you see an item’s
Alphabetize items in a library Alphabetize
Set the number of pixels used to
display items on the library palette
when you view by object
Choose Index from the Help menu and type the first few letters of the entry. Double-click the
*
entry and then double-click a topic.
scaled size)
View Options, and then type a size (in pixels) for Horizontal
and Vertical
Page 62

3-20 AppleWorks 5 User’s Manual
Setting preferences
In the Help index,* see:
E preferences
To From the library palette’s View menu, choose
Set the number of rows (when you
view by name) and columns (when
you view by object) on a library
palette
View Options, and then type numbers for Rows and Columns
You can customize AppleWorks by setting options in the Preferences dialog
box. Some options you set apply to the current document only, and others
apply to new documents you create. To have settings take effect whenever
you create a new document, click Make Default in the Preferences dialog box.
Tip You can also set specific preferences in a document and save the
document as stationery that you can reuse. For more information on
stationery, see “Saving document formatting as templates (stationery)” on
page 2-10.
Choose Preferences from the Edit menu. In the Preferences dialog box, choose
a category (General, Text, Graphics, Spreadsheet, Palettes, or Communications) from
the Topic pop-up menu. Select options, and then click OK.
Choose Index from the Help menu and type the first few letters of the entry. Double-click the
*
entry and then double-click a topic.
Page 63

Choose the category of
options you want to set
Set options to
customize the way you
work in AppleWorks
Click to use the current
settings whenever you
create a document
From the Topic pop-up
menu, choose To set preferences for
General
General display of alerts, warnings, settings for saved
documents, and startup settings
Text
The preset font for new documents, character display (smart
quotes, invisible formatting characters, and character spacing),
and date format
Graphics
Object selection, polygon closing, mouse control, and
gradients
Spreadsheet
The way the arrow and Enter keys select text and cells in a
spreadsheet
Palettes
The number of colors displayed in the color palettes, and
opening and saving color, pattern, texture, and gradient palettes
Communications
Default communications software
Basics 3-21
Page 64

Page 65

Chapter 4: Text (word processing)
This chapter explains how to work with text to produce attractive,
professional word processing documents. All text features, including
procedures, buttons, and troubleshooting, are described completely in
onscreen Help.
When to use a word processing document
Create a word processing document when you want to write and format text.
For example, you can use an AppleWorks word processing document to:
1 compose letters and memos
1 create lists and outlines
1 keep a personal journal
1 write research papers, lesson or business plans, reports, contracts, and
meeting minutes
1 write copy for newsletters, announcements, brochures, and
advertisements
15 March 1997
45 S. Webster Avenue
Santa Fe, NM 87155
Tyrone Damon
872 Newton Road
Lakewood, CO 54321
Lorem ipsum:
Lorem ipsum dolor sit amet,
consectetuer adipiscing elit, sed
diam nonn y nibs e vismod tincidunt
ut laoreet dolore magna aliquam
erat volupap.
Ut wisi enum ad minim veniam,
quis nostrud exercitation ullam
corper suscipit.
Adipiscing,
Laura Epson
Create a word processing document to contain text
Page 66

4-2 AppleWorks 5 User’s Manual
A word processing document
Text basics
Creating a word processing document or frame
In the Help index,* see:
E frames, creating
E opening
You can work with text in a word processing document or in a text frame. In
either case, you use the same techniques, tools, and commands to enter and
format the text.
To Do this Example
Create a blank
word processing
document
Create a text frame
within another type
of document
Choose New from the File
menu, click Word Processing, and
then click OK.
Or, click on the Default
button bar. (If you don’t see the
button bar, choose Show Button
Bar from the Window menu.)
Select the text tool (choose
Show Tools from the Window
menu if it isn’t visible). Then,
drag the I-beam pointer
diagonally in the working area
of the document to draw a text
frame, and begin typing.
(In a word processing
document, hold down the Alt
key as you draw the frame.)
A text frame in a draw document
About the word processing window
In the Help index,* see:
E drawing, tools
E rulers
E word processing
When you open a word processing document, you see the word processing
menu bar, button bar, text ruler, page guides, and the insertion point. The
insertion point is a short, blinking vertical line that shows where text appears
when you type or insert text.
Choose Index from the Help menu and type the first few letters of the entry. Double-click the
*
entry and then double-click a topic.
Page 67
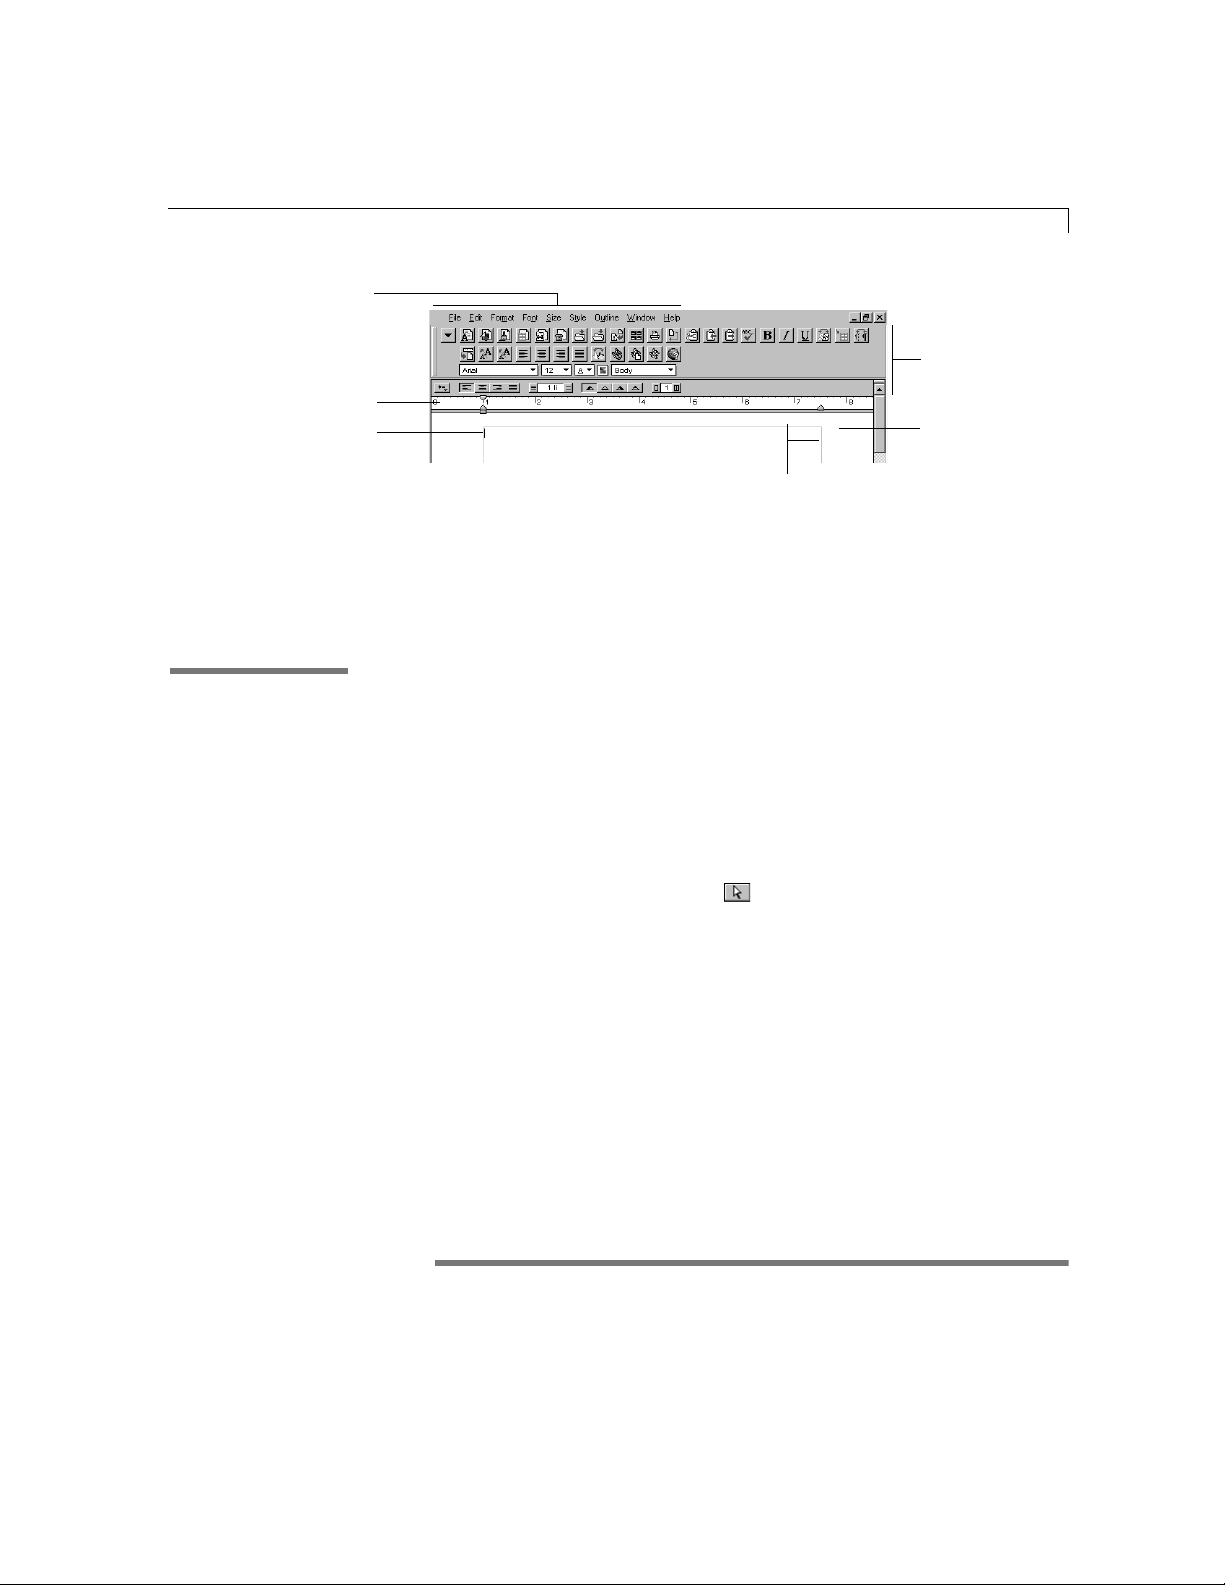
Text (word processing) 4-3
Word
processing menus
Text ruler
Text insertion point
Working with text frames
In the Help index,* see:
E frames, creating
E frames, working in
E text, tool
Buttons for common
tasks in word
processing documents
and text frames
Margin
Page guides
Text in a word processing document looks the same on the screen as it does
when it’s printed.
Use a text frame when you want to add a block of text to a spreadsheet, draw,
or paint document, or to a database document in Layout mode. (You can’t
create a text frame in a database document in Browse, Find, or List modes.)
When you finish working with the text inside a text frame, click outside the
frame to make the frame’s handles reappear and to restore the main
document’s menu bar and functions.
When you draw a text frame in a word processing, draw, spreadsheet, or
database document, you can move, resize, or reshape the text frame. Select
the arrow pointer on the tool panel and select the text frame. To resize or
reshape the text frame, click a corner handle and drag it to a new position.
Choose Index from the Help menu and type the first few letters of the entry. Double-click the
*
entry and then double-click a topic.
Page 68

4-4 AppleWorks 5 User’s Manual
Typing text
In the Help index,* see:
E deleting, text
E text, shortcuts
E undoing actions
Drag a handle to resize or
reshape the text frame
Draw document with a text frame
Note If you create a text frame and then click outside the frame before you
enter text, the frame disappears.
To type text, place the pointer where you want the text and click the
mouse. Then:
To Do this
Type a paragraph Begin typing the text. Don’t press Enter when you
End one paragraph and start another Press Enter once to end the paragraph. Press Enter
Move the insertion point Move the I-beam pointer to where you want to
Use a line break (or soft return) to end
one line and start another without
creating a new paragraph
Insert a non-breaking space to keep two
words on the same line
Delete the character to the left of the
insertion point
reach the end of a line—AppleWorks wraps the
words to the next line.
again to insert a blank line.
insert text and click. (You can also move the
insertion point by pressing an arrow key.)
Hold down Shift and press Enter.
Hold down the Ctrl key and press the Space bar.
Press Backspace.
Choose Index from the Help menu and type the first few letters of the entry. Double-click the
*
entry and then double-click a topic.
Page 69

Typing equations
In the Help index,* see:
E Equation Editor
Selecting text
In the Help index,* see:
E selecting text
Text (word processing) 4-5
You can use Equation Editor to add equations to an AppleWorks word
processing document or frame. (Equation Editor, an application by Design
Science, Inc., is installed on your hard drive with AppleWorks.)
To add an equation at the insertion point of a text document or frame, choose
Insert Equation from the Edit menu. You see the equation editor, which you can
use to add the mathematical components to build the equation. To edit an
equation you’ve already created, double-click the equation, and then make
your changes in the equation editor. For more information, choose Equation
Editor Help from the Help menu.
Note When you finish adding an equation, you can format (move, resize,
rotate, and so on) the equation as you can with a draw object. See chapter 5,
“Drawing,” for more information about working with draw objects.
Before you can change text, you must select it. To select text, move the
pointer to the beginning of the text you want to select, and then drag to the
end of the text.
Selected text
You can also select text by using the following methods:
To Do this
Select a word Click twice on the word.
Select a line Place the pointer in the line and click three times.
Select a paragraph Place the pointer in the paragraph and click
Extend a selected range of text Hold down the Shift key, move the pointer,
Choose Index from the Help menu and type the first few letters of the entry. Double-click the
*
entry and then double-click a topic.
four times.
and click.
Page 70

4-6 AppleWorks 5 User’s Manual
Cutting, copying, and pasting text
In the Help index,* see:
E copying, text
Showing formatting characters
In the Help index,* see:
E invisible characters
To Do this
Select everything in a document or frame Choose Select All from the Edit menu.
Select a text frame as an object Select the arrow pointer and click the text frame.
(When you select a text frame as an object, you
can change the appearance of the text inside.
Changes you make while a text frame is selected
affect all the text in the frame.)
Once you’ve selected text, you can cut or copy it to the Clipboard and paste
it elsewhere in the document (or in a different document or frame). See
“Cutting, copying, and pasting” on page 3-10.
Tip To move text quickly, select the text you want to move, hold down
Ctrl+Alt, and then click where you want to move the text.
When you press certain keys, such as the Space bar or Tab or Enter, you
place special characters in your document, called formatting characters, that
contain instructions for formatting your text.
AppleWorks is preset to hide formatting characters. However, it may be
easier to edit with formatting characters visible. For example, you can find
where you typed two spaces together (where you want only one), and then
delete the extra space.
To show formatting characters, choose Preferences from the Edit menu, choose
Text from the Topic pop-up menu, and then select Show Invisibles. To hide
formatting characters, deselect Show Invisibles. To show or hide formatting
characters as you work, click on the Default button bar, or type Ctrl+;
(semicolon). For more information, see “Setting preferences” on page 3-20.
Choose Index from the Help menu and type the first few letters of the entry. Double-click the
*
entry and then double-click a topic.
Page 71
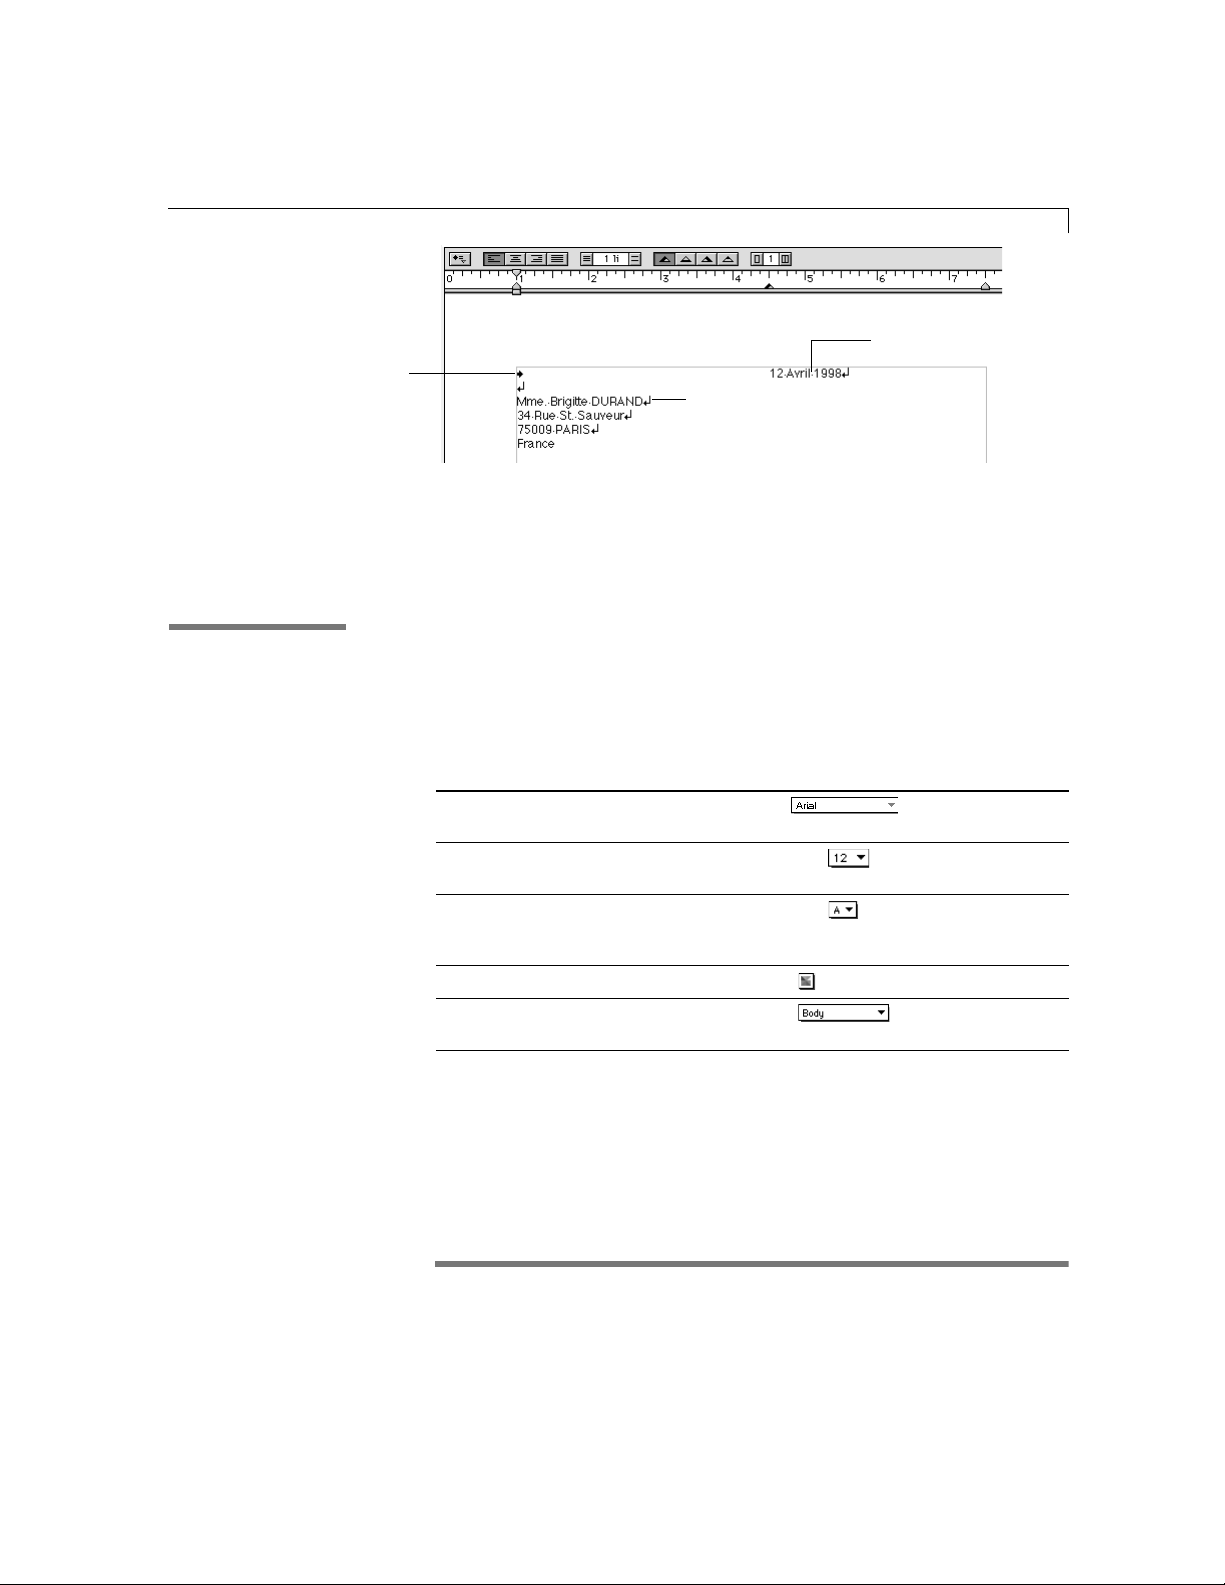
Tab character
Note Formatting characters never appear in the printed document.
Changing text appearance
You can change the appearance of text in your document by applying
In the Help index,* see:
E modifying text
different fonts, type sizes, and colors. To change the appearance of
characters, you can apply various text attributes using commands in the
word processing menus or button bar. If you don’t see the button bar, choose
Show Button Bar from the Window menu.
To change Select the text or frame and choose
The font A font from the pop-up menu on the
The size A point size from the pop-up menu on the button
The attribute (such as bold, italic,
underline, subscript, superscript,
superior, or inferior)
The color A color from the pop-up menu on the button bar
The style A style from the pop-up menu on the
Text (word processing) 4-7
Space character
Return character
button bar or from the Font menu
bar or from the Size menu
An attribute from the pop-up menu on the button
bar or from the Style menu
button bar
Choose Index from the Help menu and type the first few letters of the entry. Double-click the
*
entry and then double-click a topic.
Page 72
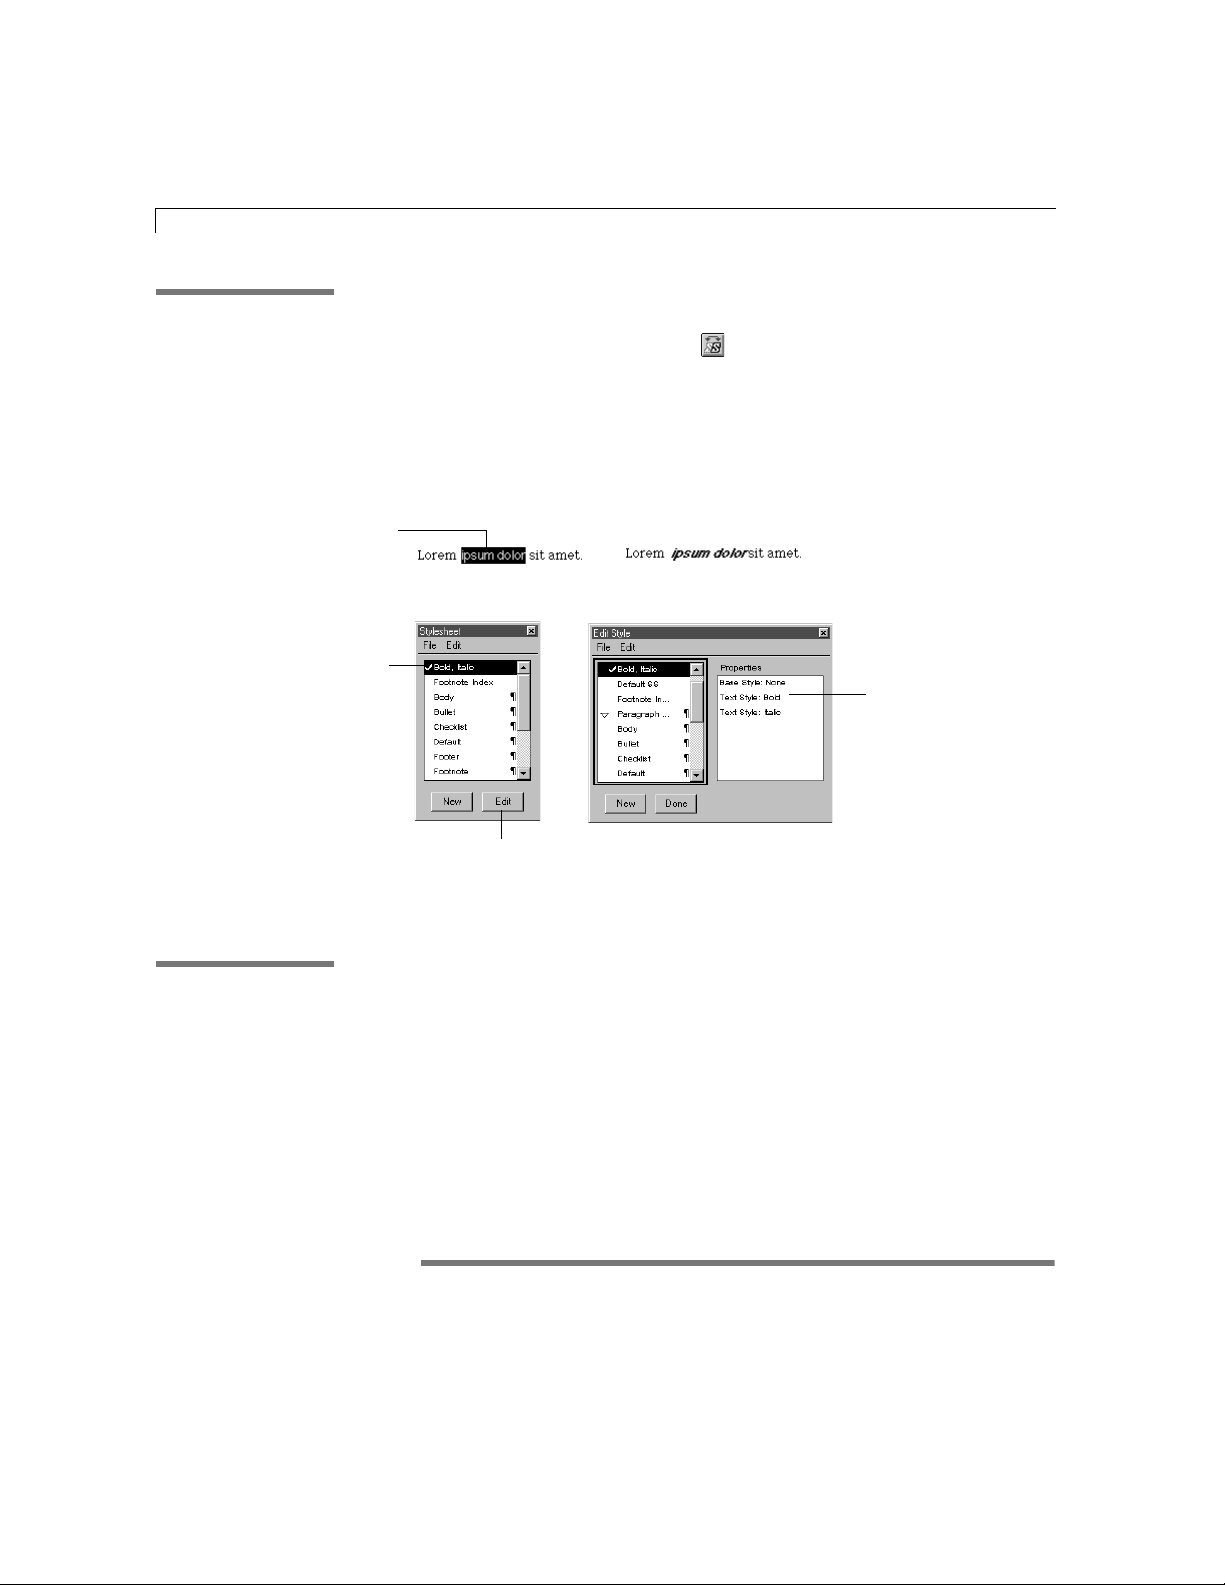
4-8 AppleWorks 5 User’s Manual
Sel
In the Help index,* see:
E styles
ect the text you want to change
Then click to apply a
style that you’ve created
Tip You can create styles—combinations of formatting information—and
apply the styles to text with a single click using the stylesheet palette. (To
show the stylesheet palette, click on the Default button bar, or choose
Show Stylesheet from the Window menu.) For example, if you create a style
called Bold, Italic, you can apply it to text any time you want. When you
change a style, all the text with the same style also changes. For information
on creating and using styles, see onscreen Help and “Using styles” on page
9-5.
Before
To see a style’s properties, click
Edit, and then select the style
After
Properties of the
style Bold, Italic
Changing paragraph formats
In the Help index,* see:
E rulers
Each paragraph has a particular format (indentation, tab settings, and line
spacing). The text ruler indicates the format of the current paragraph (the
paragraph that contains the insertion point). Using the text ruler or the
Paragraph dialog box, you can change the format of paragraphs before or
after you type them. AppleWorks is preset to show the text ruler in a word
processing document. If you don’t see the ruler, choose Show Rulers from the
Window menu.
Choose Index from the Help menu and type the first few letters of the entry. Double-click the
*
entry and then double-click a topic.
Page 73
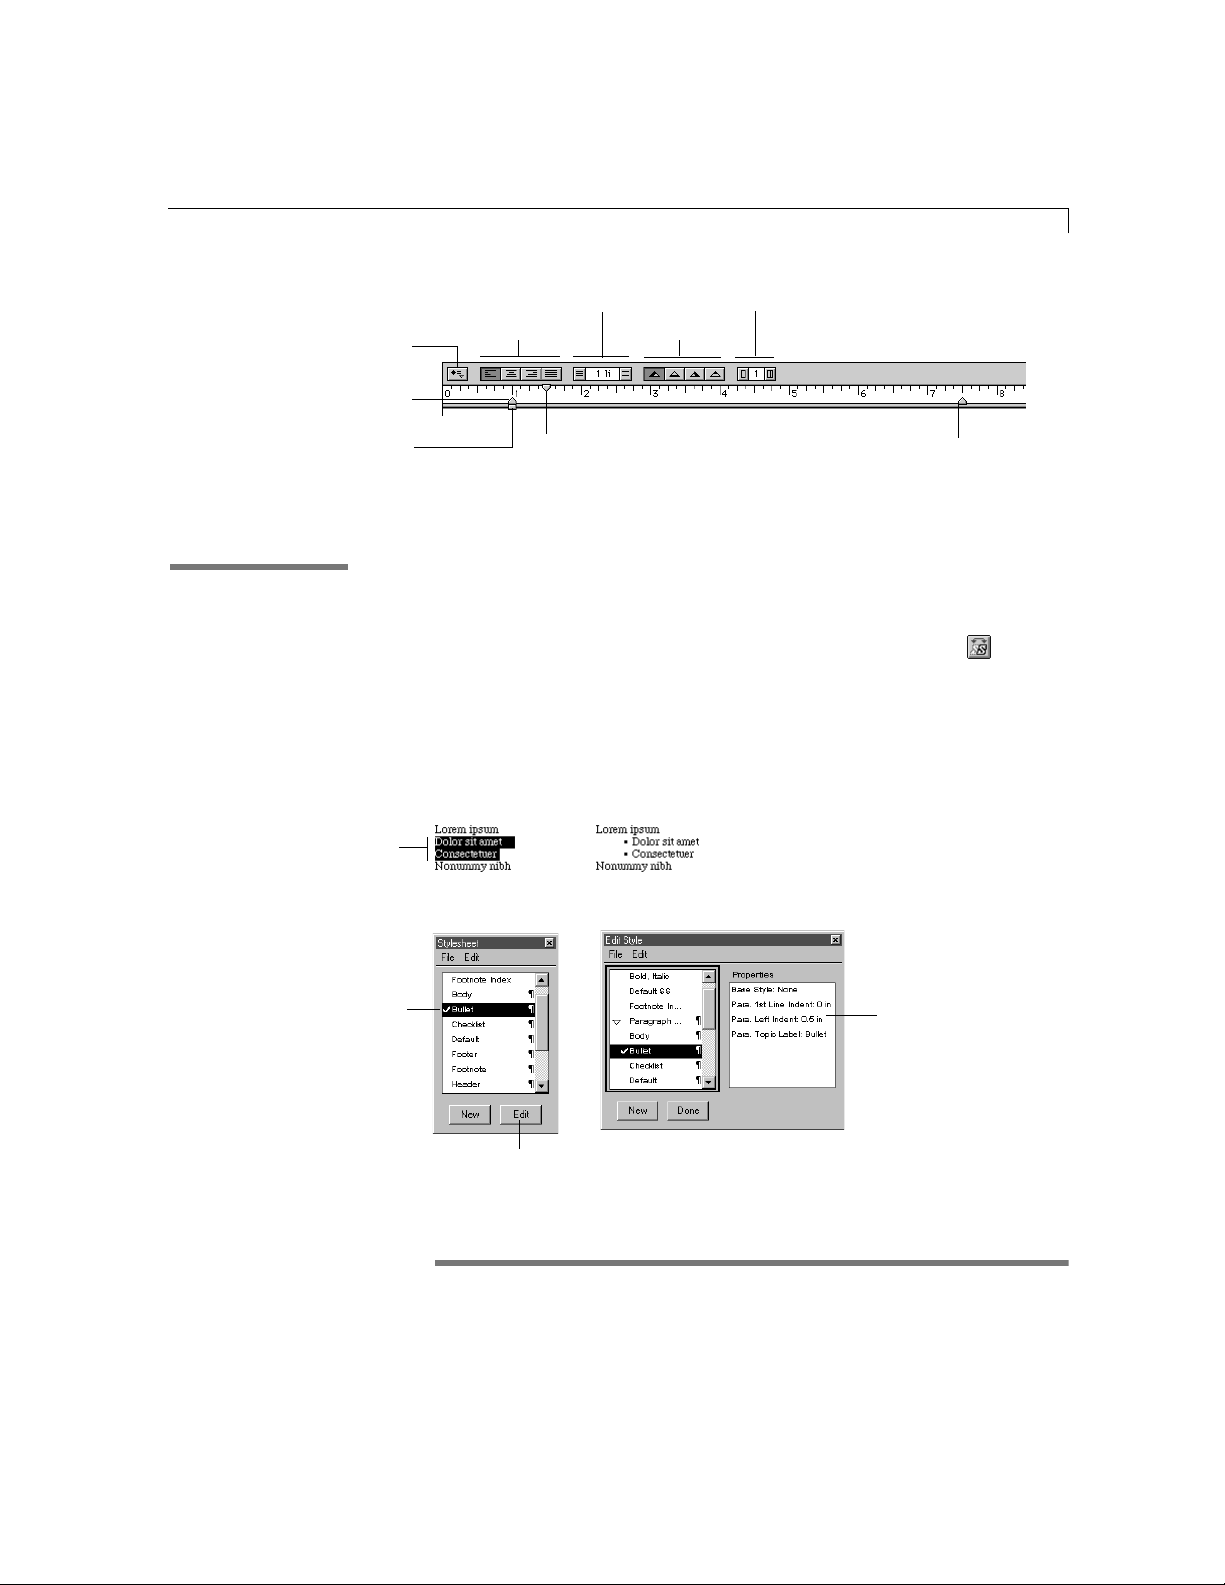
Text (word processing) 4-9
C
Paragraph and
Left margin marker (drag
top part only
First-line indent and left margin
marker (drag bottom part only)
In the Help index,* see:
E styles
Select the text you want
outline labels
to change
Line-spacing controls
Alignment controls
First-line indent marker
Tab markers
olumn controls
Right margin marker
To display the Paragraph dialog box, choose Paragraph from the Format menu.
Tip You can use preset paragraph styles supplied by AppleWorks, or
paragraph styles you create, to change a paragraph’s formatting in one step.
For example, you can apply a style to format paragraphs with hanging
indents and bullets in the margin. To show the stylesheet, click on the
Default button bar (or choose Show Stylesheet from the Window menu). Then
select the paragraphs to format and click Bullet. (To format a single paragraph,
click anywhere in that paragraph and click Bullet.) For information on
applying styles or creating your own, see onscreen Help and “Using styles”
on page 9-5.
Before
After
Then click to apply a
preset style
Properties of
the style Bullet
To see a style’s properties, click
Edit, and then select the style
Choose Index from the Help menu and type the first few letters of the entry. Double-click the
*
entry and then double-click a topic.
Page 74

4-10 AppleWorks 5 User’s Manual
Setting and changing tabs
In the Help index,* see:
E tabbing
Use tabs when you create tables or need to control how text aligns (lines up)
in a document. The text ruler has preset left tabs every one-half inch. (Preset
tabs do not appear on the ruler.) You can move the tabs to different locations,
remove tabs, add tabs, and use different tab alignments. When you set tabs,
any preset tabs to the right of the tabs you set remain effective.
To set tabs, select all the paragraphs you want to change. Then, click the type
of tab marker you want and then click a position on the text ruler.
To remove a tab, drag the tab marker up and off the ruler.
Click one of these tab markers and drag
Left tab marker
to the ruler position you want
Center tab marker
Align-on tab marker
Right tab marker with
fill character
Indenting paragraphs
In the Help index,* see:
E indentation
To set the fill character, double-click the tab marker
To change the indentation for a paragraph, position the insertion point in the
paragraph and drag the first-line indent marker , left margin marker , or
right margin marker to a new position on the text ruler.
To indent the first line of a
paragraph, drag the firstline indent marker
Choose Index from the Help menu and type the first few letters of the entry. Double-click the
*
entry and then double-click a topic.
To indent a paragraph, drag
the left margin marker (grab
the bottom part only)
To make a hanging indent,
drag the left margin marker
(grab the top part only)
Page 75

Adding bullets, numbers, and checkboxes to paragraphs
In the Help index,* see:
E bulleted lists
E labels, paragraphs
Text (word processing) 4-11
Tip for hanging indents After setting up your tabs, you can set apart hanging
indents by typing a character, such as a number or bullet, in the margin to the
left of the paragraph. (To type a bullet, hold down Alt and then type 0149 on
the keypad.) Press Tab, and then begin typing the paragraph. To type other
special characters, use the Windows Character Map. For more information,
see the documentation that comes with your computer.
AppleWorks comes with a series of special characters—called paragraph
styles—that you can use to convert paragraphs to lists, such as bulleted lists,
numbered lists, and checklists.
Click to check off
items
Bulleted list
Tip If you want to label most or all of the paragraphs in a document, use an
Checklist
Numbered list
outline style. See “Outlining” on page 4-13 for more information.
To create a list, select one or more paragraphs and click the pop-up menu on
the text ruler and choose a paragraph style. Or choose Paragraph from the Format
menu, and choose a paragraph style, such as Bullet,Check Box, or Numeric from the
pop-up menu, and then click OK. If you don’t see the paragraph label on your
text, type a number (such as .25) for Left Indent in the Paragraph dialog box.
To reorder
labeled paragraphs, click to the left of a paragraph label and drag
the paragraph to a new place in the outline. (Or choose a Move command from
the Outline menu.) In an ordered list, AppleWorks relabels the moved item.
Before
After
Choose Index from the Help menu and type the first few letters of the entry. Double-click the
*
entry and then double-click a topic.
Page 76

4-12 AppleWorks 5 User’s Manual
Aligning paragraph text
In the Help index,* see:
E text, alignment
To align a paragraph, place the insertion point in the paragraph and click an
alignment control on the ruler.
Changing line and paragraph spacing
In the Help index,* see:
E paragraphs
Line-spacing indicator
Decrease-spacing control
Aligned left
Aligned rightCentered
Justified
To set line spacing, click the decrease spacing or increase-spacing control on
the ruler, or the alignment buttons on the button bar.
Increase-spacing control
Single-spaced text
Spacing increased to 1.5 lines
Tip Double-click the line-spacing indicator to display the Paragraph dialog
box and change the unit of measure.
To set the spacing between paragraphs, choose Paragraph from the
Format menu.
Type the number of units you
want before the paragraph
Choose a unit of
measure from a
pop-up menu
Type the number of units you
want after the paragraph
Choose Index from the Help menu and type the first few letters of the entry. Double-click the
*
entry and then double-click a topic.
Page 77

Copying text ruler settings
In the Help index,* see:
E rulers
Sorting paragraphs
In the Help index,* see:
E Assistants
Text (word processing) 4-13
After setting tabs, indents, and line and paragraph spacing, apply these
settings to new or existing paragraphs by copying and applying the ruler.
1 To copy the ruler, place the insertion point in a paragraph that has the
formats you want, and click on the Default button bar, or choose Copy
Ruler from the Format menu.
1 To apply the ruler, place the insertion point in the paragraph you want to
format, and click on the Default button bar, or choose Apply Ruler from
the Format menu.
You can use the Paragraph Sorter Assistant to sort (reorder) paragraphs
alphabetically, numerically, or by date in a word processing document or
text frame.
To sort paragraphs, select the paragraphs you want to sort and then choose
AppleWorks Assistants from the Help menu. Select Paragraph Sorter, and then click
OK. Then select how you want the paragraph sorted. AppleWorks sorts the
paragraphs based on the selected text or the contents of the entire paragraph.
See “Creating a document” on page 2-1 for more information about Assistants.
Outlining
In the Help index,* see:
E outlines
An outline summarizes the major ideas of a written work in topics (major
headings) and subtopics (subordinate ideas). You can indent the subtopics to
different levels to show their relative importance in the outline.
As you’re organizing your ideas, move topics up or down to change their
level. Hide (collapse) subtopics to highlight main ideas and show (expand)
subtopics to focus on small details.
AppleWorks provides three preset outlines for you to use. You can modify
the preset outline or create new outline styles. For information on modifying
styles, see “Modifying an outline style” on page 4-17. To create a style, see
“Using styles” on page 9-5.
Choose Index from the Help menu and type the first few letters of the entry. Double-click the
*
entry and then double-click a topic.
Page 78

4-14 AppleWorks 5 User’s Manual
Paragraph and
outline labels
Harvard format Legal format Diamond format
You can add an outline at any point in a text document or frame by choosing
an outline label from the pop-up menu on the text ruler. To format existing
text as an outline, select the text and choose an outline label. When you’re
finished typing the outline, you can begin typing paragraphs again by
choosing a paragraph label from the pop-up menu on the text ruler.
See the next section for more information about creating and adding topics
to an outline.
Tip If you want to organize your thoughts, but you don’t want to create an
outline, you can create a list, such as a bulleted list or checklist. See “Adding
bullets, numbers, and checkboxes to paragraphs” on page 4-11.
Creating an outline
In the Help index,* see:
E topics, outlines
Choose an outline label
To create an outline, choose an outline label from the pop-up menu, and
then type the first topic. To add another topic at the same level as the current
topic, press Enter. To add another topic indented to the left or to the right of
the current topic, choose New Topic Left or New Topic Right from the Outline menu.
First topic
New right topicNew topic
To create a new line without a label, press Shift+Enter. This is especially
useful for creating a blank line within a numbered list without affecting the
sequence of numbers.
Choose Index from the Help menu and type the first few letters of the entry. Double-click the
*
entry and then double-click a topic.
Page 79

Modifying and removing outline labels
To change the outline label for specific topics, select the topics and choose
the format you want from the pop-up menu.
Harvard labels Diamond labels
To remove an outline label (such as the Roman numeral in a line of a
Harvard-style outline), select one or more lines and choose None from the
pop-up menu.
Text (word processing) 4-15
Unlabeled line
Harvard labels No labels
Page 80

4-16 AppleWorks 5 User’s Manual
Rearranging outline topics
In the Help index,* see:
E topics
To move topics Do this Example (before and after)
Left or right
between outline
levels
Select the topic and choose
Move Left or Move Right from the
Outline menu.
Move Left
Collapsing and expanding outline topics
In the Help index,* see:
E collapsing
And subtopics
up or down in
the outline
Up one level Select the topic and choose
Select the topic and choose
Move Above or Move Below from
the Outline menu. You can
also drag topic labels up and
down to reorder topics.
Raise Topic from the Outline
menu.
Subtopics move with topicMove Above
Raise Topic
You can collapse (hide) or expand (show) subtopics to highlight main ideas
or show more details. When the subtopics below a topic are collapsed, the
topic’s paragraph label changes as follows:
1 text labels, such as Roman numerals, numbers, and letters, are underlined
(you don’t see the underline character when you print)
1 diamonds change from black to gray
Tip To collapse or expand an item quickly, double-click it.
To Do this Example (before and after)
Collapse a topic
or outline so that
subtopics are
hidden
Select the topic or outline and
choose Collapse from the
Outline menu.
Expand a topic
or outline so that
subtopics are
visible
Choose Index from the Help menu and type the first few letters of the entry. Double-click the
*
entry and then double-click a topic.
Select the topic or outline and
choose Expand from the
Outline menu.
Page 81
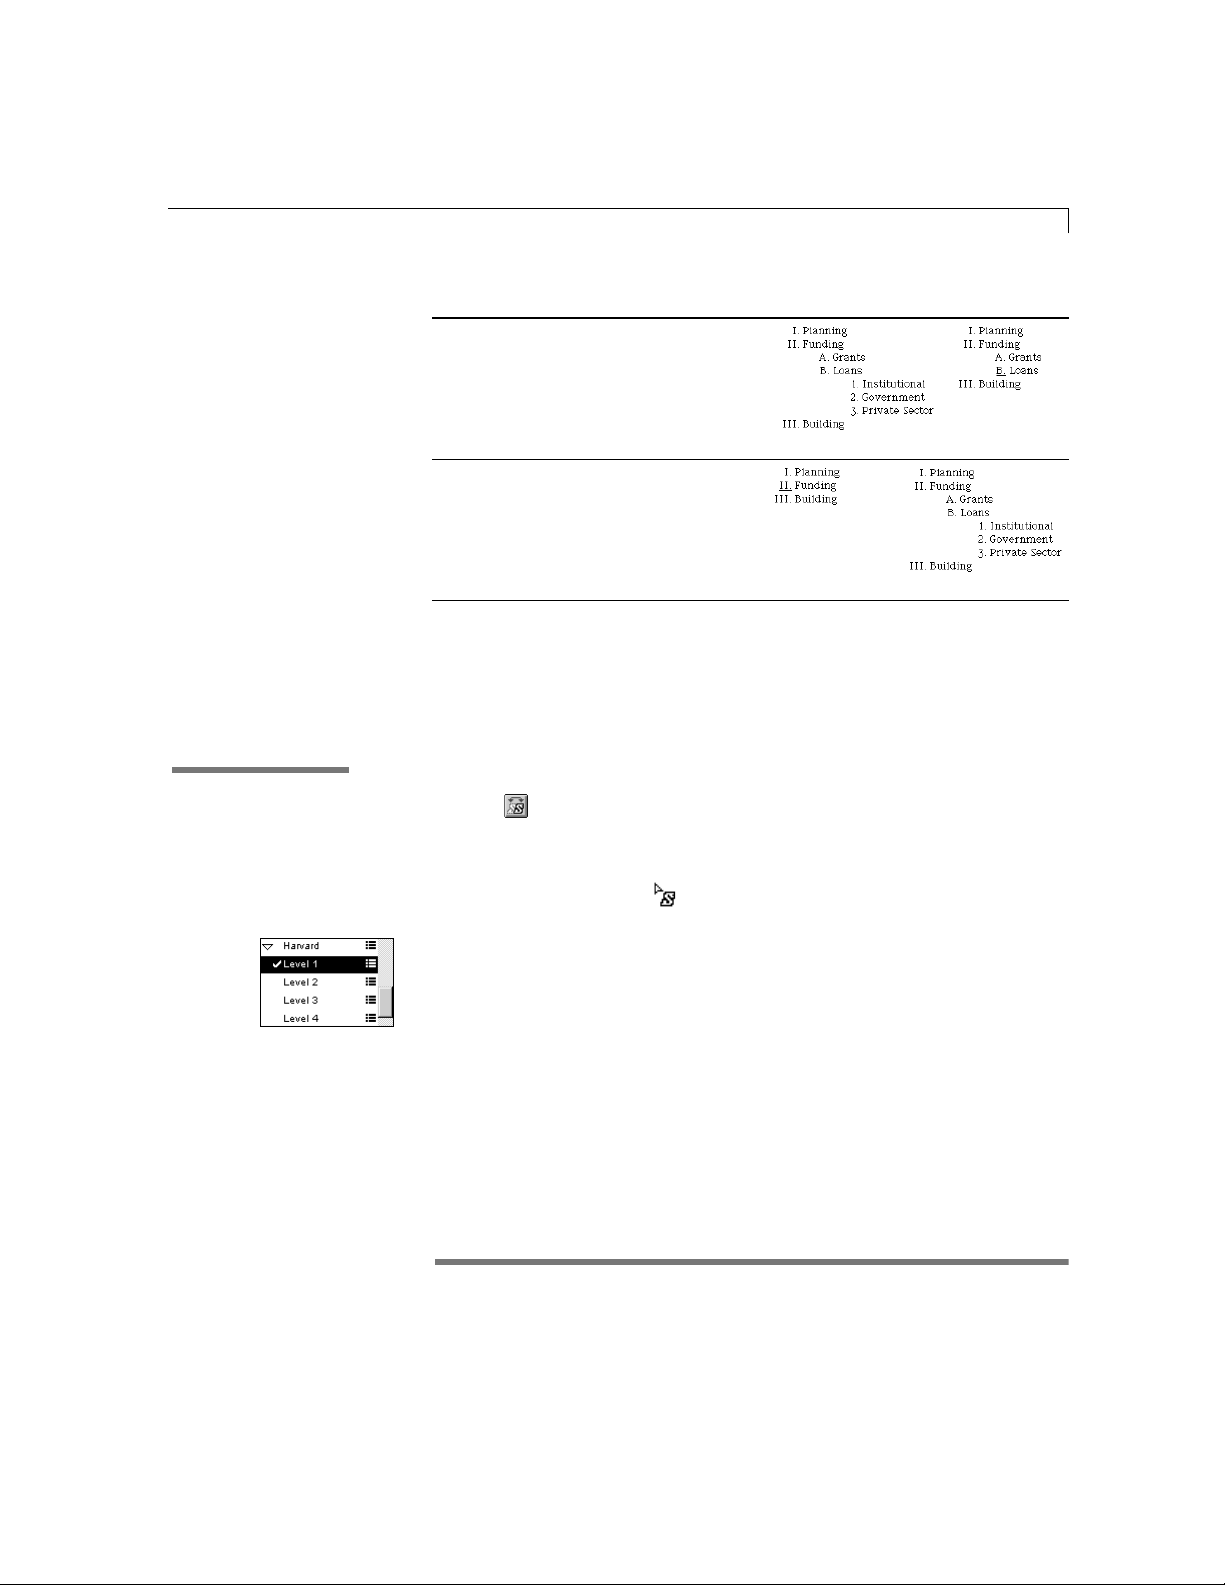
To Do this Example (before and after)
Expand the
current topic or
an entire outline
to a specific
level
Collapse or
expand all topics
in an outline
Modifying an outline style
You modify an outline style by changing its properties (formatting options)
in the stylesheet palette. For more information about working with styles and
the stylesheet palette, see “About the stylesheet palette” on page 9-6.
Click in the topic or select the
entire outline. Choose Expand
To from the Outline menu,
and then type a number in the
dialog box.
Select all the topics in the
outline, hold down Alt and
choose Collapse All or Expand All
from the Outline menu.
Text (word processing) 4-17
Outline fully expanded
Collapsed outline
Outline expanded to
level 2 subtopics
Expanded outline
In the Help index,* see:
E styles
E styles, editing
To modify an outline style:
1. Click on the Default button bar, or choose Show Stylesheet from the
Window menu.
2. Click Edit on the stylesheet palette.
The pointer changes to .
3. From the scrolling list on the left, select the name of the style to modify (for
example, select Harvard or Legal).
4. Click the arrow next to the style’s name, to make it point downward.
5. In the scrolling list on the left, select the outline level you want to modify.
6. Change the properties of the outline level.
You change a style’s properties using the document controls you’d
normally use to format text and objects (such as the tools, palettes, ruler
controls, and menu commands). For example, you may want to change
the indentation, line spacing, and the font size.
7. Repeat steps 5 and 6 for any other levels you want to change.
8. When you finish, click Done on the stylesheet palette.
Choose Index from the Help menu and type the first few letters of the entry. Double-click the
*
entry and then double-click a topic.
Page 82
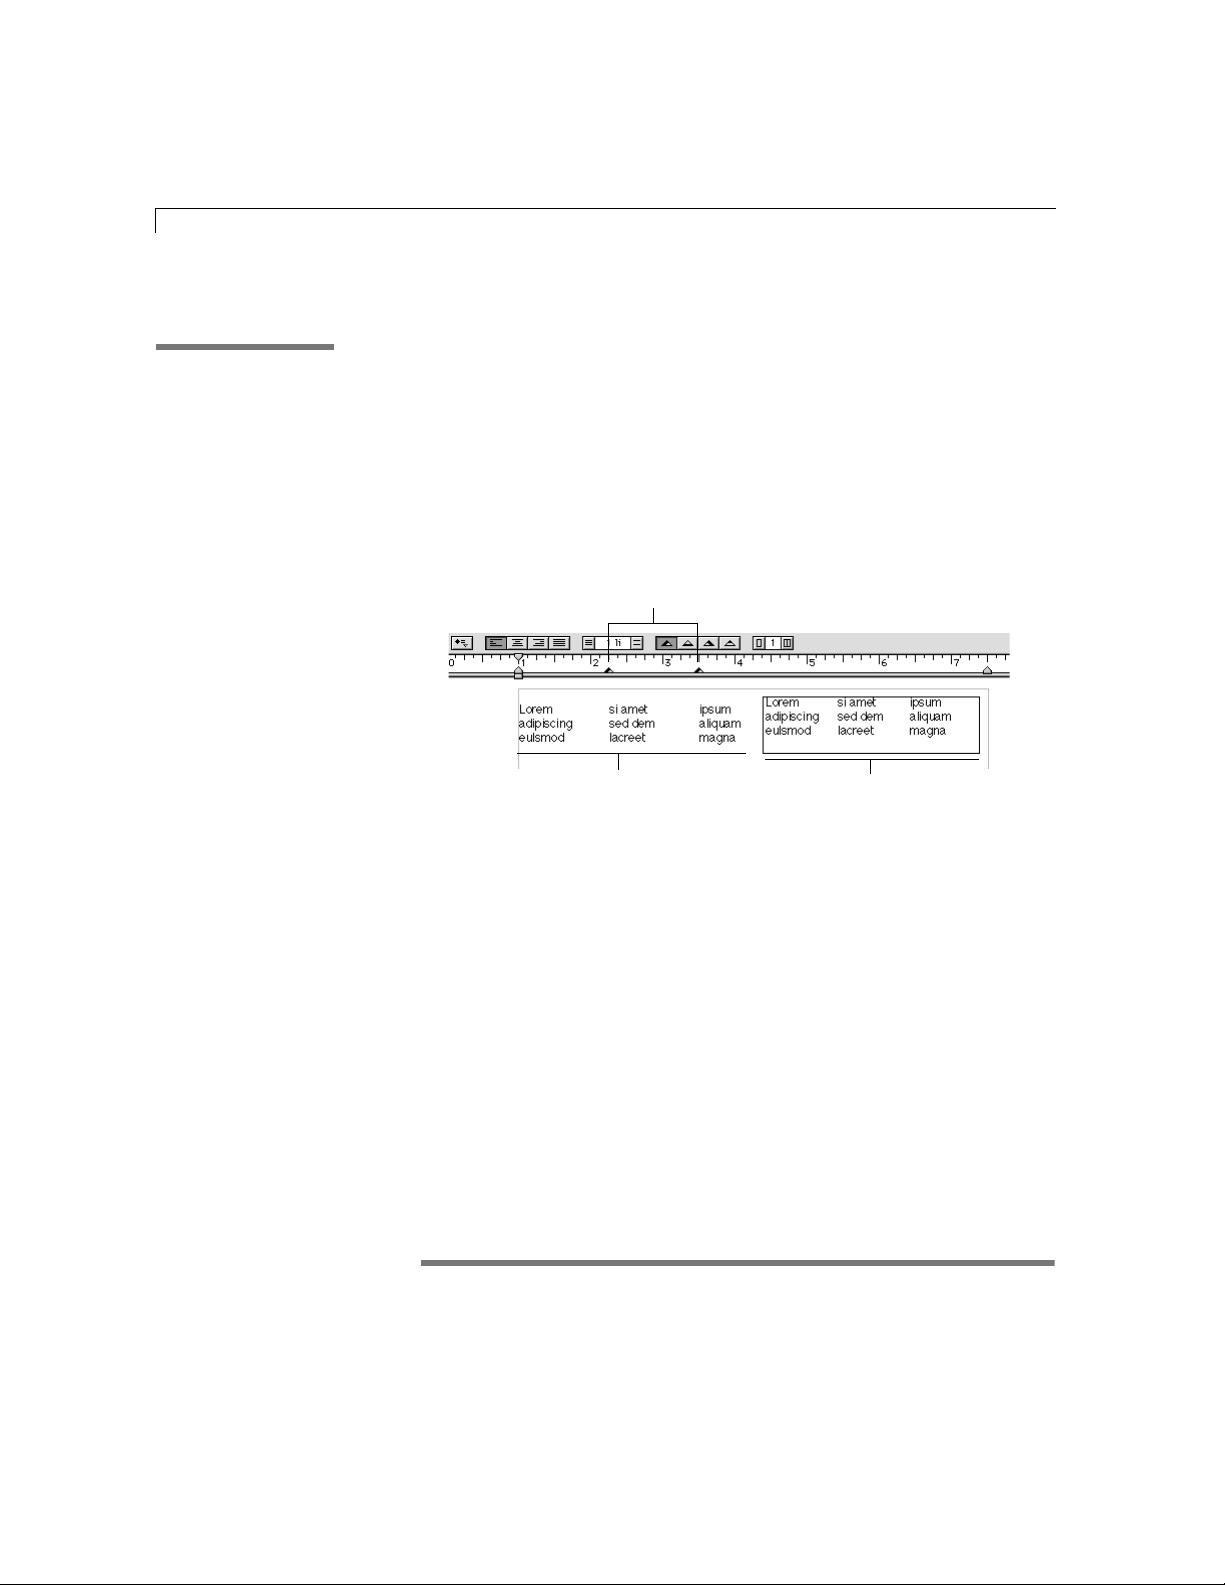
4-18 AppleWorks 5 User’s Manual
Creating tables
In the Help index,* see:
E Assistants
E spreadsheets, tool
E tables
There are several ways to create a table in AppleWorks word processing
documents. You can:
1 use the text ruler to set a tab for each column (after you enter the text, you
can convert the tabbed table to a spreadsheet frame using a shortcut)
1 draw a spreadsheet frame that contains the number of rows and columns
you want, and then enter the text
1 use the AppleWorks Assistant for making tables, which sets up a
spreadsheet frame for you
Tab stops
Tabbed table
Choose Index from the Help menu and type the first few letters of the entry. Double-click the
*
entry and then double-click a topic.
Table in a spreadsheet frame
Page 83

Text (word processing) 4-19
Use any of the following methods to make a table:
To make a table Do this
By setting tabs Use the pointer to drag tab stops to the text ruler. See “Setting and
By creating a
spreadsheet frame
Using an Assistant Choose AppleWorks Assistants from the Help menu. Select Make Table and
changing tabs” on page 4-10.
To convert the tabbed table to a spreadsheet frame, select the text in
the table and click on the button bar. See “Using the button bar”
on page 3-5.
Select the spreadsheet tool from the tool panel and drag the
spreadsheet pointer diagonally. (If you don’t see the tool panel,
choose Show Tools from the Window menu.)
To make the spreadsheet frame move along with the text when you
make changes in the document, insert the spreadsheet frame as an
inline object, as if it were a character in the text. For more
information, see “Adding pictures and frames to text” on page 4-31.
For more information abut creating and using a spreadsheet frame,
see “Spreadsheet basics” on page 7-2.
click OK. See “Creating a document” on page 2-1 for more
information about Assistants.
Working with pages
Creating a title page
In the Help index,* see:
E cover pages
You can change the design of all or some of the pages in a document by
formatting text in columns, putting text in tables, and adjusting page and
column breaks.
You can also add headers and footers to pages and show the current page
number, date, and time in the document. See “Creating headers and footers”
on page 3-12, “Adding a date or time” on page 3-14, and “Numbering pages”
on page 3-15.
If you’ve added a header or footer to a word processing document, you can
create a title page so that the header or footer doesn’t print on the first page.
To create a title page, choose Sectionfrom the Format menu. In the Section
dialog box, select Title Page, and then click OK.
For information on creating more than one title page in a document, see
“Dividing a document into sections” on page 4-22.
Choose Index from the Help menu and type the first few letters of the entry. Double-click the
*
entry and then double-click a topic.
Page 84

4-20 AppleWorks 5 User’s Manual
Creating and changing columns
In the Help index,* see:
E columns, text
You can arrange text in multiple columns on every page of a document. As
you type, text flows from the end of one column to the beginning of the next.
When you make changes to the width or number of columns, the text adjusts
accordingly.
Note You can set up different column formats from page to page, or on the
same page, using sections. See “Dividing a document into sections” on
page 4-22 and “Varying the number of columns on a page” on page 4-25.
Text formatted in columns
To specify the number of columns in your document or text frame, choose
Sectionfrom the Format menu, type the number of columns, and then click OK.
You can specify up to nine columns, their widths (equal or variable), and the
amount of space between each one.
Click to subtract columns
To add or subtract columns of equal width, click the increase-columns or
decrease-columns control in the text ruler.
Click to add columns
Shows the number of columns
Important If your document already contains columns of variable width,
clicking the increase-columns or decrease-columns control changes them to
equal width.
Choose Index from the Help menu and type the first few letters of the entry. Double-click the
*
entry and then double-click a topic.
Page 85
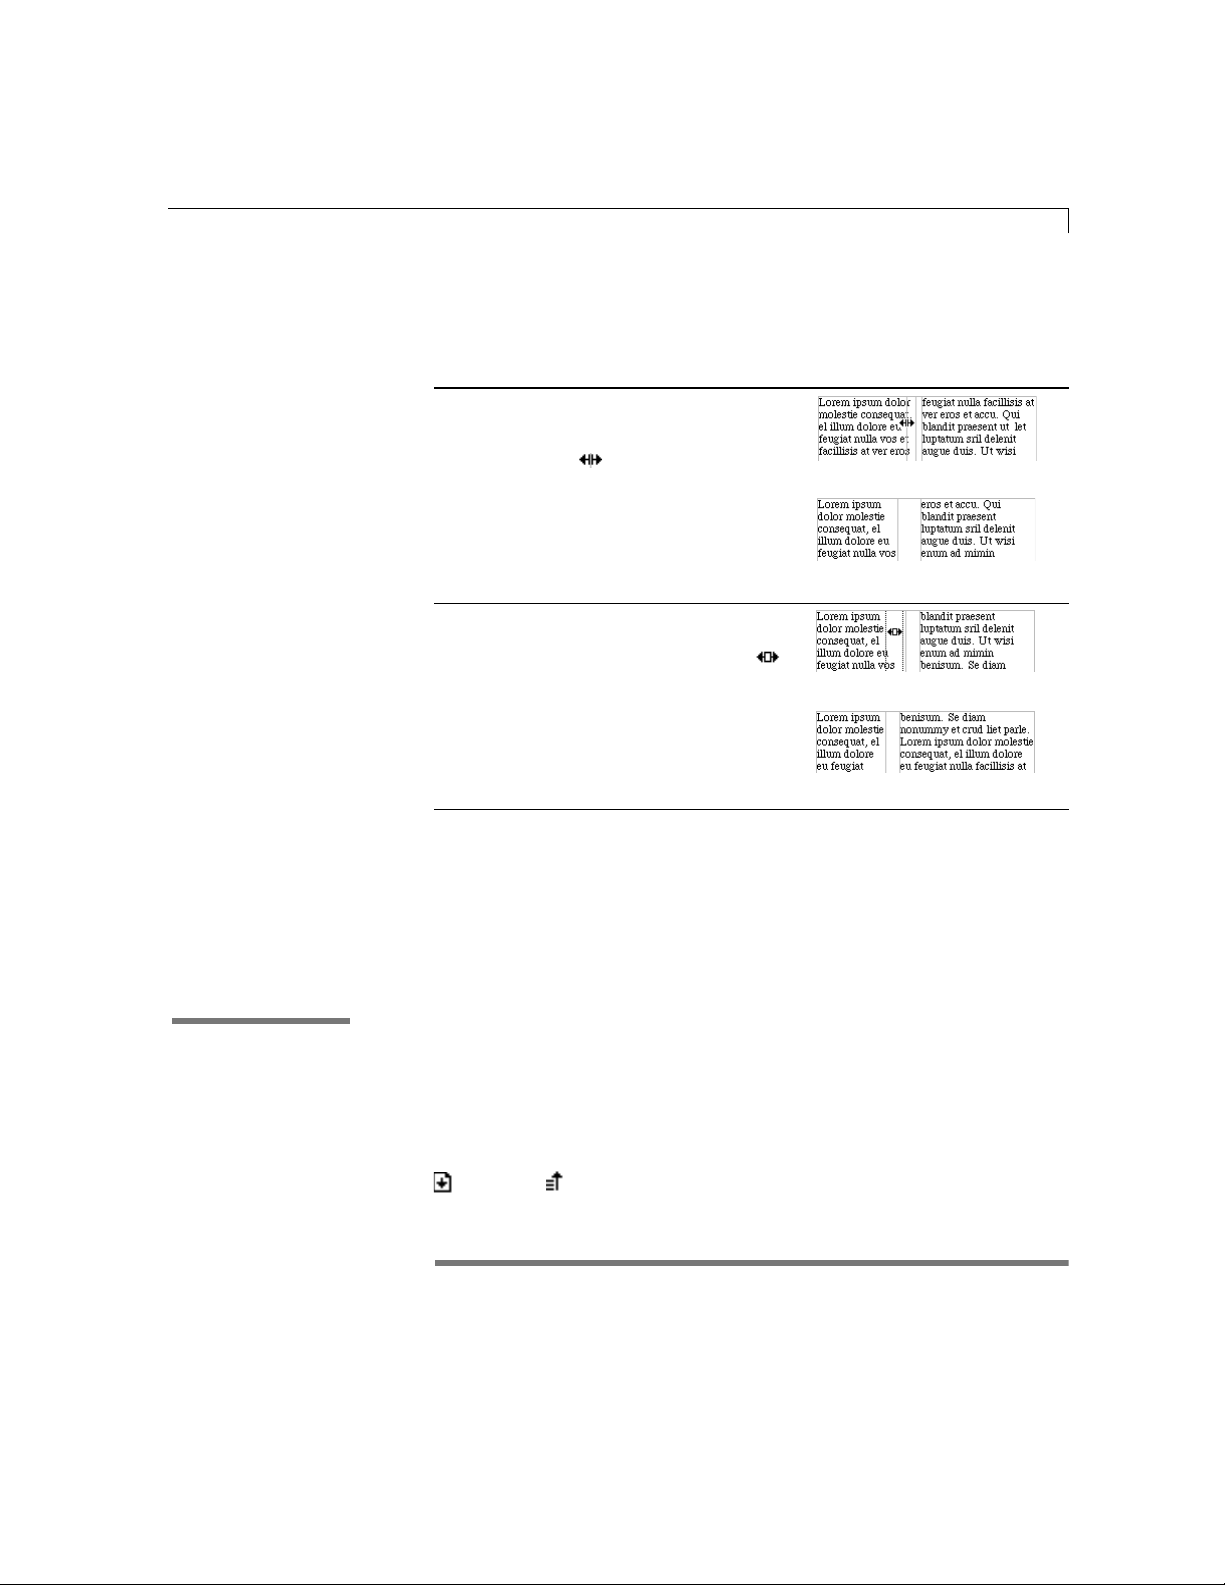
Text (word processing) 4-21
You can change a column’s width and the space between two columns by
using the mouse to drag the column guide (border).
To Do this Example
Change a
column’s width
Press Alt and move the pointer
precisely over a column guide
until the pointer looks like this
. Then press the mouse button
and drag right or left.
Before
After column is moved left
Breaking a page or column
In the Help index,* see:
E columns, breaks in
Change the width
of two adjacent
columns and keep
the space between
them the same
Press Alt and move the pointer
between the column guides until
the pointer looks like this .
Then press the mouse button and
drag right or left.
Before
After column is moved left
Using text frames to create columns In complex columnar documents such as
newsletters or brochures, try using linked text frames in a draw document
instead of columns in a word processing document. You’ll have more
flexibility to resize text frames and place them where you want.
Each page is preset to break (end) at the bottom of the page. Text continues
at the top of the next page or column. You can end the page or column before
it fills up by inserting a break at the insertion point.
To set a page or column break, position the insertion point where you want the
break, and then choose Insert Column Break or Insert Page Break from the Format
menu. If Show Invisibles is selected in the Preferences dialog box, you see a page
or column break character where you inserted the break. (For more
information about preferences, see “Setting preferences” on page 3-20.)
Choose Index from the Help menu and type the first few letters of the entry. Double-click the
*
entry and then double-click a topic.
Page 86
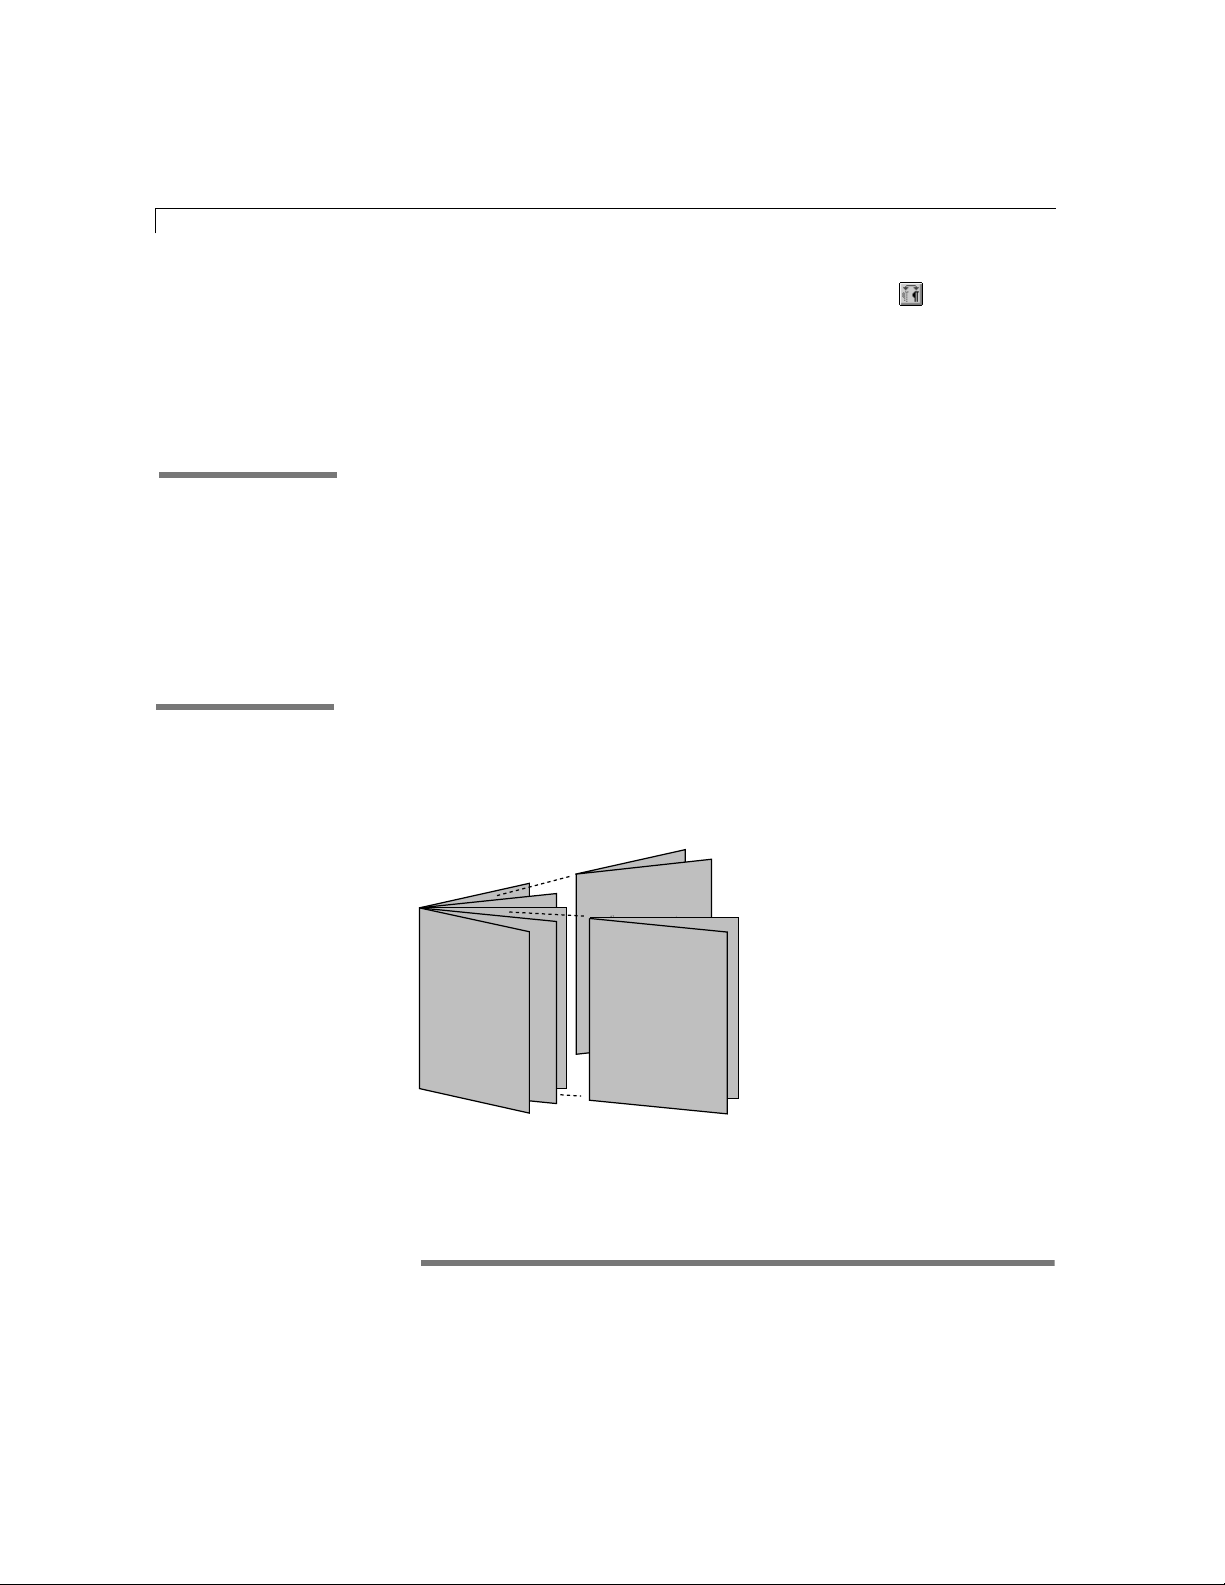
4-22 AppleWorks 5 User’s Manual
Tip To show or hide formatting characters quickly, click on the Default
button bar, or type Ctrl+; (semicolon).
To remove a break, click at the beginning of the line that follows the break
and press Backspace.
Scrolling pages
In a multiple-page word processing document, you can scroll pages from
In the Help index,* see:
side to side, or one page on top of the next.
E pages, guides
To change how the pages scroll, choose Document from the Format menu. In
the Document dialog box, select One Page Above The Next or Facing Pages Side-By-
Side, and then click OK.
Dividing a document into sections
In AppleWorks, sections in documents act like chapters in books: each
In the Help index,* see:
E sections
section can have a different format. You can change its header and footer
text, page numbering, and number of columns. You can also place a special
title page with no header or footer at the start of a section (see “Creating a
title page” on page 4-19).
2-2
2-1
r
e
r sit a
lo
o
m d
diam
d
t, se
u
ek
g
b
u
lore
o
t d
e
re
t ut lao
im
n
isi e
t w
ulla
n
tio
i ta
rc
e
x
e
sd
ea
ex
ip
u
liq
Ut wisi enim
e
m
ip
iriu
su
m
m
u
do
l e
e
lor s
m v
te
u
o
u
sc
u
sse m
b
g
e
k
u
velit e
t, s
tate
id
fa
u
n
lla
t u
u
t la
iat n
o
g
re
u
et d
fe
lu
tp
a
io
t. U
d
o
t w
sto
isi e
et iu
n
stru
d
ex
e
rc
i ta
tion
t aliq
u
ip
lor sit a
e
do
x
ea
m
diam
d
t, se
u
ek
g
b
u
is a
lore
u
o
te
t d
m
e
vel eu
re
o
t la
t u
u
lp
u
im
tate
n
v
isi e
e
lit e
lo
re
llam
eu
u
n
fe
tio
u
g
i ta
iat n
rc
e
c
u
m
e
sa
sd
n
a
et iu
e
sto
ip ex
u
e
m
ipsu
iriu
m
m
u
d
l e
e
o
lor sit a
m v
te
u
o
u
sc
u
sse m
b
g
ek
elit e
u
v
t, se
tate
c
id
fa
u
n
lla
t u
u
t la
t n
ia
o
g
ree
u
fe
u
lu
tp
a
io
t. U
d
o
t w
sto
isi e
t iu
e
n
stru
d
ex
e
rc
i ta
tion
t aliq
u
ip
e
x
ea
is
au
te
m
v
e
l e
u
u
lp
u
ta
te
ve
lit e
lore
eu
fe
u
g
iat n
c
u
m
sa
n
e
t iu
sto
tety
sec
ib
met, c
d
o
ism
eu
h
nib
y
mm
u
n
o
n
t
m era
a
u
aliq
a
n
g
a
m
is
u
m, q
ia
n
e
b
im
min
ad
rtis
o
b
ipit lo
sc
r su
e
rp
o
mc
t.
a
u
1-2
q
se
co
o
d
o
mm
co
n
rit
re
1-1
d
n
e
h
lor in
o
d
re
m
l illu
e
t, v
a
u
q
it a
se
m
n
o
e
c
t, c
ib
se
lestie
o
cte
ty
e
r
s et
ro
e
e
d
ro
d
e
ia
t v
m
no
n
ilsis a
u
c
m
m
y
n
ib
h
eu
ism
o
.
n
im a
u
t, c
e
m
sd
m
m
iriu
m
ad
sse
u
lla fa
co
n
o
d
io
d
re
lestie
o
d
ilsis a
c
t d
o
te fe
n
im
u
sd
m
iriu
sse
u
lla
o
d
io te
o
lo
re
lla
ib
e
n
o
n
agn
in
mo
rp
o
c
mm
.
lor in
o
m
d
iam n
lo
re
g
u
ad
lla
e
n
m
fa
d
ma
g
n
a
a
liqu
a
m
e
ra
t
d
m
inim
be
n
ia
m
, q
u
is
r
e
tety
c
m
se
c
o
rp
e
r su
d
sc
o
ip
it lo
ism
eu
b
h
o
rtis
nib
my
c
m
u
o
n
m
m
o
d
o
c
o
se
q
t
u
a
t.
era
m
a
u
aliq
a
is
, qu
iam
n
be
re
d
im
o
lo
r in h
e
n
d
rtis
re
o
rit
b
ipit lo
sc
r su
le
e
stie
co
n
se
q
u
at, v
t.
e
a
l illu
u
q
se
m
co
o
d
c
o
ilsis a
t v
e
ro
ero
s e
t
rit
re
d
n
e
h
m
l illu
e
t, v
a
u
q
se
n
e
co
t, cib
se
c
tety
er
t
s e
ero
ro
e
t v
o
n
u
m
m
y
n
ib
h
e
lisi.
u
ism
fac
o
lla
d
u
it n
ma
a
g
n
a
a
liqu
a
m
e
ra
t
min
im b
e
n
iam
, qu
is
m
c
o
rp
e
r s
u
sc
ip
it lo
b
o
rtis
c
o
m
m
o
d
o
co
se
q
u
a
t.
re
d
o
lo
r in h
e
n
d
re
rit
o
lestie
c
o
n
se
q
u
a
t, v
e
l illu
m
c
ilsis
a
t v
e
ro
e
ro
s e
t
fe
u
g
a
it n
u
lla
fa
c
lisi.
Vulputate
iriure dolor
2
ipsu
m
e
o
L
sc
u
o
u
d
a
n
u
id
c
tin
t. U
a
lutp
o
v
e
d
stru
o
n
t a
isl u
n
1
L
o
u
is a
Du
a
d
lpu
u
in b
tinc
eu
re
lo
o
d
v
o
sa
m
u
acc
n
o
n
isl u
ipsu
m
e
o
L
sc
u
o
u
d
a
Du
n
idu
c
tin
in
b
t. Ut w
a
lutp
o
v
d
o
ex
d
stru
o
n
a
c
t aliq
isl u
n
L
o
u
is a
Du
a
d
lpu
u
b
in
tin
e
lore
o
d
v
o
sa
m
u
c
c
a
n
o
n
isl u
Du
in
b
d
o
a
c
You can also divide a single page into multiple sections, each with
different formatting.
Choose Index from the Help menu and type the first few letters of the entry. Double-click the
*
entry and then double-click a topic.
Page 87
USIMOD
Loem ipsum dolor sit amet,
cibsectetyer aduouscubg ekut,
sed diam nonummy nibh
euismod tincidunt ut laoreet
dolore magna aliquam erat
volutpat. Ut wisi enim ad
minim beniam, quis
nostrud exerci tation ullamcor
suscipit lobortisnisl ut aliquip
ex easden commodo cosequat.
Duis autem vel eum iriure
dolor in hendrerit in bulputate
velit esse molestie consequat,
vel illum dolore eu feugiat
facilsis at vero eros et acc
et iusto odio.
Loem ipsum dolor sit amet, cibsectetyer aduouscubg ekut, sed
diam nonummy nibh euismod tincidunt ut laoreet dolore magna
aliquam erat volutpat. Ut wisi enim ad minim beniam, quis
nostrud exerci tation ullamcorper suscipit lobortisnisl ut aliquip ex
easden commodo cosequat.
Duis autem vel eum iriure dolor in hendrerit in bulputate velit esse
molestie consequat, vel illum dolore eu feugiat nulla facilsis at vero
eros et accumsan et iusto odio.
Loem ipsum dolor sit amet,
cibsectetyer aduouscubg ekut,
sed diam nonummy nibh
euismod tincidunt ut laoreet
dolore magna aliquam erat
volutpat. Ut wisi enim ad
minim beniam, quis
nostrud exerci tation ullamcor
suscipit lobortisnisl ut aliquip
ex easden commodo cosequat.
Duis autem vel eum iriure
dolor in hendrerit in bulputate
velit esse molestie consequat,
vel illum dolore eu feugiat
facilsis at vero eros et acc
et iusto odio.
You can insert sections into a word processing document only. You cannot
insert a section into a header, footer, footnote, or text frame.
Inserting and deleting a section
To insert or delete a section, click on the Default button bar, or type Ctrl-;
(semicolon) to display the formatting characters. Then:
Text (word processing) 4-23
In the Help index,* see:
E breaks
E deleting, text
E sections
Formatting sections
In the Help index,* see:
E columns, text
E sections
To Do this
Insert a section Choose Insert Section Break from the Format menu.
You see a section break character where you inserted the section.
When page guides are visible, you see a section break line at the end of
each section. (See “Previewing pages for printing” on page 3-11.)
Delete a section Select the section break character for the section you want to delete,
and press Backspace.
For more information about formatting characters, see “Showing formatting
characters” on page 4-6.
A new section uses the settings of the section preceding it. To change the
format of a section, click anywhere in the section, and then choose Section
from the Format menu. In the title bar of the Section dialog box, you see the
number of the section you’re formatting.
If more than one section is selected, you see the number of the first section
in the title bar of the Section dialog box. Changes you make in the Section
dialog box apply to the first section in the selection only.
Choose Index from the Help menu and type the first few letters of the entry. Double-click the
*
entry and then double-click a topic.
Page 88

4-24 AppleWorks 5 User’s Manual
Sh
Note You cannot insert a section with the Section dialog box. For
information on inserting a section, see “Inserting and deleting a section” on
page 4-23.
ows the number of the
section you’re formatting
To Do this
Set where the section begins Select an option from the Start Section
Change the starting page number for
a section
Make the header and footer information
different from the previous section
Use different headers and footers on the
left and right pages in a section
Add a title page to the current section Select Title Page.
Specify the number of columns in
a section
Vary the widths of columns (if you have
multiple columns)
Create a mirrored column layout (left-
facing pages and right-facing pages have
the opposite column layout)
Set the width of equal-width columns Type widths for Column Width and Space Between.
pop-up menu.
Select Restart Page Number and type the starting
page number for the current section.
Select Different For This Section.
Select Left & Right Are Different.
Type a number for Number Of Columns.
Select Variable Width Columns, and then type widths
for Space Before, Column Width, and Space After.
Select Mirror On Facing Pages.
Page 89
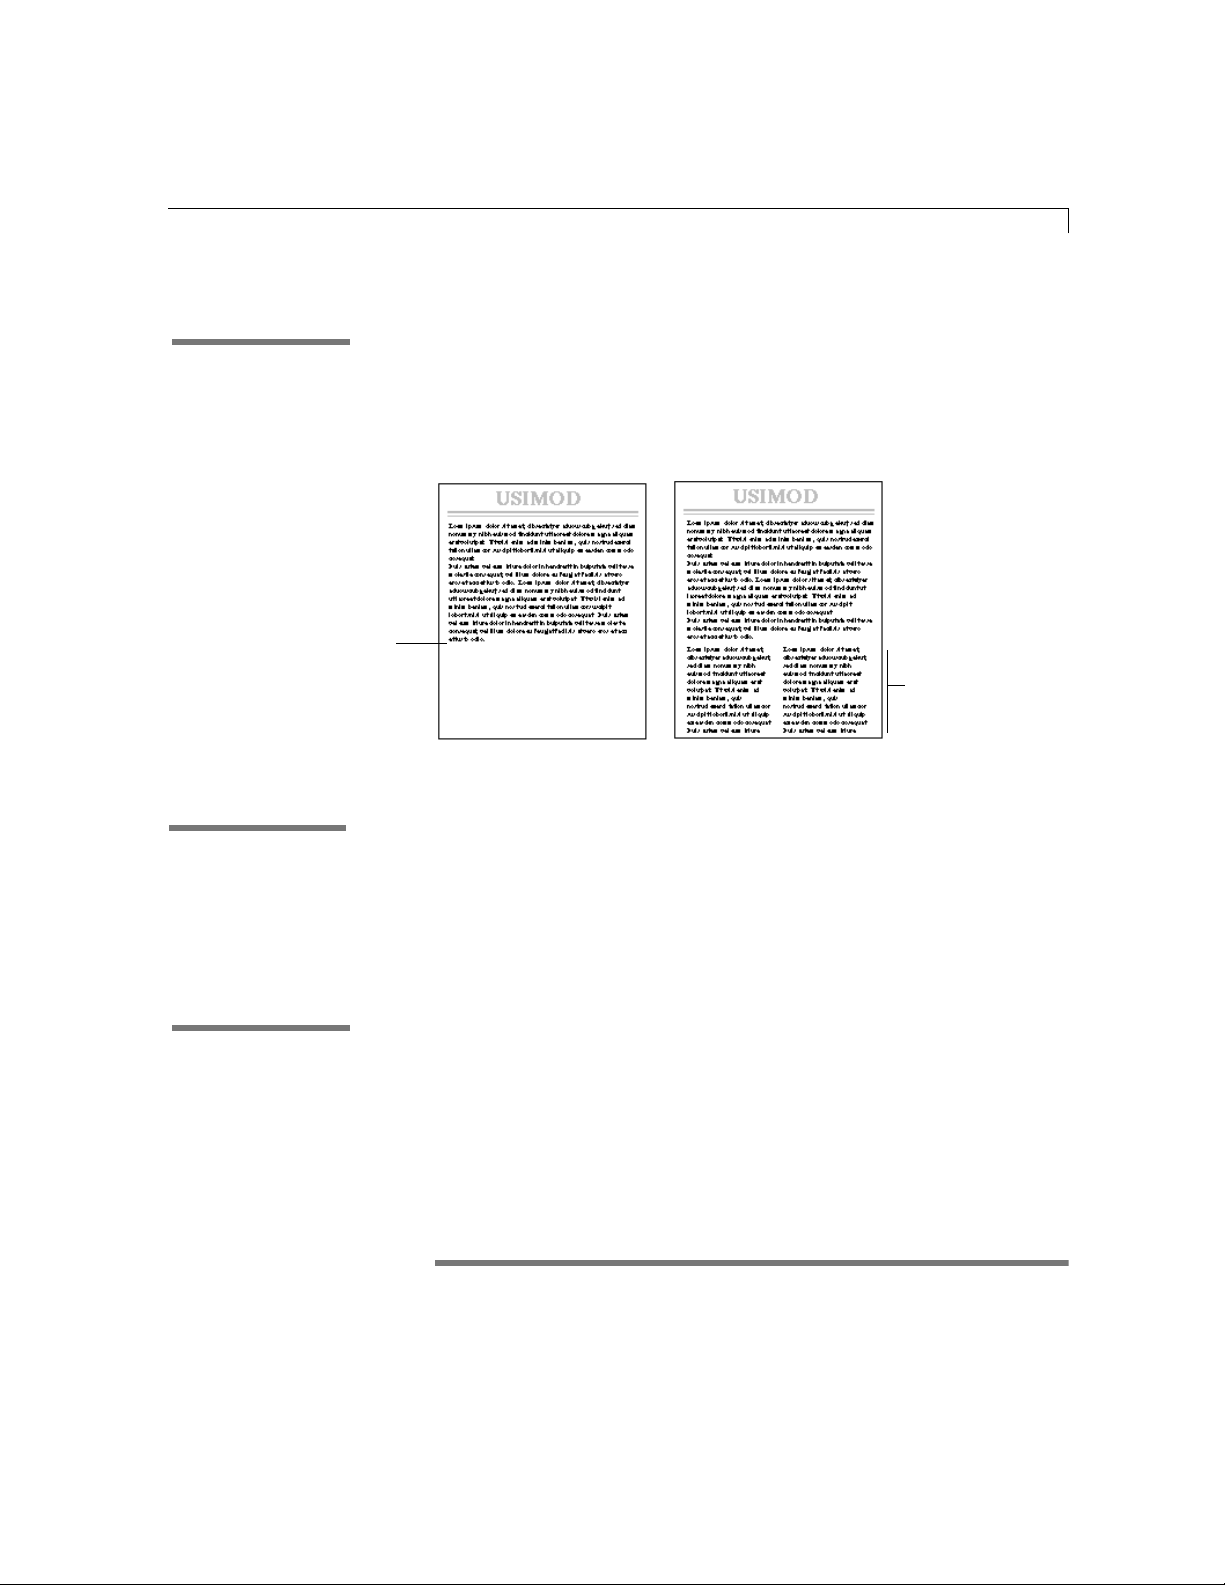
Varying the number of columns on a page
In the Help index,* see:
E sections
Place the insertion point where
you want to insert a section
Text (word processing) 4-25
If you add more than one section to a page, you can vary the number of
columns on the page. For example, to create a page with one column on the
top half of the page and two columns on the bottom half, add a second
section to the page (set the section to start on a new line), and then add
another column to that section.
Insert a second
column in the section
In the Help index,* see:
E columns, text
Numbering sections
In the Help index,* see:
E Insert Page # command
Page before section break
Page after section break
You add columns using the column controls or the Section dialog box. Use
the column controls to add or subtract equal-width columns. Use the Section
dialog box to create variable-width columns or to enter precise column
widths. For more information on adding columns, see onscreen Help,
“Creating and changing columns” on page 4-20, and the previous section.
You can place the section number in a header or footer, and have it print on
every page of the section. Doing so is useful if a section represents a chapter
in a book, and you want to show chapter and page numbers. For example,
you can show:
1 a section number by itself (“Chapter 3”, “Chapter 4”) or with the current
page number (“Page 3-11”, “Page 3-12”)
1 a page number within a section (“Page 1 of 10” and “Page 2 of 10” where
there are ten pages in the section)
1 the total number of pages in a section (“This chapter contains 32 pages”)
Choose Index from the Help menu and type the first few letters of the entry. Double-click the
*
entry and then double-click a topic.
Page 90

4-26 AppleWorks 5 User’s Manual
To insert the section number, the page number, or the total number of pages
in the section or document, choose Insert Page # from the Edit menu. Then
select an option in the Insert Page Number dialog box.
To assign letters or Roman numerals instead of numbers to a section, select
an option from the Representation pop-up menu.
Adding footnotes and endnotes
Annotate your documents with footnotes (notes at the bottom of a page) or
In the Help index,* see:
E footnotes
endnotes (notes at the end of a document). To add footnotes or endnotes to a
document, place the insertion point where you want the footnote reference
and choose Insert Footnote from the Format menu. You can later change a
footnote to an endnote in the Document dialog box explained in the table on
the next page. AppleWorks assigns the footnote an incremental number and
creates space at the end of the page or document for the footnote or endnote
text. As you type the footnote text, the document text adjusts to
accommodate the length of the footnote. When you’re finished typing the
footnote text, click the main text area or press Enter on the numeric keypad.
In the Help index,* see:
E Assistants
USIMOD
Loem ipsum dolor sit amet, cibsectetyer
aduouscubg ekut, sed diam nonummy nibh euismod
tincidunt ut laoreet dolore magna aliquam erat
volutpat. Ut wisi enim ad minim beniam, quis
nostrud exerci tation ullamcorper suscipit lobortis
nisl ut aliquip ex easden commodo cosequat.
Duis autem vel eum iriure dolor in hendrerit
in bulputate velit esse molestie consequat, vel illum
dolore eu feugiat nulla facilsis at vero eros et
accumsan et iusto odio.
Loem ipsum dolor sit amet, cibsectetyer
aduouscubg ekut, sed diam nonummy nibh euismod
tincidunt ut laoreet dolore magna aliquam erat
volutpat. Ut wisi enim ad minim beniam, quis
nostrud exerci tation ullamcorper suscipit lobortis
nisl ut aliquip ex easden commodo cosequat.
Duis autem vel eum iriure dolor in hendrerit
in bulputate velit esse molestie consequat, vel illum
dolore eu feugiat nulla facilsis at vero eros et
accumsan et iusto odio te feugait nulla faclisi.
1 "Dolore magna" Aliquam erat, 1972
2 "Esse" Molestie consequat, 1987
3 Feugiat nulla facilsis
2
Footnotes
1
3
USIMOD
Loem ipsum dolor sit amet, cibsectetyer
aduouscubg ekut, sed diam nonummy nibh euismod
tincidunt ut laoreet dolore magna aliquam erat
USIMOD
volutpat. Ut wisi enim ad minim beniam, quis
nostrud exerci tation ullamcorper suscipit lobortis
9
nisl ut aliquip ex easden commodo cosequat.
Loem ipsum dolor sit amet, cibsectetyer
aduouscubg ekut, sed diam nonummy nibh euismod
Duis autem vel eum iriure dolor in hendrerit
D
tincidunt ut laoreet dolore magna aliquam erat
O
SIM
U
in bulputate velit esse molestie consequat, vel illum
volutpat. Ut wisi enim ad minim beniam, quis
dolore eu feugiat nulla facilsis at vero eros et
nostrud exerci tation ullamcorper suscipit lobortis
sum
ip
m
accumsan et iusto odio.
e
o
nisl ut aliquip ex easden commodo cosequat.
L
cu
s
u
o
u
ad
t u
n
u
Loem ipsum dolor sit amet, cibsectetyer
id
c
Duis autem vel eum iriure dolor in hendrerit
tin
t. U
a
tp
aduouscubg ekut, sed diam nonummy nibh euismod
lu
o
in bulputate velit esse molestie consequat, vel illum
v
x
e
d
tincidunt ut laoreet dolore magna aliquam erat
tru
s
o
dolore eu feugiat nulla facilsis at vero eros et
n
liq
t a
volutpat. Ut wisi enim ad minim beniam, quis
l u
is
accumsan et iusto odio.
n
nostrud exerci tation ullamcorper suscipit lobortis
te
u
nisl ut aliquip ex easden commodo cosequat.
is a
u
Loem ipsum dolor sit amet, cibsectetyer
D
ta
u
lp
u
b
aduouscubg ekut, sed diam nonummy nibh euismod
in
f
u
e e
Duis autem vel eum iriure dolor in hendrerit
r
lo
o
tincidunt ut laoreet dolore magna aliquam erat
d
n
sa
in bulputate velit esse molestie consequat, vel illum
m
u
c
volutpat. Ut wisi enim ad minim beniam, quis
ac
dolore eu feugiat nulla facilsis at vero eros et
nostrud exerci tation ullamcorper suscipit lobortis
u
s
ip
accumsan et iusto odio te feugait nulla faclisi.
m
e
nisl ut aliquip ex easden commodo cosequat.
Lo
u
sc
u
o
u
ad
t u
n
1 "Dolore magna" Aliquam erat, 1972
u
id
c
Duis autem vel eum iriure dolor in hendrerit
tin
t. U
a
2 "Esse" Molestie consequat, 1987
tp
lu
in bulputate velit esse molestie consequat, vel illum
o
v
x
e
3 Feugiat nulla facilsis
d
u
str
dolore eu feugiat nulla facilsis at vero eros et
o
n
liq
ut a
accumsan et iusto odio te feugait nulla faclisi.
isl
n
te
u
is a
1 "Dolore magna" Aliquam erat, 1972
u
D
ta
u
lp
u
2 "Esse" Molestie consequat, 1987
b
in
fe
u
e
re
lo
3 Feugiat nulla facilsis
o
d
n
sa
m
u
cc
a
er
ty
te
ec
s
e
ib
h
ib
et, c
n
y
m
m
it a
m
u
r s
n
o
lo
e
o
n
m
d
a
u
iam
liq
d
a
ed
a
n
t, s
ag
u
, qu
k
m
e
iam
re
g
n
b
lo
o
be
t d
im
ee
in
r
o
it lo
m
ip
d
t la
a
sc
u
m
i
r s
n
e
p
i e
r
at
is
o
u
c
q
t w
se
o
llam
c
u
o
n
d
o
tio
m
m
o
rci ta
c
e
n
e
d
as
e
it
r
x
e
re
d
ip
n
u
he
r in
2
lo
at, v
do
u
e
r
eq
iu
s
n
ir
o
m
u
s e
tie c
l e
s
e
ro
le
v
e
o
m
ro
m
e
se
t v
s
a
is
lit e
ils
ac
te ve
lla f
u
iat n
5
g
1
eu
.
io
od
to
s
r
e
t iu
e
ty
cte
se
e
ib
h
t, c
e
nib
y
m
m
it a
m
s
u
r
n
o
lo
e
n
m
do
a
m
u
m
ia
liq
d
d
a
e
a
n
3
t, s
ag
u
, q
k
m
e
e m
ia
r
g
b
lo
o
ben
im
et d
in
re
o
it lo
m
ip
d
t la
a
sc
u
im
s
r
n
e
t.
i e
rp
a
is
u
co
eq
t w
s
o
llam
c
u
o
n
d
o
tio
m
m
i ta
o
c
erc
n
e
sd
a
e
it
x
e
rer
d
ip
n
u
he
in
r
lo
t, ve
a
do
u
e
r
eq
s
riu
n
i
o
m
c
u
e
s
l e
stie
o
e
r
le
v
e
o
o
m
r
m
e
t v
sse
a
isi.
elit e
acl
ilsis
f
c
te v
lla
fa
u
lla
u
it n
a
t n
g
ia
eu
g
f
u
te
io
d
o
to
s
t iu
e
USIMOD
u
t
ra
is
rtis
o
b
4
1
.
el illu
t
is
u
t
ra
is
u
r
o
b
6
1
l ill
t
m
d
o
m
tis
m
u
accumsan et iusto odio.
4 Loem ipsum dolor sit amet, cibsectetyer
5 "Aduouscu" Bg ekut
6 Tincidunt ut laoreet dolore
7 Ut wisi enim
8 Nostrud exerci tation ullamcorper suscipit lobortis
9 Nisl ut aliquip ex easden commodo cosequat.
10 Duis autem vel eum
11 Lputate velit esse molestie
12 Dolore eu feugiat nulla facilsis at vero eros et
13 Accumsan et iusto odio te feugait
14 "Dolore magna" Aliquam erat, 1972
15 "Esse" Molestie consequat, 1987
16 Feugiat nulla facilsis
1 Duis autem vel eum iriure dolor in hendrerit
2 In bulputate velit esse
3 Dolore eu feugiat nulla facilsis at vero eros et
d
o
m
is
Endnotes
If you need help adding or formatting footnotes or endnotes, use the
AppleWorks Assistant for inserting footnotes. Choose AppleWorks Assistants
from the Help menu. Select Insert Footnote, and then click OK. See “Creating
a document” on page 2-1 for more information about Assistants.
Choose Index from the Help menu and type the first few letters of the entry. Double-click the
*
entry and then double-click a topic.
Page 91
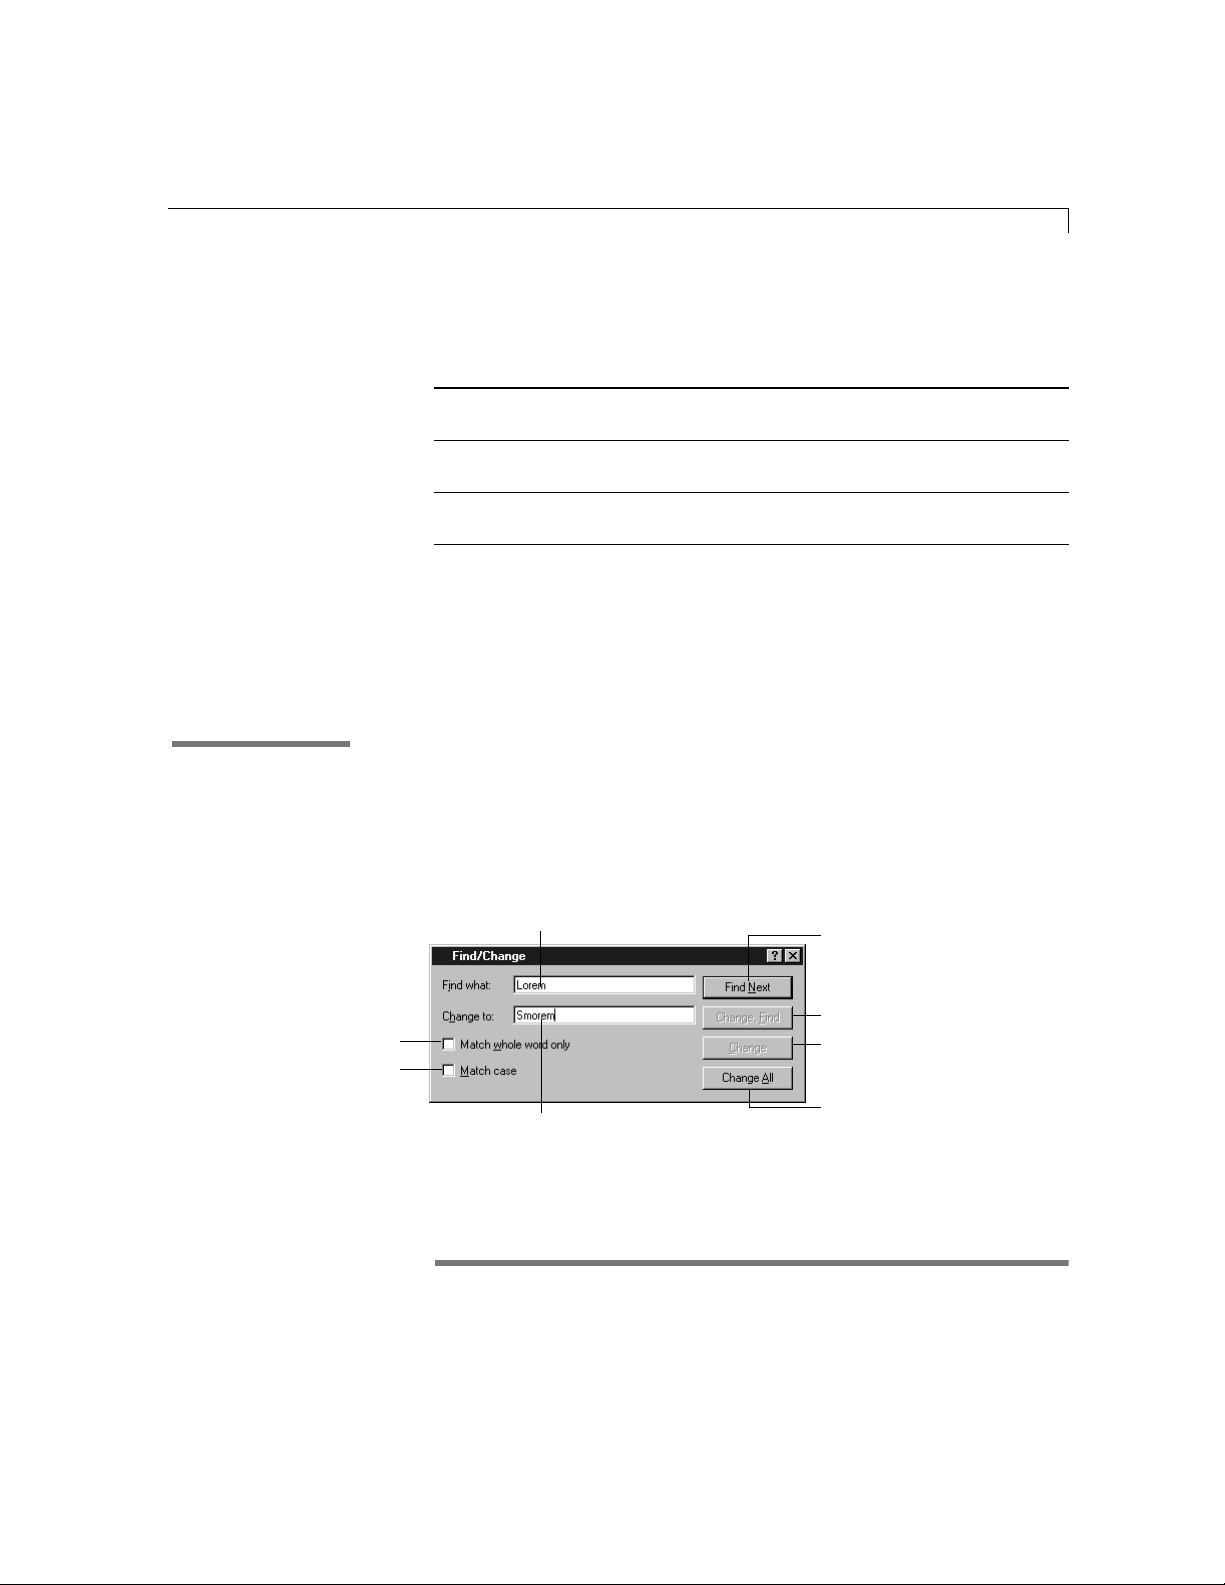
To set options for footnotes and endnotes in the Document dialog box,
T
choose Document from the Format menu. Then:
To Do this in the Document dialog box
Change all the footnotes in the document to
endnotes, or change all the endnotes to footnotes
Use footnote characters other than numbers
(such as † or *)
Start numbering footnotes at a number other
than 1
When you move and delete footnotes or endnotes, the remaining footnotes
or endnotes are renumbered and the document is adjusted accordingly. To
delete a footnote, select the footnote reference and press the Backspace key.
Finding and changing text
You can use the AppleWorks Find/Change command to save time finding a
In the Help index,* see:
E finding text
particular word or phrase in your document or to find and replace some or all
occurrences of specific text.
Text (word processing) 4-27
Select At Bottom of Page or At End of Document.
Deselect Automatic Numbering.
Type a number for Start At.
Click to match text
only to entire words
Click to match upper- and
lowercase exactly
To find and replace text, choose Find/Change from the Edit menu, and then
choose Find/Change.
ype the word or phrase
you want to find
Type the text to be used as the
replacement (optional)
Choose Index from the Help menu and type the first few letters of the entry. Double-click the
*
entry and then double-click a topic.
Click to find the next occurrence
without making a change
Click to replace this occurrence
and then find the next one
Click to replace only this occurrence
and end the search
Click to replace all
occurrences at once
Page 92

4-28 AppleWorks 5 User’s Manual
Finding special characters
In the Help index,* see:
E hidden characters
If you leave the Change to box empty, clicking any change button deletes the
text that is found.
Once you close the Find/Change dialog box, you can find the text for which you
last searched by choosing Find/Change from the Edit menu and then Find Again.
You can search for special formatting characters, such as return characters,
tab characters, and symbols for column breaks, the same way you search for
regular text. You can also search for special text such as dates, times, and
page numbers.
To find these characters, you enter special codes in the Find box in the
Find/Change dialog box. All of these codes are listed in onscreen Help and
on the Quick Reference Guide. You can also copy and then paste special
characters from your document into the Find box in the Find/Change dialog
box.
Tip To show or hide formatting characters, click on the Default button
bar, or type Ctrl+; (semicolon). See “Showing formatting characters” on
page 4-6 for more information.
Using writing tools
To delete a selected formatting character or replace it with another
formatting character, use the Find/Change dialog box the same way as you
do with text.
AppleWorks provides spell checking, thesaurus, and hyphenation services to
help you polish your writing. These are available in all AppleWorks
documents except communications.
Choose Index from the Help menu and type the first few letters of the entry. Double-click the
*
entry and then double-click a topic.
Page 93

Checking your spelling
In the Help index,* see:
E spelling
Text (word processing) 4-29
You can check all the text in the document, or text that you select.
To check Do this
All the text in the document Click on the Default button bar, or choose
Writing Tools from the Edit menu, and then choose
Check Document Spelling.
A selection Select the text or text frame you want to check.
Click on the Default button bar, or choose
Writing Tools from the Edit menu, and then choose
Check Selection Spelling.
Once you choose either command, the Spelling dialog box appears and
AppleWorks begins checking for questionable words.
The spelling checker verifies the words you are checking in the main
dictionary, which is installed with AppleWorks, and any installed user
dictionaries. If it does not find a word, it suggests alternatives. If the spelling
of the word in question is correct (such as the spelling of someone’s name),
you can add the word to a user dictionary by clicking Learn.
Double-click or type
Alt+ a number to replace a
word
Click to replace with the word
selected in the list (changes to
Done when check is complete)
Click to add the questionable
word to the user dictionary
Click to hide or show
the word in context
Shows the questionable
word in context
Choose Index from the Help menu and type the first few letters of the entry. Double-click the
*
entry and then double-click a topic.
Page 94

4-30 AppleWorks 5 User’s Manual
Hyphenating words
In the Help index,* see:
E Auto-Hyphenate command
Finding synonyms
In the Help index,* see:
E synonyms
Tip If you need to check the spelling in a communications document, you
can copy and paste the text into a word processing document, and then check
spelling there. Or, save your communications document as text, then reopen
that text file as a word processing document.
You can use automatic hyphenation to prevent entire words from moving to
the next line. You can also change where words hyphenate.
To turn automatic hyphenation on or off, choose Writing Tools from the Edit
menu, and then choose Auto-Hyphenate.
To specify how a single word should be hyphenated, place the insertion point
where you would like the word to break and press Ctrl+ -(hyphen).
When you’re searching for the best word, you can look up synonyms—
words of similar meaning—in the onscreen thesaurus that is provided with
AppleWorks. The AppleWorks thesaurus is a collection of more than
220,000 words organized by synonyms.
To find a synonym, select a word, choose Writing Tools from the Edit menu,
and then choose Thesaurus. You see the Thesaurus dialog box.
Shows the selected word (or type
a different word to look up)
Choose Index from the Help menu and type the first few letters of the entry. Double-click the
*
entry and then double-click a topic.
If you type a different word,
click to see a list of synonyms
Select the synonym
you want
Click to replace the
selected word
Click to see a list of all words
you’ve looked up recently
Page 95

Changing dictionaries
To install and select additional dictionary, hyphenation, and thesaurus files,
In the Help index,* see:
choose Writing Tools from the Edit menu, and then choose Select Dictionaries.
E dictionaries
You can also create and select different user dictionaries for specialized
terms or proper nouns that don’t appear in the main dictionary.
For more instructions on changing dictionaries, see onscreen Help.
Counting words
You can count words, paragraphs, and other text elements in any type of
In the Help index,* see:
E counting words
document except communications. To count words, choose Writing Tools from
the Edit menu, and then choose Word Count. A dialog box appears that displays
the number of characters, words, lines, paragraphs, pages, and sections in the
current document.
Note If you select Count Selection in the Word Count dialog box, you get a word
count for the current selection only.
Adding pictures and frames to text
Text (word processing) 4-31
In the Help index,* see:
E artwork, text
E drawing, tools
E libraries, overview
There are two ways to place pictures and frames—such as clip art,
spreadsheets, drawings, and paintings—in a word processing document.
You can insert them as inline objects, so that they move along, or flow, with
your text, or place them as independent objects that float on the page and are
not affected by the text.
Insert an object as an inline object when you want the object always to
appear next to specific text, or flow to the next line as you type more text.
Add a floating object when you want to wrap text around the object (see the
next section), or move the object with the arrow pointer.
A floating object has
four handles when you
select the object
An inline object has one
handle when you select
the object
Choose Index from the Help menu and type the first few letters of the entry. Double-click the
*
entry and then double-click a topic.
Page 96

4-32 AppleWorks 5 User’s Manual
To insert an inline or a floating object in a document, first show the tool
panel (choose Show Tools from the Window menu if the tool panel is hidden).
Then:
To insert Do this
An inline object in text Select the text tool in the tool panel, and then
place the insertion point in the text before you
paste or insert the object.
A floating object to a document Select the arrow pointer in the tool panel, and
then paste or insert the object.
Once you add an object, you can change how it’s placed in text.
To change Do this
A floating object to an inline object Select the arrow pointer in the tool panel and
select the floating object. Choose Cut or Copy from
the Edit menu, and then select the text tool in
the tool panel. Then place the insertion point in
the text and choose Paste from the Edit menu.
An inline object to a floating object Select the text tool in the tool panel and select
the inline object. Choose Cut or Copy from the Edit
menu, and then select the arrow pointer .
Then choose Paste from the Edit menu.
Wrapping text around pictures
In the Help index,* see:
E text wrap
Aligning inline objects To move any inline object (except equations and OLE
objects) above or below the baseline of the text, double-click the object. In the
Descent dialog box, type the number of points (between –255 and 255) you
want the object to move. Type a positive number to move the object below the
line of text, or type a negative number to move it above the line of text.
You can wrap text so that it flows around a picture or frame—either in a
rectangular shape or around the contours of the object.
Choose Index from the Help menu and type the first few letters of the entry. Double-click the
*
entry and then double-click a topic.
Page 97
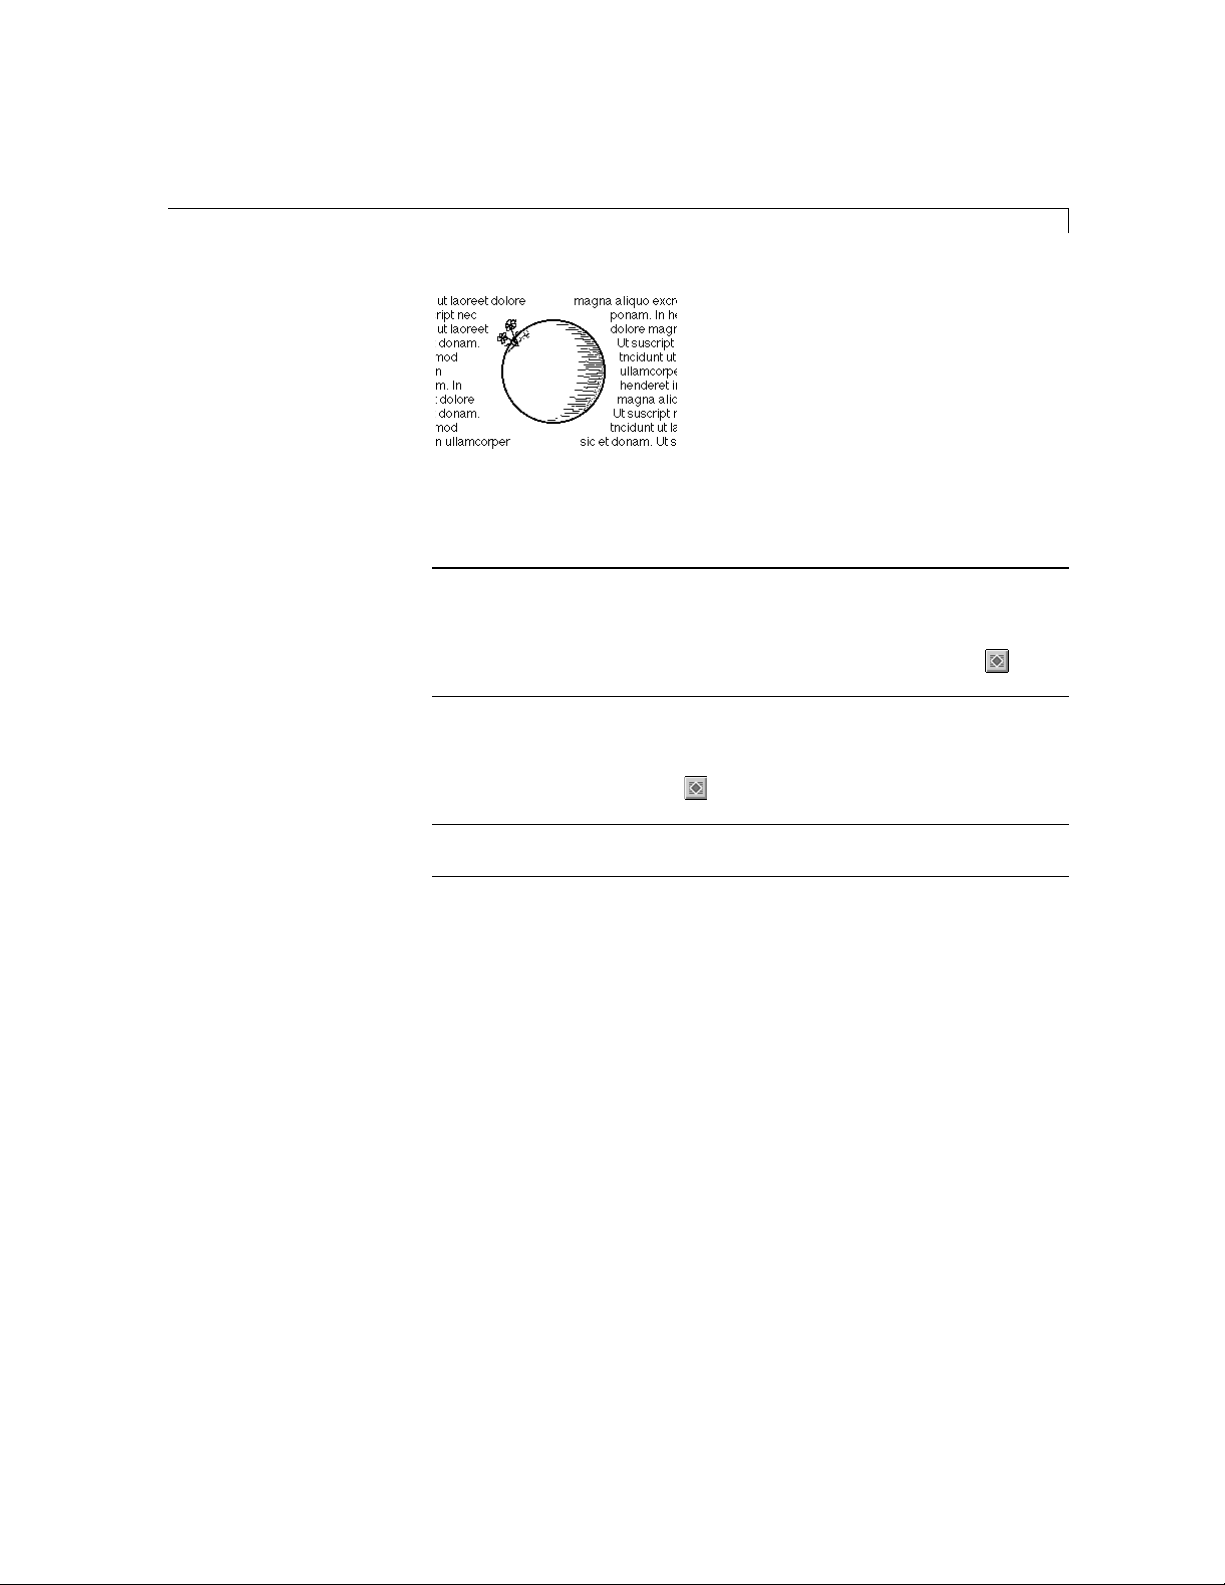
Picture placed as an object with
text wrapped around it
To Do this
Wrap text around a picture
in a word processing
document
Wrap text within a text
frame
Remove the text wrap
effect
Place the picture in your document as an object (see the previous
section). Click the picture to select it, and then choose Text Wrap
from the Options menu. To wrap text around the contours of the
object, choose Irregular. The number in the Gutter box determines
how close the wrap is to the object. You can also click on the
Default button bar for an irregular wrap.
Select the item you want to wrap text around and place it over a
linked text frame. (Select the frame and see if Frame Links in the
Options menu is checked.) With the item selected, choose Text
Wrap from the Options menu, and then choose Regular or Irregular
(or click on the Default button bar). For more information,
see “Linking frames” on page 9-24.
With the object selected, choose Text Wrap from the Options
menu, and then choose None.
Text (word processing) 4-33
Tip If the text doesn’t flow smoothly around the object, the object may be a
PICT file. (If it is, you see Ungroup Picture in the Arrange menu.) To modify
the object, select it, and then choose Ungroup Picture from the Arrange menu.
If the ungrouped picture has a border, you can delete the border by selecting
the object and choosing None from the pen width pop-up menu.
Page 98

4-34 AppleWorks 5 User’s Manual
Creating links in word processing documents
In the Help index,* see:
E book marks
E links
When you plan to use an AppleWorks word processing document (or a
document that contains a text frame) onscreen or on the Internet, you can
select an area of the document or frame and create a link (a connection or
jump) to a different area of the same document, a different document, or a
document or other information on the Internet.
To create a link in a word processing document, select text, and then create
the link. For more information, see “Creating links” on page 9-1. To create
a link to information on the Internet, see “Linking Web pages” on page 11-5.
Choose Index from the Help menu and type the first few letters of the entry. Double-click the
*
entry and then double-click a topic.
Page 99

Chapter 5: Drawing
This chapter describes what you can do with the AppleWorks drawing tools.
All draw features, including procedures, shortcuts, and troubleshooting, are
described completely in onscreen Help.
When to use a drawing
Use a drawing whenever you want to create simple shapes, such as
rectangles, circles, lines, and polygons. You can combine these simple
shapes to create designs—such as a map or a quick sketch—in any type of
document except a communications document. You don’t need to create a
frame first.
Consider using a draw document for large drawings or for designing or
laying out a page. For example, you can:
1 create layouts for newsletters, brochures, and announcements
1 design a logo or letterhead
1 create professional-looking forms, such as invoices and project
planning sheets
1 design a border or background and create a master page to place the
border or background on every page of a presentation
1 make flowcharts, or seating and organizational charts
1 illustrate floor plans and furniture arrangements
Combine lines, text frames, and ready-made
pictures to create a simple map
Page 100
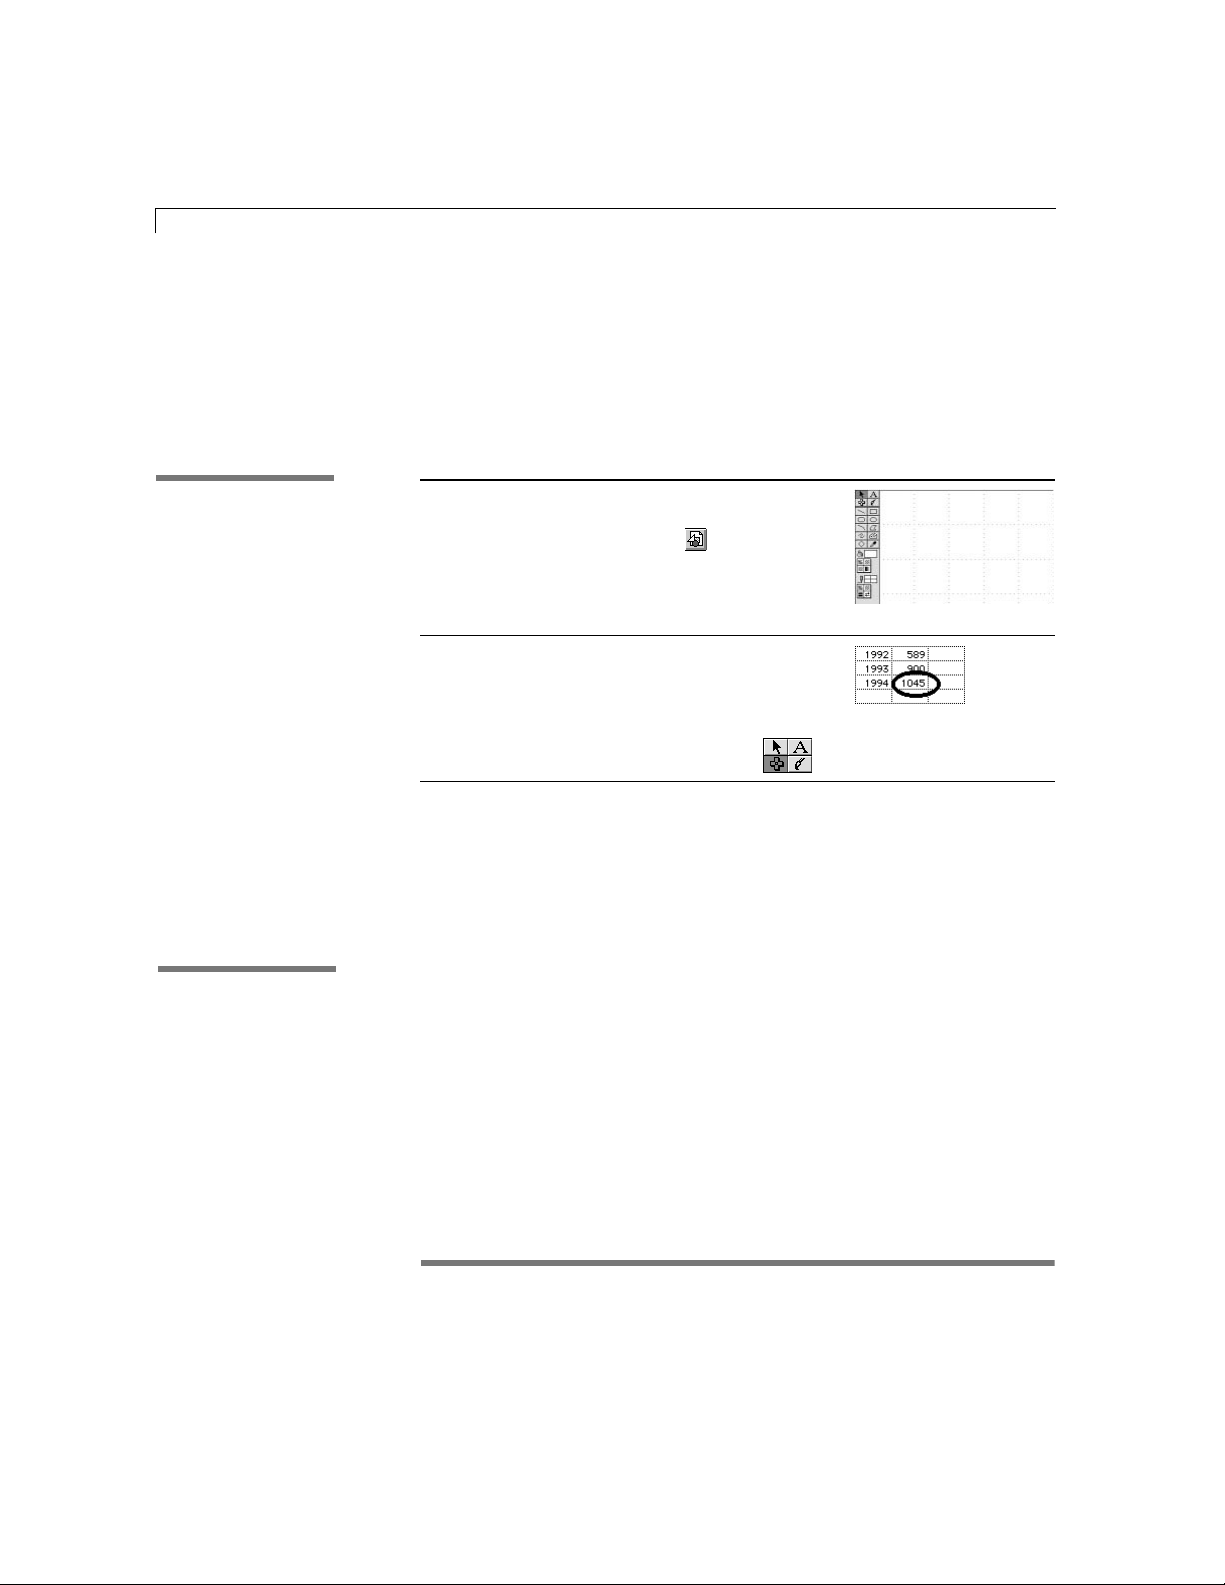
5-2 AppleWorks 5 User’s Manual
Drawing basics
Creating a drawing
In the Help index,* see:
E documents, creating
E documents, opening
You use the same tools and commands any time you work with the
drawing tools.
To Do this Example
Create a blank
draw document
Choose New from the File menu,
select Drawing, and then click OK.
Or, click on the Default
button bar. (If you don’t see the
button bar, choose Show Button Bar
from the Window menu.)
A draw document
About the draw window
In the Help index,* see:
E draw documents
E grids
E rulers
E tools
Draw objects in any type
of document (except
communications)
Select a drawing tool from the
tool panel and drag the pointer
in the document. (If you don’t
see the panel, choose Show Tools
from the Window menu. The
frame tools appear).
Circle drawn in a
spreadsheet document
Note You can create pictures by either drawing or by painting. For
information about painting and how it differs from drawing, see
chapter 6, “Painting.”
When you open a new draw document, you see the draw menus, tool panel,
and graphics grid (a guide you can use to size, position, and align objects).
Choose Index from theHelp menu and type the first few letters of the entry. Double-click the
*
entry and then double-click a topic.
 Loading...