


BR1500MS
Table of contents
 Loading...
Safety and General Information
Inspect the package contents upon receipt. Notify the carrier and
dealer if there is any damage.
SAVE THESE INSTRUCTIONS - This section contains important
instructions that should be followed during installation and maintenance
of the UPS and batteries.
Inventory
DANGER
HAZARD OF ELECTRIC SHOCK, EXPLOSION, OR ARC FLASH
• This UPS is intended for indoor use only.
• Do not operate this UPS in direct sunlight, in contact with fluids, or where there is excessive
dust or humidity.
• Be sure the air vents on the UPS are not blocked. Allow adequate space for proper ventilation.
Failure to follow these instructions will result in death or serious injury.
CAUTION
RISK OF HYDROGEN SULPHIDE GAS AND EXCESSIVE SMOKE
• Connect the UPS power cable directly to a wall outlet.
• Battery must be replaced when they reach end of service life.
• Batteries must be replaced when the unit indicates battery replacement is necessary.
• When replacing batteries, replace with the same number and type of batteries originally
installed in the unit.
Failure to follow these instructions could result in minor or moderate injury and
equipment damage.
bu476a
Coaxial cable
USB communication cable
User Manual Back-UPS
™
Pro
BR 1000/1350/1500 MS
Back-UPS Pro BR 1000/1350/1500 MS
2
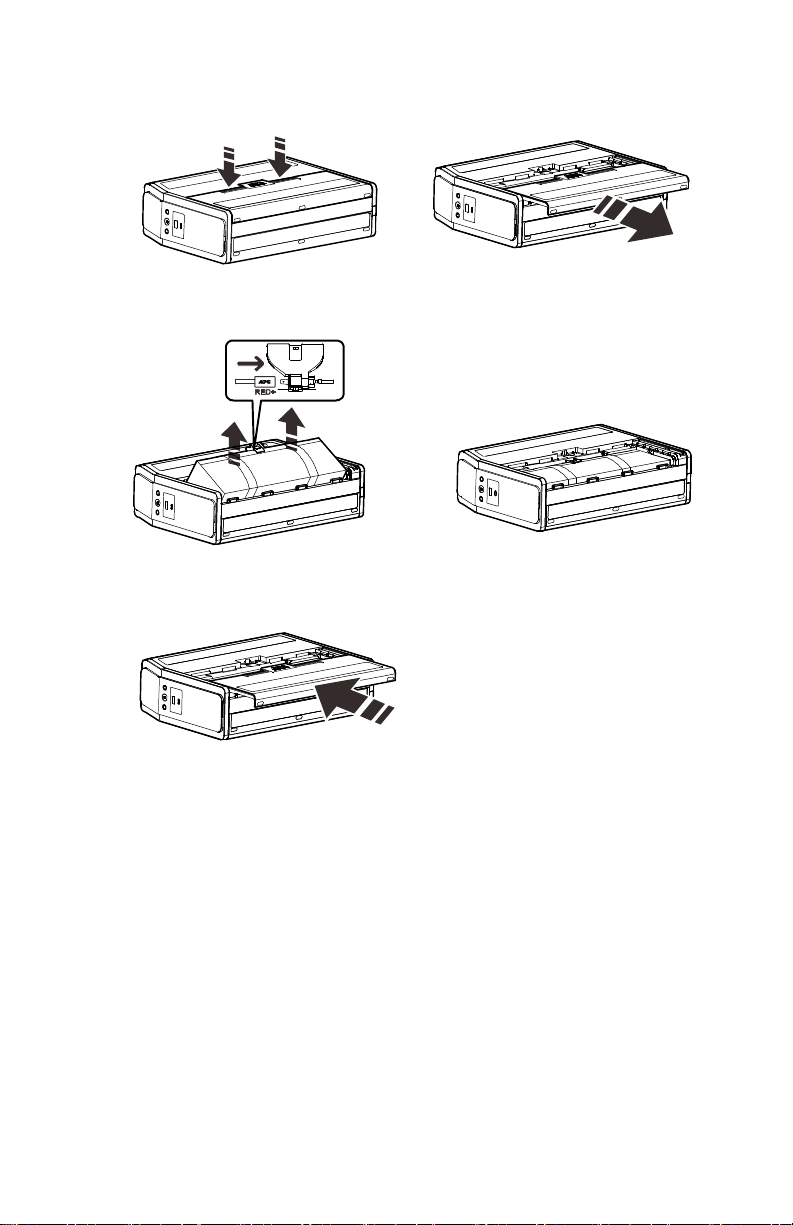
Connect the Battery
The UPS is shipped with the battery disconnected.
Install PowerChute
™
Personal Edition Software
Use PowerChute Personal Edition software to configure the UPS settings. During a
power outage, PowerChute will save any open files on your computer and shut it down.
When power is restored, it will restart the computer.
Note: PowerChute is only compatible with a Windows operating system. If you are
using Mac OSX, use the native shutdown feature to protect your system. See the
documentation provided with your computer.
Installation
Use the USB communication cable supplied with the Back-UPS to connect the data port
on the Back-UPS to the USB port on your computer. On the computer, go to
www.apc.com Search for “PowerChute Personal Edition” then click on “View Details”
to download the latest version of PCPE software. Click the download link and select
Software product. Select the appropriate operating system. Follow directions to
download the software.
Lay the UPS with the battery door facing
up. The arrows point to the locking tabs of the
battery compartment.
Press the tabs downwards and pull the
battery door away from the unit to access
the battery modules.
Using the handles on both sides of the
battery, lift the battery 30 degrees upward to
expose the battery connector. Connect the red
wire as shown above.
Push the battery into the unit.
Replace the battery door.
b
u471a
b
u
4
7
2
a
bu473a
bu474a
b
u
4
7
5
a
Back-UPS Pro BR 1000/1350/1500 MS
3
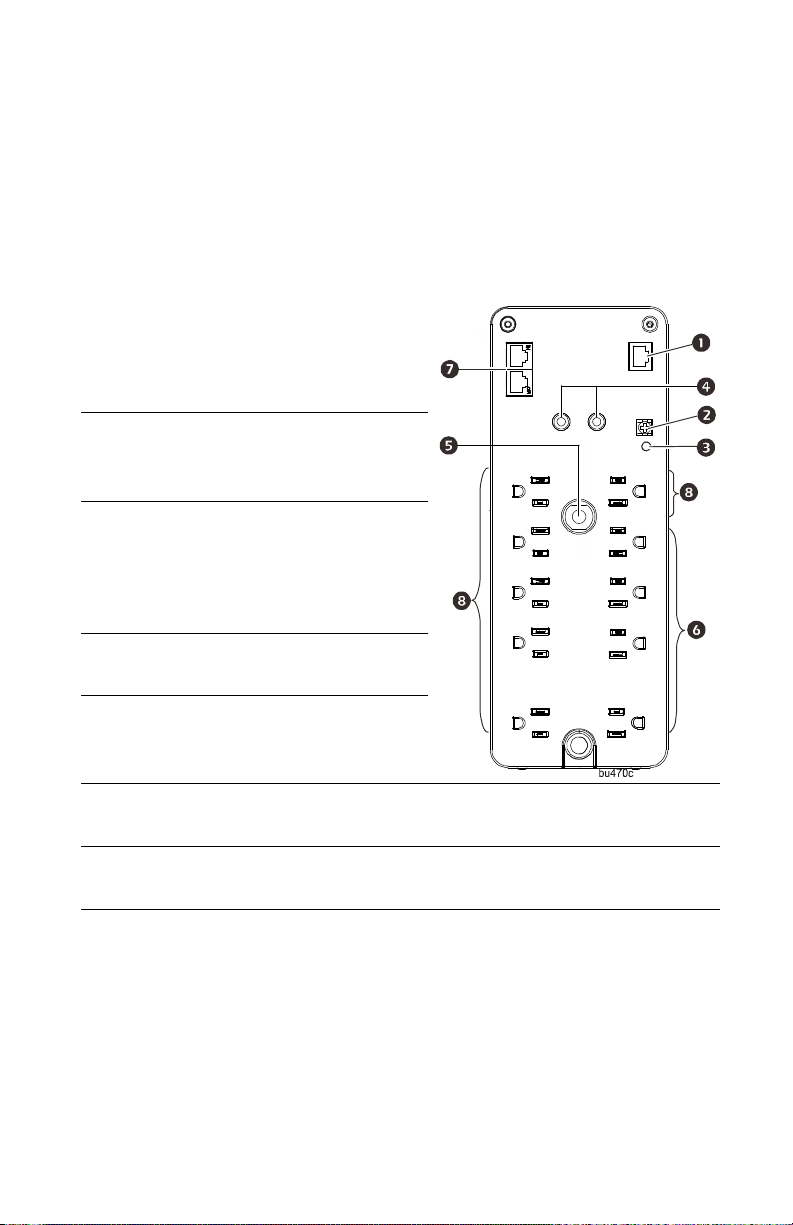
Connect the Equipment
Battery Backup and Surge Protected outlets
When the Back-UPS is receiving input power, the Battery Backup with Surge Protection
outlets will supply power to connected equipment. During a power outage or other AC
problems, the Battery Backup outlets receive power for a limited time from the Back-
UPS.
Connect equipment such as printers, fax machines, scanners, or other peripherals that do
not need battery backup power to the Surge Protection Only outlets. These outlets
provide full-time protection from surges even if the Back-UPS is switched OFF.
Surge Protected
outlets
These outlets provide full-time protection from surges, even if the
Back-UPS is off. Connect equipment such as printers and
scanners that do not require battery backup protection.
In/Out Ethernet
surge-protected
ports
Use an Ethernet cable to connect a cable modem to the I
N port,
and connect a computer to the OUT port.
Battery Backup
outlets with
Surge
Protection
During a power outage or other AC problems, the Battery Backup
outlets receive power for a limited time from the Back-UPS.
Connect critical equipment such as desktop computer, computer
monitor, modem or other data sensitive devices into these outlets.
e
USB and Serial
Data port
To use PowerChute
Personal Edition, connect
the supplied USB
communication cable or
an optional serial cable
(not supplied).
Ground screw Connect the ground lead
from an additional surge
suppression device such
as a stand-alone data line
surge protector.
Building
Wiring Fault
indicator
If this indicator is
illuminated, there is a
problem with the wiring
in the building. Contact
an electrician
immediately and do not
use the Back-UPS.
Coaxial ports
with surge
protection
Connect a cable modem
or other equipment with
coaxial jacks.
Circuit Breaker Use to reset the system
after an overload
condition has occurred
causing the circuit

Back-UPS Pro BR 1000/1350/1500 MS
4
Operation
Power Saving Display
The display interface can be configured to be continuously illuminated, or to save
energy, it can be configured to darken after a period of inactivity.
1. Full Time Mode: Press and hold DISPLAY for two seconds. The display will
illuminate and the Back-UPS will beep to confirm the Full Time mode.
2. Power Saving Mode: Press and hold DISPLAY for two seconds. The display will
darken and the Back-UPS will beep to confirm the Power Saving mode. While in
Power Saving Mode, the display will illuminate if a button is pressed, it then
darkens after 60 seconds of no activity.
Unit sensitivity
Adjust the sensitivity of the Back-UPS to control when it will switch to battery power;
the higher the sensitivity, the more often the Back-UPS will switch to battery power.
1. Ensure the Back-UPS is connected to AC power, but is OFF.
2. Press and hold the POWER button for six seconds. The LOAD CAPACITY bar will
flash on and off, indicating that the Back-UPS is in programming mode.
3. Press POWER again to rotate through the menu options. Stop at selected
sensitivity. The Back-UPS will beep to confirm the selection.
Generator Sensitivity Default Sensitive Loads
Low sensitivity Medium sensitivity (Default) High sensitivity
78-150 Vac 88-147 Vac 88-144 Vac
Input voltage is extremely low
or high. (Not recommended for
computer loads.)
The Back-UPS frequently
switches to battery power.
The connected equipment is
sensitive to voltage
fluctuations.
Loading...