

Page 1

User Guide
English ( 3 – 12 )
Guía del usuario
Español ( 13 – 23 )
Guide d’utilisation
Français ( 24 – 33 )
Guida per l’uso
Italiano ( 34 – 43 )
Benutzerhandbuch
Deutsch ( 44 – 53 )
Appendix
English ( 54 )
Page 2

2
Page 3
User Guide (English)
Introduction
Box Contents
Prestige
Power Adapter
Music Rest
Software Download Card
Support
For the latest information about this product (system requirements, compatibility information,
etc.) and product registration, visit alesis.com.
For additional product support, visit alesis.com/support.
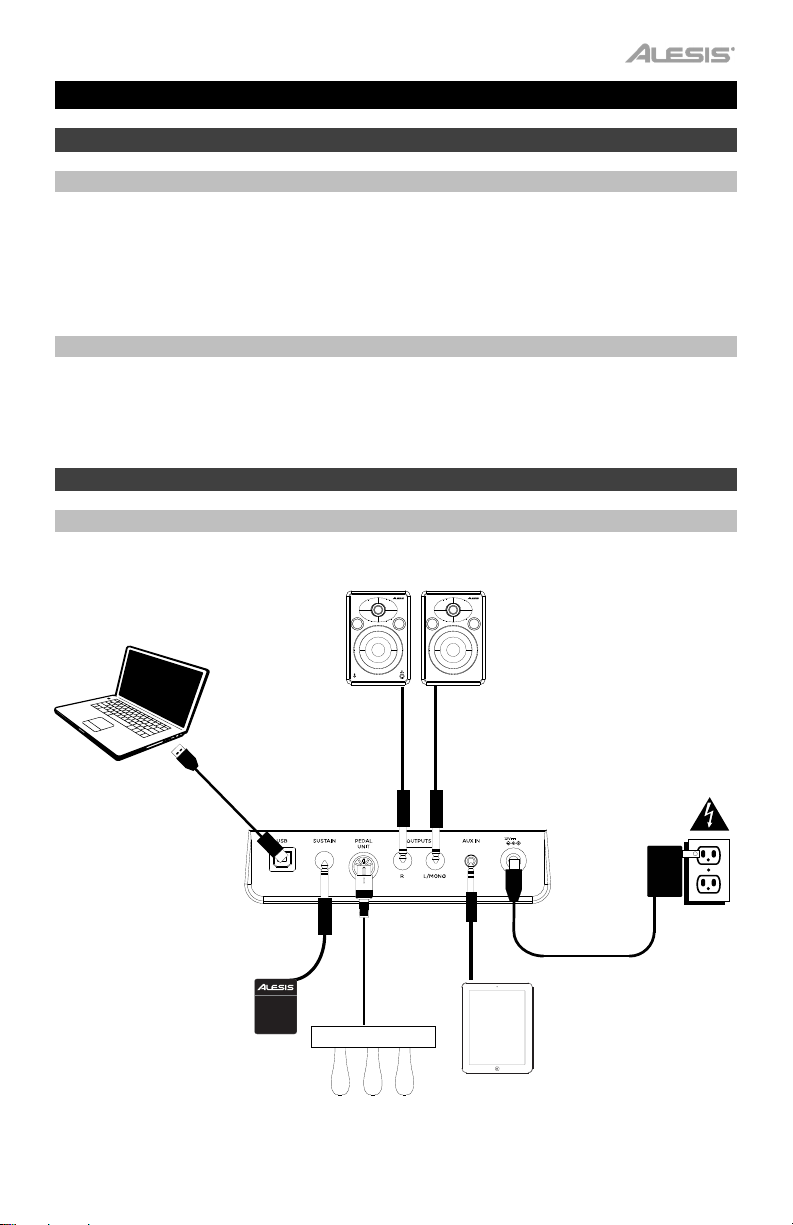
Setup
Connection Diagram
Items not listed in
Introduction > Box Contents are sold separately.
Computer
Sustain Pedal
User Guide
Safety & Warranty Manual
Speakers
Sustain
Pedal
Pedal
Unit
Tablet
Power
3
A
3
Page 4
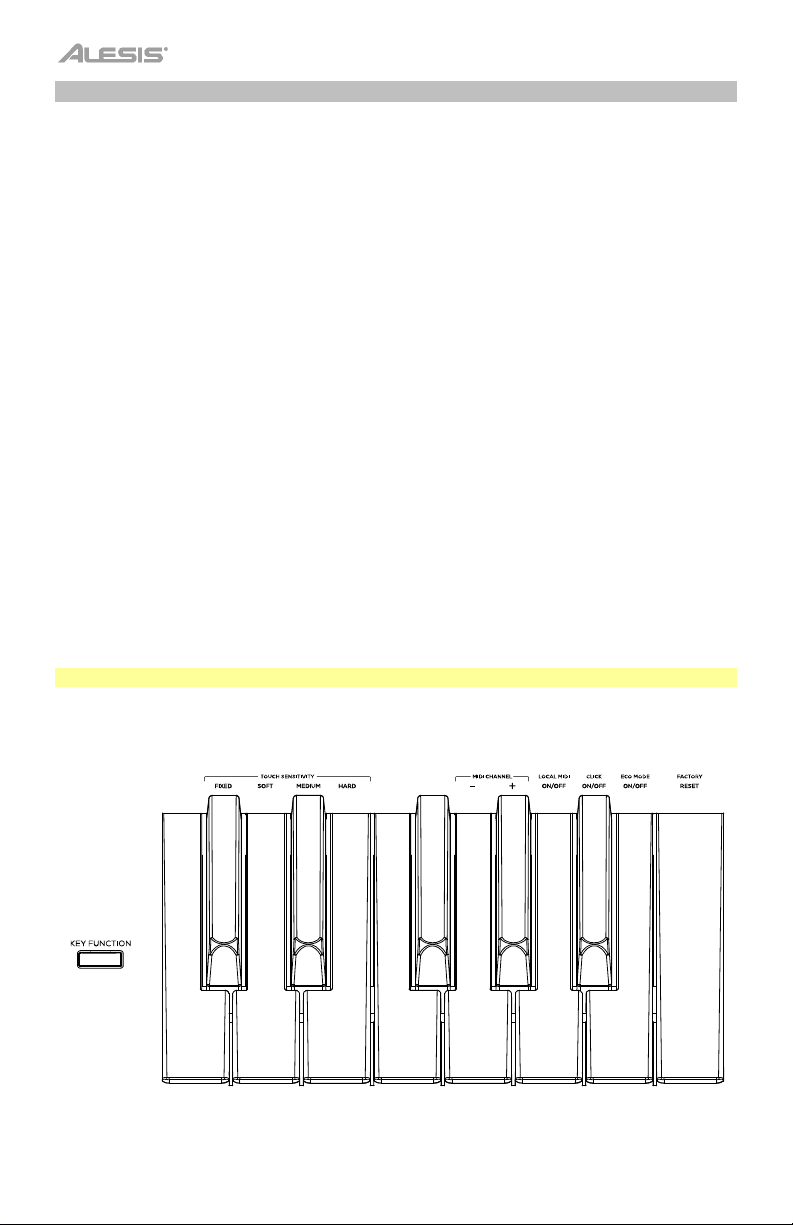
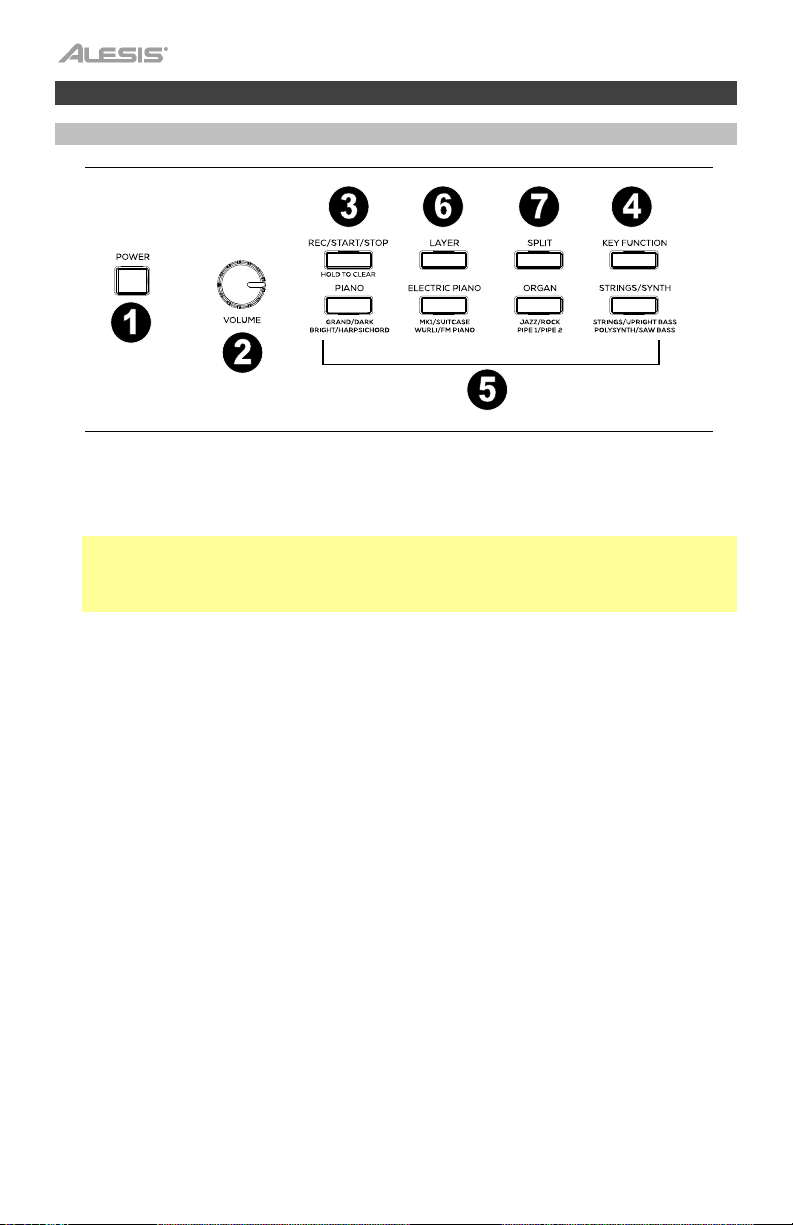
Features
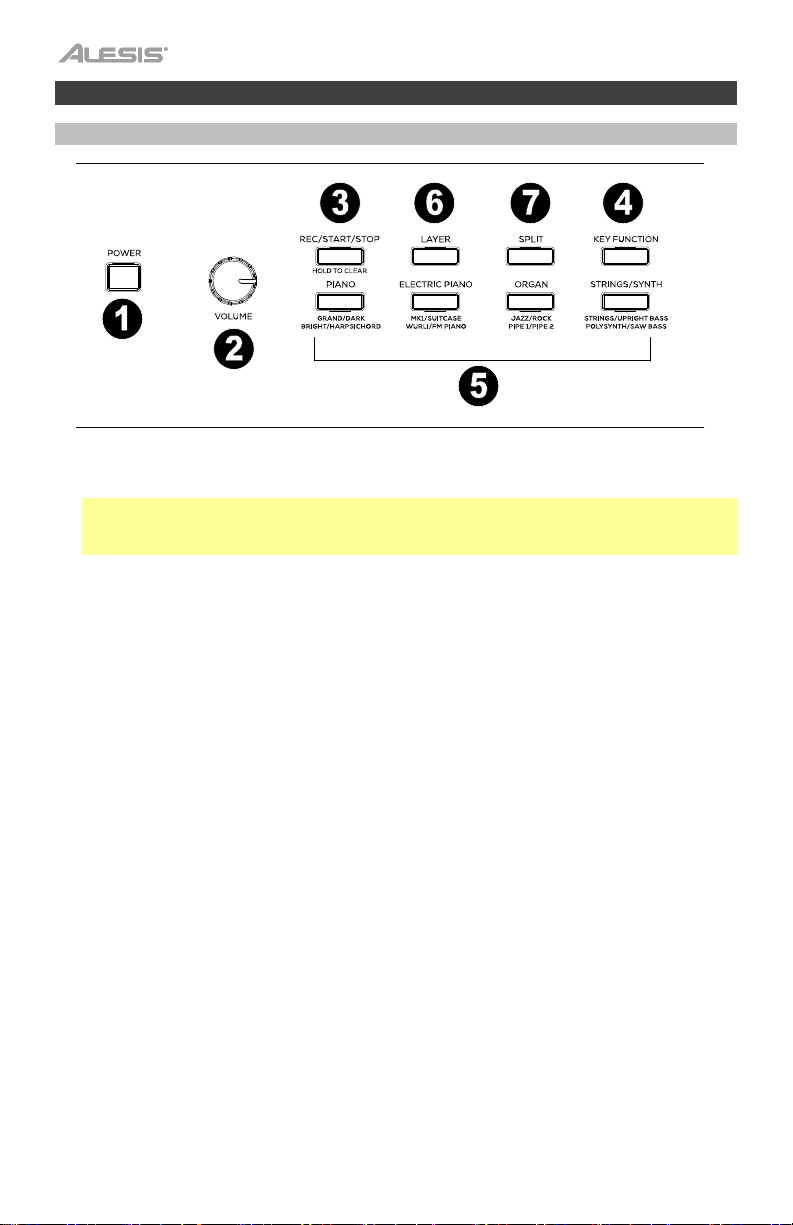
Top Panel
1.
Power Switch: Turns the piano’s power on or off.
2.
Volume Knob: Adjusts the volume for the Line Output and either Headphone Output.
Note: If the internal speakers do not produce any sound, check that the Volume knob is not
set too low or if headphones are plugged into either Headphone Output. The speakers will
be muted if there are headphones plugged into either Headphone Output.
3.
Rec/Start/Stop Button: Press this button to arm recording or stop recording a user song,
start or stop a user song, stop a demo song, or stop the metronome. Press and hold this
button to erase an existing user song.
4.
Key Function Button: Press and hold this button while also pressing one of the 88 keys to
edit various settings.
5.
Voice Select Buttons: Press one of these buttons to select a preset voice. See Operation
> Voices to learn more.
6.
Layer Button: Press this button to enable/disable Layer Mode.
7.
Split Button: Press this button to enable/disable Split Mode.
4
Page 5
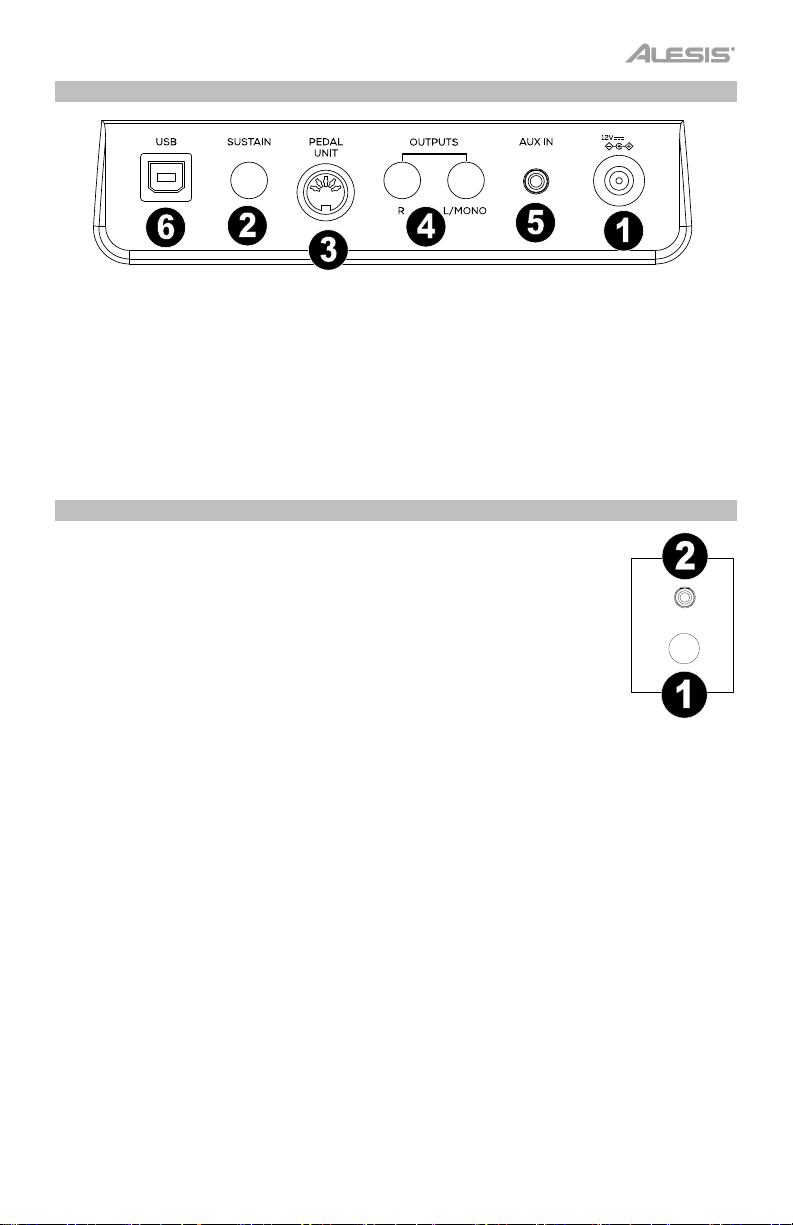
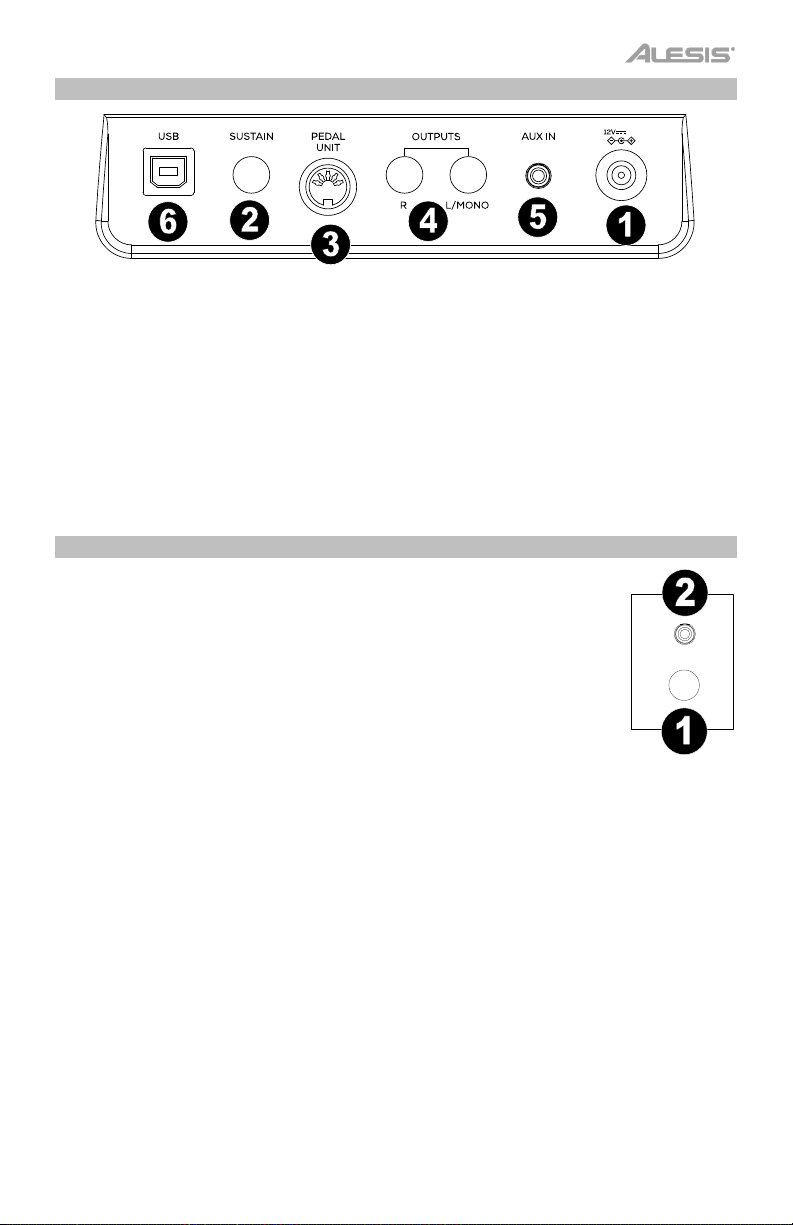
Rear Panel
A
3
1. Power Connector: Connect the included power adapter here.
2. Sustain Pedal Input: Connect a standard 1/4” (6.35 mm) sustain pedal here.
3. Pedal Unit Input: Connect a pedal unit to this input.
4. Line Output: Connect external audio equipment such as an amplifier, mixer, or recorder.
Use the R and L outputs for stereo output or just the L output for mono output.
5. Aux Input: Connect a mobile device or other audio source to this input. You can adjust the
volume of this device on your mobile device or other audio source itself.
6. USB Port: Allows for transfer of MIDI data to a computer.
Front Panel
1. 1/4” Headphone Output: Connect stereo headphones with a 1/4” (6.35
mm) stereo (TRS) connector. When headphones are connected, the
internal speakers will automatically turn off and sound will only be heard
from the headphones.
2. 1/8” Headphone Output: Connect stereo headphones with a 1/8” (3.5
mm) stereo (TRS) connector. When headphones are connected, the
internal speakers will automatically turn off and sound will only be heard
from the headphones.
PHONES
5
Page 6

Operation
Quick Start
Playing Demo Songs
The Prestige digital piano features 10 demo songs:
• Fantaisie-Impromptu in C# Minor Opus 66
• Etude Opus 25 No. 1
• Polonaise No. 6 in A Flat Major Opus 53
• Sonata No. 16 in C Major
• Toccata and Fugue in D Minor
• Prelude and Fugue No. 30 in D Minor
• Prelude and Fugue No. 1 in C Major
• Suite of Minuets in F Major
• Danse des Mirlitons
• Wedding March
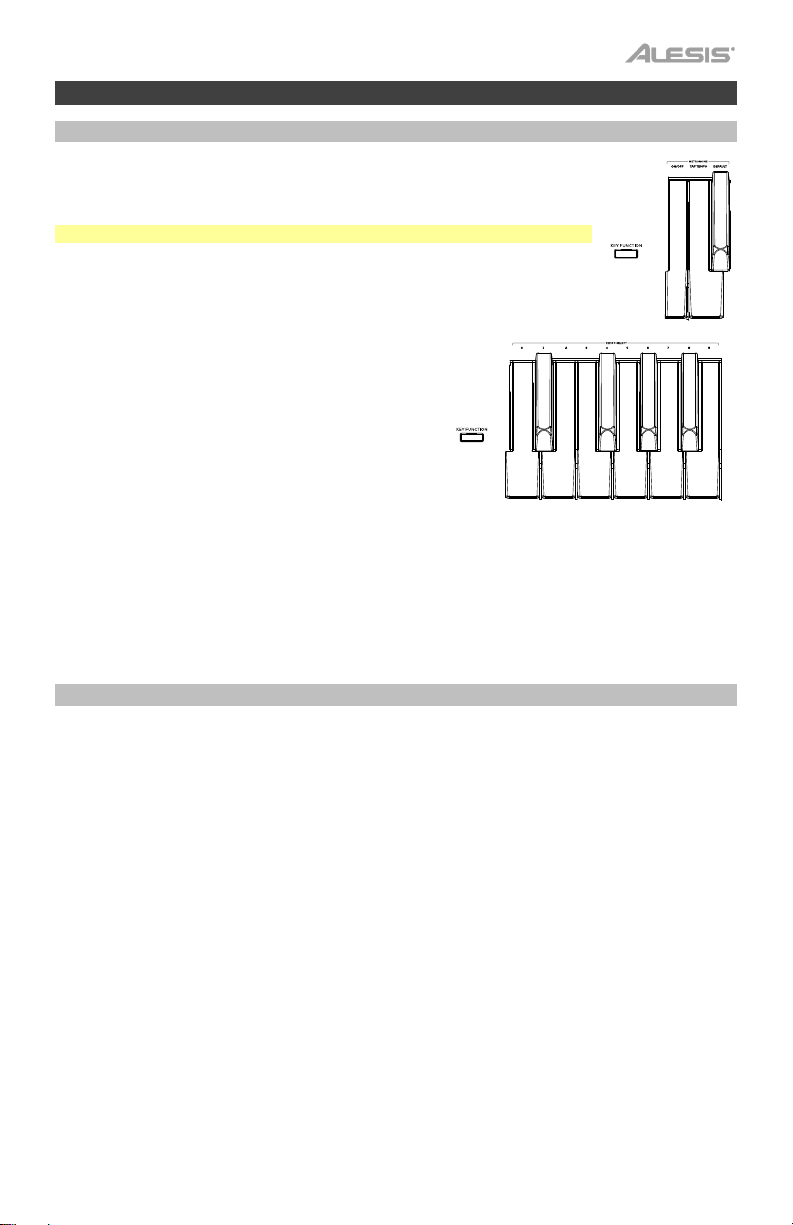
To play the demo songs:
1. To play a song demo, press and hold the Key
Function button, then press a key from C#2
through A#2.
2. To stop a song demo, press the Rec/Start/Stop
button.
Playing Voice Demos
Each Voice button on the panel is preset with a voice
demo. Press and hold the Key Function button, and
then press C2. This will play the voice demo for the
currently selected sound. If layer or split mode is
active, the voice demo will play for the upper voice.
+
+
6
Page 7
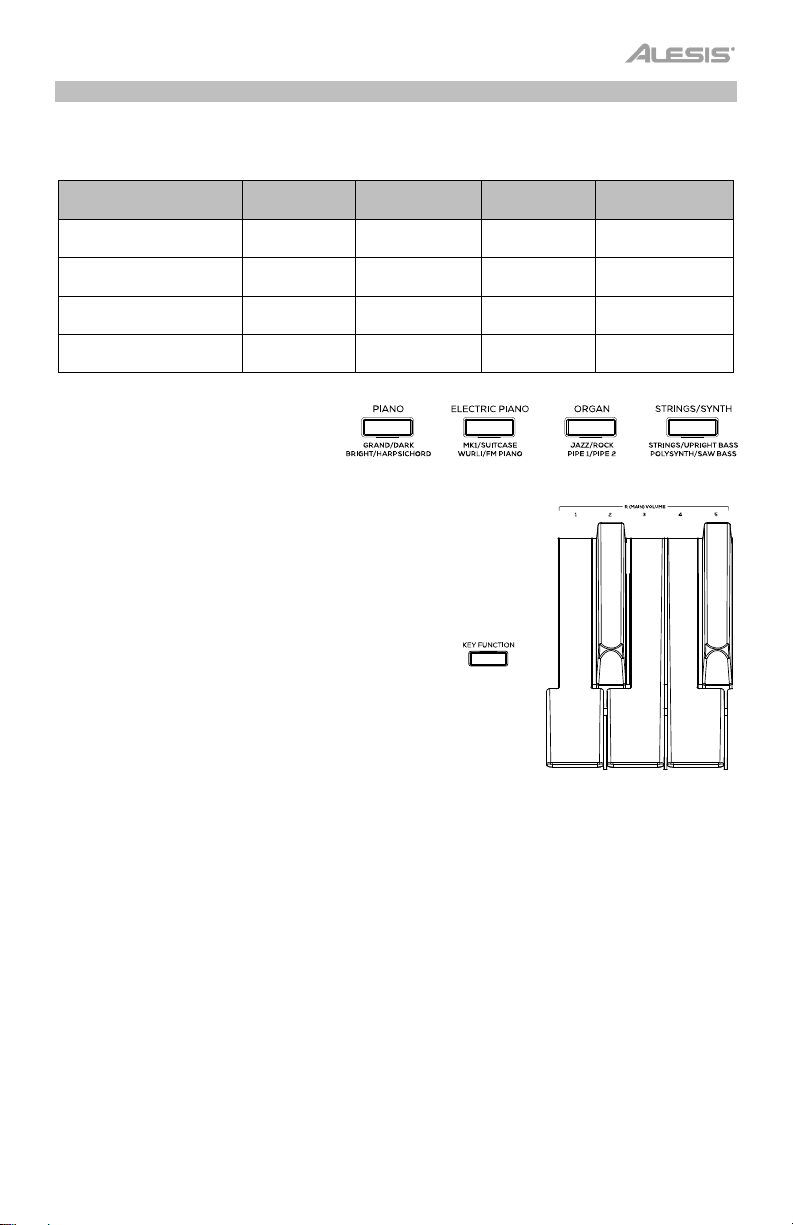
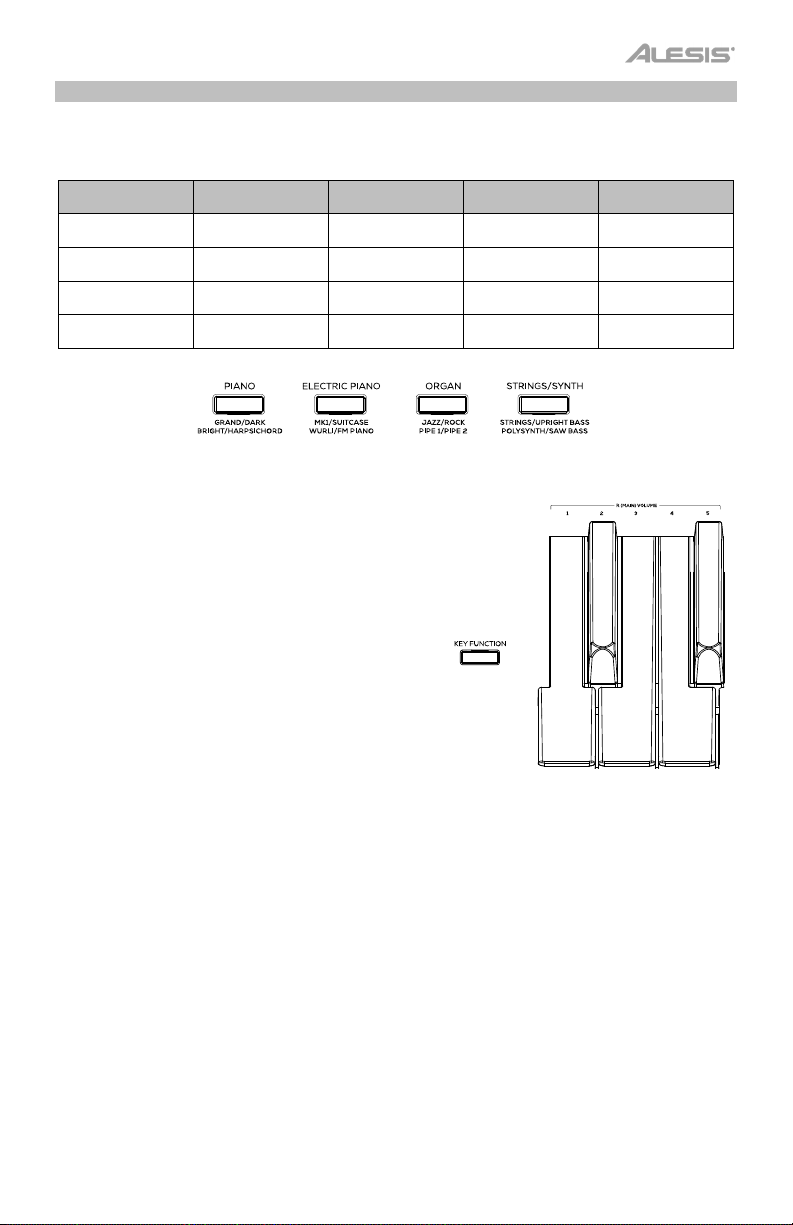
Voices
The Prestige digital piano features 4 voice categories with 4 voice variations each, for a total of
16 voices to choose from:
Voice Category Piano
Variation 1
(White LED)
Variation 2
(Green LED)
Variation 3 (Red LED)
Grand Piano Mark I Jazz Organ
Dark Grand Suitcase Rock Organ Upright Bass
Bright
Grand
Variation 4 (Blue LED) Harpsichord FM Piano
To select and play a voice:
1. Press one of the Voice Select
buttons to select a voice
category. The corresponding
LED will be lit for that voice
category.
2. Press the same Voice Select
button again to select one of the
other voice variations in that
category. The corresponding
LED will change color to indicate
which variation voice is selected.
3. Play the keys to hear the voice.
4. To change the volume for the
main voice, press and hold Key
Function, and then press a key
from D6 to F#6. The available
selections for this function are 1
(D6), 2 (D#6), 3 (E6), 4 (F6), and 5
(F#6).
Electric
Piano
Wurli
Organ Strings/Synth
String
Ensemble
Pipe Organ
1
Pipe Organ
2
Polysynth
Synth Bass
+
7
Page 8
Layer Mode
Layer Mode enables for two different voices to be
layered together for a fuller and richer sound.
To enable Layer Mode:
1. Press and release the Layer button. The
corresponding LED will turn on to indicate layer
mode is enabled. When Layer Mode is enabled,
the layered voice is referred to as the R2 voice.
2. Press and hold the Layer button while using the
Voice Select buttons to select a layer voice
+
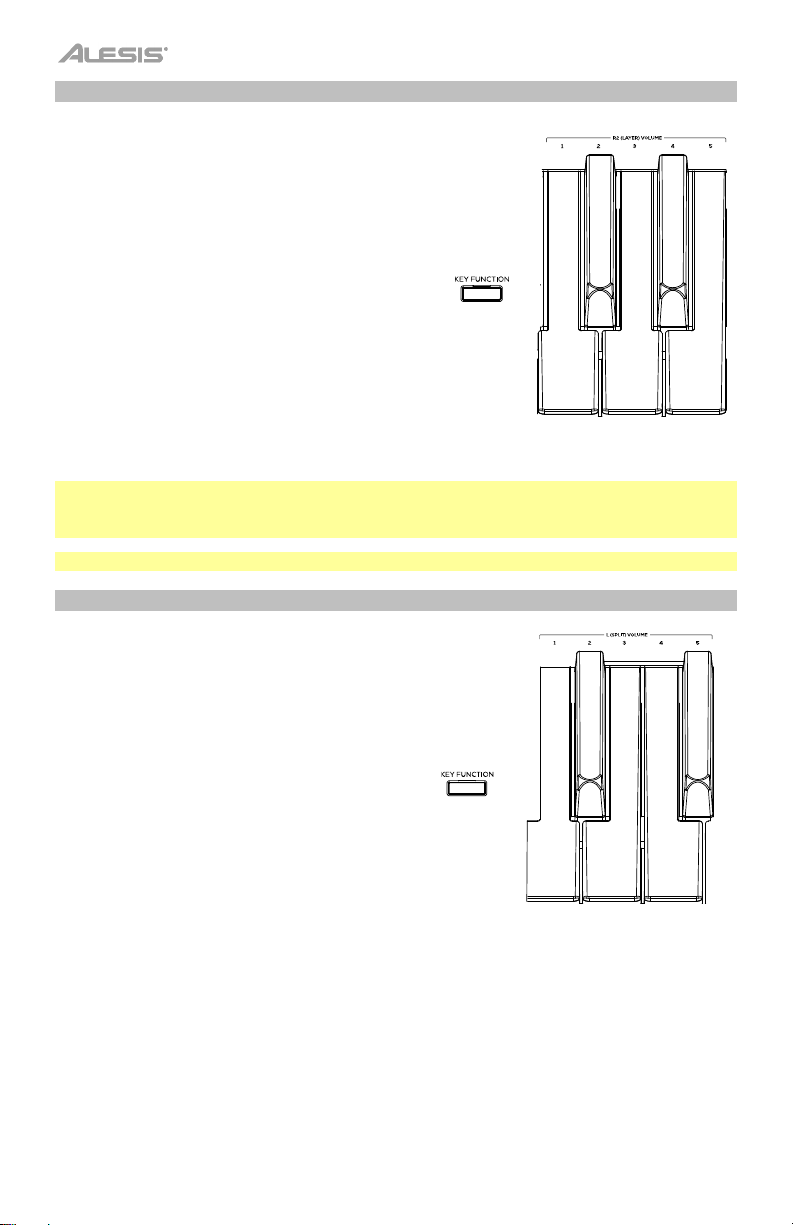
3. To change the volume of the layer voice (R2),
press and hold Key Function, and then press a
key from G6 to B6. The available selections for
this function are 1 (G6), 2 (G#6), 3 (A6), 4 (A#6),
and 5 (B6).
4. To disable layer mode, press and release the
Layer button again. The corresponding LED will
turn off to indicate layer mode is disabled.
Note: When you are selecting which voices will be layered, the first Voice button you press will
be set as the "Upper" voice, and the second Voice button you press will be set as the "Lower"
voice.
Note: You cannot layer 2 voice variations from the same voice category when using Layer Mode.
Split Mode
Split Mode enables you to split the 88 keys into two
zones so that you can have two different voices for
each of your hands. For example, you may want the
Piano voice for your right hand, and the Bass voice
for your left hand. When Split Mode is enabled, the
left-hand voice is referred to as the L1 voice.
To enable Split Mode:
1. Press and release the Split button. The
corresponding LED will turn on to indicate split
mode is enabled.
2. Press and hold the Split button while pressing a
Voice Select button to select a split voice.
3. Press and hold the Split button while pressing a
key to set the split point.
4. To change the volume of the split voice, press
and hold Key Function, then press a key from
A6 to C#6. The available selections for this
function are 1 (A6), 2
(A#6), 3 (B6), 4 (C6), and 5
(C#6).
5. To disable split mode, press and release the
Split button again. The corresponding LED will
turn off to indicate split mode is disable.
+
8
Page 9
Advanced Functions
Metronome
The metronome feature provides a steady beat to aid in practicing at a consistent
tempo. The tempo of the metronome can be freely adjusted from 30 to 280 beats
per minute.
Note: The metronome cannot be used during Demo playback.
To enable or disable the metronome, press and hold the Key Function button,
and then press the B3 key.
To set the tempo via tap, press and hold Key Function, then press the C3 key
at least 2 times to get the desired tempo.
To set the tempo to default (120 BPM), press and hold
Key Function, then press the C#3 key.
To manually change the metronome’s tempo, press
and hold Key Function, then press 3 digits using D3 to
B3.
+
To lower/raise the metronome’s volume, press and
hold Key Function, and then press C4 or C#4
respectively. To increase or decrease this by multiple
steps, press and hold Key Function, and then press C4
or C#4 repeatedly.
To set the metronome’s volume to default (4), press and hold Key Function, and then press D4.
To change the metronome’s time signature, press and hold Key Function, and then press D#4 or
E4 respectively. To increase or decrease this by multiple steps, press and hold Key Function, and
then press D#4 or E4 repeatedly.
To set the metronome’s time signature to the default value (4), press and hold Key Function, and
then press F4.
User Song Mode
To record and/or playback a user song:
1. Press the Rec/Start/Stop button to enter to the User Song Mode. The Rec/Start/Stop LED will
quickly flash continuously.
2. Press any of the 88 keys to start recording a song. The Rec/Start/Stop LED will slowly flash
continuously. If the metronome is playing, the Rec/Start/Stop LED will flash at the current tempo.
3. Press the Rec/Start/Stop button again to stop recording. The Rec/Start/Stop LED will be lit solid
to confirm a song exists.
4. Press the Rec/Start/Stop button again to playback the recording. The Rec/Start/Stop LED will
slowly flash continuously. Press the Rec/Start/Stop button again to stop the user song. The
Rec/Start/Stop LED will be lit solid when a song exists and is stopped.
5. Press and hold the Rec/Start/Stop button for 3 seconds to erase the user song. The
Rec/Start/Stop LED will quickly flash 3 times to confirm it has been erased.
Important User Song Mode Notes:
• The recorded user song will stay in memory until it is erased.
• If the internal memory becomes full during recording, the recording will automatically stop and be
saved.
+
9
Page 10
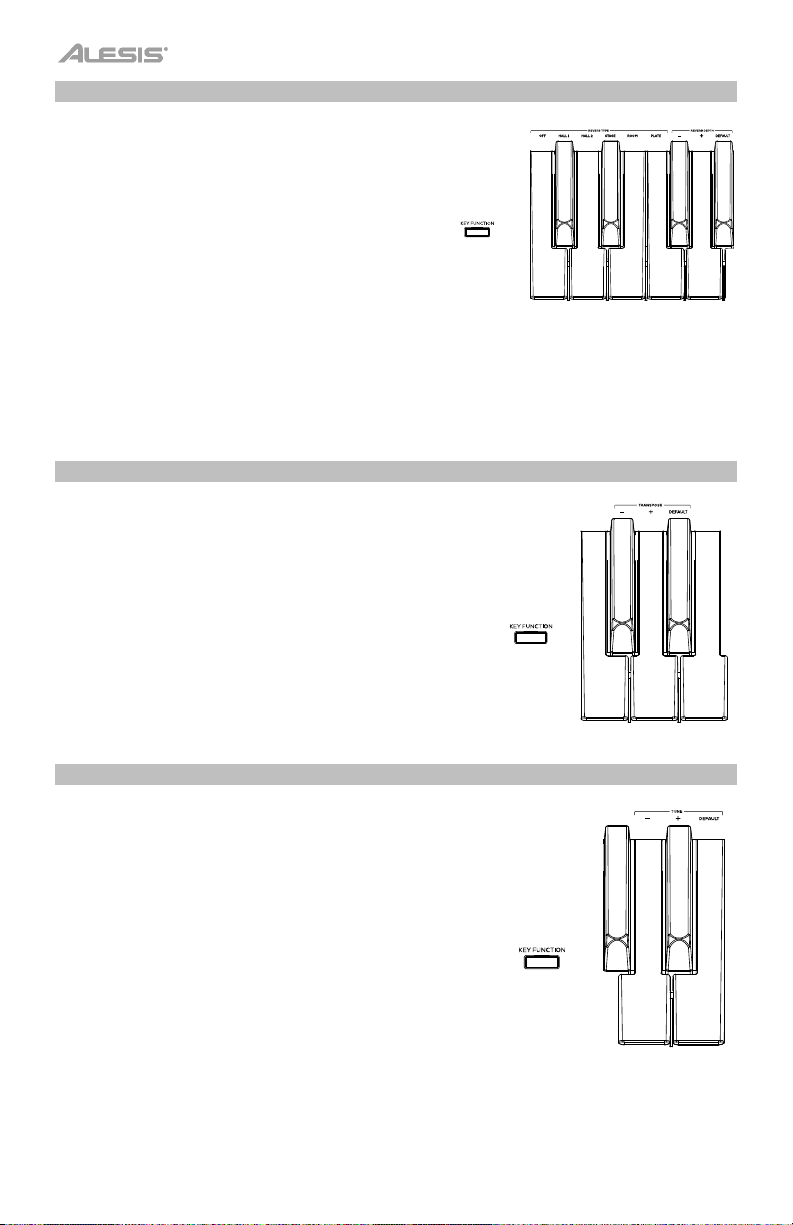
Reverb
You can also add an adjustable reverb effect to your
sound.
To select the reverb effect type, press and hold Key
Function, and then press a key from C5 to F5. The
available selections for this Key Function are Off, (C5),
Hall 1 (C#5), Hall 2 (D5), Stage (D#5), Room (E5), and
Plate (F5).
To change the depth of the reverb, press and hold
Key Function, and then press F#5 or G5 respectively.
To increase or decrease this by multiple steps, press
and hold Key Function, and then press F#5 or G5
repeatedly.
To set the depth of the reverb to the factory default
value (3), press and hold Key Function, and then
press G#5.
Transpose
This key function allows the overall pitch of the piano
to be transposed up or down by a maximum of one
octave in semitone increments in either direction.
To change the transposition, press and hold Key
Function, and then press F#4 or G4 respectively. To
increase or decrease this by multiple steps, press and
hold Key Function, and then press F#4 or G4
repeatedly.
To set the transposition to the factory default value,
press and hold Key Function, and then press G#4.
Tuning
This key function allows the overall pitch of the piano
to be fine-tuned up or down by a maximum of 25
increments in either direction.
To change the tuning, press and hold Key Function,
and then press A4 or A#4 respectively. To increase or
decrease this by multiple steps, press and hold Key
Function, and then press A4 or A#4 repeatedly.
To set the tuning to the factory default value, press
and hold Key Function, and then press B4.
10
+
+
+
Page 11
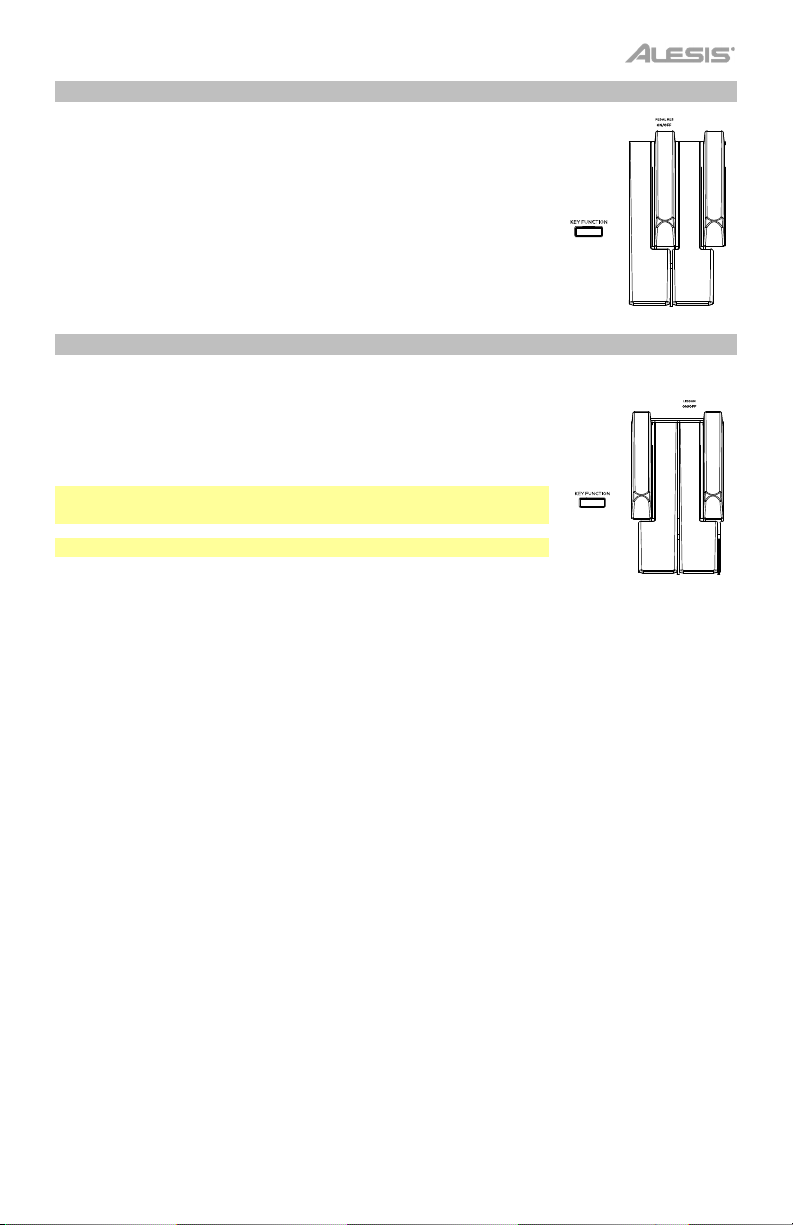
Pedal Resonance
Pedal resonance is a function that simulates the reverberation of
notes when pressing the sustain pedal on an actual piano. With Pedal
Resonance enabled, Prestige reproduces the rich harmonics and
unique sound characteristics of an actual piano when using a sustain
pedal.
To turn Pedal Resonance On/Off, press and hold Key Function,
and then press the F#7 key.
Lesson Mode
The Lesson Mode feature divides the keyboard into two zones with
the same pitch and voice. This enables both the student and teacher
to easily watch and/or play together during instruction without having
to move away from the piano and take turns or having to reach over
each other to play the same pitch.
Note: In Lesson Mode, the Layer and Split Modes will be
automatically disabled.
Note: Lesson Mode cannot be selected during Demo playback.
To turn Lesson Mode On/Off, press and hold Key Function, and
then press the F7 key.
+
+
11
Page 12
Settings
To change other settings of the digital piano:
To set the touch sensitivity of the keybed, press and hold Key Function, and then press one
these available selections:
• Fixed (C#7): The volume level does not change at all regardless of how soft or hard you play
the 88 keys.
• Soft (D7): The volume level does not change much when press you the 88 keys soft or hard.
• Medium (D#7): This is the standard piano touch response, and the default setting.
• Hard (E7): The volume level changes a lot when press the 88 keys soft or hard. You have to
hit the keys hard to produce a loud sound.
To change the MIDI channel of the keybed, press and hold Key Function, and then press G7
or G#7 accordingly. To increase or decrease this by multiple steps, press and hold Key
Function, and then press G7 or G#7 repeatedly. The available selections for this Key Function
are 1-16. The default MIDI channel is 1.
To turn local MIDI on/off, press and hold Key Function, and then press A7. When local MIDI
is on (default), sound will be generated and heard through the speaker, and MIDI messages will
be sent to the USB-MIDI output when keys are played.
generated, however MIDI messages will still be sent to the USB-MIDI output when keys are
played.
To turn the click that plays when settings are changed on/off, press and hold Key Function,
and then press A#7.
To turn eco mode (auto-power off) on/off, press and hold Key Function, and then press B7.
Note: The default auto-power off time is 30 minutes.
To reset the piano to its factory settings, press and hold Key Function, and then press C8.
When local MIDI is off, sound will not be
12
+
Page 13
Guía del usuario (Español)
Introducción
Contenido de la caja
Prestige
Adaptador de alimentación
Atril
Tarjeta de descarga de software
Soporte
Para obtener la información más completa acerca de este product (los requisitos del sistema,
compatibilidad, etc) y registro del producto, visite alesis.com.
Para soporte adicional del producto, visite alesis.com/support.
Instalación
Diagrama de conexión
Los elementos que no se enumeran en Introducción > Contenido de la caja se venden por separado.
Ordenador
Pedal de sostenido
Guía del usuario
Manual sobre la seguridad y garantía
Altavoces
Sostenido
Pedal
Unidad
de
pedal
A
3
Tableta
Suministro
eléctrico
13
Page 14
Características
Panel superior
1. Interruptor de encendido: Enciende y apaga el teclado.
2. Perilla de volumen: Ajusta el volumen de la salida de línea y ya sea salida para
auriculares.
Nota: Si los altavoces internos no emiten ningún sonido, compruebe si la perilla volumen
maestro no tiene un ajuste demasiado bajo o si los auriculares están conectados a ya sea
salida para auriculares. Los altavoces se silenciarán si se conectan auriculares a ya sea
salida para auriculares.
3. Botón de grabación/inicio/parada: Pulsar este botón para preparar la unidad para grabar
o detener la grabación de una canción del usuario, iniciar o detener una canción del usuario,
detener una canción demo o detener el metrónomo. Mantenga pulsado este botón para
eliminar una canción del usuario existente.
4. Botón de función de tecla: Mantenga pulsado el botón a la vez que pulsa una de las 88
teclas para modificar diversos ajustes.
5. Botones Voice Select (Selección de voz): Pulse uno de estos botones para seleccionar
una voz predeterminada. Consulte Funcionamiento > Voces para más información.
6. Botón Layer: Pulse este botón para activar/desactivar el modo de capas.
7. Botón Split: Pulse este botón para activar/desactivar el modo de división.
14
Page 15
Panel trasero
A
3
1. Conector de corriente: Conecte aquí el adaptador de corriente incluido.
2. Entrada para pedal de sostenido: Conecte aquí un pedal TS estándar de 6,35 mm (1/4
pulg.).
3. Entrada para unidad de pedal: Conecte un pedal a esta entrada.
4. Salida de línea: Conecte aquí un equipo de audio externo, como por ejemplo un
amplificador, un mezclador o una grabadora. Use las salidas R y L para obtener una salida
estéreo o la salida L solamente para obtener una salida monoaural.
5. Entrada auxiliar: Conecte un dispositivo móvil u otra fuente de audio a esta entrada. Puede
ajustar este volumen desde el mismo dispositivo móvil o fuente de audio.
6. Puerto USB: Permite la transferencia de datos MIDI al ordenador.
Panel frontal
1. Salida para auriculares: Conecte auriculares estéreo con conector
estéreo de 6,35 mm (1/4 pulg.). Cuando los auriculares se encuentran
conectados, los altavoces internos se apagarán automáticamente y el
sonido solo podrá escucharse desde los auriculares.
2. Salida para auriculares: Conecte auriculares estéreo con conector
estéreo de 3,5 mm (1/8 pulg.). Cuando los auriculares se encuentran
conectados, los altavoces internos se apagarán automáticamente y el
sonido solo podrá escucharse desde los auriculares.
PHONES
15
Page 16

Funcionamiento
Inicio rápido
Cómo reproducir canciones demo
El piano digital Prestige cuenta con 10 canciones demo:
• Fantaisie-Impromptu in C# Minor Opus 66
• Etude Opus 25 No. 1
• Polonaise No. 6 in A Flat Major Opus 53
• Sonata No. 16 in C Major
• Toccata and Fugue in D Minor
• Prelude and Fugue No. 30 in D Minor
• Prelude and Fugue No. 1 in C Major
• Suite of Minuets in F Major
• Danse des Mirlitons
• Wedding March
Para reproducir canciones demo:
3. Para reproducir una canción demo, mantenga
pulsado el botón Key Function, y luego pulse una
tecla entre C#2 y A#2.
4. Para reproducir una canción demo, pulse el
botón Rec/Start/Stop.
Cómo reproducir demos de voz
Cada botón Voice (Voz) del panel está
preprogramado con un demo de voz. Mantenga
pulsado el botón Key Function y luego pulse C2.
Esto reproducirá la demo de voz para el sonido
actualmente seleccionado. Si el modo de capas o de
división está activo, la demo de voz se reproducirá
para la voz superior.
+
+
16
Page 17
Voces
El piano digital Prestige cuenta con 4 categorías de voces con 4 variaciones de voz cada una,
lo que ofrece un total de 16 voces para elegir:
Categoría de voz Piano Electric Piano Organ Strings/Synth
Variación 1
(LED blanco)
Variación 2
(LED verde)
Variación 3
(LED rojo)
Variación 4
(LED azul)
Piano de cola Mark I Órgano de jazz
Dark Grand Suitcase Órgano de Rock Contrabajo
Bright Grand Wurli
Clavecín Piano FM
Para seleccionar y reproducir una voz:
1. Pulse uno de los botones Voice Select para
seleccionar una categoría de voz. El LED
correspondiente se encenderá para esa
categoría de voz.
2. Pulse el botón Voice Select nuevamente para
seleccionar una de las otras variaciones de voz
en esa categoría. El LED correspondiente
cambiará de color para indicar la variación de
voz que está seleccionada.
3. Toque las teclas para escuchar la voz.
4. Para seleccionar el volumen de la voz principal,
mantenga pulsado Key Function, y luego
pulse una tecla entre D6 y F#6. Las selecciones
disponibles para esta función son 1 (D6), 2
(D#6), 3 (E6), 4 (F6) y 5 (F#6).
Órgano de iglesia
1
Órgano de iglesia
2
+
Conjunto de
cuerdas
Polisintetizador
Bajo sintetizado
17
Page 18

Modo de capas
El modo de capas permite tocar dos voces diferentes en capas para lograr un sonido más
completo y rico.
Para habilitar el modo de capas:
1. Pulse y suelte el botón Layer. Se encenderá el
LED correspondiente para indicar que el modo
de capas está activado. Cuando el modo de
capas se encuentra activado, la voz de la capa
se denomina la voz R2.
2. Mantenga pulsado el botón Layer mientras usa
los botones Voice Select para seleccionar una
nueva voz de la capa
3. Para modificar el volumen de la voz de la capa
(R2), mantenga pulsado Key Function y luego
pulse una tecla entre D6 y F#6. Las selecciones
disponibles para esta función son 1 (G6), 2 (G#6),
3 (A6), 4 (A#6) y 5 (B6).
4. Para desactivar el modo de capas, pulse y suelte
el botón Layer nuevamente. Se apagará el LED
correspondiente para indicar que el modo de
capas está desactivado.
Nota: No se puede poner en capas 2 variaciones de voz de la misma categoría de voz al utilizar
el modo de capas.
Nota: La voz del primer botón Voice que pulse al seleccionar las voces para las capas será la
voz "superior" y la voz del segundo botón Voice que pulse será la voz "inferior".
+
18
Page 19

Modo de división
El modo de división le permite dividir las 88 teclas en dos zonas para que pueda tener dos voces
diferentes para cada una de sus manos. Por ejemplo, puede tener la voz de piano para su mano
derecha y la voz de bajo para su mano izquierda. Cuando el modo de división se encuentra
activado, la voz asignada a la mano izquierda se denomina la voz de división. Cuando el modo
de división se encuentra activado, la voz asignada a la mano izquierda se denomina voz L1.
Para habilitar el modo de división:
1. Pulse y suelte el botón Split. Se encenderá el
LED correspondiente para indicar que el modo
de división está activado.
2. Mantenga pulsado el botón Split mientras pulsa
un botón Voice Select para seleccionar una
nueva voz de división.
3. Mantenga pulsado el botón Split mientras pulsa
una tecla que será la que define el punto de
división.
4. Para modificar el volumen de la voz de la
división, mantenga pulsado Key Function y
luego pulse una tecla entre A6 y C#6. Las
selecciones disponibles para esta función son 1
(A6), 2 (A#6), 3 (B6), 4 (C6) y 5 (C#6).
5. Para desactivar el modo de división, pulse y
suelte el botón Split nuevamente. Se apagará el
LED correspondiente para indicar que el modo
de división está desactivado.
Para desactivar el modo de división, pulse nuevamente el botón Split. El LED del botón Split se
apagará cuando se desactive el modo de división.
+
19
Page 20

Funciones avanzadas
Metrónomo
La característica de metrónomo brinda un pulso
constante para ayudar a practicar a un tempo
consistente. El tempo del metrónomo puede ajustarse
libremente entre 30 y 280 beats por minuto.
Nota: Durante el modo de reproducción de demo no
se puede utilizar el metrónomo.
Para activar o desactivar el metrónomo, mantenga
pulsado el botón Key Function y luego pulse la tecla
B3.
Para ajustar el tiempo mediante toques ("tap
tempo"), mantenga pulsado Key Function y luego
pulse la tecla C3 al menos 2 veces para ajustar el
tiempo deseado.
Para ajustar el tempo al valor por defecto (120
+
BPM), mantenga pulsado Key Function y luego pulse
la tecla C#3.
Para modificar manualmente el tempo del
metrónomo, mantenga pulsado Key Function y luego
pulse 3 dígitos utilizando D3 a B3.
Para subir/bajar el volumen del metrónomo, mantenga pulsado Key Function y luego pulse
C4 o C#4 respectivamente. Para subir/bajar múltiples niveles el volumen del metrónomo,
mantenga pulsado Key Function y luego pulse C4 o C#4 repetidamente.
Para ajustar el volumen del metrónomo al valor por defecto (4), mantenga pulsado Key
Function y luego pulse D4.
Para modificar la firma de tiempo del metrónomo, mantenga pulsado Key Function y luego
pulse D#4 o E4 respectivamente. Para subir/bajar múltiples niveles de la firma de tiempo del
metrónomo, mantenga pulsado Key Function y luego pulse D#4 o E4 repetidamente.
Para ajustar la firma de tiempo del metrónomo al valor por defecto (4), mantenga pulsado
Key Function y luego pulse F4.
+
20
Page 21

Modo de canción del usuario
Como grabar y/o reproducir una canción del usuario:
1. Pulse el botón Rec/Start/Stop para ingresar al modo de canción del usuario. El LED
Rec/Start/Stop parpadeará continua y rápidamente.
2. Pulse cualquiera de las 88 teclas para comenzar a grabar una canción. El LED
Rec/Start/Stop parpadeará continua y lentamente. Si el metrónomo está activado, el LED
Rec/Start/Stop parpadeará según el tempo actual.
3. Pulse el botón Rec/Start/Stop nuevamente. El LED Rec/Start/Stop quedará iluminado
permanentemente para confirmar que existe una canción.
4. Pulse el botón Rec/Start/Stop nuevamente para reproducir la grabación. El LED
Rec/Start/Stop parpadeará continua y lentamente. Pulse el botón Rec/Start/Stop
nuevamente para detener la canción del usuario. El LED Rec/Start/Stop quedará iluminado
permanentemente cuando existe una canción y esté detenida.
5. Mantenga pulsado el botón Rec/Start/Stop durante 3 segundos para eliminar la canción
del usuario. El LED Rec/Start/Stop parpadeará 3 veces rápidamente para confirmar la
eliminación.
Notas importantes sobre el modo de canción del usuario:
• La canción del usuario grabada permanecerá en la memoria hasta que se elimine.
• Si la memoria interna se queda sin espacio libre durante una grabación, esta se detendrá y
quedará guardada automáticamente.
Reverberación
También puede agregar un efecto de reverberación
ajustable a su sonido.
Para seleccionar el tipo de efecto de reverberación,
mantenga pulsado Key Function y luego pulse una
tecla entre D5 y F#5. Las opciones disponibles para
Key Function son apagada, (C5), Salón 1 (C#5), Salón
2 (D5), Escenario (D#5), Sala (E5) y Plato (F5).
Para modificar la profundidad de la reverberación,
mantenga pulsado Key Function y luego pulse F#5 o
G5 respectivamente. Para subir/bajar múltiples niveles
la profundidad de la reverberación, mantenga pulsado
Key Function y luego pulse F#4 o G4 repetidamente.
Para ajustar la profundidad de la reverberación al
valor por defecto (3), mantenga pulsado Key
Function y luego pulse G#4.
+
21
Page 22

Transposición
Esta función de tecla permite transponer el tono general del piano
hacia arriba o abajo en una octava como máximo en incrementos
de un semitono en cualquier dirección.
Para modificar la transposición, mantenga pulsado Key Function
y luego pulse F#4 o G4 respectivamente. Para subir/bajar múltiples
niveles la transposición, mantenga pulsado Key Function y luego
pulse F#4 o G4 repetidamente.
Para ajustar la transposición al valor por defecto, mantenga
pulsado Key Function y luego pulse G#4.
Ajuste del tono
Esta función de tecla permite realizar el ajuste fino del tono general
del piano hacia arriba o abajo en un máximo de 25 incrementos en
cualquier dirección.
Para modificar el ajuste del tono, mantenga pulsado Key
Function y luego pulse A4 o A#4 respectivamente. Para subir/bajar
múltiples niveles el volumen del metrónomo, mantenga pulsado
Key Function y luego pulse A4 o A#4 repetidamente.
Para ajustar el tono al valor por defecto, mantenga pulsado Key
Function y luego pulse B4.
Resonancia de pedal
La resonancia de pedal es una función que simula la reverberación
de notas al pulsar el pedal de sostenido en un piano real. Con Pedal
Resonance activada, el Prestige reproduce los ricos armónicos y
las características únicas del sonido de un piano real cuando se
utiliza el pedal de sostenido.
Para activar/desactivar la resonancia del pedal, mantenga
pulsado Key Function y luego pulse la tecla F#7.
Modo de lección
La característica modo de lección divide las 88 teclas en dos zonas
del mismo tono y voz. Esto le permite tanto el estudiante como al
profesor observar y/o tocar juntos fácilmente durante las lecciones
sin tener que alejarse del piano, turnarse o estirarse sobre el otro
para tocar el mismo tono.
Nota: En el modo de lección, los modos de capas y división se
desactivarán automáticamente.
Nota: Durante el modo de reproducción de demo no se puede
seleccionar el modo Lesson (Lección).
Para activar/desactivar el modo de lección, mantenga pulsado
Key Function y luego pulse la tecla F7.
22
+
+
+
+
Page 23

Ajustes
Cómo modificar los demás ajustes del piano digital:
Para ajustar la sensibilidad de la placa del teclado, mantenga pulsado Key Function y luego pulse
una de las siguientes opciones:
• Fija (C#7): El nivel de volumen no cambia en absoluto independientemente de la fuerza con la que
toque las 88 teclas.
• Baja (D7): El nivel de volumen no cambia demasiado en función de la fuerza con la que toque las
88 teclas.
• Media (D#7): Esta es la respuesta táctil estándar del piano y el ajuste por defecto.
• Alta (E7): El nivel de volumen cambia significativamente en función de la fuerza con la que toque
las 88 teclas. Deberá tocar las teclas con fuerza para producir un sonido de volumen alto.
Para modificar el canal MIDI de la placa del teclado, mantenga pulsado Key Function y luego
pulse FG7 o G#7 respectivamente. Para subir/bajar múltiples niveles de este canal, mantenga pulsado
Key Function y luego pulse G7 o G#7 repetidamente. Las opciones disponibles para esta función de
tecla son 1-16. El canal MIDI por defecto es el 1.
Para activar/desactivar el MIDI local, mantenga pulsado Key Function y luego pulse la tecla A7.
Cuando el MIDI local está activado (por defecto) el sonido se generará y escuchará a través del altavoz
y los mensajes MIDI se enviarán a través de la salida USB-MIDI cuando se toquen las teclas. Cuando
el MIDI local está desactivado el sonido no se generará, sin embargo, los mensajes MIDI seguirán
enviándose a través de la salida USB-MIDI cuando se toquen las teclas.
Para activar/desactivar el sonido tipo "clic" que se escucha al modificar los ajustes, mantenga
pulsado Key Function y luego pulse A#7.
Para activar/desactivar el modo de ahorro de energía (apagado automático), mantenga pulsado
Key Function y luego pulse B7.
Nota: El tiempo de apagado automático por defecto es de 30 minutos.
Para restaurar los ajustes predeterminados de fábrica del piano, mantenga pulsado Key Function
y luego pulse C8.
+
23
Page 24

Guide d’utilisation (Français)
Présentation
Contenu de la boîte
Prestige
Adaptateur d’alimentation
Pupitre
Carte de téléchargement du
logiciel
Assistance
Pour les dernières informations concernant ce produit (la configuration système minimale
requise, la compatibilité, etc) et l’enregistrement du produit, veuillez visitez le site alesis.com.
Pour de plus amples informations, visitez alesis.com/support.
Démarrage
Schéma de connexion
Les éléments qui ne figurent pas dans Présentation > Contenu de la boîte sont vendus séparément.
Ordinateur
Pédale de sustain
Guide d’utilisation
Consignes de sécurité et informations concernant la garantie
Enceintes
24
Pédale de
sustain
Unité de
pédale
Tablette
Alimentation
3
A
Page 25

Caractéristiques
Panneau supérieur
1. Interrupteur d'alimentation : Cette touche met le piano sous et hors tension.
2. Bouton du volume : Ce bouton permet d'ajuster le niveau du volume de la sortie ligne et
de la soit sortie casque.
Remarque : Si les haut-parleurs internes ne produisent aucun son, vérifiez que le bouton
Volume n'est pas réglé trop bas ou si un casque d'écoute est branché sur soit sortie
casque. Les haut-parleurs sont mis en sourdine lorsqu’un casque d’écoute est branché à
soit sortie casque.
3. Touche Rec/Start/Stop : Cette touche permet de lancer et d'arrêter l’enregistrement d’une
chanson utilisateur, de lancer et d’arrêter la lecture d’une chanson utilisateur, d’arrêter la
lecture d’une chanson de démonstration et d’arrêter le métronome. Maintenir cette touche
enfoncée permet d’effacer une chanson utilisateur.
4. Touche Key Function : Maintenir cette touche enfoncée tout en appuyant sur l’une des 88
touches permet de modifier différents paramètres.
5. Touches Voice Select : Ces touches permettent de sélectionner une voix préréglée. Veuillez
consulter la section Fonctionnement > Voix afin d’en savoir plus.
6. Touche Layer : Cette touche permet d’activer et de désactiver le mode Layer.
7. Touche Split : Cette touche permet d’accéder et de quitter le mode Split (séparation du
clavier).
25
Page 26

Panneau arrière
A
3
1. Entrée d'alimentation : Cette entrée permet de brancher l’adaptateur secteur fourni.
2. Entrée pédale de sustain : Cette entrée permet de brancher une pédale standard 6,35 mm.
3. Entrée pour pédale : Cette entrée permet de brancher une pédale.
4. Sorties ligne : Ces sorties permettent de brancher un appareil audio externe comme un
amplificateur, une console de mixage ou un enregistreur. Utilisez les sorties R et L pour une
sortie stéréo ou uniquement la sortie L pour une sortie mono.
5. Entrée auxiliaire : Cette entrée permet de brancher un appareil mobile ou une autre source
audio. Vous pouvez régler le volume de l’entrée à partir de l’appareil mobile ou de la source
audio.
6. Port USB : Ce port permet la transmission de données MIDI vers un ordinateur.
Panneau avant
1. Sortie casque : Cette sortie permet de brancher un casque d'écoute
stéréo avec une fiche de 6,35 mm. Lorsqu’un casque d’écoute est
branché, les haut-parleurs internes sont désactivés et le son est seulement
entendu via le casque.
2. Sortie casque : Cette sortie permet de brancher un casque d'écoute
stéréo avec une fiche de 3,5 mm. Lorsqu’un casque d’écoute est branché,
les haut-parleurs internes sont désactivés et le son est seulement entendu
via le casque.
PHONES
26
Page 27

Fonctionnement
Démarrage rapide
Chansons de démonstration
Le piano numérique Prestige dispose de 10 chansons de démonstration.
• Fantaisie-Impromptu in C# Minor Opus 66
• Etude Opus 25 No. 1
• Polonaise No. 6 in A Flat Major Opus 53
• Sonata No. 16 in C Major
• Toccata and Fugue in D Minor
• Prelude and Fugue No. 30 in D Minor
• Prelude and Fugue No. 1 in C Major
• Suite of Minuets in F Major
• Danse des Mirlitons
• Wedding March
Pour faire jouer une des chansons de démonstration :
1. Pour faire la lecture d’une chanson de
démonstration, maintenez la touche Key
Function enfoncée, puis appuyez sur une des
touches entre do1# et la1#.
2. Pour arrêter la lecture d’une chanson de
démonstration, appuyez sur la touche
Rec/Start/Stop.
Voix de démonstration
Chaque touche Voice sur le panneau est préréglée
avec une voix de démonstration. Maintenez la touche
Key Function enfoncée, puis appuyez sur do1. Ceci
fera jouer la voix de démonstration pour le son
sélectionné. Si le mode Layer ou Split est activé, la
voix de démonstration jouera la voix supérieure.
+
+
27
Page 28

Voix
Le piano numérique Prestige dispose de 4 catégories de voix avec 4 variations de voix chacune
pour un total de 16 voix :
Catégorie de voix Piano Electric Piano Organ Strings/Synth
Variation 1
(DEL blanche)
Variation 2
(DEL verte)
Variation 3 (DEL rouge) Bright Grand Wurli Pipe Organ 1 Polysynth
Variation 4 (DEL bleue) Harpsichord FM Piano Pipe Organ 2 Synth Bass
Pour sélectionner et faire jouer une voix :
1. Appuyez sur l'une des touches Voice Select
pour sélectionner une catégorie de voix. La DEL
correspondante s’allumera afin d’indiquer la
catégorie de voix sélectionnée.
2. Appuyez de nouveau sur la même touche
Voice Select afin de sélectionner une des
autres variations de voix dans cette catégorie.
La DEL correspondante changera de couleur
afin d’indiquer la variation de voix sélectionnée.
3. Jouez les touches du clavier pour entendre la
voix.
4. Pour modifier le volume de la voix principale,
maintenez la touche Key Function enfoncée,
puis appuyez sur une des touches entre ré
5
. Les options disponibles pour cette fonction
fa
sont 1 (ré
5
), 2 (ré5#), 3 (mi5), 4 (fa5) et 5 (fa5#).
Grand Piano Mark I Jazz Organ String Ensemble
Dark Grand Suitcase Rock Organ Upright Bass
+
5
et
28
Page 29

Mode de superposition de voix
Le mode Split vous permet de diviser les 88 touches en
deux zones afin que vous puissiez avoir deux voix
différentes pour chacune de vos mains. Par exemple, vous
voudrez peut-être la voix de piano pour votre main droite
et la voix de basse pour votre main gauche. Le mode Layer
permet de superposer deux voix différentes afin d’obtenir
un son plus riche.
Pour activer le mode Layer :
1. Appuyez puis relâchez la touche Layer. La DEL
+
correspondante s’allumera afin d'indiquer que le mode
Layer est activé. Lorsque le mode Layer est activé, la
voix superposée devient la voix R2.
2. Maintenez la touche Layer enfoncée tout en appuyant
sur une des touches Voice Select afin de sélectionner
une voix superposée.
3. Pour modifier le volume de la voix superposée (R2), maintenez la touche Key Function
enfoncée, puis appuyez sur une des touches entre sol5 et si5. Les options disponibles pour cette
fonction sont 1 (sol5), 2 (sol5#), 3 (la5), 4 (la5#) et 5 (si5).
4. Pour désactiver le mode Layer, appuyez et relâchez de nouveau la touche Layer. La DEL
correspondante s’éteindra afin d'indiquer que le mode Layer est désactivé.
Remarque : En mode Layer, il est impossible de superposer 2 variations de voix de la même
catégorie.
Remarque : La première touche Voice enfoncée sera définie comme voix « principale », et la
deuxième sera définie comme voix « secondaire ».
Mode de séparation du clavier
Le mode Split permet de diviser le clavier de 88 touches en
deux zones afin que vous puissiez utiliser deux voix
différentes pour chacune de vos mains. Par exemple, vous
pourriez utiliser la voix Piano avec la main droite et la voix
Bass avec la main gauche. Lorsque le mode Split est activé,
la voix de la main gauche devient la voix L1.
Pour activer le mode Split :
1. Appuyez puis relâchez la touche Split. La DEL
correspondante s’allumera afin d'indiquer que le mode
Split est activé.
2. Maintenez la touche Split enfoncée tout en appuyant sur
une des touches Voice Select afin de sélectionner une
voix de séparation.
3. Maintenez la touche Split enfoncée tout en appuyant sur une des touches du clavier afin de définir
le point de séparation du clavier.
4. Pour modifier le volume de la voix de séparation, maintenez la touche Key Function enfoncée,
puis appuyez sur une des touches entre la5 et do5#. Les options disponibles pour cette fonction
sont 1 (la
5
), 2 (la5#), 3 (si5), 4 (do5) et 5 (do5#).
5. Pour désactiver le mode Split, appuyez et relâchez de nouveau la touche Split. La DEL
correspondante s’éteindra afin d'indiquer que le mode Split est désactivé.
Pour désactiver le mode Split, appuyez de nouveau sur la touche Split. La DEL de la touche Split
s’éteinte lorsque le mode Split est désactivé.
+
29
Page 30

Fonctions avancées
Métronome
La fonction de métronome fournit un battement régulier
afin de vous permet de maintenir le tempo. Le tempo du
métronome peut être réglé de 30 à 280 battements par
minute.
Remarque : Le métronome ne peut être utilisé en mode
Demo.
Pour activer ou désactiver le métronome, maintenez
la touche Key Function enfoncée et appuyez sur la
touche si
2
.
Pour définir le tempo via la fonction Tap, maintenez
la touche Key Function enfoncée, puis appuyez sur la
touche do
2
au moins à deux reprises afin d'obtenir le
tempo désiré.
Pour réinitialiser le réglage par défaut du tempo (120
BPM), maintenez la touche Key Function enfoncée, puis
appuyez sur la touche do
2
#.
+
Pour modifier manuellement le tempo du
métronome, maintenez la touche Key Function
enfoncée, puis entrez 3 chiffres en utilisant les touches
2
ré
à si2.
Pour diminuer ou augmenter le volume du métronome, maintenez la touche Key Function
enfoncée, puis appuyez respectivement sur les touches do
diminuer de plusieurs valeurs, maintenez la touche Key Function enfoncée, puis appuyez
plusieurs fois sur do
Pour réinitialiser le réglage par défaut du volume du métronome (4), maintenez la touche
Key Function enfoncée, puis appuyez sur ré
3
ou do3#.
3
.
Pour modifier la division temporelle du métronome, maintenez la touche Key Function
enfoncée, puis appuyez respectivement sur les touches ré
de plusieurs valeurs, maintenez la touche Key Function enfoncée, puis appuyez plusieurs fois
3
ou mi3.
sur ré
Pour réinitialiser le réglage par défaut de la division temporelle du métronome (4),
maintenez la touche Key Function enfoncée, puis appuyez sur fa
3
ou do3#. Pour augmenter ou
3
ou mi3. Pour augmenter ou diminuer
3
.
+
30
Page 31

Mode chanson utilisateur
Pour enregistrer ou lancer la lecture d’une chanson utilisateur :
1. Appuyez sur la touche Rec/Start/Stop pour passer en mode User Song. La DEL
Rec/Start/Stop clignotera rapidement.
2. Appuyez sur l'une des 88 touches pour lancer l'enregistrement d'une chanson. La DEL
Rec/Start/Stop clignotera lentement. Si le métronome est activé, la DEL Rec/Start/Stop
clignotera au tempo actuel.
3. Appuyez de nouveau sur la touche Rec/Start/Stop pour arrêter l'enregistrement. La DEL
Rec/Start/Stop sera allumée pour confirmer qu'une chanson existe.
4. Appuyez de nouveau sur la touche Rec/Start/Stop pour lancer la lecture de
l'enregistrement. La DEL Rec/Start/Stop clignotera lentement. Appuyez sur la touche
Rec/Start/Stop pour arrêter la lecture de la chanson utilisateur. La DEL Rec/Start/Stop sera
allumée lorsqu'une chanson existe et que la lecture est arrêtée.
5. Maintenez la touche Rec/Start/Stop enfoncée pendant 3 secondes pour effacer la chanson
utilisateur. La DEL Rec/Start/Stop clignotera rapidement 3 fois pour confirmer qu'elle a été
effacée.
Remarques importantes concernant le mode chanson utilisateur :
• La chanson utilisateur enregistrée restera en mémoire jusqu'à ce qu'elle soit effacée.
• Si la mémoire interne devient pleine durant l’enregistrement, l’enregistrement s’arrêtera
automatiquement et sera sauvegardé.
Réverbération
Vous pouvez également ajouter un effet de
réverbération qui peut être réglé à votre son.
Pour sélectionner le type d'effet de réverbération,
maintenez la touche Key Function enfoncée, puis
appuyez sur une des touches entre do
options disponibles pour cette fonction sont Off
4
), Hall 1 (do4#), Hall 2 (ré4), Stage (ré4#), Room
(do
4
) et Plate (fa4).
(mi
Pour modifier la profondeur de la réverbération,
maintenez la touche Key Function enfoncée, puis appuyez respectivement sur fa
Pour augmenter ou diminuer de plusieurs valeurs, maintenez la touche Key Function enfoncée,
puis appuyez plusieurs fois sur fa
Pour réinitialiser le réglage par défaut de la profondeur de la réverbération (3), maintenez
la touche Key Function enfoncée, puis appuyez sur sol
3
ou sol3.
5
à fa5. Les
+
4
# ou sol4.
3
#.
31
Page 32

Transposition
Cette fonction permet de transposer la hauteur tonale du piano vers
le haut ou vers le bas par incréments de demi-tons jusqu’à une
octave.
Pour modifier la transposition, maintenez la touche Key Function
enfoncée, puis appuyez respectivement sur fa
augmenter ou diminuer de plusieurs valeurs, maintenez la touche
Key Function enfoncée, puis appuyez plusieurs fois sur fa
Pour réinitialiser le réglage par défaut de la transposition (4),
maintenez la touche Key Function enfoncée, puis appuyez sur sol
3
# ou sol3. Pour
3
# ou sol3.
3
#.
Hauteur tonale
Cette fonction permet de régler la hauteur tonale du piano vers le
haut ou vers le bas d’un maximum de 25 incréments dans un sens
ou dans l'autre.
Pour modifier la hauteur tonale, maintenez la touche Key Function
enfoncée, puis appuyez respectivement sur la
augmenter ou diminuer de plusieurs valeurs, maintenez la touche
Key Function enfoncée, puis appuyez plusieurs fois sur la
Pour réinitialiser les réglages par défaut de la haute tonale,
maintenez la touche Key Function enfoncée, puis appuyez sur si
3
ou la3#. Pour
3
ou la3#.
3
.
Résonance de pédale
La résonance de pédale est une fonction qui simule la réverbération
des notes lorsque la pédale de sustain est enfoncée sur un piano
acoustique. La fonction Pedal Resonance permet au Prestige de
reproduire les sons harmoniques riches et caractéristiques uniques
d'un piano acoustique lorsqu’une pédale de sustain est utilisée.
Pour activer ou désactiver la fonction Pedal Resonance, maintenez
la touche Key Function enfoncée, puis appuyez sur la touche fa
6
#.
Mode d’apprentissage
Le mode Lesson permet de séparer le clavier de 88 touches en deux
zones avec la même hauteur tonale et la même voix. Ceci permet à
l'étudiant et au professeur de facilement observer l'autre jouer sans
devoir jouer tour à tour ou se nuire à jouer ensemble sur la même
tonalité.
Remarque : En mode Lesson, les modes Layer et Split sont
automatiquement désactivés.
Remarque : Le mode Lesson ne peut être utilisé en mode Demo.
Pour activer ou désactiver le mode Lesson, maintenez la touche
Key Function enfoncée, puis appuyez sur la touche fa
32
6
.
+
+
+
+
Page 33

Paramètres
Pour modifier d'autres paramètres du piano numérique :
Pour définir la sensibilité tactile du clavier, maintenez la touche Key Function enfoncée, puis
appuyez sur l'une des options disponibles :
• Fixed (do6#) : Cette option fait en sorte que le niveau du volume ne change pas, peu importe la
force avec laquelle vous jouez sur les 88 touches.
• Soft (ré6) : Cette option fait en sorte que le niveau du volume change très peu en fonction de la
force avec laquelle vous jouez sur les 88 touches.
• Medium (ré6#) : Cette option est la réponse tactile standard d’un piano, et le réglage par défaut.
• Hard (mi6) : Cette option fait en sorte que le niveau du volume change beaucoup en fonction de
la force avec laquelle vous jouez sur les 88 touches. Vous devez appuyer fort sur les touches pour
produire un son fort.
Pour changer le canal MIDI du clavier, maintenez la touche Key Function enfoncée, puis appuyez
sur sol6 ou sol6#. Pour augmenter ou diminuer de plusieurs valeurs, maintenez la touche Key Function
enfoncée, puis appuyez plusieurs fois sur sol6 ou sol6#. Les options disponibles pour cette fonction
sont 1-16. Le canal MIDI par défaut est 1.
Pour activer ou désactiver la fonction Local MIDI, maintenez la touche Key Function enfoncée,
puis appuyez sur la touche la6. Lorsque la fonction Local MIDI est activée (par défaut), le son est
généré et diffusé par le haut-parleur, et les messages MIDI sont envoyés à la sortie USB-MIDI lorsque
les touches sont jouées. Lorsque local MIDI est désactivée, le son ne sera pas généré, cependant les
messages MIDI seront toujours envoyés à la sortie USB-MIDI lorsque les touches sont jouées.
Pour activer ou désactiver le clic audio entendu lors de la modification des paramètres,
maintenez la touche Key Function enfoncée, puis appuyez sur la6#.
Pour activer ou désactiver le mode d’économie d’énergie (mise hors tension automatique),
maintenez la touche Key Function enfoncée, puis appuyez sur la touche si6.
Remarque : Le délai de la mise hors tension automatique par défaut est de 30 minutes.
Pour réinitialiser les réglages par défaut du piano, maintenez la touche Key Function enfoncée,
puis appuyez sur do7.
+
33
Page 34

Guida per l’uso (Italiano)
Introduzione
Contenuti della confezione
Prestige
Adattatore di alimentazione
Leggio
Scheda di download del software
Assistenza
Per conoscere le ultime informazioni in merito a questo prodotto (i requisiti di sistema complete,
compatibilità, ecc) e per la registrazione del prodotto, recarsi alla pagina alesis.com.
Per ulteriore assistenza, recarsi alla pagina alesis.com/support.
Installazione
Schema dei collegamenti
Elementi non elencati sotto Introduzione > Contenuti della confezione sono venduti separatamente.
Computer
Pedale sustain
Guida per l’uso
Istruzioni di sicurezza e garanzia
Altoparlanti
34
Pedale
Sustain
Unità
pedale
3
A
Tavoletta
Alimentazione
Page 35

Caratteristiche
Pannello superiore
1. Interruttore di alimentazione: accende e spegne il pianoforte.
2. Manopola volume: regola il volume per l'uscita di linea e per o l'uscita cuffie.
Nota bene: se gli altoparlanti interni non producono alcun suono, assicurarsi che la
manopola Volume non sia troppo bassa e che le cuffie non siano inserite nell'apposita o
uscita cuffie. Se le cuffie sono inserite o nell'uscita cuffie, gli altoparlanti saranno silenziati.
3. Tasto Rec/Start/Stop: premere questo tasto per armare la registrazione o per interrompere
la registrazione di una canzone utente, avviare o interrompere una canzone utente,
interrompere una canzone demo o fermare il metronomo. Tenere premuto questo tasto per
cancellare una canzone utente esistente.
4. Tasto Key Function: tenere premuto questo tasto premendo contemporaneamente uno
degli 88 tasti per modificare varie impostazioni.
5. Tasti Voice Select (scelta voce): premere uno di questi tasti per selezionare una voce
predefinita. Si veda Operazione > Voci per saperne di più.
6. Tasto Layer: premere questo tasto per abilitare o disabilitare la modalità Layer.
7. Tasto Split: premere questo tasto per entrare o uscire dalla modalità di divisione Split.
35
Page 36

Pannello posteriore
A
3
1. Connettore di alimentazione: collegare a questo livello l'adattatore di alimentazione in
dotazione.
2. Ingresso pedale sustain: collegare un pedale sustain standard da 6,35 mm (1/4") a questo
livello.
3. Ingresso unità pedale: collegare un pedale a questo ingresso.
4. Uscita di linea: collegare dispositivi audio esterni quali amplificatori, mixer o registratori a
questo livello. Servirsi delle uscite R ed L per un'uscita stereo o la sola uscita L per un'uscita
mono.
5. Ingresso Aux: collegare un dispositivo mobile o altre fonti audio a questo ingresso. È
possibile regolare il volume di questo dispositivo sul proprio dispositivo mobile o altre fonti
audio.
6. Porta USB: consente il trasferimento dei dati MIDI a un computer.
Pannello frontale
1. Uscita cuffie: collegare cuffie stereo con connettore stereo da 6,35 mm
(1/4"). Quando le cuffie sono collegate, gli altoparlanti interni si spengono
automaticamente e il suono si sente unicamente attraverso le cuffie stesse.
2. Uscita cuffie: collegare cuffie stereo con connettore stereo da 3,5 mm
(1/8"). Quando le cuffie sono collegate, gli altoparlanti interni si spengono
automaticamente e il suono si sente unicamente attraverso le cuffie stesse.
PHONES
36
Page 37

Operazione
Inizio rapido
Riproduzione di canzoni Demo
Il pianoforte digitale Prestige presenta 10 canzoni demo:
• Fantaisie-Impromptu in C# Minor Opus 66
• Etude Opus 25 No. 1
• Polonaise No. 6 in A Flat Major Opus 53
• Sonata No. 16 in C Major
• Toccata and Fugue in D Minor
• Prelude and Fugue No. 30 in D Minor
• Prelude and Fugue No. 1 in C Major
• Suite of Minuets in F Major
• Danse des Mirlitons
• Wedding March
Per riprodurle:
1. Per riprodurre una canzone demo, tenere
premuto il tasto Key Function e premere un
tasto da C#2 ad A#2.
2. Per fermare una canzone demo, premere il
tasto Rec/Start/Stop.
Riproduzione delle voci demo
Ciascun tasto Voice sul pannello è predefinito con
una voce demo. Premere e tenere premuto il tasto
Key Function, quindi premere C2. In questo modo
verrà riprodotta la demo vocale per il suono
selezionato. Se la modalità layer o split sono attive,
la demo vocale verrà riprodotta per la voce
superiore.
+
+
37
Page 38

Voci
Il pianoforte digitale Prestige presenta 4 categorie vocali con 4 varianti vocali ciascuna, per un
totale di 16 voci tra cui scegliere:
Categoria
voce
Variante 1:
(LED bianco)
Variante 2:
(LED verde)
Variante 3
(LED rosso)
Variante 4
(LED blu)
Piano
Pianoforte Mark I Organo jazz Insieme di archi
Pianoforte Dark
Grand
Bright Grand Wurli
Clavicembalo Piano FM
Per selezionare e riprodurre una voce:
1. Premere uno dei tasti Voice Select per
selezionare una categoria vocale. Il LED
corrispondente sarà acceso per tale categoria.
2. Premere nuovamente lo stesso tasto Voice
Select per selezionare una delle altre varianti
voce in tale categoria. Il LED corrispondente
cambierà colore a indicare quale voce variante è
stata selezionata. Suonare i tasti per sentire la
voce.
3. Per modificare il volume della voce principale,
tenere premuto Key Function, quindi premere un
tasto da D6 a F#6. Le opzioni disponibili tra cui
scegliere per questa funzione sono 1 (D6), 2 (D#6),
3 (E6), 4 (F6) e 5 (F#6).
Electric
Piano
Organ Strings/Synth
Suitcase Organo rock Contrabbasso
Organo a
canne 1
Organo a
canne 2
Sintetizzatore
multiplo
Synth di basso
+
38
Page 39

Modalità Layer
Questa funzione consente la sovrapposizione di due voci
diverse per ottenere un suono più ricco e pieno.
Per abilitare la modalità Layer:
1. Premere e rilasciare il tasto Layer. Il LED
corrispondente si accenderà a indicare che la
modalità layer è attiva. Quando la modalità Layer è
attiva, la voce sovrapposta è considerata la voce R2.
2. Tenere premuto il tasto Layer servendosi dei
tastiVoice Select per selezionare uno strato
3. Per modificare il volume dello strato voce (R2),
tenere premuto Key Function, quindi premere un
tasto da G6 a B6. Le opzioni disponibili tra cui
scegliere per questa funzione sono 1 (G6), 2 (G#6), 3
(A6), 4 (A#6) e 5 (B6).
4. Per disabilitare la modalità layer, premere e rilasciare
il tasto Layer ancora una volta. Il LED corrispondente
si spegnerà a indicare che la modalità layer è
disattiva.
Nota bene: in modalità layer non è possibile stratificare 2 variazioni voce della stessa categoria.
Nota bene: il primo tasto Voice che viene premuto quando si selezionano le voci da sovrapporre sarà
impostato come voce "superiore", mentre il secondo tasto Voice premuto sarà la voce "inferiore".
+
Modalità Split
Questa modalità consente di dividere gli 88 tasti in due
zone in modo da poter avere voci diverse per ciascuna
mano. Ad esempio, si potrebbero avere la voce
Pianoforte per la mano destra e la voce Basso per quella
sinistra. Quando la modalità Split è attiva, la voce a
sinistra è considerata la voce L1.
Per abilitare la modalità Split:
1. Premere e rilasciare il tasto Split. Il LED
corrispondente si accenderà a indicare che la
modalità Split è attiva.
2. Tenere premuto il tasto Split premendo un tasto
Voice Select per selezionare una voce split.
3. Tenere premuto il tasto Split premendo un tasto per
impostare il punto di divisione.
4. Per modificare il volume della voce split, tenere premuto Key Function, quindi premere un
tasto da A6 a C#6. Le opzioni disponibili tra cui scegliere per questa funzione sono 1 (A6), 2 (A#6),
3 (B6), 4 (C6) e 5 (C#6).
5. Per disabilitare la modalità Split, premere e rilasciare il tasto Split ancora una volta. Il LED
corrispondente si spegnerà a indicare che la modalità Split è disattiva.
Per disattivare la modalità Split, premere nuovamente il tasto Split. Il LED del tasto Split si spegne
quando la modalità Split è disattiva.
+
39
Page 40

Funzioni avanzate
Metronomo
La funzione di metronomo garantisce un battito
costante per aiutare a fare esercizio con un tempo
costante. Il tempo del metronomo può essere regolato
liberamente da 30 a 280 battiti al minuto.
Nota bene: il metronomo non può essere utilizzato
durante la riproduzione della Demo.
Per attivare o disattivare il metronomo, tenere
premuto il tasto Key Function, quindi premere il tasto
B3.
Per impostare il tempo tramite tocco, tenere
premuto il tasto Key Function, quindi premere il tasto
C3 almeno 2 volte per ottenere il tempo desiderato.
Per impostare il tempo su quello predefinito (120
+
BPM), tenere premuto il tasto Key Function, quindi
premere il tasto C#3.
Per cambiare manualmente il tempo del
metronomo, tenere premuto il tasto Key Function,
quindi premere 3 cifre usando i tasti da D3 a B3.
Per abbassare/alzare il volume del metronomo, tenere premuto il tasto Key Function, quindi
premere C4 o C#4 rispettivamente. Per aumentarlo o ridurlo in più passaggi, tenere premuto il
tasto Key Function, quindi premere C4 o C#4 ripetutamente.
Per impostare il volume del metronomo su quello predefinito (4), tenere premuto il tasto
Key Function, quindi premere D4.
Per modificare la divisione metrica del metronomo, tenere premuto il tasto Key Function,
quindi premere D#4 o E4 rispettivamente. Per aumentarla o ridurla in più passaggi, tenere
premuto il tasto Key Function, quindi premere D#4 o E4 ripetutamente.
Per impostare la divisione metrica del metronomo sul suo valore predefinito (4), tenere
premuto il tasto Key Function, quindi premere F4.
+
40
Page 41

Modalità canzone utente
Per registrare e/o riprodurre una canzone utente:
1. Premere il tasto Rec/Start/Stop per entrare in modalità canzone utente. Il LED
Rec/Start/Stop lampeggerà rapidamente in maniera continua.
2. Premere uno qualsiasi degli 88 tasti per iniziare a registrare una canzone. Il LED
Rec/Start/Stop lampeggerà lentamente in maniera continua. Se il metronomo è acceso, il
LED Rec/Start/Stop lampeggerà al tempo corrente.
3. Premere nuovamente il tasto Rec/Start/Stop. Il LED Rec/Start/Stop sarà illuminato in
maniera fissa a indicare che esiste una canzone.
4. Premere nuovamente il tasto Rec/Start/Stop per riprodurre la registrazione. Il LED
Rec/Start/Stop lampeggerà lentamente in maniera continua. Premere nuovamente il tasto
Rec/Start/Stop per fermare la canzone utente. Il LED Rec/Start/Stop sarà illuminato in
maniera fissa quando una canzone esiste ed è interrotta.
5. Tenere premuto il tasto Rec/Start/Stop per 3 secondi per cancellare la canzone utente. Il
LED Rec/Start/Stop LED lampeggerà rapidamente 3 volte per confermare che è stata
cancellata.
Note importanti sulla Modalità canzone utente:
• La canzone utente registrata rimarrà in memoria finché non verrà cancellata.
• Se la memoria interna si riempie durante la registrazione, questa si interromperà e verrà
salvata automaticamente.
Reverb
Al suono è inoltre possibile aggiungere un effetto di
riverbero regolabile.
Per selezionare il tipo di effetto reverb, tenere
premuto Key Function, quindi premere un tasto da
C5 a F5. Le opzioni disponibili per questa funzione
tasto sono Off, (C5), Hall 1 (C#5), Hall 2 (D5), Stage
(D#5), Room (E5) e Plate (F5).
Per modificare la profondità del riverbero, tenere
premuto il tasto Key Function, quindi premere F#5
o G5 rispettivamente. Per aumentarla o ridurla in più
passaggi, tenere premuto il tasto Key Function,
quindi premere F#4 o G4 ripetutamente.
Per impostare la profondità del riverbero sul suo
valore predefinito di fabbrica (3), tenere premuto il
tasto Key Function, quindi premere G#4.
+
41
Page 42

Transpose (trasponi)
Questa funzione consente di trasporre il pitch complessivo del
pianoforte verso l'alto o verso il basso di un massimo di un'ottava in
incrementi di un semitono.
Per modificare la trasposizione, tenere premuto il tasto Key
Function, quindi premere F#4 o G4 rispettivamente. Per aumentarla
o ridurla in più passaggi, tenere premuto il tasto Key Function,
quindi premere F#4 o G4 ripetutamente.
Per impostare la trasposizione sul suo valore predefinito di
fabbrica, tenere premuto il tasto Key Function, quindi premere G#4.
Sintonia
Questa funzione consente di effettuare una regolazione fine del pitch
complessivo del pianoforte verso l'alto o verso il basso di un
massimo di 25 incrementi in ciascuna direzione.
Per modificare il tuning, tenere premuto il tasto Key Function,
quindi premere A4 o A#4 rispettivamente. Per aumentarlo o ridurlo in
più passaggi, tenere premuto il tasto Key Function, quindi premere
A4 o A#4 ripetutamente.
Per impostare il tuning sul suo valore predefinito di fabbrica,
tenere premuto il tasto Key Function, quindi premere B4.
Risonanza del pedale
La risonanza del pedale è una funzione che simula il riverbero delle
note quando viene premuto il pedale sustain su un vero pianoforte.
Con la funzione Pedal Resonance abilitata, il Prestige riproduce la
ricca armonica e le caratteristiche di suono uniche di un vero
pianoforte quando viene utilizzato il pedale sustain.
Per accendere/spegnere la risonanza del pedale, tenere premuto
Key Function, quindi premere il tasto F#7.
Modalità Lezione
La modalità lezione suddivide gli 88 tasti in due aree con gli stessi
pitch e voce. Questo consente allo studente e all'insegnante di
guardare facilmente e/o suonare insieme durante le istruzioni senza
doversi allontanare dal pianoforte e fare a turno o dovendo allungarsi
per suonare lo stesso pitch.
Nota bene: in modalità lezione, le modalità Layer e Split saranno
disattivate automaticamente.
Nota bene: la modalità lezione non può essere selezionata durante
la riproduzione della Demo.
Per accendere/spegnere la modalità lezione (Lesson), tenere
premuto il tasto Key Function, quindi premere il tasto F7.
42
+
+
+
+
Page 43

Settings (impostazioni)
Per modificare altre impostazioni del pianoforte digitale:
Per impostare la sensibilità tattile della tastiera, tenere premuto il tasto Key Function, quindi
premere una delle seguenti opzioni disponibili:
• Fissa (C#7): Il livello del volume non cambia affatto per quanto forte o piano vengano suonati gli
88 tasti.
• Morbida (D7): Il livello del volume non cambia molto quando vengono suonati piano o forte gli 88
tasti.
• Media (D#7): Questa è la risposta standard del pianoforte e l’impostazione predefinita.
• Dura (E7): Il livello del volume cambia molto quando vengono suonati piano o forte gli 88 tasti.
Per produrre un suono forte, occorre premere forte i tasti.
Per modificare il canale MIDI della tastiera, tenere premuto il tasto Key Function, quindi premere
G7 o G#7, a seconda. Per aumentarlo o ridurlo in più passaggi, tenere premuto il tasto Key Function,
quindi premere G7 o G#7 ripetutamente. Le opzioni disponibili per questa funzione sono 1-16. Il canale
MIDI predefinito è 1.
Per accendere/spegnere il MIDi a livello locale, tenere premuto il tasto Key Function, quindi
premere il tasto A7. Quando il MIDI locale è acceso (impostazione predefinita), il suono sarà generato
e si sentirà attraverso la cassa e i messaggi MIDI saranno inviati all’uscita USB-MIDI quando vengono
suonati i tasti. Quando il MIDI locale è spento, il suono non sarà generato, ma i messaggi MIDI saranno
inviati ugualmente all’uscita USB-MIDI quando vengono suonati i tasti.
Per accendere/spegnere il clic che viene riprodotto quando le impostazioni vengono modificate,
tenere premuto Key Function, quindi premere A#7.
Per accendere/spegnere la modalità eco (spegnimento automatico), tenere premuto il tasto Key
Function, quindi premere il tasto B7.
Nota bene: il tempo predefinito di spegnimento automatico è di 30 minuti.
Per riportare il piano alle sue impostazioni predefinite di fabbrica, tenere premuto il tasto Key
Function, quindi premere C8.
+
43
Page 44

Benutzerhandbuch (Deutsch)
Einführung
Lieferumfang
Prestige
Netzteil
Notenständer
Software-Download-Karte
Kundendienst
Für aktuelle Informationen zu diesem Produkt (Systemanforderungen, Informationen zur
Kompatibilität etc.) und zur Produktregistrierung besuchen Sie alesis.com.
Um weitere Unterstützung zu Ihrem Produkt zu erhalten, besuchen Sie alesis.com/support.
Setup
Anschlussdiagramm
Teile, die nicht unter Einführung > Lieferumfang angegeben sind, sind separat erhältlich.
Sustain-Pedal
Benutzerhandbuch
Sicherheitshinweise und Garantieinformationen
44
Computer
Sustain
Pedal
Pedaleinheit
Lautsprecher
3
A
Tablette
Stromversorgung
Page 45

Funktionen
Oberseite
1. Netzschalter: Schaltet die Stromversorgung des Pianos ein bzw. aus.
2. Gesamtlautstärkeregler: Stellt die Gesamtlautstärke für den Line- und entweder
Kopfhörerausgang ein.
Hinweis: Wenn die internen Lautsprecher keinen Ton ausgeben, überprüfen Sie, ob der
Gesamtlautstärkeregler nicht zu niedrig eingestellt ist, oder ob die Kopfhörer an den
entweder Kopfhörerausgang angeschlossen sind. Die Lautsprecher werden stumm
geschaltet, wenn die Kopfhörer an den entweder Kopfhörerausgang angeschlossen sind.
3. Rec/Start/Stopp-Taste: Drücken Sie diese Taste, um die Aufnahme zu aktivieren oder die
Aufnahme eines User-Songs zu stoppen, einen User-Song zu starten/stoppen, einen DemoSong zu stoppen oder das Metronom zu stoppen. Halten Sie diese Taste gedrückt, um einen
vorhandenen User-Song zu löschen.
4. Key Function-Taste: Halten Sie diese Taste gedrückt, während Sie gleichzeitig eine der 88
Tasten drücken, um verschiedene Einstellungen zu bearbeiten.
5. Voice Select-Tasten: Drücken Sie eine dieser Tasten, um eine Preset-Voice auszuwählen.
Siehe Betrieb > Voices , um mehr zu erfahren.
6. Layer-Taste: Drücken Sie diese Taste, um den Layer-Modus zu aktivieren/deaktivieren.
7. Split-Taste: Drücken Sie diese Taste, um den Split-Modus zu starten bzw. zu beenden.
45
Page 46

Rückseite
A
3
1. Stromanschluss: Schließen Sie das mitgelieferte Netzteil hier an.
2. Sustain Pedal-Eingang: Schließen Sie hier ein standardmäßiges 6,35 mm (1/4") SustainPedal an.
3. Pedaleingang: Schließen Sie eine Pedaleinheit an diesen Eingang an.
4. Line-Ausgang: Schließen Sie externe Audiogeräte wie Verstärker, Mischpult oder Recorder
an. Verwenden Sie die R- und L-Ausgänge als Stereo-Ausgang oder nur den L-Ausgang als
Mono-Ausgang.
5. Aux-Eingang: Schließen Sie ein mobiles Gerät oder eine andere Audioquelle an diesen
Eingang an. Sie können die Lautstärke dieses Geräts auf Ihrem Mobilgerät oder einer
anderen Audioquelle selbst einstellen.
6. USB-Anschluss: Ermöglicht die Übertragung von MIDI-Daten auf einen Computer.
Vorderseite
1. Kopfhörerausgang: Schließen Sie hier Stereokopfhörer mit einem 6,35
mm (1/4") Stereostecker an. Wenn Kopfhörer angeschlossen sind, werden
die internen Lautsprecher automatisch ausgeschaltet und der Ton wird nur
über den Kopfhörer zu hören sein.
2. Kopfhörerausgang: Schließen Sie hier Stereokopfhörer mit einem 3,5 mm
(1/8") Stereostecker an. Wenn Kopfhörer angeschlossen sind, werden die
internen Lautsprecher automatisch ausgeschaltet und der Ton wird nur
über den Kopfhörer zu hören sein.
PHONES
46
Page 47

Betrieb
Schnellstart
Wiedergabe von Demo-Songs
Das Prestige-Digitalpiano verfügt über 10 Demo-Songs:
• Fantaisie-Impromptu in C# Minor Opus 66
• Etude Opus 25 No. 1
• Polonaise No. 6 in A Flat Major Opus 53
• Sonata No. 16 in C Major
• Toccata and Fugue in D Minor
• Prelude and Fugue No. 30 in D Minor
• Prelude and Fugue No. 1 in C Major
• Suite of Minuets in F Major
• Danse des Mirlitons
• Wedding March
Um die Demo-Songs abzuspielen:
1. Um eine Song-Demo abzuspielen, halten Sie die
Key Function-Taste gedrückt und drücken dann
eine Taste zwischen C#2 und A#2.
2. Um eine Song-Demo zu stoppen, drücken Sie die
Rec/Start/Stop Taste.
Wiedergabe von Voice-Demos
Jede Voice-Taste auf dem Bedienfeld hat eine
voreingestellte Voice-Demo. Halten Sie die Key
Function-Taste gedrückt und drücken Sie dann C2.
Dadurch wird die Voice-Demo für den aktuell
ausgewählten Sound abgespielt. Wenn der Layeroder Split-Modus aktiv ist, wird die Voice-Demo für die
obere Stimme abgespielt.
+
+
47
Page 48

Voices
Das Prestige Digitalpiano verfügt über 4 Voice-Kategorien mit jeweils 4 Voice-Varianten, wobei
insgesamt 16 Stimmen zur Auswahl stehen:
Voice-Kategorie Piano E-Piano Orgel Streicher/Synth
Variation 1
(Weiße LED)
Variation 2
(Grüne LED)
Variante 3 (rote LED) Bright Grand Wurli Pfeifenorgel 1 Polysynth
Variante 4 (blaue LED) Cembalo FM Piano Pfeifenorgel 2 Synth Bass
Um eine Voice auszuwählen und wiederzugeben:
1. Drücken Sie eine der Voice Select-Tasten, um
eine Voice-Kategorie auszuwählen. Die
entsprechende LED dieser Voice-Kategorie
beginnt zu leuchten.
2. Drücken Sie dieselbe Voice Select-Taste erneut,
um eine andere Voice-Variante in dieser
Kategorie auszuwählen. Die entsprechende LED
ändert ihre Farbe, um anzuzeigen, welche
Variationsstimme ausgewählt ist.
3. Spielen Sie die Klaviaturtasten, um die Voice zu
hören.
4. Um die Lautstärke für die Hauptstimme zu
ändern, halten Sie Key Function gedrückt und
drücken dann eine Taste zwischen D6 und F#6.
Die verfügbaren Auswahlmöglichkeiten für diese
Funktion sind 1 (D6), 2 (D#6), 3 (E6), 4 (F6) und 5
(F#6).
Konzertflügel Mark I Jazz-Orgel Streicherensemble
Dark Grand Suitcase Rock-Orgel Kontrabass
+
48
Page 49

Layer-Modus
Im Layer-Modus können zwei verschiedene Voices für
einen volleren Klang übereinander geschichtet werden.
Um den Layer-Modus zu aktivieren:
1. Drücken Sie die Layer-Taste und lassen Sie sie los.
Die entsprechende LED leuchtet auf, um anzuzeigen,
dass der Layer-Modus aktiviert ist. Wenn der LayerModus aktiviert ist, wird die Layer-Voice als R2-Voice
bezeichnet.
2. Halten Sie die Layer-Taste gedrückt, während Sie
mit den Voice Select-Tasten eine Layerstimme
auswählen.
3. Um die Lautstärke der Layer-Stimme (R2) zu
ändern, halten Sie Key Function gedrückt und
drücken Sie dann eine Taste zwischen G6 und B6.
Die verfügbaren Auswahlmöglichkeiten für diese
Funktion sind 1 (G6), 2 (G#6), 3 (A6), 4 (A#6) und 5
(B6).
4. Um den Layer-Modus zu deaktivieren, drücken Sie
kurz die Layer-Taste. Die entsprechende LED
erlischt, um anzuzeigen, dass der Layer-Modus
deaktiviert ist.
Hinweis: Im Layer-Modus können 2 Voice-Varianten derselben Voice-Kategorie nicht überlagert
werden.
Hinweis: Die erste Voice-Taste, die Sie bei der Auswahl der Voices drücken, wird als die "obere"
Voice eingestellt, die zweite von Ihnen gedrückte Voice-Taste wird als "untere" Voice eingestellt.
+
Split-Modus
Im Split-Modus können Sie die 88 Tasten in zwei Zonen
aufteilen, so dass Sie zwei verschiedene Voices für jede
Hand haben. Zum Beispiel könnten Sie die Piano-Voice
für die rechte Hand und die Bass-Voice für die linke
Hand verwenden. Wenn der Split-Modus aktiviert ist,
wird die Voice der linken Hand als L1 Voice bezeichnet.
Um den Split-Modus zu aktivieren:
1. Drücken Sie die Split-Taste und lassen Sie sie los.
Die entsprechende LED leuchtet auf, um
anzuzeigen, dass der Split-Modus aktiviert ist.
2. Halten Sie die Split -Taste gedrückt, während Sie
eine Voice Select-Taste drücken, um eine SplitVoice auszuwählen.
3. Halten Sie Split gedrückt, während Sie eine Taste drücken, um den Split-Punkt festzulegen.
4. Um die Lautstärke der Split-Voice zu ändern, halten Sie Key Function gedrückt und drücken
dann eine Taste zwischen A6 und C#6. Die verfügbaren Auswahlmöglichkeiten für diese Funktion
sind 1 (A6), 2 (A#6), 3 (B6), 4 (C6) und 5 (C#6).
5. Um den Split-Modus zu deaktivieren, drücken Sie erneut kurz die Split-Taste. Die entsprechende
LED erlischt, um anzuzeigen, dass der Split-Modus deaktiviert ist.
Um den Split-Modus zu deaktivieren, drücken Sie erneut die Taste Split. Die Split-Tasten-LED erlischt,
wenn der Split-Modus deaktiviert ist.
+
49
Page 50

Erweiterte Funktionen
Metronom
Die Metronom-Funktion bietet einen konstanten
Rhythmus, um beim Üben bei gleichbleibender
Geschwindigkeit zu helfen. Das Tempo des
Metronoms kann frei von 30–280 Schläge pro Minute
eingestellt werden.
Hinweis: Das Metronom kann während der DemoWiedergabe nicht verwendet werden.
Um das Metronom zu aktivieren oder zu
deaktivieren, halten Sie Key Function gedrückt und
drücken dann die Taste B3.
Um das Tempo per Tippen einzustellen, halten Sie
Key Function gedrückt und tippen dann mindestens
zweimal die Taste C3, um das gewünschte Tempo zu
erhalten.
+
Um das Tempo auf Standard (120 BPM)
einzustellen, halten Sie Key Function gedrückt und
drücken dann die Taste C#3.
Um das Tempo des Metronoms manuell zu ändern, halten Sie Key Function gedrückt und
drücken dann 3 Ziffern mit D3 bis B3.
Um die Lautstärke des Metronoms zu verringern/erhöhen, halten Sie Key Function
gedrückt und drücken dann C4 bzw. C#4. Um dies um mehrere Stufen zu erhöhen oder zu
verringern, halten Sie Key Function gedrückt und drücken dann wiederholt C4 oder C#4.
Um die Lautstärke des Metronoms auf Standard (4) einzustellen, halten Sie Key Function
gedrückt und drücken Sie dann D4.
Um die Taktart des Metronoms zu ändern, halten Sie Key Function gedrückt und drücken
Sie dann D#4 bzw. E4. Um dies um mehrere Stufen zu erhöhen oder zu verringern, halten Sie
Key Function gedrückt und drücken dann wiederholt D#4 bzw. E4.
Um dies um mehrere Schritte zu erhöhen oder zu verringern, können Sie Key Function
gedrückt halten und dann wiederholt F4 drücken.
+
50
Page 51

User Song-Modus
Zur Aufnahme und/oder Wiedergabe eines User-Songs:
1. Drücken Sie die Rec/Start/Stop -Taste, um in den User Song-Modus zu gelangen. Die
Rec/Start/Stop-LED blinkt schnell und kontinuierlich.
2. Drücken Sie eine der 88 Tasten, um die Aufnahme eines Songs zu starten. Die
Rec/Start/Stop-LED blinkt langsam und kontinuierlich. Wenn das Metronom läuft, blinkt die
Rec/Start/Stop-LED im aktuellen Tempo.
3. Drücken Sie erneut die Rec/Start/Stop -Taste. Die Rec/Start/Stop-LED leuchtet dauerhaft,
um zu bestätigen, dass ein Track vorhanden ist.
4. Drücken Sie die Rec/Start/Stop Taste erneut, um die Aufnahme wiederzugeben. Die
Rec/Start/Stop-LED blinkt langsam und kontinuierlich. Drücken Sie die Rec/Start/Stop -
Taste erneut, um den User-Song zu stoppen. Die Rec/Start/Stop-LED leuchtet dauerhaft,
wenn ein Song vorhanden ist und gestoppt wird.
5. Halten Sie die Rec/Start/Stop -Taste 3 Sekunden lang gedrückt, um den User-Song zu
löschen. Die Rec/Start/Stop-LED blinkt schnell dreimal, um zu bestätigen, dass er gelöscht
wurde.
Wichtige Hinweise zum User-Song-Modus:
• Der aufgenommene User-Song bleibt im Speicher, bis er gelöscht wird.
• Wenn der interne Speicher während der Aufnahme voll wird, wird die Aufnahme automatisch
gestoppt und gespeichert.
Reverb
Sie können Ihrem Sound auch einen einstellbaren
Reverb-Effekt hinzufügen.
Um den Reverb-Effekt-Typ auszuwählen, halten Sie
Key Function gedrückt und drücken dann eine Taste
zwischen C5 und F5. Die verfügbaren
Auswahlmöglichkeiten für diese Tastenfunktion sind
Aus, (C5), Hall 1 (C#5), Hall 2 (D5), Bühne (D#5),
Raum (E5) und Platte (F5).
Um die Tiefe des Nachhalls zu ändern, halten Sie
Key Function gedrückt und drücken Sie dann F#5
bzw. G5. Um dies um mehrere Stufen zu erhöhen oder
zu verringern, halten Sie Key Function gedrückt und
drücken dann wiederholt F#4 bzw. G4.
Um die Halltiefe auf die Werkseinstellung (3) zu
setzen, halten Sie Key Function gedrückt und
drücken dann G#4.
+
51
Page 52

Transponieren
Mit dieser Funktion kann die Gesamtstimmung des Klaviers um
maximal eine Oktave in Halbtonschritten nach oben oder unten
transponiert werden.
Um die Transposition zu ändern, halten Sie Key Function gedrückt
und drücken dann F#4 bzw. G4. Um dies um mehrere Stufen zu
erhöhen oder zu verringern, halten Sie Key Function gedrückt und
drücken dann wiederholt F#4 bzw. G4.
Um die Transposition auf die Werkseinstellung zu setzen, halten
Sie Key Function gedrückt und drücken dann G#4.
Tuning
Mit dieser Funktion kann die Gesamtstimmung des Klaviers um
maximal 25 Stufen nach oben oder unten transponiert werden.
Um das Tuning zu ändern, halten Sie Key Function gedrückt und
drücken dann A4 bzw. A#4. Um dies um mehrere Stufen zu erhöhen
oder zu verringern, halten Sie Key Function gedrückt und drücken
dann wiederholt A4 bzw. A#4.
Um das Tuning auf die Werkseinstellung zu setzen, halten Sie Key
Function gedrückt und drücken dann B4.
Pedalresonanz
Pedalresonanz ist eine Funktion, die den Nachhall der Noten beim
Betätigen des Haltepedals auf einem echten Klavier simuliert. Ist die
Pedal Resonance aktiviert, reproduziert Prestige die reichen
Harmonien und einzigartigen Klangeigenschaften eines echten
Klaviers mit gehaltenem Sustain-Pedal.
Halten Sie zum Ein- und Ausschalten der Pedalresonanz Key
Function gedrückt und drücken dann die Taste F#7.
Lektionsmodus
Der Lektionsmodus teilt die 88 Tasten in zwei Zonen mit gleicher
Tonhöhe und Voice auf. Auf diese Weise können sowohl Schüler als
auch Lehrer leicht beobachten und/oder während des Unterrichts
gemeinsam spielen, ohne sich vom Klavier wegbewegen zu müssen,
abwechselnd spielen zu müssen oder übereinander greifen zu
müssen, um die gleiche Tonhöhe zu spielen.
Hinweis: Im Lektionsmodus sind die Layer- und Split-Modi
automatisch deaktiviert.
Hinweis: Der Lektionsmodus kann während der Demo-Wiedergabe
nicht ausgewählt werden.
Halten Sie zum Ein- und Ausschalten des Lektionsmodus Key
Function gedrückt und drücken dann die Taste F7.
52
+
+
+
+
Page 53

Einstellungen
So ändern Sie andere Einstellungen des Digitalpianos:
Um die Berührungsempfindlichkeit der Klaviatur einzustellen, halten Sie Key Function gedrückt
und drücken dann eine der verfügbaren Optionen:
• Fixiert (C#7): Die Lautstärke ändert sich überhaupt nicht, unabhängig davon, wie leicht oder stark
Sie die 88 Tasten anschlagen.
• Weich (D7): Die Lautstärke ändert sich nicht wesentlich, unabhängig davon, wie leicht oder stark
Sie die 88 Tasten anschlagen.
• Mittel (D#7): Dies ist die standardmäßige Piano-Anschlagdynamik und die Standardeinstellung.
• Hart (E7): Die Lautstärke ändert sich wesentlich, je nachdem, wie leicht oder stark Sie die 88
Tasten anschlagen. Sie müssen die Tasten hart anschlagen, um einen lauten Ton zu erzeugen.
Um den MIDI-Kanal der Klaviatur zu ändern, halten Sie Key Function gedrückt und drücken dann
entsprechend G7 oder G#7. Um dies um mehrere Stufen zu erhöhen oder zu verringern, halten Sie
Key Function gedrückt und drücken dann wiederholt G7 oder G#7. Die verfügbaren
Auswahlmöglichkeiten für diese Tastenfunktion sind 1-16. Der Standard-MIDI-Kanal ist 1.
Um das lokale MIDI ein- oder auszuschalten, halten Sie Key Function gedrückt und drücken Sie
dann A7. Wenn lokales MIDI aktiviert ist (Standardeinstellung), wird Ton erzeugt und über die
Lautsprecher ausgegeben und MIDI-Meldungen werden an den USB-MIDI-Ausgang gesendet, wenn
die Tasten gespielt werden. Wenn das lokale MIDI ausgeschaltet ist, wird kein Ton erzeugt, es werden
jedoch weiterhin MIDI-Meldungen an den USB-MIDI-Ausgang gesendet, wenn die Tasten gespielt
werden.
Um den Klick, der beim Ändern der Einstellungen abgespielt wird, ein-/auszuschalten, halten
Sie Key Function gedrückt und drücken Sie dann A#7.
Halten Sie zum Ein- und Ausschalten des Eco-Modus (automatische Abschaltung) Key Function
gedrückt und drücken Sie dann B7.
Hinweis: Die Standardzeit für das automatische Ausschalten beträgt 30 Minuten.
Um das Piano auf die Werkseinstellungen zurückzusetzen, halten Sie Key Function gedrückt und
drücken Sie dann C8.
+
53
Page 54

Appendix (English)
Technical Specifications
Keyboard
Polyphony
Sounds
Demos
Metronome Tempo Range
Speakers Speaker Configuration: Micro-Array
Connectors
Power
Dimensions
(width x depth x height)
Weight
Specifications are subject to change without notice.
Trademarks & Licenses
Alesis is a trademark of inMusic Brands, Inc., registered in the U.S. and other countries.
All other product names, company names, trademarks, or trade names are those of their respective owners.
88 graded hammer-action keys
128
16
10 piano demo songs
30-280 BPM
Total Amp Power: 50 W (25 W x 2)
• Woofers: (4) 2.5” woofers
• Passive Radiators: (4) 2.5” passive radiators
(2) 1/4” (6.35 mm) TRS line outputs
(1) 1/4” (6.35 mm) TRS headphone output
(1) 1/8” (3.5 mm) TRS headphone output
(1) 1/4” (6.35 mm) TRS sustain pedal input
(1) 3-Pedal DIN connector
(1) USB Type-B port
(1) Power adapter input
12V DC 3A, center-pin positive power adapter (included)
52.08” x 11.7” x 5.88” / 132.2 x 29.7 x 14.9 cm
28.21 lbs. / 12.8 kg
54
Page 55

55
Page 56

alesis.com
Manual Version 1.5
 Loading...