

Page 1

Alesis
QUADRAVERB
Plus
USERS MANUAL
ADDENDUM
Page 2

2
INTRODUCTION
The QuadraVerb Plus is an upgraded version of the original QuadraVerb . The
many new features that are now available are made possible by a simple
software update, which requires only the replacement of its EPROM (Erasable
Programmable Read Only Memory). The hardware of the QuadraVerb remains
unchanged.
The operation of the QuadraVerb Plus is identical to the original QuadraVerb
and all original features of the QuadraVerb are retained in the QuadraVerb
Plus . All patches originally written for the QuadraVerb will sound the same on
the QuadraVerb Plus. This addendum only describes the new features. Full
instructions on the operation of your unit can be found in your User's Guide.
NEW FEATURES
New features available on the QuadraVerb Plus include Sampling, Ring
Modulator, and Resonator configurations, plus the addition of Multi Tap Delay,
Auto Panning, and Tremolo Modulation on original configurations where these
features are applicable.
In addition, the Quadraverb's extensive MIDI implementation has been greatly
enhanced to include real-time parameter control of parameters such as the
Delay, Volume, and Feedback for each of the 8 individual taps in the Multi Tap
Delay configuration, as well as the Auto Panning and Tremolo's Modulation
Speed and Depth. Also, the Quadraverb Plus lets the user adjust parameters
such as the Ring Modulator's Spectrum Shift, Output Up/Down Mix, and
Delay/Reverb Up/Down Mix as well as the Pitch and Decay of the Resonator.
This allows the user to achieve a greater level of creative control than ever
before.
• MULTI TAP DELAY - The Multi Tap Delay is a new type of
delay available in the 5 BAND EQ->PITCH->DELAY
configuration where up to 8 taps can be defined in the delay.
The Delay Time, Volume, Panning, and Feedback Amount
can be individually adjusted for each tap as well.
• SAMPLING - The QuadraVerb Plus now has the ability to
make a brief digital recording of the input being fed to it,
commonly known as sampling.
2
Page 3

3
• AUTO PANNING - Auto Panning allows a signal to
automatically pan from side to side (when the outputs are
connected in stereo) at a selected rate and depth.
• TREMOLO MODULATION - Tremolo Modulation is an
effect which automatically varies the volume at a selected
rate and depth, simulating the "Surf Sound" tremolo effect
found on old instrument amplifiers.
• RING MODULATOR - The Ring Modulator is a specialized
amplitude modulator that produces an output that contains
only the sum and difference frequencies of its input
waveforms' harmonics. It is most useful for generating
metallic, bell-like sounds.
• RESONATORS - A Resonator generates a pitch in addition
to the original input signal, making it possible for a nonpitched sound to become pitched. There are 5 resonators in
the QuadraVerb Plus.
MULTI TAP DELAY
The Multi Tap Delay is a new type of delay available in the 5 BAND EQ->PITCH>DELAY configuration. In this mode, up to 8 taps can be defined in the delay.
The Delay Time, Volume, Panning, and Feedback Amount can be individually
adjusted for each tap. The cumulative delay time of all 8 taps is 1500
milliseconds.
The Master Feedback control adjusts the global amount of feedback from all the
taps, and the Mix Delay volume adjusts the amount of delay in the effect output.
The Delay Time is relative to the previous tap, which means that when Tap #1 is
delayed, all of the following Taps are delayed by the same amount as well. The
following illustration shows how the timing of adjacent taps behave when a single
delay time is modified (Tap 2 delay is changed from 250ms to 500 ms in this
example):
FIGURE 7
MULTI TAP DELAYS
A
3
Page 4
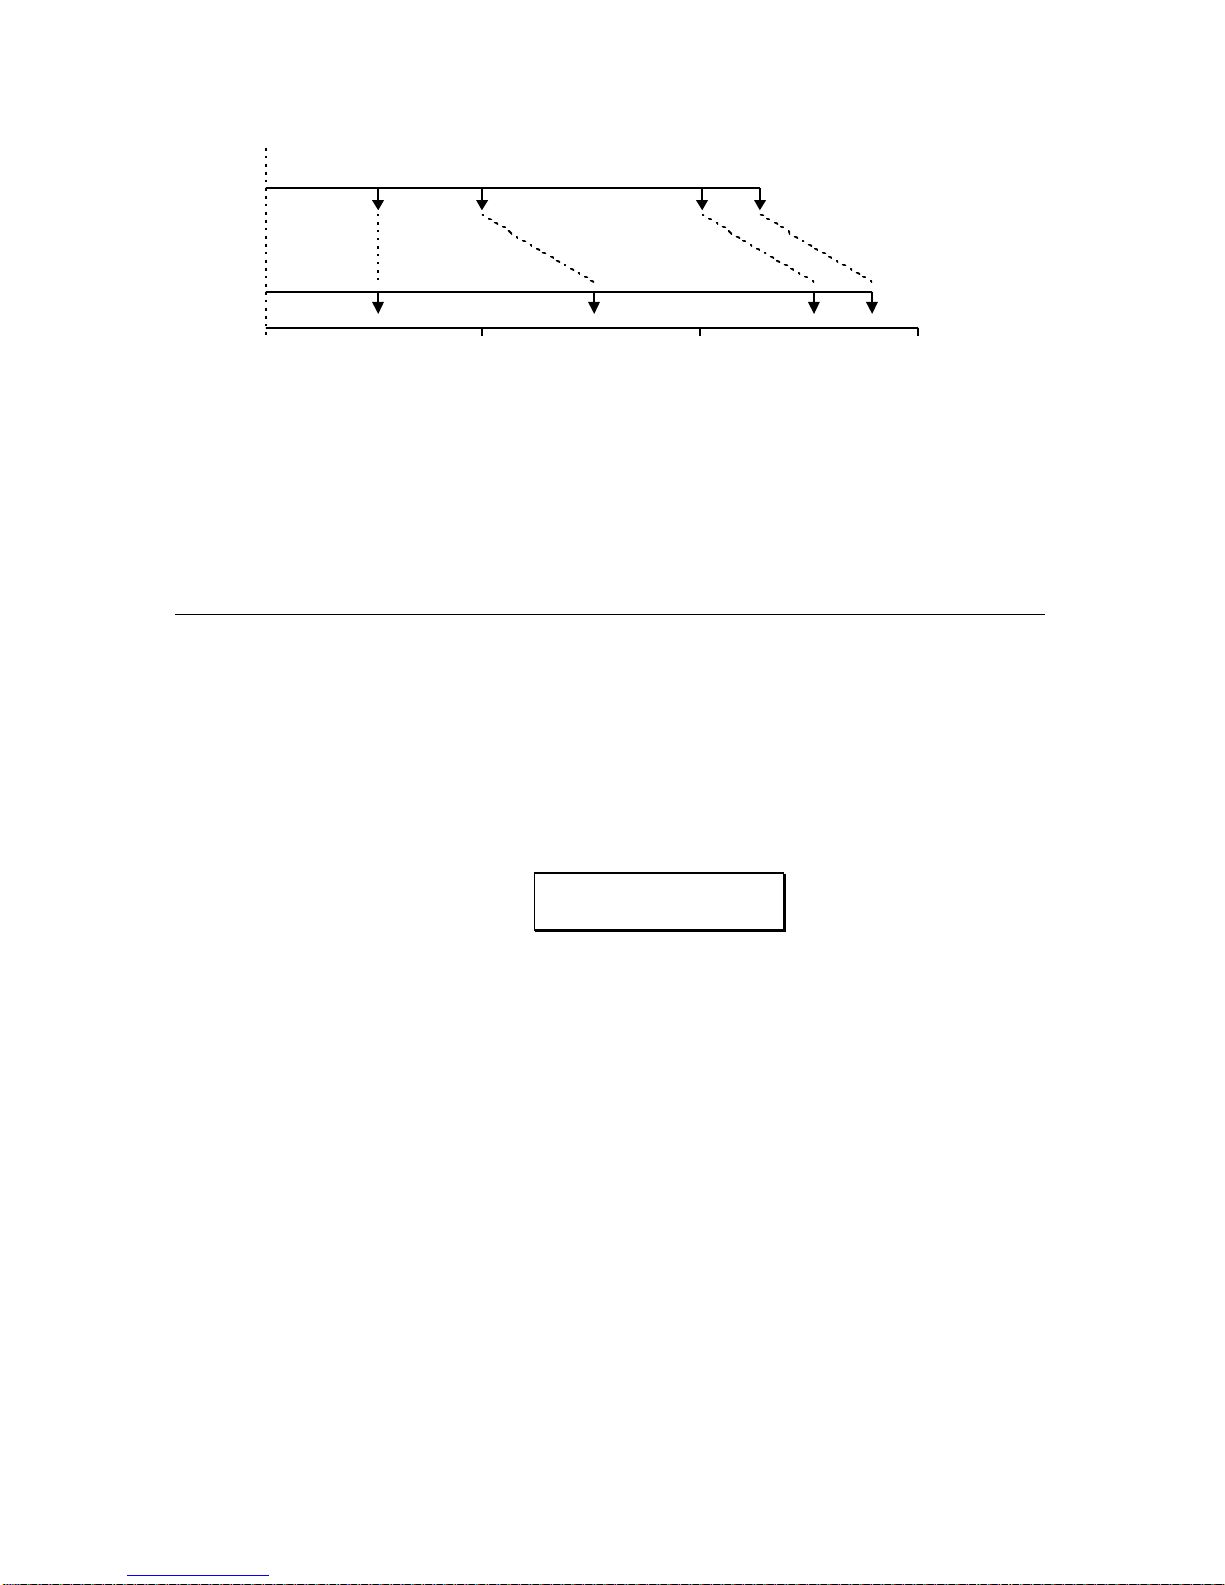
4
250 ms 250 ms 500 ms 125 ms
TAP 1 TAP 2 TAP 3 TAP 4
250 ms 500 ms 500 ms 125 ms
TAP 1 TAP 2 TAP 3 TAP 4
B
0 0.5 Sec 1.0 Sec 1.5 Sec
In Figure 7A, Tap #1 is set at 250ms, Tap #2 is set 250ms behind Tap #1
(500ms from the beginning), Tap #3 is set 500ms behind Tap #2 (1 second from
the beginning). In Figure 7B, an additional 250ms is added to Tap #2 which
means that it now occurs at 750ms (instead of 500ms as in 7A), and Tap #3 now
occurs at 1250ms (instead of 1 second in Figure 7A).
SELECTING THE MULTI TAP DELAY
CONFIGURATION
Multi Tap Delay is accessed through the 5 BAND EQ->PITCH->DELAY
configuration.
To select the configuration, first press the
buttons until the display reads:
CONFIGURATION:
5BAND EQ>PCH>DL
CONFIG button, then press the VALUE
The block diagram of this configuration is as follows:
FIGURE 8
5 BAND EQ->PITCH->DELAY BLOCK DIAGRAM (with Multi Tap Delay)
4
Page 5

5
DELAY 1 DELAY 2 DELAY 8
FEEDBACK
AMP 10 AMP 2 AMP X AMP 8
FEEDBACK 1 FEEDBACK 2 FEEDBACK X FEEDBACK 8
5 BAND EQ PITCH
MULTI TAP DELAY
PAN 2 PAN X PAN 8PAN 1
1
MIX
2
EQ OUTPUT
DELAY X
PITCH
OUTPUT
MULTI TAP
DELAY OUTPUT
EFFECTS OUTPUT
L
R
DIRECT OUTPUTDIRECT PRE/POST EQ
L
R
EDITING THE MULTI TAP DELAY PARAMETERS
1) To access the Multi Tap Delay parameters, press the DELAY button. The
display will then read:
DELAY TYPE:
STEREO DELAY
Press the "Up" VALUE button until the next selection reads:
DELAY TYPE:
MULTI TAP DELAY
This page allows the selection of the Mono, Stereo, Ping Pong (as from
the original configuration) or the new Multi Tap Delay.
2) Pressing the "Up"
PAGE button will select the next page which will read:
5
Page 6
6
DELAY INPUT 1:
POST EQ
Pressing the VALUE buttons will select the other input choice which will
read:
DELAY INPUT 1:
PRE EQ
This page selects whether the input signal to Input #1 of the Delay section
is derived either before (Pre) or after (Post) the EQ. This page is also
identical to the original QuadraVerb configuration.
3) Pressing the "Up"
Pressing the VALUE buttons will select the mix between Delay Input #1
(which was selected on the previous page) or the second Delay input
which is dedicated to the output of the Pitch section. This page is also
identical to the original QuadraVerb configuration.
4) Pressing the "Up"
which will read:
Pressing the VALUE buttons will select the desired Tap. The range is 1 to
8.
5) Pressing the "Up"
which will read:
PAGE button again will select the next page which will read:
DELAY INPUT MIX:
1<-00 -> PITCH
PAGE button again will select the Delay Tap to be edited,
TAP NUMBER:
1
PAGE button again will select the Tap Delay Time page,
Pressing the VALUE buttons will select the desired Delay Time measured
in milliseconds. The tap number selected on the previous page is
displayed on the first line. If the cumulative delay time of the 8 taps
exceed 1500 milliseconds (1.5 seconds), the delay time will not be
allowed to increase.
TAP 1 DELAY TIME:
0125 millisecs
6
Page 7

7
6) Pressing the "Up" PAGE button again will select the individual Tap output
volume to be edited, which will read:
TAP 1 VOLUME:
50
Pressing the VALUE buttons will select the desired Output Volume. The
range is 0 to 99.
7) Pressing the "Up"
PAGE button again will select the individual Tap Panning to
be edited, which will read:
Pressing the VALUE buttons will select the desired Panning from Left to
Right. The range is Left 99 to Right 99.
8) Pressing the "Up"
PAGE button again will select the individual Tap Feed-back
to be edited, which will read:
Pressing the VALUE buttons will select the desired amount of feedback.
The higher the feedback value is set, the more repeats will occur. The
range is 0 to 99.
9) Pressing the "Up"
PAGE button again will select the Master Feedback to be
edited, which will read:
TAP 1 PANNING:
LEFT<-00->RIGHT
TAP 1 FEEDBACK:
00%
Pressing the VALUE buttons will select the desired amount of feedback.
This is a global parameter, scaling the feedback of all taps at once. The
range is 0 to 99.
MASTER FEEDBACK:
00%
7
Page 8

8
PLEASE NOTE: As a short cut, while page four through eight are active, the
Tap Number under edition can be incremented by pushing the DELAY switch.
The Tap number will fold back to 1 when Tap 8 is passed.
MODULATING THE MULTI TAP DELAY
PARAMETERS
The Delay, Volume, Panning, and Feedback of each Tap, as well as the Master
Feedback can also be modulated by any MIDI modulation source. This can be
accomplished by referring to the "Modulating the Parameters" section of the
QuadraVerb Users Manual on page 66.
EDITING THE EQ, PITCH, DELAY AND REVERB
PARAMETERS
The parameters and mode of adjustment of the EQ, Pitch, and other Delay
sections are identical to the original 5 BAND EQ->PITCH->DELAY configuration
as found on page 76 of the QuadraVerb Users Manual.
SAMPLING
The QuadraVerb Plus now has the ability to make a 1.55 second sample of the
input being fed to it. The maximum record time is 1.55 seconds. In playback,
the sample start and length times can be altered for special effects or to trim the
playback of the sample to the actual start point of the sound. The sample can
also be played back in its entirety (one shot) or continuously repeated (looping).
The playback can be further altered by having a variety of sources to trigger the
sample. These sources include an incoming audio source, playback from the
front panel, or a MIDI note on, note off, and note number/pitch message, which
allows the sample to be played back from a MIDI keyboard.
SELECTING THE SAMPLING CONFIGURATION
Sampling is accessed through new Configuration 8. All Sampling parameters
reside under the
To select this configuration, first press the
buttons until the display reads:
DELAY button while in the SAMPLING configuration.
CONFIG button, then press the VALUE
8
Page 9

9
CONFIGURATION:
SAMPLING
The block diagram of this configuration is as follows:
FIGURE 4
CONFIGURATION 8
SAMPLING
TRIGGER
AUDIO
TRIGGER
MIDI
NOTE
LengthLooping
Start
OnOff
PITCHTRIGGER
SAMPLING
L
R
SAMPLING OUTPUT
L
R
DIRECT OUTPUT
RECORDING A SAMPLE
There are two ways to record a sample. In the first (the easiest to get a good
sample), the QuadraVerb Plus waits for the incoming audio to trigger recording.
The second method requires the user to initiate recording by pressing the
BYPASS switch on the front panel.
RECORDING BY AUDIO TRIGGER
1) Press the DELAY button. The display will read:
SAMPLE PLAYBACK:
ONE SHOT
This page is primarily for playback and can be bypassed for now.
2) Press the
PAGE up button three times. The display will then read:
3) Press the VALUE button to select the Audio Trigger On mode. The display will
read:
AUDIO TRIGGER
SAMPLING: OFF
9
Page 10

10
AUDIO TRIGGER
SAMPLING: ON
4) Now press the BYPASS button. The display will read:
WAITING FOR AUDIO
THRESHOLD
5) Send a signal to the QuadraVerb Plus. When the first LED (-18dB) lights,
the input signal has passed the audio threshold and recording has begun.
For the best recorded signal, raise the input level control so that the -6dB
LED lights. The signal will be distorted if the red "Clip" LED lights.
RECORDING FROM THE FRONT PANEL
1) Press the DELAY button. The display will read:
SAMPLE PLAYBACK:
ONE SHOT
This page is primarily for playback and can be bypassed for now.
2) Press the
PAGE up button three times. The display will then read:
AUDIO TRIGGER
SAMPLING: ON
3) Press the VALUE button to select the Audio Trigger Off mode. The display will
read:
AUDIO TRIGGER
SAMPLING: OFF
4) Now, when ready to sample, press the BYPASS button. The display will read:
SAMPLING.................
..
For the best recorded signal, raise the input level control so that the -6dB
LED lights. The signal will be distorted if the red "Clip" LED lights.
10
Page 11

11
PLAYING BACK A SAMPLE
There are three ways to play back a recorded sample: from the front panel, from
an audio trigger, or through MIDI. Playback from the front panel (manual
playback) would normally be used when you want to manually trigger a recorded
sample. Playback from an audio trigger is normally used when replacing one
audio source with a recorded sample, as in the case of replacing a snare drum
on a tape track with a better recorded sample. Playback through MIDI enables a
recorded sample to be played from a MIDI keyboard.
PLAYBACK FROM THE FRONT PANEL
1) Press the DELAY button. The display will read:
SAMPLE PLAYBACK:
ONE SHOT
One Shot means that once a sample is initiated, it will play until the end of
the sample and then stop.
2) To begin playback, press the
then automatically stop. To playback again, press the
3) The volume of the sample can be increased or decreased by the
control of the QuadraVerb Plus.
1A) If you wish to have the sample play back continuously until told to stop,
press the "Down"
2A) To begin playback, press the EQ button. The display will then read:
3A) To stop playback, press the EQ button again. The display will then read:
VALUE button. The display will read:
EQ button. The sample will play to the end and
EQ button again.
OUTPUT
SAMPLE PLAYBACK:
LOOPING
PUSH EQ TO STOP
SAMPLE PLAYBACK
PUSH EQ TO TRIG.
SAMPLE PLAYBACK
11
Page 12

12
To play again, repeat steps 2A and 3A.
PLAYBACK FROM AN AUDIO TRIGGER
1) Press the DELAY button. The display will read:
SAMPLE PLAYBACK:
ONE SHOT
2) Press the "Up" VALUE button until the display reads:
SAMPLE PLAYBACK:
AUDIO TRIGGER
Any incoming audio signal that passes the threshold (makes the -18dB LED
light) will cause the sample to play.
PLEASE NOTE:
• The recorded sample can still be manually played back by pressing the
button.
• "Looping" is not available in the Audio Trigger mode.
• Once a sample is audio triggered, the -18dB LED must turn off before sample
can be re-audio triggered.
EQ
PLAYBACK FROM MIDI
It is also possible to MIDI trigger the recorded sample from a MIDI keyboard.
This can happen in two ways. In the first, called MIDI One Shot, when a MIDI
note on is received by the QuadraVerb Plus, the recorded sample will play back
to the selected end of the sample, regardless of how long that the key is
depressed. In the second way, known as MIDI Gated, the sample will stop
playing when the key has stopped being depressed. It is also possible to select
the note on the keyboard that will trigger the sample at its original pitch, as well
as the highest and lowest notes that the QuadraVerb Plus will respond to.
TO SELECT THE MIDI TRIGGER MODE
1) Press the
2) Press the PAGE "Up" button until the display reads:
DELAY button. The display will read:
SAMPLE PLAYBACK:
ONE SHOT
12
Page 13

13
MIDI TRIGGER:
GATED
In the MIDI Gated mode, the sample will stop playing as soon as the key
is released.
3) Pressing the
read:
When the MIDI Trigger is in the "Off" state, then the QuadraVerb Plus will
not respond to MIDI note on/off information.
4) Pressing the
will read:
In the MIDI One Shot mode, the recorded sample will play back to the
selected end of the sample, regardless of how long that the key is
depressed.
VALUE "Down" button once will select the next display, which will
MIDI TRIGGER:
OFF
VALUE "Up" button two times will select the next display, which
MIDI TRIGGER:
ONE SHOT
PLEASE NOTE: If the playback mode is set to "Looping" and MIDI Trigger is set
to One Shot, the sample will play indefinitely until the mode is changed or the
sampling configuration is deselected.
TO SELECT THE MIDI TRIGGER NOTE
1) Press the
PAGE "Up" button. The next display will read:
2) Press the VALUE "Up" button to select the lowest desired note to trigger the
recorded sample. Note number 60 = Middle C.
3) Press the
PAGE "Up" button. The next display will read:
MIDI TRIGGER
LOW LIMIT: 000
13
Page 14

14
MIDI TRIGGER
BASE: 060
The Base value is the note where the sample will play back with no pitch
change.
4) Press the
VALUE buttons to select the desired note. Note number 60 = Middle
C.
5) Press the
PAGE "Up" button. The next display will read:
MIDI TRIGGER
HIGH LIMIT: 127
6) Press the VALUE "Down" button to select the highest desired note to trigger
the recorded sample. Note number 60 = Middle C.
PLEASE NOTE:
• Because of the nature of sampling, the timing of the sample as well as the
pitch will change substantially the farther away from the base note that it's
triggered, with the higher notes sounding like "munchkins" and the lower
notes like "giants". This is a normal phenomena that occurs during sample
playback.
• The pitch of the sample will follow within a 2 octave range and will loop back
into the range if any note information falls outside of the 2 octave range. For
instance, if the base note has been selected to note number 60 (Middle C or
C3) and note number 84 (C5) is played, the sample pitch will be triggered 1
octave higher than the bass (C4).
ADJUSTING THE SAMPLE PLAYBACK LENGTH
In any playback mode it is possible to adjust the sample playback length in order
to either ignore unwanted sampled material or "dead air", or in order to make a
loop more musical. This is accomplished in the following manner.
1) Press the
2) Press the PAGE "Up" button. The display will read:
DELAY button. The display will read:
SAMPLE PLAYBACK:
ONE SHOT
SAMPLE START:
0.00 SECONDS
14
Page 15

15
This page will determine at what point in the sample that playback will
start.
3) Press the
VALUE button to select the desired Start time.
The start can be anywhere in the sample in 10 millisecond steps. When the
start of the sample is moved, the length of a loop is maintained unless the
end of the sample is reached before the loop duration. In this case, the loop
duration will be from the start to the actual end of the sample regardless of
the loop duration. However, the duration value will remain intact and in effect
as soon as the user adjustment of the loop start will permit the proper length.
The range is from 0 through 1.5 seconds in 10 millisecond increments.
4) Press the
PAGE "Up" button. The display will read:
SAMPLE LENGTH:
1.55 SECONDS
This page will determine the length of the sample playback.
5) Press the
VALUE button to select the desired Sample length time.
ADJUSTING THE SAMPLE MIX PARAMETERS
The MIX section allow for adjusting the relative balance between the direct
signal, and the recorded sample playback signal.
1) Press the
This page controls the level of the direct signal.
2) Press the
is 0 to 99 with 0 being off.
3) Press the "Up"
This page controls the output level of the recorded sample.
MIX button. The display will read:
DIRECT SIGNAL
LEVEL: + 50
VALUE buttons to select the desired direct signal level. The range
PAGE button to select the next page. The display will read:
SAMPLE PLAYBACK
SIGNAL LEVEL: + 50
15
Page 16

16
4) Press the VALUE buttons to select the desired recorded Sample signal level.
The range is 0 to 99 with 0 being off.
PANNING AND TREMOLO
MODULATION
Auto Panning and Tremolo modulation of the EQ output has been added to the
EQ->PITCH->DELAY->REVERB and 5 BAND EQ->PITCH->DELAY
configurations.
Auto Panning allows a signal that has first been routed through the EQ section of
either of the above configurations to automatically pan from side to side at a
selectable rate. Please note that the effect will only be heard when both the left
and right outputs of the Quadraverb are in use.
Tremolo Modulation means that a signal that has first been routed through the
EQ section of either of the above configurations will vary in volume at a selected
rate. Both the depth and rate of the Auto Panning and Tremolo Modulation can
be varied and/or modulated by any MIDI modulation source.
SELECTING THE PANNING OR TREMOLO
CONFIGURATION
Auto Panning or Tremolo Modulation is accessed through the EQ->PITCH>DELAY->REVERB or 5 BAND EQ->PITCH->DELAY configurations.
To select either configuration, first press the
VALUE buttons until the display reads:
CONFIGURATION:
EQ>PCH>DL>REVERB
or
CONFIGURATION:
5BAND EQ>PCH>DL
The block diagram of this configuration is as follows:
FIGURE 5
EQ->PITCH->DELAY->REVERB BLOCK DIAGRAM
CONFIG button, then press the
16
Page 17

17
EQ PITCH DELAY REVERB
EQ OUTPUT
PANNING/
TREMOLO
L
R
DIRECT PRE/POST EQ
1 2 1 2
MIX MIX
PITCH OUTPUT DELAY OUTPUT REVERB OUTPUT
FIGURE 6
5 BAND EQ->PITCH->DELAY BLOCK DIAGRAM
1 2
5 BAND EQ PITCH DELAY
EQ OUTPUT
PANNING/
TREMOLO
L
R
MIX
PITCH OUTPUT DELAY OUTPUT
EFFECTS OUTPUT
DIRECT OUTPUT
EFFECTS OUTPUT
DIRECT OUTPUTDIRECT PRE/POST EQ
L
R
L
R
EDITING THE PANNING OR TREMOLO
PARAMETERS
1) To access the Auto Panning parameters, press the
will then read:
DIRECT SIGNAL:
PRE-EQ
2) Press the "Up" VALUE button until the next page reads:
DIRECT SIGNAL:
POST-EQ PANNING
or
DIRECT SIGNAL:
POST-EQ TREMOLO
MIX button. The display
17
Page 18

18
This page allows the selection of the direct signal going either Pre-EQ,
Post-EQ (both with no panning or tremolo), or Post-EQ with Panning or
Post-EQ with Tremolo.
3) Pressing the "Up"
Tremolo Depth page which will read:
.........depending on if Panning or Tremolo was selected above.
Pressing the
Tremolo Depth. The range is 0 to 99.
4) Pressing the "Up"
Tremolo Speed page which will read:
PAGE button repeatedly will select the Panning Depth or
EQ PANNING DEPTH
EQ TREMOLO
DEPTH 99
VALUE buttons will select the desired amount of Panning or
PAGE button again will select the Panning Speed or
99
or
EQ PANNING SPEED
30
or
EQ TREMOLO SPEED
30
.........depending on if Panning or Tremolo was selected above.
Pressing the
Tremolo Speed. The range is 0 to 99.
VALUE buttons will select the desired amount of Panning or
MODULATING THE PANNING OR TREMOLO
PARAMETERS
The Auto Panning Speed and Depth and the Tremolo Modulation Speed and
Depth can also be modulated by any MIDI modulation source. This can be
18
Page 19

19
accomplished by referring to the "Modulating the Parameters" section of the
QuadraVerb Users Manual on page 66.
EDITING THE EQ, PITCH, DELAY AND REVERB
PARAMETERS
The parameters and mode of adjustment of the EQ, Pitch, Delay and Reverb
sections are identical to the original EQ->PITCH->DELAY->REVERB
configuration as found on page 48 of the QuadraVerb Users Manual, and 5
BAND EQ->PITCH->DELAY configuration as found on page 76 of the
QuadraVerb Users Manual.
RING MODULATOR
The Ring Modulator is a specialized amplitude modulator that produces an
output that contains only the sum and difference frequencies of its input
waveforms' harmonics. It is most useful for generating metallic, bell-like sounds.
The Ring Modulator in the QuadraVerb Plus creates two signals (Up and Down)
from the initial input signal. The up output signal is a version of the input signal
with its harmonic spectrum shifted up, while the down output signal is the input
signal with its harmonic spectrum shifted down. The amount of shift is identical
for the up, and down outputs, and is specified in Hertz by the Shift Amount
parameter.
The following illustration shows how the output spectrums relate to the input
spectrum.
FIGURE 1
RING MODULATOR HARMONIC SPECTRUM SHIFT
19
Page 20

20
100Hz
500Hz
10KHz
A
INPUT SIGNAL
Amp
100Hz
500Hz
500Hz
1KHz
1KHz
2KHz
5KHz
Freq.
10KHz
B
C
PITCH SHIFT
AMOUNT = 200Hz
DOWN OUTPUT
Amp
UP OUTPUT
Amp
100Hz
300Hz
500Hz
700Hz
800Hz
1KHz
1KHz
1.2KHz
1.8KHz
2.2KHz
5KHz
5KHz
Freq.
10KHz
Freq.
In Figure 1A, the fundamental (or frequency that we perceive as the instrument's
pitch) is 500 Hz. The harmonics are normally even multiples of the fundamental,
or 2 times the fundamental, 3 times the fundamental, 4 times the fundamental,
etc. In this case, the 2nd harmonic is 1KHz (1000 cycles per second), or twice
the fundamental of 500Hz, and the 4th harmonic is 2KHz, or 4 times the
fundamental.
In Figure 1B, the Pitch Shift amount has been set to 200Hz, which means that
the fundamental and all of its related harmonics are shifted up by the same
200Hz amount. This means that the fundamental has been shifted to 700Hz, the
2nd harmonic is now at 1.2KHz (normally it should be 2 times the fundamental,
or 1.4KHz), and the 4th harmonic is 2.2KHz (normally it should be 2.8KHz).
In Figure 1C, the Pitch Shift amount is shifted down by 200Hz, which means that
the fundamental and all of its related harmonics are shifted down by the same
200Hz amount. This means that the fundamental has been shifted to 300Hz, the
2nd harmonic is now at 800Hz (normally it should be 2 times the fundamental, or
600Hz), and the 4th harmonic is 1.8KHz (normally it should be 1.2KHz).
Since the ratio between the input signal's harmonics is not preserved, the
resulting sound is drastically different from the original. While usual ring
modulators only provide a fixed mix of the Up and Down spectrums, the
20
Page 21

21
algorithm implemented in the QuadraVerb Plus gives independent access to the
Up and Down version of the original spectrum. The ring modulator treatment will
be most valuable for special effect on voices or sound effects.
SELECTING THE RING MODULATOR
The Ring Modulator is accessed through new Configuration 6, which is RING
MODULATOR->DELAY->REVERB. The block diagram of this configuration is:
FIGURE 2
CONFIGURATION 6
RING MODULATOR->DELAY->REVERB BLOCK DIAGRAM
RING MODULATOR CONTROL:
Spectrum shift amount
L
R
RING
MODULATOR
Ring Mod. output shift mix
Delay/Reverb shift mix
UP
DOWN
1 2 1 2
MIX MIX
DELAY REVERB
DELAY TYPES
Mono Delay - 800ms
Stereo Delay - 400ms per side
Ping-Pong Delay - 400ms
REVERB TYPES
Plate 1
Room 1
Chamber 1
Hall 1
Reverse 1
RING
MODULATOR
OUTPUT
DELAY OUTPUT REVERB OUTPUT
EFFECTS OUTPUT
DIRECT SIGNAL
To select this configuration, first press the CONFIG button, then press the VALUE
buttons until the display reads:
CONFIGURATION:
RING->DL->REVERB
EDITING THE RING MODULATOR PARAMETERS
1) To access the Ring Modulator parameters, press the PITCH button. The
display will then read:
SPECTRUM SHIFT:
100Hz
L
R
Pressing the VALUE buttons will select the desired Spectrum Shift. The
range is 1 Hertz to 300 Hertz in 1 Hertz increments.
21
Page 22
22
2) Pressing the "Up" PAGE button will select the next page which will read:
RING MOD OUTPUT
MIX: DOWN<-00->UP
Pressing the VALUE buttons will select the desired mix of Up to Down Ring
Modulator outputs.
3) Pressing the "Up"
Pressing the VALUE buttons will select the desired ratio of Up to Down
Spectrum Shift which can then be used as input for the Delay or Reverb.
This differs from the second page in that it is possible to send a different
mix of Ring Modulator outputs to the Delay and Reverb than the mix that
will appear in the
PAGE button again will select the third page which will read:
DEL/REVERB INPUT
MIX: DOWN<-00->UP
MIX section of the QuadraVerb Plus.
MODULATING THE RING MODULATOR
PARAMETERS
The Spectrum Shift, Ring Modulator Output up/down mix, and Delay/Reverb
up/down mix can also be modulated by any MIDI modulation source. This can
be accomplished by referring to the "Modulating the Parameters" section of the
QuadraVerb Users Manual on page 66.
EDITING THE DELAY AND REVERB
PARAMETERS
The parameters and mode of adjustment of the Delay and Reverb sections are
identical to the original LEZLIE-> DELAY->REVERB configuration as found on
page 69 of the QuadraVerb Users Manual.
RESONATORS
Instead of just processing a signal such as Delay or Reverb, a resonator
generates a pitch in addition to the original input signal. There are 5 resonators
in the QuadraVerb Plus. The initial resonating frequency of each resonator can
be individually adjusted (tuned) on a chromatic scale. The resonator frequencies
also chromatically follow incoming MIDI notes. The decay time of the five
resonators can also be adjusted simultaneously.
22
Page 23

23
SELECTING THE RESONATOR CONFIGURATION
The Resonators are accessed through new Configuration 7, which is
RESONATOR->DELAY->REVERB. The block diagram of this configuration is as
follows:
FIGURE 3
CONFIGURATION 7
RESONATORS->DELAY->REVERB BLOCK DIAGRAM
RESONATOR CONTROLS:
Decay time
L
R
Resonator 1
Resonator 2
Resonator 3
Resonator 4
Resonator 5
Frequency
1 2
MIX
RESONATOR
OUTPUT
DELAY REVERB
DELAY OUTPUT REVERB OUTPUT
DELAY TYPES
Mono Delay - 720ms
Stereo Delay - 320ms per side
Ping-Pong Delay - 320ms
1 2
MIX
REVERB TYPES
Plate 1
Room 1
Chamber 1
Hall 1
Reverse 1
EFFECTS OUTPUT
DIRECT SIGNAL
L
R
To select this configuration, first press the CONFIG button, then press the VALUE
buttons until the display reads:
CONFIGURATION:
RESONATOR>DL>REV
EDITING THE RESONATOR PARAMETERS
1) To access the Resonators parameters, press the PITCH button. The display
will then read:
RESONATOR GATE
MODE: CONTINOUS
This page determines if the resonators are gated by an incoming MIDI
note on/off. If the MIDI GATE is on, the input of each resonator will be
connected to the input signal only while its corresponding MIDI gate is on.
Consequently, when a note is released, the output of the resonator driven
by this note will decay to zero even if the input signal is active. Pressing
the
VALUE buttons will select the MIDI GATED mode.
23
Page 24

24
RESONATOR GATE
MODE: MIDI GATED
PLEASE NOTE: When playing the resonators from MIDI, the five pitches are
determined by up to five notes played on the MIDI keyboard. When used this
way, the resonator's tunings should be set to zero for proper keyboard tuning.
2) Pressing the "Up" PAGE button will select the next page which will read:
RESONATOR DECAY:
49
This page simultaneously adjusts the decay time of the five resonators.
The range is from 0 through 99, with 99 being maximum decay time.
Pressing the
VALUE buttons will select the desired decay time.
3) The next five pages adjusts the initial pitch of resonator 1 through 5.
Pressing the "Up"
PAGE button continually will select each Resonator page
which will read:
RESONATOR 1
TUNE +00 SEMI
TONE
RESONATOR 2
TUNE +00 SEMI
TONE
........ up to Resonator 5
Pressing the
VALUE buttons will select the desired tuning of the resonator.
The range is -24 to +36 semi tones, and covers 5 octaves from C1
through C6 (0=C3).
MODULATING THE RESONATOR PARAMETERS
The Resonator Decay can also be modulated by any MIDI modulation source.
This can be accomplished by referring to the "Modulating the Parameters"
section of the QuadraVerb Users Manual on page 66.
24
Page 25

25
EDITING THE DELAY AND REVERB
PARAMETERS
The parameters and mode of adjustment of the Delay and Reverb sections are
identical to the original LEZLIE-> DELAY->REVERB configuration as found on
page 69 of the QuadraVerb Users Manual.
25
 Loading...