

Page 1

n
Quick Start Owner’s Manual
Box Contents:
Playmate Vocalist CD Player
Quick Start Owner’s Manual
Power Cord
Manual de inicio rápido del usuario (Español)
Contenido de la caja:
Reproductor de CD Playmate
Vocalist
Manual de inicio rápido del
usuario
Cable de alimentación
Guide d'utilisation simplifié (Français)
Contenu de la boîte :
Lecteur de disque compact
Playmate Vocalist
Guide d’utilisation simplifié
Câble d'alimentatio
Schnellbedienungsanleitung (Deutsch)
Inhalt der Verpackung:
Playmate Vocalist CD-Spieler
Schnellbedienungsanleitung
Manuale rapido di utilizzazione (Italiano)
Contenuto della Confezione:
Lettore CD Playmate Vocalist
Manuale rapido di
utilizzazione
Cavo di alimentazione
Page 2

This page intentionally left blank.
Page 3

Hookup
Diagram
Power
Source
Mic
Headphones
For Recording
Digital Audio
Workstation
Live
PA System
IN GAIN
MICROPHONE
Quick Setup
1. Make sure all items listed on the
front of this guide are in the
Playmate Vocalist’s box.
2. Read the Important Safety
Instructions.
3. Study the Hookup Diagram above.
Refer to the next section for details
on which cables to use.
4. Make sure all devices and
instruments are turned off and all
gain knobs set to zero.
5. Connect your microphone to
either the XLR input or the 1/4”
direct input located on the rear of
the Playmate Vocalist.
Note: The Playmate Vocalist does
not provide phantom power. Do
not attempt to use microphones
that require external phantom
power.
6. Connect your headphones to one
of the PHONES jacks. You may
connect two sets of headphones.
7. To output the signal to a PA
amplifier, mixer or other
equipment, connect the Playmate
Vocalist’s Left and Right OUTPUT
jacks to the inputs of the device
using 1/4” TRS plugs. To connect
to your stereo, you will need to
buy 1/4”-to-RCA plug converters.
8. Turn on the Playmate Vocalist first,
followed by the other equipment.
Be sure to turn on any amplifiers
last to avoid any sudden “pops”
that could damage speakers.
9. When finished, turn off any
external amplifiers first—
before turning off or
disconnecting the Playmate
Vocalist—to prevent damage
to external speakers.
10. Go to http://www.alesis.com
to register the Playmate
Vocalist.
ADAT
Rear-Panel Features and
Connection Details
1. POWER – Turns the unit on and
off. Always use this button to turn
off the unit before removing the
power cord.
2. IEC Power Plug Connector –
Plug in the power cord that came
with the unit here.
3. Voltage Switch – Adjusts the
voltage from 115V/60Hz
(American) to 230V/50Hz
(European). It’s important that this
is set to the correct voltage;
otherwise, you could damage the
Playmate Vocalist.
4. MICROPHONE Input – an XLR
input that accepts any microphone
with an XLR plug.
5. DIRECT IN
instrument input. This input
bypasses the Playmate Vocalist’s
effects section and works well for
adding your synthesizer or other
instrument into the mix.
Input – a 1/4”
6. Gain Knob – controls the gain of
the MICROPHONE input. Turn this
knob up until you achieve a loud,
clear sound. Turn it down if you
experience distortion, feedback,
clipping or excessive hiss.
NOTE: The Gain knob only works
with the MICROPHONE input; it
does not affect the DIRECT IN
input.
Rear Panel
2
4
1
IN GAIN
3
MICROPHONE
7
5
8
6
3
4
Page 4
7. PHONES – stereo 1/4”
unbalanced jacks for connecting
two sets of headphones.
8. L and R OUTPUTS – 1/4” TRS
stereo output for routing the left
and right signals to a device such
as a mixer or amplifier.
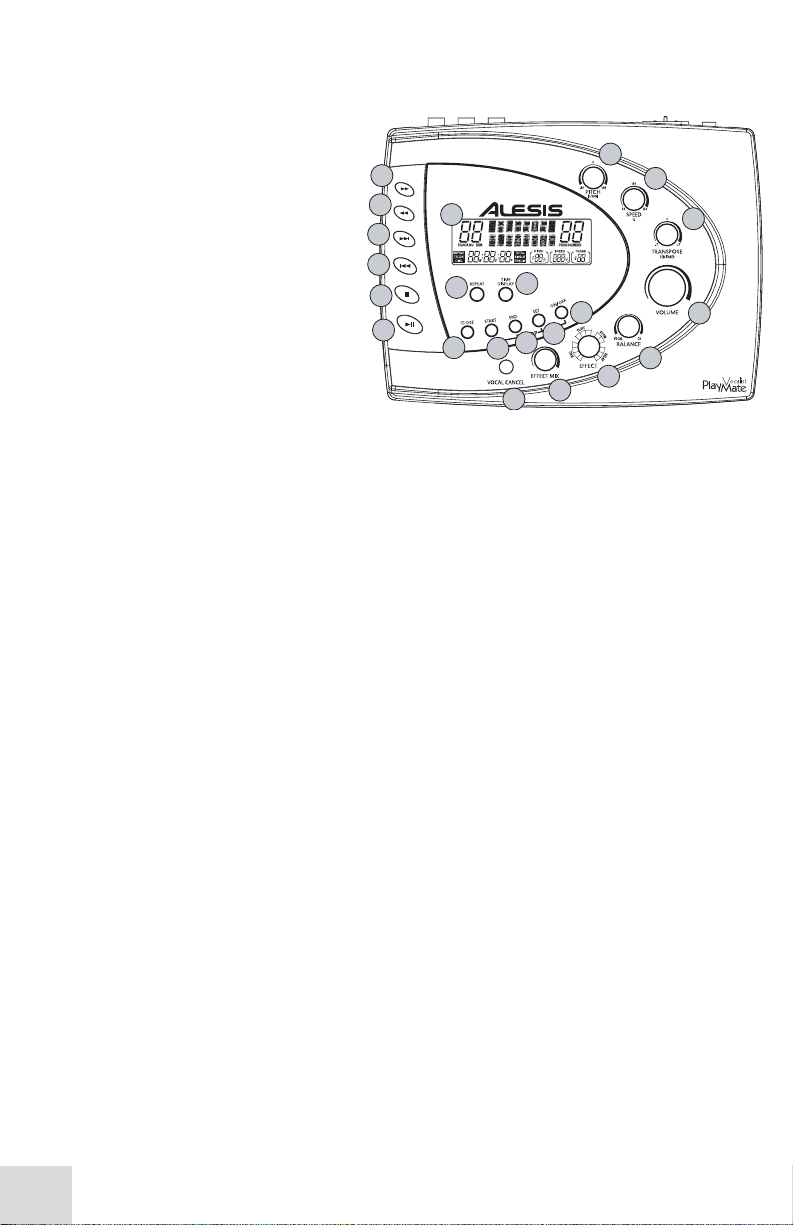
Features of the Playmate Vocalist
1. Display – Shows the current
track and effect program, CD
time and various other settings.
Refer to the “Features of the
Display” section for details.
2. Play/Pause Button – Plays the
CD. If you press this button while
a CD is playing, it will be paused
until you press Play/Pause again.
3. Stop Button – Stops a playing CD.
4. Skip Previous Button – Skips to
the beginning of the current track,
or skips to the previous track on
the CD.
5. Skip Next Button – Skips to the
beginning of the next song on the
CD.
6. Scan Forward Button – Scans
forward through the current song.
Hold down this button to continue
scanning.
7. Scan Back Button – Scans
backward through the current
song. Hold down this button to
continue scanning.
8. PITCH Knob – Controls the
tuning of the CD audio. When you
turn this knob, both the pitch and
the speed of the audio are affected.
You may adjust the pitch by as
much as plus or minus 8%.
9. SPEED Knob – Adjusts the speed,
or tempo, of the CD audio without
affecting its pitch. You may
decrease the tempo by as much as
50% and increase it as much as
150%.
10. TRANSPOSE Knob – Changes the
key of the CD audio in half-step
intervals, a maximum of seven
half-steps up or down, without
affecting the speed of the audio.
The TRANSPOSE knob does not
affect the audio’s tuning either. For
example, let’s say you tune the
audio to 5% sharp using the
PITCH knob. If you then transpose
the audio up four half-steps, it will
then be four half-steps plus 5%
sharp.
Top of the Playmate Vocalist
8
7
6
5
4
3
2
1
M
17
16
18
22
21
20
19
14
15
TIP: We recommend that you
transpose a song to the
appropriate key first, and then
adjust the speed, followed by the
pitch. That way you can tune the
music to your voice or instrument
first, adjust the tempo without
affecting that tuning, and then
make minor pitch adjustments if
9
10
11
12
13
necessary.
VOLUME Knob – Controls the
11.
master output volume of the
Vocalist Playmate.
12. BALANCE Knob – Controls the
ratio of the volume of the inputted
vocal (along with the selected
effect) versus the volume of the
CD audio. Turn this knob all the
way to the right and the main
outputs will contain 100% CD
audio. Turn it all the way to the
left and the outputs will contain
100% vocal. When the knob is in
the center position, the vocals and
CD audio will be mixed evenly at
50% each.
13. EFFECT Knob – Turn this 16position knob to select an effect
program from the Playmate
Vocalist’s digital vocal processor.
When you turn on the unit, you
automatically have access to the 16
effects in Bank A. To access Bank
B, press and hold the SET button
and hit the ON/OFF button. The
sixteen positions of the EFFECT
knob will then be mapped to
Programs 17 – 32.
Bank A contains traditional effects
such as reverbs and delays. Bank
B offers some inventive reverbs,
echoes, pitch shifters, distortions
4
Page 5

and special effects. See the Effect
Quick Reference for descriptions
of all the effects.
14. EFFECT MIX Knob – Controls the
wet/dry mix of the selected effect
from 0% to 100%. Turn the
EFFECT MIX knob to the right to
increase the amount of effect in
the signal. Turn the knob to the
left to decrease the amount.
The Display will show the
percentage of the wet/dry mix as
you turn the EFFECT MIX knob.
15. VOCAL CANCEL Button –
eliminates the lead vocal track
from the CD. As you press this
button, you’ll rotate through Type
1, Type 2, Type 3 and Off vocal
cancellation types. Depending on
the specific CD, you may find any
one of the three types to be most
effective.
16. OPEN/CLOSE Button – Opens
and closes the CD tray.
17. REPEAT Button – Press this
button repeatedly to cycle through
the four Repeat options:
• Track – Plays a track and
then stops.
• Track Repeat – Plays a
track and then plays it again,
over and over.
• Disc – Plays the disc and
then stops.
• Disc Repeat – Plays the
disc and then plays it again,
over and over.
18. TIME DISPLAY Button – Press
this button repeatedly to cycle
through the four Time Display
options.
• In Total mode, the Display
shows the time elapsed on
the CD.
• In Total Remain mode, the
Display shows the time
remaining until the end of the
CD.
• In Single mode, the Display
shows the time elapsed in the
current track.
• In Single Remain mode,
the Display shows the time
remaining in the current track.
Looping Features
Topics 19 – 22 cover the Playmate
Vocalist’s looping features. These
work together to allow you to
define a section of CD audio that
you would like to repeat
indefinitely. The Playmate Vocalist
makes looping easy: simply tell it
the locations on the CD at which
you want the loop to begin and
end, enable the loop, and then
sing or play along.
See “Creating a Loop” for more
information.
19. START Button – This button has
two functions: setting the Loop
Start and jumping to the Loop Start.
To set the Loop Start, hold down
the SET button and press START.
To jump to the Loop Start, simply
press START.
When you first insert a CD, the
Loop Start is automatically set to
the beginning of the disc (0:00:00).
20. END Button – This button also
serves two functions: setting the
Loop End point and jumping to
the Loop End point. To set the
Loop End, hold down the SET
button and press END. To jump to
the Loop Start, just press END.
When you first insert a CD, the
Loop Start is automatically set to
the end of the disc.
21. SET Button – Used in conjunction
with the START and END buttons
to set the Loop Start and Loop End.
You can also use the SET button
in conjunction with the ON/OFF
button to access Bank B of the
effects processor (press ON/OFF
while holding down SET).
22. ON/OFF Button – Enables and
disables the loop. If the loop is
playing when you hit ON/OFF, the
CD will continue playing through
the end of the loop instead of
returning to the Loop Start.
5
6
Page 6

Display
2
M
1
4
5
7
6
8
9
Features of the Display
1. Screen – When you turn the unit
on, the screen reads “Alesis
Playmate” for a few seconds. It
also does the following:
• During normal playing
mode, the screen displays the
currently selected effect
program.
• When you turn the EFFECT
MIX knob, the screen shows
the current effect level. This
level remains on the screen
for a few seconds after you
stop turning the knob.
• When you press the VOCAL
CANCEL button, the screen
briefly indicates whether
Vocal Cancel mode is on or
off.
2. TRACK NUMBER Indicator –
Shows the number of the currently
selected track.
3. PROG NUMBER Indicator –
Shows the number of the currently
selected effect program.
4. REPEAT Indicator – Displays the
current Repeat mode:
• Track – Plays a track and
then stops.
• Track Repeat – Plays a
track and then plays it again,
over and over.
• Disc – Plays the disc and
then stops.
• Disc Repeat – Plays the
disc and then plays it again,
over and over.
5. Time Display – Shows the current
playing time.
6. Time Display Indicator –
Indicates which of the four Time
Display modes is current: Total,
Total Remain, Single or Single
Remain.
7. PITCH Indicator – Shows the
current setting of the PITCH knob.
8. SPEED Indicator – Shows the
current setting of the SPEED knob.
9. TRANS Indicator – Shows the
current setting of the TRANSPOSE
knob.
3
Creating a Loop
1. Insert a CD and press Play.
2. Use the Skip button to move to
the track where you would like to
create the loop.
3. Listen to the track and make note
of the point at which you would
like the loop to begin.
4. Use the Scan button to reach a
point a few moments before the
place you want the loop to start.
You may allow the CD to continue
playing, or you may pause it to
give yourself preparation time.
5. Press and hold down the SET
Button.
6. If you paused the CD, hit
PLAY/PAUSE to continue playing.
As soon as the CD reaches the
point at which you want the loop
to begin, hit the START button
while holding the SET button. The
Loop Start is now set. You may
now return to the Loop Start at
any time by pressing START.
7. Allow the CD to continue to play,
or use the Scan button to move to
a point a few moments before the
point at which you want the loop
to end.
8. Press and hold down the SET
button.
9. When the CD reaches the point at
which you want the loop to end,
hit the END button while holding
down the SET button. The Loop
End is now set. You may return to
the Loop End at any time by
pressing END.
10. Enable the loop by pressing the
ON/OFF button. The Playmate
Vocalist will jump to the Loop
Start while continuing to play.
Every time it reaches the Loop End,
it will jump back to the Loop Start.
To disable the loop, press the
ON/OFF button again. it will jump
back to the Loop Start.
If you skip to another track, the
loop will be disabled. The loop
start and end points will automatically change to coincide with the
start and end points of the new
track.
6
Page 7

(To switch between banks, press ON/OFF while holding down SET)
Effect Type Number and Name Description
Bank A: Conventional Effects
Effect Quick Reference
Hall Reverb 1. Small Hall Simulates the sound of a small concert hall.
2. Medium Hall Simulates a medium concert hall.
3. Large Hall Simulates a large concert hall.
4. Concert Hall A warmer and even larger hall reverb.
5. Reverse Reverb A reverb that plays in reverse and comes before
Plate Reverb 6. Classic Plate A recreation of the classic “plate reverb” produced
7. Modern Plate Brighter and thinner than Classic Plate.
8. Future Plate Similar to Classic Plate, but larger sounding.
9. Golden Plate Similar to Modern Plate, but larger sounding.
10. Small Room Simulates the acoustics of a small room. Room Reverb
11. Medium Room Simulates the acoustics of a medium-sized room.
12. Large Room The full-sounding reverb of a large room.
Delay 13. Echo 1 Adds an echo to your vocals.
14. Echo 2 An echo that has a longer delay time than Echo 1.
15. Echo 3 An echo that has a shorter delay time than Echo 1.
16. Tape Echo Imitates the classic tape delay created by recording
instead of after the original sound.
by vibrating metal plates.
audio to tape and replaying it as an echo.
Bank B: Radical Effects
Reverbs 17. Triggered Reverb A reverb that doesn’t kick in until a certain volume
18. Ducking Reverb A “ducking” reverb. The reverb level decreases
Echoes 19. Ducking Echo 1 A ducking version of Echo 1. The echo level
20. Ducking Echo 2 A ducking version of Echo 2.
Pitch 21. Multi Chorus Adds fullness to your vocals by emulating the
22. Schizo Chorus A frenzied chorus effect.
23. Easy Flange Shifts the pitch of the original signal up and down,
24. Resonant Flange A flange with wider and quicker shifts in pitch.
25. Stereo Rotary The classic sound of an organ’s rotary speaker.
Distortion 26. Walkie Talkie Distorts your voice so that you sound as if you’re
27. Distort & Phaser A distortion effect combined with a phaser, which
28. Distort & Flange Distortion combined with a flange effect.
Special Effects 29. Robot Vocal The name says it all; this one gives your voice an
30. Robovox & Reverb The Robot Vocal effect with reverb added.
31. Telephone
Receiver
32. Decim8ed Filter A super low-fi, harsh and resonant effect.
threshold is reached.
when the input is loud and increases when the
input is quieter.
decreases when the input is loud and increases
when the input is quieter.
sound of several voices at once.
creating a swirling effect.
singing through a walkie talkie.
creates a duplicate signal and delays it slightly.
electronic, robot-like tone.
Cuts off highs and lows so you sound like you’re
talking on the telephone.
7
8
Page 8

This page intentionally left blank.
8
Page 9
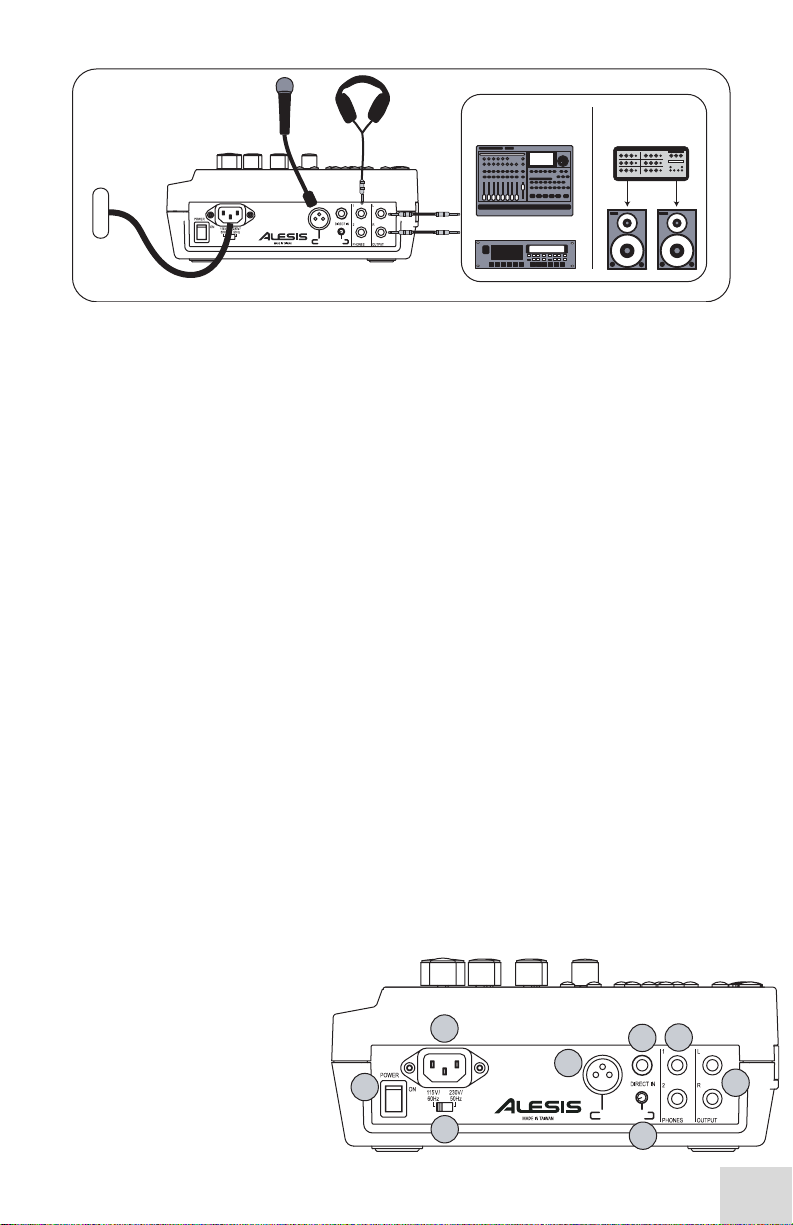
Diagrama de
montaje
Fuente de
alimentació
Micrófono
Auriculares
Para grabar
Estación de trabajo
de audio digital
En directo
Sistema de
amplificación
IN GAIN
MICROPHONE
Instalación rápida
1. Asegúrese de que todos los
artículos incluidos al inicio de este
manual están incluidos en la caja
del Playmate Vocalist.
2. Lea las importantes instrucciones
de seguridad.
3. Estudie el diagrama de montaje
que aparece más arriba. Consulte
la próxima sección para ver
detalles sobre los cables que
deben ser utilizados.
4. Asegúrese de que todos los
dispositivos e instrumentos están
apagados y de que todos los
controles de ganancia están en
posición “cero”.
5. Conecte su micrófono sea a la
entrada de XLR o la entrada
directa de 1/4” ubicada en la parte
posterior del Playmate Vocalist.
Nota: El Playmate Vocalist no
proporciona potencia fantasma.
No intente usar micrófonos que
requieren potencia fantasma
externa.
6. Conecte sus auriculares a uno de
los jacks de PHONO. Puede
conectar dos juegos de auriculares.
7. Para la salida de la señal al
amplificador del sistema de
amplificación, mezclador u otro
equipo, conecte los jacks de salida
de la derecha e izquierda del
Playmate Vocalist a las entradas
del dispositivo usando los
enchufes de TRS de 1/4”. Para
conectar su estéreo, necesitará
comprar convertidores de enchufes
de 1/4” a RCA.
8. Encienda el Playmate
Vocalist primero, seguido
por los demás equipos.
Asegúrese de encender los
amplificadores en último
lugar para evitar cualquier
ruido súbito que puedan
dañar sus altavoces.
ADAT
9. Cuando termine, apague primero
cualquier amplificador externo —
antes de apagar o desconectar el
Playmate Vocalist— para evitar
daños a los altavoces externos.
10. Visite http://www.alesis.com para
registrar el Playmate Vocalist.
Características del panel trasero y
detalles de conexión
1. POWER – Enciende y apaga la
unidad. Use siempre este botón
para apagar la unidad antes de
sacar el cable de alimentación.
2. Conector del enchufe de
alimentación IEC – Enchufe el
cable de alimentación incluido en
la caja con la unidad.
3. Interruptor de voltaje – Ajusta
el voltaje de 115V/60Hz
(americano) a 230V/50Hz
(europeo). Es importante que éste
esté ajustado al voltaje correcto;
sino, podría dañar el Playmate
Vocalist.
4. Entrada de micrófono
[MICROPHONE] – Una entrada
XLR que acepta cualquier
micrófono con una entrada XLR.
5. Entrada directa [DIRECT IN] –
Una entrada de instrumento de
1/4”. Esta entrada se desvía la
sección de efectos del Playmate
Vocalist y funciona bien para
agregar su sintetizador u otro
instrumento a
la mezcla.
2
4
1
3
Panel posterior
7
5
IN GAIN
MICROPHONE
6
8
9
10
Page 10

6. Botón de ganancia – Controla la
ganancia de la entrada del
micrófono [MICROPHONE]. Gire
este botón hacia arriba hasta que
obtenga un sonido fuerte y claro.
Apáguelo si experimenta
distorsión, retroalimentación,
clipping o un siseo excesivo.
NOTA: El botón de ganancia
funciona solamente con la
entrada de micrófono; no afecta
a la entrada directa [DIRECT IN].
7. PHONES – Jacks no balanceados
de 1/4” para conectar dos pares
de auriculares.
8. Salidas derecha e izquierda [L
y R OUTPUTS] – Salida de estéreo
TRS de 1/4” para dirigir las señales
de la derecha y de la izquierda
hacia un dispositivo como un
mezclador o un amplificador.
Características del Playmate
Vocalist
1. Pantalla – Muestra el programa
de pista y efecto actual, el tiempo
del CD y otros ajustes. Consulte la
sección de «Características de la
pantalla» para más detalles.
2. Botones [Play/Pause] –
Reproducen el CD. Si pulsa este
botón mientras reproduce un CD,
estará pausado hasta que pulse el
botón [Play/Pause] de nuevo.
3. Botón [Stop] – Detiene un CD
que está sonando.
4. Botón [Skip previous] – Salta al
comienzo de la pista actual o salta
a la pista anterior del CD.
5. Botón [Skip Next]– Salta al
comienzo de la canción siguiente
en el CD.
6. Botón [Scan Forward] – Escanea
hacia adelante a través de la pista
actual. Mantenga este botón
pulsado para continuar
escaneando.
7. Botón [Scan Back] – Escanea
hacia atrás a través de la pista
actual. Mantenga este botón
pulsado para continuar
escaneando.
8. Botón [PITCH] – Controla el
afinado del audio del CD. Cuando
gira este botón, afecta tanto al
pitch como a la velocidad de
audio. Puede ajustar el pitch hasta
+8% ó -8%.
Parte superior del Playmate Vocalist
8
7
6
5
4
3
2
1
M
17
16
18
22
21
20
19
14
15
9
10
11
12
13
9. Botón [SPEED] – Ajusta la
velocidad o el tempo de audio del
CD sin afectar su pitch. Puede
disminuir el tempo hasta un 50% y
aumentarlo hasta un 150%.
10. Botón [TRANSPOSE] – Cambia la
clave del audio de CD en
intervalos de medio paso y un
máximo de siete medios pasos
hacia arriba o abajo, sin afectar a
la velocidad del audio.
El botón [TRANPOSE] tampoco
afecta al afinado del audio. Por
ejemplo, digamos que afina el
audio a un 5% sharp (sostenido)
usando el botón de [PITCH]. Si
luego transporta el audio hacia
arriba cuatro medios pasos, será
entonces cuatro medios pasos más
el 5% sostenido.
CONSEJO: Le recomendamos que
transporte una canción a la clave
correspondiente primero y luego
ajuste la velocidad, seguida por el
pitch. De esa forma podrá primero
afinar la música a su voz o
instrumento, ajustar el tempo sin
que afecte a esa afinación y luego
hacer ajustes pequeños de pitch si
es necesario.
11. Botón de VOLUMEN – Controla
el volumen de salida principal del
Vocalist Playmate.
12. Botón de BALANCE – Controla el
ratio del volumen del vocal de
entrada (junto con el efecto
seleccionado) versus el volumen
del audio del CD. Gire este botón
totalmente a la derecha y las
salidas principales contendrán el
100% del audio de CD. Gírelo
totalmente a la izquierda y las
10
Page 11

salidas contendrán vocales de
100%. Cuando el botón está en la
posición central, las vocales y el
audio del CD serán mezclados de
manera uniforme al 50% cada uno.
13. Botón [EFFECT] – Gire este
botón de 16 posiciones para
seleccionar un programa de
efectos del procesador de vocal
digital de Playmate Vocalist.
Cuando encienda la unidad, tendrá
acceso a los 16 efectos
automáticamente en el Banco A.
Para acceder al Banco B, pulse y
mantenga pulsado el botón SET y
pulse el botón ON/OFF. Las
dieciséis posiciones del botón
EFFECT serán entonces
encaminadas a los Programas 17 a
32.
El Banco A contiene efectos
tradicionales como las
reverberaciones y retrasos. El
Banco B ofrece algunas
reverberaciones, ecos,
conmutadores de pitch,
distorsiones y efectos especiales
innovadores. Consulte la
«Referencia rápida de efectos» para
ver descripciones de todos los
efectos.
14. Botón [EFFECT MIX] – Controla
la mezcla wet/dry del efecto
seleccionado de 0% a 100%. Gire
el botón EFFECT MIX a la derecha
para aumentar la cantidad de
efecto de la señal. Gire el botón a
la izquierda para disminuir la
cantidad.
La pantalla le mostrará el
porcentaje de la mezcla wet/dry
mientras gira el botón EFFECT
MIX.
15. Botón [VOCAL CANCEL] –
Elimina la pista de la voz principal
del CD. Mientras pulse este botón,
cambiará entre los tipos de
cancelaciones de voz: tipo 1, tipo
2, tipo 3 y off (apagado).
Dependiendo del CD específico,
encontrará que cualquiera de los
tres tipos es muy efectivo.
16. Botón OPEN/CLOSE – Abre y
cierra la bandeja de CD.
17. Botón REPEAT – Pulse este botón
varias veces para visualizar las
cuatro opciones de repetición:
• Track (pista) – Reproduce
una pista y después se
detiene.
• Track Repeat (repetición de
pista) – Reproduce una pista y
la vuelve a reproducir sin
parar.
• Disc (disco) – Reproduce
una pista y después para.
• Disc Repeat (repetición del
disco) – Reproduce una pista
y la vuelve a reproducir sin
parar.
18. Botón TIME DISPLAY – Presione
este botón varias veces para ver
las cuatro opciones de
visualización del tiempo:
• En el modo Total, la
pantalla muestra el tiempo
transcurrido en el CD.
• En el modo de Total
Remain, la pantalla muestra el
tiempo restante hasta el final
del CD.
• En el modo Single, la
pantalla muestra el tiempo
transcurrido en la pista actual.
• En el modo Single Remain,
la pantalla muestra el tiempo
permaneciente en la pista
actual.
Características de Looping
Los temas 19 a 22 tratan las
características de looping del
Playmate Vocalist. Estos funcionan
juntos para permitirle definir una
sección del audio de CD que
desea repetir sin parar. El
Playmate Vocalist hace el looping
fácil: simplemente, muéstrele las
ubicaciones en el CD donde desea
que empiece y termine el loop y,
comience el loop; luego, cante o
toque junto con el CD.
Remítase a «Cómo crear un loop»
para más información.
19. Botón START – Este botón tiene
dos funciones: ajustar el comienzo
del loop y saltar al comienzo del
loop. Para ajustar el comienzo del
loop, mantenga pulsado el botón
SET y pulse START. Para saltar al
comienzo del loop, simplemente
pulse START.
Cuando inserte un CD por primera
vez, el comienzo del loop estará
ajustado automáticamente al
comienzo del disco (0:00:00).
20. Botón END – Este botón también
tiene dos funciones: ajustar el
punto final del loop y saltar al
punto final del loop. Para ajustar
11
12
Page 12

el final del loop, mantenga
pulsado el botón SET y pulse END.
Para saltar al comienzo del loop,
simplemente pulse END.
Cuando inserte un CD por primera
vez, el comienzo del loop estará
ajustado automáticamente al final
del disco.
21. Botón SET – Utilizado junto con
los botones START y END para
ajustar el comienzo y el final del
loop.
Puede también usar el botón SET
junto con el botón ON/OFF para
acceder el Banco B del procesador
de efectos (pulse OFF/ON
mientras mantiene pulsado el
botón SET).
22. Botón ON/OFF – Enciende y
apaga el loop. Si el loop está
tocando mientras presiona
ON/OFF, el CD continuará
sonando hasta el final del loop en
vez de volver al comienzo del
loop.
Pantalla
2
M
1
4
5
7
6
8
Características de la pantalla
1. Pantalla – Cuando enciende la
unidad, la pantalla muestra «Alesis
Playmate» durante algunos
segundos. También hace lo
siguiente:
• Durante el modo de
reproducción normal, la
pantalla visualiza el programa
de efectos seleccionado
actualmente.
• Cuando gira el botón
EFFECT MIX, la pantalla
muestra en nivel de efecto
actual. Este nivel permanece
en la pantalla durante algunos
segundos después de que se
detenga girando el botón.
• Cuando pulsa el botón
[VOCAL CANCEL], la pantalla
indica brevemente si el modo
Vocal Cancel está encendido
o apagado.
2. Indicador de número de la
pista [TRACK NUMBER] –
Muestra el número de la pista
seleccionada actualmente.
3. Indicador de número del
programa [PROG NUMBER] –
Muestra el número del programa
seleccionado actualmente.
4. Indicador de repetición
[REPEAT] – Visualiza el modo de
repetición actual:
• Track (pista) – Reproduce
una pista y después se
detiene.
• Track Repeat (repetición de
pista) – Reproduce una pista y
la vuelve a reproducir sin
parar.
• Disc (disco) – Reproduce
una pista y después para.
• Disc Repeat (repetición del
disco) – eproduce una pista y
la vuelve a reproducir sin
parar.
5. Visualización de tiempo –
Muestra el tiempo de reproducción
actual.
6. Indicador de visualización del
3
– Indica cual de los cuatro
tiempo
modos de la visualización de
tiempo se está mostrando en ese
momento: total, total remain,
single o single remain.
7. Indicador del PITCH – Muestra
9
el ajuste actual del botón del
PITCH.
8. Indicador de velocidad –
Muestra el ajuste actual del botón
de la velocidad.
9. Indicador del TRANS – Muestra
el ajuste actual del botón de
transporte [TRANSPOSE].
Cómo crear un Loop
1. Inserte un CD y pulse PLAY.
2. Use el botón [Skip] (saltar) para
saltar a la pista donde desea crear
el loop.
3. Escuche la pista y tome nota del
punto donde desearía empezar el
loop.
4. Use el botón [Scan] para alcanzar
un punto algunos momentos antes
del punto en el cual desea que
empiece el loop. Puede dejar que
el CD continúe sonando o puede
detenerlo para darse tiempo para
prepararse.
12
Page 13

5. Pulse y mantenga pulsado el
botón SET.
6. Si ha detenido el CD, pulse
PLAY/PAUSE para que continúe
sonando. En cuanto el CD alcance
el punto en el cual usted desea
que empiece el loop, pulse el
botón START mientras mantiene
pulsado el botón SET. Ya está
ajustado el comienzo del loop.
Puede volver al comienzo del loop
cuando desee, simplemente pulse
START.
7. Deje que el CD siga sonando o
use el botón [Scan] para
desplazarse a un punto anterior al
punto en el cual desea que
termine el loop.
8. Pulse y mantenga pulsado el
botón SET.
9. Cuando el CD alcance el punto en
el cual desea que termine el loop,
pulse el botón END mientras
mantiene pulsado el botón SET.
Ya está ajustado el final del loop.
Puede volver al final del loop
cuando desee, simplemente pulse
END.
10. Active el loop pulsando el botón
ON/OFF. El Playmate Vocalist
saltará al comienzo del loop
mientras sigue sonando. Cada vez
que alcance el final del loop,
volverá a saltar al comienzo del
loop.
Para activar el loop, pulse el botón
ON/OFF de nuevo.
Referencia rápida de efectos
Tipo de efecto Número y nombre Descripción
Convencional
Hall Reverb 1. Pequeña sala Simula el sonido de una sala de conciertos pequeña.
(Reverberación
de sala de
conciertos)
5. Reverse Reverb Una reverberación invertida y que viene antes en vez
Plate Reverb 6. Platillo clásico Una recreación de la reverberación de platillo clásico
7. Platillo moderno Más brillante y más delgada que el platillo clásico.
8. Platillo futuro Similar al platillo clásico pero con un sonido mayor.
9. Platillo dorado Similar al platillo moderno pero con un sonido
12. Habitación grande La reverberación con sonido de plenitud de una
Retraso 13. Eco 1 Agrega un eco a sus vocales.
14. Eco 2 Un eco que tiene un tiempo de retraso más largo que
15. Eco 3 Un eco que tiene un tiempo de retraso más corto
16. Eco de casete Imita el retraso del casete clásico creado al grabar el
2. Sala de conciertos
mediana
3. Sala de conciertos
grande
4. Sala de conciertos Una reverberación aún más cálida y más grande de
10. Habitación pequeña Simula los acústicos de una habitación pequeña. Room Reverb
11. Habitación mediana Simula los acústicos de una habitación de tamaño
Simula el sonido de una sala de conciertos mediana.
Simula el sonido de una sala de conciertos grande.
sala de conciertos.
de después del sonido original.
producida por la vibración de platillos de metal.
mayor.
mediano.
habitación grande.
el Eco 1.
que el Eco 1.
audio en un casete y volver a reproducirlo como un
eco.
13
14
Page 14

Reverberaciones
18. Reverberación de
Ecos 19. Eco 1 de reducción Una versión de reducción del Eco 1. El nivel del eco
20. Eco 2 de reducción 2ª: versión de reducción del Eco 2.
Pitch (tono) 21. Coro múltiple Agrega plenitud a sus voces al emular el sonido de
22. Coro Schizo Un efecto de coro enloquecido.
23. Flange fácil Mueve el pitch de la señal original hacia arriba y
24. Flange resonante Un flange con cambios en el pitch más amplios y
25. Stereo Rotary El sonido clásico del altavoz giratorio de un órgano.
Distorsión 26. Walkie-Talkie Distorsiona su voz para que suene como si estuviera
27. Distorsión y Phaser
28. Distorsión y Flange Distorsión combinada con un efecto de flange.
Efectos
especiales
30. Robovox y
31. Teléfono Corta los altos y los bajos para que suene como si
32. Filtro decimado Un efecto muy baja fidelidad (low-fi) fuerte y
17. Reverberaciones
activadas
reducción
(modulador de fase)
29. Voz de robot El nombre lo dice todo: este le da un tono
reverberación
Radical
Una reverberación que no es activada hasta que se
alcance un cierto límite de volumen.
Una reverberación de reducción. El nivel de
reverberación se disminuye cuando la entrada es
fuerte y se aumenta cuando la entrada es más baja.
se disminuye cuando la entrada es fuerte y se
aumenta cuando la entrada es más baja.
varias voces a la vez.
abajo, creando un efecto giratorio.
rápidos.
cantando a través de un walkie-talkie.
Un efecto de distorsión combinado con una
modulación de fase que crea una señal duplicada y
la retrasa ligeramente.
electrónico tipo robot a su voz.
El efecto de voz de robot con reverberación añadida.
estuviera hablando por teléfono.
resonante.
14
Page 15

g
t
Schéma
d’installation
Bloc
d’alimentation
Microphone
Casque
d'écoute
Pour
enre
istremen
Poste audio
numérique
En direct
Système PA
IN GAIN
MICROPHONE
Guide d’installation rapide
1. Assurez-vous que tous les articles
énumérés sur la page couverture
de ce guide sont inclus dans la
boîte.
2. Veuillez lire les consignes de
sécurité.
3. Examiner le schéma d’installation
ci-dessus. Veuillez vous référez à
la section suivante pour plus
d’information concernant les
câbles à utiliser.
4. Assurez-vous que tous les
appareils sont hors tension et que
tous les boutons de gain sont
réglés à zéro.
5. Vous pouvez brancher votre
microphone à l’entrée XLR ou à
l’entrée directe de ¼ po située à
l’arrière du Playmate Vocalist.
Note: Le Playmate Vocalist n'offre
pas de l’alimentation fantôme.
Veuillez ne pas essayer d’utiliser
des microphones qui nécessitent
du alimentation fantôme externe.
6. Branchez votre casque d’écoute à
l’une des entrées pour casque
d’écoute (PHONES). Vous avez la
possibilité de brancher deux
casques d'écoute.
7. Pour acheminer le signal à un
amplificateur de système PA, une
console de mixage ou à d’autres
appareils, branchez les sorties
gauche et droite du Playmate
Vocalist à l’appareil en utilisant
des prises TRS de ¼ po. Pour brancher
votre stéréo vous devrez vous procurer
des convertisseurs de prises ¼
po à RCA.
8. Assurez-vous de mettre
sous tension le Playmate
Vocalist en premier et
ensuite les autres appareils.
Assurez-vous que les
amplificateurs soient mis
sous tension uniquement
lorsque tous les autres
ADAT
appareils seront allumés pour
éviter d’endommager les enceintes
acoustiques.
9. Assurez-vous de mettre tous les
amplificateurs externes hors
tension avant de fermer ou de
débrancher le Playmate Vocalist
pour éviter d’endommager les
enceintes acoustiques externes.
10. Veuillez visiter le site
http://www.alesis.com pour
enregistrer le Playmate Vocalist.
Caractéristiques du panneau
arrière et des connectiques
1. Alimentation électrique
(POWER) – Met l'appareil sous et
hors tension. Veuillez toujours
utiliser ce bouton pour mettre
l’appareil hors tension avant de
débrancher le câble d’alimentation.
2. Connecteur CEI pour câble
d'alimentation – Brancher le
câble d'alimentation fourni à cette
prise.
3. Sélecteur de tension – Permet de
régler la tension à 115 V/60 Hz
(américain) ou à 230 V/50 Hz
(européen). Il est très important de
sélectionner la tension appropriée,
autrement vous pourriez
endommager le Playmate Vocalist.
4. Entrée MICROPHONE – Une
entrée XLR qui accepte tous
microphones munis d’une fiche
XLR.
Panneau arrière
2
4
1
IN GAIN
3
MICROPHONE
7
5
8
6
15
16
Page 16

5. Entrée directe (DIRECT IN) – a
Une entrée pour instrument de ¼
po. Cette entrée contourne la
section des effets du Playmate
Vocalist et est très utile pour
ajouter un synthétiseur ou tout
autre instrument au mix.
6. Bouton de gain – Permet de
régler le niveau de gain de
l’entrée MICROPHONE . Réglez
le niveau de gain jusqu’à ce que
le son soit puissant et clair.
Réglez-le à la baisse s’il y a de la
distorsion, de la réinjection, de
l’écrêtage ou une sorte de
chuintement.
NOTE: Le bouton de gain
fonctionne uniquement avec
l’entrée MICROPHONE, il n’affecte
pas les réglages de l’entrée direct
(DIRECT IN).
7. Entrée casque d’écoute
(PHONES) – Entrée asymétrique
de ¼ po permettant de brancher
deux casques d'écoute.
8. Sorties gauche et droite (L & R
OUTPUTS) – Sortie TRS stéréo de
¼ po pour acheminer les signaux
gauches et droits à un appareil tel
qu’un amplificateur ou une
console de mixage.
Caractéristiques du Playmate
Vocalist
1. Écran d’affichage – Indique la
piste et le programme d’effet en
cours de lecture, la durée du CD
et autres réglages. Veuillez vous
référer à la section «
caractéristiques de l’écran
d’affichage » pour plus de détails.
2. Touche lecture/pause
(PLAY/PAUSE) – Permet de
lancer la lecture du CD. Si vous
appuyez sur cette touche en cours
de lecture, le lecteur se mettra en
pause jusqu'à ce que vous
appuyiez sur la touche à nouveau.
3. Touche d’arrêt – Permet d’arrêter
la lecture du CD.
4. Touche de saut de piste arrière
– Permet de retourner au début de
la piste en cours, ou de passer
directement à la piste précédente
du CD.
5. Touche de saut de piste avant –
Permet de passer directement au
début de la piste suivante du CD.
6. Touche de recherche avant –
Permet d’effectuer une recherche
Haut du Playmate Vocalist
8
7
6
5
4
3
2
1
M
17
16
18
22
21
20
19
14
15
9
10
11
12
13
au sein de la chanson en cours.
Maintenez la touche enfoncée
pour continuer la recherche.
7. Touche de recherche arrière –
Permet d’effectuer une recherche
au sein de la chanson en cours.
Maintenez la touche enfoncée
pour continuer la recherche.
8. Régulateur de tonalité (PITCH)
– Permet de faire la syntonisation
du signal audio du CD. Lorsque
vous ajustez ce bouton, la tonalité
et la vitesse du signal audio sont
modifiées. Il est possible de régler
la tonalité et la vitesse de plus ou
moins 8 %.
9. Régulateur de vitesse (SPEED)
– Permet de modifier la vitesse, ou
le tempo du signal audio du CD
sans en modifier la tonalité. Il est
possible de baisser le tempo
jusqu'à 50 % et de l'augmenter
jusqu'à 150 %.
10. Régulateur de transposition
(TRANSPOSE) – La tonalité du
signal audio du CD peut être
augmentée ou diminuée jusqu’à
sept demi-tons, sans affecter la
vitesse de la chanson.
Le régulateur de transposition
(TRANSPOSE) ne modifie
aucunement la syntonisation du
signal. Par exemple, si vous réglez
la syntonisation du signal à 5 % à
l’aide du régulateur de tonalité et
que vous augmentez ensuite la
transposition du signal de quatre
demi-tons plus 5 %.
CONSEIL: Nous vous
recommandons de commencer par
transposer une chanson à l’accord
16
Page 17

approprié, ensuite d’ajuster la
vitesse et ensuite la tonalité. De
cette façon vos pouvez syntoniser
la musique à votre voix ou à votre
instrument en premier, ajuster le
tempo sans modifier le premier
réglage et ensuite faire des
ajustements mineurs à la tonalité si
nécessaire.
11. Bouton du VOLUME – Permet de
modifier le niveau de la sortie
principale du Vocalist Playmate.
12. Bouton de BALANCE – Permet de
modifier le ratio du volume de la
voix injectée et l’effet sélectionné
contre le volume du CD. Régler ce
bouton complètement à la droite
pour que le signal acheminé aux
sorties principales provienne à
100 % du CD. Régler ce bouton
complètement à la gauche pour
que le signal acheminé provienne
à 100 % de la partie vocale.
Lorsque le bouton est réglé à la
position centrale, les parties
vocales et audio sont mélangées à
50 %.
13. Bouton d’effet (EFFECT) –
Utilisez ce bouton à 16 positions
pour sélectionner un programme
d’effet du processeur vocal
numérique du Playmate Vocalist.
Lorsque vous mettez l’appareil
sous tension, vous avez
automatiquement accèss aux 16
effets de la banque A. Pour
accéder à la banque B, enfoncez
et maintenez la touche de
programmation (SET) et appuyez
sur le bouton MARCHE/ARRÊT
(ON/OFF). Les seize positions du
boutons d’effet (EFFECT) seront
maintenant assignés aux
programmes 17 32.
La banque A contient les effets
traditionnels tels que les
réverbérations et les délais. La
banque B offre des réverbérations,
des échos, des pitch shifters, des
distorsions et des effets spéciaux.
Veuillez voir le Guide de référence
des effets pour une description de
tous les effets.
14. Bouton du mix des effets
(EFFECT MIX) – Permet de
modifier le mixage du signal traité/
non traité de l’effet sélectionné de
0 % à 100 %. Réglez le bouton du
mix des effets (EFFECT MIX) vers
la droite pour augmenter la
quantité d’effet injectée dans le
signal. Réglez le bouton vers la
gauche pour diminuer la quantité
d’effet injecté.
Lorsque vous ajustez le bouton du
mix des effets (EFFECT MIX),
l’écran d’affichage indique le
pourcentage du signal traité/ non
traité.
15. Bouton d'élimination de la voix
(VOCAL CANCEL) – Élimine la
piste vocale principale du CD.
Vous devez tourner ce bouton en
même temps que vous l'enfoncez
pour pouvoir sélectionner le type
d'élimination vocale : Type 1,
Type 2, Type 3 et Arrêt (Off).
Selon le CD, vous trouverez un de
ces différents types d’élimination
efficaces.
16. Touche d'ouverture et de
fermeture (OPEN/CLOSE) –
Permet d’ouvrir et de fermer le
tiroir du lecteur de disque compact.
17. Touche de lecture répétée
(REPEAT) – Appuyez sur cette
touche à plusieurs reprises pour
passer en revue les quatre modes
de répétition:
• Piste (Track) – Fait la lecture
d'une piste puis s’arrête.
• Lecture répétée d’une piste
(Track Repeat) – Permet de faire la
lecture en boucle d'une piste.
• Disque (Disc) – Permet de faire
la lecture de la totalité du disque.
• Lecture répétée du disque (Disc
Repeat) – Permet de faire la
lecture en boucle de la totalité du
disque.
18. Bouton d’affichage de la durée
(TIME DISPLAY) – Appuyez sur
cette touche à plusieurs reprises
pour passer en revue les quatre
modes d’affichage de la durée.
• En mode Total, l'écran
d’affichage indique le temps
écoulé sur le disque.
• En mode temps restant total
(Total Remain), l'écran d’affichage
indique le temps restant sur le
disque.
• En mode piste (Single), l'écran
d’affichage indique le temps
écoulé de la piste en cours.
• En mode temps restant de la
piste (Single Remain), l'écran
d’affichage indique le temps
restant de la piste en cours.
17
18
Page 18

Fonctions de lecture en boucle
Les sujets 19 à 22 couvrent les
fonctions de lecture en boucle du
Playmate Vocalist. Ils vous
aideront à définir une section du
signal audio du CD que vous
aimeriez répéter indéfiniment. Le
Playmate Vocalist facilite la lecture
en boucle : Vous n’avez qu’à lui
indiquer les emplacements sur le
disque où vous aimeriez que la
boucle commence et s’arrête,
activer la boucle, et ensuite
chanter ou jouer sur la musique.
Voir la section « Créer une boucle »
pour plus d’information.
19. Touche de démarrage (START)
– Cette touche a deux fonctions :
Le réglage du point de départ de
la boucle et pour sauter
directement au point de départ de
la boucle. Pour régler le point de
départ de la boucle, enfoncez et
maintenez la touche de
programmation (SET) et appuyez
sur le bouton de démarrage
(START). Pour sauter directement
au point de départ de la boucle,
appuyez sur le bouton de
démarrage (START).
Lorsque vous insérez un disque, le
point de départ de la boucle est
automatiquement programmé au
début du disque (0:00:00).
20. Touche fin (END) – Cette touche
sert à deux fonctions également :
le réglage du point de fin de
boucle et pour sauter directement
au point de fin de boucle. Pour
régler le point de fin boucle,
enfoncez et maintenez la touche
de programmation (SET) et
appuyez sur la touche fin (END).
Pour sauter directement au point
de fin de boucle, appuyez sur la
touche fin (END).
Lorsque vous insérez un disque, le
point de fin de boucle est
automatiquement programmé à la
fin du disque.
21. Touche de programmation
(SET) – Utiliser en conjonction
avec les touches démarrage
(START) et fin (END) pour
programmer les points de départ
et de fin de boucle.
Il est possible d’utiliser la touche
de programmation (SET) en
conjonction avec la touche
MARCHE/ARRÊT (ON/OFF) pour
accéder à la banque B du
processeur d'effet (enfoncez et
maintenez la touche de
programmation et appuyez sur la
touche MARCHE/ARRÊT).
22. Touche MARCHE/ARRÊT
(ON/OFF) – Active et désactive la
lecture en boucle. Si vous appuyez
sur la touche MARCHE/ARRÊT
(ON/OFF) pendant la lecture en
boucle, la lecture en boucle sera
annulée et la lecture en continu du
disque reprendra.
Écran d’affichage
2
M
1
4
5
7
6
8
9
Caractéristiques de l'écran
d’affichage
1. Écran d’affichage – Lorsque vous
mettez l’appareil sous tension, les mots
« Alesis Playmate » apparaissent
quelques secondes. Il indique
également les choses suivantes:
• En mode de lecture normale, l’écran
affiche le programme d’effet en cours.
• Lorsque vous modifiez le réglage du
bouton du mix des effets (EFFECT
MIX), l’écran affiche le niveau d’effet
en cours. Ce niveau demeure à l’écran
pour quelques secondes après que
vous arrêtez de tourner le bouton.
• Lorsque vous appuyez sur le bouton
d'annulation de la voix, l’écran affiche
brièvement si le mode d’annulation de
la voix est activé ou désactivé.
2. Indicateur de numéro de piste
(TRACK NUMBER)
numéro de la piste en cours.
– Indique le
3. Indicateur de numéro de
programme (PROG NUMBER) –
Indique le numéro du programme
d’effet en cours.
4. Indicateur de lecture répétée
(REPEAT) – Indique le mode de
lecture répétée en cours:
• Piste (Track) – Fait la lecture d'une
piste puis s’arrête.
• Lecture répétée d’une piste (Track
Repeat) – Permet de faire la lecture en
boucle d'une piste.
3
18
Page 19

• Disque (Disc) – Permet de faire la
lecture de la totalité du disque.
• Lecture répétée du disque (Disc
Repeat) – Permet de faire la lecture en
boucle de la totalité du disque.
5. Affichage de la durée – Indique le
temps écoulé de la piste en cours.
6. Indicateur d’affichage de la
durée – Indique lequel des quatre
modes d'affichage est sélectionné :
Durée totale du disque (Total), temps
restant sur le disque (Total Remain),
durée de la piste (Single) ou temps
restant de la piste (Single Remain).
7. Indicateur de tonalité (PITCH) –
Indique les réglages en cours du
bouton de tonalité (PITCH).
8. Indicateur de vitesse (SPEED) –
Shows the current setting of the SPEED
knob.
9. Indicateur de transposition
(TRANS) – Indique les réglages en
cours du bouton de transposition
(TRANSPOSE).
Créer une boucle
1. Insérez un disque et appuyez sur
la touche de lecture (Play).
2. Utilisez la touche de recherche de
piste (Skip) pour passer à la piste
dans laquelle vous voudriez
insérer une boucle.
3. Écoutez la piste et notez l’endroit
où vous voudriez que la boucle
commence.
4. Utilisez la touche de balayage
pour atteindre quelques instants
avant la position où vous désirez
que la boucle commence. Vous
pouvez arrêter la lecture du disque
ou passer en mode pause pour
vous permettre un peu de temps
pour vous préparer.
5. Enfoncez et maintenez la touche
de programmation (SET).
6. Si le lecteur était en mode pause,
appuyez sur la touche
lecture/pause (PLAY/PAUSE) pour
recommencer la lecture. Lorsque le
disque atteint la position où vous
désirez que commence la boucle,
appuyez sur la touche de
démarrage (START) en maintenant
toujours la touche de
programmation enfoncée. Le point
de départ de la boucle est
maintenant programmé. Vous
pouvez en tout temps retourner au
point de départ de la boucle en
appuyant sur la touche de
démarrage (START).
7. Laissez le lecteur continuer la
lecture du disque ou utilisez la
touche de balayage pour atteindre
quelques instants avant la position
où vous désirez que la boucle
s’arrête.
8. Enfoncez et maintenez la touche
de programmation (SET).
9. Lorsque le disque atteint la
position où vous désirez que
s'arrête la boucle, appuyez sur la
touche fin (END) en maintenant
toujours la touche de
programmation enfoncée. Le point
d'arrêt de la boucle est maintenant
programmé. Vous pouvez en tout
temps retourner au point d’arrêt
de la boucle en appuyant sur la
touche fin (END).
10. Activez la lecture en boucle en
appuyant sur la touche
MARCHE/ARRÊT (ON/OFF). Le
Playmate Vocalist sauter
directement au point de départ de
la boucle tout en continuant la
lecture. Toutes les fois que le
lecteur atteint le point d'arrêt de la
boucle, il recommence la lecture
au point de départ de la boucle.
Pour désactiver la lecture en
boucle, appuyez de nouveau sur
la touche MARCHE/ARRÊT
(ON/OFF).
Guide de référence des effets
Type d’effet Numéro et nom Description
A: Classique
Réverbe Hall 1. Small Hall Correspond à la simulation d’une petite salle.
2. Medium Hall Correspond à la simulation d’une salle de grandeur
3. Large Hall Correspond à la simulation d’une grande salle.
4. Concert Hall Correspond à une simulation d’une plus grande
5. Reverse Reverb Une réverbe artificielle qui joue à l’envers et qu’on
moyenne.
salle avec un son plus chaud.
19
20
Page 20

Plate Reverb 6. Classic Plate Une réverbe inspirée de la Classic Plate produite
7. Modern Plate Simule une réverbe plus net et plus mince que
8. Future Plate Similaire à la Classic Plate, mais avec un son plus
9. Golden Plate Similaire à la Modern Plate, mais avec un son plus
10. Small Room Correspond à l’acoustique d’une petite pièce. Room Reverb
11. Medium Room Correspond au champ sonore d’une pièce de
12. Large Room Correspond au champ sonore large d’une grande
Delay 13. Echo 1 Ajoute un effet d’écho aux voix.
14. Echo 2 Un effet d’écho avec un plus grand délai que celui
15. Echo 3 Un effet d’écho avec un plus petit délai que celui
16. Tape Echo Imitation du classique tape delay créé en
entend avant le son original.
par les vibrations de plaques de métal.
celle de la classique.
large.
large.
grandeur moyenne.
pièce.
de l’Echo 1.
de l’Echo 1.
enregistrant le signal audio sur une cassette et en le
rejouant en tant qu’écho.
B: Radicales
Réverbes 17. Triggered Reverb Une réverbe qui est ajoutée uniquement lorsque le
18. Ducking Reverb Une réverbe dynamique. Le niveau de la réverbe
Echoes 19. Ducking Echo 1 Une version dynamique de l' Echo 1. Le niveau de
20. Ducking Echo 2 Une version dynamique de l' Echo 2.
Tonalité 21. Multi Chorus Augmente la profondeur des voix en simulant le
22. Schizo Chorus Un effet de cœur Schizo.
23. Easy Flange Modifie la tonalité du signal original à la hausse ou
24. Resonant Flange Un flange avec des variations plus marquées et plus
25. Stereo Rotary Le son classique d’une enceinte acoustique à effet
Distorsion 26. Walkie Talkie Ajoute de la distorsion à votre voix comme si vous
27. Distort & Phaser Un effet de distorsion combiné avec un effet phaser
28. Distort & Flange Un effet de distorsion combiné avec un effet flange.
Effets
spéciaux
30. Robovox & Reverb L’effet de voix robotique combiné avec une
31. Telephone
32. Decim8ed Filter Un effet de son de basse fidélité, rauque et
29. Robot Vocal Le nom en dit long; cet effet donne à votre voix un
Receiver
volume atteint un niveau précis.
diminue lorsque le niveau du signal entrant est
élevé et augmente lorsque le niveau du signal
entrant est bas.
la réverbe diminue lorsque le niveau du signal
entrant est élevé et augmente lorsque le niveau du
signal entrant est bas.
son de différente voix en même temps.
à la baisse en créant un effet de tourbillonnement.
rapides dans la tonalité.
Leslie d’un orgue.
parliez dans un walkie talkie.
pour créer un signal double avec un léger délai.
son électronique comme celle d’un robot.
réverbe.
Coupe les hautes et les basses fréquences pour que
votre voix soit comme au téléphone.
résonnant.
20
Page 21

Anschlussdiagram
Netz
Mikrophon
Kopfhörer
Zur Aufnahme
Digitale AudioWorkstation
Live
PA-System
IN GAIN
MICROPHONE
Schnellaufbau
1. Überprüfen Sie, dass sich alle auf
der Vorderseite dieser Anleitung
aufgeführten Teile in der
Verpackung des Playmate Vocalist
befinden.
2. Lesen Sie den Abschnitt „Wichtige
Sicherheitshinweise“.
3. Sehen Sie sich das obenstehende
Anschlussdiagramm genau an.
Einzelheiten über welche Kabel zu
verwenden sind, finden Sie im
nächsten Abschnitt.
4. Stellen Sie sicher, dass alle Geräte
und Instrumente ausgeschaltet und
alle Verstärkungsregler auf Null
stehen.
5. Schließen Sie Ihr Mikrophon
entweder an den XLR-Eingang
oder den 6.3 mm Direkteingang,
welche sich auf der Rückseite des
Playmate Vocalist befinden, an.
Hinweis: Der Playmate Vocalist
ermöglicht keine Phantomspeisung.
Versuchen Sie deshalb nicht,
Mikrophone, welche externe
Phantomspeisung benötigen, zu
verwenden.
6. Schließen Sie Ihren Kopfhörer an
eine der beiden PHONES-Buchsen
an. Sie können insgesamt zwei
Kopfhörersätze anschließen.
7. Um ein Signal an einen PA-
Verstärker, ein Mischpult oder
andere Geräte zu senden,
verbinden Sie die linken und
rechten OUTPUT-Buchsen des
Playmate Vocalist mit den
Eingängen des jeweiligen
Geräts mit 6.3 mm TRSSteckern. Um das Gerät an
Ihre Stereoanlage
anzuschließen, sollten Sie
sich 6.3mm-nach-RCA
Adapterstecker besorgen.
8. Schalten Sie zuerst den
Playmate Vocalist, dann die
anderen Geräte ein. Schalten Sie
ADAT
vorhandene Verstärker auf jeden
Fall zuletzt ein, um das Auftreten
plötzlicher
Rückkopplungsgeräusche, welche
die Lautsprecher beschädigen
könnten, zu vermeiden.
9. Bei Beenden des Betriebs, schalten
Sie zunächst vorhandene externe
Verstärker aus, bevor Sie den
Playmate Vocalist ausschalten oder
–stecken, um eine Beschädigung
externer Lautsprecher zu
vermeiden.
10. Besuchen Sie die Webseite
http://www.alesis.com um den
Playmate Vocalist zu registrieren.
Bedienungselemente Rückseite und
Anschlüsse
1. POWER – Hier wird das Gerät
ein- oder ausgeschaltet. Schalten
Sie das Gerät immer zuerst hier
aus, bevor Sie das Netzkabel
ausstecken.
2. Netzkabelanschluss (IEC-
Standard) – Stecken Sie hier das
mitgelieferte Netzkabel ein.
3. Spannungsschalter – Stellen Sie
hier die Stromspannung ein entweder 115V/60Hz (Amerika)
oder 230V/50Hz (Europa). Es ist
äußerst wichtig, dass die korrekte
Spannung gewählt wurde,
andernfalls könnten Sie den
Playmate Vocalist beschädigen.
Rückseite
2
4
1
IN GAIN
3
MICROPHONE
7
5
8
6
21
22
Page 22

4. MICROPHONE-Eingang – ein
XLR-Eingang, an welchen alle mit
XLR-Steckern ausgerüstete
Mikrophone angeschlossen
werden können.
5. DIRECT IN-Eingang – ein 6.3
mm Eingang für Instrumente.
Dieser Eingang sperrt die
eingebauten Effekte des Playmate
Vocalist und eignet sich daher
hervorragend, um Ihren
Synthesizer oder andere
Instrumente in den Mix
einzubringen.
6. Verstärkungsregler – Regelt die
Lautstärke des MICROPHONEEingangs. Drehen Sie diesen
Regler hoch, bis Sie einen lauten,
klaren Klang erzielen. Drehen Sie
ihn herunter, falls Verzerrung,
Rückkopplung, Clipping oder
übermäßiges Rauschen auftreten.
HINWEIS: Der Verstärkungsregler
ist nur für den MICROPHONEEingang zuständig, er beeinflusst
den DIRECT IN-Eingang in
keinster Weise.
7. PHONES – 6.3 mm
unsymmetrische Stereobuchsen
zum Anschluss von bis zu zwei
Kopfhörersätzen.
8. L und R OUTPUTS – 6.3mm TRS-
Stereoausgänge, um die linken
und rechten Signale an ein Gerät
wie z. B. ein Mischpult oder einen
Verstärker zu senden.
Oberseite des Playmate Vocalist
8
7
6
5
4
3
2
1
M
17
16
18
22
21
20
19
13
14
15
Bedienelemente des Playmate
Vocalist
1. Anzeige – Zeigt das momentane
Musikstück und Effektprogramm
an, die Länge der CD und
verschiedene andere Einstellungen.
Weitere Einzelheiten finden Sie im
Abschnitt “Anzeige-Elemente”.
2. Play/Pause-Taste – Spielt die CD
ab. Falls Sie diese Taste während
des Abspielens einer CD drücken,
wird diese unterbrochen, bis Sie
die Play/Pause-Taste wieder
drücken.
3. Stop-Taste – Beendet das
Abspielen einer CD.
4. Skip-Previous-Taste – Springt
zum Anfang des momentanen
Musikstücks oder zum vorherigen
Musikstück auf der CD.
5. Skip-Next-Taste – Springt zum
Anfang des nächsten Musikstücks
auf der CD.
6. Scan-Forward-Taste – Schnelle
Vorwärtssuche durch Abtasten des
momentanen Musikstücks. Halten
Sie diese Taste gedrückt, um mit
der Suche fortzufahren. Hold
down this button to continue
scanning.
7. Scan-Back-Taste – Schnelle
Rückwärtssuche durch Abtasten
des momentanen Musikstücks.
Halten Sie diese Taste gedrückt,
um mit der Suche fortzufahren.
PITCH-Regler – Dient zur
8.
Abstimmung des Klangs der CD.
Wenn Sie diesen Regler betätigen,
ändern sich sowohl die Tonhöhe
als auch die Geschwindigkeit des
Tons. Sie können die Tonhöhe bis
zu plus oder minus 8% verändern.
9. SPEED-Regler – Stimmt die
Geschwindigkeit oder das
Tempo des Tons der CD ab,
ohne die Tonhöhe zu
9
10
11
12
verändern. Sie können das
Tempo bis zu 50% vermindern
und bis zu 150% erhöhen.
10. TRANSPOSE-Regler – Hier
lässt sich der Tonschlüssel der
CD jeweils in HalbtonIntervallen verändern,
maximal sieben Halbtöne nach
oben oder nach unten, ohne
dass die Tongeschwindigkeit
verändert wird.
Der TRANSPOSE-Regler
verändert auch nicht die
Abstimmung des Tons. Falls
Sie, z. B. den Ton mit dem PITCHRegler genau auf 5% abstimmen
und dann den Ton um 4 Halbtöne
nach oben verändern, wird der
Ton vier Halbtöne höher sein und
22
Page 23

die Tonhöhe genau 5% betragen.
TIP: Es empfiehlt sich, das
Musikstück zuerst auf den
passenden Tonschlüssel
einzustellen, dann die
Geschwindigkeit und zuletzt die
Tonhöhe anzupassen. Auf diese
Weise können Sie die Musik
zunächst Ihrer Stimme oder Ihrem
Instrument anpassen, das Tempo
einstellen, ohne die Abstimmung
zu beeinflussen und schließlich,
falls erforderlich,
Feinabstimmungen in der
Tonhöhe vornehmen.
11. VOLUME-Regler – Hier lässt sie
die Lautstärke der Hauptausgabe
des Vocalist Playmate einstellen.
12. BALANCE-Regler – Dieser dient
zur Regelung des Verhältnisses
zwischen der Lautstärke der
eingehenden Stimme (zusammen
mit dem gewählten Effekt) und der
Lautstärke der CD. Wenn Sie
diesen Regler ganz nach rechts
drehen, enthalten die
Hauptausgänge 100% CD-Ton.
Wenn ganz nach links gedreht
wird, wird 100% Stimme
ausgegeben. Falls der Regler in der
mittleren Position steht, werden
CD und Stimme im Verhältnis
50:50 gemischt.
13. EFFECT-Regler – Dieser Regler
mit 16 Stellungen dient zur
Auswahl eines Effektprogramms
aus dem digitalen Stimmprozessor
des Playmate Vocalist.
Sobald Sie das Gerät einschalten,
haben Sie automatisch Zugang zu
den 16 Effekten in Bank A. Um auf
Bank B zugreifen zu können,
drücken Sie die SET-Taste und
halten diese gedrückt, während Sie
die EIN/AUS-Taste drücken. Die
sechzehn Stellungen des EFFECTReglers werden dann den
Programmen 17-32 zugeordnet.
Bank A enthält herkömmliche
Effekte wie Reverbs und
Verzögerungen. Bank B bietet
einige originelle Reverbs, Echos,
Tonhöhenverschiebungen,
Verzerrungen und Spezialeffekte.
Für eine Beschreibung aller Effekte
lesen Sie den Abschnitt
Kurzbeschreibung der Effekte.
14. EFFECT MIX-Regle – Stimmt den
“Wet/Dry-Mix” des gewählten
Effekts zwischen 0% und 100% ab.
Drehen Sie den EFFECT MIX-
Regler nach rechts, um den Anteil
des Effekts im Signal zu erhöhen.
Drehen Sie den Regler nach links,
um den Anteil zu vermindern.
Die Anzeige zeigt den Prozentsatz
des “Wet/Dry-Mix“ während Sie
den EFFECT MIX-Regler betätigen,
an.
15. VOCAL CANCEL-Taste – blendet
die Hauptstimme der CD aus.
Wenn Sie diese Taste mehrmals
drücken, erscheinen nacheinander
die Ausblendmöglichkeiten Typ 1,
Typ 2, Typ 3 und Stimme Aus.
Welche der drei Typen Sie am
wirkungsvollsten finden, hängt
von der jeweiligen CD ab.
16. OPEN/CLOSE-Taste – Öffnet und
schließt die Einlegevorrichtung für
die CD.
17. REPEAT-Taste – Drücken Sie
diese Taste mehrmals um
nacheinander die vier
Wiederholungsmöglichkeiten
abzurufen:
• Track – Spielt ein Musikstück ab
und hält dann an.
• Track Repeat – Spielt ein
Musikstück ab und wiederholt es,
immer wieder.
• Disc – Spielt die gesamte CD ab
und hält dann an.
• Disc Repeat – Spielt die
gesamte CD ab und wiederholt
dies immer und immer wieder.
18. TIME DISPLAY-Taste – Drücken
Sie diese Taste mehrmals um
nacheinander die vier Optionen
der Zeitanzeige abzurufen.
• Anzeige “Total” – Anzeige zeigt
die bereits abgespielte Zeit der
gesamten CD an.
• Anzeige “Total Remain” –
Anzeige zeigt die bis zum Ende
der CD verbleibende Abspielzeit
an.
• Anzeige “Single” – Anzeige
zeigt die bereits abgespielte Zeit
des momentanen Musikstücks an.
• Anzeige “Single Remain” –
Anzeige zeigt die noch
verbleibende Abspielzeit für das
momentane Musikstück an.
23
24
Page 24

Looping-Optionen
Die Punkte 19 – 22 beschäftigen
sich mit den Looping-Optionen
des Playmate Vocalist. Diese
funktionieren in Verbindung
miteinander, um es Ihnen zu
ermöglichen, einen bestimmten
Bereich der CD unbegrenzt oft zu
wiederholen. Mit dem Playmate
Vocalist ist Looping einfach: geben
Sie einfach die Start- und
Endpunkte auf der CD für das
Loop ein, schalten Sie das Loop
ein und begleiten Sie es dann mit
Stimme oder Instrument.
Für weitere Einzelheiten lesen Sie
bitte “Aufbau eines Loops”.
19. START-Taste – Diese Taste hat
zwei Funktionen: Einstellung des
Loop-Starts und zum Loop-Start
springen. Um den Loop-Start
einzustellen, halten Sie die SETTaste gedrückt und drücken
gleichzeitig START. Um zum LoopStart zu springen, drücken Sie
einfach START.
Wird eine CD zum ersten Mal
eingelegt, wird der Loop-Start
automatisch auf den Beginn der
CD gesetzt (0:00:00).
20. END-Taste – Diese Taste hat
ebenfalls zwei Funktionen:
Einstellung des Loop-Endes und
zum Loop-Ende springen. Um das
Loop-Ende einzustellen, halten Sie
die SET-Taste gedrückt und
drücken gleichzeitig END. Um
zum Loop-Ende zu springen,
drücken Sie einfach END.
Wird eine CD zum ersten Mal
eingelegt, wird das Loop-Ende
automatisch auf das Ende der CD
gesetzt.
21. SET-Taste – Wird in Verbindung
mit den Tasten START und END
verwendet, um Loop-Start und
Loop-Ende zu setzen.
Sie können die SET-Taste auch in
Verbindung mit der ON/OFF-Taste
verwenden, um auf Bank B des
Effektprozessors zuzugreifen
(drücken Sie OFF/ON während Sie
die SET-Taste gedrückt halten).
22. ON/OFF-Taste – Schaltet das
Loop ein oder aus. Falls das Loop
abgespielt wird, wenn Sie ON/OFF
drücken, dann spielt die CD weiter
bis an das Ende des Loops anstatt
an den Startpunkt des Loops
zurückzukehren.
Anzeige
2
M
1
4
5
7
6
8
9
Anzeige-Elemente
1. Bildschirm – Wenn Sie das Gerät
einschalten, erscheint für wenige
Sekunden “Alesis Playmate” auf dem
Bildschirm. Die weiteren Funktionen
sind:
• Während des normalen
Abspielbetriebs, zeigt der Bildschirm
das momentan gewählte
Effektprogramm an.
• Wenn Sie den Regler EFFECT MIX
betätigen, zeigt der Bildschirm den
momentanen Effektpegel an. Dieser
Pegel verbleibt auf dem Bildschirm für
wenige Sekunden nach Betätigung des
Reglers.
• Wenn Sie die Taste VOCAL CANCEL
drücken, zeigt der Bildschirm für einen
kurzen Moment an, ob
Stimmausblendung ein- oder
ausgeschaltet ist.
2. TRACK NUMBER-Anzeige – Zeigt
die Nummer des momentan gewählten
Musikstücks an.
3. PROG NUMBER-Anzeige – Zeigt
die Nummer des momentan gewählten
Effektprogramms an.
4. REPEAT-Anzeige – Zeigt die
momentane Wiederholungs-Option an:
• Track – Spielt ein Musikstück ab und
hält dann an.
• Track Repeat – Spielt ein Musikstück
ab und wiederholt es, immer wieder.
• Disc – Spielt die gesamte CD ab und
hält dann an.
• Disc Repeat – Spielt die gesamte CD
ab und wiederholt dies immer und
immer wieder.
5. Zeitanzeige – Zeigt die momentane
Abspielzeit an.
6. Zeitartanzeige – Zeigt an, welche
der vier Zeitanzeigearten momentan
verwendet wird: Total, Total Remain,
Single oder Single Remain.
3
24
Page 25

7. PITCH-Anzeige – Zeigt die
momentane Einstellung des PITCHReglers an.
8. SPEED-Anzeige – Zeigt die
momentane Einstellung des SPEEDReglers an.
9. TRANS-Anzeige – Zeigt die
momentane Einstellung des
TRANSPOSE-Reglers an.
Aufbau eines Loops
1. Legen Sie eine CD ein und
drücken Sie Play.
2. Verwenden Sie die Skip-Taste, um
an die Stelle des Musikstücks zu
gelangen, wo Sie das Loop
gestalten möchten.
3. Hören Sie das Musikstück ab und
notieren Sie sich die Stelle, wo Sie
das Loop starten möchten.
4. Verwenden Sie die Scan-Taste, um
zu einem Punkt, welcher wenige
Momente vor dem Startpunkt Ihres
Loops liegt zu gelangen. Sie
können die CD weiterspielen
lassen oder mit Pause anhalten,
um etwas Vorbereitungszeit zu
gewinnen.
5. Drücken Sie die SET-Taste und
halten Sie diese gedrückt.
6. Falls Sie die CD mit Pause
angehalten haben, drücken Sie
PLAY/PAUSE um mit dem
Abspielen fortzufahren. Sobald die
CD den Punkt, an welchem Sie
das Loop starten möchten, erreicht,
drücken Sie die START-Taste,
während Sie die SET-Taste
gedrückt halten. Der Loop-Start ist
nun festgelegt. Sie können nun
jederzeit zum Loop-Start
zurückkehren, indem Sie die
START-Taste drücken.
7. Lassen Sie die CD weiter abspielen,
oder verwenden Sie die Scan-Taste,
um an einen Punkt, welcher
wenige Momente vor Ihrem
beabsichtigten Loop-Ende liegt, zu
gelangen.
8. Drücken Sie die SET-Taste und
halten Sie diese gedrückt.
9. Wenn die CD den Punkt, an
welchem Sie das Loop-Ende
beabsichtigen, erreicht hat,
drücken Sie die END-Taste,
während Sie die SET-Taste
gedrückt halten. Das Loop-Ende ist
nun festgelegt. Sie können nun
jederzeit zum Loop-Ende
zurückkehren, indem Sie die ENDTaste drücken.
10. Schalten Sie das Loop mit der
ON/OFF-Taste ein. Der Playmate
Vocalist wird zum Loop-Start
springen, ohne das Abspielen zu
unterbrechen. Jedes Mal, wenn das
Loop-Ende erreicht wird, springt er
automatisch wieder zum LoopStart zurück.
Um das Loop wieder
auszuschalten, drücken Sie die
ON/OFF-Taste erneut.
Kurzbeschreibung der Effekte
Effektart Nummer und
Bezeichnung
Beschreibung
Herkömmliche Effekte
Hall-Reverb 1. Kleiner-Hall Simuliert den Hall einer kleinen Konzerthalle.
2. Mittlerer Hall Simuliert den Hall einer mittelgroßen Konzerthalle.
3. Großer Hall Simuliert den Hall einer großen Konzerthalle.
4. Konzert Hall Ein etwas wärmerer und noch etwas größerer Hall
5. Umkehr-Reverb Ein Reverb, welches umgekehrt abgespielt wird
Plate-Reverb 6. Klassisches Plate Eine Neuauflage des klassischen “Plate-Reverb”,
7. Modernes Plate Hellere und dünnere Klangfarbe als das Klassische
8. Future Plate Ähnlich wie das Klassische Plate, klingt aber
Reverb.
und vor anstelle von nach dem Originalton
erscheint.
welches durch vibrierende Metallplatten erzeugt
wird.
Plate.
25
26
Page 26

9. Golden Plate Ähnlich wie das Moderne Plate, klingt aber größer.
10. Kleiner Raum Simuliert die Akustik eines kleinen Raumes. Raum-Reverb
11. Mittlerer Raum Simuliert die Akustik eines mittelgroßen Raumes.
12. Großer Raum Das klangvolle Reverb eines großen Raumes.
Verzögerung 13. Echo 1 Fügt Ihrer Stimme ein Echo hinzu.
14. Echo 2 Ein Echo mit einer längeren Verzögerungsspanne
15. Echo 3 Ein Echo mit einer kürzeren Verzögerungsspanne
16. Tape Echo Imitiert die klassische Bandverzögerung, welche
größer.
als das Echo 1.
als das Echo 1.
durch die Tonaufnahme auf Band entsteht und gibt
diese als Echo wieder.
Radical
Reverbs 17. Ausgelöstes Reverb Ein Reverb, welches erst dann einsetzt, wenn ein
18. Ducking Reverb Ein “ducking” Reverb. Der Pegel des Reverbs
Echos 19. Ducking Echo 1 Eine Ducking-Version des Echo 1. Der Echopegel
20. Ducking Echo 2 Eine Ducking-Version des Echo 2.
Tonhöhe 21. Multi Chorus Lässt Ihre Stimme voll klingen, indem die
22. Schizo Chorus Ein “wahnsinniger” Choreffekt.
23. Easy Flange Verschiebt die Tonhöhe des ursprünglichen Signals
24. Resonant Flange Ein Flange mit weiteren und schnelleren
25. Stereo Rotary Der klassische Klang eines Rotary Speakers einer
Verzerrung 26. Walkie Talkie Verzerrt Ihre Stimme, als ob Sie durch ein
27. Distort & Phaser Ein Verzerreffekt, kombiniert mit einem Phaser,
28. Distort & Flange Verzerrung kombiniert mit einem Flange-Effekt.
Spezialeffekte 29. Roboter Stimme Wie der Name schon sagt; dieser Effekt verleiht
30. Robovox & Reverb Die Roboterstimme mit einem zusätzlichen Reverb.
31. Telefonhörer Nimmt die Höhen und Tiefen heraus, sodass Ihre
32. Dezimierter Filter Ein extremer Low-fi, harscher und mitschwingender
bestimmter Lautstärkepegel erreicht ist.
verringert sich bei lautem Eingangspegel und
erhöht sich, wenn dieser leise ist.
verringert sich, wenn der Eingangspegel laut ist
und wird verstärkt, wenn dieser leise ist.
Nachahmungen mehrerer Stimmen auf einmal
hinzugefügt werden.
nach oben und unten, was einen wirbelnden Effekt
erzeugt.
Verschiebungen der Tonhöhe.
Orgel.
Funkgerät singen.
welcher ein Doppelsignal erzeugt und dieses leicht
verzögert.
Ihrer Stimme einen elektronischen, Roboterähnlichen Klang.
Stimme klingt, als ob Sie am Telefon sprechen.
Effekt.
26
Page 27

g
Schema
p
y
t
collegamenti
Sorgente
d’alimentazi
Microfono
IN GAIN
MICROPHONE
Cuffie
Per la
re
istrazione
Stazione Audio
Digitale
Live
Sistema di
diffusione
sonora
Impostazione rapida
1. Assicuratevi che tutti gli elementi
elencati sul frontespizio di questo
manuale siano inclusi nella
confezione del Playmate Vocalist.
2. Leggete le Importanti Istruzioni di
Sicurezza.
3. Esaminate attentamente lo schema
dei collegamenti. Fate riferimento
al prossimo paragrafo per maggiori
dettagli su quali cavi utilizzare.
4. Assicuratevi che tutti i dispositivi e
gli strumenti siano spenti e che le
manopole di guadagno siano
impostate a "zero".
5. Collegate il microfono all’ingresso
XLR o all’ingresso diretto da 1/4”
situato sul pannello posteriore del
Playmate Vocalist.
Nota bene: il Playmate Vocalist
non è dotato di alimentazione
phantom. Non cercate di servirvi
di microfoni che richiedano
un’alimentazione phantom esterna.
6. Collegare le cuffie ad uno dei jack
CUFFIE (PHONES). È possibile
collegare due set di cuffie.
7. Per far uscire il segnale ad un
amplificatore PA, un mixer o altri
dispositivi, collegare i jack di
USCITA destro e sinistro del
Playmate Vocalist agli ingressi
dell’apparecchio, servendosi di
prese TRS da 1/4”. Per collegare il
vostro stereo, sarà necessario
acquistare degli adattatori da 1/4”
a RCA.
8. Accendere il Playmate Vocalist
per primo, seguito dal resto
dell’equipaggiamento.
Assicurarsi di accendere gli
amplificatori per ultimi per
evitare “clic” che potrebbero
danneggiare gli altoparlanti.
9. Una volta terminato,
spegnere innanzitutto gli
amplificatori esterni—prima
di spegnere o scollegare il
Playmate Vocalist—per evitare che
vengano danneggiati.
10. Recarsi sul sito
http://www.alesis.com per la
registrazione del Playmate Vocalist.
Caratteristiche pannello posteriore
e Dettagli di connessione
1. POWER – Accende e spegne
l’apparecchio. Servirsi sempre di
questo tasto per spegnere
l’apparecchio prima di rimuovere
il cavo di alimentazione.
2. Connettore cavo di
alimentazione IEC – Inserire qui
il cavo di alimentazione fornito
con l’apparecchio.
3. Interruttore del voltaggio –
Regola il voltaggio da 115V/60Hz
(Americano) a 230V/50Hz
(Europeo). È importante che
questo sia impostato al giusto
voltaggio; in caso contrario,
potreste danneggiare il Playmate
Vocalist.
4. Ingresso MICROFONO –
Ingresso XLR che accetta qualsiasi
microfono dotato di una presa XLR.
5. Ingresso DIRECT IN – Ingresso
da 1/4” per lo strumento. Questo
ingresso bypassa la sezione effetti
del Playmate Vocalist ed è perfetto
per aggiungere il vostro
sintetizzatore o un altro strumento
nel mix.
Pannello posteriore
2
4
1
IN GAIN
3
MICROPHONE
7
5
8
6
27
28
Page 28

t
6. Manopola di guadagno (Gain)
– Controlla il guadagno
dell’ingresso MICROFONO. Girare
questa manopola fino a percepire
un suono forte e chiaro.
Abbassatela in caso di distorsione,
reazione, clipping o sibilo
eccessivo.
NOTA BENE: la manopola Gain
funziona solo con l’ingresso
MICROFONO; non influisce
sull’ingresso DIRECT IN.
7. CUFFIE – Jack stereo 1/4” non
bilanciati per il collegamento di
due set di cuffie.
8. USCITE L e R – Uscite TRS stereo
da 1/4” TRS per convogliare i
segnali di sinistra e di destra ad
un’apparecchiatura quale un mixer
o un amplificatore.
Parte superiore del Playmate Vocalis
8
7
6
5
4
3
2
1
M
17
16
18
22
21
20
19
14
15
12
13
Caratteristiche del Playmate
Vocalist
1. Display – Mostra la traccia e il
programma di effetti correnti, il
tempo del CD e diverse altre
impostazioni. Per maggiori dettagli,
fare riferimento al paragrafo
“Caratteristiche del Display”.
2. Tasto Play/Pause – Avvia la
riproduzione del CD. Premendo
questo tasto durante la
riproduzione del CD, questa verrà
interrotta temporaneamente, fino a
quando non venga premuto
nuovamente Play/Pause.
3. Tasto Stop – Ferma la
riproduzione di un CD.
4. Tasto Skip Previous – Salta
all’inizio della traccia in corso,
oppure alla traccia precedente sul
CD.
5. Tasto Skip Next – Salta all’inizio
della canzone successiva sul CD.
6. Tasto Scan Forward – Scorre in
avanti lungo la canzone in corso.
Mantenere la pressione del tasto
per continuare lo scorrimento.
7. Tasto Scan Back – Scorre
all’indietro lungo la canzone in
corso. Mantenere la pressione del
tasto per continuare lo scorrimento.
8. Manopola PITCH – Regola la
sintonia del CD audio. Girando
questa manopola, si ha effetto sul
pitch e sulla velocità dell’audio. È
possibile regolare il pitch fino a
+/- 8%.
9. Manopola SPEED – Regola la
velocità, o tempo, del CD audio
senza incidere sul pitch. È
possibile diminuire il tempo fino al
50% ed aumentarlo fino al 150%.
10. Manopola TRANSPOSE –
Modifica la chiave del CD
audio a intervalli di un
9
10
11
semitono, con un massimo di
sette semitoni in crescendo o
in calando, senza che venga
interessata la velocità
dell’audio.
Neanche la manopola
TRANSPOSE influisce sulla
sintonia audio. Ad esempio,
supponiamo che sintonizziate
l’audio al 5% diesis
servendovi della manopola
PITCH. Se in seguito
trasponete l’audio di quattro
semitoni in crescendo,
saranno quattro semitoni più
5% diesis.
SUGGERIMENTO:
raccomandiamo di trasporre una
canzone prima nella chiave
appropriata, e quindi di regolare la
velocità, seguita dal pitch. In
questo modo potrete accordare la
musica alla vostra voce o al vostro
strumento, regolare il tempo senza
influenzare questo accordo, quindi
eseguire delle regolazioni minori
del pitch, se necessario.
11. Manopola VOLUME – Regola il
volume dell’uscita master del
Vocalist Playmate.
12. Manopola BALANCE – Controlla
il rapporto del volume della parte
28
Page 29

vocale in ingresso (con l’effetto
selezionato) rispetto al volume del
CD audio. Girando questa
manopola completamente a destra,
le uscite principali conterranno il
100% CD audio. Girandola
completamente a sinistra, le uscite
conterranno il 100% vocale.
Quando la manopola si trova in
posizione centrale, la parte vocale
e il CD audio verranno missati
equamente al 50% ciascuno.
13. Manopola EFFECT – Girare
questa manopola da 16 posizioni
per selezionare un programma
effetti dal processore vocale
digitale del Playmate Vocalist.
Quando viene acceso
l’apparecchio, automaticamente
viene garantito l’accesso ai 16
effetti del Banco A. Per accedere al
Banco B, premere il tasto SET
mantenendo la pressione, e
schiacciare il tasto ON/OFF. Le
sedici posizioni della manopola
EFFECT verranno mappate con i
programmi 17 – 32.
Il Banco A contiene gli effetti
tradizionali, quali i riverberi e gli
effetti ritardati (delay). Il Banco B
offre alcuni riverberi, eco,
convertitori del pitch, distorsioni
ed effetti speciali inventivi. Vedi la
Guida agli effetti per la descrizione
di tutti gli effetti.
14. Manopola EFFECT MIX –
Controlla il missaggio wet/dry
dell’effetto selezionato dallo 0% al
100%. Girare la manopola EFFECT
MIX verso destra per aumentare la
quantità di effetti nel segnale.
Girare la manopola a sinistra per
diminuirla.
A Display verrà visualizzata la
percentuale del missaggio wet/dry
man mano che viene girata la
manopola EFFECT MIX.
15. Tasto VOCAL CANCEL – elimina
la traccia vocale principale dal CD.
Premendo questo tasto, passerete
attraverso i tipi di cancellazione
vocale Tipo 1, Tipo 2, Tipo 3 e Off
vocal. A seconda del CD specifico,
scoprirete quale dei tipi sia
maggiormente efficace.
16. Tasto OPEN/CLOSE – Apre e
chiude il vassoio porta-CD.
17. Tasto REPEAT – Premere questo
tasto ripetutamente per passare
attraverso le quattro opzioni di
ripetizione (Repeat):
• Track – Riproduce una traccia e
s’interrompe.
• Track Repeat – Riproduce una
traccia, e la ripete all’infinito.
• Disc – Riproduce il disco e
s’interrompe.
• Disc Repeat – Riproduce il
disco e lo ripete all’infinito.
18. Tasto TIME DISPLAY – Premere
questo tasto ripetutamente per
passare attraverso le quattro
opzioni di visualizzazione del
tempo (Time Display).
• In modalità Total, il Display
visualizza il tempo trascorso sul
CD.
• In modalità Total Remain, il
Display visualizza il tempo
rimanente fino alla fine del CD.
• In modalità Single, il Display
visualizza il tempo trascorso nella
traccia in corso.
• In modalità Single Remain, il
Display visualizza il tempo
rimanente nella traccia in corso.
Caratteristiche del Looping
Gli elementi 19 – 22 trattano delle
caratteristiche di looping del
Playmate Vocalist. Queste
funzionano insieme per
permettervi di definire una sezione
del CD audio che desiderate
ripetere indefinitamente. Il
Playmate Vocalist rende il looping
facile: basta indicargli le posizioni
sul CD in cui desiderate far
iniziare e terminare il loop, attivare
il loop, e quindi cantare o suonare
insieme.
Vedi “Creare un Loop” per
maggiori informazioni.
19. Tasto START – Questo tasto ha
due funzioni: impostare il punto
d’inizio del Loop e saltare al punto
d’inizio del Loop. Per impostare il
punto d’inizio del Loop, tenere
premuto il tasto SET e premere
START. Per saltare al punto
d’inizio del Loop, premere
semplicemente START.
La prima volta che viene inserito
un CD, il punto d’inizio del Loop
viene impostato automaticamente
all’inizio del disco (0:00:00).
29
30
Page 30

20. Tasto END – Anche questo tasto
ha due funzioni: impostare il
punto terminale del Loop e saltare
al punto terminale del Loop. Per
impostare il punto terminale del
Loop, tenere premuto il tasto SET
e premere END. Per saltare al
punto d’inizio del Loop, premere
END.
La prima volta che viene inserito
un CD, il punto d’inizio del Loop
viene impostato automaticamente
alla fine del disco.
21. Tasto SET – Viene usato
unitamente ai tasti START ed END
per impostare i punti d’inizio e
terminale del Loop.
Si può anche usare il tasto SET
unitamente al tasto ON/OFF per
accedere al Banco B del
processore di effetti (schiacciare
OFF/ON tenendo premuto SET).
22. Tasto ON/OFF – Abilita e
disabilita il loop. Se al momento di
schiacciare ON/OFF il loop sta
suonando, il CD continuerà a
suonare fino alla fine del loop
anziché ritornare al punto d’inizio
del Loop.
Display
2
M
1
4
5
7
6
8
9
Caratteristiche del Display
1. Schermo – All’accensione
dell’apparecchio, lo schermo visualizza
la scritta “Alesis Playmate” per alcuni
secondi. Farà anche quanto segue:
• Durante la normale modalità di
riproduzione, lo schermo visualizza il
programma di effetti attualmente
selezionato.
• Quando si gira la manopola EFFECT
MIX, lo schermo mostra il livello
attuale dell’effetto. Questo livello
rimane sullo schermo per alcuni
secondi dopo che avrete smesso di
girare la manopola.
• Quando viene premuto il tasto
VOCAL CANCEL, lo schermo indica
brevemente se la modalità Vocal
Cancel è accesa o spenta.
2. Indicatore TRACK NUMBER –
Mostra il numero della traccia
selezionata.
3. Indicatore PROG NUMBER–
Mostra il numero del programma di
effetti selezionato.
4. Indicatore REPEAT– Mostra
l’attuale modalità Repeat:
• Track – Riproduce una traccia e
s’interrompe.
• Track Repeat – Riproduce una traccia
e la ripete, ininterrottamente.
• Disc – Riproduce il disco e
s’interrompe.
• Disc Repeat – Riproduce il disco e lo
ripete, ininterrottamente.
5. Time Display – Mostra il tempo di
riproduzione attuale.
Indicatore Time Display – Indica
6.
quale delle quattro modalità di
visualizzazione del tempo è quella in
corso: totale, totale rimanente, singolo,
singolo rimanente (Total, Total Remain,
Single or Single Remain).
7. Indicatore PITCH – Mostra
l’impostazione corrente della manopola
PITCH.
8. Indicatore SPEED – Mostra
l’impostazione corrente della manopola
SPEED.
9. Indicatore TRANS – Mostra
l’impostazione corrente della manopola
3
TRANSPOSE.
Creare un Loop
1. Inserire un CD e premere Play.
2. Servitevi del tasto Skip per passare
alla traccia a livello della quale
desiderate creare il loop.
3. Ascoltate la traccia e annotate il
punto in cui desiderate far iniziare
il loop.
4. Servitevi del tasto Scan per
raggiungere un punto situato
pochi attimi prima di quello in cui
desiderate far avviare il loop.
Potete far continuare la
riproduzione del CD, oppure
metterlo in pausa per concedervi il
tempo di preparazione.
5. Premere il tasto SET e mantenere
la pressione.
6. Se avete messo in pausa il CD,
premete PLAY/PAUSE per far
riprendere la riproduzione.
Appena il CD raggiunge il punto
in cui desiderate far iniziare il loop,
premete il tasto START tenendo
30
Page 31

schiacciato il tasto SET. Il punto
d’inizio del Loop ora è stato
impostato. Adesso potrete tornare
al punto d’inizio del Loop in
qualsiasi momento premendo
START.
7. Lasciate che il CD continui a
suonare, o servitevi del tasto Scan
per passare ad un punto situato
poco prima di dove desiderate far
terminare il loop.
8. Premere il tasto SET mantenendo
la pressione.
9. Quando il CD raggiunge il punto
in cui desiderate far terminare il
loop, schiacciate il tasto END
tenendo premuto il tasto SET. Il
punto terminale del Loop ora è
stato impostato. Potrete tornare al
punto terminale del Loop in
qualsiasi momento premendo END.
10. Abilitate il loop premendo il tasto
ON/OFF. Il Playmate Vocalist
salterà al punto d’inizio del Loop
continuando a suonare. Ogni volta
che raggiungerà il punto terminale
del Loop, tornerà indietro al punto
d’inizio del Loop.
Per disabilitare il loop, premere
nuovamente il tasto ON/OFF.
Istruzioni Rapide Effetti
Tipo di
Effetto
Numero e Nome Descrizione
Convenzionali
Hall Reverb 1. Small Hall Simula il suono di una piccola sala concerti.
2. Medium Hall Simula una sala concerti di medie dimensioni.
3. Large Hall Simula una grande sala concerti.
4. Concert Hall Effetto di riverbero da sala concerti più caldo e
5. Reverse Reverb Effetto di riverbero che suona al contrario e viene
Plate Reverb 6. Classic Plate Una riproduzione del classico “plate reverb”
7. Modern Plate Più intenso e sottile del Classic Plate.
8. Future Plate Simile al Classic Plate, ma con un sonoro più
9. Golden Plate Simile al Modern Plate, ma con un sonoro più
10. Small Room Simula l’acustica di una piccola stanza. Room Reverb
11. Medium Room Simula l’acustica di una stanza di medie dimensioni.
12. Large Room Il riverbero dal suono pieno di una stanza di grandi
Delay 13. Echo 1 Aggiunge un eco alla parte vocale.
14. Echo 2 Un eco con tempi di effetto ritardato più lunghi
15. Echo 3 Un eco con tempi di effetto ritardato più brevi
16. Tape Echo Imita il classico effetto ritardato del nastro creato
perfino più ampio.
prima anziché dopo il suono originale.
prodotto facendo vibrare piatti di metallo.
ampio.
ampio.
dimensioni.
dell’Echo 1.
dell’Echo 1.
registrando l’audio su nastro e facendolo suonare
nuovamente come eco.
31
32
Page 32

Riverberi 17. Triggered Reverb Un effetto di riverbero che non sfonda fino a
18. Ducking Reverb Un effetto di riverbero caratterizzato dal “ducking”.
Eco 19. Ducking Echo 1 Una versione con ducking dell’Echo 1. Il livello
20. Ducking Echo 2 Una versione con ducking dell’Echo 2.
Pitch 21. Multi Chorus Aggiunge pienezza alle vostre parti vocali
22. Schizo Chorus Un frenetico effetto chorus.
23. Easy Flange Sposta il pitch del segnale originale verso l’alto e
24. Resonant Flange Un effetto di flange con spostamenti del pitch più
25. Stereo Rotary Il classico suono di un altoparlante rotante di un
Distorsione 26. Walkie Talkie Distorce la tua voce in modo tale che sembri che tu
27. Distort & Phaser Un effetto di distorsione combinato con un phaser,
28. Distort & Flange Distorsione combinata con un effetto di flange.
Effetti Speciali 29. Robot Vocal Il nome dice tutto; questo effetto conferisce alla
30. Robovox & Reverb L’effetto Robot Vocal con l’aggiunta di un riverbero.
31. Telephone
Receiver
32. Decim8ed Filter Un effetto a frequenze estremamente low-fi, duro e
Radicali
quando non viene raggiunto una determinata soglia
di volume.
Il livello del riverbero diminuisce quando l’ingresso
è forte e aumenta quando è più silenzioso.
dell’eco diminuisce quando l’ingresso è forte ed
aumenta quando è più silenzioso.
emulando il suono di numerose voci allo stesso
tempo.
verso il basso, creando un effetto vorticante.
ampi e più rapidi.
organo.
stia cantando tramite un walkie talkie.
che crea un segnale duplicato e lo ritarda
leggermente.
vostra voce un tono metallico, robotico.
Taglia gli alti e i bassi, suonate come se steste
parlando al telefono.
risonante.
7-51-0171-A
32
 Loading...