


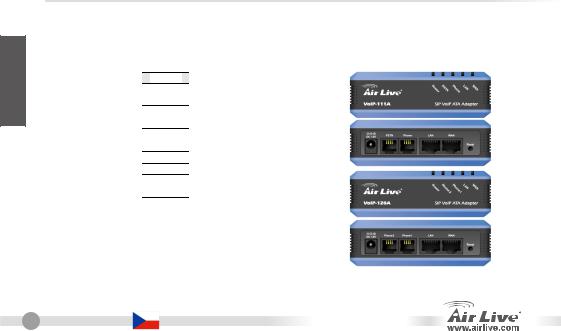
VoIP-111A/120A
SIP VoIP ATA Adapter
Table of Contents |
|
List of Languages |
|
English ................ |
1 |
Česky |
|
................... |
11 |
Deutsch............... |
20 |
Ελληνικός............ |
29 |
Français............... |
38 |
Italiano................ |
47 |
VoIP-111A / 120A
Magyar................
Polski ..................
Slovensky.............
56
65
74
Declaration of Conformity
We, Manufacturer/Importer
OvisLink Corp.
5F., NO.6, Lane 130, Min-Chuan Rd., Hsin-Tien City, Taipei County, Taiwan
Declare that the product
SIP VoIP ATA Adapter
AirLive VoIP-111A, VoIP-120A is in conformity with
In accordance with 89/336 EEC-EMC Directive and 1999/5 EC-R & TTE Directive
Clause |
Description |
■ EN 55022:1998/A1: 1995/A2:1997 |
Limits and methods of measurement of radio disturbance characteristics of information technology equipment |
■ EN 61000-3-2:2000 |
Disturbances in supply systems caused by household appliances and similar electrical equipment "Harmonics" |
■ EN 61000-3-3:1995/A1:2001 |
Disturbances in supply systems caused by household appliancesand similar electrical equipment "Voltage fluctuations" |
■ EN 55024:1998/A1: 2001 |
Information Technology equipment-Immunity characteristics-Limits and methods of measurement |
■ CE marking |
|
|
Manufacturer/Importer |
Signature |
______________ |
Name |
Albert Yeh____ |
Position/ Title : |
Vice President |
Date |
2007/12/3___ |
English
VoIP-111A / 120A |
|
|
|
|
English |
1 |
|
|
|
|
|||
|
|
|
|
|
|
|

English
Note on the FCC standard
This equipment has been tested and found to comply with the limits for a Class B digital device pursuant to Part 15 of the FCC Rules. These limits are designed to provide reasonable protection against harmful interferences when the equipment is operating in a commercial area. This equipment generates, uses and may radiate radio frequency energy, and if not installed in accordance with the user guide, may cause interference in the transmission of radio communications. If operating in a residential area, it is probable this equipment will cause harmful interference, in which case the user will be required to try to correct this interference using his own means.
Note on CE Marking
This is a Class B product. In a residential area this product may cause radio interference, in which case the user can be required to take the appropriate measures. OvisLink Corp. hereby declares that AirLive
VoIP-111A / 120A meets the basic requisites of directive 99/05/CE, and is therefore liable for the accuracy of these data:
OvisLink Corp.
5F, No.6 Lane 130,
Min-Chuan Rd, Hsin-Tien City,
Taipei, Taiwan
TEL: +886-2-2218-6888
Warranties
This product has undergone various quality controls to ensure proper operation.
This product is covered by a two-year warranty for countries inside European Union. For other countries, the warranty period is one year only. In the event of any manufacturing fault or breakdown, it will be repair by OvisLink Corp. Please contact your supplier for details on the procedure to follow. This warranty shall not be applicable in the event of damage caused by improper use of the product, accidents, faulty handling or manipulation nor any future incompatibility with third party products.
2 |
English |
|
|
|
|
VoIP-111A / 120A |
|
|
|
|
|||
|
|
|
|
|
|
|

Basic Information
Default Setting: |
|
|
User Name: |
airlive |
|
|
IP Address: |
192.168.100.1 |
|||
|
Subnet Mask: |
255.255.255.0 |
|
Password: |
airlive |
LED Indicators
|
LED Indicator |
|
Color |
|
Power |
|
On |
|
PSTN (VoIP-111A) |
|
On |
|
|
|
Off |
|
Phone (VoIP-120A) |
|
flash |
|
|
|
On |
|
LAN |
|
On |
|
10/100M |
|
Off |
|
WAN |
|
On |
|
10/100M |
|
Off |
|
|
Status
Power is applied to this device.
The PSTN is in use.(off-hook)
The PSTN is idle (on-hook)
The Phone is in use.(off-hook)
The Phone is idle.(on-hook)
LAN port is connected
LAN port is not connected.
WAN port is connected.
WAN port is not connected.
English
VoIP-111A / 120A |
|
|
|
|
English |
3 |
|
|
|
|
|||
|
|
|
|
|
|
|

English
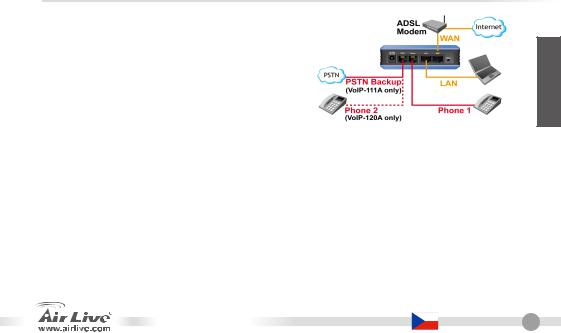
Hardware Installation
1.Setup LAN connection: connect an Ethernet cable from ATA’s LAN port to your computer’s Ethernet port.
2.Setup WAN connection: connect an ethernet cable from ATA’s WAN port to your cable (xDSL) modem’s ethernet port
3.Setup Phone/PSTN connection: connect an RJ-11 cable from ATA’s phone port to your analog phone or PSTN line.
Setup the ATA by the Web
1.Please make sure your computer’s network setting is DHCP mode (obtain IP address automatically).
2.Connect the ATA’s power and LAN cable on the back.
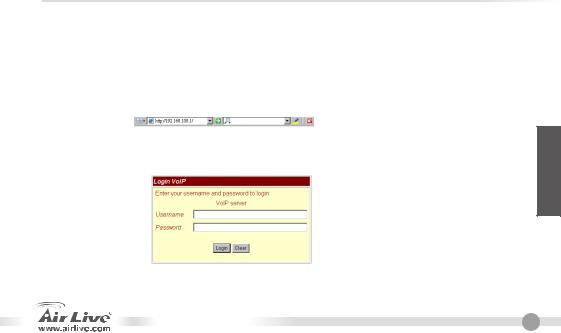
3.Open your web browser and in the address field , input the following IP address “http://192.168.100.1”:
4 |
English |
|
|
|
|
VoIP-111A / 120A |
|
|
|
|
|||
|
|
|
|
|
|
|
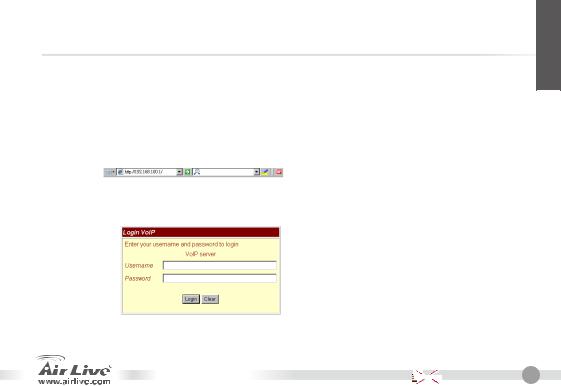
Web Login
1.Please input the username and password into the blank field, the default username is “airlive”, and password is “airlive”.
2.Click the “Login” button will move into the web management page.
3.If you change the setting in the Web Management interface, please do remember to click the “submit” button in this page. After finishing all the settings, please click the “Save” function on the left side and click the Reboot button.
http://192.168.100.1 (LAN Port’s default IP)
English
VoIP-111A / 120A |
|
|
|
|
English |
5 |
|
|
|
|
|||
|
|
|
|
|
|
|

English
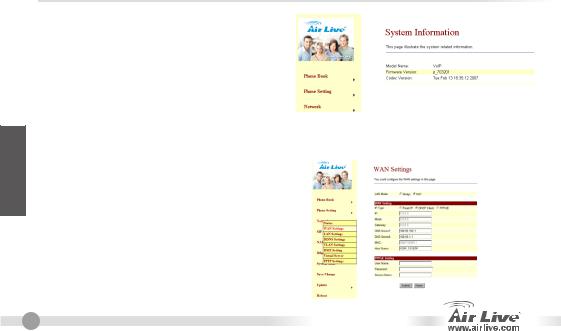
System Information
When you login the web page, you can see the ATA current system information in this page.
Network-WAN and LAN setting
1.The WAN port IP address is in DHCP client by default.
2.If you change the WAN port’s setting to Fix IP mode or PPPoE mode, then you have to make sure that all parameters are suitable for your current network environment.
3.The LAN port‘s default IP address is 192.168.100.1. Default Mask is 255.255.255.0, and the DHCP server is enabled.
6 |
English |
|
|
|
|
VoIP-111A / 120A |
|
|
|
|
|||
|
|
|
|
|
|
|

SIP Setting-Service domain
In Service Domain Function, you need to input the account and the related information in this page. Please refer to your ITSP (Internet Telephony Service Provider). You can register up to three SIP accounts in the ATA for mark or receive the phone call from three SIP accounts.
After the settings are done, you can see the Register Status in the Status item showing “Registered” — then you can make calls directly. When the settings are finished, please click the Submit button and Save Change item on the left side.
SIP setting-Codec setting
You can setup the codec priority, RTP packet length, and VAD function in this page. You need to follow the ITSP suggestion to setup these items. When you finish the setting, please click the Submit button and Save Change item on the left side.
VoIP-111A / 120A
English
English 7
English
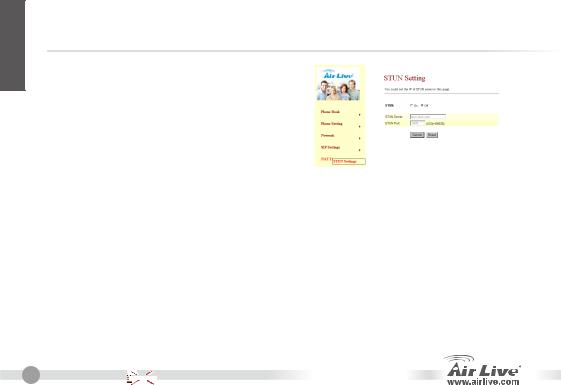
NAT Trans-STUN setting
You can setup the STUN Enable/Disable and STUN Server address in this page. This function can help ATA working properly behind NAT. To change these settings please follow your ITSP information. When you have finished the setting, please click the Submit and Save Change button on the left side.
How to make a phone call
When the ATA is configured properly, you can make a phone call to your friend in the same Service provider. If you want to make a phone call, you can dial the phone number and press “#” button to start to dial the phone number.
The ATA also provides some function that list as below:
1.Call Waiting: When a new call is coming while you are talking, you can push the Flash button to switch to the new call. You can push the Flash button to switch between the two calls.
2.Call Hold: You can push the Hold key to hold the current call for a while, then push Hold key again to keep talking.
3.3-way conference: If you want to make 3-way conference call, you can make a phone call to the first phone number. After the call is established, push the Flash button then you can hear the Dial tone, then make a phone call to the second phone number. When the second call is established, press the Flash button again.
8 |
English |
|
|
|
|
VoIP-111A / 120A |
|
|
|
|
|||
|
|
|
|
|
|
|
Supplement: Using FWD Free SIP Service
Note: OvisLink Corp. is not affiliated with FWD service. The ATA also works with majority of other SIP proxy services. The following instructions are for your own information only.
1.Apply a FWD account at http://account2.freeworlddialup.com/index.php?section_id=94
2.As shown below, fill in your personal information (First Name / Last Name / email …), then click “Next” until all steps are finished.
Note: Please make sure that your email address is correct in order for you to receive the account support Information.
Here is the Quick Start Guide: http://www.freeworlddialup.com/help/?p=userguides
3.After you have registered with the FWD, you will see the following confirmation message:
English
Sign UP
EndUser Registeration:
Finalize Registeration
Congratulations airlive, you are registered with FWD Number: 8**321
Please fill in your profile here
VoIP-111A / 120A |
|
|
|
|
English |
9 |
|
|
|
|
|||
|
|
|
|
|
|
|

English
4.Go to ATA’s service domain setting. Input the account and related information in this page. After completing all the settings, the Status field will show Registered — then you can make a call directly. (example: 613# for echo test)
Note: if the ATA is working behind NAT, please enable the STUN setting.
10 English
VoIP-111A / 120A 

FCC Standard - upozornění
Toto zařízení bylo testováno a vyhovuje předpisům třídy B pro digitální zařízení, na základě odstavce 15, FCC pravidel. Tyto limity jsou vytvořeny po poskytování účinné ochrany před škodlivými vlivy zařízení pracující
v komerční sféře. Toto zařízení vyzařuje radiové vlny a pokud není instalováno a používáno v souladu s touto uživatelskou příručkou, tak může vykazovat rušení okolní radiové komunikace. Provoz tohoto zařízení
v osídlených oblastech bude pravděpodobně příčinou nežádoucího rušení. V tomto případě by měl uživatel přijmout opatření, která povedou ke korekci rušení.
CE Marking - upozornění
Toto zařízení odpovídá třídě B. V domácím prostředí může způsobovat radiové rušení. V tomto případě by měl uživatel přijmout odpovídající opatření. Společnost OvisLink Corp. takto deklaruje, že AirLive VoIP-111A / 120A splňuje základní pravidla norem 99/05/CE, a je proto odpovědná za správnost všech údajů:
OvisLink Corp.
5F, No.6 Lane 130,
Min-Chuan Rd, Hsin-Tien City,
Taipei, Taiwan
TEL: +886-2-2218-6888
Záruka
Tento produkt byl podrobený rozličným kontrolám kvality k zajištění všech funkcí.
Tento produkt podléhá dvouleté záruce v krajinách Evropské Unie. V ostatních krajinách je záruční doba stanovena na jeden rok. V případě výrobních závad nebo nefunkčnosti bude zařízení opraveno společností OvisLink Corp. Prosím kontaktujte svého dodavatele, který vám sdělí detailní informace. Záruka nebude uznána pokud dojde k poškození zařízení vlivem nestandardního užívání, např.: fyzické poničení následkem pádu, nesprávná manipulace, neautorizované zásahy, provoz v extremních podmínkách atd.
VoIP-111A / 120A |
|
Česky |
11 |
eskyČ
eskyČ
Základní informace
Základní nastavení: |
|
|
Uživatelské jméno: |
airlive |
|
|
IP adresa: |
192.168.100.1 |
|||
|
Maska sítě: |
255.255.255.0 |
|
Heslo: |
airlive |
Indikátory LED
Indikátor LED |
|
Stav |
|
Stav |
Power |
|
Svítí |
|
Zařízení je připojeno k |
|
|
Svítí |
|
napájení |
PSTN (VoIP-111A) |
|
|
PSTN je používáno |
|
|
|
Nesvítí |
|
PSTN není používáno |
Phone (VoIP-120A) |
|
Bliká |
|
Telefon je používán |
|
|
Svítí |
|
Telefon není používán |
LAN |
|
Svítí |
|
LAN port je připojen |
10/100M |
|
Nesvítí |
|
LAN port není připojen |
WAN |
|
Svítí |
|
WAN port je připojen |
10/100M |
|
Nesvítí |
|
WAN port není připojen |
12 |
Česky |
|
VoIP-111A / 120A |
Hardwarová instalace
1.Nastavení připojení LAN: Připojte síťový LAN kabel do síťového portu vašeho počítače.
2.Nastavení připojení WAN: Připojte síťový LAN kabel WAN portu zařízení do příslušného portu vašeho xDSL/kabelového modemu.
3.Nastavení připojení Phone/PSTN: Připojte RJ-11 kabel z portu Phone do vašeho analogového telefonu nebo PSTN linky.
eskyČ
Nastavení zařízení přes internetový prohlížeč
1.Ujistěte se, že má vaše síťová karta nastaven mód DHCP klienta.
2.Připojte zařízení k napájení a k LAN portu počítače
3.Otevřete váš internetový prohlížeč a zadejte IP adresu “http://192.168.100.1”:
VoIP-111A / 120A |
|
Česky |
13 |

Přihlášení do administračního rozhraní
eskyČ
1.Zadejte uživatelské jméno a heslo do příslušných polí. Základní uživatelské jméno je „airlive“ a heslo
„airlive“.
2.Klikněte na tlačítko „Login“
3.I Pokud provedete v administračním rozhraní změny, tak klikněte na tlačítko „Submit“. Po dokončení celé konfigurace klikněte na tlačítko „Save“ a restartujte tlačítkem „Reboot“.
Základní IP adresa je http://192.168.100.1
14 |
Česky |
|
VoIP-111A / 120A |

Systémové informace
Po přihlášení do administračního rozhraní se zobrazí aktuální systémové informace o stavu zařízení.
Nastavení WAN a LAN
1.Základní mód WAN portu je DHCP Client (DHCP klient).
2.I Pokud změníte nastavení WAN portu na pevnou IP adresu nebo na mód PPPoE, tak se ujistěte, že máte správně nastaveny všechny potřebné parametry.
3.Základní IP adresa je 192.168.100.1, maska sítě 255.255.255.0, DHCP server je zapnutý.
VoIP-111A / 120A
eskyČ
Česky 15

eskyČ
SIP Nastavení Service Domain
Pro správnou funkci Service Domain je nutné založit účet a doplnit související informace v této stránce. Informujte se prosím u vašeho poskytovatele datových a hlasových služeb. Můžete založit najednou až tři SIP účty pro obsluhu telefonních hovorů.
Po dokončení nastavení si můžete prohlédnout stav registrace účtů, pokud se zobrazí „Registered“, tak můžete uskutečnit volání přímo. Pro uložení změn klikněte na tlačítko Submit a
Save Change v levé menu.
SIP Nastavení kodeků
Můžete si nastavit prioritu kodeků, délku packetu a funkce VAD. Možnost těchto nastavení však musí podporovat váš ISTP (poskytovatel datových a hlasových služeb). Provedené změny uložíte kliknutím na tlačítka Submit a Save Change v levém menu.
16 |
Česky |
|
VoIP-111A / 120A |

NAT Nastavení Trans-STUN
Můžete si nastavit zapnutí / vypnutí STUN a adresu SUN severu. Tato funkce umožňuje zařízení pracovat za NATem. Pokud chcete toto nastavení změnit, tak si prosím vyžádejte informace do vašeho ISTP. Provedené změny uložíte kliknutím na tlačítka Submit a Save Change v levém menu.
Jak uskutečnit telefonní hovor
Pokud je zařízení nakonfigurováno, tak můžete začít telefonovat vašim přátelům v síti vašeho poskytovatele. Pokud chcete uskutečnit hovor, tak navolte telefonní číslo a stiskněte tlačítko „#“ pro zahájení vytáčení. Zařízení poskytuje následující funkce:
1.Hovor na lince: Pokud přichází nový hovor, když právě voláte, tak můžete stiskem tlačítka Flash, přepnout na nový hovor nebo přepínat mezi dvěma hovory.
2.Přidržení hovoru: Stiskem tlačítka Hold můžete přidržet aktuální hovor, který tím přerušíte a potom opětovným stiskem v hovoru pokračovat.
3.Konferenční hovor: Pokud chcete volat s více účastníky najednou, tak využijte možnosti konferenčních hovorů. Po zahájení jednoho hovoru stiskněte tlačítko Flash, uslyšíte oznamovací tón a můžete zahájit další hovor, když je hovor navázán stiskněte opět tlačítko Flash a zahájíte konferenční hovor.
eskyČ
VoIP-111A / 120A |
|
Česky |
17 |
Doplněk: Možnost využití volné FWD
yeskČ
Poznámka: Společnost Ovislink Corp., neodpovídá za funkčnost služby FWD, ale naše zařízení spolupracuje s většinou SIP proxy serverů. Následující informace jsou pouze pro vaše vlastní využití.
1.Založte si FWD účet http://account2.freeworlddialup.com/index.php?section_id=94
2.Jak je ukázáno níže,vyplňte svoje osobní údaje (jméno, příjmení, email…) a stiskem tlačítka „Next“ pokračujte.
Zkontrolujte zda je zadaná emailová adresa je korektní, protože vám na ní budou zaslány přístupové údaje.
Zde je krátký průvodce http://www.freeworlddialup.com/help/?p=userguides
3.Po dokončení registrace účtu FWD uvidíte následující potvrzovací zprávu:
Sign UP
EndUser Registeration:
Finalize Registeration
Congratulations airlive, you are registered with FWD Number: 8**321
Please fill in your profile here
18 |
Česky |
|
VoIP-111A / 120A |
4.Zvolte sekci nastavení Domain Service. Zadejte účet a související informace. Po dokončení nastavení by se měl zobrazit status „Registered“ a můžete přímo uskutečnit hovor. (napr: 613# pro testovací hovor).
Poznámka: Pokud pracuje ATA zařízení za NATem, zapněte podporu STUN.
VoIP-111A / 120A
eskyČ
Česky 19

Deutsch
Anmerkungen zum FCC-Standard
Dieses Produkt wurde getestet und ist anerkannt worden, mit den Richtlinien der FCC, Teil 15 für digitale Geräte der Kategorie B übereinzustimmen. Diese Beschränkungen sind dafür bestimmt, einen angemessenen Schutz gegen schädliche Störungen zu bieten wenn die Produkte in einer gewerblichen Umgebung verwendet werden. Diese Produkte erzeugen und benutzten Radiofrequenzen und können darüber hinaus solche ausstrahlen. Bei einer Installation und Nutzung, die sich nicht nach dieser Bedienungsanleitung richtet kann zudem eine schädliche Störung des Funkverkehrs auftreten. Beim Betrieb dieser Produkte im Wohnbereich sind solche Störungen nicht unwahrscheinlich. In diesem Fall wird der Benutzer dazu aufgefordert, die Störungen auf eigene Kosten zu beseitigen.
Anmerkungen zum CE-Zeichen
Hier handelt es sich um ein Produkt der Kategorie B. In häuslicher Umgebung können solche Produkte Funkstörungen hervorrufen. In diesem Fall kann der Benutzer aufgefordert werden, entsprechende Maßnahmen zu treffen. Die Firma OvisLink erklärt hiermit, dass der AirLive VoIP-111A / 120A die Basisanforderungen der CE-Direktive 99/05/CE erfüllt und ist somit verantwortlich für die Verlässlichkeit dieser Angaben:
OvisLink Corp.
5F, No.6 Lane 130,
Min-Chuan Rd, Hsin-Tien City,
Taipei, Taiwan
TEL: +886-2-2218-6888
Garantiebestimmungen
Um einen sicheren Betrieb zu gewährleisten wurde dieses Produkt verschiedenen Qualitätskontrollen unterzogen. Für dieses Produkt werden innerhalb der Europäischen Union zwei Jahre Garantie gewährt. In anderen Ländern beträgt die Garantiedauer nur 1 Jahr. Im Falle eines Herstellungsfehlers oder Defektes wird das Gerät durch Ovislink repariert. Bitte fragen Sie in einem solchen Fall Ihren Händler nach weiteren Details. Diese Garantie gilt nicht im Falle eines Schadens durch unsachgemäße Benutzung, Unfallschäden, Transportschäden oder einer Manipulation des Gerätes, sowie auch nicht bei zukünftigen Inkompatibilitäten mit Produkten eines Dritten
20 |
Deutsch |
|
VoIP-111A / 120A |
|
|||
|

Grundlegende Information
Werkseitige Voreinstellungen: |
|
|
Benutzername: |
airlive |
|
|
IP-Adresse: |
192.168.100.1 |
|||
|
Netzwerkmaske: |
255.255.255.0 |
|
Passwort: |
airlive |
LED-Anzeigen
|
LED |
Status |
Beschreibung |
|
Power |
An |
Gerät in Betrieb |
|
PSTN (VoIP-111A) |
An |
Amtsleitung wird benutzt |
|
|
Aus |
Amtsleitung frei |
|
Phone (VoIP-120A) |
Blinkt |
Telefon wird benutzt |
|
|
An |
Telefon im Wartebetrieb |
|
LAN |
An |
LAN-Port verbunden |
|
10/100M |
Aus |
LAN-Port nicht verbunden |
|
WAN |
An |
WAN-Port verbunden |
|
10/100M |
Aus |
WAN-Port nicht verbunden |
Deutsch
VoIP-111A / 120A |
|
Deutsch |
21 |
|
|||
|

Deutsch
Installation der Hardare
1.Einrichten der LAN-Verbindung: Verbinden Sie den LAN-Port des ATAs und den Ethernet-Port Ihres PCs mit einem Ethernet-Kabel.
2.Einrichten der WAN-Verbindung: Verbinden Sie den WAN-Port des ATAs und den Ethernet-Port Ihres (xDSL)-Modems mit einem Ethernetkabel.
3.Einrichten der Telefon/Amts-Verbindung:
Verbinden Sie den “Phone”-Anschluss das ATAs und Ihr analoges Telefon oder Ihre Amtsleitung mit einem RJ-11-Kabel.
Konfiguration des mit einem Webbrowser
1.Bitte stellen Sie sicher, dass das Netzwerk Ihres Computers auf DHCP eingestellt ist (IP-Adresse automatisch beziehen).
2.Verbinden Sie das Stromanschlusskabel und das LAN-Kabel mit den entsprechenden Anschlüssen an der Geräterückseite.
3.Öffnen Sie Ihren Webbrowser und geben Sie die folgende IP-Adresse im Adressfeld ein: “http://192.168.100.1”:
22 |
Deutsch |
|
VoIP-111A / 120A |
|
|||
|
Web-Login
1.Geben Sie bitte den Benutzernamen und das Passwort in den dafür vorgesehenen Feldern ein. Der werkseitig voreingestellte Benutzername ist “airlive” und das Passwort ist “airlive”.
2.Mit einem Klick auf den “Login”-Button gelangen Sie auf die Hauptseite der Web-Konfiguration.
3.Wenn Sie in der Web-Konfiguration Einstellungen ändern, vergessen Sie bitte nicht, dies mit dem “submit”-Button zu bestätigen. Nachdem Sie sämtliche Einstellungen vorgenommen haben klicken Sie bitte auf der linken Seite auf “Save”. Klicken Sie dann bitte auf den Button “Reboot” um einen Neustart des Gerätes zu veranlassen.
http://192.168.100.1 (Standard-IP-Adresse des LAN Ports)
Deutsch
VoIP-111A / 120A |
|
Deutsch |
23 |
|
|||
|
Deutsch
Systeminformationen
Nachdem Sie sich auf der Webseite eingeloggt haben sehen Sie die aktuellen Systeminformationen des ATAs.
Netzwerk: WANund LAN-Einstellungen
1.Werkseitig ist für die IP-Adresse des WAN-Ports “DHCP-Client” voreingestellt.
2.Wenn Sie die Einstellung des WAN-Ports auf “Feste Ip” oder “PPPoE-Modus” ändern, müssen Sie sicherstellen, dass die eingegebenen Parameter mit Ihrer derzeitigen Netzwerkumgebung übereinstimmen.
3.Die werkseitig voreingestellte IP-Adresse des LAN-Ports ist 192.168.100.1 mit der Netzwerkmaske 255.255.255.0 und DHCP-Server enabled (aktiviert).
24 |
Deutsch |
|
VoIP-111A / 120A |
|
|||
|

Einstellung der Service-Domain für SIP
Geben Sie bitte auf der Seite für die “Service Domain” die Zugangsdaten, die Sie von Ihrem SIP-Provider erhalten haben, sowie sonstige damit verbundenen Informationen ein. Bis zu 3 SIP-Zugänge, über die sich Telefongespräche führen oder entgegennehmen lassen, können Sie mit dem ATA registrieren. Nachdem Sie die Einstellungen vorgenommen haben klicken Sie bitte auf den Button “submit” um diese zu übernehmen. In der entsprechenden Statusanzeige für den jeweiligen Zugang sollte nun “Registered” angezeigt werden. Das bedeutet, dass sofort Gespräche über diesen Zugang geführt werden können. Klicken Sie bitte auf der linken Seite auf “Save” um die Einstellungen dauerhaft zu speichern.
Einstellung des SIP-Codecs
Auf dieser Seite können sie die Priorität des Codec, die Länge der RTP-Pakete und die VAD-Funktion einstellen. Hierzu richten Sie sich bitte nach den Empfehlungen Ihres SIP-Providers. Nachdem Sie die Einstellungen beendet haben klicken Sie bitte auf der linken Seite auf “Save” um diese zu speichern.
VoIP-111A / 120A
Deutsch 25
Deutsch
 Loading...