


 Loading...
AP60
WIRELESS-N POE ACCESS POINT
USER’S MANUAL
EU VERSION

Copyright and Disclaimer
Copyright & Disclaimer
No part of this publication may be reproduced in any form or by any means, whether electronic, mechanical, photocopying, or recording without the written consent of OvisLink Corp.
OvisLink Corp. has made the best effort to ensure the accuracy of the information in this user’s guide. However, we are not liable for the inaccuracies or errors in this guide. Please use with caution. All information is subject to change without notice
All Trademarks are properties of their respective holders.
This product contains some codes from GPL. In compliance with GPL agreement, AirLive will publish the GPL codes on our website. Please go to www.airlive.com and go to the "Support → GPL" menu to download source code.
AirLive AP60 User’s Manual

Table of Contents
|
Table of Contents |
|
1. Introduction.............................................................................................. |
1 |
|
1.1 |
Overview............................................................................................ |
1 |
1.2 |
Firmware Upgrade and Tech Support ................................................ |
2 |
1.3 |
Features ............................................................................................ |
3 |
1.4 |
Wireless Operation Modes................................................................. |
4 |
|
1.4.1 Access Point Mode ...................................................................................... |
4 |
|
1.4.2 Client Mode ................................................................................................. |
5 |
|
1.4.3 Bridge Mode ................................................................................................ |
6 |
|
1.4.4 WDS Repeater Mode................................................................................... |
7 |
|
1.4.5 Universal Repeater Mode ............................................................................ |
7 |
|
1.4.6 WISP Router Mode...................................................................................... |
8 |
|
1.4.7 WISP + Repeater Mode............................................................................... |
9 |
|
1.4.8 AP Router Mode .......................................................................................... |
9 |
|
1.4.9 WDS Station (Bridge Send Beacon) .......................................................... |
10 |
2. Installing the AP60................................................................................. |
11 |
|
2.1 |
Package Content .............................................................................. |
11 |
2.2 |
Knowing your AP60 ......................................................................... |
12 |
2.3 |
Hardware Installation ....................................................................... |
13 |
2.4 |
LED Table ........................................................................................ |
15 |
2.5 |
Restore Settings to Default .............................................................. |
16 |
3. Configuring the AP60 ............................................................................ |
17 |
|
3.1 |
Important Information....................................................................... |
17 |
3.2 |
Prepare your PC .............................................................................. |
18 |
3.3 |
Introduction to IP Finder................................................................... |
19 |
3.4 |
Introduction to Web Management .................................................... |
21 |
|
3.4.1 Getting into Web Management .................................................................. |
21 |
|
3.4.2 Main Menu................................................................................................. |
21 |
3.5 |
Initial Configurations ........................................................................ |
23 |
|
3.5.1 Change the Device’s IP Address ............................................................... |
23 |
|
3.5.2 Set the Time and Date................................................................................ |
24 |
|
3.5.3 Change Password ...................................................................................... |
24 |
|
I |
|
AirLive AP60 User’s Manual

Table of Contents
4. Wireless Settings ................................................................................... |
26 |
4.1 About Wireless Modes ..................................................................... |
26 |
4.2 General Wireless Functions............................................................. |
28 |
4.2.1 Band .......................................................................................................... |
29 |
4.2.2 SSID .......................................................................................................... |
29 |
4.2.3 Multiple SSID............................................................................................. |
29 |
4.2.4 Site Survey ................................................................................................ |
30 |
4.2.5 Signal Survey ............................................................................................ |
31 |
4.2.6 Channel Width ........................................................................................... |
31 |
4.2.7 Channel Sideband ..................................................................................... |
32 |
4.2.8 Channel ..................................................................................................... |
32 |
4.2.9 Broadcast SSID ......................................................................................... |
33 |
4.2.10 WMM ....................................................................................................... |
33 |
4.2.11 Data Rate................................................................................................. |
33 |
4.2.12 Wireless Client Limit ................................................................................ |
33 |
4.2.13 Client Mode Security Settings.................................................................. |
34 |
4.2.14 AP Mode Security Settings ...................................................................... |
36 |
4.2.15 WPS ........................................................................................................ |
39 |
4.2.16 Access Control......................................................................................... |
40 |
4.3 Advance Settings ............................................................................. |
41 |
4.4 Bridge Mode Settings ...................................................................... |
43 |
4.4.1 WDS Settings ............................................................................................ |
43 |
4.4.2 WDS Security ............................................................................................ |
43 |
5. Wireless Menu: Router Mode Settings ................................................. |
46 |
5.1 Router Mode Settings under Wireless Menu.................................... |
46 |
5.1.1 WAN Port................................................................................................... |
48 |
5.1.2 Virtual Server Settings ............................................................................... |
49 |
5.1.3 DMZ........................................................................................................... |
49 |
5.1.4 Dynamic DNS ............................................................................................ |
50 |
5.1.5 DoS (Denial of Service) ............................................................................. |
50 |
5.1.6 URL Filter................................................................................................... |
52 |
5.1.7 MAC Filter.................................................................................................. |
52 |
5.1.8 IP Filter ...................................................................................................... |
53 |
5.1.9 Routing ...................................................................................................... |
54 |
5.1.10 Remote Management .............................................................................. |
55 |
6. System Configurations.......................................................................... |
56 |
II |
AirLive AP60 User’s Manual |
|

Table of Contents
6.1 |
Menu Structure ................................................................................ |
56 |
|
6.2 |
LAN Interface Setup ........................................................................ |
57 |
|
|
6.2.1 DHCP Settings........................................................................................... |
57 |
|
|
6.2.2 Set Static DHCP ........................................................................................ |
58 |
|
|
6.2.3 Domain Name............................................................................................ |
58 |
|
|
6.2.4 802.11d Spanning Tree .............................................................................. |
58 |
|
|
6.2.5 Clone MAC Address .................................................................................. |
59 |
|
|
6.2.6 Enable AirLive IP Finder Management ...................................................... |
59 |
|
6.3 Time Settings ................................................................................... |
59 |
||
6.4 |
Password Settings ........................................................................... |
60 |
|
6.5 |
Wireless Scheduling ........................................................................ |
60 |
|
6.6 Watchdog ........................................................................................ |
61 |
||
6.7 |
Firmware Upgrade ........................................................................... |
62 |
|
6.8 |
Configuration Save and Restore ...................................................... |
63 |
|
6.9 |
Factory Default ................................................................................ |
64 |
|
7. Device Status Menu ............................................................................... |
65 |
||
7.1 |
Menu Structure ................................................................................ |
65 |
|
7.2 |
Device Information........................................................................... |
66 |
|
7.3 |
Statistic |
............................................................................................ |
67 |
7.4 |
Client Table ...................................................................................... |
67 |
|
7.5 |
Log .................................................................................................. |
|
68 |
8. Bandwidth Control................................................................................. |
69 |
||
8.1 |
What is Bandwidth Control?............................................................. |
69 |
|
8.2 |
Configure the Bandwidth Control ..................................................... |
71 |
|
|
8.2.1 |
Control by IP Address............................................................................ |
73 |
|
8.2.2 |
Control by MAC Address ....................................................................... |
73 |
9. Emergency Firmware Recovery............................................................ |
75 |
||
9.1 |
How Emergency Upgrade Works? ................................................... |
75 |
|
9.2 |
Emergency Upgrade Procedure....................................................... |
76 |
|
10. Frequent Asked Questions ................................................................. |
78 |
||
11. Specifications ...................................................................................... |
80 |
||
11.1 Hardware Features ........................................................................ |
80 |
||
|
|
III |
|
AirLive AP60 User’s Manual

Table of Contents
11.1.1 General Hardware Feature |
......................................................................80 |
11.1.2 Power Supply........................................................................................... |
80 |
11.1.3 Dimension and Weight ............................................................................. |
80 |
11.2 Radio Specifications....................................................................... |
81 |
11.2.1 Frequency Band....................................................................................... |
81 |
11.2.2 Rate and Modulation................................................................................ |
81 |
11.2.3 TX Output Power ..................................................................................... |
81 |
11.2.4 Supported WLAN Mode ........................................................................... |
82 |
11.3 Software Feature ........................................................................... |
82 |
11.3.1 Operation Mode ....................................................................................... |
82 |
11.3.2 Management Interface ............................................................................. |
82 |
11.3.3 Advance Functions................................................................................... |
82 |
12. Wireless Network Glossary................................................................. |
84 |
IV |
AirLive AP60 User’s Manual |
|
1. Introduction
1 |
1. Introduction |
|
1.1 Overview
The AP60 is a wireless multi-function router based on 150Mbps wireless-b/g/n 2.4GHz radio technologies. The Wireless Access Point is equipped with four 10/100 Mbps Auto-sensing Ethernet ports for connecting to LAN and also for cascading to next Wireless Access Point.
Passive PoE Port
You can supply power through Ethernet cable to AP60 using the passive PoE port. The AP60’s passive PoE port can accept 12V to 24V power from a passive PoE switch (such as AirLive POE-FSH8PW) or a passive PoE DC Injector (AirLive POE-1P).
9 Wireless Modes
The AP60 has 9 different wireless operation modes. Therefore, it can perform different functions such as AP, Bridge, Client, Repeater, Router and more.
1 |
AirLive AP60 User’s Manual |

1. Introduction
Long Distance Radio
The AP60 features a long distance and wide coverage radio. It has potential to provide greater coverage than ordinary AP/Router. However, the output power is set to comply with your country regulation. Please do not use more power than allowed in your country.
Versatile Management
The AP60 comes with a user friendly interface that can access through web browser. There is a setup wizard to help you setup quickly. The IP finder utility can help you to find your AP.
Whether it's for own, office, hotspot, or WISP environments, the AirLive Wireless-B/G/N AP Router family brings you the maximum performance and security for today's high speed wireless network.
1.2 Firmware Upgrade and Tech Support
If you encounter a technical issue that can not be resolved by information on this guide, we recommend that you visit our comprehensive website support at www.airlive.com. The tech support FAQ are frequently updated with latest information.
In addition, you might find new firmware that either increase software functions or provide bug fixes for AP60. You can reach our on-line support center at the following link: http://www.airlive.com/support/support_2.jsp
Since 2009, AirLive has added the “Newsletter Instant Support System” on our website. AirLive Newsletter subscribers receives instant email notifications when there are new download or tech support FAQ updates for their subscribed airlive models. To become an AirLive newsletter member, please visit: http://www.airlive.com/member/member_3.jsp
AirLive AP60 User’s Manual |
2 |

1. Introduction
AirLive Newsletter Suppport System
1.3 Features
150Mbps 802.11b/g/n Standard
4MB Flash and 32MB SDRAM
9 wireless multi-function modes: Access Point, Client Mode, WDS Repeater, WDS Bridge, Universal Repeater, WISP Router, AP Router, WISP+ Universal Repeater, WDS Station
R-SMA connector antenna.
Passive PoE Port for 12V~24V Passive POE System. Passive DC Injector not included.
Site Survey, Signal Survey
Emergency firmware recovery mode
Web management
Easy Setup Wizard
Bandwidth Control, Access Control
Multiple SSID and Virtual AP
Client Isolation, Watchdog
TX Output Power Adjustment
Wireless Scheduling
All LED Off function
3 |
AirLive AP60 User’s Manual |

1. Introduction
NAT, Static Router, RIP1, RIP2
IP Finder Management Utility
1.4 Wireless Operation Modes
The AP60 can perform as a Multi-Function wireless device. Through the AirLogic web interface, users can easily select which wireless mode they wish the AP60 to perform.
AP60 Wireless Operation Mode
Wireless Mode |
Radio |
WAN |
Application |
|
|
|
|
Access Point |
AP |
None |
Hotspot (Indoor and Outdoor) |
|
|
|
|
Client |
Client |
None |
WISP Client |
|
|
|
|
Bridge |
Bridge |
None |
Building to Building network |
|
|
|
|
WDS Repeater |
AP + Client |
None |
Extend distance of another WDS |
|
|
|
AP/Router |
|
|
|
|
Universal Repeater |
AP + Client |
None |
Extend distance of any AP Router |
|
|
|
|
WISP Router |
Client |
Wireless |
WISP Client Router |
|
|
|
|
WISP + Repeater |
AP + Client |
Wireless |
WISP 2-Way CPE (One radio only) |
|
|
|
|
AP Router |
AP |
LAN Port |
Broadband Sharing |
|
|
|
|
WDS Station |
Bridge |
None |
Bridge with SSID |
|
|
|
|
1.4.1 Access Point Mode
When operating in the Access Point mode, the AP60 becomes the center hub of the wireless network. All wireless cards and clients connect and communicate through AP60. This type of network is known as “Infrastructure Network”. Other AP60 or 802.11b/g/n device can connect to AP mode through “Client Mode”.
AirLive AP60 User’s Manual |
4 |
1. Introduction
1.4.2 Client Mode
This mode is also known as “Client” mode. For AP60, there are 2 types of Client modes: Infrastructure and Adhoc mode. In Infrastructure mode, the AP60 acts as if it is a wireless adapter to connect with a remote Access Point. Users can attach a computer or a router to the LAN port of AP60 to get network access. This mode is often used by WISP on the subscriber’s side.
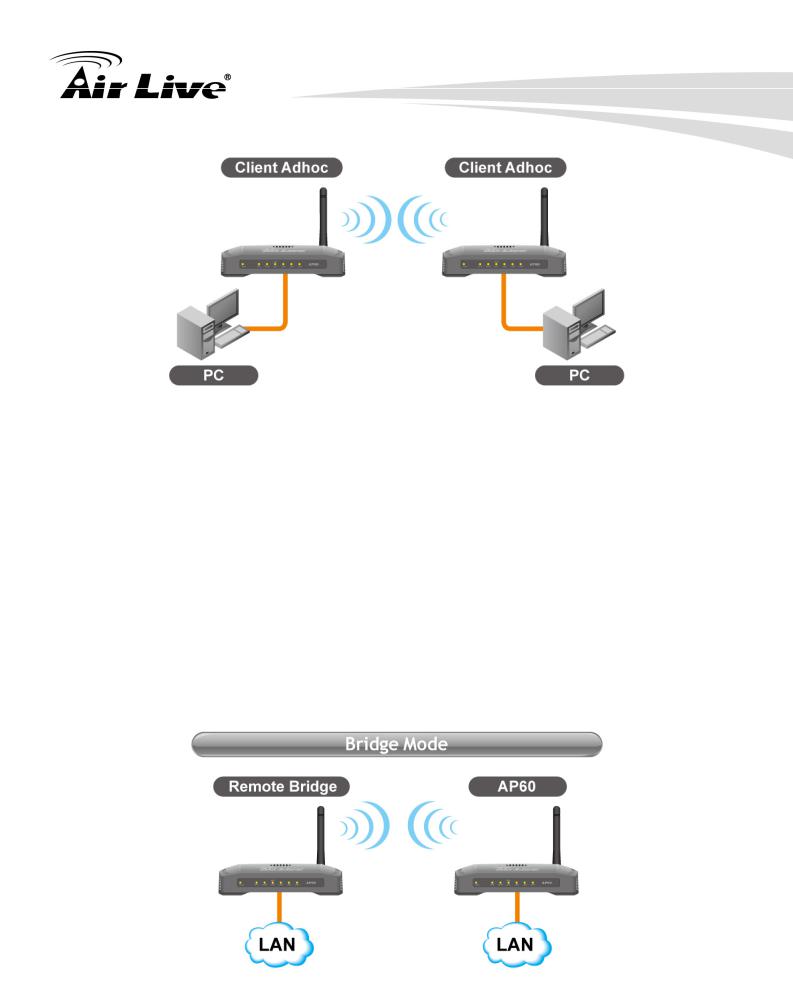
In Client Ad Hoc mode, AP60 can connect to other wireless adapters without access point. Users can attach a computer or a router to the LAN port of AP60 to get network access.
5 |
AirLive AP60 User’s Manual |
1. Introduction
1.4.3 Bridge Mode
This mode is also known as “WDS Pure MAC Bridge mode”. When configured to operate in the Wireless Distribution System (WDS) Mode, the AP60 provides bridging functions with remote LAN networks in the WDS system. The system will support up to total of 8 bridges in a WDS network (by daisy chain). However, each bridge can only associate with maximum of 4 other bridges in the WDS configuration. This mode is best used when you want to connect LAN networks together wirelessly (for example, between office and warehouse). If you have more than 2 AP in WDS Bridges mode, please remember to turn on the “802.1d Spanning Tree” or “STP” option on to avoid network loop. This mode usually delivers faster performance than infrastructure mode.
AirLive AP60 User’s Manual |
6 |

1. Introduction
1.4.4 WDS Repeater Mode
In WDS Repeater mode, the AP60 functions as a repeater that extends the range of remote wireless LAN. In this mode, the remote Access Point must have WDS (Wireless Distribution System) capability. If you require the PC’s MAC addresses to be preserved when the data pass through the Repeater, it is necessary to use the WDS Repeater mode. Because the radio is divided into WDS + AP mode, the Repeater mode will have less performance and distance.
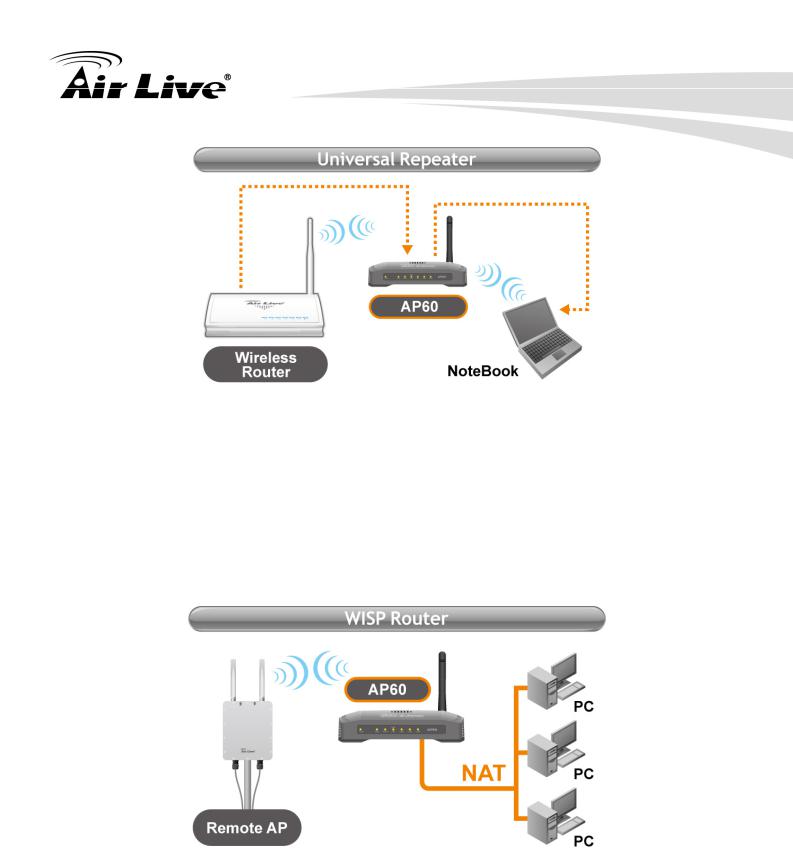
1.4.5 Universal Repeater Mode
In Universal Repeater mode, the AP60 functions as a repeater that extends the range of remote wireless LAN. This mode can repeat the signal of any remote AP/Router, even if they do not have WDS capability. However, the MAC addresses of any wireless traffic going through Universal Repeater are “translated” into the Repeater’s MAC address. As a result, any applications that require identification by MAC address (such as hotspot or firewall) can not use this mode. It is also recommended to use “DHCP” Relay function to get IP address from remote DHCP server.
Because the radio is divided into Client + AP mode, the Repeater mode will have less performance and distance.
7 |
AirLive AP60 User’s Manual |
1. Introduction
1.4.6 WISP Router Mode
In WISP Router Mode, AP60 connects to the remote Access Point as in Client Infrastructure Mode. On the LAN side, it acts like a wired router for IP sharing function. This mode is best used for IP sharing application for WISP subscribers. In this mode, the WAN is the wireless client side; the LAN is the wired side.
|
|
|
AirLive AP60 User’s Manual |
8 |
|

1. Introduction
1.4.7 WISP + Repeater Mode
This mode is the combination of WISP Router mode and AP mode. The radio is divided into 2-way. One way is the client mode to connect with the remote AP, the other is the AP mode to serve the local wireless network. There is a NAT router function to share the Internet connection. Since the radio is divided by half, it is not recommended for long distance application.
1.4.8 AP Router Mode
In AP Router Mode, the AP60 behaves like a wireless router. The LAN1 port of the AP60 will become WAN port. The wireless network of AP60 becomes the LAN side.
9 |
AirLive AP60 User’s Manual |

1. Introduction
1.4.9 WDS Station (Bridge Send Beacon)
The WDS Station mode is similar to Bridge mode with the exception that the link has added “SSID” as basis for the bridge link. This mode is for added bridge mode compatibility with Atheros base wireless device.
AirLive AP60 User’s Manual |
10 |

2. Installing the AP60
2 |
2. Installing the AP60 |
|
|
|
|
This section describes the installation procedure for the AP60. It starts with a summary of the content of the package you have purchased, followed by steps of how to power up and connect the AP60. Finally, this section explains how to configure a Windows PC to communicate with the AP60.
2.1 Package Content
The AP60 package contains the following items:
One AP60 main unit
One 12V DC power adapter
One antenna
One CD of the AP60
Quick Start Guide
79
AirLive AP60 User’s Manual

2. Installing the AP60
2.2 Knowing your AP60
Below are descriptions and diagrams of the product:
1 |
3 |
|
2 |
|
6 |
||
|
|
||
|
5 |
|
|
|
|
|
4
1Antenna Connector
2Power Adapter Connector
3 LAN Port 1, Passive PoE, or WAN Port (AP Router mode only)
4LAN Ports
5Reset Button
6WPS Button
7 LED Indicators
AirLive AP60 User’s Manual |
12 |

2. Installing the AP60
2.3 Hardware Installation
*Note Before you starting hardware connection, you are advised to find an appropriate location to place the Access Point. Usually, the best place for the Access Point is at the center of your wireless network, with line of straight to all your wireless stations. Also, remember to adjust the antenna; usually the higher the antenna is placed; the better will be the performance.
1. Please install the antennas by turning clock wise into the RF antenna connectors
2. Now connect the power adapter to the AP60
79
AirLive AP60 User’s Manual

2. Installing the AP60
3. Connect the Ethernet cable to one of the LAN port and the other end to your PC.
4. If you have broadband connection, please connect the Internet cable to “WAN port”.
Passive PoE Installation
If you want to supply the power by using Passive PoE, please follow the installation diagram below. Please note that the passive DC Injector is not included with AP60, it needs to be purchased separately (AirLive Model: PoE-1P). Air3G uses 12V passive PoE system. it is recommend to use a power adapter of 12Vdc at 1.25A.
AirLive AP60 User’s Manual |
14 |
2. Installing the AP60
2.4 LED Table
This section describes the LED behavior of AP60.
You can find the LED in front of the AP60.
LED |
Display |
Color |
Indication |
|
|
|
|
1 |
Power |
Green |
Lights on when the device is powered. |
|
|
|
|
2 |
WPS |
Green |
Blinking: WPS is enabled to make a connection |
|
|
|
OFF: Radio Disabled |
|
|
|
|
3 |
WLAN |
Green |
Slow Flashing : Radio is active |
|
|
|
Fast Flashing: Transmitting Data |
|
|
|
OFF: Radio Disabled |
|
|
|
|
|
|
|
79 |
AirLive AP60 User’s Manual
2. Installing the AP60
4 |
LAN1 |
|
|
|
|
|
|
|
|
5 |
LAN2 |
|
Lights on when the port is actively connected, blinking |
|
|
|
Green |
||
|
|
when transmitting or receiving data. |
||
6 |
LAN3 |
|||
|
||||
|
|
|||
|
|
|
|
|
7 |
LAN4 |
|
|
|
|
|
|
|
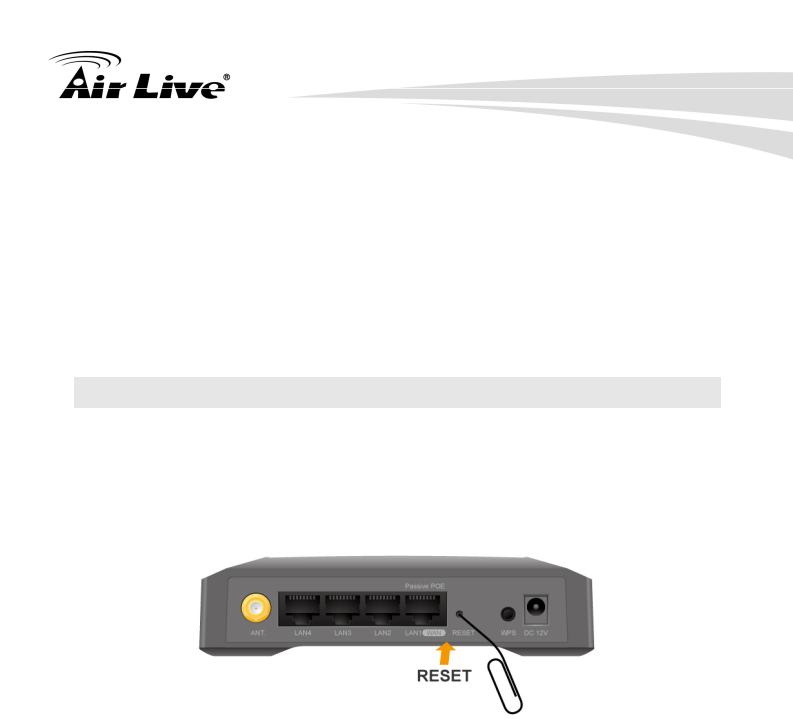
2.5 Restore Settings to Default
If you have forgotten your AP60’s IP address or password, you can restore your AP60 to the default settings by pressing on the “reset button” for more than 5 seconds. Performing the Factory Reset will erase all previously entered device settings. The reset button is in back of the case. Please see diagram below for details.
AirLive AP60 User’s Manual |
16 |

3. Configuring the AP60
3 |
3. Configuring the AP60 |
|
|
|
|
The AP60 offers web browser (http) as management interface. In this chapter, we will explain Air3G’s management interface and how to get into them.
3.1 Important Information
The following information will help you to get start quickly. However, we recommend you to read through the entire manual before you start. Please note the password and SSID are case sensitive.
|
The default IP address is: 192.168.100.252 Subnet Mask: 255.255.255.0 |
The default user’s name is: admin
The default password is: airlive
|
The default SSID is: |
airlive |
The default wireless mode is : AP mode
After power on, please wait for 1 minutes for AP60 to finish boot up
Please remember to click on “Apply” for new settings to take effect
You must reboot the AP60 after you finish all the settings for changes to take effect
When you change to “AP Router” mode, the LAN port 1 will become WAN port.
By Default, the DHCP server is turned off, please to configure your PC’s IP address manually.
79
AirLive AP60 User’s Manual
3. Configuring the AP60
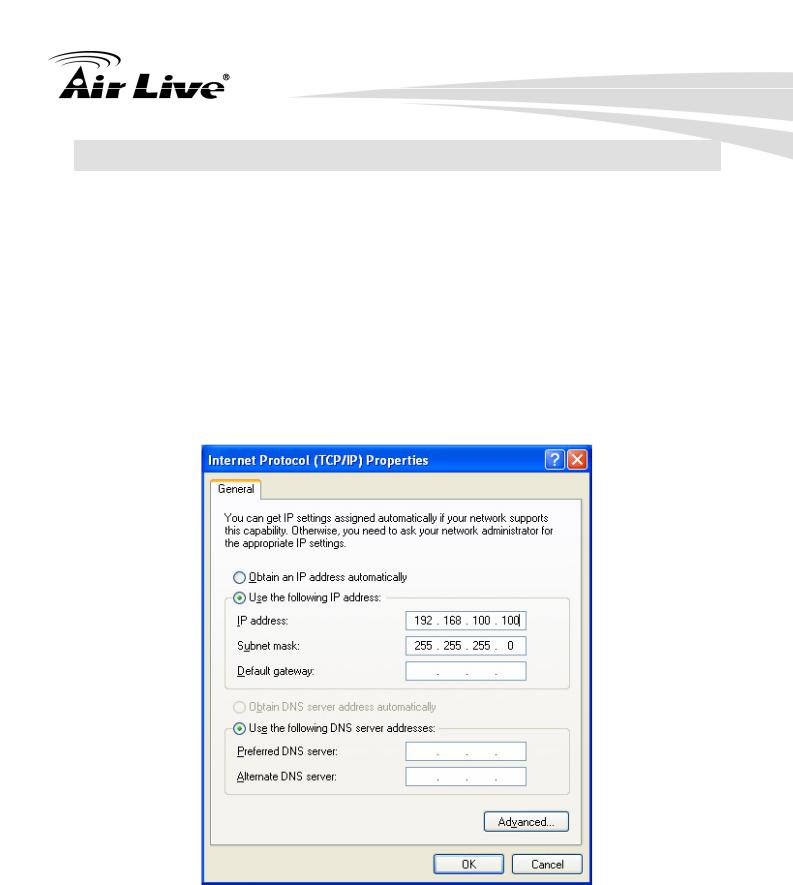
3.2 Prepare your PC
The AP60 can be managed remotely by a PC through either the wired or wireless network. The default IP address of the AP60 is 192.168.100.252 with a subnet mask of 255.255.255.0. This means the IP address of the PC should be in the same subnet of the AP60.
To prepare your PC for management with the AP60, please do the following:
1.Connect your PC directly to the LAN port of AP60
2.Set your PC’s IP address manually to 192.168.100.100 (or other address in the same subnet)
You are ready now to configure the AP60 using your PC.
AirLive AP60 User’s Manual |
18 |

3. Configuring the AP60
3.3 Introduction to IP Finder
The AP60 provides IP Finder utility and you can get into web management easily. IP Finder is included in the CD. Just click and follow the step by step instruction to install.
While entering the IP Finder utility, the IP Finder will automatically search the AP available on the network. IP Finder will show the Device Name, IP Address, HTTP Port, and Ethernet MAC Address.
Before start using IP Finder, make sure you disable personal firewall installed in you PC. (Ex. Windows XP personal firewall)
Search: By clicking Search, IP Finder will try to discover the AP60 on the network.
View: The function is for IP Camera only. It does not work for PC.
LAN: You can configure the AP60 LAN IP address here. After enter the IP Address, press >> to the next page. If you would like to change the AP60 login password, please check the box and enter the new password. Please note that the password should be filled before click submit.
Exit: Click to close IP Finder.
79
AirLive AP60 User’s Manual

3. Configuring the AP60
Click to the next page
Before submit, please input AP60 password first. The default password is airlive.
Click Submit to save the configuration.
AirLive AP60 User’s Manual |
20 |

3. Configuring the AP60
3.4 Introduction to Web Management
The AP60 can be configured using the Web management interfaces by simply typing its IP address in the web browser. Most functions of AP60 can be accessed by it.
If you are placing the AP60 behind router or firewall, you might need to open the port 80 at virtual server on your firewall/router. This procedure is not necessary in most cases unless there is a router/firewall between your PC and AP60.
3.4.1 Getting into Web Management
You can enter the web management by entering IP address into the web browser’s address field.
To get into the Normal Web Management, simply type in the AP60’s IP address (default IP is 192.168.100.252) into the web browser’s address field.
3.4.2 Main Menu
After key in the correct username and password, you will enter the main Web management screen.
79
AirLive AP60 User’s Manual

3. Configuring the AP60
Language Bar
Wireless Modes
Wireless Settings: You will find all the settings for wireless and WAN settings in this page. The AP60’s wireless settings are different between wireless modes. Only functions that are applicable to the wireless mode will show to simplify configuration. For example, WAN Port is only displayed in WISP Router and AP Router modes.
Wireless Mode: On the left hand side bar, you will find the “Wireless Mode” pull down menu. The menu will display what is the current wireless mode. You can change mode by the pull down menu. The AP will ask you to confirm for the mode change and reboot to the new wireless mode.
System Configuration: All non-wireless and router mode settings are in this category. The system configurations including changing password, upload firmware, backup configuration, settings PING watchdog, and setting management.
Device Status: This section for monitoring the status of AP60. It provides information on device status, Ethernet status, wireless status, wireless client table, and system log.
Reboot: Please remember to save changes and reboot after you finish all settings. The changes will take effect only after reboot.
Language Bar: You can select different language for the web management interface here.
AirLive AP60 User’s Manual |
22 |

3. Configuring the AP60
3.5 Initial Configurations
We recommend users to browse through AP60’s web management interface to get an overall picture of the functions and interface. Below are the recommended initial configurations for first time login:
3.5.1 Change the Device’s IP Address
The default IP address is at 192.168.100.252. You should change it to the same subnet as your network. Also, if you want to manage AP60 remotely, you have to set the Gateway and DNS server information.
To setup the IP settings for AP60, please select “System Configuration” -> Device IP Settings”. After entering the IP information, click on “Apply Changes” to finish.
1
2
79
AirLive AP60 User’s Manual

3. Configuring the AP60
3.5.2 Set the Time and Date
It is important that you set the date and time for your AP60 so that the system log will record the correct date and time information. Please go to “System Configuration” ->Time Settings. We recommend you choose “Enable NTP” so the time will be keep even after reboot. If your AP60 is not connected to Internet, please enter the time manually. Please remember to select your local time zone and click “Apply” to finish.
1
2

 3 4
3 4 

5
6
3.5.3 Change Password
You should change the password for AP60 at the first login. To change password, please
go to “System Configuration” -> “Password Settings” menu.
AirLive AP60 User’s Manual |
24 |
Loading...