


RS-1200
Dual WAN Security Gateway
Quick Setup Guide
English
Español
Português
Slovensky
Русский
Deutsch
Česky
●● ●
●● ●
●● ●
●● ●
●● ●
●● ●
●● ●
●● ●
1
6
11
16
21
26
31
36

|
|
Important Information |
|
|
|
|
|
|
|
|
|
|
English |
|
The AP mode’s default IP address is |
192.168.1.1 |
|
|||
|
|
|
||||
|
The default Subnet Mask is |
255.255.255.0 |
|
|
||
|
The default login name is |
admin |
|
|
||
|
The default password is |
admin |
|
|
||
|
|
|
|
|
|
|
|
|
|
|
|
|
|
|
|
LED Indicators |
|
|
|
|
|
|
|
|
|
|
|
|
|
|
|
|
|
|
|
RS-1200 |
|
|
|
|
|
|
LED |
|
Status |
|
Indicator |
|
Color |
ON |
Flashing |
Power |
|
● Green |
Power on |
- |
Status |
|
● Green |
Ready to use |
Turning on |
WAN1 |
|
● Green |
- |
Sending/Receiving |
WAN2 |
|
● Green |
- |
Sending/Receiving |
LAN |
|
● Green |
- |
Sending/Receiving |
DMZ |
|
● Green |
Ready to use |
Sending/Receiving |
WAN1 Port (WAN): Use this port to connect to a router, DSL modem, or Cable modem
WAN2 Port (WAN): Use this port to connect to a router, DSL modem, or Cable modem
LAN Port (LAN): Use this port to connect to the LAN network of the office. DMZ: connection to the Internet (FTP, SNMP, HTTP, DNS)
Reset: Reset the Dual WAN Security Gateway to the original default settings.
DC Power: Connect one end of the power supply to this port, the other
Dual WAN Security Gateway |
|
|
English |
1 |
|
|
|
|
|
RS-1200 |
|
|
|
|
|
|
|
|
|
|
|
|
|

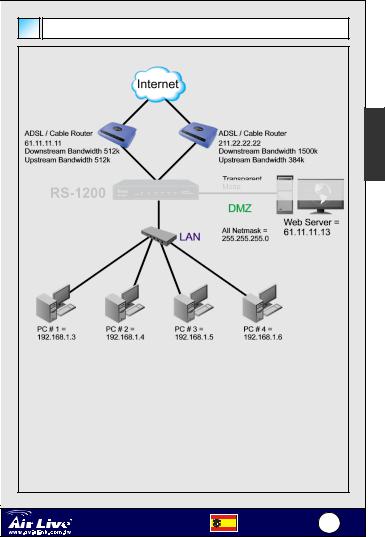
2 WAN 1 LAN Connecting Example |
|
||
English |
|
|
|
LAN Port = 192.168.1.1 |
|
|
|
WAN1 Port = 61.11.11.11 |
|
|
|
WAN2 Port = 211.22.22.22 |
|
|
|
DMZ Port = 61.11.11.11 |
|
|
|
Dual WAN Security Gateway |
English |
2 |
|
RS-1200 |
|||
|
|
||


 WebUI Configuration example
STEP 1:
Connect both the Administrator’s PC and the LAN port of the Dual WAN Security Gateway to a hub or switch. Make sure there is a link light on the hub/switch for both connections. The Dual WAN Security Gateway has an embedded web server used for management and configuration. Use a web browser to display the configurations of the Dual WAN Security Gateway (such as Internet Explorer 4(or above) or Netscape 4.0(or above) with full javascript support). The default IP address of the Dual WAN Security Gateway is 192.168.1.1 with a subnet mask of 255.255.255.0. Therefore, the IP address of the Administrator PC must be in the range between 192.168.1.2– 192.168.1.254
If the company’s LAN IP Address is not subnet of 192.168.1.0, (i.e. LAN IP Address is 172.16.0.1), then the Administrator must change his/her PC IP address to be within the same range of the LAN subnet (i.e. 172.16.0.2). Reboot the PC if necessary.
By default, the Dual WAN Security Gateway is shipped with its DHCP Server function enabled. This means the client computers on the LAN network including the Administrator PC can set their TCP/IP settings to automatically obtain an IP address from the Dual WAN Security Gateway.
The following table is a list of private IP addresses. These addresses may not be used as a WAN 1 / WAN2 IP address.
10.0.0.0 ~ 10.255.255.255
172.16.0.0 ~ 172.31.255.255
192.168.0.0 ~ 192.168.255.255
STEP 2:
Once the Administrator PC has an IP address on the same network as the Dual WAN Security Gateway, open up an Internet web browser and type in http://192.168.1.1 in the address bar.
A pop-up screen will appear and prompt for a username and password. A username and password is required to connect to the Dual WAN Security Gateway. Enter the default login username (admin) and password (admin) of Administrator.
Dual WAN Security Gateway |
|
|
English |
3 |
|
|
|
|
|
RS-1200 |
|
|
|
|
|
|
|
|
|
|
|
|
|
English

English


 Setting Up in Transparent Mode
STEP 1:
After entering the username and password, the Dual WAN Security Gateway WEB UI screen will display. Select the Interface tab on the left menu and a sub-function list will be displayed.
◊Click on WAN from the sub-functionlist, enter proper Layer3 network setup informaion
◊Click Modify to modify WAN1/2 settings (i.e. WAN1 Interface)
WAN1 interface IP Address |
61.11.11.11 |
NetMask |
255.255.255.0 |
Default Gateway |
61.11.11.254 |
Note: The above figures are only examples. Please fill in the appropriate IP address information provided to you by the ISP.
STEP 2:
Click on the Policy tab from the main function menu, and then click on Outgoing from the sub-function list.
STEP 3:
Click on New Entry button.
Dual WAN Security Gateway |
|
|
English |
4 |
|
|
|
|
|
RS-1200 |
|
|
|
|
|
|
|
|
|
|
|
|
|

STEP 4:
When the New Entry option appears, enter the following configuration:
Source Address – select Inside_Any Destination Address – select Outside_Any Service - select ANY
Action - select Permit ALL
Click on OK to apply the changes.
STEP 5:
The configuration is successful when the screen below is displayed. Make sure that all the computers that are connected to the LAN port have their Default Gateway IP Address set to the Dual WAN Security Gateway’s LAN IP Address (i.e. 192.168.1.1). At this point, all the computers on the LAN network should gain access to the Internet immediately. If a Dual WAN Security Gateway filter function is required, please refer to the Policy section in the user manual.
English
Dual WAN Security Gateway |
|
|
English |
5 |
|
|
|
|
|
RS-1200 |
|
|
|
|
|
|
|
|
|
|
|
|
|

Español


 Información Importante
La dirección IP por defecto en modo AP es: |
192.168.1.1 |
La Máscara de Subred por defecto es: |
255.255.255.0 |
El nombre de ingreso por defecto es: |
admin |
La clave de ingreso por defecto es: |
admin |


 LEDs Indicadores
RS-1200
LED |
|
|
Estado |
|
Indicador |
|
Colór |
Encendido |
Titilando |
Power |
|
● Verde |
Encendido |
- |
Status |
|
● Verde |
Listo |
Encendiendo |
WAN1 |
|
● Verde |
- |
Enviando/Recibiendo |
WAN2 |
|
● Verde |
- |
Enviando/Recibiendo |
LAN |
|
● Verde |
- |
Enviando/Recibiendo |
DMZ |
|
● Verde |
Listo |
Enviando/Recibiendo |
Puerto WAN1 (WAN): Utilice este puerto para conectar un enrutador, modem DSL o Cable modem
Puerto WAN2 (WAN): Utilice este puerto para conectar un enrutador, modem DSL o Cable modem
Puerto LAN (LAN): Utilice este puerto para conectar a la red de la oficina. DMZ: conexión a Internet (FTP, SNMP, HTTP, DNS)
Reset: Reiniciar el Gateway de Seguridad Dual WAN al estado original de Configuración.
DC Power: Conecte el conector del adaptador de DC.
Dual WAN Security Gateway |
Español |
6 |
|
|
|
RS-1200 |
|
|
Ejemplo: Conexión de 2 puertos WAN+1 LAN |
||||
|
|
|
Español |
|
Puerto LAN = 192.168.1.1 |
|
|
||
Puerto WAN1 = |
61.11.11.11 |
|
|
|
Puerto WAN2 = |
211.22.22.22 |
|
|
|
Puerto DMZ = |
61.11.11.11 |
|
|
|
Dual WAN Security Gateway |
Español |
7 |
||
RS-1200 |
||||
|
|
|||
Español


 Ejemplo de Configuración WebUI
PASO 1:
Conecte tanto el PC de Administración como el puerto LAN del Servidor de Seguridad Dual WAN a un hub o switch. Asegúrate que el indicador link del hub/switch esté activo. El Servidor de Seguridad Dual WAN tiene un servidor web para administración y configuración. Utilice un navegador para desplegar las configuraciones del Servidor de Seguridad Dual WAN (Internet Explorer 4(o mayor) o Netscape 4.0(o mayor) con soporte de javascript). La dirección IP del Servidor de Seguridad Dual WAN es 192.168.1.1 con máscara de subred 255.255.255.0. Por lo tanto, la dirección IP del PC Administrador debe estar en el rango 192.168.1.2– 192.168.1.254
Si la dirección IP de la LAN de la empresa no es una subred de 192.168.1.0, (ejemplo: la LAN IP es 172.16.0.1), entonces el administrador debe cambiar la dirección IP de su PC al mismo rango de la subred LAN (ejemplo: 172.16.0.2). Reinicie el PC si se requiere.
Por defecto, el Servidor de Seguridad Dual WAN es despachado con la función DHCP Server habilitada. Esto significa que llas PCs clientes en la red, incluyendo el PC Administrador pueden tener la configuración TCP/IP para que automáticamente obtenga su dirección IP del Servidor de Seguridad Dual WAN.
La tabla siguiente es una lista de direcciones IP privadas. Dichas direcciones no deden ser utilizadas como direcciones WAN 1 / WAN2 IP.
10.0.0.0 ~ 10.255.255.255
172.16.0.0 ~ 172.31.255.255
192.168.0.0 ~ 192.168.255.255
PASO 2:
Una vez que el PC Administrador tenga la dirección IP en la misma red del Servidor de Seguridad Dual WAN, abra el navegador y escriba la siguiente dirección en la barra de comando: http://192.168.1.1.
Una ventana se abrirá pidiendo el nombre de usuario y clave. Se requiere que el usuario y clave sean introducidos para conectarse al Servidor de Seguridad Dual WAN. Introduzca el nombre de usuario por defecto (admin) y la clave de Administrador (admin).
Dual WAN Security Gateway |
Español |
8 |
|
|
|
RS-1200 |
|
|


 Configuración en modo Transparente
PASO 1:
Luego de introducir el nombre de usuario y clave se mostrará la interfáz WEB UI. Seleccione la sección Interface del menú de la izquierda y una lista de sub-funciones será mostrada.
◊Haga Click en WAN de la lista, introduzca la información adecuada de red capa 3
◊Haga Click en Modify para cambiar la configuración WAN1/2 (ejemplo: WAN1 Interface)
WAN1 interface IP Address |
61.11.11.11 |
NetMask |
255.255.255.0 |
Nota: Las configuraciones anteriores son solo ejemplos. Introduzca por favor la dirección IP e información suministrada por su proveedor ISP.
PASO 2:
Haga Click en Policy del menú principal de funciones y despues haga click en Outgoing de la lista de sub-funciones.
PASO 3:
Haga Click en el botón New Entry.
Dual WAN Security Gateway |
Español |
9 |
|
|
|
RS-1200 |
|
|
Español
PASO 4:
Cuando la opción New Entry aparezca, introduzca la siguiente configuración:
Source Address – selecciona Inside_Any Destination Address – selecciona Outside_Any Service - selecciona ANY
Action - selecciona Permit ALL
Click on OK to apply the changes.
Español
PASO 5:
La configuration es exitosa cuando se muestre la ventana siguiente. Asegúrate que todas las computadoras que estan conectadas al puerto LAN tengan como dirección IP de compuerta de salida (Default Gateway IP Ardes) la IP del Servidor de Seguridad Dual WAN (ejemplo: 192.168.1.1). A este nivel, todas las PCs en red deben tener salida a Internet. Si se requiere alguna función de filtro del Servidor de Seguridad Dual WAN, por favor ir a la sección de Políticas (Policy) del manual.
Dual WAN Security Gateway |
Español 10 |
|
|
RS-1200 |
|
|
|
|
Informação Importante |
|
|
||||||
|
|
|
|
|
|
|
|
|
|
|
|
|
Endereço IP por defeito para modo AP |
192.168.1.1 |
|
|
|
||||||
|
Sub Mask por defeito |
|
255.255.255.0 |
|
|
|
|||||
|
Nome de Login por defeito |
admin |
|
|
|||||||
|
Password por defeito |
|
admin |
|
|
||||||
|
|
|
|
|
|
|
|
|
|
|
|
|
|
|
|
|
|
|
|
|
|
|
|
|
|
|
Indicadores LED |
|
|
|
|
||||
|
|
|
|
|
|
|
|
|
|
|
|
|
|
|
|
|
|
|
|
|
|
|
|
|
RS-1200 |
|
|
|
|
|
|
|
|
||
|
|
|
|
|
|
|
|
|
|
|
|
|
|
|
|
|
|
|
|
|
|
|
Português |
|
|
|
|
LED |
|
|
Estado |
|
|||
|
|
|
|
|
|
|
|
|
|||
|
|
|
Indicador |
|
Cor |
ACESO |
CINTILAR |
|
|
|
|
|
|
Power |
|
● Verde |
Energia ligada |
- |
|
|
|
||
|
|
|
|
|
|
||||||
|
|
Status |
|
● Verde |
Pronto a usar |
A ligar |
|
|
|
||
|
|
WAN1 |
|
● Verde |
- |
Envio/Recepção |
|
|
|
||
|
|
WAN2 |
|
● Verde |
- |
Envio/Recepção |
|
|
|
||
|
|
LAN |
|
● Verde |
- |
Envio/Recepção |
|
|
|
||
|
|
DMZ |
|
● Verde |
Pronto a usar |
Envio/Recepção |
|
|
|
||
Porta WAN1 (WAN): Use para ligar a um router, modem DSL ou Cabo. Porta WAN2 (WAN): Use para ligar a um router, modem DSL ou Cabo. Porta LAN (LAN): Use para ligar à rede LAN do escritório.
DMZ: Ligação à Internet (FTP, SNMP, HTTP, DNS)
Reset: Reponha as definições por defeito no Dual WAN Security Gateway.
DC Power: Ligue uma extremidade do cabo de alimentação a esta portae a outra extremidade à tomada da parede.
Dual WAN Security Gateway |
|
Português 11 |
|
||
RS-1200 |
|
|
|
|

Exemplo de Ligação 2 WAN 1 LAN |
|
||
Português |
|
|
|
LAN Port = 192.168.1.1 |
|
|
|
WAN1 Port = 61.11.11.11 |
|
|
|
WAN2 Port = 211.22.22.22 |
|
|
|
DMZ Port = 61.11.11.11 |
|
|
|
Dual WAN Security Gateway |
Português |
12 |
|
RS-1200 |
|||
|
|
||
 Loading...