


user manual frost free refrigeration
2 contents frost free refrigeration
Congratulations
Congratulations and thank you for choosing our products. We are sure you will fi nd your new appliance a pleasure to use. Before you use the appliance, we recommend that you read through the entire user manual, which provides the description of the appliance and its functions.
To avoid the risks that are always present when you use an electric appliance, it is important that the appliance is installed correctly and that you read the safety instructions carefully to avoid misuse and hazards.
We recommend that you keep this user manual for future reference and pass it on to any future owners.
After unpacking the appliance please check it is not damaged. If in doubt, do not use the appliance but contact your local Electrolux Customer Care Centre.
Contents |
|
Top and Bottom mount features ................................... |
3 |
Important safety instructions ........................................ |
4 |
Installing your new appliance........................................ |
5 |
Initial start up .................................................................. |
6 |
Electronic display controls – electronic models only...... |
7 |
– Controlling the temperature ......................................... |
7 |
– Freezer temperature alarm ........................................... |
7 |
– Door alarm................................................................... |
7 |
– Child lock.................................................................... |
7 |
– Drinks chill timer .......................................................... |
7 |
– Energy effi ciency.......................................................... |
7 |
Using your appliance ..................................................... |
9 |
– Crisper bin................................................................... |
9 |
– Door storage bins ........................................................ |
9 |
– Dairy compartment ...................................................... |
9 |
– Deodoriser................................................................... |
9 |
– Modula bottle caddy.................................................... |
9 |
– Bottle Twist holder ....................................................... |
9 |
– Twist ice & serve .......................................................... |
9 |
– Slideaway Spillsafe™ glass shelf................................... |
9 |
Care and maintenance................................................. |
10 |
– Changing the lightbulb............................................... |
10 |
– Cleaning the appliance .............................................. |
10 |
General information ..................................................... |
12 |
– Safety ........................................................................ |
12 |
Troubleshooting............................................................ |
13 |
Subject to change without notice
Information on disposal for users
•Most of the packing materials are recyclable. Please dispose of those materials through your local recycling depot or by placing them in appropriate collection containers.
•If you wish to discard this product, please contact your local authorities and ask for the correct method of disposal.
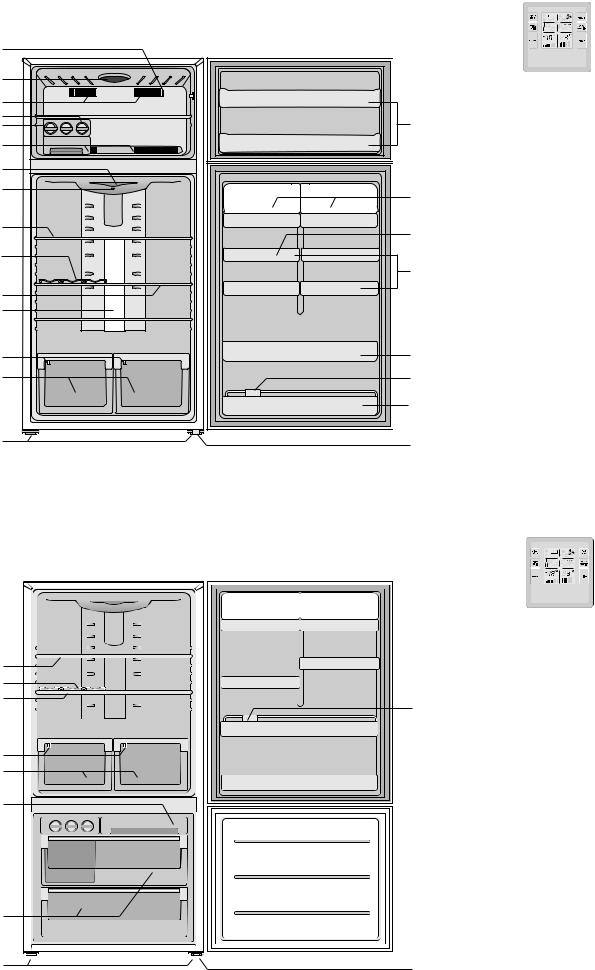
frost free refrigeration features 3
Top mount freezer model
1 |
|
|
|
|
2 |
|
|
Touch Panel on Freezer Door. |
|
3 |
|
|
|
|
4 |
16 |
1 |
Sensor |
|
5 |
2 |
Freezer light |
||
6 |
|
|||
|
3 |
Freezer air delivery vents |
||
|
|
|||
7 |
|
4 |
Spillsafe™ glass shelf |
|
8 |
17 |
5 |
Twist ice & serve with ice cube trays |
|
|
|
|||
|
6 |
Freezer air return vents |
||
|
|
|||
9 |
|
7 |
Sensor |
|
18 |
8 |
Deodoriser |
||
|
||||
|
|
|||
10 |
|
9 |
Spillsafe™ slide away glass shelf |
|
|
19 |
10 |
Modula Bottle Caddy |
|
11 |
|
11 |
Spillsafe™ glass shelves |
|
|
12 |
Fridge light |
||
12 |
|
|||
|
|
13 |
Crisper humidity controls |
|
|
20 |
14 |
Crisper bins |
|
13 |
15 |
Adjustable height rollers |
||
|
||||
14 |
21 |
16 |
Freezer door bins |
|
|
|
|
||
|
22 |
17 |
Dairy compartments |
|
|
18 |
Egg tray |
||
|
|
|||
|
|
19 |
Adjustable door bins |
|
15 |
23 |
20 |
Full width door bin |
|
|
||||
|
|
21 |
Bottle twist holder (where fi tted) |
|
Note: Product illustrations demonstrate various features but may not be completely in line |
|
22 |
Full width door bin with wire retainer |
|
|
|
|
||
with current products. |
|
23 |
Stabilising foot |
Bottom mount freezer model
1 
|
|
|
|
|
|
|
|
|
|
|
|
|
|
|
13 |
|
Touch Panel on Refrigerator Door. |
|||||||||
|
|
|
|
|
|
|
|
|
|
|
|
|
|
|
|
|||||||||||
|
|
|
|
|
|
|
|
|
|
|
|
|
|
|
|
|
|
|
|
|
|
|
|
|
|
|
|
|
|
|
|
|
|
|
|
|
|
|
|
|
|
|
|
|
|
|
|
|
|
|
|
1 |
Deodoriser |
2 |
|
|
|
|
|
|
|
|
|
|
|
|
|
|
|
|
|
|
|
|
|
|
|
14 |
2 |
Spillsafe™ slide away shelf (where fi tted) |
|
|
|
|
|
|
|
|
|
|
|
|
|
|
|
|
|
|
|
|
|
|
|
||||
|
|
|
|
|
|
|
|
|
|
|
|
|
|
|
|
3 |
Modula bottle caddy |
|||||||||
3 |
|
|
|
|
|
|
|
|
|
|
|
|
|
|
|
|
|
|
|
|
|
|
|
15 |
||
|
|
|
|
|
|
|
|
|
|
|
|
|
|
|
|
|
|
|
|
|
|
|
4 |
Adjustable Spillsafe™ glass shelf |
||
4 |
|
|
|
|
|
|
|
|
|
|
|
|
|
|
|
|||||||||||
|
|
|
|
|
|
|
|
|
|
|
|
|
|
|
|
|
|
|
|
|
|
|
|
|||
5 |
|
|
|
|
|
|
|
|
|
|
16 |
5 |
Fridge light |
|||||||||||||
|
|
|
|
|
|
|
|
|
|
|
|
|||||||||||||||
|
|
|
|
|
|
|
|
|
|
|
|
|
|
|
|
|
|
|
|
|
|
|
|
17 |
6 |
Crisper humidity controls |
|
|
|
|
|
|
|
|
|
|
|
|
|
|
|
|
|
|
|
|
|
|
|
|
|||
6 |
|
|
|
|
7 |
Crisper bins (full width on some models) |
||||||||||||||||||||
|
|
|
|
|
|
|
|
|
|
|
|
|
|
|
|
|
|
|
|
|
|
|
|
|||
|
|
|
|
|
|
|
|
|
|
|
|
|
|
|
|
|
|
|
|
|
|
|
|
8 |
Freezer storage tray |
|
7 |
|
|
|
|
|
|
|
|
|
|
|
|
|
|
|
|
|
|
|
|
|
|
|
|
||
|
|
|
|
|
|
|
|
|
|
|
|
|
|
|
|
|
|
|
|
|
|
|
|
9 |
Twist & serve ice |
|
|
|
|
|
|
|
|
|
|
|
|
|
|
|
|
|
|
|
|
|
|
|
|
|
18 |
||
8 |
|
|
|
|
10 |
Ice bin with scoop (inside freezer drawer) |
||||||||||||||||||||
|
|
|
|
|
|
|
|
|
|
|
|
|
|
|
|
|
|
|
|
|
|
|
|
|||
|
|
|
|
|
|
|
|
|
|
|
|
|
|
|
|
|
|
|
|
|
|
|
|
|||
|
|
|
|
|
|
|
|
|
|
|
|
|
|
|
|
|
|
|
|
|
|
|
|
11 |
Freezer drawers on telescopic extension slides |
|
9 |
|
|
|
|
|
|
|
|
|
|
|
|
|
|
|
|
|
|
|
|
|
|
|
|
||
|
|
|
|
|
|
|
|
|
|
|
|
|
|
|
|
|
|
|
|
|
|
|
|
12 |
Adjustable rollers |
|
|
|
|
|
|
|
|
|
|
|
|
|
|
|
|
|
|
|
|
|
|
|
|
|
|||
|
|
|
|
|
|
|
|
|
|
|
|
|
|
|
|
|
|
|
|
|
|
|
|
|
||
|
|
|
|
|
|
|
|
|
|
|
|
|
|
|
|
|
|
|
|
|
|
|
|
|
13 |
Dairy compartments |
10 |
|
|
|
|
|
|
|
|
|
|
|
|
|
|
|
|
|
|
|
|
|
|
|
|
14 |
Adjustable door bins |
|
|
|
|
|
|
|
|
|
|
|
|
|
|
|
|
|
|
|
|
|
|
|
|
|||
|
|
|
|
|
|
|
|
|
|
|
|
|
|
|
|
|
|
|
|
|
|
|
|
|
||
|
|
|
|
|
|
|
|
|
|
|
|
|
|
|
|
|
|
|
|
|
|
|
|
|
15 |
Egg tray |
11 |
|
|
|
|
|
|
|
|
|
|
|
|
|
|
|
|
|
|
|
|
|
|
|
|
16 |
Bottle twist holder (where fi tted) |
|
|
|
|
|
|
|
|
|
|
|
|
|
|
|
|
|
|
|
|
|
|
|
|
17 |
Full width bottle bin |
|
|
|
|
|
|
|
|
|
|
|
|
|
|
|
|
|
|
|
|
|
|
|
|
|
|
||
|
|
|
|
|
|
|
|
|
|
|
|
|
|
|
|
|
|
|
|
|
|
|
|
|
18 |
Full width bottle bin (can bin on smaller models) |
12 |
|
|
|
|
|
|
|
|
|
|
|
|
|
|
|
|
|
|
|
|
|
|
|
|
19 |
Stabilising foot |
|
|
|
|
|
|
|
|
|
|
|
|
|
|
|
|
|
|
|
|
|
|
|
|
|||
|
|
|
|
|
|
|
|
|
|
|
|
|
|
|
|
|
|
|
|
|
|
|
|
|||
|
|
19 |
||||||||||||||||||||||||
|
|
|
|
|||||||||||||||||||||||
|
|
|
|
|
||||||||||||||||||||||
Note: Product illustrations demonstrate various features but may not be completely
in line with current products.

4 important safety instructions frost free refrigeration
Important safety instructions
Please read the user manual carefully and store in a handy place for later reference.
 warning
This appliance is not intended for use by persons (including children) with reduced physical, sensory or mental capabilities, or lack of experience and knowledge, unless they have been given supervision or instruction concerning use of the appliance by a person responsible for their safety.
Children should be supervised to ensure that they do not play with the appliance.
 warning
R600a refrigerant
This appliance contains a small quantity of environmentally friendly, but flammable, non-synthetic R600a refrigerant:
•Ensure that the tubing of the refrigerant circuit is not damaged during transportation and installation.
•Leaking refrigerant may cause eye injuries or ignite.
•The room for installing appliance must be at least 1m3 per 8g of refrigerant. The amount of refrigerant in the appliance can be found on the rating plate inside the appliance.
 warning
• If pressurised aerosol containers bear the word ‘flammable’ and/or a small flame symbol,  do not store them inside any refrigerator or
 freezer. If you do so you may cause an explosion.
•When you dispose of your old refrigerators and freezers, remove any doors. Children can suffocate if they get trapped inside.
•This appliance contains insulation formed with flammable blowing gases. Avoid safety hazards by carefully disposing of this appliance.
•Don’t use a steam cleaner. If live components come into contact with condensing steam, they may short-circuit or cause an electric shock.
When disposing of your old refrigerator or freezer, remove all doors. Children can suffocate if they get trapped inside.
Switching off your appliance
If the appliance needs to be switched off for an extended period, the following steps should be taken to reduce the symptoms of mould:
1.Remove all food.
2.Remove the power plug from the power point.
3.Clean and dry the interior thoroughly.
4.Ensure that all the doors are wedged open slightly for air circulation.
 warning
The refrigerator must be plugged into its own dedicated electrical outlet.
The plug must be accessible when the refrigerator is in position.
It is essential the power point is properly earthed to ground. Consult a qualified electrician if you are unsure.
Don’t use extension cords or adapter plugs with this refrigerator.
If the power cord is damaged, have it replaced by a qualified service technician.
Unplug the refrigerator before cleaning it, or changing the light bulb to avoid electric shock.
Never unplug the refrigerator by pulling the electrical cord as this may damage it. Grip the plug firmly and pull straight out.
Choose a location for your refrigerator that isn’t too cold. The ambient room temperature should be above 10°C.
Stand your refrigerator in a dry place – avoid areas of high moisture or humidity.
Don’t put the refrigerator in frosty or unprotected areas like a garage or on the verandah.
Keep the refrigerator out of direct sunlight.
Don’t locate the refrigerator near stoves, fires or heaters.
When installed correctly, your refrigerator should:
–Have adequate space at the back and sides for air circulation (refer to “Installing your new appliance”).
–Be aligned to the surrounding cupboards.
–Havedoorsthatwillself-closefromapartiallyopenposition.
Keep ventilation openings in the appliance enclosure or in the built-in structure clear of obstruction.
When transporting and installing the refrigerator, care should be taken to ensure that no parts of the refrigerating circuit are damaged.

Installing your new appliance
Adequate ventilation around your refrigerator.
The diagram below shows the recommended airspace to allow for ventilation of your refrigerator. If you don’t have a cupboard with a rear gap, the recommended clearance area on top increases from 50mm to 90mm (y) and from 35mm to 75mm (x). When positioned in a corner area, spacing of at least 350mm on the hinge side will allow the doors to open enough to enable the removal of bins
and shelves.
|
50mm |
|
|
|
350mm |
30mm |
Recommended |
30mm |
(x) |
(y) |
|
|
|
||||
airspace |
|
|
|||
|
CABINET |
|
|
|
|
|
DOOR |
|
|
|
|
NOTE:
Doors are designed to sit proud of cabinetry (not fl ush). The clearances shown
above are the recommended minimum clearances. The clearance at the rear must not exceed 75mm.
Installing your refrigerator
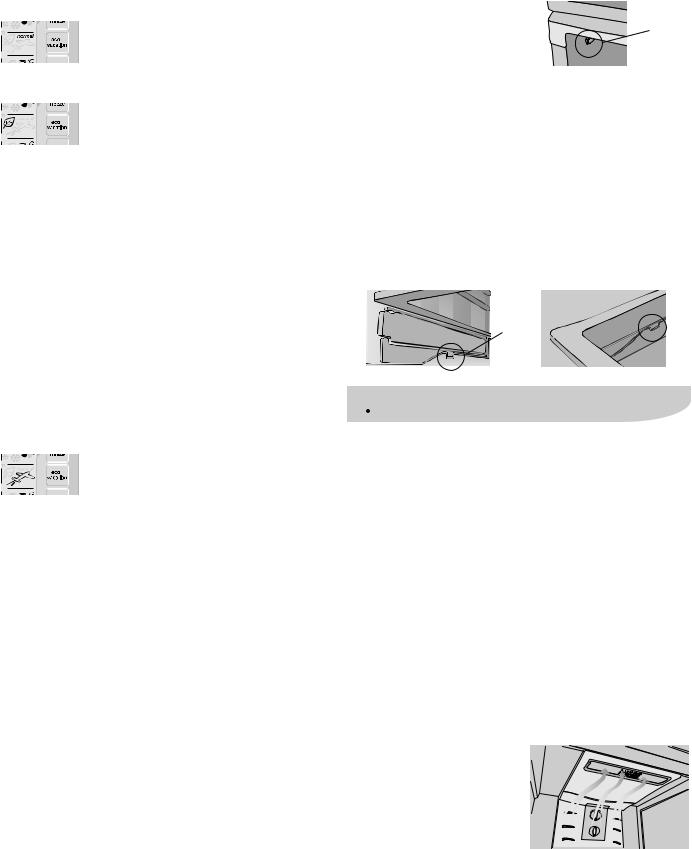
Your new refrigerator should arrive with the front adjustable rollers wound down, to tilt the top backwards by about 10mm from upright. This will allow your refrigerator door to self-close, providing a consistent closed seal.
10-15mm
Height adjustable |
Fixed rear |
front rollers |
rollers |
frost free refrigeration installing your new appliance 5
 caution
The rollers are designed for forward or backward movement only. They are not castors. Moving the refrigerator sideways may damage your fl oor and the rollers.
1.Roll the refrigerator into place.
2.The top of the refrigerator should be tilted back by 10mm. This will allow the doors to self-close providing a consistent door seal.
3.If the refrigerator isn’t tilted back, you can adjust the two front rollers by turning the large, plastic roller nut. One turn of the nut increases the height of the refrigerator by 10mm. If you have diffi culty turning the roller nut, have someone tilt the refrigerator back, so you have better access. Alternatively, you can access the rollers from the side, using a fl at screwdriver. (See diagram below).
Large plastic roller nut
Stability foot  wound up


4.Check the alignment of the refrigerator to the surrounding cupboards to see if it is level. You can adjust the level with the rollers as detailed in step 3.
Aligned to
cupboards 
ie. even gap Top of refrigerator is level ie. horizontal
Adjust front rollers for uneveness of floor eg. wind this roller down or up
The stability foot should also be wound fully up so it will not interfere with the operation of the rollers (see diagram in Step 3).
5.If you fi nd your refrigerator rocks from corner to corner, it means your fl oor is uneven. Find a piece of plastic or hardboard etc. and pack it fi rmly under the roller.
6.On certain fl oor surfaces the refrigerator may roll forward during operation. If this occurs a “roller stop” or wedge can be placed under the front rollers.
7.You may now need to fi ne-tune the installation by repeating Steps 3, 4 and 5.

6 initial start up frost free refrigeration
8.When you have the appliance in its fi nal position, it needs to be stabilised. Wind the stability foot down to the fl oor until it just makes contact with the fl oor. Lift the front of the appliance to take the weight off the stability foot, then turn it ¼ turn further to ensure fi rm contact with the fl oor. Whenever you need to move the appliance, be sure to wind the foot back up so that the appliance can roll freely and be sure to reset it when
reinstalling.
side view
Stabilising foot wound down 
front view
¼ turn
9.Clean your refrigerator thoroughly following the instructions in the “Care and maintenance” section of this manual and wipe off any dust that has accumulated during shipping.
10.Plug your refrigerator straight into its own power point and never use a double adapter. If you need to roll the refrigerator to get to the plug, remember to raise the stability foot fi rst.
11.Before you put any food in your refrigerator, it’s recommended you leave it on for 2 or 3 hours to check it is running properly.
Congratulations! You have successfully installed your new refrigerator.
Initial start-up
Refrigerators work by transferring heat from the food inside to the outside air. This operation makes the back and sides of the refrigerator (particularly at start-up) feel warm
– which is normal.
A cooling coil is located behind the rear wall of the freezer section. This coil cools and removes moisture from
the air inside.
Avoid placing food against the air vents in the refrigerator, as it affects the effi cient circulation. If the door is opened frequently, a light frosting will occasionally occur on the freezer’s interior. This is normal and will clear after a few days. If the freezer door is accidentally kept open, a heavy frost will coat the inside walls and should be removed. Your new refrigerator uses a high-speed compressor, along with other energy-effi cient components, which may make unusual sounds. These sounds simply indicate your refrigerator is working how it should. They include:
•Compressor running noises;
•Air movement noise from the small fan motor;
•A gurgling sound, similar to water boiling;
•A popping noise, heard during automatic defrosting
Further details can be found in “Troubleshooting”.
tips and information
•Don’t place food forward of the ribs on the freezer fl oor, as it will keep the door open.
Sensor
Air vents 


 Ribs
Ribs

Electronic display controls
The electronic display panel consists of an LCD (liquid crystal display) with white backlighting and 6 touch buttons. When the power is fi rst turned on, the display with backlighting will come on. If no buttons have been pressed and the fridge door is closed the backlighting will turn off after 30 seconds.
Controlling the temperature
We recommend that when you start your refrigerator for the fi rst time, the temperature for the refrigerator is set to 3°C and the freezer to -18°C. If you want to change the temperature, follow the instructions below. Make only small adjustments and wait 24 hours to see if it’s correct. Checking the softness of ice cream is a good indication if your freezer is the right temperature, while feeling the
coldness of water kept in the refrigerator is a good way of checking the temperature of the food compartment.
NOTE: When you set a temperature, you set an average temperature for the whole refrigerator cabinet. Temperatures inside each compartment may vary, depending on how much food you store and where you
place it. High or low room temperature may also affect the actual temperature inside the refrigerator.
Changing the freezer temperature
Press the freezer button to make the freezer colder in 1°C steps. Once the maximum of -23°C is reached, the display will return to -14°C with the next press of the button. The bar graph gets smaller with colder freezer settings.
Changing the refrigerator temperature
Press the fridge button to make the refrigerator colder in 1°C steps. Once 0°C is reached, the display will return to 7°C with the next button press. The bar graph gets smaller with colder refrigerator settings.
Fast freeze function
Use the fast freeze function when you


 add a large amount of food to the freezer compartment. This freezes the food quickly but does not affect the temperature in the refrigerator compartment.
To use this function, press the fast freeze button once. An animated icon will light up. The fast freeze function will now operate for 90 minutes and then switch off. If you want
to turn the fast freeze function off before 90 minutes have passed, simply press the fast freeze button again. The icon will disappear and the freezer will return to
frost free refrigeration electronic display controls 7
normal operation.
Freezer temperature alarm


 If the alarm sounds for no apparent reason,


 check whether anything is keeping the door open. If the freezer becomes too warm due to the freezer door being left open or warm food being placed too close to the temperature sensor, a buzzer will sound.
The icon adjacent to the alarm reset button, the freezer set temperature and bar graph will all fl ash, until the alarm reset button is pressed. Once pressed, the alarm disable icon adjacent to the alarm button will illuminate for 50 minutes, or until the temperature drops to an acceptable level. Make sure nothing is holding the freezer door open and move any warm food away from the temperature sensor. If the freezer is still too warm after 50 minutes, the alarm will sound again, indicating that something may be wrong with the refrigerator.
NOTE:
The freezer temperature alarm can be reset for 12 hours by pressing the alarm reset button continuously for 10 seconds.
Fridge door alarm
If the fridge door is left open for more than two minutes, the alarm will buzz and an arrow pointing to an open door will
fl ash, along with the temperature setting and bar graph. If you want to leave the door open while you load the refrigerator, you can turn the alarm off for 8 minutes by pressing the alarm reset button.
Child Lock
Press and hold the freezer
and fridge buttons together to activate the child lock. This will disable the display to prevent
accidental changes to settings. To turn the child lock off, press and hold the freezer and fridge buttons together.
Drinks chill timer


 The drinks chill timer is used to quickly chill
a bottle. Place the bottle in the freezer and


 the timer can be set for a minimum of 5 minutes to a maximum of 30 minutes. To set, simply press the drinks chill button repeatedly for the number of minutes (in 5-minute intervals). Once set, an animated icon appears beside the drinks chill button, with a timer that counts down one minute at a time.
You can change the time or turn the timer off even after the countdown has started. A buzzer will tell you when the time is fi nished and the icon will fl ash until the alarm reset button is pressed.
If your drink is not cold enough, reset the drinks chill function (remembering the drink is already partially chilled). Suggested chilling times:
•10 minutes for cans of drink
•20 minutes for bottles of beer or wine
•30 minutes for bottles of soft drink.
8 electronic display controls frost free refrigeration
Energy efficiency
Your refrigerator has been designed to be energy-effi cient and can operate in three modes: Normal, Eco and Holiday.
• Normal mode
Normal mode is used when the refrigerator door is often opened. This is the normal operating mode of your refrigerator.
• Eco mode
Eco mode can be used if you don’t open your refrigerator door a lot. It is activated in one of two ways:
–by manually pressing the eco/holiday button once when in normal mode, or,
–is automatically activated after 30 hours if the refrigerator door has not been opened.
The leaf icon will appear on the electronic display when eco mode is on. If eco mode is activated automatically, the refrigerator will revert to normal mode once the refrigerator door is opened. If eco mode is entered manually, opening the door will not revert it back to normal mode. To exit eco mode, simply press the eco/holiday button until the word “normal” is displayed. Use Eco mode when you’re not
using the refrigerator all the time (eg. as a long-term storage refrigerator). If the door is going to be opened a lot, switch back to normal mode.
Remember, if eco mode is turned on manually, it won’t switch off automatically.
• Holiday mode
Use this button when you go on holiday
or leave the house for long periods. The refrigerator minimises defrosting to save
energy but maintains your temperature settings. To put the refrigerator into holiday mode, press the eco/holiday mode button until the aeroplane icon appears. The holiday mode will operate until the button is pressed again or the refrigerator door is opened.
NOTE: Opening the freezer door won’t effect the operation of either Eco or Holiday modes.
Eco and Holiday Modes minimise defrosting to save energy, while maintaining your temperature settings.
Other special refrigerator features
•Independent control of the compressor and fan to provide the best performance.
•Extra cooling depending on the number of times the door is opened.
•Automatic defrost when the door is not frequently opened.
NOTE: Display malfunctions may be due to brief power supply interruptions. If this occurs, turn the refrigerator off at the power point and wait 5 minutes. The refrigerator pressure will need time to equalise before you turn the refrigerator on again at the powerpoint.
Using your appliance
This section tells you how to make the most of the many useful features of your new refrigerator.
Crisper bin |
|
Use the crisper bin to store |
|
vegetables, fruit or smallgoods. |
Humidity control |
Change the humidity by sliding the |
|
humidity control. |
|
•Storing vegetables
Store vegetables in the crisper bin and remember to set the humidity control to more humid (closed).
•Storing fruit & smallgoods
Store fruit and smallgoods in the crisper bin and remember to set the humidity control to less humid (open).
•Removal (standard Crisper Bins)
1.Empty food from the drawer.
2.Remove the crisper bin(s) by pulling forward, then up and forward again.
3.Remove the crisper shelf by lifting the catches on the underside of the shelf and pulling the shelf forward.
Catch 
 caution
Never store solvents or fl ammable materials like nail polish remover or lighter fl uid inside your refrigerator. They will affect the life of the plastic components and may taint stored food.
Door storage bins
Your refrigerator is fi tted with door storage bins. These bins adjust to meet different storage needs. All the door bins are completely removable for cleaning. If you want to remove or adjust a bin, lift it over the support lugs on the inner door panel. To replace, push the bin down over the support lugs to lock it in place.
Dairy compartment
Use the dairy compartment to store foods like butter, margarine and cheeses. The compartment is slightly warmer than the rest of the refrigerator compartment, while the lid provides protection against odours.
Deodoriser
Your appliance is fi tted with a catalysing deodoriser to assist
with the removal of food odours inside your appliance. Odours are removed by
adsorption through the fi lter by the normal operation of the
appliance. Keeping food covered and wrapping food with plastic wrap will also help to reduce the
odours inside your appliance.

Modula bottle caddy
The Modula bottle caddy is made of anodised aluminium. They are used to store various types of bottles like wine or beer. Bottles should be stored with the bottom end towards the back of the refrigerator. The fridge arrives with three combined caddies, but they can be separated if desired.
Bottle twist holder operation (where fitted)
The bottle twist holder is used to prevent bottles from falling over. The bottle twist holder consists of two parts, a sliding front, and a rotating retainer ring.
The bottle twist holder can be used in two positions:
•Horizontal
When the bottle twist holder ring is horizontal, any item that fi ts within the ring can simply be placed inside it.
•Vertical
When the bottle twist holder ring is vertical, it is possible to simply slide the bottle twist holder along the bottle retainer bar until it is pushed up against a bottle.
Note:
The bottle should be constrained on the other side by either the end of the bin or other adjacent bottles.
Twist Ice & Serve
To use, remove the tray, fi ll with water and place back in the freezer. Once ice has formed (approximately 3 hours) simply twist the knob at the front clockwise until the ice drops into the bin below.
frost free refrigeration using your appliance 9
Your Twist & serve ice can be relocated to the other side of the freezer as follows:
1.Remove the ice bin and ice cube tray. If the ice tray assembly is frozen to the carriage, simply squeeze the tray and shelf together to break the ice.
2.Before you remove the ice carriage, remember to disengage it from the glass shelf (as shown), as it may result in damage to the assembly.
3.Remove the centre runner by disengaging it at the front of the shelf, and removing it from the rear.
4.Refi t the runner in to the rear of the shelf on the right hand side and then engage the front (as shown)
5.Fit the carriage by sliding it into the runners until the
front of the carriage engages with the shelf.
6. Refi t the ice tray and ice bin.
Slide away glass shelf
This shelf can be used either as a full
depth shelf or when tall items need to be stored at the front of the appliance it can be collapsed to half its original depth.
• To collapse the shelf:
1. Pull the front half of the shelf forward.
Insert into the slot at the rear of the shelf
Then engage into the front of the shelf
2.Then, from the underside, lift the front half of the shelf by raising the rear edge over the recessed hook detail.
3.Pull the shelf forward and allow the rear to drop into the side channels.
4.Push the front shelf backwards (3,4) until it reaches the rear stops.
• Repositioning: |
|
|
The shelf can be repositioned |
|
|
within the appliance unit by |
|
|
pulling the whole assembly |
|
|
out until the side panels are |
|
|
free to pivot down, then |
Hook detail |
|
pivoting the rear of the shelf |
|
|
until the shelf is free from the |
|
|
|
|
|
liner runners. The shelf can |
|
|
then be positioned in any of |
|
|
the runners – this is a very |
|
|
useful feature if your appliance |
|
|
door happens to have limited |
|
|
access. |
|
|

10 care and maintenance frost free refrigeration
Care and maintenance
 warning
Before changing any light bulb, switch the power off at the power point and remove the power cord from the power point.
Changing the light bulb
• Refrigerator light
1. Switch off the power at the power
point and remove the refrigerator’s power cord from the power point.
2. Remove shelves.
3. Carefully unclip the light cover. You do this by pulling the upper part of
the cover towards the front of the cabinet.
4.Unscrew the light bulb and replace it with a bulb that is the same as the original. If, when you remove the light bulb the small rubber “O” ring comes out with the bulb, fi t the “O” ring over the new bulb and screw bulb into the socket (see diagram).
Never insert your finger into the light bulb socket to check for the presence of the “O” ring.
5.Replace the light cover by hooking the light cover lugs into the bottom of the housing and pressing the upper part of the cover until it clips in.
6.Replace shelves.
7.Wait 5 minutes to ensure pressures in the refrigeration system are equalized. Then reconnect and turn the refrigerator on at the power point.
•Freezer light
1.Switch off the power at the power point and remove the refrigerator’s power cord from the power point.
2.Carefully unclip the light cover. You do this
by pulling the light cover tab at the rear towards the front of the cabinet.
3.Unscrew the light bulb and replace it with a bulb that is the same as the original. If, when you remove the light bulb the small
rubber “O” ring comes out with the bulb, fi t the “O” ring over the new bulb and screw bulb into the socket (see diagram).
Never insert your finger into the light bulb socket to check for the presence of the “O” ring.
4.Replace the light cover by hooking the light cover lugs into the front of the housing and pressing the rear of the cover up until it clips in.
5.Wait 5 minutes to ensure pressures in the refrigeration system are equalized. Then reconnect and turn the refrigerator on at the power point.
tips and information
Ensure the ‘O’ ring is in place before replacing the bulb.
Light bulb |
“O” ring |
Light socket |
Cleaning the appliance
 warning
BEFORE CLEANING: Turn appliance off at the power point, then remove power cord from socket. This will make sure there is no chance of getting an electric shock.
•Doors and exterior
–stainless steel
Your stainless steel appliance is manufactured from a mark resistant stainless steel. This stainless steel has a special advanced protective coating that eases the
removal of marks such as fi nger prints and water spots. To keep your stainless steel appliance looking at its best, you should clean it regularly. You should only clean the stainless steel doors with luke-warm soapy water and
a soft cloth, rinsing with clean water and then wipe the surface with clean water and a soft clean cloth to remove soap residue.
–pacifi c silver
You should only clean the pacifi c silver doors with lukewarm soapy water and a soft cloth, rinsing with clean water and then wipe the surface with clean water and a soft clean cloth to remove soap residue.
 caution
Do not use stainless steel cleaners, abrasive pads or other cleaners as they are likely to scratch the surface. Damage to this product after delivery is not covered by your warranty.
•Interior
You should clean the appliance interior regularly. It will be easiest to clean when the food supply is low. Wash the interior with a soft cloth and use an unscented mild soap with lukewarm water. Thoroughly dry all surfaces and removable parts. Avoid getting water on appliance controls. If you have taken out any removable parts, replace them and switch the power on before restocking the appliance with food. Naturally, you should keep the interior of your appliance hygienic by promptly and thoroughly wiping up any food spills.
Don’t use a steam cleaner. If live components come into contact with condensing steam, they may short-circuit or cause an electric shock.
•Door seals
Take care to keep door seals clean. Sticky food and drink can cause seals to stick to the cabinet and tear when you open the door. Wash seal with a mild detergent and warm water. Rinse thoroughly and dry.
 caution
Never use hot water, solvents, commercial kitchen cleaners, aerosol cleaners, metal polishes, caustic or abrasive cleaners, or scourers to clean this appliance, as they will damage it. Many commercially available cleaning products and detergents contain solvents that will damage your refrigerator. When cleaning, use only a soft cloth with an unscented mild soap and lukewarm water.
frost free refrigeration general information 11
This appliance complies to the following E.E.C Directives:
2006/95/EC: |
Low Voltage Directive |
2004/108/EC: Electromagnetic Compatibility (EMC) Directive |
|
92/75EEC: |
Energy Labelling |
94/2/EC: |
Energy Labelling: Implementation for Refrigerators and Freezers |
96/57/EC: |
Efficiency Requirements for Refrigerators and Freezers |
93/68/EEC: |
Global Amendment Directive |
2002/95/CE: |
Restriction on Hazardous Substances (RoHS). |
Harmonised Standards to which Conformity is Declared:
92/7/5/EC:
EN153:1996 Energy Consumption: Refrigerators
89/336/EEC: |
|
EN55014-1:1993 |
Emissions: Household and Similar Devices |
EN55014-2:1997 |
Immunity: Household and Similar Devices |
EN61000-3-2 |
Limits of harmonic current emissions |
EN61000-3-3 |
Limits of voltage fl uctuations and fl icker |
The symbol on the product or on its packaging indicates that this product may not be treated as household waste. Instead it should be taken to the appropriate collection point for the recycling of electrical and electronic equipment. By ensuring this product is disposed of correctly, you will help prevent potential negative consequences for the environment and human health, which could otherwise be caused by inappropriate waste handling of this product. For more detailed information about recycling of this product, please contact your local council, your household waste disposal service or the shop where you purchased the product.
Technical data
Dimensions |
500L top mount |
510L bottom mount |
420L top mount |
430L bottom mount |
Height |
1720mm |
1720mm |
1640mm |
1720mm |
Width |
803mm |
803mm |
703mm |
703mm |
Depth |
745mm |
745mm |
709mm |
745mm |
The technical information is situated on the rating plate on the internal left side of the appliance and on the energy label.
Installation
warning
Read the “Safety Information” carefully for your safety and correct operation of the appliance before installing the appliance.
Positioning
Install this appliance at a location where the ambient temperature corresponds to the climate class indicated on the rating plate of the appliance:
Climate class |
Ambient temperature |
SN |
+10˚C to + 32˚C |
N |
+16˚C to + 32˚C |
ST |
+16˚C to + 38˚C |
T |
+18˚C to + 43˚C |

12 troubleshooting frost free refrigeration
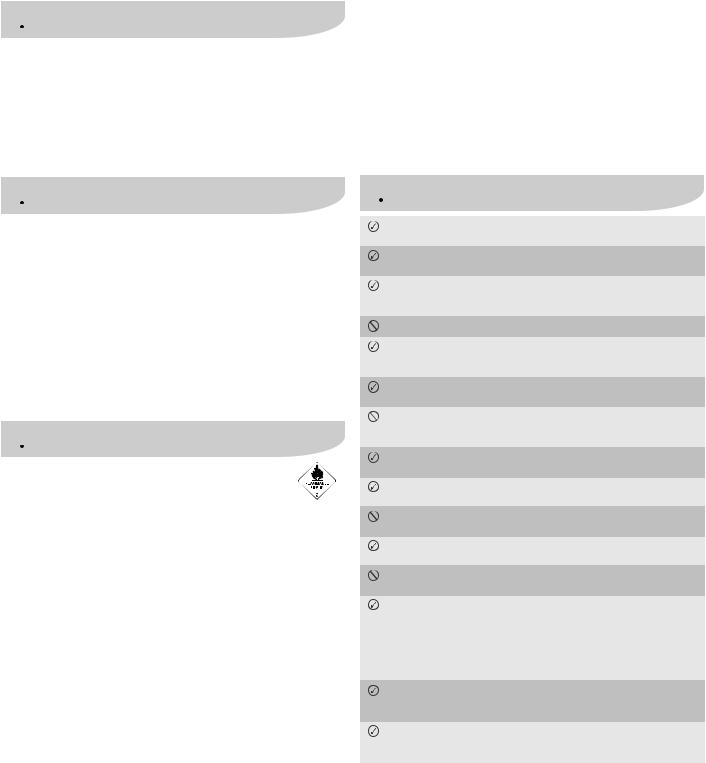
Troubleshooting
If you think something may be wrong with your refrigerator, you can carry out some easy checks before calling for service. You may locate the problem, sparing yourself from inconvenience, saving time and money.
problem |
solution |
Refrigerator is not |
• Check that the power cord is plugged into |
operating |
the power outlet properly and that the outlet |
|
is switched ‘ON’. |
|
• Try running another appliance from the |
|
power outlet. If no power is coming from |
|
the outlet you may have blown a fuse or |
|
tripped a circuit of your household power |
|
supply. |
|
• Try adjusting the temperature control to a |
|
slightly “colder” position. |
|
• It is normal for the freezer fan NOT to |
|
operate during the automatic defrost cycle, |
|
or for a short time after the appliance is |
|
switched on. |
When there is |
Modern refrigerators/freezers with |
refrigerator/freezer |
increased storage capacity use high speed |
noise |
compressors. These can provide a seemingly |
|
high level of sound which is quite normal. |
|
Normal operational sounds include: |
|
• Occasional gurgling, similar to water boiling. |
|
• Air fl ow noise (air circulates because of a |
|
small fan). |
|
• A popping noise heard during automatic |
|
defrost. |
|
Other strange sounds may mean that you |
|
need to check and take action. For example, |
|
noises may mean that: |
|
• The cabinet is not level. |
|
• The fl oor is uneven or weak. |
|
• Bottles are badly placed and rattling. |
|
• There are vibrations from an object on top |
|
of or behind or beside the refrigerator. |
|
• The back of the refrigerator cabinet is |
|
touching the wall. |
|
Remember it is quite normal for noise to |
|
seem louder just after the refrigerator |
|
starts operating. |
If there are odours |
• The interior may need cleaning. |
inside the refrigerator |
• Some foods produce odours. |
|
• Some containers and wrapping can |
|
cause odours. |
|
• Ask yourself if the odour started about the |
|
same time you started storing something |
|
unusual. |
problem |
solution |
When the motor |
Your new refrigerator has a large fridge and |
seems to run more |
freezer section to keep cool. So it is normal |
than expected |
to frequently hear the sound of the motor. |
|
However, to keep operation to a minimum |
|
check the following: |
|
• Are doors kept open too long or too often? |
|
• Are controls set too cold? Refer to |
|
“Controlling the temperature’” |
|
• Have large amounts of warm food just |
|
recently been stored? Summer, festive |
|
seasons and holidays usually mean a lot more |
|
work for your refrigerator. |
|
• If the day is hot or the room is very warm, the |
|
refrigerator will need to run more than normal. |
|
• The refrigerator will run more that normal just |
|
after you install it or when it has been turned |
|
off for a long time. |
If the temperature in |
• Check that the appliance has enough |
the refrigerator is too |
clearance at the sides, back and top. Refer to |
warm |
“Installing your new appliance” |
|
• Refer to “Controlling the temperature” |
|
• You may have kept the door open too long or |
|
too frequently. |
|
• Food containers or packaging may be holding |
|
a door open. |
If the temperature in |
• Refer to “Controlling the temperature” |
the refrigerator is too |
• Increase the temperature to avoid high energy |
cold |
consumption. |
If heavy frosting |
Make sure you fully close the freezer and fridge |
occurs in the freezer |
doors. If the doors are left open, a heavy frost |
|
will coat the inside of the freezer. If a frost |
|
develops, remove it and take care to properly |
|
close the doors. |
If water drips on the |
The defrost water tray, (located at the back or |
fl oor |
underneath of the cabinet) may not be properly |
|
positioned, or the drain tube may not be |
|
properly positioned to direct water into this tray. |
|
You may need to pull the refrigerator away from |
|
the wall to check the tray and tube. |
Fridge does not exit |
Turn appliance off at the power point. Leave off |
vacation mode |
for three (3) minutes for the memory to clear, |
|
then turn back on. |
If the doors will not |
• Check whether the top of the refrigerator is |
close |
tilted back 10-15mm to allowthe doors to self |
|
close. |
|
• Check whether something is holding the door |
|
open. |
|
It is normal for the freezer door to momentarily |
|
open and re-close, when the food storage |
|
compartment door is closed. If the freezer door |
|
stays open, it indicates that the refrigerator |
|
needs to be tilted backwards a little further. If |
|
you call a service person to solve this problem |
|
you will be charged for the cost of the service |
|
call, this is not a warranty fault. |
If you still require service
If you have a problem, and the problem persists after you have made the checks mentioned above, contact your nearest Electrolux approved Service Centre or the dealer you bought the refrigerator from. Be ready to quote the model number, 9-digit PNC and 8-digit serial number, which is stated on the label inside the refrigerator compartment.
Manuel d'utilisation
Réfrigération sans givre

14 table des matières réfrigération sans givre
Félicitations
Félicitations ! Nous vous remercions d'avoir opté pour nos produits. Nous sommes persuadés que votre nouvel appareil électroménager vous procurera le plus grand plaisir. Avant toute utilisation, il est recommandé de lire attentivement
le présent Manuel. Vous y trouverez une description de l'appareil et de ses fonctionnalités.
Pour réduire les risques liés à l'installation des appareils électriques et éviter un usage impropre de l'appareil, il importe que le réfrigérateur-congélateur soit correctement installé et que vous lisiez soigneusement les consignes de sécurité.
Nous vous conseillons de conserver ce Manuel d'utilisation pour toute consultation ultérieure. Remettez-le à l'acheteur éventuel de votre appareil en cas de cession.
Après avoir retiré l'appareil de son emballage, vérifi ez qu'il n'est pas endommagé. En cas de doute, n'utilisez pas l'appareil et contactez le service d'assistance à la clientèle Electrolux local.
Table des matières |
|
Fonctions de modèles à congélateur superposé ou |
|
réfrigérateur superposé............................................... |
15 |
Consignes de sécurité importantes............................ |
16 |
Autonomie de fonctionnement.................................... |
17 |
Stockage des denrées dans les réfrigérateurs et |
|
règles d’hygiène ........................................................... |
17 |
Emplacement des denrées.......................................... |
18 |
Installation de votre nouvel appareil........................... |
19 |
Mise en marche initiale ................................................ |
20 |
Commandes à affichage électronique – modèles |
|
électroniques uniquement ................................................ |
21 |
– Réglage de la température......................................... |
21 |
– Alarme de température du congélateur ...................... |
21 |
– Alarme porte ouverte................................................. |
21 |
– Sécurité enfant .......................................................... |
21 |
– Minuterie de réfrigération des boissons ...................... |
21 |
– Economie d'énergie................................................... |
21 |
Utilisation de votre appareil ........................................ |
23 |
– Bac à légumes .......................................................... |
23 |
– Balconnets de porte.................................................. |
23 |
– Compartiment à laitages............................................ |
23 |
– Désodoriseur ............................................................. |
23 |
– Caddie à bouteilles modulaire .................................... |
23 |
– Support pour bouteilles ............................................. |
23 |
– Distributeur à glaçons ................................................ |
23 |
– Plateau en verre rabattable Spillsafe™ ....................... |
23 |
Entretien et Nettoyage ................................................. |
24 |
– Remplacement de l'ampoule..................................... |
24 |
– Nettoyage de l'appareil .............................................. |
24 |
Informations générales ................................................ |
26 |
– Sécurité ..................................................................... |
26 |
Conseil pour le respect de l’environnemen
Informations sur la mise au rebut de l'appareil destinées à l'acheteur
•La majorité de nos emballages sont recyclables. Pour la mise au rebut des matériaux d'emballage, contactez votre centre de recyclage local ou utilisez les conteneurs de tri sélectif.
•Pour la mise au rebut de votre appareil, informez-vous de la démarche à suivre auprès des autorités locales.

réfrigération sans givre fonctions 15
Modèle à congélateur superposé |
|
|
|
|
1 |
|
|
|
|
2 |
|
|
|
|
3 |
|
Bandeau de commandes tactile sur la porte du |
||
4 |
|
|||
16 |
|
congélateur. |
||
5 |
1 |
Capteur |
||
6 |
|
|||
|
2 |
Eclairage du congélateur |
||
|
|
|||
7 |
|
3 |
Fentes d'amenée d'air du congélateur |
|
8 |
|
4 |
Plateau en verre Spillsafe™ |
|
17 |
5 |
Distributeur à glaçons avec bacs à glaçons |
||
|
||||
9 |
|
6 |
Fentes de retour d'air du congélateur |
|
18 |
7 |
Capteur |
||
|
||||
10 |
|
8 |
Désodoriseur |
|
|
9 |
Plateau en verre rabattable Spillsafe™ |
||
|
19 |
|||
|
10 |
Caddie à bouteilles modulaire |
||
|
|
|||
11 |
|
11 |
Plateaux en verre Spillsafe™ |
|
12 |
|
12 |
Eclairage intérieur du réfrigérateur |
|
|
|
13 |
Boutons de réglage de l'humidité des bacs à |
|
|
|
|
légumes |
|
13 |
20 |
14 |
Bacs à légumes |
|
14 |
21 |
15 |
Roulettes à hauteur réglable |
|
16 |
Balconnets de porte de congélateur |
|||
|
||||
|
|
|||
|
22 |
17 |
Compartiments à laitages |
|
|
|
18 |
Bac à oeufs |
|
15 |
23 |
19 |
Balconnets de porte réglables |
|
20 |
Balconnet de porte pleine largeur |
|||
|
||||
|
|
|||
|
|
21 |
Support pour bouteilles (selon le modèle) |
|
Remarque : Les illustrations du produit présentent différentes fonctions, qui ne |
|
22 |
Balconnet de porte pleine largeur avec arrêtoir |
|
correspondent pas nécessairement parfaitement aux produits actuels. |
|
|
en fi l métallique |
|
|
|
23 |
Pied de stabilisation |
|
Modèle à réfrigérateur superposé
1 
13 |
Bandeau de commandes tactile sur la porte du |
|
réfrigérateur |
||
|
2 
3
4 
5
6 
7
8
9
10
11
12 

Remarque : Les illustrations du produit présentent différentes fonctions, qui ne correspondent pas nécessairement parfaitement aux produits actuels.
|
|
Désodoriseur |
|
|
|
Plateau rabattable Spillsafe™ (selon le modèle) |
|
|
|
Caddie à bouteilles modulaire |
|
|
|
Plateau en verre réglable Spillsafe™ |
|
|
|
Eclairage intérieur du réfrigérateur |
|
|
|
Touches de réglage de l'humidité des bacs à |
|
|
|
légumes |
|
|
7 |
Bacs à légumes (pleine largeur sur certains |
|
|
|
modèles) |
|
18 |
8 |
Plateau de stockage du congélateur |
|
9 |
Distributeur de glaçons |
||
|
|||
|
10 |
Réserve à glaçons avec cuiller (à l'intérieur du |
|
|
|
tiroir du congélateur) |
|
|
11 |
Tiroir du congélateur sur glissières |
|
|
|
télescopiques |
|
|
12 |
Roulettes réglables |
|
|
13 |
Compartiments à laitages |
|
|
14 |
Balconnets de porte réglages |
|
|
15 |
Bac à oeufs |
|
|
16 |
Support pour bouteilles (selon le modèle) |
|
|
17 |
Balconnet à bouteilles pleine largeur |
|
|
18 |
Balconnet à bouteilles pleine largeur (balconnet |
|
|
|
à cannettes sur les plus petits modèles) |
|
|
19 |
Pied de stabilisation |
16 consignes de sécurité importantes réfrigération sans givre
Consignes de sécurité importantes
Lisez soigneusement ce manuel et conservez-le en lieu sûr pour consultation ultérieure.
 avertissement
Cet appareil n'est pas destiné à être utilisé par des enfants ou des personnes dont les capacités physiques, sensorielles ou mentales, ou le manque d'expérience et de connaissance les empêchent d'utiliser l'appareil sans risque lorsqu'ils sont sans surveillance ou en l'absence d'instruction d'une personne responsable qui puisse leur assurer une utilisation de l'appareil sans danger. Empêchez les enfants de jouer avec l'appareil.
 avertissement
Frigorigène R600a
Cet appareil contient une petite quantité de frigorigène R600a non synthétique écologique, mais infl ammable :
•Vérifiez que la tuyauterie du circuit de frigorigène n'a pas été endommagée pendant le transport et l'installation de l'appareil.
•Les fuites de frigorigène peuvent provoquer des blessures aux yeux ou s'enflammer.
•La pièce où l'appareil doit être installé doit faire au moins 1m3 par 8 g de frigorigène. La quantité de frigorigène que contient l'appareil figure sur la plaque signalétique à l'intérieur de l'appareil.
 avertissement
• Ne conservez pas d’aérosols sous pression portant la mention ‘inflammable’ et/ou ou le symbole d’une petite flamme à l’intérieur de
votre réfrigérateur ou congélateur. Le non-respect de cette consigne peut provoquer une explosion.
•Pour mettre le réfrigérateur et le congélateur au rebut, retirez les portes pour éviter que des enfants ne s’y enferment et ne suffoquent.
•Cet appareil comprend des matériaux isolants constitués de gaz inflammables explosifs. Une mise au rebut correcte de l’appareil permettra d’éviter tout risque.
•N’utilisez pas de nettoyeur à vapeur. Si des composants sous tension entrent en contact avec la vapeur de condensation, cela peut provoquer un court-circuit ou un choc électrique.
Pour mettre le réfrigérateur et le congélateur au rebut, retirez les portes pour éviter que des enfants ne s’y enferment et ne suffoquent.
Mise à l’arrêt de votre appareil
Si vous devez mettre votre appareil à l’arrêt pendant une période prolongée, sans qu’il ne se forme de moisissures ni d’odeurs, procédez comme suit :
1.Retirez tous les aliments.
2.Débranchez votre appareil.
3.Nettoyez et séchez bien l’intérieur.
4.Maintenez les portes entrouvertes. Si toutefois vous n’avez pas la possibilité de débrancher et vider l’appareil, faites vérifi er régulièrement le bon fonctionnement de celui-ci et ceci en tenant compte de sa charge et de son autonomie de fonctionnement.
 avertissement
L'appareil doit être branché dans sa propre prise électrique.
Le cordon d'alimentation doit être accessible une fois l'appareil en place.
Il est essentiel que la prise soit mise correctement à la terre. En cas de doute, faites appel à un électricien qualifié.
N'utilisez ni rallonges ni adaptateurs avec cet appareil.
Si le cordon d'alimentation est endommagé, il doit être remplacé par un technicien de service après-vente qualifié.
Débranchez l'appareil avant de le nettoyer ou de remplacer l'ampoule, afin d'éviter tout choc électrique.
Ne débranchez jamais l'appareil en tirant sur le cordon d'alimentation, car vous risqueriez de l'endommager. Saisissez fermement la fiche et tirez-la d'un coup sec.
Choisissez un emplacement qui ne soit pas trop frais. La température doit être supérieure à 10°C.
Installez l'appareil dans un lieu sec, à l'abri d'une moisissure ou humidité excessive.
N'installez pas l'appareil dans des endroits exposés au gel ou non protégés comme un garage ou une véranda.
Maintenez l'appareil à l'abri des rayons directs du soleil.
Ne placez pas l'appareil à proximité d'un poêle, d'un radiateur électrique ou d'un chauffage.
Si l'appareil est installé correctement, il doit :
–Avoir un espacement suffisant pour la circulation de l'air à l'arrière et sur les côtés (reportez-vous au chapitre "Installation de votre nouvel appareil")
–Etre aligné avec les meubles adjacents.
–Avoir les portes qui se ferment automatiquement lorsqu'elles sont entrouvertes.
Veillez à ce que les orifices de ventilation, situés dans l'enceinte de l'appareil ou la structure intégrée, ne soient pas obstrués.
Lorsque vous transportez et installez le réfrigérateur, veillez à n'endommager aucune partie du circuit de réfrigération.
 Loading...