


user manual brugsanvisning käyttöohje bruksanvisning bruksanvisning
Heatpump
Varmepumpe
Ilmapumppu
Varmepumpe
Värmepump
EXH09HX1WI/EXH09HX1WE
EXH12HX1WI/EXH12HX1WE

2 electrolux
Electrolux. Thinking of you.
Share more of our thinking at www.electrolux.com
Contents
Safety ..................................................... |
3 |
Description Of The Appliance ................. |
5 |
Before The First Use ............................... |
7 |
Operating The Appliance ........................ |
9 |
Additional Information On Use .............. |
16 |
Cleaning And Care ............................... |
16 |
What To Do If ....................................... |
18 |
Environment Concerns ......................... |
19 |
European Guarantee ............................ |
20 |
www.electrolux.com ............................ |
20 |

electrolux 3
Safety
Warnings for use
Warning!
1.Do not pull or deform the power supply cord. Pulling and misuse of the power supply cord can result in damage to the unit and cause electrical shock.
2.Be careful not to expose your body directly to the outlet air for a long time. It may affect your physical conditions.
3.When using the Heatpump for infants, children, elderly, bedridden, or disabled people make sure the room temperature is suitable for those in the room.
4.Never insert objects into the unit. Inserting objects can result in injury due to the high speed rotation of internal fans.
5.Ground the Heatpump without fail. Do not connect the grounding wire to gas pipe, water pipe, lightning rod or telephone grounding wire. Incomplete grounding may cause electric shock.
6.If anything is abnormal with the air conditioner (ex. a burning smell), stop the operation immediately and turn the circuit breaker OFF.
7.The appliance shall be installed in accordance with national wiring regulations. Improper cable connection can cause the power supply cord, plug and the electrical outlet to overheat and cause fire.
8.If the supply cord is damaged, it must be replaced by the manufacturer or its service agent or a similarly qualified person in order to avoid a hazard. Use only the manu- facture-specified power cord for replacement.
Warnings for installation/removal/repair
 Warning! Do not attempt to install/ remove/repair the unit by yourself. Incorrect work will cause electric shock, water leak, fire etc. Consult your dealer or other qualified service personnel for the installation/removal/repair of the unit.

4 electrolux
Cautions for use
Caution!
1.Open a window or door periodically to ventilate the room, especially when using gas appliances. Insufficient ventilation may cause oxygen shortage.
2.Do not operate the buttons with wet hand. It may cause electric shock.
3.For safety, turn the circuit breaker off when not using the unit for an extended period of time.
4.Check the outdoor unit mounting rack periodically for wear and to make sure it is firmly in place.
5.Do not put anything on the outdoor unit nor step on it. The object or the person may fall down or drop, causing injury.
6.This unit is designed for residential use. Do not use for other applications such as in a kennel or greenhouse to raise animals or grow plants.
7.Do not place a vessel with water on the unit. If water penetrates into the unit, electrical insulations may deteriorate and cause electric shock.
8.Do not block the air inlets nor outlets of the unit. It may cause insufficient performance or troubles.
9.Be sure to stop the operation and turn the circuit breaker off before performing any maintenance or cleaning. A fan is rotating inside the unit and you may get injured.
10.Do not splash or pour water directly on the unit. Water can cause electrical shock or equipment damage.
11.This appliance is not intended for use by young children or infirm persons without supervision. Young children should be supervised to ensure that they do not play with the appliance.
Cautions for location/installation
Caution!
•Make sure to connect the Heatpump to power supply of the rated voltage and frequency.
Use of a power supply with improper voltage and frequency can result in equipment damage and possible fire. Install the unit in a place with minimal dust, fumes and moisture in the air.
•Do not install the unit in a place where inflammable gas may leak. It may cause fire.
•Arrange the drain hose to ensure smooth drainage. Insufficient drainage may cause wetting of the room, furniture etc.
•Make sure a leak breaker or a circuit breaker is installed, depending on the installation location, to avoid electrical shock.
electrolux 5
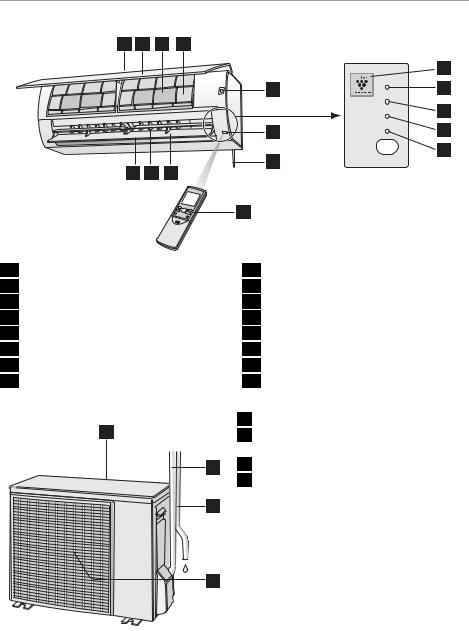
Description Of The Appliance
Indoor unit
1 |
3 |
4 |
|
|
|
|
|
|
12 |
|
|
5 |
OPERATION |
13 |
|
|
|
TIMER |
14 |
|
|
|
|
|
|
|
|
TURBO |
15 |
|
|
6 |
CLEAN |
|
|
|
|
|
16 |
10 |
9 |
8 |
|
|
|
|
11 |
|
|
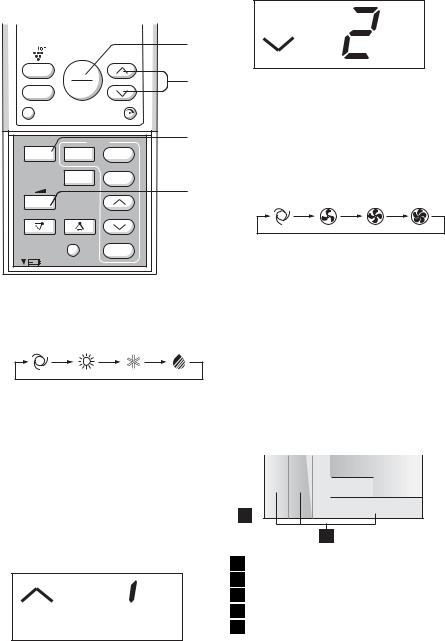
1Inlet (Air)
2Open Panel
3Air Purifying Filter
4Air Filter
5AUX Button
6Receiver Window
7Power Supply Cord
8Vertical Adjustment Louvre
Outdoor unit
1 |
2 |
3 |
4 |
9 Horizontal Adjustment Louvre
10Outlet (Air)
11Remote Control
12PLASMACLUSTER Lamp (blue)
13OPERATION Lamp (red)
14TIMER Lamp (orange)
15TURBO Lamp (green)
16CLEAN Lamp (green)
1Inlet (Air)
2Refrigerant Tube and Interconnecting Cord
3Drainage Hose
4Outlet (Air)
Actual units might vary slightly from those shown above.
6 electrolux |
|
|
|
|
|
|
Remote control |
|
|
|
|
||
|
|
|
|
1 |
TRANSMITTER |
|
|
|
|
|
2 |
DISPLAY (Liquid Crystal Display) |
|
|
|
|
|
3 |
ON/OFF Button |
|
|
|
|
|
4 |
THERMOSTAT Button |
|
|
|
|
|
5 |
TURBO Button |
|
|
|
|
2 |
6 |
TIMER ON Button (for setting the timer) |
|
|
|
|
7 |
TIMER OFF Button (for setting the timer) |
||
|
|
|
|
|||
|
|
|
|
8 |
ONE-HOUR OFF TIMER Button |
|
|
|
|
|
9 |
TIME ADVANCE Button |
|
|
|
|
|
10 |
TIME REVERSE Button |
|
|
|
TEMP |
3 |
11 |
SELF CLEAN Button |
|
21 |
PLASMA |
ON |
|
12 |
TIMER SET/CANCEL (SET/C)Button |
|
CLUSTER |
4 |
|||||
20 |
DISPLAY |
OFF |
13 |
SWING Button ( : horizontal direction) |
||
|
||||||
19 |
INDIRECT AIR TURBO |
5 |
14 |
CLOCK Button |
||
|
|
|
|
|
15 Indicates battery compartment is below |
|
|
|
TIMER |
6 |
this mark |
|
|
18 |
MODE |
OFF 1HR |
TIMER |
16 SWING Button ( |
: vertical direction) |
|
|
|
ON |
7 |
|||
|
|
CLEAN |
TIMER |
17 FAN Button |
|
|
|
|
OFF |
8 |
|
||
17 |
|
|
|
18 MODE Button |
|
|
FAN |
|
|
9 |
|
||
|
TIMEADJUST |
19 INDIRECT AIR Button |
||||
16 |
|
|
10 |
|||
|
|
|
20 DISPLAY Button |
|
||
|
SWING |
|
11 |
|
||
|
|
SET/C |
21 PLASMACLUSTER Button |
|||
|
|
SET |
|
|||
|
|
CLOCK |
|
|
|
|
15 |
|
|
|
12 |
|
|
|
|
|
|
13 |
|
|
|
|
|
|
14 |
|
|
|
|
|
electrolux |
7 |
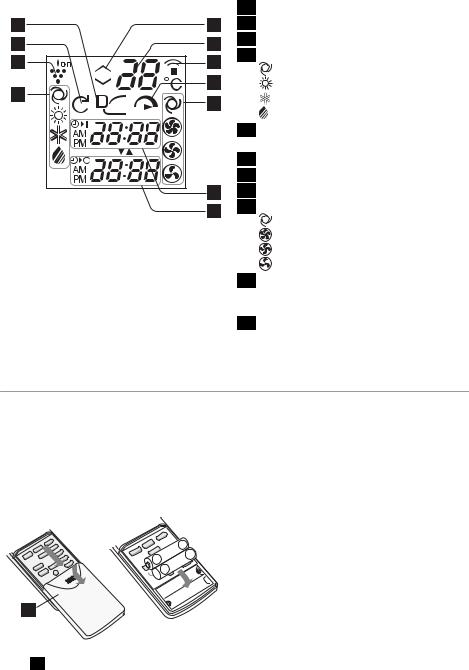
L.C.D. Remote Control Display |
|
|
|
|
|
|
1 |
INDIRECT AIR Symbol |
|
1 |
5 |
2 |
SELF CLEAN Symbol |
|
2 |
6 |
3 |
PLASMACLUSTER Symbol |
|
4 |
MODE Symbols |
|
||
3 |
7 |
|
||
|
: AUTO |
|
||
|
8 |
|
|
|
4 |
|
: HEAT |
|
|
9 |
|
: COOL |
|
|
|
|
|
||
|
|
: DRY |
|
|
|
|
|
|
|
|
|
5 |
Thermostat setting for AUTO and DRY |
|
|
|
|
modes |
|
|
|
6 |
TEMPERATURE Indicator |
|
|
|
7 |
TRANSMITTING Symbol |
|
|
10 |
8 |
TURBO Symbol |
|
|
11 |
9 |
FAN SPEED Symbols |
|
|
|
: AUTO |
|
|
|
|
|
|
|
|
|
|
: HIGH |
|
|
|
|
: LOW |
|
|
|
|
: SOFT |
|
|
|
10 |
TIMER ON Indicator/CLOCK |
|
|
|
|
Indicates the on timer preset time or cur- |
|
|
|
|
rent time. |
|
|
|
11 |
TIMER OFF Indicator |
|
|
|
|
Indicates the preset time for off timer or |
|
|
|
|
one-hour off timer. |
|
Before The First Use
Loading batteries
Use two size-AAA (R03) batteries.
1.Remove the remote control cover.
2.Insert batteries in the compartment, making sure the + and - polarities are correctly aligned.
–The display indicates “AM 6:00” when batteries are properly installed.
 -
-
+  +
+
 -
-
1
•The battery life is approximately one year in normal use.
•When you replace the batteries, always change both batteries, and make sure they are the same type.
•If the remote control does not operate properly after replacing the batteries, take out the batteries and reinstall them again after 30 seconds.
•If you will not be using the unit for a long time, remove the batteries from the remote control.
How to use the remote control
Point the remote control towards the unit’s signal receiver window and press the desired button. The unit generates a beep when it receives the signal.
1Remote control cover
3.Reinstall the cover.

8 electrolux
•Point the remote control towards the unit’s signal receiver window and press the desired button. The unit generates a beep when it receives the signal.
•The remote control can send signals from up to 7 metres away.
 Caution!
• Do not allow the signal receiver window to receive strong direct sunlight,
Set current clock time
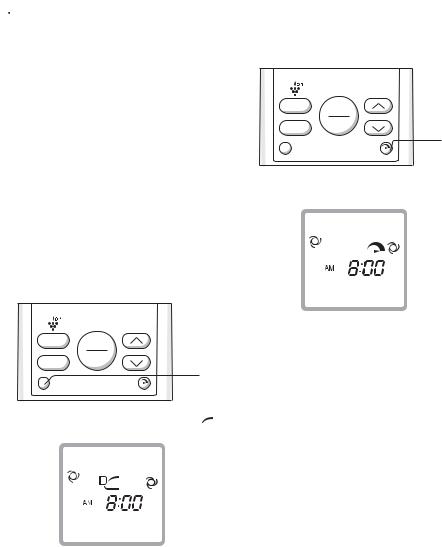
There are two clock modes: 12-hour mode and 24-hour mode.
Example: 5 o’clock in the afternoon
Clock |
Display |
12-hour mode |
PM 5:00 |
24-hour mode |
17:00 |
|
|
1.To set to the 12-hour mode, press the CLOCK button once in the first step. To set to the 24-hour mode, press the CLOCK button twice in the first step.
2.Press the TIME ADVANCE or REVERSE button to set the current time.
–Keep the button pressed to advance or reverse the time display quickly.
3.Press the SET/C button.
–The colon (:) blinks to indicate that the clock is functioning.
since it can adversely affect its operation. If the signal receiver window is exposed to direct sunlight, close a curtain to block the light.
•Do not allow the signal receiver window to receive strong direct sunlight, since it can adversely affect its operation. If the signal receiver window is exposed to direct sunlight, close a curtain to block the light.
•The unit can be affected by signals transmitted from the remote control of a television, VCR or other equipment used in the same room.
•Do not leave the remote control in direct sunlight or near a heater. Also, protect the unit and remote control from moisture and shock which can discolour or damage them.
|
TIMER |
|
|
MODE |
OFF 1HR |
TIMER |
|
|
|
ON |
|
|
CLEAN |
TIMER |
|
|
|
OFF |
|
FAN |
|
|
2 |
|
|
TIMEADJUST |
|
|
SWING |
|
3 |
|
CLOCK |
SET/C |
|
|
SET |
||
|
|
|
1 |
•The current time cannot be set when the timer is operating.
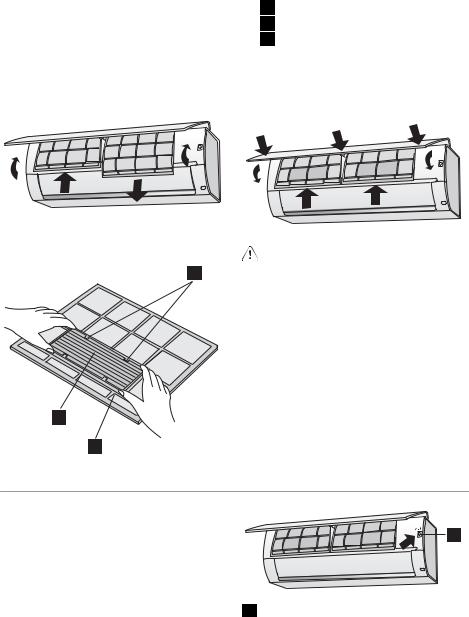
Setting air purifying filter
The air purifying filters are packed as accessory of this unit. During operation of the air conditioner, the filters remove dust and
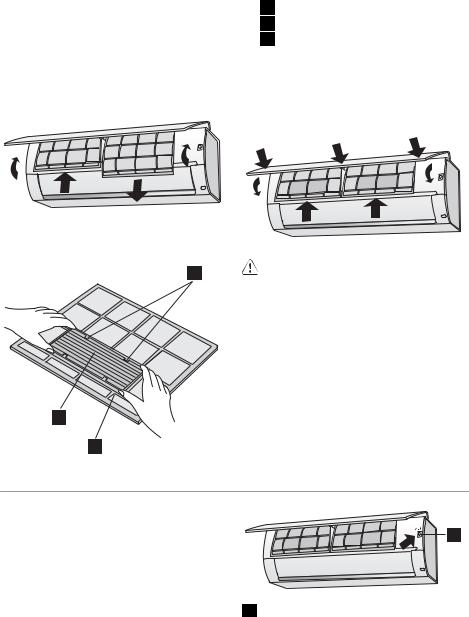
tobacco smoke from the air and discharges clean air.
1.Take out the air filters.
a)Open the open panel.
b)Push the air filters up slightly to unlock them.
c)Pull the air filters down to remove them.
a
bc
2.Set the air purifying filter under the filter stoppers located on the air filter.
3
1
2
electrolux 9
1Air purifying filter
2Air filter
3Filter stopper
3.Reinstall the air filters.
a)Reinstall the air filters in the original positions.
b)Close the open panel.
c)Push the arrow-marked of the panel firmly to lock it in place.
c
b
a
Caution!
•The filters are sealed in a plastic bag to keep their dust collection effect.
•Do not open the bag until using the filters. (Otherwise the filters life may get shorter.)
•Do not expose the filters to direct sunlight. (Otherwise they may deteriorate.)
Operating The Appliance
Auxiliary mode
Use this mode when the remote control is not available.
To turn on
Lift the open panel of the indoor unit and press the AUX button.
•The red OPERATION lamp on the unit will light and the unit will start operating in the AUTO mode.
•The fan speed and temperature setting are set to AUTO.
To turn off
Press the AUX button again.
•The red OPERATION lamp on the unit will turn off.
1
1AUX button
•If the AUX button is pressed during normal operation, the unit will turn off.
10 electrolux
Basic operation
|
|
|
2 |
|
|
TEMP |
5 |
PLASMA |
ON |
|
|
CLUSTER |
|
3 |
|
DISPLAY |
OFF |
|
|
|
|
||
|
|
|
|
INDIRECT AIR |
TURBO |
|
|
|
TIMER |
1 |
|
|
|
||
MODE |
OFF 1HR |
TIMER |
|
|
|
ON |
|
|
CLEAN |
TIMER |
|
|
|
OFF |
4 |
FAN |
|
|
|
|
|
|
|
|
|
TIMEADJUST |
|
|
SWING |
|
|
|
CLOCK |
SET/C |
|
|
SET |
|
|
1.Press the MODE button to select the operation mode.
AUTO HEAT COOL DRY
2.Press the ON/OFF button to start operation.
–The red OPERATION lamp on the unit will light.
3.Press the THERMOSTAT button to set the desired temperature.
Auto/dry mode
The temperature can be changed in 1°C increments within the range of 2°C higher to 2°C lower from the temperature automatically determined by the air conditioner.

 C
C
(Example: 1°C higher)
 C
C
(Example: 2°C lower)
Heat/cool mode
The temperature can be set within the range of 18 to 32°C.
4.Press the FAN button to set the desired fan speed.
AUTO SOFT LOW HIGH
In the DRY mode, the fan speed is preset to AUTO and cannot be changed.
5.To turn off the unit, press the ON/OFF button again.
The red OPERATION lamp on the unit will turn off.
Tips about auto mode
In the AUTO mode, the temperature setting and mode are automatically selected according to the room temperature and outdoor temperature when the unit is turned on.
Modes and Temperature Settings
|
|
|
4 |
|
|
|
5 |
|
|
|
|
|
|
||
|
|
|
|
|
|
|
|
|
|
|
|
|
|
|
|
|
|
|
|
|
|
|
|
°C |
2 |
||||||
|
0 |
10 18 |
|
|
|
28 |
|
34 |
|
||||||
|
|
|
|
|
|
|
|
|
|
|
|
|
|
|
|
|
|
|
|
24°C |
|
25°C |
|
26°C |
|||||||
29 |
|
|
|
|
|
|
|
|
|
|
|
|
|
|
|
24°C |
23°C |
|
|
|
|
|
|
|
|
|
|
|
|
|
|
21 |
|
|
|
|
|
|
|
|
|
|
|
|
|
||
|
|
|
|
|
|
|
|
|
|
|
|
|
|
|
|
|
|
|
|
|
|
|
|
|
|
|
|
|
|
|
|
22°C
1 °C
3
1Indoor temperature (°C )
2outdoor temperature (°C )
3Heat
4Dry (room temp. - 2°C)
5Cool
The figures on chart are temperature settings During operation, if the outdoor temperature changes, the temperature settings will automatically slide as shown in the chart.
 Mode Changeover
During seasons when you need HEATING at night and COOLING at daytime , or if the room temperature should become extremely higher than the temperature setting, due to supplementary heating equipment, the mode will automatically switch between HEAT and COOL mode to keep the comfortable room temperature.
Adjusting vertical air flow direction
1.Press the SWING button (  ) on the remote control once.
–The vertical adjustment louvre will swing continuously.
2.Press the SWING button (  ) again when the vertical adjustment louvre is at the desired position.
–The louvre will stop moving within the range shown in the diagram.
|
TIMER |
|
MODE |
OFF 1HR |
TIMER |
|
|
ON |
|
CLEAN |
TIMER |
|
|
OFF |
FAN |
|
1 |
|
|
|
|
|
TIMEADJUST |
|
|
2 |
|
SWING |
|
|
CLOCK |
SET/C |
|
SET |
|
|
electrolux 11 |
Adjustment range |
|
HEAT mode |
COOL and DRY |
|
modes |
Adjusting horizontal air flow direction
1.Press the SWING button (  ) on the remote control once.
–The horizontal adjustment louvres will swing continuously.
2.Press the SWING button (  ) again when the horizontal adjustment louvres are at the desired position.
|
TIMER |
|
MODE |
OFF 1HR |
TIMER |
|
|
ON |
|
CLEAN |
TIMER |
|
|
OFF |
FAN |
|
1 |
|
|
|
|
|
TIMEADJUST |
|
|
2 |
|
SWING |
|
|
CLOCK |
SET/C |
|
SET |
|
•The adjusted position will be memorized and will be automatically set to the same position when operated the next time.
•The adjustment range is narrower than the SWING range in order to prevent condensation from dripping.
12 electrolux
 Caution! Never attempt to adjust the louvres manually.
•Manual adjustment of the louvres can cause the unit to malfunction.
•When the vertical adjustment louvre is positioned at the lowest position in the COOL or DRY mode for an extended period of time, condensation may result.
Indirect air
Press the INDIRECT AIR button during cooling or dry operation when you do not want to feel cold air. The vertical adjustment louvre is set obliquely upward to deliver cool air to the ceiling.
Press the button during heating operation. The vertical adjustment louvre is set downward to deliver the warm air down to the floor.
1.During operation, press the INDIRECT AIR button.
rection to make the room cool or warm rapidly.
1.During operation, press the TURBO button.
|
|
TEMP |
PLASMA |
|
ON |
CLUSTER |
|
|
DISPLAY |
OFF |
|
|
1 |
|
|
|
|
INDIRECT AIR |
TURBO |
|
– The remote control will display 
|
|
TEMP |
PLASMA |
|
ON |
CLUSTER |
|
|
DISPLAY |
OFF |
|
|
1 |
|
|
|
|
INDIRECT AIR |
TURBO |
|
– The remote control will display 
To cancel
Press the INDIRECT AIR button again.
•The INDIRECT AIR setting is cancelled when you press TURBO button while INDIRECT AIR is set.
•If you want INDIRECT AIR operation in TURBO mode, press INDIRECT AIR button during TURBO operation.
Turbo operation
In this operation, the air conditioner works at the maximum power and optimum louvre di-
–The temperature display will go off.
–The green TURBO lamp on the unit will light up.
To cancel
Press the TURBO button again.
–The TURBO operation will also be cancelled when the operation mode is changed, or when the unit is turned off.
–The green TURBO lamp on the unit will turn
off.
•The Heatpump will operate at “Extra HIGH” fan speed for 5 minutes, and then shift to “HIGH” fan speed. The vertical adjustment louvre will be set automatically to a diagonally lower direction, though it can be changed if necessary.
•You can not set the temperature or fan speed during the TURBO operation.
•To turn off the TURBO lamp, press the DISPLAY button.
Plasmacluster operation
The Plasmacluster Ion generator inside the Heatpump will release positive and negative plasmacluster ions into the room.
Approximately the same number of positive and negative ions released into the air will reduce some airborne mold.
1.During operation, press the PLASMACLUSTER button.
|
|
|
|
|
|
|
|
electrolux |
13 |
|
|
|
TEMP |
1 |
|
TIMER |
|
|
|
|
PLASMA |
ON |
|
|
MODE |
OFF 1HR |
TIMER |
1 |
|
|
CLUSTER |
|
|
|
|
ON |
|||
|
|
|
|
|
|
|
|
||
|
DISPLAY |
OFF |
|
|
|
CLEAN |
TIMER |
|
|
|
|
|
|
|
|
|
|||
|
|
|
|
|
|
|
OFF |
|
|
|
INDIRECT AIR |
TURBO |
|
FAN |
|
|
|
|
|
|
|
|
|
|
|
|
|
|
|
|
|
|
|
|
|
|
TIMEADJUST |
|
|
– |
The remote control will display |
|
|
SWING |
|
|
|
||
|
|
|
|
|
|
CLOCK |
SET/C |
|
|
|
|
|
|
|
|
SET |
|
|
|
– The remote control displays 
– The blue PLASMACLUSTER lamp on the unit will light up.
To cancel
Press the PLASMACLUSTER button again.
–The PLASMACLUSTER lamp on the unit will turn off.
•Use of the PLASMACLUSTER operation will be memorized, and it will be activated the next time you turn on the air conditioner.
•To turn off the PLASMACLUSTER lamp, press the DISPLAY button.
•To perform the PLASMACLUSTER operation without accompanying heat, cool or dry mode, press the PLASMACLUSTER button while the unit is not operating. The mode symbol of the remote control will go off and the fan speed can not be set AUTO.
Self clean operation
SELF CLEAN operation will provide effect to reduce the growth mold fungus, and to dry inside of the Heatpump unit with Plasmacluster ions. Utilize the operation at seasonal change over terms.
1.Press the SELF CLEAN button when the unit is not operating.
–The red OPERATION lamp, the green CLEAN lamp and the blue PLASMACLUSTER lamp on the unit will light up.
–The unit will stop operation after forty
minutes.
To cancel
Press the SELF CLEAN button. Alternatively, turn the unit off by pressing the ON/ OFF button.
–The red OPERATION lamp, the green CLEAN lamp and the blue PLASMACLUSTER lamp on the unit will turn off.
•You cannot set the temperature, fan speed, air flow direction or timer setting during the SELF CLEAN operation.
•Mold fungus already grown can not be eliminated by this operation.
One-hour off timer
When the ONE-HOUR OFF TIMER is set, the unit will automatically turn off after one hour.
1.Press the ONE-HOUR OFF TIMER button.

14 electrolux
|
TIMER |
1 |
||
MODE |
OFF 1HR |
TIMER |
||
|
||||
|
|
ON |
|
|
|
CLEAN |
TIMER |
|
|
|
|
OFF |
|
|
FAN |
|
|
|
|
|
|
TIMEADJUST |
|
|
|
SWING |
|
2 |
|
|
CLOCK |
SET/C |
|
|
|
SET |
|
||
– The remote control displays
Timer off operation
1. Press the TIMER OFF (  ) button.
|
TIMER |
|
|
MODE |
OFF 1HR |
TIMER |
|
|
|
ON |
|
|
CLEAN |
TIMER |
1 |
|
OFF |
||
FAN |
|
|
2 |
|
|
TIMEADJUST |
|
|
SWING |
|
3 |
|
CLOCK |
SET/C |
|
|
SET |
||
2.The TIMER OFF indicator will blink; press the TIME ADVANCE or REVERSE button to set the desired time.
(The time can be set in 10-minute increments.)
–The orange TIMER lamp on the unit will light up.
–The unit will stop operating after one hour.
2.To cancel
Press the TIMER CANCEL (SET/C) button.
–The orange TIMER lamp on the unit will turn off.
Alternatively, turn the unit off by pressing the ON/ OFF button.
–The red OPERATION lamp and the orange TIMER lamp on the unit will turn off.
•The ONE-HOUR OFF TIMER operation has priority over TIMER ON and TIMER OFF operations.
•If the ONE-HOUR OFF TIMER is set while the unit is not operating, the unit will operate for an hour at the formerly set condition.
•If you wish to operate the unit for another hour before the ONE-HOUR OFF TIMER is activated, press the ONE-HOUR OFF TIMER button again during operation.
•If TIMER ON and/or TIMER OFF are set, TIMER CANCEL (SET/C) button cancels every setting.
3.Point the remote control at the receiver window on the unit and press the TIMER SET (SET/C) button.
–The orange TIMER lamp on the unit will light.
–The unit will generate a beep when it receives the signal.
Tips about timer off operation
When the TIMER OFF mode is set, the temperature setting is automatically adjusted to prevent the room from becoming excessively hot or too cold while you sleep. (Auto Sleep function) The Auto Sleep function will not activate during the AUTO mode.
Heat mode:
• One hour after the timer operation begins, the temperature setting drops 3°C lower than the original temperature setting.
Cool/dry mode:
•One hour after the time operation begins, the temperature setting rises 1 °C higher than the original temperature setting.
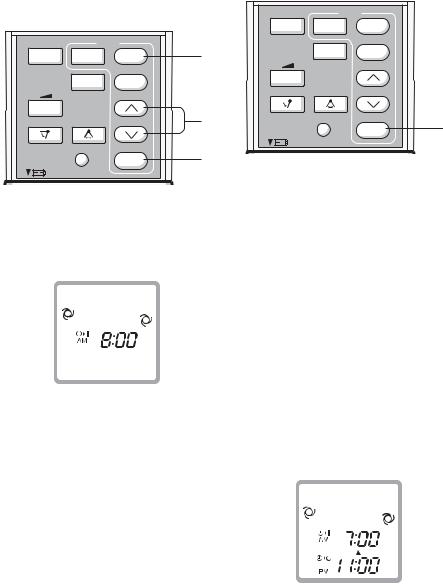
Timer on operation
1. Press the TIMER ON ( 
 ) button.
|
TIMER |
1 |
|
MODE |
OFF 1HR |
TIMER |
|
ON |
|||
|
CLEAN |
TIMER |
|
|
|
OFF |
|
FAN |
|
|
2 |
|
|
TIMEADJUST |
|
|
SWING |
|
3 |
|
CLOCK |
SET/C |
|
|
SET |
||
2.The TIMER ON indicator will blink; press the TIME ADVANCE or REVERSE button to set the desired time.
(The time can be set in 10-minute increments.)
3.Point the remote control at the receiver window on the unit and press the TIMER SET (SET/C) button.
–The orange TIMER lamp on the unit will light.
–The unit will generate a beep when it receives the signal.
4.Select the operation condition.
•The unit will turn on prior to the set time to allow the room to reach the desired temperature by the programmed time. (Awaking function)
Timer cancel/change operation To cancel timer mode
1.Press the TIMER CANCEL (SET/C) button.
–The orange TIMER lamp on the unit will turn off.
–The current clock time will be displayed on the remote control.
electrolux 15
|
TIMER |
|
|
MODE |
OFF 1HR |
TIMER |
|
|
|
ON |
|
|
CLEAN |
TIMER |
|
|
|
OFF |
|
FAN |
|
|
|
|
|
TIMEADJUST |
|
|
SWING |
|
1 |
|
CLOCK |
SET/C |
|
|
SET |
||
•If any TIMER ON, TIMER OFF and ONEHOUR OFF TIMER are set, the TIMER
CANCEL (SET/C) button cancels all settings.
To change time setting
Cancel the TIMER setting first, then set it again.
Timer on/off operation (combined use)
You can use the ON and OFF timers in combination.
Example:
To stop operation at 11:00 p.m. and resume operation to bring the room temperature to the desired level by 7:00 a.m.
1.Set the TIMER OFF to 11:00 p.m. during operation.
2.Set the TIMER ON to 7:00 a.m.
–The arrow (  or
or  ) between the TIMER ON indicator and the TIMER OFF indicator shows which timer will activate first.
•You cannot programmed the ON-TIMER and OFF-TIMER to operate the unit at different temperatures or other settings.
•Either timer can be programmed to activate prior the other.

16 electrolux
Additional Information On Use
Tips on saving energy
Below are some simple ways to save energy when you use your Heatpump.
Set the correct temperature
•Setting the thermostat 1°C higher than the desired temperature in the COOL mode and 2°C lower in the HEAT mode will save approximately 10 percent in power consumption.
•Setting the temperature lower than necessary during cooling operation will result in increased power consumption.
Block direct sunlight and prevent drafts
Operating temperature range
|
|
|
Heating |
|
upper limit |
|
|
lower limit |
Cooling |
|
upper limit |
|
|
lower limit |
|
|
|
•The built-in protective device may prevent the unit from operating when used out of this range.
•Condensation may form on the air outlet if the unit operates continuously in the COOL or DRY mode when humidity is over 80 percent.
When power failure occurs
This Heatpump has a memory function to store settings when a power failure occurs. After power recovery, the unit will automatically restart in the same settings which were active before the power failure, except for timer settings.
If the timers were set before a power failure, they will need to be re-set after power recovery.
Preheating function
In the HEAT operation, the indoor fan may not start for two to five minutes after the unit is turned on to prevent cold air from blowing out of the unit.
•Blocking direct sunlight during cooling operation will reduce power consumption.
•Close the windows and doors during cooling and heating operations.
Set proper air flow direction to obtain the best air circulation
Keep filter clean to ensure the most efficient operation
Make most of the timer off function Disconnect the power cord when the unit is not used for an extended period of time
•The indoor unit still consumes a small amount of power when it is not operating.
Indoor temp. |
Outdoor temp. |
27˚C |
24˚C |
5˚C |
–20˚C |
32˚C |
43˚C |
21˚C |
–10˚C |
|
|
De-icing function
•When ice forms on the heat exchanger in the outdoor unit during the HEAT operation, an automatic de-icer provides heat for about 5 to 10 minutes to remove the ice. During de-icing, the inside and outside fans stop operating.
•After de-icing is completed, the unit automatically resumes operation in the HEAT mode.
Heating efficiency
•The unit employs a heat pump that draws heat from the outside air and releases it into the room. The outside air temperature therefore greatly affects the heating efficiency.
•If the heating efficiency is reduced due to low outside temperatures, use an additional heater.
•It takes time to warm up and heat the entire room because of the forced air circulation system.
Cleaning And Care
 Caution! Be sure to disconnect the power cord from the wall outlet or turn off the circuit breaker before performing any maintenance.
Cleaning the filters
The air filters should be cleaned every two weeks.
1.Turn off the unit.
2.Remove the filters.

a)Lift the open panel.
b)Push the air filters up slightly to unlock them.
c)Pull the air filters down to remove them.
a
bc
3.Take off the air purifying filters from the air filters.
4.Clean the filters.
Use a vacuum cleaner to remove dust. If the filters are dirty, wash them with warm water and a mild detergent. Dry filters in the shade before reinstalling.
5.Reinstall the air purifying filters.
6.Reinstall the filters.
a)Reinstall the filters in the original positions.
b)Close the open panel.
c)Push the arrow-marked of the panel firmly to lock it in place.
c
b
a
electrolux 17
Changing the air purifying filter
The filters should be changed every 3 ~ 6 months
1.Remove the air filters.
2.Change the air purifying filters.
a)Take off the old air purifying filters from the air filters.
b)Set the new air purifying filters, under the filter stoppers located on the air filters.
1
2
1Air purifying filter
2Air filter
3Filer stopper
3.Reinstall the air filters.
•The dirty air purifying filters are not washable for reuse. The new filters are available at your nearest dealer.
 Disposal of Filters
Please dispose of replaced filters according to the local disposal laws and regulations.
Air purifying filter materials Filter: Polypropylene Frame: Polyester
Cleaning the unit and the remote control
•Wipe them with a soft cloth.
•Do not directly splash or pour water on them. It can cause electrical shock or equipment damage.
•Do not use hot water, thinner, abrasive powders or strong solvents.

18 electrolux
Maintenance after Heatpump season
1.Operate the unit in the SELF CLEAN operation to allow the mechanism to thoroughly dry.
2.Stop the operation and unplug the unit. Turn off the circuit breaker, if you have one exclusively for the air conditioner.
3. Clean the filters, then reinstall them.
Maintenance before Heatpump season
1.Make sure that the air filters are not dirty.
2.Make sure that nothing obstructs the air inlet or outlet.
What To Do If
The following conditions do not denote equipment malfunctions
Problem |
Remedy |
Unit does not operate |
The unit will not operate if it is turned on |
|
immediately after it is turned off. The unit will not |
|
operate immediately after the mode is changed. |
|
This is to protect the internal mechanisms. Wait 3 |
|
minutes before operating the unit. |
Unit does not send out warm air |
The unit is preheating or de-icing. |
Odors |
Carpet and furniture odors that entered into the |
|
unit may be sent out from the unit. |
Water vapour |
• In the HEAT operation, water vapour may flow |
|
out of the outdoor unit during de-icing. |
|
• In the COOL and DRY operation, water vapour |
|
can sometimes be seen at the air outlet due to |
|
the difference between the room air tempera- |
|
ture and the air discharged by the unit. |
The outdoor unit does not stop |
After stopping the operation, the outdoor unit will |
|
rotate its' fan for about a minute to cool down the |
|
unit. |
|
|
Odor emitted from the Plasmacluster air outlet
If the unit appears to be malfunctioning, check the following points before calling for service.
Problem
If the unit fails to operate
If the unit fails to heat (or cool) the room effectively
This is the smell of ozone generated from the Plasmacluster Ion generator. The ozone concentration is very small, posing no adverse effect on your health. The ozone discharged into the air rapidly decomposes, and its density in the room will not increase.
What should be checked
Check to see if the circuit breaker has tripped or the fuse has blown.
•Check to see if the circuit breaker has tripped or the fuse has blown.
•Check the outdoor unit to make sure nothing is blocking the air inlet or outlet.
•Check the thermostat is proper setting.
•Make sure windows and doors are closed tightly.
•A large number of people in the room can prevent the unit from achieving the desired temperature.
•Check whether any heat-generating appliances are operating in the room.
Problem
If the unit fails to receive the remote control signal
Please call for service when OPERATION lamp, TIMER lamp and/or PLASMACLUSTER lamp on the unit blink.
electrolux 19
What should be checked
•Check whether the remote control batteries have become old and weak.
•Try to send the signal again with the remote control pointed properly towards the unit’s signal receiver window.
•Check whether the remote control batteries are installed with the polarities properly aligned.
Environment Concerns
The symbol  on the product or on its packaging indicates that this product may not be treated as household waste. Instead it should be taken to the appropriate collection point for the recycling of electrical and electronic equipment. By ensuring this product is disposed of correctly, you will help prevent potential negative consequences for the environment and human health, which could otherwise be caused by inappropriate waste handling of this product. For more detailed information about recycling of this product, please contact your local council, your household waste disposal service or the shop where you purchased the product.
A. Information on Disposal for Users (private households)
• In the European Union
 Caution! If you want to dispose of this equipment, please do not use the ordinary dust bin!
Used electrical and electronic equipment must be treated separately and in accordance with legislation that requires proper treatment, recovery and recycling of used electrical and electronic equipment. Following the implementation by member states, private households within the EU states may return their used electrical and electronic equipment to designated collec-
tion facilities free of charge1). In some countries12345) your local retailer may also take back your old product free of charge if you purchase a similar new one.
If your used electrical or electronic equipment has batteries or accumulators, please dis-
pose of these separately beforehand according to local requirements.
By disposing of this product correctly you will help ensure that the waste undergoes the necessary treatment, recovery and recycling and thus prevent potential negative effects on the environment and human health which could otherwise arise due to inappropriate waste handling.
B.Information on Disposal for Business Users.
• In the European Union
If the product is used for business purposes and you want to discard it:
Please contact your ELECTROLUX dealer who will inform you about the take-back of the product. You might be charged for the costs arising from take-back and recycling. Small products (and small amounts) might be taken back by your local collection facilities. For Spain: Please contact the established collection system or your local authority for take-back of your used products.
C.Information before disposal of the Heatpump containing refrigerant R410A.
Before dismounting the product for disposal, the appliance has to be emptied for refrigerant. The gas has a server impact on the greenhouse effect and must not be disposed in the air because of environmental aspects. This has to be done by an authorized professional in accordance with local legal regulation. After emptied the gas, the product should be treated as other electrical and electronic appliances.
1) Please contact your local authority for further details.

20 electrolux
European Guarantee
This appliance is guaranteed by Electrolux in each of the countries listed at the back of this user manual, for the period specified in the appliance guarantee or otherwise by law. If you move from one of these countries to another of the countries listed, the appliance guarantee will move with you subject to the following qualifications:-
•The appliance guarantee starts from the date you first purchased the appliance which will be evidenced by production of a valid purchase document issued by the seller of the appliance.
•The appliance guarantee is for the same period and to the same extent for labour and parts as exists in your new country of
residence for this particular model or range of appliances.
•The appliance guarantee is personal to the original purchaser of the appliance and cannot be transferred to another user.
•The appliance is installed and used in accordance with instructions issued by Electrolux and is only used within the home, i.e. is not used for commercial purposes.
•The appliance is installed in accordance with all relevant regulations in force within
your new country of residence.
The provisions of this European Guarantee do not affect any of the rights granted to you by law.
www.electrolux.com
|
|
|
|
Albania |
+35 |
5 4 261 450 |
Rr. Pjeter Bogdani Nr. 7 Tirane |
Belgique/België/Belgien |
+32 |
2 363 04 44 |
Bergensesteenweg 719, 1502 |
|
|
|
Lembeek |
Česká republika |
+420 2 61 12 61 12 |
Budějovická 3, Praha 4, 140 21 |
|
Danmark |
+45 |
70 11 74 00 |
Sjællandsgade 2, 7000 Frederi- |
|
|
|
cia |
Deutschland |
+49 |
180 32 26 622 |
Muggenhofer Str. 135, 90429 |
|
|
|
Nürnberg |
Eesti |
+37 |
2 66 50 030 |
Pärnu mnt. 153, 11624 Tallinn |
España |
+34 |
902 11 63 88 |
Carretera M-300, Km. 29,900 |
|
|
|
Alcalá de Henares Madrid |
France |
www.electrolux.fr |
|
|
Great Britain |
+44 |
8705 929 929 |
Addington Way, Luton, Bed- |
|
|
|
fordshire LU4 9QQ |
Hellas |
+30 |
23 10 56 19 70 |
4, Limnou Str., 54627 |
|
|
|
Thessaloniki |
Hrvatska |
+385 1 63 23 338 |
Slavonska avenija 3, 10000 Za- |
|
|
|
|
greb |
Ireland |
+353 1 40 90 753 |
Long Mile Road Dublin 12 |
|
Italia |
+39 |
(0) 434 558500 |
C.so Lino Zanussi, 26 - 33080 |
|
|
|
Porcia (PN) |
Latvija |
+37 |
17 84 59 34 |
Kr. Barona iela 130/2, LV-1012, |
|
|
|
Riga |
Lietuva |
+370 5 278 06 03 |
Ozo 10a, LT-08200 Vilnius |
|
Luxembourg |
+352 42 431 301 |
Rue de Bitbourg, 7, L-1273 |
|
|
|
|
Hamm |
Magyarország |
+36 |
1 252 1773 |
H-1142 Budapest XIV, Erzsébet |
|
|
|
királyné útja 87 |
|
|
|
|
|
|
|
electrolux 21 |
|
|
|
|
|
|
|
|
Nederland |
+31 |
17 24 68 300 |
Vennootsweg 1, 2404 CG - Al- |
|
|
|
phen aan den Rijn |
Norge |
+47 |
81 5 30 222 |
Risløkkvn. 2 , 0508 Oslo |
Österreich |
+43 |
18 66 400 |
Herziggasse 9, 1230 Wien |
Polska |
+48 |
22 43 47 300 |
ul. Kolejowa 5/7, Warszawa |
Portugal |
+35 |
12 14 40 39 39 |
Quinta da Fonte - Edificio Gon- |
|
|
|
çalves Zarco - Q 35 -2774-518 |
|
|
|
Paço de Arcos |
Romania |
+40 |
21 451 20 30 |
Str. Garii Progresului 2, S4, |
|
|
|
040671 RO |
Schweiz - Suisse - Svizzera |
+41 |
62 88 99 111 |
Industriestrasse 10, CH-5506 |
|
|
|
Mägenwil |
Slovenija |
+38 |
61 24 25 731 |
Gerbičeva ulica 98, 1000 |
|
|
|
Ljubljana |
Slovensko |
+421 2 43 33 43 22 |
Electrolux Slovakia s.r.o., Elec- |
|
|
|
|
trolux Domáce spotrebiče SK, |
|
|
|
Seberíniho 1, 821 03 Bratislava |
Suomi |
www.electrolux.fi |
|
|
Sverige |
+46 |
(0)771 76 76 76 |
Electrolux Service, S:t Görans- |
|
|
|
gatan 143, S-105 45 Stockholm |
Türkiye |
+90 |
21 22 93 10 25 |
Tarlabaşı caddesi no : 35 Tak- |
|
|
|
sim İstanbul |
Россия |
+7 495 937 7837 |
129090 Москва, |
|
|
|
|
Олимпийский проспект, 16, |
|
|
|
БЦ "Олимпик" |
Україна |
+380 44 586 20 60 |
04074 Київ, |
|
|
|
|
вул.Автозаводська, 2а, БЦ |
|
|
|
"Алкон" |

22 electrolux
Electrolux. Thinking of you.
Share more of our thinking at www.electrolux.com
Indhold
Sikkerhed ............................................. |
23 |
Beskrivelse af anlægget ........................ |
25 |
Inden ibrugtagning ................................ |
27 |
Betjening af enheden ............................ |
29 |
Yderligere oplysninger om brug ............ |
36 |
Rengøring og vedligeholdelse ............... |
36 |
Hvis der opstår fejl ................................ |
38 |
Skån miljøet .......................................... |
39 |
Garanti/Kundeservice ........................... |
40 |
Europæisk Garanti ............................... |
40 |
www.electrolux.com ............................ |
41 |

electrolux 23
Sikkerhed
Advarsler for brug
Advarsel
1.Netkablet må ikke strækkes, vrides eller knækkes. Strækning og forkert behandling af netkablet kan resultere i skader på anlægget og elektrisk stød.
2.Pas på ikke at udsætte kroppen direkte for afgangsluften i længere tid. Det kan være sundhedsskadeligt.
3.Når varmepumpen bruges til spædbørn, børn, ældre, sengeliggende eller svagelige: Kontrollér, at temperaturen er passende for den eller dem, der opholder sig i lokalet.
4.Stik aldrig ting ind i enheden. Hvis der stikkes ting ind, kan de ramme de hurtigt roterende blæsere, med fare for personskade.
5.Varmepumpen skal altid forbindes til jord. Jordlederen må ikke forbindes til et gaseller vandrør, lynafleder eller jordledning til telefon. Risiko for elektrisk stød ved mangelfuld jordforbindelse.
6.Hvis der sker noget unormalt i klimaanlægget (f.eks. brændt lugt), skal det straks standses, og der slukkes for den pågældende strømkreds på el-tavlen.
7.Anlægget skal installeres iht. det gældende stærkstrømsreglement. Ukorrekt tilslutning af ledninger kan overophede netkablet, stikket og stikkontakten, med fare for brand.
8.Hvis netkablet beskadiges, skal det udskiftes af producenten, dennes serviceleverandør eller en montør med tilsvarende kvalifikationer for at forebygge, at nogen udsættes for fare. Netkablet må kun udskiftes med det kabel, som producenten har specificeret.
Advarsler vedr. installation/nedtagning/ reparation
 Advarsel Forsøg aldrig selv at installere/ nedtage eller reparere anlægget. Forkert udført arbejde medfører elektrisk stød, udsivning af vand, brand mm. Spørg forhandleren eller en anden sagkyndig til råds, når anlægget skal installeres, nedtages eller repareres.

24 electrolux
Forholdsregler ved brug
Bemærk
1.Åbn vinduet eller døren en gang imellem for at gennemlufte lokalet, især hvis der er gasforbrugende apparater. Utilstrækkelig ventilation kan give iltmangel.
2.Betjen ikke knapperne med en våd hånd. Fare for elektrisk stød.
3.Af hensyn til sikkerheden skal der slukkes på el-tavlen, når enheden ikke er i brug i længere tid.
4.Efterse jævnligt monteringsrammen til udedelen for slid, og kontrollér, at den sidder fast.
5.Læg ikke noget på udedelen, og træd ikke op på den. Tingen (eller personen) kan falde ned og komme til skade.
6.Anlægget er beregnet til brug i boliger. Det må ikke bruges til andre formål, f.eks. i en kennel (dyreopdræt) eller et drivhus (dyrkning af planter).
7.Stil ikke en skål med vand på enheden. Hvis der kommer vand i enheden, kan isoleringsmaterialerne blive nedbrudt, med fare for elektrisk stød.
8.Anlæggets luftindsugninger eller - udblæsninger må ikke blokeres. Det kan nedsætte ydelsen eller give driftsforstyrrelser.
9.Stop altid anlægget, og sluk på relæet på el-tavlen, inden der udføres vedligeholdelse eller rengøring. Du kan komme til skade på grund af blæserrotationen i enheden.
10.Sprøjt eller hæld ikke vand direkte på enheden. Vand kan give elektrisk stød eller skade udstyret.
11.Apparatet må ikke bruges af små børn eller svagelige, med mindre de er under opsyn. Hold øje med små børn for at sikre, at de ikke leger med anlægget.
Forholdsregler vedr. placering/ installation
Bemærk
•Sørg for at tilslutte varmepumpen til en strømforsyning med opgivne mærkespænding og -frekvens.
Hvis der bruges en strømforsyning med forkert mærkespænding og -fre- kvens, kan udstyret tage skade, med fare for brand.
Enheden skal installeres et sted, hvor der er mindst muligt støv, dampe og fugt i luften.
•Enheden må ikke installeres et sted, hvor der kan sive brændbar gas ud. Det kan forårsage brand.
•Placer afløbsslangen, så vandet kan løbe uhindret. Utilstrækkeligt afløb kan give vandskader i lokalet, på møbler osv.
•Sørg for, at der er installeret en jordafbryder eller et HFI-relæ - afhængigt af installationens placering - for at forebygge elektrisk stød.
electrolux 25
Beskrivelse af anlægget
Indedel |
|
|
|
|
1 |
3 |
4 |
|
|
|
|
|
|
12 |
|
|
5 |
OPERATION |
13 |
|
|
|
TIMER |
14 |
|
|
|
|
|
|
|
|
TURBO |
15 |
|
|
6 |
CLEAN |
|
|
|
|
|
16 |
10 |
9 |
8 |
|
|
|
|
11 |
|
|
1 |
Indsugning (luft) |
9 |
Spjæld til vandret justering |
|
Adgangspanel |
|
Udblæsning (luft) |
2 |
10 |
||
|
Luftrensningsfilter |
|
Fjernbetjening |
3 |
11 |
||
|
Luftfilter |
|
PLASMACLUSTER Kontrollampe (blå) |
4 |
12 |
||
|
AUX -knap |
|
OPERATION Kontrollampe (rød) |
5 |
13 |
||
|
Modtagervindue t. fjernbetjening |
|
TIMER Kontrollampe (gul) |
6 |
14 |
||
|
Netkabel |
|
TURBO Kontrollampe (grøn) |
7 |
15 |
||
|
Spjæld til lodret justering |
|
CLEAN Kontrollampe (grøn) |
8 |
16 |
Udedel |
1 |
2 |
3 |
4 |
1Indsugning (luft)
2Kølerør og forbindelseskabel
3Afløbsslange
4Udblæsning (luft)
I praksis kan enhederne afvige en smule fra de her viste.
26 electrolux |
|
|
|
|
|
|
|
|
Fjernbetjening |
|
|
|
|
|
|
||
|
|
|
|
|
1 |
SENDER |
|
|
|
|
|
|
|
2 |
DISPLAY (lcd-display) |
||
|
|
|
|
|
3 |
ON/OFF -knap (tænd/sluk) |
||
|
|
|
|
|
4 |
THERMOSTAT -knap (indstilling af ter- |
||
|
|
|
|
|
|
mostat) |
|
|
|
|
|
|
2 |
5 |
TURBO -knap (fuld effekt) |
||
|
|
|
|
6 |
TIMER ON -knap (til indstilling af timer) |
|||
|
|
|
|
|
||||
|
|
|
|
|
7 |
TIMER OFF -knap (til indstilling af timer) |
||
|
|
|
|
|
8 |
OFF 1HR-knap (1 times drift) |
||
|
|
|
|
|
9 |
TIMER FREM-knap (stil timer frem) |
||
21 |
CLUSTER |
ON |
TEMP |
3 |
10 |
TIMER TILBAGE-knap (stil timer tilbage) |
||
|
|
11 |
SELF CLEAN CLEAN-knap (automatisk |
|||||
|
PLASMA |
|
|
|
|
|
|
|
20 |
DISPLAY |
OFF |
|
4 |
|
rensning) |
|
|
|
|
12 |
SET/C-knap (indstil/annuller timer) |
|||||
19 |
|
|
|
5 |
||||
INDIRECT AIR |
TURBO |
13 |
SWING |
-knap (vandret justering af |
||||
|
|
|
|
|
||||
|
|
TIMER |
|
|
spjæld) |
|
||
18 |
MODE |
6 |
14 |
CLOCK CLOCK SET-knap (indstil ur) |
||||
OFF 1HR |
ON |
|||||||
|
|
|
TIMER |
|
|
|
|
|
|
|
CLEAN |
TIMER |
7 |
15 |
Viser, at batterikammeret er under dette |
||
|
|
|
|
mærke |
|
|||
|
|
|
OFF |
8 |
|
|
||
17 |
|
|
|
16 |
|
|||
FAN |
|
TIMEADJUST |
9 |
SWING |
-knap (lodret justering af |
|||
|
|
|
10 |
|
spjæld) |
|
||
16 |
|
|
|
|
|
|||
|
|
|
17 |
FAN -knap (blæser) |
||||
|
SWING |
|
11 |
|||||
|
|
|
||||||
|
|
CLOCK |
SET/C |
|
18 |
MODE -knap (funktionsvælger) |
||
15 |
|
SET |
12 |
|||||
|
|
|||||||
|
|
|
19 |
INDIRECT AIR -knap (indirekte luft) |
||||
|
|
|
|
13 |
||||
|
|
|
|
20 |
DISPLAY -knap |
|||
|
|
|
|
14 |
||||
|
|
|
|
21 |
PLASMACLUSTER -knap (ionisering) |
|||
|
|
|
|
|
||||

|
|
|
electrolux 27 |
|
LCDdisplay på fjernbetjening |
|
|
|
|
|
|
1 |
INDIRECT AIR -symbol (indirekte luft) |
|
1 |
5 |
2 |
SELF CLEAN -symbol (automatisk rens- |
|
2 |
6 |
|
ning) |
|
3 |
PLASMACLUSTER -symbol (ionisering) |
|||
3 |
7 |
|||
4 |
MODE -symboler (funktionsvælger) |
|||
|
|
|||
4 |
8 |
|
: AUTO |
|
9 |
|
: VARME |
||
|
|
: KØLING |
||
|
|
|
||
|
|
|
: AFFUGTNING |
|
|
|
5 |
Termostatindstilling, funktionerne AUTO |
|
|
|
|
og AFFUGTNING |
|
|
|
6 |
TEMPERATUR-indikator |
|
|
10 |
7 |
SENDER-symbol |
|
|
8 |
TURBO -symbol |
||
|
11 |
|||
|
9 |
BLÆSERHASTIGHED-symboler |
||
|
|
|||
|
|
|
: AUTO |
|
|
|
|
: HØJ |
|
|
|
|
: LAV |
|
|
|
|
: STILLE |
|
|
|
10 |
TIMER ON -indikator/CLOCK |
|
|
|
|
Viser det tilkoblingstidspunkt, der er ind- |
|
|
|
|
stillet med timeren, eller aktuelt klokke- |
|
|
|
|
slæt. |
|
|
|
11 |
TIMER OFF -indikator |
|
|
|
|
Viser det frakoblingstidspunkt, der er |
|
|
|
|
indstillet med Timer off eller Timedrift |
|
|
|
|
(OFF 1HR). |
Inden ibrugtagning
Isætning af batterier
Brug to AAA-batterier (R03).
1.Fjern dækslet på fjernbetjeningen.
2.Sæt batterier i batterikammeret, og pas på at vende +polen og -polen rigtigt.
–Displayet viser "AM 6:00", når batterierne er lagt rigtigt i.
 -
-
+  +
+
 -
-
1
1Dæksel til fjernbetjening
3.Sæt dækslet på igen.
•Ved normal brug holder batteriet i ca. et år.
•Sørg altid for at skifte begge batterier på en gang, og se efter, at de er af samme type.
•Hvis fjernbetjeningen ikke virker korrekt, når der er skiftet batterier: Tag batterierne ud, vent 30 sekunder, og sæt dem i igen.
•Tag batterierne ud af fjernbetjeningen, hvis enheden ikke skal bruges i længere tid.
Sådan bruges fjernbetjeningen
Vend fjernbetjeningen mod enhedens modtagervindue, og tryk på den ønskede knap. Enheden giver et 'bip', når den modtager signalet.
28 electrolux
•Vend fjernbetjeningen mod enhedens modtagervindue, og tryk på den ønskede knap. Enheden giver et 'bip', når den modtager signalet.
•Fjernbetjeningen kan sende signaler i op til 7 meters afstand.
 Bemærk
• Modtagervinduet må ikke stå i stærkt direkte sollys, da det kan forstyrre
Indstille aktuel tid
Uret har to visninger: 12-timers ur og 24-ti- mers ur.
Eksempel: klokken 5 om eftermiddagen
Ur |
Visning |
12-timers ur |
PM 5:00 |
24-timers ur |
17:00 |
|
|
1.Vælg 12-timers ur ved at trykke én gang på CLOCK-knappen i første trin. Vælg 24-timers ur ved at trykke to gange på CLOCK-knappen i første trin.
2.Tryk på knappen TIMER FREM eller TIMER TILBAGE for at indstille det aktuelle klokkeslæt.
–Hold knappen nede for at skifte hurtigt frem eller tilbage i urdisplayet.
3.Tryk på SET/C-knappen.
–Kolon-tegnet (:) blinker for at vise, at uret virker.
funktionen. Dæmp lyset ved at trække gardinet for, hvis modtagervinduet står i direkte sol.
•Modtagervinduet må ikke stå i stærkt direkte sollys, da det kan forstyrre funktionen. Dæmp lyset ved at trække gardinet for, hvis modtagervinduet står i direkte sol.
•Enheden kan blive påvirket af signaler fra andre fjernbetjeninger, f.eks. til fjernsyn, video eller andet udstyr, der bruges i samme rum.
•Lad ikke fjernbetjeningen ligge i direkte sol eller tæt på en radiator. Beskyt også enheden og fjernbetjeningen mod fugt og rystelser, der kan misfarve eller beskadige dem.
|
TIMER |
|
|
MODE |
OFF 1HR |
TIMER |
|
|
|
ON |
|
|
CLEAN |
TIMER |
|
|
|
OFF |
|
FAN |
|
|
2 |
|
|
TIMEADJUST |
|
|
SWING |
|
3 |
|
CLOCK |
SET/C |
|
|
SET |
||
|
|
|
1 |
•Aktuel tid kan ikke indstilles, når timeren er i gang.
Indstille luftrensningsfilter
Luftrensningsfiltrene medfølger som tilbehør til enheden. Når klimaanlægget kører, renser
filtrene luften for støv og tobaksrøg og udsender ren luft.
1.Tag luftfiltrene ud.
a)Åbn adgangspanelet.
b)Løsn luftfiltrene ved at trykke dem lidt opad.
c)Tag luftfiltrene ud ved at trække ned i dem.
electrolux 29
1Luftrensningsfilter
2Luftfilter
3Filterholder
3.Sæt luftfiltrene i igen.
a)Sæt luftfiltrene på plads.
b)Luk adgangspanelet.
c)Tryk hårdt de steder på panelet, der er vist med pile, til det låses fast.
a
bc
2.Sæt luftrensningsfilteret under filterholderne, der sidder på luftfilteret.
3
1
2
c
b
a
Bemærk
•Filtrene er forseglet i en plastpose for at bevare deres støvopsamlende virkning.
•Åbn først posen, når filtrene skal bruges. (Ellers kan deres holdbarhed forkortes).
•Udsæt ikke filtrene for direkte sollys. (Ellers kan de blive nedbrudt).
Betjening af enheden
Nødbetjening (AUX)
Brug denne funktion, når fjernbetjeningen ikke kan bruges.
Tænde for enheden
Løft adgangspanelet på indedelen, og tryk på AUX-knappen.
•Den røde OPERATION-kontrollampe på enheden lyser, og enheden går i gang i AUTO-funktionen.
•Blæserhastighed og temperatur er indstillet til AUTO.
Slukke for enheden
Tryk igen på AUX-knappen.
•Den røde OPERATION-lampe på enheden slukkes.
1
1AUX -knap
•Hvis der trykkes på AUX-knappen under normal drift, slukkes der for enheden.

30 electrolux
Betjening i hovedtræk |
|
||
|
|
|
2 |
|
|
TEMP |
5 |
PLASMA |
ON |
|
|
CLUSTER |
|
3 |
|
DISPLAY |
OFF |
|
|
|
|
||
|
|
|
|
INDIRECT AIR |
TURBO |
|
|
|
TIMER |
1 |
|
|
|
||
MODE |
OFF 1HR |
TIMER |
|
|
|
ON |
|
|
CLEAN |
TIMER |
|
|
|
OFF |
4 |
FAN |
|
|
|
|
|
|
|
|
|
TIMEADJUST |
|
|
SWING |
|
|
|
CLOCK |
SET/C |
|
|
SET |
|
|
1.Tryk på MODE-knappen for at vælge driftsmåde.
KØ-
AF-
AUTO VARME FUGTLING
NING
2.Tryk på ON/OFF-knappen for at starte enheden.
–Den røde OPERATION-lampe på enheden lyser.
3.Tryk på THERMOSTAT-knappen for at indstille den ønskede temperatur.
Funktionerne Auto/Affugtning
Temperaturen kan ændres i trin på 1°C indtil 2°C over/under den temperatur, der automatisk vælges af klimaanlægget.

 C
C
(Eksempel: 1°C højere)
 C
C
(Eksempel: 2°C lavere)
Funktionerne Varme/Køling
Temperaturen kan indstilles mellem 18 og 32°C.
4.Tryk på FAN-knappen for at indstille den ønskede blæserhastighed.
AUTO STILLE LAV HØJ
Ved funktionen AFFUGTNING er blæserhastigheden forindstillet til AUTO og kan ikke ændres.
5.Sluk for enheden ved atter at trykke på ON/OFF-knappen.
Den røde OPERATION-lampe på enheden slukkes.
Tips om auto-funktionen
Ved AUTO-funktionen indstilles temperaturen automatisk efter rumtemperaturen og udetemperaturen, når der tændes for enheden.
Funktioner og temperaturindstillinger
|
|
|
4 |
|
|
|
5 |
|
|
|
|
|
|
||
|
|
|
|
|
|
|
|
|
|
|
|
|
|
|
|
|
|
|
|
|
|
|
|
°C |
2 |
||||||
|
0 |
10 18 |
|
|
|
28 |
|
34 |
|
||||||
|
|
|
|
|
|
|
|
|
|
|
|
|
|
|
|
|
|
|
|
24°C |
|
25°C |
|
26°C |
|||||||
29 |
|
|
|
|
|
|
|
|
|
|
|
|
|
|
|
24°C |
23°C |
|
|
|
|
|
|
|
|
|
|
|
|
|
|
21 |
|
|
|
|
|
|
|
|
|
|
|
|
|
||
|
|
|
|
|
|
|
|
|
|
|
|
|
|
|
|
|
|
|
|
|
|
|
|
|
|
|
|
|
|
|
|
22°C
1 °C
3
1Indetemperatur (°C )
2Udetemperatur (°C )
3Varme
4Affugtning (rumtemperatur - 2°C)
5Køling
Tallene i tabellen er temperaturindstillinger Hvis udetemperaturen ændrer sig under drift, rykker temperaturindstillingerne automatisk, som vist i tabellen.
 Loading...