


AE7355
Vacuum Cleaner |
Operating Instructions |
Bodenstaubsauger |
Gebrauch sanw eisung |
Aspirateur traîneau |
M ode d'em ploi |
Stofzuiger |
Gebruik saanw ijzing |
Aspirapolvere |
Instruzioni per l’uso |
Aspirado de polvo |
Instrucciones de uso |
Aspirador |
Instruções de utilização |
Η λεκτρική σκούπ α |
Οδη ϊες χρήσεω ς |
Ele k trik li s üpürge |
K ulanm a k ılavuzu |

D escription ofparts ........................................................................... |
1 |
Im portantsafeguards ........................................................................ |
1 |
Instructions for use ............................................................................ |
1 |
M aintenance ........................................................................................ |
1 |
Rem oving th e contents ofth e dustcontainer .......................... |
1 |
Replacing th e filters .......................................................................... |
1 |
Replacing or cleaning th e cartridge filter .................................. |
2 |
Cleaning th e m otor filter ................................................................. |
2 |
H anging th e exh austfilter .............................................................. |
2 |
Operating th e h ose in/outofth e suction inlet......................... |
2 |
Protecting th e environm ent........................................................... |
2 |
Block ed air flow and dirty filters ................................................... |
2 |
Besch reibung ....................................................................................... |
3 |
Für Ih re Sich erh eit.............................................................................. |
3 |
Inbetriebnah m e ................................................................................... |
3 |
Verw endung und W artung .............................................................. |
3 |
Ausleeren des Staubbeh älters ......................................................... |
3 |
Ausw ech seln /reinigen der Filter .................................................. |
3 |
Ersetzen oder reinigen des Cartridge Filters (Rundfilters)....... |
4 |
Reinigung des M otorfilters .............................................................. |
4 |
Ersetzung des Abluftfilters .............................................................. |
4 |
Entnah m e bzw . Einsetzen des Saugsch lauch es ......................... |
4 |
Um w eltsch utz...................................................................................... |
4 |
D escription de votre aspirateur ..................................................... |
5 |
Consignes de sécurité ........................................................................ |
5 |
M ode d’em ploi ..................................................................................... |
5 |
Entretien ................................................................................................ |
5 |
Com m entvider le conteneur à poussière ................................... |
5 |
Rem placem entetnettoyage des filtres ...................................... |
6 |
Rem placem entou nettoyage de la cartouch e filtrante ......... |
6 |
Nettoyage du filtre m oteur ............................................................. |
6 |
Rem placem entdu filtre de sortie d’air ........................................ |
6 |
Com m entenlevez etm ettre en place le flexible ...................... |
6 |
Pour le respectde l’environnem ent.............................................. |
6 |
Blocages etfiltres sales ..................................................................... |
6 |
Besch rijving .......................................................................................... |
7 |
Belangrijk e veiligh eidsinstructies .................................................. |
7 |
In gebruik nem en ............................................................................... |
7 |
Onderh oud ............................................................................................ |
7 |
Stofcontainer legen ........................................................................... |
7 |
Filters vervangen ................................................................................. |
7 |
Filtercassette vervangen ofreinigen ............................................ |
8 |
M otorfilter sch oonm ak en ................................................................ |
8 |
Uitblaasfilter vervangen ................................................................... |
8 |
Z uigslang inzetten en losnem en .................................................... |
8 |
M ilieubesch erm ing ............................................................................. |
8 |
Geblok k eerde luch tstroom en vuile filters ................................. |
8 |
D escrizione ............................................................................................ |
9 |
Im portanti indicazioni inerenti la sicurezza.............................. |
9 |
Istruzioni per l'uso .............................................................................. |
9 |
M anutenzione ...................................................................................... |
9 |
Rim uovere la polvere dalcontenitore .......................................... |
9 |
Sostituzione dei filtri ......................................................................... |
9 |
Sostituzione o pulizia delfiltro a cartuccia............................... |
10 |
Pulizia delFiltro m otore ................................................................... |
10 |
Sostituzione delfiltro in uscita...................................................... |
10 |
Colegam ento/Scolegam ento delflessibile ala presa di |
|
aspirazione ............................................................................................ |
10 |
Tutela am bientale ............................................................................... |
10 |
Riciclaggio del'apparecch io ............................................................ |
10 |
Flusso del'aria bloccato e filtri sporch i ....................................... |
10 |
D escripcion ........................................................................................... |
|
11 |
|
Norm as im ortantes de seguridad .................................................. |
11 |
||
Intrucciones de uso ............................................................................ |
11 |
||
M antenim iento .................................................................................... |
11 |
||
Vaciado deldepósito ......................................................................... |
11 |
||
Sustitucion de los filtros .................................................................. |
11 |
||
Cam biar o lim piar elfiltro ............................................................... |
12 |
||
Lim pieza delfiltro delm otor .......................................................... |
12 |
||
Cam biar elfiltro de salida de aire ................................................. |
12 |
||
M anejo de la m anguera conexión /desconexión de la |
|
||
tom a de aspiración ............................................................................. |
12 |
||
Protección delm edio am biente ..................................................... |
12 |
||
Reciclaje delAparato alfinalsu vida útil................................... |
12 |
||
Obstrucción de la circulación delaire y filtros sucios ............ |
12 |
||
D escriçao ............................................................................................... |
|
13 |
|
Instruçoes de segurança................................................................... |
13 |
||
Instruçoes de utilizaçao .................................................................... |
13 |
||
M anutençao ......................................................................................... |
|
13 |
|
Rem over o lixo do depósito ............................................................. |
13 |
||
Substituição ou lim peza dos filtros .............................................. |
13 |
||
Substituição ou lim peza da cassete do filtro ............................. |
14 |
||
Lim peza do filtro do m otor ............................................................. |
14 |
||
Substituiçâo do filtro de exaustão de saída de ar ................... |
14 |
||
Colocar e retirar a m angueira no encaixe de sucção do |
|
||
aspirador ................................................................................................ |
|
14 |
|
Protecção do am biente ..................................................................... |
14 |
||
Reciclagem de aparelh os fora de uso .......................................... |
14 |
||
Bloq ueio do fluxo de ar e filtros sujos ......................................... |
14 |
||
Χαρακτη ριστικά ....................................................................... |
15 |
||
Ση µαντικέ ς οδη γίες ασφάλειας ................................................ |
15 |
||
Οδη γίες χρήσεω ς .................................................................... |
15 |
||
Συντήρη ση ............................................................................... |
|
15 |
|
Αφαίρεση σκόνη ς απ ότο δοχείο ............................................. |
15 |
||
Αντικατάσταση |
τω ν φίλτρω ν.................................................... |
15 |
|
Αντικατάσταση |
ή καθαρισµός του φίλτρου σε κυλινδρικό |
|
|
π ερίβλη µα ............................................................................... |
|
16 |
|
Καθαρισµός φίλτρου κινη τήρα ................................................. |
16 |
||
Καθαρισµός φίλτρου εξαγω γής ............................................... |
16 |
||
Λειτουργία του λάστιχου στο στόµιο εισαγω γής /εξαγω γής .... |
16 |
||
Προστασία του π εριβάλλοντος ................................................ |
16 |
||
Μ π λοκαρισµέ νη |
ροή αέ ρα καιβρώµικα φίλτρα ....................... |
16 |
|
Özelik ler ................................................................................................ |
|
17 |
|
Önem li em niyetönlem leri ............................................................... |
17 |
||
K ulanm a talim atlari .......................................................................... |
17 |
||
Bak im |
...................................................................................................... |
|
17 |
Toz h aznesinin .............................................................bo altılm ası |
17 |
||
Filtrelerin ....................................................................deği tirilm esi |
17 |
||
Silindir ........................................................filtrenin tem izlenm esi |
18 |
||
M otor ..........................................................filtrenin tem izlenm esi |
18 |
||
H ava ç ................................................ık ı filtresinin tem izlenm esi |
18 |
||
H ortum .......................u bağlantı yerine yerle tirm e /çık arm a |
18 |
||
Çevreyi ...................................................................................k orum a |
18 |
||
Tek nik ................................................................................... |
ozelik ler |
18 |
|
Üretim ............................................................................................ |
yeri |
|
18 |
AE7355
•
XL
•
•
•
•
•
1
3 2
5
6
10
7
9
4
8
11 |
|
13 |
14 |
15 |
12 |
|
|||
|
|
|
||
|
|
|
|
16
17 |
18 |
19 |
|
A B C
D E

20 |
21 |
22 |
23 |
|
24 |
25 |
26 |
27 |
28 |
|
29 |
||
|
30 |
31 |
32 |

Dear Custom er
Th ank you for ch oosing an AEGElectrolux cleaner. To ensure total satisfaction, read th is Instruction book carefuly.
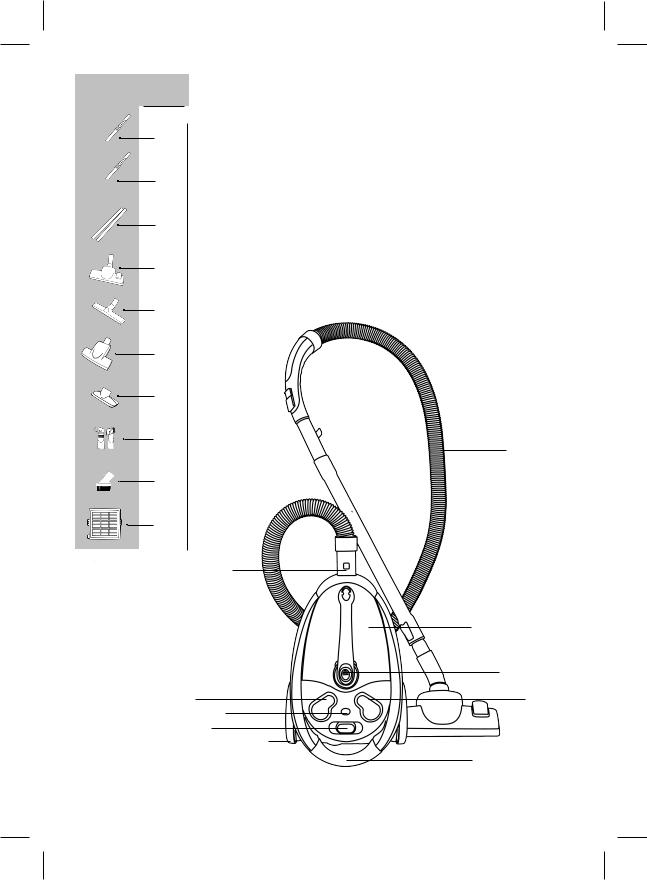
Description of parts
1.Suction inlet
2.Electronic perform ance indicator
3.On/offsw itch
4.Cable rew ind button
5.Variable pow er control
6.W h eel
7.D ustcontainer
8.Carrying h andle
9 . D ustcontainer open button
10.H ose
11.Telescopic tube
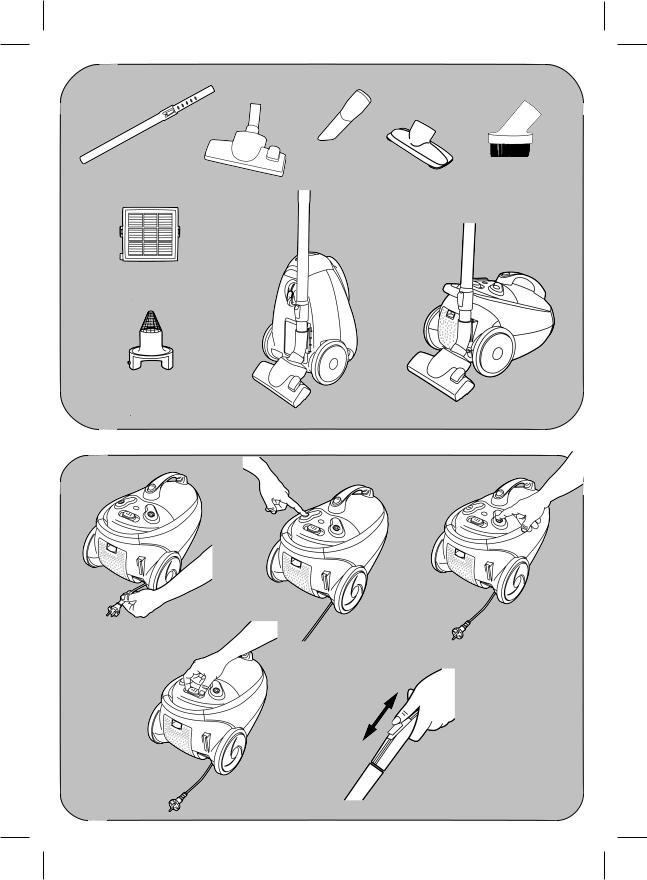
12.D ualpurpose floor nozzle
13.Crevice nozzle
14.Uph olstery nozzle
15.D usting brush
16.H EPA filter
17.Nose cone
18.Verticalpark ing
19 . H orizontalpark ing
Im portantsafeguards
• Read th is instruction book letcarefuly.
• Before using |
th e |
appliance, ch eck th at th e m ains |
|
pow er voltage |
corresponds to th e |
voltage sh ow n on |
|
th e rating plate. |
|
|
|
• D o not sw itch |
th e |
appliance on |
if it appears to be |
faulty in any w ay or ith as a dam aged cord or plug.
• D o nottry to repair th e appliance by yourself.
• Alw ays rem ove th e plug from th e pow er sock et w h en th e appliance is not in use and before carrying out any cleaning or m aintenance operations.
•Never leave th e appliance unattended w h en itis sw itch ed on. Keep th e appliance outofreach ofch ildren.
•Th is appliance is for dom estic use only. Use as described in th is instruction book let.
• D o not pulth e appliance by th e cord. D o not unplug by puling on th e cord.
• D o not use appliance on w et surfaces or to vacuum liq uids, m ud, ash and burning cigarette butts. D o not
vacuum |
up |
any |
h igh ly |
flam m able |
or |
explosive |
||
substances or gases. |
|
|
|
|
|
|||
• D o notunplug th e vacuum |
cleaner w ith |
w eth ands. |
|
|||||
• D o not operate |
th e vacuum cleaner |
too |
close |
to |
||||
h eaters and radiators,stoves etc. |
|
|
|
|||||
• Before |
you start using |
th e vacuum cleaner, please |
||||||
rem ove |
large |
or |
sh arp |
objects from |
th e |
floor |
to |
|
preventdam age to th e dustcontainer and h ose.
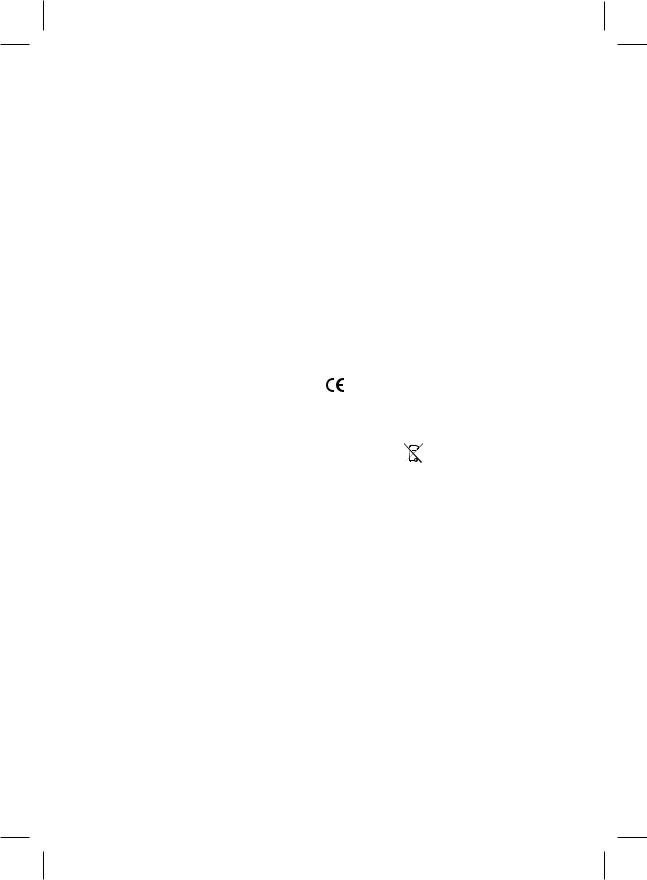
Instructions for use
|
Before placing into operation m ak e certain th at th e |
|||||||
|
filters are in th e proper position. |
|
|
|
||||
A |
Unw ind a sufficient length of cable |
and insert th e |
||||||
|
plug into th e |
pow er sock et. A YELLOW m ark on th e |
||||||
|
pow er cable |
sh ow s |
th e idealcable |
length . D o |
not |
|||
|
extend th e cable beyond th e RED m ark . |
|
||||||
B |
Press th e ON/OFF button to sw itch |
th e appliance |
on. |
|||||
|
On |
initial start up |
ful pow er |
is |
reach ed after |
|||
|
approxim ately 1- 2 seconds. |
|
|
|
||||
C |
To rew ind th e |
pow er cable, press th e |
rew ind button |
|||||
|
w ith |
foot, and |
guide |
th e cable w ith |
h and to ensure |
|||
|
th atitdoes notw h ip causing dam age. |
|
||||||
D |
By m oving th e variable pow er control, th e suction |
|||||||
|
pow er can be adjusted. |
|
|
|
||||
ESuction can also be regulated on th e h ose h andle by opening /closing th e aperture.
M aintenance
Rem oving th e contents of th e dustcontainer
•Never operate th e cleaner w ith out th e dust container instaled.
• Th e cleaner is eq uipped w ith |
an electronic |
perform ance indicator. |
|
•Th e dust container m ust be em ptied if th e perform ance indicator ch anges to red w h en th e cleaner is operating at
m axim um leveland th e nozzle is raised from th e floor.
20Rem ove th e dust container by push ing th e open button on th e h andle.
23 |
Rem ove th e filter from |
its place. |
21 |
Rem ove th e contents |
of th e dust container by |
|
push ing th e orange - coloured opening button. |
|
23 |
Putth e filter back into its place. |
|
22 |
Close th e dustcontainer lid untilitclick s. |
|
20Putth e dustcontainer back into th e cleaner.
Please note: It is norm alfor th e red ligh t of th e indicator to flick er on and offduring use.
If th e dust container is em ptied and th e indicator is
stil active, |
it m eans |
th at th e |
cartridge filter |
is |
clogged. In |
th is case, |
folow |
th e instructions |
of |
ch apter 'Replacing or cleaning th e cartridge filter'. |
|
|||
Replacing th e filters
• Filters sh ould be replaced at least tw ice a year or w h en th ey becom e visibly soiled.
•Alw ays operate th e cleaner w ith filters instaled to avoid reduced suction.
• D isconnect from electricaloutlet before ch anging th e filters.
1
Replacing or cleaning th e cartridge filter
20 Rem ove th e dust container by using th e open button on th e h andle.
23Rem ove th e filter from its place.
24Rem ove th e protector m esh from th e cartridge filter.
25 |
Sh ak e th e dirt from |
th e filter |
and th e m esh |
into a |
|
|
bin, if necessary th e |
filter and |
m esh |
can be |
rinsed, |
|
w ith cold w ater,under a tap. |
|
|
|
|
26 |
Air dry th em for approxim ately 24 h ours,to ensure it |
||||
|
is com pletely dry |
before reusing. |
Avoid |
direct |
|
sunligh tand extrem e drying circum stances.
If you w ish to use your appliance w h ile th e cartridge filter is drying, you m ay use th e extra cartridge filter inserted in th e pack aging box.
24Insert th e protector m esh into its place by push ing it onto th e cartridge filter.
23 Putth e filter back into its place.
20Insert th e dust container back into th e cleaner by pressing itdow n untilitclick s.
Cartridge filter reference num ber: M enalux F102
Cleaning th e m otor filter
If necessary, th e m otor filter also can be w ash ed or replaced atleasttw ice a year or ifclogged.
20 Rem ove th e dust container by using th e open button on th e h andle.
27Rem ove th e filter from its place.
28Rinse itunder tap w ater and dry itcom pletely.
27Putth e filter back into its place.
20Insert th e dust container back into th e cleaner by pressing itdow n untilitclick s.
M otorfilter reference num ber: M enalux F132
Ch anging th e exh austfilter
29Open th e filter gril.
30Rem ove th e exh austfilter w ith gril.
31Tak e th e filter outofth e griland inserta new one.
30 |
Insertth e filter w ith grilinto th e cleaner. |
29 |
Close th e filter gril. |
Exh austfilter reference num ber: M enalux F132
O perating th e h ose in/outof th e suction inlet
32 To connect th e h ose into th e suction inlet push it untilitclick s.
To disconnect th e h ose from th e suction inlet push th e button atth e end ofth e h ose.
Protecting th e environm ent
• Attem pt to recycle pack aging m aterial and old appliances.
•Th e cardboard pack aging can be placed in th e w aste paper colection.
• D eposit th e plastic bag m ade |
of polyeth ylene |
(PE) at |
||||||
th e PE colection pointfor recycling. |
|
|
|
|||||
• D eposit th e polystyrene |
foam |
at th e PS |
colection |
|||||
point for recycling. Recycling |
th e |
Appliance |
at th e |
|||||
end ofits life. |
|
|
|
|
|
|
|
|
• Th e plastic |
com ponents |
al carry |
a |
m aterial |
||||
identification |
m ark ing |
so |
th at, |
lik e |
th e |
oth er |
||
m aterials, th ey can recycled at th e |
end of th e |
life of |
||||||
th e appliance. |
|
|
|
|
|
|
|
|
Please inq uire w ith your localauth ority. |
|
|
|
|||||
Block ed air flow and dirty filters
• Th e |
cleaner stops autom aticaly if a block age occurs |
||||
in th e nozzle/tube/h ose or |
if th e |
filters are block ed |
|||
w ith |
dirt. |
|
|
|
|
• Disconnect from |
m ains and |
alow |
th e |
cleaner to cool |
|
for 2030 m inutes. Rem ove block age and/or clean filters. |
|||||
• Restartth e cleaner. |
|
|
|
||
Th is |
appliance |
conform s |
w ith |
th e |
folow ing EC |
D irectives:
•Low Voltage D irective 2006/9 5/EC
• EM C D irective |
89 /336/EEC |
w ith |
am endm ents |
|||||
9 2/31/EEC and 9 3/68/EEC |
|
|
|
|
|
|||
Th e sym bol |
on th e product or on its pack aging |
|||||||
indicates |
th at th is |
product m ay |
not be |
treated as |
||||
h ouseh old w aste. Instead it sh albe |
h anded over to |
|||||||
th e applicable colection point for th e recycling of |
||||||||
electricaland electronic eq uipm ent. By ensuring th is |
||||||||
product |
is |
disposed of correctly, |
you |
w il h elp |
||||
prevent |
potential negative |
conseq uences |
for th e |
|||||
environm ent |
and |
h um an |
h ealth , |
w h ich |
could |
|||
oth erw ise be caused by inappropriate w aste h andling |
||||||||
of th is product. For m ore detailed inform ation about |
||||||||
recycling of th is product, please |
contact your local |
|||||||
city office, your h ouseh old |
w aste disposalservice or |
|||||||
th e sh op w h ere you purch ased th e product.
2

Seh r geeh rte Kundin,seh r geeh rter Kunde,
lesen Sie bitte diese Gebrauch sanw eisung sorgfältig durch . Beach ten Sie vor alem die Sich erh eitsh inw eise auf den ersten Seiten dieser Gebrauch sanw eisung! Bew ah ren Sie bitte die Gebrauch sanw eisung zum späteren Nach sch lagen auf. Geben Sie diese an eventuele Nach besitzer des Gerätes w eiter.
Besch reibung
1.Sch lauch ansch luss
2.Betriebsanzeige
3.Ein- /Aus- Sch alter
4.K nopffür K abelaufw ick lung
5.Leistungsregulierung
6.Rad
7.Staubbeh älter
8.Tragegriff
9 . Öffnungstaste für Staubbeh älter
10.Sch lauch
11.Telesk oproh r
12.Um sch altbare Bodendüse
13.Fugendüse
14.Polsterdüse
15.M öbelpinsel
16.Cartridge Rundfilter
17.CYCLONE K egel
18.Park position vertik al
19 . Park position h orizontal
Für Ih re Sich erh eit
•Gerätnich tm itW asser reinigen.
•Lesen Sie diese Bedienungsanleitung sorgfältig.
• Vor Inbetriebnah m e des Gerätes prüfen Sie bitte, ob Ih re Netzspannung der auf dem Gerät angegebenen Netzspannung entsprich t.
•Verw enden Sie das Gerätnich tm itbesch ädigtem Kabel!
•Unsere Kundenbetreuung und unseren Bestelservice für Z ubeh ör erreich en Sie per Telefon,M ail,und Fax. M ontag bis Freitag von 8.00 bis 18.00 Uh r sind w ir für Sie da.
ProgressServiceLine: 01805 – 30 60 80*
*aus dem Festnetz der Deutsch en Telek om Euro 0,12/M in.
Fax: 09 11323- 49 19 30
E- M ail: info.service@ progressstaugsauger.de
•In der Sch w eiz steh en w ir Ih nen für Fragen,Anregungen oder bei Problem en von M ontag bis Donnerstag von 8.-
12.00Uh r, 13.3017.00 Uh r, am Freitag vom 8.00-
12.00Uh r,13.3016.30 Uh r zur Verfügung. Serviceline: 0848 89 9 300,Fax 062 889 9 3 10.
•Steck en Sie das Gerät im m er aus, w enn Sie es nich t verw enden und bevor Sie den Filter ausw ech seln.
• Lassen Sie das Gerät nich t unbeaufsich tigt, w enn es in Betrieb ist. K inder von Elek trogeräten fernh alten.
• Das Gerät ist nur für den norm alen H aush altsgebrauch – verw enden Sie es nur w ie in dieser Anleitung besch rieben.
•Netzsteck er nie am Kabelaus der Steck dose zieh en. Kabel nich tm itdem Gerätoder den Saugbürsten überfah ren.
• Nich t zum Aufsaugen von Flüssigk eiten, Sch lam m , h eißer Asch e, glüh ender Z igaretten verw enden. Nich t in der Näh e entflam m barer Gase verw enden.
• Netzsteck er nie m it nassen H änden in die Steck dose
steck en oder h erauszieh en. |
|
|||
• Gerät |
k einen |
W itterungseinflüssen, |
k einer |
|
Feuch tigk eitund k einer H itzeq uele aussetzen. |
|
|||
• Verm eiden Sie |
die |
Aufnah m e h arter, |
spitzer |
|
Gegenstände, da |
diese |
Staubbeh älter, Saugsch lauch |
||
und M otor besch ädigen k önnen.
Inbetriebnah m e
• Prüfen Sie, ob |
die Filter/Staubbeh älter rich tig eingesetzt |
||||
|
sind. Verw enden Sie das Gerätnur m itrich tig eingesetztem |
||||
|
Staubbeh älter und rich tig eingesetzten Filtern. |
||||
A |
Kabelan die |
Strom versorgung ansch ließen. Eine gelbe |
|||
|
Mark ierung am |
Netzk abelzeigtdie ideale Kabelänge.Z ieh en |
|||
|
Sie das Kabelnie länger als bis zur roten Mark ierung. |
||||
B |
Z um |
Einsch alten des Geräts den Ein- /Aus- Sch alter |
|||
|
drück en. Nach |
dem |
Einsch alten des Gerätes ist die |
||
|
vole Leistung nach |
etw a 1- 3 Sek unden erreich t. |
|||
C |
Z um |
Z urück spulen |
des |
K abels den K nopf m it dem |
|
|
Fuß |
drück en |
und das |
K abelm it der H and füh ren, |
|
dam ites nich tverdreh tw ird.
DZ ur Erh öh ung / Reduzierung der Saugstärk e den Leistungsregler versch ieben.
E Z ur Regulierung |
der |
Länge |
des |
Telesk oproh res |
|
drück en Sie |
bitte |
den Sch ieberegler nach unten und |
|||
zieh en Sie das Roh r nach |
unten (Verlängerung) bzw . |
||||
sch ieben es nach oben (Verk ürzung). |
|
||||
Verw endung und W artung |
|
|
|||
Ausleeren des Staubbeh älters |
|
|
|||
• Verw enden |
Sie |
das |
Gerät |
nur |
m it rich tig |
eingesetztem |
Staubbeh älter. |
|
|
||
20D rück en Sie die Öffnungstaste und zieh en Sie den Staubbeh älter h eraus.
23 |
Entfernen Sie den Filter von seinem Platz. |
21 |
Entfernen Sie den Sch m utz durch D rück en der |
|
orange – farbenen Taste. |
23 |
Setzen Sie den Filter zurück in seinen Platz. |
22 |
Sch ließen Sie den Staubbeh älterdeck elbis er k lick t. |
20 |
Setzen Sie den Staubbeh älter in das Gerätzurück . |
•D er Staubbeh älter m uss entleert w erden, sobald die Anzeige auf rot um gesprungen ist, bei m axim aler Leistung und von Boden abgeh obener Bodendüse.
Ausw ech seln /reinigen der Filter
• Bitte |
beach ten Sie: Verstopfte |
Filter füh ren zu einer |
|||||
verm inderten Saugleistung und ggf. zu einem |
Absch alten |
||||||
des Gerätes durch |
Überh itzung. Das Gerät in diesem |
Fal |
|||||
ca. 30 M inuten abk üh len lassen, Filter reinigen |
bzw . |
||||||
erneuern und Gerätansch ließend erneutstarten. |
|
||||||
H inw eis: Größere |
M engen |
eingesaugten |
Feinstaubs |
||||
oder Tierh aare k önnen die |
Filter verstopfen und eine |
||||||
h äufigere |
und gründlich ere |
Reinigung der Filter bzw . |
|||||
einen h äufigeren Filterw ech selerforderlich |
m ach en. |
||||||
• Um |
eine |
Besch ädigung des |
Geräts zu |
verm eiden, |
|||
nich t oh ne Staubbeh älter |
oder Filter staubsaugen, |
||||||
dies k ann zu sch w eren D efek ten am Gerätfüh ren.
•Vor dem Ausw ech seln der Filter den Steck er aus der Steck dose zieh en.
3
 Loading...