

Page 1

U
B
1
A
U
U
B
1
A
A
N
H
T
2
T
2
3 T
T
•
C
•
2 L
3 T
dob e P hot oshop A lbum H elp
sing H elp | C on t en ts | Inde x
ack
sing H elp
U sing Help
bout Help
dobe Systems Incorporated provides complete documentation in an Adobe PDF-based
help system. This help system includes information on all tools, commands, and features
of an application. It is designed for easy on-screen navigation and can also be printed and
used as a desktop reference. Additionally, it supports third-party screen-reader applica
tions that run in a Windows environment.
avigating in Help
elp opens in an Adobe Acrobat window with the Bookmarks pane open. (If the
Bookmarks pane is not open, click the Bookmarks tab at the left edge of the window.)
At the top and bottom of each page is a navigation bar containing links to this page (Using
Help), the table of contents (Contents), and the index (Index).
-
To move through pages sequentially, you can click the Next Page and the Previous
Page arrows; click the navigation arrows at the bottom of the page; or click Back to
return to the last page you viewed.
You can navigate Help topics by using bookmarks, the table of contents, the index, or the
Search (Acrobat 6) or Find (Acrobat 5) command.
o find a topic using bookmarks:
1
I
n the B ookmarks pane, click the plus sign (+) (Windows) or the right-facing arrow
(Mac OS) next to a bookmark topic to view its subtopics.
C
lick the b ookmark to go to that topic.
o find a topic using the table of contents:
1
C
lick C ontents in the navigation bar.
On the C ontents page, click a topic to go to that topic.
o view a list of subtopics, click the plus sign (+) (Windows) or the right-facing arrow
(Mac OS) next to the topic name in the Bookmarks pane.
o find a topic using the index:
1
D
o one of the f ollowing:
lick Index in the navigation bar, and then click a letter at the top of the page.
Ι
n the B ookmarks pane, expand the Index bookmark to view the letter subtopics;
then click a letter.
ocate the entry you want to view, and click the page number to go to that topic.
o view other entries for the same topic, click Back to return to the same place in the
index, and then click another page number.
sing H elp | C on t en ts | Inde x
ack
Page 2

U
B
2
A
U
U
B
2 T
2 T
T
2 T
3 T
P
A
T
C
dob e P hot oshop A lbum H elp
sing H elp | C on t en ts | Inde x
o find a topic using the Search command (Acrobat 6):
1 C hoose Edit > Search.
ype a word or phrase in the text box and click Search. Acrobat searches the document
and displays every occurrence of the word or phrase in the Results area of the Search PDF
pane.
o find a topic using the Find command (Acrobat 5):
1 C hoose Edit > Find.
ype a word or phrase in the text box and click Find. Acrobat searches the document,
starting from the current page, and displays the first occurrence.
o find the next occurrence, choose Edit > Find Again.
ack
sing H elp
rinting Help
lthough Help is optimized for on-screen viewing, you can print selected pages or the
entire file.
o print Help:
hoose File > Print, or click the Print icon in the Acrobat toolbar.
sing H elp | C on t en ts | Inde x
ack
Page 3

U
B
3
A
C on t en ts
U
B
3
C
A
dob e P hot oshop A lbum H elp
sing H elp | C on t en ts | Inde x
ontents
ddendum: Getting Started with Adobe Photoshop Album 2.0 Starter Edition 4
Installing and Learning to Use Adobe Photoshop Album 12
Photoshop Album Basics 15
Getting Photos into Photoshop Album 25
Organizing Photos 42
Viewing and Finding Photos 79
Fixing Photos 98
Making Creations from Your Photos 119
Sharing, Printing, and Exporting Photos 144
ack
Shortcuts 163
Legal Notices 166
sing H elp | C on t en ts | Inde x
ack
Page 4

dob e P hot oshop A lbum H elp A ddendum: G etting S tar t ed with A dob e P hot oshop A lbum 2.0
U
B
4
A
U
sing H elp | C on t en ts | Inde x
ack
Addendum: Getting Started with Adobe Photoshop Album 2.0 Starter Edition
About Photoshop Album 2.0 Starter Edition
Welcome to the Adobe® Photoshop® Album Starter Edition application, the fast and easy
way to organize your lifetime of photos so that you can instantly find the ones you want
and share your experiences with anyone, anywhere. Photoshop Album 2.0 Starter Edition
offers many of the important features found in Photoshop Album 2.0. This addendum
supplements the Photoshop Album 2.0 Help and will get you started using Photoshop
Album 2.0 Starter Edition immediately. For detailed information on using the Photoshop
Album 2.0 Starter Edition and on the additional features in Photoshop Album 2.0, see the
main Photoshop Album 2.0 Help.
Installing Photoshop Album 2.0 Starter Edition
To install Photoshop Album 2.0 Starter Edition, launch the installer and follow the onscreen instructions.
If Photoshop Album 1.0 or Photoshop Album 1.0 Starter Edition is already installed on
your computer, Photoshop Album 2.0 Starter Edition installs and automatically creates a
copy of your existing catalog. The original catalog file remains unaltered so you can
continue using it with Photoshop Album 1.0 or Photoshop Album 1.0 Starter Edition.
Photoshop Album 2.0 Starter Edition cannot be installed on a computer that already has
Photoshop Album 2.0 installed.
Note: Photoshop Album 2.0 Starter Edition does not support certain Photoshop Album 1.0
and Photoshop Album 1.0 Starter Edition features such as creations; file formats other
than BMP, JPEG, or TIFF; burning to CD or DVD; and the calendar view. Unsupported
features will not show in the Photoshop Album 2.0 Starter Edition catalog. However, if you
upgrade to Photoshop Album 2.0, all features unsupported in Photoshop Album 2.0
Starter Edition will be carried forward into the Photoshop Album 2.0 catalog.
Starting Photoshop Album 2.0 Starter Edition
The first time you start the Photoshop Album 2.0 Starter Edition application, you’ll be
presented with the Adobe End User License Agreement window. Click Agree to continue
using the application.
After closing the License Agreement, you’re prompted to register online. Use the Registration Wizard to register and use your copy of Photoshop Album 2.0 Starter Edition.
sing H elp | C ontents | Index Back 4
Page 5

Adobe Photoshop Album Help Addendum: Getting Started with Adobe Photoshop Album 2.0
Using Help | Contents | Index Back 5
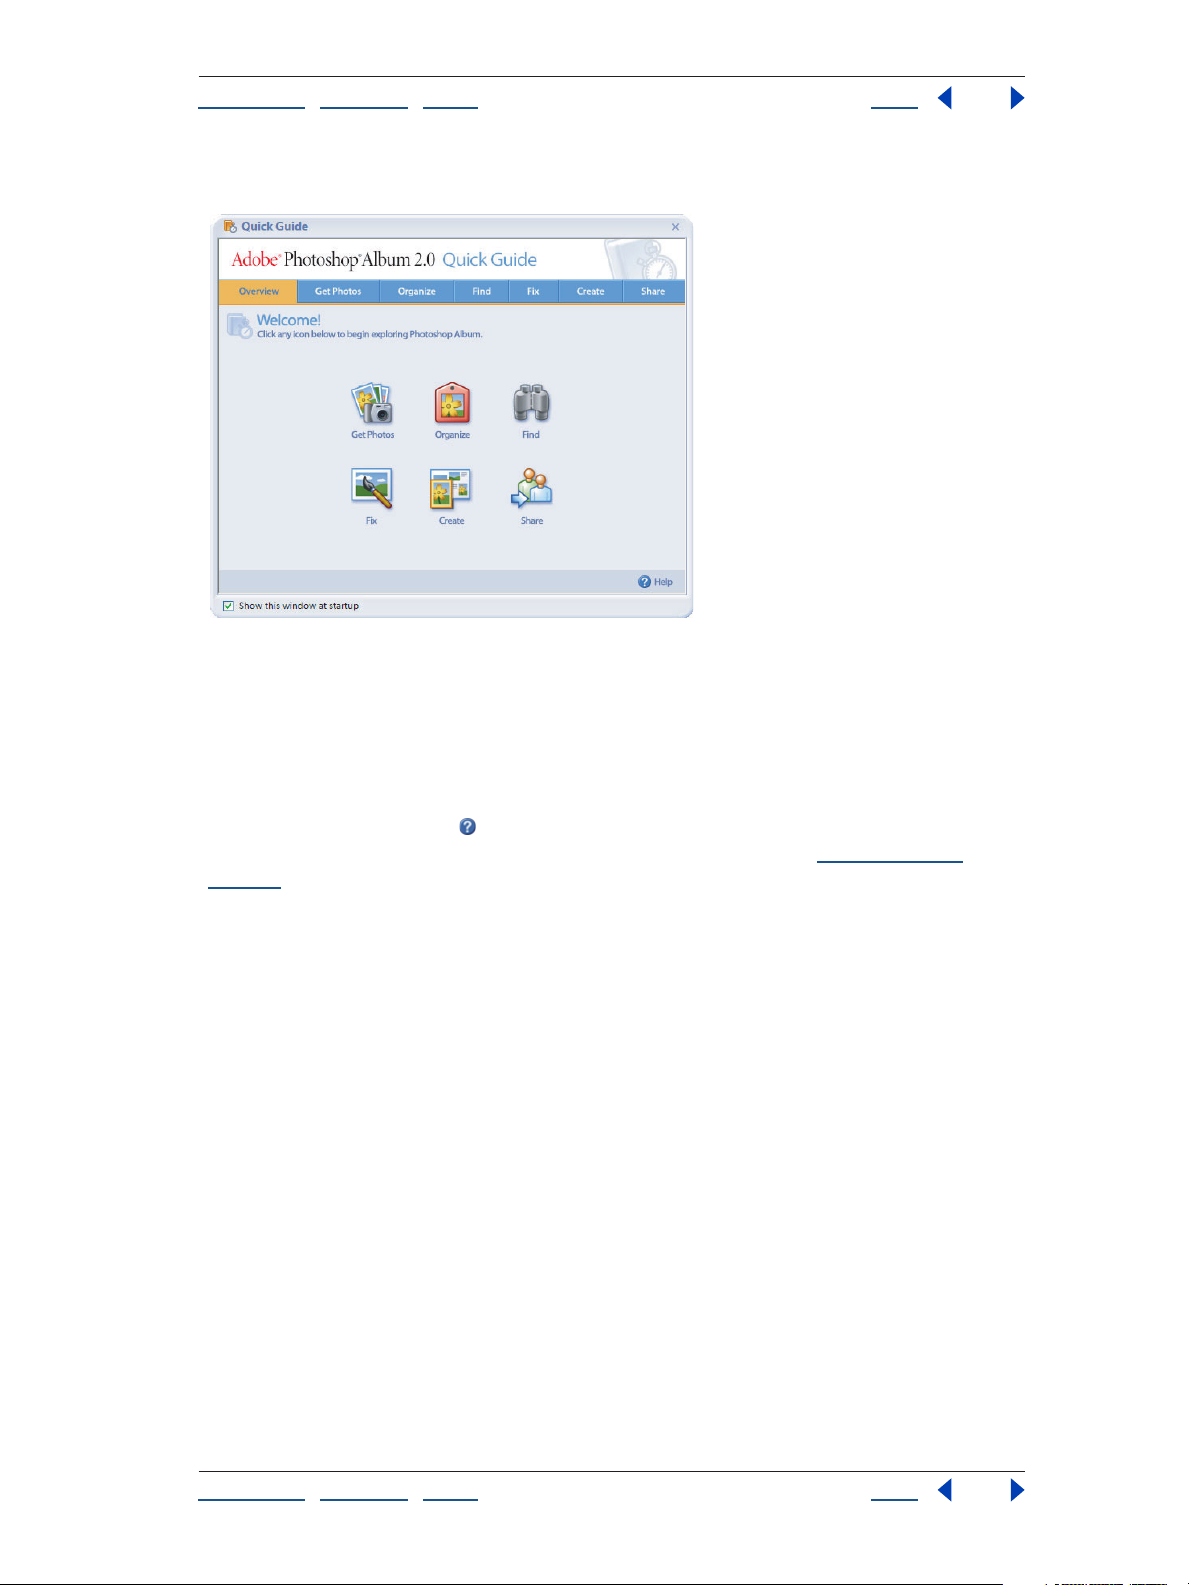
Using the Quick Guide
By default, the Quick Guide window opens when you first start Photoshop Album 2.0
Starter Edition. The Quick Guide is a convenient starting point for key tasks in Photoshop
Album 2.0 Starter Edition. Select a task by clicking an icon or tab in the Quick Guide
Overview window. You can open or close the Quick Guide at any time while you’re using
Photoshop Album 2.0 Starter Edition.
To open or close the Quick Guide:
Choose Help > Quick Guide.
Getting photos into Photoshop Album Starter Edition
The first thing you’ll probably need to do is get photos into Photoshop Album 2.0 Starter
Edition. You might already have photos on your computer, or you might need to get
photos from your digital camera.
To get photos from your computer’s hard drive:
In the Photoshop Album 2.0 Starter Edition Quick Guide, click the Get Photos in the
Overview tab or the Get Photos tab, and then click Search Drive . Follow the on-screen
instructions to search for and import photos into Photoshop Album 2.0 Starter Edition.
To get photos from a digital camera or card reader:
1 Make sure that your camera or card reader is connected properly and turned on.
2 In the Photoshop Album 2.0 Starter Edition Quick Guide window, click the Get Photos
in the Overview tab or the Get Photos tab, and then click Camera . Follow the onscreen instructions to finish importing the photos into Photoshop Album 2.0 Starter
Edition.
To get photos from specific files and folders:
In the Photoshop Album 2.0 Starter Edition Quick Guide window, click the Get Photos in
the Overview tab or the Get Photos tab, and then click File Folders . In the Get Photos
from Files and Folders dialog box, select the files and folders you want, and then click the
Get Photos button.
For more details on getting photos into Photoshop Album 2.0 Starter Edition,
including instructions for getting photos from a scanner or CD, see the Photoshop
Album 2.0 Help.
Viewing photos in Photoshop Album Starter Edition
Once your photos are in Photoshop Album 2.0 Starter Edition, they appear in the photo
well as thumbnail images. You can adjust the appearance of the thumbnails by clicking
the four buttons
Photoshop Album 2.0 Starter Edition also gives you different ways to sort your catalog in
the photo well. In the options bar, you can choose from the following sort options in the
Sort pop-up menu:
below the photo well.
• Date (Newest First) to show the most recently taken or imported photos first. (Within a
given day, the photos are still shown in the order they were taken, oldest-first). Newest-
Using Help | Contents | Index Back 5
Page 6
Adobe Photoshop Album Help Addendum: Getting Started with Adobe Photoshop Album 2.0
Using Help | Contents | Index Back 6
first order is convenient when you need to attach tags to the photos you imported
most recently.
• Date (Oldest First) to show all the photos in chronological order.
• Import Batch to display photos in the batches in which they were imported. Each batch
is separated by a bar that displays information about the way you got the photos.
• Folder Location to display photos by the folders in which they are stored.
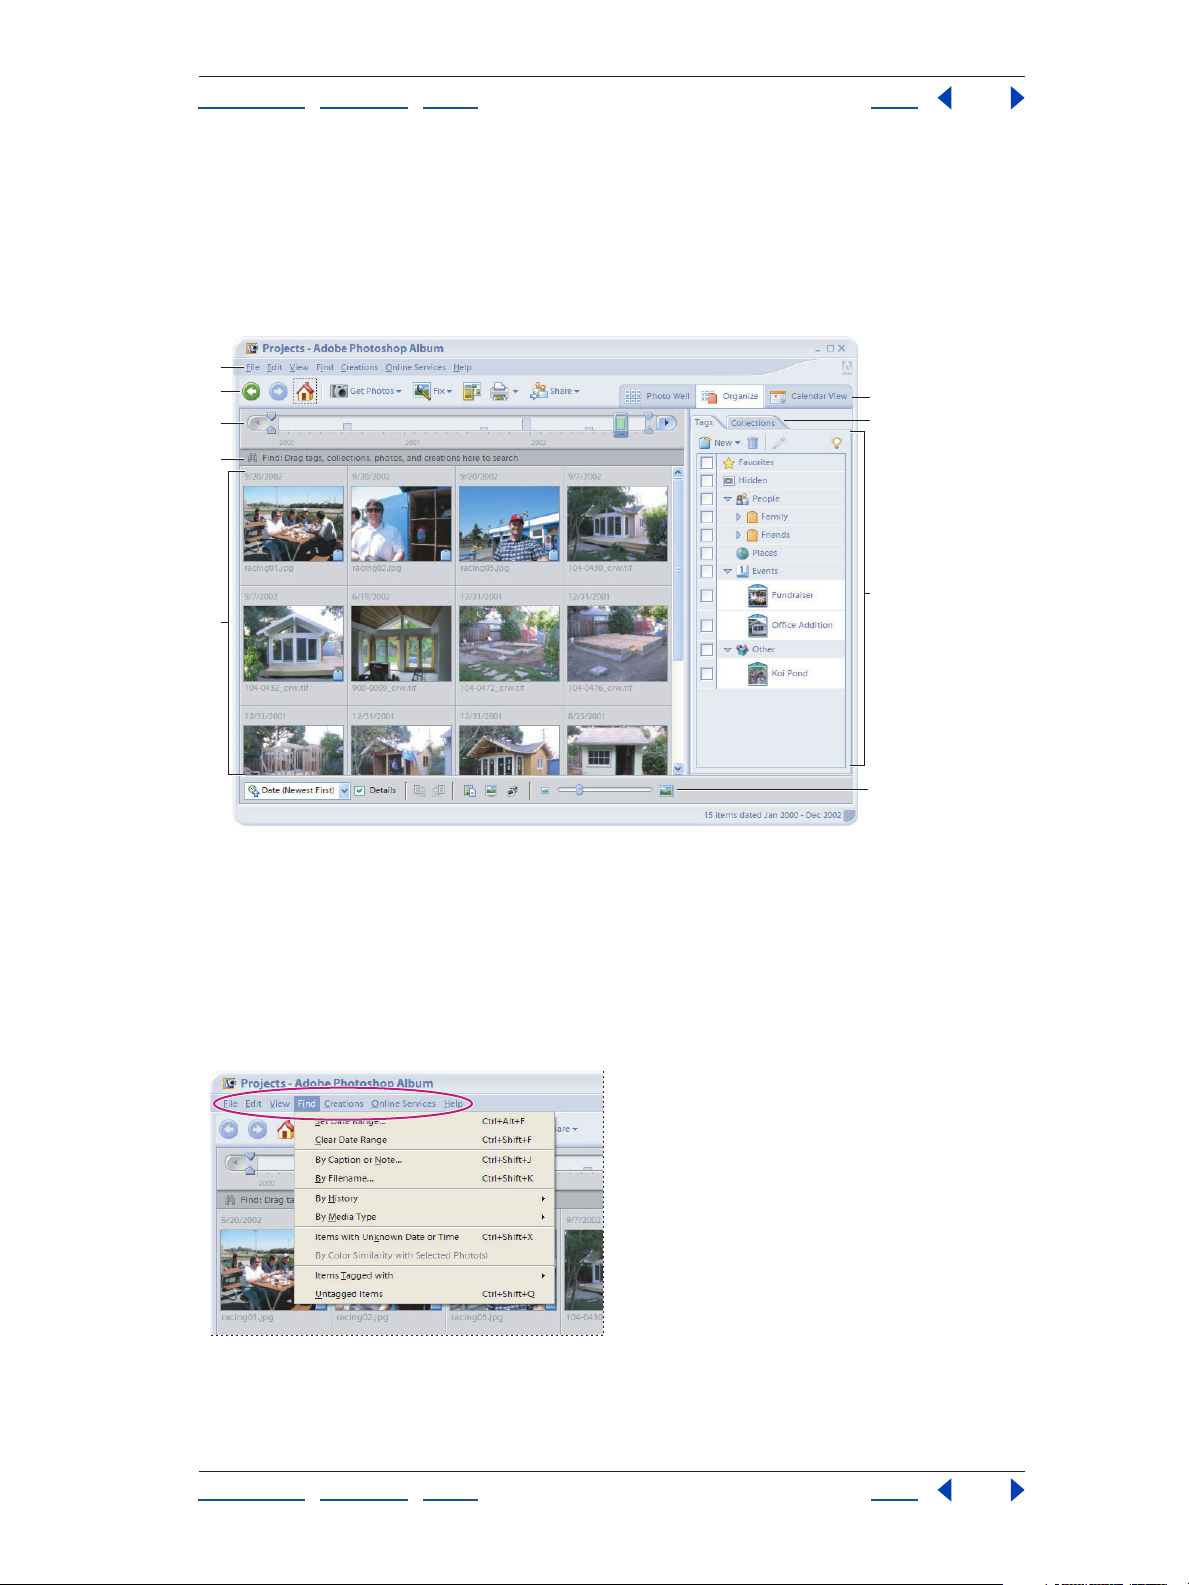
A
B
C
D
E
G
F
H
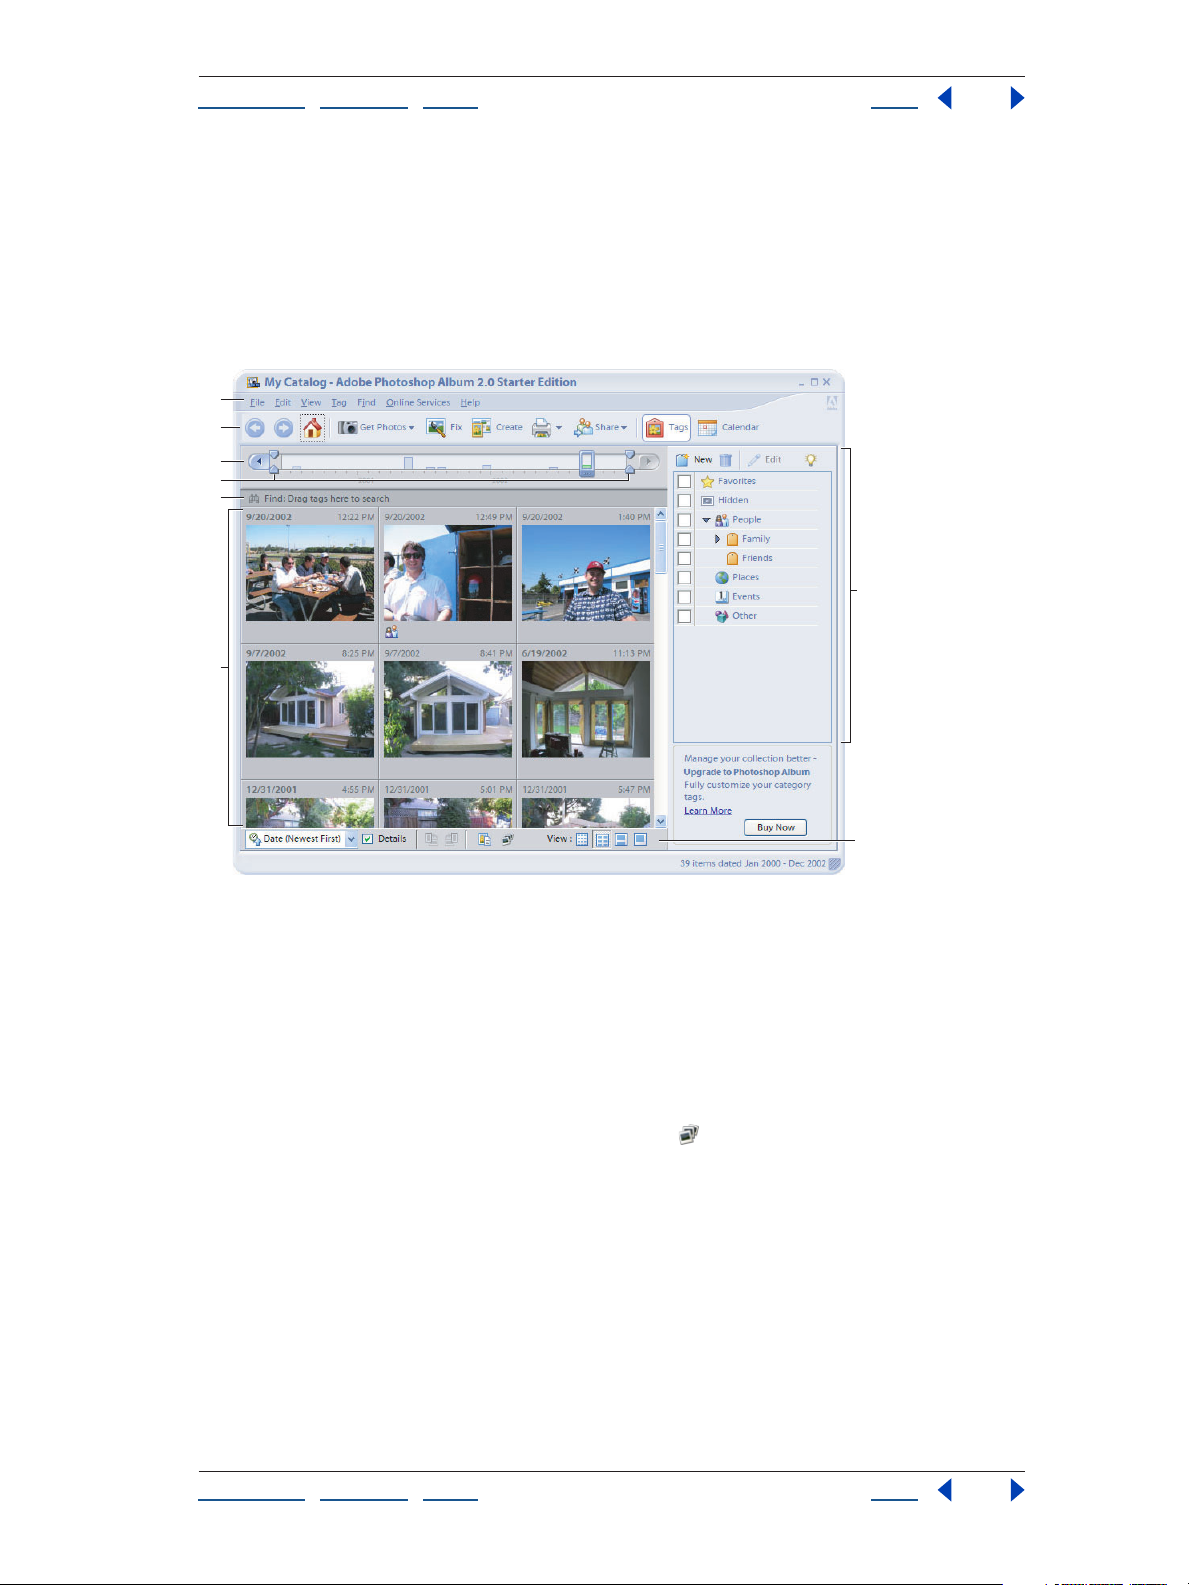
The Photoshop Album work area
A. Menu bar B. Shortcuts bar C. Timeline D. Timeline endpoint markers E. Find bar F. Photo well
Above the photo well is the timeline. It helps you view and find photos by date. The height
of each bar in the timeline shows the number of photos in each month, import batch, or
folder. You can select a range of photos to view by clicking a bar or dragging the
endpoints of the timeline.
In the options bar just under the photo well are controls for viewing photos and their
properties. Among the controls is a View Slideshow
button that instantly displays a
slideshow of the photos you’ve selected in the photo well.
For more details on the Photoshop Album work area, see the Photoshop Album 2.0 Help.
G. Tag pane H. Options bar
Using Help | Contents | Index Back 6
Page 7

Adobe Photoshop Album Help Addendum: Getting Started with Adobe Photoshop Album 2.0
Using Help | Contents | Index Back 7
Organizing your photos
Photoshop Album 2.0 Starter Edition automatically organizes your photos in the photo
well based on when they were taken. However, you can enhance the organization, sorting,
previewing, and finding of photos by using tags. You can use keyword tags to find photos
based on the people in them, where the photo was taken, the event, and other character
istics of the photo that are important to you. When you tag your photos, you don’t have to
remember each photo’s filename, date, or folder. Using tags also liberates you from filing
your photos in folders by subject, and from renaming your photos and videos.
To use tags, you first need to open the Tag pane. Attach one or more tags from the Tag
pane to a photo in the photo well by dragging and dropping them onto the photo. Tags
don’t change the photos they are attached to; they simply give you additional and more
flexible ways of finding and organizing your photos.
To open the Tag pane:
Click the Tags button in the shortcuts bar.
To create your own tag:
1 Click the New button in the Tag pane and choose New Tag.
2 In the Create Tag dialog box, use the Category menu to choose which category or
subcategory you want to list the tag under.
-
3 In the Name text box, type the name you want to give the tag.
4 In the Note text box, type any information you want to add about the tag. (For example,
you could write that Mildred is your mom’s elementary school friend who lives in New
Yor k.)
5 Click OK.
The tag appears in the Tag pane under the category or subcategory you selected.
Notice that the tag has a question mark icon . The first time you attach the tag to a
photo, it will use that photo as its icon. You can change the icon to a different photo. For
more information on changing the icon and for using tags, see the Photoshop Album 2.0
Help.
To attach a tag to a photo:
Drag the tag from the Tag pane onto the photo in the photo well.
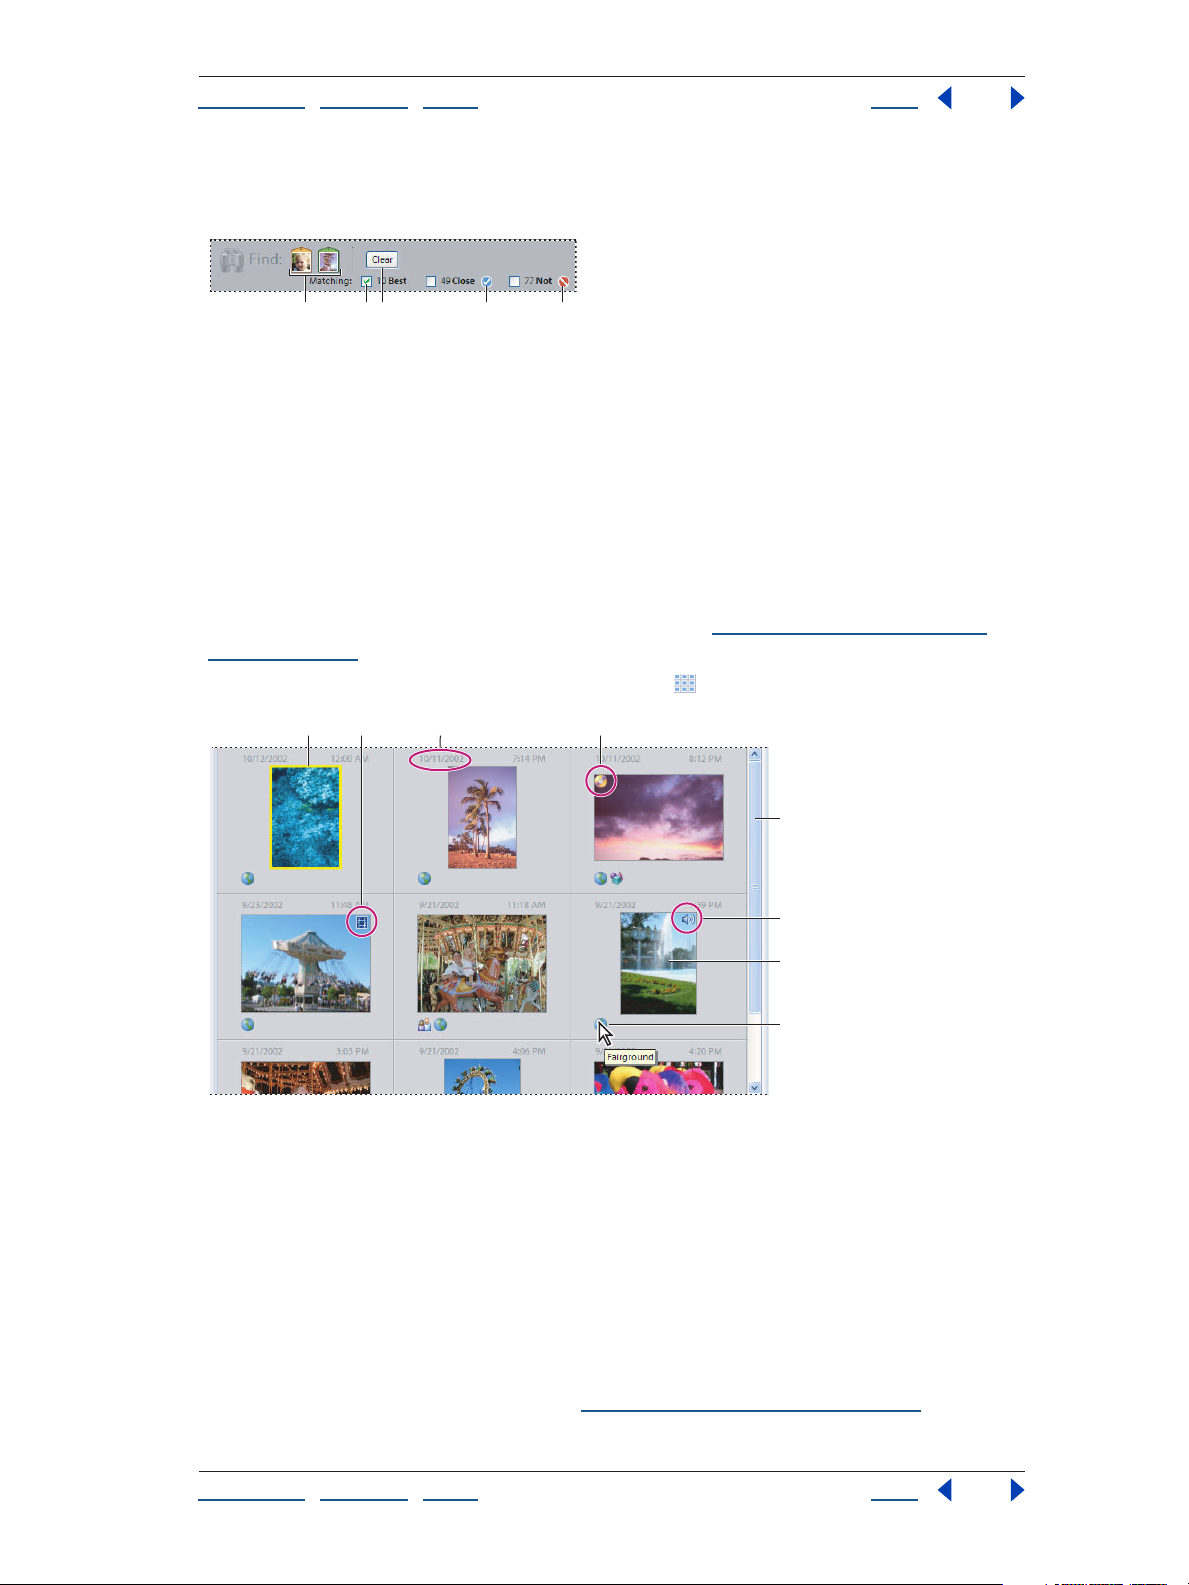
Finding your photos
It’s easy to find photos in Photoshop Album 2.0 Starter Edition. You can use tags to find
photos by subject. In the Tag pane, double-click a specific tag; the search will find all
photos that have that particular tag attached. Simply select the check boxes next to the
tags and you will be able to cross-reference or search using multiple tags. The Best match
results will find photos that have all the selected tags in them. The Close match results will
find photos that have one or more of the selected tags in them.
The timeline lets you narrow the range of photos and jump to a particular month just by
clicking a bar.
Using Help | Contents | Index Back 7
Page 8
Adobe Photoshop Album Help Addendum: Getting Started with Adobe Photoshop Album 2.0
Using Help | Contents | Index Back 8
For more information and procedures on finding photos using timeline or tags, see the
Photoshop Album 2.0 Help.
Fixing photos
The photos you bring into Photoshop Album 2.0 Starter Edition may not be perfect.
Photoshop Album 2.0 Starter Edition provides tools to fix the most common photo
problems. For instance, you can apply a quick fix to adjust the overall color, brightness,
contrast, or sharpness of the photo. You can also rotate or crop a photo or remove red-eye
from it.
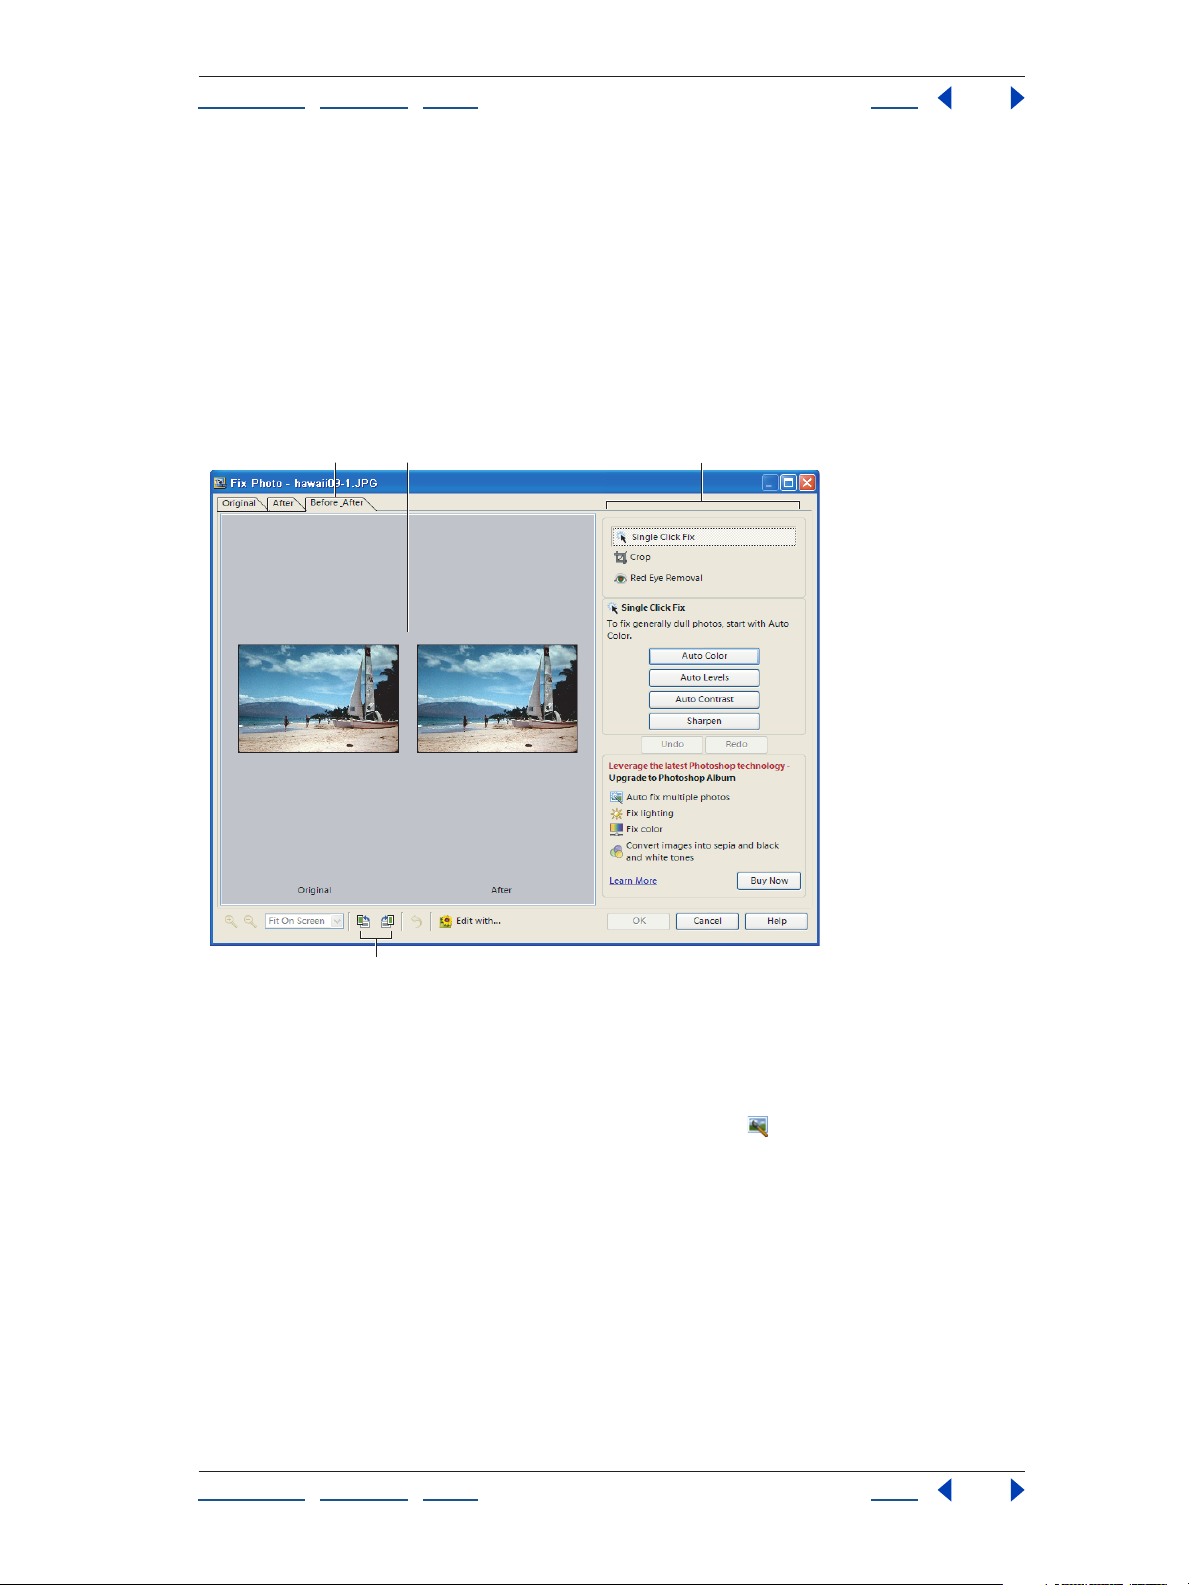
A
The Fix Photo dialog box
A. Tabs for choosing different views of the photo B. Preview images C. Editing options D. Rotate
options
B
D
C
To fix photos in Photoshop Album 2.0 Starter Edition:
1 Select a photo in the photo well and click the Fix button in the shortcuts bar.
Photoshop Album 2.0 Starter Edition makes a copy of the original photo file for editing.
2 In the Fix Photo dialog box, choose one of the following:
Single Click Fix Applies an automatic correction for color, contrast, or sharpening.
Crop Lets you crop a photo to improve the composition or add emphasis to an image.
Red Eye Removal Corrects for the red-eye effect caused by a camera flash.
For details on fixing photos and the advanced options for fixing photos in Photoshop
Album 2.0, see the Photoshop Album 2.0 Help.
Using Help | Contents | Index Back 8
Page 9

Adobe Photoshop Album Help Addendum: Getting Started with Adobe Photoshop Album 2.0
Using Help | Contents | Index Back 9
Creating a PDF slideshow
PDF slideshows automatically present your photos in the sequence you specify. Slideshows are a good way to share your photos via e-mail and view them on a computer
screen.
PDF is a universal file format that can be read by anyone who has the free Adobe
Reader software. PDF provides a better photo-viewing experience for your recipients
by packaging up all the individual photos into a slideshow, complete with transitions. Your
recipients can download the free Adobe Reader from the Adobe Web site (http://
www.adobe.com).
To create a PDF slideshow:
1 In the photo well, select the photos you want to use in the slideshow. If you don’t make
a selection, all the photos in the photo well will be used in the slideshow.
2 Click the Create button in the shortcuts bar.
3 In the Create Slideshow dialog box, click the Add Photos button to add any more
photos to the slideshow you are about to create.
4 In the Add Photos to Creation dialog box, display a set of photos by clicking one of the
options at the left.
5 Select the photos you want to include in your creation by clicking the check box next to
each one.
6 Click Add to Creation. The photos you selected are added to your PDF slideshow, and
the check boxes are cleared to let you make a new selection. When you’re done adding
photos, click OK.
7 In the Create Slideshow dialog box, rearrange, duplicate, or remove photos as desired.
Click the Full Screen Preview button
8 Click OK and follow the on-screen instruction to save your PDF slideshow.
to preview your slideshow.
Sharing and printing your photos
Photoshop Album 2.0 Starter Edition lets you share your photos by e-mailing, printing
them locally, ordering prints online, and sharing online. You can e-mail individual photos
or a PDF slideshow. When you print, you can make individual prints, contact sheets or a
Picture Package. You can also order prints via the Web using the Online Services feature.
To e-mail photos:
1 Select one or more photos in the photo well.
2 Click the Share button in the shortcuts bar, and then choose E-mail from the pop-up
menu. Follow the on-screen instructions to choose recipients and specify a format for the
attachment.
Photoshop Album 2.0 Starter Edition automatically resizes and compresses your photos
for a smoother e-mail delivery. You can also package up multiple photos into a slideshow
by clicking the PDF Slideshow button in the E-mail window. Photoshop Album 2.0 Starter
Edition generates the attachment and then launches your default e-mail program. To get
more information on setting your e-mail preferences, see the Photoshop Album 2.0 Help.
Using Help | Contents | Index Back 9
Page 10
Adobe Photoshop Album Help Addendum: Getting Started with Adobe Photoshop Album 2.0
Using Help | Contents | Index Back 10
To print photos to your printer
1 Make sure that your printer is on and connected to your computer.
2 In the photo well, select one or more photos that you want to print.
3 Click the Print button in the shortcuts bar and choose Print from the pop-up menu.
4 Select options in the Print Photos dialog box and click Print. For more details on
printing photos, see the Photoshop Album 2.0 Help.
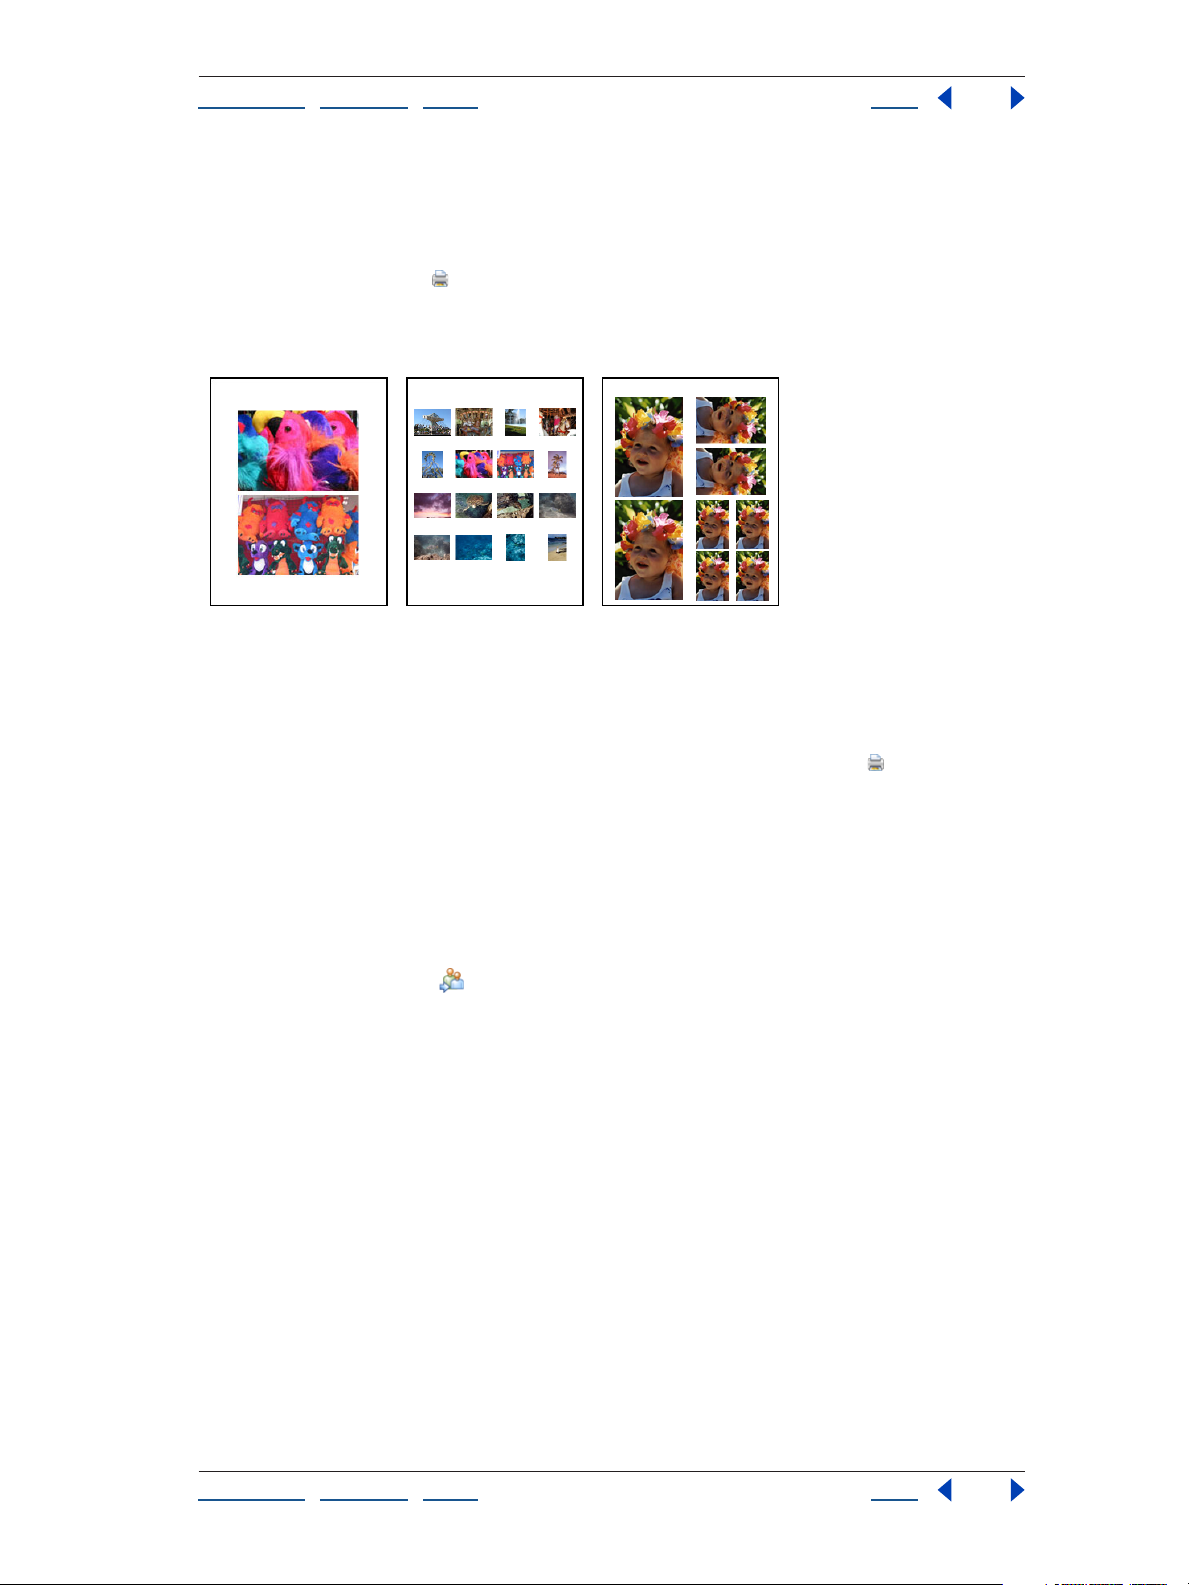
ABC
Three different printing options
A. Individual prints B. Contact sheet C. Picture package
To print photos from an online service:
First select the photo or photos you want to order. Click the Print button and choose
Order Prints from the pop-up menu. Follow the on-screen instructions to finish ordering
your prints. The service list may be updated each time you select the Online Services
command, so check it occasionally for new services.
To share photos online:
1 Select the photo or photos you want to share.
2 Do one of the following:
• Click the Share button in the shortcuts bar, and then choose Share Online from the
pop-up menu.
• Choose Online Services > Share Services, and then choose a service from the list.
3 The first time you use a provider, an End User License Agreement appears. Click the
Agree button to continue.
4 A screen appears to let you know that you’ve left the Adobe Photoshop Album
program. From this point, if you need help, refer to the service provider’s customer service
or help system.
To download shared photos:
1 Choose Online Services > Download, and then choose a service from the list.
2 The first time you use a provider, an End User License Agreement appears. Click the
Agree button to continue.
3 A screen appears to let you know that you’ve left the Adobe Photoshop Album
program. From this point, if you need help, refer to the service provider’s customer service
or help system.
Using Help | Contents | Index Back 10
Page 11

Adobe Photoshop Album Help Addendum: Getting Started with Adobe Photoshop Album 2.0
Using Help | Contents | Index Back 11
For more details on sharing your photos through prints, e-mail, or online services, see the
Photoshop Album 2.0 Help.
Using Help | Contents | Index Back 11
Page 12

Adobe Photoshop Album Help Installing and Learning to Use Adobe Photoshop Album
Using Help | Contents | Index Back 12
Installing and Learning to Use Adobe Photoshop Album
Introduction
Welcome to the Adobe® Photoshop® Album application, the fast and easy way to organize
your lifetime of photos so that you can instantly find the ones you want and share your
experiences with anyone, anywhere. Photoshop Album has features designed specifically
for active picture takers, photo-hobbyists, and business users who want to organize their
digital photos, create albums, print photos, e-mail photos, share photos on the Web, or
make a CD or disc for viewing on a computer or TV
screen.
Registration
Please register your copy of the application so Adobe can continue to provide you with
the highest quality software, offer technical support, and inform you about new
Photoshop Album software developments.
When you first start the Adobe Photoshop Album application, you’re prompted to register
online. You can choose to submit the form directly or fax a printed copy. You can also
register by filling out and returning the registration card included with your software
package.
Installing Adobe Photoshop Album
You must install the Photoshop Album application from the Adobe Photoshop Album CD
onto your hard drive; you cannot run the application from the CD.
Follow the on-screen installation instructions. For more detailed information, see the How
to Install Read Me file on the CD.
Tools for using Adobe Photoshop Album
Adobe provides a variety of options to help you learn and use Photoshop Album,
including built-in Help, the Photoshop Album Quick Guide, context-sensitive menus,
and
tool tips.
In addition to this Getting Started Guide, you’ll also find Adobe Portable Document
Format (PDF) documents on the Photoshop Album CD. The Adobe Acrobat
you view PDF documents and is included on the CD as part of the Photoshop Album
installation.
Using Help | Contents | Index Back 12
®
Reader® lets
Page 13

Adobe Photoshop Album Help Installing and Learning to Use Adobe Photoshop Album
Using Help | Contents | Index Back 13
Using Help
Adobe Photoshop Album includes complete documentation in an easily accessible,
built-in Help system. The Help system contains essential information on using all
Photoshop Album commands, features, and tools, as well as keyboard shortcuts and
full-color illustrations.
When launched, the Help system is displayed in a Web browser for easy navigation. To
properly view the Help topics, your computer must have either Netscape Communicator
(4.75 or higher) or Microsoft
®
Internet Explorer (5.0 or higher) installed.
To start Photoshop Album Help:
Do one of the following:
• Press the F1 key.
• Choose Help > Adobe Photoshop Album Help from the menu bar.
• Click the Help button located in the lower right corner of the Quick Guide window.
Using the Photoshop Album Quick Guide
By default, the Photoshop Album Quick Guide window opens when the application is
launched. The Quick Guide is a convenient starting point for major tasks in Photoshop
Album. For more information on using the Photoshop Album Quick Guide, see
using Photoshop Album” on page 17.
“Start
Using context-sensitive menus
Photoshop Album streamlines your use of the application with context-sensitive menus.
These menus display options for photos and tools, and change depending on the item
that’s currently selected.
A context-sensitive menu
To display context menus:
1 Position the pointer over an image or item in a pane.
2 Right-click.
If no context-sensitive menu appears, no menu is available for that tool or pane.
Using Help | Contents | Index Back 13
Page 14

Adobe Photoshop Album Help Installing and Learning to Use Adobe Photoshop Album
Using Help | Contents | Index Back 14
Using tool tips
The tool tips feature displays the name or function of tools, buttons, or controls.
A tool tip
To identify a tool, button, or control:
Position the pointer over a tool, button, or control, and pause. A tool tip appears showing
the name or function and sometimes the keyboard shortcut for the item.
Note: Tool tips are not available in most dialog boxes. However, some dialog boxes
contain hyperlinks that display explanations or tips.
Using Web resources
If you have an Internet connection, you can access additional resources for learning
Photoshop Album on the Adobe Systems Web site. These resources are continually
updated.
To access the Adobe home page for your region:
Do one of the following:
• Click the Go to Adobe.com button near the top-right corner of the application
window.
• Choose Help > Adobe Online from the menu bar.
Customer support
When you register your product, you may be entitled to technical support for a single
incident. Terms vary depending on your country of residence and are available only for
retail versions. For more information, refer to the registration card provided with your
Photoshop Album documentation.
Additional customer support resources
Adobe Systems also provides several forms of automated technical support:
• See the ReadMe and ReadMe First! files installed with the program for information that
became available after this guide went to press.
• Choose Help > Support to explore the extensive customer support information on
Adobe’s Web site.
Using Help | Contents | Index Back 14
Page 15

Adobe Photoshop Album Help Photoshop Album Basics
Using Help | Contents | Index Back 15
Photoshop Album Basics
Enjoying your photo collection with Photoshop Album
If you love to take pictures, you’ve probably accumulated piles of shoeboxes filled with
prints and negatives. Or maybe you’ve gone digital and you’re trying to keep track of all
those photo files on your computer. Now you can spend time enjoying your photos
instead of just looking for them. Let Adobe Photoshop Album be the hub to manage your
lifetime of photos. With Photoshop Album, you can bring photos into your computer,
organize them, find them, view them, fix them, get creative with them, and share them.
With Photoshop Album, you see all your photos in one place, organized by the time you
took the photos, even if they’re spread across many folders on your computer. Gone is the
tedium of painstakingly organizing your folders by subject or renaming all your photo
files—only to discover that you still have no way to see a list of all your photos by date and
time or that you put a photo in one folder but went looking for it in another.
Get photos from various devices such as digital cameras, scanners, and folders on your
computer and bring them into Photoshop Album. You can also bring video clips or audio
clips into Photoshop Album. Once photos and media are in Photoshop Album, you can
organize, view, and find them. You can even fix common photo problems. As the hub for
all your photo activities, Photoshop Album lets you make such creations as albums,
greeting cards, slideshows, and Web photo galleries based on your photos. You can also
share your photos online or in print, all without leaving the program.
Using Help | Contents | Index Back 15
Page 16
Adobe Photoshop Album Help Photoshop Album Basics
Using Help | Contents | Index Back 16
Photoshop Album recognizes digital photos, video, and audio in some of the most
commonly used formats. For more information on file formats you can bring into
Photoshop Album, see
“Working with different file formats in Photoshop Album” on
page 39.
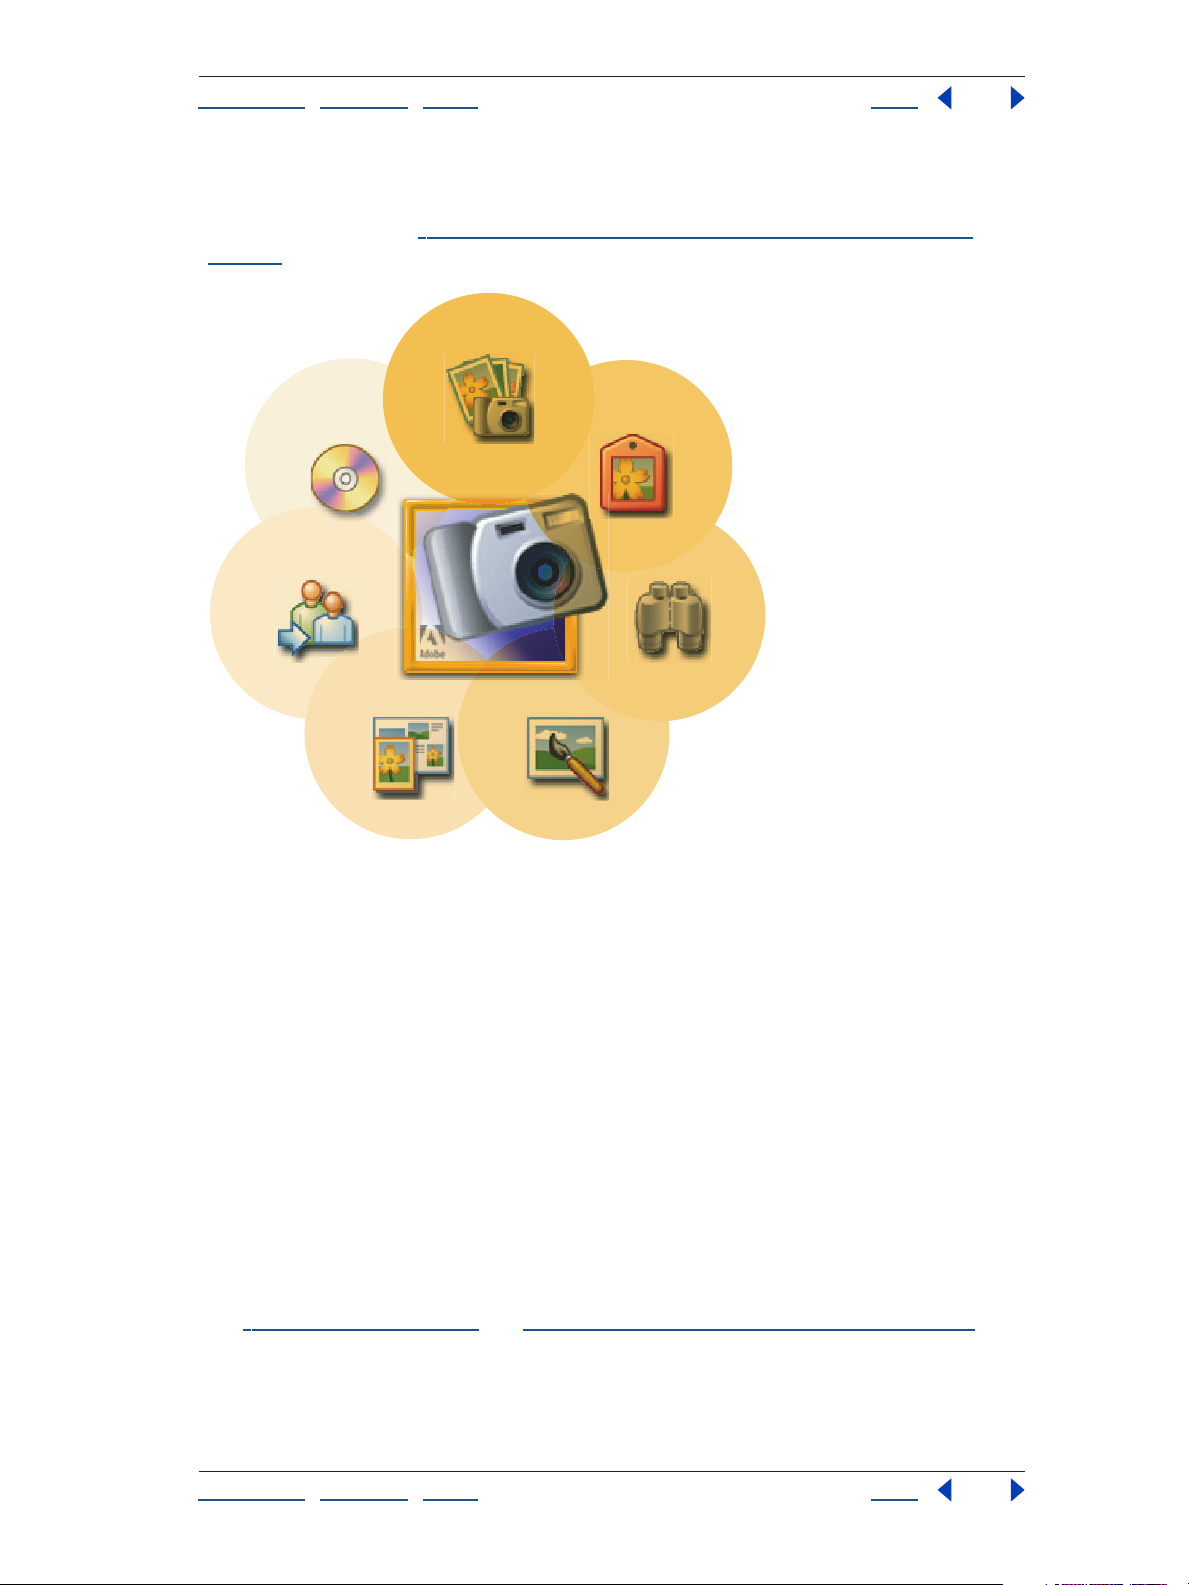
GET PHOTOS
BURN AND
BACKUP
ADOBE
PHOTOSHOP ALBUM
SHARE
CREATE
Adobe Photoshop Album is the hub of all your work with photos—the fast and easy way to organize
and share your lifetime of photos.
ORGANIZE
FIND
FIX
How Photoshop Album works
Adobe Photoshop Album creates links to your photos so it knows where the photo is
located, what file format it’s in, and so forth. Photoshop Album does this by keeping
information about your photos, video clips, and audio clips in a database of information
called the
catalog.
Photoshop Album automatically creates a catalog for you named My Catalog.psa when
you first launch the application and bring in photos. Your catalog keeps track of the
photos, video clips, and audio clips on your computer and on other media such as discs.
It’s a collection of information about each photo, but it doesn’t contain the actual photos
themselves.
Photos, video clips, and audio clips brought into Photoshop Album are automatically
organized by the date/time the photo was taken by the digital camera. For more infor
mation about how Photoshop Album automatically organizes your photos in the timeline,
see
“The timeline” on page 20 and “Organizing photos in the photo well” on page 43.
Using Help | Contents | Index Back 16
Page 17

Adobe Photoshop Album Help Photoshop Album Basics
Using Help | Contents | Index Back 17
Photoshop Album also has a powerful tags feature that functions much like attaching
keywords to identify your photos. It’s very similar in concept to the use of name tags or
luggage tags. Tags give you even more flexibility in how you manage, identify, and
organize photos by letting you find photos based on the people in them, where the photo
was taken, what the event was, and so forth. You can have multiple tags for any photo to
mark the photo with all of the things that are important about it. By selecting any combi
nation of tags, you can find and organize just the photos you want. For more information
on tags, see
page 71.
Of course, if you want the tags to reflect your existing folder organization, Photoshop
Album gives you an easy way to create and apply tags based on those folder names. For
more information, see
page 55.
“The Tags pane” on page 23 and “Organizing photos into catalogs” on
“Creating and attaching tags based on existing folder names” on
-
Start using Photoshop Album
When you first start Photoshop Album, the Quick Guide window is open by default.
The
Quick Guide is a convenient “jumping off” point to all the major tasks in Photoshop
Album. Select a task by clicking an icon in the Quick Guide Overview window or clicking a
tab. If you’re a new user of Photoshop Album, your first task will be to get photos into
Photoshop Album.
The Quick Guide can be closed or reopened at any time while you’re using Photoshop
Album. For more information about a specific feature in the Quick Guide, see documen
tation on that feature in Photoshop Album Help.
To start Photoshop Album:
1 Do one of the following:
• Double-click the Photoshop Album icon on your desktop.
• Use the Start menu to find and open Photoshop Album.
-
Using Help | Contents | Index Back 17
Page 18
Adobe Photoshop Album Help Photoshop Album Basics
Using Help | Contents | Index Back 18
By default, the Quick Guide window appears on top of the Photoshop Album work area.
The Quick Guide Overview window
2 In the Quick Guide Overview window, do one of the following to start using Photoshop
Album immediately:
• Click a tab.
• Click one of the six icons in the Overview window.
Note: Click the Help button at the bottom-right corner of the Quick Guide window if you
want to access the built-in Help. For more information on Help, see “Using Help” on
page 13.
To open the Quick Guide (if it’s been closed):
Choose Help > Quick Guide from the menu bar.
To automatically show the Quick Guide when you start Photoshop Album:
1 Choose Edit > Preferences, and then click General from the list on the left.
2 Select Show Quick Guide at Startup.
Using Help | Contents | Index Back 18
Page 19
Adobe Photoshop Album Help Photoshop Album Basics
Using Help | Contents | Index Back 19
About the Photoshop Album work area
The Adobe Photoshop Album work area is designed to help you get, find, view, organize,
and fix photos; make creations; and share those photos and creations. To do all this, the
work area is organized into several related components that help you move from one task
to another easily and effectively.
A
B
C
D
E
F
G
H
I
The Photoshop Album work area
A. Menu bar B. Shortcuts bar C. Timeline D. Find bar E. Photo well F. Calendar view G. Collec-
tions tab for displaying Collections pane H. Tags pane I. Options bar
The menu bar
The menu bar contains commands for performing tasks. The menus in the menu bar are
organized according to the type of task you can perform. For example, the Find menu lists
commands for finding photos according to date, name, and so forth.
The menu bar
Using Help | Contents | Index Back 19
Page 20

Adobe Photoshop Album Help Photoshop Album Basics
Using Help | Contents | Index Back 20
The shortcuts bar
The shortcuts bar displays buttons for common commands, and is located just below the
menu bar. You can quickly click these commands as you need them while you’re working
in Photoshop Album. To see the name of a button, position the pointer over the button
and its tool tip appears.
C D E F G H I J KBA
The shortcuts bar
A. Navigation buttons B. Click to show all photos C. Get photos, video, and audio D. Fix photos E.
Start a new creation F. Print photos G. E-mail and share photos H. Display items in the photo
well I. Display the Tags pane and Collections pane J. Display items in the calendar view K. Go to
Adobe.com
The timeline
The timeline lets you find photos by the date they were taken. When you select a date or
range of time in the timeline, photos that were created or saved with that date appear in
the photo well. When you select a range of time in the timeline, the photo well scrolls to
the photos that were taken within that range. You can also scroll to a particular month in
any year by clicking that month in the timeline. The timeline also shows how items are
distributed across time; the height of each bar is proportional to the number of images in
each month.
For more information on the timeline, see “Using the timeline to find photos” on page 82.
A C D E F GB
Using the timeline
A. Click to scroll the range of the timeline B. Gray area indicates photos out of set range C. Drag end
points to refine searches
pointer over a bar to identify its range (month, import batch date, or file location) F. The height of
the bar indicates the number of photos
D. Click a bar or drag the marker to scroll to a different month E. Hold
G. Blank area indicates hidden photos
The find bar
The find bar performs quick searches when you drag tags onto it. When not in use, the find
bar is a horizontal bar right above the photo well. When you drag a tag onto it, the find bar
automatically expands so you can see the tags you’ve added to the search. Every file with
the chosen tag attached to it will be found, so if you want to refine your search, you can
drag more tags onto the find bar.
Using Help | Contents | Index Back 20
Page 21
Adobe Photoshop Album Help Photoshop Album Basics
Using Help | Contents | Index Back 21
In addition, when you drag a creation or collection onto the find bar, the photos in it are
displayed in the photo well, replacing any previous view.
B DCA E
Find bar expanded with search criteria
A. Search criteria B. Click a check box to show search results C. Clear the search and close the find
bar D. Close match E. Not matching
The photo well
The photo well is the area where your photos, video clips, audio files, and creations are
displayed, either one at a time or in a grid of thumbnails. The options bar located below
the photo well contains a row of buttons that provide quick access to the most common
actions for changing the view options of the photo well, including a photo well
arrangement menu that specifies the sort order for displaying the photos. In the photo
well, you can select the items you want to do things with, such as attach tags to photos
and add photos to creations. For more information, see
well” on page 79.
To view the photo well, click the Photo Well button in the shortcuts bar.
“Viewing photos in the photo
A B DC
E
F
G
H
The photo well in medium thumbnail view with the Details option selected
A. Selected image B. Indicates video clip C. Click to edit date and time D. Indicates offline
photo E. Scroll to view photos F. Indicates audio caption attached G. Double-click to view as
Single Photo H. In the medium thumbnail view, place the pointer over the icon to see tag names
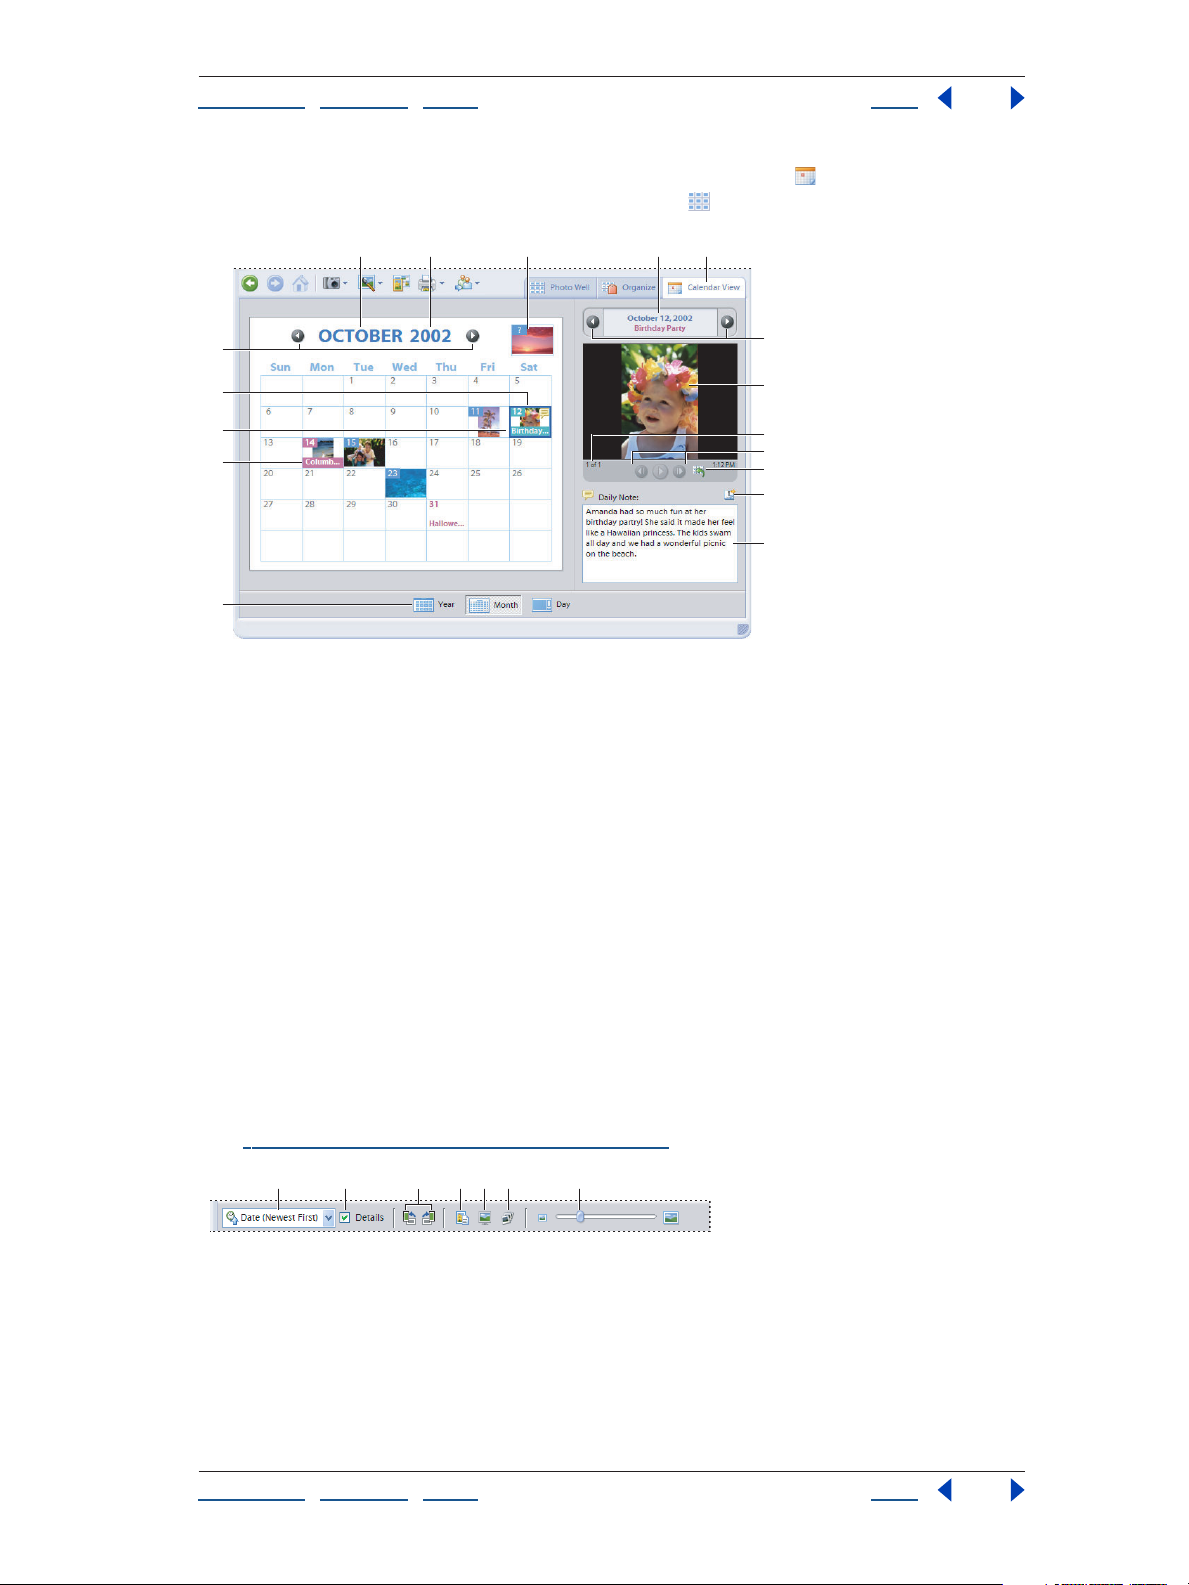
The calendar view
The calendar view lets you display and find items by day, month, or year. When the
calendar view is displayed, it shows the first photo for each day, and it identifies the
number of photos (or video clips) taken on that day. In the calendar view, you can do many
of the same operations on photos that you can do from the photo well. You can even keep
track of recurring events, such as holidays and birthdays, and add notes to any day in the
calendar view. For more information, see
“Using the calendar view” on page 83.
Using Help | Contents | Index Back 21
Page 22
Adobe Photoshop Album Help Photoshop Album Basics
Using Help | Contents | Index Back 22
To view the calendar view, simply click the Calendar View button in the shortcuts bar. To
switch to the photo well, click the Photo Well button in the shortcuts bar.
A B C D E
F
G
H
I
J
K
L
M
N
O
P
Q
Using the calendar view
A. Click to select a month B. Click to select a year C. Click to view photos with unknown dates D.
Click to select a date E. Click to display calendar view F. Click to view previous/next month G.
Custom event H. Date currently selected I. Holiday J. Click to choose Year, Month, or Day view K.
Click to view previous/next day
L. Right-click photo to display commands M. Number of photos for selected date N. Controls for
viewing slideshow O. Click to display item in photo well P. Add an event Q. Enter a daily note
The options bar
The buttons in the options bar help you organize and sort files in the photo well and
calendar view. You can display information on what each button on the options bar does
by holding the mouse pointer over that button.
For the photo well, the options bar lets you choose the order by which to display items,
show detailed information about each item, rotate photos, display the Properties palette,
view photos as a slideshow, and specify the size of thumbnails.
For the calendar view, the options bar lets you select whether to view items by year,
month, or day.
For more information on using the options bar for viewing photos in the work area,
see
“Viewing photos in the photo well” on page 79.
B D E F GA C
The photo well options bar
A. Photo well arrangement menu B. Show Details option C. Rotate left button D. Rotate right
button E. Show/Hide Properties button F. Display Full Screen Preview button G. View Slideshow
H. Thumbnail view controls
button
Using Help | Contents | Index Back 22
Page 23

Adobe Photoshop Album Help Photoshop Album Basics
Using Help | Contents | Index Back 23
The Tags pane
Photoshop Album automatically organizes your photos in the photo well. However, you
can enhance your photo organization by attaching keyword tags to them. Tags are a
powerful tool for finding and identifying photos, video clips, audio clips, and creations so
you don’t have to remember each item’s filename, date, or folder. Using tags also liberates
you from having to file your items in folders by subject, and renaming them. For more
information on using tags to organize photos, see
page 45.
To view the Tags pane, click the Organize button in the shortcuts bar, and then click the
Tags tab below it.
ABC D
E
F
G
H
I
J
“Using tags to organize your photos” on
K
L
M
The Tags pane
A. Tags tab B. Delete button C. Edit button D. Show tag tips E. New button F. Favorites tag G.
Hidden tag H. Category I. Subcategory J. User-created tag K. Selected tag L. Find check box M.
Click to display the tags in that category or subcategory
The collections pane
A collection is a container that you put photos into. Using the photo well, you can then
organize and display the photos in that collection in a custom order. (This is unlike tags, in
which selecting a tag displays the photos associated with that tag either by date, import
batch, or folder location.) Collections don’t change the photos in them; they simply give
you additional and more flexible ways of finding and organizing your photos. You use the
Collections pane to create, select, and modify collection containers. For more information
on using collections to organize photos, see
on page 57.
To view the Collections pane, click the Organize button in the shortcuts bar, and then
click the Collections tab below it.
“Using collections to organize your photos”
Using Help | Contents | Index Back 23
Page 24
Adobe Photoshop Album Help Photoshop Album Basics
Using Help | Contents | Index Back 24
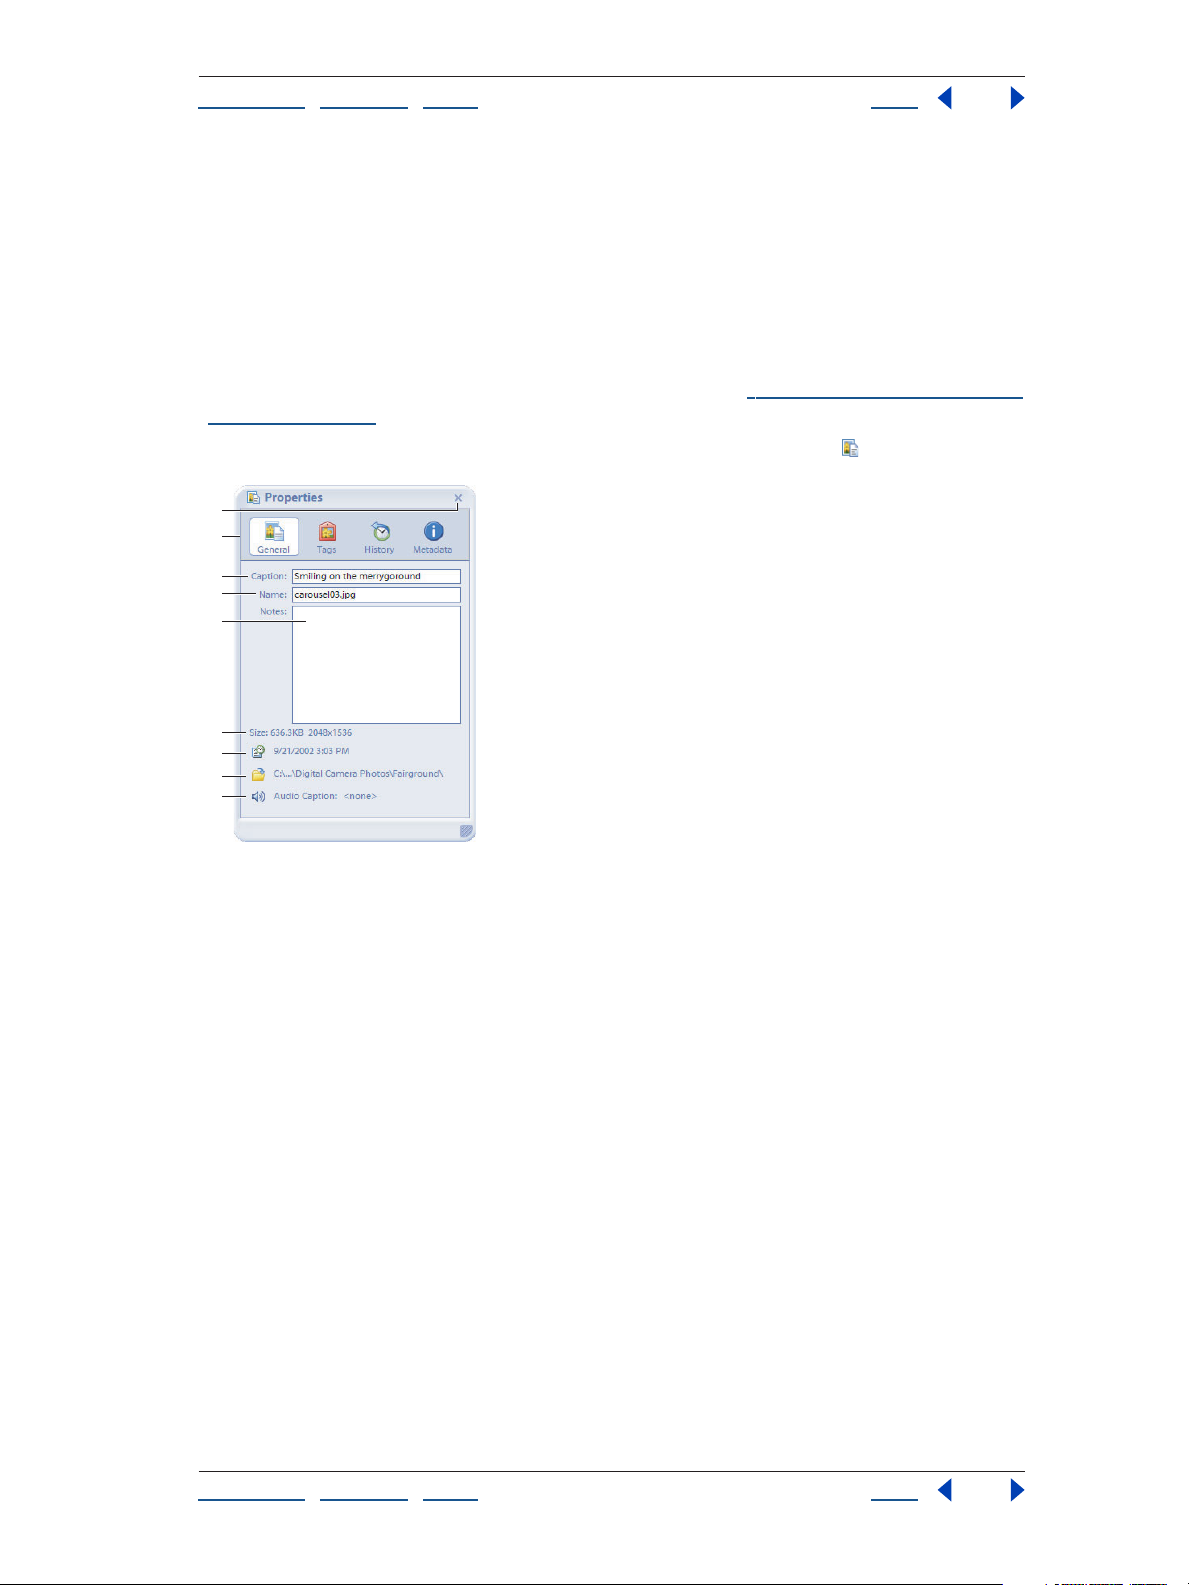
The Properties palette
The Properties palette contains detailed information about a selected photo or media file.
In the Properties palette, you can view the name of the file, any captions or notes you’ve
added to the file, metadata in the file, the dates you imported or modified the file, any
creations using the file, any tags attached to the file, any collections the file is in, and the
location (path) of the file on your computer. You can also record or listen to audio annota
tions attached to photos. Additionally, the Properties pane lets you rename a file, add a
caption or notes, and adjust the date and time of the photo file. For more information on
how to view or add information in the Properties pane, see
photo” on page 66.
To view the Properties pane, click the Show or Hide Properties button in the options bar.
A
B
C
D
E
“Viewing information about a
-
F
G
H
I
The Properties palette
A. Closes the Properties palette B. Buttons for choosing what information to view C. Caption of the
photo, video clip, or audio clip D. Filename E. Type or view notes F. File size, dimensions (photos
and video only), and playing time (audio only) G. Change the Date and Time H. Path to the file
location on your computer I. Record, play, or attach the audio caption
Using Help | Contents | Index Back 24
Page 25

Adobe Photoshop Album Help Getting Photos into Photoshop Album
Using Help | Contents | Index Back 25
Getting Photos into Photoshop Album
Getting photos from digital cameras or card readers
The way you get your photos from a digital camera depends on how your camera attaches
to your computer. Some cameras come with TWAIN drivers (software made by the
manufacturer that allows the camera to communicate with your computer) that must be
installed first. Photoshop Album uses these drivers to get photos from your camera to
your computer.
Other cameras support WIA (Windows Image Acquisition) drivers which make the process
of getting your photos as simple as connecting the camera to your computer and then
clicking a button in Photoshop Album. WIA can be used only if you are running Windows
XP or Windows Me.
Some cameras mount to your computer so that when the camera is connected it
looks like an additional hard-disk drive on your computer. To get your photos from a
mounted camera, follow the directions in
page 32.
If you have a flash card or memory card reader attached to your computer, or if you have a
flash or memory card in your digital camera, Photoshop Album makes it easy to get your
photos. You may also get your photos from a card reader using the directions in
photos from your computer” on page 32.
Sometimes you may try to get photos that already exist in your catalog. If this happens,
Photoshop Album displays a dialog box letting you know which photos you already have.
These photos won’t be reimported.
Note: When you get photos from your camera using TWAIN drivers, you might lose some
metadata, such as the date and time when the photo was taken. In addition, TWAIN
drivers might convert files in JPEG format to TIFF format, using more disk space and
slowing down the importing process. If your camera uses TWAIN drivers, consider using a
card reader to get the photos instead of getting them directly from the camera.
“Getting photos from your computer” on
“Getting
Getting your photos from a digital camera or a card reader
Carefully read any documentation that came with your camera or card reader to make
sure it’s connected correctly. If you’re using a camera with TWAIN drivers, make sure that
you have installed the drivers that came with your digital camera before you launch
Photoshop Album.
To get photos from a digital camera or card reader:
1 Make sure that your camera or card reader is connected properly and turned on.
2 Do one of the following:
Using Help | Contents | Index Back 25
Page 26

Adobe Photoshop Album Help Getting Photos into Photoshop Album
Using Help | Contents | Index Back 26
• Click the Get Photos button in the shortcuts bar and then choose From Camera or
Card Reader.
• Choose File > Get Photos > From Camera or Card Reader.
If you have a WIA-enabled camera, Photoshop Album should automatically detect
your camera when you attach it, so you won’t need to click the Get Photos button.
3 If the Get Photos from Camera or Card Reader dialog box appears, choose the name of
the connected device from the Camera pop-up menu at the top of the dialog box.
Get Photos from Camera or Card Reader dialog box
4 Next, select Create Subfolder Using Date/Time of Import if you want the photos you’re
getting to be stored in their own folder, whose name includes the date and time they were
imported. Click the OK button.
5 Select Delete Photos on Camera or Memory Card after Import if you want to erase the
photos from your camera once they’re brought into Photoshop Album.
6 If you have a WIA-enabled camera, select the Import All Photos option if you want
Photoshop Album to import all the images on your camera.
Note: If your camera uses TWAIN drivers, Photoshop Album may launch the driver that
came with your digital camera. Acquire the photos from your camera as instructed by the
driver software online help, or the printed documentation that came with your camera.
7 Click the OK button.
Important: If your camera does not appear as a choice in the menu, it could just mean
that the camera is not connected or that the camera is not turned on.
You can rotate any photo you bring in from a digital camera. Select one or more
photos you want to rotate. Then click the Rotate Left button or the
Rotate Right button in the options bar.
The photos you just imported are displayed in the photo well. For more information on
navigating through the photo well, see
“The photo well” on page 21.
Note: If the photos you import contain keyword metadata, the Import Attached Tags
dialog box appears. For information on importing the keywords as tags, see
“Importing
tags attached to photos” on page 38.
Using Help | Contents | Index Back 26
Page 27
Adobe Photoshop Album Help Getting Photos into Photoshop Album
Using Help | Contents | Index Back 27
Setting camera or card reader preferences
Once you’ve set camera or card reader preferences, you may not have to change them
unless you would like to get your photos from a different device.
If you have changed the settings and are having trouble getting your photos, try
clicking the Restore Default Settings button to return the preferences to the original
configuration. The default settings work well for most users.
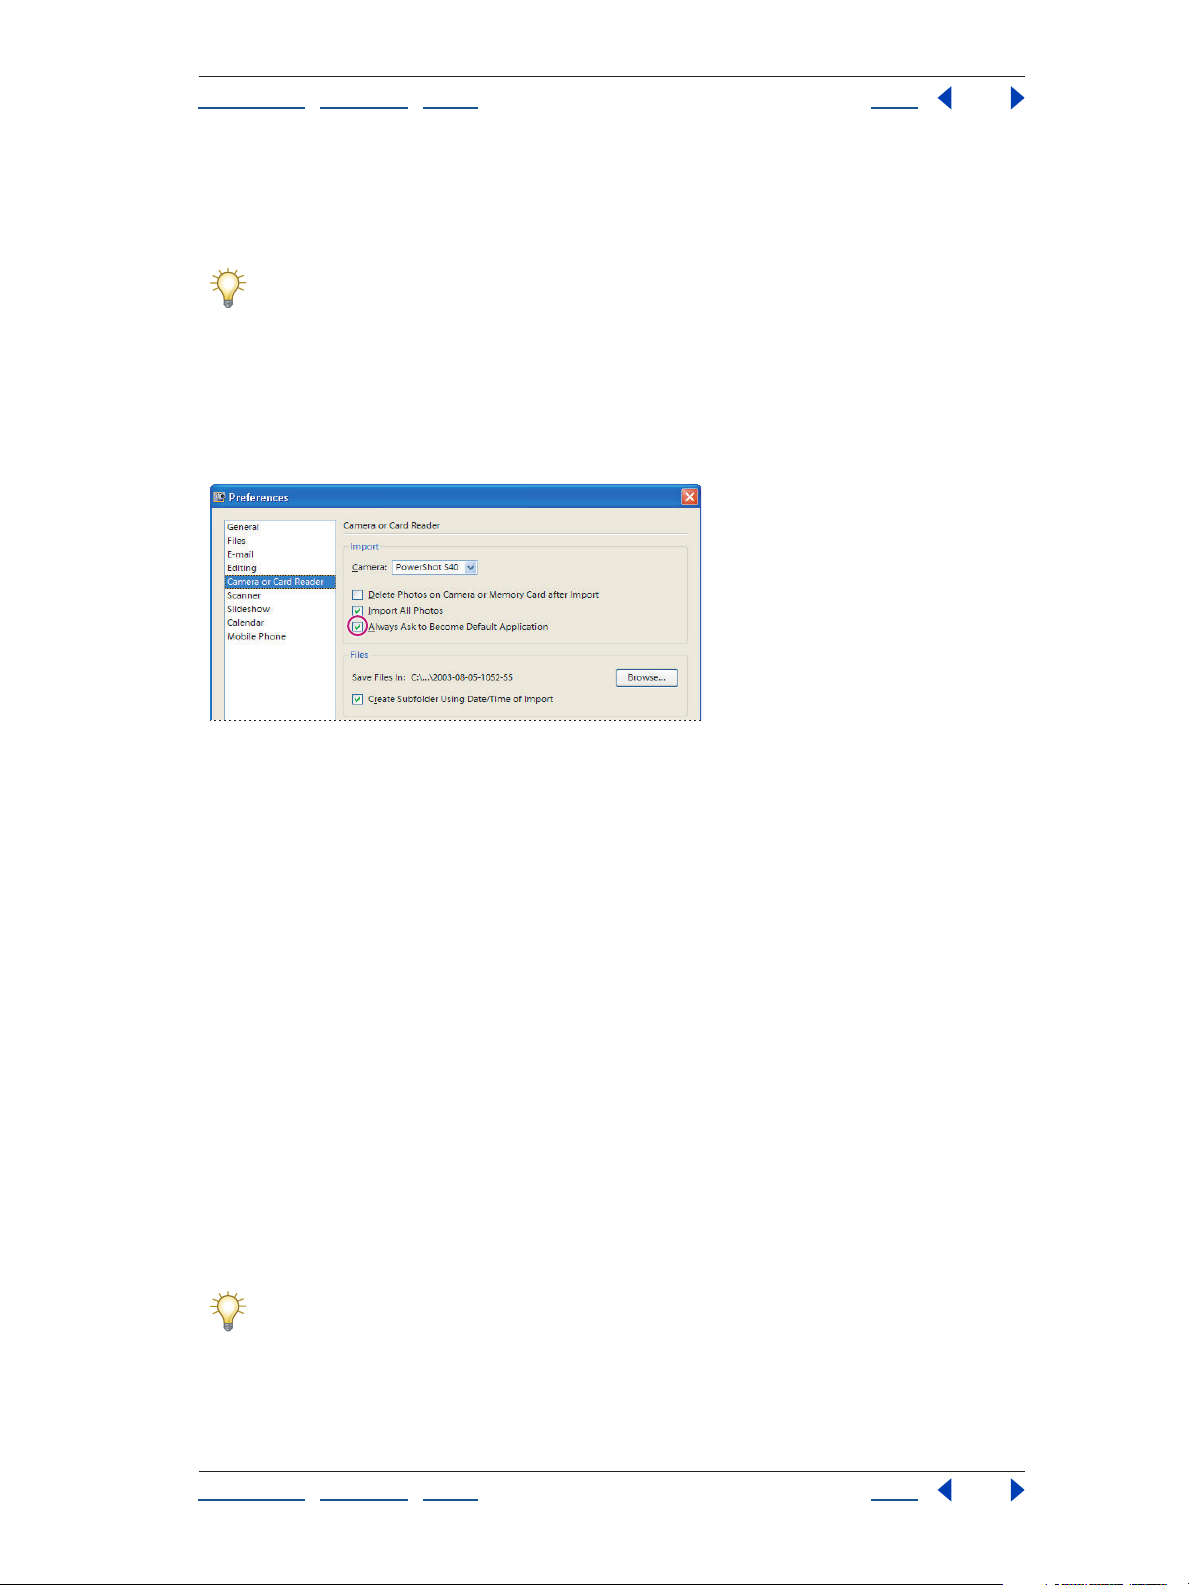
To set camera preferences:
1 If the Camera Preferences dialog box isn’t displayed on your screen, choose
Edit
> Preferences to open the Preferences dialog box, and then choose Camera or Card
Reader from the list on the left side of the dialog box.
Setting camera preferences
2 Choose the name of your camera from the Camera pop-up menu. If you’ve used more
than one camera, each known camera will appear in the pop-up menu.
Note: Each time you connect with a different camera, you’ll need to select that camera
from the list.
3 If you want the photos you just downloaded to be cleared from your digital camera,
select Delete Photos on Camera or Memory Card after Import (leave the option unchecked
to keep the images on your camera).
4 If you have a WIA-enabled camera, select Import All Photos if you want Photoshop
Album to automatically get all the images on your digital camera. If you want to choose
just some of the images, deselect this option.
5 Make sure that Always Ask to Become Default Application is checked so that Photoshop
Album launches when WIA-enabled cameras are attached to your computer. Even if you
don’t have a WIA-enabled camera, it’s a good idea to keep this option selected.
6 Under Files, select Create Subfolder Using Date/Time of Import if you want Photoshop
Album to put imported photos in a new subfolder named according to the date and time
you imported them. This is helpful if you need to locate the images on your computer. Also
listed is the path to the main folder where your photos are stored.
If you want to change the main folder location where imported files are stored, click
Files to display the Files page of the Preferences dialog box, and then choose a new
location for saved files. That way, all imported files will be stored in a consistent location.
7 Click OK to close the Preferences dialog box.
Using Help | Contents | Index Back 27
Page 28
Adobe Photoshop Album Help Getting Photos into Photoshop Album
Using Help | Contents | Index Back 28
Getting photos from scanners
Photoshop Album lets you use a scanner to bring in images of your photos, negatives, and
slides. Photoshop Album uses the scanner driver (software made by the manufacturer that
allows the scanner to communicate with your computer) installed on your system to get
scanned photos. The advantage of using these drivers is that you can usually choose the
area of a photo you want to scan, and sometimes you can correct initial color problems,
too. Other scanners use WIA (Windows Image Acquisition) drivers, which you can use if
you are running Windows XP or Windows Me.
In Windows XP, you can set preferences that cause Photoshop Album to start as soon
as your computer detects that your scanner is attached. This streamlines the importation process. See the documentation that came with your Windows XP operating system
for more information.
Before you try to get your photos into Photoshop Album, make sure that you’ve installed
all the software that came with your scanner. Carefully read any documentation that came
with your scanner to make sure that it’s connected properly to your computer. If the
Preferences dialog box displays on your screen after you click the Get Photos button,
follow the directions in
“Setting scanner preferences” on page 29 to set your scanner up.
If you’re having trouble getting your scanner to work well with Photoshop Album,
you may want to use the software that came with your scanner instead. Simply scan
the photos as directed, and then save them to your computer. To bring them into
Photoshop Album, follow the directions in
page 32.
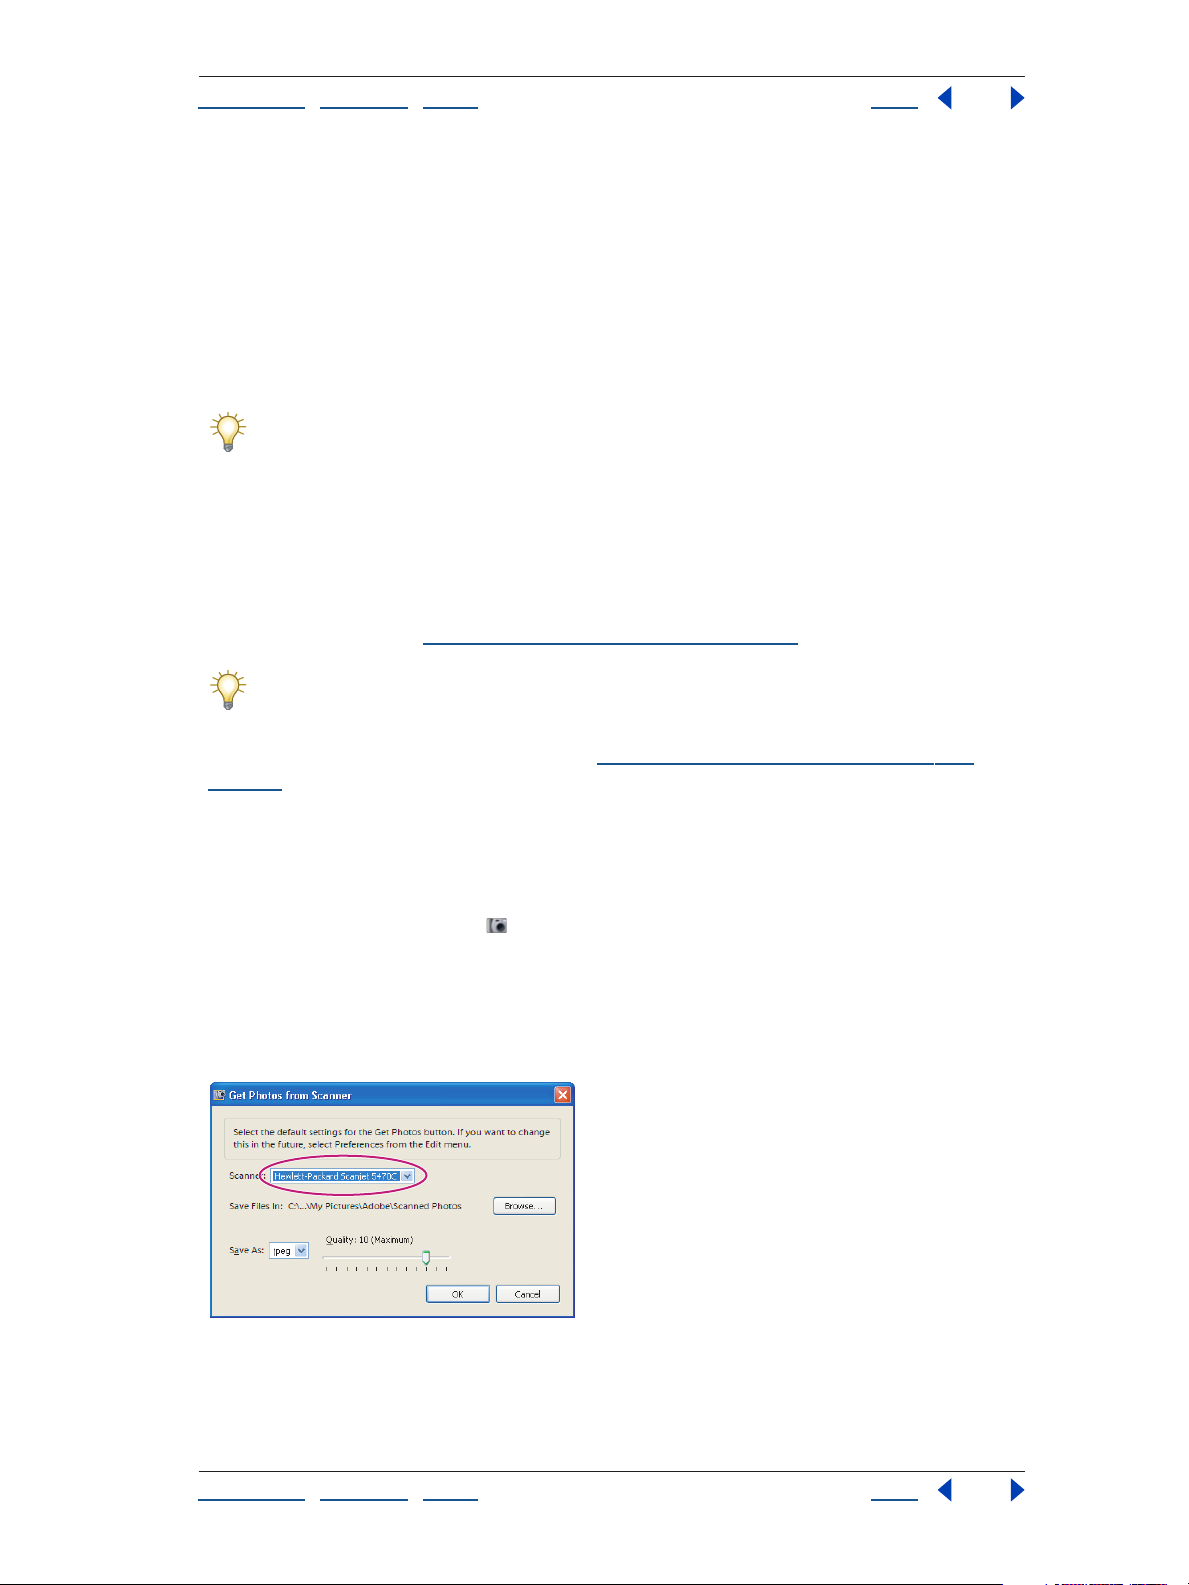
To get photos from scanners:
1 Make sure that your scanner is connected and turned on.
2 Do one of the following:
• Click the Get Photos button in the shortcuts bar, and then choose From Scanner from
the pop-up menu.
• Choose File > Get Photos > From Scanner.
3 If the Get Photos from Scanner dialog box appears, choose the name of the scanner
from the Scanner pop-up menu.
“Getting photos from your computer” on
Get Photos from Scanner dialog box
Note: If you get a “None Detected” message in the Scanner menu, make sure that the
scanner is on and properly connected to your computer.
Using Help | Contents | Index Back 28
Page 29

Adobe Photoshop Album Help Getting Photos into Photoshop Album
Using Help | Contents | Index Back 29
4 Choose a file format for the scanned photos from the Save As pop-up menu
(see
“Working with different file formats in Photoshop Album” on page 39). JPEG is usually
the best choice. Photoshop Album selects medium quality JPEG as the default format for
your scan. If you choose the JPEG format, you’ll be able to drag the Quality slider. A higher
quality setting results in a larger file but less data loss (see
resolution” on page 144).
5 Click the OK button.
6 If you’re using a scanner with a TWAIN driver, Photoshop Album launches the driver
that came with your scanner. Follow the instructions that came with the driver software to
scan your photo. Typically, you can also select an area to scan, or correct any color issues
that you may see.
Note: If you’re using Windows XP, then Photoshop Album launches the Windows XP
scanning interface. Instructions can be found in Windows XP online help.
7 After the photo is scanned, Photoshop Album brings it in. You’ll see a preview of the
scan in the Getting Photos dialog box.
After you get scanned images, you may want to change the date assigned to the
photos (Photoshop Album assigns the import date to the photos, not the date they
were taken). For directions, see
“Changing the date of a photo” on page 43.
“Working with photo
Setting scanner preferences
Setting up your scanner is easy. The options provided by Photoshop Album help you work
efficiently to get your scanned photos.
To set scanner preferences:
1 If the Scanner Preferences dialog box isn’t displayed on your screen, choose
Edit
> Preferences to open the Preferences dialog box, and then choose Scanner from the
Preferences list on the left side of the dialog box.
2 Choose the name of your scanner from the Scanner pop-up menu.
Note: Each time you connect with a different scanner, you’ll need to select that device
from the list. The connected scanner is indicated to help you identify it.
3 Choose a file format from the Save As pop-up menu. JPEG is the default format, and is
the best choice for most users. For information on different file formats, see
different file formats in Photoshop Album” on page 39.
4 Under Files, select the folder where scanned photos are stored is listed. Click the Browse
button to choose a new folder location. Also listed is the path to the main folder where
your photos are stored.
If you want to change the main folder location where imported files are stored, click
Files to display the Files page of the Preferences dialog box, and then choose a new
location for saved files. That way, all imported files will be stored in a consistent location.
5 Click OK to close the Preferences dialog box.
“Working with
Using Help | Contents | Index Back 29
Page 30
Adobe Photoshop Album Help Getting Photos into Photoshop Album
Using Help | Contents | Index Back 30
Getting photos from CDs and DVDs
When you get photos from CDs and DVDs, you can choose whether or not to bring the
photos onto the hard disk drive of your computer, or leave them on the CD or DVD, known
as keeping them
is shown in your catalog so you can continue to view the photo in Photoshop Album.
When you perform an operation that requires the original photo, you will be asked to
insert the disc on which the offline photo is stored. You can then decide to use the proxy
file, bring in the master photo, or cancel the procedure.
When you choose to keep a master photo offline, Photoshop Album asks you to give the
CD or DVD a
you. It’s smart to write the reference name you’ve chosen on the CD or DVD or on the disc’s
jewel case. When Photoshop Album requests the master disk, it will provide the reference
name so you can insert the correct CD or DVD.
offline. A low-resolution copy, or proxy file, of a master photo kept offline
reference name. T he reference name you choose should be meaningful to
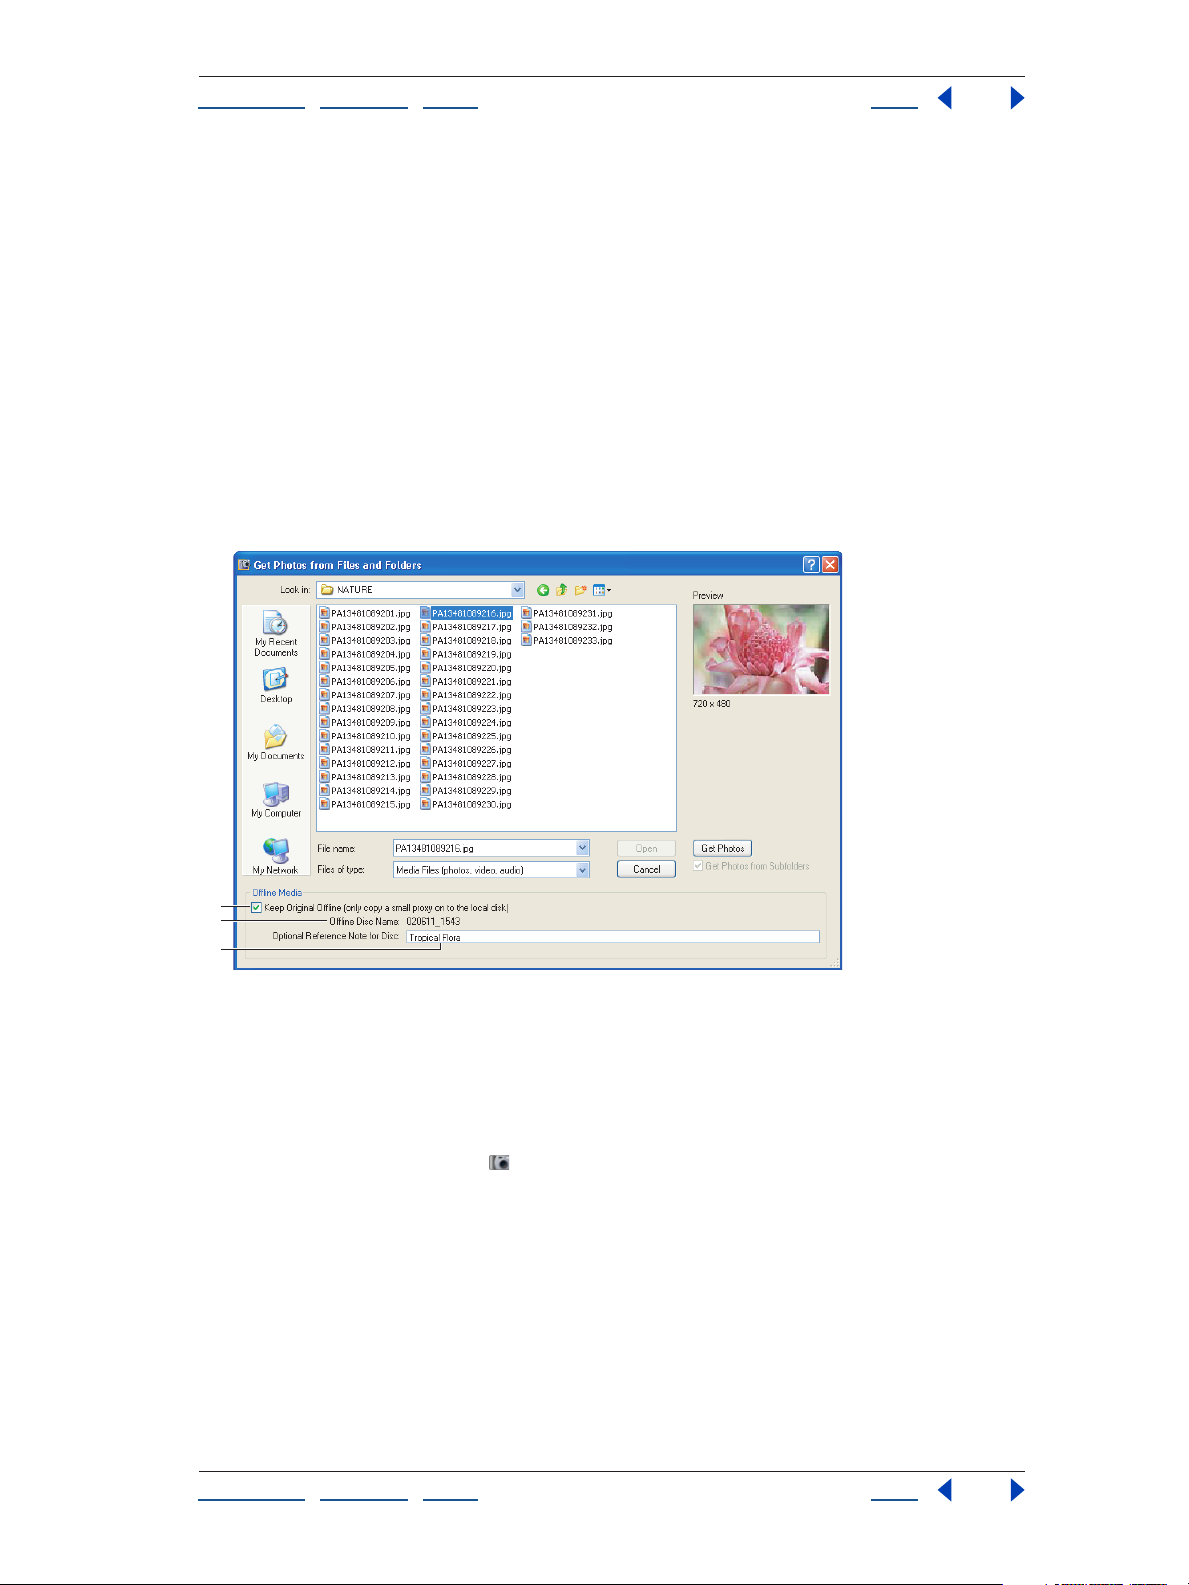
A
B
C
Getting photos from a CD or DVD
A. Choose to keep the master photo offline B. Name of the CD that your computer recognizes C.
Add a reference name for the CD or DVD that is meaningful for you in the text box
To get photos from a CD-ROM or DVD:
1 Do one of the following:
• Click the Get Photos button in the shortcuts bar, and then choose From Files and
Folders from the pop-up menu.
• Choose File > Get Photos > From Files and Folders.
2 Navigate to your CD-ROM or DVD drive.
3 Select the photos you want to import from the CD-ROM or DVD.
4 Select Keep Original Offline to add just a copy of the photo to your Photoshop Album
catalog. If this option is selected, a low-resolution copy (or proxy file) will be downloaded
on your computer, and Photoshop Album will reference it from that location. To download
the master photo, leave this option deselected.
Using Help | Contents | Index Back 30
Page 31

Adobe Photoshop Album Help Getting Photos into Photoshop Album
Using Help | Contents | Index Back 31
5 If you’re keeping a master photo offline, type in a Reference name for the CD or DVD
that will make it easy for you to identify the disc in case Photoshop Album requests it at a
later time. It’s also a good idea to write the reference name on the disc or its case.
6 Click Get Photos. Your photos are brought in to Photoshop Album. If the photos contain
keyword metadata, the Import Attached Tags dialog box appears; see
“Importing tags
attached to photos” on page 38.
Note: An offline photo has the CD icon in its thumbnail. Its file location references the
drive from which the CD was inserted.
Example of a copy of a photo whose master is kept offline. References to the offline volume and
proxy can be viewed by clicking the History button in the Properties palette.
If your photos were organized into folders before you brought them into Photoshop
Album, you might want to maintain that organization within Photoshop Album.
Using the Instant Tag feature, you can quickly create and apply a tag with a folder’s name
to all of the items in that folder. You can then use that tag anytime you want to see all the
items in the folder. For more information, see
“Creating and attaching tags based on
existing folder names” on page 55.
Setting preferences for offline photos
When you store photos offline, a lower-resolution copy, or proxy file, is made on your
computer and stored in Photoshop Album, so you can continue to view the photo in
Album even though the master is offline. In offline media preferences, you can set the
image size of proxy files.
To set offline media preferences:
1 Choose Edit > Preferences, and then click Files.
2 Under Offline Media, choose the pixel dimensions for the proxy you would like to store
for each offline photo. A 640 x 480 size is good for most users. Use a smaller size if you
want to conserve space on your computer, or a larger size for better display quality. For
information on pixel dimensions, see
“Working with photo resolution” on page 144.
Using Help | Contents | Index Back 31
Page 32

Adobe Photoshop Album Help Getting Photos into Photoshop Album
Using Help | Contents | Index Back 32
Getting photos from your computer
When you import photos from your computer’s hard drive, Photoshop Album creates a
link to the location of the photos. The original photo files remain in their locations on your
computer. If you move a file, Photoshop Album might not be able to find the photo until
you reconnect it from its new location (see
you need to move photo files after importing them into Photoshop Album, it’s best to use
the Move command on the File menu; for more information, see
page 116.
“Reconnecting to missing files” on page 113). If
“Moving files” on
Getting photos from your computer
Select photo(s), and then click the Get Photos button.
You can import a PDF file, or a Photoshop Album creation in PDF format. The JPEG
images used in the PDF file will be imported, but not the PDF file or creation.
To get photos from your computer:
1 Do one of the following:
• Click the Get Photos button in the shortcuts bar and then choose From Files and
Folders from the pop-up menu.
• Choose File > Get Photos > From Files and Folders.
2 Click the triangle icon on the right side of the Look In menu and choose a location on
your computer to bring up the contents of a folder.
3 Move the pointer over a file or folder. In the case of a file, Photoshop Album displays
information about the photo. Selecting a file displays a preview. Then do one of the
following:
• To get a single photo, select it and then click Get Photos.
• To get multiple photos, select the first file you want to import, hold down Shift, and
select the last file you want to import (all the files in between are selected). Alternately,
hold down the Ctrl key and select additional files (only the files you click are selected).
When you’re done selecting photos, click Get Photos.
Using Help | Contents | Index Back 32
Page 33

Adobe Photoshop Album Help Getting Photos into Photoshop Album
Using Help | Contents | Index Back 33
• To get all the photos in a folder, navigate to the location of the folder and select it. Then
click Get Photos.
• If you want to get photos stored in multiple subfolders, navigate to the location of the
main folder and select it. Select Get Photos from Subfolders, and then click Get Photos.
When Photoshop Album is finished importing the photos, they appear in the photo well
(see
“The photo well” on page 21).
Note: If the photos you import have tags attached to them, the Import Attached Tags
dialog box appears. For information on importing the tags, see
“Importing tags attached
to photos” on page 38.
If your photos were organized into folders before you brought them into Photoshop
Album, you might want to maintain that organization within Photoshop Album.
Using the Instant Tag feature, you can quickly create and apply a tag with a folder’s name
to all of the items in that folder. You can then use that tag anytime you want to see all the
items in the folder. For more information, see
“Creating and attaching tags based on
existing folder names” on page 55.
Dragging photos into the photo well
You can add photos to your catalog by dragging them into the photo well. When you drag
and drop the photo, Photoshop Album creates a new file with the image data dropped in
the photo well. Note that you can bring in more than one copy of a photo.
Note: Not all image-editing software will allow you to drag photos into Photoshop Album.
To get photos from other applications:
1 Make sure that Photoshop Album is open.
2 In your image-editing application, select the photo you want and then drag it into the
photo well.
3 The Getting Photos dialog box appears, with a preview of the photo you just brought
into Photoshop Album. The photo appears by itself in the photo well.
Using Help | Contents | Index Back 33
Page 34

Adobe Photoshop Album Help Getting Photos into Photoshop Album
Using Help | Contents | Index Back 34
Searching for files on your computer
Often photos are scattered about in many different locations on your computer.
Photoshop Album makes it easy to import photos by searching for all the photos and
video clips on your computer and then letting you choose which ones you want to import.
Removable media (CDs, DVDs) and network drives (if your computer is attached to a
network) are not searched.
A
B
C
D
E
FG
Searching for photos on your computer
A. Choose a location to search B. Search button C. Import selected folder from the Search Results
window D. Click Preview check box to view photo thumbnails E. Search Results window F.
Selected folder for importing G. Thumbnail of photo(s) in selected folder
To search for files:
1 Choose File > Get Photos > By Searching.
2 Select a search option from the Look In drop-down menu:
• All Hard Disks to find all of the photos on your computer (deselect this option if you
want to target your search more closely). All installed hard disk drives on your PC will be
searched, so the search may take a while.
• C Drive to search the main hard disk drive in your computer.
• My Documents to search for all photos in that folder and its subfolders.
• Browse to look for a specific folder.
3 Limit your search:
• Select Exclude System and Program Folders to exclude these directories from the
search, since they are unlikely to contain your photos.
• Select Exclude Files Smaller Than to only include files large enough to be your full-
resolution photos. Then enter a minimum file size in kilobytes in the KB text box.
4 Click Search.The search may take a while. Click Cancel if you want to stop the search.
Using Help | Contents | Index Back 34
Page 35

Adobe Photoshop Album Help Getting Photos into Photoshop Album
Using Help | Contents | Index Back 35
5 When the search is complete, the lower area of the dialog box lists all the folders that
were found to contain photos and video clips.
6 Click a folder to select it. To select more than one folder, press the Ctrl key and click on
another folder name. You can preview the items in a folder by clicking the folder name in
the list.
7 When you’re done selecting or deselecting folders in the list, click the Import Folders
button.
When Photoshop Album is finished importing the photos, they appear in the photo well
(see
“The photo well” on page 21).
Note: If the photos you import have tags attached to them, the Import Attached Tags
dialog box appears. For information on importing the tags, see
“Importing tags attached
to photos” on page 38.
If your photos were organized into folders before you brought them into Photoshop
Album, you might want to maintain that organization within Photoshop Album.
Using the Instant Tag feature, you can quickly create and apply a tag with a folder’s name
to all of the items in that folder. You can then use that tag anytime you want to see all the
items in the folder. For more information, see
“Creating and attaching tags based on
existing folder names” on page 55.
Getting photos from your mobile phone
If you have a mobile phone with a built-in camera, you might be able to import the photos
into Photoshop Album. There are three methods for getting the photos from your phone
to your Photoshop Album catalog:
• If your mobile phone stores photos on a removable flash or memory card, you can use a
card reader to transfer the photos to your catalog. For instructions, see
photos from a digital camera or a card reader” on page 25. To determine how your
phone stores photos, refer to the instructions that came with your phone.
• If your phone doesn’t use a removable memory card, you might still be able to transfer
files to your computer using either a cable or a wireless method. The phone manufac
turer might have provided you with a cable and software for this purpose, or you might
be able to purchase it. Or, a wireless method might be available. For more information,
consult the phone manufacturer or the instructions that came with your phone. Once
you’ve transferred the photos to your computer, you use the Get Photos button in the
shortcuts bar to import the photos into your catalog. For more information, see
“Importing photos from your mobile phone” on page 36.
• If your carrier is an Adobe service partner, you might be able to use Photoshop Album’s
Online Sharing Services to transfer the photos from your phone to your Photoshop
Album catalog. To find out if this option is available to you, click the Get Photos button
on the shortcuts bar and choose From Online Sharing Service from the pop-up menu. If
your carrier appears in the list to the right, you may be able to use this method to move
photos to your catalog. For instructions, see
“Importing photos using the Online
Sharing Service” on page 37.
Note: Not all phones and carriers allow you to transfer photos to your computer using the
methods described above. Your carrier or phone manufacturer can tell you what options
“Getting your
-
Using Help | Contents | Index Back 35
Page 36

Adobe Photoshop Album Help Getting Photos into Photoshop Album
Using Help | Contents | Index Back 36
are available to you. You can also refer to the Adobe Web site (http://www.adobe.com/
support/main.html) for the latest information.
Make sure your phone saves photos in a file format that Photoshop Album supports; see
“Working with different file formats in Photoshop Album” on page 39. To find out what file
format is used by your phone, refer to the instructions that came with the phone.
Importing photos from your mobile phone
To import photos into your Photoshop Album catalog, you must first transfer them to a
folder on your computer. To do so, you might need a cable and software; these might be
provided by the phone manufacturer, or purchased from a third party. Or, you might be
able to use a wireless service designed for the purpose. To find out, consult the phone
manufacturer or the instructions that came with the phone.
You might also be able to import photos using the Online Sharing Service. For more information, see “Importing photos using the Online Sharing Service” on page 37.
Note: If your mobile phone stores photos on a removable flash or memory card, use a card
reader to transfer the photos to your catalog. For instructions, see
from a digital camera or a card reader” on page 25.
“Getting your photos
To import photos into your catalog from a mobile phone:
1 Use your equipment to transfer the photos to your computer’s hard drive; for details,
refer to the manufacturers’ instructions.
Make a note of the folder in which the photos are placed on your computer.
2 After the photos are transferred to your computer, do one of the following:
• Click the Get Photos button in the shortcuts bar and then choose From Mobile Phone
Folder from the pop-up menu.
• Choose File > Get Photos > From Mobile Phone Folder.
3 If this is the first time you’ve imported files from your mobile phone to your catalog, the
Specify Mobile Phone Folder dialog box appears. Click Browse and select the folder into
which the photos were placed in step 1.
4 Select whether you want to be automatically notified of changes to the folder each
time you start up Photoshop Album.
5 Click OK.
When Photoshop Album is finished importing the photos, they appear in the photo well.
To set mobile phone preferences:
1 Choose Edit > Preferences, and then click Mobile Phone.
2 Click Browse to specify the folder where photos from your mobile phone are placed.
3 Select whether you want to be automatically notified of changes to the folder each
time you start up Photoshop Album. If you deselect this option, you will need to click the
Get Photos button on the shortcuts bar each time you want to import photos you’ve
transferred to this folder.
Using Help | Contents | Index Back 36
Page 37

Adobe Photoshop Album Help Getting Photos into Photoshop Album
Using Help | Contents | Index Back 37
Importing photos using the Online Sharing Service
If your mobile phone carrier is an Adobe service partner, you might be able to use
Photoshop Album’s Online Sharing Services to transfer the photos from your phone to
your Photoshop Album catalog.
Note: If your mobile phone stores photos on a removable flash or memory card, use a card
reader to transfer the photos to your catalog. For instructions, see
from a digital camera or a card reader” on page 25.
To import photos using the Online Sharing Service:
1 Click the Get Photos button in the shortcuts bar and choose From Online Sharing
Service from the pop-up menu.
2 Choose your mobile phone carrier from the submenu. If your carrier doesn’t appear on
the submenu, this method of importing photos is unavailable to you.
3 Follow the on-screen instructions to finish importing the photos into your catalog.
“Getting your photos
Getting photos from Adobe PhotoDeluxe albums
If you use Adobe PhotoDeluxe®, Photoshop Album will scan your hard disk drive for any
albums you created in PhotoDeluxe.
To find PhotoDeluxe albums:
1 Choose File > Get Photos > PhotoDeluxe Album.
2 In the Finding PhotoDeluxe Albums dialog box, enter your search criteria:
• Select Search PhotoDeluxe User Folders to search for catalogs just in the folders
associated with PhotoDeluxe.
• Select Browse to choose one folder to search.
3 Click Start.
When the search is complete, the lower area of the dialog box lists all the folders that were
found to contain PhotoDeluxe albums. You can preview the items in a folder by clicking
the folder name in the list.
4 Click an album name to select or deselect it for import.
5 When you’re done selecting or deselecting albums in the list, click Import Album.
When Photoshop Album is finished importing the catalogs, the photos appear in the
photo well (see
“The photo well” on page 21).
Getting photos from Adobe ActiveShare albums
If you have Adobe ActiveShare® installed on your computer, Photoshop Album will scan
your hard disk drive for any albums you created using ActiveShare.
To find ActiveShare albums:
1 Choose File > Get Photos > ActiveShare Album.
2 In the Finding ActiveShare Albums dialog box, enter your search criteria (see “Getting
photos from Adobe PhotoDeluxe albums” on page 37 for more information on the search
options available).
Using Help | Contents | Index Back 37
Page 38

Adobe Photoshop Album Help Getting Photos into Photoshop Album
Using Help | Contents | Index Back 38
3 Click Search. When the search is complete, the lower area of the dialog box lists all the
folders that were found to contain ActiveShare albums. You can preview the items in a
folder by clicking on the folder name in the list.
4 Click an album name to select or deselect the album for import.
5 When you’re done selecting or deselecting albums in the list, click Import Album.
When Photoshop Album is finished importing the albums, the photos appear in the photo
well (see
“The photo well” on page 21).
Importing tags attached to photos
When you e-mail photos using Photoshop Album, you have the option to include any tags
attached to the photos (see
have Photoshop Album 2.0 or higher can import the tags into their catalogs along with
the photos. If you receive photos from another Photoshop Album user, and the photos
have tags attached, the Import Attached Tags dialog appears. The dialog also appears if
you import photos that contain keyword metadata, such as keywords added to a photo
using Adobe Photoshop.
“Sharing photos using e-mail” on page 146). Recipients who
Photoshop Album lets you choose which tags to import into your catalog, and even lets
you rename the imported tags or map them to existing tags in your catalog.
To import tags attached to photos:
1 Import the photos into your catalog; for information, see “Getting photos from digital
cameras or card readers” on page 25, “Getting photos from CDs and DVDs” on page 30,
“Getting photos from your computer” on page 32, or “Searching for files on your
computer” on page 34.
If the photos include tags or keyword metadata, the Import Attached Tags dialog box
appears.
2 Do one of the following:
• Select the tags you want to import. The tags you select are added to the Tags pane
when the photos are imported. If a tag has an asterisk (*), it means you already have a
tag of the same name in your catalog, and that existing tag will be attached to the
photos.
• Click Advanced for additional options.
3 If you clicked Advanced, the Import Attached Tags (Advanced) dialog box opens. Do
one or more of the following:
• Select the tags you want to import by clicking the boxes next to the tag names. When
you select a tag, the options to the right of the tag become active.
• To rename a tag you are importing, click the button to the right of the tag under Import
As New Tag Named, and type a name in the text box. Photoshop Album adds a tag with
the new name to your catalog and attaches the tag to the imported photos.
• To map an imported tag to an existing tag in your catalog, click the button in the right-
hand column under Use an Existing Tag and choose a tag from the pop-up menu. The
tag name you choose gets attached to the imported photos instead of the tag name
the photos originally had.
Using Help | Contents | Index Back 38
Page 39

Adobe Photoshop Album Help Getting Photos into Photoshop Album
Using Help | Contents | Index Back 39
• Click Reset to Basic to clear your changes and return to the basic Import Attached Tags
dialog box.
4 Click OK.
Photoshop Album imports the photos. The tags you selected are attached to the imported
photos. New tags appear in the Tags pane under Imported Tags.
Note: If the photos you are importing have a very large number of tags attached, a special
dialog box appears. You can choose to import all of the tags or none of the tags. The
photos are imported and appear in the photo well. If you prefer to select individual tags to
import, undo the import by choosing Edit > Under Import Items, or select the entire import
batch and delete it from the catalog. Then, reimport the photos in smaller batches.
Setting file preferences
In the Files page of the Preferences dialog box, you can specify the location and size of
certain files created by Photoshop Album. You can also choose how dates and captions are
applied to photos you import.
To set file preferences:
1 Choose Edit > Preferences, and then click Files.
2 Under File Options, specify whether you want Photoshop Album to use the date on
which the file was last modified. If you select this option, Photoshop Album will use this
date only if it cannot find a date provided by the camera in EXIF format. If you deselect this
option and a file does not contain an EXIF date, the file will have an unknown date.
3 Select Import EXIF Caption if you want Photoshop Album to import the EXIF caption
stored by the camera when the photo was taken.
4 Select Automatically Search for and Reconnect Missing Files if you want Photoshop
Album to automatically find files that are missing; for more information, see
necting to missing files” on page 113.
5 Specify locations for saving your catalogs and saved files. Click the Browse button to
choose a new file location.
6 Under Offline Media, choose a proxy file size (see “Setting preferences for offline
photos” on page 31 for directions).
“Recon-
Working with different file formats in Photoshop Album
You are able to work with several photo, video, and audio formats in Photoshop Album. A
list of allowable image, sound, and video formats is below.
When you’re exporting your photos, the file format you choose depends on the content of
your image and how you plan to use it. For example, if you’re saving an image for use on
the Web, you should choose JPEG or PNG. If you want to work with a photo in Photoshop
Elements, you should export the photo using PSD.
Photo file formats
Photoshop Album can work with the following image file formats:
Using Help | Contents | Index Back 39
Page 40

Adobe Photoshop Album Help Getting Photos into Photoshop Album
Using Help | Contents | Index Back 40
JPEG Commonly used by digital cameras, JPEG is one of the standard formats for
displaying images over the World Wide Web and other online services. JPEG is a good
choice for e-mailing photos. You can choose the level of compression you want when you
save a photo as a JPEG file. JPEG uses “lossy” compression techniques, in which files are
made smaller by removing image data, so high levels of compression degrade image
quality and produce a smaller file. Photoshop Album can export JPEG files (see
photos” on page 153).
TIFF Virtually all desktop scanners can produce TIFF images. Photoshop Album can work
only with RGB TIFF images, not CMYK TIFF images. Photoshop Album can export TIFF files
(see
“Exporting photos” on page 153).
BMP A standard Windows image format; Photoshop Album does not export BMP files.
PNG Used for display of images on the World Wide Web, though some Web browsers do
not support PNG images. Photoshop Album can export PNG files (see
on page 153).
GIF The file format commonly used to display graphics and images in Web pages. GIF is a
compressed format designed to minimize file size and electronic transfer time, but it is not
good for supporting the range of colors typically found in photos. Photoshop Album
doesn’t support animated GIFs, nor does it export GIF files.
“Exporting photos”
“Exporting
PSD The native format of Adobe Photoshop and Adobe Photoshop Elements files. These
files are larger than some of the other supported file types. PSD files with multiple layers
are flattened into one layer when imported. Photoshop Album can export PSD files (see
“Exporting photos” on page 153).
PDF The native format of Adobe Acrobat files. You can export creations as PDFs (see
“Sharing your photos with Photoshop Album creations” on page 119, and you can make
PDF e-mail attachments (see “Sharing photos using e-mail” on page 146). You can also
import a PDF file; Photoshop Album extracts JPEG images from the file and adds them to
the catalog.
PDD PhotoDeluxe catalogs are saved as PDD files. Photoshop Album can import the
photos, but cannot export in the PDD format.
Camera Raw Unlike other file formats, a camera raw file contains the unprocessed image
data captured by the camera’s sensor. As a result, camera raw image files are much larger
than JPEG files (though smaller than uncompressed TIFF files). Photoshop Album can
import camera raw files but cannot export in camera raw formats. Different camera
manufacturers use different raw formats; for a list of supported cameras, refer to the
ReadMe file installed with Photoshop Album.
Audio file formats
Photoshop Album supports the following sound file formats:
.mp3 A common audio file format that works well for compressing audio files while still
keeping the quality of the sound when they are played.
.wav A standard audio file format known for good-quality audio.
Video file formats
When you import video clips, they are shown in the photo well as a thumbnail of the first
frame. Photoshop Album supports the following video file formats:
Motion JPEG Commonly saved as .avi files.
Using Help | Contents | Index Back 40
Page 41

Adobe Photoshop Album Help Getting Photos into Photoshop Album
Using Help | Contents | Index Back 41
MPEG-1/.mpg MPEG-1 movies are optimized for CD-ROM viewing. MPEG movies are
saved in the .mpg format.
.mov QuickTime movies are saved in the .mov format.
.avi Audio/Video Interleaved format is used for Windows-based movies.
3GPP/.3gp The 3GPP video file format, used by some mobile phones, requires QuickTime
6.3 or later and the QuickTime 3GPP component.
Using Help | Contents | Index Back 41
Page 42

Adobe Photoshop Album Help Organizing Photos
Using Help | Contents | Index Back 42
Organizing Photos
Making sense of your photo collection
Photoshop Album lets you organize, sort, preview, and find your photos and video files. It
does this by giving you access to these powerful tools:
• The timeline is especially powerful because Photoshop Album automatically organizes
photos in the photo well by the date the photo was taken. Except for instances when
you want to change the date of a scanned photo, you don’t have to do anything to
organize photos in the date order.
• The calendar view lets you easily find by date with an intuitive calendar interface.
Thumbnails are displayed on the day you took the photos. To view a given day’s photos
in the calendar view, simply click the Play button.
• In addition to date/time, you can use keyword tags to find photos based on the people
in them, where the photo was taken, the event, etc. In this way, tags let you crossreference your photos, such as by different people’s names, events, and places. Tags
give you a powerful tool for finding and identifying photos so you don’t have to use
and remember each photo’s filename, date, or folder. Using tags also liberates you from
filing your photos in folders by subject, and from renaming your photos and videos.
You can even add captions and notes, just as you would in a traditional photo album.
• Collections lets you create named collections in which photos, video clips, and audio
clips can be displayed in the order you choose.
Using Help | Contents | Index Back 42
Page 43

Adobe Photoshop Album Help Organizing Photos
Using Help | Contents | Index Back 43
Organizing photos in the photo well
Photoshop Album automatically organizes your photos in the photo well by their creation
date, the batch they were imported in, or folder location. Different views of the photo well
and timeline—by date, import batch, or folder location—appear when you choose a view
from the Sort menu in the options bar. For more information about the photo well, see
“The photo well” on page 21.
Choosing from the photo well arrangement menu displays different views in the timeline and photo
well
You can find photos in the photo well even if you don’t add a caption, annotate, or attach a
tag to them. Using the timeline, you can show a date range of photos in the photo well.
For example, when you have the photo well in date arrangement, selecting a date or range
of time in the timeline causes the photo well to display the photos that were captured (or
scanned) within that date or range.
Clicking a month in the timeline scrolls the view in the photo well to start at that month.
The timeline also shows how items are distributed across time; the height of each bar is
proportional to the number of images in each month. For more information about using
the timeline, see
page 20.
“Using the timeline to find photos” on page 82 and “The timeline” on
Changing the date of a photo
Digital cameras automatically embed the date and time when you take a photo. This
feature works well
correctly or if the photo is taken in a different time zone from the camera’s clock setting,
the date and time embedded in the photo would be wrong. Photoshop Album has easyto-use tools to fix the incorrect date and time.
Also, when you scan a photo, the photo has the file date stamp from the operating system.
This file date is changed anytime the photo is edited. As a result, the file of a photo taken
years ago would have a current date. For example, a photo taken in 1925 and scanned in
2003 will have 2003 as its date. Again, Photoshop Album lets you easily adjust the date to
reflect the accurate origin of the photo.
if the camera’s clock is set correctly. But, if the camera’s clock isn’t set
Using Help | Contents | Index Back 43
Page 44

Adobe Photoshop Album Help Organizing Photos
Using Help | Contents | Index Back 44
To adjust the date and time of a photo or group of photos:
1 Select one or more photos in the photo well. Shift-click to select a series of photos. Ctrl-
click to select nonadjacent photos. Then, do one of the following to open the Adjust Date
and Time window:
• Click the date or time in a thumbnail. The pointer turns into a pointing finger . Mak e
sure that the Details option is selected in the options bar. This method works for all
views in the photo well.
The pointer becomes a pointing finger when placed over
the date or time of a photo; click to adjust the date and time.
• Right-click a thumbnail and choose Adjust Date and Time from the context menu.
• Choose Edit > Adjust Date and Time from the menu bar.
• If only one photo is selected, click the Adjust Date and Time button in the General
options of the Properties palette. For more information about the Properties palette,
see
“Viewing information about a photo” on page 66.
2 In the Adjust Date and Time dialog box, do one of the following:
• To manually change date and time, select Change to a Specified Date and Time and
then click OK. In the Set Date and Time dialog box, type or choose a year in the Year text
box. Choose a month and day, or choose the question marks from the menu if
unknown. Under Time, select Known and type or choose a time in the text box, or select
the Unknown option.
• To change the time to the Modified Date of the file, select Change to Match File’s Date
and Time, and then click OK.
• To adjust the time ahead or back by a certain number of hours, select Shift by Set
Number of Hours (Time Zone Adjust), and then click OK. In the Time Zone Adjust dialog
box, select either Ahead or Back, and then either type or click the up or down arrows to
specify the number of hours you wish to adjust. Then click OK.
• To adjust the time of multiple selected photos in relation to the oldest photo in the set,
select Shift to New Starting Date and Time. Specify a new date and time for the earliest
item in the group by selecting a new year, month, day, and time. Then click OK. For
instance, if you change the time to one month earlier, one day, and one hour earlier, all
the photos are adjusted back by the same amount.
Using Help | Contents | Index Back 44
Page 45

Adobe Photoshop Album Help Organizing Photos
Using Help | Contents | Index Back 45
Once you click OK, Photoshop Album adjusts the timeline to accommodate the updated
photo and writes the new date and time to the photo’s file on disk.
Note: In the Adjust Date and Time dialog box, you can also select the Change to Match File
Date and Time option.
To display dates in the format you’ve specified for your computer, press
Ctrl+Shift+Alt+D. Pressing the shortcut again changes the date back to the format
specified by Photoshop Album.
Using tags to organize your photos
Photoshop Album automatically organizes your photos in the photo well. However, you
can enhance your photo organization by attaching keyword tags to them. Tags are a
powerful tool for finding and identifying photos, video clips, audio clips, and creations so
you don’t have to remember each item’s filename, date, or folder. Using tags also liberates
you from having to file your items in folders by subject, and renaming them.
If your photos are currently organized by folders, you can use the Instant Tag button
to create and apply tags based on those folder names. For more information, see
“Creating and attaching tags based on existing folder names” on page 55.
What are tags and how are they used?
Tags represent descriptive information that you attach to your photos, such as keywords.
Tags appear as icons. They don’t change the photos they are attached to; they simply give
you additional and more flexible ways of finding and organizing your photos. For more
information on using tags to find photos, see
Tags in the Tags pane and attached to a photo
Tags are organized in the Tags pane; by default, there are four categories available: People,
Places, Events, and Other. While these standard categories work fine, you can easily add,
rename, or remove categories, and add your own subcategories to customize the catalog
for your needs. Under either a category or subcategory, you create your own custom tags
to give yourself even more options for identifying and finding photos. For more infor
mation, see “Organizing tags in the Tags pane” on page 51 and “Creating categories and
subcategories for tags” on page 53.
“Finding files by media type” on page 89.
-
Using Help | Contents | Index Back 45
Page 46

Adobe Photoshop Album Help Organizing Photos
Using Help | Contents | Index Back 46
For example, you may have family photos located in many different folders on your
computer. With Photoshop Album, you can create a Parents tag and attach it to each
photo featuring your parents, and then instantly find any photo with that Parents tag,
regardless of where the photo is stored on your system. For more information, see
“Attaching tags to and removing tags from photos” on page 47.
Moreover, you can attach more than one tag to a photo. For instance, photos of a family
reunion party could be tagged with a Family tag, a tag of the event (for example,
Reunions), and even a tag for the location of the party (for example, Hawaii). The use of
multiple tags gives you even more flexibility in finding and identifying photos.
To show the Tags pane:
Do one of the following:
• Click the Organize button in the shortcuts bar, and then click the Tags tab below it.
• Choose View > Organize View, and then choose View > Tags from the menu bar.
Using tags to find photos
In the Tags pane, double-click a tag that reflects your search criteria; the search will find all
photos that have that tag attached. Double-clicking a category tag displays all photos
with that category tag plus any subcategory tag and custom tag listed within that
category. Double-clicking a subcategory tag in the Tags pane displays all the photos with
that subcategory tag plus any tag listed within that subcategory.
In the Tags pane, you can also click the check box next to a tag and display all the photos
with that tag. Click the check boxes next to the tags that reflect your search criteria; the
search will find all photos that have any or all of those tags attached. For more infor
mation, see “Finding files by media type” on page 89.
-
Creating your own tags
One of the keys to organizing your photos is creating useful and descriptive tags. For
instance, you might make a tag called “Hawaii” under the Places category to represent
your Hawaii vacation photos. You create tags using the Create Tag dialog box. In addition
to creating tags within a category, tags can be created in a subcategory. For more infor
mation, see “Creating categories and subcategories for tags” on page 53.
-
The Create Tag dialog box lets you create tags.
Using Help | Contents | Index Back 46
Page 47

Adobe Photoshop Album Help Organizing Photos
Using Help | Contents | Index Back 47
To create your own tag:
1 Click the New button in the Tags pane and choose New Tag. (For information on
creating categories and subcategories, see “Creating categories and subcategories for
tags” on page 53.)
2 In the Create Tag dialog box, use the Category menu to choose which category or
subcategory you want to list the tag under.
3 In the Name text box, type the name you want to give the tag.
4 In the Note text box, type any information you want to add about the tag. (For example,
you could write that the tag represents vacation photos taken in Hawaii.)
5 Click OK.
The tag appears in the Tags pane under the category or subcategory you selected.
Notice that the tag has a question mark icon . The first time you attach the tag to a
photo, it will use that photo as its icon (see “Attaching tags to and removing tags from
photos” on page 47). You can also change the icon to a different photo, as described in
“Modifying and deleting tags” on page 48.
Attaching tags to and removing tags from photos
Attaching tags is as simple as dragging them onto any photo or photos in the photo well.
To attach a tag to a single photo:
Do one of the following:
• Drag the tag from the Tags pane onto the photo in the photo well.
• Drag the photo in the photo well onto the Tag in the Tags pane.
The tag is now attached. If this is the first time you have attached the tag to a photo, the
photo becomes the icon for that tag. To change the icon to another photo, see
and deleting tags” on page 48.
Dragging a tag from the Tags pane to a photo; after dragging, the tag is attached to the photo.
To attach one or more tags to one or more photos:
1 In the photo well, select one or more photos to which you want to attach any number
of tags. (Click to select a single photo, Shift-click to select multiple photos in a series, or
Ctrl-click to select nonadjacent photos.)
“Modifying
The selected photos are outlined in yellow.
2 Do one of the following:
• Drag the tag from the Tags pane onto any of the selected photos.
Using Help | Contents | Index Back 47
Page 48

Adobe Photoshop Album Help Organizing Photos
Using Help | Contents | Index Back 48
• Right-click the selected photo(s) and choose Attach Tag, followed by the name of the
tag you want to attach.
• Click to select a single tag, Shift-click to select multiple tags in a series, or Ctrl-click to
select multiple tags. Then drag the tags onto any of the selected photos.
• Click to select a single tag, Shift-click to select multiple tags in a series, or Ctrl-click to
select nonadjacent tags. Then drag the photos onto any of the selected tags in the Tags
pane.
The tags are attached to all of the selected photos. If this is the first time you have attached
the tag to a photo, the photo you dragged the tag to becomes the icon for that tag. If you
selected multiple photos and dragged them onto a tag, the first selected photo becomes
the icon for the tag. To change the icon for that tag, see
“Modifying and deleting tags” on
page 48.
Holding the pointer over a category icon lists the tags attached to a photo.
To apply a tag to the same photos that are in a collection, double-click the collection
in the Collections pane. Then click the Tags tab to display the Tags pane. Select all of
the photos in the photo well, and attach the tag to them.
To remove a tag from a photo:
Depending on the view in the photo well, do one of the following:
• Right-click the photo and choose Remove Tag, followed by the tag name.
• In larger views, you can right-click a category icon associated with the photo and
choose Remove
<tag name>.
To remove tags from multiple photos:
1 In the photo well, select the photos from which you want to remove a tag. Shift-click to
select multiple photos in a series. Ctrl-click to select nonadjacent photos.
2 Right-click one of the selected photos and choose Remove Tag from Selected Items,
followed by the tag name.
Modifying and deleting tags
After you’ve made a tag, you may want to change its category, its name, or the note you
attached to it. Perhaps you find a better photo to use for the tag icon. Or you may not need
a tag any more and want to delete it. You can edit any tag except the Favorites and Hidden
tags.
Using Help | Contents | Index Back 48
Page 49

Adobe Photoshop Album Help Organizing Photos
Using Help | Contents | Index Back 49
You can also move tags and subcategories in the Tags palette to improve the organization
of your tags. For more information on subcategories, see
“Creating categories and subcat-
egories for tags” on page 53.
To change a tag’s category, name, or note with the Edit Tag dialog box:
1 Select the tag in the Tags pane and do one of the following to open the Edit Tag dialog
box:
• Click the Edit button in the Tags pane.
• Right-click the selected tag and choose Edit <tag name> Tag from the context menu.
2 To change the category, choose a category or subcategory from the Category menu in
the Edit Tag dialog box. If you choose New Sub-Category, the Create New Sub-Category
dialog box opens. For more information on categories and subcategories, see
“Creating
categories and subcategories for tags” on page 53.
3 To change the tag’s name, type a new name in the Name text box.
4 To change the tag’s note, edit or add text in the Note text box.
5 Click OK.
To change a tag’s category or subcategory by dragging and dropping:
1 Select one or more tags in the Tags pane. Click to select a single tag, Shift-click to select
multiple tags in a series, or Ctrl-click to select nonadjacent tags.
2 Drag the tags onto the category or subcategory you want them in.
For information on dragging and dropping subcategories, see “Modifying and deleting
categories and subcategories” on page 53
To change a tag’s icon:
1 Select the tag in the Tags pane and do one of the following to open the Edit Tag dialog
box:
• Click the Edit button .
• Right-click the selected tag and choose Edit <tag name> Tag from the context menu.
2 Click Edit Icon in the Edit Tag dialog box.
3 To use a different photo for the icon, click Find to display all the photos that use that
tag. Select a photo and click OK or use the arrows next to the Find button to page through
and select the photo you want to use.
Using Help | Contents | Index Back 49
Page 50

Adobe Photoshop Album Help Organizing Photos
Using Help | Contents | Index Back 50
4 To change the portion of the photo included in the icon, resize and move the cropping
marquee (the dotted outline). To resize, move the pointer to a corner of the marquee;
when the pointer changes to a double-headed arrow, drag the corner. To move the
marquee, place the pointer inside it; when the pointer changes to a hand, drag the
marquee.
Resizing the cropping marquee (left); moving the cropping marquee (right)
5 Click OK, and then click OK in the Edit Tag dialog box.
To delete a tag:
1 Select the tag in the Tags pane. To select more than one tag, Shift-click to select
multiple tags in a series or Ctrl-click to select nonadjacent tags.
2 Do either of the following:
• Click the Delete button in the Tags pane.
• If you’ve selected a single tag, right-click and choose Delete <tag name>.
• If you’ve selected multiple tags, right click and choose Delete Selected Tags.
Note: Do not press Delete on your keyboard. Photoshop Album will attempt to delete any
selected photos, rather than the tag.
Using Help | Contents | Index Back 50
Page 51

Adobe Photoshop Album Help Organizing Photos
Using Help | Contents | Index Back 51
Organizing tags in the Tags pane
Tags are viewed and managed in the Tags pane. All the tags and subcategories you create
are displayed along with the ones provided by Photoshop Album. You can create tags
under any category or subcategory you want. However, a little advance planning will help
you create a set of tags that will work for you in the long run.
ABC D
E
F
G
H
I
J
K
L
M
The Tags pane
A. Tags tab B. Delete button C. Edit button D. Show tag tips E. New button F. Favorites tag G.
Hidden tag H. Category I. Subcategory J. User-created tag K. Selected tag L. Find check box M.
Clickable display triangle for displaying lower-level tags
Don’t worry about getting the organization right the first time you create tags. You can
always come back later and edit them. For instance, it’s easy to edit or move a tag to
reassign it from one category to another. And of course, those reassigned tags will still be
attached to the photos, unless you decide to remove or delete them.
For information on attaching, removing, and deleting tags, see “Attaching tags to and
removing tags from photos” on page 47.
Working with the tag categories
At the top level in the Tags pane are four categories that initially come with Photoshop
Album: People, Places, Events, and Other. However, you can rename or remove these, and
create new categories as well. You can create tags or subcategories under any categories,
depending on how you want to organize your tags.
Although you can attach a category or subcategory to photos as a tag, categories are
intended primarily as containers for other tags. It’s best to use categories and subcate
gories as headings for groups of tags. They are primarily useful when performing searches,
because selecting a category or subcategory finds photos with any tag listed under that
category or subcategory.
-
Here are some basic suggestions for using these four default categories:
People The People category is for tags you might want to create and attach to photos
of different people. By default, your Photoshop Album catalog comes with “Family” and
“Friends” subcategories under the People category. These two subcategories can always
be edited or deleted.
Using Help | Contents | Index Back 51
Page 52

Adobe Photoshop Album Help Organizing Photos
Using Help | Contents | Index Back 52
Using the People category, you might create tags under the Family subcategory named
“Amanda” and “Bill.” You could then attach these tags to photos with those people in
them. If you had a photo with Amanda and Bill in it, you could attach both of those tags to
the photo. Later, you could use the tags to look for photos showing either or both of these
people.
Places Use the Places category for tags that identify where a photo was taken. You
might create tags under Places for specific locations, such as Hawaii or San Francisco;
general places, such as beaches and museums; or even for personalized locations, such as
your uncle’s farm.
Events You can use the tags under the Events category in many ways. For example,
under Events you could create tags for weekend getaways, family gatherings, or birthdays.
You can also create Events subcategories like holidays, parties, and vacations. Keep in
mind that you don’t need separate tags for each year an event takes place, since you can
use the timeline to select a particular year along with that tag.
Other This general category can be used for tags that don’t fit in the other categories.
For instance, you might put all your miscellaneous tags into this category, or you might
create subcategories, such as Animals, Hobbies, or Nature, and create tags under them.
Using the Favorites tag and the Hidden tag
In addition to categories, subcategories, and tags, two special tags are displayed at the top
of the Tags pane:
Favorites This tag is very useful for easily finding your favorite photos, video clips,
audio clips, or creations. Make sure that the Favorites tag is attached to a photo, and it will
have preference in searches with the Favorites tag as a search criteria. For example, you
might make a tag called “Michael” and attach it to all the photos that show your friend
Michael. Next, you can identify your favorite Michael photos by adding a second tag, the
Favorites tag, to them. Now, when you want to find your favorite Michael photos, simply
select both the Michael tag and the Favorites tag as your search criteria.
For more information on how to use the Favorites tag in a search, see “Finding photos with
the Favorites tag or the Hidden tag” on page 93.
Hidden This is a special tag that’s useful with photos, video clips, audio clips, or
creations that you generally don’t want to view or sort through, but that you don’t want to
delete. Photos with the Hidden tag attached are displayed only if you include this tag in
the search criteria. For instance, suppose you have numerous photos of a friend and have
created a “Friend” tag for these. Perhaps some of the photos aren’t great—maybe they’re
out of focus. Yet you’re not ready to delete them. Instead of attaching only the Friend tag
to the flawed photos, you can also attach the Hidden tag. Now, these photos won’t show
up when you do a search for photos with the Friend tag. But, if you later want to find one
of those out-of-focus photos, just search on Hidden along with Friend.
Keep in mind that you will still see the photo in the photo well (after attaching the Hidden
tag to it) until you refresh the photo well by clicking the Show All button
View > Refresh from the menu bar, or selecting a different view of the photo well from the
options bar. Hidden photos appear in collections (for more information, see
tions to find photos” on page 59). Also, hidden photos appear in the list of photos
displayed when you edit an icon. Similarly, if a photo is untagged, the tag icon may use a
hidden photo for the icon.
, choosing
“Using collec-
Using Help | Contents | Index Back 52
Page 53

Adobe Photoshop Album Help Organizing Photos
Using Help | Contents | Index Back 53
All photos with the Hidden tag attached are normally hidden whenever you search for
photos or when you click the Show All button
. If you want to display hidden photos of a
specific subject, select both the Hidden tag and the tag for the desired category or subcategory as your search criteria.
For more information on how to use the Hidden tag in a search, see “Finding photos with
the Favorites tag or the Hidden tag” on page 93.
Creating categories and subcategories for tags
To help organize your tags, you can create additional categories, or create subcategories
under categories. You do so with the Create New Category command and the Create New
Sub-category command.
Once you’ve created a category or subcategory, you can still change its name (and in the
case of subcategories, the category it’s contained in). For more information, see
“Modifying and deleting tags” on page 48.
Note: You can always edit or delete a subcategory, but its icon appears as a plain tag and
you cannot add a photo to it.
To create a new category or subcategory:
1 In the Tags pane, click the New button and choose New Category or New Sub-
Category.
Note: You can also choose New Tag, and choose New Category or New Sub-Category from
the Category menu in the Edit Tag dialog box that appears.
2 Create a new category or subcategory:
• To create a new category, type the name you want in the Category Name text box. Then
click the icon you want to use from the Category Icon list.
• To create a new subcategory, type the name you want in the Sub-Category Name text
box. Then use the Category menu to choose which category you want to list the
subcategory under.
3 Click OK.
The category or subcategory now appears in the Tags pane.
Modifying and deleting categories and subcategories
After you’ve made a category or subcategory, you can rename it or delete it. You can also
change the category under which a subcategory is located.
To change a category’s/subcategory’s name or location:
1 Select the category or subcategory in the Tags pane and do one of the following:
• Click the Edit button .
• Right-click and choose Edit <category name> Category from the context menu.
• Right-click and choose Edit <subcategory name> Subcategory from the context menu.
2 Edit the category/subcategory:
• To change the category’s/subcategory’s name, type a new name in the Category/Sub-
category Name text box.
Using Help | Contents | Index Back 53
Page 54

Adobe Photoshop Album Help Organizing Photos
Using Help | Contents | Index Back 54
• To change the icon a category uses, click the icon you want from the Category Icon list.
To add your own category icons to the list, place 20-pixel by 20-pixel images in the
shared_assets\caticons folder located in the Photoshop Album folder.
• To change the category a subcategory is listed under, choose a category from the
Category menu. For more information on subcategories, see
“Creating categories and
subcategories for tags” on page 53.
3 Click OK.
To change a subcategory’s category by dragging and dropping:
1 Select one or more subcategories in the Tags pane. Click to select a single subcategory,
Shift-click to select multiple subcategories in a series, or Ctrl-click to select nonadjacent
categories.
2 Drag the subcategories onto the category you want them in. Subcategories can only be
dragged into categories, not onto tags or other subcategories.
Any tags within the subcategory you are moving move with that subcategory.
To delete a category or subcategory:
1 Select the category or subcategory in the Tags pane.
Note: You cannot delete multiple categories or subcategories.
2 Do one of the following:
• Click the Delete button in the Tags pane.
• Right-click and choose Delete <category name> Category.
• Right-click and choose Delete <subcategory name> Subcategory.
Note: Do not press Delete on your keyboard. Photoshop Album will attempt to delete any
selected photos, rather than the category or subcategory.
Using Help | Contents | Index Back 54
Page 55

Adobe Photoshop Album Help Organizing Photos
Using Help | Contents | Index Back 55
Creating and attaching tags based on existing folder names
If you’ve already organized your photos into folders before ever using Photoshop Album,
you probably don’t want to lose all the organizing you’ve done. Fortunately, with the
Instant Tag button, you can quickly create and apply a tag with a folder’s name to all of the
items in that folder. You can then use that tag anytime you want to see all of the items in
the folder.
In Folder Location view, the photo well shows the folder’s pathname and the photos the folder
contains. This makes it easy to attach tags that reflect your photos’ folder organization.
To create and attach a tag to the photos from a particular folder:
1 Click the Photo Well button in the shortcuts bar.
2 Do one of the following:
• Choose View > Arrangement > Folder Location.
• Choose Folder Location from the menu in the options bar (located below the photo
well).
The photos in the photo well are displayed according to which folder they are in, with the
folder’s full pathname listed above the photos it contains.
3 Scroll up or down until you see the folders and photos you want.
4 Click the Instant Tag button on the right side of the separator bar that lists the folder’s
pathname.
All of the items in that folder are selected and the Create and Apply New Tag dialog box is
filled in with the name of that folder.
5 Use the Category menu in the dialog box to choose which category or subcategory you
want to list the tag under.
6 In the Tag Name text box, type the name you want to give the tag, or use the name of
the folder, which is filled in by default.
7 In the Note text box, type any information you want to add about the tag. (For example,
you could write that the tag represents photos of your favorite restaurant.)
8 Click OK.
Using Help | Contents | Index Back 55
Page 56

Adobe Photoshop Album Help Organizing Photos
Using Help | Contents | Index Back 56
9 Repeat steps 3 through 8 for each folder you want to create an instant tag for.
The tag appears in the Tags pane under the category or subcategory you selected and is
applied to all items in that folder.
Notice that the tag uses the first photo in the folder as its icon. You can change the icon to
a different photo, as described in
“Modifying and deleting tags” on page 48.
Note: For information on attaching the tag you made to photos in other folders, see
“Attaching tags to and removing tags from photos” on page 47. For information on
creating categories and subcategories to represent that folder’s organization, see
“Creating categories and subcategories for tags” on page 53.
Viewing tags in the Tags pane
You can change how tags look and how they are listed in the Tags pane by using the Tag
Options dialog box. To help you use tags, a set of tag-related tips can be displayed.
To display the Tags pane:
Do one of the following:
• Click the Organize button in the shortcuts bar, and then click the Tags tab below it.
Clicking Organize button and the Tags tab shows the Tags pane.
• Choose View > Organize View, and then choose View > Tags from the menu bar.
To display a tag:
Do one or both of the following in the Tags pane:
• Use the scroll bar to scroll up and down the list of tags, as needed.
• Click the display triangle next to a category or subcategory to display the tags under
it.
To expand or collapse the list of tags in the Tags pane:
Choose View > Expand All Tags or View > Collapse All Tags from the menu bar.
To change to a different view of the tags:
1 Choose View > Tag Viewing Options.
2 In the Tag Options dialog box, select the size you want the tags to appear:
• Select the small tag to list tags on separate lines under their categories or subcategories
with no icons visible.
• Select the medium tag to lists tags on separate lines under their categories or subcate-
gories with their icons visible. This view shows longer tag names than large tags.
• Select the large tag to list tags side by side under their categories or subcategories. This
view shows larger icons but shorter tag names than medium tags.
Using Help | Contents | Index Back 56
Page 57

Adobe Photoshop Album Help Organizing Photos
Using Help | Contents | Index Back 57
3 If you selected small or medium tags, you can select the Alphabetical Order option to
view your tags in alphabetical order regardless of their category or subcategory.
4 Click OK.
The Tags pane viewed with alphabetical order option selected; categories and subcategories move
to the bottom of the tags list
To display and hide the tag-related tips:
Click the Show Tag Tips button at the top of the Tags pane to display the tip. Click the tip
to close it when you are finished.
Using collections to organize your photos
Photoshop Album automatically organizes your photos, video clips, audio clips, and
creations in the photo well. Depending on the view you choose, items in the photo well
are normally listed either by date, import batch, or folder location. However, a collection
lets you create a named subset of items in the photo well and display each item there in a
custom order you create.
If you’ve already used tags, you’ll find that collections operate similarly, in that you can
create, edit, and modify collections in much the same way you do with tags. If you’re
familiar with tags, you know that items are displayed in one of the preset orders, and are
often “filtered” in some way. For instance, you can set the timeline to show only certain
items, or use the Hidden tag to hide items. With collections, however, the photo well
always shows all of the items in the collection, even items marked with the Hidden tag. But
most importantly, with collections, you can create a custom order in which to display
items by dragging and dropping the items into the order you want. When viewing a
collection, each item is then displayed in the photo well in the order you created. A
number is displayed above the item indicating its position in the order.
Using Help | Contents | Index Back 57
Page 58

Adobe Photoshop Album Help Organizing Photos
Using Help | Contents | Index Back 58
In short, you can think of a tag as a marker of photos, and a collection as a container of
photos.
Use collections to organize your photos when making a creation.
Above: Tags display items in one of four preset orders you select, such as by date.
Below: Collections display items in the custom order you create.
What are collections and how are they used?
A collection is a container that you put photos into. Using the photo well, you can then
organize and display the photos in that collection in a custom order. (This is unlike tags, in
which selecting a tag displays the photos associated with that tag either by date, import
batch, or folder location.) Collections don’t change the photos in them; they simply give
you additional and more flexible ways of finding and organizing your photos.
Using Help | Contents | Index Back 58
Page 59

Adobe Photoshop Album Help Organizing Photos
Using Help | Contents | Index Back 59
For example, suppose you have photos from your trip to Japan. You could create a
collection called “Ten Best Japan Photos” and put your ten favorite photos from that trip
into that collection, and organize the photos from tenth best photo to the best photo. You
could then show it in an instant slideshow or use it to make a creation based on that
collection. For more information, see
“Organizing photos within a collection” on page 64.
Moreover, you can put photos into more than one collection. For instance, you might also
use some of the photos from your “Ten Best Japan Photos” in a “Twenty Favorite Vacation
Spots” collection.
Collections in the Collections pane and identified with a photo
Collections are listed in alphabetical order in the Collections pane. When you first use
Photoshop Album, there are no collections listed. However, you can easily add, rename, or
remove collections for your needs.
To show or hide the Collections pane:
1 Do one of the following:
• Click the Organize button in the shortcuts bar, and then click the Collections tab
below it.
• Choose View > Organize View, and then choose View > Collections from the menu bar.
2 Click the Show All button to display everything in the photo well.
Using collections to find photos
Selecting a collection finds all of the photos that are part of that collection. However, you
can only search for a single collection at a time. That’s because the same items can be in
different orders in different collections. For instance, the first photo in the collection
“Lance’s Cars” might be the last photo in the collection “Greg’s Cars,” making it unclear
where to show that photo if both collections were selected at the same time.
To find photos using collections:
1 Do one of the following:
• In the Collections pane, double-click a collection that reflects your search criteria.
Using Help | Contents | Index Back 59
Page 60

Adobe Photoshop Album Help Organizing Photos
Using Help | Contents | Index Back 60
• Click the check box next to the collection.
• Drag the collection from the Collections pane to the find bar just above the photo well.
Note: Items that have the Hidden tag attached always appear when you display a
collection in the photo well.
Creating your own collections
One of the keys to organizing your photos is creating useful and descriptive collection
names. For instance, you might make a collection called “My Flower Arrangements” to
represent your collection of flower photos. You create collections using the Create
Collection dialog box.
The Create Collection dialog box lets you create collections.
To create a collection:
1 Click the Create New Collection button in the Collections pane.
2 In the Name text box, type the name you want to give the collection.
3 In the Note text box, type any information you want to add about the collection. (For
example, you could write that the collection represents your flower arrangements dating
from 1997.)
4 Click OK.
The collection appears in the Collections pane.
Notice that the collection has a question mark icon . The first time you put a photo into a
collection, it will use that photo as its icon. You can also change the icon to a different
photo, as described in
“Modifying and deleting collections” on page 63.
Putting photos into and removing them from collections
Putting photos into a collection is as simple as dragging one or more photos in the photo
well into the collection. The photos are then part of that collection.
To put a single photo into a collection:
1 Click Clear in the find bar or click the Show All button in the shortcuts bar to display
everything in the photo well.
2 Do one of the following:
Using Help | Contents | Index Back 60
Page 61

Adobe Photoshop Album Help Organizing Photos
Using Help | Contents | Index Back 61
• Drag the photo in the photo well into the collection in the Collections pane.
• Select the photo you want. Then right-click and choose Add to Collection, followed by
the collection name.
• Drag the collection from the Collections pane onto the photo in the photo well.
The photo is now part of that collection. If this is the first time you have put a photo into
the collection, the photo becomes the icon for that collection. To change the icon to
another photo, see
Dragging a photo from the photo well into the collection in the Collections pane; after dragging, the
photo is part of that collection.
“Modifying and deleting collections” on page 63.
To add one or more photos to a collection:
1 In the photo well, select one or more photos you want to add to one or more collec-
tions. (Click to select a single photo, Shift-click to select multiple photos in a series, or Ctrlclick to select nonadjacent photos.)
The selected photos are outlined in yellow.
2 In the Collections pane, click to select a single collection, Shift-click to select multiple
collections in a series, or Ctrl-click to select nonadjacent collections.
3 Add the photos to the collection(s):
• Drag the photos into any of the selected collections in the Collections pane.
• Right-click a selected collection and choose Add <number> Selected Items to Selected
Collection(s).
• Drag a collection from the Collections pane onto any of the selected photos.
• Drag the collection(s) onto any of the selected photos.
Using Help | Contents | Index Back 61
Page 62

Adobe Photoshop Album Help Organizing Photos
Using Help | Contents | Index Back 62
The photos are part of the selected collections. If this is the first time you have put a photo
into the collection, the photo becomes the icon for that collection. If you dragged multiple
photos onto a collection, the first selected photo becomes the icon for the collection. To
change the icon for that collection, see
“Modifying and deleting collections” on page 63.
To see which collections the photos are in, hold your pointer over each collection
icon associated with the photo in the photo well or use the Properties palette.
Holding the pointer over a collection icon lists the collections the photo is in.
To attach a tag to the same photos that are in a collection:
1 Select the collection in the Collections pane to display the photos in that collection.
2 Click the Tags tab to display the Tags pane.
3 Choose Edit > Select All.
4 Select and attach the tag(s) you want to the photos.
To put all the photos that have a particular tag attached into a collection:
1 Click Clear at the top of the photo well if you’re currently in the Collections pane.
2 Click the Tags tab to display the Tags pane.
3 Select the tag to display the photos with that tag attached.
4 Click the Collections tab to display the Collections pane.
5 Choose Edit > Select All.
6 Do one of the following:
• Put the photos into the collections.
• Create a collection and put the photos into it.
To remove a photo from a collection:
Depending on the view in the photo well, do one of the following:
• Right-click the photo and choose Remove from Collection, followed by the collection
name.
• In larger views, you can right-click a collection icon associated with a photo, and choose
Remove from
<collection name>.
Using Help | Contents | Index Back 62
Page 63

Adobe Photoshop Album Help Organizing Photos
Using Help | Contents | Index Back 63
To remove multiple photos from a collection:
1 In the photo well, select the photos you want to remove from a collection. Shift-click to
select multiple photos in a series. Ctrl-click to select nonadjacent photos.
2 Depending on the view in the photo well, do one of the following:
• Right-click one of the selected photos and choose Remove Selected Items from
Collection, followed by the collection name.
• In larger views, you can right-click the collection icon associated with the photos, and
choose Remove from
<collection name>.
Modifying and deleting collections
After you’ve made a collection, you may want to change the collection’s name or the note
you attached to it. Or perhaps you find a better photo to use for the collection icon. Maybe
you decide you don’t need a particular collection any more and want to delete it. Fortu
nately, you can do all these things with the Edit Collections dialog box.
To change a collection’s name or note with the Edit Collection dialog box:
1 Select the collection in the Collections pane and do one of the following to open the
Edit Collection dialog box:
-
• Click the Edit button .
• Right-click the selected collection and choose Edit <collection name> Collection from
the context menu.
2 To change the collection’s name, type a new name in the Name text box.
3 To change the collection’s note, edit or add text in the Note text box.
4 Click OK.
To change the photo used for a collection:
1 Select the collection in the Collections pane and do one of the following to open the
Edit Collection dialog box:
• Click the Edit button in the Collections pane.
• Right-click the selected collection and choose Edit <collection name> Collection from
the context menu.
2 In the Edit Collection dialog box, click Edit Icon.
3 To use a different photo for the icon, click Find to display all the photos in that
collection. Select a photo and click OK or use the arrows next to the Find button to page
through and select the photo you want to use.
Using Help | Contents | Index Back 63
Page 64

Adobe Photoshop Album Help Organizing Photos
Using Help | Contents | Index Back 64
4 To change the portion of the photo included in the icon, resize and move the cropping
marquee (the dotted outline). To resize, move the pointer to a corner of the marquee;
when the pointer changes to a double-headed arrow, drag the corner. To move the
marquee, place the pointer inside it; when the pointer changes to a hand, drag the
marquee.
Resizing the cropping marquee (left); moving the cropping marquee (right)
5 Click OK, and then click OK in the Edit Collection dialog box.
To delete a collection:
1 Select the collection in the Collections pane. To select more than one collection, Shift-
click to select multiple collections in a series or Ctrl-click to select nonadjacent collections.
2 Do one of the following:
• Click the Delete button in the Collections pane.
• If you’ve selected a single collection, right-click and choose Delete <collection name>.
• If you’ve selected multiple collections, right-click and choose Delete Selected Collec-
tions.
Note: Do not press Delete on your keyboard. Photoshop Album will attempt to delete any
selected photos, rather than the collection.
Organizing photos within a collection
When you first create a collection, items are ordered in the order in which you added them
to the collection. Once you have created a collection and put photos, creations, video
clips, or audio clips into it, you can reorganize the order in which those items appear when
displaying that collection. Items are numbered and appear in order from left to right and
top to bottom. You can also reset all items in a collection to appear in chronological order,
oldest first.
Use collections to organize your photos when making a creation.
To change the order of items in a collection:
1 Select the collection.
2 In the photo well drag the items you want to their new location:
Using Help | Contents | Index Back 64
Page 65

Adobe Photoshop Album Help Organizing Photos
Using Help | Contents | Index Back 65
• To move a single photo, drag the photo to its new position.
• To move multiple photos, Shift-click to select multiple photos in a series or Ctrl-click to
select non adjacent photos. Then drag the photos to their new location within the
collection.
Dragging a photo from a collection in the photo well; after dragging, the photo appears in its new
location.
To reset the order of items in a collection to oldest first:
1 Select the collection.
2 Right-click and choose Reorder <collection name> by Date (Oldest First).
Using Help | Contents | Index Back 65
Page 66

Adobe Photoshop Album Help Organizing Photos
Using Help | Contents | Index Back 66
Viewing information about a photo
The Properties palette contains detailed information about a selected photo or media file.
In the Properties palette, you can view the name of the file, any captions or notes you’ve
added to the file, metadata in the file, the dates you imported or modified the file, any
creations using the file, any tags attached to the file, any collections the file is in, and the
location (path) of the file on your computer. You can also record or listen to audio annota
tions attached to photos. For more information about listening to audio captions, see
“Playing audio attached to photos” on page 70. Additionally, the Properties palette lets
you rename a file, add a caption or notes, and adjust the date and time of the photo file.
A
B
C
D
E
-
F
G
H
I
The Properties palette
A. Closes the Properties palette B. Buttons for choosing what information to view C. Caption D.
Filename E. Type or view notes F. File size, dimensions (photos and video only), and playing time
(audio only) G. Change the Date and Time H. Path to the file location on your computer I. Record,
play, or attach the audio caption
To view information about a photo:
Double-click the thumbnail to display the photo as a single photo in the photo well. Make
sure that the Details option is selected in the options bar. This procedure lets you view the
filename, caption, tags, collection, and date and time information, and listen to an audio
caption or sound annotation.
To view information about an item in the Properties palette:
1 Select a photo, video clip, or audio clip in the photo well or calendar view.
2 Display the Properties palette:
• Choose View > Properties.
• Click the Show or Hide Properties button in the options bar below the photo well.
• Right-click the photo, video clip, or audio clip and choose Show Properties from the
context menu.
3 Select the type of information you want to view or modify:
Using Help | Contents | Index Back 66
Page 67

Adobe Photoshop Album Help Organizing Photos
Using Help | Contents | Index Back 67
• Click the General button to view or edit general information: any caption, the name
and location of the file, notes, file size, pixel dimensions, duration (for video clips and
audio clips), and any audio annotation.
To open a window displaying the folder the item came from, click the Folder button
at the bottom of the pane.
• Click the Tags button to view any tags attached to the item and any collections the
file is in.
• Click the History button to view the date a photo was imported and/or modified,
and where it was imported from. The History information also includes a listing of any
creation that uses the photo and a variety of other details, such as when it was shared
or printed (the information shows up only if such activity has occurred for that photo).
• Click the Metadata button to see a list of any metadata associated with the item, such
as the make and model of camera, the camera settings used to take the photo, and the
file type. To view basic camera information, select Brief in the lower section of the
Properties palette. To view all EXIF (Exchangeable Image File) information, select
Complete.
You can add captions and notes to your photo from the General options in the
Properties palette. You can also rename a photo file by typing in the Name text box.
For renaming a batch of photos, Photoshop Album has a Rename command.For more
information on adding captions and notes, see
“Adding captions, notes, and audio
annotations to photos” on page 67. For details on renaming one or more photos, see
“Renaming your photo files” on page 70.
To show or hide information about a photo in the photo well:
Do one of the following:
• Select Details in the options bar to show photo information. Deselect Details to hide the
photo information.
• Choose View > Dates and Tags to toggle between showing and hiding photo infor-
mation.
Adding captions, notes, and audio annotations to photos
Adding captions and descriptive notes to photos in a traditional album helps identify an
image and bring back memories of a captured moment. You can do the same in
Photoshop Album by adding captions and notes to your photos, video clips, and audio
clips, and audio annotations to photos and video clips. Captions and notes are very useful
in identifying your photos as well as finding them. Captions can be used in creations,
printed in contact sheets, and viewed in a Web Photo Gallery or Adobe Atmosphere 3D
Gallery. For more information on using captions and notes to find photos, see
photos by filename, caption, or annotation” on page 94.
“Finding
Using Help | Contents | Index Back 67
Page 68

Adobe Photoshop Album Help Organizing Photos
Using Help | Contents | Index Back 68
Captions can be added at any time after you bring photos into Photoshop Album.
However, if you plan to use captions in a Photoshop Album
creation such as an album,
slideshow, video CD, calendar, photo book, Web Photo Gallery, or Atmosphere 3D Gallery,
you must add a caption before making your creation. Otherwise, no captions will appear
with your photos. For more information about making creations, see
“Sharing your photos
with Photoshop Album creations” on page 119.
You can also search your catalog for captions and notes. For more information,
see “Finding photos by filename, caption, or annotation” on page 94.
Adding captions to photos
Adding a caption to a photo, video clip, or audio clip is like giving it a descriptive title. You
can add or view a caption in the single photo view of the photo well, the Properties
palette, or with the Add Caption command. For more information on the single photo
view, see
palette, see “The Properties palette” on page 24.
To add a caption to a single photo:
Do one of the following:
• Double-click a photo in the photo well or drag the thumbnail slider all the way to the
“Choosing a viewing size” on page 79; for more information on the Properties
right to display the photo as a single view. Click the caption or the text “Click here to
add caption” (if there is no existing caption). Then type the caption and click elsewhere
on the thumbnail.
• Select a photo in the photo well or calendar view. Choose Edit > Add Caption. Type in
the Caption text box and click OK.
• Select a photo in the photo well or calendar view. Make sure that the Properties palette
is open (choose View > Properties if it isn’t) and click the General button
in the dialog
box. Type in the Caption text box.
• Select a photo in Day View in the calendar view. Type in the Caption text box.
Note: Captions can be up to 63 characters in length.
To add captions to multiple photos:
Do one of the following:
1 Select multiple photos in the photo well.
2 Choose Edit > Add Caption to Selected Items.
3 Select Replace Existing Captions if you want to replace the captions on items that
already have them.
4 Type in the Caption text box and click OK.
Note: Captions can be up to 63 characters in length.
To remove captions, use the Add Caption command and enter a blank caption.
Using Help | Contents | Index Back 68
Page 69

Adobe Photoshop Album Help Organizing Photos
Using Help | Contents | Index Back 69
Adding notes to photos
Descriptive notes are an excellent way of identifying a photo and recording information
you don’t want to lose about your photos. The Notes text box in the Properties palette lets
you enter and view information such as personal reminiscences or anecdotes about a
photo. Keep in mind that notes can be viewed only on-screen in Photoshop Album.
Note: Notes can be up to 1,023 characters in length.
To add a note to a photo:
1 Select a photo in the photo well or calendar view.
2 Make sure that the Properties palette is open (choose View > Properties if it isn’t).
3 Click the General button .
4 Type in the Notes text box.
Adding audio captions to photos
In addition to adding captions and notes to describe and identify your photos, you can
add an audio clip or record an audio caption.
Note: Your computer must have a microphone connected to record an audio caption.
A
B
C
D
E F G H
Audio window
A. Menu B. Drag the slider to a position to play a specific section of audio C. Start and End
buttons D. Record button E. Volume control F. Play button G. Stop button H. Length of audio
To add an audio caption:
1 If you’re recording a caption, make sure your computer is set up to record audio (for
instance, that it has a microphone connected). See your computer’s documentation for
details.
2 Select the photo in the photo well or calendar view.
3 Make sure that the Properties palette is open (choose View > Properties if it isn’t).
4 Click the General button .
5 Click the Record Audio Caption button .
6 Record a caption or attach an audio clip:
Using Help | Contents | Index Back 69
Page 70

Adobe Photoshop Album Help Organizing Photos
Using Help | Contents | Index Back 70
• To record a caption, click the Record button in the audio window and begin speaking
into the microphone set up for your computer. Click the Record button again when
you’ve finished your audio caption. You can listen to your audio caption by clicking the
Play button
. If you’re not satisfied with the recording, click the Record button again
to rerecord your audio caption.
• If you have an existing audio clip that you want to attach to your photo, choose File >
Browse from the audio window menu. Then locate and select the audio clip and click
Open.
7 Close the audio window to automatically save the new audio caption and attach it to
your photo.
Playing audio attached to photos
With Photoshop Album, you’re not limited to viewing only written notes and descriptions
of your photos. You can also enjoy listening to any audio caption included in your
photo(s).
To play audio captions:
1 Double-click the photo to display it as a single photo in the photo well.
2 Click the Play Audio Caption button .
3 Click the Play button in the audio window. Close the window once you’re finished
listening to the audio.
You can also play audio captions by clicking the Audio Caption button in the
General options in the Properties palette.
Renaming your photo files
Renaming your files isn’t necessary to find them with Photoshop Album. However, you
may still want to give your files relevant names, especially if they’ve been imported from a
digital camera and have just a string of numerals and letters. Photoshop Album lets you
easily rename a file or batch rename a group of files. The new names are written to your
computer’s hard disk in case you want to find them in the file system.
When you batch-rename photos, the selected files are renamed with the name you specify
followed by a numeric suffix. For example, if you renamed a group of files with the name,
“Honolulu,” the first selected photo file will be renamed “Honolulu-1,” the following file
will be renamed “Honolulu-2,” and so forth. When necessary, Photoshop Album automati
cally adds additional suffixes to make sure that each name is unique. For example, if there
is already a file named “Honolulu-2,” the file being renamed would become “Honolulu-2-
1.”
To rename a file:
Select an item in the photo well or calendar view, and then do one of the following:
• Choose File > Rename from the menu bar. In the Rename dialog box, type a name in the
New Name text box, and then click OK.
-
• If the Properties palette is open, type a new name in the Name text box.
You can undo the renaming of files using CTRL+Z immediately after renaming.
Using Help | Contents | Index Back 70
Page 71

Adobe Photoshop Album Help Organizing Photos
Using Help | Contents | Index Back 71
To rename files in a batch:
1 Select items in the photo well. Shift-click to select items in a series. Ctrl-click to select
nonadjacent items.
2 Choose File > Rename from the menu bar.
3 Type a name in the Common Base Name text box, and then click OK.
Note: Keep in mind that if you batch rename an edited or duplicated photo, it is renamed
as specified, losing its “_edited” or “-copy” suffix. The name of the original file is not
changed if there is an edited copy.
Organizing photos into catalogs
Adobe Photoshop Album creates links to your photos so that it knows where the photo is
located, what file format it’s in, what tags are attached to it, and so forth. Photoshop
Album does this by keeping information about your photos, video clips, and audio clips in
a database of information called the
When you launch Photoshop Album and bring in photos, a catalog is automatically
created for you. You don’t have to create it yourself. Your catalog keeps track of the photos,
video clips, and audio clips on your computer and on other media such as CDs or DVDs. It’s
a collection of information about each photo, but it doesn’t contain the actual photos
themselves.
catalog.
The Photoshop Album catalog references the photo files, video files, and audio files on your
computer and displays a thumbnail of each in the photo well.
The catalog can also contain lots of other information about photos, including when the
photo was taken and information you’ve added by using Photoshop Album, such as which
tags are attached to the photo. All of this information enables Photoshop Album to give
you flexibility in managing, identifying, and organizing photos.
Here's some of the information that Photoshop Album displays about the photos, video
clips and audio clips in your catalog:
• The path and filename of the photo file, video clip file, or audio clip file
• The path and filename of any associated audio file
Using Help | Contents | Index Back 71
Page 72

Adobe Photoshop Album Help Organizing Photos
Using Help | Contents | Index Back 72
• The path, filename, and volume name of the original, full-resolution file (if the original
file is stored
• The path and filename of the original, unedited file (if the file has been edited)
• The name of any camera or scanner associated with the batch of imported photos
• Any caption you’ve added to a photo
• Any notes you’ve added to a photo
• The media type—that is, whether it’s a photo, video clip, audio clip, or creation
• The date and time the photo was taken and whether its date is completely or only
offline, in other words, left on the CD or DVD)
partially known
• Any tags that have been applied to the photo
• Any collections that the photo is in
• The photo’s history: whether it was printed on a local printer, exported, shared by e-mail
or online, sent to an online photo-finishing service, as well as any creations and Web
galleries the photo was used in
• Edits that have been applied to the photo (such as rotation, cropping, and fixing red-
eye)
• The pixel dimensions of any photos and video clips
• The creation settings (creation type, whether you are showing captions, showing page
numbers, etc.) for creations
Creating new catalogs for additional users
Although Photoshop Album automatically creates a catalog for you when you first start
the application and bring in photos, you can create more than one catalog. Most people
won’t need or want to have multiple catalogs. However, creating multiple catalogs might
be useful if friends or family members share Photoshop Album on the same computer, yet
they want to have their own, separate sets of photos and tag organization.
Note: You can open only one catalog at a time, you cannot move photos or tags between
catalogs, and you cannot search across multiple catalogs.
To create a new catalog:
1 Choose File > Catalog.
2 Click New in the Catalog dialog box.
3 Choose a location for the catalog or use the default location shown in the dialog box.
4 Type a name for the catalog in the File Name text box.
5 Select Import Free Music into all New Catalogs to automatically import the free music
files shipped with Photoshop Album. The music files are then available as background
music for creations and PDF files.
6 Click Save.
Using Help | Contents | Index Back 72
Page 73

Adobe Photoshop Album Help Organizing Photos
Using Help | Contents | Index Back 73
Specifying the default folder for catalogs
Although it is generally not necessary, you can name a different folder in which to store
any catalog you create. This flexibility is available in case you expect to create a very large
catalog and want to store it on a different disk drive.
To specify a different default catalog folder:
1 Choose Edit > Preferences and select Files from the list on the left.
2 To change the location of the catalog or saved files, do one or both of the following:
• Click Browse to specify a different location for the catalog. Then navigate to the folder in
which you want to store the catalog and click OK.
• Click Browse to specify a different location for saved files. Then navigate to the folder in
which you want to store the files and click OK.
Note: Click Restore Default Settings to restore the folder pathname to its default location.
3 Click OK
Opening existing catalogs
Occasionally, more than one catalog is available for Adobe Photoshop Album. For
example, another member of your family may have his or her own catalog in order to set
up a separate set of photos and tags. (For more information, see
for additional users” on page 72.)
Creating different catalogs lets you use different tags and photos in each catalog.
“Creating new catalogs
To open another catalog:
1 Choose File > Catalog.
2 Click Open in the Catalog dialog box.
3 Locate the catalog, if needed, using the file browser in the dialog box.
4 Click Open.
Using Help | Contents | Index Back 73
Page 74

Adobe Photoshop Album Help Organizing Photos
Using Help | Contents | Index Back 74
Copying catalogs
The Save As option in the Catalog dialog box creates a new copy of your current catalog
and then opens it as your new catalog, retaining your old one. This is useful, for instance, if
you want to rename your catalog, or if you want to provide a catalog to someone else you
know who wants to create his or her own sets of photos and tag organizations but wants
to base it on your tag organization. (For more information, see
additional users” on page 72.)
To create a new catalog by making a copy:
1 Choose File > Catalog.
2 In the Catalog dialog box, click Save As.
3 Choose a location for the catalog if you don’t want it to be in the default location shown
in the dialog box.
4 Type a name for the catalog in the File Name text box.
5 Click Save.
Note: This makes a duplicate copy of the catalog, but it does not make a duplicate of any
of the items in the catalog. The new catalog links to all the same files as the original
catalog.
“Creating new catalogs for
Safeguarding and preserving your photo catalog
After all the effort you put into your catalog, you will always want to make sure to
safeguard your work. You can preserve your work and your catalog, all within Photoshop
Album. Or, perhaps your hard disk is filling up and you want to get the full-resolution
masters of photos you don’t use often off your drive and onto a CD. No other software is
required; just use Photoshop Album’s Backup feature or Burn feature.
Backup copies your catalog, along with your photos (both the original and any edited
version you’ve made), video clips, and audio clips onto a CD or DVD. It’s very useful to have
a spare copy of your catalog and media files as a safety copy, in case you ever need to
restore them due to a problem or accident.
Burn copies or moves your photos, video clips, and audio clips, but not your catalog onto a
CD or DVD. This is useful when you want to provide a copy of your files to a friend, for
instance.
Backing up your catalog and its contents
The Backup command makes a copy of the catalog and the photos, video clips, and audio
clips you’ve brought into Photoshop Album, along with the folder structure they’re stored
in. You can back up the catalog to a hard drive or other media, such as writable CDs and
DVDs.
To back up a catalog, along with the photos, video clips, and audio clips:
1 If you’re backing up to CD or DVD, make sure you have a CD or DVD drive with writable
media connected to your computer. If you’re making an incremental backup, make sure
you have the media containing the last full backup.
Using Help | Contents | Index Back 74
Page 75

Adobe Photoshop Album Help Organizing Photos
Using Help | Contents | Index Back 75
2 Choose File > Backup from the menu bar.
Note: Backup backs up only the currently open catalog. If you have multiple catalogs, be
sure to open the one you want to back up.
The Burn/Backup wizard appears with the option Backup the Catalog selected.
3 Click Next.
If necessary, a dialog box appears and asks whether you want to check for missing files
and reconnect them first.
4 Click Continue to proceed, or Reconnect to check for missing files.
5 If you clicked Reconnect, and any files can’t be found, the Reconnect Missing Files
dialog box appears and prompts you to reconnect the missing files. For more information,
see
“Reconnecting to missing files” on page 113.
6 Select options from Step 2 of the Burn/Backup Wizard and click Next:
• Full Backup to create a copy of the entire catalog, all the photo files, video clips, audio
clips, and other related files. You should choose this option at least the first time you
backup your files.
• Incremental Backup to make a copy of the catalog and all new or modified photo files,
video clips, audio clips, and other related files since the last full or incremental backup.
7 Select options from Step 3 of the Burn/Backup Wizard:
• Select the CD or DVD drive, or hard drive folder to which you want to burn the items. (If
necessary, create a new folder to hold your backup files.) Click Browse to search for the
drive if it isn’t listed in the Destination Drive list.
Note: If you back up to a folder on your computer’s internal hard drive, the files there are
renamed by Photoshop Album with an alphanumeric code. This prevents you from ending
up with multiple files with the same name in the same backup folder. However, Photoshop
Album restores the names when you restore the files. It’s best to back up to a CD, DVD, or
attached hard drive.
• Type a name for the CD or DVD in the Name text box, or accept the default name.
• Choose a speed at which to burn the items. The highest possible speed for your drive
and CD/DVD media is chosen by default. If that speed doesn’t work, try progressively
lower speeds until you find one that works.
• Backup Path is the location the files will be backed up. To change the location, click
Browse and select another location.
• Previous Backup File is the file that is used to determine how many files have changed if
you are making an incremental backup. To change the backup file, click Browse and
select another file.
8 After Photoshop Album calculates how many discs are needed for the backup, click
Backup. Photoshop Album prompts you to insert writable CDs or DVDs as needed.
Using Help | Contents | Index Back 75
Page 76

Adobe Photoshop Album Help Organizing Photos
Using Help | Contents | Index Back 76
9 If you’re making an incremental backup, locate or insert the media containing the last
full backup. Then follow the on-screen directions to insert the media on which you want to
make the incremental backup. If the backup won’t fit on the media, Photoshop Album
notifies you and asks for additional media as needed.
Note: Photoshop Album will give you the option of verifying the disc or not. While
verifying is time-consuming, it’s recommended, to make sure that the discs were created
correctly.
Once you’re finished, it’s a good idea to mark any removable media, such as a CD,
with the name and date of the backup.
Burning your photos to a CD or DVD
The Burn command is used to copy a set of photos to a CD or DVD. For instance, instead of
sharing your photos in a slideshow or PDF that’s put on CD, you might want to create a CD
with just the photos only. Or, perhaps your hard disk is filling up and you want to get the
full-resolution masters of photos you don’t use often off your drive and onto a CD.
The Burn command includes a Move option. With this option, all the master files of the
selected photos are written to a CD or DVD, and then a low-resolution proxy (copy) is
written to your hard disk and the master files are deleted from your disk. Now, you can
continue to see the photos in your catalog just as before (a CD icon
that are offline) and view them on-screen, but you’ve freed up most of the disk space they
used. When you try to print a photo whose master file is offline, or do something else that
requires the full-resolution file, you’ll be prompted for the disc you created.
shows up on items
To burn photos, video clips, and audio clips:
1 Make sure you have a CD or DVD drive with writable media connected to your
computer.
2 Select the items you want to copy.
3 Choose File > Burn.
The Burn/Backup wizard appears with the option Copy/Move Files selected. If you haven’t
selected any files, a dialog box appears, and gives you the option to select all files in the
photo well.
4 Click Next.
5 Select options from Step 2 of the Burn/Backup Wizard and click Next:
• Move Files deletes the selected full-resolution photos from your computer after it
copies them to the CD or DVD. A thumbnail of the items remains.
Note: The Move Files option is not available for video clips and audio clips.
• Copy/Move Only Edited Files burns just the edited files if the original files exists, and
burns the original if there is no edited version.
• Copy/Move Both Edited and Original Files to burn both types of files.
6 Select options from Step 3 of the Burn/Backup Wizard:
• From the Destination Drive list, select the CD or DVD drive to which you want to burn
the items. Click Browse to search for the drive if it isn’t listed.
• Type a name for the CD or DVD in the Name text box, or accept the default name.
Using Help | Contents | Index Back 76
Page 77

Adobe Photoshop Album Help Organizing Photos
Using Help | Contents | Index Back 77
• Choose a speed at which to burn the items. The highest possible speed for your drive
and CD/DVD media is chosen by default. If that speed doesn’t work, try progressively
lower speeds until you find one that works.
7 After Photoshop Album calculates how many discs are needed for the archive, click
Burn. Photoshop Album prompts you to insert writable CDs or DVDs as needed.
Note: Photoshop Album will give you the option of verifying the disc or not. While
verifying is time-consuming, it’s recommended, to make sure that the discs were created
correctly.
Once you’re finished, it’s a good idea to mark any removable media, such as a CD,
with the name and date of the copy.
Repairing and restoring your catalog
In the event of a problem with your catalog, Photoshop Album lets you recover and
restore your catalog, along with your photos (both the original and any edited version
you’ve made), video clips, and audio clips.
Using the Recover command to repair a catalog
When your catalog is damaged by a power failure or technical glitch, Photoshop Album
displays a message saying that there’s a problem with the catalog. Use the Recover
command to fix it. The Recover command also compacts the catalog, removing any
unused space.
To use the Recover command:
1 Choose File > Catalog.
2 Click the Recover button in the Catalog dialog box.
3 Click OK when prompted to proceed.
Restoring your catalog to a previously saved version
Sometimes, you want to restore your catalog to a previously saved version. Perhaps you
accidentally deleted photos from your current catalog and want them back. The Restore
command places the backup copy of the catalog, photos, video clips, and audio clips into
Photoshop Album. You could also use this command to move your catalog, photos, etc., to
another computer. In this case you might use the Backup command to copy everything
onto a writable CD or DVD and then use the Restore command to place the files from the
CD or DVD onto the other computer.
To restore a catalog, along with the photos and related media:
1 Insert the media, such as the CD or DVD onto which you made the backup.
If you’ve backed up to an external hard drive, make sure that it’s connected to your
computer. If you select a CD or DVD, Photoshop Album prompts you to insert discs if your
backup is contained on more than one disc. Follow the on-screen instructions, which will
differ depending on whether you’re restoring a single backup set or a single backup set
plus one or more incremental backups.
2 Choose File > Restore from the menu bar.
3 Select where you want to restore from:
Using Help | Contents | Index Back 77
Page 78

Adobe Photoshop Album Help Organizing Photos
Using Help | Contents | Index Back 78
• Restore from CD or DVD if your backup files are on either of these media.
• Restore from Hard Disk or Other Storage Volume if your backup files are on your hard
disk or some other media, such as a flash drive.
4 Select the drive from the list and click Restore.
Using Help | Contents | Index Back 78
Page 79

Adobe Photoshop Album Help Viewing and Finding Photos
Using Help | Contents | Index Back 79
Viewing and Finding Photos
Viewing photos in the photo well
Photos, video clips, audio clips, and creations appear in the photo well organized in grids
of thumbnails you can resize. The buttons in the options bar help you organize and sort
files in the photo well. (See
You can also view photos by date, using the calendar view. For more information, see
“Using the calendar view” on page 83.
Choosing a viewing size
The thumbnail slider in the options bar lets you adjust the layout of your media files in the
photo well. As you move the slider, the size of the thumbnail images in the photo well
changes. Smaller thumbnails allow you to see many images at once, while larger thumb
nails show more detail and make it easier to identify individual photos.
“The photo well” on page 21.)
-
Adjust the thumbnail slider to change the viewing size of your photos
When Details is selected in the options bar, you can see information about each photo,
such as the date and the tags that are attached. You can change the date assigned to the
photo by clicking it (see
Names in Details preference is selected, the file name of the photo is also displayed (see
“Setting viewing preferences” on page 81). The amount of information displayed in the
photo well varies depending on the size of the thumbnail.
“Changing the date of a photo” on page 43). If the Show File
Using Help | Contents | Index Back 79
Page 80

Adobe Photoshop Album Help Viewing and Finding Photos
Using Help | Contents | Index Back 80
At the far right of the thumbnail slider is the single photo view, which shows one photo at
a time in the photo well. If Details is selected in the options bar, you can view and edit the
photo’s caption or audio annotation in single photo view.
A
B
C
D
E
H IF
G
Single photo view
A. Click to edit date and time B. Scroll to the previous/next photo C. Double-click to open Fix Photo
window D. Click to add or play audio caption E. Options bar F. Indicates that photo is used in a
collection G. Tags attached to the photo H. Select to view date, caption, and audio annotation I.
Click to add or change caption
To choose a viewing size:
Do one of the following:
• Move the thumbnail slider in the options bar.
• Click the button to the left of the slider to display the smallest thumbnails possible.
• Click the button to the right of the slider to display a single photo.
You can also display a photo in the single photo view by double-clicking its
thumbnail.
To view photos using the full screen:
1 Select one or more photos in the photo well, and do one of the following:
• Choose View > Show Full Screen.
• Click the Full Screen Preview button in the options bar.
2 Use the left and right arrow keys to view the previous or next photo in the photo well. If
you selected more than one photo, the arrow keys only display the photos in your
selection.
3 Click the mouse button or press the Escape key to return to Photoshop Album. The
photo you were viewing full-screen is selected in the photo well.
To refresh thumbnail views:
Choose View > Refresh. You’d want to refresh your view, for example, after you attached
the hidden tag to an image, because it will not become hidden until you refresh.
Using Help | Contents | Index Back 80
Page 81

Adobe Photoshop Album Help Viewing and Finding Photos
Using Help | Contents | Index Back 81
Sorting files in the photo well
Photoshop Album gives you different ways to sort your catalog in the photo well. You can
also decide what kind of media files appear in the photo well.
Photo Well Arrangement menu in the options bar
You can choose from the following sort options:
• Date (Newest First) to show the most recently taken or imported photos first. (Within a
given day, the photos are still shown in the order they were taken, oldest-first). Newestfirst order is convenient when you need to attach tags to the photos you imported
most recently.
• Date (Oldest First) to show all the photos in chronological order.
• Import Batch to display photos in the batches in which they were imported. Each batch
is separated by a bar that displays information about the way you got the photos.
• Folder Location to display photos by the folders in which they are stored.
• Color Similarity is activated only when you’re viewing photos that have similar color
distribution. (See
• Collection Order is activated only when you’re viewing a collection. (See “Using collec-
“Finding photos using color” on page 96 for directions.)
tions to find photos” on page 59.)
To sort files in the photo well:
Do one of the following:
• Choose an option from the Photo Well Arrangement menu in the options bar.
• Choose View > Arrangement, and then choose an option from the pop-up list.
To choose the kinds of media to view:
1 Choose View > Media Types.
2 In the dialog box, select or deselect the media types you want to view.
Setting viewing preferences
You can specify preferences for how you want photos and details to appear in the photo
well.
To set viewing preferences:
1 Choose Edit > Preferences, and then click General.
2 Select Allow Photos to Resize to allow photos to scale up past 100% of actual size, to the
maximum size for the space available. Deselect this option to display small images at their
actual size even when more space is available for display.
Using Help | Contents | Index Back 81
Page 82

Adobe Photoshop Album Help Viewing and Finding Photos
Using Help | Contents | Index Back 82
3 Select Show File Names in Details to display the file name of each photo in the photo
well when the Details option is selected in the options bar.
Using the timeline to find photos
Because Photoshop Album automatically organizes your photos in the timeline, you can
view and find photos without ever attaching tags to them. The timeline is divided into
years and months. You can jump to a particular month in any year by clicking that month
in the timeline. Photoshop Album then displays photos for that month in the photo well.
To help you identify a month, hold your mouse pointer over a bar in the timeline, and the
name of the corresponding month appears. You can also select a range of time in the
timeline to view photos taken within that range.
The timeline helps you view and find photos by date, import batch, or file location,
depending on the setting you choose in the options bar. (See
well” on page 81.) If you’re viewing photos by date, the height of each bar is proportional
to the number of images in each month. If you’re viewing by Import Batch, the height of
the bars is proportional to the number of photos you imported together (or in a batch). If
you’re viewing photos by folder location, the height of the bars in the timeline is propor
tional to the number of images in each folder.
“Sorting files in the photo
-
If a bar in the timeline is partially blank, that means that you have photos with the
Hidden tag attached in that month, batch, or folder. To view these photos, include
the Hidden tag in your search. (See
“Finding photos with the Favorites tag or the Hidden
tag” on page 93.)
The timeline works with tagged photos to help you refine searches. For example, let’s say
that you’re looking for pictures taken at your friend Richard’s birthday parties over the
years. Assume that pictures taken of Richard would all have the tag “Richard” attached to
them. Richard’s birthday happens in the same month (December, for example) every year,
so to find his birthday photos, you’d search on the “Richard” tag, and then click the
December bars of every year in the timeline to see the photos taken at every birthday
party.
A C D E F GB
Using the timeline
A. Click to scroll the range of the timeline B. Gray area indicates photos out of set range C. Drag end
points to refine searches D. Click a bar or drag the marker to scroll to a different month E. Hold
pointer over a bar to identify its range (month, import batch date, or file location) F. The height of
the bar indicates the number of photos G. Blank area indicates hidden photos
To view and find photos using the timeline:
1 Choose View > Timeline if the timeline is not visible.
Using Help | Contents | Index Back 82
Page 83

Adobe Photoshop Album Help Viewing and Finding Photos
Using Help | Contents | Index Back 83
2 Choose an option from the Photo Well Arrangement menu. (See “Sorting files in the
photo well” on page 81.)
3 Do one of the following:
• Click and drag the timeline endpoint markers in or out to the range you’d like to view.
• Choose Find > Set Date Range. For both the start date and end date, type a year in the
Year text box, and then choose a month and day to specify the date range you want to
search. Click OK.
Setting a date range
The end points in the timeline correspond to the start and end dates specified for a date range.
Photoshop Album adjusts the date range selection in the timeline and displays photos
within that range in the photo well.
4 Drag the end points to refine your date range if you like.
To use the timeline with tagged photos:
1 Drag and drop a tag onto the find bar. (See “Using the find bar” on page 92.)
2 Drag the timeline endpoint markers in or out to the range you’d like to search.
3 Photos with the tag found in the range of dates appear in the photo well.
Using the calendar view
The calendar view lets you browse through your photos chronologically or find photos
from a particular day, month, or year. When you’ve found the day you’re looking for, you
can view that day’s photos as a mini-slideshow. You can even keep track of recurring
events, such as holidays and birthdays, and add notes to any day in the calendar view. In
the calendar view, you can do many of the same operations on photos that you can do
from the photo well.
Using Help | Contents | Index Back 83
Page 84

Adobe Photoshop Album Help Viewing and Finding Photos
Using Help | Contents | Index Back 84
To switch to the calendar view, simply click the Calendar View button in the shortcuts
bar. To switch to the photo well, click the Photo Well button in the shortcuts bar.
A B C D E
F
G
H
I
J
K
L
M
N
O
P
Q
Using the calendar view
A. Click to select a month B. Click to select a year C. Click to view photos with unknown dates D.
Click to select a date E. Click to display calendar view F. Click to view previous/next month G.
Custom event H. Date currently selected I. Holiday J. Click to choose year, month, or day view K.
Click to view previous/next day
L. Right-click photo to display commands M. Number of photos for selected date N. Controls for
viewing slideshow O. Click to display item in photo well P. Add an event Q. Enter a daily note
Viewing and finding photos in the calendar view
The calendar view lets you navigate through your catalog by year, month, or day, or
display a specific day of your choosing.
To view and find photos in the calendar view:
1 Do one of the following:
• Click the Calendar View button in the shortcuts bar.
• Choose View > Calendar View.
2 Navigate to the month and day you want to view by doing one of the following:
• Click the left arrow button and right arrow button to go forward or backward.
Hold down the arrow buttons to move forward more rapidly.
• Click the name of the month to display a list of months from which you can choose.
Using Help | Contents | Index Back 84
Page 85

Adobe Photoshop Album Help Viewing and Finding Photos
Using Help | Contents | Index Back 85
• Click the name of the year to display a list of years from which you can choose.
A
B
Choosing a different month in the calendar view
A. Click the month to display a list of months B. The list shows which months contain photos
3 Click the day of interest.
4 If there is more than one photo in the day, click the Play button to start a mini-
slideshow in the calendar view.
5 If you see a photo you want to find in the photo well, click the Back to Photo Well
button
under the photo.
Many of the photo commands you use in the photo well can also be used in the
calendar view. Just right-click a photo to see a menu of commands available.
To view photos by year, month, or day:
Do one of the following:
• Click the Year , Month , or Day button at the bottom of the calendar view.
• In the year or month view, double-click a day. The calendar switches to day view and
displays the first photo for that day.
To jump to a particular date in the calendar:
Click the date display, and then enter the date you want to find.
Jumping to a day in the calendar
Using Help | Contents | Index Back 85
Page 86

Adobe Photoshop Album Help Viewing and Finding Photos
Using Help | Contents | Index Back 86
To view photos in the day view:
1 Select the day you want to view and click the Day button .
2 Do one of the following:
• To view a photo, click its thumbnail in the column to the right.
• To view all the photos for the selected day as a slideshow in the calendar view, click the
Play button
• To view the currently selected photo full-screen, click the Full Screen Preview button .
.
Press the Escape key to return to Photoshop Album.
• Click the Slideshow button to view the photos for the selected day as a full-screen
slideshow; see “Viewing photos as instant slideshows” on page 94.
To view photos with unknown dates:
Click the Unknown Date icon . If the month and year of a photo are known, but not the
day, the Unknown Date icon appears in the upper-right corner of the month. If only the
year of a photo is known, the icon appears in the upper-right corner of that year in the
year view of the calendar. Photos with an unknown year do not appear in the calendar
view at all.
The Unknown Date icon might represent more than one photo. If so, the photos can be
viewed as a slideshow, just as dated photos can.
Adding notes, events, and captions in the calendar view
The calendar view lets you keep track of dates and photos through daily notes, events, and
captions. Daily notes and events correspond to days in the calendar, while captions apply
to the photos themselves.
To add a daily note to the calendar view:
Select a day in the calendar view, and type the note in the Daily Note text box. You can add
a daily note to any day in the calendar, even if it doesn’t have photos. In the month view, a
Note icon
Note: A daily note is different from a caption. It corresponds to a day in the calendar,
rather than a particular photo. Daily notes can only be accessed in the calendar view; they
are not visible in the Properties palette.
To add an event to the calendar view:
1 Do one of the following:
• Click the Event icon .
• In the month or year view, right-click a day and choose Add Event from the context
menu.
2 Type a name for the event in the Event Name box.
3 If necessary, change the dates shown in the pop-up menus.
4 If the event is annual, select Repeating Event. If desired, type in a year when the
repeating event ends. When you’re done, click OK.
appears on each day that has a daily note.
Using Help | Contents | Index Back 86
Page 87

Adobe Photoshop Album Help Viewing and Finding Photos
Using Help | Contents | Index Back 87
In the month and year views of the calendar, holidays and events are displayed using
special colors.
B
A
Holidays and events displayed in the calendar view
A. Examples of holidays B. Examples of custom events
You can use the Preferences dialog box to add, remove, and edit events. For more
information, see “Setting calendar view preferences” on page 87.
To add or change a caption in the calendar view:
1 Display the photo whose caption you want to edit.
2 If necessary, click the Day button to switch to day view.
3 Type text in the Caption text box in the lower right corner. Captions can be up to 63
characters in length.
Editing a caption in the day view
Setting calendar view preferences
You can personalize your calendar view by setting calendar view preferences.
To set calendar view preferences:
1 Choose Edit > Preferences, and then click Calendar.
2 Select Use Monday As First Day of the Week to set the calendar view to start each week
on Monday. Leave this option unselected to specify Sunday as the first day of the week.
Using Help | Contents | Index Back 87
Page 88

Adobe Photoshop Album Help Viewing and Finding Photos
Using Help | Contents | Index Back 88
3 Select any holidays you want to note in the calendar view. Click Select All or Select
None to note all or none of the holidays.
4 Add, delete, and edit events as desired:
• To add an event, click New and enter information in the Create New Event dialog box.
• To edit an event, select the event and click Edit. Change the information in the Edit
Event dialog box.
• To delete an event, select it in the list and click Delete.
5 Click OK to exit the Preferences dialog box.
Finding photos by their history
Photoshop Album helps you keep track of where you got photos, how you’ve used them,
and how you shared or exported them.
A
B
Finding photos by the date they were e-mailed
A. Click a column heading to sort by that category. B. Double-click an item to view the files you e-
mailed.
Note: The commands on the Find menu work only in the photo well view or the organize
view, and not in the calendar view.
To find photos by the date they were imported:
1 Choose Find > By History > Imported On.
2 A list of the files you’ve imported appears, with the device the photos were imported
from, the date they were imported, and the number of items that were imported. Doubleclick an item to see the files in the photo well.
To find photos by the way you received them:
1 Choose Find > By History > Received From.
2 A list of the files you’ve received appears. Double-click an item to see the files in the
photo well.
To find photos by the date they were e-mailed:
1 Choose Find > By History > E-mailed to.
2 A list of the files you’ve e-mailed to people in your contact book appear. Double-click on
an item to view the media files you e-mailed. For more information about e-mailing
photos, see
“Sharing photos using e-mail” on page 146.
To find photos by the date they were printed:
1 Choose Find > By History > Printed On.
Using Help | Contents | Index Back 88
Page 89

Adobe Photoshop Album Help Viewing and Finding Photos
Using Help | Contents | Index Back 89
2 A list of the photos you’ve printed appears. Double-click an item to see the photos. For
more information about printing photos, see
“Printing photos at home” on page 154.
To find photos by the date they were exported:
1 Choose Find > By History > Exported On.
2 A list of the media files you’ve exported appears, including the dates and times they
were exported. Double-click an item to see the files. For more information about
exporting photos, see
“Exporting photos” on page 153.
To find photos by the date they were ordered online:
1 Choose Find > By History > Ordered Online.
2 A list of the photos you’ve ordered through online services appears. Double-click an
item to see the files. For more information on using online services, see
“Using online
services” on page 160.
To find photos by the date they were shared online:
1 Choose Find > By History > Shared Online.
2 A list of the photos you’ve shared online through online services appears. Double-click
an item to see the files. For more information on using online services, see
“Using online
services” on page 160.
To find items with unknown dates or times:
1 Choose Find > Items with Unknown Date or Time.
2 In the photo well, Photoshop Album displays the media files in which date or time is set
to unknown. For directions on fixing the date of a photo, see
“Changing the date of a
photo” on page 43.
Finding files by media type
You can view just one type of media file in the photo well. By selecting a media type, you
can perform other searches that will look only at the media you want.
To find files by media type:
1 Make sure the photo well is displayed. If you’re in the calendar view, click the Photo Well
button or the Organize button.
2 Choose Find > By Media Type, and then choose one of the following options from the
pop-up menu:
• Photos to view just photos.
• Video to see thumbnails of video clips (the first frame of the video clip is shown).
• Audio to browse your collection of audio clips.
• Creations to look at the creations you’ve made.
• Items with Audio Captions to see photos and creations that you’ve attached audio
captions to.
3 The files of the selected media type appear in the photo well.
Using Help | Contents | Index Back 89
Page 90

Adobe Photoshop Album Help Viewing and Finding Photos
Using Help | Contents | Index Back 90
Finding photos using tags
Photoshop Album has plenty of tools to help you find your photos. By attaching a tag to
your photos and other media (see
page 47), you give Photoshop Album the information it needs to help you quickly find
what you are looking for. When you use tags to find photos, the find bar expands to show
you the tags you’ve selected. Searches begin as soon as you select the tags. For infor
mation about creating tags and using them to organize your photos, see “Using tags to
organize your photos” on page 45.
Note: You can also use collections to find photos. For more information, see “Using collec-
tions to find photos” on page 59.
“Attaching tags to and removing tags from photos” on
-
Click the square next to a tag to start a search
Photos with the Hidden tag attached aren’t normally included when you search for
photos. If you want to display hidden photos, select both the Hidden tag and the tag
for the desired category or subcategory as your search criteria (see
“Finding photos with
the Favorites tag or the Hidden tag” on page 93).
To find items using tags:
Do any of the following:
• Click the square next to the name of the tag, so the binoculars icon appears. Click
again to cancel the search.
Note: Clicking the square next to multiple tags finds photos that have all of those tags
attached. (The exception is if you search on Place tags, in which case Photoshop Album
finds photos that have any of the tags.) Double-clicking a tag clears an existing search
and displays all the photos with that tag.
• Drag one or more tags onto the find bar (see “Using the find bar” on page 92). The tag
appears in the find bar to remind you of the tag you searched for.
• Choose Find > Items Tagged With, and then choose a tag from the pop-up menu.
To cancel the search and show your catalog, click the Show All button .
Using Help | Contents | Index Back 90
Page 91

Adobe Photoshop Album Help Viewing and Finding Photos
Using Help | Contents | Index Back 91
To find untagged items:
Choose Find > Untagged Items to see all the photos in your catalog that don’t have tags
assigned to them.
Best matches, close matches, and not matching photos
When you search using tags, Photoshop Album ranks the results of the search using the
following groups:
Best matches These photos are tagged with all the search criteria tags. As you add more
tags to your search, fewer best matches appear.
Close matches Photos tagged with one or more (but not all) of the search criteria tags
are called close matches. Closely matching photos have a blue circle with a white check
mark in their thumbnails. Note that if you search using more than one “Place” category tag,
photos with just one of the “Place” category tags attached will show up as Best.
Not matching These photos don’t have any of the search criteria tags attached to them.
They have a red circle with a white “x” in their thumbnails.
Matching and Closely Matching photos
To view closely matching or not matching photos:
In the find bar, click the square next to Close or Not to select a category. You can view more
than one category at a time. You can also hide best matches by deselecting the Best
option.
To see hidden photos, select both Best and Close categories in your search criteria
(see “Finding photos with the Favorites tag or the Hidden tag” on page 93).
To have Photoshop Album automatically show closely matching photos:
1 Choose Edit > Preferences, and then click General.
2 Select Show Closely Matching Sets for Searches, and then click OK.
Using Help | Contents | Index Back 91
Page 92

Adobe Photoshop Album Help Viewing and Finding Photos
Using Help | Contents | Index Back 92
Using the find bar
The find bar performs quick searches when you drag tags onto it. When not in use, the find
bar is a horizontal bar right above the photo well. When you drag a tag onto it, the find bar
automatically expands so you can see the tags you’ve added to the search. Every file with
the chosen tag attached to it will be found, so if you want to refine your search, you can
drag more tags onto the find bar.
Dragging-and-dropping a tag on the find bar
B DCA E
Find bar expanded with search criteria
A. Search criteria B. Click a check box to show search results C. Clear the search and close the find
bar D. Close match E. Not matching
Photos with the Hidden tag attached are normally hidden whenever you search for
photos. If you want to display hidden photos of a specific subject, drag both the
Hidden tag and the tag for the desired category or subcategory onto the find bar (see
“Finding photos with the Favorites tag or the Hidden tag” on page 93).
To use the find bar:
1 Make sure that the Tags pane is on your screen. (See “Using tags to organize your
photos” on page 45.)
2 Select the tag you want to use to perform the search, drag the tag onto the find bar,
and release it. The search starts right away, and the find bar expands to show the tag it’s
using to perform the search.
3 If you’d like, drag more tags onto the find bar to narrow your search.
4 To start a new search, or to close the find bar, do one of the following:
• Click the Clear button.
• Click the Show All button .
You can also use the find bar to view the photos used in a collection or a creation. To
do so, drag a collection container from the Collections pane or a creation from the
photo well to the find bar.
Using Help | Contents | Index Back 92
Page 93

Adobe Photoshop Album Help Viewing and Finding Photos
Using Help | Contents | Index Back 93
Finding photos with the Favorites tag or the Hidden tag
The Favorites tag helps you easily find your favorite photos, video clips, audio clips, or
creations. When the Favorites tag is attached to a photo, it has preference in searches with
the Favorites tag as a search criteria.
You’d attach the Hidden tag to photos, video clips, audio clips, or creations that you
generally don’t want to view or sort through. Photos with the Hidden tag attached are
normally hidden whenever you search for photos. If you want to display hidden photos of
a specific subject, select both the Hidden tag and the tag for the desired category or
subcategory as your search criteria. For more information on attaching the Favorites tag or
Hidden tag, see
“Using the Favorites tag and the Hidden tag” on page 52.
Finding hidden photos
To find items with the Favorites tag attached:
Do one of the following:
• Click the square next to the Favorites tag.
• Choose Find > Items Tagged With > Favorites.
• Drag the Favorites tag onto the find bar (see “Using the find bar” on page 92).
To find items with the Hidden tag attached:
Do one of the following:
• Click the square next to the Hidden tag. To find photos with an additional tag attached,
click the square next to the other tag.
• Drag the Hidden tag onto the find bar (see “Using the find bar” on page 92). To find
photos with an additional tag attached, click the square next to the other tag.
• Choose Find > Items Tagged with > Hidden.
Photos with the Hidden tag attached are hidden whenever you search for photos. If
you want to display hidden photos of a specific subject, select both the Hidden tag
and the tag for the desired category or subcategory as your search criteria.
Using Help | Contents | Index Back 93
Page 94

Adobe Photoshop Album Help Viewing and Finding Photos
Using Help | Contents | Index Back 94
Finding photos by filename, caption, or annotation
You can find photos by entering a word or phrase used in the photo’s filename (the name
they are saved under), caption, or note.
Note: The commands on the Find menu work only in the photo well view or the organize
view, and not in the calendar view.
To find photos by their caption or note:
1 Choose Find > By Caption or Note.
2 In the Find By Caption or Note dialog box, type a word or phrase to find files whose
captions contain the entered word or phrase, and then click OK.
3 The files with matching captions appear in the photo well.
To find photos by filename:
1 Choose Find > By Filename.
2 Type a word in the Find by Filename dialog box to search for media files whose
filenames contain the word and then click OK.
To find photos with audio captions:
Choose Find > By Media Type > Items with Audio Captions.
Viewing photos as instant slideshows
You can select some of the photos in your catalog to view as an instant slideshow. The
photos you select appear on your screen one at a time and automatically advance every
few seconds. When the slideshow is over, it automatically closes. You can also control the
pace of slideshows using the on-screen controls. If the controls don’t appear, move the
mouse to activate them.
The timing, transitions, and background are determined by settings in Slideshow preferences. (See “Setting preferences for instant slideshows” on page 95.)
You can also create a slideshow project to save as a PDF file (see “Creating slide-
shows” on page 128).
To view photos as a slideshow:
1 Select the photos you want to use by doing one of the following:
• In the photo well, select the photos you want to use (see “Selecting photos, video clips,
audio clips, and creations” on page 100).
• In the calendar view, select a date and display it in day view. For more information, see
“Viewing and finding photos in the calendar view” on page 84. All of the photos in the
selected day will be used in the slideshow.
2 Do one of the following to start the slideshow:
• Click the Slideshow button .
• Choose View > Slideshow.
3 To end the slideshow before it’s complete, press the Esc key.
Using Help | Contents | Index Back 94
Page 95

Adobe Photoshop Album Help Viewing and Finding Photos
Using Help | Contents | Index Back 95
Setting preferences for instant slideshows
You can personalize your instant slideshows by setting slideshow preferences.
To set slideshow preferences:
1 Choose Edit > Preferences, and then select Slideshow from the list of preferences on the
left side of the dialog box.
2 Choose from the following options:
Background Music: S elect a audio clip to accompany your slideshow.
Play Audio Captions: Select to play any audio captions attached to the photos.
Transition: Choose the way photos will change in the slideshow.
Page Duration: Choose the length of time that each photo appears on the screen.
Include Play Controls: S elect to include the on-screen controls when you play your
slideshow.
Pause on Start/Manual Advance: S elect to put the slideshow into pause mode when it
starts so that you can use the on-screen controls to run through the slideshow.
Allow Video to Resize: S elect to allow video clips to resize to fill your screen.
Repeat Slideshow: Select to have your slideshow repeat after it’s completed its show.
Include Captions: Select to include captions on your photos.
Viewing video clips
In catalogs, the first frames of video clips are shown. You can play video clips in the
Photoshop Album Media Player.
A
B
C
D
E F G H
Viewing video clips in Photoshop Album
A. Menu B. Drag the slider through the video clip C. Start and End buttons D. Record E. Volume
control F. Play button G. Stop button H. Elapsed time
If you also own Photoshop Elements, you can use it to take still shots from a video
clip. Other photo-editing applications may also have this capability. Read the
documentation that came with your software for more information.
Using Help | Contents | Index Back 95
Page 96

Adobe Photoshop Album Help Viewing and Finding Photos
Using Help | Contents | Index Back 96
To view video clips:
1 Double-click the video clip in the photo well.
2 When the Photoshop Album Media Player appears, click the Play button to start the
video. You can click the Pause or Stop buttons during the viewing to interrupt or stop the
video.
3 When you’re finished, click the close button to close the Photoshop Album Media
Player.
You can drag the position slider through a video clip to view it frame by frame. If you
have a long video clip, it may jump over a few frames.
Finding photos using color
You can search for photos that have similar color distribution using the Color Similarity
command. You need to first select one or more photos to use this option. You can also find
similar photos by dragging a photo onto the find bar. (See
page 92.)
“Using the find bar” on
To find photos with similar color distribution:
Select the photo you want to use to search for other photos that have similar colors, and
then do one of the following:
• Drag the photo onto the find bar.
• Choose Find > By Color Similarity with Selected Photo(s).
Photos with similar color distribution are displayed in the photo well. The photos are
sorted in decreasing order of similarity.
Finding photos used in creations
It’s easy to find photos, video clips, and audio clips you’ve used in creations. (See “Sharing
your photos with Photoshop Album creations” on page 119 for more information on
creations.)
To find photos used in creations:
Do one of the following:
• In the photo well or calendar view, right-click the creation and choose Show Photos
from the context menu. The Creations Wizard opens, displaying the photos.
• In the photo well, right-click the creation and choose Show Creation Items in Photo
Well. The photos appear in the photo well. This is useful if you want to edit the captions
or make other changes to the photos in your creation.
• Drag the creation onto the find bar (see “Using the find bar” on page 92) to display the
photos in the photo well.
Media used in the creation appear in the photo well.
You can also see if a photo is used in a creation by looking under History in the
Properties palette (see “The Properties palette” on page 24).
Using Help | Contents | Index Back 96
Page 97

Adobe Photoshop Album Help Viewing and Finding Photos
Using Help | Contents | Index Back 97
To find photos used in Web Photo Galleries:
1 Choose Find > By History > In Web Photo Galleries.
2 A list of Web photo galleries appears. Select an item to view the media used in the
photo gallery.
To find photos used in Adobe Atmosphere 3D Galleries:
1 Choose Find > By History > In Adobe Atmosphere 3D Galleries.
2 A list of Atmosphere galleries appears. Select an item to view the media used in the
gallery.
Using Help | Contents | Index Back 97
Page 98

Adobe Photoshop Album Help Fixing Photos
Using Help | Contents | Index Back 98
Fixing Photos
Fixing your photos
Nobody takes perfect photos all the time. Problems with a photo’s orientation, exposure,
color balance, and framing are common. Fortunately, Photoshop Album has tools to fix
the most common photo problems right within the application. For instance, you can
adjust the overall color, contrast, brightness, and sharpness of the photo. You can also crop
or remove red-eye from a photo as well as rotate the photo. All fixes are done in the Fix
Photo dialog box, a convenient work area for adjusting your photo. If you need more
sophisticated editing tools than Photoshop Album provides, you can jump to any other
image-editing application on your computer. To learn more about how you can edit
photos, see
photos automatically” on page 109.
With one exception, no matter how you edit a photo, Photoshop Album preserves the
original in its original folder. All changes are made to a copy of the photo file, which is
saved as a file called “filename_edited” in the same folder as the original photo.
“Fixing photos in Photoshop Album” on page 101 and “Adjusting multiple
Once you’ve edited a photo, the photo well displays only the edited version. If you decide
you don’t like the changes you’ve made, you can revert to the original version at any time,
which is then displayed in place of the edited version. The only time Photoshop Album
overwrites the original photo is when you choose the Replace Original with Edited
command. To learn more, see
“Managing versions of photos” on page 112.
How Photoshop Album names edited files
When you edit a photo, Photoshop Album provides a new name for the edited file. Here
are the two basic naming rules:
• If the file is in a format Photoshop Album can work with—JPEG, PNG, TIFF, or PSD—the
edited version is saved with the word “edited” added to the name. For example, if your
original file is called “daisy.jpg,” the edited version is called “daisy_edited.jpg.”
• If the file is not in a format Photoshop Album can work with, you can choose whether to
save the edited version in JPEG, PNG, TIFF, or PSD format with the name “edited” added
to it. For example, if your original file is in BMP format and is called “smile.bmp,” and you
save the edited version in JPEG, the edited version is called “smile_edited.jpg.”
Using Help | Contents | Index Back 98
Page 99

Adobe Photoshop Album Help Fixing Photos
Using Help | Contents | Index Back 99
Calibrating your monitor
To help your photo editing, your monitor should be calibrated to display colors more
reliably. Calibration is the process of eliminating any color cast from your monitor and
making the monitor grays as neutral as possible. The result is that what you see on screen
more accurately represents what your photos will look like when printed. Calibrating your
monitor is important if you are going to be modifying your photos, because otherwise you
may make changes that are pleasing on screen but don’t achieve the results you expect
when printed out.
About monitor calibration settings
When you calibrate your monitor, you adjust these video settings to precisely describe
how your monitor reproduces color.
Brightness and contrast The overall level and range, respectively, of display intensity.
These parameters work just as they do on a television set.
Gamma The brightness of the midtone values. The values produced by a monitor from
black to white are nonlinear—if you graph the values, they form a curve, not a straight
line. The gamma value defines the slope of that curve halfway between black and white.
Gamma adjustment compensates for the nonlinear tonal reproduction of output devices
such as monitor tubes.
Phosphors The substance that monitors use to emit colors. Different phosphors have
different color characteristics.
White point The coordinates at which red, green, and blue phosphors at full intensity
create white.
Calibrating your monitor with Adobe Gamma
The Adobe Gamma software utility installed with Photoshop Album helps you calibrate
your monitor by stepping you through the process.
Note: LCD monitors (such as flat-screen and laptop computer monitors) do not calibrate
easily, because things like viewing angles can change colors significantly. You can skip the
calibration procedure if you are using this type of screen.
To use Adobe Gamma:
1 Make sure that your monitor is displaying thousands of colors (16 bits) or more. For
more information, see the documentation for your operating system.
2 Set your desktop to display neutral grays only, using RGB values of 128. For more information, see the documentation for your operating system.
3 Make sure that your monitor has been on for at least 30 minutes. If your monitor isn’t
warmed up, the colors it displays may not be accurate.
4 Start Adobe Gamma, located in the Control Panels folder or in the Program Files/
Common Files/Adobe/Calibration folder on your hard drive.
5 Choose options in the Adobe Gamma application:
• To use a version of the utility that will guide you through each step, select Step by Step
(Wizard), and click OK. This version is recommended if you’re new to calibrating
monitors. If you choose this option, follow the instructions described in the utility. Start
from the default profile for your monitor, if available, and type a unique description
Using Help | Contents | Index Back 99
Page 100

Adobe Photoshop Album Help Fixing Photos
Using Help | Contents | Index Back 100
name for the profile. When you are finished with Adobe Gamma, save the profile using
the same description name. (If
you do not have a default profile, contact your monitor
manufacturer for appropriate phosphor specifications.)
• To use a compact version of the utility with all the controls in one place, select Control
Panel, and click OK. This version is recommended only if you have experience creating
color profiles.
At any time while working in the Adobe Gamma control panel, you can click the
Wizard button for instructions that guide you through the same settings as in the
control panel, one option at a time.
Selecting photos, video clips, audio clips, and creations
Photoshop Album can display photos, video clips, audio clips, and creations in the photo
well. The first step to working with any of these items is selecting them. You can select a
single item or multiple items at once. When an item is selected, it has a yellow border.
A selected photo, video clip, audio clip, and creation
To select a single item:
Click it in the photo well.
To select multiple items:
1 Click the first item you want to select.
2 Select one or more items:
• Hold down Shift and click the last item you want to select. All the items in between are
selected.
• Hold down Ctrl and click additional items. Only the items you click are selected.
To select or deselect all items in the photo well:
Choose Edit > Select All or Edit > Select None.
Using Help | Contents | Index Back 100
 Loading...