

Page 1

Adobe PageMaker 6.5
Foundation Level
Training Manual
Corporate Edition
C C T G L O B A L .C O M
Page 2

© 1995-2001 Cheltenham Computer Training
Crescent House
24 Lansdown Crescent Lane
Cheltenham
Gloucestershire
GL50 2LD, UK
Tel: +44 (0)1242 227200
Fax: +44 (0)1242 253200
Email: info@cctglobal.com
Internet: http://www.cctglobal.com
All trademarks acknowledged. E&OE.
© Cheltenham Computer Training 1995-2001 No part of this document may be copied without written permission from
Cheltenham Computer Training unless produced under the terms of a courseware site license agreement with
Cheltenham Computer Training.
All reasonable precautions have been taken in the preparation of this document, including both technical and nontechnical proofing. Cheltenham Computer Training and all staff assume no responsibility for any errors or omissions. No
warranties are made, expressed or implied with regard to these notes. Cheltenham Computer Training shall not be
responsible for any direct, incidental or consequential damages arising from the use of any material contained in this
document. If you find any errors in these training modules, please inform Cheltenham Computer Training. Whilst every
effort is made to eradicate typing or technical mistakes, we apologize for any errors you may detect. All courses are
updated on a regular basis, so your feedback is both valued by us and will help us to maintain the highest possible
standards.
Sample versions of courseware from Cheltenham Computer Training
(Normally supplied in Adobe Acrobat format)
If the version of courseware that you are viewing is marked as NOT FOR TRAINING, SAMPLE, or similar, then it cannot
be used as part of a training course, and is made available purely for content and style review. This is to give you the
opportunity to preview our courseware, prior to making a purchasing decision. Sample versions may not be re-sold to a
third party.
For current license information
Cheltenham Computer Training reserves the right to alter the licensing conditions at any time, without prior notice. No
terms or conditions will affect your rights as defined under UK law. Please see the site license agreement available at:
www.cctglobal.com/agreement
Courseware Release Version 5.0
Page 3

INTRODUCTION TO PAGEMAKER ...................................................................................................... 1
HAT IS PAGEMAKER
W
What is PageMaker?.............................................................................................................................. 2
Types of output....................................................................................................................................... 2
Adobe PageMaker website..................................................................................................................... 2
AGEMAKER EXTENSIONS
P
Extensions.............................................................................................................................................. 3
Using Publication files .......................................................................................................................... 3
Using Template files .............................................................................................................................. 3
ENERAL PREFERENCES
G
Using General Preferences.................................................................................................................... 4
Setting Measurement ............................................................................................................................. 5
Setting the Vertical Ruler....................................................................................................................... 5
Setting the Graphics Display................................................................................................................. 5
Setting the Control Palette..................................................................................................................... 5
Setting the Save Option.......................................................................................................................... 6
Applying Guides..................................................................................................................................... 6
EVIEW QUESTIONS
R
PAGEMAKER INTERFACE ..................................................................................................................... 9
ORK ENVIRONMENT
W
Using the PageMaker Environment..................................................................................................... 10
Using Blank Pages............................................................................................................................... 11
Using the Pasteboard .......................................................................................................................... 11
OOLBOX
T
OLORS PALETTE
C
ONTROL PALETTE
C
ULERS/GUIDES
R
EVIEW QUESTIONS
R
.................................................................................................................................................. 12
Using the Toolbox................................................................................................................................ 12
Using the Colors Palette...................................................................................................................... 13
Using the Control Palette .................................................................................................................... 15
Using the Character View.................................................................................................................... 15
Using the Paragraph View .................................................................................................................. 16
Using the Object View ......................................................................................................................... 17
Using Rulers ........................................................................................................................................ 18
To Change the Ruler Measurements.................................................................................................... 18
Using the Zero Point Option................................................................................................................ 18
Using Guides ....................................................................................................................................... 19
To add a Guide .................................................................................................................................... 19
To remove a Guide............................................................................................................................... 19
Applying the Snap to Option................................................................................................................ 19
6.5? ........................................................................................................................ 2
.......................................................................................................................... 3
............................................................................................................................. 4
.................................................................................................................................... 7
.............................................................................................................................. 10
..................................................................................................................................... 13
................................................................................................................................... 15
....................................................................................................................................... 18
.................................................................................................................................. 20
DOCUMENTS ............................................................................................................................................ 21
EW DOCUMENTS
N
Creating New Documents .................................................................................................................... 22
Using the Document Setup dialog box................................................................................................. 23
Applying Page Size .............................................................................................................................. 23
Applying Dimensions........................................................................................................................... 23
Applying Orientation ........................................................................................................................... 23
Applying Options ................................................................................................................................. 24
Applying Number of Pages .................................................................................................................. 24
Applying Start Page #.......................................................................................................................... 24
Applying the Margins .......................................................................................................................... 24
..................................................................................................................................... 22
FOR USE AT THE LICENSED SITE(S) ONLY
Cheltenham Computer Training 1995-2001 - www.cctglobal.com
Page 4

Changing the Document Setup ............................................................................................................ 25
ASTER PAGES
M
Setting Up Master Pages ..................................................................................................................... 26
To Display the Master Page content.................................................................................................... 27
AVING DOCUMENTS
S
Using the Save and Save As commands............................................................................................... 28
File Types ............................................................................................................................................ 30
PENING DOCUMENTS
O
Using the Open command.................................................................................................................... 31
Using the Open As option .................................................................................................................... 32
PANOSE Font Matching...................................................................................................................... 32
Using the Cannot Find dialog box....................................................................................................... 32
LOSING DOCUMENTS
C
Using the Close command ................................................................................................................... 33
EVIEW QUESTIONS
R
......................................................................................................................................... 26
................................................................................................................................28
.............................................................................................................................. 31
.............................................................................................................................. 33
.................................................................................................................................. 34
TOOLS ........................................................................................................................................................ 35
ASIC TOOLS
B
Using the Pointer Tool......................................................................................................................... 36
Using the Text Tool.............................................................................................................................. 36
Using the Rotating Tool....................................................................................................................... 36
Using the Cropping Tool ..................................................................................................................... 36
RAWING TOOLS
D
Using Drawing Tools........................................................................................................................... 37
Using the Line Tool ............................................................................................................................. 37
Using the Constrained Line Tool......................................................................................................... 37
Using the Rectangle Tool..................................................................................................................... 38
Using the Rectangle Frame Tool......................................................................................................... 38
Using the Ellipse Tool ......................................................................................................................... 38
Using the Ellipse Frame Tool.............................................................................................................. 38
Using the Polygon Tool ....................................................................................................................... 38
Using the Polygon Frame Tool............................................................................................................ 38
ISUAL TOOLS
V
Using Visual Tools............................................................................................................................... 39
Using the Hand Tool............................................................................................................................ 39
To move your page............................................................................................................................... 39
Using the Zoom Tool ........................................................................................................................... 39
To magnify part of a page by dragging ............................................................................................... 40
To zoom in and out while using another tool....................................................................................... 40
ODIFYING TOOLS
M
Using the Preferences dialog box........................................................................................................ 41
Using the Character Specifications dialog box ...................................................................................42
Using the Custom Stroke dialog box.................................................................................................... 42
Using the Rounded Corners dialog box............................................................................................... 43
Using the Fill and Stroke dialog box................................................................................................... 44
Using the Frame Options dialog box................................................................................................... 45
Using the Polygon Settings dialog box................................................................................................ 46
EVIEW QUESTIONS
R
............................................................................................................................................ 36
...................................................................................................................................... 37
.......................................................................................................................................... 39
................................................................................................................................... 41
.................................................................................................................................. 47
COLORS AND FILLS ............................................................................................................................... 49
USTOM COLORS
C
Using the Define Colors dialog box..................................................................................................... 50
Creating Colors ................................................................................................................................... 51
Editing Colors...................................................................................................................................... 51
Removing Colors ................................................................................................................................. 51
OLOR OPTIONS DIALOG BOX
C
...................................................................................................................................... 50
.................................................................................................................. 52
FOR USE AT THE LICENSED SITE(S) ONLY
Cheltenham Computer Training 1995-2001 - www.cctglobal.com
Page 5

Using the Color Options dialog box.................................................................................................... 52
Applying a Color Name ....................................................................................................................... 53
Applying Color Type............................................................................................................................ 53
Applying a Color Model ...................................................................................................................... 54
Applying a Color Field ........................................................................................................................ 54
Previewing Colors ............................................................................................................................... 54
OLORS PALETTE
C
Using the Stroke Button....................................................................................................................... 55
Using the Fill Button ........................................................................................................................... 56
Using the Both Button.......................................................................................................................... 56
Applying the Tint Percentage .............................................................................................................. 56
Using the Color Icon ........................................................................................................................... 56
Using the Color Model Icon ................................................................................................................ 57
Using the Color Type Icon................................................................................................................... 57
Using the EPS Color Icon.................................................................................................................... 57
Using the Color-Level Tint Icon .......................................................................................................... 57
Using the CMS Display........................................................................................................................ 57
Using the New Color Button................................................................................................................ 57
Using the Trash Button........................................................................................................................ 57
EVIEW QUESTIONS
R
TEXT ........................................................................................................................................................... 59
LOCKS VS
B
Using Text Blocks ................................................................................................................................ 60
To Create a Text Block ........................................................................................................................ 60
To Resize a Text Block......................................................................................................................... 61
Overset Text Icon................................................................................................................................. 61
Using Text Frames............................................................................................................................... 62
To Create a Text Frame....................................................................................................................... 62
To Resize a Text Frame ....................................................................................................................... 63
Overset Text Icon................................................................................................................................. 63
NPUTTING TEXT
I
Inputting text into a Text Block............................................................................................................ 64
Inputting text into a Text Frame .......................................................................................................... 65
LACING TEXT
P
Using the Place dialog box.................................................................................................................. 66
Choosing File Name ............................................................................................................................ 68
Choosing File Types ............................................................................................................................ 68
Kind field ............................................................................................................................................. 68
Size field............................................................................................................................................... 68
Last Modified field............................................................................................................................... 68
Setting Place ........................................................................................................................................ 69
Setting Options..................................................................................................................................... 69
Text-Only Import Filters...................................................................................................................... 70
DITING TEXT
E
To Highlight Text in a Text frame or text block with the mouse.......................................................... 71
To Highlight Text in a Text frame or text block with the keyboard...................................................... 72
Adding and Removing text................................................................................................................... 72
Copying, Cutting and Pasting text....................................................................................................... 72
To Copy Text........................................................................................................................................ 72
To Paste the copied Text...................................................................................................................... 72
To Cut Text and Paste.......................................................................................................................... 73
To Paste the cut Text............................................................................................................................ 73
EXT CONTROL PALETTE
T
Using the Character View.................................................................................................................... 74
Using the Paragraph View .................................................................................................................. 74
..................................................................................................................................... 55
.................................................................................................................................. 58
RAMES
. F
................................................................................................................................60
....................................................................................................................................... 64
.......................................................................................................................................... 66
........................................................................................................................................... 71
.......................................................................................................................... 74
FOR USE AT THE LICENSED SITE(S) ONLY
Cheltenham Computer Training 1995-2001 - www.cctglobal.com
Page 6

C
HARACTER SPECIFICATIONS DIALOG BOX
Using the Character Specifications dialog box ...................................................................................75
To display the Character Specifications dialog box ............................................................................ 75
Choosing Font Names.......................................................................................................................... 75
Setting Font Size .................................................................................................................................. 76
Setting Leading .................................................................................................................................... 76
Setting Horizontal Scale ...................................................................................................................... 76
Setting text Color ................................................................................................................................. 76
Setting Color Tint ................................................................................................................................ 76
Setting Type Style................................................................................................................................. 77
Setting Position.................................................................................................................................... 78
Setting Case ......................................................................................................................................... 78
Setting Track........................................................................................................................................ 78
Setting Line End................................................................................................................................... 78
R
EVIEW QUESTIONS
.................................................................................................................................. 79
.............................................................................................. 75
PICTURES.................................................................................................................................................. 81
P
LACING PICTURES
Using the Place dialog box.................................................................................................................. 82
Choosing File Types ............................................................................................................................ 83
Kind Field............................................................................................................................................ 83
Size Field ............................................................................................................................................. 83
Last Modified Field.............................................................................................................................. 83
Setting Place ........................................................................................................................................ 83
Linking and Embedding Pictures......................................................................................................... 84
Retaining Cropping Data..................................................................................................................... 84
M
ODIFYING PICTURE
Using the Object View ......................................................................................................................... 85
Positioning pictures on page ............................................................................................................... 85
Setting the Frame Size ......................................................................................................................... 86
Setting the picture Scale ...................................................................................................................... 86
Rotating picture ................................................................................................................................... 86
Skewing picture.................................................................................................................................... 86
Flipping pictures.................................................................................................................................. 86
To Copy a Picture................................................................................................................................ 87
To Paste the copied picture ................................................................................................................. 87
To Cut a picture................................................................................................................................... 87
To Past the cut picture......................................................................................................................... 87
Wrapping Text around pictures ........................................................................................................... 87
Colorizing pictures .............................................................................................................................. 87
To Colorize a bitmap ........................................................................................................................... 87
C
ROPPING
Cropping pictures................................................................................................................................ 88
Positioning pictures in Frame ............................................................................................................. 89
R
EVIEW QUESTIONS
................................................................................................................................................. 88
................................................................................................................................... 82
................................................................................................................................85
.................................................................................................................................. 90
OBJECTS.................................................................................................................................................... 91
S
ELECTING OBJECTS
Selecting single Object with the Pointer Tool...................................................................................... 92
Selecting multiple Objects with the Pointer Tool................................................................................. 93
Selecting Objects with the Marquee Box ............................................................................................. 94
G
ROUPED OBJECTS
Grouping Objects................................................................................................................................. 95
Ungrouping Objects............................................................................................................................. 95
M
OVING OBJECTS
Moving objects using the Mouse.......................................................................................................... 96
................................................................................................................................. 92
................................................................................................................................... 95
..................................................................................................................................... 96
FOR USE AT THE LICENSED SITE(S) ONLY
Cheltenham Computer Training 1995-2001 - www.cctglobal.com
Page 7

Moving objects using the Control Palette............................................................................................ 97
Removing Objects ................................................................................................................................ 97
LIGNING OBJECTS
A
Using the Align Objects dialog box ..................................................................................................... 98
Setting the Align Icons......................................................................................................................... 99
Setting the Distribute Icons.................................................................................................................. 99
Using the Alignment Preview ............................................................................................................ 100
RRANGING OBJECTS
A
Using the Arrange menu.................................................................................................................... 101
Using Send to Back............................................................................................................................ 102
Using Send Backward........................................................................................................................ 102
Using Bring To Front ........................................................................................................................ 102
Using Bring Forward ........................................................................................................................ 103
EVIEW QUESTIONS
R
OUTPUT ................................................................................................................................................... 105
RINTING YOUR WORK
P
Using the Print dialog box................................................................................................................. 106
RINT DOCUMENT
P
Setting Print Document options......................................................................................................... 107
Selecting a Printer ............................................................................................................................. 107
Printing multiple Copies.................................................................................................................... 108
Collating pages.................................................................................................................................. 108
Reversing pages................................................................................................................................. 108
Setting Pages ..................................................................................................................................... 108
Printing Page Ranges........................................................................................................................ 109
Setting Non-Printing option............................................................................................................... 109
To create a Non-printing object......................................................................................................... 109
To hide or display non-printing objects in your publication: ............................................................ 109
Printing Blank Pages......................................................................................................................... 109
Orientation Options / Icons ............................................................................................................... 110
RINT PAPER
P
Setting Print Paper options................................................................................................................ 111
Choosing Paper Sizes ........................................................................................................................ 112
Choosing Paper Source..................................................................................................................... 112
Printing Printer’s Marks ................................................................................................................... 112
Printing Page Information................................................................................................................. 112
Tiling Pages....................................................................................................................................... 113
Scaling Pages..................................................................................................................................... 113
Printing Thumbnails .......................................................................................................................... 113
To Print Thumbnail proofs ................................................................................................................ 114
Using Fit Preview.............................................................................................................................. 114
RINT OPTIONS
P
Setting Print Options ......................................................................................................................... 116
Sending Image Data .......................................................................................................................... 117
RINT COLOR
P
Setting Print Color options................................................................................................................ 118
Composite Printing............................................................................................................................ 119
Black and White Printing................................................................................................................... 119
RINT FEATURES
P
Setting Print Features options ........................................................................................................... 120
EVIEW QUESTIONS
R
................................................................................................................................... 98
............................................................................................................................. 101
................................................................................................................................ 104
........................................................................................................................... 106
.................................................................................................................................. 107
........................................................................................................................................... 111
....................................................................................................................................... 116
.......................................................................................................................................... 118
..................................................................................................................................... 120
................................................................................................................................ 122
FOR USE AT THE LICENSED SITE(S) ONLY
Cheltenham Computer Training 1995-2001 - www.cctglobal.com
Page 8

Page 9

Introduction to PageMaker 1
PageMaker 6.5 Foundation 2001 Cheltenham Computer Training
Introduction to PageMaker
When you
have
completed
this learning
module you
will have
seen how to:
• Use Publication files
• Use Template files
• Use General Preferences
• Set the Measurement In
• Set the Vertical ruler
• Set the Graphics Display
• Set the Control Palette
• Set the Save Options
• Apply Guides
FOR USE AT THE LICENSED SITE(S) ONLY
Cheltenham Computer Training 1995-2001 - www.cctglobal.com
Page 10
2 Introduction to PageMaker
2001 Cheltenham Computer Training PageMaker 6.5 Foundation
What is PageMaker 6.5?
What is PageMaker 6.5?
What is
PageMaker?
Types of
output
Adobe
PageMaker
website
PageMaker is a page layout application
© Cheltenham Computer Training 2001
Adobe PageMaker 6.5 - Slide No 2
• This course will teach you the fundamentals of PageMaker 6.5. It is a
page layout application. You can use PageMaker to create complex
multi-page publications such as Text Books, Magazines and Novels,
or single page publications such as a personal letter or a simple
business card.
• PageMaker 6.5 publications can be outputted to high-end or low-end
printers, saved as HTML files, and may even be saved as PDF files for
placement in other applications.
• If you don’t already have PageMaker 6.5 you can download a Demo
Version from the Adobe website at http://www.adobe.com and use it
for 30 days before having to purchase it. This is a great opportunity to
learn the program and see if you like it, before investing in it.
FOR USE AT THE LICENSED SITE(S) ONLY
Cheltenham Computer Training 1995-2001 - www.cctglobal.com
Page 11
Introduction to PageMaker 3
PageMaker 6.5 Foundation 2001 Cheltenham Computer Training
PageMaker Extensions
PageMaker Extensions
• PageMaker uses two kind
of Extensions:
.P65 (Publication files)
.T65 (Template files )
Extensions
Using
Publication
files
Using
Template
files
© Cheltenham Computer Training 2001
Adobe PageMaker 6.5 - Slide No 3
• PageMaker uses two kind of extensions, .P65 and .T65
• The .P65 extension represents PageMaker Publication files, which
all of your work will be saved as this file type by default. PageMaker
publication files are displayed in windows by the following icon:
Note: The PageMaker extensions and icons also make it easier to
distinguish PageMaker files from other applications files.
• The .T65 extension represents PageMaker Template files. These are
used to save you time when using the same layout as the publications
over again. You might consider creating a template to use as your
starting point at the beginning of every production cycle, saving time
and ensuring consistency.
Note: Templates have the .T65 extension. The only real difference
between a template and a publication is when you open the former;
you open a copy rather than the original.
FOR USE AT THE LICENSED SITE(S) ONLY
Cheltenham Computer Training 1995-2001 - www.cctglobal.com
Page 12
4 Introduction to PageMaker
2001 Cheltenham Computer Training PageMaker 6.5 Foundation
General Preferences
General Preferences
• This dialog box allows you
to create defaults for how
PageMaker will treat the
content in your
publications such as your
text, save your files, move
items, measure items, and
display guides .
Using
General
Preferences
© Cheltenham Computer Training 2001
Adobe PageMaker 6.5 - Slide No 4
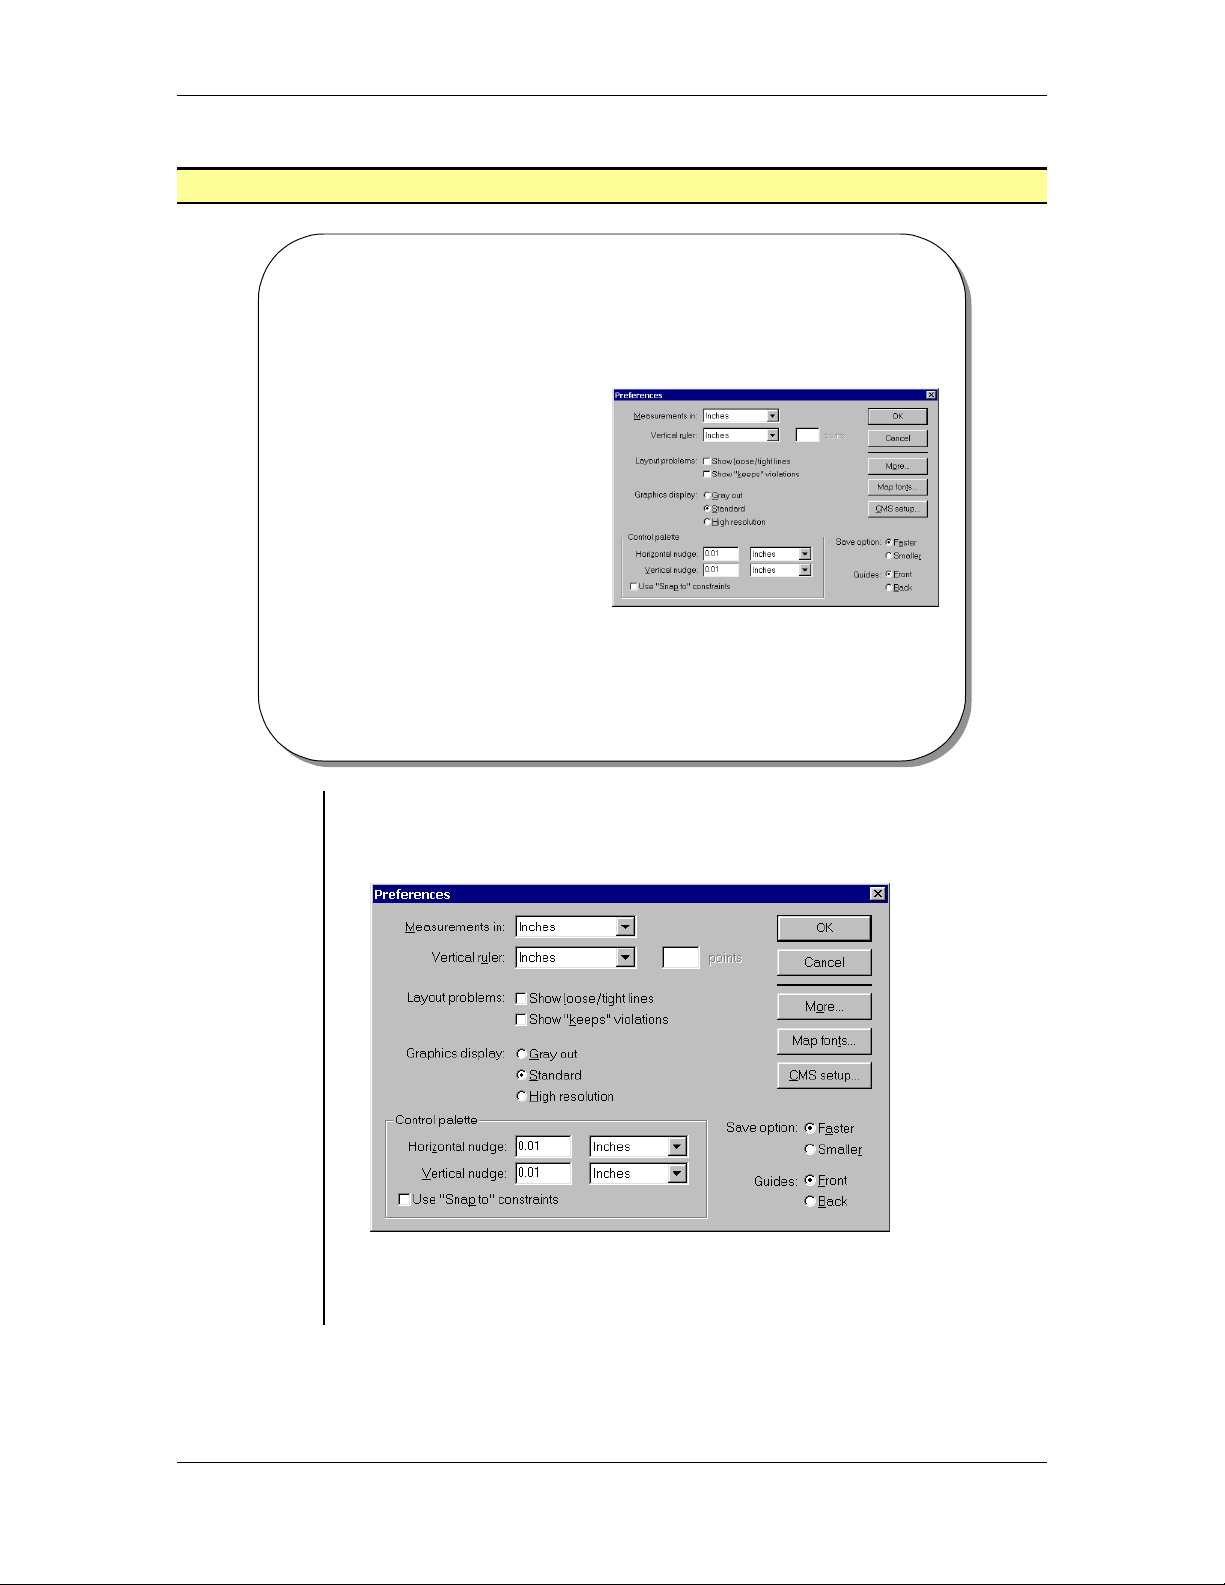
• From the main menu, choose File > Preferences > General to open the
General Preferences dialog box.
press the Ctrl + K key combination:
OR
• This dialog box allows you to create defaults for how PageMaker will treat
the content in your publications such as your text, save your files, move
items, measure items, and display guides.
FOR USE AT THE LICENSED SITE(S) ONLY
Cheltenham Computer Training 1995-2001 - www.cctglobal.com
Page 13
Introduction to PageMaker 5
PageMaker 6.5 Foundation 2001 Cheltenham Computer Training
Setting
Measurement
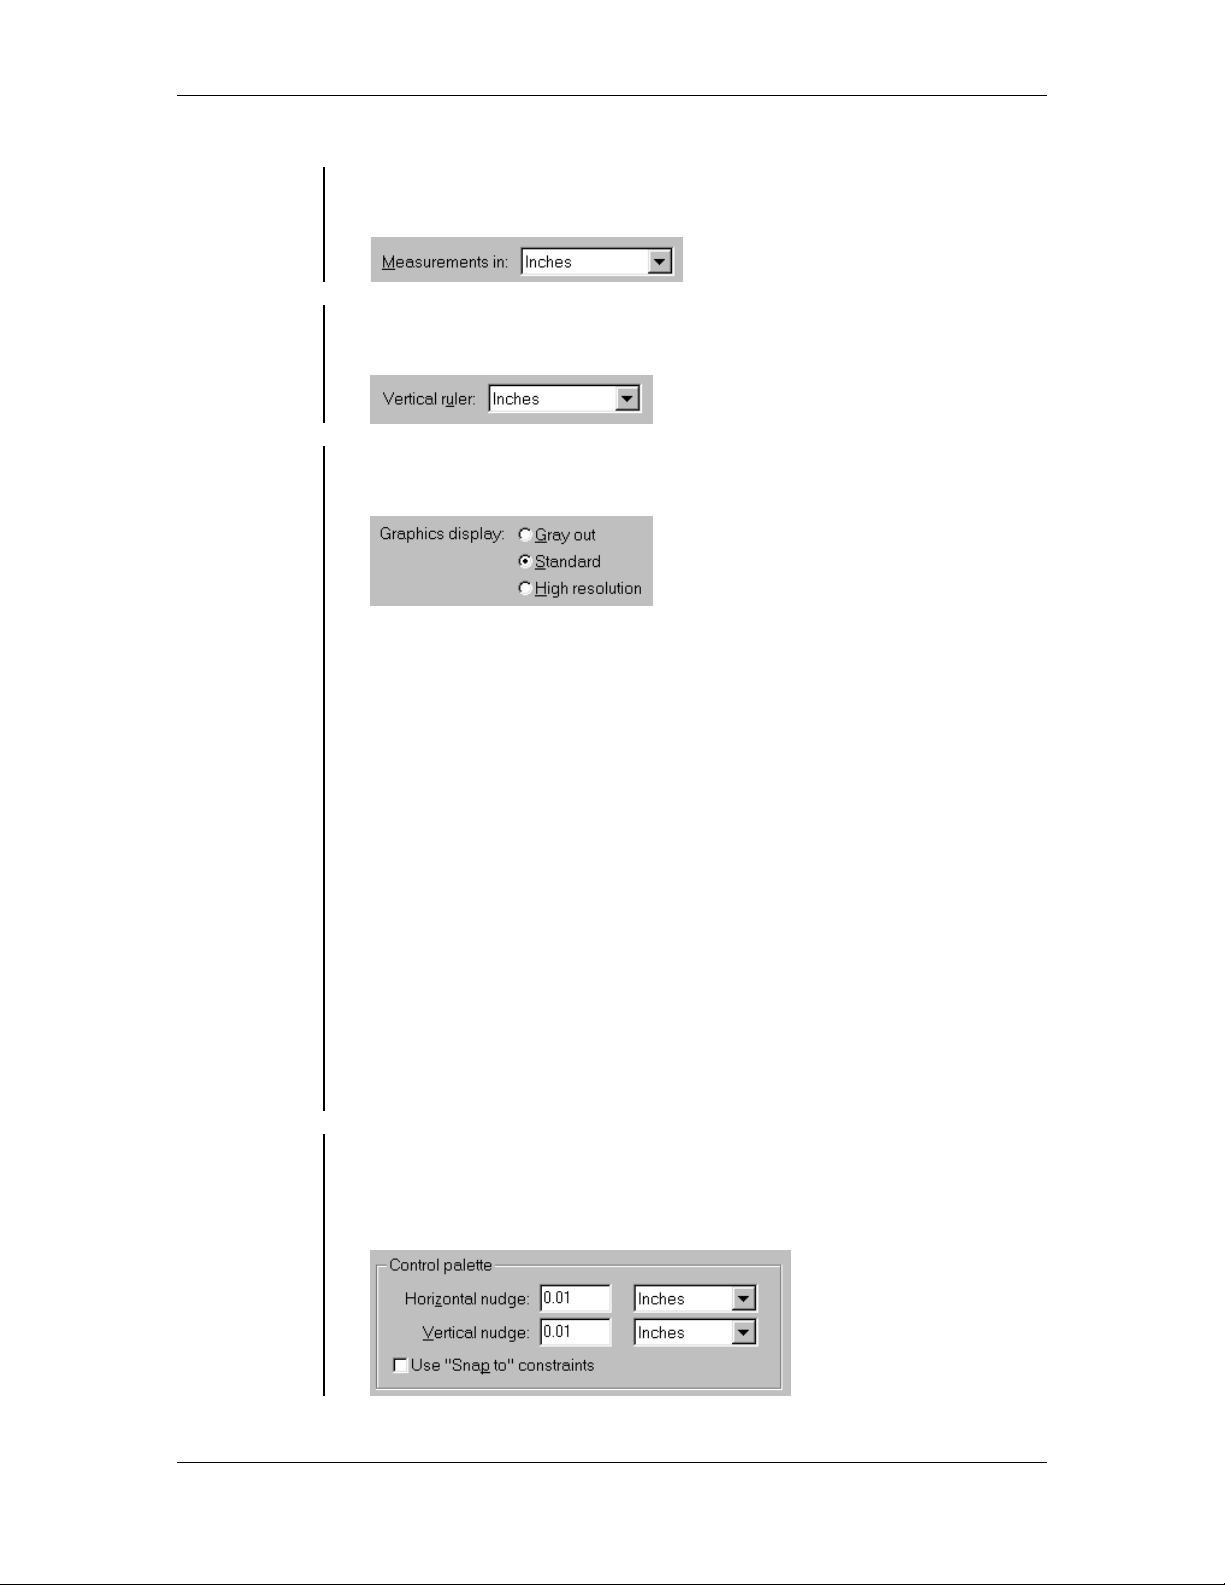
• While the default Measurement system is inches, you can change the
measurement units to picas, millimeters, and ciceros:
Setting the
Vertical Ruler
Setting the
Graphics
Display
Setting the
Control
Palette
• The Vertical Ruler default setting is inches, however you can change
the vertical ruler units to picas, millimeters, and ciceros:
• The Preferences dialog box allows you to choose the Graphic
Display options for your placed graphics:
Gray out – Can be useful if you want to concentrate on the text
elements in your publication and speed your screen redraw.
Unfortunately, you cannot selectively gray out graphics. It’s all or
nothing. With advent layers this option might be obsolete. If you want
to hide graphics, place them on their own layer and hide that layer as
needed.
Standard – The view you work in most of the time. Standard view
enables your screen to redraw faster by displaying the low-resolution
screen-only image. As long as your links are up to date, the lowresolution image is only for the screen. W hen you print, the real
graphic is sent to the printer for high- resolution output. You can
adjust the resolution PageMaker uses for Standard display in the More
Preferences dialog box.
High-resolution – Will draw the screen image from the actual graphic
file, be it embedded or linked. If your graphic file is more than a few
megabytes in size, this process can take an eternity.
Note: For best print quality, use the High Resolution setting when
you are ready to print.
• The Control palette settings allow you to make adjustments to how
the Horizontal and Vertical nudges, and the ‘Snap to’ constraints
will work in the Control palette. The Control palette is simply a
compact and convenient way of making changes to your publication:
FOR USE AT THE LICENSED SITE(S) ONLY
Cheltenham Computer Training 1995-2001 - www.cctglobal.com
Page 14

6 Introduction to PageMaker
2001 Cheltenham Computer Training PageMaker 6.5 Foundation
Setting the
Save Option
• The Save option allows you to select the saving option appropriate for
you. The default setting is Faster:
Applying
Guides
• You can determine whether the Guides appear in front of or behind
objects. Click the Guides radio button for Front or Back:
• You can also change the location of the guides with out going to the
General Preferences dialog box, to do this:
From the main menu, choose the View > Send Guides to Back
choose the View > Bring Guides to Front
OR
Note: To select an object that is overlapped by a guide, press the Ctrl
key while clicking the object. It is best to keep all your guides in front.
FOR USE AT THE LICENSED SITE(S) ONLY
Cheltenham Computer Training 1995-2001 - www.cctglobal.com
Page 15

Introduction to PageMaker 7
PageMaker 6.5 Foundation 2001 Cheltenham Computer Training
Review Questions
Review Questions
How would
you:
© Cheltenham Computer Training 2001
• Use Publication files?
• Use Template files?
• Use General Preferences?
• Set the Measurement In?
• Set the Vertical ruler?
• Set the Graphics Display?
• Set the Control Palette?
• Set the Save Options?
• Apply Guides?
Adobe PageMaker 6.5 - Slide No 5
FOR USE AT THE LICENSED SITE(S) ONLY
Cheltenham Computer Training 1995-2001 - www.cctglobal.com
Page 16

Page 17

PageMaker Interface 9
PageMaker 6.5 Foundation 2001 Cheltenham Computer Training
PageMaker Interface
When you
have
completed
this learning
module you
will have
seen how to:
• Use the PageMaker Environment
• Use Blank Pages
• Use the Pasteboard
• Use the Toolbox
• Use the Colors Palette
• Use the Control Palette
• Use the Character View
• Use the Paragraph View
• Use the Object View
• Use Rulers
• Use the Zero Point Option
• Use Guides
• Apply the Snap to Option
FOR USE AT THE LICENSED SITE(S) ONLY
Cheltenham Computer Training 1995-2001 - www.cctglobal.com
Page 18
10 PageMaker Interface
2001 Cheltenham Computer Training PageMaker 6.5 Foundation
Work Environment
Work Environment
• The PageMaker
environment will
display a New
Publication window, a
Blank Page, a Master
Page, and Current
Page icons, horizontal
and vertical Scroll
Bars, Rulers, the
Control palette, the
Toolbox, and other
palettes.
Using the
PageMaker
Environment
© Cheltenham Computer Training 2001
Adobe PageMaker 6.5 - Slide No 6
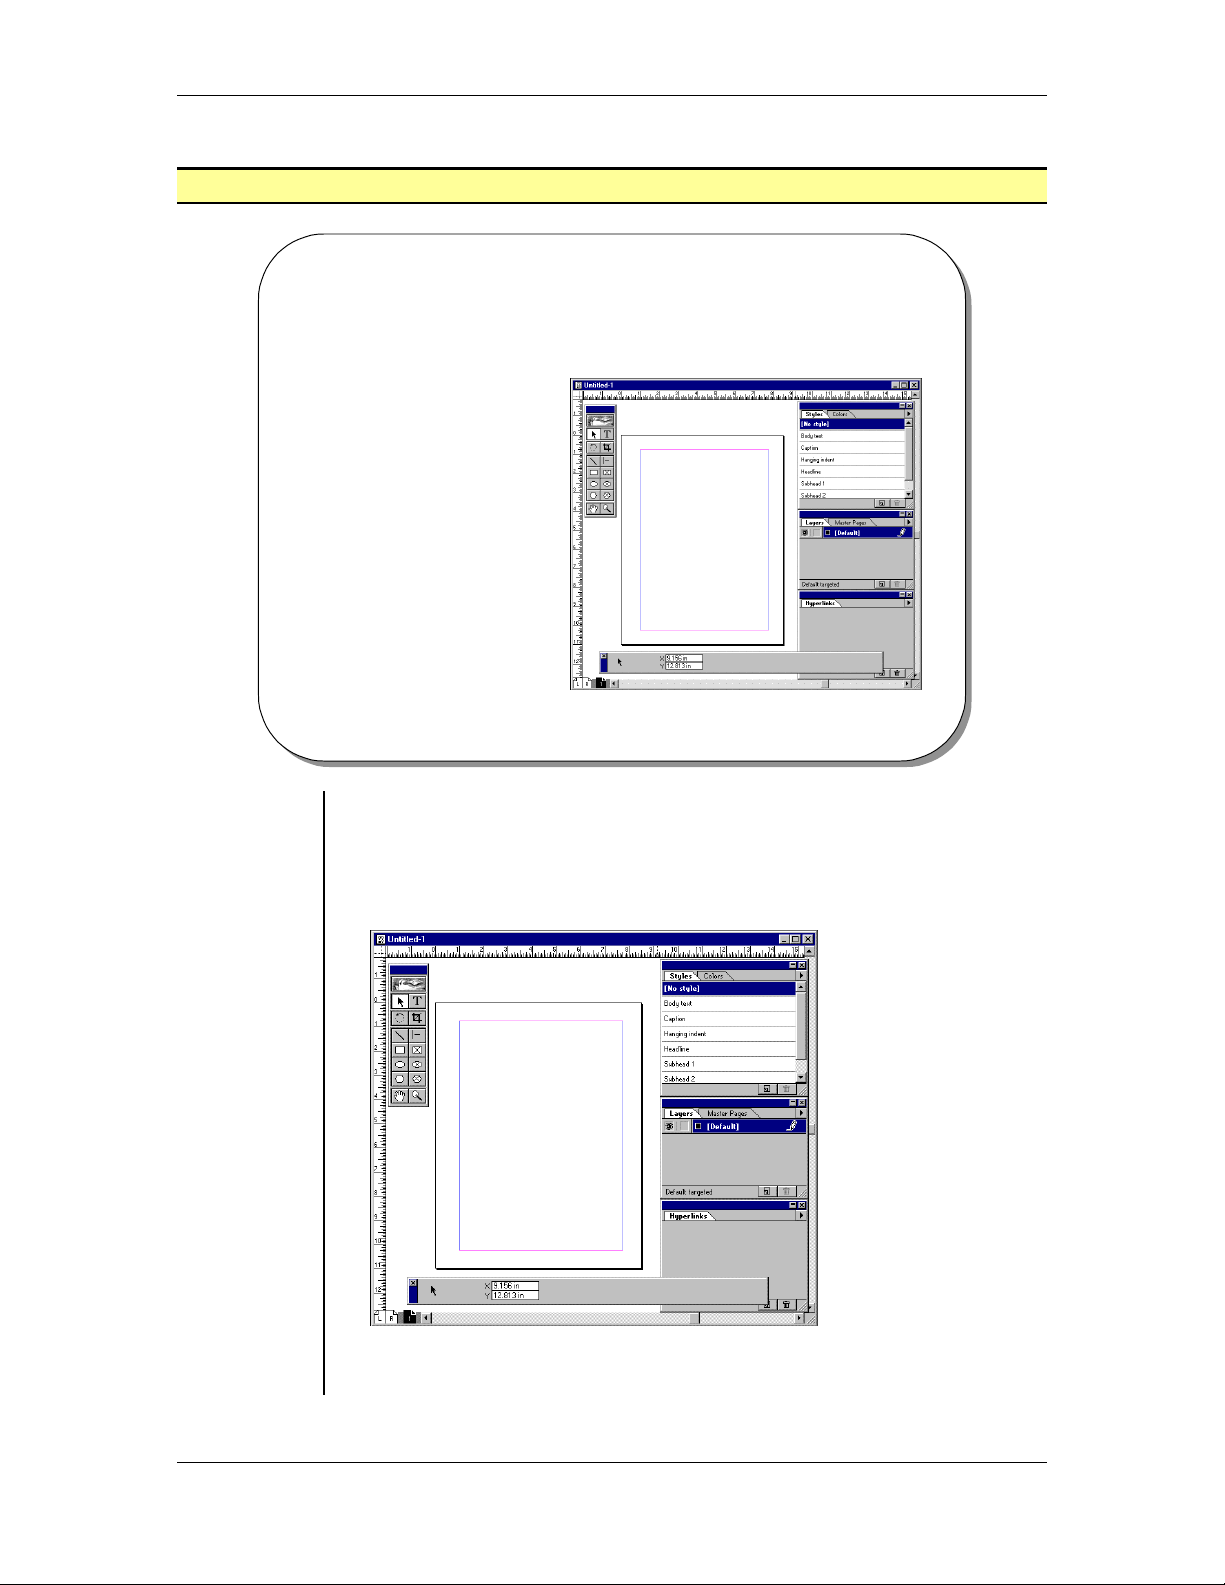
• The PageMaker environment will display a New Publication window,
a Blank Page, a Master Page, and Current Page icons, horizontal
and vertical Scroll Bars, Rulers, the Control palette, the Toolbox,
and other palettes such as Styles, Colors, Layers, Master Pages,
and Hyperlinks:
Note: Palettes always display in front of your work window, and
remain opened until you close them.
FOR USE AT THE LICENSED SITE(S) ONLY
Cheltenham Computer Training 1995-2001 - www.cctglobal.com
Page 19
PageMaker Interface 11
PageMaker 6.5 Foundation 2001 Cheltenham Computer Training
Using Blank
Pages
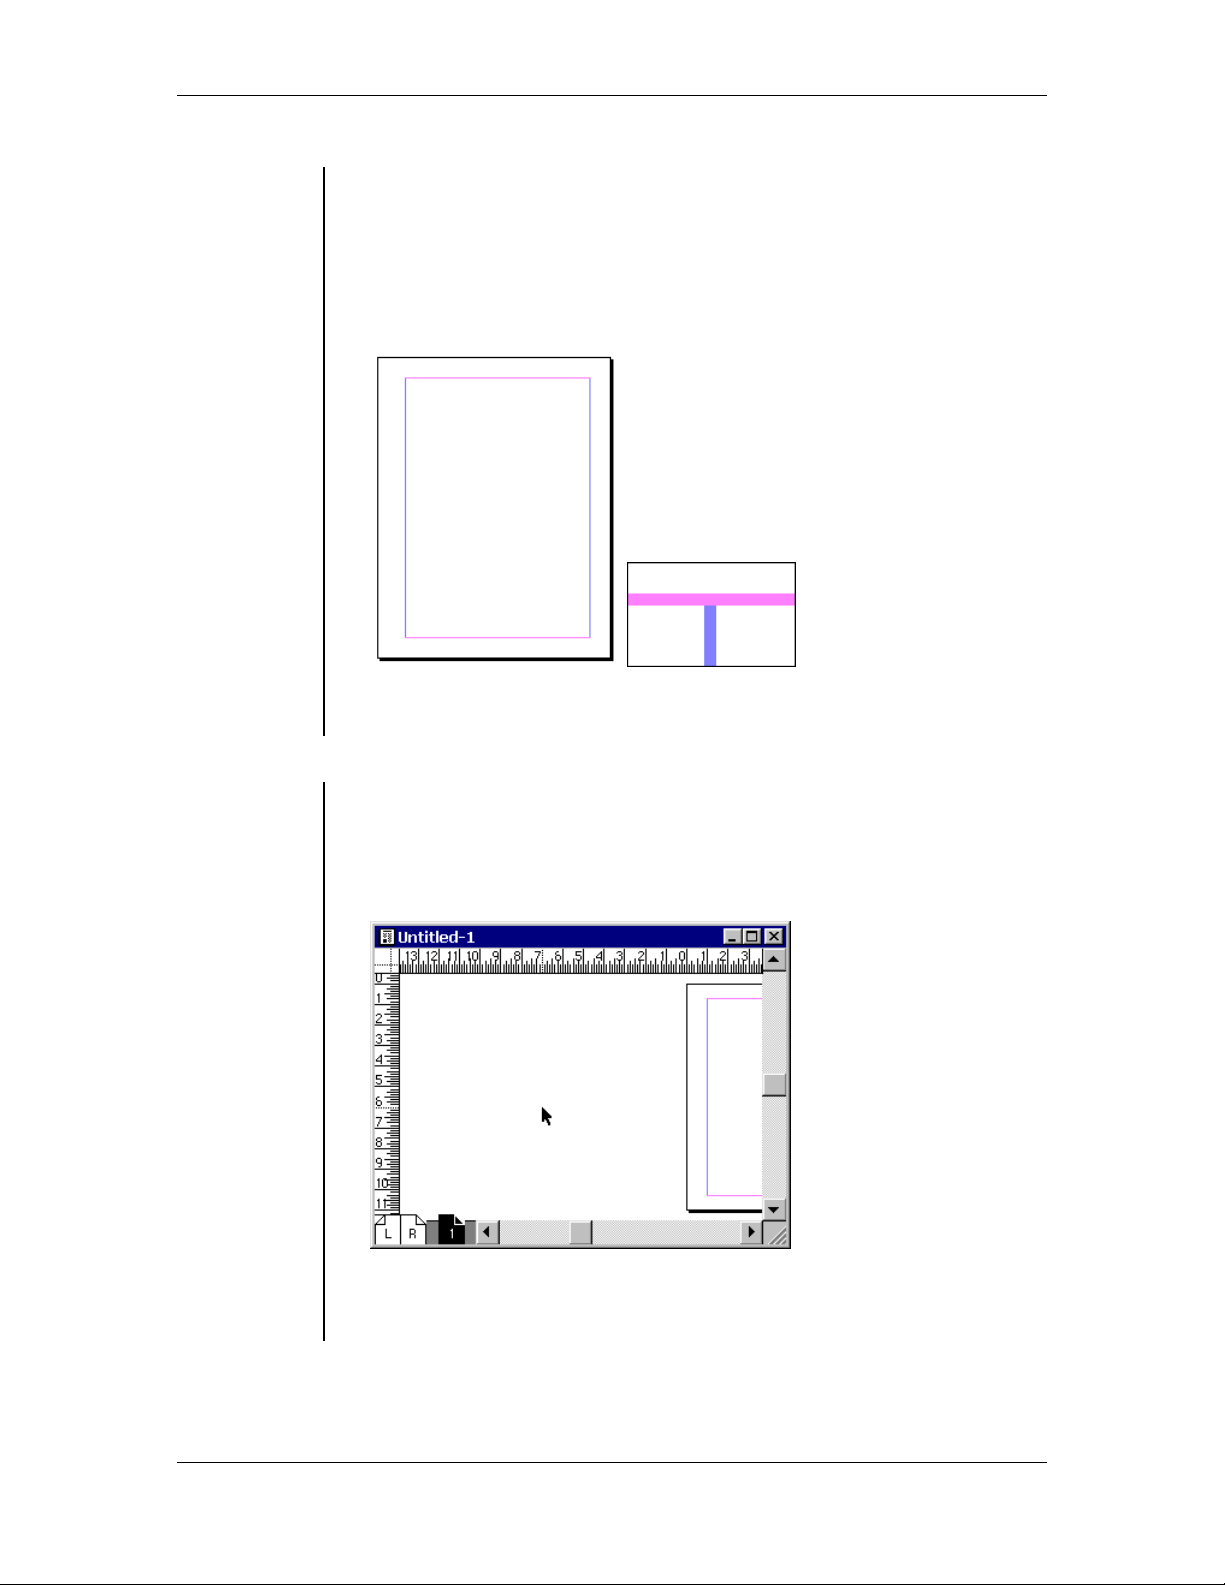
• When starting with a new document, you will see a blank page
with/without Margin Guides set to a size specified in the Page Setup
dialog box. A rectangle with a black key line and a drop shadow
represents the page. If you set page margins for your page they will
be represented by a bright magenta colored keyline which will be
smaller than your page size, and two darker colored Column Guides
on the left and right side of the page:
Using the
Pasteboard
Note: If you set all of your page margins to zero, the margin guides
and column guides will become the keyline of the page.
• The Pasteboard is the non-printing area outside the blank page. The
function of the pasteboard in PageMaker is the same as the traditional
pasteboard, simply select objects and move them onto the pasteboard
for use on other pages. You can leave items on the pasteboard until
you are ready to use them:
Note: If you go to another page in your document, the items on the
pasteboard will still stay in place, and they will always be visible unless
you delete them.
FOR USE AT THE LICENSED SITE(S) ONLY
Cheltenham Computer Training 1995-2001 - www.cctglobal.com
Page 20
12 PageMaker Interface
2001 Cheltenham Computer Training PageMaker 6.5 Foundation
Toolbox
Toolbox
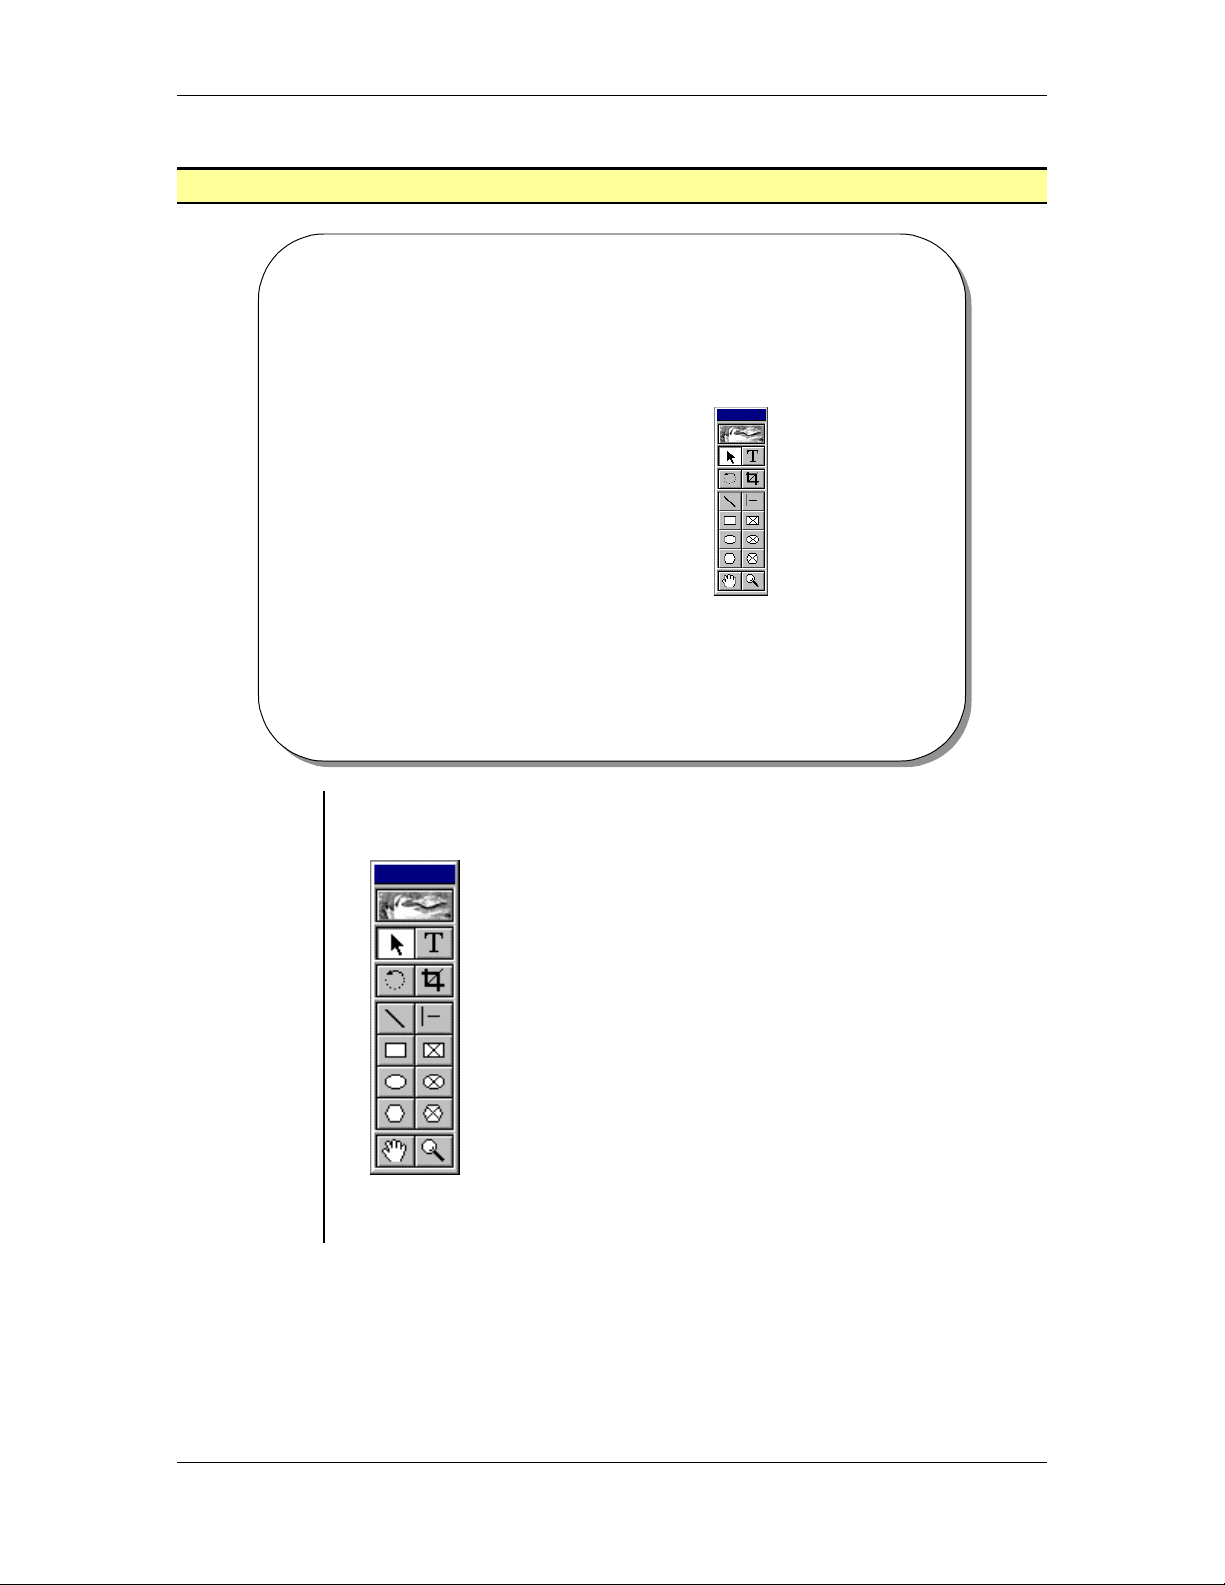
• The PageMaker Toolbox
enables you to access the
basic tools you need to
perform various actions in
the publication window.
Using the
Toolbox
© Cheltenham Computer Training 2001
Adobe PageMaker 6.5 - Slide No 7
• The PageMaker Tool palette enables you to access the basic tools
you need to perform various actions in the publication window:
Note: For more information on the Tool Palette, see the Basic Tools
chapter.
FOR USE AT THE LICENSED SITE(S) ONLY
Cheltenham Computer Training 1995-2001 - www.cctglobal.com
Page 21
PageMaker Interface 13
PageMaker 6.5 Foundation 2001 Cheltenham Computer Training
Colors Palette
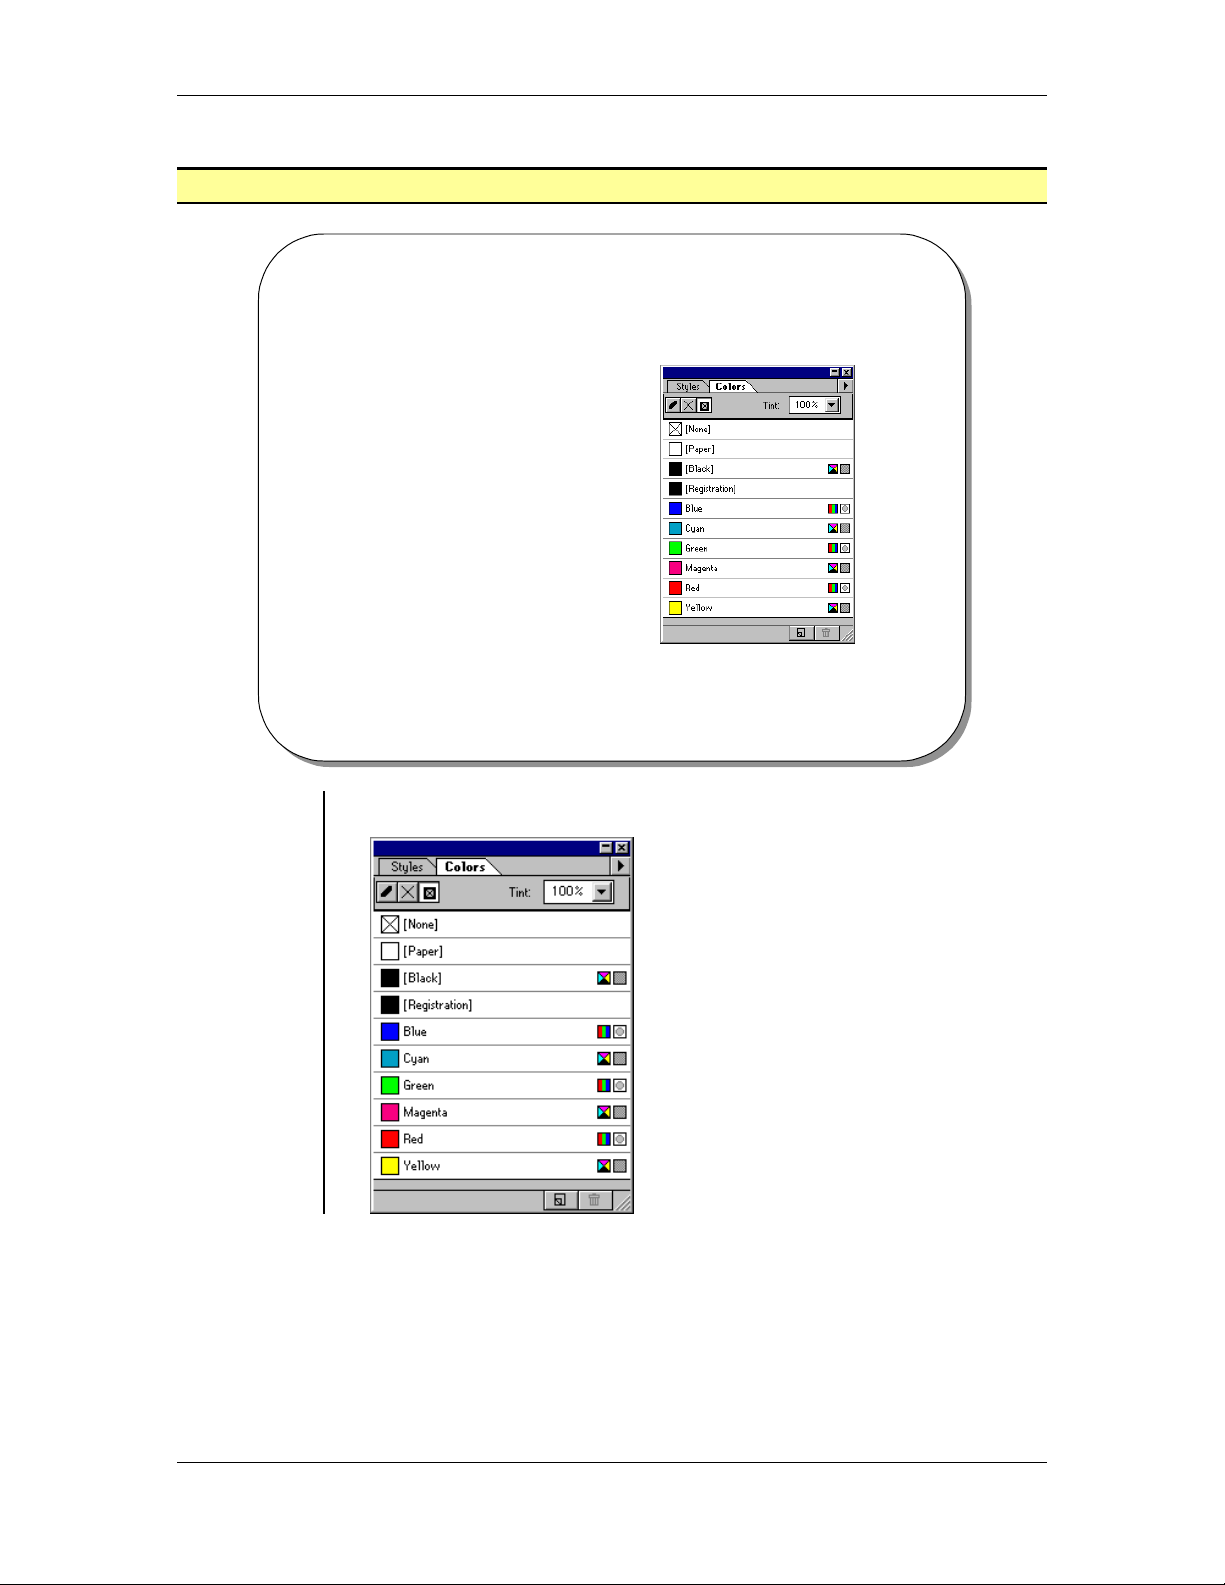
Colors Palette
• The Colors palette is used
to make quick color
changes to your
publication.
• By default every Colors
palette must contain the
following colors : None,
Paper, Black, and
Registration.
Using the
Colors
Palette
© Cheltenham Computer Training 2001
Adobe PageMaker 6.5 - Slide No 8
• From the main menu, choose Window > Show Colors Palette
FOR USE AT THE LICENSED SITE(S) ONLY
Cheltenham Computer Training 1995-2001 - www.cctglobal.com
Page 22

14 PageMaker Interface
2001 Cheltenham Computer Training PageMaker 6.5 Foundation
• The Colors palette contains the following colors by default: None,
Paper, Black, and Registration.
None: Apply this color to objects you want to be transparent-that is
when you want the color of a background object to show through the
selected object.
Paper: This is the color of the paper you are working on; technically, it
is no ink at all.
Black: This is the default color for text.
Registration: This is not really a color at all, but more of a
designation, used when you are printing separations
Process colors: These are cyan, magenta, and yellow. These colors
are denoted by the process colors symbol
.
RGB colors: These are red, green, and blue, denoted by the RGB
symbol
.
FOR USE AT THE LICENSED SITE(S) ONLY
Cheltenham Computer Training 1995-2001 - www.cctglobal.com
Page 23
PageMaker Interface 15
PageMaker 6.5 Foundation 2001 Cheltenham Computer Training
Control Palette
Control Palette
Empty Control Palette
• The Control palette
gives you a one-stop
shop, enabling you to
change several
formatting options in
one place rather than
making repeat trips to
the Type menu.
Character Control Palette
Paragraph Control Palette
Object Control Palette
Using the
Control
Palette
Using the
Character
View
© Cheltenham Computer Training 2001
Adobe PageMaker 6.5 - Slide No 9
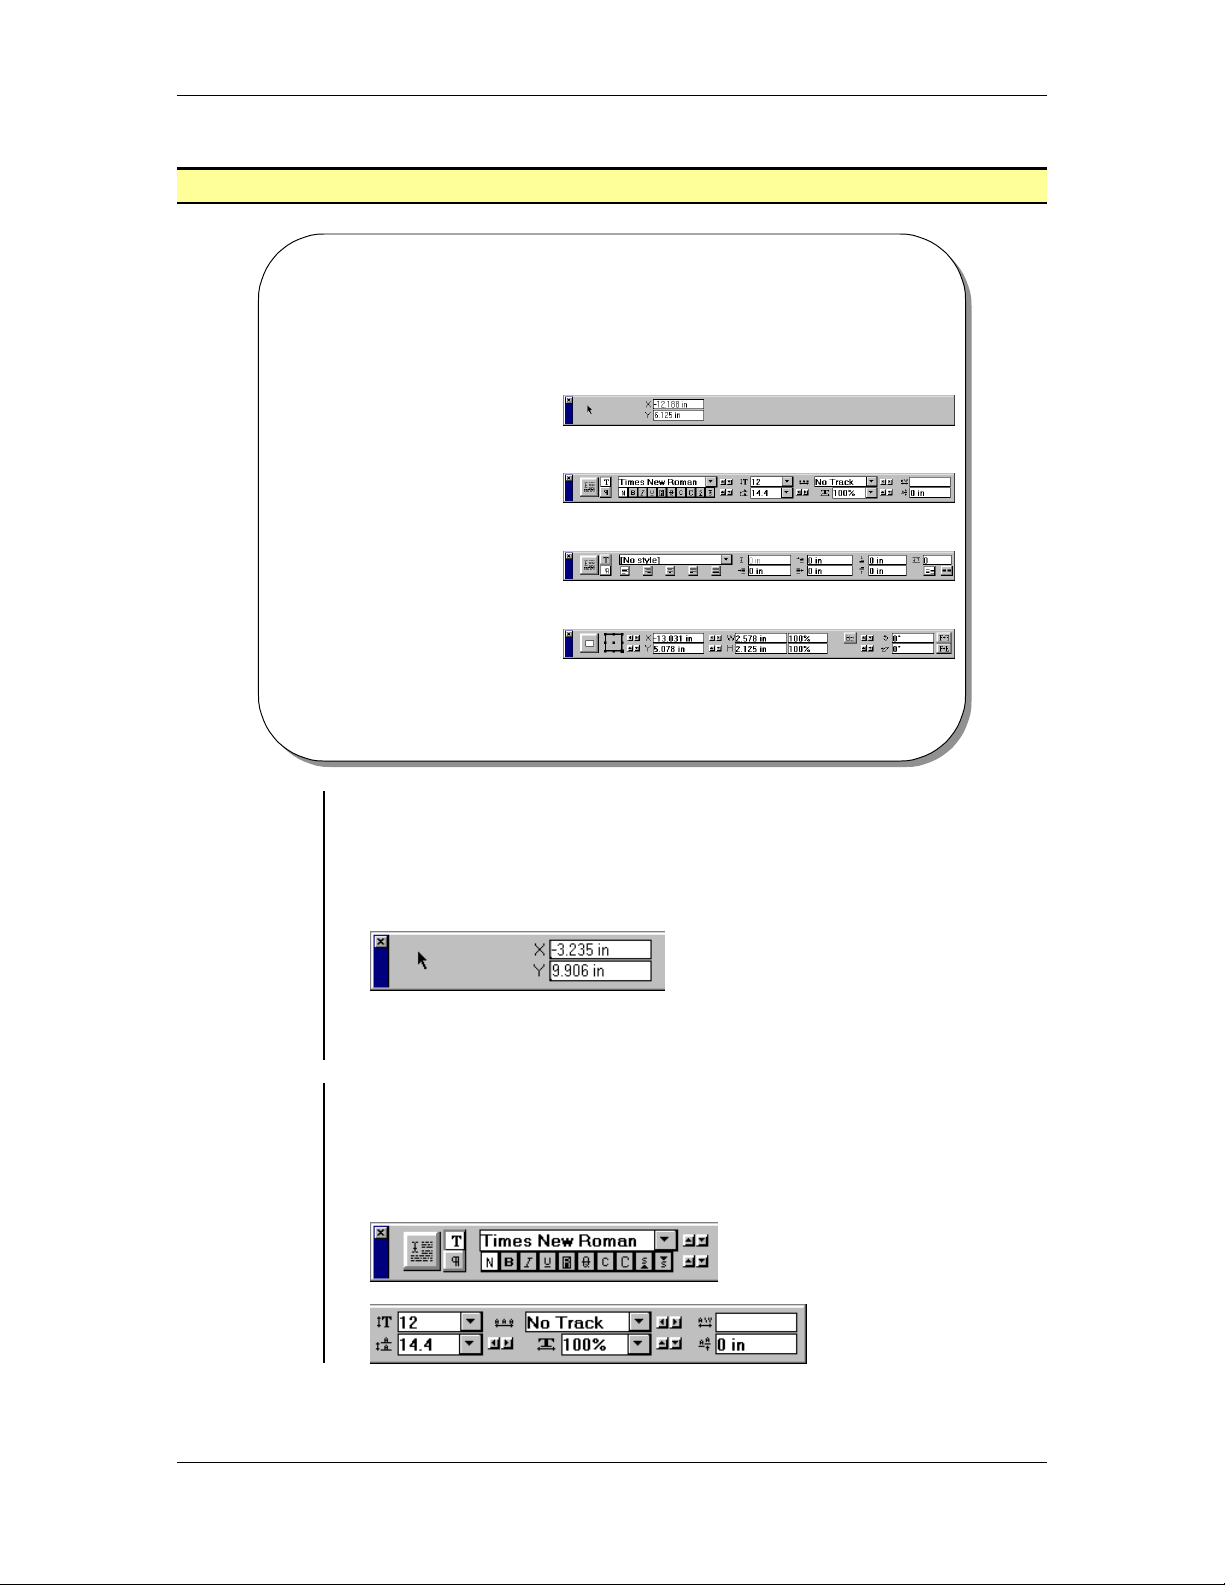
• The Control palette gives you a one-stop shop, enabling you to
change several formatting options in one place rather than making
repeat trips to the Type menu.
• From the main menu, choose Window > Show Control Palette
press the Ctrl + ‘ key combination
OR
• The X and Y coordinates displays the horizontal and vertical
distances of the selected object from the current zero point.
• In the Character View, click one of the font options in the Control
palette. You can view the Characters by using the toggling button to
choose the Apply button, Type style, Case, Position, Type Size,
Leading, Expert tracking, Horizontal Scale, Kerning, and Baseline
Shift:
FOR USE AT THE LICENSED SITE(S) ONLY
Cheltenham Computer Training 1995-2001 - www.cctglobal.com
Page 24
16 PageMaker Interface
2001 Cheltenham Computer Training PageMaker 6.5 Foundation
Using the
Paragraph
View
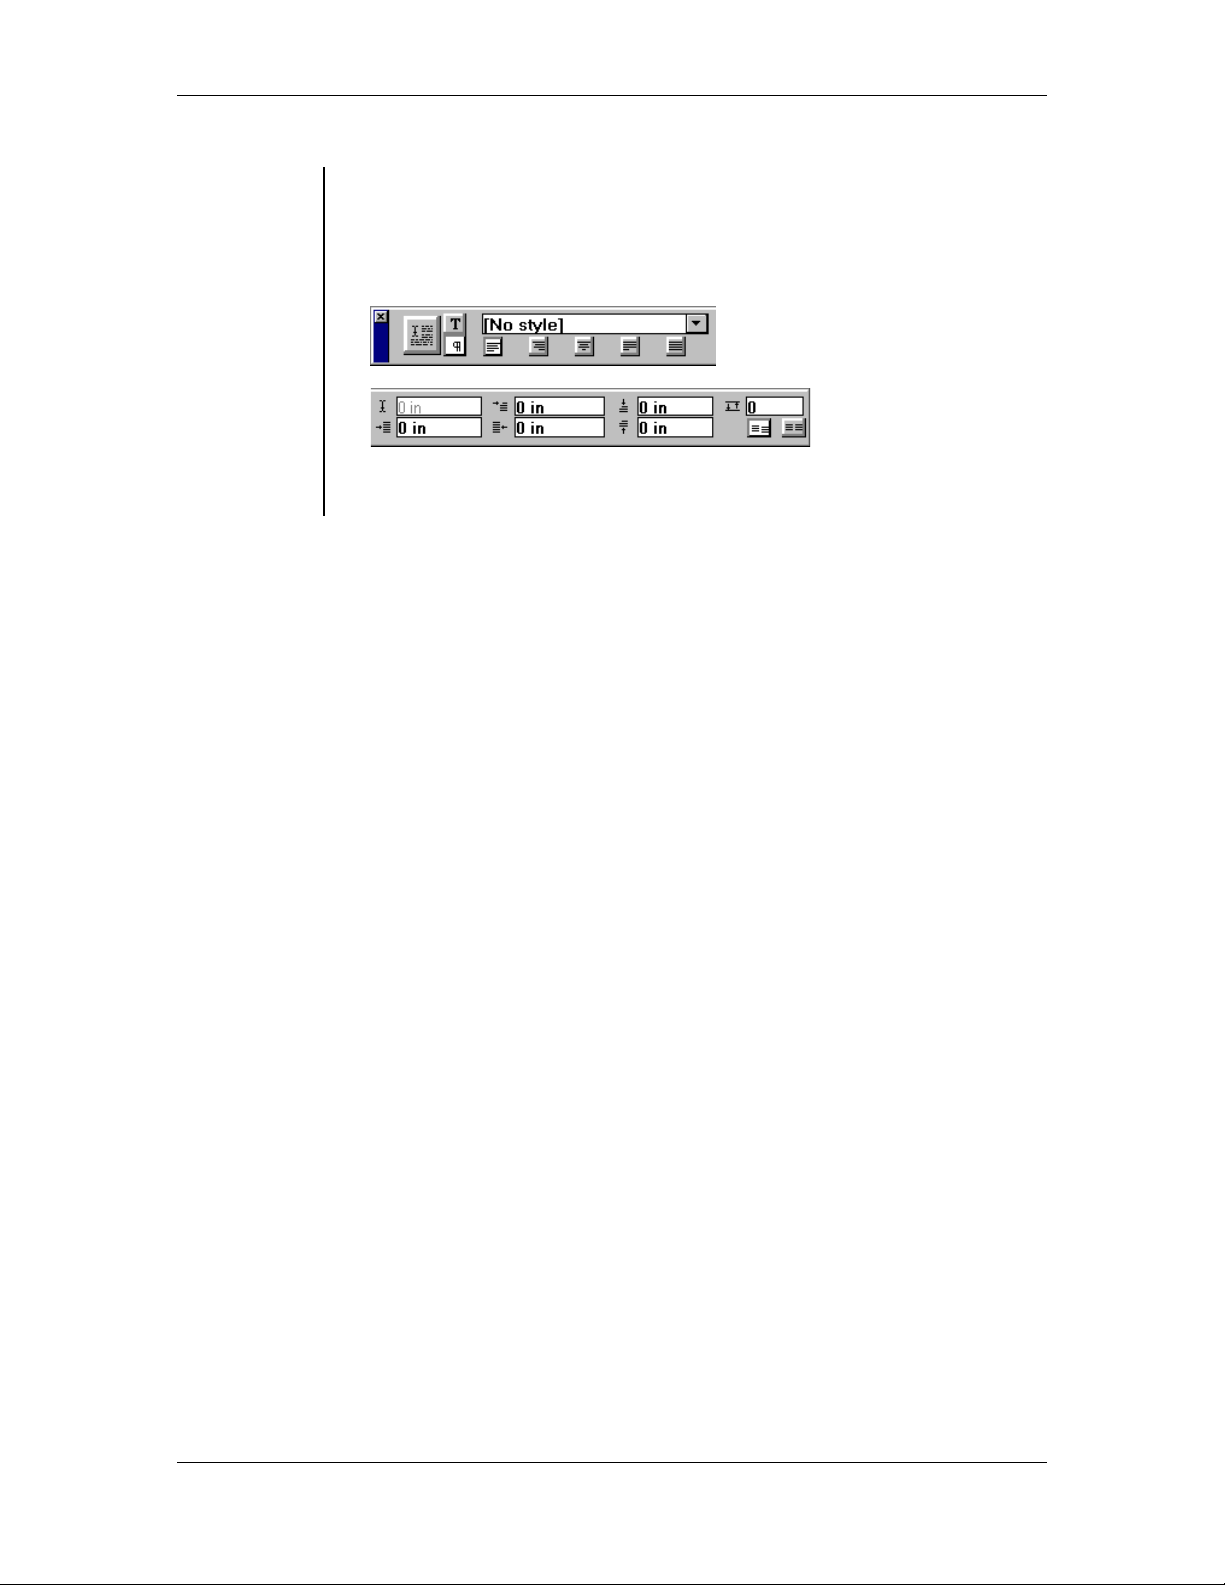
• The Paragraph View of the Control palette offers many of the same
options as the Character View. Such as, Apply button,
Character/Paragraph buttons Alignment, Style, Cursor position
indicator, First line indent, Right indent, Left indent, Add space above
paragraph, Grid options, Add space after paragraph:
Note: To toggle between the character and paragraph views of the
Control palette, press the Ctrl + Shift + ‘ key combination.
FOR USE AT THE LICENSED SITE(S) ONLY
Cheltenham Computer Training 1995-2001 - www.cctglobal.com
Page 25
PageMaker Interface 17
PageMaker 6.5 Foundation 2001 Cheltenham Computer Training
Using the
Object View
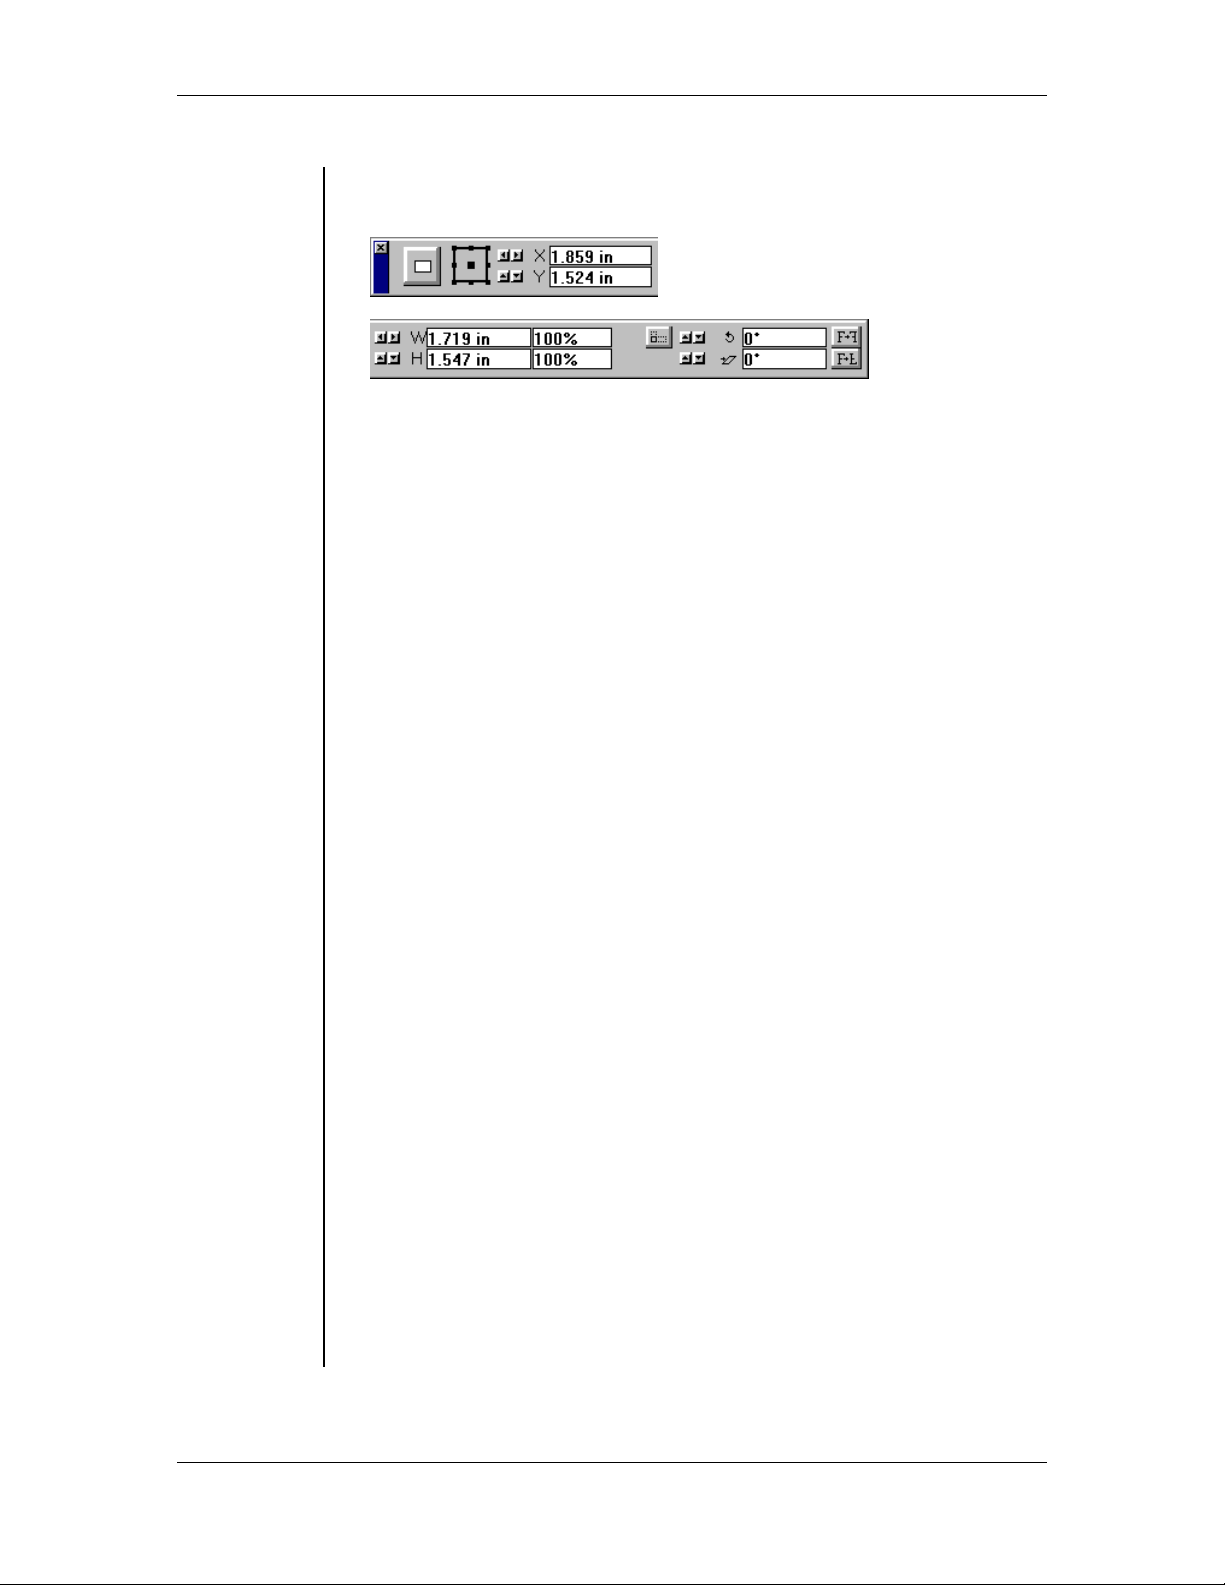
• When drawing/selecting objects, the Control palette will change
depending on the object type:
Apply button: Apply changes to objects using numeric values you
enter.
Proxy: Represents the selected object. Click to set a reference point,
or the point you are manipulating on the object.
Nudge buttons: Use to resize, click to move, or transform an object
incrementally. Press Shift while nudging to increase the nudge
increment by ten.
Position pointer: Displays the X and Y coordinate values of the
reference point or pointer, relative to the current rulers.
Sizing options: Specifies the width and height of the selected object
or cropping rectangle. Nudge amount 0.01 inches.
Percent scaling option: Specifies the percentage change from the
original size.
Scaling option: Click to use scaling option to resize an imported
graphic.
Cropping option: Click to use the cropping tool to crop imported
graphics.
Proportional-scaling option: Specifies whether you change an
object’s height or width independently, or maintaining its original
proportions.
Printer-resolution-scaling option: Constrains the scaling of
imported 1-bit bitmap graphics so that they are compatible with the
target printer specified in the Document Setup dialog box.
Skewing options: Skews objects horizontally –85 to 85 degrees in
relation to the selected reference point.
Rotating option: Rotates the object around the reference point.
Horizontal reflecting point: Reflect the object vertically, and then
rotate the object 180 degrees so it appears to be reflected horizontally.
Vertical-reflecting button: Reflects the object vertically.
FOR USE AT THE LICENSED SITE(S) ONLY
Cheltenham Computer Training 1995-2001 - www.cctglobal.com
Page 26
18 PageMaker Interface
2001 Cheltenham Computer Training PageMaker 6.5 Foundation
Rulers/Guides
Rulers/Guides
• Rulers can be toggled on
and off by choosing View >
Show/Hide Rulers
OR by pressing the Ctrl + R
key combination.
Using Rulers
To Change the
Ruler
Measurements
Using the
Zero Point
Option
© Cheltenham Computer Training 2001
Adobe PageMaker 6.5 - Slide No 10
• Rulers can be toggled on and off by choosing View > Show/Hide
Rulers
by pressing the Ctrl + R key combination. Most of the time you
OR
will need them on. You can change the measurement system the
ruler displays by going to the General Preferences.
• From the main menu, choose File > Preferences > General
press the Ctrl + K key combination:
OR
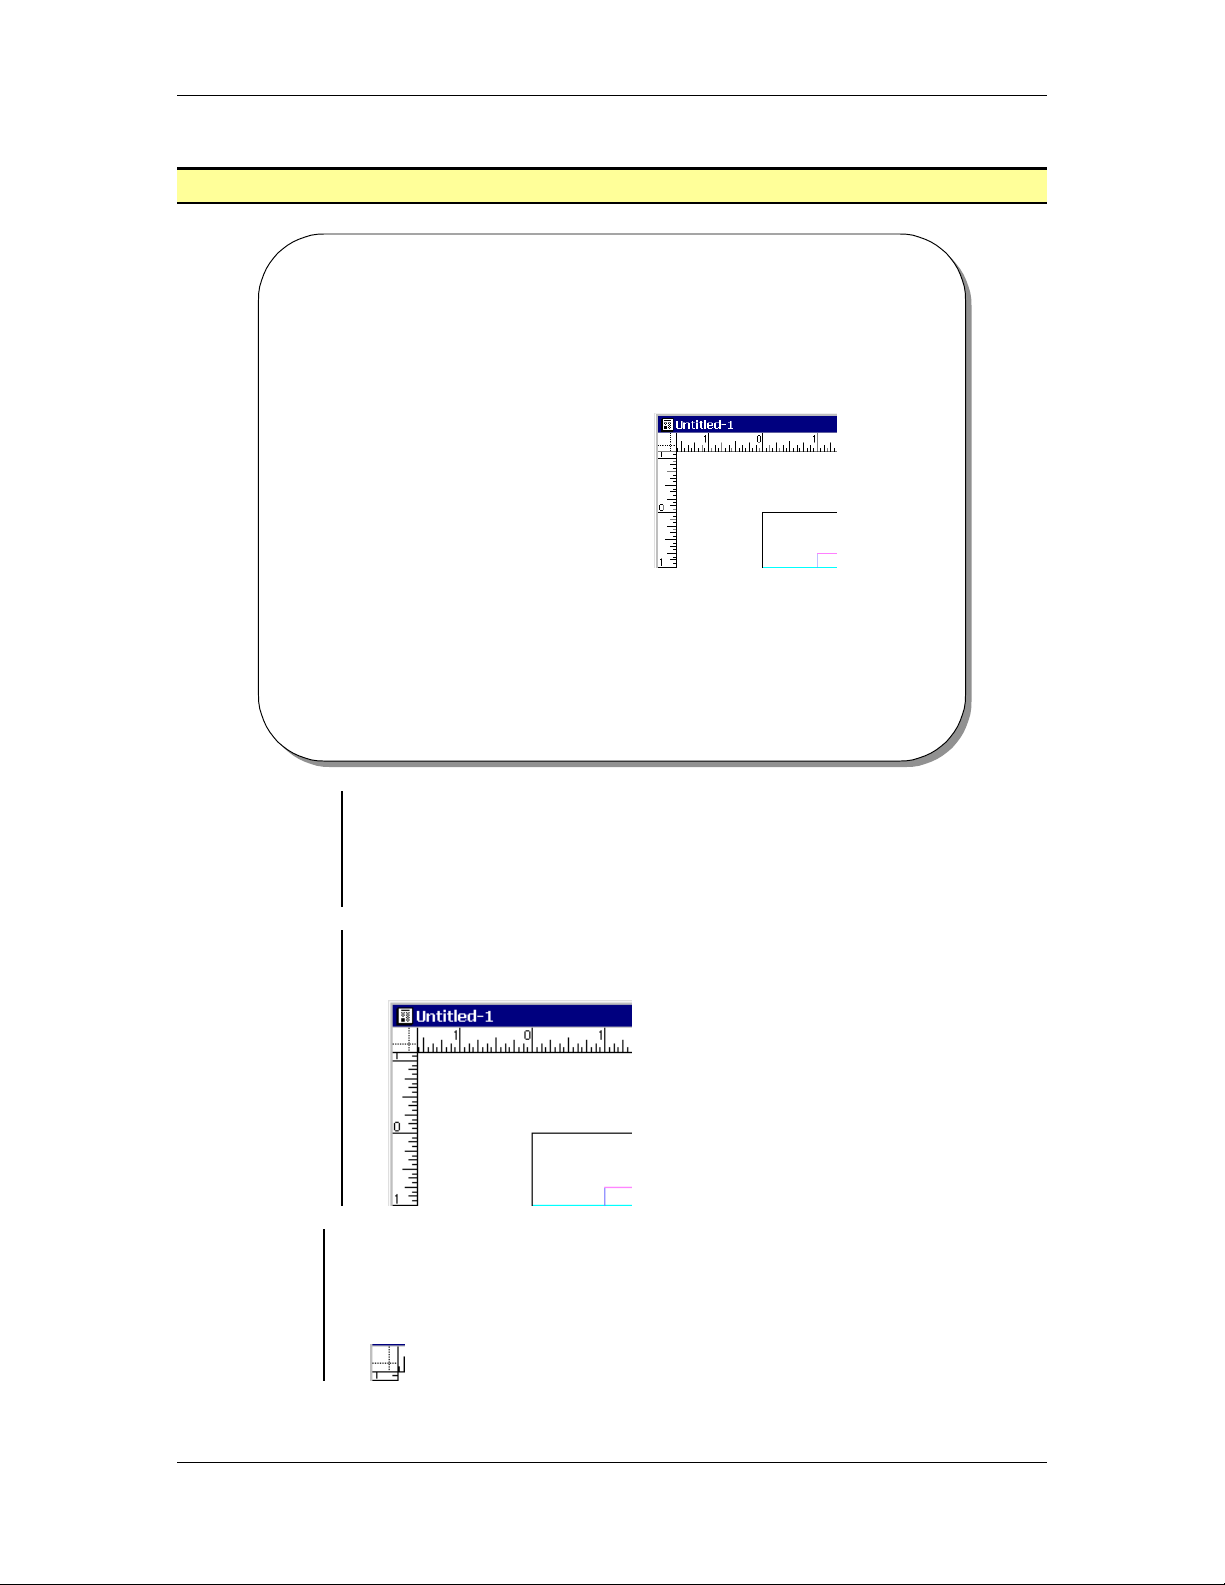
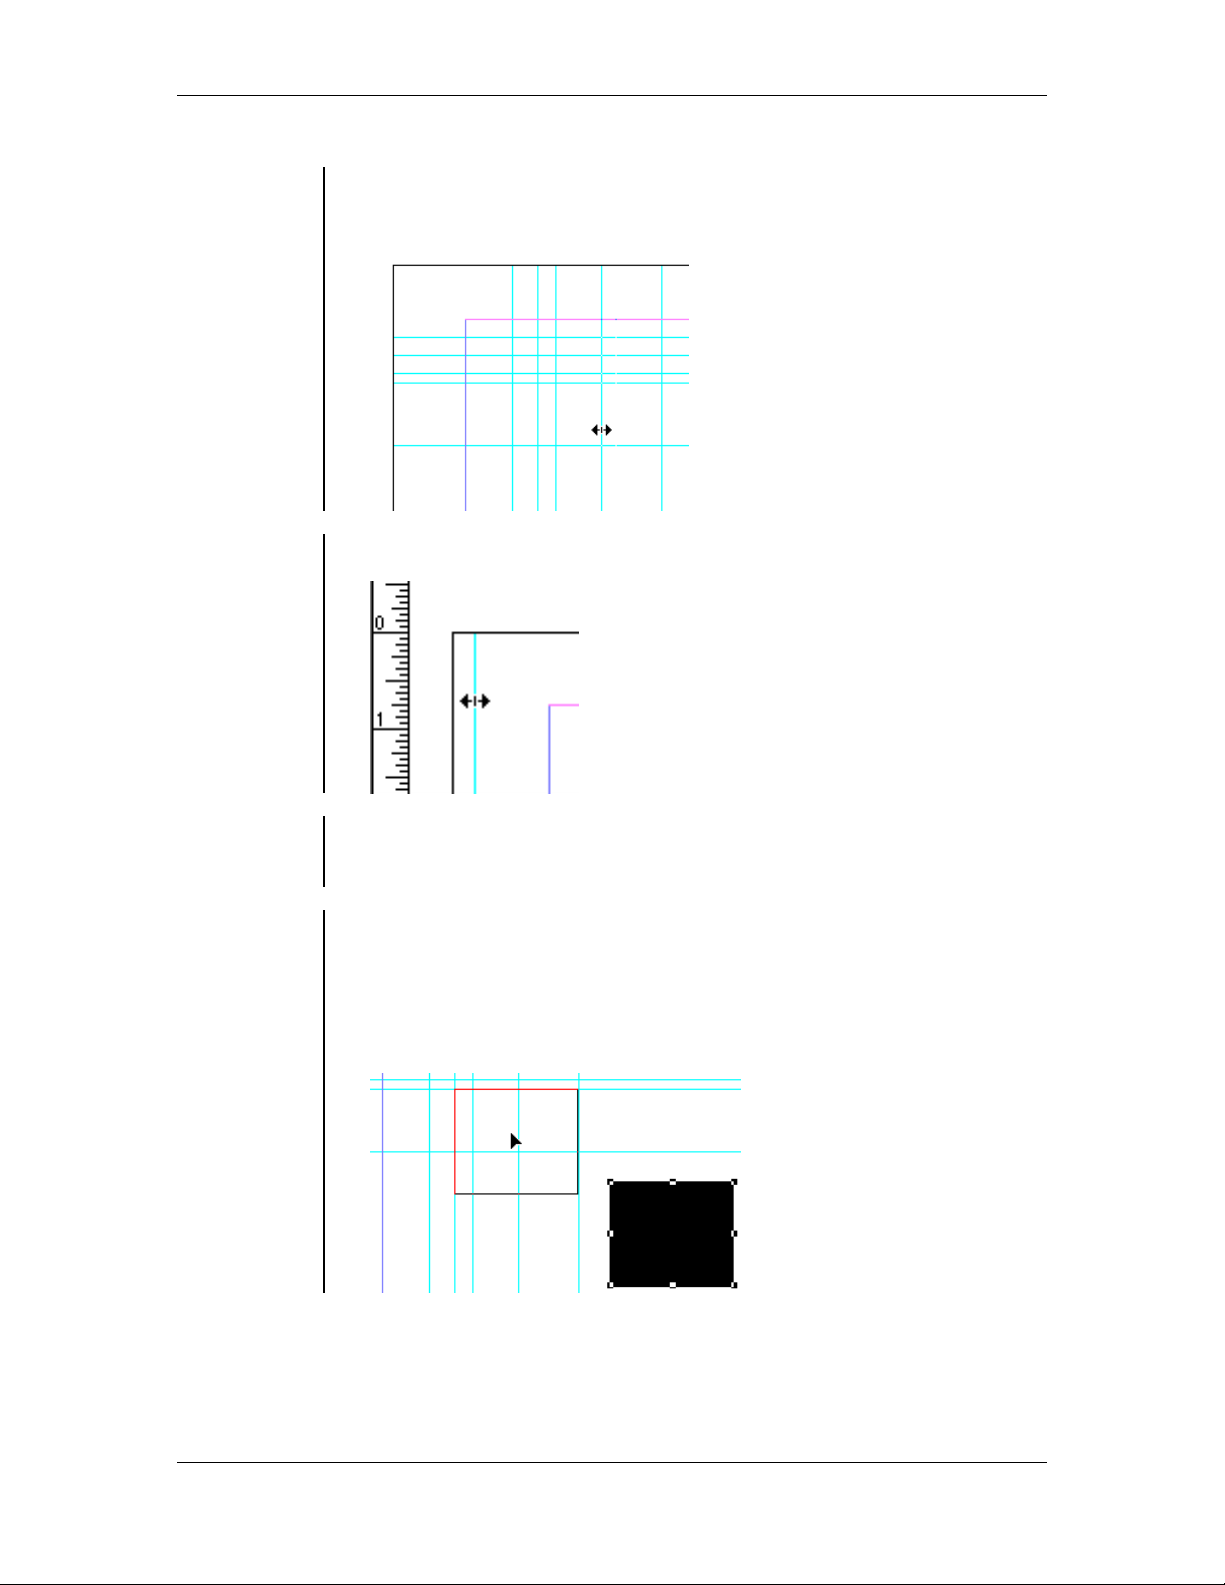
• The Zero Point is the reference point by which you can refer to an
object’s location on the page or pasteboard. Unless you change it, the
zero point reflects the top left of your page or, if you are working with
facing pages, the point at which the two pages meet:
FOR USE AT THE LICENSED SITE(S) ONLY
Cheltenham Computer Training 1995-2001 - www.cctglobal.com
Page 27
PageMaker Interface 19
PageMaker 6.5 Foundation 2001 Cheltenham Computer Training
Using Guides
• Guides are used to help you place objects precisely on your page.
These ruler guides help you align objects along the same plane, and
like the margin and column guides, they do not print:
To add a
Guide
To remove a
Guide
Applying the
Snap to
Option
• Drag a guide from the left or the top ruler onto the page:
• Grab and drag a guide outside of the work area.
Note: You can have up to 120 ruler guides per page.
• When the Snap to Guides option is on choose View > Snap to
Guides
press the Ctrl + Shift + ; key combination.
OR
• You may find the movement of an object constrained by the snapping,
preventing you from moving it incrementally nearer to a guide. In such
cases, you should turn off Snap to Guides:
FOR USE AT THE LICENSED SITE(S) ONLY
Cheltenham Computer Training 1995-2001 - www.cctglobal.com
Page 28
20 PageMaker Interface
2001 Cheltenham Computer Training PageMaker 6.5 Foundation
Review Questions
Review Questions
How would
you:
© Cheltenham Computer Training 2001
• Use the PageMaker Environment?
• Use Blank Pages?
• Use the Pasteboard?
• Use the Toolbox?
• Use the Colors Palette?
• Use the Control Palette?
• Use the Character View?
• Use the Paragraph View?
• Use the Object View?
• Use Rulers?
• Use the Zero Point Option?
• Use Guides?
• Apply the Snap to Option?
Adobe PageMaker 6.5 - Slide No 11
FOR USE AT THE LICENSED SITE(S) ONLY
Cheltenham Computer Training 1995-2001 - www.cctglobal.com
Page 29

Documents 21
PageMaker 6.5 Foundation 2001 Cheltenham Computer Training
Documents
When you
have
completed
this learning
module you
will have
seen how to:
• Create New Documents
• Use the Document Setup dialog box
• Apply Page Size
• Apply Dimensions
• Apply Orientation
• Apply Options
• Apply Number of Pages
• Apply Start Page #
• Apply the Margins
• Change the Document Setup
• Setup Master Pages
• Use the Save and Save As commands
• Use the Open command
• Use the Open As option
• Use the Cannot Find dialog box
• Use the Close command
FOR USE AT THE LICENSED SITE(S) ONLY
Cheltenham Computer Training 1995-2001 - www.cctglobal.com
Page 30
22 Documents
2001 Cheltenham Computer Training PageMaker 6.5 Foundation
New Documents
New Documents
• Creating a New Document
allows you to set up the
publication page with
specified settings.
• You can define such things
as the size of the page, the
size of the margins, and
even the orientation of the
page.
Creating New
Documents
© Cheltenham Computer Training 2001
Adobe PageMaker 6.5 - Slide No 12
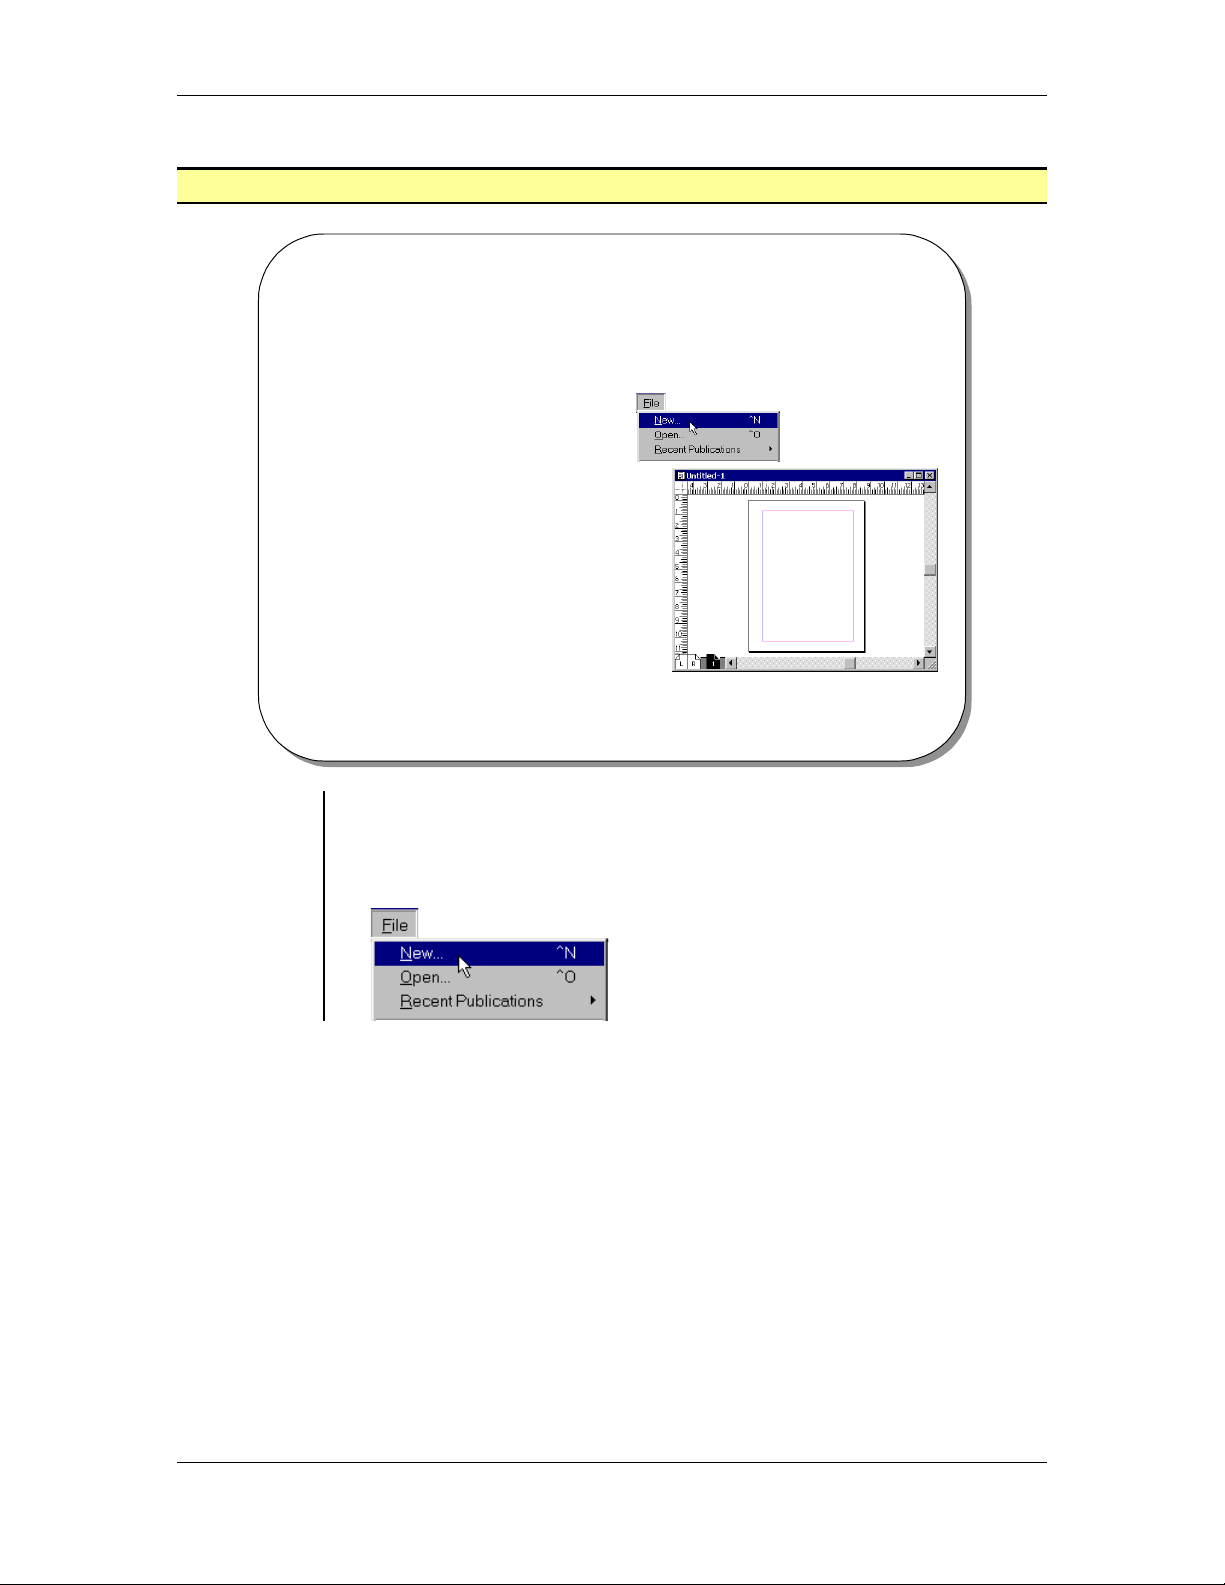
• Creating a New Document allows you to set up the publication page
with specified settings. You can define such things as the size of the
page, the size of the margins, and even the orientation of the page.
• From the main menu, choose File > New to create a new document:
FOR USE AT THE LICENSED SITE(S) ONLY
Cheltenham Computer Training 1995-2001 - www.cctglobal.com
Page 31

Documents 23
PageMaker 6.5 Foundation 2001 Cheltenham Computer Training
Using the
Document
Setup dialog
box
The Document Setup dialog box allows you to define various
characteristics of your document such as the page size, number of
pages, and page-numbering:
Applying
Page Size
Applying
Dimensions
Applying
Orientation
• Click the Page Size pop-up menu to see the standard page sizes
provided:
Note: Standard screen sizes for creating online publications are
expressed in pixels.
• You can use whatever page Dimensions you like-up to a maximum
page size of 42 x 42 inches. To use a non-standard page size, type in
the dimensions and the Page Size option changes to Custom:
Note: Consider your page dimensions before you choose a custom
page size for your publication. You can only have one page size per
publication
• If you change the Orientation from tall (also known as portrait) to wide
(landscape), the dimensions will switch:
FOR USE AT THE LICENSED SITE(S) ONLY
Cheltenham Computer Training 1995-2001 - www.cctglobal.com
Page 32

24 Documents
2001 Cheltenham Computer Training PageMaker 6.5 Foundation
Applying
Options
• The Options allow you to set your page setup:
Double-sided – When checked will cause the left and right margins
to become the inside and outside. Select this option when creating
publications printed on both sides of the page, a magazine,
newsletter, or book.
Facing Pages – When checked will allow you to view your pages as
spreads-with the even numbered pages on the left, and the oddnumbered pages on the right:
Applying
Number of
Pages
Applying
Start Page #
Applying the
Margins
• The Number of Pages field allows you to determine the number of
pages in your publication. If you don’t yet know how many pages you
need, it’s easy to insert and remove pages while your publication is in
progress:
• The Start Page # field allows you to type in where you want page
numbering to begin. If you choose an even number, your first page is
a left page:
• Set the values in the Margins sections to determine the margins for
the Document page:
Note: Margins are applied to the document master page.
FOR USE AT THE LICENSED SITE(S) ONLY
Cheltenham Computer Training 1995-2001 - www.cctglobal.com
Page 33

Documents 25
PageMaker 6.5 Foundation 2001 Cheltenham Computer Training
Changing the
Document
Setup
• Although the Change Setup dialog box appears when you choose
File > New to create a new publication, you can modify a publication's
Document Setup at any point in your work by choosing File >
Document Setup while the publication is active:
FOR USE AT THE LICENSED SITE(S) ONLY
Cheltenham Computer Training 1995-2001 - www.cctglobal.com
Page 34

26 Documents
2001 Cheltenham Computer Training PageMaker 6.5 Foundation
Master Pages
Master Pages
• The Master Page
typically contains the
basic design elements
of a page, such as
headers and footers,
and page numbers.
Setting Up
Master Pages
© Cheltenham Computer Training 2001
Adobe PageMaker 6.5 - Slide No 13
• The Master Page typically contains the basic design elements of a
page, such as headers and footers, and page numbers. The contents
of the Master Page will apply to all of the pages in the publication
unless you specify otherwise. You can create, modify, and delete
objects on master pages just like any other page. Master pages also
contain column guides, ruler guides, and margin guides. Each
publication can have an unlimited number of Master Pages.
• Every publication contains a Document-Master page or a DocumentMaster page spread, in the case of publications that include facing
pages. You cannot rename or remove these Master Pages from the
publication.
• The Master icon is located at the bottom left of the publication window.
An icon containing the letters L (for left) and R (for right) mark the
master page icon for facing pages or spreads:
• In the case of single pages an icon containing the letter R marks a
single-sided publication. Click the icon to turn to the master applied to
the current publication page:
FOR USE AT THE LICENSED SITE(S) ONLY
Cheltenham Computer Training 1995-2001 - www.cctglobal.com
Page 35

Documents 27
PageMaker 6.5 Foundation 2001 Cheltenham Computer Training
To Display
the Master
• From the main menu, choose View > Display Master Page Items:
Page content
FOR USE AT THE LICENSED SITE(S) ONLY
Cheltenham Computer Training 1995-2001 - www.cctglobal.com
Page 36

28 Documents
2001 Cheltenham Computer Training PageMaker 6.5 Foundation
Saving Documents
Saving Documents
• The Save and Save As
commands allow you to
store your active
publication.
• To save your publication,
choose File > Save
OR press the Ctrl + S key
combination.
Using the
Save and
Save As
commands
© Cheltenham Computer Training 2001
Adobe PageMaker 6.5 - Slide No 14
• The Save and Save As commands allow you to store your active
publication.
• To save your publication:
From the main menu, choose File > Save
press the Ctrl + S key combination.
OR
• To use the save as method:
From the main menu, choose File > Save As
OR press the Shift + Ctrl + S key combination:
FOR USE AT THE LICENSED SITE(S) ONLY
Cheltenham Computer Training 1995-2001 - www.cctglobal.com
Page 37

Documents 29
PageMaker 6.5 Foundation 2001 Cheltenham Computer Training
• When you Save your publication for the first time or if you choose the
Save As command, you will see the Save Publication dialog box. In
this dialog box, you can choose the location you would like to save you
publication, crate a name to represent your publication and choose the
file type you would like the publication to save as:
Note: One of the most practical habits you can develop is to save your
PageMaker publication often. When you save a publication, your File
Name ensures that it remains stored in your computer even if there is
a power failure or system crash. To avoid the frustration of rebuilding
a lost publication, save your work regularly.
FOR USE AT THE LICENSED SITE(S) ONLY
Cheltenham Computer Training 1995-2001 - www.cctglobal.com
Page 38
30 Documents
2001 Cheltenham Computer Training PageMaker 6.5 Foundation
File Types
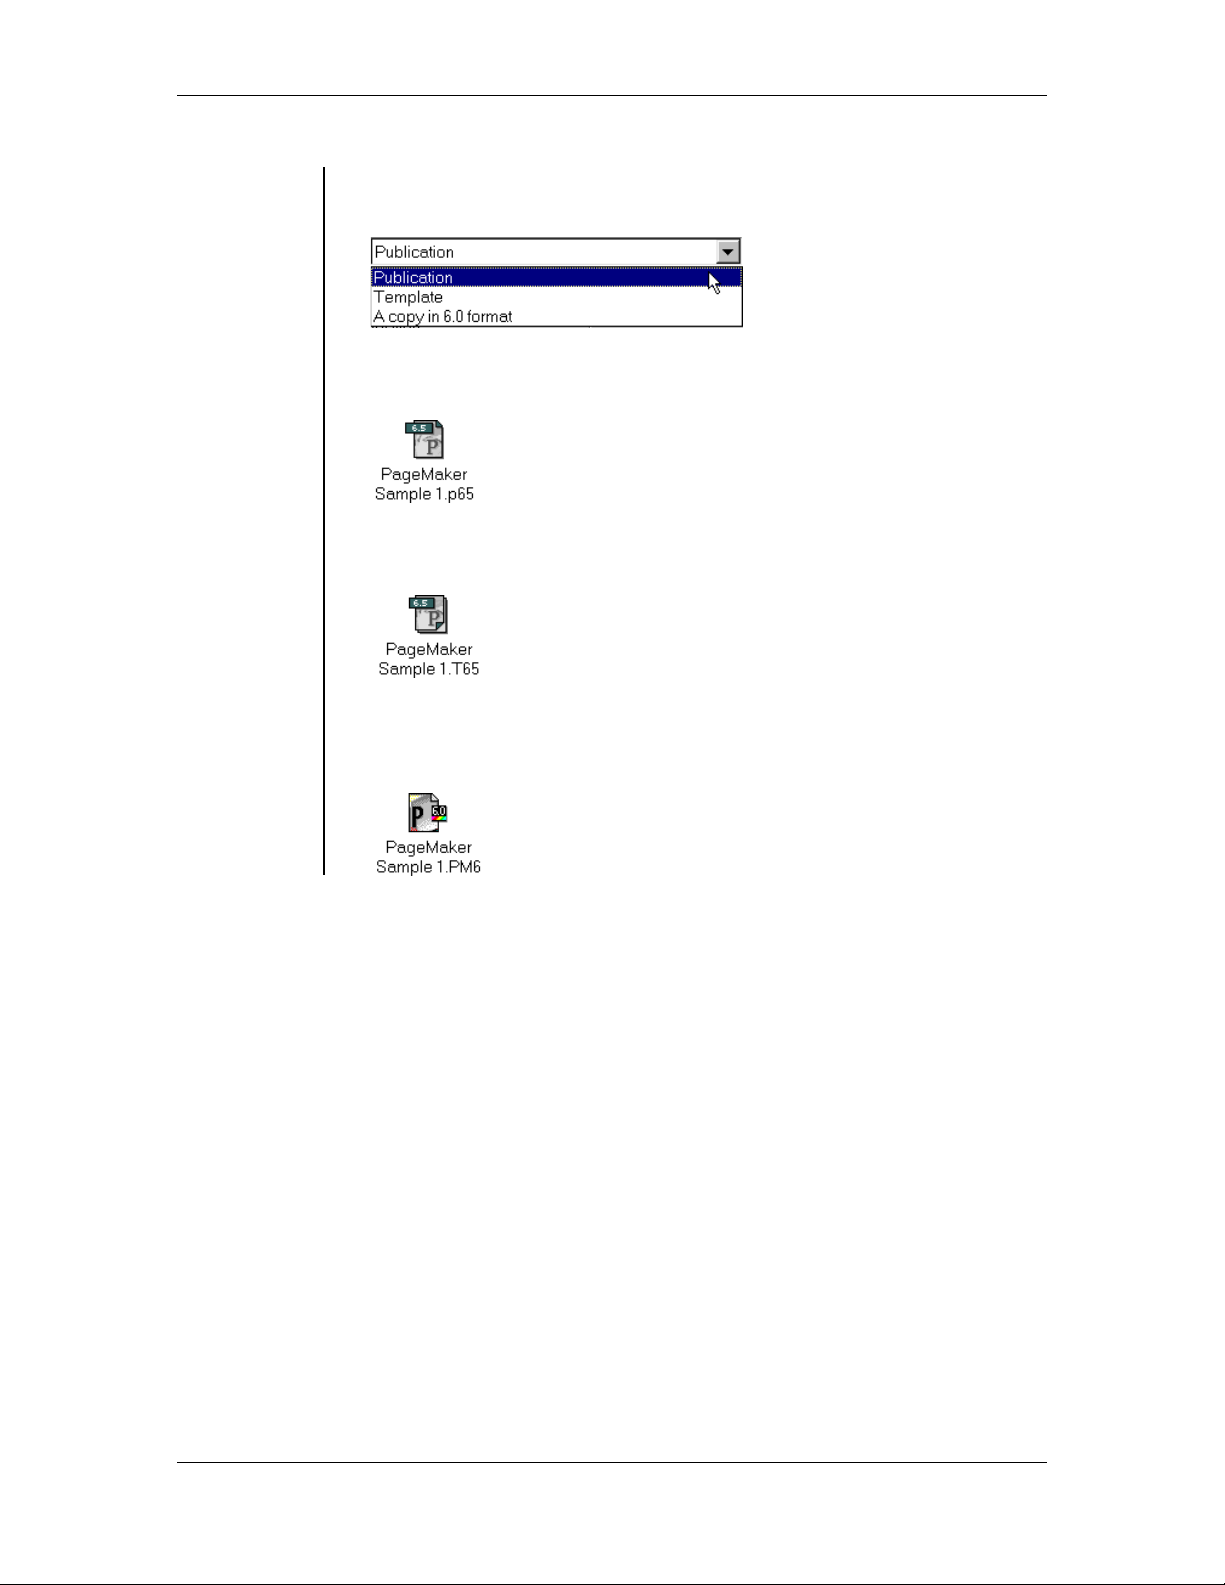
• The Save as type drop down list allows you to choose how you want
to save your publication:
• The Publication file type will save your publication as a native
PageMaker 6.5 file. The file extension will be .P65:
• The Template file type will save your publication as a template. The
file extension will be .T65:
• The A copy in 6.0 format file type will save you publication as a
PageMaker 6.0 version so that you may open your publication in
PageMaker 6.0 or higher. The DOS extension will be .PM6:
FOR USE AT THE LICENSED SITE(S) ONLY
Cheltenham Computer Training 1995-2001 - www.cctglobal.com
Page 39

Documents 31
PageMaker 6.5 Foundation 2001 Cheltenham Computer Training
Opening Documents
Opening Documents
• The Open command allows
you to open a previously
saved publication.
• To Open a publication
choose File > Open
OR press the Ctrl + O key
combination.
Using the
Open
command
© Cheltenham Computer Training 2001
Adobe PageMaker 6.5 - Slide No 15
• The Open command allows you to open a previously saved
publication.
• From the main menu, choose File > Open
press the Ctrl + O key combination:
OR
FOR USE AT THE LICENSED SITE(S) ONLY
Cheltenham Computer Training 1995-2001 - www.cctglobal.com
Page 40

32 Documents
2001 Cheltenham Computer Training PageMaker 6.5 Foundation
• When you are opening up a publication you will see the Open
Publication dialog box. This dialog box allows you to navigate around
your hard drive to locate PageMaker files:
Using the
Open As
option
PANOSE
Font
Matching
Using the
Cannot Find
dialog box
Note: By default PageMaker Files are the only file types that will be
available to you in the Open Publication dialog box. The explorer
window will only display PageMaker 6.0 – 6.5 Publication and
Template files. If you will like to try and open another file type, you
will have to select the All Files option from the Files of Type drop
down list.
• Once you have found the file you would like to open, you have a
choice of how you would like to open the files, as PageMaker
publication or template file. By default it opens the original publication
or a copy of the template file:
• Use the File > Open command to open the original version or a copy
of a PageMaker 6.5 publication or template. PageMaker keeps track
of the last eight publications you opened and saved, and lists these
when you choose File > Recent Publications.
• When you select a template or a PageMaker 4.0-6.01 publication,
PageMaker automatically selects Copy. To open the original of a
template instead, click Original. (The Original option is not available
for a PageMaker 4.0-6.01 publication.)
• After you select a publication to open, the fonts used in the publication
are matched with those available in your computer. If a font used in
the selected publication isn't available, PageMaker displays the
PANOSE Font Matching dialog box to allow you to select available
fonts to substitute for the missing fonts. For more information about
substituting fonts, refer to Font Substitution.
• If you are opening a publication that has links to external text or
graphics files, you will see a Cannot Find dialog box if a file cannot be
located. Use this dialog box to locate the file or to tell PageMaker to
ignore the link. See Importing, Linking, and Exporting, for more
information.
FOR USE AT THE LICENSED SITE(S) ONLY
Cheltenham Computer Training 1995-2001 - www.cctglobal.com
Page 41

Documents 33
PageMaker 6.5 Foundation 2001 Cheltenham Computer Training
Closing Documents
Closing Documents
• Close command,
closes the active
publication.
Using the
Close
command
© Cheltenham Computer Training 2001
Adobe PageMaker 6.5 - Slide No 16
• From the main menu, choose File > Close to close the active
publication:
Note: To close all open publications at once, press the Shift key as
you select the Close command from the file menu.
FOR USE AT THE LICENSED SITE(S) ONLY
Cheltenham Computer Training 1995-2001 - www.cctglobal.com
Page 42
34 Documents
2001 Cheltenham Computer Training PageMaker 6.5 Foundation
Review Questions
Review Questions
How would
you:
© Cheltenham Computer Training 2001
• Create New Documents?
• Use the Document Setup dialog box?
• Apply Page Size?
• Apply Dimensions?
• Apply Orientation?
• Apply Options?
• Apply Number of Pages?
• Apply Start Page #?
• Apply the Margins?
• Change the Document Setup?
• Setup Master Pages?
• Use the Save and Save As commands?
• Use the Open command?
• Use the Open As option?
• Use the Cannot Find dialog box?
• Use the Close command?
Adobe PageMaker 6.5 - Slide No 17
FOR USE AT THE LICENSED SITE(S) ONLY
Cheltenham Computer Training 1995-2001 - www.cctglobal.com
Page 43

Tools 35
PageMaker 6.5 Foundation 2001 Cheltenham Computer Training
Tools
When you
have
completed
this learning
module you
will have
seen how to:
• Use the Pointer Tool
• Use the Text Tool
• Use the Rotating Tool
• Use the Cropping Tool
• Use Drawing Tools
• Use the Line Tool
• Use the Constrained Line Tool
• Use the Rectangle Tool
• Use the Rectangle Frame Tool
• Use the Ellipse Tool
• Use the Ellipse Frame Tool
• Use the Polygon Tool
• Use the Polygon Frame Tool
• Use Visual Tools
• Use the Hand Tool
• Use the Zoom Tool
• Use the Preferences dialog box
• Use the Character Specifications dialog box
• Use the Custom Stroke dialog box
• Use the Rounded Corners dialog box
• Use the Fill and Stroke dialog box
• Use the Frame Options dialog box
• Use the Polygon Settings dialog box
FOR USE AT THE LICENSED SITE(S) ONLY
Cheltenham Computer Training 1995-2001 - www.cctglobal.com
Page 44

36 Tools
2001 Cheltenham Computer Training PageMaker 6.5 Foundation
Basic Tools
Basic Tools
• The Pointer tool is used to select,
move, and resize text objects and
graphics.
• The Text tool is used to create text
blocks and text frames, select, and
edit text.
• The Rotation tool is used to select
and rotate text objects and
graphics.
• The Cropping tool is used to crop
parts of the graphic that you do not
want to print.
Using the
Pointer Tool
Using the
Text Tool
Using the
Rotating Tool
Using the
Cropping
Tool
© Cheltenham Computer Training 2001
Adobe PageMaker 6.5 - Slide No 18
• The Pointer tool is used to select, move, and resize text
objects and graphics:
• The Text tool is used to create text blocks and text
frames, select, and edit text:
• The Rotation tool is used to select and rotate text
objects and graphics:
• When importing a graphic from another program or
publication, you can use the Cropping tool to crop parts
of the graphic that you do not want to print by adjusting
the size of its surrounding bounding box:
FOR USE AT THE LICENSED SITE(S) ONLY
Cheltenham Computer Training 1995-2001 - www.cctglobal.com
Page 45

Tools 37
PageMaker 6.5 Foundation 2001 Cheltenham Computer Training
Drawing Tools
Drawing Tools
• The Drawing tools allow
you to create simple
graphics (or frames to hold
text or imported graphics)
to which you can apply a
stroke and or fill.
Using
Drawing
Tools
Using the
Line Tool
Using the
Constrained
Line Tool
© Cheltenham Computer Training 2001
Adobe PageMaker 6.5 - Slide No 19
• The Drawing tools allow you to create simple graphics (or frames to
hold text or imported graphics) to which you can apply a stroke and or
fill. If necessary, choose Window > Show Tools to display the
Toolbox:
• The Line tool is used to draw lines at any angle:
• The Constrained Line tool is used to draw straight lines or lines at 45-
degree angles:
FOR USE AT THE LICENSED SITE(S) ONLY
Cheltenham Computer Training 1995-2001 - www.cctglobal.com
Page 46

38 Tools
2001 Cheltenham Computer Training PageMaker 6.5 Foundation
Using the
Rectangle
Tool
• The Rectangle tool is used to draw rectangles, or by holding down the
Shift key allows you to draw squares. You can change the corner
radius of the rectangle before it is drawn by double clicking the
rectangle tool to display the Rounded Corners dialog box:
Note: You can change the corners of the rectangle after it has been
drawn, by choosing the Element > Rounded Corner command.
Using the
Rectangle
Frame Tool
• The Rectangle Frame tool is used the same way as the rectangle
tool; however, this tool allows you to place text or graphics within the
frame:
Using the
Ellipse Tool
Using the
Ellipse Frame
Tool
Using the
Polygon Tool
Using the
Polygon
Frame Tool
• The Ellipse tool is used to draw ellipses, or by holding down the Shift
key allows you to draw circles:
• The Ellipse Frame tool is used the same way as the ellipse tool;
however, this tool allows you to place text or graphics within the frame:
• The Polygon tool is used to draw customized or preset polygon
shapes.
• To change the preset shape you will be drawing, double click the
polygon tool to display the Polygon Settings dialog box.
• Holding down the Shift key allows you to constrain the length and
width of the shape, or the line segment.
• After you draw a shape, you can add, move, or delete its vertices and
line segments, by double clicking the shape.
• From the main menu, choose the Element > Polygon Settings
command to change shapes drawn with the polygon presets:
Note: If you save your document, as a PageMaker 6.0 publication,
when reopened in Version 6.0, any irregular polygons you create
cannot be edited as far as changing the vertices and line segments,
only resized.
• The Polygon Frame tool is used the same way as the Polygon tool;
however, this tool allows you to place text or graphics within the frame:
FOR USE AT THE LICENSED SITE(S) ONLY
Cheltenham Computer Training 1995-2001 - www.cctglobal.com
Page 47
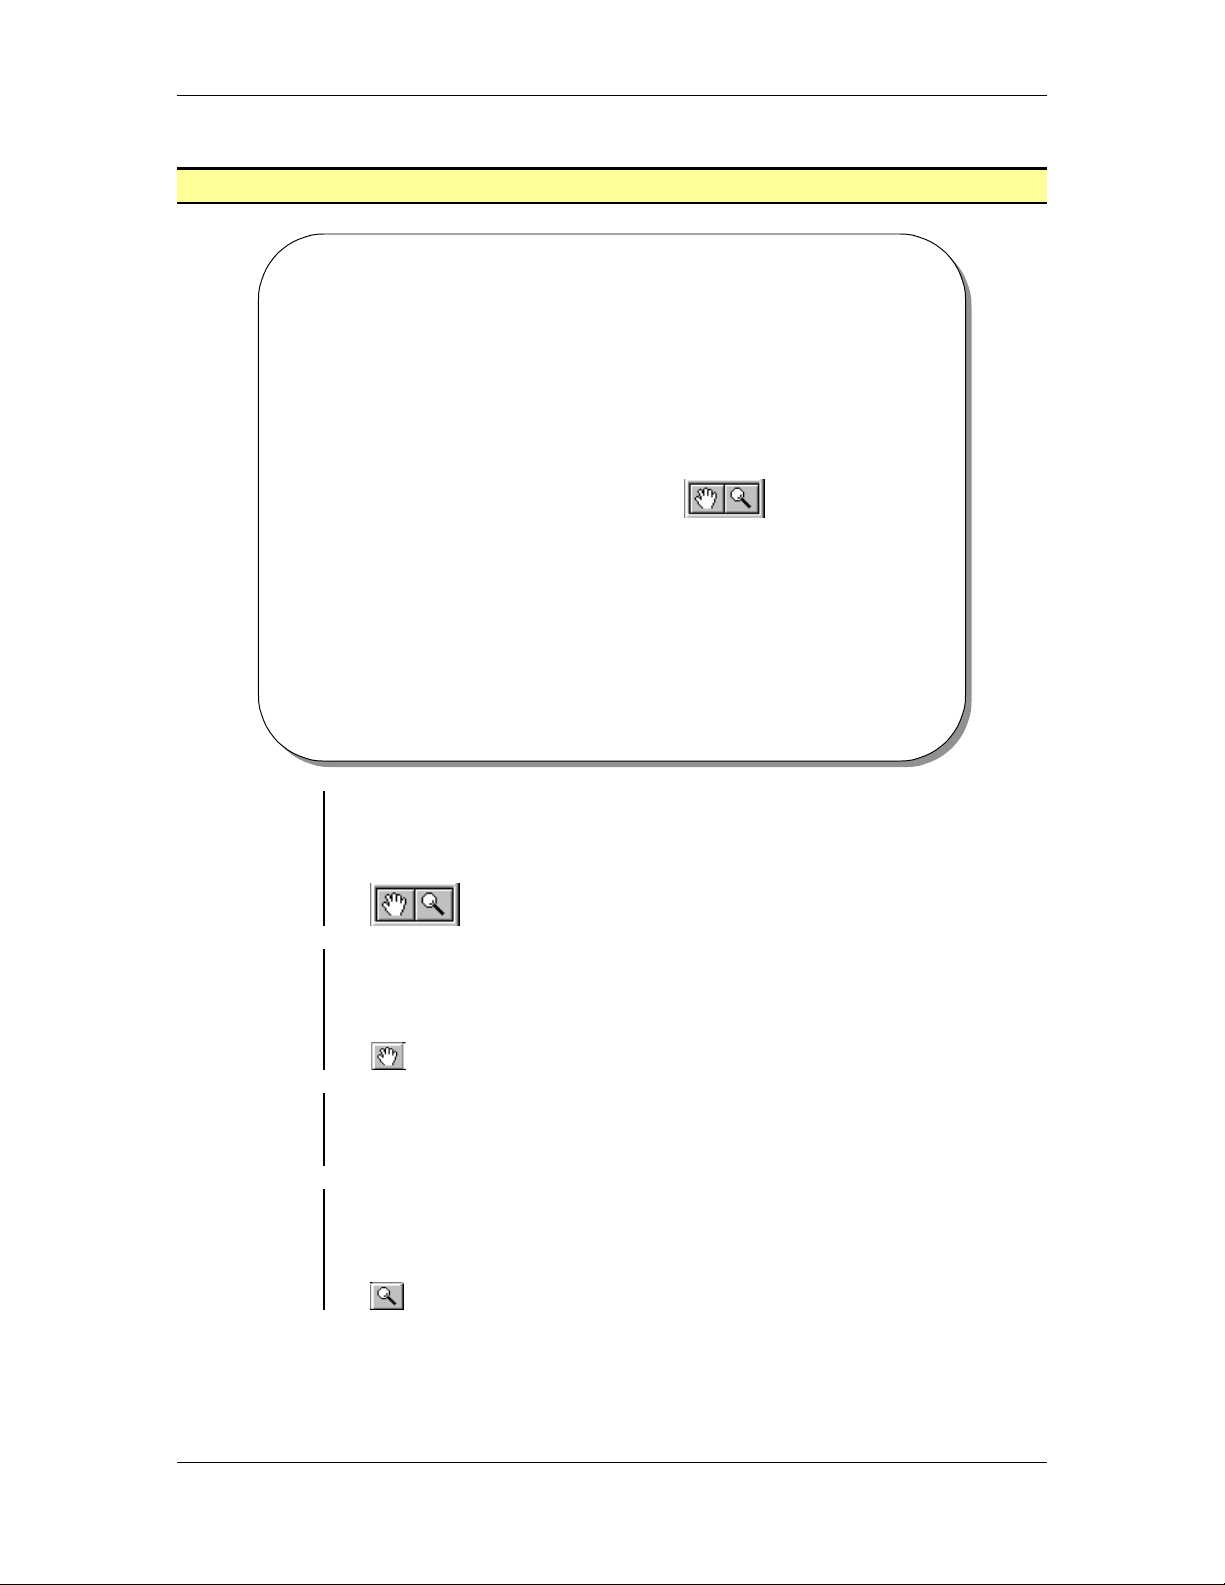
Tools 39
PageMaker 6.5 Foundation 2001 Cheltenham Computer Training
Visual Tools
Visual Tools
• The Visual tools allow you
to zoom in and out of or
navigate around your
publication or Pasteboard.
• These tools can be used on
their own or in conjunction
with other tools by using
the keyboard shortcut.
Using Visual
Tools
Using the
Hand Tool
To move your
page
Using the
Zoom Tool
© Cheltenham Computer Training 2001
Adobe PageMaker 6.5 - Slide No 20
• The Visual tools allow you to zoom in and out of or navigate around
your publication or Pasteboard. These tools can be used on their own
or in conjunction with other tools by using the keyboard shortcut:
• The Hand tool is used to move your page around within your
publication window or (in the Advanced Level) to preview and test
hyperlinks:
• Select the Hand tool.
• Click on the page and drag the page to the desired location.
• Release the mouse.
• The Zoom tool allows you to magnify or reduce the display of any area
in your publication. The magnification limits are between 25% and
400%:
FOR USE AT THE LICENSED SITE(S) ONLY
Cheltenham Computer Training 1995-2001 - www.cctglobal.com
Page 48

40 Tools
2001 Cheltenham Computer Training PageMaker 6.5 Foundation
To magnify
part of a page
by dragging
• Select the Zoom tool.
• Click and drag to draw a marquee around the area you want to
magnify.
To zoom in
and out while
using another
tool
• Press the Ctrl + Spacebar key combination to zoom in,
press the Ctrl + Spacebar + Alt key combination to zoom out.
OR
• Click to zoom in or out, or drag to select an area you want to zoom in
on.
Note: You can also double-click the Zoom tool to jump to Actual Size,
or press the Alt key as you double-click the Zoom tool to go to Fit in
Window view.
FOR USE AT THE LICENSED SITE(S) ONLY
Cheltenham Computer Training 1995-2001 - www.cctglobal.com
Page 49

Tools 41
PageMaker 6.5 Foundation 2001 Cheltenham Computer Training
Modifying Tools
Modifying Tools
• Double-clicking some
of the tools will display
various dialog boxes.
Using the
Preferences
dialog box
© Cheltenham Computer Training 2001
Adobe PageMaker 6.5 - Slide No 21
• Double-clicking the Pointer tool will display the Preferences dialog
box:
FOR USE AT THE LICENSED SITE(S) ONLY
Cheltenham Computer Training 1995-2001 - www.cctglobal.com
Page 50

42 Tools
2001 Cheltenham Computer Training PageMaker 6.5 Foundation
Using the
Character
Specification
s dialog box
• Double-clicking the Text tool will display the Character
Specifications dialog box:
Using the
Custom
Stroke dialog
box
• The Character Specifications dialog box will allow you to control the
font, size, and other attributes of a selected range of text, part of the
default, or part of a style.
• Character attributes determine how text looks on the page. Size,
typeface, and character width (or horizontal scale) are a few of the
attributes that you can set in PageMaker.
• Double-clicking the Line tools will display the Custom Stroke dialog
box:
• You can use the Custom Stroke dialog box to apply fill and stroke for
drawn rectangles, polygons, or ellipses (including frames). Specify
whether the stroke or fill of the object should overprint; and also set an
object-level tint for either the stroke or the fill.
FOR USE AT THE LICENSED SITE(S) ONLY
Cheltenham Computer Training 1995-2001 - www.cctglobal.com
Page 51

Tools 43
PageMaker 6.5 Foundation 2001 Cheltenham Computer Training
Using the
Rounded
Corners
dialog box
• Double-clicking the Rectangle tool will display the Rounded Corners
dialog box:
• The Rounded Corners dialog box allows you to select the shape of
corners when a PageMaker-drawn box is selected.
• After you create a rectangle, you can change the shape of its corners.
• After you create a polygon, you can add, move, or delete its vertices
and line segments.
• For regular polygons only (created by dragging the polygon tool), you
can also use the Element > Polygon Settings command to change
the number of sides it has, and its inset value (the angle at which the
sides point toward the center of the shape).
Note: With no object selected, the chosen setting becomes the default
for PageMaker-drawn boxes. Unavailable if the selected object is not
a box drawn in PageMaker.
FOR USE AT THE LICENSED SITE(S) ONLY
Cheltenham Computer Training 1995-2001 - www.cctglobal.com
Page 52

44 Tools
2001 Cheltenham Computer Training PageMaker 6.5 Foundation
Using the Fill
and Stroke
dialog box
• Double-clicking the Ellipse tool will display the Fill and Stroke dialog
box:
• You can modify objects a number of ways with Fill and Strokes. For
example, you can resize, rotate, and add color to objects. For objects
drawn with PageMaker drawing tools, you can also change stroke (the
width of lines drawn with the drawing tools, and the width of borders
around rectangles, ellipses, and polygons), as well as stroke and fill
patterns.
Note: Changes you make to color attributes do not affect an object if
Reverse is selected from the Stroke drop-down menu, or if Paper is
selected from the Fill drop-down menu.
FOR USE AT THE LICENSED SITE(S) ONLY
Cheltenham Computer Training 1995-2001 - www.cctglobal.com
Page 53
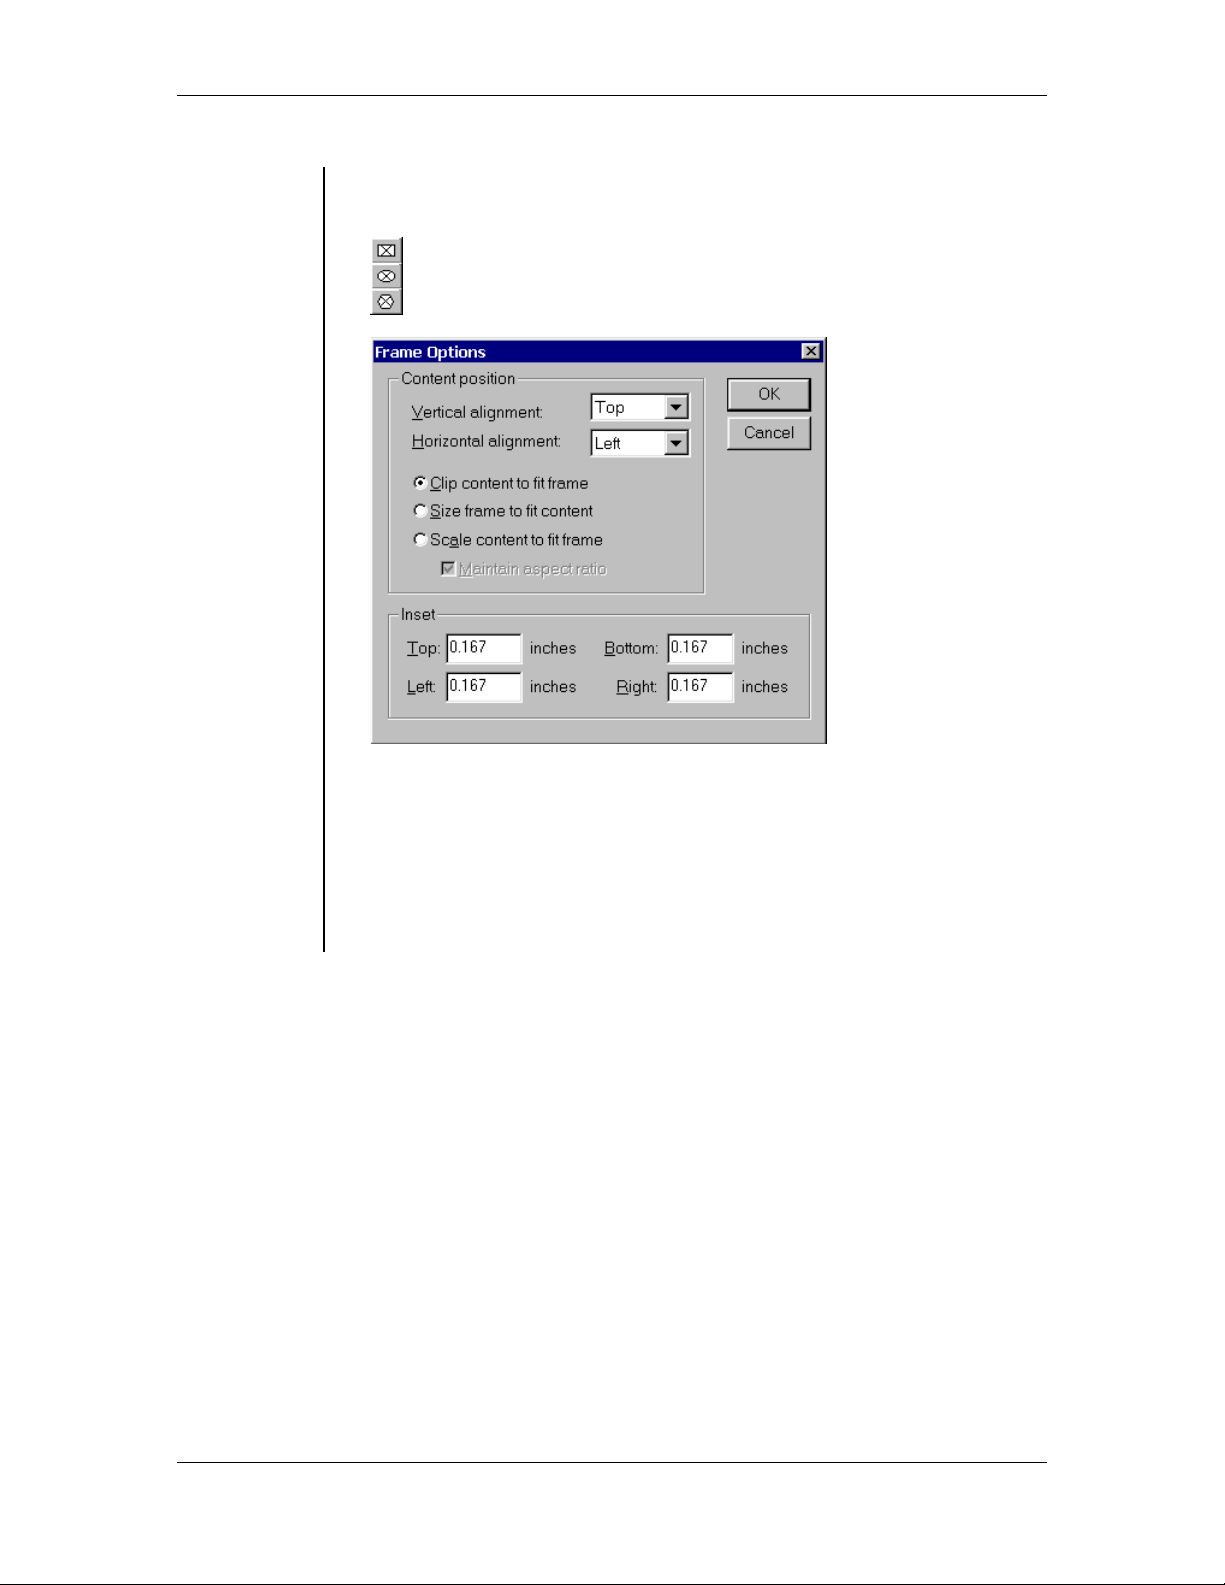
Tools 45
PageMaker 6.5 Foundation 2001 Cheltenham Computer Training
Using the
Frame
Options
• Double-clicking the Frame tools will display the Frame Options dialog
box:
dialog box
• The Frame Options dialog box allows you to specify alignment and
offset for text or graphics within a frame. This is unavailable if a frame
is not selected.
Note: If you don't want a border around the frame, select the frame,
and choose Element > Stroke > None. A non-printing, light-gray
border appears around the frame. If you want to hide the non-printing
border, choose View > Hide Guides.
FOR USE AT THE LICENSED SITE(S) ONLY
Cheltenham Computer Training 1995-2001 - www.cctglobal.com
Page 54

46 Tools
2001 Cheltenham Computer Training PageMaker 6.5 Foundation
Using the
Polygon
Settings
dialog box
• Double-clicking the Polygon tools will display the Polygon Settings
dialog box:
• The Polygon Settings dialog box allows you to change the shape of
polygons. You can change the number of sides (up to 100) and the
degree to which the sides are inset to form a star. With no object
selected, the chosen setting becomes the default for PageMakerdrawn polygons. This is unavailable if the selected object is not a
polygon drawn in PageMaker.
FOR USE AT THE LICENSED SITE(S) ONLY
Cheltenham Computer Training 1995-2001 - www.cctglobal.com
Page 55

Tools 47
PageMaker 6.5 Foundation 2001 Cheltenham Computer Training
Review Questions
Review Questions
How would
you:
© Cheltenham Computer Training 2001
• Use the Pointer Tool?
• Use the Text Tool?
• Use the Rotating Tool?
• Use the Cropping Tool?
• Use Drawing Tools?
• Use the Line Tool?
• Use the Constrained Line Tool?
• Use the Rectangle Tool?
• Use the Rectangle Frame Tool?
• Use the Ellipse Tool?
• Use the Ellipse Frame Tool?
• Use the Polygon Tool?
• Use the Polygon Frame Tool?
• Use Visual Tools?
• Use the Hand Tool?
• Use the Zoom Tool?
• Use the Preferences dialog box?
• Use the Character Specifications dialog box?
• Use the Custom Stroke dialog box?
• Use the Rounded Corners dialog box?
• Use the Fill and Stroke dialog box?
• Use the Frame Options dialog box?
• Use the Polygon Settings dialog box?
Adobe PageMaker 6.5 - Slide No 22
FOR USE AT THE LICENSED SITE(S) ONLY
Cheltenham Computer Training 1995-2001 - www.cctglobal.com
Page 56

Page 57

Colors and Fills 49
PageMaker 6.5 Foundation 2001 Cheltenham Computer Training
Colors and Fills
When you
have
completed
this learning
module you
will have
seen how to:
• Use the Define Colors dialog box
• Create Colors
• Edit Colors
• Remove Colors
• Use the Color Options dialog box
• Apply a Color Name
• Apply Color Type
• Apply a Color Model
• Apply a Color Field
• Preview Colors
• Use the Stroke Button
• Use the Fill Button
• Use the Both Button
• Apply the Tint Percentage
• Use the Color Icon
• Use the Color Model Icon
• Use the Color Type Icon
• Use the EPS Color Icon
• Use the Color-Level Tint Icon
• Use the CMS Display
• Use the New Color Button
• Use the Trash Button
FOR USE AT THE LICENSED SITE(S) ONLY
Cheltenham Computer Training 1995-2001 - www.cctglobal.com
Page 58

50 Colors and Fills
2001 Cheltenham Computer Training PageMaker 6.5 Foundation
Custom Colors
Custom Colors
• You can create custom
colors using the Define
Colors dialog box.
• To open the Define
Colors dialog box,
choose Utilities > Define
Colors.
Using the
Define Colors
dialog box
© Cheltenham Computer Training 2001
• To open the Define Colors
dialog box, choose Utilities
> Define Colors:
• The Define Colors dialog
box allows you to create,
edit and rename the colors
for use in your publication:
Adobe PageMaker 6.5 - Slide No 23
FOR USE AT THE LICENSED SITE(S) ONLY
Cheltenham Computer Training 1995-2001 - www.cctglobal.com
Page 59
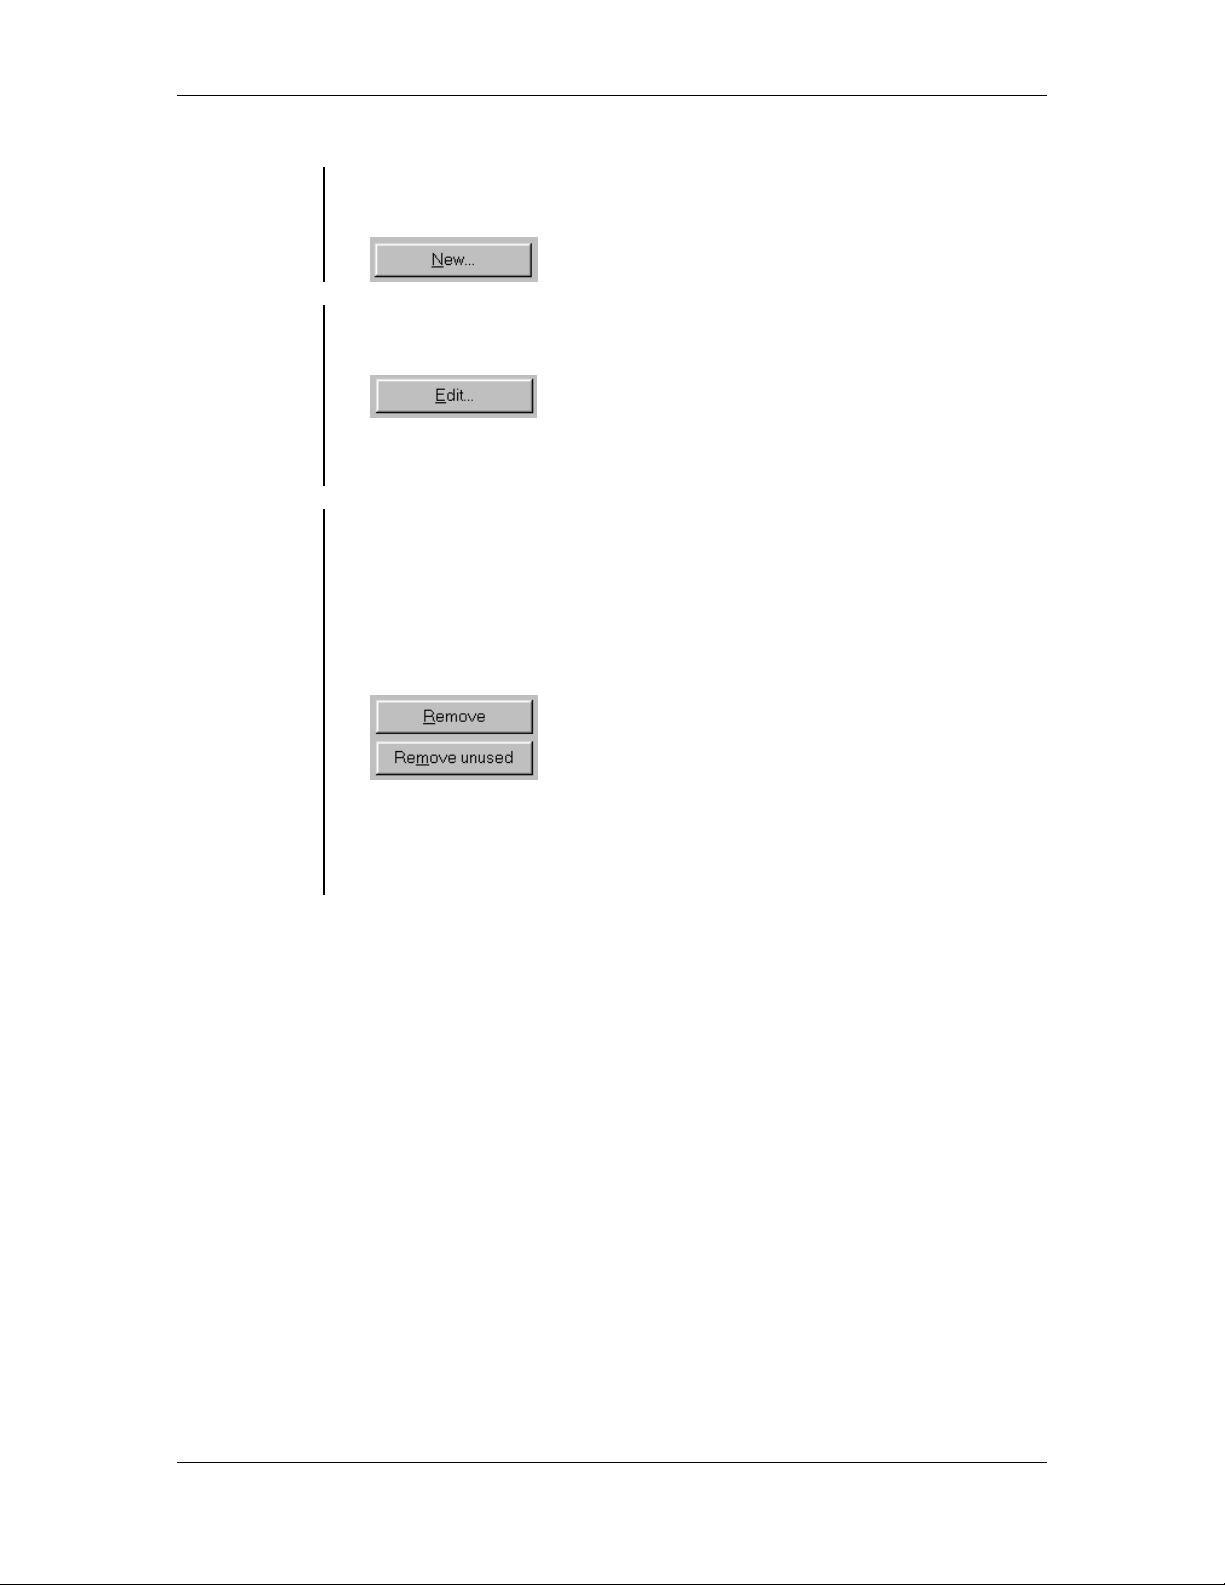
Colors and Fills 51
PageMaker 6.5 Foundation 2001 Cheltenham Computer Training
Creating
Colors
• Creating new Spot and Process colors is simple. To create a New
Color, select the New button to open the Color Options dialog box:
Editing
Colors
Removing
Colors
• When you Edit Colors, PageMaker will automatically update any
objects that the color was applied to:
Note: You can edit the definition of a Spot color imported with an EPS
graphic, but you cannot change its name or its Overprint setting.
• When you Remove Color, PageMaker will apply the color Black to
any text or graphic to which the color you removed was applied. Tints
that used the removed color also change to tints of Black. You can
remove a color from a PageMaker-drawn graphic, and remove a color
from the active publication.
• To remove all the colors defined but not being used, from the active
publication, select the Remove Unused button:
Note: You cannot remove the colors None, Paper, Black, and
Registration. Also note that you can remove colors imported with an
EPS graphic only if the EPS graphic itself has been deleted from the
publication.
FOR USE AT THE LICENSED SITE(S) ONLY
Cheltenham Computer Training 1995-2001 - www.cctglobal.com
Page 60

52 Colors and Fills
2001 Cheltenham Computer Training PageMaker 6.5 Foundation
Color Options Dialog Box
Color Options Dialog Box
• To select a color or choose
a color model (such as
RGB), go to the Color
Options dialog box by
choosing Utilities > Define
Color and clicking the New
button.
Using the
Color
Options
dialog box
© Cheltenham Computer Training 2001
Adobe PageMaker 6.5 - Slide No 24
• To select a color or choose a color model (such as RGB), go to the
Color Options dialog box by choosing Utilities > Define Color and
clicking the New button:
Note: You can also click the New Color icon at the bottom of the
Colors palette to open the Color Options dialog box.
FOR USE AT THE LICENSED SITE(S) ONLY
Cheltenham Computer Training 1995-2001 - www.cctglobal.com
Page 61

Colors and Fills 53
PageMaker 6.5 Foundation 2001 Cheltenham Computer Training
Applying a
Color Name
• Cyan, black, and yellow are just a few of the colors to name when
trying to define a color in the color Name field. Black is the default
color:
Applying
Color Type
Note: It is good idea to include the different color values you used to
create the color, rather than just giving the color a creative name. This
will help you keep track of how the color was created without always
having to keep going to the Color Options dialog box. If creating a
blue color using 100% cyan and 75% magenta, the color would be
something like: Blue C100, M75. If the value of a color is 0% you do
not need to include in the name.
• Color Type can be changed to Spot, Process, or Tint:
Spot – Use when you do not want the color to print as a separation or
when you want to use Pantone colors. Spot colors are often
preferred as a way to use color without drastically increasing printing
cost.
Process – Use in conjunction with the CYMK color model. Process
colors are colors that you want to separate when they are printed.
Tint – Use when you want to use tints of a color. You can choose
values of 0 – 100%. The Color Model field will change to a Base
Color field when you select the Tint color type:
Note: You cannot create a tint of a color that you are currently editing;
if you try you will get a warning:
FOR USE AT THE LICENSED SITE(S) ONLY
Cheltenham Computer Training 1995-2001 - www.cctglobal.com
Page 62

54 Colors and Fills
2001 Cheltenham Computer Training PageMaker 6.5 Foundation
Applying a
Color Model
• The Color Model can be changed to CMYK, RGB or HLS:
Applying a
Color Field
Note: You can use any of the models to create a process color, but
PageMaker will convert those values to the approximate CMYK values
when you print separations or color composites. To control the final
printed colors in your publication, use the CMYK model to specify
process colors.
• In the Color fields, specify the percentages of a color to create colors,
to increase or decrease how much color is being used, type the
number in values of 0 – 100% or use the slider bar.
CMYK Color fields:
RGB Color fields:
Previewing
Colors
• The Color Preview displays a sample of the chosen colors you are
using and a sample of how the color has been modified:
FOR USE AT THE LICENSED SITE(S) ONLY
Cheltenham Computer Training 1995-2001 - www.cctglobal.com
Page 63

Colors and Fills 55
PageMaker 6.5 Foundation 2001 Cheltenham Computer Training
Colors Palette
Colors Palette
Fill Button
Using the
Stroke Button
Stroke Button
Both Button
Color Icon
CMS Color Model
and Ink Value
Create New color Icon
© Cheltenham Computer Training 2001
Tint Drop down list
Color Model Icon
Color Type Icon
Trash Icon
Adobe PageMaker 6.5 - Slide No 25
• The Stroke button specifies the line weight and pattern for the
rectangle, ellipse, or polygon tool. You can specify other line weights
in one-tenth of a point, up to 800 points:
FOR USE AT THE LICENSED SITE(S) ONLY
Cheltenham Computer Training 1995-2001 - www.cctglobal.com
Page 64

56 Colors and Fills
2001 Cheltenham Computer Training PageMaker 6.5 Foundation
Using the Fill
Button
• The Fill button lets you specify a fill or pattern when drawing a
rectangle, ellipse, or polygon:
• To select a pattern fill choose the Element > Fill command:
Using the
Both Button
Applying the
Tint
Percentage
Using the
Color Icon
Note: A pattern fill can also be applied to a selected box or oval. With
the exception of None color, the patterns are opaque, hiding whatever
is behind them.
• The Both button allows you to colorize the stroke, and the fill at the
same time with the same color:
• The Tint Percentage pop-up menu in the Colors palette determines
the percentage of the base color to apply to an object. The advantage
of this kind of tint is it can be applied instantly:
• The Color icon gives you a swatch to indicate how the color will look
when it is applied to an object:
FOR USE AT THE LICENSED SITE(S) ONLY
Cheltenham Computer Training 1995-2001 - www.cctglobal.com
Page 65

Colors and Fills 57
PageMaker 6.5 Foundation 2001 Cheltenham Computer Training
Using the
Color Model
Icon
• The Color Model icon represents the colors model set in the Color
Options dialog box.
Using the
Color Type
Icon
Using the
EPS Color
Icon
Using the
Color-Level
Tint Icon
CMYK Color Model:
RGB Color Model:
HLS Color Model:
• The Color Type icon indicates the color types set in the Color
Options dialog box.
Process Color icon:
Spot Color icon:
• EPS Color icon appears when you place EPS graphics containing
Process or Spot colors into the publication:
• Color-level Tint icon indicates that the color you are looking at is
using a Color-level tint of a color found in your color list:
Using the
CMS Display
Using the
New Color
Button
Using the
Trash Button
• CMS Display indicates the Color Model, Ink value, and/or Tint Value
of a selected color:
• The New Color button allows you to quickly choose new colors from
the palette:
• The Trash button offers a quick and convenient way of deleting colors:
FOR USE AT THE LICENSED SITE(S) ONLY
Cheltenham Computer Training 1995-2001 - www.cctglobal.com
Page 66

58 Colors and Fills
2001 Cheltenham Computer Training PageMaker 6.5 Foundation
Review Questions
Review Questions
How would
you:
© Cheltenham Computer Training 2001
• Use the Define Colors dialog box?
• Create Colors?
• Edit Colors?
• Remove Colors?
• Use the Color Options dialog box?
• Apply a Color Name?
• Apply Color Type?
• Apply a Color Model?
• Apply a Color Field?
• Preview Colors?
• Use the Stroke Button?
• Use the Fill Button?
• Use the Both Button?
• Apply the Tint Percentage?
• Use the Color Icon?
• Use the Color Model Icon?
• Use the Color Type Icon?
• Use the EPS Color Icon?
• Use the Color-Level Tint Icon?
• Use the CMS Display?
• Use the New Color Button?
• Use the Trash Button?
Adobe PageMaker 6.5 - Slide No 26
FOR USE AT THE LICENSED SITE(S) ONLY
Cheltenham Computer Training 1995-2001 - www.cctglobal.com
Page 67

Text 59
PageMaker 6.5 Foundation 2001 Cheltenham Computer Training
Text
When you
have
completed
this learning
module you
will have
seen how to:
• Use Text Blocks
• Use Text Frames
• Input text into a Text Block
• Input text into a Text Frame
• Use the Place dialog box
• Choose File Name
• Choose File Types
• Set Place
• Set Options
• Highlight text
• Add and Remove text
• Copy, Cut and Paste text
• Use the Character View
• Use the Paragraph View
• Use the Character Specifications dialog box
• Choose Font Names
• Set Font Size
• Set Leading
• Set Horizontal Scale
• Set text Color
• Set Color Tint
• Set Type Style
• Set Position
• Set Case
• Set Track
• Set Line End
FOR USE AT THE LICENSED SITE(S) ONLY
Cheltenham Computer Training 1995-2001 - www.cctglobal.com
Page 68

60 Text
2001 Cheltenham Computer Training PageMaker 6.5 Foundation
Blocks Vs. Frames
Blocks Vs. Frames
• A Text Block is one of two
ways in which PageMaker
allows you to add Text to
your publication.
• A Frame becomes a Text
Frame or a Graphics Frame
depending on the content
you add into it.
Using Text
Blocks
To Create a
Text Block
© Cheltenham Computer Training 2001
Adobe PageMaker 6.5 - Slide No 27
A Text Block is one of two ways in which PageMaker allows you to add
Text to your publication. The height or width of a Text Block will change
as you add or remove text.
• Select the text tool from the tools palette.
• Click and drag the mouse to the desired size:
• Enter in the desired text.
FOR USE AT THE LICENSED SITE(S) ONLY
Cheltenham Computer Training 1995-2001 - www.cctglobal.com
Page 69
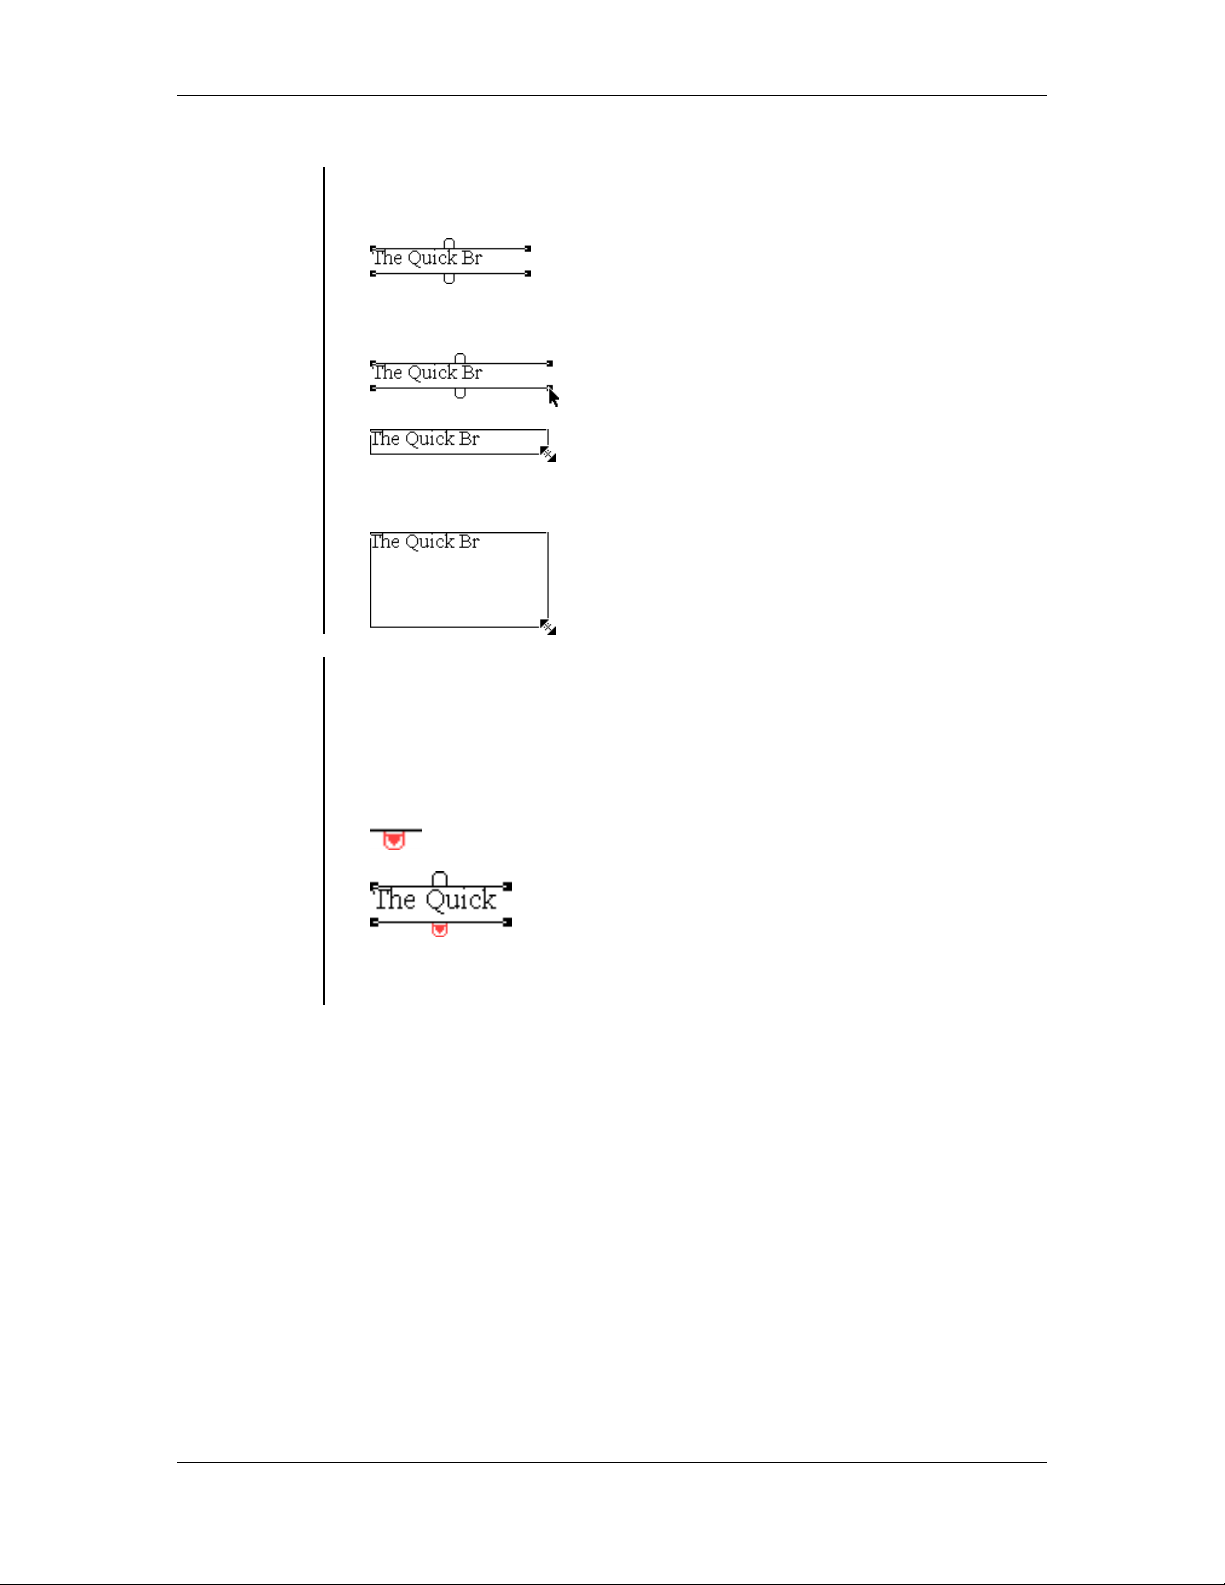
Text 61
PageMaker 6.5 Foundation 2001 Cheltenham Computer Training
To Resize a
Text Block
• Select the Pointer Tool from the tools Palette.
• Select the Text block you would like to resize:
Overset Text
Icon
• Select the text block handle:
• Click and drag the handle to the new desired size:
• When resizing a Text Block you have to click and then drag the text
block handle from one of its corner points to the new desired size of
the text block. If you make the text block smaller than it original size
you will cause the text to become overset. If the text becomes
overset, an Overset Text icon will indicate that not all of the text fit
inside the new text block size:
Note: A text block must be rectangular; and if it is empty it will
disappear. It is also not possible to apply a stroke or fill to a text block.
FOR USE AT THE LICENSED SITE(S) ONLY
Cheltenham Computer Training 1995-2001 - www.cctglobal.com
Page 70

62 Text
2001 Cheltenham Computer Training PageMaker 6.5 Foundation
Using Text
Frames
• A Frame becomes a Text Frame or a Graphics Frame depending on
the content you add into it. Once you add a graphic to a new frame,
the frame becomes a graphic frame and you cannot include text into
the frame, unless you first delete or detach the graphic from the frame.
• A Text Frame functions in much the same way as the Text block, but
unlike the text block the text frame the height or width will not change
as you add or remove text. Also unlike the text block, empty text
frames will not disappear and It is possible to apply strokes or fills to
text frames:
To Create a
Text Frame
• Select a Frame Tool.
• Click and drag the mouse to the desired size:
• Select the text tool from the tools palette.
• Place the mouse inside of the frame and click the mouse button:
• Enter in the desired text.
FOR USE AT THE LICENSED SITE(S) ONLY
Cheltenham Computer Training 1995-2001 - www.cctglobal.com
Page 71

Text 63
PageMaker 6.5 Foundation 2001 Cheltenham Computer Training
To Resize a
Text Frame
• Select the Pointer Tool from the tools palette.
• Select the Text Frame you would like to resize:
Overset Text
Icon
• Select the Text Frame handle:
• Click and drag the handle to the new desired size:
•
FOR USE AT THE LICENSED SITE(S) ONLY
Cheltenham Computer Training 1995-2001 - www.cctglobal.com
Page 72

64 Text
2001 Cheltenham Computer Training PageMaker 6.5 Foundation
Inputting Text
Inputting Text
• To Input Text into a
Text Block.
To Input Text into a
•
Text Frame.
Inputting text
into a Text
Block
© Cheltenham Computer Training 2001
Adobe PageMaker 6.5 - Slide No 28
• Create a text block to the desired size:
• You will see a flashing curser appear on the screen, you can begin to
enter in your desired text:
FOR USE AT THE LICENSED SITE(S) ONLY
Cheltenham Computer Training 1995-2001 - www.cctglobal.com
Page 73

Text 65
PageMaker 6.5 Foundation 2001 Cheltenham Computer Training
Inputting text
into a Text
• Create your text frame to the desired size:
Frame
• With the text tool selected place the cursor inside of the frame:
• Click the mouse button:
• Enter in the desired text:
FOR USE AT THE LICENSED SITE(S) ONLY
Cheltenham Computer Training 1995-2001 - www.cctglobal.com
Page 74

66 Text
2001 Cheltenham Computer Training PageMaker 6.5 Foundation
Placing Text
Placing Text
• The Place Dialog Box
allows you to import text
from various sources.
• PageMaker can import
such files as Spreadsheet
or Database documents,
Word-Processed
documents, another
PageMaker Story files,
ASCII text files, Rich Text
files and HTML files.
Using the
Place dialog
box
© Cheltenham Computer Training 2001
• To open the Place dialog box:
From the main menu, choose File > Place
press the Ctrl + D key combination:
OR
Adobe PageMaker 6.5 - Slide No 29
FOR USE AT THE LICENSED SITE(S) ONLY
Cheltenham Computer Training 1995-2001 - www.cctglobal.com
Page 75

Text 67
PageMaker 6.5 Foundation 2001 Cheltenham Computer Training
• The Place dialog box allows you to import text (and graphics) from
various sources. PageMaker can import such files as Spreadsheet or
Database documents, Word-Processed documents, another
PageMaker Story files, ASCII text files, Rich Text files and HTML
files. The files you can place depend in part on the import filters you
have installed:
• When you open a text file to be placed into your publication, your
mouse pointer will become a Loaded Text Icon:
Note: If you try to place a file that PageMaker does not have a filter
installed for, you will get a Caution dialog box, which will allow you to
use other installed filters to try and open the file:
FOR USE AT THE LICENSED SITE(S) ONLY
Cheltenham Computer Training 1995-2001 - www.cctglobal.com
Page 76
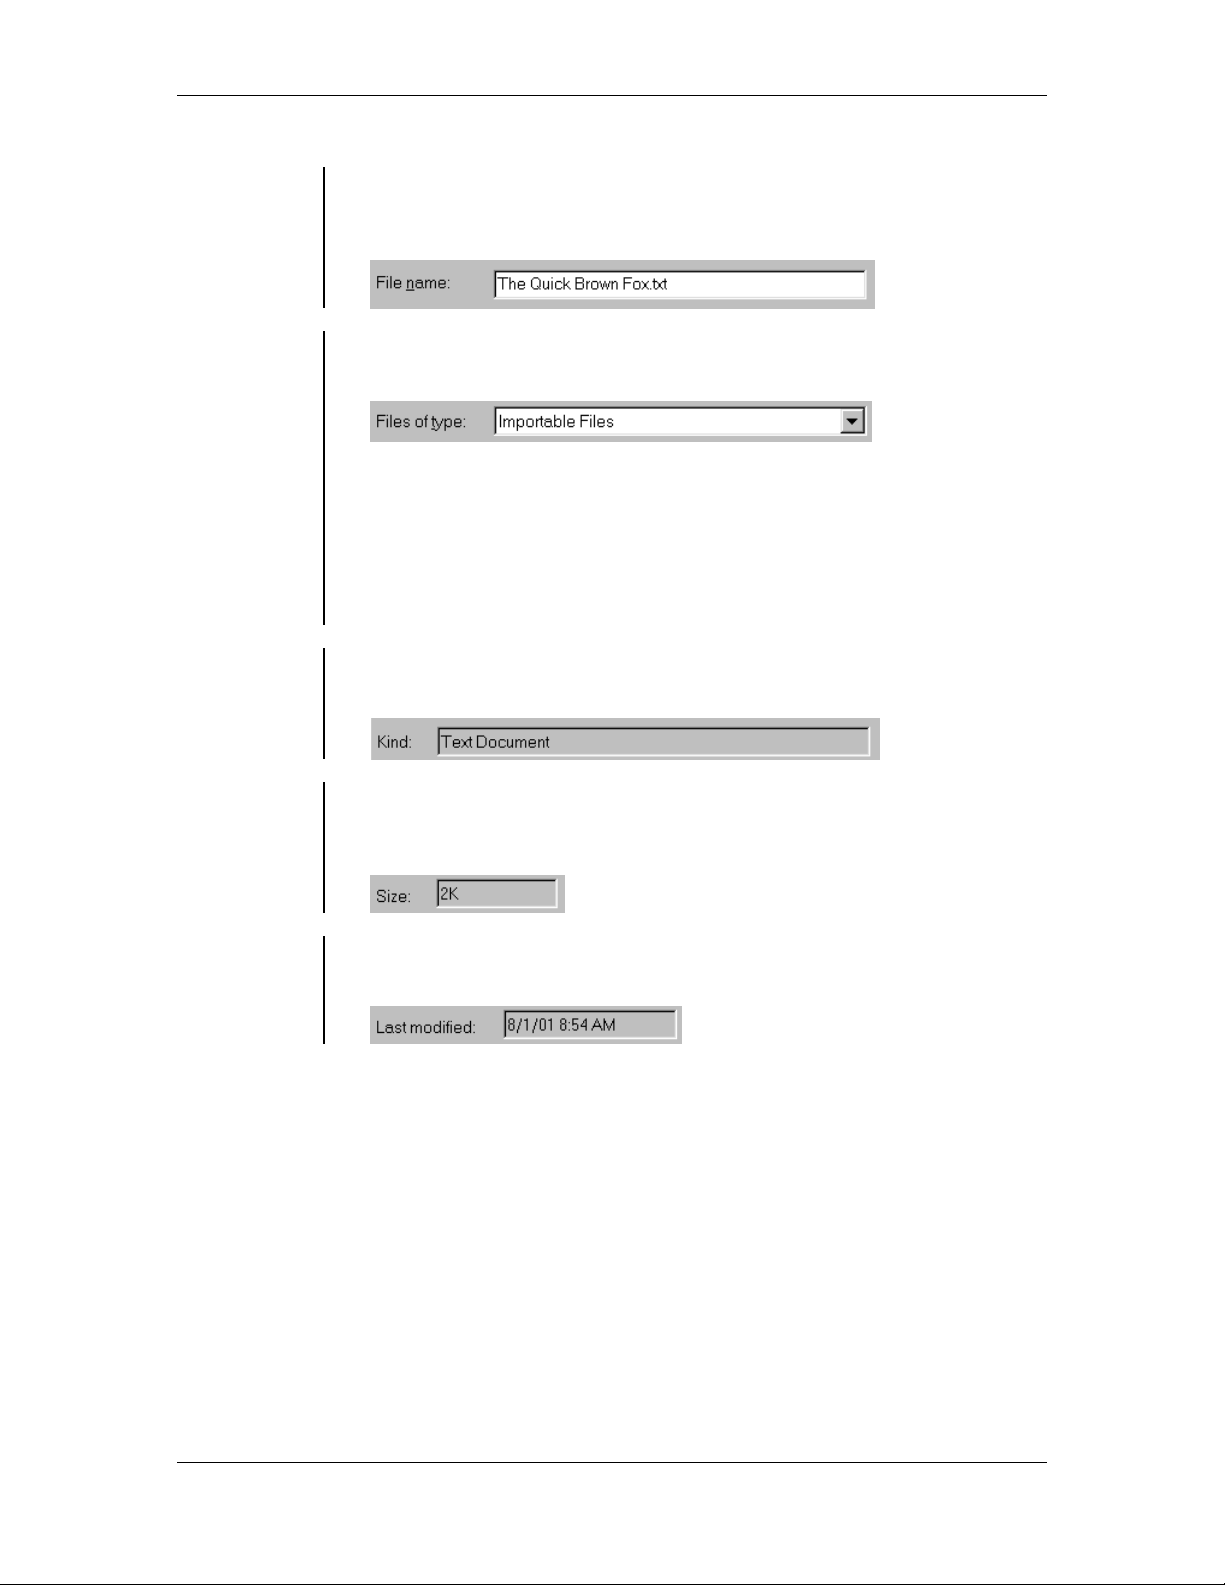
68 Text
2001 Cheltenham Computer Training PageMaker 6.5 Foundation
Choosing File
Name
• The File Name field is where you enter in the name of the text file you
are looking for. You can also use the Explorer window to locate your
file:
Choosing File
Types
Kind field
Size field
• The Files of Type drop-down list allows you to decide which kinds of
files you want to place into your PageMaker publications:
Note: Depending on the import filter you have installed you will be
able to place files from other PageMaker publications, Wordprocessing applications (WordPerfect, Microsoft Word, and Microsoft
Works), HTML files, Text or Table editors or any application that can
export text in ASCII format, Spreadsheet files from Excel or Lotus 1-23 formats, and Database files (dBASE and dBASE-compatible
applications).
• The Kind field tells you the type of document is being chosen to place,
whether it’s Microsoft application Document, or other Text Document:
• The Size field informs you of how large the file size is. The file size is
important in cases where you need to control the file size of your
publication:
Last Modified
field
• The Last Modified field allows you to see the date and time of when
the selected file was last modified:
FOR USE AT THE LICENSED SITE(S) ONLY
Cheltenham Computer Training 1995-2001 - www.cctglobal.com
Page 77

Text 69
PageMaker 6.5 Foundation 2001 Cheltenham Computer Training
Setting Place
• Place options radio buttons allow you to determine how the text you
are importing will be placed into your publication:
Setting
Options
• The As New Story option adds the placed file as a new story,
separate from the existing stories in your publication.
• The Replacing Entire Story option will delete a selected story from
your publication and replaces it with the new one you have select to
place. PageMaker will also preserve the position, size, and orientation
text object you are replacing.
• The Inserting Text option will place the placed text at the insertion
point, without deleting the existing text.
• The Replacing Selected Text option will delete text, which you have
selected in your publication, and replace it with the new text you have
selected to place.
• The Options settings allow you to determine how the text you are
importing will behave when it is being placed:
• The Retain Format option allows you to retain any character or
paragraph formatting and the style sheet when the text is imported, if
the file contains one:
• The Convert Quotes option converts the quotation marks and
apostrophes of the selected file into typographer's quotation marks
and apostrophes:
• The Read Tags option allows you to apply paragraph styles to text
when it is placed:
FOR USE AT THE LICENSED SITE(S) ONLY
Cheltenham Computer Training 1995-2001 - www.cctglobal.com
Page 78

70 Text
2001 Cheltenham Computer Training PageMaker 6.5 Foundation
Text-Only
Import Filters
• The Text-Only Import filters allow you to further adjust how the
imported text will appear when it is placed:
FOR USE AT THE LICENSED SITE(S) ONLY
Cheltenham Computer Training 1995-2001 - www.cctglobal.com
Page 79

Text 71
PageMaker 6.5 Foundation 2001 Cheltenham Computer Training
Editing Text
Editing Text
• To edit text, first
you need to
Highlight text in
a Text Frame or
Text Block with
the mouse.
Then delete
•
existing text or
add new text.
To Highlight
Text in a Text
frame or text
block with
the mouse
© Cheltenham Computer Training 2001
Adobe PageMaker 6.5 - Slide No 30
• Place the cursor at the appropriate end of the selected sentence:
• Click and drag the cursor over the sentence, word or character you
would like to highlight:
• Edit the highlighted text:
FOR USE AT THE LICENSED SITE(S) ONLY
Cheltenham Computer Training 1995-2001 - www.cctglobal.com
Page 80

72 Text
2001 Cheltenham Computer Training PageMaker 6.5 Foundation
To Highlight
Text in a Text
frame or text
block with
the keyboard
• Place the insertion point at the start of the range of characters you
want to highlight and click the mouse button.
• Hold down Shift key.
• Press the Arrow keys to extend the selection either one character at a
time by using the Right or Left arrow keys or one line at a time by
using the Up or Down arrow keys.
• Note: You can also use the Keyboard and mouse together to
Highlight text. To do this:
• Place the insertion point at the start of the range of characters you
want to highlight and click the mouse button.
• Hold down Shift key.
• Place the insertion point and the end of the range of characters you
would like to highlight and click the mouse button again to highlight the
desired range.
Adding and
Removing
text
• Highlight the text you want to edit or place the insertion point at the
beginning of the location where you would like to add the text.
• Enter in the new text information or press the Delete or Backspace
key to remove the unwanted text.
Copying,
Cutting and
Pasting text
• The standard editing commands for moving information back and forth
from one location to another are the Cut, Copy, Paste, and Clear
commands.
To Copy Text
• Highlight the desired text.
To Paste the
copied Text
• From the main menu, choose Edit > Copy
press the Ctrl + C key combination
OR
• Place the cursor where you would like to Paste the Copied text,
• From the main menu, choose Edit > Paste
press the Ctrl + V key combination
OR
FOR USE AT THE LICENSED SITE(S) ONLY
Cheltenham Computer Training 1995-2001 - www.cctglobal.com
Page 81
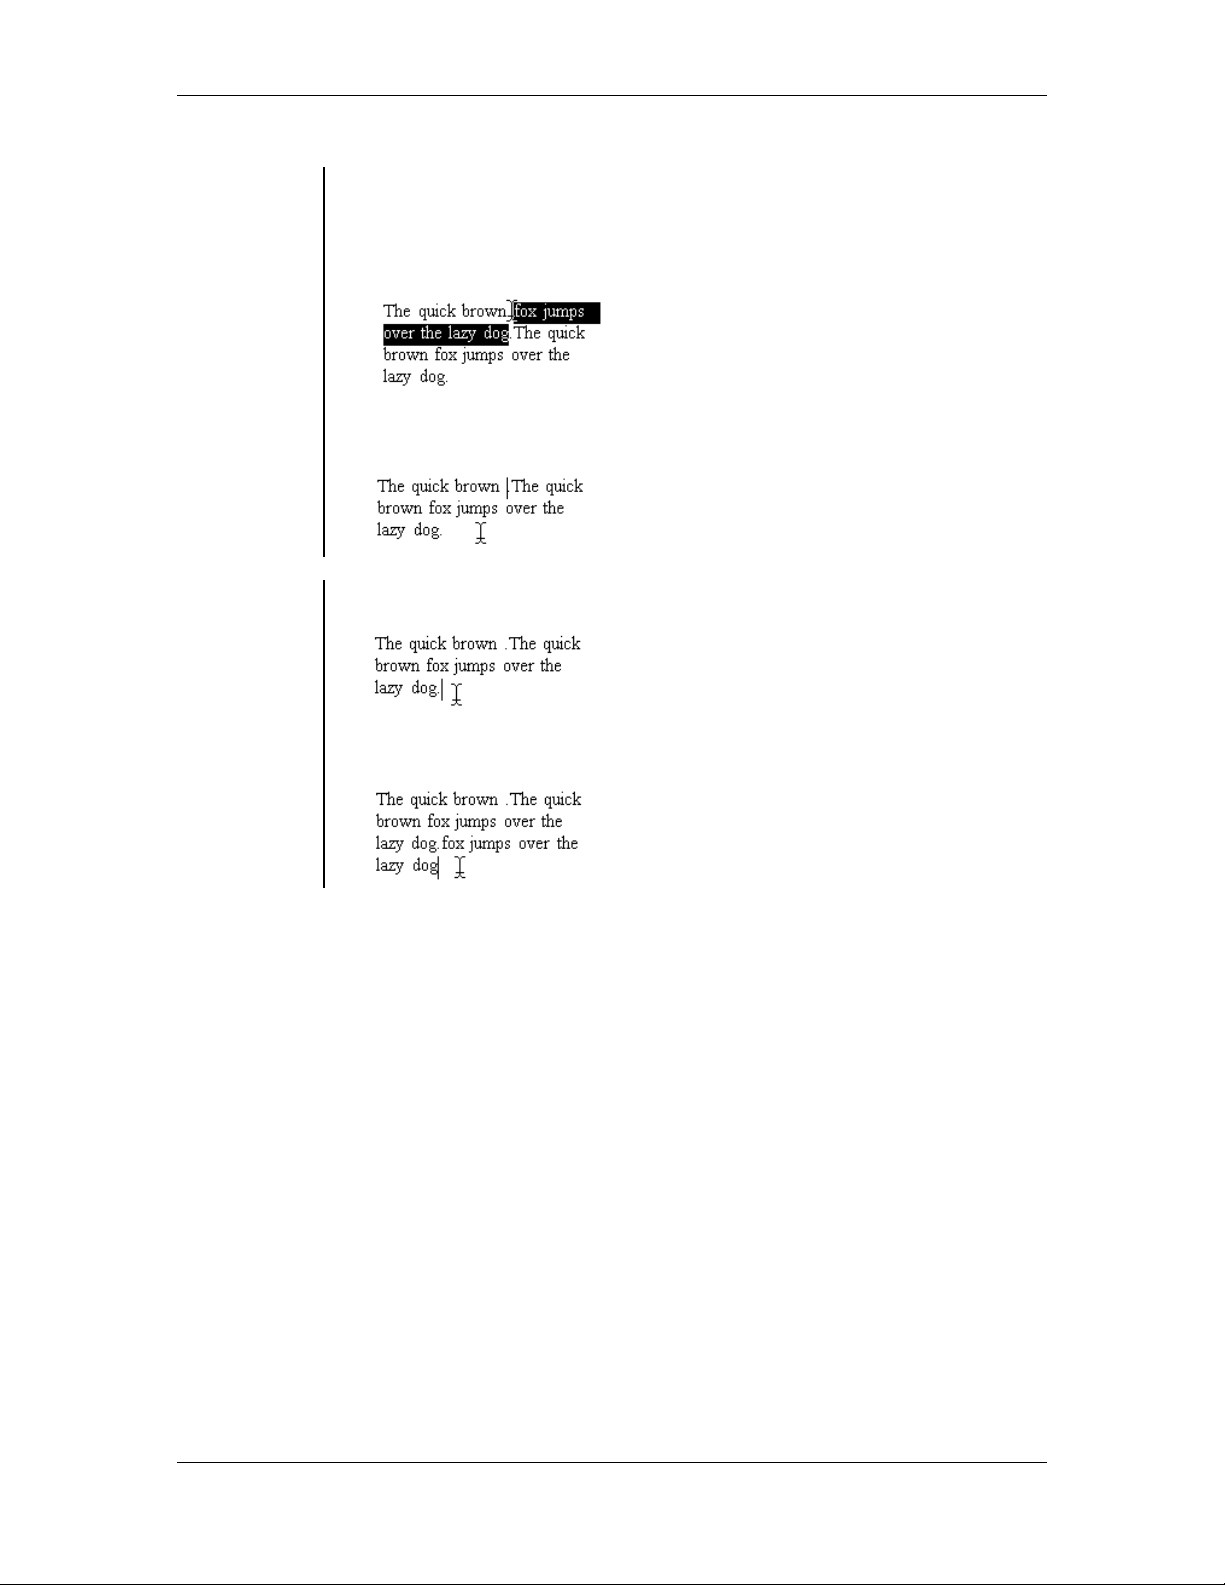
Text 73
PageMaker 6.5 Foundation 2001 Cheltenham Computer Training
To Cut Text
and Paste
• Highlight the desired text you would like to Cut.
• From the main menu, choose Edit > Cut
press the Ctrl + X key combination
OR
To Paste the
cut Text
• After you select the Cut command, the highlighted text will be removed.
• Place the cursor where you want to paste the cut text:
• Paste the cut text where it is required:
FOR USE AT THE LICENSED SITE(S) ONLY
Cheltenham Computer Training 1995-2001 - www.cctglobal.com
Page 82

74 Text
2001 Cheltenham Computer Training PageMaker 6.5 Foundation
Text Control Palette
Text Control Palette
• In the Character View click
one of the font options in
the Control palette.
• Use the toggling buttons to
choose the Type style,
Case, Position, Type Size,
Leading, Expert tracking,
Horizontal Scale, Kerning,
and Baseline Shift to
format the text.
Using the
Character
View
Using the
Paragraph
View
© Cheltenham Computer Training 2001
Adobe PageMaker 6.5 - Slide No 31
• To display the Control palette, choose Window > Show Control
Palette. When you have selected the Text tool, Text Block or the Text
Frame, the Character View will be automatically displayed in the
Control palette.
• In the Character View click one of the font options in the Control
palette. Use the toggling buttons to choose the Type style, Case,
Position, Type Size, Leading, Expert tracking, Horizontal Scale,
Kerning, and Baseline Shift:
• To display the Control palette Paragraph setting, choose Window >
Show Control Palette to display the Control palette, then select the
Paragraph Icon to open display the Paragraph View.
• The Paragraph View of the Control palette offers many of the same
options as the Character View. Such as, Apply button,
Character/Paragraph buttons Alignment, Style, Cursor position
indicator, First line indent, Right indent, Left indent, Add space above
paragraph, Grid options, Add space after paragraph:
FOR USE AT THE LICENSED SITE(S) ONLY
Cheltenham Computer Training 1995-2001 - www.cctglobal.com
Page 83

Text 75
PageMaker 6.5 Foundation 2001 Cheltenham Computer Training
Character Specifications Dialog Box
Character Specifications Dialog Box
• The Character
Specifications dialog box
allows you to format the
text in your publication.
• If you open the dialog box
without having any text
items selected, any
changes you make will
become the default setting
for the text you will use in
your publication.
Using the
Character
Specification
s dialog box
To display
the Character
Specification
s dialog box
Choosing
Font Names
© Cheltenham Computer Training 2001
Adobe PageMaker 6.5 - Slide No 32
• The Character Specifications Dialog Box allows you to format the
text in your publication. If you open the dialog box without having any
text items selected, any changes you make will become the default
setting for the text you will use in your publication.
• From the main menu, choose Text > Character
press the Ctrl + T key combination:
OR
• The Font drop-down list allows you to select a font to use in your
publication or change an existing font:
FOR USE AT THE LICENSED SITE(S) ONLY
Cheltenham Computer Training 1995-2001 - www.cctglobal.com
Page 84

76 Text
2001 Cheltenham Computer Training PageMaker 6.5 Foundation
Setting Font
Size
• The Size drop-down list allows you to specify the size of your type in
points:
Setting
Leading
Setting
Horizontal
Scale
Setting text
Color
Setting Color
Tint
Note: You can only select font sizes from 4 to 650 points in increments
of 0.1.
• The Leading drop-down list allows you to adjust the vertical space
between lines of text:
Note: Like letter and word spacing, the right amount of leading makes
text easier to read.
• The Horizontal Scale drop-down list allows you to adjust the width of
characters:
Note: You can specify a custom width anywhere from 5 to 250 percent.
• The Color drop-down list allows you to add color to text:
Note: You cannot apply the None color to text.
• The Tint drop-down list allows you to specify a tint of a color from the
Color drop-down list:
Note: If you apply a tint to the color Paper or Registration you see no
change take place.
FOR USE AT THE LICENSED SITE(S) ONLY
Cheltenham Computer Training 1995-2001 - www.cctglobal.com
Page 85

Text 77
PageMaker 6.5 Foundation 2001 Cheltenham Computer Training
Setting Type
Style
• Type Style checkboxes allow you to make various changes to the look
of your text. You have six options to choose from:
Normal: This option will return the text back to it’s original state (with
no Style applied to it):
Bold: This option will increase the weight of your text, making it thicker:
Italic: This option will give the text a slight slant:
Underline: This option will place a horizontal line under a character or
words:
Reverse: This option will make your text white. This is used to apply
text to a Black or dark background:
Strike thru: This option will draw a horizontal line through the text:
Note: You can also combine the options to further alter the look of you
text:
FOR USE AT THE LICENSED SITE(S) ONLY
Cheltenham Computer Training 1995-2001 - www.cctglobal.com
Page 86

78 Text
2001 Cheltenham Computer Training PageMaker 6.5 Foundation
Setting
Position
• The Position drop-down list allows you to set your text to Subscript,
Superscript or Normal (no position applied):
Setting Case
Setting Track
• The Case drop-down list allows you to change the case of you text.
You have choice of Normal, All Caps or Small Caps:
• The Track drop-down list allows you quickly increase or decrease the
space between words; you have a choice of Loose and Very Loose
to increase the space, Tight and Very Tight to decrease the space,
and Normal to use the default track setting:
Setting Line
End
• The Line End option allows you to control how a line of text brakes up
in a text block or text frame. You have a choice of Break or No Break.
The Break option is the default, but if you want to force a paragraph to
fit on one line, use the No Break option:
FOR USE AT THE LICENSED SITE(S) ONLY
Cheltenham Computer Training 1995-2001 - www.cctglobal.com
Page 87

Text 79
PageMaker 6.5 Foundation 2001 Cheltenham Computer Training
Review Questions
Review Questions
How would
you:
© Cheltenham Computer Training 2001
• Use Text Blocks?
• Use Text Frames?
• Input text into a Text Block?
• Use the Place dialog box?
• Choose File Name?
• Choose File Types?
• Set Place?
• Set Options?
• Copy, Cut and Paste text?
• Use the Character View?
• Use the Paragraph View?
• Use the Character Specifications dialog box?
• Choose Font Names?
• Set Font Size?
• Set Leading?
• Set Horizontal Scale?
• Set text Color?
• Set Color Tint?
• Set Type Style?
• Set Position?
• Set Case?
• Set Track?
• Set Line End ?
Adobe PageMaker 6.5 - Slide No 33
FOR USE AT THE LICENSED SITE(S) ONLY
Cheltenham Computer Training 1995-2001 - www.cctglobal.com
Page 88

Page 89

Pictures 81
PageMaker 6.5 Foundation 2001 Cheltenham Computer Training
Pictures
When you
have
completed
this learning
module you
will have
seen how to:
• Use the Place dialog box
• Choose File Types
• Set Place
• Link and Embed Pictures
• Retain Cropping Data
• Use the Object View
• Position pictures on page
• Set the Frame Size
• Set the picture Scale
• Rotate picture
• Skew picture
• Flip picture
• Copy, Cut and Paste pictures
• Wrap Text around pictures
• Colorize pictures
• Crop pictures
• Position pictures in Frame
FOR USE AT THE LICENSED SITE(S) ONLY
Cheltenham Computer Training 1995-2001 - www.cctglobal.com
Page 90

82 Pictures
2001 Cheltenham Computer Training PageMaker 6.5 Foundation
Placing Pictures
Placing Pictures
• The Place dialog box
allows you to Import
graphics of various file
formats such as Tiff,
Eps, Jpeg and Gif.
Using the
Place dialog
box
© Cheltenham Computer Training 2001
Adobe PageMaker 6.5 - Slide No 34
• The Place dialog box allows you to Import graphics of various file
formats such as Tiff, Eps, Jpeg and Gif. The files that can be placed
in PageMaker depend on part on the graphic filters that you have
installed:
FOR USE AT THE LICENSED SITE(S) ONLY
Cheltenham Computer Training 1995-2001 - www.cctglobal.com
Page 91

Pictures 83
PageMaker 6.5 Foundation 2001 Cheltenham Computer Training
• When you open a graphic file from the place dialog box, your pointer
icon will turn into a graphic icon:
Note: The graphic files that can be placed into your publication will
depend in part on the import filters you have installed into PageMaker.
If you have a problem installing a particular file type, it may not have
the necessary filter installed.
Choosing File
Types
• There are various File Types that can be imported into PageMaker.
When you have the Importable Files option selected from the Files of
type drop-down list, the explorer window will display all the various
graphic (and text) formats that you can import into your publication
such as Tiff, Eps, Jpeg and Gif:
Kind Field
Size Field
Last Modified
Field
Setting Place
• The Kind field will indicate what type of graphic file placing into your
publication. Whether it is a TIFF image or other:
• The Size field Indicates to you how large the file you are placing will
be. The file information is important when you need to control the file
size of your publication:
• The Last Modified field allows you to see the date, and time of when
the file selected was last modified:
• The Place options allow you to
choose how a graphic is placed
in your publication:
• The As independent graphic option adds the graphic to your
publication as an independent image.
• The Replacing entire graphic option will delete a selected existing
graphic from your publication and replace it with the new placed
graphic. When the new graphic is placed, it will retain all the same
characteristic of the former graphic such as the image scale or size,
cropping data (if you select the check box), location, and even color (if
you are placing grayscale images).
FOR USE AT THE LICENSED SITE(S) ONLY
Cheltenham Computer Training 1995-2001 - www.cctglobal.com
Page 92

84 Pictures
2001 Cheltenham Computer Training PageMaker 6.5 Foundation
Linking and
Embedding
Pictures
• When you open an image from the Place dialog box, an Alert
message may appear, prompting you to include a complete copy of
the selected image into your publication. The Alert will only appear if
the placed image is larger than the default image size of 256 KBytes.
• If you select No to the prompt, you will place only a low-resolution
version of the image into your publication with a link to the High
Resolution file:
Retaining
Cropping
Data
• If you select Yes to the prompt, you will place the full high-resolution
image into your publication. The image will now be embedded into
your publication and it will increase the size of your publication more
so than when you placed the low-resolution link. The size of the
increase will depend on the size of the image:
Note: If you link an image you cannot move or delete the original
graphic. If PageMaker cannot locate the original high-resolution image
when you print, you will only get the low-resolution output. But if you
have embedded the image, all the necessary data in already there for
PageMaker to use in order to output the high-resolution publication.
• The Retain Cropping Data option keeps the cropping information
from the original image when you are replacing an image. This option
is only available when the Replacing Entire Graphic option is
selected:
FOR USE AT THE LICENSED SITE(S) ONLY
Cheltenham Computer Training 1995-2001 - www.cctglobal.com
Page 93

Pictures 85
PageMaker 6.5 Foundation 2001 Cheltenham Computer Training
Modifying Picture
Modifying Picture
• The Control Palette allows
you to adjust the size of
your picture, the location of
the picture on the page, the
size of your picture frame,
the rotation of the picture,
or the how the picture is
skewed.
Using the
Object View
Positioning
pictures on
page
© Cheltenham Computer Training 2001
Adobe PageMaker 6.5 - Slide No 35
• The Object View of the Control Palette allows you to adjust the size
of your picture, the location of the picture on the page, the size of your
picture frame, the rotation of the picture, or the how the picture is
skewed.
• From the main menu, choose Window > Show Control Palette to
display the Control palette:
• The Position field allows you to adjust the position of your picture
anywhere on the X and Y access of the publication page:
• The Nudge buttons allow you to move, resize or transform a picture
in small increments. You can also use the Shift key while you click on
the nudge button to increase the nudging by a multiply of ten:
FOR USE AT THE LICENSED SITE(S) ONLY
Cheltenham Computer Training 1995-2001 - www.cctglobal.com
Page 94

86 Pictures
2001 Cheltenham Computer Training PageMaker 6.5 Foundation
Setting the
Frame Size
• The Size field allows you to adjust the width and height of a picture
as well as the cropping rectangle:
Setting the
picture Scale
Rotating
picture
• You can also use the Cropping option in the Control palette to crop a
picture which will also reduce it’s size:
• The Percent Scale field allows you to scale your picture:
Other Scale options:
Printer resolution Scaling option
Proportional scaling option
Scaling option
• The Rotate field allows you to rotate a picture by ± 360 degrees in
increments of .01 degree. Use the Rotating tool in the toolbox to
rotate an object manually around any fixed point, or use the Rotating
option on the Control palette to rotate relative to the reference point
selected on the Proxy:
Skewing
picture
Flipping
pictures
• The Control palette can be used to Skew a picture horizontally by ± 85
degrees in increments of .01 degree.
• To skew an object, select the object.
• From the main menu, choose Window > Show Control Palette.
• Click or double-click to select a reference point on the Proxy:
• You can Flip a picture either vertically or horizontally with the
Reflection button in the control palette:
The Horizontal Reflection button:
The Vertical Reflection button:
FOR USE AT THE LICENSED SITE(S) ONLY
Cheltenham Computer Training 1995-2001 - www.cctglobal.com
Page 95

Pictures 87
PageMaker 6.5 Foundation 2001 Cheltenham Computer Training
To Copy a
Picture
• Select the desired picture.
• From the main menu, choose Edit > Copy
press the Ctrl + C key combination.
OR
To Paste the
copied
• From the main menu, choose Edit > Paste
press the Ctrl + V key combination.
OR
picture
To Cut a
picture
• Select the desired picture you would like to Cut.
• From the main menu, choose Edit > Cut
press the Ctrl + X key combination.
OR
• After you select the Cut command, the selected picture will be
removed.
To Past the
cut picture
• Paste the cut picture.
• Move it to where it is required.
Wrapping
Text around
pictures
• To Text Wrap around another text block, select the text block around
which you want text to wrap, and then choose Element > Group.
PageMaker now treats the text block like a graphic. With the grouped
text block selected, apply a text-wrap option. To wrap text around only
three sides of a graphic, position either the left or right edge of the
graphic against a column guide.
• Alternatively, you can increase the standoff values enough to put the
graphics boundary next to the column guide:
Colorizing
pictures
To Colorize a
bitmap
• The Colorizing function will only work with 1 bit bitmaps or grayscale
bitmaps. When Colorizing Pictures you define a color, you specify
whether it is a spot color, process color, or a tint of a spot or process
color.
• Select a 1 bit or grayscale bitmap
• From the main menu, choose Window > Show Colors
press the Ctrl + J key combination to open the Color palette.
OR
• Click the Fill button.
• Select a color and or tint from the colors palette list.
FOR USE AT THE LICENSED SITE(S) ONLY
Cheltenham Computer Training 1995-2001 - www.cctglobal.com
Page 96

88 Pictures
2001 Cheltenham Computer Training PageMaker 6.5 Foundation
Cropping
Cropping
• When you import a graphic
from another program or
publication, you can crop
parts of the graphic that
you do not want to print by
adjusting the size of its
surrounding bounding box.
Cropping
pictures
© Cheltenham Computer Training 2001
Adobe PageMaker 6.5 - Slide No 36
• When you import a graphic from another program or publication, you
can crop parts of the graphic that you do not want to print by adjusting
the size of its surrounding bounding box.
• Select a crop tool from the Control palette
• Click on a picture to display nodes.
• Click and drag a node to crop parts of the picture:
FOR USE AT THE LICENSED SITE(S) ONLY
Cheltenham Computer Training 1995-2001 - www.cctglobal.com
Page 97

Pictures 89
PageMaker 6.5 Foundation 2001 Cheltenham Computer Training
• Note that while you dragging a node, the image will become a
grayscale.
• After you crop a graphic, you can control which portions of it appear in
your publication by moving the graphic within the visible area. Just
click on the picture and drag it inside the cropped area:
• You cannot crop to resize the visible area of locked objects, but you
can change what portion of the image shows within the cropped area.
Note: If you crop an inline graphic with the Control palette, you can
only crop from the center. To crop from any other point, use the
cropping tool in the toolbox.
Positioning
pictures in
Frame
• For Positioning in Frame graphics larger or smaller than the frames
that contain them, you can specify that graphics be clipped to fit within
the existing frame borders (applies only to graphics larger than the
frame), or scaled to fit the existing frame borders.
• Alternatively, you can specify that the frame size to fit the size of the
graphic.
• You can specify an inset value between text and the frame border.
You can set a separate inset value for each side of a rectangular text
frame, or set a single inset value for oval or polygonal text frames.
• You can change how the content aligns vertically and horizontally
within the frame. For example, you might want some graphics to be
positioned in the center of a frame; in other frames you might want the
graphics to align along the top and left borders of the available space.
FOR USE AT THE LICENSED SITE(S) ONLY
Cheltenham Computer Training 1995-2001 - www.cctglobal.com
Page 98

90 Pictures
2001 Cheltenham Computer Training PageMaker 6.5 Foundation
Review Questions
Review Questions
How would
you:
© Cheltenham Computer Training 2001
• Use the Place dialog box?
• Choose File Types?
• Set Place?
• Link and Embed Pictures?
• Retain Cropping Data?
• Use the Object View?
• Position pictures on page?
• Set the Frame Size?
• Set the picture Scale?
• Rotate picture?
• Skew picture?
• Flip picture?
• Copy, Cut and Paste pictures?
• Wrap Text around pictures?
• Colorize pictures?
• Crop pictures?
• Position pictures in Frame?
Adobe PageMaker 6.5 - Slide No 37
FOR USE AT THE LICENSED SITE(S) ONLY
Cheltenham Computer Training 1995-2001 - www.cctglobal.com
Page 99

Objects 91
PageMaker 6.5 Foundation 2001 Cheltenham Computer Training
Objects
When you
have
completed
this learning
module you
will have
seen how to:
• Select Objects
• Group and Ungroup Objects
• Move Objects with the Mouse
• Move Objects with the Control Panel
• Remove Objects
• Use the Align Objects Dialog Box
• Use the Align Icons
• Use the Distribute Icons
• Use the Alignment Preview
• Setting the Do Mini Save
• Arrange Objects
FOR USE AT THE LICENSED SITE(S) ONLY
Cheltenham Computer Training 1995-2001 - www.cctglobal.com
Page 100

92 Objects
2001 Cheltenham Computer Training PageMaker 6.5 Foundation
Selecting Objects
Selecting Objects
• Use the Pointer tool when
selecting objects.
• You can select a single
object, or you can select
multiple objects and modify
them all at once.
Selecting
single Object
with the
Pointer Tool
© Cheltenham Computer Training 2001
Adobe PageMaker 6.5 - Slide No 38
• Use the Pointer tool when selecting objects. You can select a single
object, or you can select multiple objects and modify them all at once.
When objects overlap, you can select them through the stack of
objects.
• To select a single object, click on the object with the pointer tool:
FOR USE AT THE LICENSED SITE(S) ONLY
Cheltenham Computer Training 1995-2001 - www.cctglobal.com
 Loading...