

Page 1

Adobe® Illustrator® CC
Help
Page 2

Legal notices
Legal notices
For legal notices, see http://help.adobe.com/en_US/legalnotices/index.html.
Last updated 2/2/2018
Page 3

Contents
Chapter 1: Introduction to Illustrator
New features summary . . . . . . . . . . . . . . . . . . . . . . . . . . . . . . . . . . . . . . . . . . . . . . . . . . . . . . . . . . . . . . . . . . . . . . . . . . . . . . . . . . . . . . . . . . . . . . . . .1
Workspace basics . . . . . . . . . . . . . . . . . . . . . . . . . . . . . . . . . . . . . . . . . . . . . . . . . . . . . . . . . . . . . . . . . . . . . . . . . . . . . . . . . . . . . . . . . . . . . . . . . . . . . 11
Create documents . . . . . . . . . . . . . . . . . . . . . . . . . . . . . . . . . . . . . . . . . . . . . . . . . . . . . . . . . . . . . . . . . . . . . . . . . . . . . . . . . . . . . . . . . . . . . . . . . . . . 19
Tools . . . . . . . . . . . . . . . . . . . . . . . . . . . . . . . . . . . . . . . . . . . . . . . . . . . . . . . . . . . . . . . . . . . . . . . . . . . . . . . . . . . . . . . . . . . . . . . . . . . . . . . . . . . . . . . . . 26
System requirements | Illustrator . . . . . . . . . . . . . . . . . . . . . . . . . . . . . . . . . . . . . . . . . . . . . . . . . . . . . . . . . . . . . . . . . . . . . . . . . . . . . . . . . . . . . . 31
Chapter 2: Workspace
Workspace basics . . . . . . . . . . . . . . . . . . . . . . . . . . . . . . . . . . . . . . . . . . . . . . . . . . . . . . . . . . . . . . . . . . . . . . . . . . . . . . . . . . . . . . . . . . . . . . . . . . . . . 42
Customize the workspace . . . . . . . . . . . . . . . . . . . . . . . . . . . . . . . . . . . . . . . . . . . . . . . . . . . . . . . . . . . . . . . . . . . . . . . . . . . . . . . . . . . . . . . . . . . . . 50
Create documents . . . . . . . . . . . . . . . . . . . . . . . . . . . . . . . . . . . . . . . . . . . . . . . . . . . . . . . . . . . . . . . . . . . . . . . . . . . . . . . . . . . . . . . . . . . . . . . . . . . . 56
Properties panel . . . . . . . . . . . . . . . . . . . . . . . . . . . . . . . . . . . . . . . . . . . . . . . . . . . . . . . . . . . . . . . . . . . . . . . . . . . . . . . . . . . . . . . . . . . . . . . . . . . . . . 63
Artboards . . . . . . . . . . . . . . . . . . . . . . . . . . . . . . . . . . . . . . . . . . . . . . . . . . . . . . . . . . . . . . . . . . . . . . . . . . . . . . . . . . . . . . . . . . . . . . . . . . . . . . . . . . . . 65
Tools . . . . . . . . . . . . . . . . . . . . . . . . . . . . . . . . . . . . . . . . . . . . . . . . . . . . . . . . . . . . . . . . . . . . . . . . . . . . . . . . . . . . . . . . . . . . . . . . . . . . . . . . . . . . . . . . . 75
Tool galleries . . . . . . . . . . . . . . . . . . . . . . . . . . . . . . . . . . . . . . . . . . . . . . . . . . . . . . . . . . . . . . . . . . . . . . . . . . . . . . . . . . . . . . . . . . . . . . . . . . . . . . . . . 80
Safe Mode . . . . . . . . . . . . . . . . . . . . . . . . . . . . . . . . . . . . . . . . . . . . . . . . . . . . . . . . . . . . . . . . . . . . . . . . . . . . . . . . . . . . . . . . . . . . . . . . . . . . . . . . . . . 91
Set preferences . . . . . . . . . . . . . . . . . . . . . . . . . . . . . . . . . . . . . . . . . . . . . . . . . . . . . . . . . . . . . . . . . . . . . . . . . . . . . . . . . . . . . . . . . . . . . . . . . . . . . . . 95
View artwork . . . . . . . . . . . . . . . . . . . . . . . . . . . . . . . . . . . . . . . . . . . . . . . . . . . . . . . . . . . . . . . . . . . . . . . . . . . . . . . . . . . . . . . . . . . . . . . . . . . . . . . . . 97
Tou ch Works pac e . . . . . . . . . . . . . . . . . . . . . . . . . . . . . . . . . . . . . . . . . . . . . . . . . . . . . . . . . . . . . . . . . . . . . . . . . . . . . . . . . . . . . . . . . . . . . . . . . . . . 101
Use the Touch Bar with Illustrator . . . . . . . . . . . . . . . . . . . . . . . . . . . . . . . . . . . . . . . . . . . . . . . . . . . . . . . . . . . . . . . . . . . . . . . . . . . . . . . . . . . . 105
Microsoft Surface Dial support in Illustrator . . . . . . . . . . . . . . . . . . . . . . . . . . . . . . . . . . . . . . . . . . . . . . . . . . . . . . . . . . . . . . . . . . . . . . . . . . 108
Recover document data after a crash . . . . . . . . . . . . . . . . . . . . . . . . . . . . . . . . . . . . . . . . . . . . . . . . . . . . . . . . . . . . . . . . . . . . . . . . . . . . . . . . . 109
Recovery, undo, and automation . . . . . . . . . . . . . . . . . . . . . . . . . . . . . . . . . . . . . . . . . . . . . . . . . . . . . . . . . . . . . . . . . . . . . . . . . . . . . . . . . . . . . 110
Files and templates . . . . . . . . . . . . . . . . . . . . . . . . . . . . . . . . . . . . . . . . . . . . . . . . . . . . . . . . . . . . . . . . . . . . . . . . . . . . . . . . . . . . . . . . . . . . . . . . . . 111
Rulers, grids, and guides . . . . . . . . . . . . . . . . . . . . . . . . . . . . . . . . . . . . . . . . . . . . . . . . . . . . . . . . . . . . . . . . . . . . . . . . . . . . . . . . . . . . . . . . . . . . . 115
Synchronize settings using Adobe Creative Cloud . . . . . . . . . . . . . . . . . . . . . . . . . . . . . . . . . . . . . . . . . . . . . . . . . . . . . . . . . . . . . . . . . . . . 121
iii
Chapter 3: Drawing
Drawing basics . . . . . . . . . . . . . . . . . . . . . . . . . . . . . . . . . . . . . . . . . . . . . . . . . . . . . . . . . . . . . . . . . . . . . . . . . . . . . . . . . . . . . . . . . . . . . . . . . . . . . . 128
Draw pixel-perfect art . . . . . . . . . . . . . . . . . . . . . . . . . . . . . . . . . . . . . . . . . . . . . . . . . . . . . . . . . . . . . . . . . . . . . . . . . . . . . . . . . . . . . . . . . . . . . . . 133
Draw simple lines and shapes . . . . . . . . . . . . . . . . . . . . . . . . . . . . . . . . . . . . . . . . . . . . . . . . . . . . . . . . . . . . . . . . . . . . . . . . . . . . . . . . . . . . . . . . 136
Perspective drawing . . . . . . . . . . . . . . . . . . . . . . . . . . . . . . . . . . . . . . . . . . . . . . . . . . . . . . . . . . . . . . . . . . . . . . . . . . . . . . . . . . . . . . . . . . . . . . . . . 145
Edit paths . . . . . . . . . . . . . . . . . . . . . . . . . . . . . . . . . . . . . . . . . . . . . . . . . . . . . . . . . . . . . . . . . . . . . . . . . . . . . . . . . . . . . . . . . . . . . . . . . . . . . . . . . . . 161
Adjust path segments . . . . . . . . . . . . . . . . . . . . . . . . . . . . . . . . . . . . . . . . . . . . . . . . . . . . . . . . . . . . . . . . . . . . . . . . . . . . . . . . . . . . . . . . . . . . . . . 168
Symbols . . . . . . . . . . . . . . . . . . . . . . . . . . . . . . . . . . . . . . . . . . . . . . . . . . . . . . . . . . . . . . . . . . . . . . . . . . . . . . . . . . . . . . . . . . . . . . . . . . . . . . . . . . . . 171
Symbolism tools and symbol sets . . . . . . . . . . . . . . . . . . . . . . . . . . . . . . . . . . . . . . . . . . . . . . . . . . . . . . . . . . . . . . . . . . . . . . . . . . . . . . . . . . . . 179
Create 3D objects . . . . . . . . . . . . . . . . . . . . . . . . . . . . . . . . . . . . . . . . . . . . . . . . . . . . . . . . . . . . . . . . . . . . . . . . . . . . . . . . . . . . . . . . . . . . . . . . . . . 182
Edit artwork using Image Trace . . . . . . . . . . . . . . . . . . . . . . . . . . . . . . . . . . . . . . . . . . . . . . . . . . . . . . . . . . . . . . . . . . . . . . . . . . . . . . . . . . . . . . 190
Define perspective grids . . . . . . . . . . . . . . . . . . . . . . . . . . . . . . . . . . . . . . . . . . . . . . . . . . . . . . . . . . . . . . . . . . . . . . . . . . . . . . . . . . . . . . . . . . . . . 192
Draw pixel-aligned paths for web workflows . . . . . . . . . . . . . . . . . . . . . . . . . . . . . . . . . . . . . . . . . . . . . . . . . . . . . . . . . . . . . . . . . . . . . . . . . 194
Draw with the Pen, Curvature, or Pencil tool . . . . . . . . . . . . . . . . . . . . . . . . . . . . . . . . . . . . . . . . . . . . . . . . . . . . . . . . . . . . . . . . . . . . . . . . . . 198
Last updated 2/2/2018
Page 4

ILLUSTRATOR
Content s
Chapter 4: Color
About color . . . . . . . . . . . . . . . . . . . . . . . . . . . . . . . . . . . . . . . . . . . . . . . . . . . . . . . . . . . . . . . . . . . . . . . . . . . . . . . . . . . . . . . . . . . . . . . . . . . . . . . . . 209
Adjust colors . . . . . . . . . . . . . . . . . . . . . . . . . . . . . . . . . . . . . . . . . . . . . . . . . . . . . . . . . . . . . . . . . . . . . . . . . . . . . . . . . . . . . . . . . . . . . . . . . . . . . . . . 214
Select colors . . . . . . . . . . . . . . . . . . . . . . . . . . . . . . . . . . . . . . . . . . . . . . . . . . . . . . . . . . . . . . . . . . . . . . . . . . . . . . . . . . . . . . . . . . . . . . . . . . . . . . . . 218
Use the Adobe Color Themes panel . . . . . . . . . . . . . . . . . . . . . . . . . . . . . . . . . . . . . . . . . . . . . . . . . . . . . . . . . . . . . . . . . . . . . . . . . . . . . . . . . . 220
Use and create swatches . . . . . . . . . . . . . . . . . . . . . . . . . . . . . . . . . . . . . . . . . . . . . . . . . . . . . . . . . . . . . . . . . . . . . . . . . . . . . . . . . . . . . . . . . . . . . 232
Color groups (harmonies) . . . . . . . . . . . . . . . . . . . . . . . . . . . . . . . . . . . . . . . . . . . . . . . . . . . . . . . . . . . . . . . . . . . . . . . . . . . . . . . . . . . . . . . . . . . . 239
Color Themes panel . . . . . . . . . . . . . . . . . . . . . . . . . . . . . . . . . . . . . . . . . . . . . . . . . . . . . . . . . . . . . . . . . . . . . . . . . . . . . . . . . . . . . . . . . . . . . . . . . 254
Chapter 5: Painting
About painting . . . . . . . . . . . . . . . . . . . . . . . . . . . . . . . . . . . . . . . . . . . . . . . . . . . . . . . . . . . . . . . . . . . . . . . . . . . . . . . . . . . . . . . . . . . . . . . . . . . . . . 257
Gradients . . . . . . . . . . . . . . . . . . . . . . . . . . . . . . . . . . . . . . . . . . . . . . . . . . . . . . . . . . . . . . . . . . . . . . . . . . . . . . . . . . . . . . . . . . . . . . . . . . . . . . . . . . . 257
Paint with fills and strokes . . . . . . . . . . . . . . . . . . . . . . . . . . . . . . . . . . . . . . . . . . . . . . . . . . . . . . . . . . . . . . . . . . . . . . . . . . . . . . . . . . . . . . . . . . . 264
Brushes . . . . . . . . . . . . . . . . . . . . . . . . . . . . . . . . . . . . . . . . . . . . . . . . . . . . . . . . . . . . . . . . . . . . . . . . . . . . . . . . . . . . . . . . . . . . . . . . . . . . . . . . . . . . . 270
Live Paint groups . . . . . . . . . . . . . . . . . . . . . . . . . . . . . . . . . . . . . . . . . . . . . . . . . . . . . . . . . . . . . . . . . . . . . . . . . . . . . . . . . . . . . . . . . . . . . . . . . . . . 284
Transparency and blending modes . . . . . . . . . . . . . . . . . . . . . . . . . . . . . . . . . . . . . . . . . . . . . . . . . . . . . . . . . . . . . . . . . . . . . . . . . . . . . . . . . . . 291
Stroke an object . . . . . . . . . . . . . . . . . . . . . . . . . . . . . . . . . . . . . . . . . . . . . . . . . . . . . . . . . . . . . . . . . . . . . . . . . . . . . . . . . . . . . . . . . . . . . . . . . . . . . 298
Meshes . . . . . . . . . . . . . . . . . . . . . . . . . . . . . . . . . . . . . . . . . . . . . . . . . . . . . . . . . . . . . . . . . . . . . . . . . . . . . . . . . . . . . . . . . . . . . . . . . . . . . . . . . . . . . 306
Create and edit patterns . . . . . . . . . . . . . . . . . . . . . . . . . . . . . . . . . . . . . . . . . . . . . . . . . . . . . . . . . . . . . . . . . . . . . . . . . . . . . . . . . . . . . . . . . . . . . 308
Video tutorial: Define a pattern . . . . . . . . . . . . . . . . . . . . . . . . . . . . . . . . . . . . . . . . . . . . . . . . . . . . . . . . . . . . . . . . . . . . . . . . . . . . . . . . . . . . . . 308
Patterns . . . . . . . . . . . . . . . . . . . . . . . . . . . . . . . . . . . . . . . . . . . . . . . . . . . . . . . . . . . . . . . . . . . . . . . . . . . . . . . . . . . . . . . . . . . . . . . . . . . . . . . . . . . . . 310
iv
Chapter 6: Select and arrange objects
Select objects . . . . . . . . . . . . . . . . . . . . . . . . . . . . . . . . . . . . . . . . . . . . . . . . . . . . . . . . . . . . . . . . . . . . . . . . . . . . . . . . . . . . . . . . . . . . . . . . . . . . . . . 317
Move, align, and distribute objects . . . . . . . . . . . . . . . . . . . . . . . . . . . . . . . . . . . . . . . . . . . . . . . . . . . . . . . . . . . . . . . . . . . . . . . . . . . . . . . . . . . 326
Layers . . . . . . . . . . . . . . . . . . . . . . . . . . . . . . . . . . . . . . . . . . . . . . . . . . . . . . . . . . . . . . . . . . . . . . . . . . . . . . . . . . . . . . . . . . . . . . . . . . . . . . . . . . . . . . . 330
Stack objects . . . . . . . . . . . . . . . . . . . . . . . . . . . . . . . . . . . . . . . . . . . . . . . . . . . . . . . . . . . . . . . . . . . . . . . . . . . . . . . . . . . . . . . . . . . . . . . . . . . . . . . . 334
Group and expand objects . . . . . . . . . . . . . . . . . . . . . . . . . . . . . . . . . . . . . . . . . . . . . . . . . . . . . . . . . . . . . . . . . . . . . . . . . . . . . . . . . . . . . . . . . . . 335
Lock, hide, and delete objects . . . . . . . . . . . . . . . . . . . . . . . . . . . . . . . . . . . . . . . . . . . . . . . . . . . . . . . . . . . . . . . . . . . . . . . . . . . . . . . . . . . . . . . . 337
Duplicate objects . . . . . . . . . . . . . . . . . . . . . . . . . . . . . . . . . . . . . . . . . . . . . . . . . . . . . . . . . . . . . . . . . . . . . . . . . . . . . . . . . . . . . . . . . . . . . . . . . . . . 338
Rotate and reflect objects . . . . . . . . . . . . . . . . . . . . . . . . . . . . . . . . . . . . . . . . . . . . . . . . . . . . . . . . . . . . . . . . . . . . . . . . . . . . . . . . . . . . . . . . . . . . 340
Chapter 7: Reshape objects
Crop images . . . . . . . . . . . . . . . . . . . . . . . . . . . . . . . . . . . . . . . . . . . . . . . . . . . . . . . . . . . . . . . . . . . . . . . . . . . . . . . . . . . . . . . . . . . . . . . . . . . . . . . . 345
Cut, divide, and trim objects . . . . . . . . . . . . . . . . . . . . . . . . . . . . . . . . . . . . . . . . . . . . . . . . . . . . . . . . . . . . . . . . . . . . . . . . . . . . . . . . . . . . . . . . . 347
Transform objects . . . . . . . . . . . . . . . . . . . . . . . . . . . . . . . . . . . . . . . . . . . . . . . . . . . . . . . . . . . . . . . . . . . . . . . . . . . . . . . . . . . . . . . . . . . . . . . . . . . 351
Puppet Warp . . . . . . . . . . . . . . . . . . . . . . . . . . . . . . . . . . . . . . . . . . . . . . . . . . . . . . . . . . . . . . . . . . . . . . . . . . . . . . . . . . . . . . . . . . . . . . . . . . . . . . . . 352
Combine objects . . . . . . . . . . . . . . . . . . . . . . . . . . . . . . . . . . . . . . . . . . . . . . . . . . . . . . . . . . . . . . . . . . . . . . . . . . . . . . . . . . . . . . . . . . . . . . . . . . . . 353
Scale, shear, and distort objects . . . . . . . . . . . . . . . . . . . . . . . . . . . . . . . . . . . . . . . . . . . . . . . . . . . . . . . . . . . . . . . . . . . . . . . . . . . . . . . . . . . . . . 360
Blend objects . . . . . . . . . . . . . . . . . . . . . . . . . . . . . . . . . . . . . . . . . . . . . . . . . . . . . . . . . . . . . . . . . . . . . . . . . . . . . . . . . . . . . . . . . . . . . . . . . . . . . . . 365
Reshape using envelopes . . . . . . . . . . . . . . . . . . . . . . . . . . . . . . . . . . . . . . . . . . . . . . . . . . . . . . . . . . . . . . . . . . . . . . . . . . . . . . . . . . . . . . . . . . . . 368
Reshape objects with effects . . . . . . . . . . . . . . . . . . . . . . . . . . . . . . . . . . . . . . . . . . . . . . . . . . . . . . . . . . . . . . . . . . . . . . . . . . . . . . . . . . . . . . . . . 370
Edit clipping masks . . . . . . . . . . . . . . . . . . . . . . . . . . . . . . . . . . . . . . . . . . . . . . . . . . . . . . . . . . . . . . . . . . . . . . . . . . . . . . . . . . . . . . . . . . . . . . . . . . 371
Build new shapes with Shaper and Shape Builder tools . . . . . . . . . . . . . . . . . . . . . . . . . . . . . . . . . . . . . . . . . . . . . . . . . . . . . . . . . . . . . . . 374
Live Shapes . . . . . . . . . . . . . . . . . . . . . . . . . . . . . . . . . . . . . . . . . . . . . . . . . . . . . . . . . . . . . . . . . . . . . . . . . . . . . . . . . . . . . . . . . . . . . . . . . . . . . . . . . 379
Work with Live Corners . . . . . . . . . . . . . . . . . . . . . . . . . . . . . . . . . . . . . . . . . . . . . . . . . . . . . . . . . . . . . . . . . . . . . . . . . . . . . . . . . . . . . . . . . . . . . . 384
Last updated 2/2/2018
Page 5

ILLUSTRATOR
Content s
Create shapes using the Shape Builder tool . . . . . . . . . . . . . . . . . . . . . . . . . . . . . . . . . . . . . . . . . . . . . . . . . . . . . . . . . . . . . . . . . . . . . . . . . . . 387
Enhanced reshape workflows with touch support . . . . . . . . . . . . . . . . . . . . . . . . . . . . . . . . . . . . . . . . . . . . . . . . . . . . . . . . . . . . . . . . . . . . 389
Chapter 8: Import, export, and save
Import artwork files . . . . . . . . . . . . . . . . . . . . . . . . . . . . . . . . . . . . . . . . . . . . . . . . . . . . . . . . . . . . . . . . . . . . . . . . . . . . . . . . . . . . . . . . . . . . . . . . . 391
Save artwork . . . . . . . . . . . . . . . . . . . . . . . . . . . . . . . . . . . . . . . . . . . . . . . . . . . . . . . . . . . . . . . . . . . . . . . . . . . . . . . . . . . . . . . . . . . . . . . . . . . . . . . . 395
Export artwork . . . . . . . . . . . . . . . . . . . . . . . . . . . . . . . . . . . . . . . . . . . . . . . . . . . . . . . . . . . . . . . . . . . . . . . . . . . . . . . . . . . . . . . . . . . . . . . . . . . . . . 400
Package files . . . . . . . . . . . . . . . . . . . . . . . . . . . . . . . . . . . . . . . . . . . . . . . . . . . . . . . . . . . . . . . . . . . . . . . . . . . . . . . . . . . . . . . . . . . . . . . . . . . . . . . . 406
Collect assets and export in batches . . . . . . . . . . . . . . . . . . . . . . . . . . . . . . . . . . . . . . . . . . . . . . . . . . . . . . . . . . . . . . . . . . . . . . . . . . . . . . . . . 408
Creative Cloud Libraries in Illustrator . . . . . . . . . . . . . . . . . . . . . . . . . . . . . . . . . . . . . . . . . . . . . . . . . . . . . . . . . . . . . . . . . . . . . . . . . . . . . . . . . 414
Import bitmap images . . . . . . . . . . . . . . . . . . . . . . . . . . . . . . . . . . . . . . . . . . . . . . . . . . . . . . . . . . . . . . . . . . . . . . . . . . . . . . . . . . . . . . . . . . . . . . . 423
Import Adobe PDF files . . . . . . . . . . . . . . . . . . . . . . . . . . . . . . . . . . . . . . . . . . . . . . . . . . . . . . . . . . . . . . . . . . . . . . . . . . . . . . . . . . . . . . . . . . . . . . 424
Import artwork from Photoshop . . . . . . . . . . . . . . . . . . . . . . . . . . . . . . . . . . . . . . . . . . . . . . . . . . . . . . . . . . . . . . . . . . . . . . . . . . . . . . . . . . . . . 425
Import EPS, DCS, and AutoCAD files . . . . . . . . . . . . . . . . . . . . . . . . . . . . . . . . . . . . . . . . . . . . . . . . . . . . . . . . . . . . . . . . . . . . . . . . . . . . . . . . . . 427
Place multiple files | Illustrator CC . . . . . . . . . . . . . . . . . . . . . . . . . . . . . . . . . . . . . . . . . . . . . . . . . . . . . . . . . . . . . . . . . . . . . . . . . . . . . . . . . . . . 428
Links information . . . . . . . . . . . . . . . . . . . . . . . . . . . . . . . . . . . . . . . . . . . . . . . . . . . . . . . . . . . . . . . . . . . . . . . . . . . . . . . . . . . . . . . . . . . . . . . . . . . . 429
Create Adobe PDF files . . . . . . . . . . . . . . . . . . . . . . . . . . . . . . . . . . . . . . . . . . . . . . . . . . . . . . . . . . . . . . . . . . . . . . . . . . . . . . . . . . . . . . . . . . . . . . 431
Adobe PDF options . . . . . . . . . . . . . . . . . . . . . . . . . . . . . . . . . . . . . . . . . . . . . . . . . . . . . . . . . . . . . . . . . . . . . . . . . . . . . . . . . . . . . . . . . . . . . . . . . . 435
Unembed images . . . . . . . . . . . . . . . . . . . . . . . . . . . . . . . . . . . . . . . . . . . . . . . . . . . . . . . . . . . . . . . . . . . . . . . . . . . . . . . . . . . . . . . . . . . . . . . . . . . 441
File information and metadata . . . . . . . . . . . . . . . . . . . . . . . . . . . . . . . . . . . . . . . . . . . . . . . . . . . . . . . . . . . . . . . . . . . . . . . . . . . . . . . . . . . . . . . 442
Extract CSS | Illustrator CC . . . . . . . . . . . . . . . . . . . . . . . . . . . . . . . . . . . . . . . . . . . . . . . . . . . . . . . . . . . . . . . . . . . . . . . . . . . . . . . . . . . . . . . . . . . 442
Video: CSS extraction in Illustrator CC . . . . . . . . . . . . . . . . . . . . . . . . . . . . . . . . . . . . . . . . . . . . . . . . . . . . . . . . . . . . . . . . . . . . . . . . . . . . . . . . 443
v
Chapter 9: Type
Create text . . . . . . . . . . . . . . . . . . . . . . . . . . . . . . . . . . . . . . . . . . . . . . . . . . . . . . . . . . . . . . . . . . . . . . . . . . . . . . . . . . . . . . . . . . . . . . . . . . . . . . . . . . 447
Import and export text . . . . . . . . . . . . . . . . . . . . . . . . . . . . . . . . . . . . . . . . . . . . . . . . . . . . . . . . . . . . . . . . . . . . . . . . . . . . . . . . . . . . . . . . . . . . . . 456
Fonts . . . . . . . . . . . . . . . . . . . . . . . . . . . . . . . . . . . . . . . . . . . . . . . . . . . . . . . . . . . . . . . . . . . . . . . . . . . . . . . . . . . . . . . . . . . . . . . . . . . . . . . . . . . . . . . 458
Format paragraphs . . . . . . . . . . . . . . . . . . . . . . . . . . . . . . . . . . . . . . . . . . . . . . . . . . . . . . . . . . . . . . . . . . . . . . . . . . . . . . . . . . . . . . . . . . . . . . . . . . 467
Format type . . . . . . . . . . . . . . . . . . . . . . . . . . . . . . . . . . . . . . . . . . . . . . . . . . . . . . . . . . . . . . . . . . . . . . . . . . . . . . . . . . . . . . . . . . . . . . . . . . . . . . . . . 471
Special characters . . . . . . . . . . . . . . . . . . . . . . . . . . . . . . . . . . . . . . . . . . . . . . . . . . . . . . . . . . . . . . . . . . . . . . . . . . . . . . . . . . . . . . . . . . . . . . . . . . . 481
Create type on a path . . . . . . . . . . . . . . . . . . . . . . . . . . . . . . . . . . . . . . . . . . . . . . . . . . . . . . . . . . . . . . . . . . . . . . . . . . . . . . . . . . . . . . . . . . . . . . . . 488
Scale and rotate type . . . . . . . . . . . . . . . . . . . . . . . . . . . . . . . . . . . . . . . . . . . . . . . . . . . . . . . . . . . . . . . . . . . . . . . . . . . . . . . . . . . . . . . . . . . . . . . . 491
Character and paragraph styles . . . . . . . . . . . . . . . . . . . . . . . . . . . . . . . . . . . . . . . . . . . . . . . . . . . . . . . . . . . . . . . . . . . . . . . . . . . . . . . . . . . . . . 492
Line and character spacing . . . . . . . . . . . . . . . . . . . . . . . . . . . . . . . . . . . . . . . . . . . . . . . . . . . . . . . . . . . . . . . . . . . . . . . . . . . . . . . . . . . . . . . . . . 494
Tab s . . . . . . . . . . . . . . . . . . . . . . . . . . . . . . . . . . . . . . . . . . . . . . . . . . . . . . . . . . . . . . . . . . . . . . . . . . . . . . . . . . . . . . . . . . . . . . . . . . . . . . . . . . . . . . . . 497
Hyphenation and line breaks . . . . . . . . . . . . . . . . . . . . . . . . . . . . . . . . . . . . . . . . . . . . . . . . . . . . . . . . . . . . . . . . . . . . . . . . . . . . . . . . . . . . . . . . 499
Tex t and type . . . . . . . . . . . . . . . . . . . . . . . . . . . . . . . . . . . . . . . . . . . . . . . . . . . . . . . . . . . . . . . . . . . . . . . . . . . . . . . . . . . . . . . . . . . . . . . . . . . . . . . 501
Text enhancements . . . . . . . . . . . . . . . . . . . . . . . . . . . . . . . . . . . . . . . . . . . . . . . . . . . . . . . . . . . . . . . . . . . . . . . . . . . . . . . . . . . . . . . . . . . . . . . . . 502
Find missing fonts (Typekit workflow) . . . . . . . . . . . . . . . . . . . . . . . . . . . . . . . . . . . . . . . . . . . . . . . . . . . . . . . . . . . . . . . . . . . . . . . . . . . . . . . . 502
Work with Typekit fonts . . . . . . . . . . . . . . . . . . . . . . . . . . . . . . . . . . . . . . . . . . . . . . . . . . . . . . . . . . . . . . . . . . . . . . . . . . . . . . . . . . . . . . . . . . . . . . 507
Spelling and language dictionaries . . . . . . . . . . . . . . . . . . . . . . . . . . . . . . . . . . . . . . . . . . . . . . . . . . . . . . . . . . . . . . . . . . . . . . . . . . . . . . . . . . . 508
Update text from Illustrator 10 . . . . . . . . . . . . . . . . . . . . . . . . . . . . . . . . . . . . . . . . . . . . . . . . . . . . . . . . . . . . . . . . . . . . . . . . . . . . . . . . . . . . . . . 510
Format Asian characters . . . . . . . . . . . . . . . . . . . . . . . . . . . . . . . . . . . . . . . . . . . . . . . . . . . . . . . . . . . . . . . . . . . . . . . . . . . . . . . . . . . . . . . . . . . . . 511
Arabic and Hebrew type . . . . . . . . . . . . . . . . . . . . . . . . . . . . . . . . . . . . . . . . . . . . . . . . . . . . . . . . . . . . . . . . . . . . . . . . . . . . . . . . . . . . . . . . . . . . . 519
Indic support with new Composers . . . . . . . . . . . . . . . . . . . . . . . . . . . . . . . . . . . . . . . . . . . . . . . . . . . . . . . . . . . . . . . . . . . . . . . . . . . . . . . . . . 519
Last updated 2/2/2018
Page 6

ILLUSTRATOR
Content s
Chapter 10: Create special effects
Work with effects . . . . . . . . . . . . . . . . . . . . . . . . . . . . . . . . . . . . . . . . . . . . . . . . . . . . . . . . . . . . . . . . . . . . . . . . . . . . . . . . . . . . . . . . . . . . . . . . . . . . 521
Appearance attributes . . . . . . . . . . . . . . . . . . . . . . . . . . . . . . . . . . . . . . . . . . . . . . . . . . . . . . . . . . . . . . . . . . . . . . . . . . . . . . . . . . . . . . . . . . . . . . . 525
Graphic styles . . . . . . . . . . . . . . . . . . . . . . . . . . . . . . . . . . . . . . . . . . . . . . . . . . . . . . . . . . . . . . . . . . . . . . . . . . . . . . . . . . . . . . . . . . . . . . . . . . . . . . . 529
Create sketches and mosaics . . . . . . . . . . . . . . . . . . . . . . . . . . . . . . . . . . . . . . . . . . . . . . . . . . . . . . . . . . . . . . . . . . . . . . . . . . . . . . . . . . . . . . . . . 534
Create a drop shadow . . . . . . . . . . . . . . . . . . . . . . . . . . . . . . . . . . . . . . . . . . . . . . . . . . . . . . . . . . . . . . . . . . . . . . . . . . . . . . . . . . . . . . . . . . . . . . . 535
Drop shadows, glows, and feathering . . . . . . . . . . . . . . . . . . . . . . . . . . . . . . . . . . . . . . . . . . . . . . . . . . . . . . . . . . . . . . . . . . . . . . . . . . . . . . . . 535
Summary of effects . . . . . . . . . . . . . . . . . . . . . . . . . . . . . . . . . . . . . . . . . . . . . . . . . . . . . . . . . . . . . . . . . . . . . . . . . . . . . . . . . . . . . . . . . . . . . . . . . . 536
Chapter 11: Web graphics
Best practices for creating web graphics . . . . . . . . . . . . . . . . . . . . . . . . . . . . . . . . . . . . . . . . . . . . . . . . . . . . . . . . . . . . . . . . . . . . . . . . . . . . . . 543
Create animations . . . . . . . . . . . . . . . . . . . . . . . . . . . . . . . . . . . . . . . . . . . . . . . . . . . . . . . . . . . . . . . . . . . . . . . . . . . . . . . . . . . . . . . . . . . . . . . . . . . 546
Create graphs . . . . . . . . . . . . . . . . . . . . . . . . . . . . . . . . . . . . . . . . . . . . . . . . . . . . . . . . . . . . . . . . . . . . . . . . . . . . . . . . . . . . . . . . . . . . . . . . . . . . . . . 549
Slices and image maps . . . . . . . . . . . . . . . . . . . . . . . . . . . . . . . . . . . . . . . . . . . . . . . . . . . . . . . . . . . . . . . . . . . . . . . . . . . . . . . . . . . . . . . . . . . . . . 561
SVG . . . . . . . . . . . . . . . . . . . . . . . . . . . . . . . . . . . . . . . . . . . . . . . . . . . . . . . . . . . . . . . . . . . . . . . . . . . . . . . . . . . . . . . . . . . . . . . . . . . . . . . . . . . . . . . . . 565
Chapter 12: Printing
Set up documents for printing . . . . . . . . . . . . . . . . . . . . . . . . . . . . . . . . . . . . . . . . . . . . . . . . . . . . . . . . . . . . . . . . . . . . . . . . . . . . . . . . . . . . . . . 569
Print with color management . . . . . . . . . . . . . . . . . . . . . . . . . . . . . . . . . . . . . . . . . . . . . . . . . . . . . . . . . . . . . . . . . . . . . . . . . . . . . . . . . . . . . . . . 572
Overprint . . . . . . . . . . . . . . . . . . . . . . . . . . . . . . . . . . . . . . . . . . . . . . . . . . . . . . . . . . . . . . . . . . . . . . . . . . . . . . . . . . . . . . . . . . . . . . . . . . . . . . . . . . . 574
PostScript printing . . . . . . . . . . . . . . . . . . . . . . . . . . . . . . . . . . . . . . . . . . . . . . . . . . . . . . . . . . . . . . . . . . . . . . . . . . . . . . . . . . . . . . . . . . . . . . . . . . 575
Change the page size and orientation . . . . . . . . . . . . . . . . . . . . . . . . . . . . . . . . . . . . . . . . . . . . . . . . . . . . . . . . . . . . . . . . . . . . . . . . . . . . . . . . 578
Specify crop marks for trimming or aligning . . . . . . . . . . . . . . . . . . . . . . . . . . . . . . . . . . . . . . . . . . . . . . . . . . . . . . . . . . . . . . . . . . . . . . . . . . 579
Print presets . . . . . . . . . . . . . . . . . . . . . . . . . . . . . . . . . . . . . . . . . . . . . . . . . . . . . . . . . . . . . . . . . . . . . . . . . . . . . . . . . . . . . . . . . . . . . . . . . . . . . . . . . 580
Printer’s marks and bleeds . . . . . . . . . . . . . . . . . . . . . . . . . . . . . . . . . . . . . . . . . . . . . . . . . . . . . . . . . . . . . . . . . . . . . . . . . . . . . . . . . . . . . . . . . . . 581
Print color separations . . . . . . . . . . . . . . . . . . . . . . . . . . . . . . . . . . . . . . . . . . . . . . . . . . . . . . . . . . . . . . . . . . . . . . . . . . . . . . . . . . . . . . . . . . . . . . . 583
Print and save transparent artwork . . . . . . . . . . . . . . . . . . . . . . . . . . . . . . . . . . . . . . . . . . . . . . . . . . . . . . . . . . . . . . . . . . . . . . . . . . . . . . . . . . . 586
Print gradients, meshes, and color blends . . . . . . . . . . . . . . . . . . . . . . . . . . . . . . . . . . . . . . . . . . . . . . . . . . . . . . . . . . . . . . . . . . . . . . . . . . . . 593
Trapping . . . . . . . . . . . . . . . . . . . . . . . . . . . . . . . . . . . . . . . . . . . . . . . . . . . . . . . . . . . . . . . . . . . . . . . . . . . . . . . . . . . . . . . . . . . . . . . . . . . . . . . . . . . . 597
White Overprint . . . . . . . . . . . . . . . . . . . . . . . . . . . . . . . . . . . . . . . . . . . . . . . . . . . . . . . . . . . . . . . . . . . . . . . . . . . . . . . . . . . . . . . . . . . . . . . . . . . . 601
vi
Chapter 13: Automate tasks
Data-driven graphics through templates and variables . . . . . . . . . . . . . . . . . . . . . . . . . . . . . . . . . . . . . . . . . . . . . . . . . . . . . . . . . . . . . . . 603
Automation with actions . . . . . . . . . . . . . . . . . . . . . . . . . . . . . . . . . . . . . . . . . . . . . . . . . . . . . . . . . . . . . . . . . . . . . . . . . . . . . . . . . . . . . . . . . . . . 607
Automation with scripts . . . . . . . . . . . . . . . . . . . . . . . . . . . . . . . . . . . . . . . . . . . . . . . . . . . . . . . . . . . . . . . . . . . . . . . . . . . . . . . . . . . . . . . . . . . . . 614
Chapter 14: Keyboard shortcuts
Default keyboard shortcuts | Illustrator CC . . . . . . . . . . . . . . . . . . . . . . . . . . . . . . . . . . . . . . . . . . . . . . . . . . . . . . . . . . . . . . . . . . . . . . . . . . . . 616
Customize keyboard shortcuts . . . . . . . . . . . . . . . . . . . . . . . . . . . . . . . . . . . . . . . . . . . . . . . . . . . . . . . . . . . . . . . . . . . . . . . . . . . . . . . . . . . . . . . 631
Last updated 2/2/2018
Page 7
Chapter 1: Introduction to Illustrator
New features summary
The October 2017 release of Illustrator CC (version 22.0) rolls out exciting new features for designers and illustrators.
Read on for a quick introduction to these features and links to resources offering more information.
For a summary of features introduced in earlier releases of Illustrator CC, see Feature summary | earlier releases .
1
Properties panel
New in the October 2017 release
The new Properties panel in Illustrator lets you view settings and controls in the context of your current task or
workflow. This new panel has been designed with ease of use in mind, ensuring that you have access to the right
controls right when you need them.
The Properties panel is available by default in the Essentials workspaces. You can also select Win d ow > Properties to
view it.
Properties panel
Last updated 2/2/2018
Page 8

Introduction to Illustrator
To lear n h ow to u s e it, s e e Properties panel .
Puppet Warp tool
New in the October 2017 release
Puppet Warp lets you twist and distort parts of your artwork, such that the transformations appear natural. You can
add, move, and rotate pins to seamlessly transform your artwork into different positions and stances using the Puppet
Warp tool in Illustrator.
Access this new tool from the Tools panel. To learn how to use it, see Puppet Warp.
Artboard-related improvements
Enhanced in the October 2017 release
Artboards are much easier to work with in this release of Illustrator CC. Also, you can now create 1 to
artboards per document depending on the size of your artboards.
1000
Select multiple artboards
Do one of the following:
2
• Shift-click the artboards.
• Shift-click the canvas and drag the cursor to select multiple artboards using a marquee control.
• Press Control/Command+A to select all the artboards in your document.
Align and distribute artboards
You can now align or distribute the selected artboards in Align panel or the Control panel. Do the following:
• Select the artboards you want to align or distribute.
• Do one of the following:
• Click Align in the Control panel and then click the icon for the type of alignment or distribution you want.
• Choose Window > Align and then click the icon for the type of alignment or distribution you want.
Last updated 2/2/2018
Page 9

Introduction to Illustrator
Align artboards
3
For more information, see ArtboardsArtboards
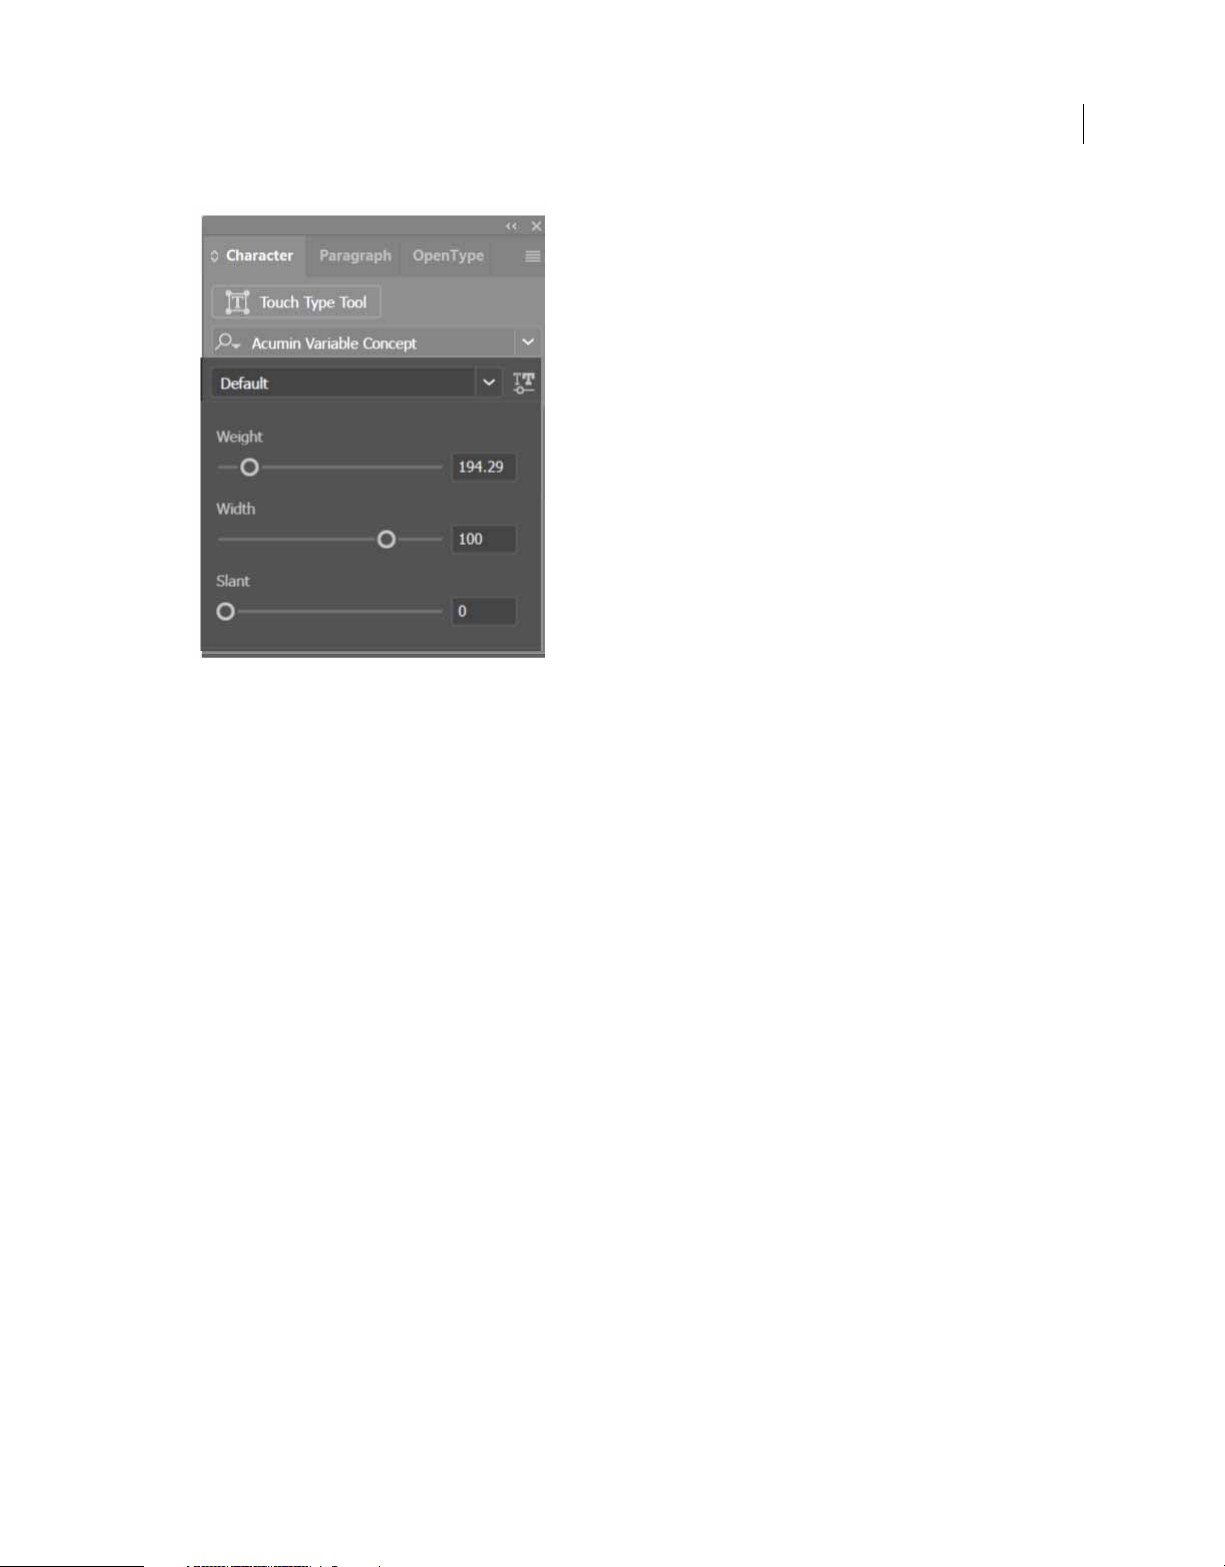
Variable fonts
New in the October 2017 release
Illustrator now supports Var i a bl e Font, a new OpenType font format supporting custom attributes like weight, width,
slant, optical size, etc. This release of Illustrator ships with several variable fonts for which you can adjust weight, width,
and slant using convenient slider controls available when you click
Character Styles panel, and Paragraph Styles panel.
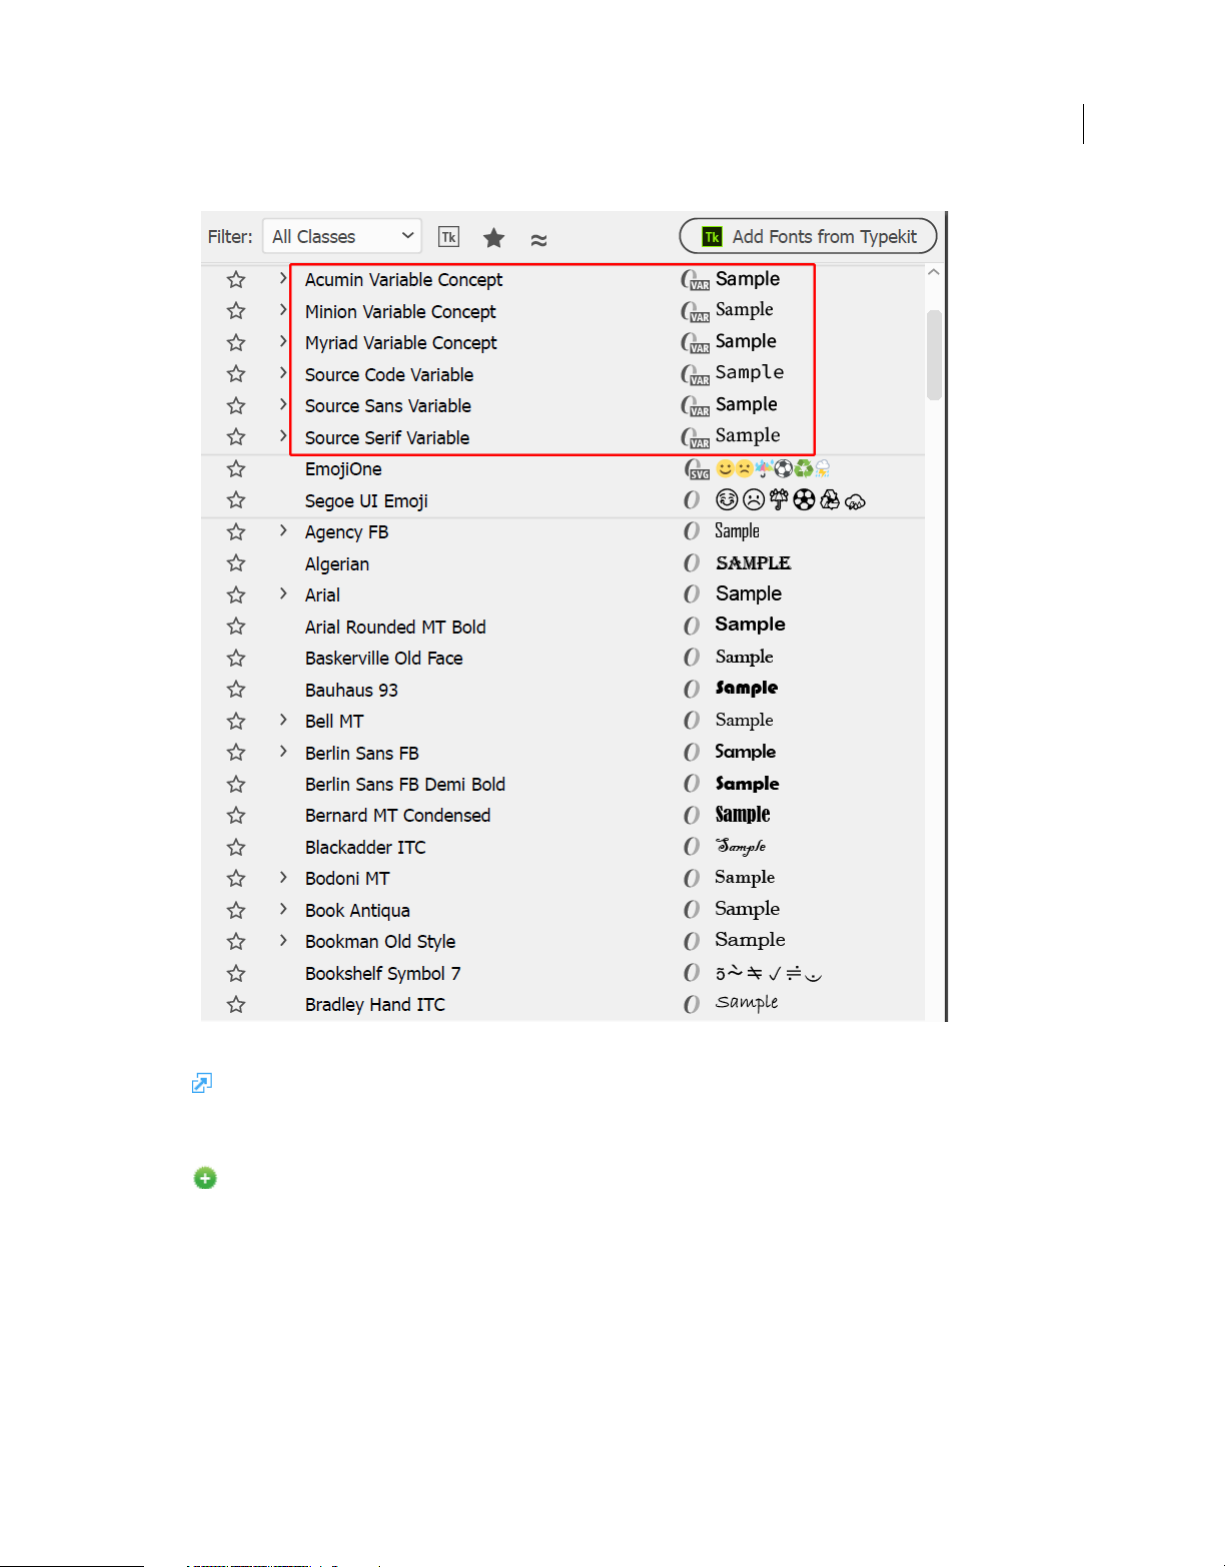
Search for variablein the font list to look for variable fonts. Alternatively, look for the icon next to the font name.
in the Control panel, Character panel,
Last updated 2/2/2018
Page 10
Introduction to Illustrator
Move the slider to adjust the Weight, Width, and Slant of the font.
4
Last updated 2/2/2018
Page 11
Introduction to Illustrator
5
Font list: Some variable fonts
For more information, see Fonts.
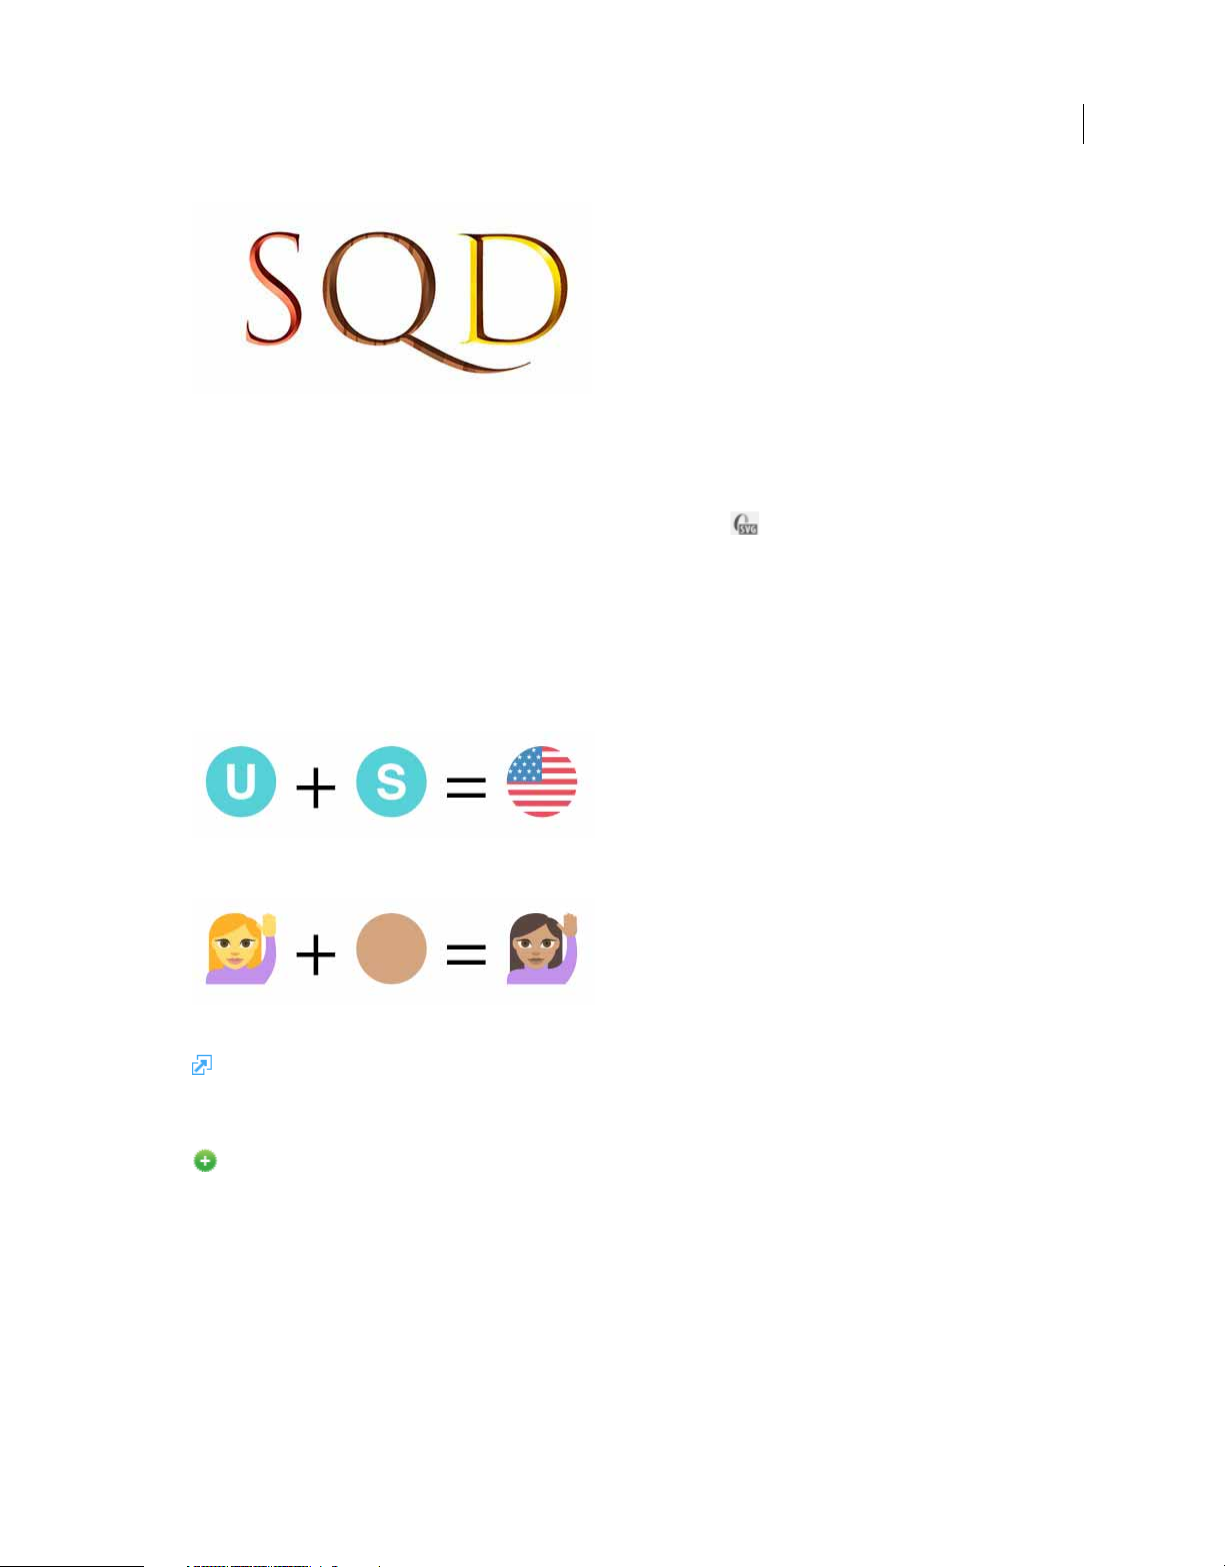
OpenType SVG fonts
New in the October 2017 release
Illustrator now supports OpenType SVG fonts that provide multiple colors and gradients in a single glyph.
Last updated 2/2/2018
Page 12
Introduction to Illustrator
OpenType SVG fonts: Multiple colors and gradients
To use OpenType SVG fonts, follow these steps:
• Create either a text object using the Type tool.
• Set the font to an OpenType SVG font. These fonts are marked with in the font list.
• Sel ect sp ecific glyphs us ing the Gly phs Panel. To v iew th e Glyphs Panel, sele ct Ty pe > Glyphs. Alternatively, you can
open the Glyphs panel by selecting
Window > Typ e > Glyphs.
Using Emoji fonts, you can include various colorful and graphical characters, such as smileys, flags, street signs,
animals, people, food, and landmarks in your documents.
OpenType SVG emoji fonts, such as the EmojiOne font, let
you create certain composite glyphs from one or more other glyphs. For example, you can create the flags of countries
or change the skin color of certain glyphs depicting people and body parts such as hands and nose.
6
Combine glyphs to form the flags of countries
Combine single-person characters with skin colors
For more information, see Fonts.
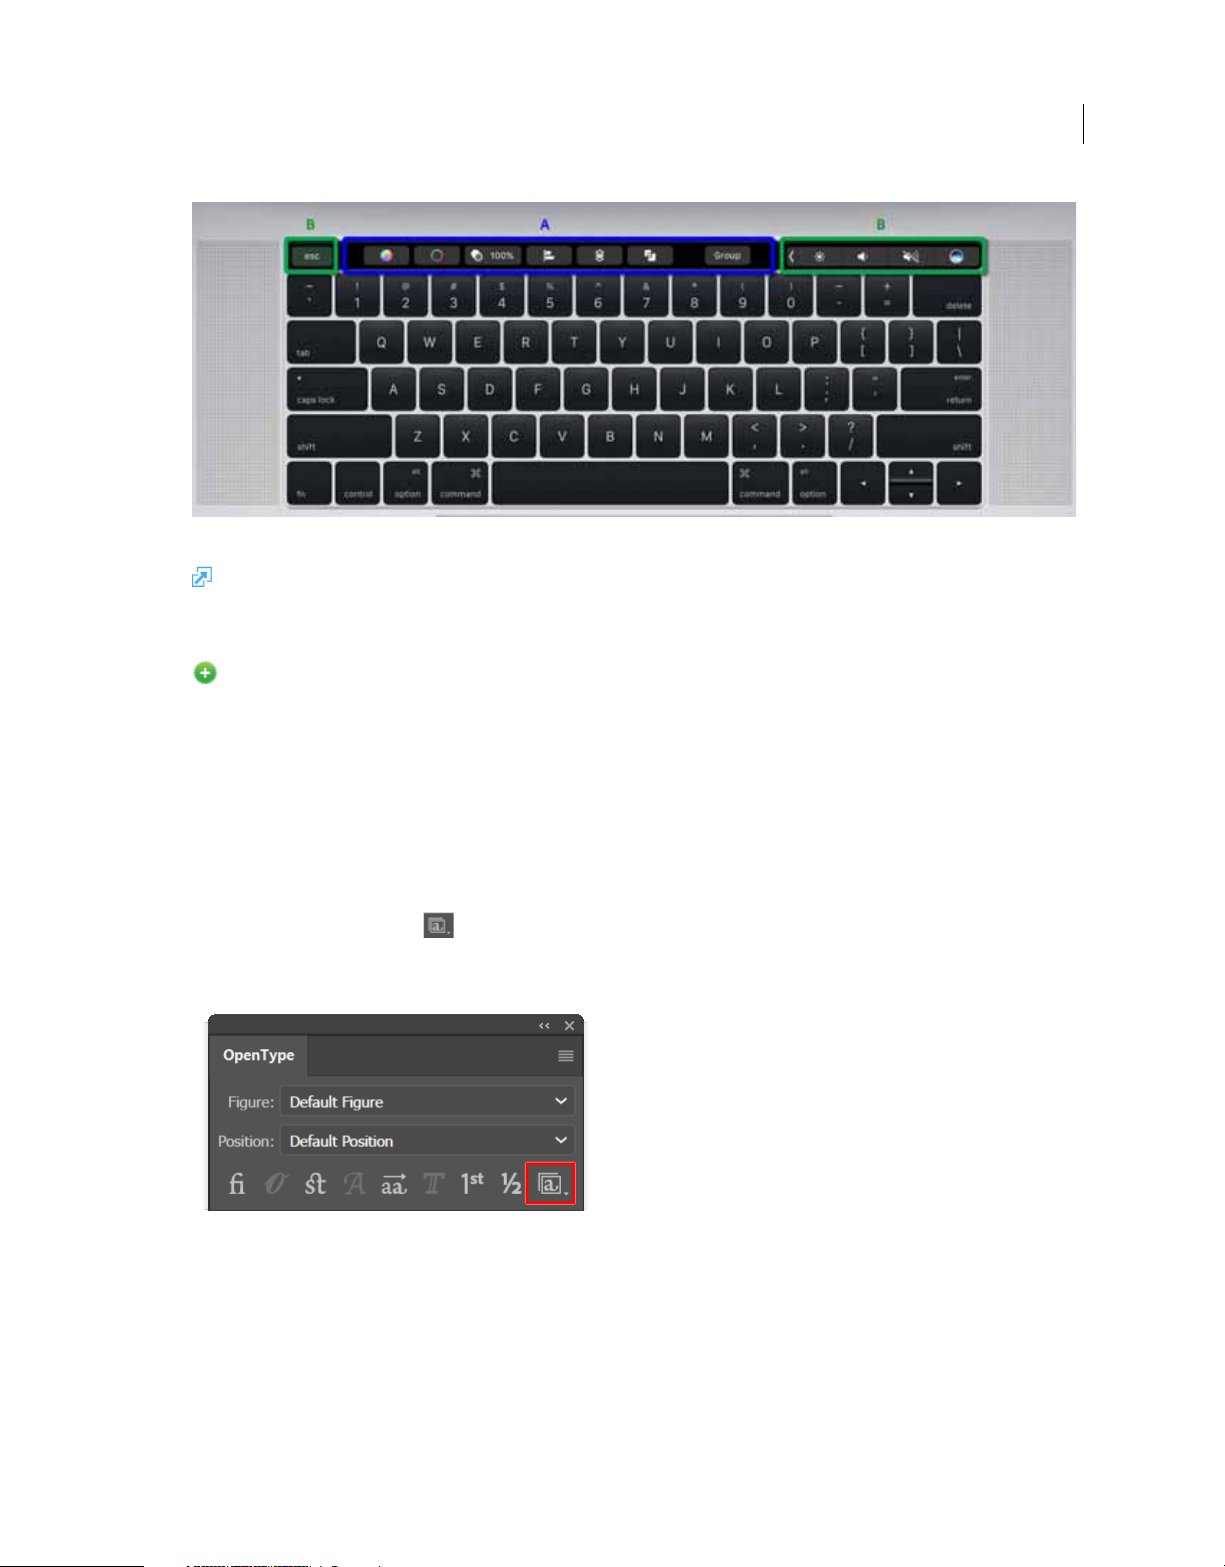
Use the Touch Bar with Illustrator
New in the October 2017 release
Illustrator now supports Touch Bar, the multitouch display at the top of the new MacBook Pro keyboard. Using the
Touch Bar, you can access Illustrator features and controls right in the context of your current task on the main screen.
The Touch Bar supports familiar gestures, such as tap, drag, and slide.
By default, a part of the Touch Bar interface is reserved for macOS system controls. Controls for Illustrator are displayed
in the app-specific area in the middle of the Touch Bar interface.
Last updated 2/2/2018
Page 13
Introduction to Illustrator
Tou ch Bar i nter fa ce
For more information, see Use the Touch Bar with Illustrator.
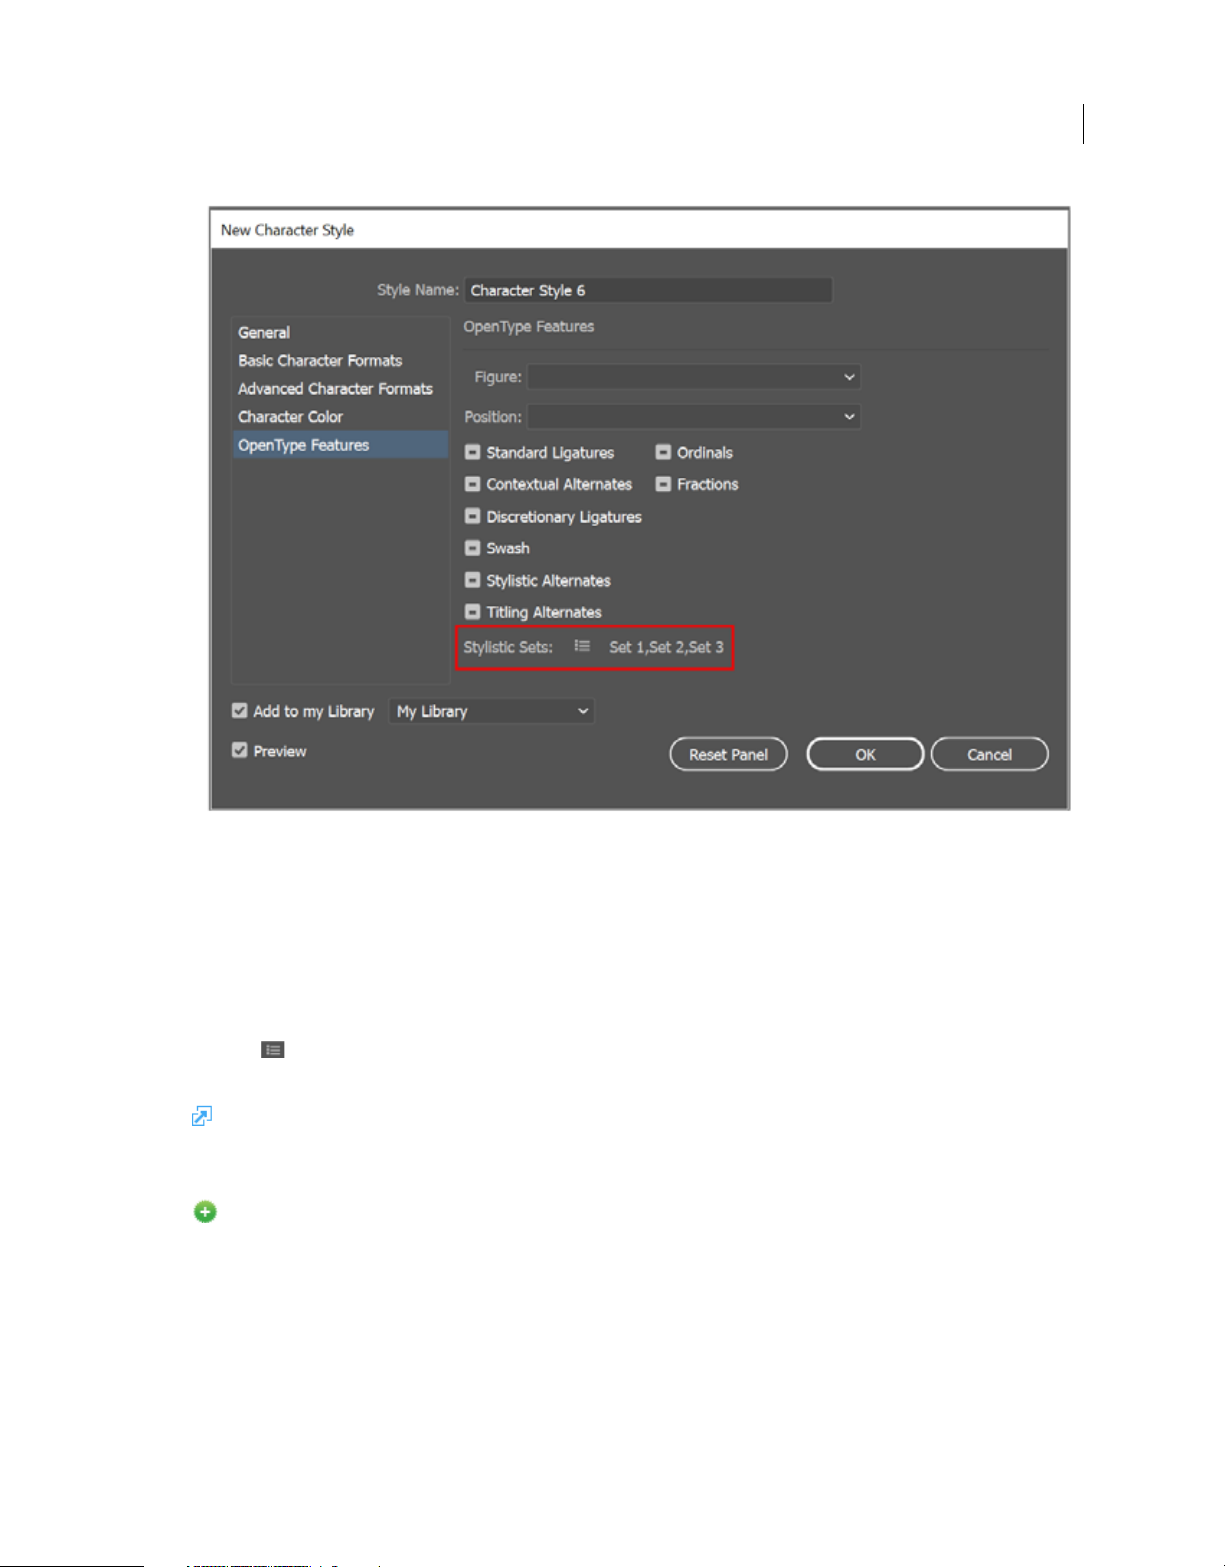
Apply stylistic sets to text
New in the October 2017 release
7
A stylistic set is a group of glyph alternates that can be applied to a selected block of text. When you apply a stylistic set,
the glyphs defined in the set replace the font’s default glyphs in the selected text. The name of the stylistic set provided
by the Font Developer is shown in various places in Illustrator. For some fonts, Illustrator displays the stylistic set names
as Set 1, Set 2, and so on. You can apply multiple stylistic sets to a range of text.
To apply stylistic sets to your text object, do the following:
1 Select the text block or the text range to which you want to apply a stylistic set.
2 Choose Window > Typ e > OpenType to open the OpenType panel. Now, do one of the following:
• Click the Stylistic Sets icon at the bottom of the panel and choose the desired set.
• Select Stylistic Sets from the panel menu and choose the desired set.
Apply stylistic sets using the OpenType panel
Last updated 2/2/2018
Page 14
Introduction to Illustrator
8
Add stylistic sets to a character style
To add stylistic sets to a character or a paragraph style, do the following:
1 Choose Window > Typ e > Character Styles/ Paragraph Styles to open the Character Styles panel or the Paragraph
Styles panel.
2 Choose the New Character/ Paragraph Style option from the panel menu.
3 Select the OpenType Features tab on the left of the New Character/ Paragraph Style dialog.
4 Click and choose the desired stylistic sets from the list.
5 Click OK.
For more information, see Use stylistic sets.
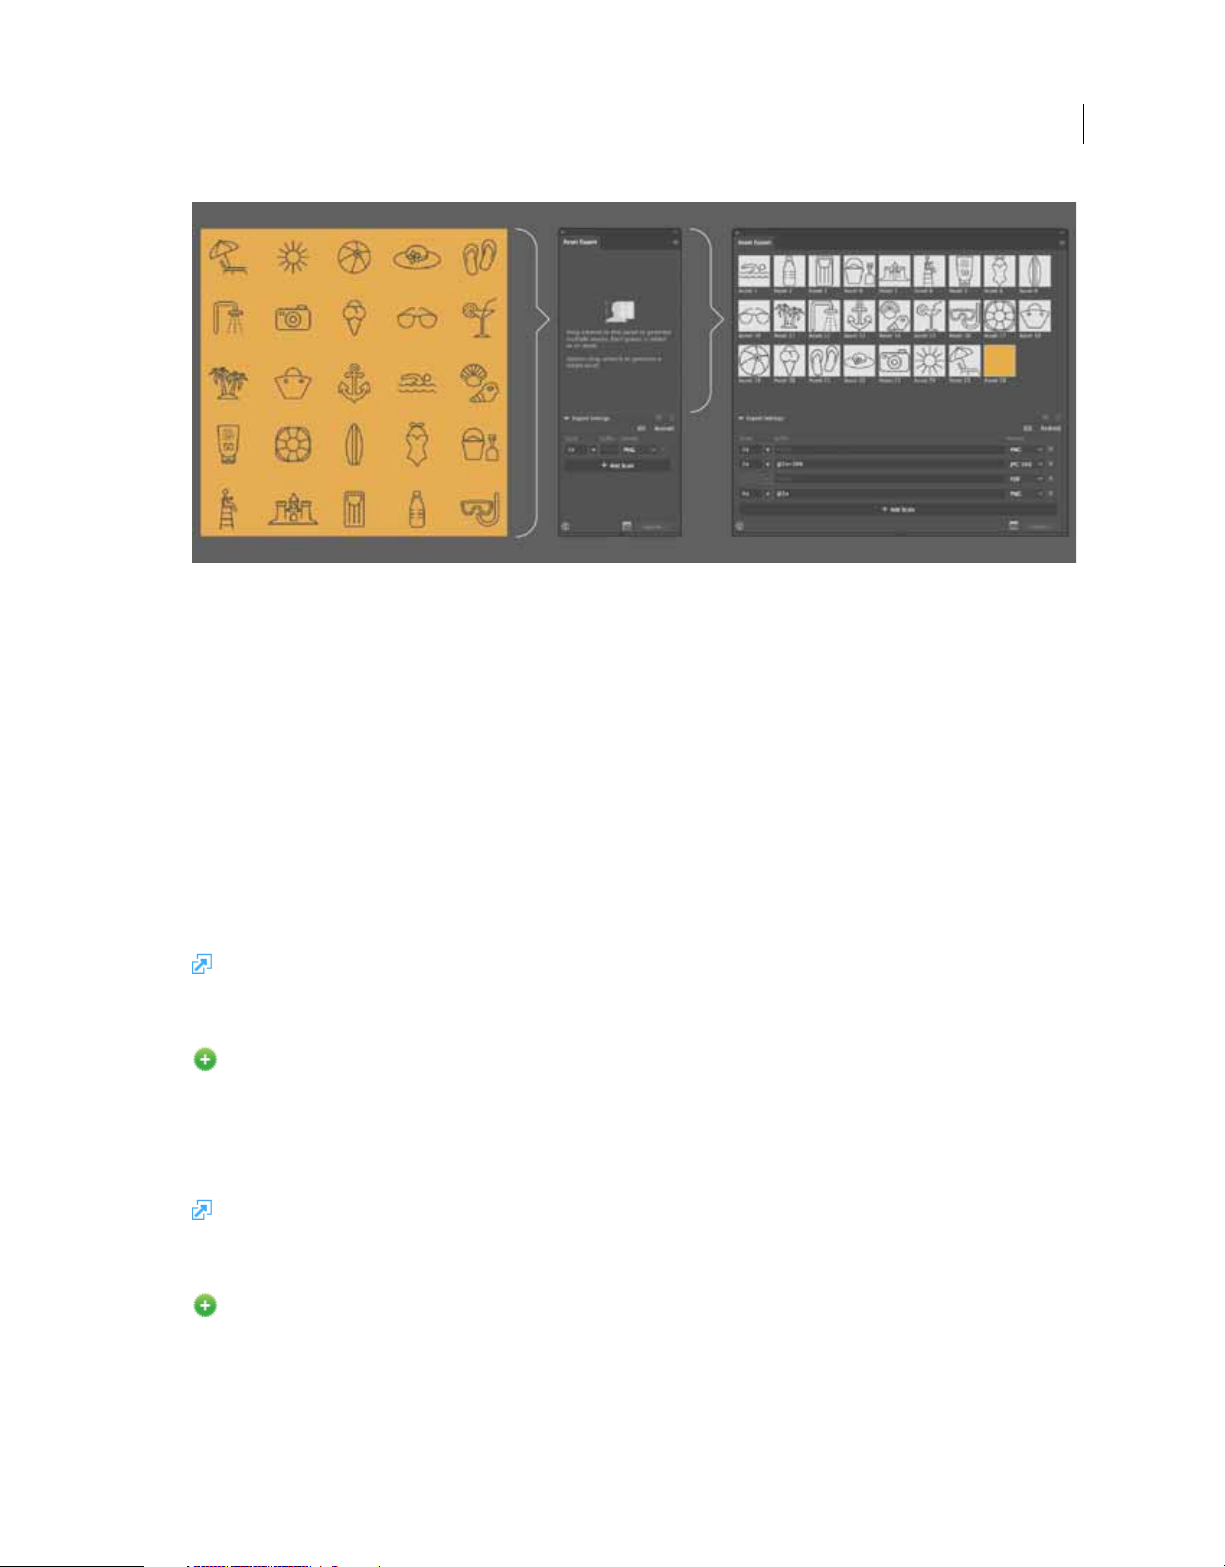
Enhanced export experience
New in the October 2017 release
Last updated 2/2/2018
Page 15
Introduction to Illustrator
Now, you can collect objects in the Asset Export panel for export as a single asset or multiple assets. Simply drag your
artwork to the Asset Export panel. Alternatively,
Multiple Assets
While exporting assets, Illustrator creates subfolders at the export location by default based on the scaling options you
choose. For example, if you select multiple scale formats in the Asset Export panel, say 1x 2x, and 3x to export a file as
PNG, Illustrator creates subfolders named 1x, 2x, and 3x for the exported files.
options, Illustrator names the subfolders based on the file formats selected for exporting—for example, SVG and PDF.
from the context menu.
right-click a piece of artwork and then choose Collect for Export > As
For formats that do not support scaling
9
Illustrator also exports raster objects accurately when you do one of the following while exporting assets using the Asset
Export panel or the Export For Screens dialog box:
• Define a non-integral scale—a scaling value that is not a multiple of 72 pixels.
• Specify the desired width and height that’s not a multiple of 100 pixels.
Note: Exercise caution while exporting artwork or artboards not aligned to the pixel grid or containing strokes not
aligned to Inside. The exported asset for such artwork may still have an extra pixel.
For more information, see Collect assets and export in batches .
Add and share text assets using Creative Cloud Libraries
New in the October 2017 release
Now, you can add text objects from your Illustrator documents to Creative Cloud libraries and then share them with
other users and across applications. Text assets in a library retain the character/paragraph styles and other attributes
originally applied to them. You can reuse text assets in libraries across Illustrator or InDesign documents. However, if
a text object has effects and appearances applied to it, you must add it to the library as a graphics asset to preserve them.
For more information, see Creative Cloud Libraries in Illustrator.
Microsoft Surface Dial support in Illustrator
New in the October 2017 release
Illustrator now supports Microsoft Surface Dial on Windows 10 Anniversary edition and later or directly on Surface
Studio. You can use Surface Dial to adjust settings and parameters for your Illustrator documents.
Last updated 2/2/2018
Page 16
Introduction to Illustrator
While using Illustrator, long press Surface Dial to access the following options:
• Undo/ Redo
• Arrange
• Zoom
• Artboard Navigation
• Tools, including Rotate, Scale, Brush, Blob Brush, and Eraser.
For more information, see Microsoft Surface Dial support in Illustrator.
Other enhancements and fixes
Issues fixed in Illustrator CC (version 22.0.1)
Unable to export artwork as PNG other than 72 ppi using the October 2017 release of Illustrator CC
Text layout issues while working with Japanese text with the None preset applied for Mojikumi and Kinsoku
Enhancements in Illustrator CC (version 22.0)
You can now disable zoom to selection. Go to Preferences > Selection And Anchor Display and then deselect
the Zoom To Selection option.
10
You can now create text objects, select text, or edit text in sequence without having to reselect the Text tool.
You can now preview font characteristics, such as size, style, leading, and tracking in real time by simply hovering
over the font characteristics in the Control panel and the Character panel. For details, see Fonts.
The Missing Font dialog is now enabled for Composite fonts. If your document has one or more fonts missing from
the Composite font, an alert message appears when you open it.
The text caret is more responsive now. For example, the text caret now appears promptly on the screen as you type.
The length of the text caret increases or decreases when you change the font size.
Now, when you triple-click anywhere in a paragraph or use Ctrl/Cmd+Up/Down Arrow keys, Illustrator selects
the entire paragraph even if it contains forced line breaks.
When you convert a spot color into a process color (CMYK), Illustrator displays the correct CMYK values
according to the standards communicated by the International Color Consortium (ICC).
Now, scripts in the Actions panel are preserved when you relaunch Illustrator.
A new swatch is now a Global swatch by default.
New Document dialog box improvements:
• The New Document dialog box displays the units of measurement in the text boxes, such as Width and Height.
• You can use the formulas: add, subtract, multiply, or divide for quick computations of the preset dimensions in the
New Document dialog box.
• Yo u can s pec i fy t he Color Mode, Raster Effects, and Preview Mode of your document.
You ca n no w u se th e Path > Join (Ctrl/ Command + J) command in Illustrator to join the endpoints of compound
paths and artwork in different groups.
Last updated 2/2/2018
Page 17

Introduction to Illustrator
Now, when the folder containing the Illustrator document and the linked files is moved, Illustrator automatically
finds and updates the linked files using the current path of the Illustrator document.
Workspace basics
You create and manipulate your documents and files using various elements, such as panels, bars, and windows. Any
arrangement of these elements is called a
look similar so that you can move between the applications easily.) You can adapt Illustrator to the way you work by
selecting from several preset workspaces or by creating one of your own.
Start workspace
The Start workspace in Illustrator gives you quick access to your recent files, libraries, and mobile creations. Depending
on your subscription status, the Start workspace may also display content tailored for your requirements. You can also
look for the right Adobe Stock asset for your project directly from within the Start workspace.
Illustrator displays the Start workspace at launch or whenever no documents are open.
workspace. (The workspaces of the different applications in Creative Cloud
11
Start workspace
Work with Start workspace
Toggle between tile and list views Click the List icon ( ) or the Tile icon ( ).
Interact with your Libraries Use the integrated Libraries panel to quickly view, work with, or edit assets in your own
or shared Creative Cloud Libraries.
Find a Stock asset Enter a keyword in the Search field. Illustrator displays the search results from Adobe Stock in a new
browser window.
Disable the Start workspace
1 Select Preferences > General.
2 Deselect Show The Start Workspace When No Documents Are Open.
You can use the keyboard shortcuts to open files (Ctrl/Cmd + O) or start new documents (Ctrl/Cmd + N).
Create documents
When you create a document in Illustrator, instead of beginning with a blank canvas, you can choose from a wide
variety of templates, including templates from Adobe Stock. Templates include stock assets and illustrations that you
can build on to complete your project. When you open a template in Illustrator, you can work with it just as you would
work with any other Illustrator document (.ai).
In addition to templates, you can also create a document by selecting one of the numerous presets available in
Illustrator.
For more information, see Create documents.
Last updated 2/2/2018
Page 18
Introduction to Illustrator
12
New Document dialog | Templates from Adobe Stock and presets
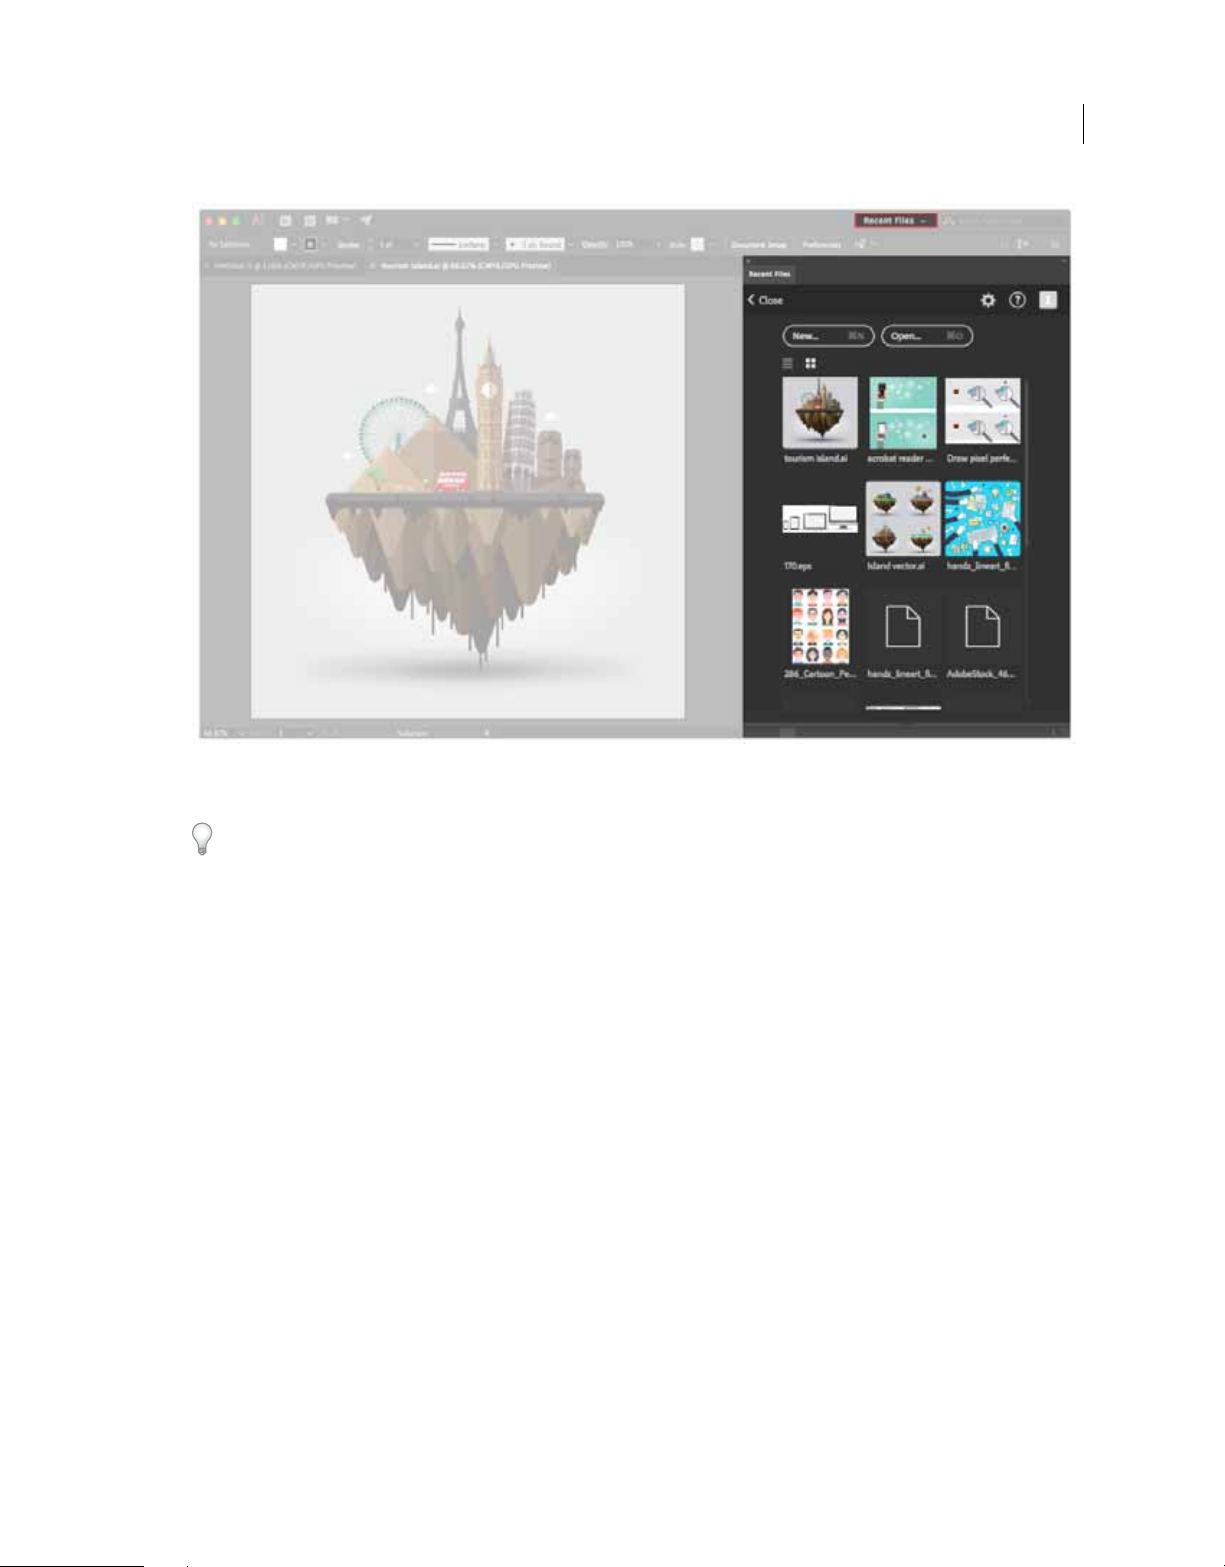
Recent Files workspace
Use the Recent Files workspace to review a list or thumbnail view of the files you have been working on recently. Select
Recent Files from the Workspace Switcher menu to view Recent Files workspace.
To set the number of files you want to view, modify the value of Number Of Recent Files To Display text box
(Preferences
> File Handling & Clipboard > Files).
Last updated 2/2/2018
Page 19
Introduction to Illustrator
13
Recent Files workspace
This feature is disabled by default. To enable the Recent Files workspace from the Preferences dialog, select the Show
The Recent Files Workspace While Opening A File check box (Preferences > General tab).
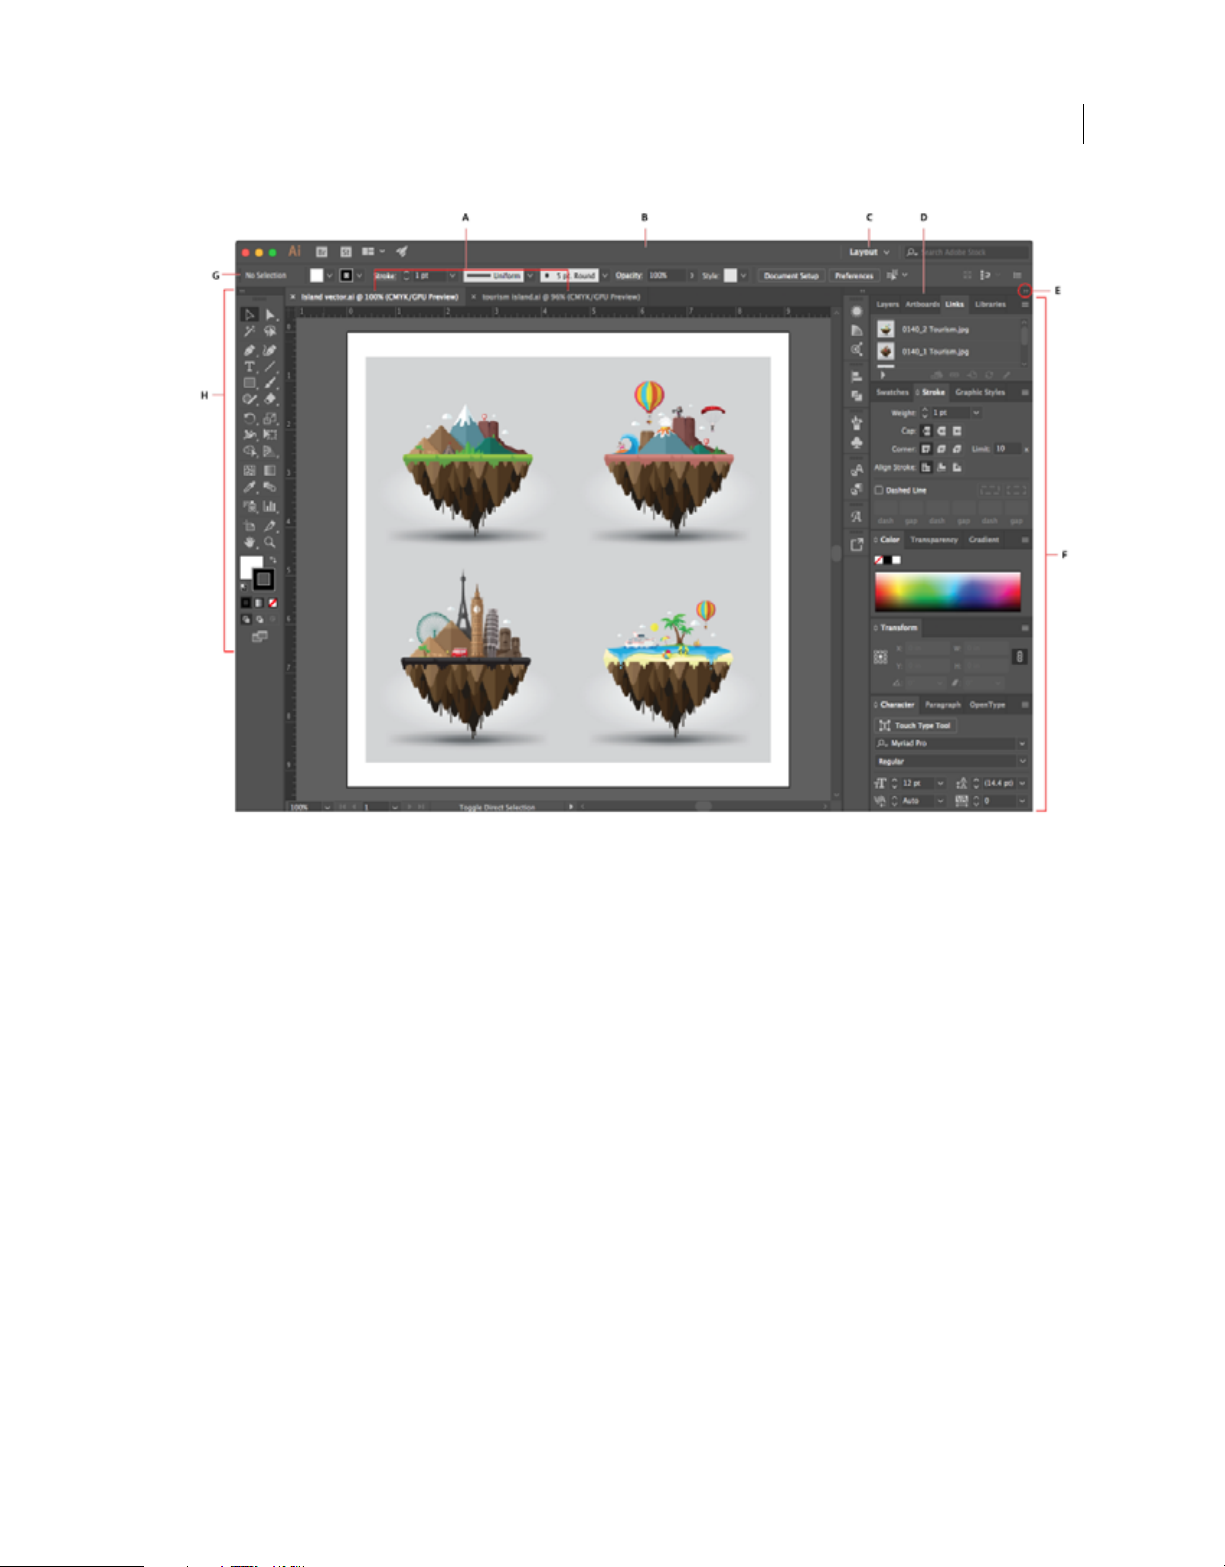
Workspace overview
• The Application frame groups all the workspace elements in a single, integrated window that lets you treat the
application as a single unit. When you move or resize the Application frame or any of its elements, all the elements
within it respond to each other so none overlap. Panels don’t disappear when you switch applications or when you
accidentally click out of the application. If you work with two or more applications, you can position each
application side by side on the screen or on multiple monitors. If you are using a Mac and prefer the traditional, freeform user interface, you can turn off the Application frame. Select
off.
• The Application bar across the top contains a workspace switcher, menus (Windows only), and other application
controls. On Mac, the application bar is available only when Application frame is off. You can toggle it on or off using
the Window menu.
• The Tools panel contains tools for creating and editing images, artwork, page elements, and so on. Related tools are
grouped.
• The Control panel displays options for the currently selected object.
• The Document window displays the file you’re working on. Document windows can be tabbed and, in certain cases,
grouped and docked.
• Panels help you monitor and modify your work. Panels can be grouped, stacked, or docked.
Window > Application Frame to toggle it on or
Last updated 2/2/2018
Page 20
Introduction to Illustrator
14
Default Illustrator workspace
A Tabb ed Docume nt w indows B Application bar C Workspace switcher D Panel title bar E Collapse To Icons button F Four panel groups in
vertical dock G
Control panel H Tools panel
Properties panel
Introduced in the October 2017 release of Illustrator CC
The Properties panel in Illustrator lets you view settings and controls in the context of your current task or workflow.
This new panel has been designed with ease of use in mind, ensuring that you have access to the right controls right
when you need them.
The Properties panel is available by default in the Essentials workspaces. You can also select Wi n do w > Properties to
view it.
Last updated 2/2/2018
Page 21
Introduction to Illustrator
15
Properties panel
For details, see Properties panel .
Manage windows and panels
Hide or show all panels
• To hide or show all panels, including the Tools panel and Control panel, press Ta b.
• To hide or show all panels except the Tools panel and Control panel, press Shift+Tab.
Ti p: You can temporarily display hidden panels if Auto-Show Hidden Panels is selected in Interface preferences. It’s
always on in Illustrator. Move the pointer to the edge of the application window (Windows®) or to the edge of the
monitor (Mac
Display panel options
?
Click the panel menu icon in the upper-right corner of the panel.
Ti p: You can open a panel menu even when the panel is minimized.
Adjust panel brightness
?
In User Interface preferences, you can customize the interface to sport one of the four available color options
designed for optimal user experience:
Note: The canvas color in Illustrator is matched to the user interface brightness by default. Choose Preferences > User
Interface > Canvas Color > White
OS®) and hover over the strip that appears.
Dark, Medium Dark, Medium Light, and Light.
to change the canvas color to white.
Last updated 2/2/2018
Page 22
Introduction to Illustrator
Reconfigure the Tools panel
You can display the tools in the Tools panel in a single column, or side by side in two columns.
?
Click the double arrow at the top of the Tools panel.
If you work with only a specific set of tools, you can create a customized tools panel that contains only those tools.
For details, see
Custom tools panel .
Enter values in panels and dialog boxes
You enter values using the same methods in all panels and dialog boxes. You can also perform simple math in any box
that accepts numeric values. For example, if you want to move a selected object 3 units to the right using the current
measurement units, you don’t have to work out the new horizontal position—simply type +3 after the current value in
the Transform panel.
Enter a value in a panel or dialog box
?
Do any of the following:
16
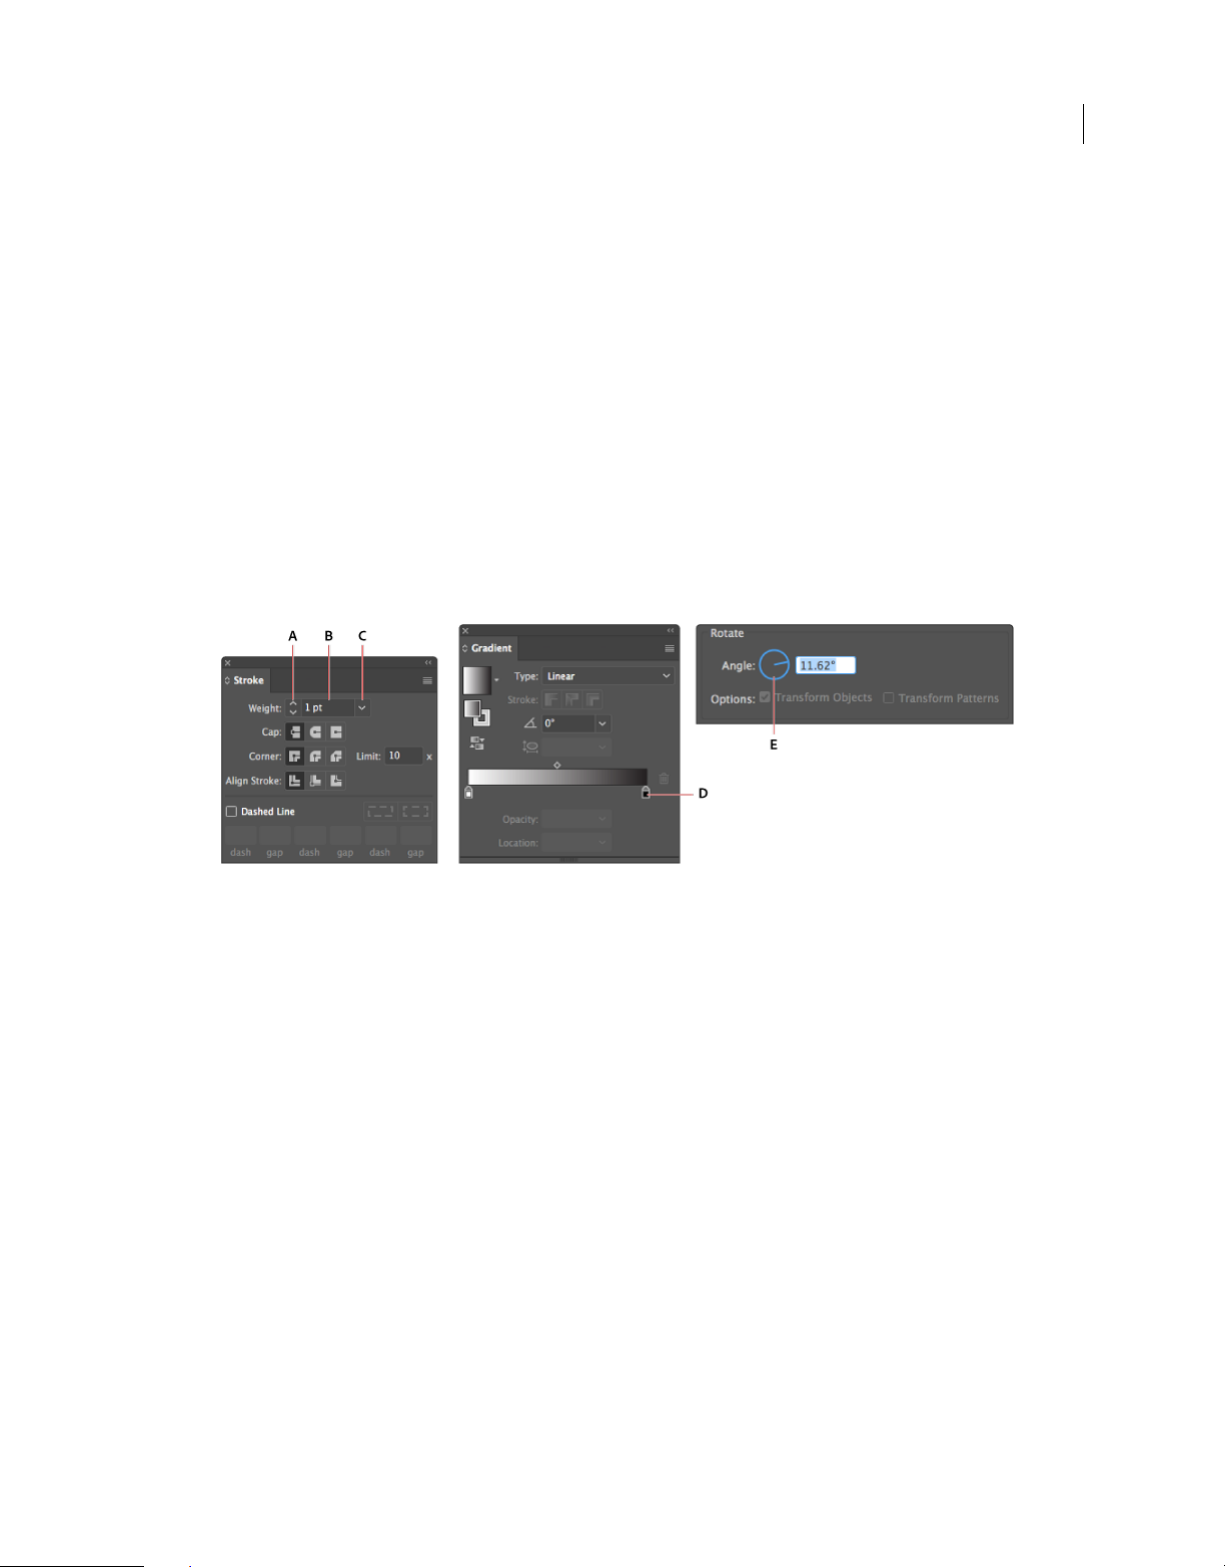
Ways to enter values
• A Click the arrow buttons in the panel to increase or decrease the value.
• B Type a value in the box, and press Enter or Return.
• C Select a value from the menu associated with the box.
• D Drag the slider.
• E Drag the dial.
Note: Press Cmd/ Ctrl key while clicking the arrow buttons to increase or decrease the numerical values in fractions. For
example, when you press Cmd/ Ctrl key while clicking Arrow Up to increase the Stroke Weight, the value increases from
1 point to 1.1 point.
Calculate values in a panel or dialog box
1 In a text box that accepts numerical values, do one of the following:
• To replace the entire current value with a mathematical expression, select the entire current value.
• To use the current value as part of a mathematical expression, click before or after the current value.
2 Type a simple mathematical expression using a single mathematical operator, such as + (plus), - (minus), x
(multiplication), / (division), or %
(percent).
Last updated 2/2/2018
Page 23
Introduction to Illustrator
For example, 0p0 + 3 or 5mm + 4. Similarly, 3cm * 50% equals 3 centimeters multiplied by 50%, or 1.50 cm, and
50pt + 25% equals 50 points plus 25% of 50 points, or 62.5 points.
3 Press Enter or Return to apply the calculation.
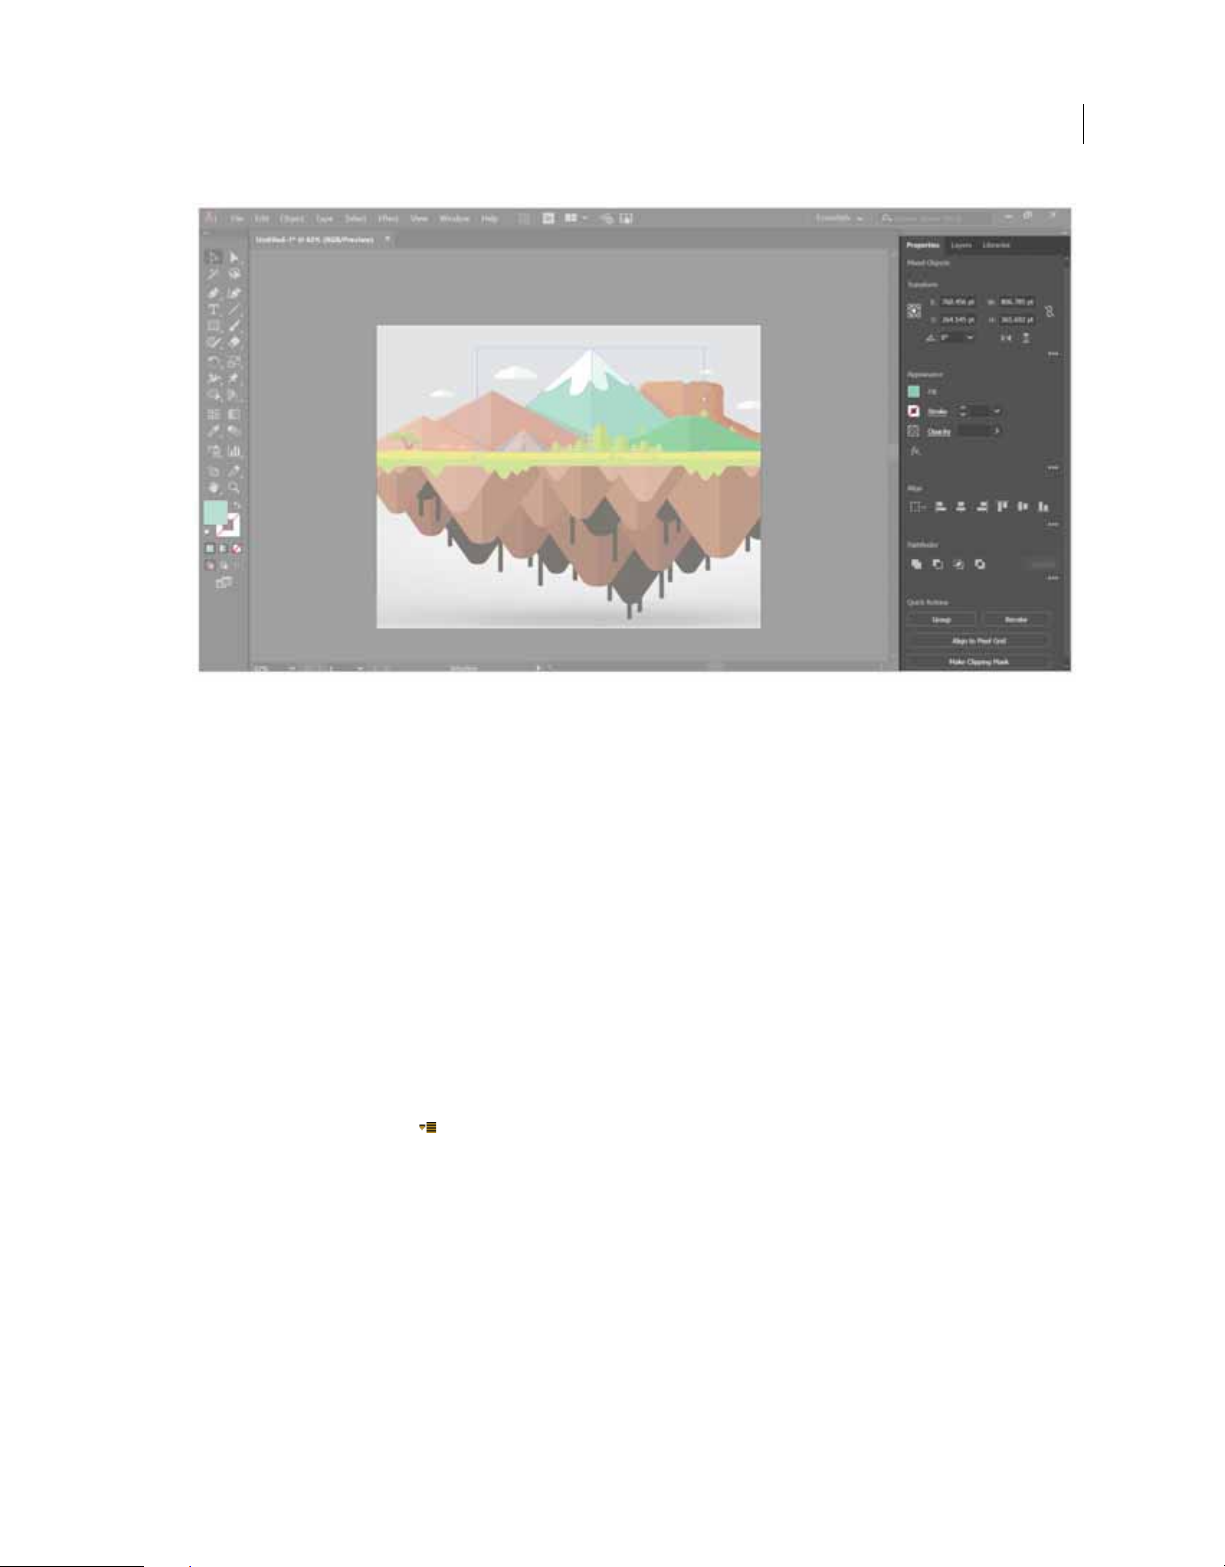
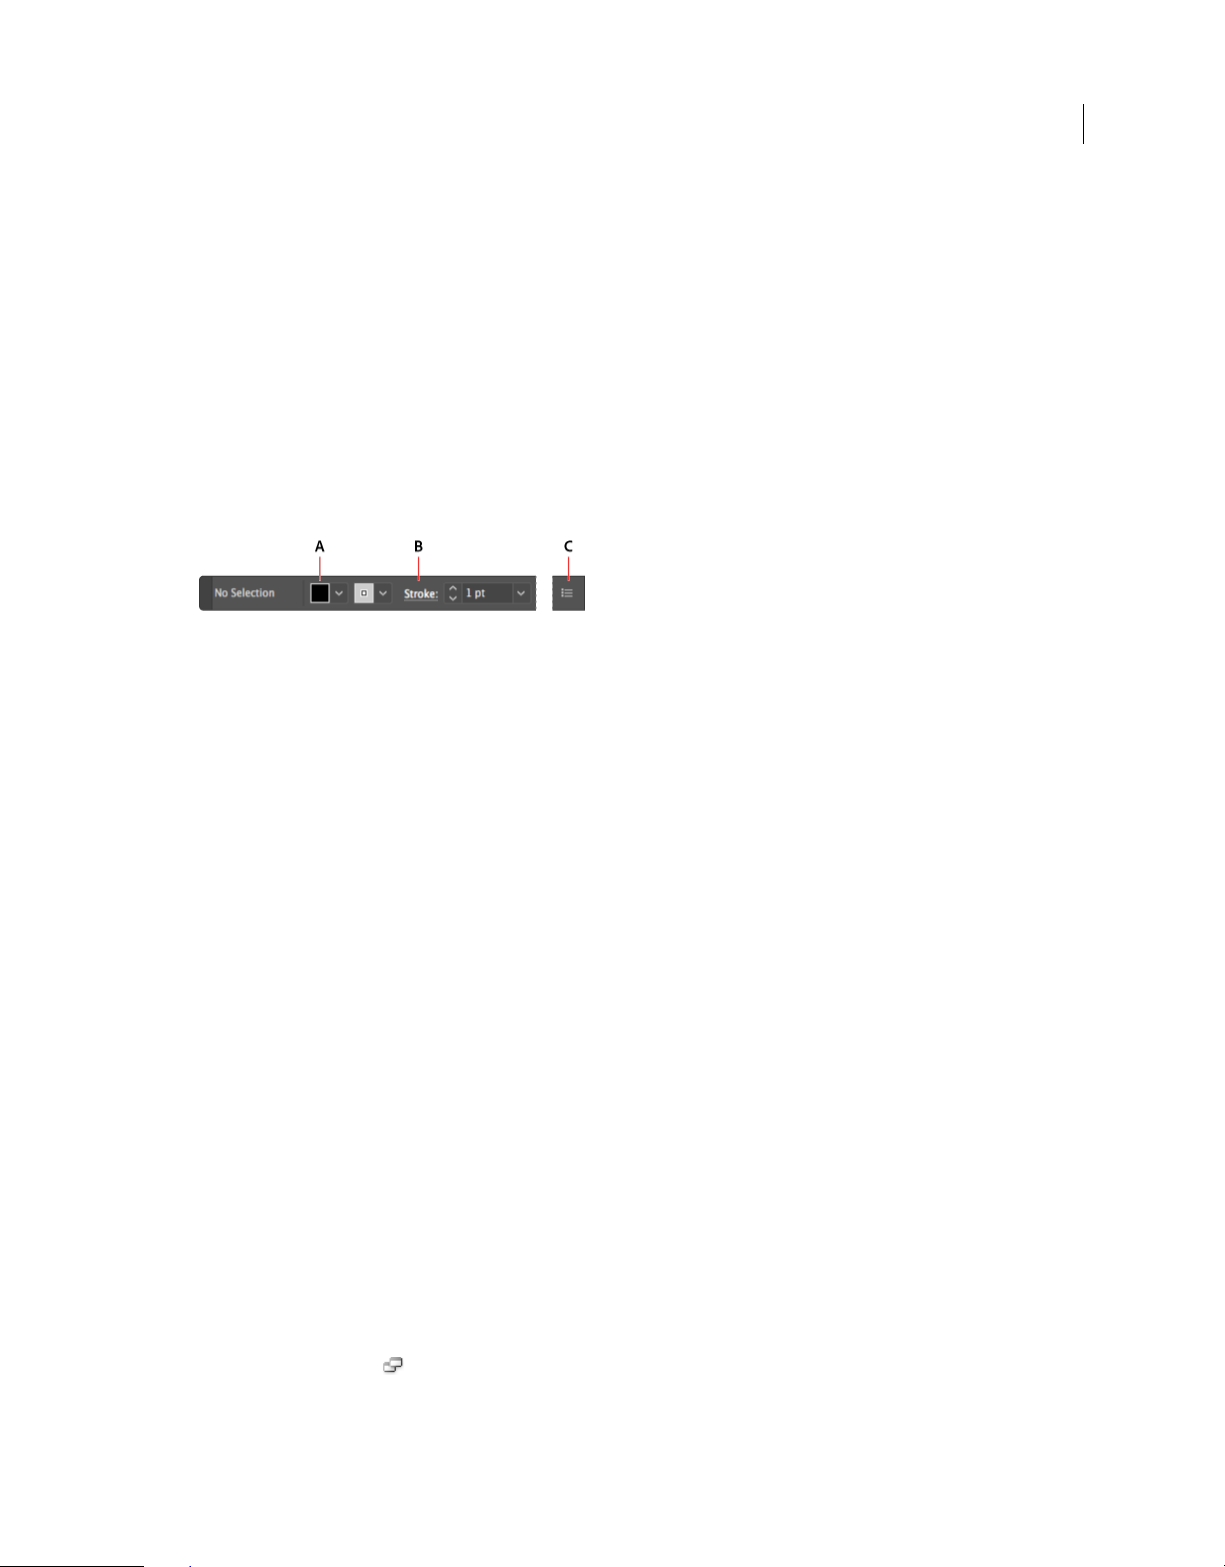
Control panel overview
The Control panel offers quick access to options related to the objects you select. By default, the Control panel is docked
at the top of the workspace.
Options displayed in the Control panel vary depending on the type of object or tool you select. For example, when you
select a text object, the Control panel displays text-formatting options in addition to options for changing the color,
placement, and dimensions of the object. When a selection tool is active, you can access Document Setup and
Preferences from the Control panel.
Control panel
A Hidden options B Link to another panel C Panel menu
17
When text in the Control panel is blue and underlined, you can click the text to display a related panel or dialog box.
For example, click the word Stroke to display the Stroke panel.
Change the kinds of controls that appear in the Control panel
?
Select or deselect options in the Control panel menu.
Open and close a panel or dialog box from the Control panel
1 Click a blue underlined word to open its associated panel or dialog box.
2 Click anywhere outside the panel or dialog box to close it.
Dock the Control panel at the bottom of the workspace
?
Choose Dock To Bottom from the Control panel menu.
Convert the Control panel to a floating panel
?
Drag the gripper bar (located on the left edge of the panel) away from its current position.
To redock the Control panel, drag the gripper bar to the top or bottom of the application window (Windows) or
screen (Mac
OS).
About screen modes
You can change the visibility of the illustration window and menu bar using the mode options at the bottom of the Tools
panel. To access panels when in Full Screen Mode, position the cursor at the left or right edge of the screen and the
panels will pop up. If you’ve moved them from their default locations, you can access them from the Window menu.
You can choose one of the following modes:
• Normal Screen Mode displays artwork in a standard window, with a menu bar at the top and scroll bars on the
sides.
Last updated 2/2/2018
Page 24

Introduction to Illustrator
• Full Screen Mode With Menu Bar displays artwork in a full-screen window, with a menu bar at the top and scroll
bars.
• Full Screen Mode displays artwork in a full-screen window, with no title bar or menu bar.
Use F key to toggle between the screen modes.
Using the status bar
The status bar appears at the lower-left edge of the illustration window. It displays any of the following:
• current zoom level
• current tool in use
• current artboard in use
• navigation controls for multiple artboards
Search box
Search for Help topics and assets from Adobe Stock directly from within the Illustrator workspace. Select one of the
following options from the drop-down menu of the search box on the right side of the Application bar:
18
• Adobe Stock
• Adobe Help
Search for Adobe Stock assets
You can search for high-quality, curated, royalty-free stock illustrations and vector graphics from for all your creative
projects from right within Illustrator.
1 In the search box in the upper-right corner of the workspace, enter the name of the item that you want to find.
2 Press Enter.
Note: You can also search for stock asset by selecting File > Search Adobe Stock.
All assets available from Adobe Stock for a particular search query appear in a separate browser window.
Search Adobe Help
Use the Search For Help box to search for Help topics and online content. If you have an active Internet connection,
you can access all content on the Community Help website. If you search for Help without an active Internet
connection, search results are limited to Help content that is included with Illustrator.
1 In the search box, type the name of the item on which you want to search (such as a feature, application, or tool).
2 Press Enter.
All topics available from the Community Help center appear in a separate browser window.
Use Illustrator with the Touch Bar on M acB ook Pro
Introduced in the October 2017 release of Illustrator CC
Illustrator supports Touch Bar, the multitouch display at the top of the new MacBook Pro keyboard. Using the Touch
Bar, you can access Illustrator features and controls right in the context of your current task on the main screen. The
Touch Bar supports familiar gestures, such as tap, drag, and slide. For details, see
Last updated 2/2/2018
Use the Touch Bar with Illustrator.
Page 25

Introduction to Illustrator
Use Illustrator with Microsoft Dial
Introduced in the October 2017 release of Illustrator CC
Illustrator supports the new Microsoft Dial on Windows 10 Anniversary edition and later or directly on the
SurfaceStudio. You can use Dial to adjust settings and parameters for your Illustrator documents.
While using Illustrator, long press the Dial to access the following options:
• Undo/ Redo
• Arrange
• Zoom
• Artboard Navigation
• Tools, including Rotate, Scale, Brush, Blob Brush, and Eraser.
For details, see Microsoft Surface Dial support in Illustrator.
Create documents
Introduced in Adobe Illustrator CC 2017 release
19
While creating a document in Illustrator, instead of beginning with a blank canvas, you can choose from a wide variety
templates, including templates from Adobe Stock. Templates include assets and illustrations that you can build on to
of
complete your project. When you open a template in Illustrator, you can work with it just as you would work with
other Illustrator document (.ai).
In addition to templates, you can also create a document by selecting one of the numerous presets available in
Illustrator.
any
Templates and presets
Te mp l at es provide rich, inspirational, and reusable content for your documents. You can download templates from
Adobe Stock that include quality graphics and illustrations right within Illustrator. You can then build on these
templates to easily create documents that share common settings and design elements. Illustrator also provides blank
Last updated 2/2/2018
Page 26

Introduction to Illustrator
templates with predefined dimensions and settings for common tasks, such as designing business cards or brochures.
Templates open as .ai files in Illustrator and generally include multiple artboards.
Blank Document Presets are blank documents with predefined dimensions and settings. Presets make designing for
specific device form factors or use cases easier. For example, you can use a preset to quickly start designing for the iPad
Pro. Blank document presets have predefined size, color, mode, unit, orientation, positioning, bleed, and resolution
settings. You can
Templates and presets are categorized into these sets:
modify these settings before creating a document using the preset.
• Mobile
• We b
• Print
• Film & Video
• Art & Illustration
Access the New Document dialog
1 Launch Illustrator.
20
2 Do one of the following:
• Select File > New.
• Click New or Start New in the Start workspace.
• Use the following keyboard shortcut:
• (Mac) Cmd+N
• (Windows) Ctrl+N
• Right-click the tab for an open document and choose New Document from the in-context menu.
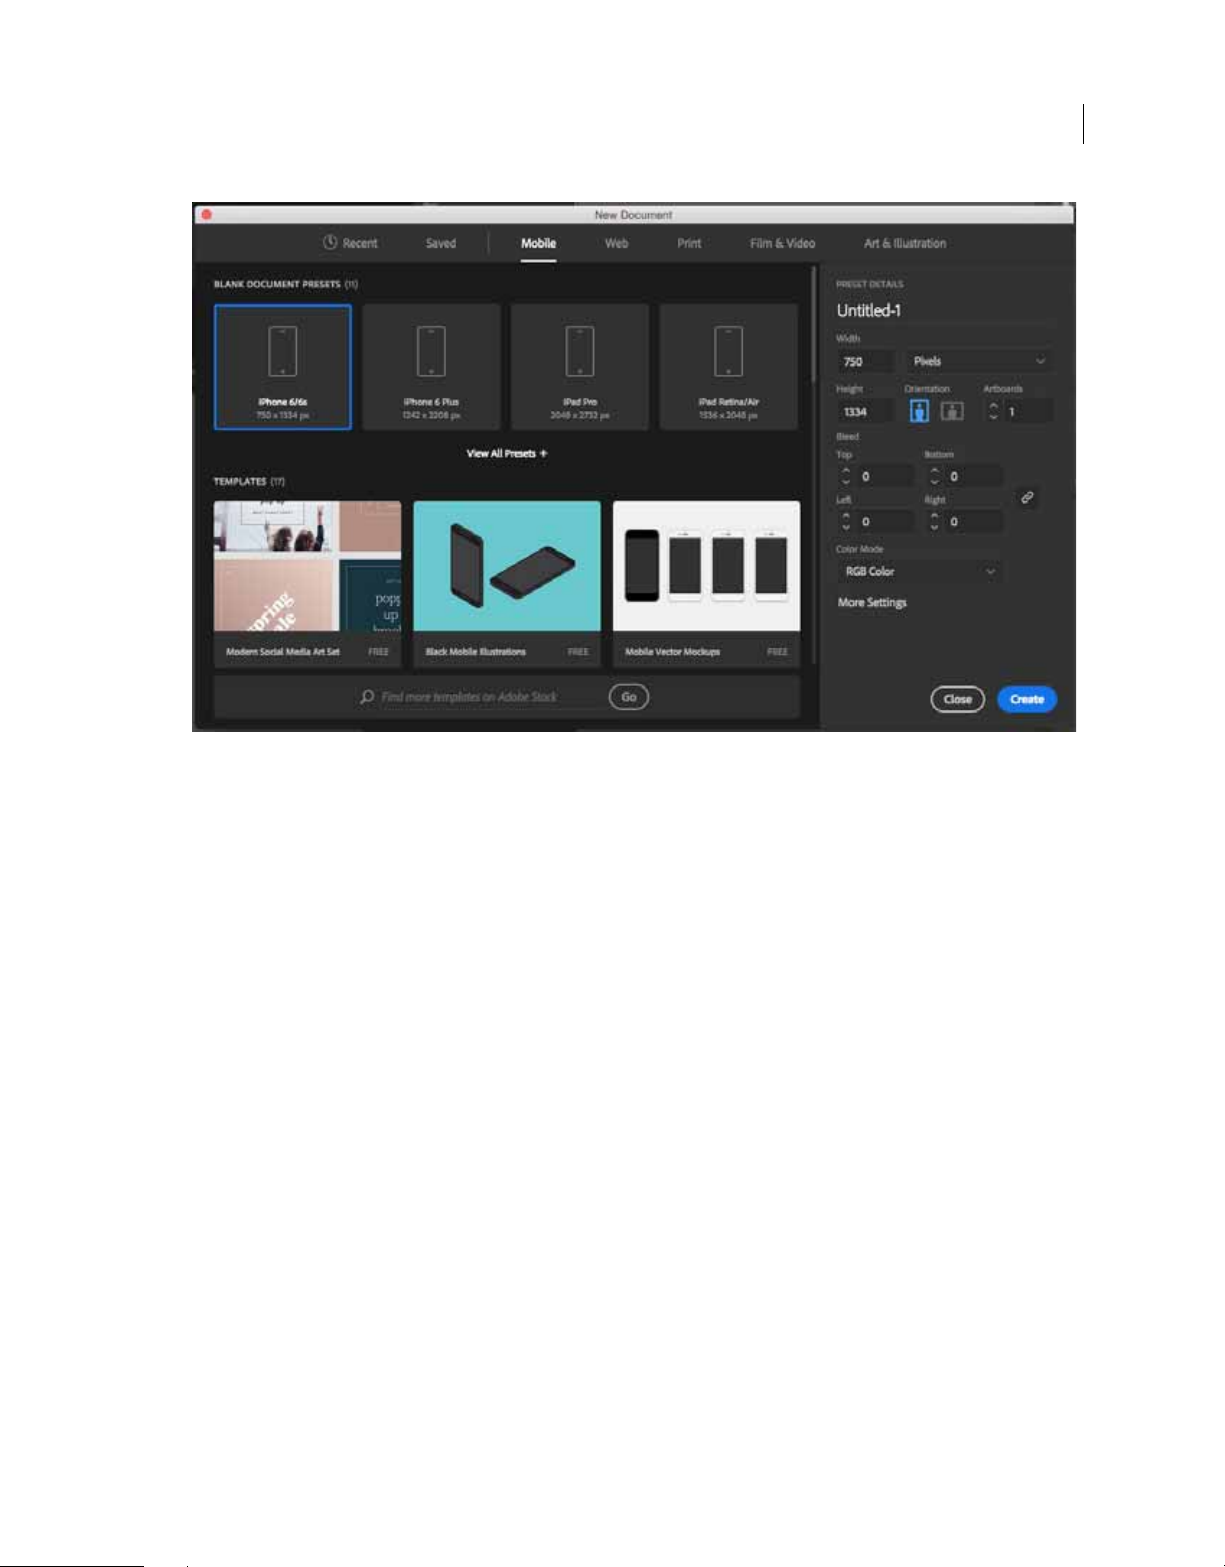
Overview: New Document dialog
Among other operations, the New Document dialog lets you:
• Create documents using selected templates from Adobe Stock across several categories: Mobile, Web, Print, Film &
Video, and Art & Illustration
• Search for more templates on Adobe Stock and create documents using them
• Quickly access files, templates, and items that you've have recently accessed (Recents tab)
Last updated 2/2/2018
Page 27
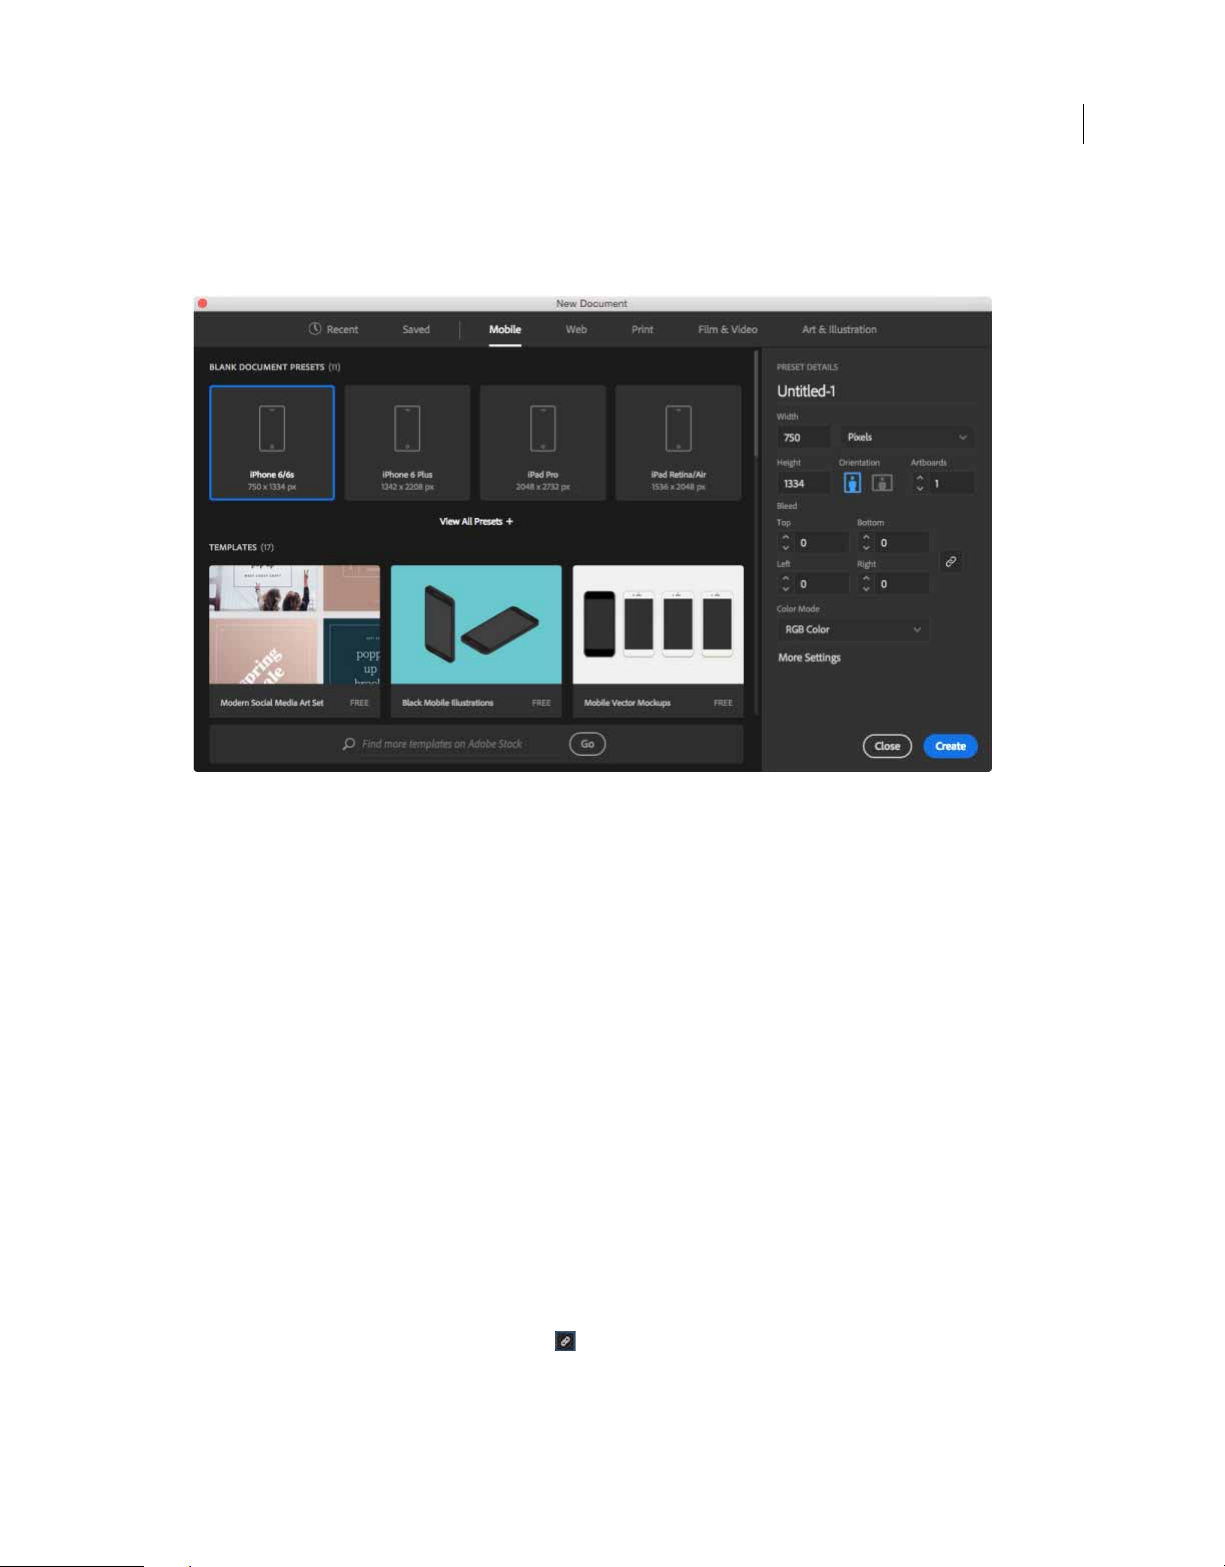
Introduction to Illustrator
• Quickly access templates that you've downloaded from Adobe Stock (Saved tab)
• Create documents using Blank Document presets for multiple categories and device form factors. Before opening
the presets, you can modify their settings.
21
Mobile tab | New Document dialog box
Create documents using presets
1 In the New Document dialog box, click a category tab: Mobile, Web, Print, Film & Video, or Art & Illustration.
2 Select a preset.
3 Optionally, change the settings for the selected preset in the Preset Details pane on the right. See Modify presets to
understand how.
4 Click Create. Illustrator opens a new document based on the preset.
Modify presets
Before opening a document using the preset, you can modify its settings in the right pane.
1 Specify a name for the document.
2 Specify the following options for the selected preset:
Width and Height: Specify the size of the artboard. Select the unit from the pop-up menu.
Orientation: Specify a page orientation for the document: Landscape or Portrait
Artboard: Specify the number of artboards in the document
Bleed: Specify the position of the bleed along each side of the artboard. To use different values for different sides,
delink the dimensions by clicking the chain (
) icon.
Color Mode: Specify a color mode for the document: RGB or CMYK. Changing the color mode converts the default
contents (swatches, brushes, symbols, graphic styles) of the
selected new document profile to a new color mode,
resulting in a color change.
Last updated 2/2/2018
Page 28
Introduction to Illustrator
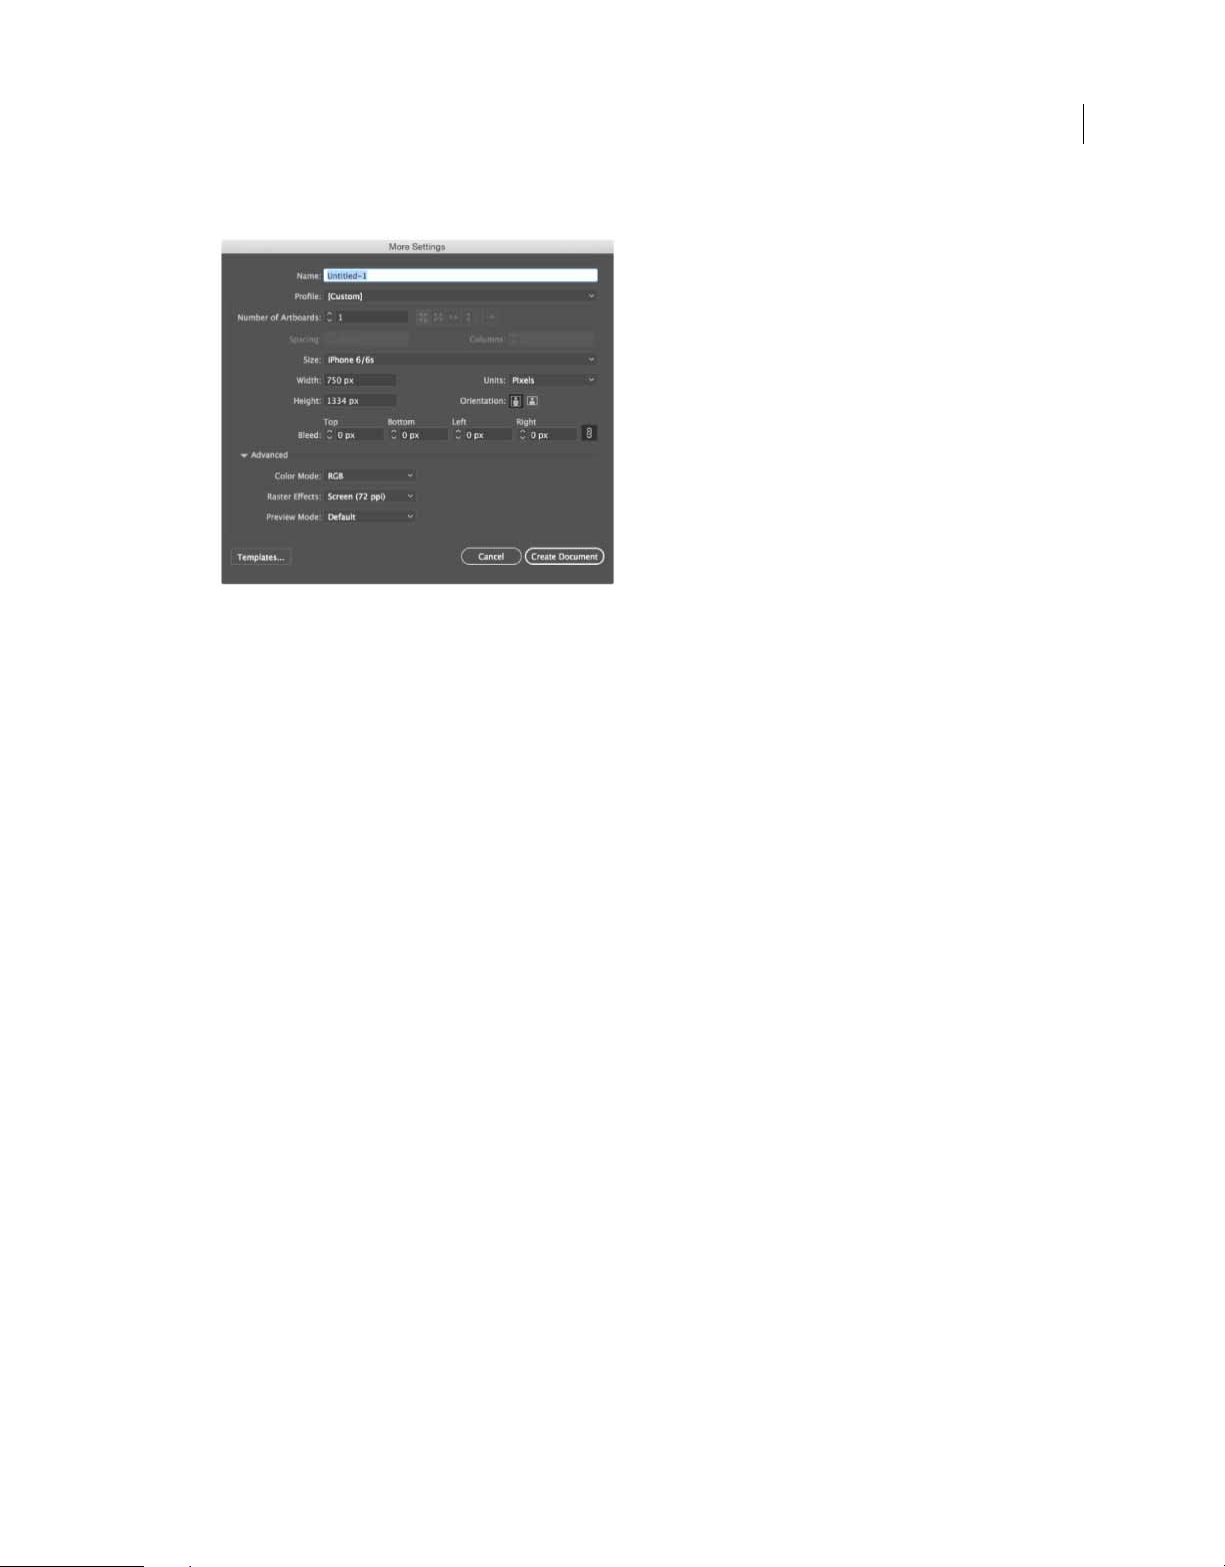
3 Click More Settings to specify additional options:
Raster Effects: Specify the resolution for raster effects in the document. It is especially important to set this at High
when you plan to output to a high-end printer at high
resolution. The Print profile sets this at High by default.
22
Preview Mode: Set the default preview mode for the document:
• Default displays artwork created in the document in vector vie w with fu ll color. Zo om in/out ret ains smoot hness
curves.
in the
• Pixel displays artwork with a rasterized (pixelated) appearance. It does not actually rasterize the content, but
displays a simulated preview, as if the contents were rasters.
• Overprint provides an “ink preview” that approximates how blending, transparency, and overprinting will
appear in color-separated output.
Note: You can change the Preview Mode at any time using the Vie w menu.
4 Click Create Document to open a document with the preset settings.
Note: Options in the More Settings dialog are similar to options in the legacy New Document dialog in earlier versions of
Illustrator. See
Files and templatesfor more information about those options.
Create documents using templates from Stock
Illustrator comes with a variety of templates from Adobe Stock, including templates for tablet illustrations, mobile
illustrations, laptop illustrations, letterheads,
basic fonts or fonts that can be synced from Adobe Typekit. To create a document using a template, do one of the
use
following:
1 In the New Document dialog, click a category tab: Mobile, Web, Print, Film & Video, or Art & Illustration.
2 Select a template.
envelopes, business cards, and many more. Templates with font layers
3 Click See Preview to view a preview of the template. A preview is an image representation of a template that you can
review and decide if you want to license that template.
Last updated 2/2/2018
Page 29
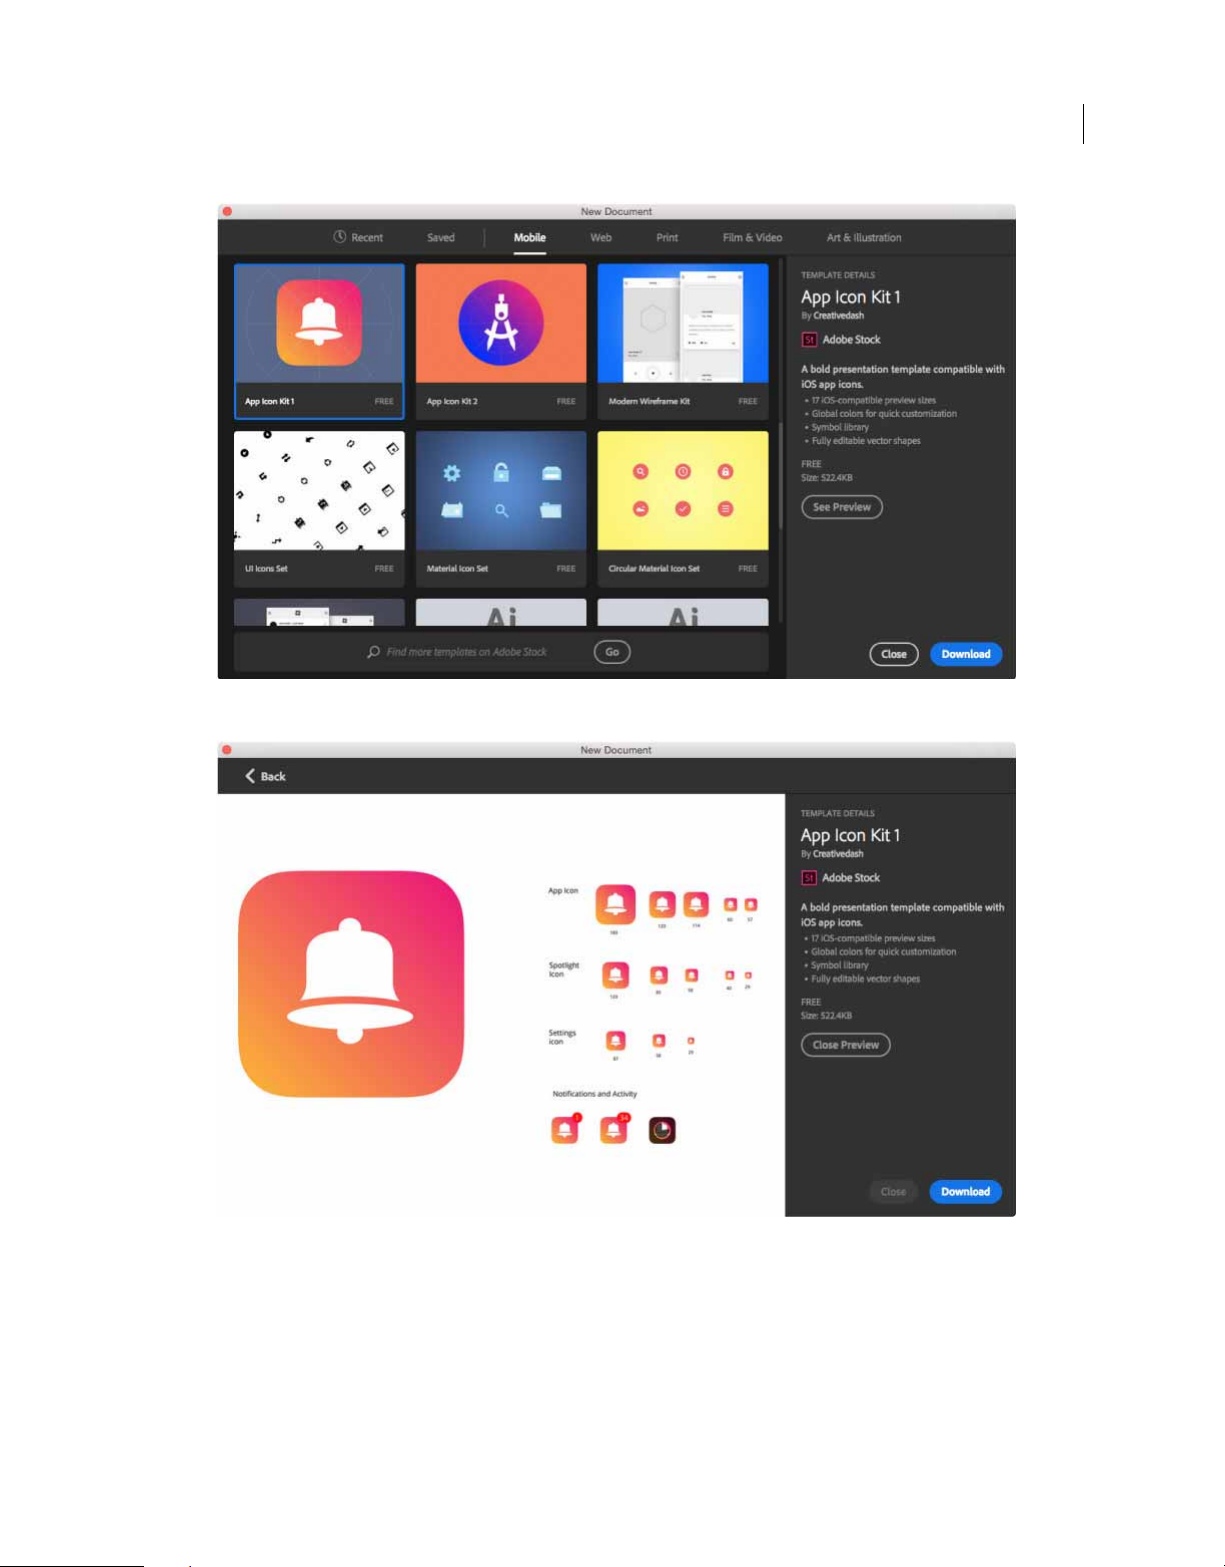
Introduction to Illustrator
23
Preview the template before licensing it
4 Click Download.
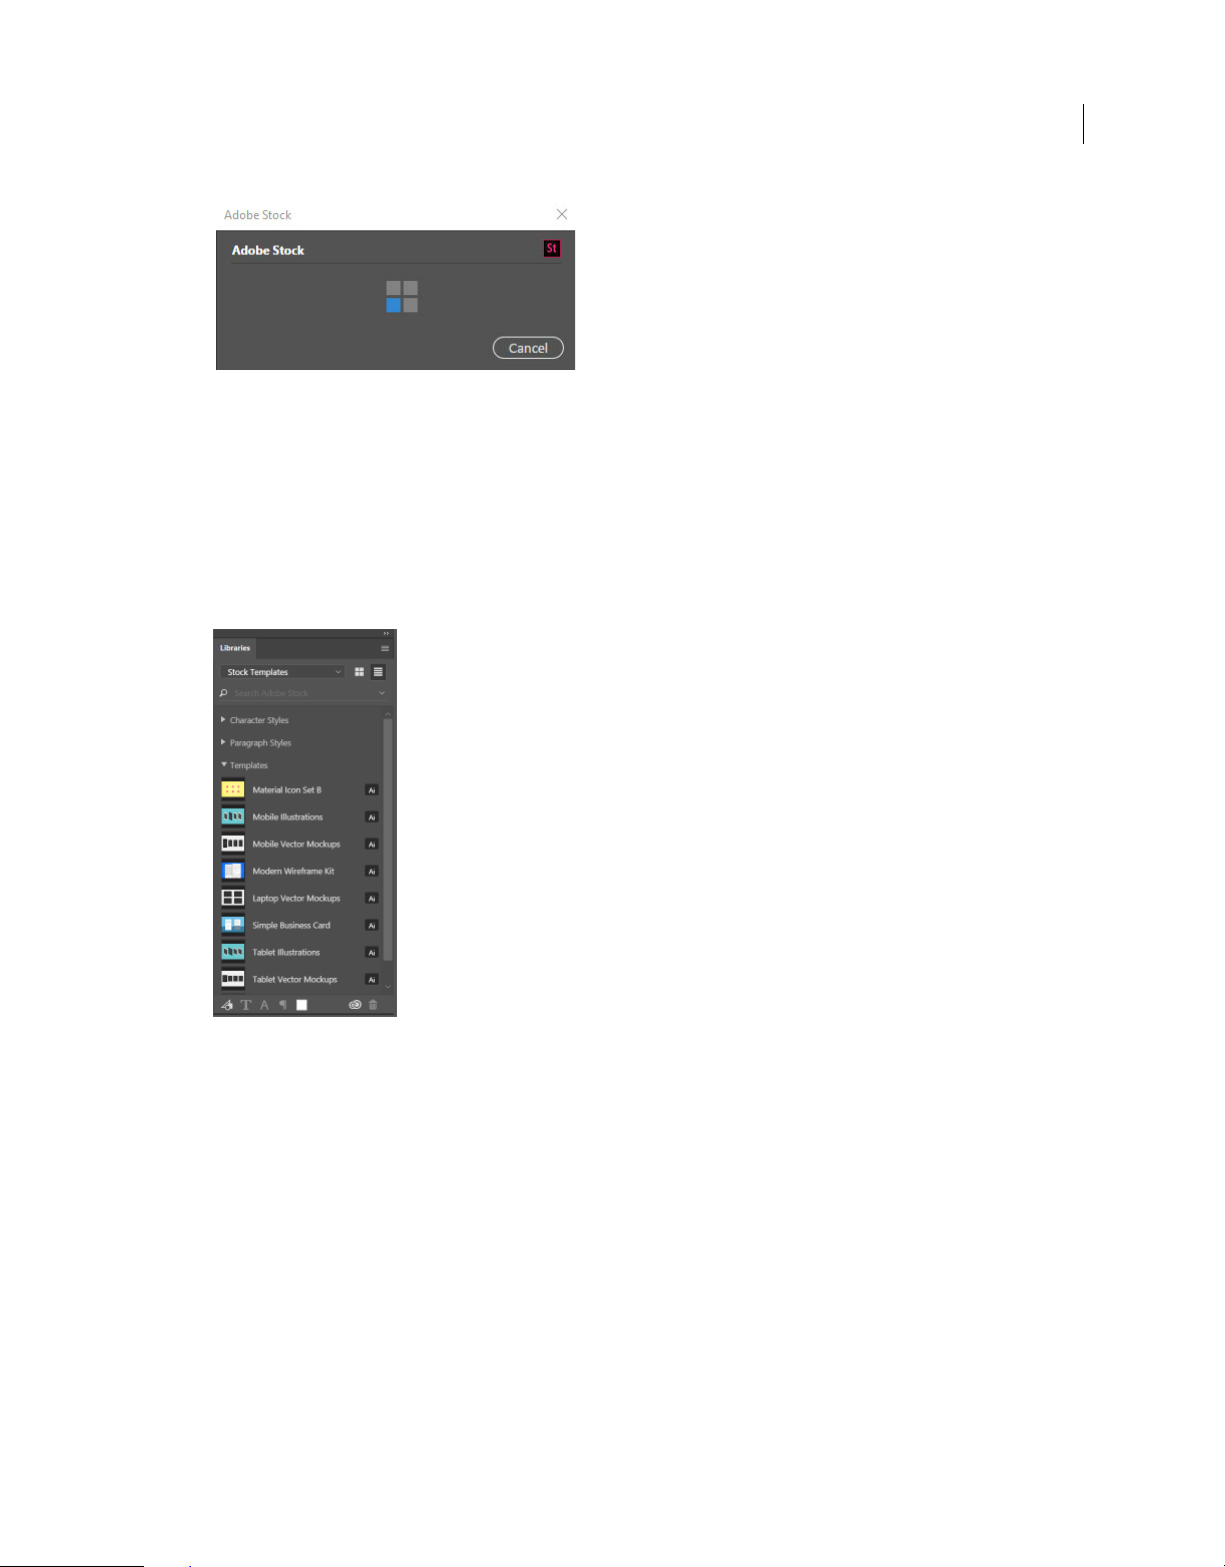
Illustrator prompts you to license the template from Adobe Stock. See Adobe Stock Help for more information
about licensing and related considerations. After the template has been licensed using asset entitlements or credits
in your account, you can open it as an Illustrator document (.ai)
for you to work on.
Last updated 2/2/2018
Page 30
Introduction to Illustrator
Template licensing in progress
5 After the template has downloaded, click Open. While opening the template, if you're prompted to sync some fonts
from Typekit, click OK.
You can now work with the open document in Illustrator just as you would work with any other .ai document.
Note: Downloaded templates are added to a Creative Cloud library called Stock Templates. You can access this library in
the Libraries panel.
24
Libraries panel | Stock Template library
Note: Illustrator templates carry the .ait filename extension. However, when you open a template, an instance of it is
opened as a document with the .ai extension. Changes made to that .ai document don't affect the original .ait template.
Search for more templates from Adobe Stock
Aside from the preselected templates from Adobe Stock, you can search for and download numerous other such
templates directly from within the New Document dialog.
• While work ing in th e New Doc ument dial og, enter a search str ing in the Fin d More Templates On Adob e Sto ck box.
Alternatively, simply click Go to browse the full selection of available templates.
Illustrator opens the Adobe Stock website in a new browser window for you to explore. License and download the one
that best meets your project's requirements. For more information about Adobe Stock, see
Last updated 2/2/2018
Using Adobe Stock .
Page 31

Introduction to Illustrator
25
Explore and license templates on the Adobe Stock website
Create documents using blank templates
Blank templates make designing common deliverables, such as brochures, business cards, CD covers, and T-shirts,
easier. Do the following to create a document using a blank template:
1 Select File > New From Template.
2 In the New From Template dialog, open the Blank Templates folder.
Note: Alternatively, you can open the Blank Templates folder directly from the New Document window. In the New
Document dialog, click More Settings and then click Templates.
3 Select a template; for example, Gift Certificate Pouchette.ait. Click New. Illustrator creates a new document based
on the selected blank template. You can work with it just as you'd work with any other .ai document.
Note: Illustrator templates carry the .ait filename extension. When you open a template, an instance of it is opened as a
document with the .ai extension. Changes made to that .ai document don't affect the original .ait template.
Use the legacy File New experience
If necessary, you may disable the latest New Document experience and revert to the experience that Illustrator provided
by default in versions CC 2015.3 and earlier.
1 Select Edit > Preferences > General.
Last updated 2/2/2018
Page 32

Introduction to Illustrator
2 Select Use Legacy File New Interface. Click OK.
Enable the legacy experience (not recommended)
Note: See Files and templatesfor more information about options in the legacy New Document dialog.
26
To ols
Tools panel over view
When you start Illustrator, the Tools panel appears at the left of the screen. You use tools in the Tools panel to create,
select, and manipulate objects in Illustrator. Some tools have options that appear when you double-click a tool. These
include tools that let you select, type, paint, draw, sample, edit, and move images.
pointer over it.
To see the name of a tool, hover the
Last updated 2/2/2018
Page 33

Introduction to Illustrator
27
Overview: Tools panel
Work with the Tools panel
View hidden tools
You can expand some tools to show tools hidden beneath them. A small triangle at the lower right of the tool icon
signals the presence of hidden tools. Hold down the mouse button on the visible tool to view the tools hidden under it.
Last updated 2/2/2018
Page 34

Introduction to Illustrator
View hidden tools in the Tools panel
View tool options
Some tools in the Tools panel have options that appear in the context-sensitive options bar. Additionally, you can also
double-click a tool in the Tools panel to view and change the settings for that tool.
Move the Tools panel
You can move the Tools panel by dragging its title bar.
View the Tools panel in double-stack or single-column
Click the double-arrow on the title bar to toggle between the double-stack and single-column view of the Tools panel.
28
Hide the Tools panel
You can also show or hide the Tools panel by choosing Window > To ol s .
Tear off hidden tools into a separate panel
Drag the pointer over the arrow at the end of the hidden tools panel and release the mouse button.
Close a separate tools panel
Click the close button on the panel’s title bar. The tools return to the Tools panel.
Change drawing modes and screen modes using the Tools panel
Click the icons at the bottom of the Tools panel to change the drawing mode from Draw Normal ( ) to Draw Behind
( ) or Draw Inside ( ).
Additionally, you can also change the screen mode by clicking the Change Screen Mode icon ( ) at t he bottom of t he
Tools panel and choosing the desired screen mode.
Last updated 2/2/2018
Page 35

Introduction to Illustrator
Create custom tools panels
If you work with only a specific set of tools, you can create a customized tools panel that contains only those tools.
1 Click Win d ow > To ol s > New Tools Panel, and then provide a name and click OK.
A new Too l s p ane l is created and displayed.
A Provide a name for the new tools panel B New tools panel created with a default fill/stroke proxy
Note: A Fill/Stroke proxy is added by default. This cannot be removed from the custom tools panel.
2 Drag a tool from an existing tools panel into a new or existing custom tools panel. If the tool is part of a group of
tools, then the topmost tool is copied. Release the mouse when the cursor appears with a plus sign (
).
29
Tools from three tool groups (left) have been added to create a tools panel (right)
Note: Dragging and dropping a tool when the cursor appears with a cancel operation sign ( ) performs no addition
or deletion of tools.
3 To get a tool that does not appear as the top-most tool in a group, do one of the following:
a Press Alt/ Option and click the tool group. This action cycles through all the tools present in the tool group.
b When the tool that you want appears at the top of the group, drag it to the custom tools panel. Release the mouse
when the cursor appears with a plus sign (
).
OR
c Drag the tool group into an empty portion of the workspace, to view it as a toolstrip.
Last updated 2/2/2018
Page 36

Introduction to Illustrator
d From the toolstrip, drag a tool to the new tools panel. Release the mouse when the cursor appears with a plus
sign (
4 To remove a tool, drag the tool out of the custom tools panel, and drop it when the cursor appears with a minus sign
).
(
).
Note: A tool can be removed from a tools panel only when a document is open.
5 To swap positions of tools within a custom-created tools panel, press the Alt/ Option key, drag a tool on top of the
tool you want to swap positions with, and then drop the tool when the cursor appears with a two-way arrow sign
).
(
Note: A custom tools panel is persistent in the workspace it is created in. If you change to another workspace and then
return to the original workspace, any tools panels created are retained and reopened.
Manage custom tools panels
1 Click Win d ow s > To o ls > Manage Tools Panel.
30
Actions that you can perform with the Manage Tools Panel dialog
A View the list of custom tools panels B Delete selected tools panel C Create a tools panel, or a copy of the selected tools panel D Rename a
selected tools panel
2 In the Manage Tools Panel dialog, do one of the following:
• Rename: Select a tools panel from the list, type a new name for the panel in the text box, and then click OK.
• New/Copy: Select a tools panel from the list, click the copy button, rename the tools panel if required, and then
click OK. If no tools panel is selected, a new tools panel is created.
• Delete: Select a tools panel from the list, and then click the Delete button.
Select a tool
Do one of the following:
• Click a tool in the Tools panel. If there is a small triangle at a tool’s lower-right corner, hold down the mouse button
to view the hidden tools, and then click the tool you want to select.
Last updated 2/2/2018
Page 37

Introduction to Illustrator
• Hold down Alt (Windows) or Option (macOS), and then click a tool to cycle through and select hidden tools.
• Press the tool’s keyboard shortcut. The keyboard shortcut is displayed in its tool tip. For example, you can select the
Move tool by pressing the V key.
Selecting a hidden tool
A Tools panel B Active tool C Tear off panel with hidden tools D Hidden tool triangle E Tool name and shortcut
Ti p: To hide tool tips, choose Edit > Preferences > General (Windows) or Illustrator > Preferences > General (macOS),
and deselect Show Tool Tips.
31
Change tool pointers
The pointer for most tools matches the tool’s icon. Each pointer has a different hotspot, where an effect or action begins.
With most tools, you can switch to precise cursors, which appear as cross hairs centered on the hotspot, and provide
for greater accuracy when working with detailed artwork.
?
Choose Edit > Preferences > General (Windows) or Illustrator > Preferences > General (macOS), and select Use
Precise Cursors.
Alternatively, press CapsLock on the keyboard.
System requirements | Illustrator
Illustrator CC October 2017 (22.0) system requirements
Windows
• Intel Pentium 4 or AMD Athlon 64 processor
• Microsoft Windows 7 with Service Pack 1, Windows 8.1, or Windows 10*
• 1 GB of RAM (3 GB recommended) for 32 bit; 2 GB of RAM (8 GB recommended) for 64 bit
• 2 GB of available hard-disk space for installation; additional free space required during installation (cannot install
on removable flash storage devices)
• 1024 x 768 display (1280 x 800 recommended)
Last updated 2/2/2018
Page 38

Introduction to Illustrator
• To view Illustrator in HiDPI mode, your monitor must support a resolution of 1920 x 1080 or more.
• OpenGL 4.x
• To use the new Touch workspace in Illustrator, you must have a touch-screen-enabled tablet/monitor running
Windows 8.1 or Windows 10 (Microsoft Surface Pro 3 recommended).
• Optional: To use GPU Performance: an Intel, NVIDIA, or AMD video adapter from those listed below
(medium/high-end recommended); 1 GB
performance
* October 2017 release of Illustrator CC is not supported on Windows 10 version 1507.
Note: Graphics processor-powered features are not supported on 32-bit Windows platforms.
of VRAM (2 GB recommended); and latest drivers for optimal
• The following video adapter series support the new Windows GPU Performance features in Illustrator:
NVIDIA
• NVIDIA Quadro K Series
• NVIDIA Quadro 6xxx
• NVIDIA Quadro 5xxx
• NVIDIA Quadro 4xxx
• NVIDIA Quadro 2xxx
• NVIDIA Quadro 2xxxD
32
• NVIDIA Quadro 6xx
• NVIDIA GeForce GTX Series (4xx, 5xx, 6xx, 7xx, 9xx, Titan)
• NVIDIA Quadro M Series
• NVIDIA Quadro P Series
Important: Microsoft Windows may not detect the availability of the latest device drivers for NVIDIA GPU cards. Get
the latest GPU card device drivers:
- Quadro series - Other series
Intel •Intel HD Graphics 4600 Series
• Intel HD Graphics 5000 Series
• Intel Iris Graphics 5000 Series
• Intel Iris Pro Graphics 5000 Series
• Intel HD Graphics 6000 Series
• Intel Iris Graphics 6000 Series
AMD
The following series are supported only on Windows 8 or later:
• AMD Radeon R9 Series Graphics
• AMD Radeon R7 Series Graphics
• AMD Radeon HD 7000 Series Graphics
• AMD Radeon HD 8000 Series Graphics
• AMD FirePro V Series Graphics
Last updated 2/2/2018
Page 39

Introduction to Illustrator
• AMD FirePro W Series Graphics
Note: Ensure that you have the latest GPU card drivers installed. See Illustrator GPU Performance | Driver Updates .
• Internet connection and registration are necessary for required software activation, validation of subscriptions, and
access to online services.*
macOS
• Multicore Intel processor with 64-bit support
• mac OS version 10.13 (High Sierra), macOS version 10.12 (Sierra), or Mac OS X version 10.11 (El Capitan)
• 2 GB of RAM (8 GB recommended)
• 2 GB of available hard-disk space for installation; additional free space required during installation (cannot install
on a volume that uses a case-sensitive file system or on removable flash storage devices)
• 1024 x 768 display (1280 x 800 recommended)
• Optional: To use GPU Performance: Your Mac should have a minimum of 1 GB of VRAM (2 GB recommended),
and your computer must support OpenGL version 4.0 or greater.
• To check for VRAM values: Choose Mac > About This Mac (Graphics information).
• To find out if your computer supports the required OpenGL version (4.0 or later), see this Apple Support
document.
33
• Internet connection and registration are necessary for required software activation, validation of subscriptions, and
access to online services.*
* NOTICE TO USERS:
• Internet connection, Adobe ID, and acceptance of license agreement required to activate and use this product. This
product may integrate with or allow access to certain Adobe or third-party hosted online services. Adobe services
are available only to users 13 and older and require agreement to additional
Policy. Applications and services may not be available in all countries or languages and may be subject to change or
discontinuation without notice. Additional fees or membership charges may apply.
terms of use and the Adobe Privacy
• Illustrator is not supported on virtualized or server-based environments. These environments include, but are not
limited to, Citrix Metaframe/Citrix Presentation Server, NVIDIA Grid, Microsoft App-V, VMWare, Parallels, and
Virtual PC. "Thin Clients" are also server-based environments.
Language versions
Illustrator CC is available in the following languages:
Dansk
Deutsch
English
Español
Français
Français*
Hebrew*
Hungarian
Italiano
Last updated 2/2/2018
Page 40

Introduction to Illustrator
Nederlands
Polish
Português (Brasil)
Svenska
Tu rk i s h
Ukrainian
čeština
Русский
????*
???
????
????
???
* Arabic and Hebrew supported in a Middle Eastern version with full right-to-left language support, Arabic/Hebrew
features, and an English interface; also in a North African French (Français*) version with full right-to-left language
support, Arabic/Hebrew features, and a French interface.
34
Illustrator CC (2017) system requirements
Windows
• Intel Pentium 4 or AMD Athlon 64 processor
• Microsoft Windows 7 with Service Pack 1, Windows 8.1, or Windows 10
• 1 GB of RAM (3 GB recommended) for 32 bit; 2 GB of RAM (8 GB recommended) for 64 bit
• 2 GB of available hard-disk space for installation; additional free space required during installation (cannot install
on removable flash storage devices)
• 1024 x 768 display (1280 x 800 recommended)
• To view Illustrator in HiDPI mode, your monitor must support a resolution of 1920 x 1080 or more.
• OpenGL 4.x
• To use the new Touch workspace in Illustrator, you must have a touch-screen-enabled tablet/monitor running
Windows 8.1 or Windows 10 (Microsoft Surface Pro 3 recommended).
• Optional: To use GPU Performance: an Intel, NVIDIA, or AMD video adapter from those listed below
(medium/high-end recommended); 1 GB
performance
Note: Graphics processor-powered features are not supported on 32-bit Windows platforms.
• The following video adapter series support the new Windows GPU Performance features in Illustrator:
NVIDIA
of VRAM (2 GB recommended); and latest drivers for optimal
• NVIDIA Quadro K Series
Last updated 2/2/2018
Page 41

Introduction to Illustrator
• NVIDIA Quadro 6xxx
• NVIDIA Quadro 5xxx
• NVIDIA Quadro 4xxx
• NVIDIA Quadro 2xxx
• NVIDIA Quadro 2xxxD
• NVIDIA Quadro 6xx
• NVIDIA GeForce GTX Series (4xx, 5xx, 6xx, 7xx, 9xx, Titan)
• NVIDIA Quadro M Series
• NVIDIA Quadro P Series
Important: Microsoft Windows may not detect the availability of the latest device drivers for NVIDIA GPU cards. Get
the latest GPU card device drivers:
- Quadro series - Other series
Intel
• Intel HD Graphics 4600 Series
• Intel HD Graphics 5000 Series
• Intel Iris Graphics 5000 Series
• Intel Iris Pro Graphics 5000 Series
35
• Intel HD Graphics 6000 Series
• Intel Iris Graphics 6000 Series
AMD
The following series are supported only on Windows 8 or later:
• AMD Radeon R9 Series Graphics
• AMD Radeon R7 Series Graphics
• AMD Radeon HD 7000 Series Graphics
• AMD Radeon HD 8000 Series Graphics
• AMD FirePro V Series Graphics
• AMD FirePro W Series Graphics
Note: Ensure that you have the latest GPU card drivers installed. See Illustrator GPU Performance | Driver Updates .
• Internet connection and registration are necessary for required software activation, validation of subscriptions, and
access to online services.*
macOS
• Multicore Intel processor with 64-bit support
• macOS version 10.12 (Sierra) or Mac OS X version 10.11 (El Capitan)
• 2 GB of RAM (8 GB recommended)
• 2 GB of available hard-disk space for installation; additional free space required during installation (cannot install
on a volume that uses a case-sensitive file system or on removable flash storage devices)
• 1024 x 768 display (1280 x 800 recommended)
Last updated 2/2/2018
Page 42

Introduction to Illustrator
• Optional: To use GPU Performance: Your Mac should have a minimum of 1 GB of VRAM (2 GB recommended),
and your computer must support OpenGL version 4.0 or greater.
• To check for VRAM values: Choose Mac > About This Mac (Graphics information).
• To find out if your computer supports the required OpenGL version (4.0 or later), see this Apple Support
document.
• Internet connection and registration are necessary for required software activation, validation of subscriptions, and
access to online services.*
* NOTICE TO USERS:
• Internet connection, Adobe ID, and acceptance of license agreement required to activate and use this product. This
product may integrate with or allow access to certain Adobe or third-party hosted online services. Adobe services
are available only to users 13 and older and require agreement to additional
Policy. Applications and services may not be available in all countries or languages and may be subject to change or
discontinuation without notice. Additional fees or membership charges may apply.
terms of use and the Adobe Privacy
• Illustrator is not supported on virtualized or server-based environments. These environments include, but are not
limited to, Citrix Metaframe/Citrix Presentation Server, NVIDIA Grid, Microsoft App-V, VMWare, Parallels, and
Virtual PC. "Thin Clients" are also server-based environments.
36
Language versions
Illustrator CC is available in the following languages:
Dansk
Deutsch
English
Español
Français
Français*
Hebrew*
Hungarian
Italiano
Nederlands
Polish
Português (Brasil)
Svenska
Tu rk i s h
Ukrainian
čeština
Русский
????*
???
Last updated 2/2/2018
Page 43

Introduction to Illustrator
????
????
???
* Arabic and Hebrew supported in a Middle Eastern version with full right-to-left language support, Arabic/Hebrew
features, and an English interface; also in a North African French (Français*) version with full right-to-left language
support, Arabic/Hebrew features, and a French interface.
Illustrator CC (2015) system requirements
Windows
• Intel Pentium 4 or AMD Athlon 64 processor
• Microsoft Windows 7 with Service Pack 1, Windows 8.1, or Windows 10
• 1 GB of RAM (3 GB recommended) for 32 bit; 2 GB of RAM (8 GB recommended) for 64 bit
• 2 GB of available hard-disk space for installation; additional free space required during installation (cannot install
on removable flash storage devices)
37
• 1024 x 768 display (1280 x 800 recommended)
• To view Illustrator in HiDPI mode, your monitor must support a resolution of 1920 x 1080 or more.
• OpenGL 4.x
• To use the new Touch workspace in Illustrator, you must have a touch-screen-enabled tablet/monitor running
Windows 8.1 or Windows 10 (Microsoft Surface Pro 3 recommended).
• Optional: To use GPU Performance: an Intel, NVIDIA, or AMD video adapter from those listed below
(medium/high-end recommended); 1 GB
performance
of VRAM (2 GB recommended); and latest drivers for optimal
• The following video adapter series support the new Windows GPU Performance features in Illustrator:
NVIDIA
• NVIDIA Quadro K Series
• NVIDIA Quadro 6xxx
• NVIDIA Quadro 5xxx
• NVIDIA Quadro 4xxx
• NVIDIA Quadro 2xxx
• NVIDIA Quadro 2xxxD
• NVIDIA Quadro 6xx
• NVIDIA GeForce GTX Series (4xx, 5xx, 6xx, 7xx, 9xx, Titan)
• NVIDIA Quadro M Series
Important: Microsoft Windows may not detect the availability of the latest device drivers for NVIDIA GPU cards. Get
the latest GPU card device drivers:
- Quadro series - Other series
Last updated 2/2/2018
Page 44

Introduction to Illustrator
Intel
• Intel HD Graphics 4600 Series
• Intel HD Graphics 5000 Series
• Intel Iris Graphics 5000 Series
• Intel Iris Pro Graphics 5000 Series
• Intel HD Graphics 6000 Series
• Intel Iris Graphics 6000 Series
AMD
The following series are supported only on Windows 8 or later:
• AMD Radeon R9 Series Graphics
• AMD Radeon R7 Series Graphics
• AMD Radeon HD 7000 Series Graphics
• AMD Radeon HD 8000 Series Graphics
• AMD FirePro V Series Graphics
• AMD FirePro W Series Graphics
Ensure that you have the latest GPU card drivers installed. See Illustrator GPU Performance | Driver Updates .
38
• Internet connection and registration are necessary for required software activation, validation of subscriptions, and
access to online services.*
Mac OS
• Multicore Intel processor with 64-bit support
• Mac OS X versions 10.9, 10.10, or 10.11(recommended)
• 2 GB of RAM (8 GB recommended)
• 2 GB of available hard-disk space for installation; additional free space required during installation (cannot install
on a volume that uses a case-sensitive file system or on removable flash storage devices)
• 1024 x 768 display (1280 x 800 recommended)
• Optional: To use GPU Performance: Your Mac should have a minimum of 512 MB of VRA M (2 GB r ecomm end ed) ,
and your computer must support OpenGL version 4.0 or greater.
• To c h e ck f o r V R AM v a lue s : Mac 10.9: Choose Mac > About This Mac > More Info (Graphics information).
Mac 10.10, 10.11: Choose Mac > About This Mac (Graphics information).
• To find out if your computer supports the required OpenGL version (4.0 or later), see this Apple Support
document.
• Internet connection and registration are necessary for required software activation, validation of subscriptions, and
access to online services.*
Last updated 2/2/2018
Page 45

Introduction to Illustrator
* NOTICE TO USERS:
• Internet connection, Adobe ID, and acceptance of license agreement required to activate and use this product. This
product may integrate with or allow access to certain Adobe or third-party hosted online services. Adobe services
are available only to users 13 and older and require agreement to additional
terms of use and the Adobe Privacy
Policy. Applications and services may not be available in all countries or languages and may be subject to change or
discontinuation without notice. Additional fees or membership charges may apply.
• Illustrator is not supported on virtualized or server-based environments. These environments include, but are not
limited to, Citrix Metaframe/Citrix Presentation Server, NVIDIA Grid, Microsoft App-V, VMWare, Parallels, and
Virtual PC. "Thin Clients" are also server-based environments.
Language versions
Illustrator CC is available in the following languages:
Dansk
Deutsch
English
Español
39
Français
Français*
Hebrew*
Hungarian
Italiano
Nederlands
Polish
Português (Brasil)
Svenska
Tu rk i s h
Ukrainian
čeština
Русский
????*
???
????
????
???
* Arabic and Hebrew supported in a Middle Eastern version with full right-to-left language support, Arabic/Hebrew
features, and an English interface; also in a North African French (Français*) version with full right-to-left language
support, Arabic/Hebrew features, and a French interface.
Last updated 2/2/2018
Page 46

Introduction to Illustrator
Illustrator CC (2014) system requirements
Windows
• Intel Pentium 4 or AMD Athlon 64 processor
• Microsoft Windows 7 with Service Pack 1, Windows 8, or Windows 8.1
• 1 GB of RAM (3 GB recommended) for 32 bit; 2 GB of RAM (8 GB recommended) for 64 bit
• 2 GB of available hard-disk space for installation; additional free space required during installation (cannot install
on removable flash storage devices)
• 1024 x 768 display (1280 x 800 recommended)
• To view Illustrator in HiDPI mode, your monitor must support a resolution of 1920 x 1080 or more. For more
information, see
• To use the new Touch workspace in Illustrator, you must have a touch-screen-enabled tablet/monitor running
Windows 8.1 (Microsoft Surface Pro 3 recommended).
• Optional: To use GPU Performance: NVIDIA video adapter listed below (medium/high-end recommended); 1
of VRAM (2 GB recommended); and latest NVIDIA drivers for optimal performance (recommended driver
GB
version 335.23 or later for GeForce series, version 332.76 or later for Quadro series)
• The following NVIDIA video adapter series support the new Windows GPU Performance features in Illustrator:
Enhanced Windows Support: HiDPI devices.
40
• Quadro K Series
• Quadro 6xxx
• Quadro 5xxx
• Quadro 4xxx
• Quadro 2xxx
• Quadro 2xxxD
• Quadro 6xx
• GeForce GTX Series (4xx, 5xx, 6xx, 7xx, Ti ta n)
• Internet connection and registration are necessary for required software activation, validation of subscriptions, and
access to online services.*
Mac OS
• Multicore Intel processor with 64-bit support
• Mac OS X v10.7, v10.8, v10.9, or v10.10
• 2 GB of RAM (8 GB recommended)
• 2 GB of available hard-disk space for installation; additional free space required during installation (cannot install
on a volume that uses a case-sensitive file system or on removable flash storage devices)
• 1024 x 768 display (1280 x 800 recommended)
• Internet connection and registration are necessary for required software activation, validation of subscriptions, and
access to online services.*
Last updated 2/2/2018
Page 47

Introduction to Illustrator
NOTICE TO USERS: Illustrator is not supported on virtualized or server-based environments. These environments
include, but are not limited to, Citrix Metaframe/Citrix Presentation Server, NVIDIA Grid, Microsoft App-V, VMWare,
Parallels, and Virtual PC. "Thin Clients" are also server-based environments.
Illustrator CC system requirements
Windows
• Intel® Pentium® 4 or AMD Athlon® 64 processor
• Microsoft® Windows® 7 with Service Pack 1, Windows 8 or Windows 8.1
• 1 GB of RAM (3 GB recommended) for 32 bit; 2G B of RAM (8 GB recommended) for 64 bit
• 2 GB of available hard-disk space for installation; additional free space required during installation (cannot install
on removable flash storage devices)
• 1024 x 768 display (1280 x 800 recommended)
• Internet connection and registration are necessary for required software activation, membership validation, and
access to online services.*
41
Mac OS
• Multicore Intel processor with 64-bit support
• Mac OS X v10.6.8, v10.7, v10.8, or v10.9
• 2 GB of RAM (8 GB recommended)
• 2 GB of available hard-disk space for installation; additional free space required during installation (cannot install
on a volume that uses a case-sensitive file system or on removable flash storage devices)
• 1024 x 768 display (1280 x 800 recommended)
• Internet connection and registration are necessary for required software activation, membership validation, and
access to online services.*
* This product may integrate with or allow access to certain Adobe or third-party hosted online services. Adobe online
services, including the Adobe® Creative Cloud™ service, are available only to users 13 and older and require agreement
to additional
countries or languages, may require user registration, and may be subject to change or discontinuation without notice.
Additional fees or membership charges may apply.
NOTICE TO USERS: Illustrator is not supported on virtualized or server-based environments. These environments
include, but are not limited to, Citrix Metaframe/Citrix Presentation Server, NVIDIA Grid, Microsoft App-V, VMWare,
Parallels, and Virtual PC. "Thin Clients" are also server-based environments.
terms and Adobe's online privacy policy. The applications and online services are not available in all
Last updated 2/2/2018
Page 48

Chapter 2: Workspace
Workspace basics
You create and manipulate your documents and files using various elements, such as panels, bars, and windows. Any
arrangement of these elements is called a
look similar so that you can move between the applications easily.) You can adapt Illustrator to the way you work by
selecting from several preset workspaces or by creating one of your own.
Start workspace
The Start workspace in Illustrator gives you quick access to your recent files, libraries, and mobile creations. Depending
on your subscription status, the Start workspace may also display content tailored for your requirements. You can also
look for the right Adobe Stock asset for your project directly from within the Start workspace.
workspace. (The workspaces of the different applications in Creative Cloud
42
Illustrator displays the Start workspace at launch or whenever no documents are open.
Start workspace
Work with Start workspace
Toggle between tile and list views Click the List icon ( ) or the Tile icon ( ).
Interact with your Libraries Use the integrated Libraries panel to quickly view, work with, or edit assets in your own
or shared Creative Cloud Libraries.
Find a Stock asset Enter a keyword in the Search field. Illustrator displays the search results from Adobe Stock in a new
browser window.
Disable the Start workspace
1 Select Preferences > General.
2 Deselect Show The Start Workspace When No Documents Are Open.
You can use the keyboard shortcuts to open files (Ctrl/Cmd + O) or start new documents (Ctrl/Cmd + N).
Create documents
When you create a document in Illustrator, instead of beginning with a blank canvas, you can choose from a wide
variety of templates, including templates from Adobe Stock. Templates include stock assets and illustrations that you
can build on to complete your project. When you open a template in Illustrator, you can work with it just as you would
work with any other Illustrator document (.ai).
In addition to templates, you can also create a document by selecting one of the numerous presets available in
Illustrator.
Last updated 2/2/2018
Page 49

Workspace
For more information, see Create documents.
43
New Document dialog | Templates from Adobe Stock and presets
Recent Files workspace
Use the Recent Files workspace to review a list or thumbnail view of the files you have been working on recently. Select
Recent Files from the Workspace Switcher menu to view Recent Files workspace.
To set the number of files you want to view, modify the value of Number Of Recent Files To Display text box
(Preferences
> File Handling & Clipboard > Files).
Last updated 2/2/2018
Page 50

Workspace
44
Recent Files workspace
This feature is disabled by default. To enable the Recent Files workspace from the Preferences dialog, select the Show
The Recent Files Workspace While Opening A File check box (Preferences > General tab).
Workspace overview
• The Application frame groups all the workspace elements in a single, integrated window that lets you treat the
application as a single unit. When you move or resize the Application frame or any of its elements, all the elements
within it respond to each other so none overlap. Panels don’t disappear when you switch applications or when you
accidentally click out of the application. If you work with two or more applications, you can position each
application side by side on the screen or on multiple monitors. If you are using a Mac and prefer the traditional, freeform user interface, you can turn off the Application frame. Select
off.
• The Application bar across the top contains a workspace switcher, menus (Windows only), and other application
controls. On Mac, the application bar is available only when Application frame is off. You can toggle it on or off using
the Window menu.
• The Tools panel contains tools for creating and editing images, artwork, page elements, and so on. Related tools are
grouped.
• The Control panel displays options for the currently selected object.
• The Document window displays the file you’re working on. Document windows can be tabbed and, in certain cases,
grouped and docked.
• Panels help you monitor and modify your work. Panels can be grouped, stacked, or docked.
Window > Application Frame to toggle it on or
Last updated 2/2/2018
Page 51

Workspace
45
Default Illustrator workspace
A Tabb ed Docume nt w indows B Application bar C Workspace switcher D Panel title bar E Collapse To Icons button F Four panel groups in
vertical dock G
Control panel H Tools panel
Properties panel
Introduced in the October 2017 release of Illustrator CC
The Properties panel in Illustrator lets you view settings and controls in the context of your current task or workflow.
This new panel has been designed with ease of use in mind, ensuring that you have access to the right controls right
when you need them.
The Properties panel is available by default in the Essentials workspaces. You can also select Wi n do w > Properties to
view it.
Last updated 2/2/2018
Page 52

Workspace
46
Properties panel
For details, see Properties panel .
Manage windows and panels
Hide or show all panels
• To hide or show all panels, including the Tools panel and Control panel, press Ta b.
• To hide or show all panels except the Tools panel and Control panel, press Shift+Tab.
Ti p: You can temporarily display hidden panels if Auto-Show Hidden Panels is selected in Interface preferences. It’s
always on in Illustrator. Move the pointer to the edge of the application window (Windows®) or to the edge of the
monitor (Mac
Display panel options
?
Click the panel menu icon in the upper-right corner of the panel.
Ti p: You can open a panel menu even when the panel is minimized.
Adjust panel brightness
?
In User Interface preferences, you can customize the interface to sport one of the four available color options
designed for optimal user experience:
Note: The canvas color in Illustrator is matched to the user interface brightness by default. Choose Preferences > User
Interface > Canvas Color > White
OS®) and hover over the strip that appears.
Dark, Medium Dark, Medium Light, and Light.
to change the canvas color to white.
Last updated 2/2/2018
Page 53

Workspace
Reconfigure the Tools panel
You can display the tools in the Tools panel in a single column, or side by side in two columns.
?
Click the double arrow at the top of the Tools panel.
If you work with only a specific set of tools, you can create a customized tools panel that contains only those tools.
For details, see
Custom tools panel .
Enter values in panels and dialog boxes
You enter values using the same methods in all panels and dialog boxes. You can also perform simple math in any box
that accepts numeric values. For example, if you want to move a selected object 3 units to the right using the current
measurement units, you don’t have to work out the new horizontal position—simply type +3 after the current value in
the Transform panel.
Enter a value in a panel or dialog box
?
Do any of the following:
47
Ways to enter values
• A Click the arrow buttons in the panel to increase or decrease the value.
• B Type a value in the box, and press Enter or Return.
• C Select a value from the menu associated with the box.
• D Drag the slider.
• E Drag the dial.
Note: Press Cmd/ Ctrl key while clicking the arrow buttons to increase or decrease the numerical values in fractions. For
example, when you press Cmd/ Ctrl key while clicking Arrow Up to increase the Stroke Weight, the value increases from
1 point to 1.1 point.
Calculate values in a panel or dialog box
1 In a text box that accepts numerical values, do one of the following:
• To replace the entire current value with a mathematical expression, select the entire current value.
• To use the current value as part of a mathematical expression, click before or after the current value.
2 Type a simple mathematical expression using a single mathematical operator, such as + (plus), - (minus), x
(multiplication), / (division), or %
(percent).
Last updated 2/2/2018
Page 54

Workspace
For example, 0p0 + 3 or 5mm + 4. Similarly, 3cm * 50% equals 3 centimeters multiplied by 50%, or 1.50 cm, and
50pt + 25% equals 50 points plus 25% of 50 points, or 62.5 points.
3 Press Enter or Return to apply the calculation.
Control panel overview
The Control panel offers quick access to options related to the objects you select. By default, the Control panel is docked
at the top of the workspace.
Options displayed in the Control panel vary depending on the type of object or tool you select. For example, when you
select a text object, the Control panel displays text-formatting options in addition to options for changing the color,
placement, and dimensions of the object. When a selection tool is active, you can access Document Setup and
Preferences from the Control panel.
Control panel
A Hidden options B Link to another panel C Panel menu
48
When text in the Control panel is blue and underlined, you can click the text to display a related panel or dialog box.
For example, click the word Stroke to display the Stroke panel.
Change the kinds of controls that appear in the Control panel
?
Select or deselect options in the Control panel menu.
Open and close a panel or dialog box from the Control panel
1 Click a blue underlined word to open its associated panel or dialog box.
2 Click anywhere outside the panel or dialog box to close it.
Dock the Control panel at the bottom of the workspace
?
Choose Dock To Bottom from the Control panel menu.
Convert the Control panel to a floating panel
?
Drag the gripper bar (located on the left edge of the panel) away from its current position.
To redock the Control panel, drag the gripper bar to the top or bottom of the application window (Windows) or
screen (Mac
OS).
About screen modes
You can change the visibility of the illustration window and menu bar using the mode options at the bottom of the Tools
panel. To access panels when in Full Screen Mode, position the cursor at the left or right edge of the screen and the
panels will pop up. If you’ve moved them from their default locations, you can access them from the Window menu.
You can choose one of the following modes:
• Normal Screen Mode displays artwork in a standard window, with a menu bar at the top and scroll bars on the
sides.
Last updated 2/2/2018
Page 55

Workspace
• Full Screen Mode With Menu Bar displays artwork in a full-screen window, with a menu bar at the top and scroll
bars.
• Full Screen Mode displays artwork in a full-screen window, with no title bar or menu bar.
Use F key to toggle between the screen modes.
Using the status bar
The status bar appears at the lower-left edge of the illustration window. It displays any of the following:
• current zoom level
• current tool in use
• current artboard in use
• navigation controls for multiple artboards
Search box
Search for Help topics and assets from Adobe Stock directly from within the Illustrator workspace. Select one of the
following options from the drop-down menu of the search box on the right side of the Application bar:
49
• Adobe Stock
• Adobe Help
Search for Adobe Stock assets
You can search for high-quality, curated, royalty-free stock illustrations and vector graphics from for all your creative
projects from right within Illustrator.
1 In the search box in the upper-right corner of the workspace, enter the name of the item that you want to find.
2 Press Enter.
Note: You can also search for stock asset by selecting File > Search Adobe Stock.
All assets available from Adobe Stock for a particular search query appear in a separate browser window.
Search Adobe Help
Use the Search For Help box to search for Help topics and online content. If you have an active Internet connection,
you can access all content on the Community Help website. If you search for Help without an active Internet
connection, search results are limited to Help content that is included with Illustrator.
1 In the search box, type the name of the item on which you want to search (such as a feature, application, or tool).
2 Press Enter.
All topics available from the Community Help center appear in a separate browser window.
Use Illustrator with the Touch Bar on M acB ook Pro
Introduced in the October 2017 release of Illustrator CC
Illustrator supports Touch Bar, the multitouch display at the top of the new MacBook Pro keyboard. Using the Touch
Bar, you can access Illustrator features and controls right in the context of your current task on the main screen. The
Touch Bar supports familiar gestures, such as tap, drag, and slide. For details, see
Last updated 2/2/2018
Use the Touch Bar with Illustrator.
Page 56

Workspace
Use Illustrator with Microsoft Dial
Introduced in the October 2017 release of Illustrator CC
Illustrator supports the new Microsoft Dial on Windows 10 Anniversary edition and later or directly on the
SurfaceStudio. You can use Dial to adjust settings and parameters for your Illustrator documents.
While using Illustrator, long press the Dial to access the following options:
• Undo/ Redo
• Arrange
• Zoom
• Artboard Navigation
• Tools, including Rotate, Scale, Brush, Blob Brush, and Eraser.
For details, see Microsoft Surface Dial support in Illustrator.
Customize the workspace
50
Manage windows and panels
You can create a custom workspace by moving and manipulating Document windows and panels. You can also save
workspaces and switch among them.
Rearrange, dock, or float document windows
When you open more than one file, the Document windows are tabbed.
• To rearrange tabbed Document windows, drag a window’s tab to a new location in the group.
• To undock (float or untab) a Document window from a group of windows, drag the window’s tab out of the group.
• To dock a Document window to a separate group of Document windows, drag the window into the group.
• To create groups of stacked or tiled documents, drag the window to one of the drop zones along the top, bottom, or
sides of another window. You can also select a layout for the group by using the Layout button on the Application bar.
• To switch to another document in a t abbed group when dragging a selection, drag the selection over the document’s
tab for a moment.
Dock and undock panels
A dock is a collection of panels or panel groups displayed together, generally in a vertical orientation. You dock and
undock panels by moving them into and out of a dock.
• To dock a panel, drag it by its tab into the dock, at the top, bottom, or in between other panels.
• To dock a panel group, drag it by its title bar (the solid empty bar above the tabs) into the dock.
• To remove a panel or panel group, drag it out of the dock by its tab or title bar. You can drag it into another dock or
make it free-floating.
Last updated 2/2/2018
Page 57

Workspace
Navigator panel being dragged out to new dock, indicated by blue vertical highlight
51
Navigator panel now in its own dock
You can prevent panels from filling all the space in a dock. Drag the bottom edge of the dock up so it no longer meets
the edge of the workspace.
Move panels
As you move panels, you see blue highlighted drop zones, areas where you can move the panel. For example, you can
move a panel up or down in a dock by dragging it to the narrow blue drop zone above or below another panel. If you
drag to an area that is not a drop zone, the panel floats freely in the workspace.
Note: The position of the mouse (rather than the position of the panel), activates the drop zone, so if you can’t see the drop
zone, try dragging the mouse to the place where the drop zone should be.
• To move a panel, drag it by its tab.
• To move a panel group, drag the title bar.
Last updated 2/2/2018
Page 58

Workspace
Narrow blue drop zone indicates Swatches panel will be docked on its own above the Color panel group.
A Title bar B Tab C Drop zone
52
Press Ctrl (Windows) or Command (Mac OS) while moving a panel to prevent it from docking. Press Esc while moving
the panel to cancel the operation.
Add and remove panels
If you remove all panels from a dock, the dock disappears. You can create a dock by moving panels to the right edge of
the workspace until a drop zone appears.
• To remove a panel, right-click (Windows) or Control-click (Mac) its tab and then select Close, or deselect it from
the Window menu.
• To add a panel, select it from the Window menu and dock it wherever you want.
Manipulate panel groups
• To move a panel into a group, drag the panel’s tab to the highlighted drop zone in the group.
Adding a panel to a panel group
• To rearrange panels in a group, drag a panel’s tab to a new location in the group.
• To remove a panel from a group so that it floats freely, drag the panel by its tab outside the group.
• To move a group, drag the title bar (the area above the tabs).
Last updated 2/2/2018
Page 59

Workspace
Stack floating panels
When you drag a panel out of its dock but not into a drop zone, the panel floats freely. The floating panel allows you to
position it anywhere in the workspace. You can stack floating panels or panel groups so that they move as a unit when
you drag the topmost title bar.
Free-floating stacked panels
• To stack floating panels, drag a panel by its tab to the drop zone at the bottom of another panel.
• To change the stacking order, drag a panel up or down by its tab.
Note: Be sure to release the tab over the narrow drop zone between panels, rather than the broad drop zone in a title
bar.
• To remove a panel or panel group from the stack, so that it floats by itself, drag it out by its tab or title bar.
Resize panels
• To minimize or maximize a panel, panel group, or stack of panels, double-click a tab. You can also double-click the
tab area (the empty space next to the tabs).
53
• To resize a panel, drag any side of the panel. Some panels, such as the Color panel in Photoshop, cannot be resized
by dragging.
Collapse and expand panel icons
You can collapse panels to icons to reduce clutter on the workspace. In some cases, panels are collapsed to icons in the
default workspace.
Panels collapsed to icons
Last updated 2/2/2018
Page 60

Workspace
Panels expanded from icons
• To collapse or expand all panel icons in a column, click the double arrow at the top of the dock.
• To expand a single panel icon, click it.
• To resize panel icons so that you see only the icons (and not the labels), adjust the width of the dock until the text
disappears. To display the icon text again, make the dock wider.
• To collapse an expanded panel back to its icon, click its tab, its icon, or the double arrow in the panel’s title bar.
• To add a floating panel or panel group to an icon dock, drag it in by its tab or title bar. (Panels are automatically
collapsed to icons when added to an icon dock.)
• To move a panel icon (or panel icon group), drag the icon. You can drag panel icons up and down in the dock, into
other docks (where they appear in the panel style of that dock), or outside the dock (where they appear as floating
icons).
54
Use panel menus
Access the panel menus using the icon on the upper-right corner of the panel.
Panel menu (Symbols panel)
Last updated 2/2/2018
Page 61

Workspace
Set UI color
You can customize the interface to sport one of following available color options: Dark, Medium Dark, Medium Light,
Light.
and
1 Do one the following:
• (Windows) Choose Edit > Preferences > User Interface.
• (Mac OS) Choose Illustrator > Preferences > User Interface.
2 Choose the desired interface color from the following Brightness options: Dark, Medium Dark, Medium Light, and
Light.
Available UI color options
55
3 Choose a Canvas Color from the following options:
• Match User Interface Brightness Sets the color of the canvas to the selected brightness level.
• WhiteSets the color of the canvas to white.
Rename or duplicate a workspace
1 Choose Window > Workspace > Manage Workspaces.
2 Do any of the following, and then click OK:
• To rename a workspace, select it, and edit the text.
• To duplicate a workspace, select it, and click the New button.
For a video on customizing the workspace based on different workflows, see www.adobe.com/go/vid0032_en.
Save and switch workspaces
By saving the current size and position of panels as a named workspace, you can restore that workspace even if you
move or close a panel. The names of saved workspaces appear in the workspace switcher in the Application bar.
Save a custom workspace
1 Choose Window > Workspace > Save Workspace.
2 Type a name for the workspace.
Display or switch workspaces
?
Select a workspace from the workspace switcher in the Application bar.
Last updated 2/2/2018
Page 62

Workspace
Delete a custom workspace
Choose Window > Workspace > Manage Workspaces, select the workspace, and then click the Delete icon.
Restore the default workspace
?
Select the Default or Essentials workspace from the workspace switcher in the application bar.
Create documents
Introduced in Adobe Illustrator CC 2017 release
56
While creating a document in Illustrator, instead of beginning with a blank canvas, you can choose from a wide variety
templates, including templates from Adobe Stock. Templates include assets and illustrations that you can build on to
of
complete your project. When you open a template in Illustrator, you can work with it just as you would work with
other Illustrator document (.ai).
In addition to templates, you can also create a document by selecting one of the numerous presets available in
Illustrator.
any
Templates and presets
Te mp l at es provide rich, inspirational, and reusable content for your documents. You can download templates from
Adobe Stock that include quality graphics and illustrations right within Illustrator. You can then build on these
templates to easily create documents that share common settings and design elements. Illustrator also provides blank
templates with predefined dimensions and settings for common tasks, such as designing business cards or brochures.
Templates open as .ai files in Illustrator and generally include multiple artboards.
Blank Document Presets are blank documents with predefined dimensions and settings. Presets make designing for
specific device form factors or use cases easier. For example, you can use a preset to quickly start designing for the iPad
Pro. Blank document presets have predefined size, color, mode, unit, orientation, positioning, bleed, and resolution
settings. You can
modify these settings before creating a document using the preset.
Last updated 2/2/2018
Page 63

Workspace
Templates and presets are categorized into these sets:
• Mobile
• We b
• Print
• Film & Video
• Art & Illustration
Access the New Document dialog
1 Launch Illustrator.
2 Do one of the following:
• Select File > New.
• Click New or Start New in the Start workspace.
• Use the following keyboard shortcut:
• (Mac) Cmd+N
• (Windows) Ctrl+N
57
• Right-click the tab for an open document and choose New Document from the in-context menu.
Overview: New Document dialog
Among other operations, the New Document dialog lets you:
• Create documents using selected templates from Adobe Stock across several categories: Mobile, Web, Print, Film &
Video, and Art & Illustration
• Search for more templates on Adobe Stock and create documents using them
• Quickly access files, templates, and items that you've have recently accessed (Recents tab)
• Quickly access templates that you've downloaded from Adobe Stock (Saved tab)
• Create documents using Blank Document presets for multiple categories and device form factors. Before opening
the presets, you can modify their settings.
Last updated 2/2/2018
Page 64

Workspace
58
Mobile tab | New Document dialog box
Create documents using presets
1 In the New Document dialog box, click a category tab: Mobile, Web, Print, Film & Video, or Art & Illustration.
2 Select a preset.
3 Optionally, change the settings for the selected preset in the Preset Details pane on the right. See Modify presets to
understand how.
4 Click Create. Illustrator opens a new document based on the preset.
Modify presets
Before opening a document using the preset, you can modify its settings in the right pane.
1 Specify a name for the document.
2 Specify the following options for the selected preset:
Width and Height: Specify the size of the artboard. Select the unit from the pop-up menu.
Orientation: Specify a page orientation for the document: Landscape or Portrait
Artboard: Specify the number of artboards in the document
Bleed: Specify the position of the bleed along each side of the artboard. To use different values for different sides,
delink the dimensions by clicking the chain (
) icon.
Color Mode: Specify a color mode for the document: RGB or CMYK. Changing the color mode converts the default
contents (swatches, brushes, symbols, graphic styles) of the
selected new document profile to a new color mode,
resulting in a color change.
3 Click More Settings to specify additional options:
Last updated 2/2/2018
Page 65

Workspace
Raster Effects: Specify the resolution for raster effects in the document. It is especially important to set this at High
when you plan to output to a high-end printer at high
Preview Mode: Set the default preview mode for the document:
resolution. The Print profile sets this at High by default.
59
• Default displays artwork created in the document in vector vie w with fu ll color. Zo om in/out ret ains smoot hness
curves.
in the
• Pixel displays artwork with a rasterized (pixelated) appearance. It does not actually rasterize the content, but
displays a simulated preview, as if the contents were rasters.
• Overprint provides an “ink preview” that approximates how blending, transparency, and overprinting will
appear in color-separated output.
Note: You can change the Preview Mode at any time using the Vie w menu.
4 Click Create Document to open a document with the preset settings.
Note: Options in the More Settings dialog are similar to options in the legacy New Document dialog in earlier versions of
Illustrator. See
Files and templatesfor more information about those options.
Create documents using templates from Stock
Illustrator comes with a variety of templates from Adobe Stock, including templates for tablet illustrations, mobile
illustrations, laptop illustrations, letterheads,
basic fonts or fonts that can be synced from Adobe Typekit. To create a document using a template, do one of the
use
following:
1 In the New Document dialog, click a category tab: Mobile, Web, Print, Film & Video, or Art & Illustration.
2 Select a template.
3 Click See Preview to view a preview of the template. A preview is an image representation of a template that you can
review and decide if you want to license that template.
envelopes, business cards, and many more. Templates with font layers
Last updated 2/2/2018
Page 66

Workspace
60
Preview the template before licensing it
4 Click Download.
Illustrator prompts you to license the template from Adobe Stock. See Adobe Stock Help for more information
about licensing and related considerations. After the template has been licensed using asset entitlements or credits
in your account, you can open it as an Illustrator document (.ai)
for you to work on.
Last updated 2/2/2018
Page 67

Workspace
Template licensing in progress
5 After the template has downloaded, click Open. While opening the template, if you're prompted to sync some fonts
from Typekit, click OK.
You can now work with the open document in Illustrator just as you would work with any other .ai document.
Note: Downloaded templates are added to a Creative Cloud library called Stock Templates. You can access this library in
the Libraries panel.
61
Libraries panel | Stock Template library
Note: Illustrator templates carry the .ait filename extension. However, when you open a template, an instance of it is
opened as a document with the .ai extension. Changes made to that .ai document don't affect the original .ait template.
Search for more templates from Adobe Stock
Aside from the preselected templates from Adobe Stock, you can search for and download numerous other such
templates directly from within the New Document dialog.
• While work ing in th e New Doc ument dial og, enter a search str ing in the Fin d More Templates On Adob e Sto ck box.
Alternatively, simply click Go to browse the full selection of available templates.
Illustrator opens the Adobe Stock website in a new browser window for you to explore. License and download the one
that best meets your project's requirements. For more information about Adobe Stock, see
Last updated 2/2/2018
Using Adobe Stock .
Page 68

Workspace
62
Explore and license templates on the Adobe Stock website
Create documents using blank templates
Blank templates make designing common deliverables, such as brochures, business cards, CD covers, and T-shirts,
easier. Do the following to create a document using a blank template:
1 Select File > New From Template.
2 In the New From Template dialog, open the Blank Templates folder.
Note: Alternatively, you can open the Blank Templates folder directly from the New Document window. In the New
Document dialog, click More Settings and then click Templates.
3 Select a template; for example, Gift Certificate Pouchette.ait. Click New. Illustrator creates a new document based
on the selected blank template. You can work with it just as you'd work with any other .ai document.
Note: Illustrator templates carry the .ait filename extension. When you open a template, an instance of it is opened as a
document with the .ai extension. Changes made to that .ai document don't affect the original .ait template.
Use the legacy File New experience
If necessary, you may disable the latest New Document experience and revert to the experience that Illustrator provided
by default in versions CC 2015.3 and earlier.
1 Select Edit > Preferences > General.
Last updated 2/2/2018
Page 69

Workspace
2 Select Use Legacy File New Interface. Click OK.
Enable the legacy experience (not recommended)
Note: See Files and templatesfor more information about options in the legacy New Document dialog.
63
Properties panel
The new Properties panel in Illustrator lets you view settings and controls in the context of your current task or
workflow. This new panel has been designed with ease of use in mind, ensuring that you have access to the right
controls when you need them.
The Properties panel is available by default in the Essentials workspace. It is also available in Window > Prop e r ties.
The frequently used controls for each Properties panel area are displayed upfront. You can access additional controls
either by clicking the ellipses in the lower-right corner of an area or clicking an underlined option.
Last updated 2/2/2018
Page 70

Workspace
64
Properties panel
No selection
When no objects are selected in your document and the Selection tool is selected, the Properties panel displays controls
related to the artboards, ruler,
grids, guides, snapping, and some commonly used preferences. In this state, the
Properties panel displays quick action buttons that let you open the Document Setup and Preferences dialog boxes and
enter the artboard editing mode.
Selected objects
Last updated 2/2/2018
Page 71

Workspace
For any selection, the Properties panel displays two sets of controls:
• Transformation and appearance controls:Width, Height, Fill, Stroke, Opacity, etc
• Dynamic controls: Additional controls, depending on the contents of your selection, may become available. For
example, you can adjust the character and paragraph attributes of
panel displays crop, mask, embed or unembed, and
Edit artwork using Image Tracecontrols.
text objects. For image objects, the Properties
65
Contextual options available in the Properties panel
A View more options B Controls available for a text object C Controls available for a path D Controls available for a linked image
Artboards
Artboards help streamline your design process by giving you an area where you can lay out designs for different devices
and screens. Artboards represent the regions that can contain printable or exportable artwork. While creating
artboards, you can choose from a wide variety of preset sizes or define your own custom artboard size.
You can have 1 to 1000 artboards per document depending on the size of your artboards. You can specify the number
of artboards for a document when you first create it, and you can add and remove artboards at any time while working
in a document. You can create artboards in different sizes, resize them by using the Artboard tool and position them
anywhere on the screen—even overlapping one another. Illustrator also provides options to set the orientation, reorder,
and rearrange artboards using the Artboards panel, Properties panel, or the Control panel (when the Artboard tool is
selected). You can specify custom names for an artboard. You can also set reference points for artboards in Illustrator.
Last updated 2/2/2018
Page 72

Workspace
You can use artboards as crop areas for printing or exporting purposes. Multiple artboards are useful for creating
various things such as multiple page PDFs, printed pages with different sizes or different elements, independent
elements for websites, video storyboards, or individual items for animation in Adobe Animate or After Effects.
Create an artboard
1 Do any of the following:
• To create a custom artboard, select the Artboard tool , and drag in the document to define the shape, size,
and location.
• To use a preset artboard, double-click the Artboard tool, select a preset and specify other options in the Artboard
Options dialog box, and click OK. Drag the artboard to position it where you want.
• To duplicate an existing artboard, select the Artboard tool, click to select the artboard you want to duplicate, and
click the New Artboard button
Alt-click as many times as you want. Or, using the Artboard tool, Alt-drag (Windows) or Option-drag (macOS)
the artboard you want to duplicate.
• To duplicate an artboard with the contents, select the Artboard tool, click to select the Move/Copy Artwork With
Artboard (
drag.
If you want the artwork to contain a bleed, make sure that there’s enough artwork beyond the artboard bounds to
accommodate the bleed.
) in the Properties panel or the Control panel, press Alt (Windows) or Option (macOS), and then
in the Control panel or the Properties panel. To create multiple duplicates,
66
2 To commit the artboard and exit the artboard-editing mode, click a different tool in the Tools panel or click Esc.
See a video on using multiple artboards.
Artboard options
To open the Artboard Options dialog box, do one of the following:
• Double-click the Artboard tool
• Click the Artboard tool and then click the Artboard Options button in the Properties panel or the Control
panel.
• Choose Artboard Options from the flyout menu of the Artboards panel.
Last updated 2/2/2018
Page 73

Workspace
67
In the Artboard Options dialog, specify the following options:
Name Specifies the name of the artboard.
Preset Specifies artboard dimensions. These presets set the video ruler pixel aspect ratio appropriately for the specified
output.
Width and Height Specifies the size of the artboard.
X: and Y: Position Specifies the position of the artboard according to Illustrator’s workspace rulers. To view these rulers,
choose View
Orientation Specifies portrait or landscape page orientation.
Constrain Proportions Keeps the aspect ratio of the artboard intact if you manually resize it.
Show Center Mark Displays a point in the center of the artboard.
Show Cross Hairs Displays cross lines through the center of each side of the artboard.
Show Video Safe Areas Displays guides that represent the areas that fall inside the viewable area of video. You want to
> Show Rulers.
keep all text and art that must be viewable to users inside the video safe areas.
Video Ruler Pixel Aspect Ratio Specifies the pixel aspect ratio used for the video rulers.
Last updated 2/2/2018
Page 74

Workspace
Fade Region Outside Artboard Displays the area outside the artboard a darker shade than the area inside the artboard
when the Artboard tool is active.
Update While Dragging Keeps the area outside the artboard darker as you drag to resize the artboard. If this is not
selected, the outside area displays in the same color as inside the artboard while resizing.
Artboards Indicates how many artboards exist.
Artboards panel overview
To access the Artboards panel, click Win do w > Artboards. You can do the following using the Artboards panel:
• Add, rearrange, and delete artboards
• Reorder and renumber artboards
• Select and navigate through multiple artboards
• Specify artboard options such as presets, artboard size, and relative artboard position
68
Artboards panel
A Rearrange all artboards B Up Arrow C Down Arrow D Add new artboards E Delete artboards
See a video on using the Artboards panel.
Work with artboards
Add artboards
To add artboards, do any one of the following:
• Click the New Artboard icon in the Properties panel, Control panel, or Artboards panel.
• Select the New Artboard option from the flyout menu of the Artboards panel.
• Alt-drag (Windows) or Option-drag (macOS) to duplicate an artboard.
Last updated 2/2/2018
Page 75

Workspace
Select multiple artboards
1 Select the Artboard tool from the Tools panel.
2 Do one of the following:
• Press Control/ Command + A to select all the artboards in your document.
• Shift-click to select artboards.
• Shift-click the canvas and drag the cursor to select multiple artboards using a marquee.
Note: Marquee selection toggles the selection state of the artboard. Selected artboards are deselected when you drag the
marquee.
Delete an artboard
1 Select the artboards you want to delete.
2 Do any one of the following:
• Click the Delete Artboard icon in the Properties panel, Control panel, or Artboards panel.
• Select the Delete option from the Artboards panel menu (flyout menu).
• Press Delete key.
69
View artboards and the canvas
Each artboard is bound by solid lines and represents the maximum printable area. To hide the artboard boundaries,
choose View
square window. The canvas represents a space on which you can create, edit, and store elements of artwork before
moving them onto an artboard. Objects placed onto the canvas are visible onscreen, but they do not print.
To center an artboard and zoom it to fit the screen, click the artboard number in the status bar, at the bottom of the
application window.
1 Select the Artboard tool from the Tools panel.
2 Do any of the following:
• Click an artboard to make it active. (Clicking in or drawing over an artboard using a different tool makes the
> Hide Artboards. The canvas is the area outside the artboard that extends to the edge of the 220-inches
Artboard tool active.) If artboards overlap, the artboard with the left edge closest to the click location becomes
the active artboard.
View artboards
A Active artboard B Inactive artboard
• To navigate between artboards, press Alt (Windows) or Option (macOS) and click an arrow key.
• To view artboards and their contents as outlines, right-click and choose Outline from the context menu. To see
artwork again, right-click and choose Preview.
Last updated 2/2/2018
Page 76

Workspace
Note: You can view the page boundaries in relation to an artboard by showing print tiling (View > Show Print Tiling).
When print tiling is on, the printable and nonprintable areas are represented by a series of solid and dotted lines between
the outermost edge of the window and the printable area of the page.
Edit artboards
You can create multiple artboards for your document, but only one can be active at a time. When you have multiple
artboards defined, you can view them all by selecting the Artboard tool. Each artboard is numbered for easy reference.
You can edit or delete an artboard at any time, and you can specify different artboards each time you print or export.
1 Select the artboards you want to edit.
2 Do any of the following:
• To resize the artboards, position the pointer on an edge or corner until the cursor changes to a double-sided
arrow, and then drag to adjust. Or, specify new Width and Height values in the Properties panel or the Control
panel.
• To change the orientation of the artboards, click the Portrait or Landscape button in the Properties panel or the
Control panel.
• To rotate between artboards, press Alt (Windows) or Option (macOS) and click an arrow key.
• To view artboards and their contents as outlines, right-click and choose Outline from the context menu. To see
artwork again, right-click and choose Preview.
70
Move an artboard
1 Select the artboards you want to move.
2 Do one of the following:
• To move the artboards and its contents, select the Move Artwork With Artboard options in the Properties panel
or click
in the Control panel, and then position the pointer in the artboard and drag.
• To move the artboards without its contents, click to deselect the Move Artwork With Artboard option in the
Properties panel or click
in the Control panel, and then position the pointer in the artboard and drag.
• Specify new X and Y values in the Properties panel or the Control panel.
Reorder artboards
In the Artboards panel, you can use the Up and Down Arrows at the bottom of the panel to reorder the artboards.
However, reordering artboards in the Artboards panel, does not reorder the artboards in the work area.
Last updated 2/2/2018
Page 77

Workspace
Rearrange artboards
A Default order in the Artboards panel B Reordered artboards in the Artboards panel
71
Rearrange artboards
To fit all artboards in view, you can rearrange artboards using the Grid by Row, Grid by Column, Arrange by Row, and
Arrange by Column options.
To rearrange artboards, do the following:
1 Select the Rearrange All Artboards option from the Properties panel or the flyout menu of the Artboards panel.
2 In the Rearrange All Artboards dialog box, choose any one layout from the following options:
Grid by Row Arranges multiple artboards in the specified number of rows. Specify the number of rows in the
Rows box. The default value creates the most square appearance possible with the specified number of artboards.
Grid by Column Arranges multiple artboards in the specified number of columns. Choose the number of
columns from the Columns menu. The default value creates the most square appearance possible with the specified
number of artboards.
Arrange by Row Arranges all the artboards in a single row.
Arrange by Column Arranges all the artboards in a single column.
Change to Right-to-Left Layout/Change to Left-to-Right Layout Arranges the artboards from left to right or right to
left. By default, artboards are arranged from left to right.
the Grid by Row and Grid Column options change to Right-to-Left Grid by Row and Right-to-Left Grid by Column.
3 Specify the spacing between the artboards. This setting applies to both horizontal and vertical spacing.
4 Select the Move Artwork with Artboard option to move the artwork whenever the artboards location changes.
Additionally, an artboard within an artboard is treated like a crop area and is moved along with the containing artboard.
If you select the Change to Right-to-Left Layout option,
Align and distribute artboards
You can align or distribute selected artboards along the axis you specify using the Properties panel, the Align panel, or
the Control panel.
Last updated 2/2/2018
Page 78

Workspace
To align or distribute artboards, do the following:
1 Select the artboards you want to align or distribute.
2 Do one of the following:
• In the Properties panel (Window > Properties), click the icon for the type of alignment or distribution you want.
• Click Align in the Control panel, and then click the icon for the type of alignment or distribution you want.
• Choose Window > Align, and then click the icon for the type of alignment or distribution you want.
• Choose Window > Properties, and then click the icon for the type of alignment or distribution you want.
72
Align artboards
Customize artboard names
Each artboard can now be given a custom name, when in artboard edit mode.
To assign a custom name to an artboard, do the following:
1 Select the Artboard Tool to edit the artboard.
2 Select the artboard and specify the artboard name in the Name box of the Artboard Control Panel or the Properties
panel.
Alternatively, you can provide a custom name in the Name field of the Artboard Options dialog box. To open the
dialog box, click Artboard Options
commit the new name for the chosen artboard.
Th e ne w ar tbo ard name app ear s on the up per-l eft sid e of the art boa rd. Th e cu stom n ame als o sh ows up in t he A rtb oar d
Navigation field and drop-down next to document’s status area.
If you assign a custom name to artboards, these names are added as suffix to the filename while saving artboard-specific
files to all formats.
in the Properties panel or the flyout menu of the Artboards Panel. Click OK to
Last updated 2/2/2018
Page 79

Workspace
73
Enter a custom name for an artboard in the Properties panel.
Note: To return to the default name, clear the name of the artboard from the Name field in the Properties panel or the
Control panel.
Set reference points for artboards (9-point referencing)
To set reference points for artboards, use the Artboard Options dialog box or the Artboard options in the Properties
panel or the Control panel.
This option allows you to hinge a corner or center of an artboard while its size is being changed.
Display artboard rulers, center mark, cross hairs, or safe area
You can choose to display a center mark, cross hairs, video safe markers, and rulers around an artboard. Rulers are
useful when you’re working with art intended for export to video. The numbers on the rulers reflect device-specific
pixels, regardless of the measurement unit specified in preferences. The default Video Ruler Pixel Aspect Ratio (VPAR)
for Illustrator is 1.0 (for square pixels)—this value changes according to the preset you choose either in the Artboard
Options dialog box or the New Document dialog box.
If you’re using nonsquare pixels, the ruler provides for easier device-specific pixel calculations. For example, if you
specify an artboard of 100 x100 Illustrator points, and you want to know the exact size in device-dependent pixels
before exporting the file for use in an NTSC DV Widescreen, you can set the video ruler in Illustrator to use a video
ruler pixel aspect ratio of 1.2 (for wide pixels) and the ruler reflects the change and displays the artboard as 83 x100
device pixels (100/1.2 = 83.333).
Last updated 2/2/2018
Page 80

Workspace
Artboard with rulers
Display center mark, cross hairs, or video safe areas
The center mark, cross hairs, and video safe area are video properties that assist you in creating videos. To display these
properties:
1 Double-click the Artboard tool in the Tools panel, or, with the Artboard tool active, click the Artboard Options
icon in the Properties panel or the Control panel.
2 In the Display section, select the options you’d like displayed in your artboards.
74
Note: You can also set or remove the center point by clicking the Show Center Mark icon in the Control panel.
Save, export, and print artboards
Save and export artboards
You can save and export artboards in different file formats. When you save or export artwork, Illustrator writes the
artwork data to a file. The structure of the data depends on the file format that you select. For details, see
You can also export artwork in a variety of file formats for use outside Illustrator. These formats are called non-native
formats because Illustrator won't be able to retrieve all the data if you reopen the file in Illustrator. For this reason, it is
recommended that you save artwork in AI format until you have finished creating it, and then export the artwork to
the desired format. For details, see
Export artwork.
Print artboards
All artboards in a document share the same media type format, such as Print. You can print each artboard individually,
tiled, or combined into one page. If you save a multiple-artboard Illustrator document to a previous version of
Illustrator, you can choose to save each artboard as a separate file, along with a master file that includes all artboards
merged.
You can preview artboards from the print dialog box before printing them. The print settings you choose are applied
to all the artboards you selected to print.
By default all artwork is cropped to an artboard and all artboards print as individual pages. Use the Range option in the
Print dialog box to print specific pages, select Ignore Artboards and specify placement options to combine all art onto
a single page or tile the artwork as desired.
Save artwork.
Last updated 2/2/2018
Page 81

Workspace
In Illustrator, artboards in a document can automatically rotate to print to the chosen media size. Select the Auto-Rotate
check box in the Print dialog box to set auto rotation for Illustrator documents. For a document created in Illustrator
CC, Auto-Rotate is enabled by default.
For example, consider a document with both landscape (width is more than height) and portrait (height is more than
wi dth ) me dia siz e. If y ou sel ect t he p aper s ize as p ort rai t in the Size o f th e Pr int di alo g box, t hen the lands cap e ar tboard s
automatically rotate to portrait media when printing.
Note: If Auto-Rotate is selected, you cannot change the direction of the page.
For details, see Set up documents for printing.
To ols
Tools panel over view
When you start Illustrator, the Tools panel appears at the left of the screen. You use tools in the Tools panel to create,
select, and manipulate objects in Illustrator. Some tools have options that appear when you double-click a tool. These
include tools that let you select, type, paint, draw, sample, edit, and move images.
pointer over it.
To see the name of a tool, hover the
75
Last updated 2/2/2018
Page 82

Workspace
76
Overview: Tools panel
Work with the Tools panel
View hidden tools
You can expand some tools to show tools hidden beneath them. A small triangle at the lower right of the tool icon
signals the presence of hidden tools. Hold down the mouse button on the visible tool to view the tools hidden under it.
Last updated 2/2/2018
Page 83

Workspace
View hidden tools in the Tools panel
View tool options
Some tools in the Tools panel have options that appear in the context-sensitive options bar. Additionally, you can also
double-click a tool in the Tools panel to view and change the settings for that tool.
Move the Tools panel
You can move the Tools panel by dragging its title bar.
View the Tools panel in double-stack or single-column
Click the double-arrow on the title bar to toggle between the double-stack and single-column view of the Tools panel.
77
Hide the Tools panel
You can also show or hide the Tools panel by choosing Window > To ol s .
Tear off hidden tools into a separate panel
Drag the pointer over the arrow at the end of the hidden tools panel and release the mouse button.
Close a separate tools panel
Click the close button on the panel’s title bar. The tools return to the Tools panel.
Change drawing modes and screen modes using the Tools panel
Click the icons at the bottom of the Tools panel to change the drawing mode from Draw Normal ( ) to Draw Behind
( ) or Draw Inside ( ).
Additionally, you can also change the screen mode by clicking the Change Screen Mode icon ( ) at t he bottom of t he
Tools panel and choosing the desired screen mode.
Last updated 2/2/2018
Page 84

Workspace
Create custom tools panels
If you work with only a specific set of tools, you can create a customized tools panel that contains only those tools.
1 Click Win d ow > To ol s > New Tools Panel, and then provide a name and click OK.
A new Too l s p ane l is created and displayed.
A Provide a name for the new tools panel B New tools panel created with a default fill/stroke proxy
Note: A Fill/Stroke proxy is added by default. This cannot be removed from the custom tools panel.
2 Drag a tool from an existing tools panel into a new or existing custom tools panel. If the tool is part of a group of
tools, then the topmost tool is copied. Release the mouse when the cursor appears with a plus sign (
).
78
Tools from three tool groups (left) have been added to create a tools panel (right)
Note: Dragging and dropping a tool when the cursor appears with a cancel operation sign ( ) performs no addition
or deletion of tools.
3 To get a tool that does not appear as the top-most tool in a group, do one of the following:
a Press Alt/ Option and click the tool group. This action cycles through all the tools present in the tool group.
b When the tool that you want appears at the top of the group, drag it to the custom tools panel. Release the mouse
when the cursor appears with a plus sign (
).
OR
c Drag the tool group into an empty portion of the workspace, to view it as a toolstrip.
Last updated 2/2/2018
Page 85

Workspace
d From the toolstrip, drag a tool to the new tools panel. Release the mouse when the cursor appears with a plus
sign (
4 To remove a tool, drag the tool out of the custom tools panel, and drop it when the cursor appears with a minus sign
).
(
).
Note: A tool can be removed from a tools panel only when a document is open.
5 To swap positions of tools within a custom-created tools panel, press the Alt/ Option key, drag a tool on top of the
tool you want to swap positions with, and then drop the tool when the cursor appears with a two-way arrow sign
).
(
Note: A custom tools panel is persistent in the workspace it is created in. If you change to another workspace and then
return to the original workspace, any tools panels created are retained and reopened.
Manage custom tools panels
1 Click Win d ow s > To o ls > Manage Tools Panel.
79
Actions that you can perform with the Manage Tools Panel dialog
A View the list of custom tools panels B Delete selected tools panel C Create a tools panel, or a copy of the selected tools panel D Rename a
selected tools panel
2 In the Manage Tools Panel dialog, do one of the following:
• Rename: Select a tools panel from the list, type a new name for the panel in the text box, and then click OK.
• New/Copy: Select a tools panel from the list, click the copy button, rename the tools panel if required, and then
click OK. If no tools panel is selected, a new tools panel is created.
• Delete: Select a tools panel from the list, and then click the Delete button.
Select a tool
Do one of the following:
• Click a tool in the Tools panel. If there is a small triangle at a tool’s lower-right corner, hold down the mouse button
to view the hidden tools, and then click the tool you want to select.
Last updated 2/2/2018
Page 86

Workspace
• Hold down Alt (Windows) or Option (macOS), and then click a tool to cycle through and select hidden tools.
• Press the tool’s keyboard shortcut. The keyboard shortcut is displayed in its tool tip. For example, you can select the
Move tool by pressing the V key.
Selecting a hidden tool
A Tools panel B Active tool C Tear off panel with hidden tools D Hidden tool triangle E Tool name and shortcut
Ti p: To hide tool tips, choose Edit > Preferences > General (Windows) or Illustrator > Preferences > General (macOS),
and deselect Show Tool Tips.
80
Change tool pointers
The pointer for most tools matches the tool’s icon. Each pointer has a different hotspot, where an effect or action begins.
With most tools, you can switch to precise cursors, which appear as cross hairs centered on the hotspot, and provide
for greater accuracy when working with detailed artwork.
?
Choose Edit > Preferences > General (Windows) or Illustrator > Preferences > General (macOS), and select Use
Precise Cursors.
Alternatively, press CapsLock on the keyboard.
Tool galleries
Illustrator provides many tools for creating and manipulating your artwork. These galleries provide a quick visual
overview for each tool.
Symbol Sprayer tool
The Symbol Sprayer tool (Shift+S) places
multiple symbol instances as a set on the
artboard. See Create symbol sets.
Direct Selection tool Group Selection tool
The Direct Selection tool (A) selects points or
path segments within objects. See Select
paths, segments, and anchor points.
The Group Selection tool selects objects and
groups within groups. See Select objects and
groups with the Group Selection tool.
Selection tool gallery
Illustrator provides the following selection tools:
Last updated 2/2/2018
Page 87

Workspace
81
Selection tool (V) selects entire
objects. See Select objects with the
Selection tool.
Lasso tool (Q) selects points or path
segments within objects. See Select
objects with the Lasso tool.
The
Direct Selection tool (A) selects
points or path segments within
objects. See Select paths, segments,
and anchor points.
The
Artboard tool creates separate
artboards for printing or export.
See Create an artboard.
Drawing tool gallery
Illustrator provides the following drawing tools:
The
Group Selection tool selects objects
and groups within groups. See
Select objects and groups with the
Group Selection tool.
The
The
Magic Wand tool (Y) selects objects
with similar attributes. See Select
objects with the Magic Wand tool.
The
Last updated 2/2/2018
Page 88

Workspace
82
Pen tool (P) draws straight and
The
curved lines to create objects. See
Drawing with the Pen tool .
The
Line Segment tool (\) draws
individual straight line segments.
See Draw straight lines.
Add Anchor Point tool (+) adds
The
anchor points to paths. See Add
and delete anchor points.
The Arc
tool draws individual concave or
convex curve segments. See Draw
arcs.
Delete Anchor Point tool (-) dele tes
The
anchor points from paths. See Add
and delete anchor points.
The
Spiral tool draws clockwise and
counterclockwise spirals. See Draw
spirals .
Convert Anchor Point tool (Shift+C)
The
changes smooth points to corner
points and vice versa. See Convert
between smooth points and corner
points.
The
Rectangular Grid tool draws
rectangular grids. See Draw
rectangular grids.
Last updated 2/2/2018
Page 89

Workspace
83
Polar Grid tool draws circular chart
The
grids. See Draw circular (polar)
grids.
The
Polygon tool draws regular, multisided shapes. See Draw polygons.
Rectangle tool (M) draws squares
The
and rectangles. See Draw
rectangles and squares.
The
Star tool draws stars. See Draw
stars.
Rounded Rectangle tool draws
The
squares and rectangles with
rounded corners. See Draw
rectangles and squares.
The
Flare tool creates lens-flare or so larflare-like effects. See Drawing flares
.
Ellipse tool (L) draws circles and
The
ovals. See Draw ellipses.
The
Pencil tool (N) draws and edits
freehand lines. See Drawing with
the Pencil tool .
Smooth tool smooths Bezier paths.
See Smooth a path.
The
Path Eraser tool erases paths and
anchor points from the object. See
Erase artwork.
Type tool gallery
Illustrator provides the following type tools:
The
Perspective Grid allows creating
and rendering artwork in
perspective. See About Perspective
Grid.
Last updated 2/2/2018
The
Perspective Selection tool allows
you to bring objects, text, and
symbols in perspective, move
objects in perspective, move objects
in perpendicular to its current
direction. See About Perspective
Grid..
The
Page 90

Workspace
84
Type tool (T ) creates individual type
and type containers and lets you
enter and edit type. See Enter text in
an area.
Vertical Area Type tool changes
closed paths to vertical type
containers and lets you enter and
edit type within them. See Enter text
in an area.
The
Area Type tool changes closed
paths to type containers and lets
you enter and edit type within
them. See Enter text in an area.
The
Vertical Type On A Path tool
changes paths to vertical type
paths and lets you enter and edit
type on them. See Creating type on
a path .
Painting tool gallery
Illustrator provides the following painting tools:
The
Type On A Path tool changes paths
to type paths, and lets you enter
and edit type on them. See Creating
type on a path .
The
The
Vertical Type tool creates vertical
type and vertical type containers
and lets you enter and edit ver tical
type. See Enter text in an area.
The
Last updated 2/2/2018
Page 91

Workspace
85
Paintbrush tool (B) draws freehand
The
and calligraphic lines, as well as art,
patterns, and bristle brush strokes
on paths. See Draw paths and
apply brush strokes
simultaneously.
The
Live Paint Bucket tool (K) paints
faces and edges of Live Paint
groups with the current paint
attributes. See Paint with the Live
Paint Bucket tool.
Mesh tool (U) creates and edits
meshes and mesh envelopes. See
Create mesh objects.
Live Paint Selection (Shift-L)tool
selects faces and edges within Live
Paint groups. See Select items in
Live Paint groups.
The
The
Reshaping tool gallery
Illustrator provides the following tools for reshaping objects:
Gradient tool (G) adjusts the
The
beginning and ending points and
angle of gradients within objects, or
applies a gradient to objects. See
Apply a gradient to an object.
The Measure tool measures the
distance between two points. See
Measure distance between objects.
Eyedropper tool (I) samples and
The
applies color, type, and appearance
attributes, including effects, from
objects. See Copy appearance
attributes using the Eyedropper
tool.
The
Blob Brush tool (Shift-B)draws
paths that automatically expand
and merge calligraphic brush paths
that share the same color and are
adjacent in stacking order. See
Draw and merge paths using the
Blob Brush tool.
Last updated 2/2/2018
Page 92

Workspace
86
Rotate tool (R) rotates objects
The
around a fixed point. See Rotate
objects.
The
Reshape tool adjusts selected
anchor points while keeping the
overall detail of the path intact.
See Stretch parts of a path
without distorting its overall
shape.
Reflect tool (O) flips objects over a
The
fixed axis. See Reflect or flip
objects.
The
Free Transform tool (E) scales,
rotates, or skews a selection.
Scale tool (S) resizes objects
The
around a fixed point. See Scale
objects.
The
Blend tool (W) creates a series of
objects blended between the
color and shape of multiple
objects. See Create blends.
Shear tool skews objects around a
The
fixed point. See Shear objects
with the Shear tool.
The
Width tool (Shift+W) allows you
to create a stroke with variable
width. See Using the Width tool .
Last updated 2/2/2018
Page 93

Workspace
87
Warp tool (Shift+R) molds objects
The
with the movement of the cursor
(like molding clay, for example).
See Distort objects using a liquify
tool.
The
Scallop tool adds random curved
details to the outline of an object.
See Distort objects using a liquify
tool.
Twirl tool creates swirling
distortions within an object. See
Distort objects using a liquify tool.
Crystallize tool adds random
spiked details to the outline of an
object. See Distort objects using a
liquify tool.
The
Pucker tool deflates an object by
moving control points towards
the cursor. See Distort objects
using a liquify tool.
The
Wrinkle tool adds wrinkle-like
details to the outline of an object.
See Distort objects using a liquify
tool.
The
The
Bloat tool inflates an object by
The
moving control points away from
the cursor. See Distort objects
using a liquify tool.
The
Shape Builder tool merges simple
shapes to create custom, complex
shapes. See Building new shapes
using the Shape Builder tool .
The Puppet Warp tool lets you
add, move, and rotate pins to
seamlessly transform your
artwork into different positions
and stances. See Puppet Warp.
Slicing and cutting tool gallery
Illustrator provides the following tools for slicing and cutting objects:
Last updated 2/2/2018
Page 94

Workspace
88
Slice tool divides artwork into
The
separate web images.Create slices
The
Knife tool cuts objects and paths.
See Cut objects with the Knife tool .
Slice Selection tool (Shift-K) selects
The
web slices. See Select slices
Eraser tool (Shift-E) erases any area
of the object over which you drag.
See Erase objects using the Eraser
tool
The
Scissors tool (C) cuts paths at
specified points. See Split a path
The
Symbolism tool gallery
The symbolism tools let you create and modify sets of symbol instances. You create a symbol set using the Symbol
Sprayer tool. You can then use the other symbolism tools to change the density, color, location, size, rotation,
transparency, and style of the instances in the set.
Last updated 2/2/2018
Page 95

Workspace
89
Symbol Sprayer tool (Shift+S)
The
places multiple symbol instances as
a set on the artboard. See Create
symbol sets.
The
Symbol Spinner tool rotates symbol
instances. See Rotate symbol
instances.
Symbol Shifter tool moves symbol
instances and change stacking
order. See Change stacking order of
symbol instances in a set.
Symbol Stainer tool colorizes
symbol instances. See Stain symbol
instances.
The
Symbol Scruncher tool moves
symbol instances closer together o r
farther apart. See Gather or scatter
symbol instances.
The
Symbol Screener tool applies
opacity to symbol instances. See
Adjust transparency of symbol
instances.
The
Symbol Sizer tool resizes symbol
instances. See Resize symbol
instances.
The
Symbol Styler tool applies the
selected style to symbol instances.
See Apply a graphic style to symbol
instances.
The
The
Graph tool gallery
Illustrator provides nine graph tools, each one for creating a different type of graph. The type of graph you choose
depends on the information you want to communicate. See
Create a graph.
Last updated 2/2/2018
Page 96

Workspace
90
Column Graph tool (J) creates
The
graphs that compare values using
vertical columns.
The
Line Graph tool creates graphs that
use points to represent one or more
sets of values, with a different line
joining the points in each set. This
type of graph is often used to show
the trend of one or more subjects
over a period of time.
Stacked Column Graph tool creates
The
graphs that are similar to column
graphs, but stacks the columns on
top of one another, instead of side
by side. This graph type is usefu l for
showing the relationship of parts to
the total.
The
Area Graph tool creates graphs that
are similar to line graphs, but
emphasizes totals as well as
changes in values.
Bar Graph tool creates graphs that
The
are similar to column graphs, but
positions the bars horizontally
instead of vertically.
The
Scatter Graph tool creates graphs
that plot data points as paired sets
of coordinates along the x and y
axes. Scatter graphs are useful for
identifying patterns or trends in
data. They also can indicate
whether variables affect one
another.
Stacked Bar Graph tool creates
The
graphs that are similar to stacked
column graphs, but stacks the bars
horizontally instead of vertically.
The Pie
Graph tool creates circular graphs
whose wedges represent the
relative percentages of the values
compared.
Radar Graph tool creates graphs
that compare sets of va lu es at gi ve n
points in time or in particular
categories, and is displayed in a
circular format. This type of graph is
also called a web graph.
The
Moving and zooming tool gallery
Illustrator provides the following tools for moving around in and controlling the view of the artboard:
Last updated 2/2/2018
Page 97

Workspace
91
moves the Illustrator artboard within the
The Hand tool (H)
illustration window.
adjusts the page grid to control where ar twork
appears on the printed page.
The Print Tiling tool
increases and decreases the view magnification
The Zoom tool (Z)
in the illustration window.
Safe Mode
When you launch Adobe Illustrator, the necessary plug-ins, fonts, drivers, and other third-party elements that are
required to function properly are loaded. In the past, when Illustrator encountered an error, for example – a damaged
font or an incompatible plug-in, the application would crash and it was difficult to diagnose the cause of the problem.
Safe Mode is a new feature that:
• Assists you in diagnosing and troubleshooting the problem-area, thus providing you with a way to fix any issues.
• Determines the cause of a crash, prevents the particular file from loading with Illustrator, and provides a listing of
the problem-causing elements when Illustrator restarts.
• Enables Illustrator to start despite encountering fatal, crash-inducing fonts, plug-ins, or more.
While running in Safe Mode, Illustrator functions normally, except that the disabled items will not be available for use
within Illustrator. For example, if a font has been found to be damaged, Illustrator will no longer display that font as an
available option to apply to text elements.
Safe Mode workflow
When you have crash-inducing elements in your Illustrator environment:
Last updated 2/2/2018
Page 98

Workspace
92
Illustrator Safe Mode workflow
Using Safe Mode
Note: This procedure assumes, at Step 1, that Illustrator has been functioning normally until now.
1 Start Illustrator. If Illustrator detects a file that is corrupt or causes errors, the application exits.
2 Do one of the following:
• Windows: Re-launch Illustrator.
• Mac: Choose Reopen.
Sample of an error on a Mac computer
3 As Illustrator restarts, you can:
• Choose Run Diagnostics to switch Illustrator to Safe Mode, to help with troubleshooting the error.
• Choose Launch Illustrator to try to start Illustrator normally again.
Last updated 2/2/2018
Page 99

Workspace
Click Run Diagnostics to enter Safe Mode
4 (This step may repeat multiple times) Illustrator restarts. If an error is found, the cause of the error (font, driver,
plug-in) is identified and disabled from obstructing Illustrator launch.
93
The Illustrator startup screen, during Safe Mode, indicates progress of diagnostic tests
Note: This step is repeated for each crash-inducing file that Illustrator finds. Do not interrupt diagnostic tests.
5 When all error-causing files have been isolated by the diagnostic steps and noted, Illustrator launches in Safe Mode.
6 When Illustrator starts, the Safe Mode dialog displays a list of all the plug-ins, fonts, or drivers that are causing
Illustrator to crash. Choose from Step 7 or Step 8.
Last updated 2/2/2018
Page 100

Workspace
94
The Safe Mode dialog to mark fixed issues
7 (Option 1 of 2) To f ix e r rors:
a Click a row in the list.
b Check the Troubleshooting Tips area for information.
Last updated 2/2/2018
 Loading...