

Page 1

Chapter 1:
User Guide
Copyright
Page 2

© 2005 Adobe Systems Incorporated. All rights reserved.
Adobe® Illustrator® CS2 User Guide for Windows® and Macintosh
If this guide is distributed with software that includes an end user agreement, this guide, as well as the software described in it, is furnished under license and may be used or
copied only in accordance with the terms of such license. Except as permitted by any such license, no part of this guide may be reproduced, stored in a retrieval system, or transmitted, in any form or by any means, electronic, mechanical, recording, or other wise, without the prior written permission of Adobe Systems Incorporated.Pleasenotethatthe
content in this guide is protected under copyright law even if it is not distributed with software that includes an end user license agreement.
Thecontent of this guideisfurnished forinformational useonly, is subjecttochangewithout notice,and should notbeconstrued as acommitmentbyAdobe Systems Incorporated. Adobe Systems Incorporated assumes no responsibility or liability for any errors or inaccuracies that may appear in the informational content contained in this guide.
Please remember that existing artwork or images that you may want to include in your project may be protected under copyright law. The unauthorized incorporation of such
material into your new work could be a violation of the rights of the copyright owner. Please be sure to obtain any permission required from the copyright owner.
Any references to company names in sample templates are for demonstration purposes only and are not intended to refer to any actual organization.
Adobe, the Adobe logo, Acrobat, Adobe Type Manager, GoLive, Illustrator, ImageReady, InCopy, InDesign, the OpenType logo, Photomerge, Photoshop, PostScript, PostScript
3, Reader, Version Cue, and XMP are either registered trademarks or trademarks of Adobe Systems Incorporated in the United States and/or other countries.
Microsoft, OpenType, and Windows are registered trademarks of Microsoft Corporation in the U.S and/or other countries. Apple, Mac, Mac OS, and Macintosh are trademarks
of Apple Computer, Inc. registered in the United States and other countries. UNIX is a registered trademark of The Open Group. Macromedia and Flash are trademarks or registered trademarks of Macromedia, Inc. in the United States and/or other countries. All other trademarks are the property of their respective owners.
This product includes either BISAFE and/or TIPEM software by RSA Data Security, Inc. This product includes cryptographic software written by Eric Young
(eay@cryptosoft.com). This software is based in part on the work of the Independent JPEG Group. Portions include technology used under license from Verity, Inc. and are
copyrighted. © 1994 Hewlett Packard Company. © 1985, 1986 Regents of the University of California. All rights reserved. Portions of this code are licensed from Apple Computer,
Inc. under the terms of the Apple Public Source License Version 2. The source code version of the licensed code and the license are available at
This product includes PHP, freely available from
developed by Brian M. Clapper (bmc@clapper.org). © 1991 by the Massachusetts Institute of Technology. ©1996, 1995 by Open Software Foundation, Inc. 1997,1996, 1995, 1994,
1993, 1992, 1991. All rights reserved.
PANTONE® Colors displayed in the software application or in the user documentation may not match PANTONE-identified standards.Consult current PANTONE Color Publications for accurate color. PANTONE® and other Pantone, Inc. trademarks are property of Pantone, Inc. © Pantone, Inc. 2003. Pantone, Inc. is the copyright owner of color data
and/orsoftwarewhich arelicensedtoAdobe SystemsIncorporatedtodistributefor useonlyincombination with AdobeIllustrator.PANTONEColor Data and/or Software shall
not be copied onto another disk or into memory unless as part of the execution of Adobe Illustrator software. The Spelling portion of this product is based on Proximity Linguistic
Technology. The Proximity Hyphenation System ©1989 All Rights Reserved Proximity Technology, Inc. Proximity and Linguibase are registered trademarks of Proximity
Tech no log y Inc .
Notice to U.S. Government End Users: The Software and Documentation are “Commercial Items,” as that term is defined at 48 C.F.R. §2.101, consisting of “Commercial
Computer Software” and “Commercial Computer Software Documentation,” as such terms are used in 48 C.F.R. §12.212 or 48 C.F.R. §227.7202, as applicable. Consistent with
48 C.F.R. §12.212 or 48 C.F.R. §§227.7202-1 through 227.7202-4, as applicable, the Commercial Computer Software and Commercial Computer Software Documentation are
being licensed to U.S. Government end users (a) only as Commercial Items and (b) with only those rights as are granted to all other end users pursuant to the terms and conditions
herein. Unpublished-rights reserved under the copyright laws of the United States. Adobe agrees to comply with all applicable equal opportunity laws including, if appropriate,
the provisions of Executive Order 11246, as amended, Section 402 of the Vietnam Era Veterans Readjustment Assistance Act of 1974 (38 USC 4212), and Section 503 of the
Rehabilitation Act of 1973, as amended, and the regulations at 41 CFR Parts 60-1 through 60-60, 60-250, and 60-741. The affirmative action clause and regulations contained in
the preceding sentence shall be incorporated by reference.
Adobe Systems Incorporated, 345 Park Avenue, San Jose, California 95110, USA.
www.php.net. This product includes the Zend Engine, freely available at www.zend.com. This product includes software
www.opensource.apple.com/apsl.
Page 3

Contents
Chapter 1: Getting started
Installation and registration . . . . . . . . . . . . . . . . . . . . . . . . . . . . . . . . . . . . . . . . . 1
Adobe Help Center . . . . . . . . . . . . . . . . . . . . . . . . . . . . . . . . . . . . . . . . . . . . . . . . . 2
Using Help . . . . . . . . . . . . . . . . . . . . . . . . . . . . . . . . . . . . . . . . . . . . . . . . . . . . . . . . . 3
Tips and training . . . . . . . . . . . . . . . . . . . . . . . . . . . . . . . . . . . . . . . . . . . . . . . . . . . . 6
What’s new . . . . . . . . . . . . . . . . . . . . . . . . . . . . . . . . . . . . . . . . . . . . . . . . . . . . . . . . 10
Chapter 2: Tutorials
Tutorials . . . . . . . . . . . . . . . . . . . . . . . . . . . . . . . . . . . . . . . . . . . . . . . . . . . . . . . . . . . 12
Chapter 3: Work area
Work area basics . . . . . . . . . . . . . . . . . . . . . . . . . . . . . . . . . . . . . . . . . . . . . . . . . . . 29
Palettes, tools, and menus . . . . . . . . . . . . . . . . . . . . . . . . . . . . . . . . . . . . . . . . . 29
Files and templates . . . . . . . . . . . . . . . . . . . . . . . . . . . . . . . . . . . . . . . . . . . . . . . . 34
Viewing artwork . . . . . . . . . . . . . . . . . . . . . . . . . . . . . . . . . . . . . . . . . . . . . . . . . . . 36
Rulers, grids, and guides . . . . . . . . . . . . . . . . . . . . . . . . . . . . . . . . . . . . . . . . . . . 41
Customizing the work area . . . . . . . . . . . . . . . . . . . . . . . . . . . . . . . . . . . . . . . . . 45
Setting preferences . . . . . . . . . . . . . . . . . . . . . . . . . . . . . . . . . . . . . . . . . . . . . . . . 45
Recovery and undo . . . . . . . . . . . . . . . . . . . . . . . . . . . . . . . . . . . . . . . . . . . . . . . . 47
iii
Chapter 4: Adobe Bridge
The basics of Bridge . . . . . . . . . . . . . . . . . . . . . . . . . . . . . . . . . . . . . . . . . . . . . . . 48
Files and folders in Bridge . . . . . . . . . . . . . . . . . . . . . . . . . . . . . . . . . . . . . . . . . . 54
Bridge Center . . . . . . . . . . . . . . . . . . . . . . . . . . . . . . . . . . . . . . . . . . . . . . . . . . . . . . 61
Running automated tasks with Bridge . . . . . . . . . . . . . . . . . . . . . . . . . . . . . . 62
Metadata in Bridge . . . . . . . . . . . . . . . . . . . . . . . . . . . . . . . . . . . . . . . . . . . . . . . . 64
Using Version Cue with Bridge . . . . . . . . . . . . . . . . . . . . . . . . . . . . . . . . . . . . . 69
Chapter 5: Adobe Stock Photos
Adobe Stock Photos . . . . . . . . . . . . . . . . . . . . . . . . . . . . . . . . . . . . . . . . . . . . . . . 71
Comp images . . . . . . . . . . . . . . . . . . . . . . . . . . . . . . . . . . . . . . . . . . . . . . . . . . . . . . 74
Buying stock photos . . . . . . . . . . . . . . . . . . . . . . . . . . . . . . . . . . . . . . . . . . . . . . . 75
Stock Photos accounts . . . . . . . . . . . . . . . . . . . . . . . . . . . . . . . . . . . . . . . . . . . . . 77
Chapter 6: Adobe Version Cue
Using Adobe Version Cue . . . . . . . . . . . . . . . . . . . . . . . . . . . . . . . . . . . . . . . . . . 81
Working with Version Cue projects . . . . . . . . . . . . . . . . . . . . . . . . . . . . . . . . . 86
Working with files in Version Cue . . . . . . . . . . . . . . . . . . . . . . . . . . . . . . . . . . . 94
Disconnecting from projects . . . . . . . . . . . . . . . . . . . . . . . . . . . . . . . . . . . . . . 105
Deleting files, folders, and projects . . . . . . . . . . . . . . . . . . . . . . . . . . . . . . . . 106
Version Cue versions . . . . . . . . . . . . . . . . . . . . . . . . . . . . . . . . . . . . . . . . . . . . . . 110
Version Cue alternates . . . . . . . . . . . . . . . . . . . . . . . . . . . . . . . . . . . . . . . . . . . . 115
Editing and synchronizing offline files . . . . . . . . . . . . . . . . . . . . . . . . . . . . . 119
Page 4

The Version Cue Administration utility . . . . . . . . . . . . . . . . . . . . . . . . . . . . .122
Creating and editing projects in Version Cue Administration . . . . . . . 127
Backing up and restoring from Version Cue Administration . . . . . . . .132
Working with users and privileges . . . . . . . . . . . . . . . . . . . . . . . . . . . . . . . .134
Viewing logs, reports, and workspace information . . . . . . . . . . . . . . . . . 138
Version Cue PDF reviews . . . . . . . . . . . . . . . . . . . . . . . . . . . . . . . . . . . . . . . . . .139
Chapter 7: Drawing
About drawing . . . . . . . . . . . . . . . . . . . . . . . . . . . . . . . . . . . . . . . . . . . . . . . . . . .144
Drawing simple lines and shapes . . . . . . . . . . . . . . . . . . . . . . . . . . . . . . . . . .147
Drawing with the Pencil tool . . . . . . . . . . . . . . . . . . . . . . . . . . . . . . . . . . . . . . 151
Drawing with the Pen tool . . . . . . . . . . . . . . . . . . . . . . . . . . . . . . . . . . . . . . . .153
Reshaping paths . . . . . . . . . . . . . . . . . . . . . . . . . . . . . . . . . . . . . . . . . . . . . . . . .157
Adding, deleting, and converting anchor points . . . . . . . . . . . . . . . . . . .160
Smoothing and simplifying paths . . . . . . . . . . . . . . . . . . . . . . . . . . . . . . . . .162
Erasing, splitting, and joining paths . . . . . . . . . . . . . . . . . . . . . . . . . . . . . . . 164
Tracing artwork . . . . . . . . . . . . . . . . . . . . . . . . . . . . . . . . . . . . . . . . . . . . . . . . . . . 165
Template layers . . . . . . . . . . . . . . . . . . . . . . . . . . . . . . . . . . . . . . . . . . . . . . . . . . .169
Symbols . . . . . . . . . . . . . . . . . . . . . . . . . . . . . . . . . . . . . . . . . . . . . . . . . . . . . . . . . .170
Sets of symbols . . . . . . . . . . . . . . . . . . . . . . . . . . . . . . . . . . . . . . . . . . . . . . . . . . .173
Drawing flares . . . . . . . . . . . . . . . . . . . . . . . . . . . . . . . . . . . . . . . . . . . . . . . . . . . .179
iv
Chapter 8: Color
About color . . . . . . . . . . . . . . . . . . . . . . . . . . . . . . . . . . . . . . . . . . . . . . . . . . . . . .181
Selecting colors . . . . . . . . . . . . . . . . . . . . . . . . . . . . . . . . . . . . . . . . . . . . . . . . . .185
Using and creating swatches . . . . . . . . . . . . . . . . . . . . . . . . . . . . . . . . . . . . . .188
Managing swatches . . . . . . . . . . . . . . . . . . . . . . . . . . . . . . . . . . . . . . . . . . . . . .193
Adjusting colors . . . . . . . . . . . . . . . . . . . . . . . . . . . . . . . . . . . . . . . . . . . . . . . . . .195
Chapter 9: Color management
Understanding color management . . . . . . . . . . . . . . . . . . . . . . . . . . . . . . . .198
Keeping colors consistent . . . . . . . . . . . . . . . . . . . . . . . . . . . . . . . . . . . . . . . . .200
Color-managing imported images . . . . . . . . . . . . . . . . . . . . . . . . . . . . . . . .204
Color-managing documents for online viewing . . . . . . . . . . . . . . . . . . . .206
Proofing colors . . . . . . . . . . . . . . . . . . . . . . . . . . . . . . . . . . . . . . . . . . . . . . . . . . .207
Color-managing documents when printing . . . . . . . . . . . . . . . . . . . . . . . .209
Working with color profiles . . . . . . . . . . . . . . . . . . . . . . . . . . . . . . . . . . . . . . . 211
Color settings . . . . . . . . . . . . . . . . . . . . . . . . . . . . . . . . . . . . . . . . . . . . . . . . . . . .215
Chapter 10: Painting
About painting . . . . . . . . . . . . . . . . . . . . . . . . . . . . . . . . . . . . . . . . . . . . . . . . . . .221
Fills and strokes . . . . . . . . . . . . . . . . . . . . . . . . . . . . . . . . . . . . . . . . . . . . . . . . . . .222
Live Paint groups . . . . . . . . . . . . . . . . . . . . . . . . . . . . . . . . . . . . . . . . . . . . . . . . .228
Brushes . . . . . . . . . . . . . . . . . . . . . . . . . . . . . . . . . . . . . . . . . . . . . . . . . . . . . . . . . .235
Creating and modifying brushes . . . . . . . . . . . . . . . . . . . . . . . . . . . . . . . . . .239
Transparency . . . . . . . . . . . . . . . . . . . . . . . . . . . . . . . . . . . . . . . . . . . . . . . . . . . . .243
Blending modes . . . . . . . . . . . . . . . . . . . . . . . . . . . . . . . . . . . . . . . . . . . . . . . . . . 248
Page 5

Gradients, meshes, and color blends . . . . . . . . . . . . . . . . . . . . . . . . . . . . . .251
Patterns . . . . . . . . . . . . . . . . . . . . . . . . . . . . . . . . . . . . . . . . . . . . . . . . . . . . . . . . . . 255
Chapter 11: Arranging objects
Selecting objects . . . . . . . . . . . . . . . . . . . . . . . . . . . . . . . . . . . . . . . . . . . . . . . . .262
Moving objects . . . . . . . . . . . . . . . . . . . . . . . . . . . . . . . . . . . . . . . . . . . . . . . . . . .269
Aligning and distributing objects . . . . . . . . . . . . . . . . . . . . . . . . . . . . . . . . .272
Rotating objects . . . . . . . . . . . . . . . . . . . . . . . . . . . . . . . . . . . . . . . . . . . . . . . . . .273
Reflecting objects . . . . . . . . . . . . . . . . . . . . . . . . . . . . . . . . . . . . . . . . . . . . . . . .276
Using layers . . . . . . . . . . . . . . . . . . . . . . . . . . . . . . . . . . . . . . . . . . . . . . . . . . . . . .278
Stacking objects . . . . . . . . . . . . . . . . . . . . . . . . . . . . . . . . . . . . . . . . . . . . . . . . . . 282
Grouping and expanding objects . . . . . . . . . . . . . . . . . . . . . . . . . . . . . . . . .284
Duplicating objects . . . . . . . . . . . . . . . . . . . . . . . . . . . . . . . . . . . . . . . . . . . . . . .285
Locking, hiding, and deleting objects . . . . . . . . . . . . . . . . . . . . . . . . . . . . . .287
Chapter 12: Reshaping objects
Transforming objects . . . . . . . . . . . . . . . . . . . . . . . . . . . . . . . . . . . . . . . . . . . . .290
Scaling objects . . . . . . . . . . . . . . . . . . . . . . . . . . . . . . . . . . . . . . . . . . . . . . . . . . . 293
Shearing objects . . . . . . . . . . . . . . . . . . . . . . . . . . . . . . . . . . . . . . . . . . . . . . . . . .295
Distorting objects . . . . . . . . . . . . . . . . . . . . . . . . . . . . . . . . . . . . . . . . . . . . . . . .297
Combining objects . . . . . . . . . . . . . . . . . . . . . . . . . . . . . . . . . . . . . . . . . . . . . . . 300
Cutting, dividing, and trimming objects . . . . . . . . . . . . . . . . . . . . . . . . . . .306
Clipping masks . . . . . . . . . . . . . . . . . . . . . . . . . . . . . . . . . . . . . . . . . . . . . . . . . . .309
Blending objects . . . . . . . . . . . . . . . . . . . . . . . . . . . . . . . . . . . . . . . . . . . . . . . . .311
Reshaping objects with effects . . . . . . . . . . . . . . . . . . . . . . . . . . . . . . . . . . . . 314
Creating 3D objects . . . . . . . . . . . . . . . . . . . . . . . . . . . . . . . . . . . . . . . . . . . . . . . 316
v
Chapter 13: Importing, exporting, and saving
Importing files . . . . . . . . . . . . . . . . . . . . . . . . . . . . . . . . . . . . . . . . . . . . . . . . . . . .325
Bitmap images . . . . . . . . . . . . . . . . . . . . . . . . . . . . . . . . . . . . . . . . . . . . . . . . . . .328
Adobe PDF files . . . . . . . . . . . . . . . . . . . . . . . . . . . . . . . . . . . . . . . . . . . . . . . . . . .330
EPS and DCS files . . . . . . . . . . . . . . . . . . . . . . . . . . . . . . . . . . . . . . . . . . . . . . . . .331
Importing artwork from Photoshop . . . . . . . . . . . . . . . . . . . . . . . . . . . . . . .333
Saving artwork . . . . . . . . . . . . . . . . . . . . . . . . . . . . . . . . . . . . . . . . . . . . . . . . . . . 334
Exporting artwork . . . . . . . . . . . . . . . . . . . . . . . . . . . . . . . . . . . . . . . . . . . . . . . .340
Creating Adobe PDF files . . . . . . . . . . . . . . . . . . . . . . . . . . . . . . . . . . . . . . . . . .346
Adobe PDF options . . . . . . . . . . . . . . . . . . . . . . . . . . . . . . . . . . . . . . . . . . . . . . .350
File information and metadata . . . . . . . . . . . . . . . . . . . . . . . . . . . . . . . . . . . .357
Chapter 14: Type
Updating legacy text . . . . . . . . . . . . . . . . . . . . . . . . . . . . . . . . . . . . . . . . . . . . .360
Creating type . . . . . . . . . . . . . . . . . . . . . . . . . . . . . . . . . . . . . . . . . . . . . . . . . . . . .361
Importing and exporting text . . . . . . . . . . . . . . . . . . . . . . . . . . . . . . . . . . . . .364
Area type . . . . . . . . . . . . . . . . . . . . . . . . . . . . . . . . . . . . . . . . . . . . . . . . . . . . . . . . . 365
Type on a path . . . . . . . . . . . . . . . . . . . . . . . . . . . . . . . . . . . . . . . . . . . . . . . . . . . .370
Editing text . . . . . . . . . . . . . . . . . . . . . . . . . . . . . . . . . . . . . . . . . . . . . . . . . . . . . . .373
Language . . . . . . . . . . . . . . . . . . . . . . . . . . . . . . . . . . . . . . . . . . . . . . . . . . . . . . . . 377
Page 6

Letterforms as graphic objects . . . . . . . . . . . . . . . . . . . . . . . . . . . . . . . . . . . .378
Selecting type . . . . . . . . . . . . . . . . . . . . . . . . . . . . . . . . . . . . . . . . . . . . . . . . . . . .380
Formatting characters . . . . . . . . . . . . . . . . . . . . . . . . . . . . . . . . . . . . . . . . . . . .381
Fonts . . . . . . . . . . . . . . . . . . . . . . . . . . . . . . . . . . . . . . . . . . . . . . . . . . . . . . . . . . . . . 382
Line and character spacing . . . . . . . . . . . . . . . . . . . . . . . . . . . . . . . . . . . . . . . . 385
Underline, strikethrough, caps, superscripts, and subscripts . . . . . . . .388
Special characters . . . . . . . . . . . . . . . . . . . . . . . . . . . . . . . . . . . . . . . . . . . . . . . .389
Scaling and rotating type . . . . . . . . . . . . . . . . . . . . . . . . . . . . . . . . . . . . . . . . .394
Formatting paragraphs . . . . . . . . . . . . . . . . . . . . . . . . . . . . . . . . . . . . . . . . . . .395
Hyphenation and line breaks . . . . . . . . . . . . . . . . . . . . . . . . . . . . . . . . . . . . . . 398
Tabs . . . . . . . . . . . . . . . . . . . . . . . . . . . . . . . . . . . . . . . . . . . . . . . . . . . . . . . . . . . . . .400
Character and paragraph styles . . . . . . . . . . . . . . . . . . . . . . . . . . . . . . . . . . . 404
Formatting Asian characters . . . . . . . . . . . . . . . . . . . . . . . . . . . . . . . . . . . . . . 406
Mojikumi . . . . . . . . . . . . . . . . . . . . . . . . . . . . . . . . . . . . . . . . . . . . . . . . . . . . . . . . .411
Kinsoku . . . . . . . . . . . . . . . . . . . . . . . . . . . . . . . . . . . . . . . . . . . . . . . . . . . . . . . . . . 413
Burasagari, leading, and kurikaeshi moji shori . . . . . . . . . . . . . . . . . . . . .414
Creating composite fonts . . . . . . . . . . . . . . . . . . . . . . . . . . . . . . . . . . . . . . . . .416
Chapter 15: Creating special effects
Appearance attributes . . . . . . . . . . . . . . . . . . . . . . . . . . . . . . . . . . . . . . . . . . . . 419
Copying appearance attributes between objects . . . . . . . . . . . . . . . . . . 421
Working with effects and filters . . . . . . . . . . . . . . . . . . . . . . . . . . . . . . . . . . . 423
Summary of effects and filters . . . . . . . . . . . . . . . . . . . . . . . . . . . . . . . . . . . . .426
Drop shadows, glows, and feathering . . . . . . . . . . . . . . . . . . . . . . . . . . . . .434
Making objects look hand-sketched . . . . . . . . . . . . . . . . . . . . . . . . . . . . . . .436
Changing vector graphics to bitmap images . . . . . . . . . . . . . . . . . . . . . . . 437
Creating mosaics . . . . . . . . . . . . . . . . . . . . . . . . . . . . . . . . . . . . . . . . . . . . . . . . .438
Graphic styles . . . . . . . . . . . . . . . . . . . . . . . . . . . . . . . . . . . . . . . . . . . . . . . . . . . . 438
vi
Chapter 16: Web graphics
Best practices for creating web graphics . . . . . . . . . . . . . . . . . . . . . . . . . . .442
Slices and image maps . . . . . . . . . . . . . . . . . . . . . . . . . . . . . . . . . . . . . . . . . . . . 443
SVG . . . . . . . . . . . . . . . . . . . . . . . . . . . . . . . . . . . . . . . . . . . . . . . . . . . . . . . . . . . . . .447
Creating animations . . . . . . . . . . . . . . . . . . . . . . . . . . . . . . . . . . . . . . . . . . . . . .450
Optimizing and saving web graphics . . . . . . . . . . . . . . . . . . . . . . . . . . . . . . 452
Web graphics formats and options . . . . . . . . . . . . . . . . . . . . . . . . . . . . . . . . 456
Output settings for web graphics . . . . . . . . . . . . . . . . . . . . . . . . . . . . . . . . . .464
Chapter 17: Printing
Basic printing tasks . . . . . . . . . . . . . . . . . . . . . . . . . . . . . . . . . . . . . . . . . . . . . . .468
Printing color separations . . . . . . . . . . . . . . . . . . . . . . . . . . . . . . . . . . . . . . . . .469
Setting up pages for printing . . . . . . . . . . . . . . . . . . . . . . . . . . . . . . . . . . . . . .472
Cropping artwork for printing . . . . . . . . . . . . . . . . . . . . . . . . . . . . . . . . . . . . .475
Printer’s marks and bleed . . . . . . . . . . . . . . . . . . . . . . . . . . . . . . . . . . . . . . . . .476
PostScript printing . . . . . . . . . . . . . . . . . . . . . . . . . . . . . . . . . . . . . . . . . . . . . . . . 477
Printing with color management . . . . . . . . . . . . . . . . . . . . . . . . . . . . . . . . . .480
Page 7

Printing gradients, meshes, and color blends . . . . . . . . . . . . . . . . . . . . . .481
Printing and saving transparent artwork . . . . . . . . . . . . . . . . . . . . . . . . . . . 484
Overprinting . . . . . . . . . . . . . . . . . . . . . . . . . . . . . . . . . . . . . . . . . . . . . . . . . . . . .490
Trapping . . . . . . . . . . . . . . . . . . . . . . . . . . . . . . . . . . . . . . . . . . . . . . . . . . . . . . . . .492
Print presets . . . . . . . . . . . . . . . . . . . . . . . . . . . . . . . . . . . . . . . . . . . . . . . . . . . . . .496
Chapter 18: Automating tasks
Actions . . . . . . . . . . . . . . . . . . . . . . . . . . . . . . . . . . . . . . . . . . . . . . . . . . . . . . . . . . .498
Scripts . . . . . . . . . . . . . . . . . . . . . . . . . . . . . . . . . . . . . . . . . . . . . . . . . . . . . . . . . . .504
Data-driven graphics . . . . . . . . . . . . . . . . . . . . . . . . . . . . . . . . . . . . . . . . . . . . .505
Chapter 19: Graphs
Creating graphs . . . . . . . . . . . . . . . . . . . . . . . . . . . . . . . . . . . . . . . . . . . . . . . . . . 510
Formatting graphs . . . . . . . . . . . . . . . . . . . . . . . . . . . . . . . . . . . . . . . . . . . . . . . . 515
Adding pictures and symbols to graphs . . . . . . . . . . . . . . . . . . . . . . . . . . .520
Chapter 20: Keyboard shortcuts
Customizing keyboard shortcuts . . . . . . . . . . . . . . . . . . . . . . . . . . . . . . . . . . 525
Default keyboard shortcuts . . . . . . . . . . . . . . . . . . . . . . . . . . . . . . . . . . . . . . .526
vii
Index . . . . . . . . . . . . . . . . . . . . . . . . . . . . . . . . . . . . . . . . . . . . . . . . . . . . . . . . . . . . 540
Page 8

Chapter 1: Getting started
Installation and registration
To install
1 Close any Adobe® applications that are open.
2 Insert the product CD into your computer’s CD drive.
3 Double-click the CD icon, and then follow the on-screen instructions.
After the installation, you may be prompted to activate your copy of the product. (See “To activate” on page 1.)
For more detailed instructions about installing the product, see the How To Install file on the product CD. For
instructions about uninstalling the product, see the How To Uninstall file on the product CD.
To activate
Activation is a simple, anonymous process you must complete within 30 days of installing the product. Activation
allows you to continue using the product, and it helps prevent casual copying of the product onto more computers
than the license agreement allows. To learn more about activation, visit the Adobe website at
www.adobe.com/activation/main.html.
1
1 Start the product to access the Activation dialog box. (If you’ve just installed Adobe Creative Suite or Adobe
Photoshop®, the Activation dialog box appears automatically.)
2 Follow the on-screen instructions.
Important: If you intend to install the product on a different computer, you must first transfer the activation to that
computer. To transfer an activation, choose Help > Transfer Activation.
For more detailed instructions about activating the product and transferring an activation, see the How To Install
file on the product CD.
To register
Register your Adobe product to receive complimentary support on installation and product defects and notifications
about product updates. Registering your product also gives you access to the wealth of tips, tricks, and tutorials in
Adobe Studio® and access to Adobe Studio Exchange, an online community where users download and share
thousands of free actions, plug-ins, and other content for use with Adobe products. Adobe Studio is available in
English, French, German, and Japanese. Find it from the home page of the Adobe website.
❖ Do one of the following:
• Install and activate the software to access the Registration dialog box, and then follow the on-screen instructions.
An active Internet connection is required.
• Register at any time by choosing Help > Registration.
Page 9
ADOBE ILLUSTRATOR CS2
User Guide
See also
“Adobe Studio” on page 7
“Extras” on page 9
Adobe Help Center
About Adobe Help Center
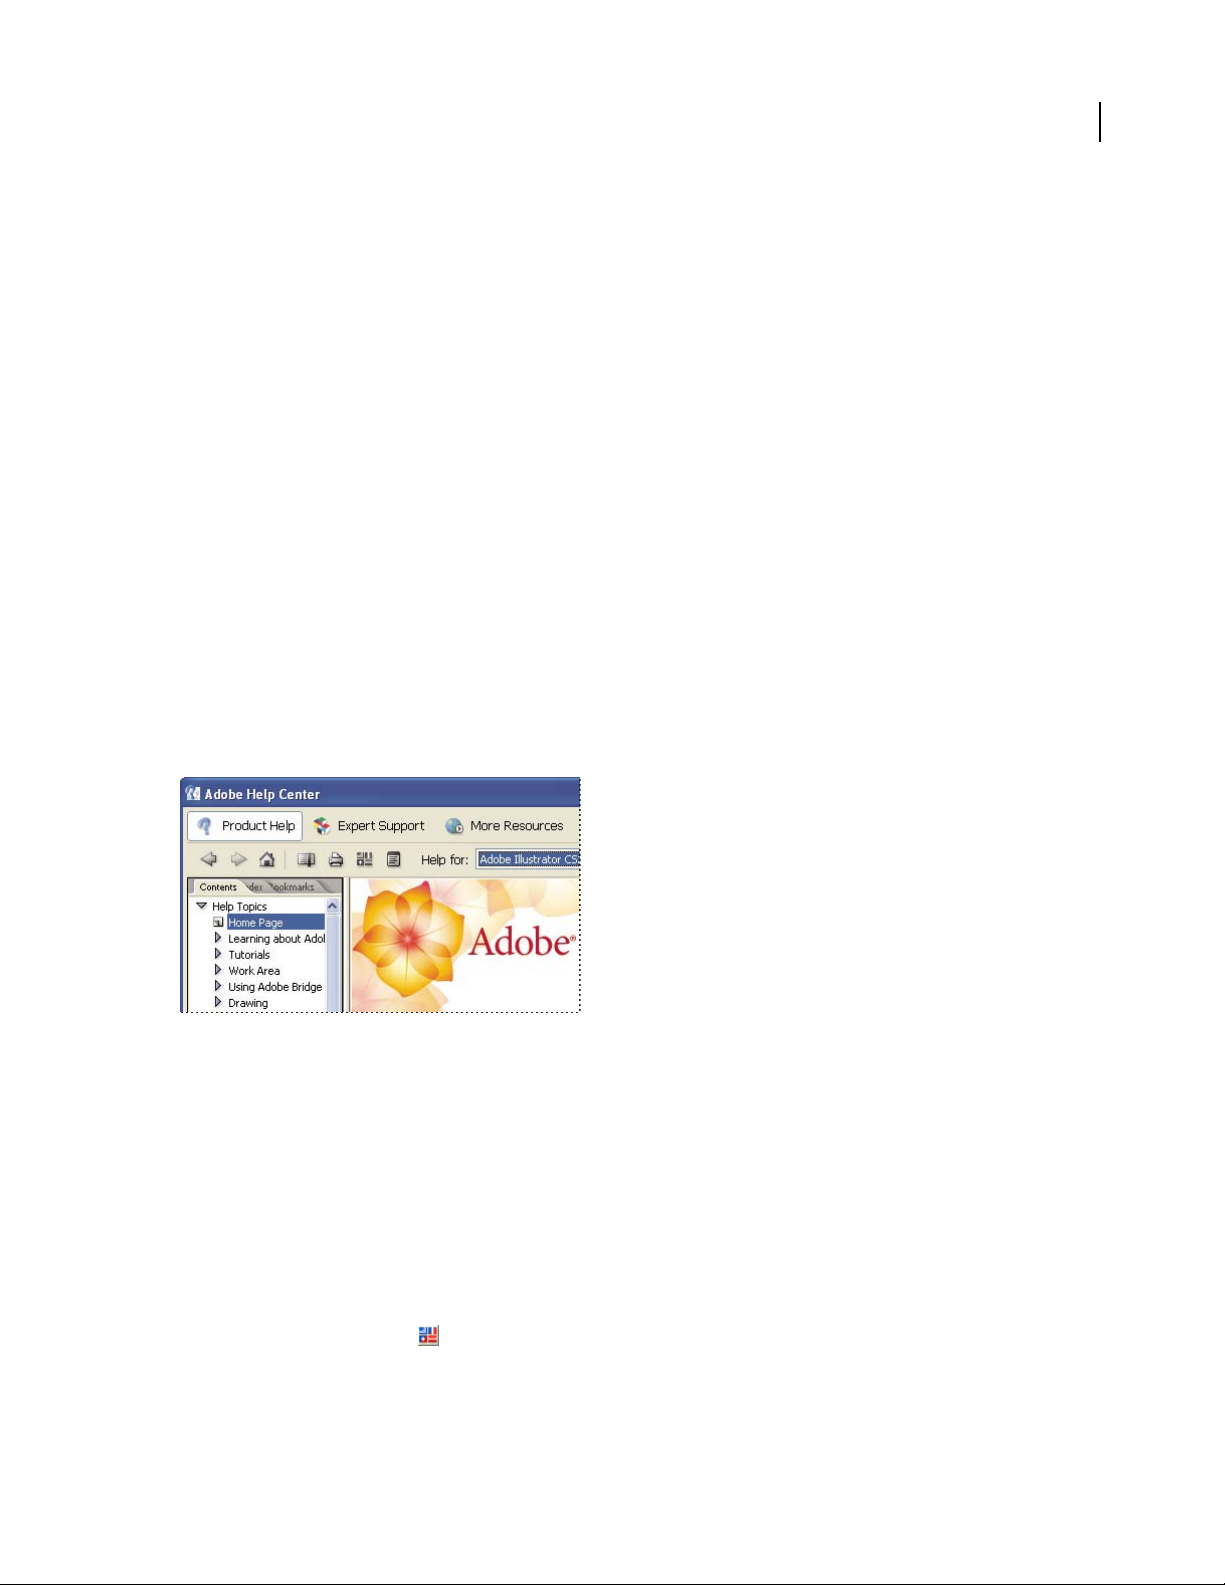
Adobe Help Center is a free, downloadable application that includes three primary features.
Product Help Provides Help topics for Adobe Photoshop Elements and Adobe CS2 products installed on your
system. (If none of these products are installed, Help topics for them aren’t available.) Help topics are updated periodically and can be downloaded through Adobe Help Center preferences.
Expert Support Provides information about Adobe Expert Support plans and lets you store details about plans
you’ve purchased. If you have an active support plan, you can also use the Expert Support section to submit web
cases—questions sent to Adobe support professionals over the web. To access links in the Expert Support section,
you must have an active Internet connection.
2
More Resources Provides easy access to the extensive resources on Adobe.com, including support pages, user
forums, tips and tutorials, and training. You can also use this area to store contact information for friends, colleagues,
or support professionals, or even websites you turn to for inspiration or troubleshooting information.
Product Help, Expert Support, and More Resources in Adobe Help Center
See also
“Using Help” on page 3
“To search Help topics” on page 5
“To navigate Help” on page 4
To check for updates
Adobe periodically provides updates to software and to topics in Adobe Help Center. You can easily obtain these
updates through Adobe Help Center. An active Internet connection is required.
1 Click the Preferences button
2 In the Preferences dialog box, click Check For Updates. If updates are available, follow the on-screen directions to
download and save them.
.
Page 10

ADOBE ILLUSTRATOR CS2
User Guide
To set Adobe Help Center preferences
1 Click the Preferences button . Set any of the following options:
Region Specifies your geographical location. Changing this option may affect which services are available to you.
Language Specifies the language in which Expert Support content is displayed.
Display Renewal Reminders For Expert Support Contracts Displays reminder screens when your Expert Support
plan has almost expired. Deselect this option if you’d like to turn off these reminders.
Enable Auto Login For Web Case Submission Allows you to submit support questions over the web. This option is
available only if you have an active Expert Support plan.
User Interface Language Specifies the language in which Adobe Help Center interface text is displayed.
Check For Updates Searches for new updates to software and Help topics as they become available from Adobe.
Network Administrators Displays options for network administration.
2 Click OK.
To display More Resources
The More Resources section in Adobe Help Center provides easy access to some of the content and services available
from the Adobe website, including support, training, and tutorials.
3
❖ To display this section, click More Resources.
To add contact information in More Resources
1 Click More Resources, and then click Personal Contacts.
2 Do any of the following:
• To add a contact, click New, type the contact information you want to save, and click OK.
• To edit a contact, click a contact in the list, click Edit, make changes to the information, and click OK.
• To delete a contact, click a contact in the list, and then click Delete. To confirm the deletion, click Yes when
prompted, or click No to cancel.
Using Help
Using Help
The complete documentation for using your Adobe product is available in Help, a browser-based system you can
access through Adobe Help Center. Help topics are updated periodically, so you can always be sure to have the most
recent information available. For more information, see “To check for updates” on page 2.
Important: Adobe Help systems include all of the information in the printed user guides, plus additional information
not included in print. The Resources and Extras CD included with the software also includes a PDF version of the
complete Help content, optimized for printing.
Page 11

A B C D E
ADOBE ILLUSTRATOR CS2
User Guide
4
Product Help section of Adobe Help Center
A. Returns you to Help home page B. Adds bookmark for current topic C. Prints contents of right pane D. Opens Preferences dialog box
E. Opens About Adobe Help Center window
See also
“To navigate Help” on page 4
“To search Help topics” on page 5
To navigate Help
❖ Do any of the following:
• To view Help for a product, choose the product name from the Help For menu. (To view only topics that apply
across all Creative Suite products, choose Adobe Creative Suite.)
• To expand or collapse a section, click the blue triangle to the left of the section name.
• To display a topic , click its title.
See also
“To use bookmarks” on page 6
Page 12

ADOBE ILLUSTRATOR CS2
User Guide
To search Help topics
Search using words or phrases to quickly find topics. You can search Help for one product or for all Adobe products
you’ve installed. If you find a topic that you may want to view again, bookmark it for quick retrieval.
1 In Adobe Help Center, click Product Help.
2 Type oneormorewords in theSearchbox.TosearchacrossHelpfor allAdobe products youhaveinstalled,click
the black triangle to the left of the Search box and choose Search All Help.
Search Help for one product or for all products you’ve installed
3 Click Search. Topics matching the search words appear in the navigation pane.
4 To view a topic, click its title.
5 To return to the navigation pane, do one of the following:
• Click the Home button.
• Click the Back button.
• Click Next Topic or Previous Topic.
5
See also
“To print a topic from Help” on page 5
“To use bookmarks” on page 6
Search tips
Adobe Help search works by searching the entire Help text for topics that contain all of the words typed in the Search
box. These tips can help you improve your search results in Help:
• If you search using a phrase, such as “shape tool,” put quotation marks around the phrase. The search returns only
those topics containing all words in the phrase.
• Make sure that the search terms are spelled correctly.
• If a search term doesn’t yield results, try using a synonym, such as “web” instead of “Internet.”
To print a topic from Help
1 Select the topic you want to print, and click the Print button.
2 Choose the printer you’d like to use, and then click Print.
Page 13

ADOBE ILLUSTRATOR CS2
User Guide
To change the view
By default, Adobe Help Center opens in Full view. Full view gives you access to the Product Help, Expert Support,
and More Resources sections. Switch to Compact view when you want to see only the selected Help topic and you
want to keep the Help window on top of your product workspace.
❖ Click the view icon to switch between Full and Compact views.
To use bookmarks
You can bookmark especially helpful topics for easy access, just as you bookmark pages in a web browser, and reread
them at another time.
1 Click the Bookmarks tab in the navigation pane to view the bookmarks.
2 Do any of the following in the Bookmarks pane:
• To create a bookmark, select the topic you want to mark, and click the Bookmark button . When the Bookmark
dialog box appears, type a new name in the text box if desired, and then click OK.
• To delete a bookmark, select it and click the Delete button. Click Yes to confirm the deletion.
• To rename a bookmark, select it and then click the Rename button . In the dialog box, type a new name for the
bookmark and then click OK.
• To move a bookmark, select it and then click the Move Up button or the Move Down button .
6
Tips and training
Learning resources
Adobe provides a wide range of resources to help you learn and use Adobe products.
• “Tutorials in Help” on page 7: Short step-by-step lessons through Adobe Help Center.
• “Total Training Video Workshop CD” on page 7: Professional training videos from experts.
• “Adobe Studio” on page 7: Videos, tips and tricks, and other learning material on Adobe products.
• Adobe Creative Suite Design Guide (Adobe Creative Suite only): A full-color printed book about using Adobe
Creative Suite 2 as a complete design and publishing toolbox, including five guided projects on print, web, and
mobile workflows.
• “Technical information” on page 8: Reference material, scripting guides, and other in-depth information.
• “Other resources” on page 8: Training, books, user forums, product certification, and more.
• Support: Complimentary and paid technical support options from Adobe.
• “Extras” on page 9: Downloadable content and software.
See also
“About Adobe Help Center” on page 2
Page 14

ADOBE ILLUSTRATOR CS2
User Guide
Tutorials in Help
The Help system for each Adobe CS2 product includes several step-by-step tutorials on key features and concepts.
These tutorials are also available in the complete, printable, PDF version of the Help contents, included on the
Resources and Extras CD.
To use these tutorials with the product, select the tutorial you want from the Contents pane in Adobe Help Center,
and click the View icon to switch to Compact view. Compact view keeps the Help window on top of the application windows, regardless of what window or application is selected. Drag an edge or a corner of the Help window
to resize it.
See also
“Adobe Studio” on page 7
“Total Training Video Workshop CD” on page 7
“Other resources” on page 8
Total Training Video Workshop CD
Presented by experts in their fields, Total Training videos provide overviews, demos of key new features, and many
useful tips and techniques for beginning and advanced users. Look for accompanying step-by-step instructions to
selected Total Training videos in monthly updates to Adobe Studio.
7
Short Total Training web videos on a variety of products and topics are also available in Adobe Studio, and complete
Total Training courseware can be purchased online from the Adobe Store.
See also
“Adobe Studio” on page 7
“Other resources” on page 8
Adobe Studio
Adobe Studio provides a huge wealth of tips and tricks, tutorials, and instructional content in video, Adobe PDF, and
HTML, authored by experts from Adobe and its publishing partners. You can search the entire collection or sort by
product, topic, date, and type of content; new content is added monthly. Adobe Studio is available in English, French,
German, and Japanese. Find it from the home page of the Adobe website.
Page 15

ADOBE ILLUSTRATOR CS2
User Guide
8
Tips and tutorials in Adobe Studio
See also
“Total Training Video Workshop CD” on page 7
“Other resources” on page 8
Technical information
The Technical information folder on the Resources and Extras CD included with your Adobe product includes
several useful documents in PDF, fully searchable and optimized for printing. These documents provide conceptual
and reference material on various in-depth topics, such as scripting, transparency, and high-end printing. For
complete developer documentation and resources, visit the Developers area of the Adobe website at
http://partners.adobe.com/public/developer/main.html. For additional backgrounders and instructional content,
visit Adobe Studio.
The Resources and Extras CD also includes the entire Help content optimized for printing. Note that the Help
content includes everything in the printed Adobe user guides, plus much more.
See also
“Adobe Studio” on page 7
“Other resources” on page 8
Other resources
Additional sources of information and help are available for Adobe products.
• Visit the Training area of the Adobe website for access to Adobe Press books; online, video, and instructor-led
training resources; Adobe software certification programs; and more.
Page 16

ADOBE ILLUSTRATOR CS2
User Guide
• Visit the Adobe user forums, where users share tips, ask questions, and find out how others are getting the most
out of their software. User forums are available in English, French, German, and Japanese on the main Support
page of your local Adobe website.
• Visit the Support area of the Adobe website for additional information about free and paid technical support
options. Top issues are listed by product on the Adobe U.S. and Adobe Japan websites.
• Visit the Developers area of the Adobe website to find information for software and plug-in developers, including
SDKs, scripting guides, and technical resources.
• ClickMoreResources in AdobeHelpCentertoaccessmanyofthe resourcesonthe Adobewebsite andtocreate
your own list of frequently visited user groups and websites and valuable contacts.
• Look in Bridge Center for RSS feeds on the latest technical announcements, tutorials, and events. To access Bridge
Center, select it in the Favorites panel in Adobe Bridge. (Bridge Center is available with Adobe Creative Suite only.)
See also
“To display More Resources” on page 3
“Learning resources” on page 6
Extras
The Resourcesand Extras CD included withyour CS2 product includes a Goodies folder that containsbonus content
and files for use with your Adobe product. For more free content and add-ons, visit Adobe Studio Exchange, an
online community where users download and share thousands of free actions, plug-ins, and other content for use
with Adobeproducts. To visitAdobe Studio Exchange,gotoAdobe Studio from thehomepageofthe Adobewebsite.
9
In addition,your CS2product includesAdobe Stock Photos, an integratedservice available within Adobe Bridge that
lets you search, view, try, and buy royalty-free stock photography from leading stock libraries. Because of the tight
integration between Stock Photos and CS2 products, you can download images directly into your Adobe Illustrator®,
Adobe InDesign®, and Adobe GoLive® projects. From Photoshop, you can open any downloaded image.
See also
“Adobe Studio” on page 7
“About Adobe Stock Photos” on page 71
“About Adobe Bridge” on page 48
Other downloads
TheDownloads area of theAdobe websiteincludesfreeupdates,tryouts, andother useful software.Inaddition, the
Plug-ins section of the Adobe Store provides access to thousands of plug-ins from third-party developers, helping
you automate tasks, customize workflows, create specialized professional effects, and more.
See also
“About Adobe Stock Photos” on page 71
“Other resources” on page 8
Page 17

ADOBE ILLUSTRATOR CS2
User Guide
What’s new
New features
Live Trace LiveTraceautomaticallyturnsplacedimagesintobeautifullydetailedvectorgraphicsthatareeasytoedit,
resize, and manipulate without distortion. Live Trace reduces the amount of time it takes to recreate a scanned
drawing on-screen from days to minutes or seconds, without loss of quality. You can interactively adjust the results
of a Live Trace using a rich assortment of vectorization options, including preprocessing, tracing, and overlay
options. (See “About tracing artwork” on page 165.)
Live Paint Live Paint lets you paint vector graphics more intuitively by automatically detecting and correcting gaps
that previously would have affected how fills and strokes were applied. Instead of having to plan every detail of an
illustration in advance to ensure the right shading and colors, you can work more as you would coloring by hand on
paper. (See “About Live Paint” on page 228.)
Enhanced support for spot colors in raster images and effects Use spot colors in new ways:
• Apply spot colors in raster-based effects, such as drop shadows, glows, feathers, and blurs.
• Colorize an embedded grayscale image with one spot or process color, in either CMYK or RGB document color
spaces. Color can be applied by dragging onto the image or just by clicking on the Swatches palette. (See “To
colorize grayscale or 1-bit images” on page 196.)
• Preserve spot-color rasters and spot-colorized grayscale images when saving to AI, EPS, or PDF files or when
exporting to legacy EPS or legacy AI formats. These spot colors will print accurately from Adobe InDesign® CS2
or QuarkXPress 6 or later, and from Adobe Acrobat® 6.0 or 7.0 Professional.
Offset a stroke on its path Control whether a stroke is centered on a path or positioned on the inside or the outside
of the path. (See “To change the stroke’s color, width, and alignment” on page 224.)
10
Type enhancements Apply underlining and strikethrough to text using the Character palette. (See “To underline or
strike through text” on page 388.) Experience improved performance working with advanced typographical
controls.
Workspace management Customize your Illustrator workspace to suit your creative workflow:
• Select commonly used options from the context-sensitive Control palette, which reduces the number of palettes
you need to have open. In addition, the Control palette makes options more accessible and allows you to work
with different features more quickly. (See “About the Control palette” on page 33.)
• Arrange palettes and defaults to support a specific workflow or client project, and then save the setup as a named
workspacethatyou canactivateatany time or sharewithother people or computers. Workspaces help youcontrol
on-screen clutter and streamline the tools available to you for different tasks. (See “To save a custom workspace”
on page 45.)
Expanded support for Wacom tablets Take advantage of new Wacom tablet features, including pressure tip and
eraser, tilt two side switches, barrel rotation, and large felt-marker-shaped nib. Illustrator® CS2 has built-in support
for the new Wacom Intuos3 tablet.
Place Photoshop® layer comps You can now control the visibility of layer comps in linked, embedded, and opened
Photoshop files as easily as you control the visibility of regular Photoshop layers. (See “Photoshop import options”
on page 333.)
New SVG and SWF options Save rich graphical content in SVG-Tiny format, which is optimized for mobile wireless
devices. Then incorporate these graphics into your mobile design and development workflows. (See “SVG format
options” on page 338.)
Page 18

ADOBE ILLUSTRATOR CS2
User Guide
Export Adobe Illustrator artwork as SWF (Flash) files with more control over mapping layers to animation frames,
maintaining the appearance of stylized text, and file compression. (See “Macromedia Flash export options” on
page 342.)
New Adobe PDF options Illustrator has long used Adobe PDF as its native file format, which makes it easy for clients
and others to open and review your artwork files in Adobe Acrobat or the free Adobe Reader®. Now you can export
Illustrator artwork to multipage PDF files and take advantage of PDF/X standards. (See “About Adobe PDF” on
page 346.)
Adobe Bridge Organize and browse Illustrator and other creative assets using Adobe Bridge, an independent file-
management system that you can launch from within Illustrator CS2. Through Adobe Bridge, you can automate
workflows across Adobe Creative Suite 2 applications, apply consistent color settings across Adobe applications, and
access version control features and online stock photo purchase services. A Start Page provides centralized control
of settings, as well as ongoing access to tips and tutorials in Adobe Studio. (See “About Adobe Bridge” on page 48.)
Templates and other professionally designed content Get a jump on the design process with new professionally
designed templates and other easily accessible content. Click Browse Cool Extras on the Welcome Screen (choose
Help > Welcome Screen) to view templates and sample files in Adobe Bridge.
11
Page 19

Chapter 2: Tutorials
Tutorials
Tutorials
Below you will find a list of tutorials that will help you get started using Illustrator quickly. Before going through the
tutorials, it’s helpful to know how to create and save documents. (See “To create a new document” on page 34 and
“Saving and exporting artwork” on page 334.)
In addition to these tutorials, Adobe provides a variety of resources for learning Illustrator. (See “Learning resources”
on page 6.)
12
For more advanced tutorials, go to Adobe Studio at
See also
“Design a quick logo or web button” on page 12
“Discover the power of compound shapes” on page 15
“Paint illustrations with graphic styles” on page 19
“Create headline type with a twist” on page 22
“Play with hand-painted effects” on page 25
http://studio.adobe.com. (A one-time registration is required.)
Design a quick logo or web button
Adobe Illustrator provides a variety of tools for creating basic geometric shapes, as well as hundreds of professionally
designed symbols. Follow along and learn how to use shapes and symbols as building blocks for artwork.
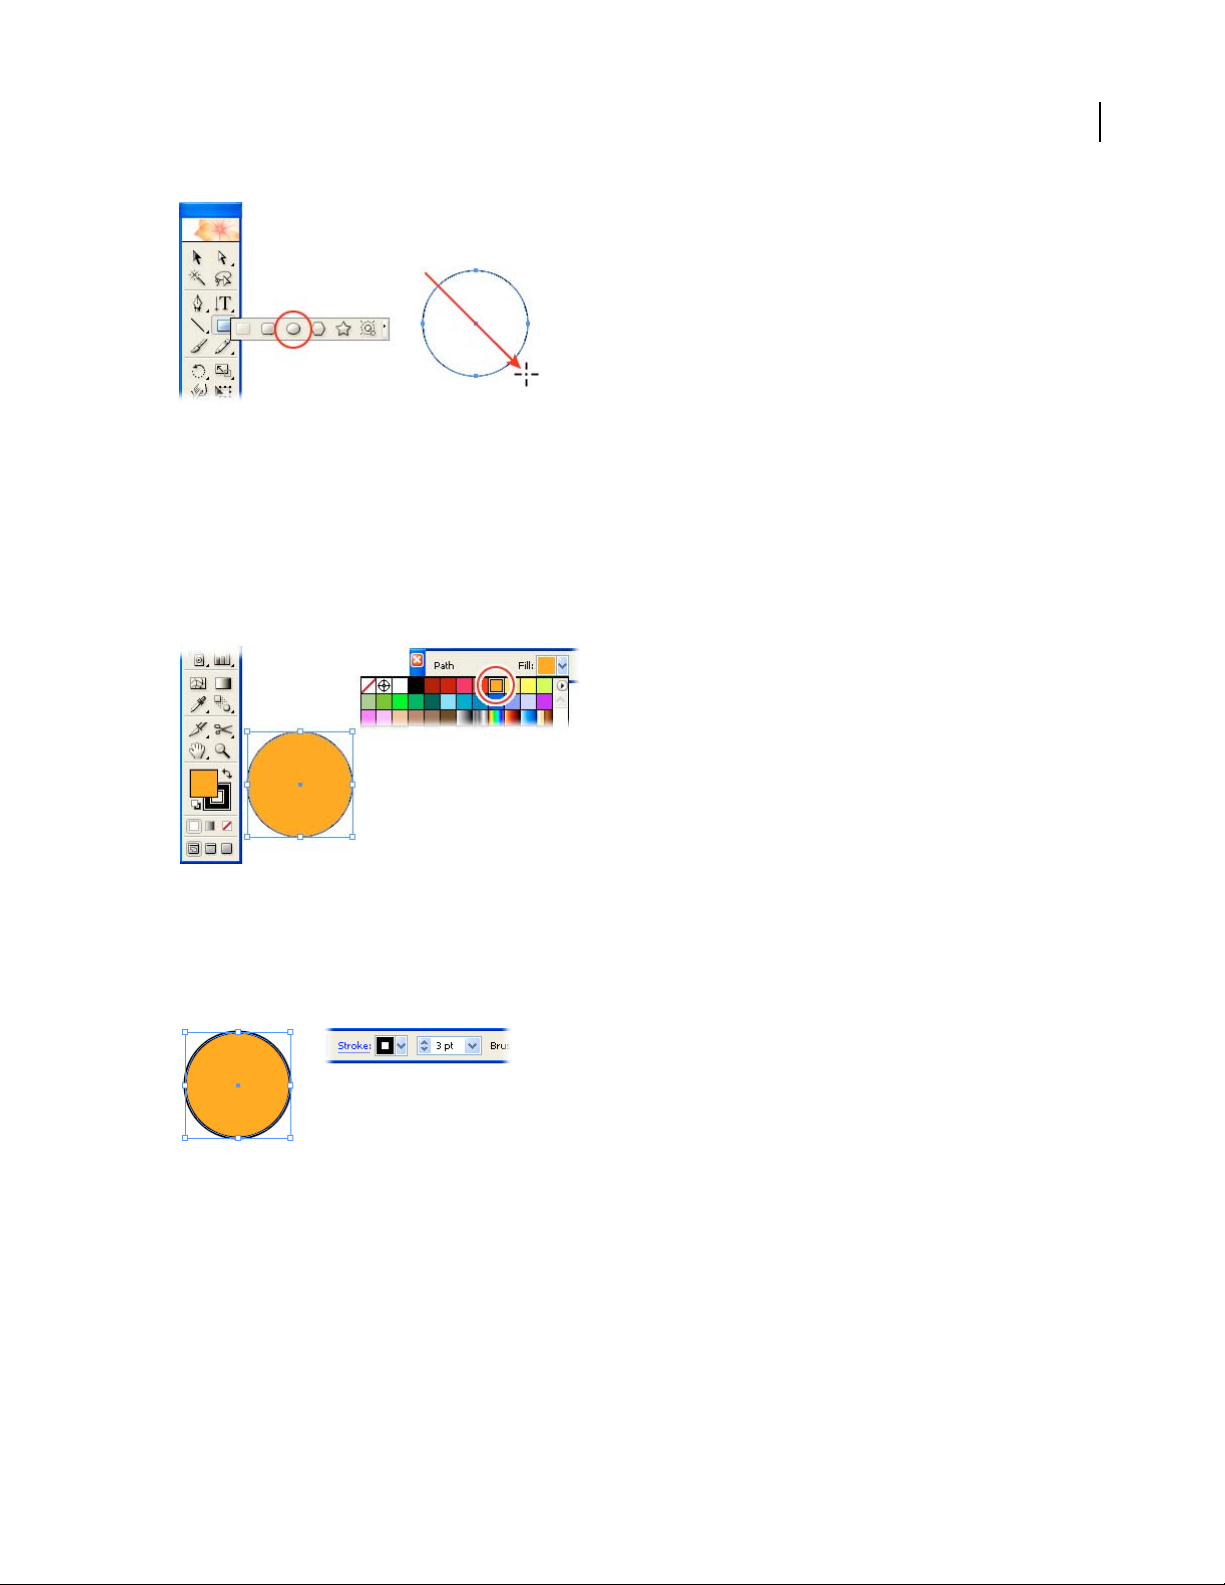
1. Draw a shape.
Hold down the mouse on a shape tool in the toolbox, and select the shape tool you want to use. Then drag in the
document window to draw the shape.
We selected the Ellipse tool and held down the Shift key while dragging to draw a circle. Holding down the Shift key
tells Illustrator to constrain proportions. For example, you can use the Shift key with the Rectangle tool to draw a
square.
Page 20
ADOBE ILLUSTRATOR CS2
User Guide
2. Fill the shape with color.
Click the Fill box in the Control palette. (The Control palette is at the top of the work area, just beneath the menu
bar. If you don’t see it, choose Window > Control Palette.) This tells Illustrator that you want to apply color inside
the shape rather than to its stroke (or outline). Then click any swatch to fill the shape with color.
If you don’t like any of the default swatches, there are several other ways to select a color. Double-click the Fill box
in the toolbox to select a color using the Color Picker, or choose Window > Color to select a color using the Color
palette. Or choose Window > Swatch Libraries, and choose a swatch library from the submenu.
13
3. Change the shape’s stroke weight.
In the Control palette, type a different value in the Stroke Weight box, and press Enter or Return to apply the change.
We increased the stroke weight to 3 points. Although we decided to stick with a black stroke, you can change the
stroke color by clicking the stroke box in the Control palette and selecting a different color.
4. Place a symbol instance.
If the Symbols palette isn’t showing, choose Window > Symbols. The Symbols palette displays a variety of default
symbols; however, many additional symbols are available to you through symbol libraries.Toopenasymbol library,
click the triangle icon at the top right corner of the Symbols palette, and choose an option from the Open Symbol
Library submenu.
Once you locate the symbol you want to use, drag it from the palette into the document window. The placed symbol
is called a symbol instance. We used the Home symbol from the Web Icons symbol library.
Page 21

ADOBE ILLUSTRATOR CS2
User Guide
5. Resize the symbol instance.
Depending on the size of the symbol instance, you may want to make it larger or smaller. First select the Selection
tool in the toolbox and click the symbol instance. Then drag one of the corner handles on the symbol instance to
enlarge or reduce it. As with drawing shapes, holding down the Shift key as you drag causes Illustrator to constrain
the proportions of the symbol instance.
You can also use the Scale tool or the Transform palette to resize selected objects in the document window. (See
“Scaling objects” on page 293.)
14
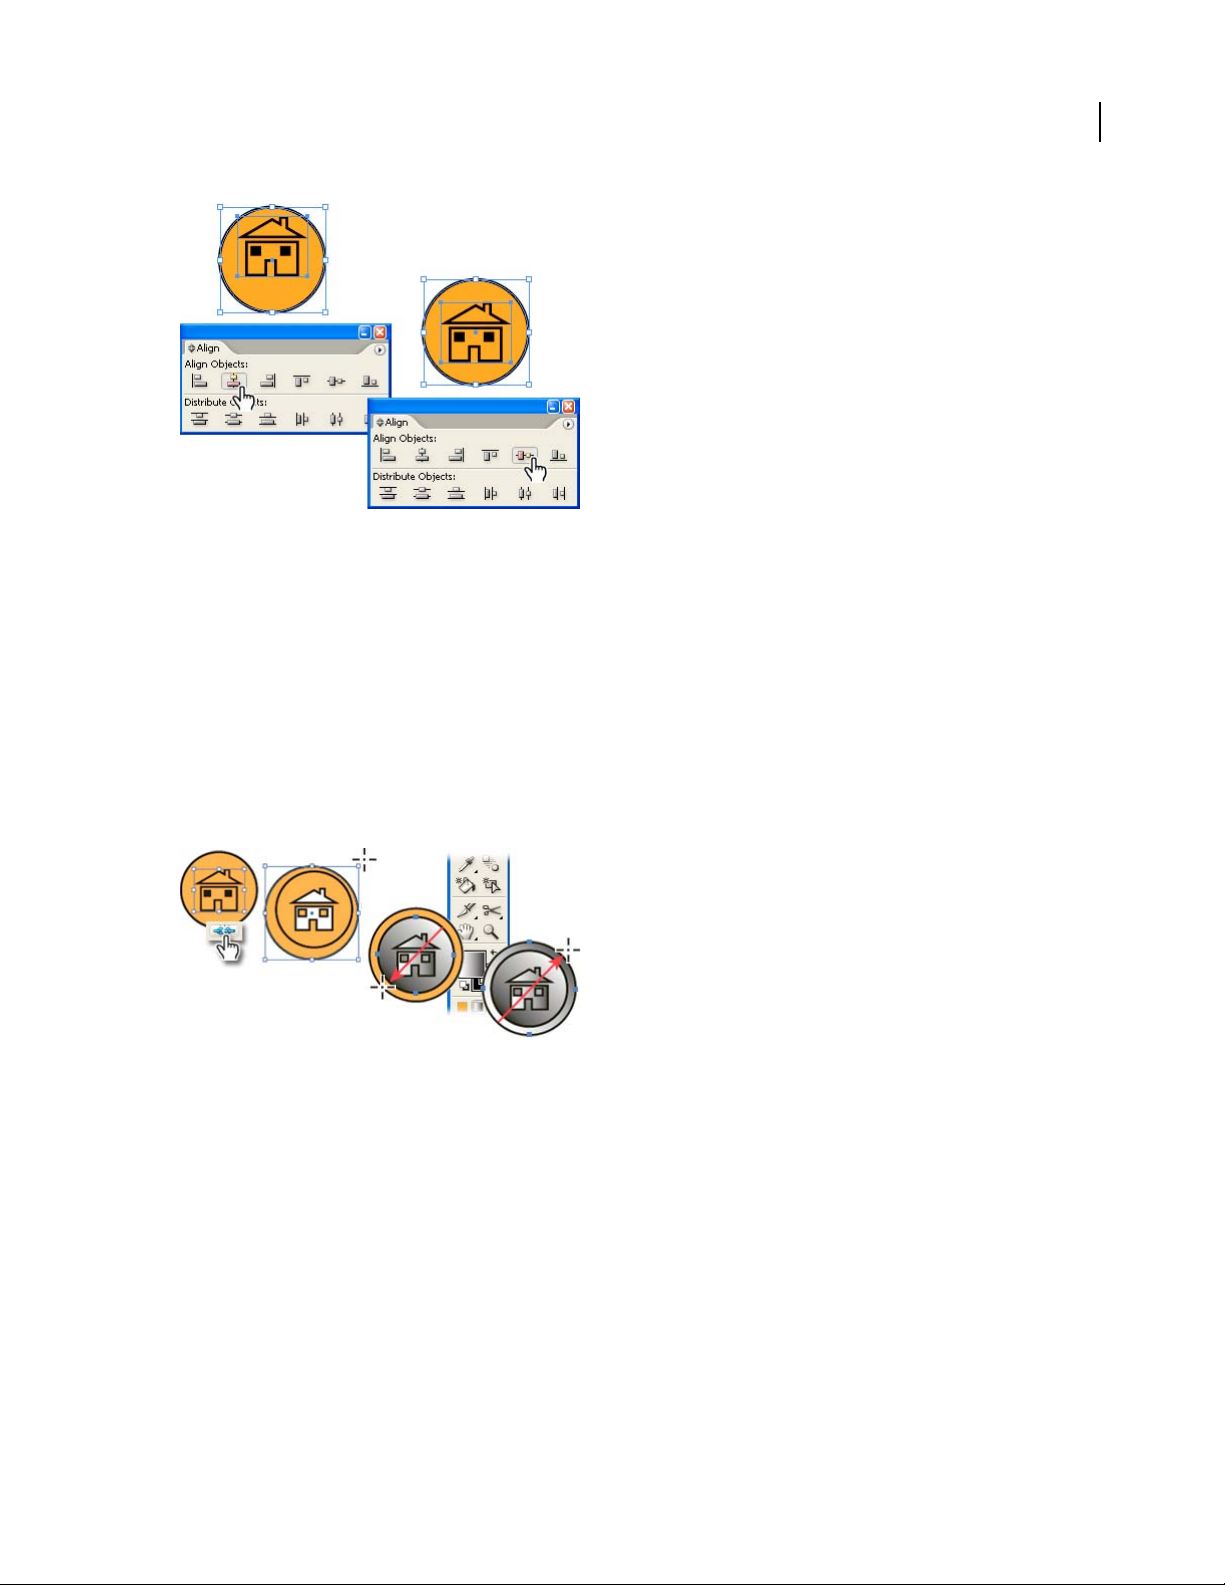
6. Align the symbol instance and the shape.
Make sure the Selection tool is still active in the toolbox, and drag a marquee around both the shape and symbol
instance. Then choose Window > Align to show the Align palette.
The Align palette contains buttons for aligning and distributing objects. First, we clicked the Horizontal Align
Center button. Then we clicked the Vertical Align Center button.
Page 22
ADOBE ILLUSTRATOR CS2
User Guide
7. Experiment with design variations.
Now that you have a basic design, experiment with different variations. For example, if you want to apply a different
fill and stroke to the symbol instance, select the instance in the document window and click the Break Link To
Symbol button in the Symbols palette. Once the link to the symbol is broken, the object is no longer a symbol, so you
can apply different fills and strokes to it.
We went one step further by applying a variety of gradients to our design. First, we drew another circle, chose
Object > Arrange > Send To Back, and realigned all three objects using the Align palette. We filled the objects with
a default gradient from the Swatches palette. Then, we selected just the outer circle and used the Gradient tool to
reverse the direction of the gradient. (See “To apply a gradient in a different direction” on page 252.) Our final design
will make a great web button, so we used the Save For Web command to save it in GIF format. (See “To optimize and
save web graphics” on page 452.)
15
Discover the power of compound shapes
Using compound shapes is one of the easiest ways to create illustrations in Adobe Illustrator. You start by drawing
basic shapes and then use the Pathfinder palette to combine them in different ways. In this tutorial, you’ll learn how
to add and subtract shapes, as well as how to use the Layers palette.
Page 23
ADOBE ILLUSTRATOR CS2
User Guide
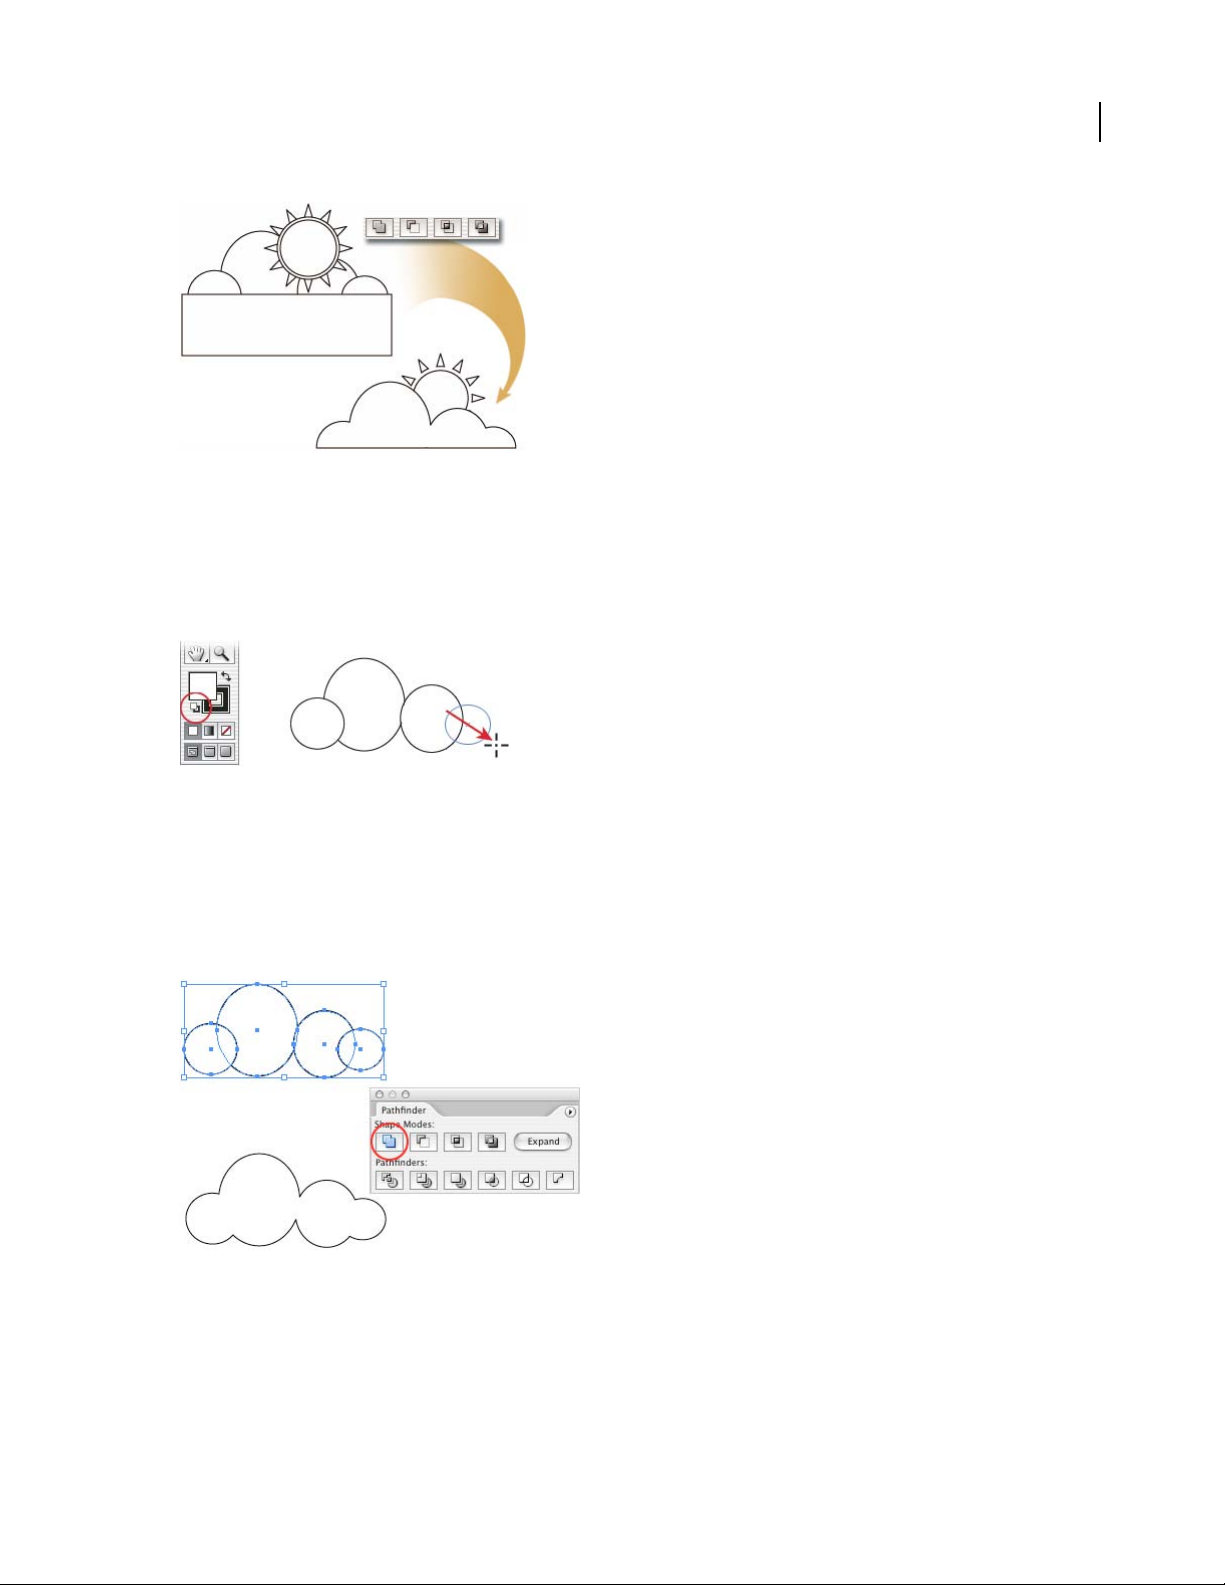
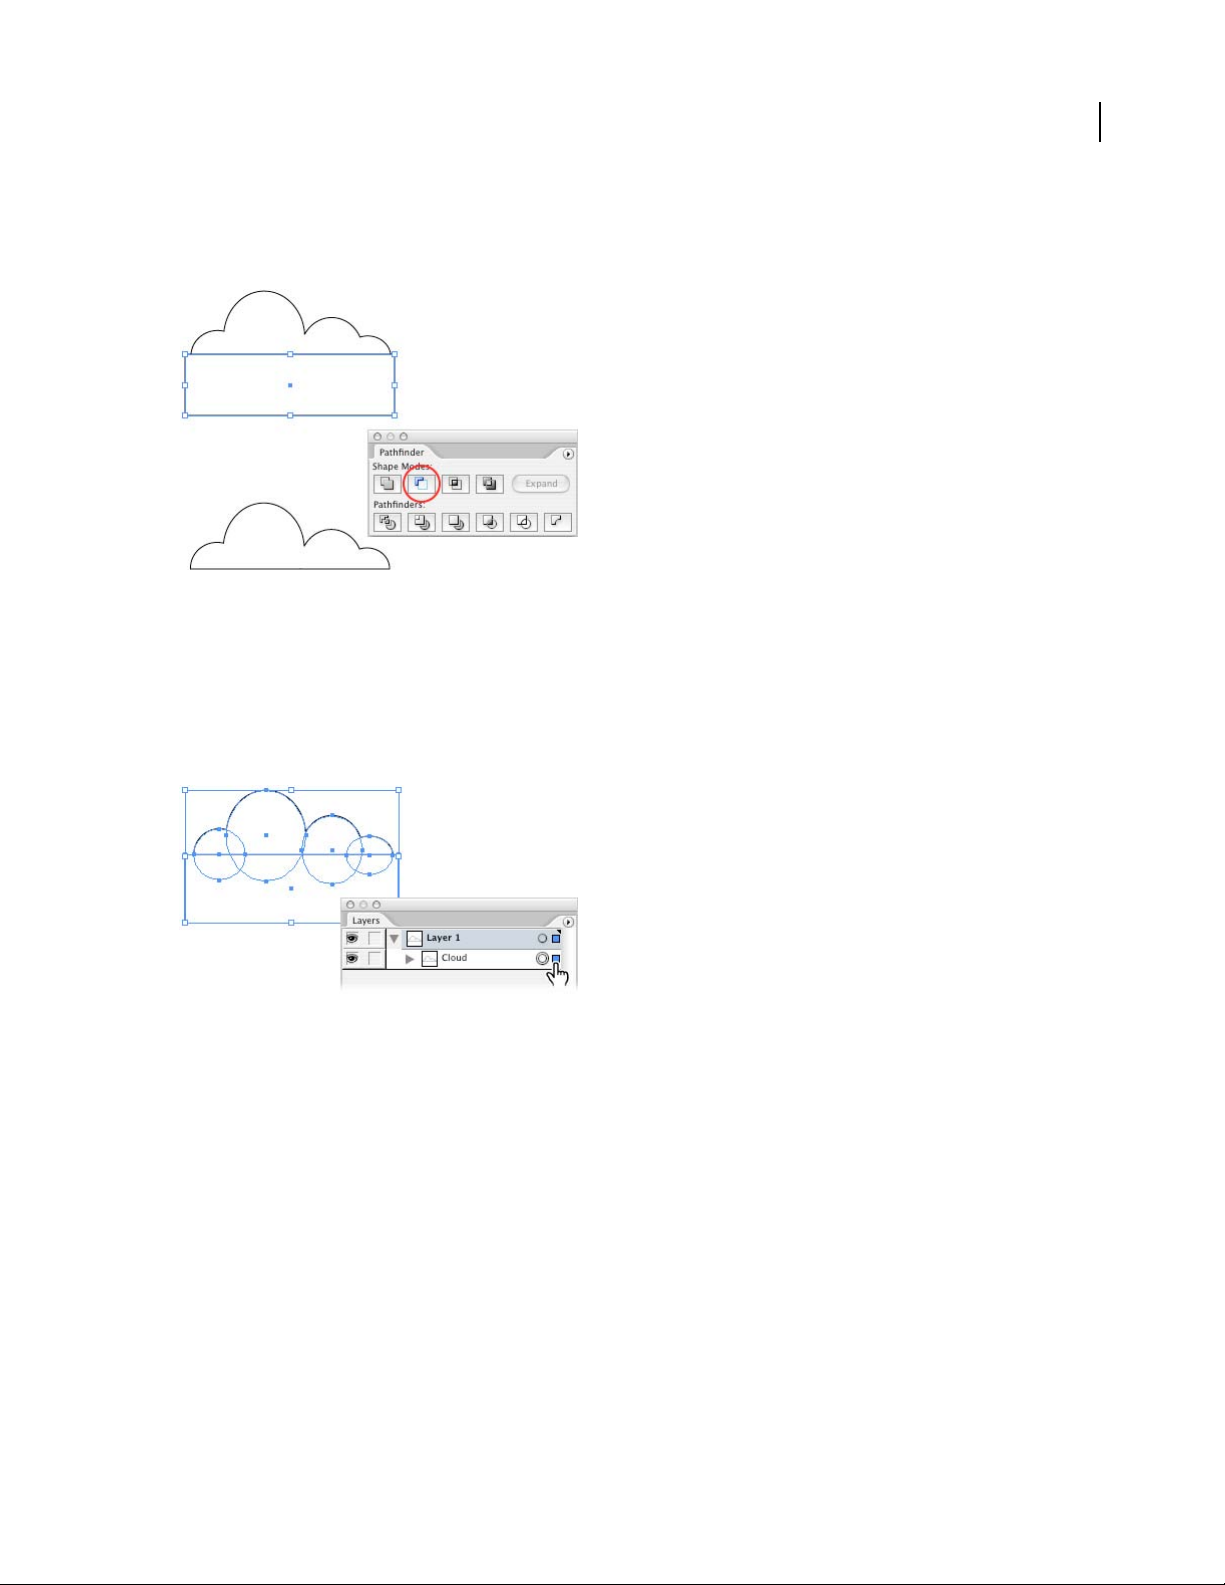
1. Draw a series of overlapping ellipses.
First, click the Default Fill And Stroke button in the toolbox. This sets the fill to white and the stroke to black. Then
select the Ellipse tool, and drag to draw a series of overlapping ellipses.
To move an ellipse, select it with the Selection tool and drag it to a different location. When you’re satisfied with the
placement of all the shapes, drag around all the ellipses to select them.
16
2. Add the ellipses together.
If the Pathfinder palette isn’t showing, choose Window > Pathfinder. Then click the Add To Shape Area button in the
Pathfinder palette.
You just created a compound shape (a shape that consists of two or more objects). You can verify this by looking in
the Layers palette. If the Layers palette isn’t showing, choose Window > Layers. Then click the triangle to the left of
Layer 1 to see the listing for the compound shape.
3. Subtract a rectangle.
Select the Rectangle tool and draw a rectangle that overlaps the bottom of the compound shape. When you’re
finished drawing, use the Selection tool to select all the shapes. Then click the Subtract From Shape Area button in
the Pathfinder palette.
Page 24
ADOBE ILLUSTRATOR CS2
User Guide
It may be difficult to tell what changed while all the shapes are selected, so click anywhere on the artboard to deselect
them. Now you can see that the rectangle has been subtracted from the ellipses. If you look in the Layers palette,
you’ll see that Illustrator created a new compound shape containing the rectangle and the first compound shape.
4. Rename the compound shape in the Layers palette.
Double-click the words “Compound Shape” in the Layers palette. Enter a more meaningful name for the shape, and
click OK. We named our shape “Cloud.”
17
The Layers palette is very useful for keeping track of the objects in a document. In addition, you can use it to select
objects by clicking in the selection column between the circle and the scroll bar. (See “About the Layers palette” on
page 278.)
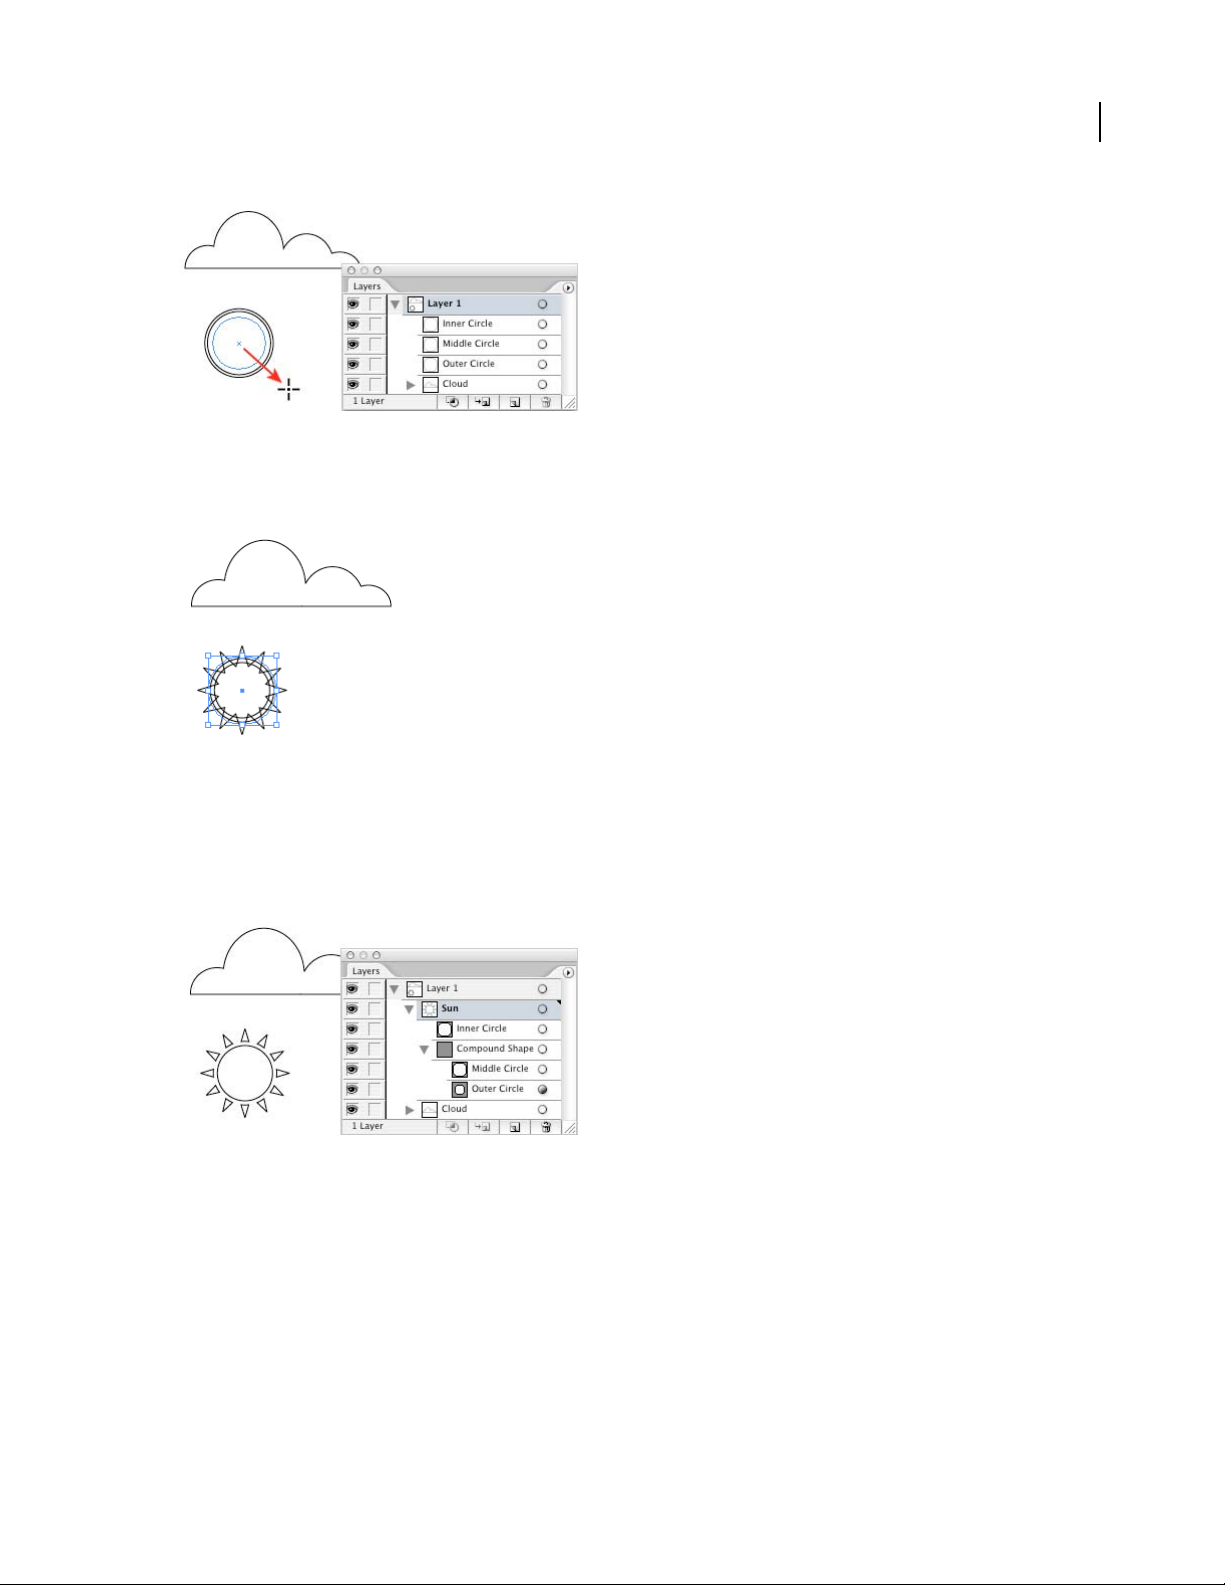
5. Draw three nested circles.
You’ll use the circles to create a sun, so draw them in proportion to the cloud. Start by selecting the Ellipse tool, and
Shift+dragging to draw the outer circle. Then position the pointer over the center of the circle, and Shift+Alt+drag
(Windows) or Shift+Option+drag (Mac OS) to draw the middle circle. (Holding down the Alt or Option key lets you
draw the circle from the center outward.) Repeat again to draw the inner circle.
We named the circles “Outer Circle,” “Middle Circle,” and “Inner Circle” in the Layers palette.
Page 25
ADOBE ILLUSTRATOR CS2
User Guide
6. Create the sun’s rays.
Select the outer circle and choose Effect > Distort & Transform > Zig Zag. Select Preview, and adjust the values for
Size and Ridges Per Segment. When you’re satisfied with the results, click OK.
18
7. Make the sun a compound shape.
Select the outer circle, then hold down Shift and select the middle circle. (Holding down Shift lets you select multiple
objects.) Click the Subtract From Shape Area button in the Pathfinder palette to combine the two shapes. Hold down
Shift, select the inner circle, and click the Add To Shape Area button in the Pathfinder palette.
We named the compound shape “Sun” in the Layers palette.
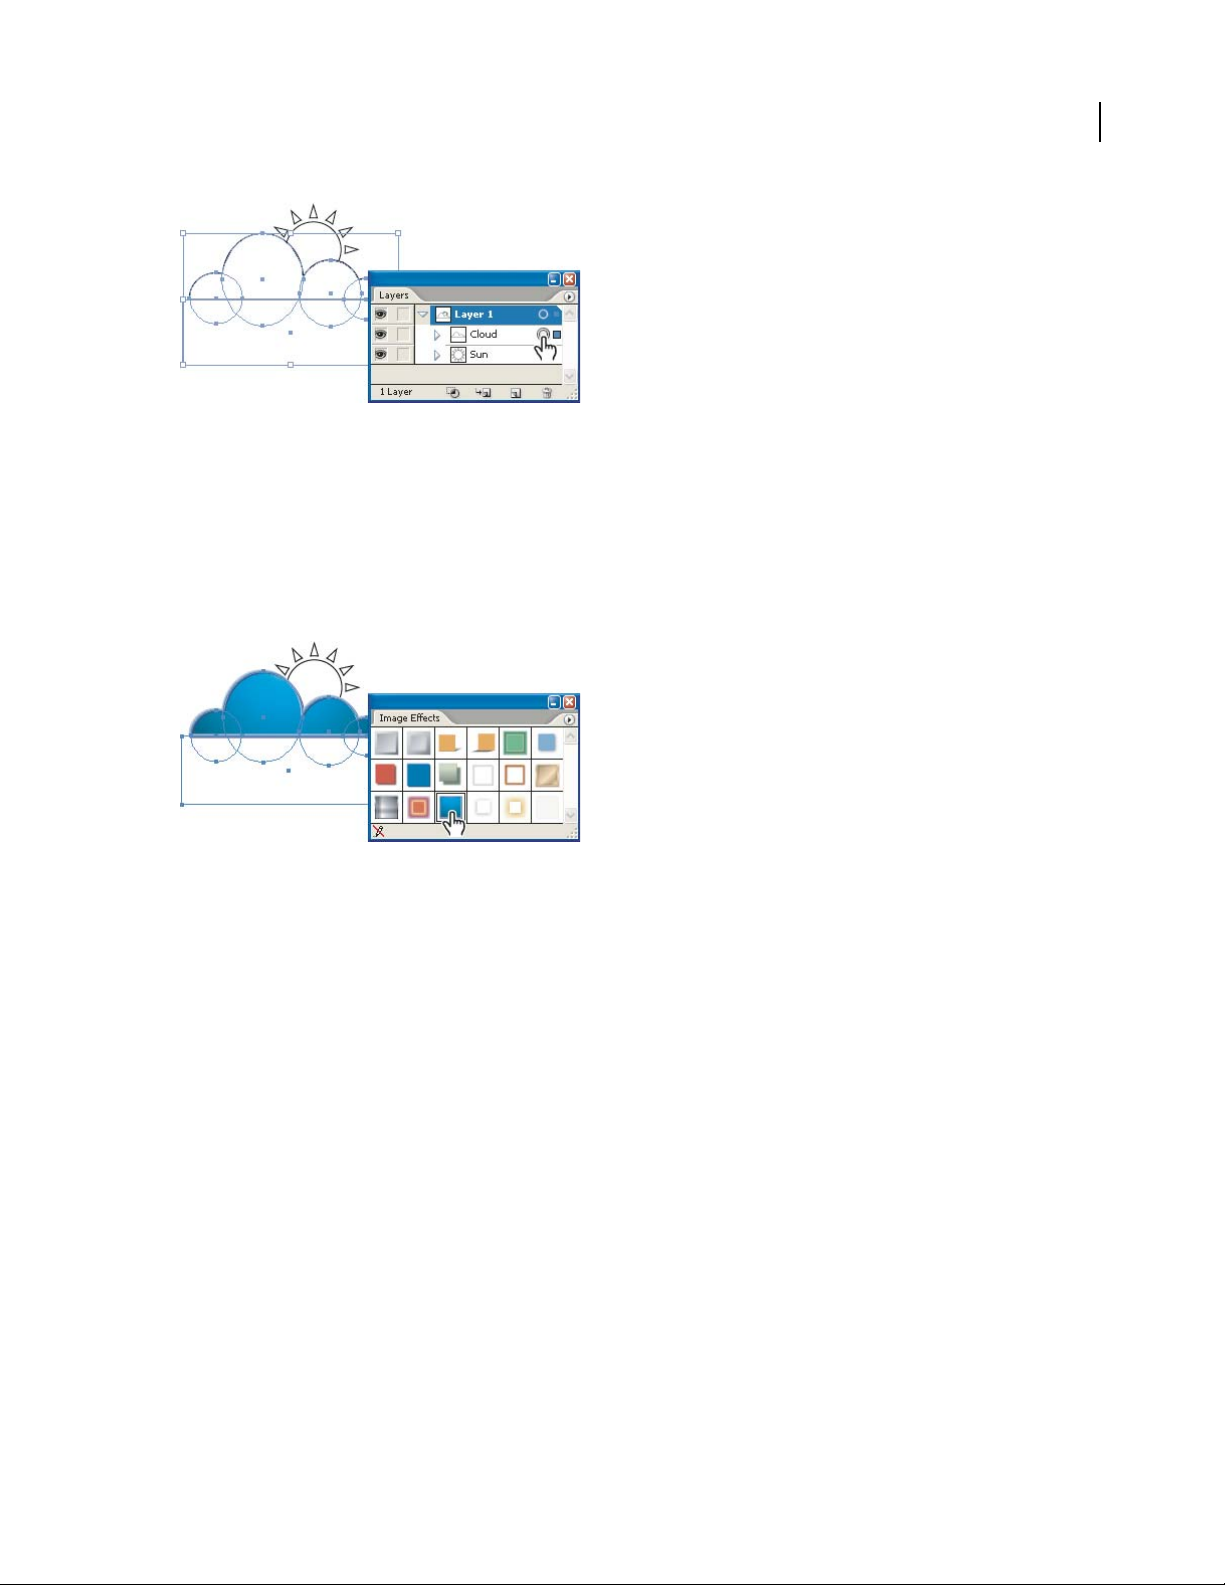
8. Move the sun behind the cloud.
Select the sun, and choose Object > Arrange > Send Backward. Then use the Selection tool to drag the sun behind
the cloud.
Notice how the sun is now listed below the cloud in the Layers palette. This is because the Layers palette reflects the
stacking order of your artwork. You can change the stacking order by dragging objects up or down in the Layers
palette. (See “About the stacking order” on page 282.)
Page 26

ADOBE ILLUSTRATOR CS2
User Guide
Paint illustrations with graphic styles
In the previous tutorial, you learned how to create the outlines, or paths, of an illustration. Now you’ll use graphic
styles to paint your illustration with colors and effects. Adobe Illustrator comes with hundreds of professionally
designed graphic styles that let you change the appearance of artwork with a single click. And graphic styles are fully
reversible, so you can always go back to your original illustration if you don’t like the results.
19
1. Target the cloud in the Layers palette.
In the Layers palette, click the circle (called the target icon) at the right edge of the cloud’s listing. When the target
icon displays a double ring, the item is targeted.
Targeting may seem simple, but it’s a commonly forgotten step when applying graphic styles and effects. Targeting is
especially important when you want to apply a style or effect to everything in a layer. (See “About targeting” on
page 420.)
Page 27
ADOBE ILLUSTRATOR CS2
User Guide
2. Apply a graphic style to the cloud.
If the Graphic Styles palette isn’t showing, choose Window > Graphic Styles. The Graphic Styles palette displays a
variety of default graphic styles; however, many additional graphic styles are available to you through graphic style
libraries. To open a graphic style library, click the triangle icon at the top right corner of the Graphic Styles palette,
and choose an option from the Open Graphic Style Library submenu.
Once you locate the graphic style you want to use, click it. We used the Raised Edges graphic style from the Image
Effects library.
20
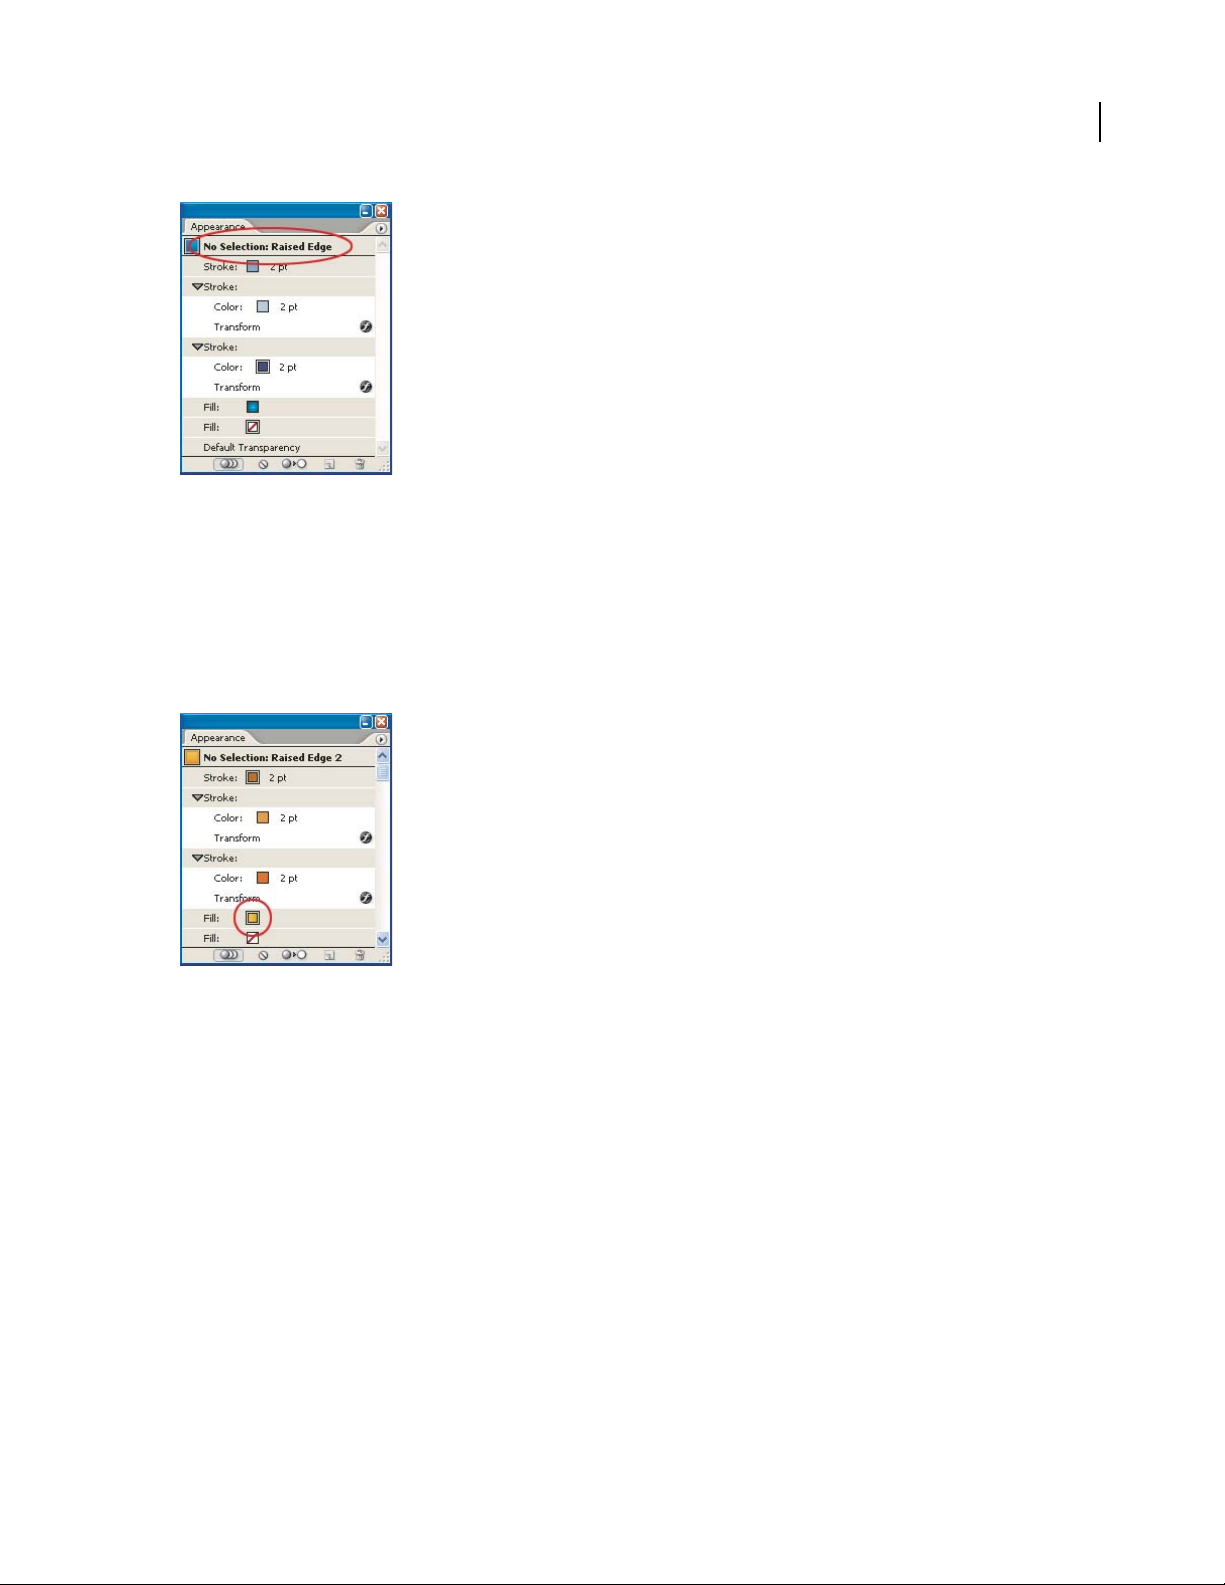
3. View appearance attributes of the graphic style.
Choose Select > Deselect to deselect the clouds, and if the Appearance palette isn’t showing, choose Window >
Appearance. The Appearance palette lists appearance attributes—propertiesthataffectthe look of an object without
altering its underlying structure. These include fills, strokes, transparency settings, and effects.
In ourcase, no artworkistargeted, so thetop listingshouldread“No Selection:” followed by thenameofthe current
graphic style. The specific appearance attributes depend on the graphic style you selected in step 2. Some attributes
may have triangles to the left of them. This means that the attribute includes effects or transparency settings. You can
expand or collapse the attribute by clicking the triangle. (See “Using the Appearance palette” on page 419.)
Page 28
ADOBE ILLUSTRATOR CS2
User Guide
4. Edit the graphic style.
Click each color swatch in the Appearance palette and choose different colors using the Swatches palette or Color
palette. You probably want to choose colors in the yellow to red range because you’ll apply the new graphic style to
the sun.
You can also use the Appearance palette to edit other aspects of a graphic style. For example, you can change the
order in which Illustrator applies attributes by dragging any attribute to a different position in the palette. If the
graphic style includes effects, double-click an effect name to change the effect’s settings.
21
5. Create a new style.
Clickthe NewGraphic Stylebuttoninthe GraphicStylespalette. Thenew styleappears as thelastiteminthe palette,
so you may need to scroll down to see it. Double-click the style, enter a descriptive name, and click OK.
We named our new graphic style “Orange Raised Edge.”
Page 29

ADOBE ILLUSTRATOR CS2
6. Apply the new graphic style to the sun.
Target the sun in the Layers palette, and click the graphic style you just created in the Graphic Styles palette.
User Guide
22
7. Experiment with design variations.
Now that you know how to apply and edit graphic styles, experiment with design variations. Start by creating a
duplicate of the sun and cloud by dragging Layer 1 in the Layers palette onto the Create New Layer button. Then
click in the selection column for the copied layer, and press the arrow keys on your keyboard to reposition the
duplicate sun and cloud. (Hold down the Shift key to move the selection in bigger increments.)
If you want to remove the existing graphic styles before applying new ones, click the Clear Appearance button in the
Appearance palette. This removes all appearance attributes (including the fill and stroke) so the sun and cloud won’t
be visible in the document window until you target them and apply new graphic styles.
Create headline type with a twist
Adobe Illustrator provides powerful, flexible features for creating and modifying type. You can add type anywhere
in your artwork—horizontally, vertically, along paths, inside shapes, around shapes, in rows and in columns. In this
tutorial, you’ll learn how to create a headline that you can reuse for a variety of purposes.
Page 30

ADOBE ILLUSTRATOR CS2
User Guide
1. Draw a curved path.
Select the Pen tool, and position the pointer where you want to start your path. Click and drag in the direction you
want the curve to go. Release the mouse button and move the pointer; then click and drag again in the direction you
want the curve to go. You can repeat this as many times as you want. When you are finished drawing, Ctrl-click
(Windows) or Command-click (Mac OS) away from the line.
If this is your firsttimeusing thePen tool,itmay take some practice to getthe hang of it;however,itwillbetimewell
spent. When you’re comfortable using the Pen tool, you can draw any line or shape with precision. (See “To draw
curves with the Pen tool” on page 154.)
23
2. Add type along the path.
Select theTypeOnAPath tool.Click thepathtoset theinsertion point, andtypethe desiredtext. Don’tworry about
the position of the type on the path—you’ll learn how to adjust it later on.
3. Format the type.
Click the Selection tool to select the type, and choose a font family, font style, and font size in the Control palette.
You can also change the color of the type by selecting a Fill color in the Control palette.
Page 31

ADOBE ILLUSTRATOR CS2
User Guide
Illustrator comes with a variety of fonts that you can use in your artwork. To view a catalog of fonts, choose Help >
Welcome Screen and click Browse Cool Extras.
4. Reposition the type if necessary.
Position the Selection tool over the type’s start, center, or end bracket until a small icon appears next to the pointer.
(If the pointer doesn’t change, make sure the Selection tool is still selected.) Drag to the right or left to reposition the
type on the path.
5. Apply a drop shadow to the type.
Choose Effect > Stylize > Drop Shadow. Select Preview, and adjust the drop shadow options. (We used the default
values.) When you’re satisfied with the results, click OK.
24
You can still edit the type after applying an effect.
6. Place a symbol instance.
If the Symbols palette isn’t showing, choose Window > Symbols. The Symbols palette displays a variety of default
symbols; however, many additional symbols are available to you through symbol libraries.Toopenasymbol library,
click the triangle icon at the top right corner of the Symbols palette, and choose an option from the Open Symbol
Library submenu.
Once you locate the symbol you want to use, drag it from the palette into the document window. The placed symbol
is called a symbol instance. We used the Bee symbol from the Nature symbol library. After placing the symbol, we
rotated it and applied a drop shadow to match the text.
Page 32

ADOBE ILLUSTRATOR CS2
User Guide
7. Save the headline.
Theformatyou save in dependsonhow youwanttouse theheadline. We choseFile > Save ForMicrosoft Office to
save our headline for use in Microsoft Word. We also saved our headline as a web banner using the Save For Web
dialog box. (See “To optimize and save web graphics” on page 452.)
Play with hand-painted effects
Illustrator includes many features for working with bitmap images. In this tutorial, you’ll learn how to import bitmap
images into Illustrator and apply artistic effects.
25
1. Choose a bitmap image.
An image with high contrast works the best. If you don’t have a suitable image, a variety of stock photography is
available on the Illustrator CD.
Page 33

ADOBE ILLUSTRATOR CS2
User Guide
2. Import the image into Illustrator.
Start by creating a new document in RGB color mode. (This is important because the Artistic filters don’t work on
CMYK images.) Then choose File > Place, and select the image file. Make sure the Link option is deselected, and
click OK.
The Links palette shows all imported images. (See “To use the Links palette” on page 326.)
26
3. Apply the Poster Edges effect.
Target the image in the Layers palette, and choose Effect > Artistic > Poster Edges. Adjust the settings until you are
satisfied with the preview, and then click OK.
The Poster Edges effect reduces the number of colors in an image according to the posterization option you set, and
finds the edges of the image and draws black lines on them. Broader areas of the image have simple shading, while
fine, dark detail is distributed throughout the image.
Page 34

ADOBE ILLUSTRATOR CS2
User Guide
4. Apply the Watercolor effect.
Choose Effect > Artistic > Watercolor. Adjust the settings until you are satisfied with the preview, and then click OK.
The Watercolor effect paints the image in a watercolor style, simplifying details in an image, using a medium brush
loaded with water and color. Where significant tonal changes occur at edges, the filter saturates the color.
27
5. Choose a brush.
If the Brushes palette isn’t showing, choose Window > Brushes. The Brushes palette displays a variety of default
brushes; however, many additional brushes are available to you through brush libraries.Toopenabrushlibrary,click
the triangle icon at the top right corner of the Brushes palette, and choose an option from the Open Brush Library
submenu.
Once you locate the graphic style you want to use, click it. We selected the Fountain Pen brush from the Artistic_Ink
library.
Page 35

ADOBE ILLUSTRATOR CS2
User Guide
6. Apply a brush stroke.
Select the Paintbrush tool, and select a color. We used the Eyedropper tool to sample a color in our artwork. Then
drag to apply the stroke.
If you want more precision, use the Pen tool to draw a path, and then apply the brush to the path. (See “To apply
brush strokes” on page 237.)
28
7. Experiment with different brushes.
We added some green splatters using the Ink Splatter brush and some yellow splatters using the Galaxy brush. Then
we defined the edges of the paint cans using the Dry Ink brush.
Page 36

Chapter 3: Work area
Work area basics
About the work area
By default, the Illustrator work area consists of an illustration window where you draw and lay out your artwork, a
toolbox that holds tools for drawing and editing artwork, palettes to help you monitor and modify artwork, and
menus that contain commands for performing tasks.
You can rearrange the work area to best suit your needs by moving, hiding, and showing palettes; zooming in or out
of artwork; scrolling to a different area of the illustration window; and creating multiple windows and views. You can
also change the visibility of the illustration window and menu bar using the Mode buttons at the bottom of the
toolbox:
• Standard Screen Mode displays artwork in a standard window, with a menu bar at the top and scroll bars on
the sides.
• Full Screen Mode with Menu Bar displays artwork in a full-screen window with a menu bar but with no title
bar or scroll bars.
• Full Screen Mode displays artwork in a full-screen window, with no title bar, menu bar, or scroll bars.
29
Using the status bar
The status bar (at the bottom left edge of the illustration window) displays the current zoom level and information
about one of the following topics: the current tool in use, the date and time, the number of undos and redos available,
the document color profile, or the status of a managed file.
Click the status bar to do any of the following:
• Change the type of information displayed in the status bar by selecting an option from the Show submenu.
• Show the current file in Adobe Bridge by choosing Reveal In Bridge.
• Access Version Cue® commands.
See also
“About Adobe Bridge” on page 48
“Getting the most out of Version Cue” on page 82
Palettes, tools, and menus
About the toolbox
The first time you start the application, the toolbox appears at the left side of the screen. You can move the toolbox
by dragging its title bar. You can also show or hide the toolbox by choosing Window > Tools.
Page 37

Toolbox overview
ADOBE ILLUSTRATOR CS2
User Guide
30
A
Selection tools
A
B
D
F
H
I
C
E
G
Selection (V)
Direct Selection (A)
Group Selection
Magic Wand (Y)
Lasso (Q)
B
Drawing tools
Pen (P)
Add Anchor Point
Delete Anchor
Point
Convert Anchor
Point
Line Segment (\)
Arc
Spiral
Rectangular Grid
Polar Grid
Rectangle (M)
Rounded Rectangle
Ellipse
Polygon
Star
Flare
Pencil (N)
Smooth
Erase
C
Type tools
Type (T)
Area Type
Type On a Path
Vertical Type
Vertical Area
Type
Vertical Type
On a Path
D
Painting tools
Paintbrush (B)
Mesh (U)
Gradient (G)
Eyedropper (I)
Measure
Live Paint Bucket (K)
Live Paint Select
(Shift+L)
E
Reshaping tools
Rotate (R)
Reflect (O)
Scale (S)
Shear
Reshape
Warp (Shift-R)
Twirl
Pucker
Bloat
Scallop
Crystallize
Wrinkle
Free Transform (E)
Blend (W)
F
Symbol tools
Symbol Sprayer
(Shift +S)
Symbol Shifter
Symbol Scruncher
Symbol Sizer
Symbol Spinner
Symbol Stainer
Symbol Screener
Symbol Styler
G
Graph tools
Column Graph (J)
Stacked Column
Graph
Bar Graph
Stacked Bar
Graph
Line Graph
Area Graph
Scatter Graph
Pie Graph
Radar Graph
H
Slicing and cutting
tools
Slice (Shift+K)
Slice Select
Scissors (C)
Knife
I
Moving and zooming
tools
Hand (H)
Page
Zoom (Z)
Indicates default tool * Keyboard shortcuts appear in parenthesis
See also
“Selection tool gallery” on page 262
“Drawing tool gallery” on page 145
“Type tool gallery” on page 361
“Painting tool gallery” on page 222
“Reshaping tool gallery” on page 290
“Symbolism tool gallery” on page 174
Page 38

ADOBE ILLUSTRATOR CS2
User Guide
“Graph tool gallery” on page 510
“Slicing and cutting tool gallery” on page 444
“Moving and zooming tool gallery” on page 37
Using tools
You use tools in the toolbox to create, select, and manipulate objects in Illustrator. You can select a tool by clicking it
or pressing the tool’s keyboard shortcut. The name of the tool and its keyboard shortcut appear when you hold the
pointer over the tool—this text is called the tool tip.
To hide tool tips, choose Edit > Preferences > General (Windows) or Illustrator > Preferences > General (Mac OS),
and deselect Show Tool Tips.
Some tools have additional tools beneath them—these are called hidden tools. A small triangle at the lower right
corner of the tool icon indicates that there are hidden tools. To view hidden tools, hold down the mouse button on
the visible tool. To select a hidden tool, continue to hold down the mouse button, drag the pointer over the tool you
want to select, and then release the mouse button. To tear off hidden tools into a separate palette, drag the pointer
over thearrow at theend of thetoolbox andrelease themouse button.Click theclose boxonthe palette’stitle barto
return the tools to the toolbox.
A B
31
C
D
E
Selecting a hidden tool
A. Too l bo x B. Active tool C. Tear off palette with hidden tools D. Hidden tool triangle E. Tool name and shortcut
You can move the toolbox around the work area by dragging its title bar. You can also hide the toolbox by choosing
Window > Tools.
The mouse pointer for most tools matches that tool’s icon. If you prefer, you can use a precision pointer for greater
accuracy when working with detailed artwork. Choose Edit > Preferences > General (Windows) or Illustrator >
Preferences > General (Mac OS), and select Use Precise Cursors. Alternatively, press Caps Lock on the keyboard.
To work with palettes
Palettes help you monitor and modify your work. You can customize the default palette arrangement in the following
ways:
• To show or hide a palette, select the palette name from the Window menu. A check mark next to the palette name
indicates that the palette is currently open.
Page 39

ADOBE ILLUSTRATOR CS2
User Guide
• To hide or show all palettes including the toolbox and Control palette, press Tab. To hide or show all palettes except
for the toolbox and Control palette, press Shift+Tab.
• To displaya palette menu, positionthe pointeron the triangle in theupper rightcorner ofthe palette,and press
the mouse button.
• To change the size of a palette, drag any corner of the palette (Windows) or drag the size box at its lower right
corner (Mac OS). Some palettes, such as the Color palette, cannot be resized by dragging.
• To collapse a group of palettes to their titles only, click the minimize/maximize box (Windows) or the zoom box
(Mac OS). You can still open the palette menu when the palette is collapsed.
• To cycle through the available views of a palette—default, hidden options visible, and palette titles only—double-
click the palette’s tab. In some palettes, you can click the double triangle at the upper left of the palette tab to
cycle through the palette views, or select Show Options or Hide Options from the palette menu.
• To make a palette appear at the front of its group, click the palette’s tab.
• To move an entire palette group, drag its title bar.
• To rearrange or separate a palette group, drag a palette’s tab. Dragging a palette outside an existing group creates
a new palette window.
• To move a palette to another group, drag the palette’s tab to that group.
• To dock palettes so that they move together, drag a palette’s tab to the bottom of another palette.
• To move an entire docked palette group, drag its title bar.
• To return palettes to their default sizes and positions, choose Window > Workspace > [Default].
32
To enter values in palettes and dialog boxes
Do any of the following:
• Type a value in the box, and press Enter or Return.
• Drag the slider.
• Drag the dial.
• Click the arrow buttons in the palette to increase or decrease the value.
• Click in the box and then use the Up Arrow key and Down Arrow key on the keyboard to increase or decrease the
value.
• Select a value from the menu associated with the box.
Page 40

ADOBE ILLUSTRATOR CS2
User Guide
A B C
D
E
Ways to enter values
A. Arrow buttons B. Text box C. Menu arrow D. Slider E. Dial
To calculate values in palettes and dialog boxes
You can perform simple math in any box that accepts numeric values. For example, if you want to move a selected
object 3 units to the right using the current measurement units, you don’t have to work out the new horizontal
position—simply type +3 after the current value in the Transform palette.
33
1 In a text box that accepts numerical values, do one of the following:
• To replace the entire current value with a mathematical expression, select the entire current value.
• To use the current value as part of a mathematical expression, click before or after the current value.
2 Type a simple mathematical expression using a single mathematical operator, such as + (plus), - (minus), x (multi-
plication), / (division), or % (percent).
For example, 0p0 + 3 or 5mm + 4. Similarly, 3cm * 50% equals 3 centimeters multiplied by 50%, or 1.50 cm, and
50pt + 25% equals 50 points plus 25% of 50 points, or 62.5 points.
3 Press Enter or Return to apply the calculation.
About the Control palette
The Control palette offers quick access to options related to the objects you select. By default, the Control palette is
docked to the top of the work area.
Options displayed in the Control palette vary depending on the type of object you select. For example, when you
select a text object, the Control palette displays text-formatting options in addition to options for changing the color,
placement, and dimensions of the object.
A B C
Control palette
A. Hidden options B. Link to another palette C. Palette menu
When text in the Control palette is blue and underlined, you can click the text to display a related palette. For
example, click the word Stroke to display the Stroke palette.
Page 41

ADOBE ILLUSTRATOR CS2
User Guide
To customize the Control palette
• To change the kinds of options that appear in the Control palette, select or deselect options in the Control palette
menu.
• To dock the palette at the bottom of the work area, choose Dock To Bottom from the Control palette menu.
• To convert the Control palette to a floating palette, drag the gripper bar away from its current position. To redock
the Control palette, drag the gripper bar to the top or bottom of the application window (Windows) or screen
(Mac OS).
Files and templates
About documents
A document is the space inwhich youcreate artwork. You cancreate newIllustrator documents from scratchor based
on a template.
Creating a document from scratch gives you a blank document with the default fill and stroke colors, graphic styles,
brushes, symbols, actions, viewing preferences, and other settings. You can customize the document defaults using
a startup file.
34
Creating a document from a template gives you a document with preset design elements and settings.
See also
“About startup files” on page 46
To create a new document
• To create a new document from scratch, choose File > New. Set document options, and click OK.
• To create a new document from a template, choose File > New From Template. Select a template, and click New.
See also
“About the artboard” on page 36
“About colors in digital graphics” on page 181
About templates
Te mp l at e s let you create new documents that share common settings and design elements. For example, if you need
to design a series of business cards with a similar look and feel, you can create a template with the desired artboard
size, view settings (such as guides), and print options. The template can also contain symbols for common design
elements (such as logos) and specific sets of color swatches, brushes, and graphic styles.
Illustratorcomes witha variety of templates, including templates forletterhead, business cards,envelopes, brochures,
labels, certificates, postcards, greeting cards, and websites.
When a template is selected via the New From Template command, Illustrator creates a new document with identical
content to the template, but leaves the original template file untouched.
Page 42

ADOBE ILLUSTRATOR CS2
User Guide
To create a new template
1 Open a new or existing document.
2 Customize the document in any of the following ways:
• Set up the document window as you want it to appear in new documents you create from the template. This
includes the magnification level, scroll position, ruler origin, and options in the View menu.
• Draw or import any artwork you want to appear in new documents you create from the template.
• Delete any existing swatches, styles, brushes, symbols, or actions you don’t want to retain.
• Create any new swatches, styles, brushes, symbols, and actions you want in the corresponding palettes. You can
also import preset swatches, styles, brushes, symbols, and actions from a variety of libraries that come with
Illustrator.
• Create any graph designs you want and add them to the Graph Design dialog box. You can also import preset
graph designs.
• Set the desired options in the Document Setup dialog box and Print Options dialog box.
3 Choose File > Save As Template.
4 In the Save As dialog box, select a location for the file, enter a file name, and click Save.
Illustrator saves the file in AIT (Adobe Illustrator Template) format.
35
To open a file
You can open files that were created in Illustrator as well as files that were created in other applications.
• To open an existing file, choose File > Open. Locate the file, and click Open. If you don’t see the name of the file
you want, make sure all formats are showing. If you still don’t see the file, it is stored in a format that Illustrator
can’t read.
• To open afilethathas recently been used,chooseFile > Open Recent Files, andchoosethe file name from thelist.
You can also use Adobe Bridge to open files.
See also
“To browse for files using Adobe Bridge” on page 35
“Importing Adobe PDF files” on page 330
“Importing EPS files” on page 331
“Importing artwork from Photoshop” on page 333
To browse for files using Adobe Bridge
Adobe Bridge lets you search for, preview, open, organize, process, rate, and share files. You can use it to create new
folders and rename and delete files, as well as view and add file information. Adobe Bridge lets you unify common
settings so that you can update all your Adobe CS2 applications at once.
In addition, you can use Bridge to access Adobe Version Cue, color management settings for Adobe Creative Suite,
and stock photography.
❖ To open Adobe Bridge, choose File > Browse or click the Bridge icon in the Control palette.
Page 43

ADOBE ILLUSTRATOR CS2
User Guide
See also
“About Adobe Bridge” on page 48
Viewing artwork
About the artboard
The artboard represents the entire region that can contain printable artwork. However, the artboard’s dimensions do
not necessarily match the current page size. For example, your artboard may be 10 x 20 inches while your print
settings specify 8-1/2 x 11 inch paper. You can view the page boundaries in relation to the artboard by showing page
tiling (View > Show Page Tiling). When page tiling is on, the printable and nonprintable areas are represented by a
series of solid and dotted lines between the outermost edge of the window and the printable area of the page.
A
B
C
D
E
36
Illustration window
A. Printable area B. Nonprintable area C. Edge of the page D. Ar tboard E. Scratch area
The printable area is bounded by the innermost dotted lines and represents the portion of the page on which the
selected printer can print. Many printers cannot print to the edge of the paper.
The nonprintable area is between the two sets of dotted lines representing any nonprintable margin of the page.
The page edge is indicated by the outermost set of dotted lines.
The artboard is bounded by solid lines and represents the maximum printable area. To hide the artboard boundaries,
choose View > Hide Artboard.
The scratch area is the area outside the artboard that extends to the edge of the 227-inch square window. The scratch
area represents a space on which you can create, edit, and store elements of artwork before moving them onto the
artboard. Objects placed onto the scratch area are visible on-screen, but they do not print.
See also
“About page size and orientation” on page 474
“To reposition artwork on the page” on page 472
“To print artwork on multiple pages” on page 473
Page 44

ADOBE ILLUSTRATOR CS2
User Guide
About page tiling
By default, Illustrator prints your artwork on a single sheet of paper. However, if the artwork is larger than the page
sizes available on your printer, you can print onto multiple sheets of paper.
Dividing the artboard to fit a printer’s available page sizes is called tiling.You canchooseatilingoptioninthe Setup
section of the Print dialog box. To view the page tiling boundaries on the artboard, choose View > Show Page Tiling.
Artboard divided into multiple page tiles
37
When you divide the artboard into multiple page tiles, the pages are numbered from left to right and from top to
bottom, starting with page 1. These page numbers appear on-screen for your reference only; they do not print. The
numbers enable you to print all of the pages in the file or specify particular pages to print.
See also
“About page size and orientation” on page 474
“To print artwork on multiple pages” on page 473
Moving and zooming tool gallery
Illustrator provides the following tools for moving around in and controlling the view of the artboard:
The Hand tool (H) moves the The Page tool adjusts the
Illustrator artboard within and decreases the view
the illustration window. magnification in the illus-
page grid to control where
artwork appears on the
printed page.
The Zoom tool (Z) increases
tration window.
Page 45

ADOBE ILLUSTRATOR CS2
See also
“About the toolbox” on page 29
To change the size and color of the artboard
1 Choose File > Document Setup.
2 From the menu at the top left of the Document Setup window, do either of the following:
• To change the size of the artboard, choose Artboard, and then set the size and orientation for the artboard.
• To change the color of the artboard, choose Transparency. Select Simulate Colored Paper, click the top color
swatch, and select a new color using the Color dialog box.
Changing the color of the artboard lets you view your document as it might appear when printed on colored paper.
For example, if you draw a blue object on a yellow background, the object appears green. The simulation is only
performed when the transparency grid is not shown.
See also
“About page size and orientation” on page 474
“To reposition artwork on the page” on page 472
User Guide
38
“To print artwork on multiple pages” on page 473
To zoom in or out
There are several ways to zoom in or out of artwork.
• Select the Zoom tool . The pointer becomes a magnifying glass with a plus sign in its center. Click in the center
of the area that you want to magnify, or hold down Alt (Windows) or Option (Mac OS) and click in the center of
the area that you want to reduce. Each click magnifies or reduces the view to the previous preset percentage.
• Select the Zoom tool and drag a dotted rectangle, called a marquee,aroundthe area youwanttomagnify.Tomove
the marquee around the artwork, hold down the spacebar, and continue dragging to move the marquee to a new
location.
• Choose View > Zoom In or View > Zoom Out. Each click magnifies or reduces the view to the next preset
percentage.
• Set the zoom level at the lower left corner of the main window or in the Navigator palette.
• To display a file at 100%, choose View > Actual Size.
• To change the view to fit the document window, choose View > Fit In Window.
See also
“Moving and zooming tool gallery” on page 37
“Keys for viewing artwork” on page 527
To move the view area
You can bring a different area of the artboard into view by doing either of the following:
• Select the Hand tool , and drag in the direction you want the artwork to move.
Page 46

ADOBE ILLUSTRATOR CS2
User Guide
• In the Navigator palette, click the area of the thumbnail display that you want to view in the illustration window.
Alternatively, drag the proxy view area (the colored box) to a different area of the thumbnail display.
To specify the quality of the display when using the Hand tool, choose Edit > Preferences > Units & Display Perfor-
mance (Windows) or Illustrator > Preferences > Units & Display Performance (Mac OS). Drag the Hand Tool slider
left to improve the quality of the view when you move it with the Hand tool, or right to improve the speed at which you
can move the view with the Hand tool.
See also
“Moving and zooming tool gallery” on page 37
“Keys for viewing artwork” on page 527
To work with the Navigator palette
You use the Navigator palette to quickly change the view of your artwork using a thumbnail display. The colored box
in the Navigator (called the proxy view area) corresponds to the currently viewable area in the illustration window.
To display the Navigator palette, choose Window > Navigator.
39
A
C D E F G
Navigator palette
A. Thumbnail display of artwork B. Palette menu button C. Zoom box D. Zoom Out button E. Proxy preview area F. Zoom slider G. Zoom
In button
B
You can customize the Navigator palette in the following ways:
• To display only artwork inside the boundaries of the artboard in the Navigator palette, select View Artboard Only
from the palette menu. Any objects outside the border of the artboard are removed from the thumbnail display.
• To change the color of the proxy view area, select Palette Options from the palette menu. Select a preset color from
the Color pop-up menu, or double-click the color box to choose a custom color.
• To display dashed lines in the document as solid lines in the Navigator palette, select Palette Options from the
palette menu and select Draw Dashed Lines As Solid Lines.
• To specify the size at which text is replaced by a gray bar in the Navigator palette, select Palette Options from the
palette menu and enter a font size in the Greeking box.
See also
“To work with palettes” on page 31
About viewing artwork as outlines
By default, Adobe Illustrator sets the view so that all artwork is previewed in color. However, you can choose to
display artwork so that only its outlines (or paths) are visible. Viewing artwork without paint attributes speeds up the
time it takes to redraw the screen when working with complex artwork.
Page 47

ADOBE ILLUSTRATOR CS2
User Guide
In Outline mode, linked files are displayed by default as outlined boxes with an X inside. To view the contents of
linked files, choose File > Document Setup, choose Artboard at the top of the dialog box, and select Show Images In
Outline.
To view artwork as outlines
By default, Illustrator previews all artwork in color. However, you can speed redraw and performance by viewing
artwork as outlines (or paths).
• To view all artwork as outlines, choose View > Outline. Choose View > Preview to return to previewing artwork
in color.
• To view all artwork in a layer as outlines, Ctrl-click (Windows) or Command-click (Mac OS) the eye icon for the
layer in the Layers palette. Ctrl-click (Windows) or Command-click (Mac OS) again to return to previewing
artwork in color. The eye icon has a hollow center when Outline view is enabled and a filled center when
Preview view is enabled.
• To view all unselected items in the Layers palette as outlines, Alt+Ctrl-click (Windows) or Option+Command-
click (Mac OS) the eye icon for the selected item. Alternatively, select Outline Others from the Layers palette
menu.
You can return all items in the Layers palette to Preview mode by choosing Preview All Layers from the Layers palette
menu.
40
See also
“About the Layers palette” on page 278
To use multiple windows and views
You can open multiple windows to display an illustration multiple times in the work area. Each window can have
different view settings. For example, you can set one window highly magnified for doing close-up work on some
objects and create another window less magnified for laying out those objects on the page.
(Windows) You can arrange multiple open windows to suit your needs, using options from the Window menu.
Cascade displays windows stacked and descending from the top left to the bottom right of the screen; Tile displays
windows edge to edge; Arrange Icons organizes minimized windows within the program window.
An alternative to creating multiple windows is creating multiple views. You can create and store up to 25 views for
each document. To switch between views, select a view name from the bottom of the View menu.
• To create a new window, choose Window > New.
• To create anew view,set up theviewasyou wish.ThenchooseView > NewView, enteraname forthe newview,
and click OK.
• To rename or delete a view, choose View > Edit Views.
See also
“About the work area” on page 29
“To save a custom workspace” on page 45
Page 48

ADOBE ILLUSTRATOR CS2
User Guide
Previewing artwork in its final output medium
Illustrator provides several ways to preview how aspects of artwork will look when printed or viewed on the web:
Overprint Preview mode (View > Overprint > Preview) Provides an “ink preview” that approximates how blending,
transparency, and overprinting will appear in color-separated output. (See “About overprinting” on page 490.)
Pixel Preview mode (View > Pixel Preview) Approximates how your artwork will appear when it is rasterized and
viewed in a web browser. (See “About pixel preview mode” on page 442.)
Flattener Preview palette (Window > Flattener Preview) The Flattener Preview palette (Window > Flattener
Preview) highlights areas of the artwork that meet certain criteria for flattening when saved or printed. (See “To
preview which areas of artwork will be flattened” on page 487.)
Soft-proofs Approximate how your document’s colors will appear on a particular type of monitor or output device.
Anti-aliasing Gives vector objects a smoother on-screen appearance and gives you a better idea of how vector
artwork will look when printed on a PostScript® printer. This is because screen resolution is relatively limited, but
vector artwork is often printed at a high resolution. To turn on anti-aliasing, choose Edit > Preferences > General
(Windows) or Illustrator > Preferences > General (Mac OS), select Anti-aliased Artwork, and click OK.
See also
“Soft-proofing colors” on page 207
41
Rulers, grids, and guides
To work with rulers
Rulers help you accurately place and measure objects in the illustration window. Rulers appear at the top and left
sidesofthe illustration window.The pointwhere 0appears on each ruleriscalledthe ruler origin. The default ruler
origin is located at the upper left corner of the artboard.
• To change the ruler origin, move the pointer to the upper left corner of the illustration window where the rulers
intersect, and drag the pointer to where you want the new ruler origin.
As you drag, a cross hair in the window and in the rulers indicates the changing ruler origin.
Note: Changing the ruler origin affects the tiling of patterns and the display of artwork in the Print dialog box.
• To restore the default ruler origin, double-click the upper left corner of the illustration window where the rulers
intersect.
• To show rulers, choose View > Show Rulers.
• To hide rulers, choose View > Hide Rulers.
Page 49

ADOBE ILLUSTRATOR CS2
User Guide
To change the unit of measurement
The default unit of measurement in Illustrator is points (a point equals .3528 millimeter). You can change the unit
that Illustrator uses for general measurements, strokes, and type. You can override the default unit while entering
values in boxes.
• To change the default unit of measurement, choose Edit > Preferences > Units & Display Performance (Windows)
or Illustrator > Preferences > Units & Display Performance (Mac OS), and then select units for the General,
Stroke, and Type options. If Show Asian Options is selected in the Type preferences, you can also select a unit
specifically for Asian type.
Note: The “General” measurement option affects rulers, measuring the distance between points, moving and trans-
forming objects, setting grid and guides spacing, and creating shapes.
• To set the general unit of measurement for the current document only, choose File > Document Setup, select
Artboard from themenuatthe topleftofthe Document Setupdialogbox,set theunitofmeasure youwanttouse,
and click OK.
• To change theunitofmeasurement when entering avalue in abox,followthe valuebyany of thefollowing abbre-
viations: inch, inches, in, millimeters, millimetres, mm, Qs (one Q equals 0.25 millimeter), centimeters, centimetres, cm, points, p, pt, picas, pc, pixel, pixels, and px.
When mixing picas and points, you can enter values as XpY, where X and Y are the number of picas and points (for
example, 12p6 for 12 picas, 6 points).
42
To work with the grid
The grid appears behind your artwork in the illustration window, and it does not print.
• To use the grid, choose View > Show Grid.
• To hide the grid, choose View > Hide Grid.
• To snap objects to gridlines, choose View > Snap To Grid, select the object you want to move, and drag it to the
desired location.
When the object’s boundaries come within 2 pixels of a gridline, it snaps to the point.
Note: When the View > Pixel Preview option is selected, Snap To Grid changes to Snap To Pixel.
• To change the spacing between gridlines, choose Edit > Preferences > Guides & Grid (Windows) or Illustrator >
Preferences > Guides & Grid (Mac OS).
You can also choose between two grid styles—dots and lines—and change the color of the grid.
To work with guides
Guides help you align text and graphic objects. You can create ruler guides (straight vertical or horizontal lines) and
guide objects (vector objects that you convert to guides). Like the grid, guides do not print.
You can choose between two guide styles—dots and lines—and you can change the color of guides by using either
predefined grid colors or colors you select using a color picker. By default, guides are locked in place, but you can
unlock them to move, modify, delete, or revert them.
• To show or hide guides, choose View > Guides > Show Guides or View > Guides > Hide Guides.
• To change guide settings, choose Edit > Preferences > Guides & Grid (Windows) or Illustrator > Preferences >
Guides & Grid (Mac OS).
• To unlock guides, deselect View > Guides > Lock Guides.
Page 50

ADOBE ILLUSTRATOR CS2
User Guide
To create guides
1 If the rulers aren’t showing, choose View > Show Rulers.
2 Position the pointer on the left ruler for a vertical guide or on the top ruler for a horizontal guide.
3 Drag the guide into position.
You can also convert vector objects to guides by selecting them and choosing View > Guides > Make Guides.
To make working with multiple guides easier, move them into a separate layer.
To move, delete, or release guides
1 Deselect View > Guides > Lock Guides.
2 Do any of the following:
• Move the guide by dragging or copying.
• Delete the guide by pressing Backspace (Windows) or Delete (Mac OS), or by choosing Edit > Cut or Edit > Clear.
• Delete all guides at once by choosing View > Guides > Clear Guides.
• Release the guide, turning it back into a regular graphic object, by selecting the guide and choosing View >
Guides > Release Guides.
43
To snap objects to anchor points and guides
1 Choose View > Snap To Point.
2 Select the object you want to move, and position the pointer on the exact point you want to align with anchor
points and guides.
Important: When snapping to a point, the snapping alignment depends on the position of the pointer, not the edges of
the dragged object.
3 Drag the object to the desired location.
When the pointer comes within 2 pixels of an anchor point or guide, it snaps to the point. The pointer changes from
a filled arrowhead to a hollow arrowhead when a snap occurs.
About Smart Guides
Smart Guides are temporary snap-to guides that help you create, align, edit, and transform objects relative to other
objects. To activate Smart Guides, choose View > Smart Guides.
You can use Smart Guides in the following ways:
• When you create an object with the pen or shape tools, use the Smart Guides to position a new object's anchor
points relative to an existing object.
• When you move an object, use the Smart Guides to align your cursor to construction guides and existing paths.
The alignment is based on the position of the pointer, not the edges of the object, so be sure to click to the exact
point you want to align to.
• When you transform an object, Smart Guides automatically appear to assist the transformation.
You can change when and how Smart Guides appear by setting Smart Guide preferences. (See “Smart Guide preferences” on page 44.)
Page 51

ADOBE ILLUSTRATOR CS2
User Guide
Note: When Snap To Grid is turned on, you cannot use Smart Guides (even if the menu command is selected).
Smart Guide preferences
Choose Edit > Preferences > Smart Guides & Slices (Windows) or Illustrator > Preferences > Smart Guides & Slices
(Mac OS) to set the following preferences:
Text Label Hints Displays information about the position the cursor is currently snapped to (such as center) as you
manipulate the cursor.
Construction Guides Displays guidelines in the file as you use Smart Guides.
Transform Tools Displays information when you scale, rotate, and shear objects.
Object Highlighting Highlights the object below the pointer as you drag around it.
Angles Sets angles at which you want guidelines drawn from the anchor points of a nearby object. You can set up to
six angles. Type an angle in the selected Angles box, select a set of angles from the Angles pop-up menu, or select a
set of angles from the pop-up menu and change one of the values in the box to customize a set of angles. The preview
reflects your settings.
Snapping Tolerance Specifies the number of points the pointer must be from another object for Smart Guides to
take effect.
44
To measure the distance between objects
The Measure tool calculates the distance between any two points and displays the results in the Info palette.
1 Select the Measure tool .
2 Do one of the following:
• Click the two points to measure the distance between them.
• Click the first point and drag to the second point. Shift-drag to constrain the tool to multiples of 45˚.
The Info palette shows the horizontal and vertical distances from the x and y axes, the absolute horizontal and
vertical distances, the total distances, and the angle measured.
About the Info palette
You use the Info palette to get information on the area beneath the pointer and on selected objects. To display the
Info palette, choose Window > Info.
• When an object is selected and a selection tool is active, the Info palette displays the object’s x and y coordinates,
width (W), and height (H). The values for width and height are affected by the Use Preview Bounds option in the
General preferences. When Use Preview Bounds is selected, Illustrator includes the stroke width (and other
attributes such as drop shadows) in the object’s dimensions. When Use Preview Bounds is deselected, Illustrator
measures only the dimensions defined by the object’s vector path.
• When you use the Pen tool or Gradient tool, or when you move a selection, the Info palette displays the change in
x (W), the change in y (H), the distance (D), and the angle as you drag.
• When you use the Zoom tool, the Info palette displays the magnification factor and the x and y coordinates after
you release the mouse button.
• When you use the Scale tool, the Info palette displays the percentage change in width (W) and height (H)and the
new width (W) and height (H) after the scaling is complete. When you use the rotate or reflect tools, the Info
palette displays the coordinates of the object’s center and the angle of rotation or reflection .
Page 52

ADOBE ILLUSTRATOR CS2
User Guide
• When uou use the Shear tool, the Info palette displays the coordinates of the object’s center, the angle of shear
axis , and the amount of shear .
• When you use the Paintbrush tool, the Info palette displays the x and y coordinates and the name of the current
brush.
• Select Show Optionsfromthe palettemenuorclick thedoublearrow on thepalette tabtoshowvaluesfor thefill
and stroke colors of the selected object and the name of any pattern, gradient, or tint applied to the selected object.
Note: If you select multiple objects, the Info palette displays only the information that is the same for all selected objects.
Customizing the work area
To save a custom workspace
By saving the current screen layout as a workspace, you’ll be able to return to it, even if you move or close a palette.
1 Choose Window > Workspace > Save Workspace.
2 Enter a name for the workspace, and click OK.
45
To switch between workspaces
❖ Choose Window > Workspace, and select a workspace from the submenu.
Assign keyboard shortcuts to each workspace to navigate among them quickly.
See also
“To customize keyboard shortcuts” on page 525
To manage workspaces
1 Choose Window > Workspace > Manage Workspaces.
2 Do any of the following:
• To rename a workspace, select it, and edit the text.
• To delete a workspace, select it, and click the Delete button.
• To duplicate a workspace, select it, and click the New button.
Setting preferences
About preferences
Preferences are options regarding how you want Illustrator to work, including those for display, tools, ruler units, and
exporting information. Your preferences are saved in a file called AIPrefs (Windows) or Adobe Illustrator Prefs
(Mac OS), which is launched each time you start Illustrator. To restore Illustrator’s default settings, you can remove
or rename preferences file and relaunch Illustrator. This can be helpful if you are having problems with the application.
Page 53

ADOBE ILLUSTRATOR CS2
User Guide
Note: It is safe to remove the entire Adobe Illustrator CS Settings folder. This folder contains various preferences that can
be regenerated.
You set preferences in the Preferences dialog box. To open the Preferences dialog box, choose Edit > Preferences
(Windows) or Illustrator > Preferences (Mac OS), followed by the type of preferences you want. To switch to
different options in the Preferences dialog box, select an option from the menu at the top left of the Preferences
dialog box. You can also click Next to display the next options, or click Prev to display the previous options.
About plug-in modules
Plug-in modules are software programs that add features to Adobe Illustrator. A number of special effects plug-ins
come with your program and are automatically installed in the Plug-ins folder inside the Illustrator folder.
To get information about a plug-in, choose Help > About Plug-ins (Windows) or Illustrator > About Plug-ins
(Mac OS). To use a different folder as your plug-ins folder, choose Edit > Preferences > Plug-ins & Scratch Disks
(Windows) or Illustrator > Preferences > Plug-ins & Scratch Disks (Mac OS), and select the folder. Then restart
Illustrator in order for the plug-in modules to take effect.
You can install any commercial plug-in designed for use with Photoshop or Illustrator. To install an Adobe Systems
plug-in module,use the installer if one is provided.Otherwise, draga copyof themodule to the Plug-ins folder inside
the Illustrator folder. Then restart Illustrator for the plug-in to take effect. To install a third-party plug-in module,
follow the installation instructions that came with the plug-in module.
46
Note: Theopenarchitectureofthe AdobeIllustrator programallowsdevelopersoutside of Adobetocreatefeaturesthat
are accessible from within Adobe Illustrator. If you are interested in creating plug-in modules compatible with Adobe
Illustrator, see the Adobe Systems U.S. website at
www.adobe.com.
About startup files
When you create a new document from scratch, Illustrator uses a startup file to define the default look and attributes
of the document. There are two startup files: one for CMYK documents and one for RGB documents. These files are
located in the Plug-ins folder in the Adobe Illustrator application folder.
By customizing a startup file, you can redefine the default graphic styles, swatches, brushes, symbols, actions, graph
designs, fill and stroke attributes, viewing preferences, magnification level, document size, illustration window size,
and scroll position for new documents. Creating a custom startup file gives you easy access to document features that
you use most frequently, by making them available in every new Illustrator file you create.
Create a template instead of customizing the startup files. You can create as many templates as you want, whereas
you are limited to customizing two startup files.
See also
“About templates” on page 34
To create a custom startup file
1 Open the startup file you want to customize (Adobe Illustrator Startup_CMYK or Adobe Illustrator
Startup_RGB) in the Plug-ins folder in the Adobe Illustrator application folder.
Make a copy of the original startup file in case you need it again.
2 Delete any existing swatches, graphic styles, brushes, or symbols you don’t want to retain.
Page 54

ADOBE ILLUSTRATOR CS2
User Guide
Note that you must delete them from their respective palettes as well as from the artwork in the startup file.
3 Do any of the following:
• Create any colors, patterns, and gradients you want, and save them as swatches. You can also import swatches
using the Swatch Libraries command and then move the swatches you want in the startup file into the default
Swatches palette.
• Save any graph designs that you want available in your files using the Graph Design dialog box. As with the new
paint style attributes, add the graphs to the artwork in the startup file so you can see and refer to the graphs later
if necessary.
• Create any graphic styles you want and save them to the Graphic Styles palette.
• Create any brushes you want and save them to the Brushes palette.
• Create any symbols you want and save them to the Symbols palette.
4 Select theoptions youwantasdefault settings from thefollowing:Viewpreferences (fromthe View menu), ruler
origins, page origins, print settings (in the Print dialog box, File > Print), and actions.
5 Save the startup file and restart Illustrator.
47
Recovery and undo
Undoing and redoing changes
You can use the Undo command (Edit > Undo) to correct mistakes you make while using the Adobe Illustrator
program. You can even undo an operation after you select the Save command (but not if you have closed and then
reopened the file). If an operation cannot be undone, the Undo command is dimmed.
Depending on how much memory is available, you can undo an unlimited number of the last operations you
performed, in reverse order, by repeatedly choosing the Undo command.
You can use the Redo command (Edit > Redo) to reapply operations you previously undid. You can also revert a file
to the version that was last saved (but not if you have closed and then reopened the file) by choosing File > Revert.
You cannot undo this action.
Page 55

Chapter 4: Adobe Bridge
The basics of Bridge
About Adobe Bridge
AdobeBridgeisthe controlcenterfor AdobeCreativeSuite. Youuse it to organize,browse, andlocatethe assets you
need to create content for print, the web, and mobile devices. Adobe Bridge keeps native PSD, AI, INDD, and Adobe
PDF files as well as other Adobe and non-Adobe application files available for easy access.You can drag assets into
your layouts as needed, preview them, and even add metadata to them. Bridge is available independently, as well as
from within Adobe Photoshop, Adobe Illustrator, Adobe InDesign, and Adobe GoLive.
File browsing From Bridge youcan view,search, sort,manage, andprocess imagefiles.You canuse Bridge to create
new folders; rename, move, and delete files; edit metadata; rotate images; and run batch commands. You can also
view information about files and data imported from your digital camera.
Version Cue If you have Adobe Creative Suite, you can use Bridge as a central location from which to use Adobe
Version Cue. From Bridge, you can browse all the files in a project in one place without having to start the native
application for each file, including non-Adobe application files. Also, you can create new Version Cue projects, delete
projects, create versions, save alternates, and set access privileges in Bridge. See “Working with Version Cue in
Bridge” on page 69.
48
Bridge Center If you have Adobe Creative Suite, Adobe Bridge includes Bridge Center, the “dashboard” of Adobe
Creative Suite, where you can view news readers in your web browser, see your most recent activity, read about tips
and tricks for using Adobe products, save groups of files, and more. Adobe Creative Suite users can also use Bridge
to specify color management settings and access scripts that help automate your workflow. See “About Bridge
Center” on page 61.
Camera Raw If you have Adobe Photoshop installed, you can open and edit camera raw files from Bridge and save
them in a Photoshop-compatible format. You can edit the image settings directly in the Camera Raw dialog box
without starting Photoshop. If you don’t have Photoshop installed, you can still preview the camera raw files in
Bridge. See “To open files in Bridge” on page 56.
Stock Photos Click Adobe Stock Photos from the Favorites pane in Bridge to search leading stock libraries for
royalty-free images. You can download low-resolution, complementary versions of the images and try them out in
your projects before purchasing them. See “About Adobe Stock Photos” on page 71.
Color management You can use Bridge to synchronize color settings across applications. This synchronization
ensures that colors look the same no matter which Creative Suite application you view them in. See “To synchronize
color settings across Adobe applications” on page 202.
See also
“The Bridge work area” on page 48
The Bridge work area
These are the main components of the Adobe Bridge window:
The menu bar Contains commands specific to Bridge. In Windows®, the menu bar is at the top of the Bridge
window. In Mac OS®, the menu bar is located at the top of the screen.
Page 56

ADOBE ILLUSTRATOR CS2
User Guide
The Look In menu Lists the folder hierarchy, as well as favorite and recent folders. This menu gives you a quick way
to find folders containing the items you want to display. The menu is at the top of the Bridge window.
The shortcut buttons Help you work efficiently with your files. They are located to the right of the Look In menu, at
the top of the Bridge window.
The Favorites panel Gives you quick access to folders as well as to Version Cue, Adobe Stock Photos, collections, and
Bridge Center (Adobe Creative Suite only). Like all panels, it’s located on the left side of the Bridge window.
The Folders panel Shows the folder hierarchy. Use it to navigate to the correct folder.
The Preview panel Displays a preview of the selected file, separate from and typically larger than the thumbnail
image displayed in the content area. You can reduce or enlarge the preview.
The Metadata panel Contains metadata information for the selected file. If multiple files are selected, shared data
(such as keywords, date created, and exposure setting) is listed.
The Keywords panel Helps you organize your images by attaching keywords to them.
The content area Displays thumbnail previews of the items in the current folder, along with information about those
items.
The bottom of the Bridge window displays status information and contains buttons for toggling the display of the
panels, a slider for setting the size of thumbnails, and buttons for specifying the type of display in the content area.
49
A
B
Bridge window in filmstrip view
A. The Look In menu B. The Metadata panel C. The shortcuts buttons D. The content area
C
D
Page 57

ADOBE ILLUSTRATOR CS2
User Guide
See also
“To create and close Bridge windows” on page 50
“To use Bridge in Compact mode” on page 50
To start and quit Bridge, and to return to an application
Do any of the following:
• To open Bridge from an application, choose File > Browse from your application.
• (Windows) To open Bridge directly, choose Adobe Bridge from the Start menu.
• (Mac OS) To open Bridge directly, double-click the Adobe Bridge icon . By default, this is located in the Appli-
cations/Adobe Bridge folder.
• To quit Bridge, choose File > Exit (Windows) or Bridge > Quit Bridge (Mac OS).
• To return to the last open application that started Bridge, choose File > Return To [Application].
See also
“About Adobe Bridge” on page 48
50
“To manage files with Bridge” on page 57
To create and close Bridge windows
❖ Do one of the following:
• Choose File > New Window to create a full-size Bridge window.
• Choose File > Close Window. In Windows, this command quits Bridge as well.
See also
“The Bridge work area” on page 48
“To use Bridge in Compact mode” on page 50
To use Bridge in Compact mode
Switch to Compact mode when you want to shrink the Bridge window, hiding the panels and simplifying the content
area. A subset of common Bridge commands remains available from the pop-up menu at the top right of the window.
By default, the Compact mode Bridge window floats on top of all windows. (In Full mode, the Bridge window can
movebehindapplicationwindows.)Thisfloatingwindowisusefulbecauseitisalwaysvisibleandusableasyouwork
in different applications. For instance, you might use Compact mode after you select the files you plan to use, and
then drag them into the application as you need them.
1 Click the Switch To Compact Mode button
2 Do any of the following:
• Choose commands from the menu at the top right of the Bridge window.
• Click the Switch To Ultra Compact Mode button to hide the content area, further minimizing the Bridge
window. You can click the button again to return to Compact mode.
.
Page 58

ADOBE ILLUSTRATOR CS2
User Guide
• Click the Switch To Full Mode button to return to Full mode, displaying the content area and the panels, and
letting Bridge move behind the current application window.
See also
“The Bridge work area” on page 48
To adjust the Bridge window
You can adjust the Bridge window by moving and resizing the panels. For example, you can enlarge the Preview panel
to display bigger thumbnails. You can’t, however, move panels outside the Bridge window.
❖ Do any of the following:
• Drag a panel by its tab up or down into another panel area.
• Drag the horizontal divider bar between panels to make them larger or smaller.
• Drag the vertical divider bar between the panels and the content area right or left to resize the panels or content
area.
• Click the Show/Hide Panes button at the lower left of the Bridge window to display or hide the panels.
• Choose View, followed by the name of the panel you want to display or hide.
51
See also
“The Bridge work area” on page 48
To select Bridge workspaces
A Bridge workspace is a certain configuration or layout of the work area. You can select either a premade one or a
custom one that you have previously saved. You can use a preset configuration or switch between different configurations best suited for specific tasks, such as sorting photos.
Note: A Bridge workspace is different from a Version Cue Workspace. Your work in Bridge workspaces has no effect on
the Version Cue Workspaces.
❖ Choose Window, followed by the name of the workspace you want, or choose Window > Workspace, followed by
one of the following commands:
Lightbox Displays just the content area of Bridge, so that you can concentrate on viewing the files.
File Navigator Displays the content area in Thumbnails view, along with the Favorites panel and Folder panel.
Metadata Focus Displays the content area in Thumbnails view, along with the Metadata panel prominently shown.
Filmstrip Focus Displays just the content area, in Filmstrip view.
See also
“To save and delete Bridge workspaces” on page 51
To save and delete Bridge workspaces
You can save the current Bridge layout (that is, the work area configuration) as a workspace and reuse it later. By
saving Bridge in various configurations, you can work in (and quickly switch between) different layouts of the work
area. For instance, you might use one workspace to sort new photos and another to work with Adobe InDesign files.
Page 59

ADOBE ILLUSTRATOR CS2
User Guide
Note: A Bridge workspace is different from a Version Cue Workspace. Your work in Bridge workspaces has no effect on
Version Cue Workspaces.
❖ Choose Window > Workspace, followed by one of these commands:
Save Workspace Saves the current Bridge layout as a workspace so that you can reuse it later, even if you move a
panelorchange theviewinthe contentarea. If youchoosethiscommand,enter anamefor theworkspace andclick
Save.You canalsoassignakeyboard shortcut to theworkspace andspecifywhether to save thelocationofthe Bridge
window as part of the workspace.
Delete Workspace Deletesthe savedworkspace.Ifyou choose this command,choosethe workspacefromthe menu,
and click Delete.
Reset To Default Workspace Restores the workspace to the default configuration.
See also
“To select Bridge workspaces” on page 51
To set Bridge preferences
1 Choose Edit > Preferences (Windows) or Bridge > Preferences (Mac OS).
2 Select any of the preferences categories on the left:
General Controls the general appearance settings. You can use this category to specify such preferences as how dark
to make the content area for thumbnails, what information to show with thumbnails, and what to include in the
Favorites panel. See “Bridge General preferences” on page 52.
52
Metadata Controls which sections and fields are displayed in the Metadata panel.
Labels Assigns names to each color label and specifies whether you need to press Control as part of the keyboard
shortcut combination to apply labels and ratings to files.
File Type Associations Specifies which application to use from Bridge to open files of the named type. For any file
type, you can click the name of the application (or None) and click Browse to locate an application to use. You can
also reset the file type associations to their default settings as well as hide any file types that don’t have an associated
application.This affects onlythose files thatyou openwith Bridge, and overrides the Explorer (Windows) andFinder
(Mac OS) settings.
Adobe Stock Photos Specifies Adobe Stock Photos settings. See “To set Adobe Stock Photos preferences” on page 79.
Advanced Specifies advanced settings, including cache options and language options. See “Bridge Advanced prefer-
ences” on page 53.
3 Click OK.
Bridge General preferences
Set any of the following General preferences and click OK:
Background Specifies the darkness of the content area in which thumbnails are shown.
Show Tooltips Specifies whether to display Bridge help information when you position the pointer over an item.
(This preference does not affect settings for Version Cue tool tips, which display metadata for items.)
Page 60

ADOBE ILLUSTRATOR CS2
User Guide
Additional Lines Of Thumbnail Metadata Specifies whether to show additional metadata information with thumb-
nailsinthe contentarea. If youselectthisoption, youcan choose thetypeofmetadatatoshowfromthe associated
menu. You can display up to three extra lines of information.
Favorites Items Specifies what items to show in the Favorites panel. Certain options are dimmed if you do not have
those items.
Reveal Scripts In Finder Opens the folder that contains scripts (the commands available in the Tools menu).
Reset All Warning Dialogs Resets warning notices in Bridge to their default settings.
See also
“To set Bridge preferences” on page 52
Bridge Advanced preferences
Set any of the following Advanced preferences and click OK:
Do Not Process Files Larger Than Specifies the maximum file size of documents for which Bridge automatically
creates thumbnails. Displaying large files can slow performance.
Number Of Recently Visited Folders To Display In The Look In Popup Sets the number of most recently viewed
folders that appear in the Look In menu.
53
Language Sets the language used in the Bridge interface. Select Automatic to set the language to the one specified
for Bridge by the program that installed it.
Show Camera Raw Interface On Open Opens camera raw files in the Adobe Camera Raw dialog box in Adobe
Photoshop.
Use A Centralized Cache File Places the two cache files created for each folder you view in a centralized folder. A
centralized cache is generally easier to use than a distributed cache. For instance, when the cache is centralized, you
don’t have to search in multiple, distributed locations if you want to remove the cache. To specify a new name or
location for this centralized cache folder, click Choose.
Use Distributed Cache Files When Possible Places the two cache files created for each folder you view in the viewed
folder,ifpossible.Forinstance,it’snotpossibletoplacethecachefilesintheviewedfolderifthatfolderisonaburned
CD. In that case, Bridge places the cache files in the centralized folder instead. However, if you are burning a CD,
using a distributed cache means that you don’t have to export the cache to the CD, because it is already in the folder
you are burning to the CD. Also, using distributed cache files preserves the cache in a folder if you rename that folder.
See “To work with the cache in Bridge” on page 53.
Note: Cache files are hidden files. To view them in Bridge, choose View > Show Hidden Files.
See also
“To set Bridge preferences” on page 52
To work with the cache in Bridge
The cache stores thumbnail, metadata, and file information to shorten loading times when you return to a previously
viewed folder. However, storing the cache takes up disk space.
Page 61

ADOBE ILLUSTRATOR CS2
User Guide
Note: Purging the cache deletes the metadata cache and thumbnail cache. If the metadata can’t be written to a file, label
and rating information is lost as well.
❖ Choose any of the following commands from the Tools > Cache submenu:
Build Cache For Subfolders Builds, as a background process, a cache for the selected folder and all the folders within
it (except aliases/shortcuts to other folders), shortening the time spent waiting for the cache to be displayed as you
look in subfolders.
Purge Cache For This Folder Clears the cache for the selected folder. This command is useful if you suspect that the
cache for a folder is old and needs to be regenerated.
Purge Central Cache Clears the entire centralized cache and any distributed cache in the currently viewed folder,
freeing room on the hard drive. The command does not otherwise clear local caches.
Export Cache Exports the cache, allowing you to burn a CD with the cache already generated. Because the folder
cache is written into the folder, the thumbnail cache and metadata cache are available after you burn the CD. This
option is active only if you chose Use A Centralized Cache File in the Preferences dialog box.
See also
“About Adobe Bridge” on page 48
54
Files and folders in Bridge
To view file and folder thumbnails in Bridge
The content area of Bridge displays thumbnails of the files and folders of the selected folder, along with information
about them (depending on your view).
You can specify how you want files and folders are displayed in the content area; for instance, you can decide how
big thumbnails should be, how they should appear, and whether file information should be displayed.
❖ Do any of the following:
• Drag the Thumbnail slider at the bottom of the Bridge window to adjust the size of thumbnails. You can also
click the buttons at either side of the Thumbnail slider to minimize or maximize the thumbnails.
• Clickthe ThumbnailViewbutton atthe bottom of theBridgewindoworchooseView > As Thumbnails to
display items in a grid.
• Click the Filmstrip View button or choose View > As Filmstrip to display thumbnails in a scrolling list along
with an extra-large thumbnail of the currently selected item. Click the Back button or Forward button directly
below the extra-large thumbnail to go to the previous or next thumbnail. Click the Switch Filmstrip Orientation
button to change from a horizontal slide show to a vertical one. Note that you can page through a PDF preview
in Filmstrip view.
• Click the Details View button or choose View > As Details to display a scrollable list of thumbnails along
with informationabout theselectedfile, such as itscreationdate, file type,pixel size,and file size.For VersionCue
files, there is additional information about the number of versions or alternates as well as enhanced status information along with the current version comment.
Page 62

ADOBE ILLUSTRATOR CS2
User Guide
• Click the Versions And Alternates View button or choose View > As Versions And Alternates to display a
scrollable list of thumbnails along with thumbnails of any Version Cue alternates and versions for each item. (Only
thecurrentfileappearsunlessyouhavecreatedanalternatesgroupcontainingthefileorcreatedpreviousversions
of the file.) Click Alternates View or Versions View at the top right of the content area to display thumbnails of
alternates or versions. In Alternates View, you can also create alternates groups containing files that are not in the
current folder.
• Choose View > Show Thumbnail Only to view thumbnails without any text information listed. However, Version
Cue tool tips still display Version Cue information when you position the pointer over the thumbnail.
• Choose View > Slideshow to view thumbnails as a slide show that takes over the entire screen. This is a quick and
easy waytodisplay andworkwithlarge versions of allthe graphics filesinafolder.Instructionsonhow to usethe
slide show are displayed on the screen when you choose this command.
Depending on the view you’re in, you can display extra file information by positioning the pointer over a thumbnail
in the content area. For files in Version Cue projects, you can also choose File > Versions or File Alternate. This
command opens a dialog box that lets you work with the file’s versions or alternates without having to select that view
in the Bridge content area.
To specify how files and folders are shown in Bridge
You can specify what type of files and folders you want to display as thumbnails in the content area, as well as the
order in which to display them.
55
❖ Choose any of the following commands from the View menu:
• Sort, followed by the order in which you want to sort files. Choose Ascending to sort in ascending rather than
descending order. Choose Manually to sort by the last order in which you dragged the files.
• Show Hidden Files to display hidden files, such as cache files and Version Cue files that have been provisionally
removed (not permanently deleted) from Version Cue projects.
• Show Folders to display folders as well as individual files.
• Show All Files to display all files regardless of type, even non-Adobe files that Bridge doesn’t normally display.
• Show Graphic Files Only to display only files in graphic file formats, such as EPS, JPEG, BMP, PS, TIFF, and GIF.
• Show Camera Raw Files Only to display only camera raw files.
• Show Vector Files Only to display only files created with drawing programs such as Adobe Illustrator, and EPS and
PS files.
• Refresh (or choose Refresh from the Folders panel menu) to update the content area. This is useful, for instance,
when you perform certain Version Cue actions that don’t automatically refresh the view in the content area.
Closing and reopening Bridge also refreshes the view.
Youcan also clickUnfilteredatthe topright of theBridgewindowand choose thefiles youwanttodisplay basedon
their rating or label. The Unfiltered menu operates independently of the View > Sort commands.
To navigate folders and files with Bridge
❖ Do any of the following:
• Select the Folders panel and click to select the folder you want. Click the plus sign (Windows) or triangle (Mac OS)
next to a folder or double-click the folder to open subfolders within it.
• Select the Favorites panel and click to select the folder you want.
Page 63

ADOBE ILLUSTRATOR CS2
User Guide
• Choose a folder from the Look In menu. You can click the Go Back button, Go Forward button, or Go Up button
next to the menu to navigate within the current folder listed in the menu.
See also
“To specify how files and folders are shown in Bridge” on page 55
To select files in Bridge
Before you can work with a file, you need to select it. You can select more than one file at a time.
❖ Do one of the following in the current folder:
• Click the thumbnail of a file.
• To select contiguous files, Shift-click them.
• To select noncontiguous files, Ctrl-click (Windows) or Command-click (Mac OS) them.
• To select all the files, choose Edit > Select All.
• To select all labeled files, choose Edit > Select Labeled.
• To select all unlabeled files, choose Edit > Select Unlabeled.
• To select the opposite of the current selection, choose Edit > Invert Selection.
• To deselect all selected files, choose Edit > Deselect All.
56
See also
“To manage files with Bridge” on page 57
“To manage folders with Bridge” on page 58
To open files in Bridge
You can open files in Bridge, even files that were not made with Adobe Creative Suite applications.
1 Select the file in the current folder.
2 Do one of the following:
• Choose File > Open.
• Press Enter (Windows) or Return (Mac OS).
• Double-click the file in the content area or Preview panel.
• Choose File > Open With, followed by the name of the application with which to open the file.
• Drag the file into the working area of an application, such as an open Illustrator document.
• Drag the file onto the application icon.
• Choose File > Open With Camera Raw to edit the Adobe camera raw settings for the file.
See also
“To manage files with Bridge” on page 57
“To manage folders with Bridge” on page 58
Page 64

ADOBE ILLUSTRATOR CS2
User Guide
To manage files with Bridge
Adobe Bridge makes it easy to drag and drop files, move them between folders, copy and duplicate them, and
otherwise manipulate them.
Note: From Bridge,you canalsouse AdobeVersion Cuetomanagefiles youauthorinAdobe Creative Suiteapplications.
You can create and manage revisions to files kept in Version Cue projects. Version Cue is also a convenient environment
for collaborative file management in workgroups. You can manage not only Adobe Creative Suite files but also nonAdobe files.
❖ Do any of the following:
To delete files Select the files and click the Delete button , click Delete on your keyboard, choose File > Send To
Recycle Bin (Windows), choose File > Move To Trash (Mac OS), drag the file to the Recycle Bin or Trash, or choose
Edit > Cut.
To copy files and folders Select the files or folders and choose Edit > Copy, or Ctrl-drag (Windows) or Option-drag
(Mac OS) the file or folders to a different folder.
To duplicate files Select the files and choose Edit > Duplicate.
To paste files Choose Edit > Paste.
To move files to another folder Select the files and drag them to a different folder. (When you search for Adobe
Stock Photos, you can’t drag images to other areas, because some images may be comp thumbnails. To drag a comp
image, first download it and then drag it from the downloaded comp’s folder.)
57
To quickly attach an image to an e-mail message, drag the image from Bridge and drop it into the e-mail message.
To rename files Click the file name, type a new name, and press Enter (Windows) or Return (Mac OS).
To manually reorder files in the content area Drag the file to a new location in the content area.
To display the location of a file in the operating system Select the file and choose File > Reveal In Explorer
(Windows) or File > Reveal In Finder (Mac OS).
To find the location of a file in a collection Select a file and choose File > Reveal In Bridge. By default, if you select a
file in a collection, it is listed as being located in the folder “File Results.” Selecting Reveal In Bridge moves you to the
folder in which the file is located.
To place files into an application Select thefiles andchooseFile > Place, followed by thenameofthe application. For
instance, you can use this command to place a JPEG image into Illustrator. You can also drag files from Bridge into
an application. Depending on the file, the document into which you want to place it may need to be open first.
To eject attached media such as CDs and DVDs Select the medium and choose File > Eject.
To drag files out of Bridge Select the files and drag them onto the desktop or into another folder. This action copies
the file (Windows) or moves the file (Mac OS) onto the desktop or folder.
To drag files into Bridge Select one or more files on the desktop, in a folder, or in another application that supports
drag and drop, and drag them into the content area in Bridge. The files are moved from their current folder into the
one displayed in Bridge. (If the file you are dragging is in a different mounted volume than Bridge, the file is copied
into Bridge.)
Drag a file or folder onto the Preview panel to display the contents of the folder in Bridge.
Page 65

ADOBE ILLUSTRATOR CS2
User Guide
See also
“To search for files and folders with Bridge” on page 60
“To batch-rename files with Bridge” on page 63
“To run automated tasks with Bridge” on page 62
“Working with Version Cue in Bridge” on page 69
To manage folders with Bridge
❖ Do any of the following:
To create new folders Click the Create A New Folder button or Choose File > New Folder. Then, enter a name
when the folder appears in the content area.
To delete folders Select the folder and click the Delete button , press Delete on your keyboard, or choose File >
Move To Recycle Bin (Windows) or File > Move To Trash (Mac OS).
To add folders to Favorites Choose a folder from the Look In menu or Folders panel or select it in the content area.
Then choose File > Add To Favorites. You can also drag the folder from the content area to the Favorites panel.
To remove folders from Favorites In the Favorites panel, select the folder you want to remove. Then choose File >
Remove From Favorites.
58
To reorganize folders in the Favorites panel Drag the folder to the desired location in the panel.
To rename folders Click the folder name, type a new name, and press Enter (Windows) or Return (Mac OS).
See also
“About Adobe Bridge” on page 48
“To manage files with Bridge” on page 57
To rotate images with Bridge
You can rotate the view of JPEG, PSD, TIFF, and camera raw file images in Bridge. Rotating an image in Bridge may
rotate it in the application in which it was created as well. Rotating does not affect the data in the image file.
1 Select one or more images in the content area.
2 Do one of the following:
• To rotate the images 90˚ clockwise, click the Rotate 90˚ Clockwise button or choose Edit > Rotate 90˚
Clockwise.
• To rotate the images 90˚ counterclockwise, click the Rotate 90˚ Counterclockwise button or choose
Edit > Rotate 90˚ Counterclockwise.
• To rotate the image 180˚, choose Edit > Rotate 180˚.
See also
“About Adobe Bridge” on page 48
“To manage files with Bridge” on page 57
Page 66

ADOBE ILLUSTRATOR CS2
User Guide
To label files with Bridge
Labeling files with a color is a flexible way to quickly mark a large number of files. Using the View > Sort menu or
Unfilter button, you can choose to view files according to their label.
For example, suppose you’ve just imported a large number of images and are viewing them in Bridge. As you review
each new image, you can label those you want to keep. After this initial pass, you can use the Unfilter button to
display and work on files you’ve labeled with a particular color.
You can assign names to labels through the Preferences dialog box. The name is then added to the file’s metadata
when you apply the label.
Note: When you view folders, Bridge shows both labeled and unlabeled files until you choose another option. Also,
purging the cache deletes labels from files that don’t support XMP write (such as BMP, DCS, Pict, PS6 PDF, and PSB
files), locked files, or read-only files (such as files on CDs).
1 Select one or more files.
2 Do one of the following:
• To label files, choose a color from the Label menu.
• To remove labels from files, choose Label > No Label.
59
See also
“About Adobe Bridge” on page 48
“To specify how files and folders are shown in Bridge” on page 55
To rate files with Bridge
You can assign ratings to files, awarding from zero to five stars. Using the View > Sort menu or Unfilter button, you
can choose to view files according to their rating.
For example, suppose you’ve just imported a large number of images and are viewing them in Bridge. As you review
each newimage,you canratethemfrombesttoworst.After this initialpass, youcan view only filesyou’verated with
four or five stars and work on those.
1 Select one or more files.
2 Do any of the following:
• In Thumbnail view, click the dot representing the number of stars you want to give the file. (Dots do not appear
in very small thumbnail views. If necessary, rescale the thumbnail view until the dots appear.)
• Choose a rating from the Label menu.
• To add one star, choose Label > Increase Rating.
• To remove one star, choose Label > Decrease Rating.
• To remove all stars, choose Label > No Rating or click the No Rating icon on the thumbnail of the file.
See also
“About Adobe Bridge” on page 48
“To specify how files and folders are shown in Bridge” on page 55
Page 67

ADOBE ILLUSTRATOR CS2
User Guide
To search for files and folders with Bridge
You can perform searches with Bridge. You can narrow your search by adding multiple search criteria. You can even
save your search criteria as a collection, so that you can perform the same search again later.
Note: For information on searching for Adobe Stock Photos with Bridge, see Help.
1 Choose Edit > Find.
2 In the Find dialog box, choose a source folder from the Look In menu. By default, the menu displays the currently
active folder. Click the Browse button to navigate to another folder.
3 (Optional) Select Include All Subfolders to expand the search to any subfolders in the source folder.
4 (Optional) Select Search Past Versions Of Version Cue Files to include past versions of Adobe Version Cue files,
as well as current ones, in the search.
5 (Optional) Select Show Find In A New Browser Window to display the search results in a new Bridge window. If
left unselected, the search results appear in the content area of the current window.
6 Choose a criterion for your search by selecting an option from the leftmost Criteria menu.
7 Select a limiter from the center Criteria menu.
8 Enter the search text in the text box at the right, if needed. You can enter basic search terms such as AND, OR,
and * (for wild cards).
9 To add search criteria, click the plus sign button. To remove search criteria, click the minus sign button.
10 Click Find. Bridge displays the files that match the search criteria, and you can navigate through the files.
11 (Optional) To save the search criteria to perform the same search again, click Save As Collection. Enter a name
for the collection. Select Start Search From Current Folder to search from the same folder in the future. Then, click
Save. The search criteria are saved in the Collections folder listed in the Favorites panel.
60
See also
“To manage files with Bridge” on page 57
“To search with criteria saved as collections” on page 60
To search with criteria saved as collections
If you saved search criteria by using the Save As Collection option in the Find dialog box, you can run that search
again by using that collection.
1 Select Collections in the Favorites panel or Look In menu.
2 Double-click the collection you want.
A new Bridge window appears containing the results of the search.
See also
“To manage files with Bridge” on page 57
“To search for files and folders with Bridge” on page 60
Page 68

ADOBE ILLUSTRATOR CS2
User Guide
Bridge Center
About Bridge Center
If you are working with the Adobe Creative Suite, Bridge Center gives you quick access to your most recent files and
folders, RSS newsreaders for the latest information, tips and tricks for using Adobe products, color management
features, and Help documentation. It even lets you start new Version Cue projects.
To display Bridge Center, select it in the Favorites panel.
Note: If you don’t see Bridge Center in the Favorites panel, make sure that Center is selected in the General preferences.
See “To set Bridge preferences” on page 52.
Adobe Stock Photos Opens the Adobe Stock Photos home page in Bridge.
Saved File Groups Lists sets of files that you have saved as a group, even if they are being used in separate applica-
tions. When you create a saved file group, you assemble and name a set of files, which Bridge then closes. When you
open a saved file group, Bridge reopens the current version of those files, launching the appropriate Adobe Creative
Suite applications as needed. See “To work with saved file groups in Bridge Center” on page 61.
Note: Saved file groups do not preserve versions of files; groups always contain the most current version of the files. For
instance, suppose you include the file logo.jpg in a saved file group. If you open the saved file group later, edit the logo.jpg
file, and save it in another group, both saved file groups will contain the same logo.jpg file.
61
Recent Folders Lists your most recently visited folders. See “To use recent folders or files from Bridge Center” on
page 62.
Recent Files Displays the most recently opened files.
RSS Reader RSS displays shared web content, such as headlines from different websites and the latest information
on products from Adobe. RSS stands for Really Simple Syndication and is an XML format used to gather and
distribute web content while reducing traffic to websites. See “To use RSS content in Bridge Center” on page 62.
Tips And Tricks Lists helpful tips and tricks for getting the most out of Adobe Creative Suite and other Adobe appli-
cations. Click the Next button or Previous button to go to the next or previous tips and tricks topic.
Note: ClickClose or Open locatedabove thebottomtabstohideorrevealthe RSS Reader area andTipsAnd Tricks area.
New Version Cue Project Opens the New Version Cue project and displays a dialog box for creating a new project.
Color Management/Open Color Settings Opens the Color Settings dialog box so that you can manage color for
Adobe Creative Suite applications. Also displays the Adobe Creative Suite Color Settings state (Synchronize or
Unsynchronize).
Open Help Starts Adobe Help Center.
To work with saved file groups in Bridge Center
1 Click Bridge Center in the Favorites panel.
Note: Bridge Center is available with Adobe Creative Suite only.
2 In the Saved File groups, do any of the following:
• To save your currently open files as a group, click the text Save Open Files into a File Group.
• To open a saved file group, select the group and click the text Open this File Group.
• To display a group in the content area, click the name of that file group.
Page 69

ADOBE ILLUSTRATOR CS2
User Guide
• To delete a saved file group, select the group and click Delete at the bottom.
To use recent folders or files from Bridge Center
1 Click Bridge Center in the Favorites panel.
Note: Bridge Center is available with Adobe Creative Suite only.
2 In the Recent Folders or Recent Files Group, do any of the following:
• To display a folder in the content area, click that folder.
• To sort the folders by name or date, click Name or Date.
• To open a file in the default application, click the file thumbnail or file name.
• To display the folder that contains a file, click the Shell icon next to the file name. The folder is displayed in
the content area.
• To sort the folders by name, date, or type, click Name, Date, or Type.
To use RSS content in Bridge Center
RSS (Really Simple Syndication) is an XML format for gathering and distributing web content. It displays web
content, such as the latest information on Adobe products.
62
1 Click Bridge Center in the Favorites panel.
Note: Bridge Center is available with Adobe Creative Suite only.
2 In the RSS Reader section, do any of the following:
• To view content, clicktoselectanRSS site from thelistonthe left,and then clicktoselectaspecific topicfromthe
list on the right. If you want, click More to start your default web browser and display further information on the
topic from that RSS website.
• To add the URL of an RSS site, click the plus sign (+) at the top of the tab.
• To delete an RSS site from the list, select the site and click the minus sign (-).
• To specify how often to check RSS sites for updates, click Open Settings and enter a number specifying the
interval, in hours.
• To check the RSS sites for updates manually, Click Update Now.
Running automated tasks with Bridge
To run automated tasks with Bridge
The Tools menu contains submenus for various commands available in the different Adobe Creative Suite applications. Forinstance, if youhaveAdobe Photoshopinstalled,you canuse thecommandsunder theTools >Photoshop
submenu to make picture packages and create Photomerge panoramas using photos you select in Bridge. Running
these tasks from Bridge saves time because you don’t have to open each file individually.
Page 70

ADOBE ILLUSTRATOR CS2
User Guide
Note: Third parties can also create and add their own items to the Tools menu for added functionality in Bridge. For
information about creating your own scripts, see Bridge JavaScript Scripting Reference.
1 Select thefiles or foldersyou want to use. If youselectafolder,the commandisapplied wherepossibletoall files
in the folder.
2 Choose Tools > [Application], followed by the command you want. (If your application doesn’t have any
automated tasks available, no application name appears in the menu.)
For information about a particular command, see the documentation for that application.
See also
“About Adobe Bridge” on page 48
“To manage files with Bridge” on page 57
“To batch-rename files with Bridge” on page 63
To batch-rename files with Bridge
You can rename files and folders in a group, or batch. When you batch-rename files, you can choose the same settings
for all the selected files, saving time.
63
1 Do one of the following:
• Select the files that you want to rename.
• Select a folder in the Folders panel. The new setting will apply to all the files in the folder.
2 Choose Tools > Batch Rename.
3 Set the following options and click Rename:
• For Destination Folder, select whether you want to place the renamed files in the same folder or in a different
folder, move them to another folder, or place a copy in another folder. If you select Move To Other Folder or Copy
To Other Folder, click Browse to select the folder.
• For New Filenames, choose elements from the menus or enter text into the text boxes. The specified elements and
text are combined to create the new file name. You can click the + button or - button to add or delete elements. A
preview of the new file name appears at the bottom of the dialog box.
Note: If you choose Sequence Number, enter a number. The number is automatically incremented for each file named.
• Select Preserve Current File Name In XMP Metadata if you want to retain the original file name in the metadata.
• For Compatibility, select the operating systems with which you want renamed files to be compatible. The current
operating system is selected by default, and you can’t deselect it.
See also
“About Adobe Bridge” on page 48
“To manage files with Bridge” on page 57
Page 71

ADOBE ILLUSTRATOR CS2
User Guide
Metadata in Bridge
About metadata
Metadata is information about the file, such as its author, resolution, color space, copyright, and keywords applied
to it. You can use metadata to streamline your workflow and organize your files. This information is stored in a
standardized way using the Extensible Metadata Platform (XMP) standard on which Adobe Bridge and the Adobe
Creative Suite applications are built. XMP is built on XML, and in most cases the information is stored in the file so
that it isn’t lost. If it is not possible to store the information in the file itself, XMP metadata is stored in a separate file
called a sidecar file.
Many of the powerful Bridge features that allow you to organize, search, and keep track of your files and versions
depend on XMP metadata in your files. Bridge provides two ways of working with metadata: through the Bridge
Metadata panel and through the File Info dialog box. These methods provide different views into the XMP metadata
stored in the file. In some cases, multiple views may exist for the same property; for example, a property may be
labeled Author in one view and Creator in another, but both refer to the same underlying property. Even if you
customize these views for specific workflows, they remain standardized through XMP. The Advanced view in the
File Info dialog box displays the fundamental values being stored.
Metadata that is stored in other formats, such as EXIF, IPTC (IIM), GPS, and TIFF, is synchronized and described
with XMP so that it can be more easily viewed and managed. Other applications and features (for example, Adobe
Version Cue) also use XMP to communicate and store information such as version comments. For instance, when
yousaveafile in VersionCue,you mightadd thecomment that yourotated thefilewhenyou worked on it.Later on,
you could use Bridge to navigate to that Version Cue project and search for the term “rotate” to locate that file.
64
In most cases the metadata remains with the file even when the file format changes, for example, from PSD to JPG.
Metadata is also retained when those files are placed in an Adobe InDesign layout.
You can use the XMP Software Development Kit to customize the creation, processing, and interchange of metadata.
For example, you can use the XMP SDK to add fields to the File Info dialog box. More information on XMP and the
XMP SDK is available from the Adobe Solutions Network (
www.adobe.com/xmp).
About the Metadata panel in Bridge
From the Metadata panel, you can view and edit the metadata for selected files, use metadata to search for files, and
use templates to append and replace metadata. Metadata preserves information about the contents, copyright status,
origin, and history of documents. Version Cue uses metadata to manage files.
You can specify the types of metadata displayed in the Metadata panel.
Note: If you have applied metadata to an Adobe Acrobat® PDF file, some keywords may not appear; however, these
keywords are still attached to the PDF file.
Depending on the selected file, the following types of metadata appear in the Bridge Metadata panel:
File Properties Describes the characteristics of the file, including the size, creation date, and modification date.
IPTC Core Displays editable metadata. You can add captions to your files as well as copyright information. IPTC
Core is a new specification that was approved by IPTC (International Press Telecommunications Council) in
October 2004. It differs from the older IPTC (IIM, legacy) in that new properties have been added, some property
names have changed, and some properties have been deleted. You can display the older IPTC (IIM, legacy) metadata
by selecting it from the Metadata options in the Preferences dialog box.
Page 72

ADOBE ILLUSTRATOR CS2
User Guide
IPTC (IIM, legacy) Displays editable metadata. As with IPTC Core, you can add captions to your files as well as
copyright information.This set of metadata is hidden by default, because it has been superseded by IPTC Core.
However, you can choose it by selecting it from the Metadata options in the Preferences dialog box.
Fonts Lists the fonts used in Adobe InDesign files.
Swatches List the swatches used in Adobe InDesign files.
Camera Data (Exif) Displays information assigned by digital cameras. EXIF information includes the camera
settings used when the image was taken.
GPS Displays navigational information from a global positioning system (GPS) available in some digital cameras.
Photos without GPS information don’t have GPS metadata.
Camera Raw Displays settings applied by the Camera Raw plug-in.
Edit History Keeps a log of changes made to images with Photoshop.
Adobe Stock Photos Lists information about images obtained from Adobe Stock Photos.
Version Cue Lists any Version Cue version information about the file.
Note: Depending on the applications you are using, custom panels for various properties may appear here as well.
See also
“To add metadata using the File Info dialog box” on page 66
65
“To view metadata with Bridge” on page 65
“To specify the metadata displayed in the Metadata panel” on page 66
To view metadata with Bridge
❖ Do any of the following:
• Select oneormorefiles andviewthe informationinthe Metadata panel. If youselectmultiplefiles,onlymetadata
that is common to the files appears. Use the scroll bars to view hidden categories. Click the triangle to display
everything within a category.
You can change the font size in the panel by choosing Increase Font Size or Decrease Font Size from the panel menu.
• Select one or more files and choose File > File Info. Then, select any of the categories listed on the left.
• Choose View > As Details or View > As Versions And Alternates to display the metadata next to the thumbnails
in the content area. This is especially useful for viewing Version Cue files.
• Position the pointer over a thumbnail in the content area. (Metadata appears in a tool tip only if Show Tooltips is
selected in General preferences.)
See also
“About Adobe Bridge” on page 48
“To create and close Bridge windows” on page 50
“About the Metadata panel in Bridge” on page 64
Page 73

ADOBE ILLUSTRATOR CS2
User Guide
To edit metadata with Bridge
1 Click the pencil icon to the far right of the metadata field you want to edit.
2 Type in the text box to edit or add metadata.
3 Press Tab to move through metadata fields.
4 When you have finished editing the metadata, click the Apply button at the bottom of the Metadata panel. To
cancel any changes you’ve made, click the Cancel button at the bottom of the panel.
See also
“About the Metadata panel in Bridge” on page 64
“To work with metadata templates in Bridge” on page 67
“To apply metadata templates to files in Bridge” on page 68
To specify the metadata displayed in the Metadata panel
1 Do one of the following:
• Choose Preferences from the Metadata panel menu.
• Choose Edit > Preferences (Windows) or Bridge > Preferences (Mac OS), and then click Metadata from the list on
the left side of the dialog box.
2 Select the metadata fields that you want to display in the Metadata panel.
3 Select the Hide Empty Fields option if you don’t want to view fields with no information in them.
4 Click OK.
66
See also
“About Adobe Bridge” on page 48
“To create and close Bridge windows” on page 50
“About the Metadata panel in Bridge” on page 64
To add metadata using the File Info dialog box
The File Info dialog box displays camera data, other file properties, an edit history, copyright and authorship information (if any), and custom metadata panels (if the application has installed them). You can add metadata directly
from the File Info dialog box. If you select multiple files, the dialog box shows where different values exist for a text
field. Any information you add to a field is applied to all selected files.
Note: You can also view metadata in the Metadata panel, in certain views in the content area, and by placing the pointer
over the thumbnail in the content area.
1 Select one or more files.
2 Choose File > File Info.
3 Select any of the following from the list on the left side of the dialog box:
Description Lets you enter document information about the file, such as document title, author, description, and
keywords that can be used to search for the document. You can also choose text from the menu to the right of the
Page 74

ADOBE ILLUSTRATOR CS2
User Guide
text fields. To specify copyright information, select Copyrighted from the Copyright Status pop-up menu. Then
enter the copyright notice string and the URL of the person or company holding the copyright.
Categories Lets you enterinformation basedon AssociatedPress categories. You canalso choose textfrom themenu
to the right of the text fields. The Categories option appears only if Adobe Photoshop is installed.
History Displays Adobe Photoshop history log information for images saved with Photoshop. The History option
appears only if Adobe Photoshop is installed.
Camera Data 1 Displays read-only information about the camera and settings used to take the photo, such as make,
model, shutter speed, and f-stop. The Camera Data 1 option appears only if Adobe Photoshop is installed.
Camera Data 2 Lists read-only file information about the photo, including pixel dimensions and resolution. The
Camera Data 2 option appears only if Adobe Photoshop is installed.
Adobe Stock Photos Lists read-only information about images obtained from Adobe Stock Photos.
Origin Lets you enter file information that is useful for news outlets, including when and where the file was created,
transmission information, special instructions for handling the file, and headline information. You can also choose
text from the menu to the right of the text fields.
Advanced Displays fields and structures for storing metadata using namespaces and properties, such as file format
and XMP, EXIF, and PDF properties. You can do any of the following with the information listed:
67
• Click Save to export the metadata to a text (.xmp) file.
• Click Replace to replace the metadata in the existing files with metadata saved in an .xmp file. Values in existing
properties are replaced with the new values.
• Click Append to add the metadata in the existing files to metadata saved in an .xmp file. Values in existing
properties are not replaced, and new values are appended or inserted where appropriate.
• Click Delete to remove the currently selected Advanced property. You can Shift-click to select multiple properties.
Note: HolddowntheOptionkeytochangethesecommandstoReplaceAll,AppendAll,andDeleteAll.Thesecommands
then affect all information in the file; that is, EXIF information that is not modifiable by the user, such as the f-stop and
the Photoshop file ID information, as well as user-modifiable information, such as document title and keywords.
Holding down Option also displays the Reset button to restore the previous settings.
4 Click OK to apply the changes.
See also
“About Adobe Bridge” on page 48
“To create and close Bridge windows” on page 50
“About the Metadata panel in Bridge” on page 64
To work with metadata templates in Bridge
You can modify the metadata in the File Info dialog box and save it as a template for use with other files.
1 Create a new file using an Adobe Creative Suite application. This creates a file without metadata from any other
source.
2 Select the file.
3 Choose File > Info.
Page 75

ADOBE ILLUSTRATOR CS2
User Guide
4 Enter the desired information in the File Info dialog box.
5 Choose any of the following from the menu at the upper right of the File Info dialog box:
• To save the metadata in the File Info dialog box as a template for use with other files, choose Save Metadata
Template. Enter a name for the template and click Save.
• To delete an existing metadata template, choose Delete Metadata Template. Choose the template you want to
delete from the menu in the dialog box and click Delete.
• To open the folder containing metadata templates, choose Show Templates.
6 Click OK. You can now also apply metadata templates to files with the Append Metadata and Replace Metadata
commands in the Tools menu and in the Metadata panel menu.
See also
“About the Metadata panel in Bridge” on page 64
“To apply metadata templates to files in Bridge” on page 68
To apply metadata templates to files in Bridge
After you have saved metadata for one file, you can apply it to others.
68
1 Select one or more files.
2 Choose either of the following commands from the Metadata panel menu or the Tools menu:
• Append Metadata, followed by the name of the template. This command applies the template metadata only where
no metadata value or property currently exists in the file.
• Replace Metadata, followed by the name of the template. This command completely replaces any existing
metadata in the file with the metadata in the template.
See also
“About the Metadata panel in Bridge” on page 64
“To add metadata using the File Info dialog box” on page 66
To apply keywords to files with Bridge
The Keyword panel lets you create and apply Bridge keywords to files. Keywords can be organized into categories
called keyword sets.Using keywords,you identify filesbased on theircontent.Later,you canviewall fileswithshared
keywords as a group.
Note: Bridge keywords are distinct from XMP keywords created with the File Info dialog box. The latter are displayed
in Version Cue files in the “Other Metadata” section of the File Info dialog box.
❖ Do any of the following:
• To add a keyword to files, select one or more files. In the Keywords panel, click the box next to the name of the
keyword you want to add. A check mark appears in the box next to the keyword when it’s added to a file.
• To addasetofkeywordstofiles,selectone or more files. In theKeywordspanel,click thebox next to thenameof
the keyword set. A check mark appears in the box next to the keyword set when it’s added to a file.
Create a group of frequently used keywords so that you can apply them as a group.
Page 76

ADOBE ILLUSTRATOR CS2
User Guide
• To remove keywords from a file, select the file, and then click the box next to the name of the keyword or keyword
set that you want to remove.
• To create a new keyword, click the New Keyword button at the bottom of the panel or choose New Keyword
from the panel menu. A new default keyword name appears in the panel. To create the new keyword, type over
the default name and press Return.
• To create a new keyword set, click the New Keyword Set button at the bottom of the panel or choose New
Keyword Set from the panel menu. A new default keyword set name appears in the panel. To create the new
keyword set, type over the default name and press Return.
• To rename a keyword or keyword set, select the keyword or keyword set and choose Rename from the panel menu.
Then, type over the name in the panel and press Return.
Note: When you rename a keyword, the keyword’s name isn’t changed in files that currently contain it. The original
name stays in the file.
• To move a keyword to a different keyword set, drag the keyword from one set to another.
• To delete akeyword,selectthe keywordbyclickingits name,and then clickthe Delete Keywordbutton atthe
bottom of the panel or choose Delete from the panel menu.
Note: Keywords that you get from other users appear in the Other Keywords category until you recategorize them. To
make these keywords permanent in Bridge, select the keyword and then choose Persistent from the context menu.
69
• To find a file using the keyword, choose Find from the panel menu.
Note: You can’t modify keywords in search results for Adobe Stock Photos.
See also
“About Adobe Bridge” on page 48
“To search for files and folders with Bridge” on page 60
Using Version Cue with Bridge
Working with Version Cue in Bridge
Adobe Bridge and Version Cue work together to give you an intuitive way to access and manage Version Cue files
and projects.
Bridge provides comprehensive visualization of and centralized command over all aspects of Version Cue files and
projects. You can use Bridge to access Version Cue Workspaces, create a project in any of those workspaces, and
create a project folder hierarchy. You can drag files into project folders and drag files from a project folder into nonproject folders on your hard drive. You can also copy and move files within and between project folders.
ThesearchcapabilitiesofBridgeenableyou to locate projectfiles usingfileinformation such as versioncomments,
or keywords or fonts contained in your files. You can view files that have been deleted (but not permanently deleted)
in projects and you can restore deleted files using Bridge.
Working with versions in Bridge As you save versions of project files as they evolve, you can use the Versions View
in Bridge to see all previous versions of the files, delete previous versions, and promote previous versions. You can
get information not only about the current version of a file, but also about the version comment for each previous
version without having to open the files in their native applications. However, if you need to view a previous version
Page 77

ADOBE ILLUSTRATOR CS2
User Guide
in more detail, you can use Bridge and Version Cue to open that version. You can view Version Cue file info
(metadata) in the Details view, Versions And Alternates view, in tooltips, and in the Metadata panel. Bridge is instrumental in helping you create and track versions of non-Adobe file types that are in the projects in your Version Cue
Workspace. When you use Bridge to open a file in a project, you can create a Version Cue version even if an application doesn’t have a Save A Version command. You can manage and use those versions as you would if they were
created from files made by Adobe Creative Suite components.
Working with alternates in Bridge Bridge also makes it easy to work with Version Cue alternates. You can use Bridge
to designate files as alternates of each other, or to generate alternates from previous versions of a file. In the Alternates
view, you can see the complete group of alternates that have been designated for a project file as well as which of these
alternates is the primary (preferred) member of the group. A file’s inclusion in a group of alternates is indicated by
an icon in all Bridge views as well as by text indications in the Details and Versions And Alternates views. Alternates
don’t have to be located within a single folder, and you can use Bridge to add files to an alternates group no matter
wheretheyare locatedinaproject. In Alternates View,it’seasytonavigatetothe foldersthatcontain alternates.You
can remove files from a group of alternates as well as dissolve the group completely in Bridge.
Viewing Workspace, project, and file information Because you may not always be connected to the network on
whichaparticular VersionCue Workspaceislocated,Bridgeindicates theavailabilityofthe workspaces andprojects
you’ve accessed by displaying different icons of workspaces and projects. When your Version Cue Workspace is
online, you can view up-to-date status for all files you’ve created with Adobe Creative Suite components. This helps
you understand whether a file is already in use, or whether another user has created a newer version. Normally, when
youstart editingaprojectfileinaVersionCue Workspace, thefile’sstatuschangestoInUse becauseyou’remaking
changestothe file.However,you canuse Bridge to mark afileInUse withouthavingtoopenthe file.You cancancel
the Mark In Use indication at any time. You can also use Mark In Use to prepare project files for offline editing when
you know you’ll be disconnected from a remote Version Cue Workspace. When you come back online, you can use
Bridge to synchronize your files with your workspace once the workspace is available again. For more information
about working with Version Cue, see “Adobe Version Cue” in Help.
70
Version Cue Workspace and project icons in Bridge
Bridge displays status icons for Version Cue Workspaces and projects to let you know if they’re available, shared,
local, or remote.
• Available and Not Shared Indicates a project that’s available and not shared with other users.
• Available and Shared Indicates a project that’s available and shared with other users.
• Local Files Only Indicates a project that contains only local files.
• Workspace Not Available Indicates a workspace that’s offline.
• Workspace On Own Hard Drive Indicates a workspace that’s local to your computer.
• Remote Workspace Online Indicates a remote workspace that’s available.
Page 78

Chapter 5: Adobe Stock Photos
Adobe Stock Photos
About Adobe Stock Photos
Welcome to Adobe Stock Photos, the newest way to view, try, and buy royalty-free images from leading stock
libraries. With Adobe Stock Photos, you won’t have to interrupt your design process to find quality images. Instead,
from inside your favorite applications, you can use the powerful search capabilities of Adobe Stock Photos to find
and download images.
From Bridge, the Favorites pane gives you quick access to these stock images. With your computer connected to the
Internet, simply click the Adobe Stock Photos icon to start browsing thousands of available images. Because of the
tight integration between Stock Photos and Adobe Creative Suite components, you can download images from
Adobe Stock Photos directly into your Illustrator, InDesign, and GoLive projects. From Photoshop, you can open
any downloaded image.
In the design process, you need the flexibility to try different images before deciding which one you want. Adobe
Stock Photos gives you the option to download low-resolution, complementary (comp) versions of images you’re
considering. You can work with the comps until you make your final decision, at which point you can purchase and
download a high-resolution image.
71
For maximum convenience, you can open an account with Adobe. The benefit of opening an account is that you
enter your personal information only once, greatly simplifying the checkout process. You can also look back at
previous purchases, and even download photos again after you purchase them.
See also
“About comp images” on page 74
“Benefits of Stock Photos accounts” on page 77
“Buying stock photos” on page 75
Searching for images in Adobe Stock Photos
Thereare afew ways to search forimagesinStock Photos.Ifyou need help gettingaprojectstarted,abroadsearch
may yield a fund of possibilities and suggest areas to explore. If you have a clear idea of what you need, then you can
use Advanced Search to narrow the field.
Related keywords also help you find photos. After you find photos, you can start a new search by selecting one or
more related keywords. Each image is associated with keywords that help you find similar images. The more
keywords you select, the narrower the search results.
Photos matching the search criteria appear as thumbnails in the main window. You can resize the thumbnail by
dragging the Thumbnail slider at the bottom of the screen. When you click an image in search results, a comp image
appearsinthe Previewpane(it maytakeseveral secondsfor theimage to appear in thepane). To enlargethe comp,
simply resize the Preview pane. You can view metadata information about the image in the Metadata pane under
Adobe Stock Photos Metadata.
Page 79

ADOBE ILLUSTRATOR CS2
User Guide
Your previous searches are automatically saved in Stock Photos in the Favorites pane. Click Previous Searches to
display the list. To see the search results, double-click a search. To delete a search, select it and press the Delete key
(Windows), right-click the search and then choose Send To Recycle Bin (Windows), or Control-click the search and
choose Move To Trash (Mac OS).
Allthumbnailsfromrecentsearchesare savedonyourcomputer. Having thethumbnailsavailable offlineishelpful
if youwanttobrowsethrough theimageswhenyourcomputerisn’t connectedtothe Internet.However,the thumbnails do take up some space on your hard drive. At some point, if you want to delete these thumbnails, delete the
searches (as described above), or remove them manually from the default file location: My Documents/AdobeStockPhotos/Previous Searches (Windows), or Documents/AdobeStockPhotos/Previous Searches (Mac OS).
See also
“To adjust the Bridge window” on page 51
“To view file and folder thumbnails in Bridge” on page 54
To search for stock photos
1 In Bridge, click Adobe Stock Photos in the Favorites pane.
2 In thetextbox at thetop of thescreen, type thewordorphrasethatdescribes thesubject of thephotosyou want
to search for.
3 Click the Search button or press Enter.
72
Images matching the search criteria are displayed in batches. (There is a preference for changing the number of
images displayed in a batch.) To view more images, click More Results. Click a photo to view more information, such
as its price and keywords associated with it.
See also
“Search tips” on page 73
“To view image price and keywords” on page 73
To use Advanced Search
Advanced Search is a powerful tool that helps you find exactly the right photo. You can combine several search
criteria to narrow your results.
1 In Bridge, click Adobe Stock Photos in the Favorites pane.
2 Click the Advanced Search button .
3 Search using any combination of the following options:
• Type a descriptive keyword or keywords in the text box to find related images. Alternatively, type an image ID, if
you know the ID of the photo you want to use.
• To restrict searches to a specific media type, choose one or more options under Media Types.
• To search by the orientation of the photo, select the acceptable shapes under Orientation.
• Select the name of one or more providers to limit the search.
4 Click the Search button to display images matching the search criteria.
Page 80

ADOBE ILLUSTRATOR CS2
User Guide
See also
“Search tips” on page 73
To search with related keywords
1 In Bridge, click Adobe Stock Photos from the Favorites pane.
2 In thetextbox at thetop of thescreen, type thewordorphrasethatdescribes thesubject of thephotosyou want
to search for.
3 In the search results, click a photo to select it.
4 Do one of the following:
• Click the Get Price & Keywords button.
• Right-click the image (Windows) and choose Get Price & Keywords from the menu.
5 When the Price & Keywords dialog box appears, select keywords under Keywords For This Image. The more
keywords you select, the narrower the search.
6 When you finish selecting keywords, click the Search Again button to begin a new search using the keywords.
To view image price and keywords
You can view size and price information, as well as related keywords, in the Image Detail dialog box.
73
1 In the search results window, click an image to select it.
2 Do one of the following:
• Click the Get Price & Keywords button.
• Right-click the image (Windows) and choose Get Price & Keywords from the menu.
3 To close the dialog box, click the Close button.
Note: Thecurrencydisplayed in thePrice &Keywordsdialogbox maynot be thenativecurrencyofyourbilling country;
it is the supported currency for purchases made from your country. When you purchase photos from Adobe Stock Photos,
your credit card will be billed in the supported currency.
Search tips
Here are some helpful pointers for refining your searches:
Misspelled words Double-check your search entries to make sure they’re spelled correctly.
Trademarked names Brand names may not return full search results. Instead, search for the item by its general
name.
Exact phrase searches To view images that exactly match a phrase, type the whole phrase in the Search text box. You
can enter Boolean operators such AND, OR, or NOT to narrow your search.
Search by subject To search for a specific subject, use nouns that describe the main subject of a photo, such as
“bicycle” or “house,” as well as adjectives that modify the nouns, such as “vintage” or “red.” To narrow the search
further, use verbs that describe an action in the photo.
Search by concept Try searching with concepts, or perceptions, such as “romance,” “vitality”, “frustration,” or
“excitement,” to find an inspiring image.
Page 81

ADOBE ILLUSTRATOR CS2
User Guide
Search by style To find photos that reflect a specific photographic or artistic technique, try searching on terms such
as “profile”, “studio shot,” or “clipping path.”
Comp images
About comp images
Comp images are free, nonwatermarked, low-resolution versions of stock photos that you can download to use in
mock-ups or other preliminary work. You can use comps to capture a feeling, idea, or concept before choosing the
final image for a project. Comps are not licensed for production, but you can use them in mock-ups or other preliminary work. Because comps are low-resolution images, they’re not suitable for printing or publishing. After an evaluation period, you can purchase a high-resolution version of the image to continue working with the photo.
Metadata is bundled with comp images. This metadata is read by Photoshop, InDesign, Illustrator, and GoLive, and
is used in each application to recognize images as stock photos, even if you rename them. Metadata allows you to
purchase high-resolution versions of images later, even after you move a comp to a project folder or create other
versions of the image. If you are about to send the photo to be printed, InDesign and Illustrator display a warning
that you are using a comp image.
You can view your downloaded comps by clicking Downloaded Comps in the Favorites pane, or you can navigate to
the default folder where comps are saved: My Documents/AdobeStockPhotos (Windows) or Documents/AdobeStockPhotos (Mac OS). You can move downloaded comps to any folder you want. To delete a comp in the Stock
Photos window, right-click it and then choose Send To Recycle Bin (Windows) or Control-click it and choose Move
To Trash (Mac OS).
74
For more information on using comps, see the terms of service (TOS), which describe when and for how long you
can use a comp. A Terms Of Service link is available on the main Adobe Stock Photos screen.
To download comps from Adobe Stock Photos
1 In the search results, click a photo to select it.
2 Do one of the following:
• Click the Download Comp button.
• Right-click the photo (Windows) and select Download Comp from the menu.
• Click Get Prices & Keywords and select Free Comp Image in the dialog box. Click the icon to download the comp.
To view comps in an Adobe Creative Suite application
From Adobe Stock Photos, you can open and edit a comp in Photoshop, Illustrator, InDesign, or GoLive. You can
also drag a comp into an application.
1 In the search results window, right-click the image you want to open.
2 In the context menu, position the pointer over Open With, and then choose the name of the application in which
you want to view a comp version of the image.
Page 82

ADOBE ILLUSTRATOR CS2
User Guide
To view saved comps in Stock Photos
To help you keep track of downloaded comps, you can view them in Bridge. If you decide to purchase a comp, put
the comp in your shopping cart.
1 In the Favorites pane, click Adobe Stock Photos.
2 Click Downloaded Comps to see the comps.
Buying stock photos
Buying stock photos
It’s simple to buy images through Adobe Stock Photos. When you find the photos you want to buy, put them in your
shopping cart. The photos remain in your cart until you’re ready to complete your purchase. When you finish
browsing, you can check out and have your images automatically downloaded to your computer.
Having an account with Adobe speeds the checkout process. Because your contact and billing information is saved,
you can complete your purchase with just a few clicks.
Adobe Stock Photos maintains a secure site, and you can rest assured that your personal information is kept in strict
confidence. Any information you enter is used only for Adobe Stock Photos purposes.
75
To view your photos, click Purchased Images in the Favorites pane, or navigate to the default Stock Photos folder:
My Documents/AdobeStockPhotos (Windows) or Documents/AdobeStockPhotos (Mac OS).
See also
“To buy photos” on page 75
“To buy photos directly from InDesign or Illustrator” on page 76
To place photos in the shopping cart
As you find photos you want to purchase, add them to the shopping cart until you’re ready to check out.
1 In the search results window, right-click a photo, and then choose Add To Cart from the context menu. You see a
dialog box confirming that the photo is your shopping cart.
2 Click OK to continue, or click View Shopping Cart to see the contents of your cart.
If you want to disable this dialog box, select Don’t Show Again.
To buy photos
1 To access your shopping cart, click the Shopping Cart icon.
2 Choose aresolutionfor thephotosyou want to buy. (You canremoveanitemfromthe shopping cart at anytime
by clicking the Delete icon .)
3 Click Check Out.
4 Do one of the following:
• If you have an Adobe account, enter your ID and password.
Page 83

ADOBE ILLUSTRATOR CS2
User Guide
• If you want to open an Adobe account, click Set Up An Account. You are prompted to enter your billing and
account information.
• If youwanttobuy theimageswithout an account, clickContinueAsGuest.You arepromptedtoenter your billing
information. Click Continue.
5 Do one of the following:
• If you have an Adobe account, confirm your billing information and click Continue.
• If you don’t have an Adobe account, enter your billing information and click Continue.
6 In the Order Summary page, confirm your choices. To delete a photo from the shopping cart, click the Delete icon.
7 If you have a promotion code, enter it in the Promotion Code text box and click Apply. You see any changes made
to your order as a result of applying the promotion code.
8 Click the check box to accept the terms of the Adobe Stock Photos License Agreement (click the blue text to read
the agreement).
9 Finally, click the Purchase Now button to complete the checkout process. Your purchase is processed, then you’re
prompted to download your photos.
10 Click Start Download. After the photos are saved, click View Purchased Images if you want to start working with
them right away.
11 To view the receipt for your purchase, in the Thank You page click View Receipt. You can also monitor the
progress of the download by clicking Open Download Status. When you finish, click Find More Images if you want
to find new photos, or click Go To Your Account.
76
If you have been working with a comp version of the image you purchased, you need to replace the comp with the
high-resolution image in your art.
Note: To delete thelistofhigh-resolutionimageswaiting fordownloadfromthe Download Status screen,chooseEdit >
Preferences (Windows) or Bridge > Preferences (Mac OS). Select Adobe Stock Photos, and then click the Clear Now
button.
See also
“To create a Stock Photos account” on page 77
“To set Adobe Stock Photos preferences” on page 79
To buy photos directly from InDesign or Illustrator
To seamlessly integrate Adobe Stock Photos into your design process, you can use the Place command to use
downloaded comps in your work. When you’re ready to purchase a photo, you can start the process from InDesign
or Illustrator. Then, you can use the Links palette to replace the comp with the full image.
1 In Illustrator or InDesign, right-click a comp image and then choose Purchase This Image from the menu.
2 Adobe Stock Photos starts, and the photo is automatically placed in your shopping cart.
3 After purchasing the image, return to Illustrator or InDesign, and then click Re-link in the Links palette.
4 Navigate to the Purchased Images folder in the Adobe Stock Photos folder: My Documents/AdobeStockPhotos
(Windows), or Documents/AdobeStockPhotos (Mac OS).
5 Select the purchased image and then click OK. The comp is replaced with the full version of the photo.
Page 84

To view order details
A benefit of having an Adobe account is that you can go back and view your previous orders.
ADOBE ILLUSTRATOR CS2
User Guide
77
1 In Adobe Stock Photos, click the Your Account button
2 In the Your Account page, click View Order History.
3 The Your Order History page shows all of your previous orders. To view details about a particular order, click the
order number (highlighted in blue).
4 In theOrder Detail page,you cansee thebillinginformation,aswellasadescriptionofthe photos youpurchased.
Click Return To Your Account if you’re done, or click Return To Order History if you want to review other orders.
You can also redownload the photos you purchased.
.
Stock Photos accounts
Benefits of Stock Photos accounts
Creating an Adobe account makes purchasing photos quick and easy. When you log in with your e-mail address and
password, you can work with your account in several ways:
Manage your profile After you complete the registration process, modify your account information anytime by
clicking the Your Account link in the navigation bar.
See your order history Track orders made through Adobe Creative Suite Stock Photos to check the specific items
ordered, the total cost of the purchase, or the order date.
Download previously purchased items again Access your order history and click Re-download to replace a lost or
corrupted file for up to one year from the original purchase date.
Shop with ease Purchase photos without providing profile information. Adobe Stock Photos automatically enters
your name and address when you make any purchases. All your personal information is securely stored.
To create a Stock Photos account
1 In Adobe Stock Photos, do one of the following:
• Click the Your Account button , and then click the Continue button under Set Up An Account.
• If you have photos in the shopping cart, click the Shopping Cart icon, and then click Checkout. Click Set Up An
Account.
2 If you haven’t chosen your billing country, you see a dialog box with a list of countries. Choose the country of your
billing address and click Continue.
3 In the text boxes, type your e-mail address and choose a password (at least six characters long and containing a
mix of letters and numbers).
4 Enter your billing address, and then type your payment information. The billing address must exactly match the
address where your credit card statements are mailed.
5 When you finish, click Continue.
After you create your account, Adobe Stock Photos sends a confirmation e-mail to the address you entered.
Page 85

ADOBE ILLUSTRATOR CS2
User Guide
To log into your Stock Photos Account
1 In Adobe Stock Photos, click the Your Account button
2 When prompted, type your e-mail address and password, and then click Continue. If your login is successful, the
Your Account page appears.
If you’re having trouble logging into your account, make sure that you have spelled your e-mail address and password
correctly. Also make sure that you haven’t pressed the Caps Lock or Number Lock keys.
.
To edit your Stock Photos account profile
Your account profile includes your name and password settings.
1 Click the Your Account button .
2 Log into your account.
3 In the Your Account page, click Edit Your Profile. Do any of the following:
• To change your password, type a new word in the Password text box. Passwords can contain only letters and
numbers and must be at least six characters long.
• To sign up to get e-mail from Adobe Stock Photos about promotions or other special information, select the check
box.
4 To confirm your changes, click Save. To go back to the main Your Account page without saving changes, click
Return To Your Account.
78
To change Stock Photos account address information
You can change your default billing address or add other addresses. Make sure that any new addresses match the
address on your credit card billing statements exactly to avoid any problems.
1 Click the Your Account button .
2 Log into your account.
3 In the Your Account page, click Edit Your Address.
4 Do any of the following:
• To change the nickname associated with the default address, type a new name in the Billing Address Nickname
text box.
• Type any changes to the default address in the text boxes.
• To add a new address to your account, click Add New Address, and then enter the information in the text boxes.
• To edit a non-default address, click Edit under the address, and make any changes.
• To make an address the default, click Set Default under the address.
• To delete an address, click Delete under the address.
5 To confirm your changes, click Save. To go back to the main Your Account page without saving changes, click
Return To Your Account.
Page 86

ADOBE ILLUSTRATOR CS2
User Guide
To change Stock Photos account payment information
You can change your saved credit card information, or add additional credit cards. Enter your credit card number
without spaces or dashes. You can give each credit card a nickname to keep track of which card you’re using.
1 Click the Your Account button .
2 Log into your account.
3 In the Your Account page, click Edit Your Payment Information.
4 Do any of the following:
• To change the nickname of the default credit card, type a new name in the Payment Nickname text box.
• To change the default credit card number, type the new number in the Credit Card Number text box, and then
choose the expiration date for the new card from the month and year menus.
• To add a new card to your account, click Add New Payment Method, and then type a nickname and the card
number. Enter the expiration date.
• To delete a payment method, click Delete under the payment nickname.
5 To confirm your changes, click Save. To go back to the main Your Account page without saving changes, click
Return To Your Account.
79
To download previously purchased images from Stock Photos
To download images, you need to have a Stock Photos Account. You can download images onto a different computer
than the one you used to purchase the photos originally (see the license agreement for information about restrictions).
1 Click the Your Account button .
2 In the Your Account page, click View Order History.
3 In the Your Order History page, click the order number (highlighted in blue) of the photo you want to download
again.
4 In the Order Detail page, click the arrow under Download. The photo is downloaded. By default, purchased
images are located at My Documents/AdobeStockPhotos/PurchasedItems (Windows) or Documents/AdobeStockPhotos/PurchasedItems (Mac OS).
To set Adobe Stock Photos preferences
1 In Adobe Bridge, choose Edit > Preferences (Windows) or Bridge > Preferences (Mac OS).
2 Select Adobe Stock Photos from the list on the left.
3 Set any of the following preferences, and then click Save:
Thumbnails displayed per group To set how many thumbnail images are displayed in a search group, choose an
option from the Thumbnails Per Search Group menu.
Search language To search using a different language, select the language from the Search Language menu. Note
that you get the best results from most providers if you search in English. This setting doesn’t affect the interface
display language.
Destination folder for downloads To select a new default folder in which to store photos, downloaded comps, and
purchased photos, click Change Location. Click Reset to restore the default location.
Page 87

ADOBE ILLUSTRATOR CS2
User Guide
Billing Country To change your default billing country, choose the name of the country from the Billing Country
menu. The currency displayed next to the Billing Country menu may not be the native currency of that country (not
all currencies are supported). Instead, it’s the currency Adobe allows for that country. Your credit card is billed in the
supported currency.
Alert messages To enable or disable the messages that appear when you download a comp or add a photo to your
shopping cart,selectordeselectDisplay MessageAfter DownloadingComporDisplay MessageAfter AddingImage
To Shopping Cart.
Automatic downloading to default folder To save your photos automatically to your default folder, select Auto-
Download Images After Purchasing Them. Deselect this option if you want to choose a location in which to save the
photos (for example, in a Version Cue project or other project-specific folder on your computer).
Downloading after lost connection To resume downloading automatically after a connection is lost, select Resume
Interrupted Downloads When Bridge Starts.
80
Page 88

Chapter 6: Adobe Version Cue
Using Adobe Version Cue
Version Cue managed projects
Adobe Version Cue® is an innovative set of features designed to increase your productivity when you work alone or
collaborate with others. Version Cue integrates design management into your existing workflows within and across
Adobe Creative Suite components, including Adobe Photoshop CS2, Adobe InDesign CS2, Adobe Illustrator CS2,
Adobe GoLive CS2, Adobe Acrobat 7, and Adobe Bridge. You can also work with Version Cue in Adobe InCopy CS2.
Version Cue streamlines the following tasks in Adobe Creative Suite:
• Creating historical versions and branched alternates of your files.
• Maintaining file security.
• Organizing files into private or shared projects.
• Browsing with file thumbnails, and searching file information and version comments.
• Reviewing file information, comments, and file status in private and shared projects while you browse.
81
In addition, you can use the Version Cue Workspace Administration for more advanced tasks:
• Initiating and managing online reviews of PDF documents.
• Duplicating, exporting, backing up, and restoring projects.
• Viewing information about projects in the Version Cue Workspace.
• Importing files to the Version Cue Workspace using FTP or WebDAV.
• Deleting file versions in batches and removing file locks.
• Creating a roster of project users and defining their project privileges.
• Restricting access to a specific project.
See also
“Availability of Version Cue features” on page 81
Availability of Version Cue features
Different Version Cue features are available in different environments:
• If you use Adobe Creative Suite, you have access to the full set of Version Cue features, including Version Cue
Administration.
• If you use only one component of Adobe Creative Suite, or if you use InCopy and not Adobe Creative Suite, you
have access to thefeaturesofthe Adobedialogbox only.You canuse Bridge,ratherthanthe Adobedialogbox,for
file browsing.
Note: Acrobat 7 and GoLive access Version Cue features differently than other Adobe Creative Suite components and
don’t use the Adobe dialog box.
Page 89

ADOBE ILLUSTRATOR CS2
User Guide
• If you don’t have Adobe Creative Suite, you can gain access to the full Version Cue feature set by participating in
a shared project; that is, if another user on your network installs Adobe Creative Suite and gives you access to a
Version Cue project in a Version Cue Workspace.
See also
“About the Adobe dialog box” on page 82
“Getting the most out of Version Cue” on page 82
Getting the most out of Version Cue
In Version Cue, you create projects that you and other users access through Adobe Creative Suite components.
Projects keep related files together in one place. Version Cue manages the files in these projects. Because Version Cue
works in all Adobe Creative Suite components, your design process isn’t interrupted when you work on individual
files within a project.
You can use Version Cue in a single application, such as Photoshop CS2, to track changes to a file as you work on it.
In addition, workgroups or an individual worker can use Version Cue across applications. Multiple users can manage
projects that contain files from all Adobe Creative Suite components. Projects can include non-Adobe files, such as
text documents, billing forms, or spreadsheets. When you keep all managed files related to a project in one place, you
eliminate the task of tracking down important files.
82
Here’s an example of how you might use Version Cue with Adobe Creative Suite: You start by creating a new project
and adding a Photoshop file containing the main image for a printed piece. Then, you add art from Illustrator and
text from InDesign. Next, you add GoLive web elements to leverage your printed content for use in a web page. As
you and your team work on each piece of the project, Version Cue creates versions to keep track of changes. When
it’s time to present the project, you create a PDF of each project file and use the Version Cue Administration utility
to set up an online PDF review. Your customers, supervisors, or peer reviewers view and comment on the project
using Acrobat.
Working with Version Cue in GoLive
Version Cue is tightly integrated with GoLive to manage the tasks specific to web page creation. Although you access
Version Cue differently in GoLive than in Photoshop, Illustrator, InCopy, and InDesign, most of the same features
are available.
Working with Version Cue in Acrobat
You access Version Cue from within Acrobat 7 much as you do in the other Adobe Creative Suite components;
however, there are some differences. Most Version Cue features are available in Acrobat 7. For more information on
using Version Cue in Acrobat 7, see Acrobat 7 Help.
See also
“Availability of Version Cue features” on page 81
About the Adobe dialog box
In Adobe Creative Suite 2.0 components (except for GoLive and Acrobat 7) and InCopy CS2, you can use the Adobe
dialog box when you choose the Open, Import, Export, Place, Save, or Save As commands, even if you don’t use
Version Cue. The Adobe dialog box displays additional information, including thumbnails, which make it easy to
identify files. You can use the Adobe dialog box when working with both Adobe and non-Adobe files.
Page 90

ADOBE ILLUSTRATOR CS2
User Guide
Note: In InDesign, if you deselect Always Save Preview Images With Documents in either the File Handling preferences
or the Save As dialog box, you won’t see thumbnails for InDesign files in the Adobe dialog box or in Bridge.
By default, when you choose the Open, Import, Export, Place, Save, or Save As commands, the operating system
(OS) dialog box appears. To use the Adobe dialog box instead and set it as the default, click Use Adobe Dialog. Use
the View menu options to customize the display. You can change back to the OS dialog box at any time by clicking
Use OS Dialog.
A B C
83
The Adobe Dialog Box
A. Favorites panel B. Project Tools menu C. View m enu
You can use the Adobe dialog box to accomplish these tasks:
• Add frequently used files and folders to the Favorites panel for quick access.
• View thumbnail images of files.
• Determine whether a file is open in another Adobe Creative Suite application on your computer.
• Rename or delete files (Mac OS only).
• Connect to Bridge by using the Reveal In Bridge command.
• View metadata about files in the Properties panel. Metadata includes author, keyword, and copyright information.
• Access Version Cue projects and files as well as non-Version Cue files.
• View detailed information about Version Cue projects, such as the status of individual files.
• View and work with Version Cue versions and alternates.
• Search for files in a Version Cue project.
• Move Version Cue files to the Project Trash.
• Determine which Version Cue files are in use, and who is using them.
• Create a new Version Cue project, or connect to an existing Version Cue project.
See also
“To view Version Cue Workspace, project, and file information” on page 89
“Availability of Version Cue features” on page 81
Page 91

ADOBE ILLUSTRATOR CS2
User Guide
What’s new in Version Cue CS2
In addition to enhanced performance and reliability, here are some key new features in Version Cue CS2:
Integration with Adobe Bridge View Version Cue projects, work with versions, and make groups of alternates, all
from one central place. From Bridge, you can search for and view all Version Cue files without opening individual
Adobe Creative Suite components. You can manipulate files directly in Bridge to avoid delays as files open or as the
components start up.
Alternates Alternates allow you to leverage an asset and take your designs in a different direction. For example, if
you want to radically transform a photo that is currently used in a project, but you don’t want to alter the original,
you can create an alternate and work with it instead. Use alternates, in addition to versions, to manage your assets.
See “About Version Cue alternates” on page 115.
Version Cue PDF Review Host online PDF reviews from your own computer or another Version Cue Workspace. You
can include in the review any PDF file in the project, and use the Automatic e-mail generation to quickly invite users
to the review. Review comments are collected in the Version Cue Workspace where all reviewers can see and
reference them as the review progresses.
Ability to manage non-Adobe files Store non-Adobe files, such as text documents, schedule spreadsheets, and
billing forms, in a Version Cue project. You can also create versions of non-Adobe files. See “To save a version of a
non-Adobe file” on page 111.
84
See also
“Initiating a Version Cue PDF review” on page 139
“Availability of Version Cue features” on page 81
“Working with Version Cue in Bridge” on page 69
To set Version Cue Workspace preferences
Note: You can perform this task only if you have access to the full Version Cue feature set, which is available in Adobe
Creative Suite or in a shared workspace. See “Availability of Version Cue features” on page 81 for more information.
Use Version Cue preferences to turn Version Cue off (it is on by default), specify Version Cue Workspace settings,
choose the locations of Version Cue folders that hold data and backup files, export projects in your workspace, and
check for updates to Version Cue.
1 Do one of the following to access Version Cue CS2 preferences:
• In Windows, double-click the Version Cue icon in the system tray at the bottom right of the screen.
• In Mac OS, click the Version Cue icon in the menu bar at the top of the screen and choose Version Cue CS2
Preferences from the menu.
2 Choose an option from theVersion CueCS2 menu.ChooseOntoturnonthe VersionCue Workspace, or Offto
turn the workspace off.
3 To automatically turn on Version Cue when the computer starts (recommended), select Turn Version Cue CS2
On When The Computer Starts.
4 Choose one of the following from the Workspace Access menu:
This Workspace Is Visible To Others Gives others access to your shared Version Cue projects.
This Workspace Is Private Keeps your Version Cue Workspace hidden from other users.
Page 92

ADOBE ILLUSTRATOR CS2
User Guide
Note: If Version Cue is installed on a computer that uses a firewall and you want to share the workspace with others,
make sure that TCP ports 3703 and 427 are left open and deselect the Internet Connection Firewall option (Windows
only). For information, see Windows Help.
5 In the Settings tab, do any of the following:
• From the Workgroup Size menu, choose the number of people who use the Version Cue Workspace on a typical
day. This setting controls how the workspace handles the potential load.
• From the Optimize For menu, choose the type of project you generally create. By default, this option is set to
Mixed Media, to support workflows that involve both print media (such as InDesign files) and web content
(created in GoLive). If you typically produce only print media, or if you create only web content, choose either
Print Media or Web Media from the Optimize menu.
• In the Memory Usage text box, enter the amount of RAM that you want to make available to Version Cue. The
default is 128 MB. This setting allocates RAM to optimize interoperability between Version Cue and Adobe
Creative Suite components. For more robust requirements, such a larger workgroup or many assets, set the RAM
to 256 MB or higher.
6 Select Show Version Cue CS2 Tray Icon (Windows) or Show Version Cue CS2 Status In Menu Bar (Mac OS) to
keep the Version Cue menu icon visible, giving you quick access to Version Cue Administration and preferences.
7 Click the Locations tab and do one of the following:
• To move the Data folder, where projects, file versions, and user IDs are stored, click the Choose button next to the
current folder location. Select a new location (not a network drive) for the folder. You must choose a location on
the computer in which the Version Cue Workspace is installed. Click OK.
• To move the Backup folder, where project backups are stored, click the Choose button next to the current folder
location. Select a new location for the folder. You must choose a location on the computer in which the Version
Cue Workspace is installed. Click OK.
85
Important: The workspace must be turned off before you change the folder locations. Do not attempt to move these
folders manually or edit any of the files in the Version Cue Data folder. The Data folder contains files that maintain the
integrity of the Version Cue file versions, metadata, and project information.
8 To export workspace data, click the Export tab, choose an export version and a location for the exported data, and
then click Export.
9 Click the Updates tab, and then click Check For Updates to see whether any updates are available online. If so,
you’re prompted to install the updates.
10 Click OK (Windows) or Apply Now (Mac OS).
If prompted, click Yes (Windows) or Restart (Mac OS) to restart the Version Cue Workspace. (If Version Cue was
running when you changed the settings, you are prompted to restart.)
See also
“To export a Version Cue project to your computer” on page 131
Page 93

ADOBE ILLUSTRATOR CS2
User Guide
To turn Version Cue on or off
By default, access to Version Cue is turned on in InCopy CS2 and in all Adobe Creative Suite components, except for
Acrobat 7. If you disable Version Cue, you won’t have access to any Version Cue Workspace, which could affect files
inaproject.IfyoudisableorenableVersionCueinanyAdobeCreativeSuitecomponent,thatchangeaffectsallother
Adobe Creative Suite components except Acrobat 7 (you must always enable or disable Version Cue manually in
Acrobat 7), Bridge, and GoLive (Version Cue is always enabled in Bridge and GoLive), and the Version Cue
Workspace (this is controlled through the Version Cue CS 2 preferences).
Photoshop CS2 Choose Edit > Preferences > File Handling (Windows) or Photoshop > Preferences > File Handling
(Mac OS). Then select or deselect Enable Version Cue Workgroup File Management, and click OK.
Illustrator CS2 Choose Edit > Preferences > File Handling & Clipboard (Windows) or Illustrator > Preferences >
File Handling & Clipboard (Mac OS). Then select or deselect Enable Version Cue, and click OK.
InDesign CS2 Choose Edit > Preferences > File Handling (Windows) or InDesign > Preferences > File Handling
(Mac OS). Then select or deselect Enable Version Cue, and click OK.
InCopy CS2 Choose Edit > Preferences > File Handling (Windows) or InCopy > Preferences > File Handling
(Mac OS). Then select or deselect Enable Version Cue, and click OK.
Acrobat 7 You must manually turn Version Cue on in Acrobat 7 to use it. Choose Edit > Preferences > General
(Windows) or Acrobat > Preferences > General (Mac OS). Then select or deselect Enable Version Cue Workgroup
File Management.
86
Bridge Version Cue is always turned on in Bridge.
GoLive Version Cue is always turned on in GoLive.
See also
“Availability of Version Cue features” on page 81
Working with Version Cue projects
About Version Cue projects
Ve rs i o n C ue u s e s projects to store related files and folders. If you work independently, you create a project to gather
all the files you need, view the files in Bridge, and use Version Cue features such as versions and alternates. In a
workgroup, depending on your workflow, you can create one Version Cue project for files that everyone in your
workgroup collaborates on, a different project for files that don’t require collaboration, and yet another project
restricted to specific users.
When you first open a Version Cue project, Version Cue creates a folder named “Version Cue” in your My
Documents(Windows) or Documents(Mac OS) folder,and adds afolderfor theproject to it.Whenyou open afile
from that project, Version Cue adds a working copy of thefiletothe projectfolder. As youeditand save intermediate
changestoyourfile, youare actually editinginthe workingcopy; theoriginalfileonthe VersionCue Workspaceis
protected.
After you open a Version Cue project, a shortcut to that project appears in the list with other Version Cue
Workspaces in Bridge, or in the Open, Place, or Save dialog boxes. Remote Version Cue Workspaces also appear in
this list after you access them.
Page 94

ADOBE ILLUSTRATOR CS2
User Guide
Version Cue uses a special folder for each project: the documents folder. This folder is where Version Cue stores nonGoLive files for each project. When you access the project from Bridge, InCopy, or any Adobe Creative Suite
component except Acrobat 7, Version Cue automatically opens the documents folder and temporarily displays the
project title as the folder name. (If you access the project using Acrobat 7, the folder is named “documents”.) You’ll
also see the documents folder if you open the working copies folder.
If you create a new Version Cue project from GoLive, or if you add a new or existing website to a project, Version
Cue creates three additional folders for that project:
Web-content folder Contains the home page (index.html) as well as any website content, including pages, images,
styles, and scripts. You can create separate Pages, Images, and Styles subfolders if necessary. Any files or folders
uploaded to a production server should be stored in the web-content folder. Because GoLive uses this folder to
manage a site as it’s created, be careful not to store other types of files in this folder. You can create any type and
number of subfolders in the web-content folder.
Web-data folder Stores different types of reusable site objects, such as Smart Objects, components, and templates.
This folder contains data used to create the final site. To avoid broken links, missing styles, and similar problems,
never store final website content in the web-data folder.
Web-settings folder Stores only the saved settings in the GoLive Site Window and Site Settings dialog boxes.
87
Viewing a Version Cue project in Bridge
See also
“To connect to a remote project” on page 88
“Using working copies” on page 94
“Availability of Version Cue features” on page 81
To open a project
Note: You can perform this task only if you have access to the full Version Cue feature set, available in Adobe Creative
Suite or in a shared workspace. See “Availability of Version Cue features” on page 81 for more information.
1 Do one of the following:
• In Illustrator, InCopy, InDesign, or Photoshop choose File > Open. If the button is visible, click Use Adobe Dialog
(if you see the Use OS Dialog button, you are already using the Adobe dialog box). Click Version Cue in the
Favorites panel.
• In Bridge, click Version Cue in the Favorites panel. Double-click Workspaces to view all available workspaces.
• In Acrobat 7, choose File > Open. Click Version Cue.
Page 95

ADOBE ILLUSTRATOR CS2
User Guide
2 To open a Version Cue Workspace, double-click it.
Note: If you don’t see a desired Version Cue Workspace, choose Refresh from the Tools menu.
3 To open a project, double-click it.
If theUse AdobeDialogbuttondoesn’t appear in theOpen, Save As,SaveACopy,orPlace dialog boxes, make sure
that you’ve turned on the Version Cue preference in InCopyorinthe AdobeCreativeSuite componentyou’reusing.
See also
“About the Adobe dialog box” on page 82
“To connect to a remote project” on page 88
“Adding files and folders to a project” on page 99
“To set Version Cue Workspace preferences” on page 84
To connect to a remote project
Note: You can perform this task only if you have access to the full Version Cue feature set, available in Adobe Creative
Suite or in a shared workspace. See “Availability of Version Cue features” on page 81 for more information.
88
When you need to work on Version Cue projects that are located remotely, on a different subnet, you can use the IP
address of the computer to access that Version Cue Workspace. Workspaces on computers within your subnet should
be visible automatically.
1 Do one of the following:
• In Illustrator, InCopy, InDesign, or Photoshop, choose File > Open. If you are using the OS Dialog box, click Use
Adobe Dialog. Click Version Cue in the Favorites panel. Choose Connect To from the Project Tools menu
• In Bridge, choose Tools > Version Cue > Connect To.
• In Acrobat, choose File > Open. Click Version Cue. Choose Connect To from the Project Tools menu.
2 In the Connect To dialog box, enter the Version Cue Client URL (the Version Cue IP or DNS address), a colon,
.
and the port number (3703), for example, http://153.32.235.230:3703.If youhave connectedto the workspace before,
it’s not necessary to enter the port number.
You can display the Version Cue Workspace Administration utility login page to identify the Version Cue Client
URLs that remote users and WebDAV applications need to access the workspace.
3 Click OK. After you connect to a remote Version Cue Workspace, the dialog box displays all available Version Cue
projects in that workspace.
A shortcut to the remote workspace is automatically included in your list of available Version Cue Workspaces.
See also
“About the Adobe dialog box” on page 82
“To log into Version Cue Administration from an Adobe Creative Suite component” on page 124
Page 96

ADOBE ILLUSTRATOR CS2
User Guide
To connect to a project using WebDAV
The Version Cue Workspace can communicate with applications that are WebDAV enabled. When Version Cue is
running on a server, you can use it as a WebDAV server. However, Version Cue's native versioning features are more
sophisticated than those available through WebDAV. WebDAV capabilities are provided for legacy workflows.
❖ Refer to your application’s documentation for information on using its WebDAV features, and then use the
Version Cue WebDAV Client URL, the port number (3703), “webdav”, and the project name to identify the project
you want to work with, for example, http://153.32.235.230:3703/webdav/project_name
See also
“Availability of Version Cue features” on page 81
To view Version Cue Workspace, project, and file information
Note: You can perform this task only if you have access to the full Version Cue feature set, available in Adobe Creative
Suite or in a shared workspace. See “Availability of Version Cue features” on page 81 for more information.
For help on viewing information in Acrobat 7, see Acrobat Help.
1 In Illustrator, InCopy, InDesign, or Photoshop, choose File > Open.
2 If the button is available, click Use Adobe Dialog (if you see the Use OS Dialog button instead, you are already
using the Adobe dialog box).
3 Click Version Cue in the Favorites panel.
89
You can resize the Favorites panel to display items with long names: place your cursor over the vertical line to the
right of the Favorites panel and drag it to the right.
4 To change the display of Version Cue Workspaces, projects, or files in the dialog box, do any of the following:
• To view the properties of a file, click the toggle to display the Properties panel.
• To change the display of project, choose a display option from the View menu
• To sort items in a column, while in detail view, click the column heading. Click the column heading again to
.
reverse the order.
• To show or hide columns of information while in list view, right-click (Windows) or Control-click (Mac OS) the
Name column heading, andchooseShowAll,HideAll,oracolumn name.(TheNamecolumncan’t be hidden.)
Visible columns have a check mark to the left of the column name.
• To change the location of a column, drag the column heading to the left or right of another column heading
(Windows), or press Command+Option and drag the column heading to the left or right of another column
heading (Mac OS). The Name column can’t be moved.
• To resize a column of information, drag the vertical dividing line between column headings or double-click the
line to automatically resize the column to fit the widest item in it.
5 To display information about a file, project, or Version Cue Workspace, do one of the following:
• Place the pointer over the item. A summary of file information appears in a tool tip.
• Right-click (Windows) or Control-click (Mac OS) the file and choose Versions (to display information about a
file’s versions) or Alternates (to display information about a file’s alternates).
Note: If you’ve already opened the file in an Adobe Creative Suite component, file status information appears at the
bottom of the file’s window.
Page 97

ADOBE ILLUSTRATOR CS2
User Guide
See also
“About the Adobe dialog box” on page 82
“Version Cue file statuses” on page 96
To view Version Cue Workspace, project, and file information in Bridge
Note: You can perform this task only if you have access to the full Version Cue feature set, available in Adobe Creative
Suite or in a shared workspace. See “Availability of Version Cue features” on page 81 for more information.
In Bridge, you can choose between two display views: Versions And Alternates View and Details View. Use the
Versions And Alternates View to view thumbnails of files along with thumbnails of Version Cue alternates and
versions. Use the Details View to view thumbnails as well as information about the number of versions or alternates,
enhanced status information, and the current version comment.
1 Start Bridge, and then click Version Cue in the Favorites panel.
2 Click the Version Cue Workspace, project, or file to view its information, or place the pointer over the item to
display a summary of information in a tool tip.
See also
“To view file and folder thumbnails in Bridge” on page 54
90
“The Bridge work area” on page 48
“Version Cue file statuses” on page 96
“About Version Cue versions” on page 110
“About Version Cue alternates” on page 115
Creating and editing projects
To begin using Version Cue, you need to create a Version Cue project. When you work with Version Cue, you decide
what a project entails. For example, you can create a project to organize files for an entire publishing effort, or you
cancreateaprojecttomanagefiles forspecific aspectsofanadvertising campaign.You canuse aproject to organize
assets related to a particular customer or use a project to separate private files from files that are worked on collaboratively. You can add files to projects at any time by using Bridge, InCopy, or any Adobe Creative Suite component.
When you create a Version Cue project, you specify a project name, the Version Cue Workspace that hosts the
project, and a project description. You specify whether to share the project or keep it private. Shared projects are
available to other users; however, you can password-protect shared projects to restrict access to specific users. You
can create private projects on a workspace installed on your computer. If you create a project on a computer that is
used as a server, it must be shared to be accessible.
You can create projects by using Bridge, InCopy, any Adobe Creative Suite component, or the Version Cue Administration utility. The Version Cue Administration utility provides options for specifying advanced project properties.
You create new Version Cue projects with it by importing a folder of files. These files are used as the project starting
point.
Page 98

The Project Tools menu contains frequently used commands
ADOBE ILLUSTRATOR CS2
User Guide
91
See also
“To create a project” on page 91
“To edit Version Cue project properties” on page 130
“To create a new Version Cue project from a folder” on page 128
“To share or unshare a project” on page 93
“To share or unshare a project from Bridge” on page 94
“Availability of Version Cue features” on page 81
To create a project
Note: You can perform this task only if you have access to the full Version Cue feature set, available in Adobe Creative
Suite or in a shared workspace. See “Availability of Version Cue features” on page 81 for more information.
For information on creating a project in Acrobat 7, see Acrobat Help.
1 In Illustrator, InCopy, InDesign, or Photoshop, choose File > Open. Click Use Adobe Dialog if you’re using the
OS dialog box.
2 Click Version Cue in the Favorites panel.
3 Choose New Project from the Project Tools menu
4 Choose a location for the project from the Location menu.
5 Enter a name for the project in the Project Name box and a description in the Project Info box. (The description
you enter appears as a tool tip when the pointer is over the project in the list of workspaces.)
6 To make this project and its files available to others, select Share This Project With Others. (If the Version Cue
Workspace is on a computer other than your own, the Version Cue project is shared by default.)
.
Page 99

ADOBE ILLUSTRATOR CS2
User Guide
7 Click OK.
See also
“About the Adobe dialog box” on page 82
To create a project in Bridge
Note: You can perform this task only if you have access to the full Version Cue feature set, available in Adobe Creative
Suite or in a shared workspace. See “Availability of Version Cue features” on page 81 for more information.
1 Start Bridge, and then click Version Cue in the Favorites panel.
2 Choose Tools > Version Cue > New Project.
3 Choose a location for the project from the Location menu.
4 Enter a name for the project in the Project Name box and a description in the Project Info box. The description
you enter appears as a tool tip when the pointer is over the project in the list of workspaces.
5 To make this project and its files available to others, select Share This Project With Others. (If the Version Cue
Workspace is on a computer being used as a server, the Version Cue project is shared by default.)
6 Click OK. The project opens automatically. No Items To Display appears in the Content Area until you add files
to the project.
92
See also
“To add a file or folder to a project in Bridge” on page 99
To edit the properties of a project
Note: You can perform this task only if you have access to the full Version Cue feature set, available in Adobe Creative
Suite or in a shared workspace. See “Availability of Version Cue features” on page 81 for more information.
1 Do one of the following:
• In Illustrator, InCopy, InDesign, or Photoshop, choose File > Open. Click Use Adobe Dialog if you’re using the OS
dialog box. Double-click the host Version Cue Workspace. Select the project, and then choose Edit Properties
from the Project Tools menu.
• In Bridge, select the project and then choose Tools > Version Cue > Edit Properties.
• In Acrobat 7,chooseFile > Open.Click VersionCue.Selectthe project, andthenchooseEditPropertiesfromthe
Project Tools menu.
2 In the Edit Properties dialog box, do any of the following, and click Save:
• To change the project name, enter a name in the Project Name text box. The new name will not be reflected on
your (or your workgroup’s) working copies project folder until you disconnect from and reconnect to the project.
• To change the description of the project, enter text in the Project Info box.
• To make this project and its files available to other users, select Share This Project With Others. (If the Version
Cue Workspace is on a computer being used as a server, the Version Cue project is shared by default.) To unshare
a shared project, deselect Share This Project With Others. Note, however, that this action does not delete any
working copies currently in project folders on the workgroup’s computers.
Page 100

ADOBE ILLUSTRATOR CS2
User Guide
• To view thelocationofworking copies on your computer,expandLocal ProjectFiles.Toopenthe folder,choose
Show Files (Windows) or Show Files in Finder (Mac OS). To change the location of the files, click Change
Location and choose the new location for working copies.
Note: Make sure that you use the Change Location feature to relocate working copies, rather than moving the project
folder manually in the file system.
• Click Advanced Administration to enable lock protection, edit or assign users, or require users to log into the
project. When prompted, log into Version Cue Administration. Depending on your privileges, this option may not
be available.
3 Click Cancel to close the Open dialog box (Version Cue saves your settings even though you clicked Cancel).
See also
“Disconnecting from projects” on page 105
“Deleting files and folders” on page 106
“To log into Version Cue Administration from an Adobe Creative Suite component” on page 124
93
To share or unshare a project
Note: You can perform this task only if you have access to the full Version Cue feature set, available in Adobe Creative
Suite or in a shared workspace. See “Availability of Version Cue features” on page 81 for more information.
Atanytime,youcanchangeaproject’ssharedstatus.ProjectsonaVersionCueWorkspacethatotheruserscanaccess
are shared by default and can’t be made private. Note that unsharing a project does not delete any working copies
currently in the working copies project folders of your workgroup.
Note: If theVersion CueWorkspace is installedonacomputer that uses afirewalland youwanttoshare theworkspace
with others, make sure that TCP ports 3703 and 427 are left open. If you’re using a Windows machine, deselect the
Internet Connection Firewall option. (For information on the Internet Connection Firewall option, see Windows Help.)
1 Do one of the following:
• In Illustrator, InCopy, InDesign, or Photoshop, choose File > Open. Click Use Adobe Dialog if you’re using the OS
Open dialog box.
• In Acrobat 7, choose File > Open.
2 Click Version Cue in the Favorites panel, and then double-click the host Version Cue Workspace.
3 Select the project, and then do one of the following:
• To share the project, choose Share Project from the Project Tools menu
• To unshare the project, choose Unshare Project from the Project Tools menu.
• Choose Edit Properties from the Project Tools menu. Select or deselect Share This Project With Others, and click
Save. After you edit the project properties, click Cancel to close the Open dialog box (your settings are saved even
though you clicked Cancel).
.
See also
“About the Adobe dialog box” on page 82
“To view Version Cue Workspace, project, and file information” on page 89
 Loading...