

Page 1
2
3
2
3
Adobe Illustrator CS Help Using Help
Using Help | Contents | Index Back 1
Using Help
About Help
Adobe Systems Incorporated provides complete documentation in an Adobe PDF-based
help system. This help system includes information on all tools, commands, and features
of an application. It is designed for easy on-screen navigation and can also be printed and
used as a desktop reference. Additionally, it supports third-party screen-reader applications that run in a Windows environment.
Navigating in Help
Help opens in an Adobe Acrobat window with the Bookmarks pane open. (If the
Bookmarks pane is not open, click the Bookmarks tab at the left edge of the window.)
At the top and bottom of each page is a navigation bar containing links to this page (Using
Help), the table of contents (Contents), and the index (Index).
To move through pages sequentially, you can click the Next Page and the Previous
Page arrows; click the navigation arrows at the bottom of the page; or click Back to
return to the last page you viewed.
You can navigate Help topics by using bookmarks, the table of contents, the index, or the
Search (Acrobat 6) or Find (Acrobat 5) command.
To find a topic using bookmarks:
I
1
n the Bookmarks pane, click the plus sign (+) (Windows) or the right-facing arrow
(Mac OS) next to a bookmark topic to view its subtopics.
2
lick the bookmark to go to that topic.
C
To find a topic using the table of contents:
1
C
lick Contents in the navigation bar.
On the Contents page, click a topic to go to that topic.
To view a list of subtopics, click the plus sign (+) (Windows) or the right-facing arrow
(Mac OS) next to the topic name in the Bookmarks pane.
To find a topic using the index:
D
1
o one of the following:
Click Index in the navigation bar, and then click a letter at the top of the page.
•
Ι
•
n the Bookmarks pane, expand the Index bookmark to view the letter subtopics;
then click a letter.
Locate the entry you want to view, and click the page number to go to that topic.
To view other entries for the same topic, click Back to return to the same place in the
index, and then click another page number.
U
sing Help | Contents | Index Back 1
Page 2

Adobe Illustrator CS Help Using Help
U
sing Help | Contents | Index Back 2
To find a topic using the Search command (Acrobat 6):
1
Choose Edit > Search.
2
Type a word or phrase in the text box and click Search. Acrobat searches the document
and displays every occurrence of the word or phrase in the Results area of the Search PDF
pane.
To find a topic using the Find command (Acrobat 5):
1
Choose Edit > Find.
2
Type a word or phrase in the text box and click Find. Acrobat searches the document,
starting from the current page, and displays the first occurrence.
3
To find the next occurrence, choose Edit > Find Again.
Printing Help
Although Help is optimized for on-screen viewing, you can print selected pages or the
entire file.
To print Help:
Choose File > Print, or click the Print icon in the Acrobat toolbar.
U
sing Help | Contents | Index Back 2
Page 3
Adobe Illustrator CS Help Contents
Using Help | Contents | Index Back 3
Contents
L
earning about Adobe Illustrator 4
What’s New in Illustrator CS 12
Tutorials 19
Looking at the Work Area 35
Creating Artwork in Illustrator 60
Basic Drawing 85
Arranging and Combining Objects 116
Reshaping Objects 159
Applying Color, Fills, and Strokes 195
Producing Consistent Color 218
Using Transparency, Gradients, and Patterns 236
Enhancing the Appearance of Objects 264
Advanced Drawing 294
Working with Bitmap Images 319
Adding Type to Artwork 323
Formatting Type 348
Creating Web Graphics 392
Saving and Exporting Artwork 423
Printing Artwork 446
Producing Color Separations 479
Automating Tasks 492
Creating Graphs 510
Keyboard Shortcuts 532
Legal Notices 543
U
sing Help | Contents | Index Back 3
Page 4
Adobe Illustrator CS Help Learning about Adobe Illustrator
Using Help | Contents | Index Back 4
Learning about Adobe Illustrator
Getting Help
Adobe provides a variety of options for you to learn Illustrator, including printed guides,
online Help, and tool tips. You can easily access a host of continually updated Web
resources for learning Illustrator, from tips and tutorials to tech support information.
Getting up to speed depends on your experience with previous versions of Illustrator.
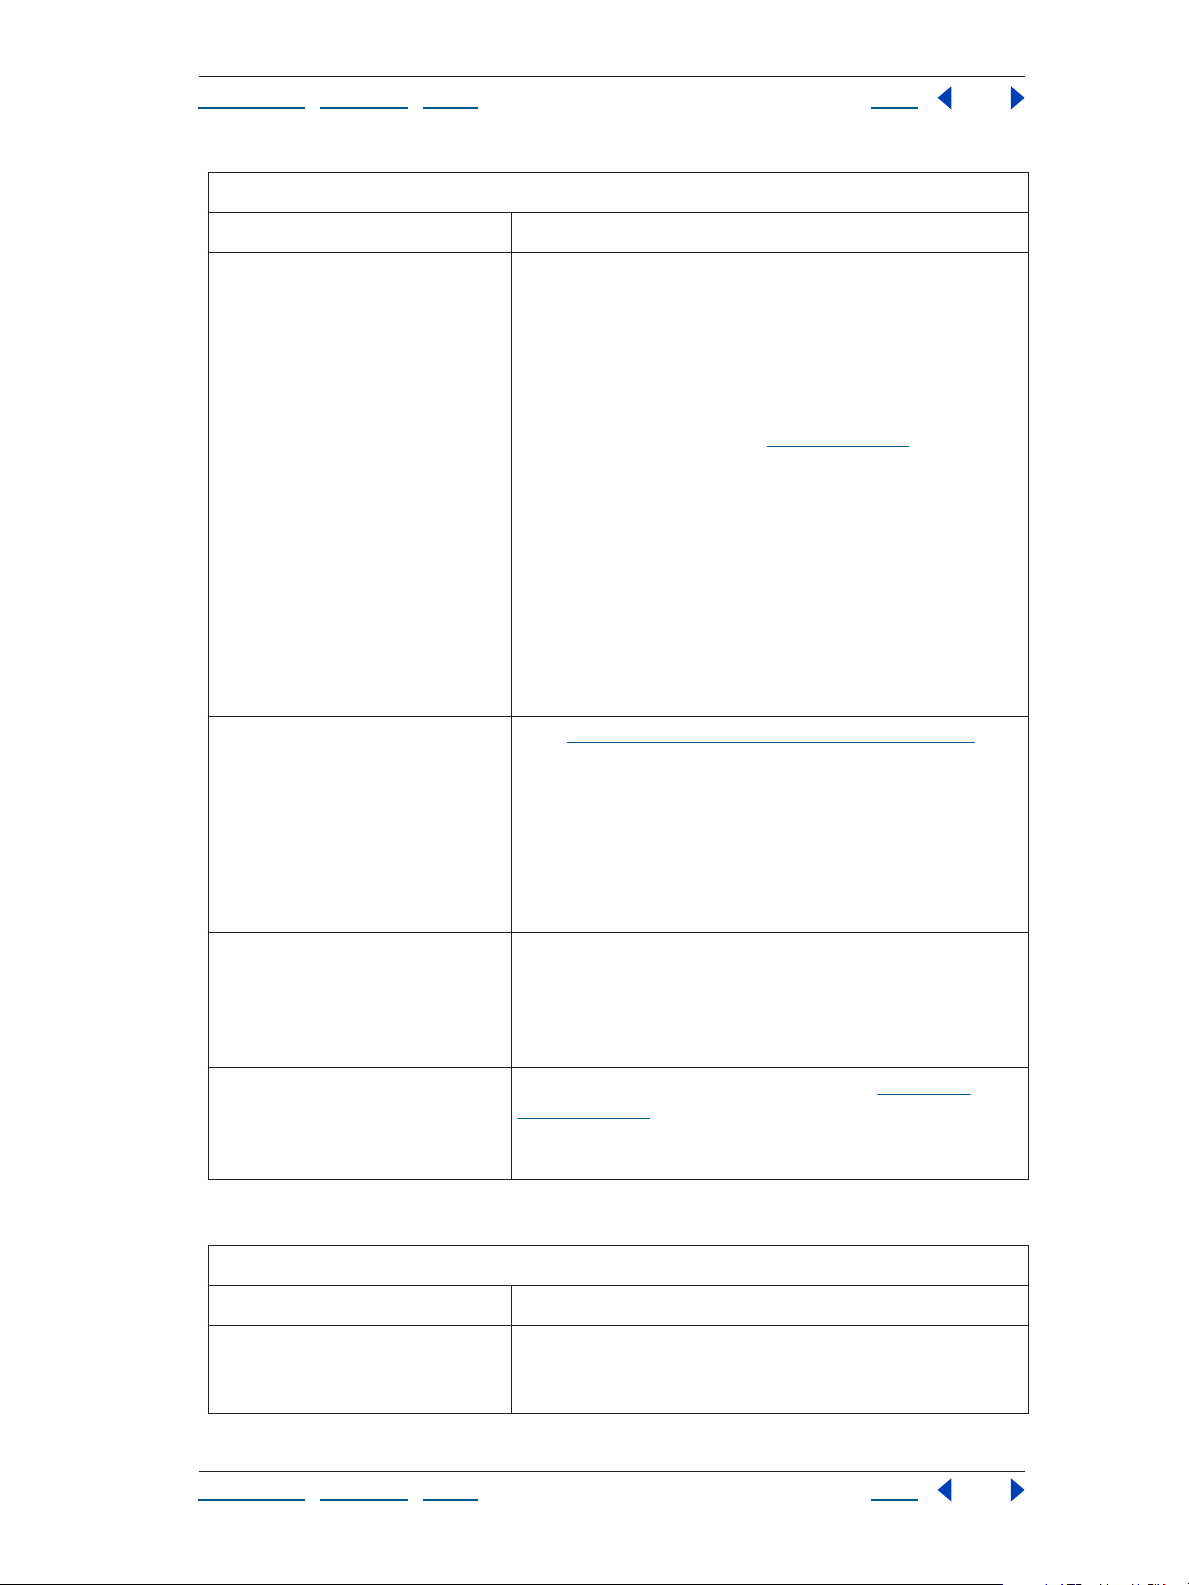
Finding Help for Illustrator features
If you... Try this...
Are new to Illustrator and want an
overview of tools and features
Are upgrading from a previous version of Illustrator
Are looking for a detailed information about a feature
Want to learn about free content
included with Illustrator
Want a PDF version of the Illustrator
User Guide and Help system
Want information on keyboard
shortcuts
• Browse through the information in “
tor” on page 6 for information on specific tasks.
• See the “Looking at the Work Area” chapter to get familiar
with the work area and tools.
•
Go to the Tutorials chapter for hands-on lessons.
• Use the Illustrator tool tips feature to help identify tools, buttons, and palette controls as you work in Illustrator. (See
sing tool tips” on page 45.)
“U
• See the “What’s New” chapter for information on new functionality in Illustrator CS.
• Browse through the information in “
tor” on page 6 for information on specific tasks.
• Search for the feature in Illustrator Help or looking it up in
the index.
• Choose Help > Welcome Screen, and click Cool Extras to view
a catalog of templates, brushes, styles, symbols, swatches,
fonts, and sample files.
• See the
• See the Keyboard Shortcuts appendix.
AICSHelp
file on the CD.
Working with Illustra-
Working with Illustra-
U
sing Help | Contents | Index Back 4
Page 5
Adobe Illustrator CS Help Learning about Adobe Illustrator
U
sing Help | Contents | Index Back 5
Finding Illustrator training resources
If you... Try this...
Want to learn new techniques for
using Illustrator
Are a developer looking for technical resources
• Complete one of the tutorials available on the Adobe Illustrator Web site.
• Choose Help > Illustrator Online to open the main Adobe
Illustrator Web page.
• Choose Help > Online Support to go directly to the Adobe
Illustrator support page.
• Open Adobe’s home page at www
.adobe.com. Then select
Products and click the Illustrator link.
Note:
You must have an Internet connection and an Internet
browser in order to access the Adobe Web site using these commands.
Resources on the Adobe Web site are continually updated
and include the following step-by-step tutorials; updates,
patches, and plug-ins; Illustrator Top Issues containing the latest Illustrator technical support solutions; technical guides; a
searchable database of answers to technical questions; and
links to user forums.
Go to h
ttp://partners.adobe.com/asn/techresources.jsp.
The Adobe Solutions Network (ASN) provides resources for
developers, print service providers, and others interested in
making the most of Adobe products and technologies. Here,
you can find access to such information as SDKs, the developer knowledgebase, and technical guides for areas such as
PDF, PostScript and printing technologies, fonts, XMP, and
SVG.
Are looking for a book or selfguided training option
Visit the Adobe Press site at www.adobe.com/misc/
books.html or contact your local bookseller. Adobe Press
books provide in-depth training in Adobe software, including
the acclaimed Classroom in a Book
®
series developed by
experts at Adobe.
Want information about becoming
an Adobe Certified Expert, Adobe
Certified Instructor, or Adobe
Visit the Partnering with Adobe Web site at h
ners.adobe.com.
Certification is available worldwide.
ttp://part-
Authorized Learning Provider
Finding support for Illustrator
If you... Try this...
Want answers to common troubleshooting questions
U
sing Help | Contents | Index Back 5
Choose Help > Online Support and follow the links to the Support Knowledgebase. You can browse top issues for Illustrator
and search a database with answers to technical questions.
Page 6
Adobe Illustrator CS Help Learning about Adobe Illustrator
U
sing Help | Contents | Index Back 6
Finding support for Illustrator
If you... Try this...
Want customer or technical support
• Refer to the technical support card provided with your software.
• When you register your product, you may be entitled to
technical support for up to 90 days from the date of your first
call. Terms may vary depending on the country of residence.
To register online, choose Help > Registration. You can also
register by filling out and returning the warranty registration
card included with your software package.
• See the ReadMe installed with the program for additional
information.
• See the Adobe Illustrator support page for information on
top support issues and troubleshooting information for common problems. This support page includes access to an
extensive Support Knowledgebase, which you can search for
answers to specific Illustrator questions and problems. To
access the Adobe Illustrator support page, choose Help >
Online Support.
Working with Illustrator
You can work with Illustrator in different ways. Whether you’re creating graphics for the
Web or high-resolution images for print, Illustrator delivers easy-to-use tools and editable
effects to let you experiment at will—or revise as needed—and still meet your deadlines.
If you want to jump-start a project
Illustrator provides a variety of professionally-designed resources to help get your creative
juices flowing:
•
Use templates to start typical design projects. Illustrator comes with templates for
business documents (letterhead, business cards, envelopes, and so on), CD and DVD
booklets, brochures, certificates, greeting cards, Web sites, and more
create new templates to meet your design and production needs. (See “
page 62 and “Creating new templates” on page 63.)
Use libraries of symbols, brushes, styles, and swatches to speed up the design process.
•
Creating new documents” on
. In addition, you can
For a catalog of the libraries, choose Help > Welcome Screen, and click Cool Extras.
If you want to draw an illustration
From the industry-standard Pen tool to versatile brushes and symbols, Illustrator supplies
tools that support your illustration style:
•
Use the Pen tool to draw precise paths—smooth, flowing curves or straight lines—or
use the dynamic pencil to draw on-screen as easily as you do on paper. (See “D
precise paths with the Pen tool” on page 98 and “Drawing freeform paths with the
Pencil tool” on page 96.)
•
Use the specialized shape tools to draw rectangles, circles, arcs, grids, spirals, stars, and
more. (See “D
rawing simple lines and shapes” on page 87.)
rawing
U
sing Help | Contents | Index Back 6
Page 7

Adobe Illustrator CS Help Learning about Adobe Illustrator
U
sing Help | Contents | Index Back 7
Use brushes to create hand-drawn effects, such as calligraphic strokes, and paint
•
patterns that flow along a path. Customize the brushes or edit the strokes at any time to
fine-tune the image. (See “U
•
If you start an illustration by sketching it on paper, simply scan your drawing and place
sing brushes” on page 294.)
it into Illustrator as a template layer. Then use the Auto Trace tool to automatically trace
the image. (See “
Use symbols to add individual design elements to an illustration or create natural-
•
looking masses of repeating elements such as foliage or crowds. (See “D
Tracing artwork” on page 113.)
rawing with
symbols” on page 306 and “Using the symbolism tools” on page 310.)
•
Create complex shapes quickly by combining simple shapes into compounds. Then edit
the compounds if you need to without redrawing the original shapes. (See “
Combining
objects into complex shapes” on page 148.)
•
Reshape objects with the Illustrator transformation tools. You can apply the changes
interactively, or enter specific settings to control the results precisely. (See “
Choosing a
reshaping method” on page 159.)
If you want to apply sophisticated color effects
Illustrator offers advanced fill and stroke options such as patterns, gradients, and the
ability to add multiple fills and strokes to a single object. In addition, you can apply transparency and masks to produce painterly, see-through effects:
Use the Transparency palette to apply transparency to vector objects, bitmap images,
•
or type. You have the option of limiting transparency to a layer, a group, or an object’s
fill or stroke, and transparent objects and type remain fully editable. (See “
transparency” on page 236.)
Apply blending modes to blend the colors of graphics and type with the colors on
•
underlying layers. By experimenting with different mode settings in the Transparency
palette, you can create a wide range of effects. (See “U
sing blending modes” on
page 239.)
•
Use clipping masks to cut an object away from its background, or create opacity masks
to let elements on an underlying layer show through an object. (See “U
masks to change the shape of objects” on page 155 and “Creating and editing opacity
masks” on page 243.)
•
Paint objects by filling them with solid colors or patterns. Or use gradients to produce
painterly fills that flow between multiple colors, similar to watercolors. (See “Applying
color fills and strokes to objects” on page 214, “Using the Gradient palette” on
page 248, and “Working with patterns” on page 255.)
•
Select Add New Fill or Add New Stroke from the Appearance palette to apply multiple
strokes and fills to a single object. (See “
Creating multiple fills and strokes in an object”
on page 217.)
Working with
sing clipping
If you want to add visual impact to your artwork
With Illustrator’s dynamic tools and effects, you’ll be able to make your ideas come to life:
Import files from other applications to add diverse elements to your artwork. (See
•
“Imp
orting artwork” on page 74 and “Managing linked and embedded artwork” on
page 80.)
U
sing Help | Contents | Index Back 7
Page 8

Adobe Illustrator CS Help Learning about Adobe Illustrator
U
sing Help | Contents | Index Back 8
Use graphic styles to quickly add flair to text and artwork. Illustrator comes with over
•
150 preset styles, plus you can save new styles with a single click. (See “U
sing graphic
styles” on page 289.)
•
Use effects to experiment with a limitless variety of appearances while keeping the
ability to edit the underlying objects. Effects can be modified or removed instantly, so
you’ll always be in control of the final artwork. (See “U
sing filters and effects” on
page 273 and “Summary of filters and effects” on page 276.)
•
When applying styles and effects, use the Layers palette to target any object, group, or
layer you want to change. Then use the Appearance palette to keep track of and modify
the results. (See “
•
Bend, stretch, and twist your graphics in any way imaginable with live enveloping,
Targeting layers, groups, and containers” on page 268.)
warping, and liquify tools. The distorted objects remain editable, no matter how much
they have been manipulated. (See “R
“R
eshaping objects with effects and filters” on page 180, and “Reshaping objects with
eshaping objects with envelopes” on page 170,
the liquify tools” on page 168.)
If you want to create professional-quality type
Illustrator provides powerful, flexible features for creating and modifying type. With the
new typographic controls in this version of Illustrator, you be able to set type like a pro:
•
Add type anywhere in your artwork—horizontally, vertically, along paths, inside shapes,
around shapes, in rows and in columns. If you can imagine it, Illustrator can do it. (See
“
Creating type” on page 324.)
•
Use the OpenType and Glyphs palettes to gain access to special characters in OpenType
font, including ligatures, fractions, swash characters, titling characters, ordinals, and
ornaments. Illustrator comes with a variety of OpenType
features in your work right away. (See “
Applying OpenType features to characters” on
page 360.)
Use the Character and Paragraph palettes to keep typographic controls at your
•
fingertips. These palettes provide a host of formatting options—from font, size, leading,
kerning, and tracking to alignment, justification, and indentation. (See “F
characters” on page 350 and “Formatting paragraphs” on page 364.)
Once your type is formatted exactly as desired, save the settings in a character or
•
paragraph style. Styles help you format type quickly and maintain high standards by
ensuring that all of the text in a design is consistent. (See “U
paragraph styles” on page 375.)
Use the Adobe Every-line Composer to automatically typeset blocks of text. The Every-
•
line Composer produces elegant line breaks with minimal hyphenation, consistent
word and letter spacing, and no distracting rivers of white space flowing from line to
line. (See “
Use editing features—including spell-checking, find and replace, and smart punctu-
•
Working with composition” on page 370.)
ation—to fine-tune your text. Illustrator comes with dictionaries for twenty-nine
different languages so you can use these features regardless of which language the text
is in. (See “E
diting text” on page 339.)
®
fonts so you can use these
ormatting
sing character and
U
sing Help | Contents | Index Back 8
Page 9

Adobe Illustrator CS Help Learning about Adobe Illustrator
U
sing Help | Contents | Index Back 9
If your artwork includes Japanese text, turn on the Show Asian Options preference.
•
Illustrator includes features for tsume, tate-chu-yoko, warichuu, mojikumi, kinsoku
shori and composite fonts. (See “
Working with Chinese, Japanese, and Korean type” on
page 378.)
If you want to create graphics for the Web
Illustrator provides Web-savvy tools to help you minimize file size without sacrificing the
quality of your artwork—and unlike their raster-based counterparts, the vector elements
you create in Illustrator remain completely editable.
•
To manage repeating graphics efficiently, create a symbol and then use as many
instances of it as you need. File size stays small because the symbol is defined only
once, and the instances reference the symbol. In addition, the instances update
automatically when you edit the symbol. (See “D
Create vector- or raster-based slices from objects, groups, or layers. The slices update
•
automatically when elements are repositioned or edited, and you can export individual
slices in Macromedia Flash (SWF), SVG, GIF, JPEG, PNG, or HTML format, all within the
same HTML table. (See “D
ividing artwork into slices” on page 394.)
rawing with symbols” on page 306.)
Use the Release to Layers command to shuffle objects from one layer onto individual
•
layers. Then export the layers in Photoshop format or as a Macromedia Flash (SWF) file
for animation in another Adobe application. (See “R
eleasing items to separate layers”
on page 139.)
Use the Image Map pop-up menu in the Attributes palette to define an image map.
•
Enter a URL, and Illustrator automatically generates a linked image map when you
export the file in Web format. (See “
Apply drop shadows and other effects as editable SVG effects. These low-memory
•
Creating image maps” on page 400.)
vector effects are rasterized only when viewed in an SVG viewer, so they look crisp at
any size. (See “
Apply type anti-aliasing selectively to keep small text easy to read. (See “R
•
Creating Web graphics with SVG” on page 401.)
asterizing and
anti-aliasing type” on page 346.)
•
Choose View > Pixel Preview to see how your vector objects will appear when they are
rasterized for the Web. (See “
•
Set the Color palette to display only Web-safe colors, or use the Only Web Colors option
Working in pixel preview mode” on page 393.)
in the Color Picker. In addition, you can convert an existing print file to RGB by choosing
File > Document Color Mode > RGB. (See “Using the Color palette” on page 201 and
“U
sing the Color Picker” on page 200.)
•
The Save for Web dialog box displays side-by-side previews of your artwork to let you
compare different compression options and select settings that keep the image quality
high and the file size low. (See “
Optimizing images” on page 407.)
If you want to speed up everyday tasks
Saving a few seconds here and there can shave hours off a complex project, and Illustrator
is packed with features to handle common tasks quickly and efficiently.
Specify a tolerance range for the Magic Wand tool to select a range of objects with
•
similar attributes—every object with a stroke weight between 1 and 3 points, for
example. Save and load selections easily using the Select menu. (See “U
Wand tool and palette” on page 121.)
U
sing Help | Contents | Index Back 9
sing the Magic
Page 10

Adobe Illustrator CS Help Learning about Adobe Illustrator
U
sing Help | Contents | Index Back 10
Use graphic styles and effects to change the appearance of vector objects instantly.
•
Because the original objects remain intact, you can modify the results at any time. (See
“U
sing graphic styles” on page 289 and “Using filters and effects” on page 273.)
•
Manage complex artwork efficiently by using the Layers palette to organize the file into
distinct layers and sublayers. You can also use the Layers palette to apply appearance
attributes to layers, groups, and objects. (See “
Organizing objects using layers” on
page 135.)
•
Position objects quickly using the precision layout tools in Illustrator, including snap-to
grids, Smart Guides, and the Align palette. (See “La
ying out artwork with precision” on
page 67 and “Aligning and distributing objects” on page 128.)
•
Sample text and color attributes with the Eyedropper tool and apply the attributes to
other objects. (See “
•
Use the Swatches palette to store color and pattern swatches in a custom swatch set.
Copying attributes between objects” on page 271.)
When you copy an object from one file to another, any swatches associated with the
object are added to the Swatches palette in the destination document. (See “
Working
with swatches” on page 202.)
If you want to use Illustrator with other applications
When you use Illustrator with other Adobe software, you can take advantage of superior
Adobe technologies such as cross-product color-management tools, file information,
Smart Object technology, transparency tools, and a unified interface that makes it easy to
put your expertise in one application to work in another:
•
Preserve layers, masks, transparency, compound shapes, and editable type when
passing files between Illustrator and Adobe Photoshop. Retain rollover and animation
information in linked Photoshop files when exporting from Illustrator as CSS layers.
(See “Exp
page 416.)
Edit native Illustrator files directly in Adobe InDesign. Adjust transparency settings in
•
InDesign, and preserve live effects, such as drop shadows.
•
Drop Illustrator files inside Adobe GoLive and then double-click the files to launch Illustrator and make edits. The changes appear automatically in the GoLive file. Fine-tune
the optimization settings directly in GoLive, and import data-driven graphics templates
into GoLive for automated network publishing.
•
Export EPS and Macromedia Flash (SWF) files for use in LiveMotion. Export Illustrator
blends as SWF sequences that can be animated in LiveMotion. Double-click a placed
Illustrator file to launch Illustrator; any edits update automatically in the LiveMotion file.
(See “
•
Save your Illustrator files in Adobe PDF format to create documents anyone can view
using the industry-standard Adobe Reader
page 425.)
•
Import layered Illustrator artwork into Adobe After Effects, and integrate easy-to-edit
Illustrator graphics into your Adobe Premiere video productions.
orting artwork” on page 437 and “Exporting layers as CSS layers” on
Creating Web graphics with SWF” on page 406.)
®
. (See “
Saving artwork in Adobe PDF” on
U
sing Help | Contents | Index Back 10
Page 11

Adobe Illustrator CS Help Learning about Adobe Illustrator
U
sing Help | Contents | Index Back 11
Create templates in Illustrator and define variable elements. Then use Adobe AlterCast
•
image server software (available only in English) to replace the variable text
and graphics automatically and generate an unlimited number of unique iterations of
the design. (See “
•
Use the Save for Microsoft Office command to create a file you can use in a PowerPoint
presentation, a Word document, or an Excel spreadsheet.
Microsoft Office” on page 437
Working with data-driven graphics” on page 503.)
(See
“
Saving artwork for
)
.
If you want to automate time-consuming processes
Tight deadlines require efficient workflow, especially for designers and developers
working in high-volume publishing environments. Illustrator lets you automate some of
the most repetitive tasks, such as batch processing and creating variations of similar
designs.
Build a basic template in Illustrator and define objects in the design as variables. Then
•
use an automated script or an image server to produce unique variations, using data
stored in any ODBC-compliant source. (See “
page 503.)
Automate repetitive tasks using the rich scripting support, which allows access to
•
almost every function in Illustrator. Write scripts using JavaScript, AppleScript, or
Microsoft Visual Basic. (See “U
Use the Illustrator Actions palette to group a series of commands into a single action.
•
sing scripts” on page 502.)
Then play back the action to repeat the entire set of steps automatically. You can even
use the Batch command to apply an action to a folder of files and subfolders.
(See “U
sing actions” on page 492.)
Working with data-driven graphics” on
™
U
sing Help | Contents | Index Back 11
Page 12
Adobe Illustrator CS Help What’s New in Illustrator CS
Using Help | Contents | Index Back 12
What’s New in Illustrator CS
3D effect
Rendering objects in perspective is a time-honored way to give printed materials the
illusion of depth. Now, Illustrator CS makes it easy to add 3D elements to your work,
whether you’re producing a logo, a package design, or a title for a video production. Using
the integrated new 3D effect, you can transform type and other shapes you draw into 3D
objects, and then rotate them in space and even customize their lighting. 3D shapes are
“live,” so changes you make to the original 2D object are automatically reflected in the 3D
shape.
For more information on the 3D effect, see “
Creating 3D objects” on page 185.
Scribble effect
Have fun making vector artwork look loose and hand-drawn with the new live Scribble
effect. Great for adding a child-like charm to artwork, the Scribble effect is also handy for
quickly making formal design elements look casual and friendly, masking images, creating
scratchboard-like illustrations, adding cross-hatching to a design, or creating animated
wiggly lines.
For more information on the Scribble effect, see “
page 287.
Making objects look hand-sketched” on
Templates and other professionally-designed content
Illustrator CS includes more than 200 real-world, professionally-designed templates—
including 50 Japanese language templates—that help you start typical projects quickly.
Templates provide a range of design ideas and include custom-sized artboards, layers,
styles, swatches, symbols, and more. Illustrator CS also includes a template file format, so
you can save your own templates. For more information on using templates, see “
new documents” on page 62 and “Creating new templates” on page 63.
In addition to templates, Illustrator CS comes with more than 100 free OpenType fonts
(including Roman, Japanese, Chinese, and Korean fonts) and professional swatch and
symbols libraries. To view a catalog of the content that comes with Illustrator CS, choose
Help > Welcome Screen and click Cool Extras.
Creating
Type enhancements
Illustrator CS introduces a redesigned text engine and forward-looking features that make
it easier than ever to set great-looking type.
U
sing Help | Contents | Index Back 12
Page 13

Adobe Illustrator CS Help What’s New in Illustrator CS
U
sing Help | Contents | Index Back 13
Paragraph and character styles Paragraph and character styles help you maintain high
production standards by ensuring that all of the text in a design uses consistent
formatting, whether for entire paragraphs or shorter segments, such as run-in heads or
words that require particular emphasis. Styles also save you time because they enable you
to apply a rich set of formatting attributes with a single click of a mouse.
For more information on character and paragraph styles, see “U
sing character and
paragraph styles” on page 375.
OpenType font support The OpenType font standard was developed jointly by Adobe
and Microsoft, and brings the advantages of both the TrueType and PostScript font
formats into a new format that takes advantage of Unicode character encoding.
OpenType fonts use a single font file for both Macintosh and Windows computers, so you
can move files from one platform to another without worrying about font substitution
and other problems that cause text to reflow. A single OpenType font file can also include
many more glyphs (a glyph is a visual representation of a character) than other font
formats, including glyphs previously only available in expert sets and characters for nonwestern languages such as Greek and Cyrillic.
In addition to these general benefits, Illustrator CS includes special OpenType commands
for automatic context-sensitive substitution of alternate glyphs. When you select any of
these options, Illustrator automatically replaces the default glyph for a particular character
or combination of characters with any contextually appropriate alternative. For example, if
you have the Fractions option selected and type 3/16 in an OpenType font that supports
arbitrary fractions, the numbers will be automatically reformatted as a fraction; if you
select the Swash option and the selected OpenType font includes alternate Swash glyphs,
they will be used.
For more information on OpenType font support, see “
Applying OpenType features to
characters” on page 360.
Easy access to alternate glyphs The new Glyphs palette in Illustrator CS offers a fast,
accessible way to see all of the glyphs in a font, such as Ornaments, Terminal Forms,
Discretionary Ligatures, and more. Simply double-clicking inserts the selected glyph.
Previously, you could access these special characters only by memorizing keyboard
shortcuts or manually formatting individual characters using a separate “expert” version of
a font that included the character you wanted.
For more information on using the Glyphs palette, see “Inser
ting glyphs” on page 340.
Columns, rows, and other area type enhancements Quickly produce multi-column
designs by defining columns and rows in any text area. Specify the number of columns
and rows, the width and height of those rows and columns, whether or not they’re a fixed
size, and the size of the gutter. You can also determine the size of the inset between the
text and the object containing it, how the baseline is set, and whether text flows between
linked objects from right to left or left to right.
For more information on setting up rows and columns, see “
Working with blocks of type”
on page 328.
U
sing Help | Contents | Index Back 13
Page 14

Adobe Illustrator CS Help What’s New in Illustrator CS
U
sing Help | Contents | Index Back 14
Optical kerning and optical margin alignment With many fonts, the default spacing
between characters is visually uneven or crowded, even when the kerning pairs built into
the font are used. Designers have long used manual kerning to adjust the space between
awkward-looking pairs of letters, but the process is time-consuming. To help balance your
desire for quality against your drive to meet schedules, Illustrator CS introduces two
features that automate kerning:
Optical kerning automatically kerns text to produce optimal spacing. When applied to a
•
word, line, or paragraph, Illustrator analyzes the visual characteristics of text and
automatically determines the ideal spacing for the characters—even when that text
mixes different fonts and font sizes. Kerning is cumulative, so you can always adjust
optically kerned text to suit your eye. For more information on using optical kerning,
see “
Adjusting kerning and tracking” on page 355.
• Optical margin alignment automatically adjusts the position of punctuation and text
characters at either end of a line to make the edges of a text block look more visually
even. You use optical alignment most often to hang punctuation, such as quotation
marks and hyphens, but other characters are subtly shifted as well in order to produce
typographically good-looking results. For more information on using optical margin
alignment, see “
Specifying hanging punctuation” on page 367.
Every-line Composer for optimized paragraph composition The new Every-line
Composer in Illustrator CS gives you the ability to produce exquisitely typeset text without
fine-tuning line breaks by hand. The main goal in setting longer runs of text—in
brochures, packaging, and other materials you create with Illustrator—is to produce the
most elegant line breaks you can with minimal hyphenation, consistent word and letter
spacing, and no distracting “rivers” of white space flowing from line to line. The Every-line
Composer, a unique Adobe composition engine used in Adobe InDesign and Adobe
Photoshop, examines all of the text in an area to determine the best combination of line
breaks across the entire run. Illustrator CS also includes the Single-line Composer, which
applies hyphenation and justification settings to one line of text at a time, just as Illustrator
did in the past.
For more information on the Every-line Composer and the Single-line Composer, see
“
Working with composition” on page 370.
Custom tab leaders With Illustrator CS, you can customize the dot type and pattern for
tab leaders, or you can design your own graphics to use as tab leaders. In addition, Illustrator now lets you set unlimited numbers of tabs.
For more information on setting up tab leaders, see “
Working with tabs” on page 371.
WYSIWYG font menu The Font menu in Adobe Illustrator CS displays each font face you
have installed, so you can choose the fonts you want to use visually. Experimenting with
different faces is now faster and more direct, and you can see at a glance what format a
font uses (for example, the green and black O indicates an OpenType font). If you prefer,
you can also disable this option.
For more information on previewing fonts, see “P
U
sing Help | Contents | Index Back 14
reviewing fonts” on page 352.
Page 15

Adobe Illustrator CS Help What’s New in Illustrator CS
Using Help | Contents | Index Back 15
Expanded support for Japanese typography Adobe Illustrator is the standard for
design in most countries, and support for file sharing between different language versions
has long made it possible to share designs globally. Illustrator CS expands this support
with more sophisticated controls for formatting Japanese text. This includes customizable
mojikumi rule sets for determining optimal character spacing, as well as editable kinsoku
shori rule sets for handling Japanese punctuation, characters that cannot begin or end
lines, and characters that can’t be separated. Illustrator also includes other enhancements,
such as automated tate-chu-yoko controls, a composite font editor, an IME editor for
entering Japanese text, and a preference for hiding or showing Japanese text options in
Roman versions of Illustrator.
For more information on Japanese type features, see “
Working with Chinese, Japanese,
and Korean type” on page 378.
New options for type on paths Illustrator CS expands your options for designing text on
a path. The new Type on a Path submenu on the Type menu provides five preset
alignment options, and the Type on a Path Options dialog box includes additional options
for controlling the position of the text relative to the path. Now you can create a wider
range of looks for projects that use path text with a minimum of effort.
For more information on setting options for type on paths, see “
Adjusting the position of
type on a path” on page 336.
On-screen highlighting of missing fonts Illustrator CS automatically highlights fonts
that are used in a document but are not available on a computer system, so you can
identify and fix problems easily. Then use the Find Font command (available in previous
versions of Illustrator) to replace the missing fonts with installed ones or identify the
missing fonts so you can install them.
For more information on missing fonts, see “Handling missing f
onts” on page 360.
Enhanced hyphenation and justification controls Illustrator CS provides significantly
enhanced hyphenation and justification controls. Control how long a word must be before
Illustrator hyphenates it, whether Illustrator hyphenates capitalized words, and whether it
favors better word and character spacing or fewer hyphens. New Justification controls
allow you to set minimum, maximum, and desired settings for word spacing, letter
spacing, glyph scaling, and more.
For more information on setting up hyphenation and justification, see “
Controlling
hyphenation and justification” on page 369.
Expanded language support Spell-check and hyphenate the text in your Illustrator
documents in 29 languages, from U.S. and U.K. English, French, and German to Icelandic,
Polish, Serbian, and Turkish.
For more information on language support, see “
Assigning a language” on page 359.
Improved text linking and deletion Text linking is now more flexible: any text area,
including path text, can be linked to any other text area, so it’s possible to flow text from
one area, onto a path, and then into a second area. Plus, you can now delete a linked text
block without also deleting any text it contains—the text now flows back into the
previous box. Illustrator also now reduces clutter in your documents by automatically
deleting empty text blocks that are created by clicking a type tool and not entering text.
For more information on text linking and deletion, see “
Threading text between objects”
on page 333 and “Unthreading text from objects” on page 334.
Using Help | Contents | Index Back 15
Page 16

Adobe Illustrator CS Help What’s New in Illustrator CS
Using Help | Contents | Index Back 16
Warning about text reflow Open documents created in older versions of Illustrator with
confidence: you can choose to have the text in legacy documents remain just as it was
designed until you click an insertion point to edit it, or you can choose to update all type
objects when you open the file with Illustrator CS.
For more information on your options for reflowing text, see “U
previous versions of Illustrator” on page 323.
pdating text created in
Enhanced PDF support
Adobe Illustrator has used Adobe PDF (Portable Document Format) as its native file format
for several versions, making it easy for you, your clients, and others to open and view your
artwork files in Adobe Acrobat or the free Adobe Reader. Now Illustrator CS introduces
new support for Adobe PDF, including compatibility with Acrobat 6.0 and the Adobe PDF
1.5 format, extensive security options, and support for layers, printer’s marks, and bleeds
in PDF files. In addition, you can apply transparency flattener styles as you save PDF files
and save PDF settings as presets to streamline PDF creation.
For more information on PDF options, see “
Saving artwork in Adobe PDF” on page 425.
Tighter integration with Adobe Photoshop
Move layered files between Photoshop and Illustrator more easily. Text editability has
been improved because the two programs now share the same underlying text composition technology. Plus, multiple spot channels can be imported and 16-bit color data can
be converted to 8-bit on import, so you no longer have to keep two versions of your
original file. Also, you can link Photoshop duotone and tritone PDF images and print them
accurately from Illustrator.
For more information on moving artwork between Illustrator and Photoshop, see
“Imp
orting artwork from Photoshop” on page 78, “About importing layers from
Photoshop files” on page 80, and “Photoshop format (PSD)” on page 440.
Expanded print capabilities
One of the top priorities for Illustrator CS was to refine the printing experience and make
Illustrator print jobs more efficient and reliable to output, whether to a desktop printer or
a high-end print production device. To achieve this, Illustrator CS introduces a streamlined
user interface and next-generation support for fast and reliable printing, so you can easily
produce consistent results every time you print.
Illustrator CS eliminates the Page Setup and Separations Setup dialog boxes, and consolidates their functionality in the comprehensive new Print dialog box. You can now specify
all print settings in the Print dialog box, from tiling and custom page sizes to printer’s
marks, color management output profiles, and transparency flattener settings. This new,
more unified interface makes it easier to specify printing options quickly and accurately to
achieve the results you want. Other new printing features include an interactive print
preview, convenient scaling options, intuitive tiling controls, time-saving print presets,
improved consistency with transparency flattener presets, more flexible printer’s marks,
independent bleed settings, new separation options, and finer control when printing
layers.
Using Help | Contents | Index Back 16
Page 17

Adobe Illustrator CS Help What’s New in Illustrator CS
Using Help | Contents | Index Back 17
For more information on print capabilities, see “Using the Print dialog box” on page 447.
Adobe Version Cue
Use Adobe Version Cue™ features in Illustrator CS to increase your productivity when you
work alone or collaborate with others. You can integrate Version Cue design management
into your existing workflows within and across the Adobe
Version Cue features in Illustrator CS are only compatible with the Adobe Version Cue
Workspace, which is a feature that is only available as part of the Adobe Creative Suite.
(See “
Working with Adobe Version Cue managed projects” on page 58)
®
Creative Suite applications. The
Faster performance
Illustrator CS is faster across the board, so you can work more quickly. From copying and
pasting to scrolling around the artboard, printing, and saving files, you can pursue your
ideas in a more interactive environment.
Tighter integration with Microsoft Office
When you need to move artwork from Illustrator into a PowerPoint presentation, a Word
document, or an Excel spreadsheet, the new Save For Microsoft Office command saves
your graphics in a format that gives you great-looking results every time. Whether you’re
working on a Windows or Mac OS system, this new option saves you time by ensuring
your artwork displays and prints beautifully when viewed in Microsoft Office documents.
For more information on saving for Microsoft Office, see “
Office” on page 437.
Saving artwork for Microsoft
Support for eXtensible Metadata Platform (XMP)
Metadata is increasingly important in all types of publishing: when metadata is embedded
in a file, publishing that file across print, the Web, eBooks and more can be automated
more easily. Developed by Adobe, the eXtensible Metadata Platform (XMP) is an open XML
framework that standardizes the creation, processing, and interchange of metadata across
publishing workflows. By adding metadata in XMP, for example, keywords you add to your
files can be indexed by Internet search engines, making your images more easily accessible online. Because the XMP standard is also supported by Photoshop CS, Acrobat 6.0
Professional, and InDesign CS, the metadata information you enter in your Illustrator files
can be maintained wherever you take the file.
For more information on XMP, see “
h
ttp://www.adobe.com/products/xmp/
main.html.
Adding metadata to documents” on page 443 or go to
Using Help | Contents | Index Back 17
Page 18

Adobe Illustrator CS Help What’s New in Illustrator CS
Using Help | Contents | Index Back 18
Plus more...
Input from customers has helped Adobe make many improvements to the features you
rely on. Other enhancements are designed to make Illustrator more intuitive, so new users
can get up to speed more quickly. Here’s an overview of some of the user interface
enhancements in this release:
• Learn about Illustrator and how to make the most of key features: Watch a 90-minute
Total Training video by expert author and trainer Deke McClelland included on a CD in
the box.
• Learn about new features in Illustrator CS and access Tutorials and other free content by
choosing options from the Welcome to Adobe Illustrator CS screen that appears when
you first launch the program.
• Take advantage of richer support for the SVG file format: Illustrator now supports the
use of SVG primitives, expanding your options for manipulating objects in the SVG files
you import and export.
• Print and export linked EPS and PDF files that interact with transparency—including
duotones—without embedding them.
• Open and save Style, Swatch, Brush, and Symbol libraries right from their respective
palettes by choosing the Open Library and Save Library commands from the palette
menus.
• Use a lock button on the Transform palette to scale objects proportionally.
• Specify a sample size in pixels for the Eyedropper tool.
• Choose a custom scale size for DXF and DWG files on import.
• Optimize and export WBMP graphics for use on wireless devices.
• Automate more tasks with Scripting enhancements, including the ability to automate
all new features—such as the new Printing interface—with expanded scripting
support.
Using Help | Contents | Index Back 18
Page 19
Adobe Illustrator CS Help Tutorials
Using Help | Contents | Index Back 19
Tutorials
About tutorials
The following tutorials are designed to give new users a quick tour of Illustrator. Before
you get started, be sure you know how to create and save documents. (See “
documents” on page 62 and “About saving artwork” on page 423.)
In addition to these tutorials, Adobe provides a variety of resources to help you learn Illustrator. (See “
Support Web site at h
the Tutorials link.
Getting Help” on page 4.) For more advanced tutorials, go to the Illustrator
ttp://www.adobe.com/support/products/illustrator.html and click
Creating new
Design a quick logo or Web button
Adobe Illustrator provides a variety of tools for creating basic geometric shapes, as well as
hundreds of professionally-designed symbols. Follow along and learn how to use shapes
and symbols as building blocks for artwork.
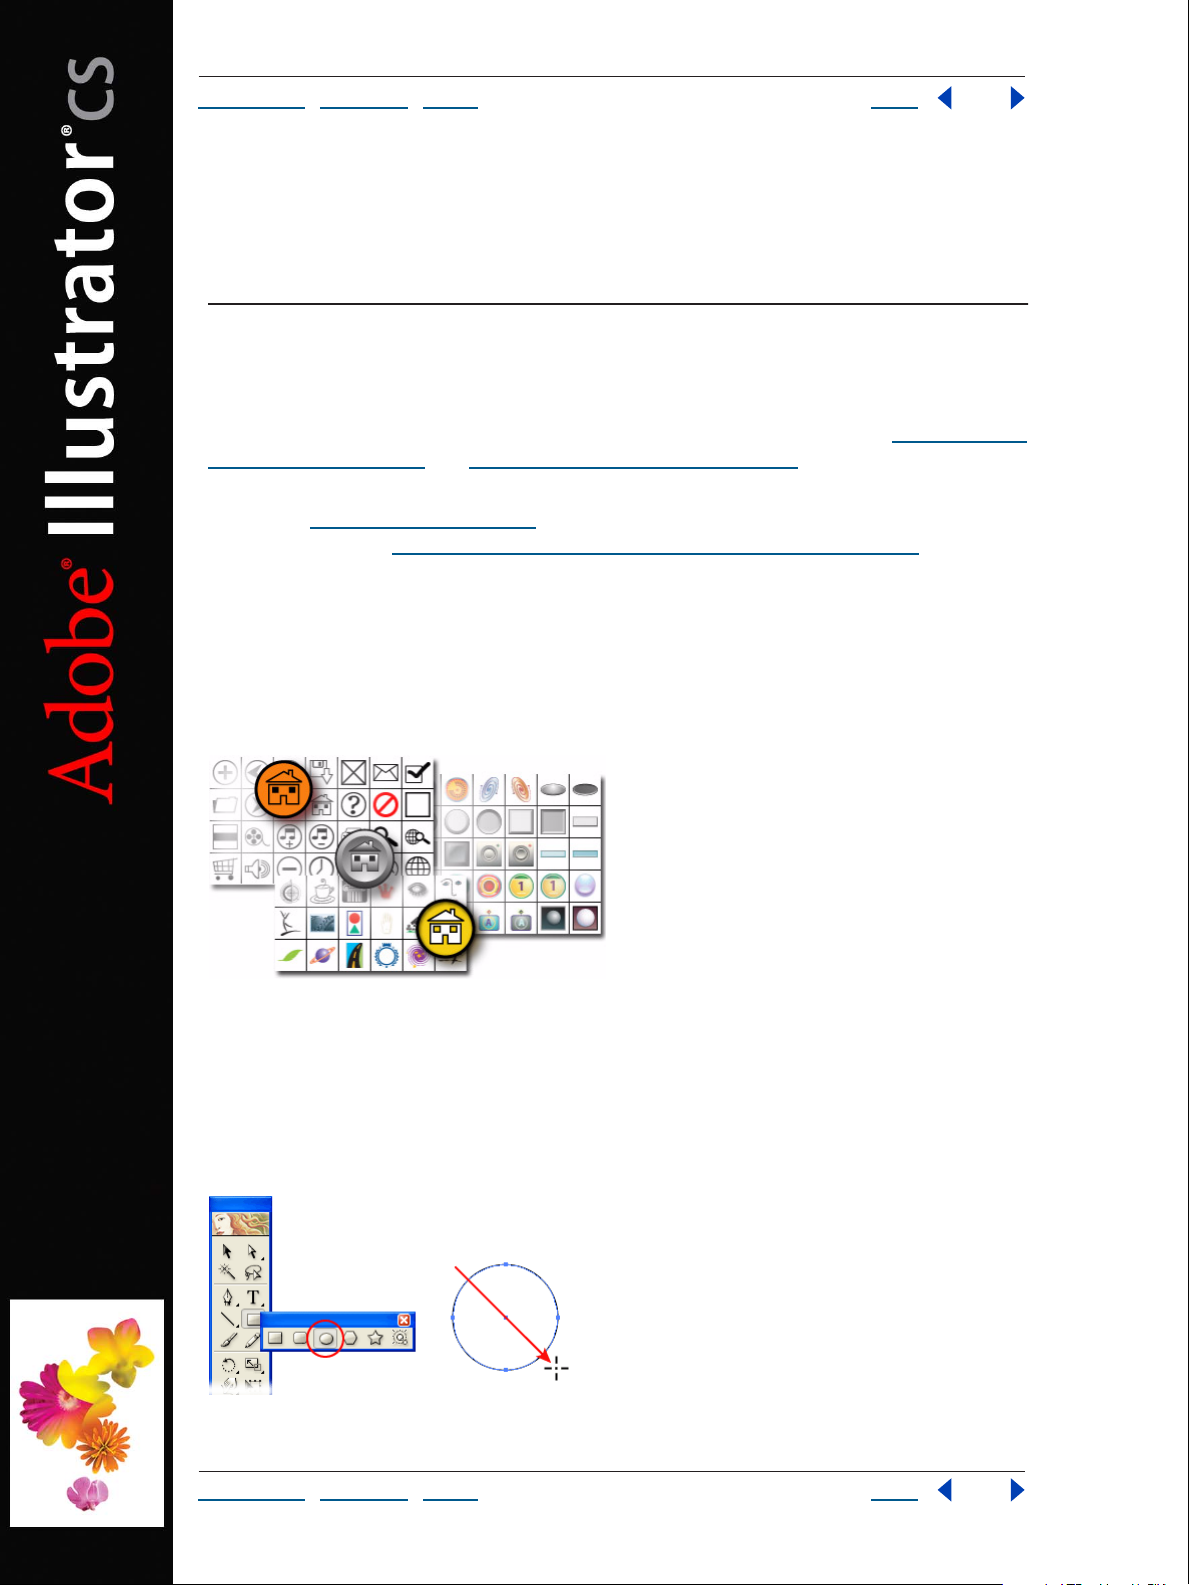
1. Draw a shape.
Hold the mouse down on a shape tool in the toolbox, and select the shape tool you want
to use. Then drag in the document window to draw the shape.
We selected the Ellipse tool and held down the Shift key while dragging to draw a circle.
Holding down the Shift key tells Illustrator to constrain proportions. For example, you can
use the Shift key with the Rectangle tool to draw a square.
Using Help | Contents | Index Back 19
Page 20
Adobe Illustrator CS Help Tutorials
Using Help | Contents | Index Back 20
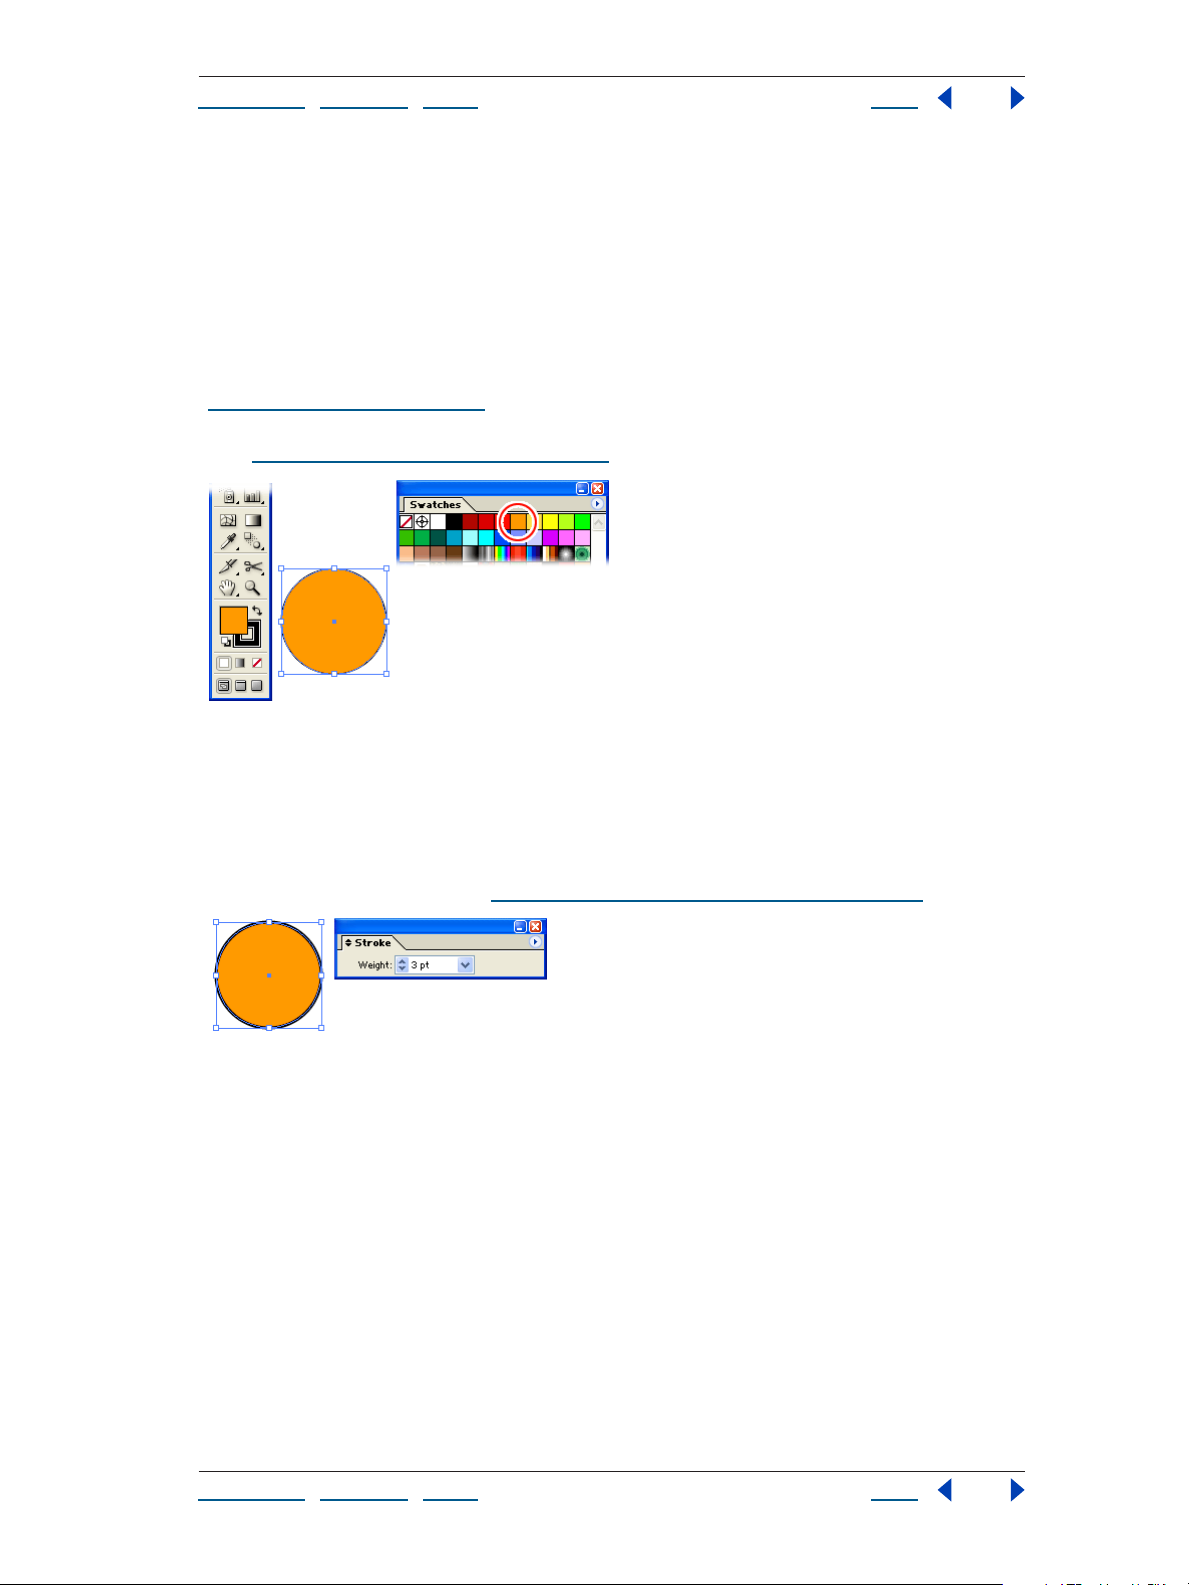
2. Fill the shape with color.
Click the fill box in the toolbox. This tells Illustrator that you want to apply color inside the
shape rather than to its stroke (or outline). Then click any swatch in the Swatches palette to
fill the shape with color. (If the Swatches palette isn’t showing, choose Window >
Swatches.)
If you don’t like any of the default colors in the Swatches palette, there are several other
ways to select a color. Double-click the fill box in the toolbox to select a color using the
Color Picker, or choose Window > Color to select a color using the Color palette. (See
“
Selecting colors” on page 200.) Or click the triangle icon at the top right corner of the
Swatches palette, and choose a swatch library from the Open Swatch Library submenu.
(See “
Creating swatch libraries” on page 209.)
3. Change the shape’s stroke weight.
If the Stroke palette isn’t showing, choose Window > Stroke. In the Stroke palette, type a
different value in the Weight text box, and press Enter or Return to apply the change.
We increased the stroke weight to 3 points. Although we decided to stick with a black
stroke, you can change the stroke color by clicking the stroke box in the toolbox and
selecting a different color. (See “
Applying color using the toolbox” on page 214.)
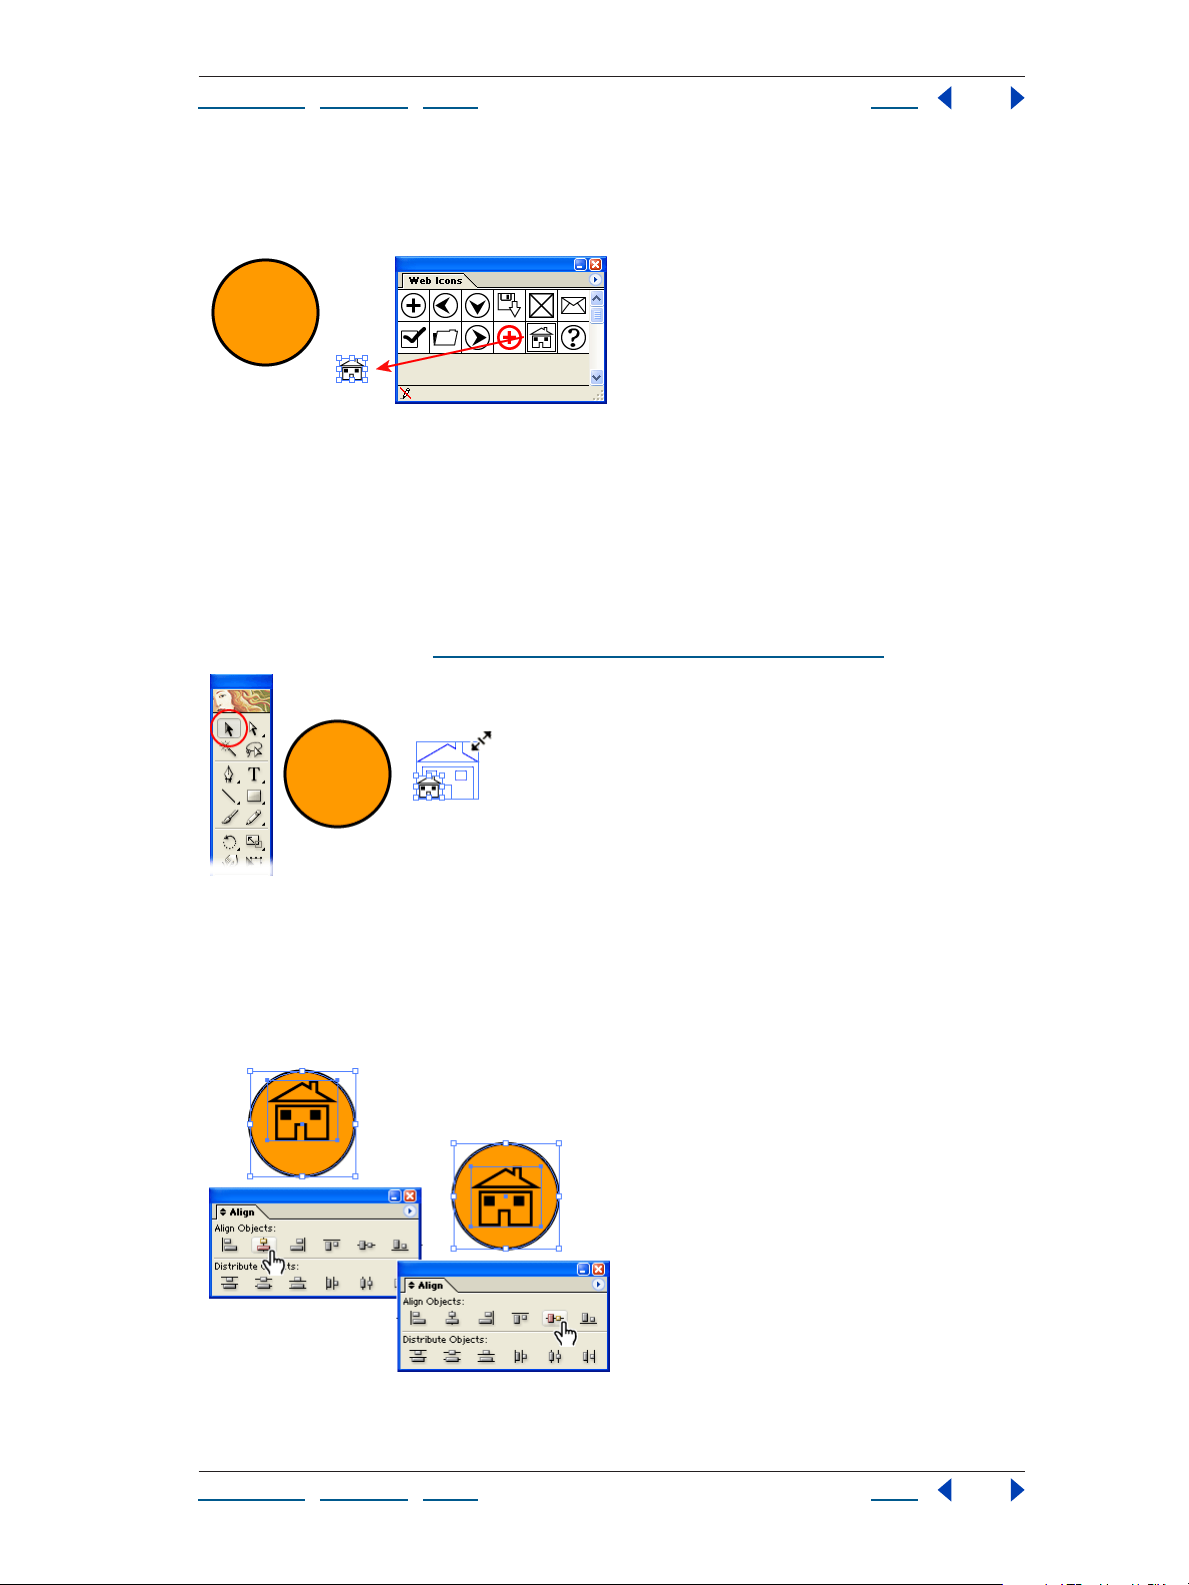
4. Place a symbol instance.
If the Symbols palette isn’t showing, choose Window > Symbols. The Symbols palette
displays a variety of default symbols; however many additional symbols are available to
you through symbol libraries. To open a symbol library, click the triangle icon at the top
right corner of the Symbols palette, and choose an option from the Open Symbol Library
submenu.
Using Help | Contents | Index Back 20
Page 21
Adobe Illustrator CS Help Tutorials
Using Help | Contents | Index Back 21
Once you locate the symbol you want to use, drag it from the palette into the document
window. The placed symbol is called a symbol instance. We used the Home symbol from
the Web Icons symbol library.
5. Resize the symbol instance.
Depending on the size of the symbol instance, you may want to make it larger or smaller.
First select the Selection tool in the toolbox and click the symbol instance. Then drag one
of the corner handles on the symbol instance to enlarge or reduce it. As with drawing
shapes, holding down the Shift key as you drag causes Illustrator to constrain the proportions of the symbol instance.
You can also use the Scale tool or the Transform palette to resize selected objects in the
document window. (See “
Scaling objects, strokes, and effects” on page 161.)
6. Align the symbol instance and the shape.
Make sure the Selection tool is still active in the toolbox, and drag a marquee around both
the shape and symbol instance. Then choose Window > Align to show the Align palette.
The Align palette contains buttons for aligning and distributing objects. First, we clicked
the Horizontal Align Center. Then we clicked the Vertical Align Center button.
Using Help | Contents | Index Back 21
Page 22

Adobe Illustrator CS Help Tutorials
Using Help | Contents | Index Back 22
7. Experiment with design variations.
Now that you have a basic design, experiment with different variations. For example, if you
want to apply a different fill and stroke to the symbol instance, select the instance in the
document window and click the Break Link to Symbol button in the Symbols palette. Once
the link to the symbol is broken the object is no longer a symbol, so you can apply
different fills and strokes to it.
We went one step further by applying a variety of gradients to our design. First, we drew
another circle, chose Object > Arrange > Send Backward, and realigned all three objects
using the Align palette. Then we filled the objects with a default gradient from the
Swatches palette. Then, we selected just the outer circle and used the Gradient tool to
reverse the direction of the gradient. (See “U
final design will make a great Web button, so we used the Save For Web command to save
it in GIF format. (See “
Optimizing images” on page 407.)
sing the Gradient palette” on page 248.) Our
Discover the power of compound shapes
Using compound shapes is one of the easiest ways to create illustrations in Adobe Illustrator. You start by drawing basic shapes and then use the Pathfinder palette to combine
them in different ways. In this tutorial, you’ll learn how to add and subtract shapes, as well
as how to use the Layers palette.
Using Help | Contents | Index Back 22
Page 23
Adobe Illustrator CS Help Tutorials
Using Help | Contents | Index Back 23
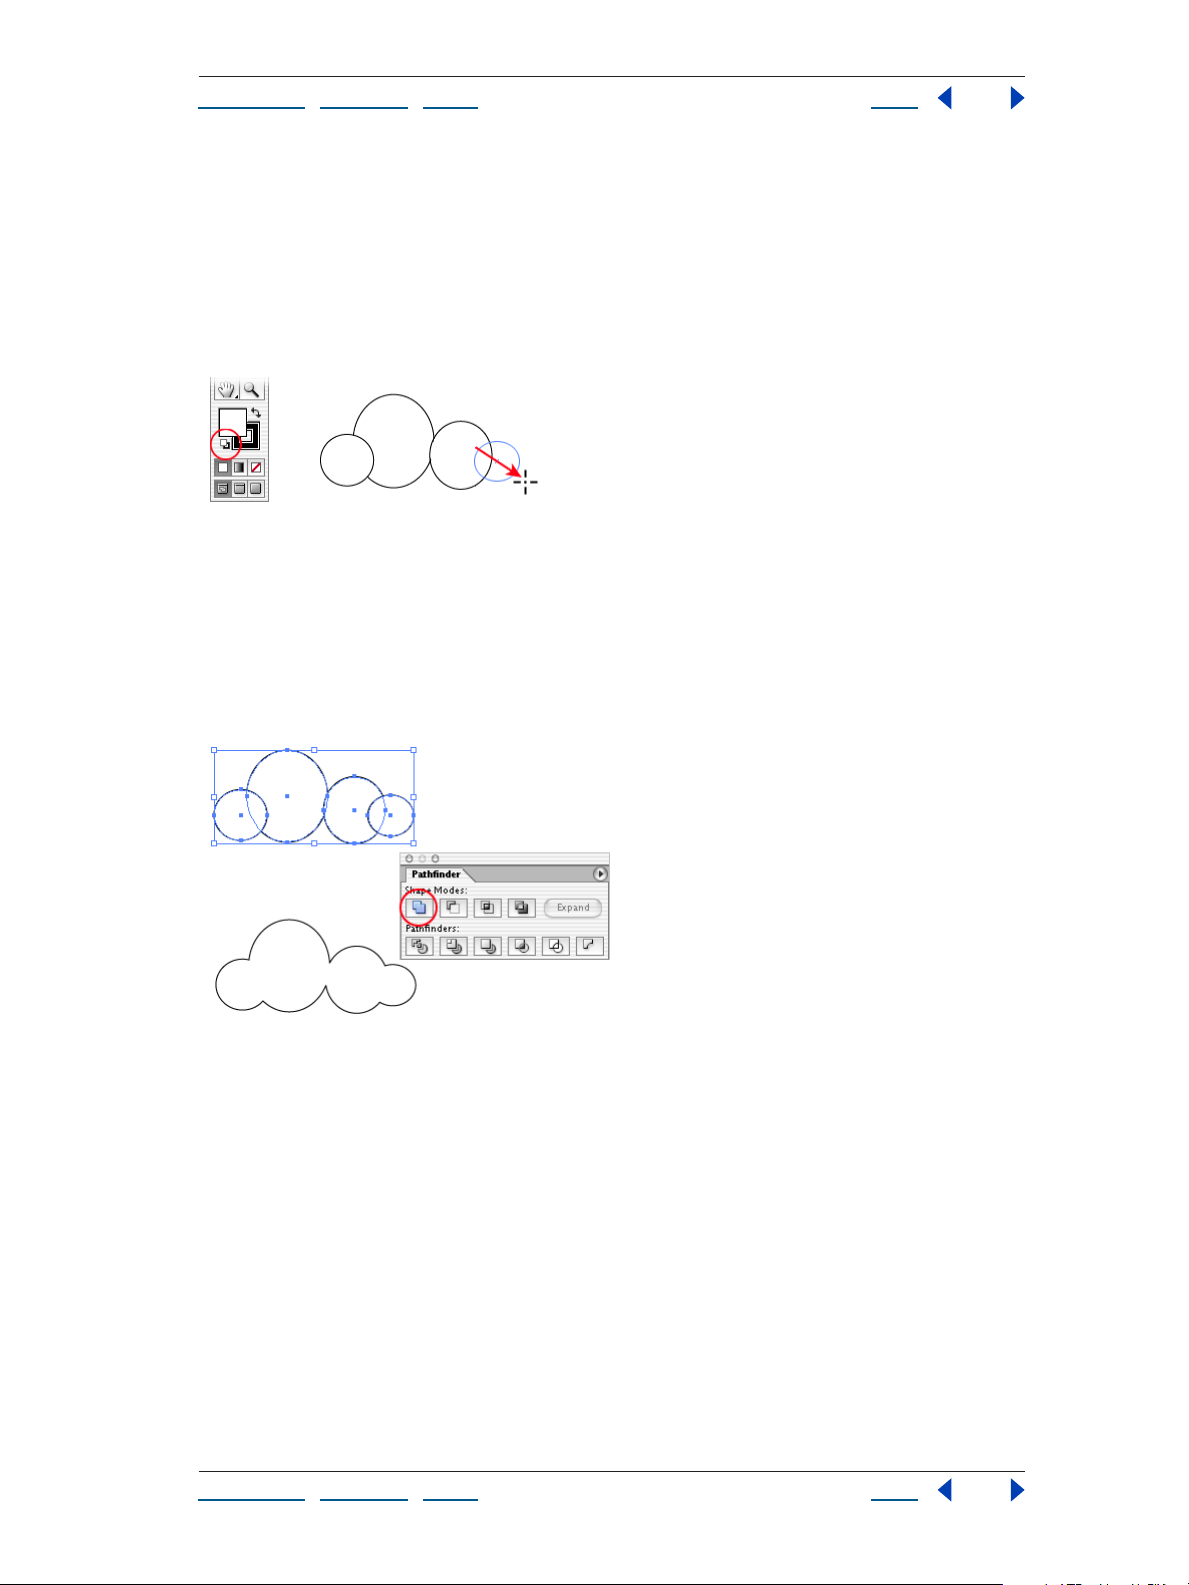
1. Draw a series of overlapping ellipses.
First, click the Default Fill and Stroke button in the toolbox. This sets the fill to white and
the stroke to black. Then select the Ellipse tool, and drag to draw a series of overlapping
ellipses.
To move an ellipse, select it with the Selection tool and drag it to a different location.
When you’re satisfied with the placement of all the shapes, drag around all the ellipses to
select them.
2. Add the ellipses together.
If the Pathfinder palette isn’t showing, choose Window > Pathfinder. Then click the Add to
Shape Area button in the Pathfinder palette.
You just created a compound shape (a shape that consists of two or more objects). You
can verify this by looking in the Layers palette. If the Layers palette isn’t showing, choose
Window > Layers. Then click the triangle to the left of Layer 1 to see the listing for the
compound shape.
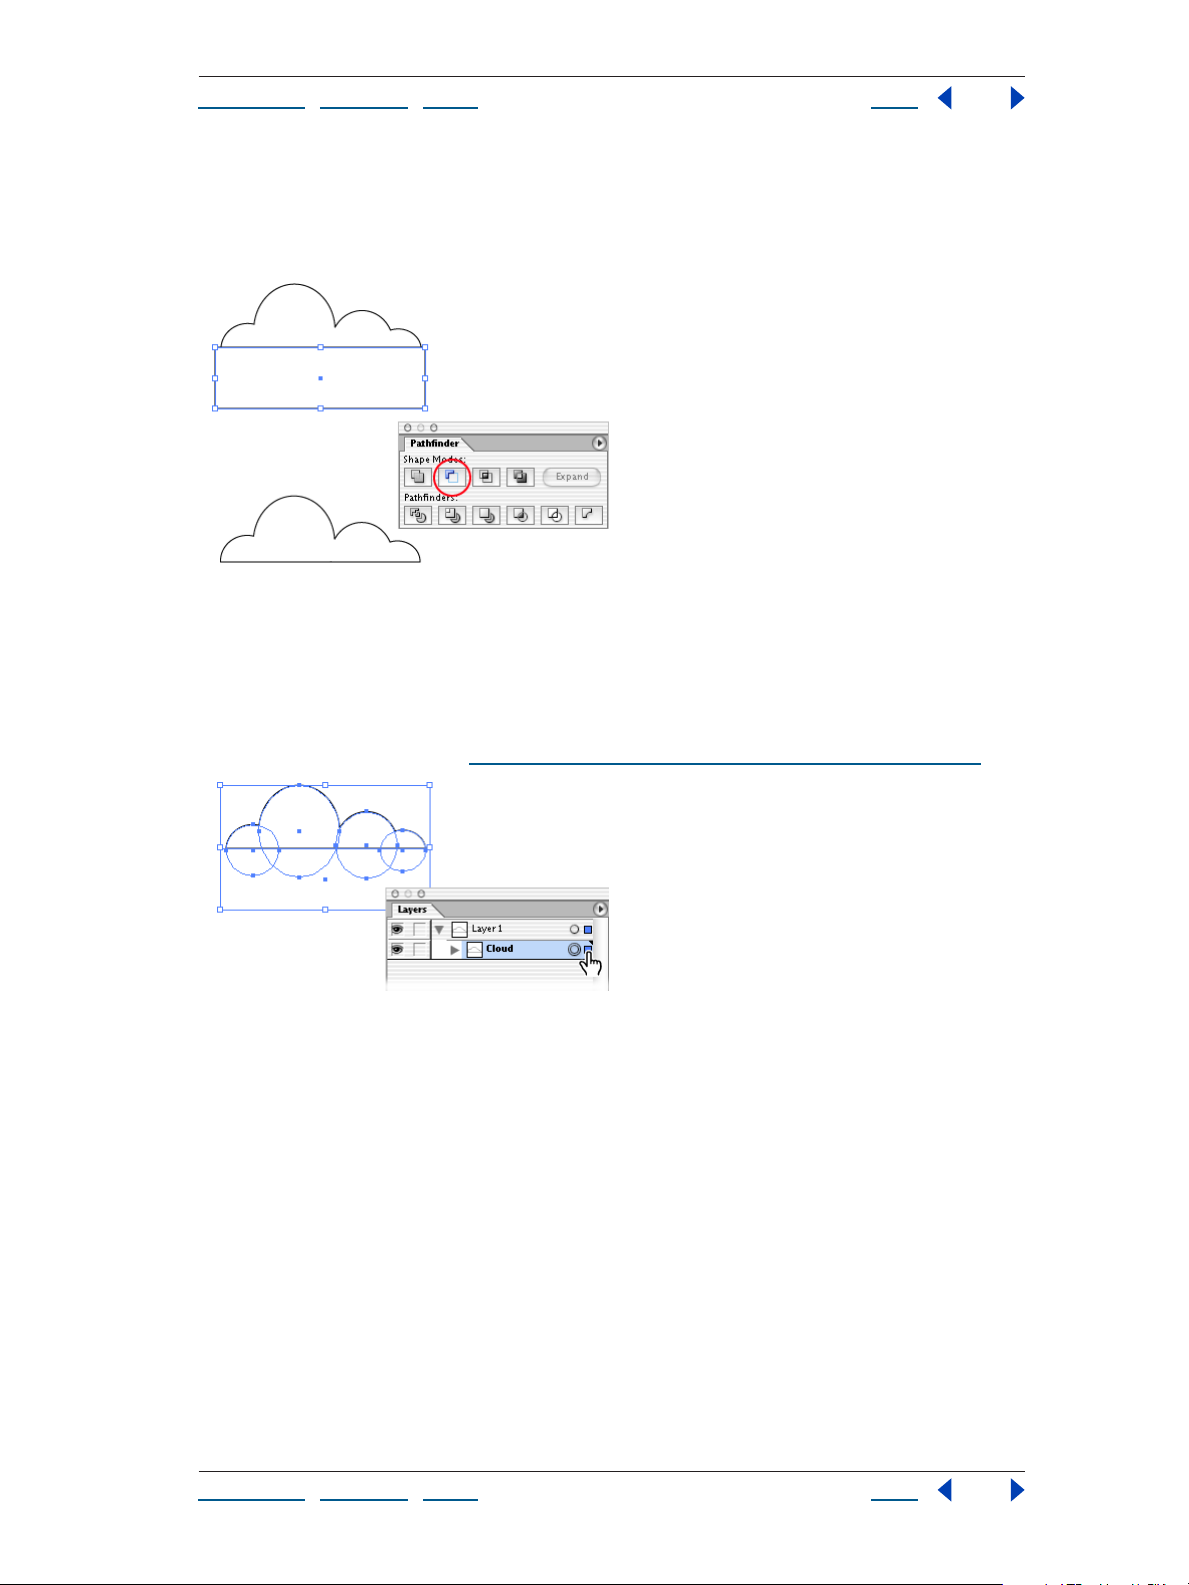
3. Subtract a rectangle.
Select the Rectangle tool and draw a rectangle that overlaps the bottom of the compound
shape. When you’re finished drawing, use the Selection tool to select all the shapes. Then
click the Subtract from Shape Area button in the Pathfinder palette.
Using Help | Contents | Index Back 23
Page 24
Adobe Illustrator CS Help Tutorials
Using Help | Contents | Index Back 24
It may be difficult to tell what changed while all the shapes are selected, so click anywhere
on the artboard to deselect them. Now you can see that the rectangle has been
subtracted from the ellipses. If you look in the Layer palette, you’ll see that Illustrator
created a new compound shape containing the rectangle and the first compound shape.
4. Rename the compound shape in the Layers palette.
Double-click the words Compound Shape in the Layers palette. Enter a more meaningful
name for the shape, and click OK. We named our shape Cloud.
The Layers palette is very useful for keeping track of the objects in a document. In
addition, you can use it to select objects by clicking in the selection column between the
circle and the scroll bar. (See “
Selecting objects using the Layers palette” on page 117.)
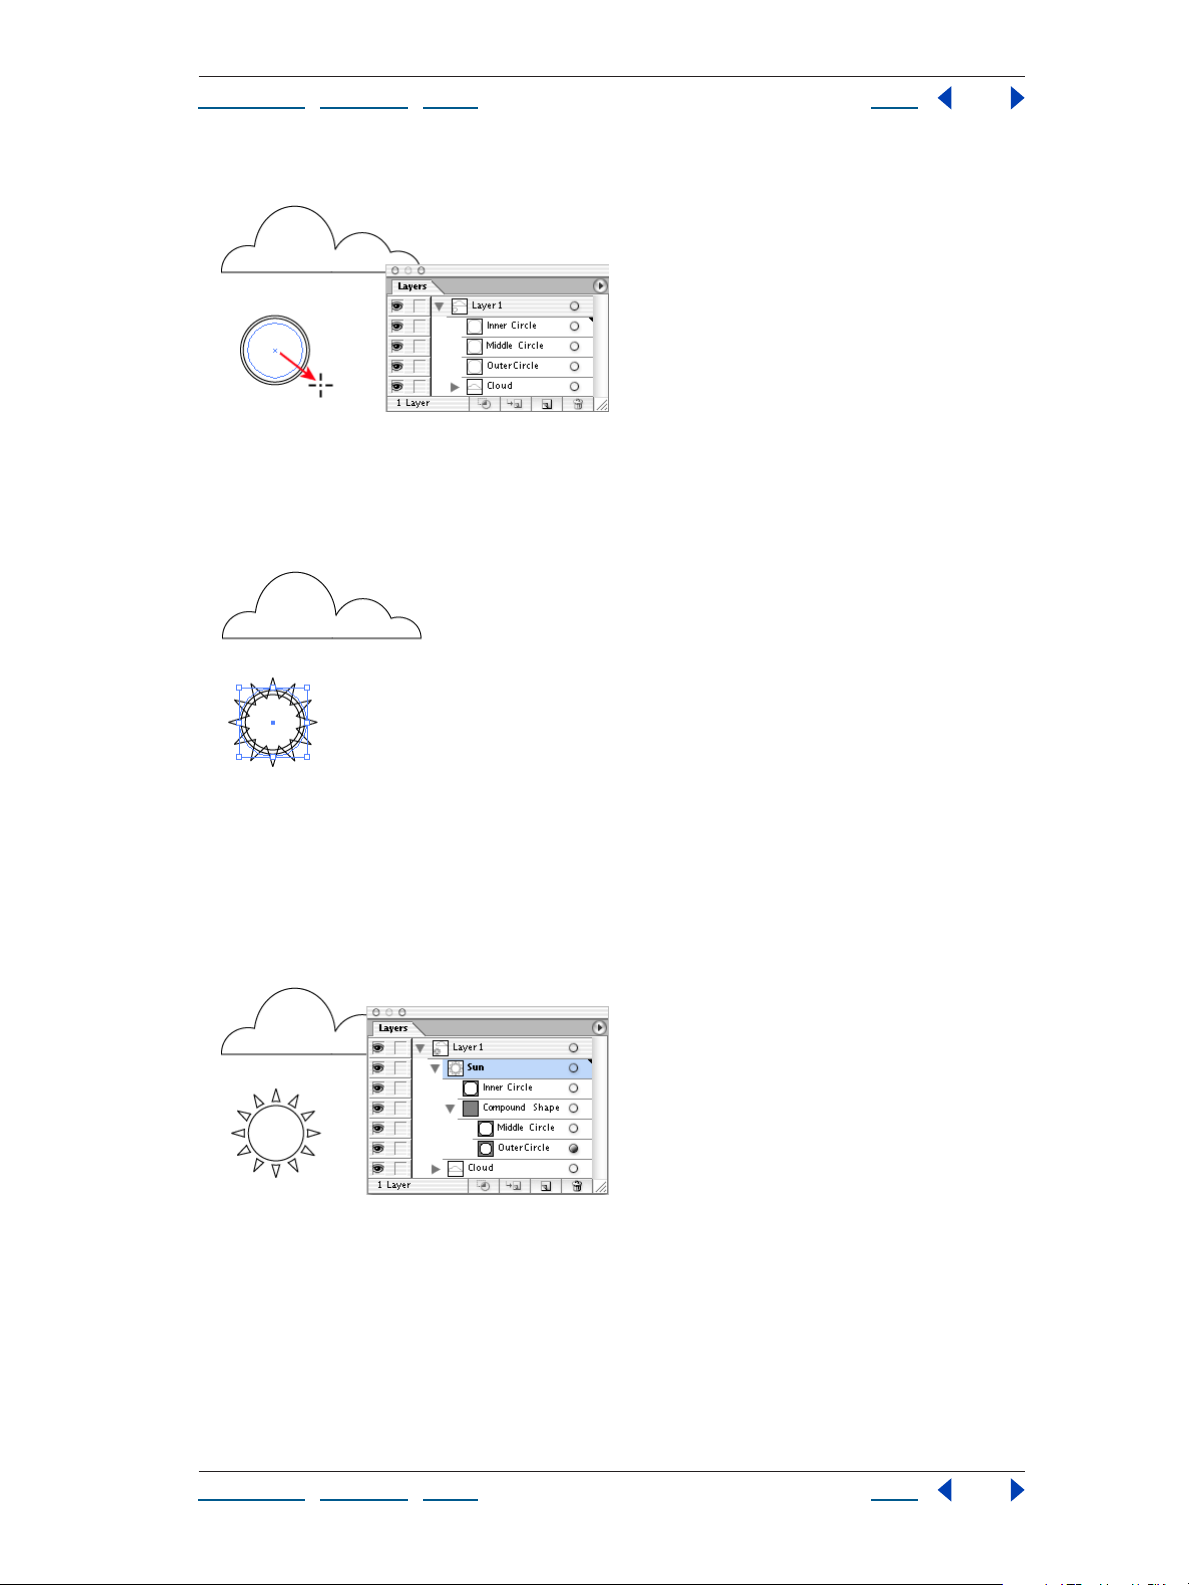
5. Draw three nested circles.
You’ll use the circles to create a sun, so draw them in proportion to the cloud. Start by
selecting the Ellipse tool, and Shift+dragging to draw the outer circle. Then position the
pointer over the center of the circle, and Shift+Alt+drag (Windows) or Shift+Option+drag
(Mac OS) to draw the middle circle. (Holding down the Alt or Option key lets you draw the
circle from the center outward.) Repeat again to draw the inner circle.
Using Help | Contents | Index Back 24
Page 25
Adobe Illustrator CS Help Tutorials
Using Help | Contents | Index Back 25
We named the circles Outer Circle, Middle Circle, and Inner Circle in the Layers palette.
6. Create the sun’s rays.
Select the outer circle and choose Effect > Distort & Transform > Zig Zag. Select Preview,
and adjust the values for Size and Ridges per segment. When you’re satisfied with the
results, click OK.
7. Make the sun a compound shape.
Select the outer circle, then hold down Shift and select the middle circle. (Holding down
Shift lets you select multiple objects.) Click the Subtract from Shape Area in the Pathfinder
palette to combine the two shapes. Hold down Shift, select the inner circle, and click the
Add to Shape Area button in the Pathfinder palette.
We named the compound shape Sun in the Layers palette.
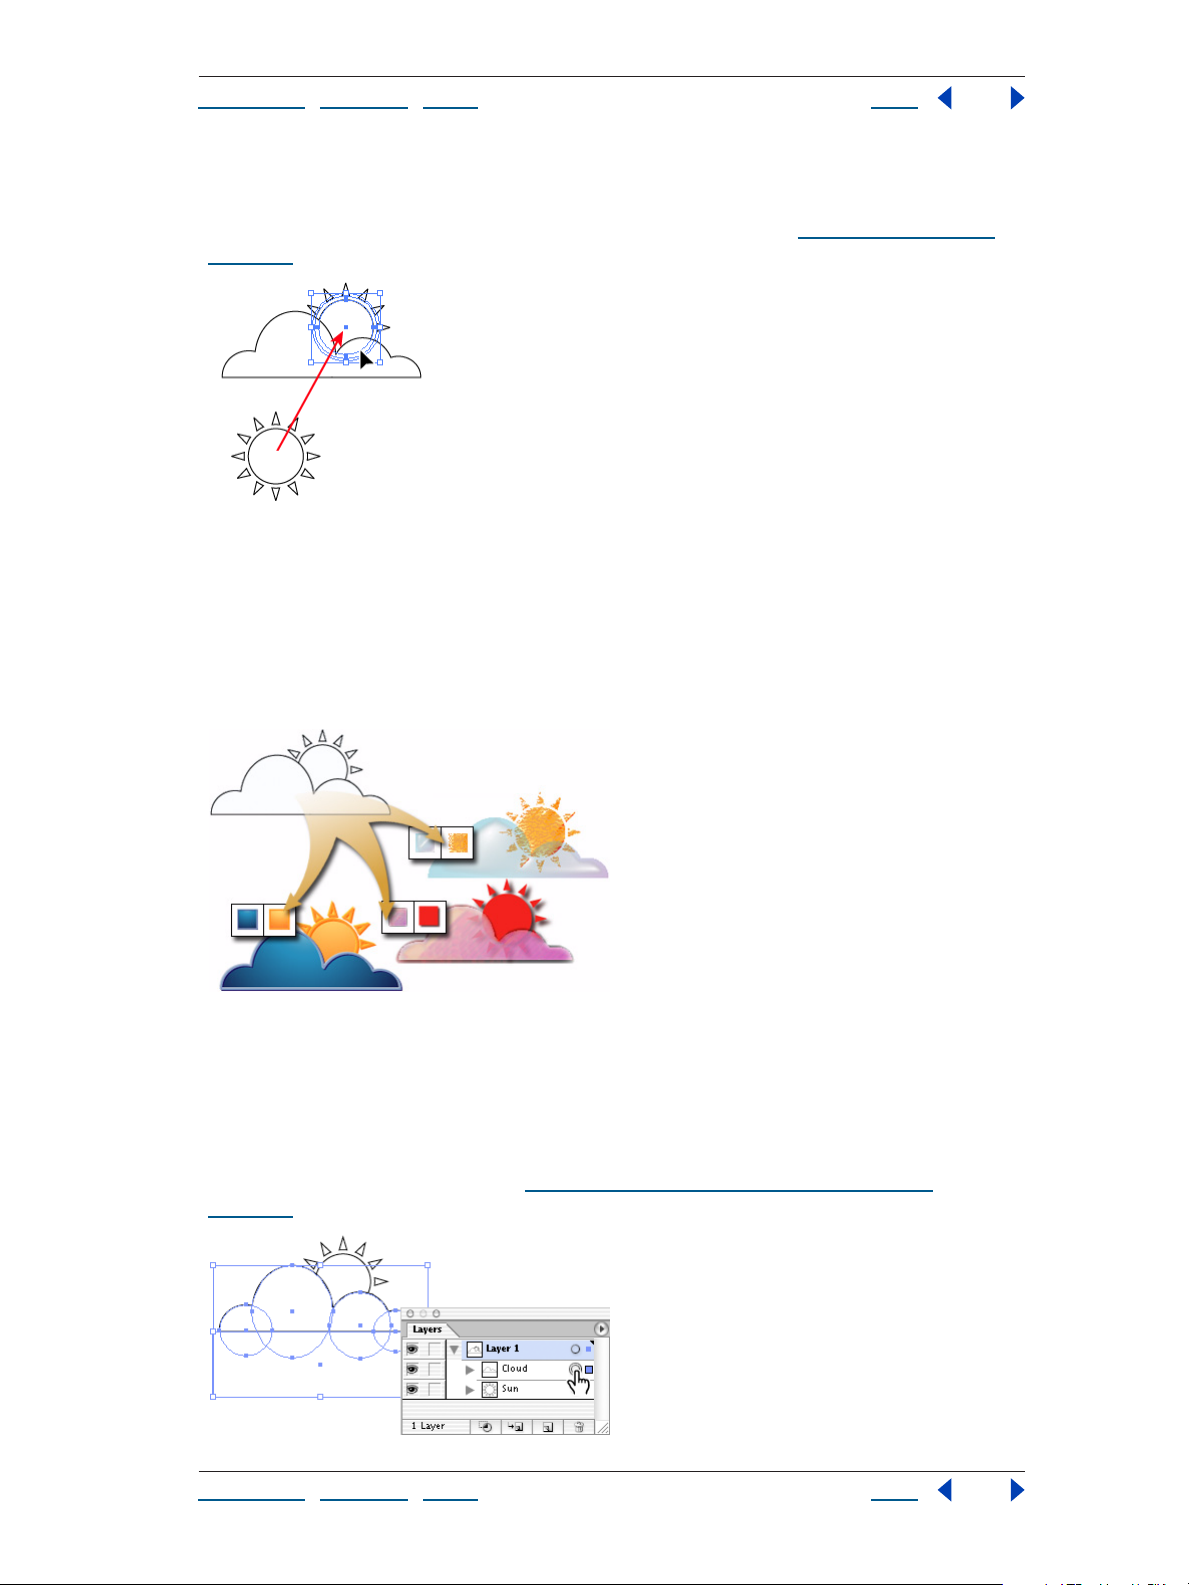
8. Move the sun behind the cloud
Select the sun, and choose Object > Arrange > Send Backward. Then use the Selection tool
to drag the sun behind the cloud.
Using Help | Contents | Index Back 25
Page 26
Adobe Illustrator CS Help Tutorials
Using Help | Contents | Index Back 26
Notice how the sun is now listed below the cloud in the Layers palette. This is because the
Layers palette reflects the stacking order of your artwork. You can change the stacking
order by dragging objects up or down in the Layers palette. (See “
page 141.)
Stacking objects” on
Paint illustrations with graphic styles
In the previous tutorial, you learned how to create the outlines, or paths, of an illustration.
Now you’ll use graphic styles to paint your illustration with colors and effects. Adobe Illustrator comes with hundreds of professionally-designed graphic styles that let you change
the appearance of artwork with a single click. And graphic styles are fully reversible, so you
can always go back to your original illustration if you don’t like the results.
1. Target the cloud in the Layers palette.
In the Layers palette, click the circle (called the target icon) at the right edge of the cloud’s
listing. When the target icon displays a double ring, the item is targeted.
Targeting may seem simple, but it’s a commonly forgotten step when applying graphic
styles and effects. Targeting is especially important when you want to apply a style or
effect to everything in a layer. (See “
page 268.)
Using Help | Contents | Index Back 26
Targeting layers, groups, and containers” on
Page 27
Adobe Illustrator CS Help Tutorials
Using Help | Contents | Index Back 27
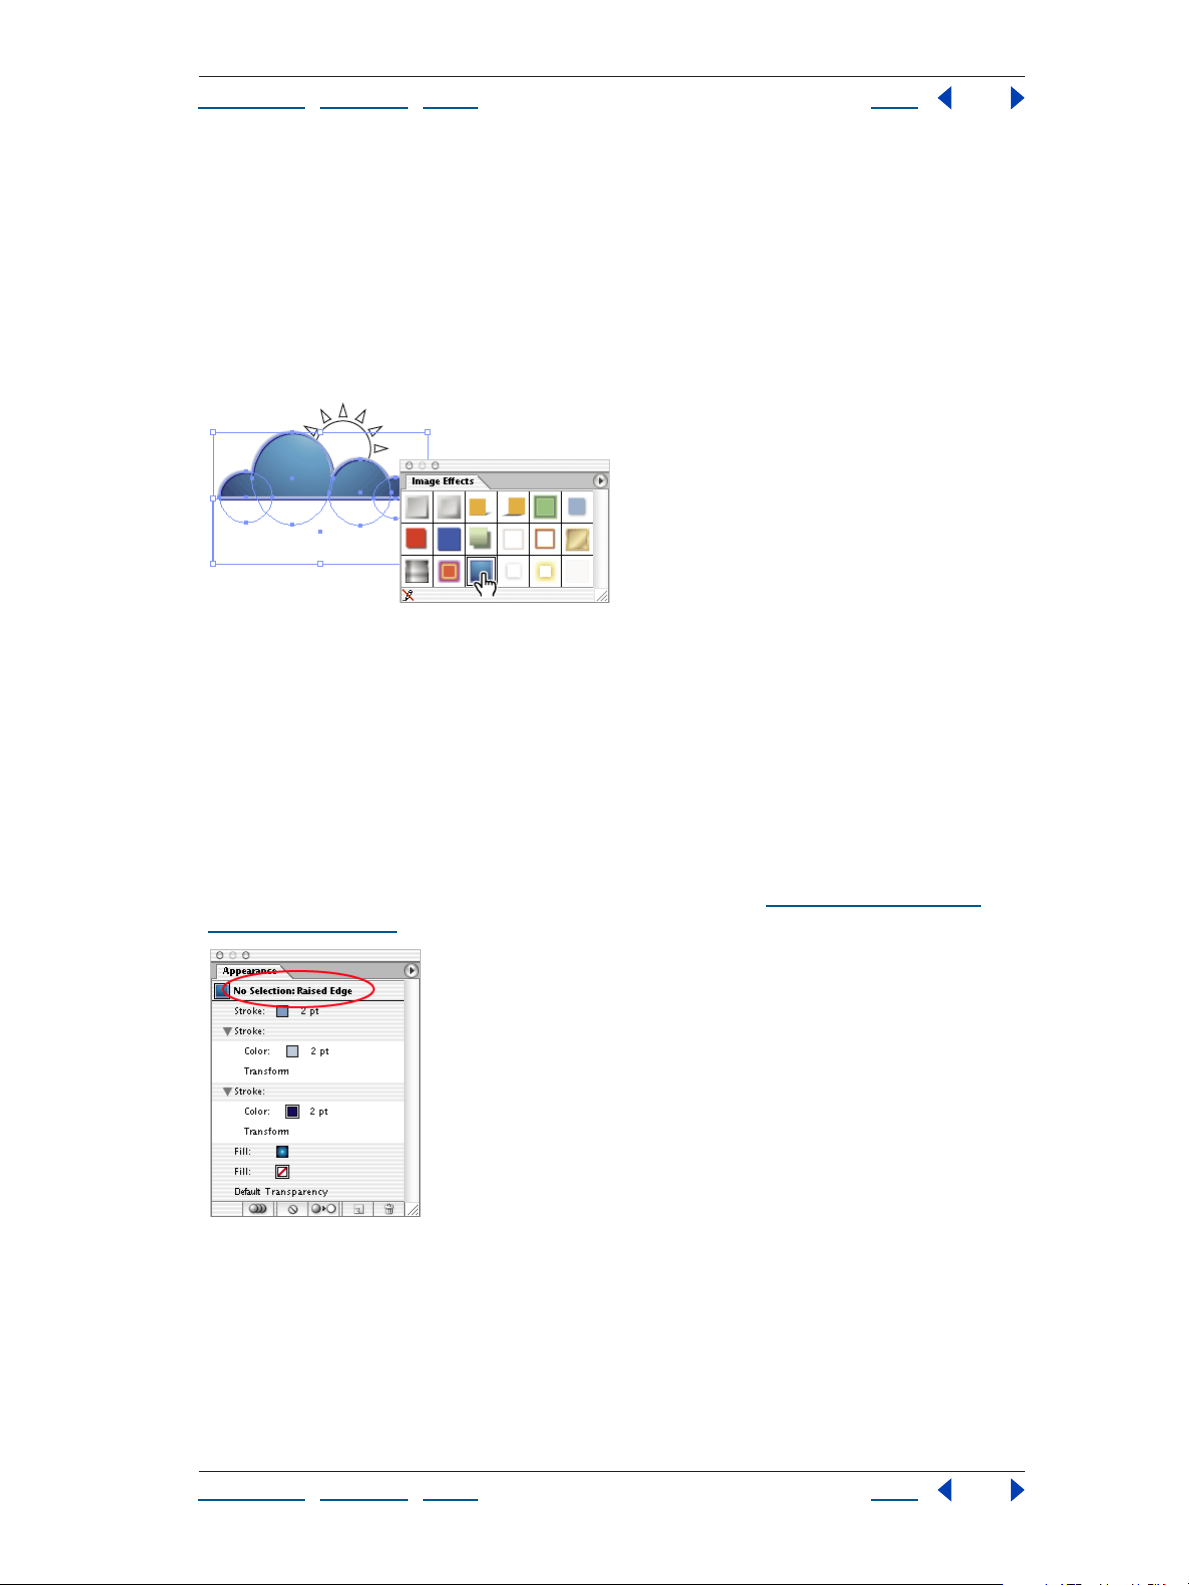
2. Apply a graphic style to the cloud.
If the Graphic Styles palette isn’t showing, choose Window > Graphic Styles. The Graphic
Styles palette displays a variety of default graphic styles; however many additional graphic
styles are available to you through graphic style libraries. To open a graphic style library,
click the triangle icon at the top right corner of the Graphic Styles palette, and choose an
option from the Open Graphic Styles Library submenu.
Once you locate the graphic style you want to use, click it. We used the Raised Edges
graphic style from the Image Effects library.
3. View appearance attributes of the graphic style.
Choose Select > Deselect to deselect the clouds, and if the Appearance palette isn’t
showing, choose Window > Appearance. The Appearance palette lists appearance
attributes—properties that affect the look of an object without altering its underlying
structure. These include fills, strokes, transparency settings, and effects.
In our case, no artwork is targeted, so the top listing should read No Selection: followed by
the name of the current graphic style. The specific appearance attributes depend on the
graphic style you selected in Step 2. Some attributes may have triangles to the left of
them. This means that the attribute includes effects or transparency settings. You can
expand or collapse the attribute by clicking the triangle. (See “U
sing the Appearance
palette” on page 266.)
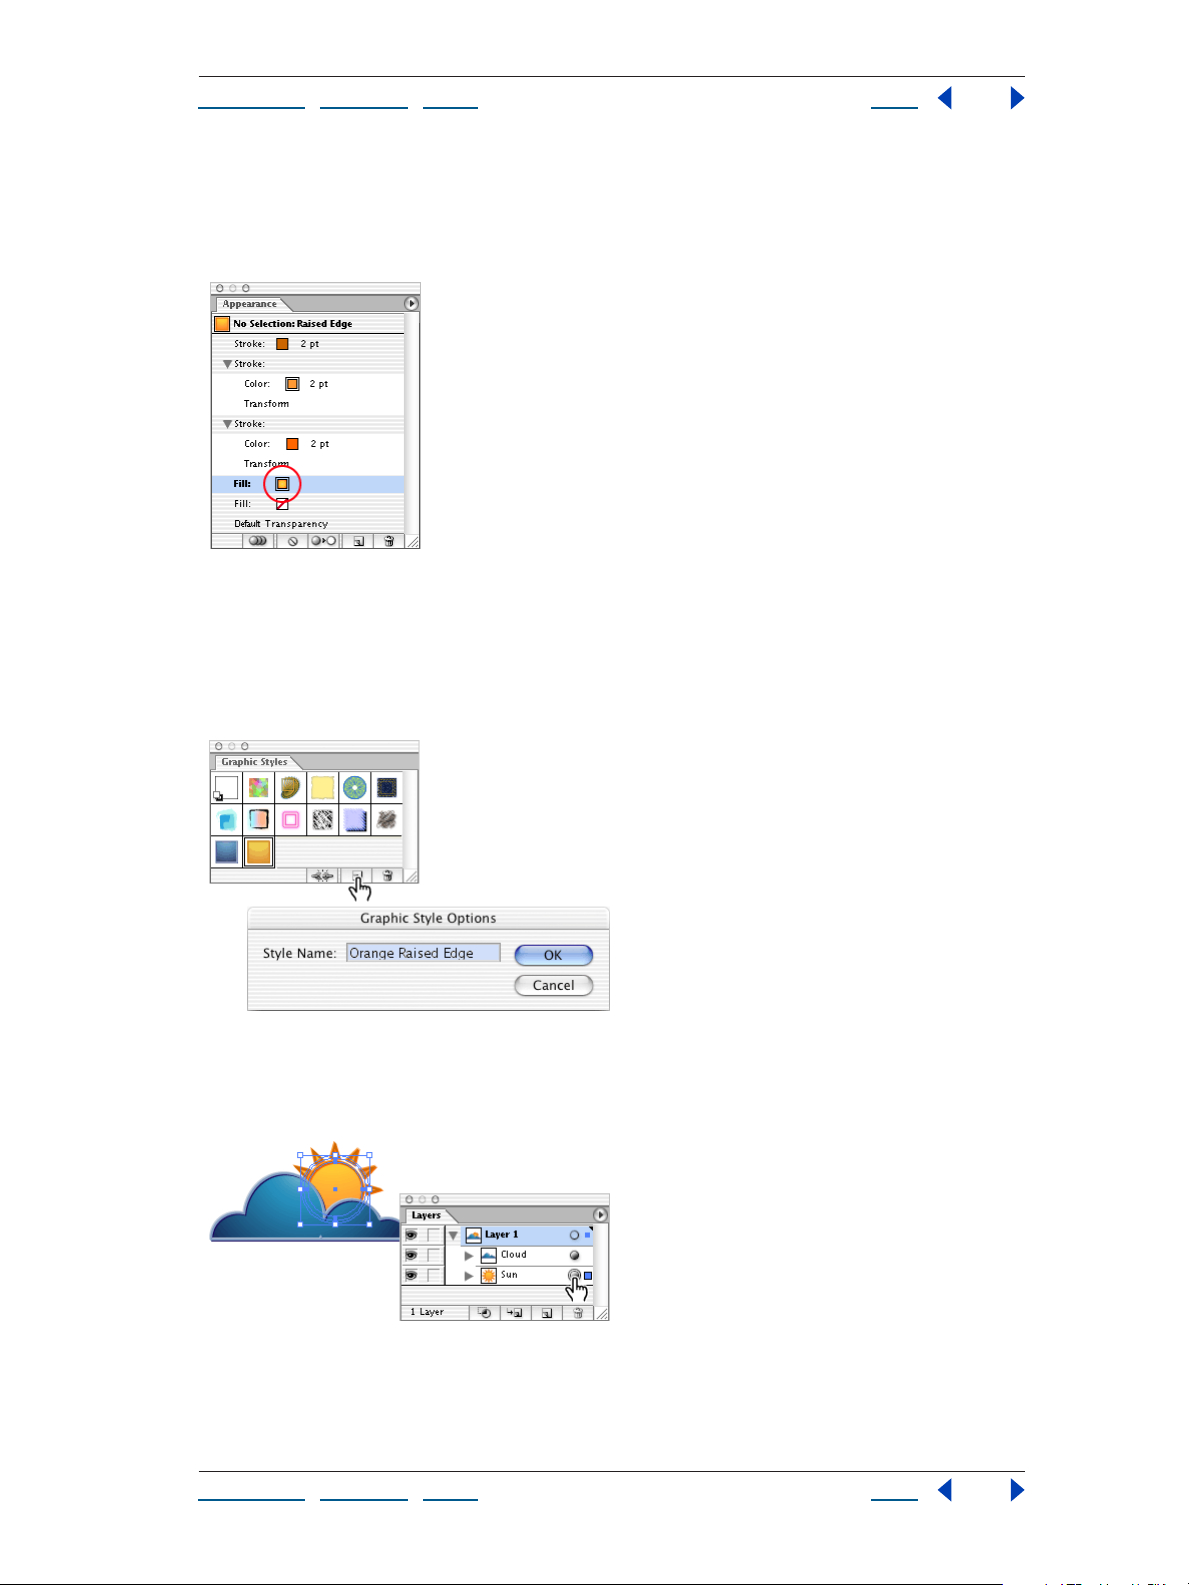
4. Edit the graphic style.
Click each color swatch in the Appearance palette and choose different colors using the
Swatches palette or Color palette. You probably want to choose colors in the yellow to red
range because you’ll apply the new graphic style to the sun.
Using Help | Contents | Index Back 27
Page 28
Adobe Illustrator CS Help Tutorials
Using Help | Contents | Index Back 28
You can also use the Appearance palette to edit other aspects of a graphic style. For
example, you can change the order in which Illustrator applies attributes by dragging any
attribute to a different position in the palette. If the graphic style includes effects, doubleclick an effect name to change the effect’s settings.
5. Create a new style.
Click the New Graphic Style button in the Graphic Styles palette. The new style appears as
the last item in the palette, so you may need to scroll down to see it. Double-click the style,
enter a descriptive name, and click OK.
We named our new graphic style Orange Raised Edge.
5. Apply the new graphic style to the sun.
Target the sun in the Layers palette, and click the graphic style you just created in the
Graphic Styles palette.
Using Help | Contents | Index Back 28
Page 29

Adobe Illustrator CS Help Tutorials
Using Help | Contents | Index Back 29
6. Experiment with design variations.
Now that you know how to apply and edit graphic styles, experiment with design variations. Start by creating a duplicate of the sun and cloud by dragging Layer 1 in the Layers
palette onto the Create New Layer button. Then click in the selection column for the
copied layer, and press the arrow keys on your keyboard to reposition the duplicate sun
and cloud. (Hold down the Shift key to move the selection in bigger increments.)
If you want to remove the existing graphic styles before applying new ones, click the Clear
Appearance button in the Appearance palette. (See “
attributes” on page 269.) This removes all appearance attributes (including the fill and
stroke) so the sun and cloud won’t be visible in the document window until you target
them and apply new graphic styles.
Modifying and removing appearance
Create headline type with a twist
Adobe Illustrator provides powerful, flexible features for creating and modifying type. You
can add type anywhere in your artwork—horizontally, vertically, along paths, inside
shapes, around shapes, in rows and in columns. In this tutorial, you’ll learn how to create a
headline that you can reuse for a variety of purposes.
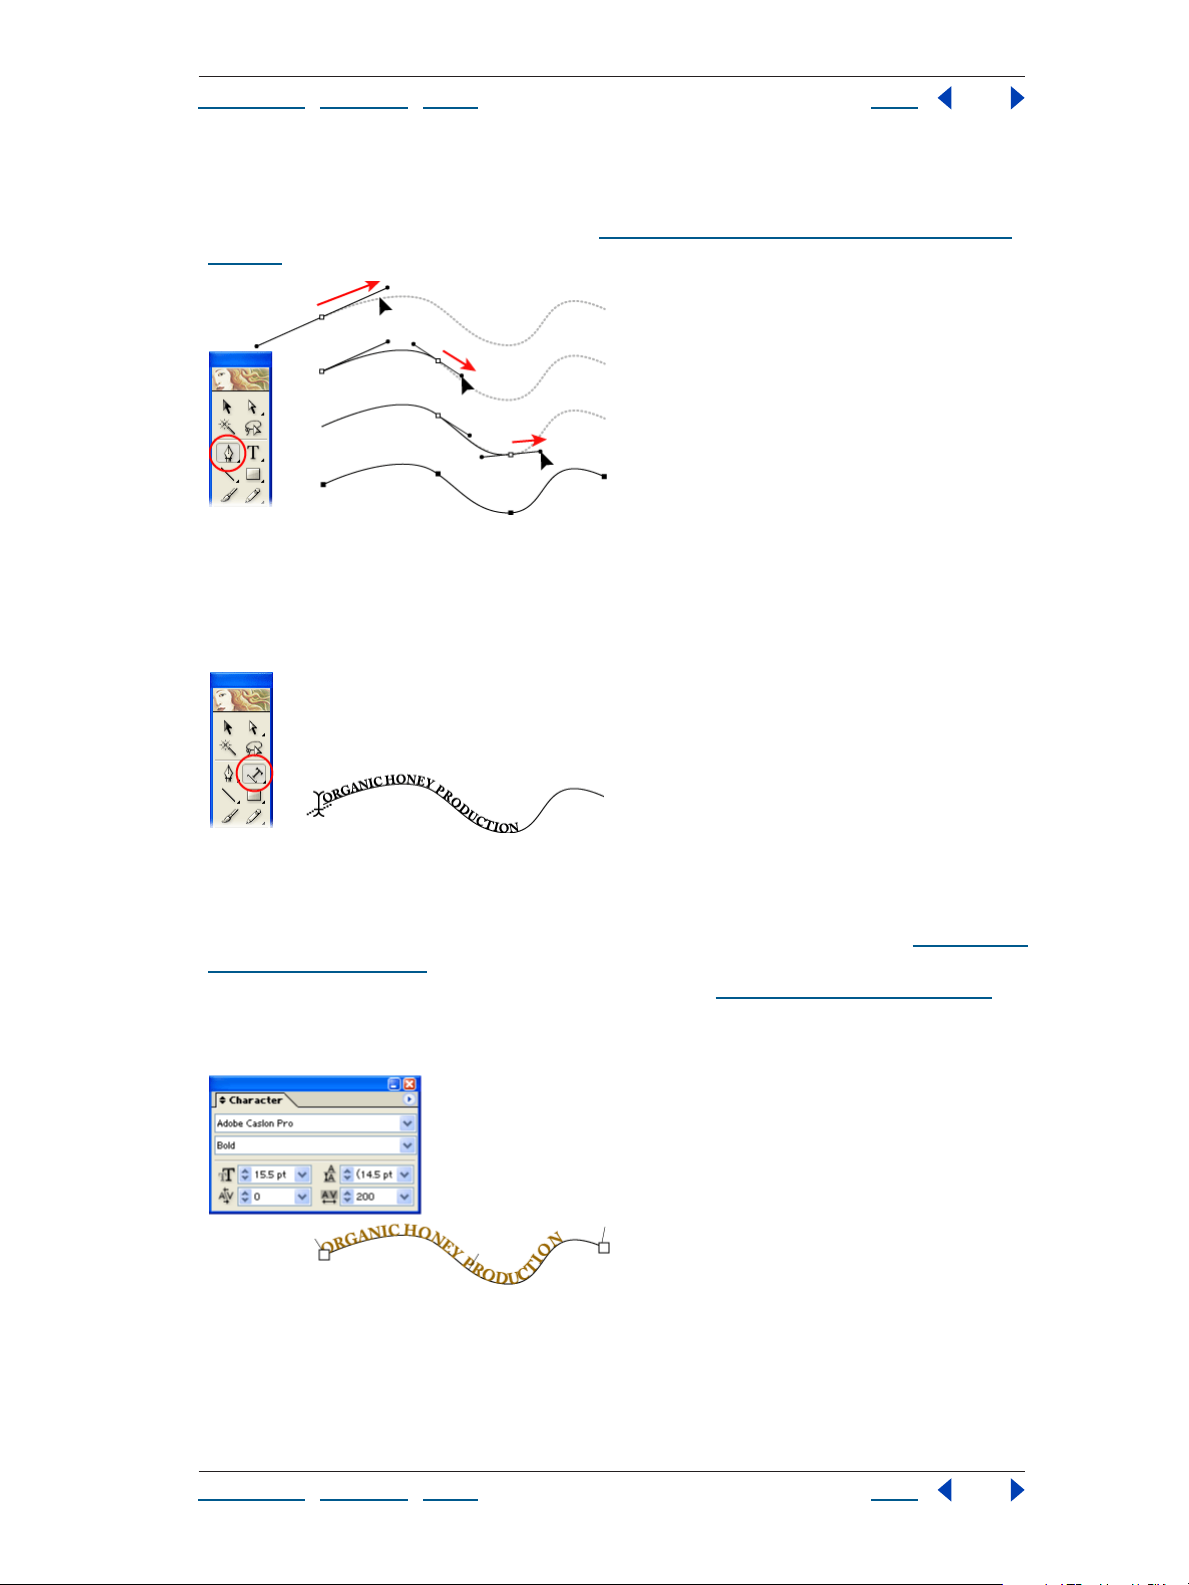
1. Draw a curved path.
Select the Pen tool, and position the pointer where you want to start your path. Click and
drag in the direction you want the curve to go. Release the mouse button and move the
pointer; then click and drag again in the direction you want the curve to go. You can
repeat this as many times as you want. When you are finished drawing, Ctrl-click
(Windows) or Command-click (Mac OS) away from the line.
Using Help | Contents | Index Back 29
Page 30
Adobe Illustrator CS Help Tutorials
Using Help | Contents | Index Back 30
If this is your first time using the Pen tool, it may take some practice to get the hang of it;
however, it will be time well spent. When you’re comfortable using the Pen tool, you can
draw any line or shape with precision. (See “D
rawing precise paths with the Pen tool” on
page 98.)
2. Add type along the path.
Select the Type on a Path tool. Click the path to set the insertion point, and type the
desired text. Don’t worry about the position of the type on the path—you’ll learn how to
adjust it later on.
3. Format the type.
Click the Selection tool to select the type, and choose Window > Type > Character to
display the Character palette. Set the font family, font style, and font size. (See “F
ormatting
characters” on page 350.) You can also change the color of the type by selecting a color in
the Color palette, Swatches palette, or Color Picker. (See “
Selecting colors” on page 200.)
Illustrator comes with a variety of fonts that you can use in your artwork. To view a catalog
of fonts, choose Help > Welcome Screen and click Cool Extras.
Using Help | Contents | Index Back 30
Page 31

Adobe Illustrator CS Help Tutorials
Using Help | Contents | Index Back 31
4. Reposition the type if necessary.
Position the Selection tool over the type’s start, center, or end bracket until a small icon
appears next to the pointer. (If the pointer doesn’t change, make sure the Selection tool is
still selected.) Drag to the right or left to reposition the type on the path.
5. Apply a drop shadow to the type.
Choose Effect > Stylize > Drop Shadow. Select Preview, and adjust the drop shadow
options. (We used the default values.) When you’re satisfied with the results, click OK.
You can still edit the type after applying an effect.
6. Place a symbol instance.
If the Symbols palette isn’t showing, choose Window > Symbols. The Symbols palette
displays a variety of default symbols; however many additional symbols are available to
you through symbol libraries. To open a symbol library, click the triangle icon at the top
right corner of the Symbols palette, and choose an option from the Open Symbol Library
submenu.
Once you locate the symbol you want to use, drag it from the palette into the document
window. The placed symbol is called a symbol instance. We used the Bee symbol from the
Nature symbol library. After placing the symbol, we rotated it and applied a drop shadow
to match the text.
7. Save the headline.
The format you save in depends on how you want to use the headline. We chose File >
Save for Microsoft Office to save our headline for use in Microsoft Word. We also saved our
headline as a Web banner using the Save for Web dialog box. (See “
Optimizing images” on
page 407.)
Using Help | Contents | Index Back 31
Page 32

Adobe Illustrator CS Help Tutorials
Using Help | Contents | Index Back 32
Play with hand-painted effects
Illustrator includes many features for working with bitmap images. In this tutorial, you’ll
learn how to import bitmap images into Illustrator and apply artistic effects.
1. Choose a bitmap image.
An image with high contrast works the best. If you don’t have a suitable image, a variety of
stock photography is available on the Illustrator CD.
2. Import the image into Illustrator.
Start by creating a new document in RGB color mode. (This is important because the
Artistic filters don’t work on CMYK images.) Then choose File > Place, and select the image
file. Make sure the Link option is deselected, and click OK.
The Links palette shows all imported images. (See “
artwork” on page 80.)
Using Help | Contents | Index Back 32
Managing linked and embedded
Page 33

Adobe Illustrator CS Help Tutorials
Using Help | Contents | Index Back 33
3. Apply the Poster Edges effect.
Target the image in the Layers palette, and choose Effect > Artistic > Poster Edges. Adjust
the settings until you are satisfied with the preview, then click OK.
The Poster Edges effect reduces the number of colors in an image according to the posterization option you set, and finds the edges of the image and draws black lines on them.
Broader areas of the image have simple shading while fine, dark detail is distributed
throughout the image.
4. Apply the Watercolor effect.
Choose Effect > Artistic > Watercolor. Adjust the settings until you are satisfied with the
preview, then click OK.
The Watercolor effect paints the image in a watercolor style, simplifying details in an
image, using a medium brush loaded with water and color. Where significant tonal
changes occur at edges, the filter saturates the color.
5. Choose a brush.
If the Brushes palette isn’t showing, choose Window > Brushes. The Brushes palette
displays a variety of default brushes; however many additional brushes are available to
you through brush libraries. To open a brush library, click the triangle icon at the top right
corner of the Brushes palette, and choose an option from the Open Brush Library
submenu.
Using Help | Contents | Index Back 33
Page 34

Adobe Illustrator CS Help Tutorials
Using Help | Contents | Index Back 34
Once you locate the graphic style you want to use, click it. We selected the Fountain Pen
brush from the Ink library.
6. Apply a brush stroke.
Select the Paintbrush tool, and select a color. We used the Eyedropper tool to sample a
color in our artwork. (See “
Copying attributes between objects” on page 271.) Then drag
to apply the stoke.
If you want more precision, use the Pen tool to draw a path, then apply the brush to the
path. (See “
Applying brushes to existing paths” on page 297.)
7. Experiment with different brushes.
We added some green splatters using the Ink Splatter brush and some yellow splatters
using the Galaxy brush. Then we defined the edges of the paint cans using the Dry Ink
brush.
Using Help | Contents | Index Back 34
Page 35

Adobe Illustrator CS Help Looking at the Work Area
Using Help | Contents | Index Back 35
Looking at the Work Area
Using the Welcome screen
The Welcome screen automatically appears when you open Illustrator. You can use this
window to create a new document, open an existing document, and get information
about how to use Illustrator.
To use the Welcome screen:
1 Choose Help > Welcome Screen to display the window if it’s not already open.
2 Select one of the following options:
• What’s New in Illustrator to launch your Web browser and take you to a Web page
describing new features in Illustrator.
• Tutorials to launch your Web browser and take you to a Web page containing illustrated
lessons that will help you learn how to use Illustrator.
• Cool Extras to see a PDF catalog listing all of the samples that are provided with Illus-
trator, including clip art, bitmap images, premade templates, premade symbols,
graphic styles, swatches, brushes, and actions.
• New Document to create a new document. For information on setting options for new
documents, see “
• New from Template to create a new document from a template. For more information
on choosing templates, see “
• Open Document to open an existing file as an Illustrator document. For more infor-
mation on the types of files you can open in Illustrator, see “
page 64.
• Close to exit the Welcome screen and access the rest of Illustrator.
To prevent the Welcome window from appearing each time Illustrator launches:
1 Choose Help > Welcome Screen to display the window.
2 Deselect Show This Dialog at Startup, and click Close.
Creating new documents” on page 62.
Creating new documents” on page 62.
Opening existing files” on
About the work area
The Illustrator work area is arranged to help you focus on creating and editing artwork.
The work area consists of the following components:
Menus The menus in the menu bar contain commands for performing tasks.
(See“
Choosing commands” on page 45.)
Tools The toolbox holds tools for drawing and editing artwork. (See “U
page 36.)
Using Help | Contents | Index Back 35
sing tools” on
Page 36

Adobe Illustrator CS Help Looking at the Work Area
Using Help | Contents | Index Back 36
Palettes Palettes help you monitor and modify artwork. (See “Using palettes” on
page 47.)
Artboard The artboard is where you draw and lay out your artwork. (See “
Setting up the
artboard” on page 64.)
A
B
D
C
Illustrator work area
A. Menus B. Tools C. Artboard D. Palettes
Using tools and commands
Tools change the function of your mouse pointer to let you create, select, and modify
objects. Commands, meanwhile, let you perform different tasks on objects you’ve selected
and on your document.
Using tools
You use tools in the toolbox to create, select, and manipulate objects in Illustrator. The
name of the tool appears below the pointer when you hold it over the tool—this is called
the tool tip. In parentheses within the tool tip is the keyboard shortcut to select that tool.
Using Help | Contents | Index Back 36
Page 37

Adobe Illustrator CS Help Looking at the Work Area
Using Help | Contents | Index Back 37
You must first select a tool to use it. The currently selected tool is highlighted in the
toolbox. Some tools also have additional tools beneath them—these are called hidden
tools. When you see a small triangle at the lower right corner of the tool icon, you know
that there are hidden tools.
AB
C
D
E
Selecting a hidden tool
A. Toolbox B. Active tool C. Hidden tool
D. Hidden tool triangle E. Tool name and shortcut
To show or hide the toolbox:
Choose Window > Tools. (A check mark next to the command means that the toolbox is
already displayed.)
To display a tool tip:
Hold the mouse pointer over the tool.
To specify whether to show or hide tool tips:
1 Choose Edit > Preferences > General (Windows) or Illustrator > Preferences > General
(Mac OS).
2 Select Show Tool Tips to display tool tips, deselect it to hide them. Then click OK.
To select a tool:
Do one of the following:
• Click a tool in the toolbox. If there is a small triangle at a tool’s lower right corner, hold
down the mouse button to view the hidden tools. Then drag the pointer over the tool
you want to select, and release the mouse button.
• Press the tool’s keyboard shortcut. The keyboard shortcut is displayed in its tool tip.
For example, if the tooltip says “Hand Tool (H),” you can select the tool by pressing the
“h” key on your keyboard. (See “Ke
ys for selecting tools” on page 532.)
To move the toolbox:
Drag the toolbox by its title bar.
To detach a toolbar from the toolbox:
1 Hold down the mouse button on a tool that has hidden tools underneath it.
Using Help | Contents | Index Back 37
Page 38

Adobe Illustrator CS Help Looking at the Work Area
Using Help | Contents | Index Back 38
2 When the hidden tools appear, drag to the arrow at the end of the toolbar and release
the mouse button. The toolbar detaches from the toolbox and you can drag it by the title
bar.
To close a detached toolbar:
Click the close box.
Changing the tool pointer
When you select most tools, the mouse pointer matches the tool’s icon. For example,
choosing the paintbrush tool changes the pointer to a paintbrush. You can also change a
tool pointer to a precision pointer, such as a cross hair , for greater precision when
aligning or working with detailed artwork.
To change the pointer to a precision pointer:
Do one of the following:
• While the tool is selected, press Caps Lock on the keyboard.
• Choose Edit > Preferences > General (Windows) or Illustrator > Preferences > General
(Mac OS). Then select Select Use Precise Cursors, and click OK.
Overview of tools (1 of 5)
The Selection tool
(V)
selects entire objects.
he Direct Selection
T
tool (A) selects points
or path segments
within objects.
he Group Selection
T
tool selects objects
and groups within
groups.
he Magic Wand tool
T
(Y) selects objects
with similar attributes.
Using Help | Contents | Index Back 38
Page 39

Adobe Illustrator CS Help Looking at the Work Area
Using Help | Contents | Index Back 39
The Lasso tool (Q)
selects points or path
segments within
objects.
he Convert Anchor
T
Point tool (Shift+C)
changes smooth
points to corner
points and vice versa.
he Pen tool (P)
T
draws straight and
curved lines to create
objects.
he Type tool (T)
T
creates individual
type and type
containers and lets
you enter and edit
type.
he Add Anchor
T
Point tool (+) adds
anchor points to
paths.
he Area Type tool
T
changes closed paths
to type containers and
lets you enter and edit
type within them.
he Delete Anchor
T
point tool (-) deletes
anchor points from
paths.
he Path Type tool
T
changes paths to type
paths, and lets you
enter and edit type on
them.
he Vertical Type
T
tool creates vertical
type and vertical type
containers and lets
you enter and edit
vertical type.
he Vertical Area
T
Type tool changes
closed paths to
vertical type
containers and lets
you enter and edit
type within them.
he Vertical Path
T
Type tool changes
paths to vertical type
paths and lets you
enter and edit type on
them.
Using Help | Contents | Index Back 39
Page 40

Adobe Illustrator CS Help Looking at the Work Area
Using Help | Contents | Index Back 40
Overview of tools (2 of 5)
The Line Segment
tool (\) draws
individual straight line
segments.
he Polar Grid tool
T
draws circular chart
grids.
he Arc tool draws
T
individual concave or
convex curve
segments.
he Rectangle
T
tool (M) draws
squares and
rectangles.
he Spiral tool draws
T
clockwise and
counterclockwise
spirals.
he Rounded
T
Rectangle tool draws
squares and
rectangles with
rounded corners.
he Rectangular
T
Grid tool draws
rectangular grids.
he Ellipse tool (L)
T
draws circles and
ovals.
he Polygon tool
T
draws regular, multisided shapes.
he Star tool draws
T
stars.
The Flare tool creates
lens-flare or solarflare-like effects.
he Paintbrush
T
tool (B) draws
freehand and calligraphic lines, as well
as art and patterns on
paths.
Using Help | Contents | Index Back 40
Page 41

Adobe Illustrator CS Help Looking at the Work Area
Using Help | Contents | Index Back 41
The Pencil tool (N)
draws and edits
freehand lines.
he Smooth tool
T
smooths bezier paths.
Overview of tools (3 of 5)
he Reflect tool (O)
T
flips
objects over a fixed
axis.
he Scale tool (S)
T
resizes objects around
a fixed point.
The Erase tool erases
paths and anchor
points from the
object.
he Shear tool skews
T
objects around a fixed
point.
he Rotate tool (R)
T
rotates objects
around a fixed point.
he Reshape tool
T
smooths or changes a
path while retaining
the path’s overall
shape.
he Warp tool
T
(Shift+R) molds
objects with the
movement of the
cursor (like molding
clay, for example).
he Twirl tool creates
T
swirling distortions
within an object.
he Pucker tool
T
deflates an object.
The Bloat tool
inflates an object.
Using Help | Contents | Index Back 41
Page 42

Adobe Illustrator CS Help Looking at the Work Area
Using Help | Contents | Index Back 42
The Scallop Tool adds
many curved details
to the outline of an
object.
he Symbol Sprayer
T
tool (Shift+S) places
multiple symbol
instances as a set on
the artboard.
he Crystallize tool
T
adds many spiked
details to the outline
of an object.
he Symbol Shifter
T
tool moves symbol
instances.
Overview of tools (4 of 5)
he Wrinkle tool
T
adds wrinkle-like
details to the outline
of an object.
he Symbol
T
Scruncher tool
moves symbol
instances closer
together.
he Free Transform
T
tool (E) scales, rotates,
or skews a selection.
he Symbol Sizer
T
tool resizes symbol
instances.
he Symbol Spinner
T
tool rotates symbol
instances.
he Symbol Stainer
T
tool colorizes symbol
instances.
he Symbol Screener
T
tool applies opacity to
symbol instances.
The Symbol Styler
tool applies the
selected style to
symbol instances.
Using Help | Contents | Index Back 42
Page 43

Adobe Illustrator CS Help Looking at the Work Area
Using Help | Contents | Index Back 43
80
70
60
50
40
30
20
10
0
BA
The Column Graph
tool (J) positions
columns vertically.
80
70
60
50
40
30
20
5040302010
100
80
60
40
20
0
he Stacked Column
T
BA
graph tool stacks
columns on top of one
another.
100
80
60
40
20
0
A
B
0 1020304050607080
he Bar Graph tool
T
positions columns
horizontally.
50
40
30
20
10
0
10 20 30 40 50
A
B
0 20406080100
he Stacked Bar
T
Graph tool stacks
columns and
positions them
horizontally.
DCBA
he Line Graph tool
T
shows the trend of
one or more subjects
over time.
50
40
30
20
10
he Radar Graph
T
tool uses a circle to
compare sets of
values at given points
in time or in particular
categories.
he Area Graph tool
T
emphasizes totals as
well as changes in
values.
he Mesh tool (U)
T
creates and edits
meshes and mesh
envelopes.
he Scatter Graph
T
tool plots data as
paired sets of x and y
coordinates.
he Gradient tool (G)
T
adjusts the beginning
and ending points
and angle of gradients
within objects.
he Pie Graph tool
T
creates a circle graph
with wedges showing
relative percentages
of the compared
values.
he Eyedropper tool
T
(I) samples color or
type attributes from
objects.
Using Help | Contents | Index Back 43
Page 44
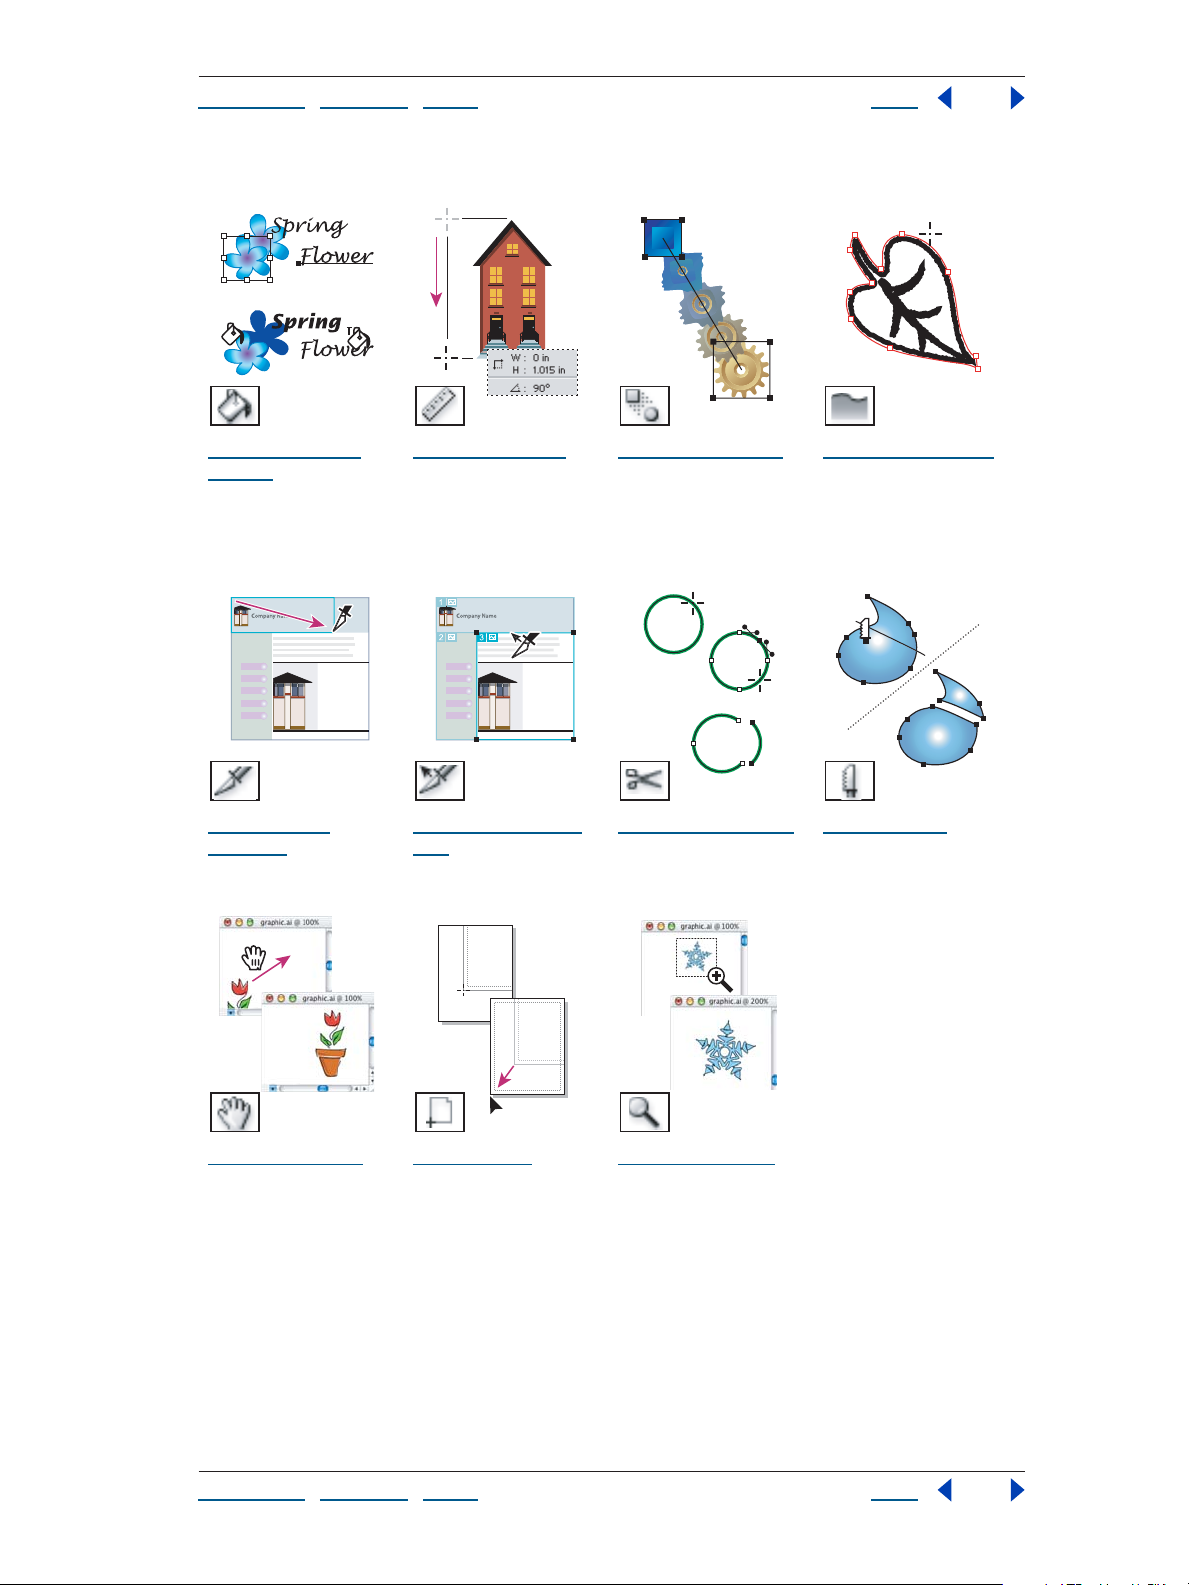
Adobe Illustrator CS Help Looking at the Work Area
Using Help | Contents | Index Back 44
Overview of tools (5 of 5)
The Paint Bucket
tool (K) fills vector
objects with the
current paint or type
attributes.
he Slice tool
T
(Shift+K) divides
artwork into separate
Web images.
he Measure tool
T
measures the distance
between two points.
he Slice Selection
T
tool selects Web
slices.
he Blend tool (W)
T
creates a series of
objects blended
between the color
and shape of multiple
objects.
he Scissors tool (C)
T
cuts paths at specified
points.
he Auto Trace tool
T
traces the outlines of a
raster image to create
a vector object based
on the image.
he Knife tool cuts
T
objects and paths.
he Hand tool (H)
T
moves the Illustrator
artboard within the
illustration window.
he Page tool adjusts
T
the page grid to
control where artwork
appears on the
printed page.
he Zoom tool (Z)
T
increases and
decreases the view
magnification in the
illustration window.
Using Help | Contents | Index Back 44
Page 45

Adobe Illustrator CS Help Looking at the Work Area
Using Help | Contents | Index Back 45
Using tool tips
The tool tips feature lets you display the name of tools, or of buttons and controls in
palettes.
To identify a tool or control:
Position the pointer over a tool or control and pause. A tool tip appears showing the name
and keyboard shortcut (if any) for the item.
If tool tips don’t appear, the preference for displaying them may be turned off.
To display tool tips:
1 Choose Edit > Preferences > General (Windows) or Illustrator > Preferences > General
(Mac OS).
2 Select Show Tool Tips, and click OK.
Note: Tool tips are not available in most dialog boxes.
Choosing commands
Commands let you perform a wide variety of tasks. Illustrator provides several ways to
choose commands:
• The menus at the top of your screen provide access to commands. If a command is
dimmed in a menu, it isn’t applicable to the current operation. For instance, a command
may only work on a selected object, or a particular kind of object (such as type or
bitmap objects).
• Context-sensitive menus display commands that are relevant to the active tool,
selection, or palette. To display a context menu, right-click (Windows) or Control-click
(Mac OS) in the document window or palette.
• Keyboard shortcuts let you quickly execute commands without using a menu. When
available, the keyboard shortcut appears to the right of the command name in the
menu. For more information on keyboard shortcuts, see “
Customizing shortcuts” on
page 45 and the appendix on keyboard shortcuts.
Illustrator lets you edit standard keyboard shortcuts and create new shortcuts. For
more information, see “
Customizing shortcuts” on page 45.
Customizing shortcuts
Illustrator provides a set of standard keyboard shortcuts for commands and tools. Illustrator also ships with alternative sets of keyboard shortcuts, including shortcuts for
previous versions and for other programs.
You can switch between sets of shortcuts, change individual shortcuts within a set, and
define your own sets of shortcuts.
To view, manage, or print sets of keyboard shortcuts:
1 Choose Edit > Keyboard Shortcuts.
2 Choose a set of shortcuts from the Set menu at the top of the Keyboard Shortcuts
dialog box.
3 Choose a shortcut type (Menu Commands or Tools) from the menu above the shortcut
display.
Using Help | Contents | Index Back 45
Page 46

Adobe Illustrator CS Help Looking at the Work Area
Using Help | Contents | Index Back 46
4 Do any of the following:
• To apply the displayed set of shortcuts, click OK.
• To delete the displayed set of shortcuts, click Delete. You can’t delete the set named
Illustrator Defaults.
• To export the displayed set of shortcuts into a text file, click Export Text. In the Save Key
Set File As dialog box, enter a filename for the current key set that you are saving, and
click Save. You can use this text file to print out a copy of your keyboard shortcuts.
To define new shortcuts or sets of shortcuts:
1 Choose Edit > Keyboard Shortcuts.
2 Choose a set of shortcuts from the Set menu at the top of the Keyboard Shortcuts
dialog box.
3 Choose a shortcut type (Menu Commands or Tools) from the menu above the shortcut
display.
4 In the Shortcut column of the scroll list, select the shortcut you want to modify (palette
shortcuts are at the end of the scroll list).
5 Type a new shortcut. When you begin entering changes, the name in the Set menu
becomes [Custom].
If the shortcut is already assigned to another command or tool in the set, an alert informs
you that another command or tool has the shortcut. Click away from the selection to
assign the shortcut to the new command or tool, and to erase the previously assigned
shortcut. Once you have reassigned a shortcut, you can click Undo to undo the change, or
click Go To to go to the other command or tool and assign it a new shortcut.
Note: Mac OS does not allow you to assign Command+Option+8 as a menu shortcut
6 In the Symbol column, type the symbol that will appear in the menu or tool tip for the
command or tool. You can use any of the characters that are allowed in the Shortcut
column.
7 When you have finished changing shortcuts and symbols, do one of the following:
• To create a new set that includes the modifications, click OK or Save, and then save the
shortcuts as a file. Enter a name for the new set in the Name text box, and click OK. The
new key set will appear in the pop-up menu under the new name.
• To discard all changes and exit the dialog box, click Cancel.
• To discard the last saved change without closing the dialog box, click Undo.
To clear shortcuts and symbols from a command or tool:
1 In the Keyboard Shortcuts dialog box, select the command or tool name whose
shortcut and symbol you want to delete.
2 Click Clear.
To delete an entire set of shortcuts:
1 Choose Edit > Keyboard Shortcuts.
2 In the Set pop-up menu, choose the shortcut set that you want to delete.
3 Click Delete and then click OK to exit the dialog box.
Using Help | Contents | Index Back 46
Page 47

Adobe Illustrator CS Help Looking at the Work Area
Using Help | Contents | Index Back 47
Using palettes
Adobe Illustrator includes a number of palettes to help you monitor and modify your
work. By default, these palettes appear stacked together in several groups. You can also
dock palettes so that you can move them as a unit.
Each palette also has an associated menu that lists commands specifically for use with that
palette. For more information, see the description of individual palettes.
Showing and hiding palettes
You can display and hide palettes as you work.
To show or hide a palette:
Do one of the following:
• Choose Window > [palette name]. A check mark appears before a palette that is
currently open.
• Press Tab to hide or show all palettes and the toolbox.
• Press Shift+Tab to hide or show all palettes except for the toolbox.
• Click the top right button (Windows) or the top left button (Mac OS) to close it.
Changing the palette display
You can control the size of a palette as well as how many options appear in it.
To change the palette display:
• To change the size of a palette, drag the lower right corner of the palette.
Note: Some palettes, such as the Color palette, cannot be resized by dragging.
• To collapse a group to the palette titles only, click the minimize/maximize box
(Windows) or click the zoom box (Mac OS). You can still open the palette menu from a
collapsed palette.
• To cycle through the available views of a palette—the default view, view with hidden
options showing, view as resized by dragging, and palette titles only—double-click the
palette’s tab. Alternately, in some palettes you can click the double triangle at the
upper left of the palette tab to cycle through the palette displays, or choose Show
Options or Hide Options from the palette menu.
For maximum performance, hide all palettes except those that are necessary for your
work.
Arranging palettes
You can rearrange your palettes to make better use of your work area by using the
following techniques:
• To make a palette appear at the front of its group, click the palette’s tab.
• To move an entire palette group, drag its title bar.
• To rearrange or separate a palette group, drag a palette’s tab. Dragging a palette
outside of an existing group creates a new palette window.
• To move a palette to another group, drag the palette’s tab to that group.
Using Help | Contents | Index Back 47
Page 48

Adobe Illustrator CS Help Looking at the Work Area
Using Help | Contents | Index Back 48
• To dock palettes so that you can move them together, drag a palette’s tab to the bottom
of another palette.
• To move an entire docked palette group, drag its title bar.
Entering values in palettes and dialog boxes
Palettes and dialog boxes let you enter numeric values in a variety of ways. As a result, you
may encounter multiple ways of entering a value in a single text box.
ABC
D
E
Ways to enter values
A. Arrow buttons B. Tex t box C. Menu arrow
D. Slider E. Dial
The following rules apply when entering numeric values:
• You can change the type of units used for the numeric value. (See “Changing the unit of
measurement” on page 68.)
• If you use a unit other than the preset unit to enter values, Illustrator converts it to the
set unit. For example, entering 3cm in a text box set to inches converts the value to
1.1811 inches.
• You can add, subtract, multiply, divide, and define percentages in any Illustrator text
box that accepts numeric values. For example, when specifying the size of a rectangle,
you can type 72 pt + 2cm for the height. Illustrator performs the calculation and
applies the result.
• You can use the following units and abbreviations in text boxes: inch, inches, in, milli-
meters, millimetres, mm, Qs (one Q equals 0.25 millimeter), centimeters, centimetres,
cm, points, p, pt, picas, pc, pixel, pixels, and px.
• When mixing picas and points, you can enter values as XpY, where X and Y are the
number of picas and points (for example, 12p6 for 12 picas, 6 points).
• A value without a specified unit uses the default unit for that text box, unless it follows a
value with a specified unit. For example, in a text box that uses inches by default, typing
3 + 6 would equal 3 inches plus 6 inches, or 9 inches. Typing 3cm + 6 would equal 3
centimeters plus 6 centimeters, or 3.5433 inches.
Using Help | Contents | Index Back 48
Page 49

Adobe Illustrator CS Help Looking at the Work Area
Using Help | Contents | Index Back 49
• You can use percentages in combination with units. For example, typing 3cm * 50%
would equal 3 centimeters multiplied by 50%, or 1.50 cm. Typing 50pt + 25% would
equal 50 points plus 25% of 50 points, or 62.5 points.
To enter a value:
Do one of the following:
• Type a value in the text box. To apply the entry from a palette, press the Enter or Return
key on your keyboard or set a value elsewhere in the palette.
• Drag the slider to the desired value.
• Drag the dial to the desired value.
• Click the arrow buttons in the palette to increase or decrease the value.
• (Windows) Click in the text box and then use the Up Arrow key and Down Arrow key on
the keyboard to increase or decrease the value.
• Choose a value from the menu associated with the text box.
You can use the Tab key to move between text boxes.
Viewing artwork
Adobe Illustrator gives you great flexibility in viewing your artwork. You can view different
areas of the artwork at different magnifications, use simplified views for tasks such as
editing paths, and preview how your artwork will appear in a Web browser or in print.
Magnifying and reducing the view area
The Zoom-in and Zoom-out tools and commands let you magnify or reduce the display of
any area in the file up to 64 times its actual size. You can also magnify and reduce the view
area using the Navigator palette. (See “U
You see the current magnification level at the top and the bottom left of the window.
To zoom in:
Do one of the following:
• Select the Zoom tool . The pointer becomes a magnifying glass with a plus sign in its
center. Click at the center of the area you want to magnify. Each click magnifies the view
to the next preset percentage. When the file has reached its maximum magnification
level of 6400%, the magnifying glass appears blank.
• Choose View > Zoom In. Each click magnifies the view to the next preset percentage.
When the file has reached its maximum magnification level of 6400%, the command is
dimmed.
• When no objects are selected, click the right mouse button (Windows) or Control-click
(Mac OS) and select the Zoom In command from the context menu.
sing the Navigator palette” on page 51.)
• Enter a magnification level in the Zoom text box at the lower left of the window.
• Select a magnification level from the Zoom pop-up menu at the lower left of the
window.
Using Help | Contents | Index Back 49
Page 50

Adobe Illustrator CS Help Looking at the Work Area
Using Help | Contents | Index Back 50
To zoom out:
Do one of the following:
• Select the Zoom tool, then hold down Alt (Windows) or Option (Mac OS). The pointer
becomes a magnifying glass with a minus sign in its center. Click the center of the area
you want to reduce. Each click reduces the view to the previous preset percentage,
down to a maximum reduction level of 3.13%.
• Choose View > Zoom Out. Each click reduces the view to the previous preset
percentage, down to a maximum reduction level of 3.13%.
• When no objects are selected, click the right mouse button (Windows) or Control-click
(Mac OS) and select the Zoom Out command from the context menu.
• Enter a reduction level in the Zoom text box at the lower left of the window.
• Select a magnification level from the Zoom pop-up menu at the lower left of the
window.
To choose the Zoom-in tool while using another tool, press Ctrl+spacebar (Windows)
or Command+spacebar (Mac OS). To choose the Zoom-out tool while using another
tool, press Ctrl+Alt+spacebar (Windows) or Command+Option+spacebar (Mac OS).
To magnify by dragging:
1 Select the Zoom-in tool .
2 Drag a dotted rectangle, called a marquee, around the area you want to magnify. To
move the marquee around the artwork, after you’ve begun dragging to create the
marquee hold down the spacebar, and continue dragging to move the marquee to a new
location.
To display a file at 100%:
Choose View > Actual Size, or double-click the Zoom tool.
To change the view to fit the document window:
Choose View > Fit In Window, or double-click the Hand tool.
Navigating the view area
The Hand tool lets you bring another area of your artwork into view. You can also scroll
through the view area using the Navigator palette. (See “U
page 51.) The Units & Display Performance options in the Preferences dialog box let you
set the quality of the view as you move the Hand tool.
To reposition the view with the Hand tool:
1 Select the hand tool .
2 Move the pointer onto the artwork, and drag in the direction in which you want the
artwork to move.
sing the Navigator palette” on
To switch to the Hand tool temporarily while using another tool, hold down the
spacebar.
To specify the quality of the display when using the Hand tool:
1 Choose Edit > Preferences > Units & Display Performance (Windows) or Illustrator >
Preferences > Units & Display Performance (Mac OS).
Using Help | Contents | Index Back 50
Page 51

Adobe Illustrator CS Help Looking at the Work Area
Using Help | Contents | Index Back 51
2 Drag the Hand Tool slider left to improve the quality of the view when you move it with
the Hand tool, or right to improve the speed at which you can move the view with the
Hand tool.
Using the Navigator palette
You use the Navigator palette to quickly change the view of your artwork using a
thumbnail display. The colored box in the Navigator (called the proxy view area) corresponds to the currently viewable area in the document window.
For more information, see “U
A
CDEF G
Navigator palette
A. Thumbnail display of artwork B. Palette menu button
C. Zoom text box D. Zoom out button E. Proxy preview area F. Zoom slider G. Zoom in button
B
sing palettes” on page 47.
Displaying the Navigator palette Choose Window > Navigator.
Note: The Navigator palette may take a long time to display when the document contains
a large number of objects.
Using the Navigator palette menu Click the triangle in the upper right corner of the
palette.
Changing the palette display To display only artwork inside the boundaries of the
artboard, choose View Artboard Only from the Navigator palette menu. Any objects
outside the border of the artboard are removed from the thumbnail display.
To change the color of the proxy view area, choose Palette Options from the Navigator
palette menu. Choose a preset color from the Color pop-up menu, or double-click the
color box to choose a custom color. Then click OK.
To display dashed lines in the document as solid lines in the Navigator palette, select Draw
Dashed Lines As Solid Lines.
To specify the size at which text is replaced by a gray bar in the Navigator palette, enter a
font size in the Greeking text box.
Magnifying or reducing the view Click the zoom in button or zoom out button; drag
the zoom slider; or enter a percentage in the zoom text box and press Enter or Return.
Alternately, hold down Ctrl (Windows) or Command (Mac OS), and drag over the area of
the thumbnail display that you want to magnify.
Moving the view Click the area of the thumbnail display that you want to view in the
document window. Alternately, drag the proxy view area (the colored box) to a different
area of the thumbnail display.
Using Help | Contents | Index Back 51
Page 52

Adobe Illustrator CS Help Looking at the Work Area
Using Help | Contents | Index Back 52
Setting up windows and views
You can open additional windows to display several views of a document at once, so that
you can quickly switch between view modes or magnifications. For example, you can set
one view highly magnified for doing close-up work on some objects and create another
view less magnified for laying out those objects on the page.
To change the screen mode for illustration windows:
Click a screen mode button in the toolbox:
• The left (Standard Screen mode) button displays artwork in a standard window, with a
menu bar at the top and scroll bars on the sides.
• The center (Full Screen Mode with Menu Bar) button displays artwork in a full-screen
window with a menu bar but with no title bar or scroll bars.
• The right (Full Screen Mode) button displays artwork in a full-screen window, with no
title bar, menu bar, or scroll bars.
To open a new window:
Choose Window > New Window.
A new window of the same size appears on top of the previously active window. The two
windows are identical except for their window numbers. The new window is now the
active window.
To close a window:
Do one of the following:
• Click the close button on the window.
• Choose File > Close to close the active window.
• Press Alt (Windows) or Option (Mac OS) and choose File > Close to close all document
windows.
To arrange multiple windows (Windows only):
Do one of the following:
• Choose Window > Cascade to display windows stacked and cascading from the top left
to the bottom right of the screen.
• Choose Window > Tile to display windows edge to edge.
• Choose Window > Arrange Icons to arrange minimized windows within the program
window.
To create a view:
1 Set up the view that you want.
2 Choose View > New View.
3 Enter a name for the new view, and click OK.
The view names, along with keyboard shortcuts for choosing them, appear at the bottom
of the View menu. You can create and store up to 25 views for each document.
To retrieve a view:
Choose View, followed by the name of the view you want to use.
Using Help | Contents | Index Back 52
Page 53

Adobe Illustrator CS Help Looking at the Work Area
Using Help | Contents | Index Back 53
To rename or delete a view:
1 Choose View > Edit Views.
2 Select the view you want to edit, and rename it or click Delete.
Viewing artwork as paths
By default, Adobe Illustrator sets the view so that all artwork is previewed in color.
However, you can toggle the Preview command to Outline, so that your artwork is
displayed only as paths, with all paint attributes hidden. Viewing artwork without paint
attributes speeds up the time it takes to redraw the screen when working with complex
artwork.
To view the artwork in color or as path outlines:
Choose a viewing option:
• Choose View > Pixel Preview to display the artwork as close as possible to how it will be
printed—drawn with as much color, shading, and detail as your monitor is capable of
displaying.
• Choose View > Outline to display the artwork as paths, hiding each object’s paint
attributes.
• Use the Layers palette to change the view mode of a layer, group, or object. (See
“
Changing the display of layered artwork” on page 137.)
Use the New Window command to see your layout in Preview view in one window
while editing in Outline view in another.
Viewing artwork as pixels
In Pixel Preview mode, you can preview how your artwork will appear when it is rasterized
and viewed in a Web browser. For more information, see “
Working in pixel preview mode”
on page 393.
Previewing how artwork will print
Illustrator provides several ways to preview how aspects of artwork will look when printed,
depending on whether you are creating color-separated output, flattening transparency,
or switching viewing devices when using color management.
• Overprint Preview mode provides an “ink preview” that approximates how blending,
transparency, and overprinting will appear in color-separated output. For more information on overprinting, see “
page 482. To preview how colors will overprint and blend, choose View > Overprint
Preview.
• Flattener preview highlights areas of the artwork that meet certain criteria for
flattening. For more information, see “
page 461. To highlight these areas, choose Window > Flattener Preview and specify the
options you want. (See “U
Step 2: Select overprint options for overlapping colors” on
About flattening transparent artwork” on
sing the Flattener Preview palette” on page 468.)
• If you are using Illustrator’s color management features, you can also display an online
preview of how your document’s colors will appear on a particular type of monitor or
output device. (See “
Soft-proofing colors” on page 229.)
Using Help | Contents | Index Back 53
Page 54

Adobe Illustrator CS Help Looking at the Work Area
Using Help | Contents | Index Back 54
• Anti-aliasing gives vector objects a smoother on-screen appearance and gives you a
better idea of how vector artwork will look when printed on a PostScript printer. This is
because screen resolution is relatively limited, but vector artwork is often printed at a
high resolution. To turn on anti-aliasing, choose Edit > Preferences > General
(Windows) or Illustrator > Preferences > General (Mac OS), select Anti-aliased Artwork,
and click OK.
Using the status bar
At the bottom left edge of the Illustrator document window is the status bar. The status
bar contains the Zoom pop-up menu and the Status pop-up menu. The Status menu can
display information about any of the following topics:
• The current tool in use.
• The date and time.
• The number of undos and redos available.
• The document color profile. For information on color profiles, see “About color
management” on page 218.
If you’re working with a managed file from an Adobe Version Cue project, the status
bar provides additional information about the status of the file. (See “
Adobe Version Cue managed projects” on page 58.)
To specify the type of information to display in the Status pop-up menu:
Choose the type of information from the pop-up menu.
Working with
Undoing and redoing changes
You can use the Undo command to correct mistakes you make while using the Adobe
Illustrator program. You can even undo an operation after you choose the Save command
(but not if you have closed and then reopened the file). If an operation cannot be undone,
the Undo command is dimmed.
Depending on how much memory is available, you can undo an unlimited number of the
last operations you performed, in reverse order, by repeatedly choosing the Undo
command.
You can also revert a file to the version that was last saved (but not if you have closed and
then reopened the file).
To undo or redo an operation:
Choose Edit > Undo or Edit > Redo. (Depending on the memory available to your system,
you can choose Undo an unlimited number of times.)
To revert a file to the last saved version:
Choose File > Revert. You cannot undo this action.
Using Help | Contents | Index Back 54
Page 55

Adobe Illustrator CS Help Looking at the Work Area
Using Help | Contents | Index Back 55
Customizing your Illustrator workspace
You can customize the way Illustrator works by specifying preferences, using plug-in
modules for added functionality, and creating a custom startup file that provides specific
swatches, as well as various settings for new documents you create.
Using the Preferences dialog box
The Preferences dialog box lets you specify options regarding how you want Illustrator to
work, including those for display, tools, ruler units, and exporting information. These
preferences are added to the preference file, which is launched each time you start Illustrator.
To find an explanation of a particular preference option or set of options, refer to the
index.
To restore Illustrator’s default settings, you can remove the Illustrator preferences file and
relaunch Illustrator. This can be helpful if you are having problems with the application.
To open the Preferences dialog box:
Do one of the following:
• In Windows, choose Edit > Preferences, followed by the type of preferences you want.
• In Mac OS, choose Illustrator > Preferences, followed by the type of preferences you
want.
To switch to different options in the Preferences dialog box:
Choose an option from the menu at the top left of the Preferences dialog box. You can also
click Next to display the next options, or click Prev to display the previous options.
To restore Illustrator’s default settings:
1 Do one of the following:
• Rename the preferences file and move it to the desktop as a safety copy.
• Delete the preferences file. Note that doing so loses all of your existing preferences.
This file is called AIPrefs (Windows) or Adobe Illustrator Prefs (Mac OS).
Note: It is safe to remove the entire Adobe Illustrator CS Settings folder. This folder
contains various preferences that can be regenerated.
Using plug-in modules
Plug-in modules are software programs developed by Adobe Systems, and by other
software developers in conjunction with Adobe Systems, to add features to Adobe Illustrator. A number of special effects plug-ins come with your program and are automatically
installed in the Plug-ins folder.
If you change the location of the Plug-ins folder, or if you want to use a different folder as
your plug-ins folder, you must use the Plug-ins & Scratch Disks preferences command to
tell Illustrator about the new location of the plug-ins.
Using Help | Contents | Index Back 55
Page 56

Adobe Illustrator CS Help Looking at the Work Area
Using Help | Contents | Index Back 56
You can also use plug-ins from Adobe Photoshop versions 3.0 to 5.5. In addition, you can
use any commercial plug-in designed for use with Photoshop or Illustrator.
To avoid duplicating your plug-ins between the two programs, make a shortcut
(Windows) or an alias (Mac OS) to your Photoshop plug-ins in your Illustrator Plug-ins
folder. Note that Illustrator CS does not support plug-ins from Photoshop 6.0 and later.
To specify the location of plug-in modules:
1 Do one of the following:
• In Windows, choose Edit > Preferences > Plug-ins & Scratch Disks.
• In Mac OS, choose Illustrator > Preferences > Plug-ins & Scratch Disks.
2 Click Choose and select the folder containing the plug-in modules.
3 Do one of the following:
• In Windows, click OK in the Browse For Folder dialog box.
• In Mac OS, click Choose in the New Plug-ins Folder dialog box.
4 Click OK in the Preferences dialog box.
5 Quit Illustrator, and then restart it for the plug-in modules to take effect.
To install an Adobe Systems plug-in module:
1 If an installer is provided, use it to install the plug-in module. Otherwise, drag a copy of
the module to the Plug-ins folder inside the Adobe Illustrator folder.
2 Restart Illustrator for the plug-in to take effect.
To install a third-party plug-in module:
Follow the installation instructions that came with the plug-in module.
Note: The open architecture of the Adobe Illustrator program allows developers outside of
Adobe to create features that are accessible from within Adobe Illustrator. If you are interested in creating plug-in modules compatible with Adobe Illustrator, see the Adobe
Systems U.S. Web site at http://www.adobe.com.
To get information about a plug-in:
1 Do one of the following:
• In Windows, choose Help > About Plug-ins.
• In Mac OS, choose Illustrator > About Plug-ins.
2 Select the plug-in from the list and click About.
3 Click Ok, and then click Done.
Creating a custom startup file
The startup file defines the default look and attributes of new documents as well as the
default contents of the Graphic Styles, Swatches, Brushes, Symbols, and Actions palettes.
By creating a custom startup file for CMYK mode and/or RGB mode, you can redefine these
defaults. (See “
access to document features that you use most frequently, by making them available in
every new Illustrator file you create.
Using Help | Contents | Index Back 56
About color models and color modes” on page 195.) This gives you easy
Page 57

Adobe Illustrator CS Help Looking at the Work Area
Using Help | Contents | Index Back 57
Note, however, that a startup file gives you only one set of default settings for new
documents. If you want multiple sets of default settings—for instance, if you want a
different default document view and swatches for each project you work on—use
templates instead. (See “
Creating new templates” on page 63.)
You can modify the following defaults in the startup file: graphic styles, swatches
(including custom colors, patterns, and gradients), brushes, symbols, actions, graph
designs, fill and stroke attributes, viewing preferences, magnification level, document size,
document window size, and scroll position.
To create a custom startup file:
1 Copy the current default startup file—Adobe Illustrator Startup_CMYK or Adobe Illus-
trator Startup_RGB—under a different name. This action saves the original startup file in
case you need it again. The startup files are located in the Plug-ins folder in the Adobe
Illustrator application folder.
2 Open one of the default startup files (either CMYK or RGB, depending on which type of
document you intend to use) as a starting point for the custom startup file. This file
contains squares filled with the default colors, patterns, and gradients available in the
Swatches palette.
3 Delete any existing swatches, graphic styles, brushes, or symbols you don’t want to
retain. Note that you must delete them from their respective palettes as well as from the
artwork in the startup file. (See “R
eplacing, merging, and deleting swatches” on page 209.)
4 Add new paint style attributes to the startup file as follows:
• Create any colors, patterns, and gradients you want and save them as swatches. You can
also import swatches using the Swatch Libraries command and then move the
swatches you want in the startup file into the default Swatches palette. (See “
Adding
swatches from other documents and swatch libraries” on page 210 and “Using swatch
libraries” on page 203.)
• Save any graph designs that you want available in your files using the Graph Design
dialog box. As with the new paint style attributes, add the graphs to the artwork in the
startup file so you can see and refer to the graphs later if necessary.
• Create any graphic styles you want and save them to the Graphic Styles palette. (See
“
Creating and modifying graphic styles” on page 291.)
• Create any brushes you want and save them to the Brushes palette. (See “Creating and
editing brushes” on page 298.)
• Create any symbols you want and save them to the Symbols palette. (See “Creating
symbols” on page 307.)
5 Select the options you want as default settings from the Print Options dialog box. (See
About printing” on page 446.)
“
6 Select the options you want as default settings from the following:
• View preferences from the View menu. (See “Viewing artwork” on page 49.)
• Ruler origins. (See “Using rulers” on page 68.)
• Page origins. (See “Specifying the media size and orientation” on page 449.)
• Actions. (See “Creating actions” on page 493.)
Using Help | Contents | Index Back 57
Page 58

Adobe Illustrator CS Help Looking at the Work Area
Using Help | Contents | Index Back 58
7 Save the new file as Adobe Illustrator Startup _CMYK or Adobe Illustrator Startup_RGB,
and place it inside the Plug-ins folder.
8 Restart Illustrator.
To restore the saved copy of the startup file:
1 Rename or delete the current copy that you no longer want.
2 Rename the saved copy as Adobe Illustrator Startup_CMYK or Adobe Illustrator
Startup_RGB and move it into the Plug-ins folder in the Adobe Illustrator application
folder.
3 Restart Illustrator.
Working with Adobe Version Cue managed projects
Adobe Version Cue™ is an innovative set of features designed to increase your productivity
when you work alone or collaborate with others. Version Cue integrates design
management into your existing workflows within and across the Adobe Creative Suite
applications, including Adobe GoLive CS, Adobe Illustrator CS, Adobe InDesign CS, and
Adobe Photoshop CS.
Note: The Version Cue features are only compatible with the Adobe Version Cue
Workspace, which is only available as part of the Adobe Creative Suite.
Version Cue streamlines the following tasks while you work in the Creative Suite:
• Creating file versions.
• Maintaining file security.
• Organizing files into private or shared projects.
• Browsing with file thumbnails, and searching file information and version comments.
• Reviewing file information, comments, and file statuses in private and shared projects
while you browse.
In addition, you can use the Version Cue Workspace Administration for more advanced
tasks:
• Duplicate, export, backup and restore projects.
• View information about projects in the workspace.
• Import files to the workspace using FTP or WebDAV.
• Delete file versions and remove file locks.
• Create project users and define their project privileges.
• Restrict access to a specific project.
To turn on Version Cue features in Illustrator:
1 Choose Edit > Preferences > Files & Clipboard (Windows) or Illustrator > Preferences >
Files & Clipboard (Mac OS).
2 Select Enable Version Cue, and click OK.
To view the complete Version Cue documentation, see A
dobe Version Cue Help. You can
also view the Version Cue documentation as a PDF or print it by opening the VersionCueHelp.pdf file located on the Adobe Creative Suite CD and the Adobe Illustrator CS CD.
Using Help | Contents | Index Back 58
Page 59

Adobe Illustrator CS Help Looking at the Work Area
Using Help | Contents | Index Back 59
Exiting Illustrator
When you are finished creating artwork in Illustrator, you can quit the program. This frees
memory for use in other applications.
To close a file and quit Illustrator:
1 Choose File > Exit (Windows) or Illustrator > Quit Illustrator (Mac OS).
2 If the file has not yet been saved or named, a notice appears giving you the option of
saving the file. To save the file, click Save, enter a name in the Name text box (if necessary),
choose a file format and location, and then click Save.
Using Help | Contents | Index Back 59
Page 60

Adobe Illustrator CS Help Creating Artwork in Illustrator
200%
8
Using Help | Contents | Index Back 60
Creating Artwork in Illustrator
About creating artwork
Computer graphics fall into two main categories—bitmap and vector. You can work
with both types of graphics in Illustrator; moreover, an Illustrator document can contain
both bitmap and vector data. Understanding the difference between the two categories
helps as you create, edit, and import artwork.
About vector graphics
Vector graphics are made up of lines and curves defined by mathematical objects called
vectors. Vectors describe an image according to its geometric characteristics. For example,
the boot laces in a vector graphic are defined by a specific width and length, set at a
specific location, and filled with a specific color. You can move, resize, or change the color
of the laces without losing the quality of the graphic.
Vector graphics are resolution-independent—that is, they can be scaled to any size and
printed at any resolution without losing detail or clarity. As a result, vector graphics are the
best choice for representing graphics that must retain crisp lines when scaled to various
sizes—for example, logos.
00%
Vector graphic at different levels of magnification
About bitmap images
Bitmap images—technically called raster images—use a grid of small squares known as
pixels to represent images. Each pixel is assigned a specific location and color value. For
example, the boot laces in a bitmap image are made up of a mosaic of pixels that give the
appearance of laces. When working with bitmap images, you edit pixels rather than
objects or shapes.
Using Help | Contents | Index Back 60
Page 61

Adobe Illustrator CS Help Creating Artwork in Illustrator
Using Help | Contents | Index Back 61
Bitmap images are the most common electronic medium for continuous-tone images,
such as photographs or digital paintings, because they can represent subtle gradations of
shades and color. Bitmap images are resolution-dependent—that is, they contain a fixed
number of pixels. As a result, they can lose detail and appear jagged if they are scaled onscreen or if they are printed at a lower resolution than they were created for.
200%
800%
Bitmap image at different levels of magnification
Because computer monitors represent images by displaying them on a grid, both vector
and bitmap data is displayed as pixels on-screen.
Combining vector graphics and bitmap images
Many of the tools and commands in Illustrator focus on vector drawing; however, Illustrator also provides a variety of ways to incorporate bitmap images in your artwork. You
can import bitmap images into an Illustrator document using the Open, Place, and Paste
commands. (See “Imp
your artwork using filters, effects, and graphic styles.
When combining vector graphics and bitmap images, it’s important to remember that
how your artwork looks in Illustrator isn’t always how it will look in its final medium
(whether commercially printed, printed on a desktop printer, or viewed on the Web). The
following factors influence the quality of your final artwork:
Transparency and flattening Many bitmap effects add partially transparent pixels to
your artwork. You can also add transparency to vector objects manually using the Transparency palette.
When your artwork contains transparency, Illustrator performs a process called flattening
before printing or exporting. In most cases, the default flattening process produces
excellent results. However, if your artwork contains complex, overlapping areas and you
require high-resolution output, you will probably want to preview the effects of flattening.
For more information, see “
Image resolution Bitmap images contain a fixed number of pixels, usually measured in
pixels per inch (ppi). An image with a high resolution contains more, and therefore smaller,
pixels than an image of the same printed dimensions with a low resolution. For example,
a 1-inch-by-1-inch image with a resolution of 72 ppi contains a total of 5184 pixels (72
pixels wide x 72 pixels high = 5184). The same 1-inch-by-1-inch image with a resolution of
300 ppi would contain a total of 90,000 pixels.
orting artwork” on page 74.) You can also create bitmap effects in
About flattening transparent artwork” on page 461.
For imported bitmap images, image resolution is determined by the source file. For
bitmap effects, you can specify a custom resolution. (See “
Specifying raster effects
settings” on page 275.)
Using Help | Contents | Index Back 61
Page 62

Adobe Illustrator CS Help Creating Artwork in Illustrator
Using Help | Contents | Index Back 62
To determine the image resolution to use, consider the medium of final distribution for
the image. If you’re producing an image for online display, the image resolution only
needs to match the typical monitor resolution (72 or 96 ppi). However, using too low a
resolution for a printed image results in pixelation—output with large, coarse-looking
pixels. Using too high a resolution (pixels smaller than what the output device can
produce) increases the file size and slows the printing of the artwork.
Printer resolution and screen frequency Printer resolution is measured in the number
of ink dots produced per inch (dpi). Most desktop laser printers have a resolution of 600
dpi, and imagesetters have a resolution of 1200 dpi or higher. Ink jet printers produce a
microscopic spray of ink, not actual dots; however, most ink jet printers have an approximate resolution of 300 to 720 dpi.
To determine the appropriate resolution for your image when printing to any laser printer,
but especially to imagesetters, you must also consider screen frequency. Screen frequency
is the number of halftone cells per inch used to print grayscale images or color separations. Also known as screen ruling or line screen, screen frequency is measured in lines per
inch (lpi)—or lines of cells per inch in a halftone screen.
The relationship between image resolution and screen frequency determines the quality
of detail in the printed image. To produce a halftone image of the highest quality, you
generally use an image resolution that is from 1.5 to at most 2 times the screen frequency.
But with some images and output devices, a lower resolution can produce good results. To
determine your printer’s screen frequency, check your printer documentation or consult
your service provider.
Note: Some imagesetters and desktop laser
printers use screening technologies other than halftoning. If you are printing an image on
a nonhalftone printer, consult your service provider or your printer documentation for the
recommended image resolutions.
Creating and opening documents
A document is the space in which you create artwork. You can create new Illustrator
documents from scratch or based on a template. You can also open existing files as Illustrator documents.
Creating new documents
Illustrator provides two ways to create new documents: from scratch and from templates:
• Creating a document from scratch gives you a blank document with the default fill and
stroke colors, graphic styles, brushes, symbols, actions, viewing preferences, and other
settings.
• Creating a document from a template gives you a document with preset design
elements and settings. Illustrator comes with a variety of templates, including
templates for letterhead, business cards, envelopes, brochures, labels, certificates, post
cards, greeting cards, and Web sites. You can also create your own templates. (See
“
Creating new templates” on page 63.)
To create a new document from scratch:
1 Choose File > New.
Using Help | Contents | Index Back 62
Page 63

Adobe Illustrator CS Help Creating Artwork in Illustrator
Using Help | Contents | Index Back 63
2 In the New Document dialog box, set any of the following options and click OK:
• Name to specify a name for the new document.
• Size to choose a preset size for the artboard.
Note: The size of the artboard does not define the size of the printed page. The paper size is
derived from your print settings. (See “
Using the Print dialog box” on page 447 and “Speci-
fying the media size and orientation” on page 449.)
• Width and Height to specify a custom size for the artboard.
• Units to choose a measurement system for the document. The option you choose
determines the default unit of measurement used for rulers and in dialog boxes. (See
“La
ying out artwork with precision” on page 67.)
• Orientation to change the orientation of the artboard between portrait and landscape.
• CMYK Color or RGB Color to choose a color mode for the document. In general, choose
CMYK if the artwork will be printed and RGB if the artwork will be published on the
Web. For more information, see “
About color models and color modes” on page 195.
To create a new document without opening the New Document dialog box, press
Ctrl+Alt+N (Windows) or Command+Option+N (Mac OS). The new, untitled
document has the settings last used.
To create a new document from a template:
1 Choose File > New from Template.
2 Select the template you want to use, and click New.
Creating new templates
Templates let you create new documents that share common settings and design
elements. For example, if you need to design a series of business cards with a similar look
and feel, you can create a template with the desired artboard size, view settings (such as
guides), and print options. The template can also contain symbols for common design
elements (such as logos) and specific sets of color swatches, brushes, and graphic styles.
When a template is selected via the New from Template command, Illustrator creates a
new document with identical content to the template, but leaves the original template file
untouched.
Templates offer a powerful alternative to creating custom startup files. While you can
only create two custom startup files (one for CMYK mode and one for RGB mode), you
can create an unlimited number of templates to meet your design and production needs.
In addition, you can store and access templates anywhere, as opposed to startup files that
must have a specific name and location.
To create a template:
1 Open a new or existing document.
2 Customize the document in any of the following ways:
• Set up the document window as you want it to appear in new documents you create
from the template. This includes the magnification level, scroll position, ruler origin,
and options in the View menu.
Using Help | Contents | Index Back 63
Page 64

Adobe Illustrator CS Help Creating Artwork in Illustrator
Using Help | Contents | Index Back 64
• Draw or import any artwork you want to appear in new documents you create from the
template.
• Delete any existing swatches, styles, brushes, symbols, or actions you don’t want to
retain.
• Create any new swatches, styles, brushes, symbols, and actions you want in the corre-
sponding palettes. You can also import preset swatches, styles, brushes, symbols, and
actions from a variety of libraries that come with Illustrator.
• Create any graph designs you want and add them to the Graph Design dialog box. You
can also import preset graph designs.
• Set the desired options in the Document Setup dialog box and Print Options dialog
box.
3 Choose File > Save As Template.
4 In the Save As dialog box, select a location for the file, enter a filename, and click Save.
Illustrator saves the file in AIT (Adobe Illustrator Template) format.
Opening existing files
You can open files that were created in Illustrator as well as files that were created in other
applications. When you open an existing file, the artwork in the file appears in an Illustrator document. For more information on the file formats Illustrator can open, see “
importing artwork” on page 74.
About
Note: If you’re working with managed files from an Adobe Version Cue project, see also
Working with Adobe Version Cue managed projects” on page 58.
“
To open an existing file:
1 Choose File > Open.
2 Locate and select the file you want to open. If you don’t see the name of the file you
want, make sure all formats are showing. If you still don’t see the file, it is stored in a format
that Illustrator can’t read.
3 Click Open.
To open a file that has recently been used:
Choose File > Open Recent Files, and choose the filename from the list.
Setting up the artboard
After you create or open a document, you can set up the artboard to best meet your
design and final output requirements. For example, you can change the size and color of
the artboard, divide the artboard into multiple page tiles, and reposition the page
boundaries.
Using Help | Contents | Index Back 64
Page 65

Adobe Illustrator CS Help Creating Artwork in Illustrator
Using Help | Contents | Index Back 65
About the artboard
In Adobe Illustrator, the artboard represents the entire region that can contain printable
artwork. However, the artboard’s dimensions do not necessarily match the current paper
size. For example, your artboard may be 10 x 20 inches while your print settings specify 8
and one-half x 11 inch paper. For more information on choosing a printer and paper size,
see “U
sing the Print dialog box” on page 447 and “Specifying the media size and orien-
tation” on page 449.
When the artboard is larger than the paper size, you can choose to divide the artboard
into multiple page tiles. (See “D
page 66.)
You can view the page boundaries in relation to the artboard by showing page tiling.
When page tiling is on, the printable and nonprintable areas are represented by a series of
solid and dotted lines between the outermost edge of the window and the printable area
of the page.
To show or hide page tiling boundaries:
Choose View > Show Page Tiling or View > Hide Page Tiling.
ividing the artboard into multiple page tiles” on
A
B
C
D
E
Illustrator work area
A. Imageable area B. Nonimageable area
C. Edge of the page D. Artboard E. Scratch area
Imageable area The imageable area is bounded by the innermost dotted lines and
represents the portion of the page on which the selected printer can print. Many printers
cannot print to the edge of the paper.
Nonimageable area The nonimageable area is between the two sets of dotted lines
representing any nonprintable margin of the page.
Edge of the page The page edge is indicated by the outermost set of dotted lines.
Artboard The artboard is bounded by solid lines and represents the maximum printable
area. You can hide the artboard boundaries if desired. (See “
Showing and hiding the
artboard boundaries” on page 66.)
Using Help | Contents | Index Back 65
Page 66

Adobe Illustrator CS Help Creating Artwork in Illustrator
Using Help | Contents | Index Back 66
Scratch area The scratch area is the area outside the artboard that extends to the edge
of the 227-inch square window. The scratch area represents a space on which you can
create, edit, and store elements of artwork before moving them onto the artboard.
Objects placed onto the scratch area are visible on-screen, but they do not print.
Showing and hiding the artboard boundaries
The artboard is bounded by solid lines and represents the entire region that can contain
printable artwork. You can choose to hide the artboard boundaries if it suits your working
style.
To show or hide the artboard boundaries:
Choose View > Show Artboard or View > Hide Artboard.
Changing the size and color of the artboard
You specify the size of the artboard when you create a new document. However, you can
change the size of the artboard at any time.
You can also change the color of the artboard to view your document as it might appear
when printed on colored paper. For example, if you draw a blue object on a yellow
background, the object appears green. The simulation is only performed when the transparency grid is not shown.
To change the size of the artboard:
1 Choose File > Document Setup. Then choose Artboard from the pop-up menu at the
top left of the Document Setup dialog box.
2 Set any of the following options, and click OK:
• Size to choose a preset size for the artboard.
• Width and Height to specify a custom size for the artboard.
Note: The size of the artboard does not define the size of the printed page. The paper size is
derived from your print settings. (See “
Using the Print dialog box” on page 447 and “Speci-
fying the media size and orientation” on page 449.)
• Orientation to change the orientation of the artboard between portrait and landscape.
To change the color of the artboard:
1 Choose File > Document Setup. Then choose Transparency from the pop-up menu at
the top left of the Document Setup dialog box.
2 Select Simulate Colored Paper.
3 Click the top color swatch, and select a new color using the Color dialog box.
4 Click OK.
In CMYK documents, choosing the Simulate Colored Paper option is even useful with a
white background, as it gives you a more accurate preview of how non-opaque
artwork will print.
Dividing the artboard into multiple page tiles
By default, Illustrator prints your artwork on a single sheet of paper. However, if the
artwork is larger than the page sizes available on your printer, you can print onto multiple
sheets of paper.
Using Help | Contents | Index Back 66
Page 67

Adobe Illustrator CS Help Creating Artwork in Illustrator
Using Help | Contents | Index Back 67
Dividing the artboard to fit a printer’s available page sizes is called tiling. You can choose a
tiling option in the Setup section of the Print dialog box. (See “U
on page 447 and “Setting setup options” on page 451.) To view the page tiling boundaries
on the artboard, choose View > Show Page Tiling.
Artboard divided into multiple page tiles
sing the Print dialog box”
When you divide the artboard into multiple page tiles, the pages are numbered from left
to right and from top to bottom, starting with page 1. These page numbers appear onscreen for your reference only; they do not print. The numbers enable you to print all of
the pages in the file or specify particular pages to print.
Moving the printable area
You can adjust the placement of the printable area of the page to control how artwork is
printed. This is a good way to avoid having the artwork extend past the boundaries of the
current page.
When adjusting the printable area, you may find it easiest to choose View > Fit in
Window so you can see all of your artwork.
To adjust the printable area using the Page tool:
1 Select the Page tool . The pointer becomes a dotted cross when you move it to the
active window.
2 Drag the printable area to the new location. As you drag, the Page tool responds as if
you were moving the page from its lower left corner.
Note: You can move the printable area anywhere on the artboard; however, any part of a
page that extends past the printable area boundary is not printed.
Laying out artwork with precision
Measurement is an important aspect of laying out artwork. Illustrator provides a variety of
ways to measure the size and position of objects on the artboard. Rulers, guides, and the
grid help you align the elements in your artwork, and the Measure tool and Info palette
give you feedback on the exact position of objects. If desired, you can change the system
of measurement used for rulers and in dialog boxes.
Using Help | Contents | Index Back 67
Page 68

Adobe Illustrator CS Help Creating Artwork in Illustrator
Using Help | Contents | Index Back 68
Changing the unit of measurement
The default unit of measurement in Illustrator is points (a point equals .3528 millimeter).
You can change the unit of measurement to inches, millimeters, centimeters, picas (a pica
equals 12 points or 4.2333 millimeters), or pixels. This general unit of measurement is used
for rulers, measuring the distance between points, moving and transforming objects,
setting grid and guides spacing, and creating shapes.
For rules that apply when you enter unit values, see “En
boxes” on page 48.
Note: Illustrator provides separate options for changing stroke and type units. (See
Changing stroke attributes” on page 215 and “Changing the type units” on page 354.)
“
To set the unit of measurement for all documents:
1 Choose Edit > Preferences > Units & Display Performance (Windows) or Illustrator >
Preferences > Units & Display Performance (Mac OS).
2 From the General pop-up menu, choose the unit of measure you want to use, and click
OK.
To set the unit of measurement for only the current document:
1 Choose File > Document Setup. Choose Artboard from the pop-up menu at the top left
of the Document Setup dialog box.
2 From the Units pop-up menu, choose the unit of measure you want to use, and click OK.
You can quickly change the units of measure by right-clicking (Windows) or Control-
clicking (Mac OS) the ruler and choosing a new unit of measure from the menu that
appears.
tering values in palettes and dialog
Using rulers
Illustrator can display rulers, one along the top and one along the left side of the illustration window.
When you open a new file, the rulers are not visible, but you can display them at any time.
These rulers are a tool for accurately placing and measuring objects on the artboard. As
you scroll and zoom around the file, the rulers adjust accordingly.
To show or hide rulers:
Choose View > Show Rulers or View > Hide Rulers.
The point where 0 appears on each ruler is called the ruler origin. When you open a file, the
position of the ruler origin depends on the options in the Setup section of the Print dialog
box. Generally, the default ruler origin is located at the lower left corner of the artboard.
When you change the ruler setting, the new setting becomes the default for the file
whenever that file is opened. You can change the origin for the rulers at any time. For
example, you may be working on a 3-inch-by-5-inch card that is centered on an 8.5-inchby-11-inch page. Setting the ruler origin to line up with the 3-by-5-inch artwork rather
than the 8.5-by-11-inch page can make precision editing easier for you.
Note: Changing the ruler origin affects the tiling of patterns and the display of artwork in
the Print dialog box.
Using Help | Contents | Index Back 68
Page 69

Adobe Illustrator CS Help Creating Artwork in Illustrator
Using Help | Contents | Index Back 69
To change the ruler origin:
1 Move the pointer to the upper left corner of the rulers where the rulers intersect.
2 Do one of the following:
• Drag the pointer to where you want the new ruler origin. As you drag, a cross hair in the
window and in the rulers indicates the changing ruler origin.
• Double-click the upper left corner where the rulers intersect to restore the default
settings.
Using the grid
The grid appears as lines or dots behind your artwork, and it does not print. You use the
grid to lay out objects or elements symmetrically. Selected artwork and tools snap to the
grid if Snap To Grid is turned on.
You can choose between two grid styles—dots and lines—and you can change the color
of the grid by using either predefined grid colors or colors you select using a color picker.
You can also change the spacing between major gridlines and subdividing gridlines.
To show or hide the grid:
Choose View > Show Grid or View > Hide Grid.
To snap artwork to gridlines:
Choose View > Snap to Grid. A check mark indicates that snapping is turned on.
Note: When your document’s viewing mode is Pixel Preview, the Snap to Grid command in
the View menu changes to Snap to Pixel. For more information, see “
Working in pixel
preview mode” on page 393.
To change grid settings:
1 Choose Edit > Preferences > Guides & Grid (Windows) or Illustrator > Preferences >
Guides & Grid (Mac OS).
2 Set any of the following options, and click OK:
• Color to choose a color for the grid. If you choose Other, click the color box, choose a
color from the color picker, and click OK.
• Style to choose a display option for the gridlines.
• Gridline Every to enter a new value (and unit of measure if necessary) for the spacing of
primary gridlines.
• Subdivisions to enter a value to subdivide the grid.
• Grids in Back to display the grid behind all artwork; deselect the option to display the
grid in front of all artwork.
Using guides
To help align text and graphic objects on the page, you can create and display alignment
outlines called guides. Like grids, guides do not print. When dragging an object, the cursor
snaps to guides if Snap To Point is turned on. (See “
Using Help | Contents | Index Back 69
Snapping to a point” on page 71.)
Page 70

Adobe Illustrator CS Help Creating Artwork in Illustrator
Using Help | Contents | Index Back 70
You can create two kinds of guides:
• Ruler guides are straight horizontal or vertical lines created with the ruler. These guides
are the simplest to make and are useful for setting alignment lines across the length or
width of the work area.
• Guide objects are vector objects (such as lines, rectangles, or any other artwork
consisting of paths, except type) that are converted to guides. Using guide objects can
help you plan and create your artwork around one or more objects. You can convert
guide objects back into graphic objects at any time.
New guides are locked in place to orient your artwork. However, you can unlock a guide to
select, move, delete, or modify it, or revert it to a graphic object.
To create a ruler guide:
1 If the rulers are not already displayed, choose View > Show Rulers.
2 Position the pointer on the left ruler for a vertical guide or on the top ruler for a
horizontal guide. Press Alt (Windows) or Option (Mac OS) to switch the ruler guide from
horizontal to vertical, and vice versa.
3 Drag the ruler guide into position.
To make working with multiple guides easier, place all guides on a single layer. You can
then choose the layer to select all guides for moving or adjusting. (See “Organizing
objects using layers” on page 135.)
To convert an object into a guide object:
1 Select an object, a group of objects, or any combination of objects and groups.
2 Choose View > Guides > Make Guides.
To lock or unlock guides:
Choose View > Guides > Lock Guides. A check mark indicates that all guides are locked.
To move, delete, or release a guide:
1 Make sure that the guides are unlocked.
2 Select the guide you want to move, delete, or release, and do one of the following:
• Move the guide by dragging or copying.
• Delete the guide by pressing Backspace or Del (Windows) or Delete (Mac OS), or by
choosing Edit > Cut or Edit > Clear.
• Delete all guides at once by choosing View > Guides > Clear Guides.
• Release the guide, turning it back into a regular graphic object, by choosing View >
Guides > Release Guides.
To show or hide guides:
Choose View > Guides > Show Guides to show all guides or View > Guides > Hide Guides
to hide them.
To change guide settings:
1 Choose Edit > Preferences > Guides & Grid (Windows) or Illustrator > Preferences >
Guides & Grid (Mac OS).
Using Help | Contents | Index Back 70
Page 71

Adobe Illustrator CS Help Creating Artwork in Illustrator
Using Help | Contents | Index Back 71
2 Set either of the following options, and click OK:
• For Color, choose a color for the guides. If you choose Other, click the color box, choose
a color from the color picker, and click OK.
• For Style, choose a display option for the guides.
Snapping to a point
When dragging objects, the Snap to Point command helps you align your cursor with
anchor points and guides in the document window. Snapping occurs when the cursor is
within 2 pixels of the point or guide.
Important: Snapping alignment depends on the position of the cursor, not the edges of
the dragged object.
To snap to anchor points and guides:
1 Choose View > Snap to Point. A check mark indicates that snapping is turned on.
2 Select the object you want to move.
3 Position your cursor on the exact point you want to align with anchor points and
guides, and hold down the mouse button.
For example, if you want to align the corner point of a rectangle with a guide, click down
exactly on the corner point.
4 Drag the object to the desired location. When your cursor comes within 2 pixels of an
anchor point or guide, it snaps to the point.
The pointer changes from a filled arrowhead to a hollow arrowhead when a snap occurs.
Using Smart Guides
Smart Guides are temporary “snap to” guides that help you create, align, edit, and
transform objects relative to other objects. You can also use Smart Guides when rotating,
scaling, and shearing objects.
When Smart Guides are turned on and you move the cursor over your artwork, the cursor
looks for objects, page boundaries, and intersections of construction guides to snap to.
The direction, angle, tolerance, and appearance of Smart Guides are determined by
settings in the preferences file.
You can use Smart Guides in the following ways when you create, move, and transform
objects:
• When you create an object with the pen or shape tools, use the Smart Guides to
position a new object's anchor points relative to an existing object.
• When you move an object, use the Smart Guides to align your cursor to construction
guides and existing paths. The alignment is based on the position of the cursor, not the
edges of the object, so be sure to click to the exact point you want to align to.
• When the Transform Tools option is selected in Smart Guides Preferences and you
transform an object, Smart Guides automatically appear to assist the transformation.
Note: When Snap to Grid is turned on, you cannot use Smart Guides (even if the menu
command is selected).
Using Help | Contents | Index Back 71
Page 72

Adobe Illustrator CS Help Creating Artwork in Illustrator
Using Help | Contents | Index Back 72
To turn Smart Guides on or off:
To turn Smart Guides on or off, choose View > Smart Guides. A check mark appears next to
the command when Smart Guides are turned on.
To change Smart Guide preferences:
1 Choose Edit > Preferences > Smart Guides & Slices (Windows) or Illustrator > Prefer-
ences > Smart Guides & Slices (Mac OS).
2 Specify options for Smart Guides:
• Text Label Hints to display information about the position the cursor is currently
snapped to (such as center) as you manipulate the cursor.
• Construction Guides to see guidelines in the file as you use Smart Guides.
• Transform Tools to have Smart Guides help when you scale, rotate, and shear objects.
• Object Highlighting to highlight the object below the pointer as you drag around it.
3 Click a text box in the Angles section and set an angle at which you want guide lines
drawn from the anchor points of a nearby object (the preview reflects your settings). You
can set up to six angles. Do one of the following:
• Type an angle in the selected Angles text box.
• Choose a set of angles from the Angles pop-up menu.
• Choose a set of angles from the pop-up menu and change one of the values in the text
box to customize a set of angles.
4 Type a value in the Snapping Tolerance text box to specify the number of points the
pointer must be from another object for Smart Guides to take effect. Then click OK.
Measuring the distance between two points
The Measure tool calculates the distance between any two points in the work area. When
you measure from one point to another, the distance measured is displayed in the Info
palette. The Info palette shows the horizontal and vertical distances from the x and y axes,
the absolute horizontal and vertical distances, the total distances, and the angle
measured.
All measurements except the angle are calculated in the units of measure currently set for
the document. (See “
To measure the distance between two points:
1 Select the Measure tool .
2 Do one of the following:
• Click the two points to measure the distance between them.
• Click the first point and drag to the second point. Shift-drag to constrain the tool to
multiples of 45 degrees.
Changing the unit of measurement” on page 68.)
Using Help | Contents | Index Back 72
Page 73

Adobe Illustrator CS Help Creating Artwork in Illustrator
Using Help | Contents | Index Back 73
Using the Info palette
You use the Info palette to get information on the area beneath the pointer and on
selected objects. Depending on the tool you’re using, you can use the Info palette to
measure size, distance, and angle of rotation. In most cases when a tool is in use, the Info
palette displays the x and y coordinates of the pointer’s position in the artwork, using the
unit of measurement that has been specified in the Document Setup or Units & Display
Performance Preferences dialog box.
The Info palette also displays color information for the fill and stroke of selected objects,
and the names of patterns, gradients, or tints applied to the objects.
Displaying the Info palette Choose Window > Info.
Viewing the position and dimensions of objects When an object is selected and a
selection tool is active, the Info palette displays the object’s x and y coordinates, width (W),
and height (H).
The values for width and height are affected by the Use Preview Bounds option in the
General preferences. When Use Preview Bounds is selected, Illustrator includes the stroke
width (and other attributes such as drop shadows) in the object’s dimensions.When Use
Preview Bounds is deselected, Illustrator measures only the dimensions defined by the
object’s vector path.
Viewing changes in position When using the Pen tool or Gradient tool, or when moving
a selection, the Info palette displays the change in x (W), the change in y (H), the distance
(D), and the angle as you drag.
Viewing the magnification factor When using the Zoom tool, the Info palette displays
the magnification factor and the x and y coordinates after you release the mouse button.
Viewing changes in scale and rotation When using the Scale tool, the Info palette
displays the percentage change in width (W) and height (H) and the new width (W) and
height (H) after the scaling is complete.
When using the rotate or reflect tools, the Info palette displays the coordinates of the
object’s center and the angle of rotation or reflection .
Viewing shearing information When using the Shear tool, the Info palette displays the
coordinates of the object’s center, the angle of shear axis , and the amount of shear .
Viewing the brush name and position When using the Paintbrush tool, the Info palette
displays the x and y coordinates and the name of the current brush.
Viewing fill and stroke information Choose Show Options from the palette menu or
click the double arrow on the palette tab to show the following information:
• Values for the fill and stroke colors of the selected object.
• If the document color mode is RGB, hexadecimal values for the fill and stroke colors of
the selected object.
• The name of any pattern, gradient, or tint applied to the selected object.
Note: If you select multiple objects, the Info palette displays only the information that is
the same for all selected objects.
Using Help | Contents | Index Back 73
Page 74

Adobe Illustrator CS Help Creating Artwork in Illustrator
Using Help | Contents | Index Back 74
Importing artwork
You don’t have to create artwork from scratch in Illustrator—you can import both vector
drawings and bitmap images from files created in other applications. Illustrator recognizes
all common graphic file formats.
To view a list of the file formats you can import into Illustrator, choose File > Place and
click the Files of type pop-up menu (Windows) or the Show pop-up menu (Mac OS).
About importing artwork
You can import artwork into Illustrator using the Open, Place, or Paste commands, or by
dragging and dropping:
• The Open command opens artwork in a new Illustrator document. Vector artwork is
converted to Illustrator paths, which you can modify using any Illustrator tool. Bitmap
images can be modified using transformation tools, such as scale and rotate, liquify
tools, and image filters. For more information on using the Open command, see
“
Opening existing files” on page 64.
• The Place command places artwork in an existing Illustrator document in one of two
ways: by creating a link to an external file or by embedding a copy of the file in the Illustrator document. For more information on using the Place command, see “P
artwork” on page 74.
• The Paste command transfers artwork from the Clipboard to the current Illustrator
document. For more information, see “U
sing the Clipboard to copy artwork” on
page 144.
• Dragging and dropping transfers artwork directly from one document to another. For
more information, see “U
sing the drag-and-drop feature to copy artwork” on page 145.
lacing
Placing artwork
The Place command lets you import artwork into an Illustrator document in one of two
ways: by creating a link to an external file or by embedding a copy of the file in the Illustrator document. The option you choose depends on how you plan to edit the artwork:
• Linked artwork remains independent of the Illustrator document, resulting in a smaller
Illustrator file. You can modify linked artwork using transformation tools and effects;
however, you cannot select and edit individual components in the artwork. A
preference you set for updating links determines whether the artwork in the Illustrator
document changes when the linked file changes outside of Illustrator.
• Embedded artwork is copied into the Illustrator document, resulting in a larger Illus-
trator file. If the artwork contains multiple components, you can edit them discretely.
For example, if the artwork contains vector data, Illustrator converts it to paths, which
you can then modify using Illustrator tools and commands. Illustrator also preserves
the object hierarchy (such as groups and layers) in artwork embedded from certain file
formats.
The Links palette lets you identify, select, monitor, and update objects in the Illustrator
artwork that are linked to external files. (See “
on page 80.)
Note: If you’re working with managed files from an Adobe Version Cue project, see also
Working with Adobe Version Cue managed projects” on page 58.
“
Managing linked and embedded artwork”
Using Help | Contents | Index Back 74
Page 75

Adobe Illustrator CS Help Creating Artwork in Illustrator
Using Help | Contents | Index Back 75
To place artwork into an Illustrator document:
1 Open the Illustrator document into which you want to place the artwork.
2 Choose File > Place.
3 Locate and select the file you want to place. If you don’t see the name of the file you
want, the file has been saved in a format that Illustrator cannot read.
4 Do one of the following, and click Place:
• To create a link between the file and the Illustrator document, select the Link option.
• To embed the artwork in the Illustrator document, deselect the Link option.
• To create a template layer using the file, select Template. For more information on using
template layers, see “
• To replace an existing placed file, select Replace. (This option is only available if you
Tracing artwork” on page 113.
select the placed artwork before choosing File > Place.)
5 In certain situations, another dialog box may appear:
• If you place a PDF file with multiple pages, you can choose which page you want to
place and how to crop the artwork. (See “Imp
orting artwork from PDF files” on
page 75.)
• If you embed a Photoshop file, you can choose how to convert layers. (See “Importing
artwork from Photoshop” on page 78.)
• If you embed a color-managing file that doesn’t match the working space of the current
document, a warning appears. You must either convert the colors in the embedded
artwork to the current working space or cancel the operation. (See “
About color
management” on page 218.)
To place a color-managed file without converting its colors, select the Link option.
Importing artwork from PDF files
Adobe Portable Document Format (PDF) is a versatile file format that can represent both
vector and bitmap data. You can bring artwork from PDF files into Illustrator using the
Open command, the Place command, the Paste command, and the drag-and-drop feature.
The method you choose depends on how you want to edit the artwork:
• To import a PDF file into an Illustrator document as an image object, use the Place
command with the Link option selected. You can modify the linked image using transformation tools; however, you cannot select and edit its individual components. If the
PDF file contains multiple pages, you choose which page to import and how to crop
the artwork.
• To edit the contents of a PDF file, use the Open command or the Place command with
the Link option deselected. Illustrator recognizes the individual components in the PDF
artwork and lets you edit each component as a discrete object. If the PDF file contains
multiple pages, you choose the page from which you want to import artwork.
• To import selected components from a PDF file, including vector objects, bitmap
images, and text, use the Paste command or the drag-and-drop feature.
Using Help | Contents | Index Back 75
Page 76

Adobe Illustrator CS Help Creating Artwork in Illustrator
Using Help | Contents | Index Back 76
Note: If you are color-managing artwork in a document, embedded PDF images are part
of the document and therefore color-managed when sent to a printing device. In contrast,
linked PDF images are not color-managed, even if color management is turned on for the
rest of the document. (See “
About color management” on page 218.)
To import artwork from a multiple-page PDF file:
1 Do one of the following:
• Choose File > Open, select the PDF file, and click Open. (See “Opening existing files” on
page 64.)
• Choose File > Place, select the PDF file and placement options, and click Place. (See
“P
lacing artwork” on page 74.)
2 Select the page you want to import.
3 For placed artwork, select an option from the Crop To pop-up menu to specify how
much of the PDF page to place:
• Bounding Box to place the PDF page’s bounding box, or the minimum area that
encloses the objects on the page, including page marks.
• Art to place the PDF only in the area defined by a rectangle that the author created as
placeable artwork (for example, clip art).
• Crop to place the PDF only in the area that is displayed or printed by Adobe Acrobat.
• Trim to identify the place where the final produced page will be physically cut in the
production process, if trim marks are present.
• Bleed to place only the area that represents where all page content should be clipped, if
a bleed area is present. This information is useful if the page is being output in a
production environment. Note that the printed page may include page marks that fall
outside the bleed area.
• Media to place the area that represents the physical paper size of the original PDF
document (for example, the dimensions of an A4 sheet of paper), including page
marks.
4 Click OK.
Managing non-native art
When you import artwork from a PDF file, it’s possible to introduce data that you can’t
create within Illustrator. This is called non-native art and includes monotone, duotone, and
tritone images. You can also generate non-native art within Illustrator by attempting to
preserve spot colors when applying the Flatten Transparency command.
Illustrator’s ability to preserve non-native art is useful in many situations. For example,
Illustrator maintains the spot color information in linked PDF files when you output
color separations.
By default, non-native art is labeled <Non-Native Art> in the Layers and Appearance
palettes. You can select, move, save, and perform basic transformations (such as scaling,
rotating, or skewing) on non-native art. However, you cannot select and edit its individual
components. In addition, you must rasterize non-native art before editing it with the
liquify tools.
Using Help | Contents | Index Back 76
Page 77

Adobe Illustrator CS Help Creating Artwork in Illustrator
Using Help | Contents | Index Back 77
To convert non-native art to an Illustrator object:
1 Select the non-native art.
2 Choose Object > Rasterize. (See “
Changing vector graphics into bitmap images” on
page 319.)
Importing artwork from EPS files
Encapsulated PostScript (EPS) is a popular file format for transferring vector artwork
between applications. You can bring artwork from EPS files into Illustrator using the Open
command, the Place command, the Paste command, and the drag-and-drop feature.
Keep the following in mind when working with EPS artwork:
• When you open or embed an EPS file that was created in another application, Illustrator
converts all objects to native Illustrator objects. However, if the file contains data that
Illustrator doesn’t recognize, some loss of data may occur. As a result, unless you need
to edit the individual objects in an EPS file, it’s best to link to the file rather than open or
embed it.
• EPS format does not support transparency; therefore, it is not a good choice for placing
transparent artwork from other applications into Illustrator. Instead, use PDF 1.4 format
for this purpose.
• You may receive an error message when printing or saving artwork that includes linked
EPS files, if those files were saved in binary format (for example, in Photoshop's default
EPS format). In this case, resave the EPS files in ASCII format, embed the linked files into
the Illustrator artwork, print to a Binary print port instead of an ASCII print port, or save
the artwork in AI or PDF format instead of EPS format.
• If you are color-managing artwork in a document, embedded EPS images are part of
the document and therefore color-managed when sent to a printing device. In contrast,
linked EPS images are not color-managed, even if color management is turned on for
the rest of the document. (See “
• If you import an EPS color that has the same name as a color in your document but a
About color management” on page 218.)
different definition, Illustrator displays an alert. Select Use Linked File’s Color to replace
the color in your document with the EPS color in the linked file. All objects using this
color in your document will get updated appropriately. Select Use Document’s Color to
leave the swatch as is and resolve all color conflicts using the document’s color. The EPS
preview cannot be changed, so the preview may be incorrect, but it will print to the
correct plates. Selecting Apply to All will resolve all color conflicts, using the definition
either of the document or the linked file, depending on which option you choose.
• Occasionally you may encounter a warning when opening an Illustrator document
containing embedded EPS images. If the application cannot find the original EPS
image, you will be prompted to extract the EPS image. Select the Extract option in the
dialog box; the image will be extracted into the same directory as the current
document. Although the embedded file does not preview in the document, the file will
now print correctly.
• If a linked EPS file isn’t visible in the document window, it may be because the file’s
preview is missing. Previews are sometimes lost when transferring EPS files saved with
PICT previews from Mac OS to Windows. To restore the preview, resave the EPS file with
a TIFF preview. (See “
Saving artwork in EPS format” on page 433.)
Using Help | Contents | Index Back 77
Page 78

Adobe Illustrator CS Help Creating Artwork in Illustrator
Using Help | Contents | Index Back 78
Importing artwork from Photoshop
Illustrator supports most Photoshop data, including layers, editable text, and paths. This
means that you can transfer files between Photoshop and Illustrator without losing the
ability to edit the artwork. You can bring artwork from Photoshop (PSD) files into Illustrator
using the Open command, the Place command, the Paste command, and the drag-anddrop feature. The method you choose depends on how you want to use the artwork.
In cases where Illustrator must convert the Photoshop data, a warning message appears.
For example, when importing a 16-bit Photoshop file, Illustrator warns you that the image
will be imported as an 8-bit, flat composite. Likewise, Illustrator warns you that images
containing non-square pixels (such as those from video applications) will be scaled to a 1:1
ratio and imported as a flat composite.
Note: Spot colors imported from Photoshop appear gray on-screen and in composite
output. However, these colors will separate correctly. If Illustrator detects a swatch conflict
when importing spot colors, a warning message appears.
To import a Photoshop file as a single bitmap image:
1 Do one of the following:
• Choose File > Open, select the Photoshop file, and click Open. (See “Opening existing
files” on page 64.)
• Choose File > Place, select the Photoshop file, deselect the Link option, and click Place.
(See “P
lacing artwork” on page 74.)
2 If the Photoshop Import dialog box appears, select Flatten Photoshop layers to a single
image and preserve text appearance, and click OK.
The converted file retains no individual objects, except for the document clipping path (if
one exists). You can create a document clipping path in Photoshop using the Clipping
Path command in the Paths palette menu. For more information, see Photoshop Help.
Opacity is retained as part of the main image, but is not editable.
To import a Photoshop file with its layers intact:
1 Do one of the following:
• Choose File > Open, select the Photoshop file, and click Open.
• Choose File > Place, select the Photoshop file, deselect the Link option, and click Place.
(See “P
lacing artwork” on page 74.)
2 In the Photoshop Import dialog box, select Convert Photoshop layers to objects and
make text editable where possible.
3 If you want to import image maps or slices that are included in the Photoshop file,
select Import Image Maps or Import Slices.
4 Click OK.
Using Help | Contents | Index Back 78
Page 79

Adobe Illustrator CS Help Creating Artwork in Illustrator
Using Help | Contents | Index Back 79
Illustrator preserves as much layer structure as possible without sacrificing appearance.
However, if the file includes layer features that aren’t supported in Illustrator (including
clipping groups, adjustment layers, layer effects, and some blending modes), Illustrator
selectively merges and rasterizes them. For more information, see “
About importing layers
from Photoshop files” on page 80.
Layer mask in Photoshop (top) converts to opacity mask in Illustrator (bottom), preserving blending
mode and
transparency.
To move part of an image from Photoshop to Illustrator:
1 In Photoshop, select the pixels you want to move. For more information, see
Photoshop Help.
2 Do one of the following:
• Copy the selection in Photoshop and paste it in Illustrator. If a layer mask is active when
you choose the Copy command, Photoshop copies the mask rather than the main layer.
• Select the Move tool in Photoshop, and drag the selection to Illustrator. Illustrator fills
transparent pixels with white.
To move individual paths from Photoshop to Illustrator:
1 In Photoshop, use the Path Component Selection tool or the Direct Selection tool to
select the paths you want to move.
You can select any path or path segment that appears in the Paths palette, including
shape vector masks, work paths, and saved paths. For more information on selecting
paths, see Photoshop Help.
2 Either copy and paste or drag the path to Illustrator.
3 In the Paste Options dialog box, choose whether to paste the path as a compound
shape or a compound path.
Note: Pasting as a compound path is faster, but may result in some loss of editability.
To import all paths (but no pixels) from a Photoshop document:
1 In Photoshop, choose File > Export > Paths to Illustrator.
2 In Illustrator, open the resulting file.
Using Help | Contents | Index Back 79
Page 80

Adobe Illustrator CS Help Creating Artwork in Illustrator
Using Help | Contents | Index Back 80
About importing layers from Photoshop files
When you open or embed a Photoshop (PSD) file using the Convert Photoshop layers to
objects option, Illustrator preserves as much layer structure as possible. However, if the file
includes features that Illustrator doesn’t support, Illustrator preserves the appearance of
the artwork by merging and rasterizing layers.
Keep the following in mind when importing layers from a Photoshop file:
• All layers in clipping masks are merged into a single layer.
• Adjustment layers are merged with the underlying layers.
• Layers that use layer effects may be merged; however, the specific merging behavior
depends on the blending mode of the layer, the presence of transparent pixels, and the
layer’s blending options.
• Layers that contain transparent pixels and use the Color Dodge, Color Burn, or
Difference blending mode are merged with the underlying layers.
• Layers that use the Linear Burn, Linear Dodge, Vivid Light, Linear Light, or Pin Light
blending mode are merged with the underlying layers.
• Layers that use a Knockout option (either Shallow or Deep) are merged with the under-
lying layers.
• Layer sets that use the Dissolve blending mode are merged into a single layer.
• Hidden layers that require merging are discarded.
Managing linked and embedded artwork
When you import artwork using the Place command, Illustrator creates a link to an
external source file or embeds a copy of the file in the Illustrator document. The Links
palette lets you identify, select, monitor, and replace linked and embedded artwork. You
can use the Links palette to determine if the link to a source file is broken or missing, get
information about linked or embedded objects, and open a linked file in its original
application.
Specifying how to update and display linked files
The Update Links preference lets you control how Illustrator updates linked artwork when
the source files change. You can also control how Illustrator displays linked EPS files: at full
resolution with vectors in full color or at low resolution for increased performance.
To specify how to update linked files:
1 Choose Edit > Preferences > Files & Clipboard (Windows) or Illustrator > Preferences >
Files & Clipboard (Mac OS).
2 Choose an update method from the Update Links pop-up menu:
• Automatically to have Illustrator update linked artwork automatically when the source
files are modified.
• Manually to leave linked artwork unchanged when the source files are modified. You
can use the Links palette to identify and update linked artwork whose source files have
been modified. (See “U
• Ask When Modified to display a dialog box when the original files are modified. In the
pdating linked artwork” on page 83.)
dialog box, click Yes to update the linked artwork or click No to leave it unchanged.
Using Help | Contents | Index Back 80
Page 81

Adobe Illustrator CS Help Creating Artwork in Illustrator
Using Help | Contents | Index Back 81
To turn on high resolution display:
1 Choose Edit > Preferences > Files & Clipboard (Windows) or Illustrator > Preferences >
Files & Clipboard (Mac OS).
2 Deselect Use Low Resolution Proxy for Linked EPS.
Deselect Use Low Resolution Proxy to view linked EPS files that don’t include built-in
previews.
Displaying linked files when in Outline mode
When you view a document in Outline mode, linked files are normally displayed as
outlined boxes with two diagonal lines. The Show Images in Outline option lets you view
the contents of linked files instead.
To display linked artwork when in Outline mode:
1 Choose File > Document Setup. Then choose Artboard from the pop-up menu at the
top left of the Document Setup dialog box.
2 Select Show Images in Outline, and then click OK.
Note: When you view a document in Preview mode, linked files are always displayed,
regardless of the Show Images in Outline option. The only exceptions are EPS files without
previews and linked files that cannot be found.
Using the Links palette
You use the Links palette to see and manage all linked or embedded artwork in an Illustrator document. By default, the palette displays a small thumbnail of the artwork and
uses icons to indicate artwork’s status. You can hide or change the size of the thumbnails,
show or hide different types of links, and sort items based on name, kind, or status.
A
B
C
D
E
Links palette
A. Transparency interaction B. Linked artwork C. Missing artwork D. Embedded artwork E.
Modified artwork
Note: If you’re working with managed files from an Adobe Version Cue project, the Links
palette displays additional file information. For more information, see “
Working with
Adobe Version Cue managed projects” on page 58.
Displaying the Links palette Choose Window > Links.
Using the Links palette menu Click the triangle in the upper right corner of the palette.
Using Help | Contents | Index Back 81
Page 82

Adobe Illustrator CS Help Creating Artwork in Illustrator
Using Help | Contents | Index Back 82
Selecting links Click a link to select it. To select multiple links, Shift-click to select a range
of adjacent links, or Ctrl-click (Windows) or Command-click (Mac OS) to select
nonadjacent links.
Displaying links according to type Choose one of the following from the Links palette
menu:
• Show All to display all links in the file.
• Show Missing to display only links with missing or broken connections with the original
file.
• Show Modified to display only links that have been changed after the last time the link
was updated.
• Show Embedded to display only links for embedded artwork.
Sorting links Choose one of the following from the Links palette menu:
• Sort by Name to alphabetize the links display.
• Sort by Kind to sort the display according to the type of file (for example, all JPEG files,
all GIF files, all EPS files, and so on).
• Sort by Status to sort the display according to the linked or embedded status.
Embedded artwork is listed first, followed by linked artwork.
Changing the display of thumbnails Choose Palette Options from the Links palette
menu, and select an option for displaying thumbnails.
Identifying files that interact with transparency Linked DCS files that overlap with
transparent objects may fail to print correctly. To identify such files, choose Palette Options
from the Links palette menu, and select Show Transparency Interactions. When this option
is selected, the Links palette displays an icon next to DCS files that interact with transparent objects.
Note: Selecting the Show Transparency Interactions option may slow performance.
Displaying link information
You can view information about any link that appears in the Links palette, including its
name, location, format, and transform settings.
Note: If you’re working with managed files from an Adobe Version Cue project, the Links
palette displays additional file information. For more information, see “
Adobe Version Cue managed projects” on page 58.
To view information about a link:
Do one of the following in the Links palette:
• Double-click a link.
• Select a link, and choose Information from the Links palette menu.
Working with
Locating linked and embedded artwork
The Links palette makes it easy to locate linked and embedded artwork in your document.
When you use the Go to Link button or the Go to Link command, Illustrator adjusts the
position of the document so that the selected artwork is at the center of the document
window.
Using Help | Contents | Index Back 82
Page 83

Adobe Illustrator CS Help Creating Artwork in Illustrator
Using Help | Contents | Index Back 83
To locate linked or embedded artwork in the document window:
1 Select a link in the Links palette.
2 Choose one of the following:
• Click the Go to Link button at the bottom of the palette.
• Choose Go to Link from the Links palette menu.
Updating linked artwork
Linked artwork whose source files have been modified since the artwork was placed (and
which have not been updated) are identified with an exclamation point icon in the Links
palette. You can manually update links using the Update Link button or the Update Link
command.
To update linked artwork:
1 Select one or more links in the Links palette that display the exclamation point icon .
2 Choose one of the following to refresh the links with the most current version of the
source file:
• Click the Update Link button at the bottom of the palette.
• Choose Update Link from the Links palette menu.
You can set a preference to automatically update links. See “
Specifying how to update
and display linked files” on page 80.
Embedding linked artwork
You can use the Links palette to quickly convert linked artwork into embedded artwork
using the Embed Image command.
To embed linked artwork:
1 Select the linked artwork in the Links palette.
2 Choose Embed Image from the Links palette menu.
Replacing linked and embedded artwork
Linked artwork whose source files are missing are identified with a stop sign icon . You
can reconnect to a missing file or replace any linked or embedded artwork with another
file using the Relink button or the Relink command.
By default, the new artwork adopts the size, placement, and transformation status of the
original artwork. However, you can change the placement options for any linked artwork.
For example, you can specify that the new artwork resets the original artwork’s bounding
box so that the new artwork’s shape and alignment are not altered.
To relink artwork:
1 Select a link in the Links palette.
2 Choose one of the following:
• Click the Relink button at the bottom of the palette.
• Choose Relink from the Links palette menu.
Using Help | Contents | Index Back 83
Page 84

Adobe Illustrator CS Help Creating Artwork in Illustrator
Using Help | Contents | Index Back 84
3 Select the file to replace the linked artwork in the Place dialog box, and click OK. The
new artwork retains the size, placement, and transformation characteristics of the artwork
that it replaced.
To change the placement of linked artwork:
1 Select the linked artwork in the Links palette.
2 Choose Placement Options from the Links palette menu.
3 Choose one of the following from the Preserve pop-up menu:
• Transforms to resize the bounding box for the new artwork upon placement while
preserving transformations.
• Proportions (Fit) to uniformly scale the artwork to fit in the bounding box. This option
preserves the aspect ratio of the artwork, filling the bounding box in one direction, but
possibly not the other.
• Proportions (Fill) to uniformly scale the artwork to fill the bounding box. This option
preserves the aspect ratio and may cause the artwork to overlap the bounding box in
one direction.
• File Dimensions to place the artwork without scaling. The artwork may fit within the
bounding box or overlap it.
• Bounds to resize the artwork to fit in the bounding box; in most cases the artwork will
be stretched.
4 Select a point on the Alignment icon from which you want to align the artwork, relative
to the bounding box.
5 If you want to keep the artwork from overlapping the bounding box, select Clip to
Bounding Box. This option is not applicable for all methods.
Editing artwork contained in linked files
When you make changes to a source file, the changes are applied to the linked artwork
when the link is updated in Illustrator. (See “
files” on page 80.)
To edit linked artwork's source file:
Select the linked artwork, and do one of the following:
• Choose Edit > Edit Original.
• Click the Edit Original button at the bottom of the Links palette.
• Choose Edit Original from the Links palette menu.
Specifying how to update and display linked
Using Help | Contents | Index Back 84
Page 85

Adobe Illustrator CS Help Basic Drawing
Using Help | Contents | Index Back 85
Basic Drawing
About drawing
Drawing is what Adobe Illustrator is all about. So it’s worth spending a few moments
getting introduced to how and what you can draw.
AB
CD
Creating drawn artwork
A. Drawing objects B. Adjusting their paths
C. Combining objects into a single complex object
D. Applying attributes to combined object
Not surprisingly, you use Illustrator’s drawing tools to draw objects. For instance, you use
the Rectangle tool to draw squares, the Pencil tool to sketch freehand lines, and the Pen
tool to create very accurate, custom shapes.
Using Help | Contents | Index Back 85
Page 86

Adobe Illustrator CS Help Basic Drawing
Using Help | Contents | Index Back 86
As you draw, the resulting line is called a path. Paths can take any shape, ranging from a
simple straight line to a geometric shape such as a star to a series of smooth curves and
sharp corners that create the outline of a flower.
ABC
Drawing objects
A. Straight line B. Geometric shape C. More complex path
Once you’ve drawn an object, you can reshape it by adjusting its path with a variety of
tools and commands. For instance, you might use the Erase tool to erase part of a path you
drew, or the Simplify command to reshape it.
AB C
Adjusting paths
A. Original path B. After being reshaped with the
Simplify command C. After being partially erased
with the Erase tool
You can even combine drawn objects to create a more complex object. As a simple
example, you can place one circle on top of another and then use the Subtract From
Shape Area option in the Pathfinder palette to make the top circle cut a hole in the bottom
circle, creating a crescent moon shape.
ABC
Combining objects into more complex objects
A. Two circles B. Circles moved to overlap each other
C. Subtract from Shape Area option applied
Using Help | Contents | Index Back 86
Page 87

Adobe Illustrator CS Help Basic Drawing
Using Help | Contents | Index Back 87
You can also apply appearance attributes to objects you’ve drawn. For instance, you might
paint the outline of an object (called its stroke) with a color from one of the swatches in
the Swatches palette or apply a color you created with the Color palette. Then you might
paint the inside of the object (called its fill) with a pattern from the Pattern palette or a
gradient from the Gradients palette.
AB C
Applying attributes
A. Object with default black stroke B. Object with
colored strokes at different widths applied
C. Object with a gradient fill added
These are just some simple instances of the many things you can do with the basic
drawing tools. As you progress, you can learn about additional tools and techniques
available in Illustrator.
Drawing simple lines and shapes
Illustrator provides two groups of tools for creating simple lines and geometric shapes.
The first group includes the Line Segment tool, Arc tool, Spiral tool, Rectangular Grid tool,
and Polar Grid tool. The second group includes the Rectangle tool, Rounded Rectangle
tool, Ellipse tool, Polygon tool, and Star tool. These tools
are easy to use and help you draw basic
objects quickly.
Keep in mind that even simple lines and shapes are defined as paths. This means that once
you create a simple line or shape, you can modify it by adjusting the path’s points and
segments. (See “
Drawing straight lines
The Line Segment tool creates individual straight lines called line segments. There are two
ways to draw with the Line Segment tool: you can drag to draw the line directly on the
artboard or click to specify properties in a dialog box.
Note: You can also use the Pen tool to draw straight lines. For more information, see
“
Drawing straight segments with the Pen tool” on page 99.
Adjusting paths” on page 104.)
To draw a straight line by dragging:
1 Select the Line Segment tool .
2 Position the pointer where you want the line to begin, and drag to where you want the
line to end.
Using Help | Contents | Index Back 87
Page 88

Adobe Illustrator CS Help Basic Drawing
Using Help | Contents | Index Back 88
You can press any of the following to get specific results as you drag:
• Alt (Windows) or Option (Mac OS) to extend the line from both sides of the reference
point.
• The spacebar to switch from drawing to moving the line.
• ` (grave accent) to create additional line segments as you move the mouse, all
emanating from the same reference point.
• Shift to constrain a single line to 45°.
To add arrowheads to a line, use the Add Arrowheads effect. (See “
Adding arrowheads
to lines” on page 284.)
To draw a straight line by specifying properties:
1 Select the Line Segment tool , and click where you want to start the line segment.
2 Set any of the following options in the dialog box, and click OK:
• Length to specify the total length of the line.
• Angle to specify the angle from the reference point of the line.
• Fill Line to specify whether to fill the line with the current fill color.
Drawing rectangles and ellipses
Illustrator provides a Rectangle tool, a Rounded Rectangle tool, and an Ellipse tool that let
you quickly create rectangles (including squares) and ellipses (including circles).
When you create an object with these tools, a center point appears in the object. You can
use this point to drag the object or to align the object with other elements in your
artwork. The center point can be made visible or invisible, but it cannot be deleted.
To create a rectangle or ellipse by dragging from an edge:
1 Select the Rectangle tool , the Rounded Rectangle tool , or the Ellipse tool .
2 Position the pointer at one corner or edge of the shape you want to create, and drag
diagonally until the shape is the desired size.
You can press any of the following to get specific results as you drag:
• Shift to constrain the tool to multiples of 45°, creating squares with the rectangle tools
and circles with the Ellipse tool.
• The spacebar to move a rectangle or ellipse as you draw it.
• Alt (Windows) or Option (Mac OS) to draw from the center outward.
To adjust corners of a rounded rectangle as you draw:
1 Select the Rounded Rectangle tool.
2 Position the pointer where you want the rectangle to begin, and start dragging diago-
nally until the rectangle is the size you want.
You can press any of the following to get specific results as you drag:
• The Up Arrow key or Down Arrow key to change the corner radius. When the corners
are the desired roundness, release the key.
• The Left Arrow key to change to the minimum radius (most angular corners).
• The Right Arrow key to change to the maximum radius (most rounded corners).
Using Help | Contents | Index Back 88
Page 89

Adobe Illustrator CS Help Basic Drawing
Using Help | Contents | Index Back 89
To draw a rectangle or ellipse by specifying dimensions:
1 Select a Rectangle tool or the Ellipse tool.
2 Do one of the following:
• Click where you want the top left corner of the object to be.
• Alt-click (Windows) or Option-click (Mac OS) where you want the center of the object to
be.
Note: By default, the Rectangle and Ellipse dialog boxes display the dimensions of the last
rectangle or ellipse you drew. The unit of measure is determined by the setting in the
Document Setup or Units & Display Preferences dialog box.
3 Set any of the following options in the dialog box, and click OK:
• Width to specify how wide you want the shape to be.
• Height to specify how tall you want the shape to be.
To create a square or circle, enter a value in the Width text box and then click the word
Height; this copies the width value to the Height text box.
• Corner Radius (rounded rectangle only) to specify the corner radius value you want the
rectangle to have. The corner radius value represents the radius of a hypothetical circle
drawn in the corner of the rectangle or square. The default corner radius is 12 points. A
corner radius of 0 creates square corners.
Note: The corner style of the rectangle or square you draw is determined by the corner
radius value you specify in either the Rectangle dialog box or the Corner Radius option in
the General Preferences dialog box. Specifying a corner radius value in either dialog box
updates the value in the other dialog box.
To display or hide the center points:
1 Choose Window > Attributes.
2 In the Attributes palette, click either the Show Center button or the Don’t Show
Center button .
Drawing polygons
The Polygon tool creates an object with a specified number of sides of equal length, each
side being the same distance from the center of the object. There are two ways to draw
with the Polygon tool: you can drag to draw the polygon directly on the artboard or click
to specify properties in a dialog box.
When you create an object with the Polygon tool, a center point appears in the object. You
can use this point to drag the object or to align the object with other elements in your
artwork. The center point can be made visible or invisible, but it cannot be deleted.
To draw a polygon by dragging:
1 Select the Polygon tool .
2 Position the pointer at the center of the polygon you want to create, and drag until the
polygon is the desired size.
You can press any of the following to get specific results as you drag:
• Shift to constrain the tool to multiples of 45° or to the angle specified in the Constrain
Angle text box in the General Preferences dialog box.
Using Help | Contents | Index Back 89
Page 90

Adobe Illustrator CS Help Basic Drawing
Using Help | Contents | Index Back 90
• The spacebar to move the polygon.
• The Up Arrow key or Down Arrow key to add or delete sides to the polygon.
• Drag the pointer in an arc to rotate the polygon.
To draw a polygon by specifying dimensions:
1 Select the Polygon tool.
2 Click where you want the center of the polygon to be.
3 Set either or both of the following options in the dialog box, and click OK:
• Radius to specify the distance from the center point to each line’s endpoint.
• Sides to specify the number of sides in the polygon.
Note: By default, the Polygon dialog box displays the dimensions of the last polygon you
drew. The unit of measure is determined by the setting in the Document Setup or Units &
Display Performance Preferences dialog box.
To display or hide the center points:
1 Choose Window > Attributes.
2 In the Attributes palette, click either the Show Center button or the Don’t Show
Center button .
Drawing stars
The Star tool creates a star-shaped object with a given size and number of points. There
are two ways to draw with the Star tool: you can drag to draw the star directly on the
artboard or click to specify properties in a dialog box.
When you create an object with the Star tool, a center point appears in the object. You can
use this point to drag the object or to align the object with other elements in your
artwork. The center point can be made visible or invisible, but it cannot
be deleted.
To draw a star by dragging:
1 Select the Star tool .
2 Position the pointer at the center of the star you want to create, and drag until the star
is the desired size.
You can press any of the following to get specific results as you drag:
• Shift to constrain the tool to multiples of 45°.
• Ctrl (Windows) or Command (Mac OS) to hold the inner radius constant.
• Alt (Windows) or Option (Mac OS) to keep the sides of the star straight.
• The spacebar to move the star.
• The Up Arrow key or Down Arrow key to add or delete sides to the star.
• Drag the pointer in an arc to rotate the star.
To draw a star by specifying dimensions:
1 Select the Star tool.
2 Click where you want the center of the star to be.
Using Help | Contents | Index Back 90
Page 91

Adobe Illustrator CS Help Basic Drawing
Using Help | Contents | Index Back 91
3 Set any of the following options in the dialog box, and click OK:
• Radius 1 to specify the distance from the center to the innermost points.
• Radius 2 to specify the distance from the center to the outermost points.
• Points to specify how many points the star has.
Note: By default, the Star dialog box displays the dimensions of the last star you drew. The
unit of measure is determined by the unit of measure set in the Document Setup or Units &
Display Performance Preferences dialog box.
To display or hide the center points:
1 Choose Window > Attributes.
2 In the Attributes palette, click either the Show Center button or the Don’t Show
Center button .
Drawing arcs
The Arc tool creates a curved line segment or a closed, wedge-like shape. There are two
ways to draw with the Arc tool: you can drag to draw the arc directly on the artboard or
click to specify properties in a dialog box.
To draw an arc segment by dragging:
1 Select the Arc tool .
2 Click where you want the arc to begin, and drag to create an arc.
You can press any of the following to get specific results as you drag:
• Alt (Windows) or Option (Mac OS) to extend the arc from both sides of the reference
point.
• The spacebar to move the arc as you draw.
• ` (grave accent) to create multiple arc segments as you move the mouse.
• C to switch between an open and closed arc.
• F to flip the arc, keeping the reference point constant.
• The Up Arrow key or Down Arrow key to increase or decrease the arc’s angle.
To draw an arc segment by specifying properties:
1 Select the Arc tool.
2 Click where you want to place the segment.
3 Set any of the following options in the dialog box, and click OK:
• Click a square on the reference point locator ( ) to determine the point from which the
arc is drawn.
• Length X-Axis to specify the length of the arc’s x axis.
• Length Y-Axis to specify the length of the arc’s y axis.
• Type to specify whether you want the object to be an open path or a closed path.
• Base Along to specify the direction of the arc. Choose X Axis or Y Axis depending on
whether you want to draw the base of the arc along the horizontal (x) axis or vertical (y)
axis.
Using Help | Contents | Index Back 91
Page 92

Adobe Illustrator CS Help Basic Drawing
Using Help | Contents | Index Back 92
• Slope to specify the direction of the arc’s slope. Enter a negative value for a concave
(inward) slope. Enter a positive value for a convex (outward) slope. A slope of 0 creates a
straight line.
• Fill Arc to fill the arc with the current fill color.
Note: By default, the Arc Tool Options dialog box displays the dimensions of the last arc
you drew. The unit of measure is determined by the unit of measure set in the Document
Setup or Units & Display Performance Preferences dialog box.
To display or hide the center points:
1 Choose Window > Attributes.
2 In the Attributes palette, click either the Show Center button or the Don’t Show
Center button .
Drawing spirals
The Spiral tool creates a spiral-shaped object of a given radius and number of winds; that
is, the number of turns that the spiral completes from start to finish. There are two ways to
draw with the Spiral tool: you can drag to draw the spiral directly on the artboard or click
to specify properties in a dialog box.
To draw a spiral by dragging:
1 Select the Spiral tool .
2 Position the pointer at the center of the spiral you want to create, and drag until the
spiral is the desired size.
You can press any of the following to get specific results as you drag:
• Shift to constrain the tool to multiples of 45° or to the angle specified in the Constrain
Angle text box in the General Preferences dialog box.
• The spacebar to move the spiral.
• The Up Arrow key or Down Arrow key to add or delete winds.
• Alt-drag (Windows) or Option-drag (Mac) to add or subtract winds while increasing the
length of the spiral.
• Control-drag (Windows) or Command-drag (Mac) to change the decay.
• Drag the pointer in an arc to rotate the spiral.
To draw a spiral by specifying dimensions:
1 Select the Spiral tool.
2 Click where you want the center of the spiral to be.
3 Set any of the following options in the dialog box, and click OK:
• Radius to specify the distance from the center to the outermost point in the spiral.
• Decay to specify the amount by which each wind of the spiral should decrease relative
to the previous wind.
• Segments to specify how many segments the spiral has. Each full wind of the spiral
consists of four segments.
Using Help | Contents | Index Back 92
Page 93

Adobe Illustrator CS Help Basic Drawing
Using Help | Contents | Index Back 93
• Style to specify the direction of the spiral.
Note: By default, the Spiral dialog box displays the dimensions of the last spiral you drew.
The unit of measure is determined by the unit of measure set in the Document Setup or
Units & Display Performance Preferences dialog box.
To display or hide the center points:
1 Choose Window > Attributes.
2 In the Attributes palette, click either the Show Center button or the Don’t Show
Center button .
Drawing grids
Use the Grid tools to quickly draw rectangular or polar grids. The Rectangular Grid tool
creates rectangular grids of a specified size with a specified number of dividers. The Polar
Grid tool creates concentric circles of a specified size and a specified number of dividers.
Specify the grid size and the number of dividers, and then drag to create the grid
anywhere on the artboard.
To draw a rectangular grid by dragging:
Select the Rectangular Grid tool , and drag diagonally.
You can press any of the following to get specific results as you drag:
• Shift to constrain the grid to a square.
• Alt (Windows) or Option (Mac OS) to extend the grid from all sides of the reference
point.
• Shift+Alt (Windows) or Shift+Option (Mac OS) to constrain the grid to a square as it
extends from the reference point.
• The spacebar to move the grid as you draw.
• The Up Arrow key or Down Arrow key to add or remove horizontal lines.
• The Right Arrow key or Left Arrow key to add or remove vertical lines.
• F to decrease the logarithmic skew value for the horizontal dividers by 10%.
• V to increase the logarithmic skew value for the horizontal dividers by 10%.
• X to decrease the logarithmic skew value for the vertical dividers by 10%.
• C to increase the logarithmic skew value for the vertical dividers by 10%.
To draw a rectangular grid by specifying properties:
1 Select the Rectangular Grid tool .
2 Click in the artboard to set the grid’s reference point and display the Rectangular Grid
Tool Options dialog box.
3 Set any of the following options in the dialog box, and click OK:
• Click a square on the reference point locator ( ) to determine the point from which the
grid is drawn.
• Width to specify the width of the entire grid.
• Height to specify the height of the entire grid.
Using Help | Contents | Index Back 93
Page 94

Adobe Illustrator CS Help Basic Drawing
Using Help | Contents | Index Back 94
• Number (Horizontal Dividers) to specify the number of horizontal dividers you want to
appear between the top and bottom of the grid. Then enter a Skew value to determine
how the horizontal dividers are weighted to the left or right side.
• Number (Vertical Dividers) to specify the number of dividers you want to appear
between the left and right sides of the grid. Then enter a Skew value to determine how
the vertical dividers are weighted toward the top or bottom of the grid.
• Use Outside Rectangle As Frame to replace the top, bottom, left, and right segments
with a separate rectangular object.
• Fill Grid to fill the grid with the current fill color (otherwise, the fill is set to none).
To draw a polar grid by dragging:
1 Select the Polar Grid tool .
2 Drag diagonally.
You can press any of the following to get specific results as you drag:
• Shift to constrain the grid to a circle.
• Alt (Windows) or Option (Mac OS) to extend the grid from all sides of the reference
point.
• Shift+Alt (Windows) or Shift+Option (Mac OS) to constrain it to a circle as it extends
from the reference point.
• The spacebar to move the grid as you draw.
• The Up Arrow key or Down Arrow key to add or remove concentric circles.
• The Right Arrow key or Left Arrow key to add or remove radial lines.
• X to change the logarithmic skew value for the concentric dividers inward by 10%.
• C to change the logarithmic skew value for the concentric dividers outward by 10%.
• F to change the logarithmic skew value for the radial dividers counterclockwise by 10%.
• V to change the logarithmic skew value for the radial dividers clockwise by 10%.
To draw a polar grid by specifying properties:
1 Select the Polar Grid tool ,.
2 Click in the artboard to set the grid’s reference point and display the Polar Grid Tool
Options dialog box.
3 Set any of the following options in the dialog box, and click OK:
• Width to specify how wide the polar grid should be.
• Height to specify how tall the polar grid should be.
• Click a square on the reference point locator ( ) to determine the point from which the
grid is drawn.
• Number (Concentric Dividers) to specify the number of circular concentric dividers you
want to appear in the grid. Then enter a Skew value to determine how the concentric
dividers are weighted toward the inside or outside of the grid.
• Number (Radial Dividers) to specify the number of radial dividers you want to appear
between the center and the circumference of the grid. Then enter a Skew value to
Using Help | Contents | Index Back 94
Page 95

Adobe Illustrator CS Help Basic Drawing
Using Help | Contents | Index Back 95
determine how the radial dividers are weighted counterclockwise or clockwise on the
grid.
• Create Compound Path From Ellipses to convert the concentric circles into separate
compound paths and fill every other circle.
• Fill Grid to fill the grid with the current fill color (otherwise, the fill is set to none).
To display or hide the center points:
1 Choose Window > Attributes.
2 In the Attributes palette, click either the Show Center button or the Don’t Show
Center button .
Drawing paths
A path is made up of one or more straight or curved segments. The beginning and end of
each segment is marked by anchor points, which work like pins holding a wire in place. You
change the shape of a path by editing its anchor points. You can control curves by
dragging the direction points at the end of direction lines that appear at anchor points.
A path is either open, like an arc, or closed, like a circle. For an open path, the starting and
ending anchor points for the path are called endpoints.
A
B
C
Components of a path
A. Selected (solid) endpoint B. Selected anchor point
C. Curved path segment D. Direction line E. Direction point
E
D
Paths can have two kinds of anchor points—corner points and smooth points. At a corner
point, a path abruptly changes direction. At a smooth point, path segments are connected
as a continuous curve. You can draw a path using any combination of corner and smooth
points. If you draw the wrong kind of point, you can always change it.
A B C
Points on a path
A. Four corner points B. Four smooth points
C. Combination of corner and smooth points
Using Help | Contents | Index Back 95
Page 96

Adobe Illustrator CS Help Basic Drawing
Using Help | Contents | Index Back 96
A corner point can connect any two straight or curved segments, while a smooth point
always connects two curved segments.
A corner point can connect both straight segments and curved segments.
Drawing freeform paths with the Pencil tool
The Pencil tool lets you draw open and closed paths as if you were drawing with a pencil
on paper. It is most useful for fast sketching or creating a hand-drawn look. Once you draw
a path, you can immediately change it if needed.
Anchor points are set down as you draw with the Pencil tool; you do not determine where
they are positioned. However, you can adjust them once the path is complete. The number
of anchor points set down is determined by the length and complexity of the path and by
tolerance settings in the Pencil Tool Preferences dialog box. These settings control how
sensitive the Pencil tool is to the movement of your mouse or graphics-tablet stylus.
To draw a freeform path with the Pencil tool:
1 Select the Pencil tool .
2 Position the tool where you want the path to begin, and drag to draw a path. The Pencil
tool displays a small x to indicate drawing a freeform path.
As you drag, a dotted line follows the pointer. Anchor points appear at both ends of the
path and at various points along it. The path takes on the current paint attributes, and the
path remains selected by default.
3 To continue the existing freeform path, make sure the path is selected, and then
position the pencil tip on an endpoint of the path and drag. (You can tell you’re close
enough to the endpoint when the small x disappears.)
To draw a closed path with the Pencil tool:
1 Select the Pencil tool.
2 Position the tool where you want the path to begin, and start dragging to draw a path.
3 After you’ve begun dragging, hold down Alt (Windows) or Option (Mac OS). The Pencil
tool displays a small o to indicate you’re creating a closed path.
4 When the path is the size and shape you want, release the mouse button (but not the
Alt or Option key). After the path closes, release the Alt or Option key.
To connect a new path to an existing path:
1 Select both paths.
2 Select the Pencil tool.
Using Help | Contents | Index Back 96
Page 97

Adobe Illustrator CS Help Basic Drawing
Using Help | Contents | Index Back 97
3 Position the tool where you want to begin from one path, and start dragging toward
the other path.
4 After you’ve begun dragging, hold down Ctrl (Windows) or Option (Mac OS). The Pencil
tool displays a small icon of an anchor point to indicate you’re adding to the existing
path.
5 Drag onto the endpoint of the other path, release the mouse button, then release the
Ctrl or Option key.
Note: For best results, drag from one path to the other as if you were simply continuing the
paths in the direction they were created.
To add a new path to an existing path:
1 Select the existing path.
2 Select the Pencil tool.
3 Position the tool where you want the path to begin, and start dragging to draw a path.
4 After you’ve begun dragging, hold down Ctrl (Windows) or Option (Mac OS). The Pencil
tool displays a small icon of an anchor point to indicate you’re adding to the existing
path.
5 Drag onto the existing path, release the mouse button, then release the Ctrl or
Option key.
To change a path with the Pencil tool:
1 Select the path you want to change. (See “
Selecting objects” on page 116.)
2 Position the Pencil tool on or near the path to redraw. (You can tell you’re close enough
to the path when the small x disappears from the tool.)
3 Drag the tool until the path is the desired shape.
Using the Pencil tool to edit a closed shape
Note: Depending on where you begin to redraw the path and in which direction you drag,
you may get unexpected results. For example, you may unintentionally change a closed
path to an open path, change an open path to a closed path, or lose a portion of a shape.
To set preferences for the Pencil tool:
1 Double-click the Pencil tool .
2 Set any of the following options, and click OK:
• Fidelity to control how far you have to move your mouse or stylus before Illustrator
adds a new anchor point to the path. For example, a Fidelity value of 2.5 means that
Using Help | Contents | Index Back 97
Page 98

Adobe Illustrator CS Help Basic Drawing
Using Help | Contents | Index Back 98
tool movements of less than 2.5 pixels aren’t registered. Fidelity can range from 0.5 to
20 pixels; the higher the value, the smoother and less complex the path.
• Smoothness to control the amount of smoothing that Illustrator applies when you use
the tool. Smoothness can range from 0% to 100%; the higher the value, the smoother
the path.
• Keep Selected to determine whether or not Illustrator keeps the path selected after you
draw it.
• Edit Selected Paths to determine whether or not you can change an existing path with
the Pencil tool.
• Within: _ pixels to determine how close your mouse or stylus must be to an existing
path in order to edit the path with the Pencil tool. This option is only available when the
Edit Selected Paths option is selected.
Drawing precise paths with the Pen tool
Use the Pen tool to draw a path that you can’t draw using the simpler drawing tools. The
Pen tool lets you create straight lines and smooth, flowing curves with great precision.
You may occasionally add a stray anchor point that has no path with the Pen tool. You
can find such anchor points by choosing Select > Object > Stray Points. You can then
delete them by choosing the Edit > Cut or Edit > Clear commands, or by pressing Delete or
Backspace on the keyboard.
About direction lines and direction points
Before you draw and modify curved segments with the Pen tool, it’s important to understand two elements that are associated with anchor points on curves. When you use the
Direct Selection tool or Lasso tool to select an anchor point connecting curved segments,
the segments display direction lines, which end in direction points. The angle and length of
the direction lines determine the shape and size of the curved segments. Moving the
direction points reshapes the curves. Direction lines don’t print.
For information about selecting anchor points, see “
points” on page 104.
Selecting path segments or anchor
After selecting an anchor point (left), direction lines appear
on any curved segments connected by the anchor point (right).
A smooth point always has two direction lines that move together as a single, straight unit.
When you drag the direction point of either direction line on a smooth point, both
direction lines move simultaneously, maintaining a continuous curve at that anchor point.
Using Help | Contents | Index Back 98
Page 99

Adobe Illustrator CS Help Basic Drawing
Using Help | Contents | Index Back 99
In comparison, a corner point can have two, one, or no direction lines, depending on
whether it joins two, one, or no curved segments, respectively. Corner point direction lines
maintain the corner by using different angles. When you drag a direction point on a corner
point’s direction line, the other direction line, if present, does not move.
Adjusting direction lines on a smooth point (left) and a corner point (right)
Direction lines are always tangent to (perpendicular to the radius of) the curve at the
anchor points. The angle of each direction line determines the slope of the curve, and the
length of each direction line determines the height, or depth, of the curve.
Moving and resizing direction lines changes the slopes of curves.
Drawing straight segments with the Pen tool
The simplest path you can draw with the Pen tool is a straight line, made by clicking the
Pen tool to create two anchor points. By continuing to click, you create a path made of
straight line segments connected by corner points. To create independent line segments,
see “D
rawing straight lines” on page 87 and “Drawing arcs” on page 91.
To draw a straight line segment with the Pen tool:
1 Select the Pen tool .
2 Position the Pen tool where you want the straight segment to begin, and click to define
the first anchor point (do not drag). The anchor point remains selected (solid) until you
add the next point.
Note: The first segment you draw will not be visible until you click a second anchor point.
Also, if direction lines appear, you’ve accidentally dragged the Pen tool; choose Edit >
Undo and click again.
3 Click again where you want the segment to end. (Shift-click to constrain the segment’s
angle to multiples of 45°.) This creates another anchor point.
4 Continue clicking the Pen tool to create additional straight segments.
The last anchor point you add appears as a solid square, indicating that it is selected.
Existing anchor points become deselected as you add more anchor points.
Using Help | Contents | Index Back 99
Page 100

Adobe Illustrator CS Help Basic Drawing
Using Help | Contents | Index Back 100
5 Complete the path by doing one of the following:
• To close a path, position the pen pointer over the first (hollow) anchor point. A small
circle appears next to the Pen tool when it is positioned correctly. Click to close the
path.
• To leave the path open, Ctrl-click (Windows) or Command-click (Mac OS) anywhere
away from all objects, or choose Select > Deselect, or select a different tool in the
toolbox.
Drawing curved segments with the Pen tool
You create curves by using the Pen tool to add anchor points where a curve changes
direction, and to drag the direction points that shape the curves. To draw individual curve
segments, see “D
Curves are easier to edit and your system can display and print them faster if you draw
them using as few anchor points as possible. Using too many points can also introduce
unwanted bumps in a curve. Instead, draw widely spaced anchor points, and practice
shaping curves by adjusting the length and angles of the direction lines.
To draw a curved segment:
rawing straight lines” on page 87 and “Drawing arcs” on page 91.
1 Select the Pen tool .
2 Position the Pen tool where you want the curve to begin. Hold down the mouse button.
The first anchor point appears, and the Pen tool pointer changes to an arrowhead .
3 Drag to set the slope of the curve segment you’re creating. In general, extend the
direction line about one third of the distance to the next anchor point you plan to draw.
Shift-drag to constrain the direction line to multiples of 45°.
A B C
Drawing the first point in a curve
A. Positioning Pen tool B. Starting to drag (mouse button pressed)
C. Dragging to extend direction lines
4 Release the mouse button.
Note: The first segment will not be visible until you draw the second anchor point.
5 Position the Pen tool where you want the curve segment to end, and then do one of the
following:
Using Help | Contents | Index Back 100
 Loading...