


 Loading...
Aspire 3
USER’S MANUAL

2 -
© 2019. All Rights Reserved. Aspire 3
Covers: A315-42 / A315-42G / A315-54 / A315-54K / A315-56 This revision: October 2019
Important
This manual contains proprietary information that is protected by copyright laws. The information contained in this manual is subject to change without notice. Some features described in this manual may not be supported depending on the Operating System version. Images provided herein are for reference only and may contain information or features that do not apply to your computer. Acer Group shall not be liable for technical or editorial errors or omissions contained in this manual.
Register your Acer product
If your new device runs on Windows OS, you may have had your product registered automatically while you start up your device with Windows OS.
Log in at www.acer.com/myproducts with the email address you registered for Windows OS to review your product record. (Reset your password if you do not know it.)
If the record is not found, please follow the steps below to register.
1.Ensure you are connected to the Internet.
2.Go to www.acer.com/register-product.
3.Sign in or sign up for an Acer ID.
4.Enter S/N or SNID of your device to register it.
Model number: _________________________________
Serial number: _________________________________
Date of purchase: ______________________________
Place of purchase: ______________________________

Table of contents - 3
TABLE OF CONTENTS
First things first |
5 |
Your guides ............................................. |
5 |
Basic care and tips for using your |
|
computer.................................................. |
5 |
Turning your computer off........................... |
5 |
Taking care of your computer ..................... |
6 |
Taking care of your AC adapter.................. |
7 |
Cleaning and servicing................................ |
7 |
Your Acer notebook tour |
8 |
Screen view............................................. |
8 |
Keyboard view ........................................ |
9 |
Left view .............................................. |
10 |
Right view ............................................. |
10 |
USB 3.1 Gen 1 information....................... |
10 |
Base view .............................................. |
11 |
Using the keyboard |
12 |
Lock keys............................................... |
12 |
Special keys .......................................... |
12 |
Hotkeys.................................................. |
13 |
Windows keys........................................ |
14 |
Using the Precision Touchpad |
15 |
Touchpad gestures................................ |
15 |
Changing touchpad settings.................. |
17 |
Recovery |
18 |
Creating a factory default backup.......... |
18 |
Backing up your wireless and LAN |
|
drivers.................................................... |
20 |
Restoring your computer ....................... |
20 |
Reset this PC and keep my files............... |
21 |
Reset this PC and remove everything ...... |
22 |
Power management |
36 |
Saving power......................................... |
36 |
Battery pack |
38 |
Battery characteristics ........................... |
38 |
Charging the battery ................................. |
38 |
Optimizing battery life ............................... |
39 |
Checking the battery level......................... |
40 |
Battery-low warning .................................. |
40 |
Traveling with your computer |
41 |
Disconnecting from the desktop ............ |
41 |
Moving around....................................... |
41 |
Preparing the computer ............................ |
41 |
What to bring to meetings......................... |
42 |
Taking the computer home.................... |
42 |
Preparing the computer ............................ |
42 |
What to take with you................................ |
42 |
Special considerations.............................. |
43 |
Setting up a home office ........................... |
43 |
Traveling with the computer................... |
43 |
Preparing the computer ............................ |
44 |
What to take with you................................ |
44 |
Special considerations.............................. |
44 |
Traveling internationally......................... |
44 |
Preparing the computer ............................ |
44 |
What to bring with you .............................. |
44 |
Special considerations.............................. |
45 |
Universal Serial Bus (USB) |
47 |
Video and audio connectors |
48 |
Connecting a monitor............................. |
48 |
Headphones and microphone................ |
48 |
HDMI |
49 |
Using a Bluetooth connection |
25 |
Enabling and disabling Bluetooth .......... |
25 |
Enable Bluetooth and add a device .......... |
25 |
Connecting to the Internet |
27 |
Connecting to a wireless network.......... |
27 |
Connecting to a wireless LAN................... |
27 |
Connecting with a cable ........................ |
30 |
Built-in network feature ............................. |
30 |
Connecting to a cellular network ........... |
30 |
Bluelight Shield |
31 |
Securing your computer |
33 |
Using a computer security lock.............. |
33 |
Using passwords ................................... |
33 |
Entering passwords .................................. |
34 |
BIOS utility |
35 |
Boot sequence....................................... |
35 |
Setting passwords ................................. |
35 |
Frequently asked questions |
51 |
Requesting service ................................ |
53 |
Tips and hints for using Windows 10..... |
54 |
How do I get to Start? ............................... |
54 |
How do I turn off my computer?................ |
54 |
How do I unlock my computer?................. |
54 |
How do I set the alarm?............................ |
56 |
Where are my apps?................................. |
57 |
What is a Microsoft ID (account)?............. |
57 |
How do I check for Windows updates?..... |
58 |
Where can I get more information?........... |
58 |
Troubleshooting..................................... |
59 |
Troubleshooting tips.................................. |
59 |
Error messages......................................... |
59 |
Internet and online security |
61 |
First steps on the net ............................. |
61 |
Protecting your computer.......................... |
61 |
Choose an Internet Service Provider........ |
61 |
Network connections................................. |
63 |
Surf the Net!.............................................. |
64 |
Internet security software.......................... |
64 |
Getting started...
In this section you will find:
•Useful information on caring for your computer and your health
•Where to find the power button, ports and connectors
•Tips and tricks for using the touchpad and keyboard
•How to create recovery backups
•Guidelines for connecting to a network and using Bluetooth
•Information on using Acer’s bundled software

First things first - 5
FIRST THINGS FIRST
We would like to thank you for making this Acer notebook your choice for meeting your mobile computing needs.
Your guides
To help you use your Acer notebook, we have designed a set of guides:
First off, the Setup Guide helps you get started with setting up your computer.
The Quick Guide introduces you to the basic features and functions of your new computer. For more on how your computer can help you to be more productive, please refer to the User’s Manual. This guide contains detailed information on such subjects as system utilities, data recovery, expansion options and troubleshooting.
Once you have connected to the internet, you can download updates for your computer from:
http://go.acer.com/?id=17883
1.The link will open the Acer Support webpage.
2.Scroll down to Drivers and Manuals and search for your model by pasting in or manually entering the serial number, SNID, or product model.
3.From this page you can also download and install the Acer identification utility that will automatically detect your computer’s serial number and SNID and allow you to copy it to the clipboard.
4.Once you have found your product model, any updates, or documents will be listed.
Basic care and tips for using your computer
Turning your computer off
To turn the power off, do any of the following:
•Use the Windows shutdown command: Press the Windows key or select the Windows Start button, select Power > Shut down.

6 - First things first
•Right-click the Windows Start button > Shut down or sign out >
Shut down.
If you need to power down the computer for a short while, but don’t want to completely shut it down, you can put it to Sleep by doing any of the following:
•Press the power button.
•Press the sleep hotkey.
•Press the Windows key or select the Windows Start button, select
Power > Sleep.
•Right-click the Windows Start button > Shut down or sign out >
Sleep.
 Note
Note
If you cannot power off the computer normally, press and hold the power button for up to ten seconds to shut down the computer. If you turn off the computer and want to turn it on again, wait at least two seconds before powering up.
Taking care of your computer
Your computer will serve you well if you take care of it.
•Only use the adapter provided with your device, or an Acerapproved adapter to power your device.
•Do not expose the computer to direct sunlight. Do not place it near sources of heat, such as a radiator.
•Do not expose the computer to temperatures below 0º C (32º F) or above 50º C (122º F).
•Do not subject the computer to magnetic fields.
•Do not expose the computer to rain or moisture.
•Do not spill water or any liquid on the computer.
•Do not subject the computer to heavy shock or vibration.
•Do not expose the computer to dust or dirt.
•Never place objects on top of the computer.
•Do not slam the computer display when you close it.
•Never place the computer on uneven surfaces.
First things first - 7
Taking care of your AC adapter
Here are some ways to take care of your AC adapter:
•Do not connect the adapter to any other device.
•Do not step on the power cord or place heavy objects on top of it. Route the power cord and any cables away from where people walk.
•When unplugging the power cord, do not pull on the cord itself but pull on the plug.
•The total ampere ratings of the equipment plugged in should not exceed the ampere rating of the cord if you are using an extension cord. Also, the total current rating of all equipment plugged into a single wall outlet should not exceed the fuse rating.
Cleaning and servicing
When cleaning the computer, follow these steps:
1.Turn off the computer.
2.Disconnect the AC adapter.
3.Use a soft, moist cloth. Do not use liquid or aerosol cleaners.
If your computer is dropped or visibly damaged, or does not work normally, please contact your nearest authorized Acer service center.
8 - Your Acer notebook tour
YOUR ACER NOTEBOOK TOUR
After setting up your computer as illustrated in the Setup Guide, let us show you around your new Acer computer.
Screen view
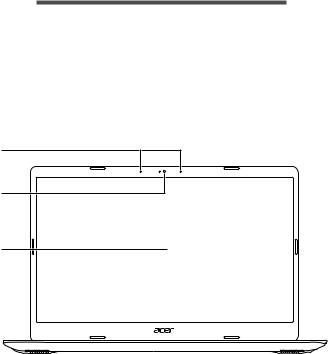
1
2
3
# |
Icon Item |
Description |
|
1 |
Microphones |
Internal digital microphones for |
|
sound recording. |
|||
|
|
||
|
|
Web camera for video |
|
2 |
Webcam |
communication. |
|
A light next to the webcam indicates |
|||
|
|
||
|
|
that the webcam is active. |
|
|
|
|
|
3 |
Screen |
Displays computer output. |
|
|
|
|

Your Acer notebook tour - 9
Keyboard view
1
4
2
3
# |
Icon Item |
Description |
|
Power indicator |
Indicates the computer’s power |
|
|
status. |
Indicates the computer’s battery 1 status.
Battery indicator Charging: The light shows amber when the battery is charging.
Fully charged: The light shows blue when in AC mode.
For entering data into your computer.
2Keyboard See "Using the keyboard" on page
12.
Touch-sensitive pointing device.
The touchpad and selection buttons form a single surface.
3Touchpad Press down firmly on the touchpad
surface to perform a left click. Press down firmly on the lower right corner to perform a right click.
4 |
Power button |
Turns the computer on and off. |
|
|
|
10 - Your Acer notebook tour
Left view
|
|
|
|
|
|
|
|
|
|
|
|
|
|
|
|
|
|
|
|
|
|
|
|
|
|
|
|
|
|
|
|
|
|
|
|
|
|
|
1 |
2 |
3 |
4 |
5 |
6 |
||||||||||||
|
|
|
|
|
|
|
|
|
|
|
|
|
|
|
|
|
|
|
# |
Icon |
Item |
|
|
|
|
|
|
Description |
|||||||||
1 |
|
|
|
|
|
|
|
|
DC-in jack |
|
|
|
|
Connects to an AC adapter. |
||||
|
|
|
|
|
|
|
|
|
|
|
|
|||||||
|
|
|
|
|
|
|
|
|
|
|
|
|||||||
|
|
|
|
|
|
|
|
|
|
|
|
|
|
|
|
|
|
|
|
|
|
|
|
|
|
|
|
|
|
|
|
|
|
|
|
Connects to an Ethernet 10/100/ |
|
2 |
|
|
|
|
|
|
|
|
Ethernet (RJ-45) 1000-based network. |
|||||||||
|
|
|
|
|
|
|
|
port |
|
|
|
|
|
|
Pull the lip down to open the port |
|||
|
|
|
|
|
|
|
|
|
|
|
|
|
|
|
||||
|
|
|
|
|
|
|
|
|
|
|
|
|
|
|
|
|
fully. |
|
|
|
|
|
|
|
|
|
|
|
|
|
|
|
|
|
|
|
|
3 |
|
|
|
|
|
|
|
|
HDMI port |
|
|
|
|
Supports high-definition digital video |
||||
|
|
|
|
|
|
|
|
|
|
|
|
connections. |
||||||
|
|
|
|
|
|
|
|
|
|
|
|
|
|
|
|
|
||
4 / 5 |
|
|
|
|
|
|
|
|
USB ports |
|
|
|
|
Connect to USB devices. |
||||
|
|
|
|
|
|
|
|
|
|
|
|
|
|
|
|
|
|
|
|
|
|
|
|
|
|
|
|
Headset/ |
|
|
|
|
Connects to audio devices (e.g., |
||||
6 |
|
|
|
|
|
|
|
|
|
|
|
|
speakers, headphones) or a headset |
|||||
|
|
|
|
|
|
|
|
speaker jack |
|
|
||||||||
|
|
|
|
|
|
|
|
|
|
|
with microphone. |
|||||||
|
|
|
|
|
|
|
|
|
|
|
|
|
|
|
|
|
||
|
|
|
|
|
|
|
|
|
|
|
|
|
|
|
|
|
|
|
Right view
|
|
|
|
|
|
|
|
1 |
2 |
||
|
|
|
|
|
|
# |
Icon Item |
Description |
|
|
|
1 |
USB port |
Connects to USB devices. |
|||
|
|
|
|
|
|
2 |
Kensington lock |
Connects to a Kensington-compatible |
|||
slot |
security lock. |
|
|
||
|
|
|
|||
USB 3.1 Gen 1 information
•USB 3.1 Gen 1 compatible ports are blue.
•Compatible with USB 3.1 Gen 1 and earlier devices.
Your Acer notebook tour - 11
•For optimal performance, use USB 3.1 Gen 1-certified devices.
•Defined by the USB 3.1 Gen 1 specification (SuperSpeed USB).
Base view
1
3
2
# |
Icon Item |
Description |
|
1 |
Ventilation and |
Allows the computer to stay cool. |
|
Do not cover or obstruct the |
|||
|
cooling fan |
openings. |
|
|
|
||
|
|
|
|
2 |
Speakers |
Deliver stereo audio output. |
|
|
|
Simulates removing and reinstalling |
|
3 |
Battery reset |
the battery. |
|
pinhole |
Insert a paperclip into the hole and |
||
|
press for four seconds.

12 - Using the keyboard
USING THE KEYBOARD
The keyboard has full-sized keys, a numeric keypad, separate cursor, lock, Windows, special keys and hotkeys.
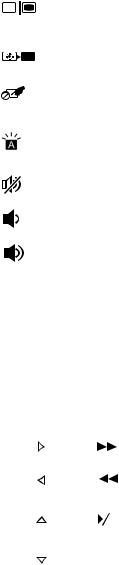
Lock keys
The keyboard has lock keys which you can use to turn keyboard functions on and off.
Lock key |
Description |
|
Caps Lock |
When Caps Lock is on, all alphabetic characters |
|
typed are in uppercase. |
||
|
When Num Lock is on, the keypad is in numeric
NumLk mode. The keys function as a calculator (complete (Numeric Lock) with the arithmetic operators +, -, *, and /). Use this
mode when you need to do a lot of numeric data entry.
|
When Scroll Lock is on, the screen moves one line |
Scr LK |
up or down when you press the up or down arrow |
(Scroll Lock) |
keys respectively. Scroll Lock does not work with |
|
some applications. |
Special keys
Your computer’s keyboard includes keys that activate special functions. The function of each key is clearly marked with an icon.
Icon |
Function |
Description |
|
Sleep |
Puts the computer in Sleep mode. |
|
|
|
|
Flight mode |
Turns on / off the computer's network |
|
devices. |
|
|
|
|
|
Brightness down |
Decreases the screen brightness. |
|
|
|
|
Brightness up |
Increases the screen brightness. |
|
|
|
|
|
Using the keyboard - 13 |
|
|
|
Icon |
Function |
Description |
|
|
Switches display output between the |
|
Display toggle |
display screen, external monitor (if |
|
|
connected) and both. |
|
Display off |
Turns the display screen backlight off to |
|
save power. Press any key to return. |
|
|
|
Touchpad toggle Turns the built-in touchpad on and off.
Keyboard |
Turns the keyboard backlight on and off. |
|
Function varies depending on |
||
backlight toggle |
||
|
configuration. |
|
Speaker toggle |
Turns the speakers on and off. |
|
|
|
|
Volume down |
Decreases the sound volume. |
|
|
|
|
Volume up |
Increases the sound volume. |
|
|
|
|
Scr LK Scroll Lock |
Turns Scroll Lock on or off. |
|
|
|
Hotkeys
To activate hotkeys, press and hold the Fn key before pressing the other key in the hotkey combination.
Hotkey |
Icon Function |
Description |
|||
Fn + F1-F12 |
|
|
|
Function keys |
Activate the F1 to F12 keys. |
Fn + |
|
|
|
Next |
Jump to the next media file. |
|
|
|
|||
|
|
|
|||
|
|
|
|
|
|
Fn + |
|
|
|
Previous |
Return to the previous media |
|
|
|
file. |
||
|
|
|
|||
|
|
|
|
|
|
|
|
|
|
|
|
Fn + |
|
|
|
Play/Pause |
Play or pause a selected |
|
|
|
media file. |
||
|
|
|
|||
|
|
|
|
|
|
|
|
|
|
|
|
Fn + |
|
|
|
Stop |
Stop playing the selected |
|
|
|
media file. |
||
|
|
|
|||
|
|
|
|
|
|

14 - Using the keyboard
 Note
Note
To swap the hotkey and special function of the F1 to F12 keys, change the function key setting in the BIOS (to open the BIOS press F2 when starting your computer, then select the Main menu and change Function key behavior to Function keys).
(Specifications vary depending on model.)
Windows keys
The keyboard has two keys that perform Windows-specific functions.
Key |
|
Description |
|
Windows key |
Pressed alone it returns to the Start screen |
|
or to return to the last open app. |
|
|
|
|
|
Application key |
This key has the same effect as clicking |
|
the right mouse button. |
|
|
|

Using the Precision Touchpad - 15
USING THE PRECISION TOUCHPAD
The touchpad controls the arrow (or 'cursor') on the screen. As you slide your finger across the touchpad, the cursor will follow this movement. The Precision Touchpad (PTP) is designed to provide a more uniform, smooth, and accurate touchpad experience. Many applications support precision touchpad gestures that use one or more fingers, however, some gestures may not be supported by the specific application or program you are using.
Touchpad gestures
Single-finger slide
Slide a finger across the touchpad to move the cursor.
Single-finger press or tap
Press the touchpad down, or lightly tap the touchpad with your finger, to perform a 'click', which will select or start an item. Quickly repeat the tap to perform a double tap or 'double click'.
Two-finger press
Lightly tap the touchpad with two fingers to perform a  'right click'. In the Start screen, this will toggle the app commands. In most apps this will open a context menu related to the selected item.
Two-finger slide
Swiftly scroll through web pages, documents and playlists by placing two fingers on the touchpad and moving both in any direction.
Two-finger pinch
Zoom in and out of photos, maps and documents with a simple finger-and-thumb gesture.

16 - Using the Precision Touchpad
Three-finger press
Lightly tap the touchpad with three fingers to open the
Search Windows.
Three-finger swipe
Swipe across the touchpad with three fingers.
•Swipe up to open Task View. Move the cursor over a window and tap the touchpad to select that window, or swipe downwards to exit Task View.
•Swipe down to minimize all open windows and show Desktop; swipe upwards to restore the minimized windows.
•Swipe left or right to switch between open windows.
Four-finger press
Lightly tap the touchpad with four fingers to open the
Action Center.
Four-finger swipe
Swipe across the touchpad with four fingers.
•Swipe up to open Task View. Move the cursor over a window and tap the touchpad to select that window, or swipe downwards to exit Task View.
•Swipe down to minimize all open windows and show Desktop; swipe upwards to restore the minimized windows.
The precision touchpad includes added technology features that help recognize and prevent unintentional gestures such as accidental taps, gestures, and pointer movement.
 Note
Note
The touchpad is sensitive to finger movement; the lighter the touch, the better the response. Please keep the touchpad and your fingers dry and clean.
Using the Precision Touchpad - 17
Changing touchpad settings
To change the touchpad settings to suit your personal requirements, please do the following.
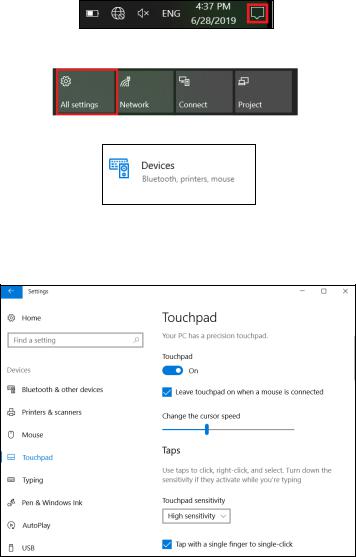
1.In the icon tray in the lower right-hand corner of the screen, select the Notifications icon to open the Notifications pane.
2.Select All settings.
3.Select Devices > Touchpad
4.Now you can adjust the settings to suit your personal needs. You can switch off the touchpad if you prefer to use a mouse. Or you can adjust the touchpad sensitivity to suit your needs. Scroll down to see more settings.

18 - Recovery
RECOVERY
If you are having trouble with your computer, and the frequently asked questions (see Got a question? on page 50) do not help, you can recover your computer.
This section describes the recovery tools available on your computer. Acer provides Acer Care Center, which allows you to reset your PC, refresh your PC, or create a factory default backup. If you cannot access Acer Care Center, click Settings in the Start menu, select
Update & Security and then click Recovery.
 Note
Note
Acer Care Center vary depending on model or Operating System.
Important
We recommend that you create a Factory Default Backup as soon as possible. In certain situations a full recovery will require a USB recovery backup.
Creating a factory default backup
Recovery Management allows you to quickly and easily back up your operating system, installed apps and data.
 Note
Note
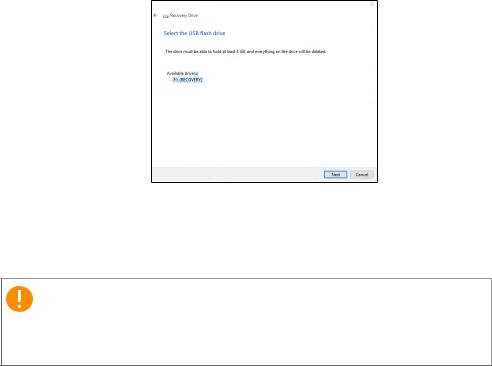
Since the recovery backup requires at least 8 GB of storage after formatting, it is recommended to use a USB drive with a capacity of 16 GB or larger.
Recovery - 19
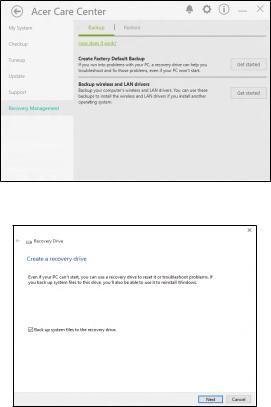
1.From Start, select Care Center then Recovery Management.
2.Select the Backup tab and click Get Started for Create Factory Default Backup to open the Recovery Drive window.
3.Make sure Back up system files to the recovery drive is selected and click Next.
20 - Recovery
4.Plug in the USB drive and wait for the PC to detect the USB drive then click Next.
5.Everything on the drive will be deleted. Click Create to continue.
6.You will be shown the backup progress on the screen.
7.Follow the process until it completes.
8.Unplug the USB drive and label it clearly.
Important
Write a unique, descriptive label on the backup, such as 'Windows Recovery Backup'. Make sure you keep the backup in a safe place that you will remember.
Backing up your wireless and LAN drivers
Back up your wireless and LAN drivers. You can use these backups to install the wireless and LAN drivers if you install another operating system.
1.From Start, select Care Center then Recovery Management.
2.Select the Backup tab and click Get started for Backup wireless and LAN drivers. Choose a folder to save your drivers and select
OK.
Restoring your computer
Recovery Management allows you to quickly and easily restore your computer back to its default status. You can choose to keep your files or remove them before reinstalling Windows.
Recovery - 21
Reset this PC and keep my files
1.From Start, select Care Center then Recovery Management.
2.Select the Restore tab and click Get started to Choose an option.
3.Select Keep my files to refresh your PC and reinstall your operating system without removing your personal files. Click Next to continue.
Important
If you have apps installed on your PC, they will be removed.
Loading...