


Acer ASPIRE 1830T, ASPIRE 1830Z, ASPIRE 1830TZ, ASPIRE 1430Z, ASPIRE 1830 User Manual
...Contents
English |
Slovenski |
Français |
Hrvatski |
Deutsch |
Română |
Italiano |
Български |
Español |
Eesti |
Português |
Latviski |
Nederlands |
Lietuviškai |
Norsk |
Ελληνικά |
Dansk |
Türkçe |
Svenska |
|
Suomi |
|
Русский |
|
Polski |
|
Magyar |
Bahasa Indonesia |
Čeština |
|
Slovenčina |
|


 Series
Quick Guide


 Series
© 2010 All Rights Reserved
Aspire One Series Quick Guide
Original Issue: 04/2010
Aspire One Series Notebook PC
Model number: __________________________________
Serial number: ___________________________________
Date of purchase: ________________________________
Place of purchase: ________________________________
Quick Guide
Federal Communications Commission
Declaration of Conformity
This device complies with Part 15 of the FCC Rules. Operation is subject to the following two conditions: (1) this device may not cause harmful interference, and (2) this device must accept any interference received, including interference that may cause undesired operation.
The following local Manufacturer / Importer is responsible for this declaration:
Product name: |
Notebook PC |
Brand: |
Acer |
Model number: |
MS2296 |
Machine type: |
AO 753 series |
Name of Responsible Party: |
Acer America Corporation |
Address of responsible party: |
333 West San Carlos St., San Jose |
|
CA 95110, U. S. A. |
Contact person: |
Acer Representative |
Phone No.: |
1-254-298-4000 |
Fax No.: |
1-254-298-4147 |
April 30, 2010 |
|
|
|


 Series
CE Declaration of Conformity
We,
Acer Incorporated
8F, 88, Sec. 1, Hsin Tai Wu Rd., Hsichih, Taipei Hsien 221, Taiwan Contact Person: Mr. Easy Lai, e-mail:easy_lai@acer.com.tw
And,
Acer Europe SA
Via Cantonale, Centro Galleria 2 6928 Manno Switzerland Hereby declare that:
Product: |
Notebook Computer |
Trade Name: |
Acer |
Model Number: |
MS2296 |
Machine Type: |
AO753 series |
Is compliant with the essential requirements and other relevant provisions of the following EC directives, and that all the necessary steps have been taken and are in force to assure that production units of the same product will continue comply with the requirements.
EMC Directive 2004/108/EC as attested by conformity with the following harmonized standards:
•EN55022, AS/NZS CISPR22, Class B
•EN55024
•EN61000-3-2 Class D
•EN61000-3-3
Low Voltage Directive 2006/95/EC as attested by conformity with the following harmonized standard:
• EN60950-1
Council Decision 98/482/EC (CTR21):
(Applicable to product with panEuropean single terminal connection to the Public Switched Telephone Network (PSTN).) RoHS Directive 2002/95/EC on the Restriction of the Use of certain Hazardous Substances in Electrical and Electronic Equipment

Quick Guide
• The maximum concentration values of the restricted substances by weight in homogenous material are:
Lead |
0.1% |
Polybrominated Biphenyls (PBB’s) |
0.1% |
Mercury |
0.1% |
Polybrominated Diphenyl Ethers (PBDE’s) |
0.1% |
Hexavalent Chromium |
0.1% |
Cadmium |
0.01% |
Directive 2009/125/EC with regard to establishing a framework for the setting of ecodesign requirements for energy-related product.
R&TTE Directive 1999/5/EC as attested by conformity with the following harmonized standard:
•Article 3.1(a) Health and Safety
-EN60950-1
-EN62311
•Article 3.1(b) EMC
-EN301 489-1
-EN301 489-3 (Applicable to non-bluetooth wireless keyboard mouse set).
-EN301 489-7
-EN301 489-17
-EN301 489-24
•Article 3.2 Spectrum Usages
-EN300 440-2 (Applicable to non-bluetooth wireless keyboard mouse set).
-EN300 328
-EN301 511
-EN301 893 (Applicable to 5GHz high performance RLAN).
-EN301 908-1
- EN301 908-2
Easy Lai /Manager
Regulation Center, Acer Inc.


 Series
Just for starters
1 |
2 |
3 |
2-2
3-2
2-1 |
3-1 |
Ensure that the battery is properly locked in place, as illustrated in 2-2.
4 |
5 |
6 |
 Illustrations are for reference only. Actual product specifications may vary.
1

Quick Guide
First things first
We would like to thank you for making an Acer notebook your choice for meeting your mobile computing needs.
Your guides
To help you use your Acer notebook, we have designed a set of guides*:
First off, the Quick Guide helps you get started with setting up your computer.
For more on how your computer can help you to be more productive, please refer to the AcerSystem User Guide. This guide contains detailed information on such subjects as system utilities, data recovery, expansion options and troubleshooting. In addition it contains warranty information and the general regulations and safety notices for your notebook. It is available in Portable Document Format (PDF) and comes preloaded on your notebook.
 Note: Viewing the file requires Adobe Reader. If Adobe Reader is not installed on your computer, clicking on AcerSystem User Guide will run the Adobe Reader setup program first. Follow the instructions on the screen to complete the installation. For instructions on how to use Adobe Reader, access the Help and Support menu.
 * IMPORTANT NOTICE: Please note that the guides mentioned herein, whether in printed or electronic form, are for your reference only and except as provided in the specific warranty information contained in the AcerSystem User Guide nothing contained in these guides shall constitute a representation or warranty by Acer with regard to the product you purchased. Acer expressly disclaims any liability for errors contained in the guides.
2


 Series
Network configuration
This guide will help you configure your LAN and wireless network settings to enable you to connect to the Internet.
Setting up LAN connection
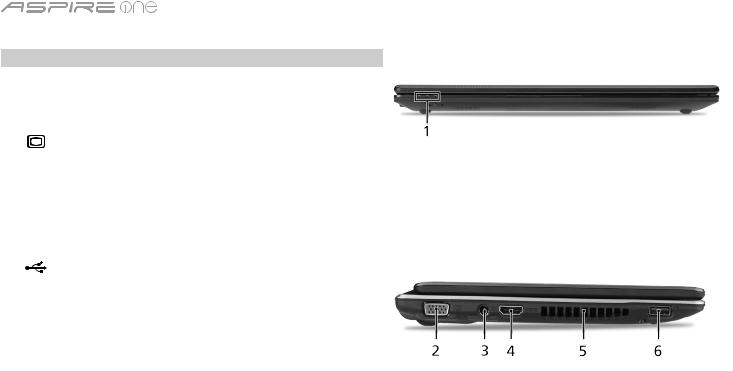
Simply plug in the LAN cable to the Ethernet (RJ-45) port. Please refer to "Right view" on page 6 for the location of the Ethernet port.
Setting up a wireless connection
1.Press <Fn> + <F3> to access the communication manager. Here you can turn on the Wi-Fi connection by clicking on the red button next to Wi-Fi.
Note: 3G and Bluetooth are also accessible through the communication manager. Communication devices vary by model.
2.Click the  icon on your system tray and choose the wireless access point you want to connect to.
Inserting a 3G SIM card (only for certain models)
Remove the battery and carefully insert a 3G SIM card into the 3G SIM card slot. Please refer to "Rear & base views" on page 6 for the location of the 3G SIM card slot.
3
Your Aspire One tour
After setting up your computer as illustrated in the Just for starters section, let us show you around your new Acer notebook.
|
|
|
|
Quick Guide |
||
Top view |
|
|
|
|
||
|
|
|
|
|
|
|
# Icon |
Item |
Description |
|
|
|
|
1 |
|
Acer Crystal Eye |
Web camera for video communication |
|||
|
|
webcam |
(configuration may vary by model). |
|||
2 |
|
Microphone |
Internal microphone for sound recording. |
|||
|
|
|
|
|
|
|
3 |
|
Display screen |
Also called Liquid-Crystal Display (LCD), |
|||
|
|
|
displays computer output (configuration |
|||
|
|
|
may vary by model). |
|
|
|
4 |
|
Power button |
Turns the computer on and off. |
|||
5 |
|
Keyboard |
For entering data into your computer. |
|||
6 |
|
Power indicator1 |
Indicates the computer's power status. |
|||
|
|
|
|
|
|
|
7 |
|
Battery indicator1 |
Indicates the computer's battery status. |
|||
|
|
|
1. Charging: The light shows amber when |
|||
|
|
|
the battery is charging. |
|
|
|
|
|
|
2. Fully charged: The light shows blue when |
|||
|
|
|
in AC mode. |
|
|
|
8 |
|
Communication |
Indicates the status of 3G/Wireless LAN |
|||
|
|
indicator1 |
communication. |
|
|
|
|
|
|
Blue light on |
Orange light on |
Not lit |
|
|
|
|
3G on / WiFi on |
3G off / WiFi on |
3G off / WiFi off |
|
|
|
|
3G on / WiFi off |
|
||
|
|
|
|
|
|
|
|
|
|
|
|
|
|
9 |
|
Click buttons (left |
The left and right buttons function like the |
|||
|
|
and right) |
left and right mouse buttons. |
|
|
|
10 |
|
Touchpad |
Touch-sensitive pointing device which |
|||
|
|
|
functions like a computer mouse. |
|||
|
|
|
|
|
|
|
11 |
|
Palmrest |
Comfortable support area for your hands |
|||
|
|
|
when you use the computer. |
|
|
|
12 |
|
HDD indicator |
Indicates when the hard disk drive is active. |
|||
|
|
Num Lock |
Lights up when Num Lock is activated. |
|||
|
|
|
|
|
|
|
|
|
Caps Lock |
Lights up when Caps Lock is activated. |
|||
1. The front panel indicators are visible even when the computer cover is closed.
4
|
|
|
|
|
|
|
|
|
Series |
Closed front view |
|
||||||||
|
|
|
|
|
|
|
|
|
|
# |
Icon |
Item |
Description |
||||||
1 |
|
|
|
|
|
|
|
Status indicators |
Light-Emitting Diodes (LED) that light up to |
|
|
|
|
|
|
|
|
|
show the status of the computer's functions |
|
|
|
|
|
|
|
|
|
and components. |
|
|
|
|
|
|
|
|
||
Left view |
|
||||||||
|
|
|
|
|
|
|
|
|
|
2 |
|
|
|
|
|
|
|
External display |
Connects to a display device (e.g., external |
|
|
|
|
|
|
|
|
(VGA) port |
monitor, LCD projector). |
|
|
|
|
|
|
|
|
|
|
3 |
|
|
|
|
|
|
|
DC-in jack |
Connects to an AC adapter. |
|
|
|
|
|
|
|
|||
|
|
|
|
|
|
|
|
|
|
4 |
HDMI |
HDMI port |
Supports high definition digital video |
||||||
|
|
|
|
|
|
|
|
|
connections. |
|
|
|
|
|
|
|
|
|
|
5 |
|
|
|
|
|
|
|
Ventilation slots |
Enable the computer to stay cool, even |
|
|
|
|
|
|
|
|
|
after prolonged use. |
|
|
|
|
|
|
|
|
|
|
6 |
|
|
|
|
|
|
|
USB 2.0 port |
Connects to USB 2.0 devices (e.g., USB |
|
|
|
|
|
|
|
|
|
mouse, USB camera). |
5
|
|
|
|
|
Quick Guide |
Right view |
|
||||
|
|
|
|
|
|
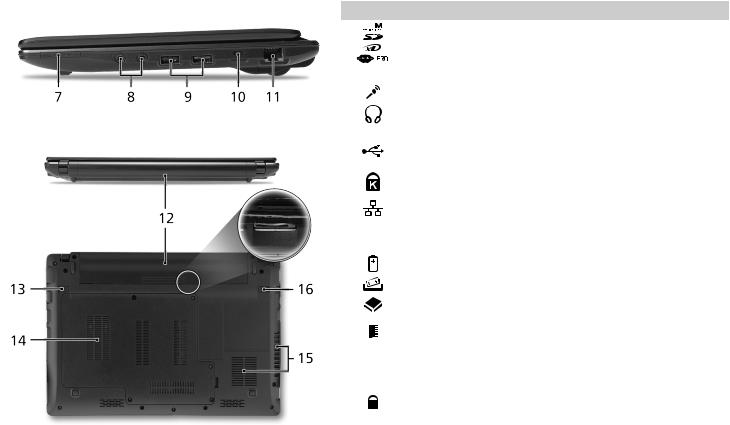
# |
Icon Item |
Description |
|||
7 |
|
|
|
Multi-in-1 card reader |
Accepts Secure Digital (SD), MultiMediaCard |
|
|
||||
|
|
||||
|
|
|
|
|
(MMC), Memory Stick (MS), Memory Stick |
|
|
|
|
|
PRO (MS PRO), xD-Picture Card (xD). |
|
|
|
|
|
Note: Push to remove/install the card. Only |
|
|
|
|
|
one card can operate at any given time. |
8 |
|
|
|
Microphone-in jack |
Accepts inputs from external microphones. |
|
|
|
|
|
|
|
|
|
|
Headphone/speaker/ |
Connects to audio line-out devices |
|
|
|
|
line-out jack with |
(e.g., speakers, headphones). |
|
|
|
|
S/PDIF support |
|
9 |
|
|
|
USB 2.0 port |
Connects to USB 2.0 devices (e.g., USB |
|
|
|
|
|
mouse). |
10 |
|
|
|
Kensington lock slot |
Connects to a Kensington-compatible |
|
|
|
|
|
computer security lock. |
11 |
|
|
|
Ethernet (RJ-45) port |
Connects to an Ethernet 10/100/1000-based |
|
|
|
|
|
network. |
Rear & base views |
|
||||
12 |
|
|
|
Battery bay |
Houses the computer's battery pack. |
|
|
|
|
|
|
13 |
|
|
|
Battery release latch |
Releases the battery for removal. |
|
|
|
|
|
|
14 |
|
|
|
Hard disk bay |
Houses the computer's hard disk |
|
|
|
|
|
(secured with screws). |
|
|
|
|
Memory compartmen |
Houses the computer's main memory. |
|
|
|
|
|
|
15 |
|
|
|
Ventilation slots and |
Enable the computer to stay cool, even |
|
|
|
|
cooling fan |
after prolonged use. |
|
|
|
|
|
Note: Do not cover or obstruct the opening |
|
|
|
|
|
of the fan. |
16 |
|
|
|
Battery lock |
Locks the battery in position. |
|
|
|
|
|
|
6


 Series
Environment
Temperature:
Operating: 5 °C to 35 °C
Non-operating: -20 °C to 65 °C
Humidity (non-condensing):
Operating: 20% to 80%
Non-operating: 20% to 80%
7

Gamme
Guide rapide
Gamme 


© 2010 Tous droits réservés
Guide rapide de la gamme Aspire One
Première publication : 04/2010
Ordinateur notebook de la gamme Aspire One
Modèle : _______________________________________
No. de série : ___________________________________
Date d'achat : __________________________________
Lieu d'achat : __________________________________
Guide rapide
Federal Communications Commission Declaration of Conformity
This device complies with Part 15 of the FCC Rules. Operation is subject to the following two conditions: (1) this device may not cause harmful interference, and (2) this device must accept any interference received, including interference that may cause undesired operation.
The following local Manufacturer / Importer is responsible for this declaration:
Product name: |
Notebook PC |
Brand: |
Acer |
Model number: |
MS2296 |
Machine type: |
AO 753 series |
Name of Responsible Party: |
Acer America Corporation |
Address of responsible party: |
333 West San Carlos St., San Jose |
|
CA 95110, U. S. A. |
Contact person: |
Acer Representative |
Phone No.: |
1-254-298-4000 |
Fax No.: |
1-254-298-4147 |
April 30, 2010 |
|
|
|

Gamme 


CE Declaration of Conformity
We,
Acer Incorporated
8F, 88, Sec. 1, Hsin Tai Wu Rd., Hsichih, Taipei Hsien 221, Taiwan Contact Person: Mr. Easy Lai, e-mail:easy_lai@acer.com.tw
And,
Acer Europe SA
Via Cantonale, Centro Galleria 2 6928 Manno Switzerland Hereby declare that:
Product: |
Notebook Computer |
Trade Name: |
Acer |
Model Number: |
MS2296 |
Machine Type: |
AO753 series |
Is compliant with the essential requirements and other relevant provisions of the following EC directives, and that all the necessary steps have been taken and are in force to assure that production units of the same product will continue comply with the requirements.
EMC Directive 2004/108/EC as attested by conformity with the following harmonized standards:
•EN55022, AS/NZS CISPR22, Class B
•EN55024
•EN61000-3-2 Class D
•EN61000-3-3
Low Voltage Directive 2006/95/EC as attested by conformity with the following harmonized standard:
• EN60950-1
Council Decision 98/482/EC (CTR21):
(Applicable to product with panEuropean single terminal connection to the Public Switched Telephone Network (PSTN).) RoHS Directive 2002/95/EC on the Restriction of the Use of certain Hazardous Substances in Electrical and Electronic Equipment

Guide rapide
• The maximum concentration values of the restricted substances by weight in homogenous material are:
Lead |
0.1% |
Polybrominated Biphenyls (PBB’s) |
0.1% |
Mercury |
0.1% |
Polybrominated Diphenyl Ethers (PBDE’s) |
0.1% |
Hexavalent Chromium |
0.1% |
Cadmium |
0.01% |

Gamme |
|
|
Pour partir du bon pied |
|
|
1 |
2 |
3 |
|
|
2-2 |
|
|
3-2 |
2-1 |
3-1 |
Assurez que la batterie est correctement verrouillée en place, comme illustré à 2-2.
4 |
5 |
6 |
 Les illustrations sont mises uniquement à titre de référence. Les caractéristiques réelles des produits peuvent changer.
1
Guide rapide
Pour commencer
Nous désirons vous remercier d’avoir fait d’un notebook Acer votre choix pour répondre à vos besoins informatiques mobiles.
Vos guides
Pour vous aider à utiliser votre notebook Acer, nous avons conçu plusieurs guides* :
Tout d’abord, le Guide rapide vous aide à configurer votre ordinateur.
Pour plus d’information sur l’aide que peut vous apporter votre ordinateur pour être plus productif, veuillez vous reporter au Guide utilisateur AcerSystem. Ce guide contient des informations détaillées sur des sujets tels que les utilitaires systèmes, la récupération des données, les options d’extension et le dépannage. De plus, il contient des informations de garantie et les réglementations générales et les avis de sécurité pour votre notebook. Il est disponible au format PDF (Portable Document Format) et est préchargé sur votre notebook.
 Remarque : L'affichage du fichier nécessite Adobe Reader. Si Adobe Reader n’est pas installé dans votre ordinateur, le clic sur Guide utilisateur AcerSystem va exécuter le programme d’installation d’Adobe Reader. Suivez les instructions à l’écran pour terminer l’installation. Pour des instructions sur l’utilisation de Adobe Reader, accédez au menu Aide et Support.
 * AVIS IMPORTANT : Veuillez noter que les guides mentionnés ici, que ce soit imprimés ou au format électronique, sont pour votre référence seulement et à l’exception de ce qui est indiqué dans les informations spécifiques à la garantie contenue dans AcerSystem User Guide, rien de ce qui est contenu dans ces guides ne constitue une déclaration ou garantie par Acer en ce qui concerne le produit que vous avez acheté. Acer rejette expressément toute responsabilité pour les erreurs contenues dans les guides.
2

Gamme 


Configuration réseau
Ce guide vous aide à configurer les paramètres de votre réseau local et de votre réseau sans fil pour pouvoir vous connecter à Internet.
Configurer la connexion réseau
Branchez simplement le câble réseau dans le port Ethernet RJ-45. Veuillez vous reporter « Vue droite » à la page 6 pour l’emplacement du port Ethernet.
Configurer une connexion sans fil
1.Appuyez <Fn> + <F3> pour accéder au gestionnaire de communication. Ici vous pouvez activer la connexion Wi-Fi en cliquant sur le bouton rouge à côté de Wi-Fi.
Remarque : 3G et Bluetooth sont également accessibles via le gestionnaire de communication. Les périphériques de communication varient en fonction du modèle.
2.Cliquez sur l’icône  sur votre barre des tâches et choisissez le point d’accès sans fil auquel vous souhaitez vous connecter.
Insérer une carte SIM 3G (seulement pour certains modèles)
Retirez la batterie et insérez avec soin une carte SIM 3G dans le connecteur de carte SIM 3G. Veuillez consulter « Vue arrière & Vue de la base » à la page 6 pour l’emplacement du connecteur de carte SIM 3G.
3

Visite guidée de votre Aspire One
Après avoir configuré votre ordinateur comme illustré la section Pour partir du bon pied, nous allons vous faire explorer votre nouveau notebook Acer.
|
|
|
Guide rapide |
||
Vue supérieure |
|
|
|
|
|
|
|
|
|
|
|
# |
Icône Élément |
Description |
|
|
|
1 |
Webcam Acer |
Webcam pour communication video (la |
|||
|
Crystal Eye |
configuration peut varier en fonction des modèle). |
|||
2 |
Microphone |
Microphone interne pour l’enregistrement sonore. |
|||
3 |
Écran d’affichage |
Également appelé écran LCD (Liquid Crystal |
|||
|
|
Display), affiche les données de l’ordinateur (la |
|||
|
|
configuration peut varier en fonction des modèle). |
|||
4 |
Bouton Marche/ |
Met l’ordinateur sous tension et hors tension. |
|||
|
Arrêt |
|
|
|
|
5 |
Clavier |
Pour l’entrée des informations dans votre ordinateur. |
|||
6 |
Indicateur |
Indique l’état d’alimentation de l’ordinateur. |
|||
|
d’alimentation1 |
|
|
|
|
7 |
Indicateur de |
Indique l’état de la pile de l’ordinateur. |
|||
|
batterie1 |
1. Charge : La lumière est orange lorsque la pile se |
|||
|
|
recharge. |
|
|
|
|
|
2. Pleine charge : La diode est bleue en mode secteur. |
|||
8 |
Indicateur de |
Indique l’état de la communication réseau sans fil/3G. |
|||
|
communication1 |
Lumière bleue |
Lumière orange |
Pas allumé |
|
|
|
allumée |
allumée |
|
|
|
|
3G activé/ |
|
|
|
|
|
WiFi activé |
3G désactivé/ |
3G désactivé/ |
|
|
|
3G activé/ |
WiFi activé |
WiFi désactivé |
|
|
|
WiFi désactivé |
|
|
|
|
|
|
|
|
|
9 |
Boutons |
Le bouton gauche et le bouton droit fonctionnent |
|||
|
(gauche et droit) |
comme le bouton gauche et le bouton droit d’une souris. |
|||
10 |
Touchpad |
Périphérique de pointage sensible au touché qui |
|||
|
|
fonctionne comme une souris. |
|
|
|
11 |
Repose mains |
Zone de support confortable pour vos mains |
|||
|
|
lorsque vous utilisez l’ordinateur. |
|||
12 |
Indicateur du |
Indique l’activité du disque dur. |
|
|
|
|
disque dur |
|
|
|
|
|
Verr Num |
Est allumé lorsque Verr Num est activée. |
|||
|
|
|
|
|
|
|
Verr Maj |
Est allumé lorsque Verr Maj est activée. |
|||
1. Les indicateurs du panneau avant sont visibles même lorsque l’écran LCD est fermé.
4

Gamme 


Vue frontale fermée
# |
Icône Élément |
Description |
|||||||
1 |
|
|
|
|
|
|
|
Indicateurs d’état |
Diodes électroluminescentes (DEL) |
|
|
|
|
|
|
|
|
|
qui s’allume pour indiquer l’état |
|
|
|
|
|
|
|
|
|
des fonctions et composants de |
|
|
|
|
|
|
|
|
|
l’ordinateur. |
Vue gauche |
|
||||||||
2 |
|
|
|
|
|
|
|
Port d’affichage |
Se connecte à un périphérique |
|
|
|
|
|
|
|
|
(VGA) externe |
d’affichage (p.ex. un moniteur |
|
|
|
|
|
|
|
|
|
externe, un projecteur LCD). |
3 |
|
|
|
|
|
|
|
Prise d’alimentation |
Se connecte à l’adaptateur secteur. |
|
|
|
|
|
|
||||
|
|
|
|
|
|
|
|
|
|
4 |
HDMI Port HDMI |
Prend en charge les connexions |
|||||||
|
|
|
|
|
|
|
|
|
vidéo numériques à haute |
|
|
|
|
|
|
|
|
|
définition. |
5 |
|
|
|
|
|
|
|
Fentes de ventilation Permettent à l’ordinateur de rester |
|
|
|
|
|
|
|
|
|
|
froid, même après une longue |
|
|
|
|
|
|
|
|
|
utilisation. |
6 |
|
|
|
|
|
|
|
Port USB 2.0 |
Se connecte à des périphériques |
|
|
|
|
|
|
|
|
|
USB 2.0 (p.ex. une souris USB, une |
caméra USB).
5

|
|
|
|
|
|
Guide rapide |
Vue droite |
|
|||||
|
|
|
|
|
|
|
# Icône |
Élément |
Description |
||||
7 |
|
|
|
|
Lecteur de cartes |
Accepte une carte mémoire Secure Digital |
|
|
|
|
|||
|
|
|
|
|||
|
|
|
|
|
multiples en un |
(SD), MultiMediaCard (MMC), Memory Stick |
|
|
|
|
|
|
(MS), Memory Stick Pro (MS PRO), et xD- |
|
|
|
|
|
|
Picture (xD). |
|
|
|
|
|
|
Remarque : Poussez pour retirer/installer la |
|
|
|
|
|
|
carte. Seule une carte peut fonctionner à un |
|
|
|
|
|
|
moment donné. |
8 |
|
|
|
|
Prise d’entrée |
Accepte les entrées de microphones externes. |
|
|
|
|
|
microphone |
|
|
|
|
|
|
Prise de sortie audio/ |
Se connecte à des périphériques audio en |
|
|
|
|
|
haut-parleur/casque |
sortie (p.ex. haut-parleurs ou un casque |
|
|
|
|
|
avec prise en charge |
stéréo). |
|
|
|
|
|
de S/PDIF |
|
9 |
|
|
|
|
Port USB 2.0 |
Se connecte à des périphériques USB 2.0 |
|
|
|
|
|
|
(p.ex. une souris USB). |
10 |
|
|
|
|
Fente pour cadenas |
Se connecte à un cadenas de sécurité pour |
|
|
|
|
|
Kensington |
ordinateur Kensington. |
11 |
|
|
|
|
Port Ethernet RJ-45 |
Se connecte à un réseau Ethernet |
|
|
|
|
|
|
10/100/1000 Base. |
Vue arrière & Vue de la base |
||||||
12 |
|
|
|
|
Baie de la batterie |
Contient la batterie de l’ordinateur. |
|
|
|
|
|
|
|
13 |
|
|
|
|
Loquet de libération |
Libère la batterie pour le retrait. |
|
|
|
|
|
de la batterie |
|
14 |
|
|
|
|
Baie du disque dur |
Contient le disque dur de l'ordinateur |
|
|
|
|
|
|
(fixé avec des vis). |
|
|
|
|
|
Compartiment |
Contient la mémoire principale de |
|
|
|
|
|
mémoire |
l’ordinateur. |
15 |
|
|
|
|
Fentes de ventilation |
Permettent à l’ordinateur de rester froid, |
|
|
|
|
|
et ventilateur de |
même après une longue utilisation. |
|
|
|
|
|
refroidissement |
Remarque : Ne couvrez pas et ne bloquez |
|
|
|
|
|
|
pas l’ouverture du ventilateur. |
16 |
|
|
|
|
Verrou de la batterie |
Verrouille la batterie en position. |
6
Gamme 


Environnement
Température :
En marche : 5°C à 35°C À l’arrêt : -20°C à 65°C
Humidité (sans condensation) :
En marche : 20% à 80% À l’arrêt : 20% à 80%
7


 Serie
Serie
Kurzanleitung


 Serie
Serie
© 2010 Alle Rechte vorbehalten
Kurzanleitung für Aspire One Serie
Originalausgabe: 04/2010
Notebook-PC der Aspire One Serie
Modellnummer: ________________________________
Seriennummer: _________________________________
Kaufdatum: ____________________________________
Kaufort: _______________________________________
Kurzanleitung
Federal Communications Commission
Declaration of Conformity
This device complies with Part 15 of the FCC Rules. Operation is subject to the following two conditions: (1) this device may not cause harmful interference, and (2) this device must accept any interference received, including interference that may cause undesired operation.
The following local Manufacturer / Importer is responsible for this declaration:
Product name: |
Notebook PC |
Brand: |
Acer |
Model number: |
MS2296 |
Machine type: |
AO 753 series |
Name of Responsible Party: |
Acer America Corporation |
Address of responsible party: |
333 West San Carlos St., San Jose |
|
CA 95110, U. S. A. |
Contact person: |
Acer Representative |
Phone No.: |
1-254-298-4000 |
Fax No.: |
1-254-298-4147 |
April 30, 2010 |
|
|
|


 Serie
Serie
CE Declaration of Conformity
We,
Acer Incorporated
8F, 88, Sec. 1, Hsin Tai Wu Rd., Hsichih, Taipei Hsien 221, Taiwan Contact Person: Mr. Easy Lai, e-mail:easy_lai@acer.com.tw
And,
Acer Europe SA
Via Cantonale, Centro Galleria 2 6928 Manno Switzerland Hereby declare that:
Product: |
Notebook Computer |
Trade Name: |
Acer |
Model Number: |
MS2296 |
Machine Type: |
AO753 series |
Is compliant with the essential requirements and other relevant provisions of the following EC directives, and that all the necessary steps have been taken and are in force to assure that production units of the same product will continue comply with the requirements.
EMC Directive 2004/108/EC as attested by conformity with the following harmonized standards:
•EN55022, AS/NZS CISPR22, Class B
•EN55024
•EN61000-3-2 Class D
•EN61000-3-3
Low Voltage Directive 2006/95/EC as attested by conformity with the following harmonized standard:
• EN60950-1
Council Decision 98/482/EC (CTR21):
(Applicable to product with panEuropean single terminal connection to the Public Switched Telephone Network (PSTN).) RoHS Directive 2002/95/EC on the Restriction of the Use of certain Hazardous Substances in Electrical and Electronic Equipment
 Loading...