


Contents
Contents
Safety precautions . . . . . . . . . . . . . . . . . . . . . . . . . . . 4
Introduction . . . . . . . . . . . . . . . . . . . . . . . . . . . . . . . . 5
Possible uses . . . . . . . . . . . . . . . . . . . . . . . . . . . . . . . . . . . . . . . . . . . . . . . . . . . . . . . . . 5
First Steps . . . . . . . . . . . . . . . . . . . . . . . . . . . . . . . . . . 9
Contents . . . . . . . . . . . . . . . . . . . . . . . . . . . . . . . . . . . . . . . . . . . . . . . . . . . . . . . . . . . . . 9 System requirements . . . . . . . . . . . . . . . . . . . . . . . . . . . . . . . . . . . . . . . . . . . . . . . . . . . 9 Operating displays and connections . . . . . . . . . . . . . . . . . . . . . . . . . . . . . . . . . . . . . . 10 Front panel . . . . . . . . . . . . . . . . . . . . . . . . . . . . . . . . . . . . . . . . . . . . . . . . . . . . . . . 10 Back panel . . . . . . . . . . . . . . . . . . . . . . . . . . . . . . . . . . . . . . . . . . . . . . . . . . . . . . . 11 Setting up the Gigaset WLAN Repeater 108 . . . . . . . . . . . . . . . . . . . . . . . . . . . . . . . . 12 Connecting the Gigaset WLAN Repeater 108 . . . . . . . . . . . . . . . . . . . . . . . . . . . . . . . 13 To a wired network (LAN), a PC, a games console or a modem . . . . . . . . . . . . . . 13 Wirelessly to a PC . . . . . . . . . . . . . . . . . . . . . . . . . . . . . . . . . . . . . . . . . . . . . . . . . . 13 To the mains power supply . . . . . . . . . . . . . . . . . . . . . . . . . . . . . . . . . . . . . . . . . . 14
The user interface . . . . . . . . . . . . . . . . . . . . . . . . . . 15
Launching the user interface . . . . . . . . . . . . . . . . . . . . . . . . . . . . . . . . . . . . . . . . . . . . 16 The start screen . . . . . . . . . . . . . . . . . . . . . . . . . . . . . . . . . . . . . . . . . . . . . . . . . . . . . . 17 Selecting a language . . . . . . . . . . . . . . . . . . . . . . . . . . . . . . . . . . . . . . . . . . . . . . . . . . 19 Elements on the user interface . . . . . . . . . . . . . . . . . . . . . . . . . . . . . . . . . . . . . . . . . . 20
Basic Setup Wizard . . . . . . . . . . . . . . . . . . . . . . . . . . 21
Regional Options . . . . . . . . . . . . . . . . . . . . . . . . . . . . . . . . . . . . . . . . . . . . . . . . . . . . . 22 Operating Mode selection . . . . . . . . . . . . . . . . . . . . . . . . . . . . . . . . . . . . . . . . . . . 23
Basic settings for the Repeater and
Access point Operating Mode . . . . . . . . . . . . . . . . . . . . . . . . . . . . . . . . . . . . . . . . . . . 24 Settings for the wireless network . . . . . . . . . . . . . . . . . . . . . . . . . . . . . . . . . . . . . 24 Local network settings . . . . . . . . . . . . . . . . . . . . . . . . . . . . . . . . . . . . . . . . . . . . . . 26 Basic settings in Ethernet adapter Operating Mode . . . . . . . . . . . . . . . . . . . . . . . . . . 30 Local network settings . . . . . . . . . . . . . . . . . . . . . . . . . . . . . . . . . . . . . . . . . . . . . . 32
Security Setup Wizard . . . . . . . . . . . . . . . . . . . . . . . 35
Changing the system password . . . . . . . . . . . . . . . . . . . . . . . . . . . . . . . . . . . . . . . . . . 36 SSID . . . . . . . . . . . . . . . . . . . . . . . . . . . . . . . . . . . . . . . . . . . . . . . . . . . . . . . . . . . . . . . 37 Setting data encryption . . . . . . . . . . . . . . . . . . . . . . . . . . . . . . . . . . . . . . . . . . . . . . . . 38 WPA2/WPA with pre-shared key (PSK) . . . . . . . . . . . . . . . . . . . . . . . . . . . . . . . . . . 39 WEP encryption . . . . . . . . . . . . . . . . . . . . . . . . . . . . . . . . . . . . . . . . . . . . . . . . . . . 40 Access control within the wireless network . . . . . . . . . . . . . . . . . . . . . . . . . . . . . . . . 42 Saving settings . . . . . . . . . . . . . . . . . . . . . . . . . . . . . . . . . . . . . . . . . . . . . . . . . . . . . . . 44
1
Contents
Configuring the Advanced Settings . . . . . . . . . . . . 45
Operating Mode . . . . . . . . . . . . . . . . . . . . . . . . . . . . . . . . . . . . . . . . . . . . . . . . . . . . . . 46 Local Network . . . . . . . . . . . . . . . . . . . . . . . . . . . . . . . . . . . . . . . . . . . . . . . . . . . . . . . 47 Repeater/Access Point . . . . . . . . . . . . . . . . . . . . . . . . . . . . . . . . . . . . . . . . . . . . . . 47 Ethernet adapter Operating Mode . . . . . . . . . . . . . . . . . . . . . . . . . . . . . . . . . . . . . 50 Wireless Network . . . . . . . . . . . . . . . . . . . . . . . . . . . . . . . . . . . . . . . . . . . . . . . . . . . . . 51 Setting wireless security . . . . . . . . . . . . . . . . . . . . . . . . . . . . . . . . . . . . . . . . . . . . 55 WPA2-PSK and WPA2-PSK / WPA-PSK . . . . . . . . . . . . . . . . . . . . . . . . . . . . . . . . . . . 56 WEP encryption . . . . . . . . . . . . . . . . . . . . . . . . . . . . . . . . . . . . . . . . . . . . . . . . . . . 58 Permitted clients . . . . . . . . . . . . . . . . . . . . . . . . . . . . . . . . . . . . . . . . . . . . . . . . . . 61 Repeater function (WDS) . . . . . . . . . . . . . . . . . . . . . . . . . . . . . . . . . . . . . . . . . . . . 63
Administration . . . . . . . . . . . . . . . . . . . . . . . . . . . . . 64
Regional Options . . . . . . . . . . . . . . . . . . . . . . . . . . . . . . . . . . . . . . . . . . . . . . . . . . . . . 64 Internet Time . . . . . . . . . . . . . . . . . . . . . . . . . . . . . . . . . . . . . . . . . . . . . . . . . . . . . 65 System Password . . . . . . . . . . . . . . . . . . . . . . . . . . . . . . . . . . . . . . . . . . . . . . . . . . . . . 66 Saving and restoring a configuration . . . . . . . . . . . . . . . . . . . . . . . . . . . . . . . . . . . . . 67 Saving configuration data . . . . . . . . . . . . . . . . . . . . . . . . . . . . . . . . . . . . . . . . . . . 67 Restoring the back-up . . . . . . . . . . . . . . . . . . . . . . . . . . . . . . . . . . . . . . . . . . . . . . 68 Resetting to the factory settings . . . . . . . . . . . . . . . . . . . . . . . . . . . . . . . . . . . . . . 68 Reboot . . . . . . . . . . . . . . . . . . . . . . . . . . . . . . . . . . . . . . . . . . . . . . . . . . . . . . . . . . . . . 68 Updating firmware . . . . . . . . . . . . . . . . . . . . . . . . . . . . . . . . . . . . . . . . . . . . . . . . . . . . 69 System Log . . . . . . . . . . . . . . . . . . . . . . . . . . . . . . . . . . . . . . . . . . . . . . . . . . . . . . . . . . 71
Status information . . . . . . . . . . . . . . . . . . . . . . . . . . 72
Overview . . . . . . . . . . . . . . . . . . . . . . . . . . . . . . . . . . . . . . . . . . . . . . . . . . . . . . . . . . . 72 Security . . . . . . . . . . . . . . . . . . . . . . . . . . . . . . . . . . . . . . . . . . . . . . . . . . . . . . . . . . . . 74 Local Network . . . . . . . . . . . . . . . . . . . . . . . . . . . . . . . . . . . . . . . . . . . . . . . . . . . . . . . 75 Wireless Network . . . . . . . . . . . . . . . . . . . . . . . . . . . . . . . . . . . . . . . . . . . . . . . . . . . . . 76 Device . . . . . . . . . . . . . . . . . . . . . . . . . . . . . . . . . . . . . . . . . . . . . . . . . . . . . . . . . . . . . . 78
Appendix . . . . . . . . . . . . . . . . . . . . . . . . . . . . . . . . . . 80
Settings for wireless connection for games consoles |
|
and set-top boxes . . . . . . . . . . . . . . . . . . . . . . . . . . . . . . . . . . . . . . . . . . . . . . . . . . . . |
. 80 |
Integration in the network . . . . . . . . . . . . . . . . . . . . . . . . . . . . . . . . . . . . . . . . . . . . . . |
82 |
Windows XP . . . . . . . . . . . . . . . . . . . . . . . . . . . . . . . . . . . . . . . . . . . . . . . . . . . . . . |
83 |
Windows 2000 . . . . . . . . . . . . . . . . . . . . . . . . . . . . . . . . . . . . . . . . . . . . . . . . . . . . |
85 |
Windows 98 SE/ME . . . . . . . . . . . . . . . . . . . . . . . . . . . . . . . . . . . . . . . . . . . . . . . . |
88 |
Assigning IP addresses automatically . . . . . . . . . . . . . . . . . . . . . . . . . . . . . . . . . . . . . |
93 |
Windows XP . . . . . . . . . . . . . . . . . . . . . . . . . . . . . . . . . . . . . . . . . . . . . . . . . . . . . . |
93 |
Windows 2000 . . . . . . . . . . . . . . . . . . . . . . . . . . . . . . . . . . . . . . . . . . . . . . . . . . . . |
95 |
Windows 98 SE/ME . . . . . . . . . . . . . . . . . . . . . . . . . . . . . . . . . . . . . . . . . . . . . . . . |
97 |
Assigning static IP addresses . . . . . . . . . . . . . . . . . . . . . . . . . . . . . . . . . . . . . . . . . . . |
100 |
Private IP addresses . . . . . . . . . . . . . . . . . . . . . . . . . . . . . . . . . . . . . . . . . . . . . . . |
100 |
Windows XP . . . . . . . . . . . . . . . . . . . . . . . . . . . . . . . . . . . . . . . . . . . . . . . . . . . . . |
101 |
Windows 2000 . . . . . . . . . . . . . . . . . . . . . . . . . . . . . . . . . . . . . . . . . . . . . . . . . . . |
102 |
Windows 98 SE/ME . . . . . . . . . . . . . . . . . . . . . . . . . . . . . . . . . . . . . . . . . . . . . . . |
104 |
2
|
Contents |
Restarting the network . . . . . . . . . . . . . . . . . . . . . . . . . . . . . . . . . . . . . . . . . . |
. . . . . 106 |
Updating IP addresses . . . . . . . . . . . . . . . . . . . . . . . . . . . . . . . . . . . . . . . . . . . |
. . . . . 107 |
Trouble shooting . . . . . . . . . . . . . . . . . . . . . . . . . . . . . . . . . . . . . . . . . . . . . . . |
. . . . . 111 |
Specifications . . . . . . . . . . . . . . . . . . . . . . . . . . . . . . . . . . . . . . . . . . . . . . . . . . |
. . . . . 116 |
Approval . . . . . . . . . . . . . . . . . . . . . . . . . . . . . . . . . . . . . . . . . . . . . . . . . . . . . . |
. . . . . 117 |
Disposal . . . . . . . . . . . . . . . . . . . . . . . . . . . . . . . . . . . . . . . . . . . . . . . . . . . . . . |
. . . . . 117 |
Customer service (Customer Care) . . . . . . . . . . . . . . . . . . . . . . . . . . . . . . . . . |
. . . . . 119 |
Guarantee Certificate United Kingdom . . . . . . . . . . . . . . . . . . . . . . . . . . . . . . |
. . . . . 120 |
Guarantee Certificate Ireland . . . . . . . . . . . . . . . . . . . . . . . . . . . . . . . . . . . . . |
. . . . . 121 |
Tillverkarens garanti Sverige . . . . . . . . . . . . . . . . . . . . . . . . . . . . . . . . . . . . . . |
. . . . . 123 |
Takuuehdot Suomi . . . . . . . . . . . . . . . . . . . . . . . . . . . . . . . . . . . . . . . . . . . . . . |
. . . . . 124 |
Tillverkarens garanti Finland . . . . . . . . . . . . . . . . . . . . . . . . . . . . . . . . . . . . . . |
. . . . . 125 |
Garanti Norge . . . . . . . . . . . . . . . . . . . . . . . . . . . . . . . . . . . . . . . . . . . . . . . . . |
. . . . . 126 |
Gyldighet . . . . . . . . . . . . . . . . . . . . . . . . . . . . . . . . . . . . . . . . . . . . . . . . . . |
. . . . . 126 |
Garantiperiode . . . . . . . . . . . . . . . . . . . . . . . . . . . . . . . . . . . . . . . . . . . . . . |
. . . . . 127 |
Producentens Garanti Danmark . . . . . . . . . . . . . . . . . . . . . . . . . . . . . . . . . . . |
. . . . . 128 |
Glossary . . . . . . . . . . . . . . . . . . . . . . . . . . . . . . . . . 129
Index . . . . . . . . . . . . . . . . . . . . . . . . . . . . . . . . . . . . 137
3
Safety precautions
Safety precautions
uOnly use the mains adapter (5V DC 1A) that is supplied with the Gigaset WLAN Repeater 108. Comply with the connection values and ratings when connecting the device to the mains power supply.
u Protect the device from damp.
uNever open the device. For reasons of electrical safety it may only be opened by authorised service technicians.
uThe device may affect medical equipment. Take account of the technical conditions in the relevant environment.
Trademarks
Microsoft, Windows 98 SE, Windows ME, Windows 2000, Windows XP and Internet Explorer are registered trademarks of the Microsoft Corporation.
Mozilla Firefox is a registered trademark of the Mozilla Organisation. Super G is a registered trademark of Atheros Communications, Inc.
4
Introduction
Introduction
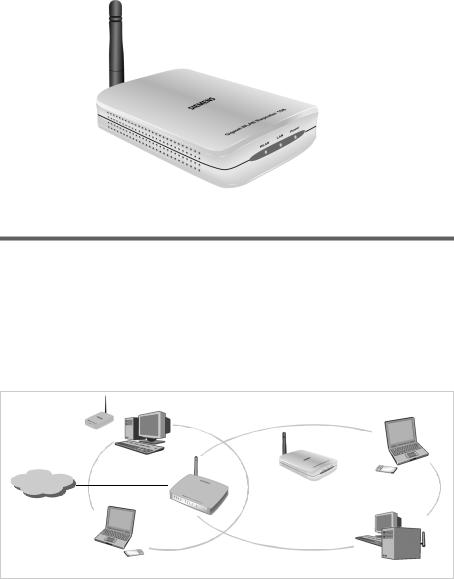
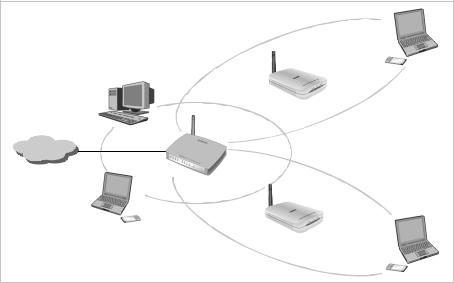
The Gigaset WLAN Repeater 108 offers various possibilities for use in wired and wireless networks. It enables very simple wireless integration of remote PCs into a network. You can also provide wireless access to a wired network.
Possible uses
You can use your Gigaset WLAN Repeater 108 in various functions in your network. The device provides three operating modes that you can choose to suit your requirements.
Use as Repeater
The Gigaset WLAN Repeater 108 can be used to increase the coverage of your wireless network. Set it up within the range of your network. The Gigaset WLAN Repeater 108 will now transmit data traffic into its own wireless area. This allows you to set up wireless networks that cover a much larger area than would be possible with just
one wireless router (e.g. Gigaset SE551 WLAN dsl/cable).
)))
)))
Internet
)))
)))
(((
Gigaset WLAN Repeater 108
)))
5

Introduction
In this case you need to operate your Gigaset WLAN Repeater 108 in Repeater Operating Mode.
PCs that you wish to connect to a wireless local network via a Gigaset WLAN Repeater 108 must have a wireless network adapter, such as a Gigaset USB Adapter 108.
Use as access point in conjunction with a Router
The Gigaset WLAN Repeater 108 permits wireless connection of PCs to a wired local network. For example, the Gigaset WLAN Repeater 108 can be connected via an Ethernet cable to an Ethernet router, thus providing further PCs with wireless access to this network. It is also possible to connect the Gigaset WLAN Repeater 108 away from (e.g. on the first floor) the Ethernet router (which is in the cellar for example) using cable.
In this case you need to operate your Gigaset WLAN Repeater 108 in Access point Operating Mode.
)))
Ethernet |
((( |
|
Internet
Gigaset WLAN Repeater 108
)))
Gigaset Router
6

Introduction
Use as wireless network adapter
The Gigaset WLAN Repeater 108 can be connected directly to the Ethernet port of a PC or other device (e.g. a games console, set-top box). It then functions as a wireless network adapter, but uses the device's wired Ethernet port. You do not need to install any additional driver software on the device. This ensures that access to the wireless network is independent of the operating system.
When you set up a connection from a computer or other device to an access point using the Gigaset WLAN Repeater 108, you operate the Gigaset WLAN Repeater 108 in
Ethernet adapter Operating Mode.
))) |
((( |
|
||
|
||||
Internet |
|
|
|
|
Gigaset WLAN Repeater 108
If you want to set up a wireless connection between two PCs or other devices using the Gigaset WLAN Repeater 108, you have to use one Gigaset WLAN Repeater 108 in Access point Operating Mode, and all others in Ethernet adapter Operating Mode. An example of this configuration, a wireless connection between two games consoles, can be found on page 80.
)))
 )))
)))
Gigaset WLAN Repeater 108
7

Introduction
Use for accessing the Internet with a PC
The Gigaset WLAN Repeater 108 permits wireless Internet access for a PC. Here it is operated in Access point Operating Mode, connected directly to a DSL or cable modem. However, simultaneous Internet access for several PCs is not possible. This requires a wireless router (e.g. a Gigaset SE551WLAN dsl/cable).
Internet |
|
|
|
|
))) |
((( |
|
|
|
|
|
|
|
||
|
|
|
|
|
|
||
|
|
|
|
|
|||
|
|
|
|
|
|
|
|
|
DSL modem |
|
|
|
|
||
|
Gigaset WLAN Repeater 108 |
||||||
To access the Internet, a DSL or cable modem is required. You also need an Internet Service Provider for Internet access. The Internet access is configured using the software from your Internet Service Provider. The Gigaset WLAN Repeater 108 does not require any further configuration.
Security functions
You can use various encryption methods and authentication methods (WEP, WPA/WPA2PSK,WPA/WPA2, MAC access control) to prevent unauthorised access to your wireless LAN or make data illegible to unauthorised parties. The security settings available to you depend on the Operating Mode you select and the components used in your local network.
8
First Steps
First Steps
Contents
The package contains the following components: u one Gigaset WLAN Repeater 108
u one mains adapter (5V DC, 1A) u one Ethernet cable (CAT5)
uone power supply cable for the Gigaset WLAN Repeater 108 fed by a USB interface (e.g. on the PC)
u one CD containing this user guide and the "Gigaset WLAN practical tips" document u one Quick Start Guide
System requirements
To operate your Gigaset WLAN Repeater 108 you need
ua PC with
–a Gigaset PC Card 108, a Gigaset USB Adapter 108 or a different 802.11g or 802.11b compatible wireless network adaptor
and/or
–an Ethernet card,
ua Web browser, e.g. Microsoft Internet Explorer 6.0 or higher, Mozilla Firefox 1.0 or higher, to configure your repeater.
9

First Steps
Operating displays and connections
Front panel
LED displays
The front panel of the Gigaset WLAN Repeater 108 contains LED displays that show the operating state and simplify installation and fault finding in the network.
The LED's show the following:
LED |
State |
Status |
|
|
|
|
|
|
On |
There is a wireless connection to the local network. |
|
|
|
|
|
|
|
u The Gigaset WLAN Repeater 108 is sending or receiving |
|
|
|
data on its WLAN interface. |
|
WLAN |
Flashing |
u New firmware is being loaded on the Gigaset WLAN |
|
|
|
Repeater 108 or the Gigaset WLAN Repeater 108 is |
|
|
|
rebooting. |
|
|
|
|
|
|
Off |
The WLAN interface is not active. |
|
|
|
|
|
|
On |
There is a connection to the local network via the Ethernet |
|
|
cable. |
||
|
|
||
|
|
|
|
LAN |
Flashing |
The Gigaset WLAN Repeater 108 is sending or receiving data |
|
via the Ethernet cable. |
|||
|
|
||
|
|
|
|
|
Off |
There is no connection to the local network via the Ethernet |
|
|
cable. |
||
|
|
||
|
|
|
|
Power |
On |
The Gigaset WLAN Repeater 108 has been powered up. |
|
|
|
||
Off |
The Gigaset WLAN Repeater 108 has been powered down. |
||
|
|||
|
|
|
10
First Steps
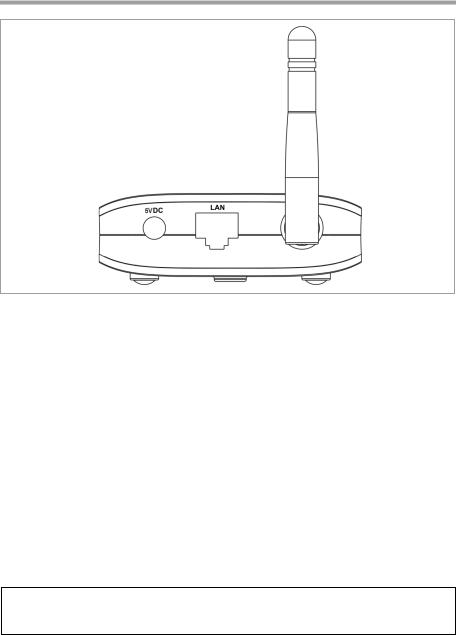
Back panel
The back panel of the Gigaset WLAN Repeater 108 houses the following sockets.
Element |
Description |
|
|
5VDC |
Socket for the mains adapter supplied |
|
Please note: |
|
Using the wrong power supply unit may damage the repeater. |
|
|
LAN |
Socket for an Ethernet cable |
|
|
Reset
The reset button is located behind the small opening on the underside of the device.
uRestart function: Press the reset button for longer than 1 second but less than 5 seconds to reboot the device. This does not affect the configuration settings. The WLAN LED flashes while the device restarts. This may take several minutes.
uReset function: Press the button behind the small opening on the underside of the device for at least 5 seconds to return all settings to the factory settings. Warning: This will clear all the configuration settings you have made.
Updated firmware will not be affected.
Please note:
While the device is rebooting the reset button does not function. To trigger the restart or reset function, please wait until the WLAN LED has stopped flashing.
11

First Steps
Setting up the Gigaset WLAN Repeater 108
The Gigaset WLAN Repeater 108 can be set up in any suitable location in the home or office. You do not need any special wiring. However, you should comply with the following guidelines:
uOperate the Gigaset WLAN Repeater 108 only indoors within a temperature range of +5 to +40 °C. Do not position the Gigaset WLAN Repeater 108 near sources of heat. Do not cover the ventilation slots. High temperatures will reduce the transmitter range.
uA suitable mains socket and a connection to the Ethernet socket of a PC or a wired network must be available where you set up the Gigaset WLAN Repeater 108.
uDo not position the device in the immediate vicinity of stereo equipment, TV sets or microwave ovens. This may cause interference.
uPosition the Gigaset WLAN Repeater 108 on a non-slip surface.
The router feet do not normally leave any traces on the surface they are on. However, some furniture surfaces may contain substances that attack and soften the router's plastic feet. This may cause the feet to mark the furniture surface.
uPosition the Gigaset WLAN Repeater 108 in such a way that it cannot fall down and damage the antenna.
u Do not place the Gigaset WLAN Repeater 108 on a heat sensitive surface.
uLay the cables so that nobody can trip over them. You should not cover the cables with anything.
u Protect the Gigaset WLAN Repeater 108 from dampness.
12
First Steps
Connecting the Gigaset WLAN Repeater 108
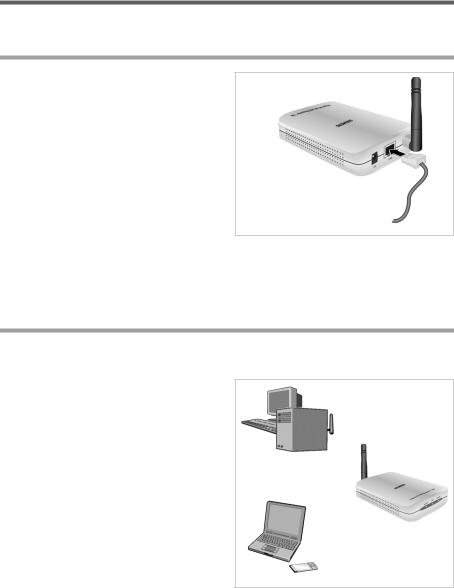
Set up the Gigaset WLAN Repeater 108 at the required location.
To a wired network (LAN), a PC, a games console or a modem
ìPlug one end of the Ethernet cable into the socket marked LAN on the Gigaset WLAN Repeater 108.
ìPlug the other end of the Ethernet cable into the device to which you wish to connect the Gigaset WLAN Repeater 108.
Depending on the particular application, this could be a router, a PC, a games console or a DSL/cable modem.
Please note:
Depending on the use, you will first have to make some settings via the browser-based configuration program of your Gigaset WLAN Repeater 108. We therefore recommend that you first connect the device to a PC using an Ethernet cable.
Wirelessly to a PC
A wireless connection is made using a wireless network adapter that must be installed in your PC.
A wireless network is defined by assigning an identical SSID to all the devices. The default SSID of the Gigaset WLAN Repeater 108 is ConnectionPoint.
ìTherefore, enter ConnectionPoint as the SSID on the wireless network adapter in your PC, and deactivate encryption if necessary. The user guide belonging to the device will tell you how to do this.
If the correct SSID has been entered in your PC's wireless network adapter, the wireless link will be established automatically once you connect your Gigaset WLAN Repeater 108 to the mains power supply.
)))
(((
)))
13
First Steps
Aligning the antenna
ì Align the antenna.
The antenna should be at right-angles to the communicating partner. The aerial can be turned sideways and backwards (away from the device).
The configuration and monitoring program provides information about the quality of the connection. Try out the antenna positions to see which gives the best results for your location.
Please remember:
Before your PC can communicate via the Gigaset WLAN Repeater 108, you must run network configuration on the PC (see page 82).
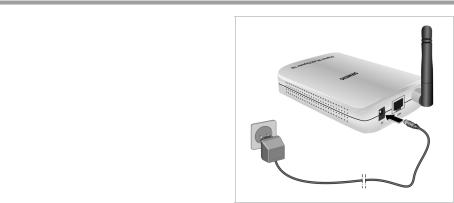
To the mains power supply
ìInsert the round plug into the connection socket marked 5VDC on the Gigaset WLAN Repeater 108.
ìPlug the mains adapter into a socket to which no other devices are connected.
Please remember:
Never plug the mains adapter into a mains power socket if you are not sure that it complies with the values on the nameplate. The mains adapter and device could be destroyed and you might be injured.
Your Gigaset WLAN Repeater 108 is now ready for use. u The power LED on the front lights up.
uThe WLAN-LED flashes during startup and is on continuously when a wireless connection to the local network is established.
uThe LAN LED lights up if you connect the Gigaset WLAN Repeater 108 using an Ethernet cable with a router or PC from your network.
14

The user interface
The user interface
Your Gigaset WLAN Repeater 108 comes supplied with factory settings that normally allow it to be used as a repeater without comprehensive adjustments being necessary. However, you still have to set up the connection to the access point, for which you wish to extend the range with the Gigaset WLAN Repeater 108. If you wish to use your Gigaset WLAN Repeater 108 in a different Operating Mode (see page 5), you need to configure it.
If you use encryption in your wireless network, you must also use encryption and set the keys on the repeater.
You can use a browser-based configuration program that can be opened from a PC to carry out the configuration steps and to monitor operations. Detailed information is provided about the steps required. Necessary configuration steps are carried out automatically.
Please note:
uFor initial configuration we suggest that you connect the Gigaset WLAN Repeater 108 with an Ethernet cable to the Ethernet port of the PC on which you wish to make the configuration. The Ethernet card should also be set to "Obtain an IP address automatically" (see Section
"Assigning IP addresses automatically" on page 93).
uTo start the configuration environment, you may need to deactivate the HTTP proxy for your browser (see page 83 for Windows XP, page 87 for Windows 2000 and page 91 for Windows 98 SE/ME).
uIf you use the Mozilla Firefox browser or if you use Internet Explorer together with Windows XP Service Pack 2, you need to configure the popup blocker (see page 84 for Windows XP, page 87 for Windows 2000 and page 92 for Windows 98 SE/ME).
15
The user interface
Launching the user interface
As described in the "First Steps" on page 9 chapter, you have connected your Gigaset WLAN Repeater 108 and made any changes necessary to the Ethernet card's network configuration (see the chapter "Integration in the network" on page 82). Your Gigaset WLAN Repeater 108 is connected to the mains power supply, the Power LED lights up, as does the WLAN LED. The LED for the local network lights up if you have connected a device directly using an Ethernet cable.
To access the Gigaset WLAN Repeater 108's user interface:
ìLaunch your Web browser.
ìEnter the IP address of the Gigaset WLAN Repeater 108 in the browser's address field.
http://192.168.2.254
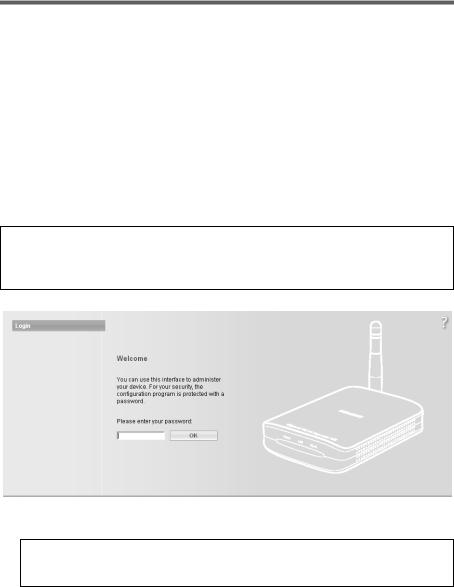
The login screen appears.
Please note:
If the DHCP server in your Gigaset WLAN Repeater 108 has been activated (factory setting), it may take a while after connecting to your PC until your PC is automatically assigned an IP address and you can access the configuration program.
ì The factory settings password is admin. Enter the password and click OK.
Please note:
For security reasons you should change the password at a later stage (see page 36).
16

The user interface
A screen with security information is displayed.
For the initial configuration you can skip this information. If you carry out all the basic and security settings using the wizard as described below, then your device and network are fully protected. If not, the next time you log on you will be informed of security gaps in the configuration program.
ì Click on OK.
You will now see the start screen.
The start screen
The start screen is the starting point for all configuration and administration activities.
Start screen functions
On the start screen you can
u select the language for the user interface (see page 19), u call up the Basic Setup Wizard (see page 21),
u call up the Security Setup Wizard (see page 35),
uopen the Advanced Settings menu for additional configuration options (see page 45),
uopen the Status menu to obtain status information about the Gigaset WLAN Repeater 108 (see page 72).
You can call up the wizards, the Advanced Settings menu, and status information from any other configuration program screen at any time via the tabs on the upper edge of the user interface.
17
The user interface
The configuration program offers you the following functions:
Basic Setup Wizard |
These wizards allow you to set the date for your region, select |
|
the Operating Mode and configure – depending on the Oper- |
|
ating Mode selected – your wireless and wired local network. |
|
This is described from page 21. |
Security Setup Wizard |
These wizards allow you to take precautions against unau- |
|
thorised access to your Gigaset WLAN Repeater 108 and the |
|
local network. For example, you can change the password |
|
and set up encryption for wireless traffic. This is described |
|
from page 35. For the protection of your network we recom- |
|
mend that you carry out this setup. |
Advanced Settings |
Additional settings for changing the configuration of your |
|
wireless and wired network can be found in the Advanced Set- |
|
tings menu. You can also, for example, secure and restore |
|
your configuration data or restart the device. These configu- |
|
ration steps are optional and can be carried out at a later |
|
stage. This is described from page 45. |
18
The user interface
Selecting a language
The user interface can be presented in various languages. ì Click on Language, top right above the start screen.
ìIf you wish to change the preset language, select the required language from the list.
ìClick OK to apply the setting.
The device will be restarted to activate the change. Confirm the reboot in the dialogue field shown.
Once the procedure has been concluded the start screen is shown again.
19

The user interface
Elements on the user interface
The user interface pages contain the following elements:
Log Off Button
The Log Off button is always present on the right above the user interface. If you click on Log Off the session is terminated and the login screen appears again.
Help
Click on the question mark to display explanations about the current user interface screen.
Buttons and symbols used by the wizards
The wizards use graphic symbols to show which steps you have already carried out.
As soon as you have changed the configuration in a screen, click on Next > at the bottom of the screen. The < Back button returns you to the previous configuration step, and Cancel returns you to the start screen. In this case all changes will be lost. The entered data is not stored until you click on Finish when closing the wizard.
Buttons in the Advanced Settings menu
OK |
Transfers the settings you have made to the |
|
Gigaset WLAN Repeater 108 configuration. |
Cancel |
Deletes all the entries in a screen since the last time you clicked |
|
on OK. |
Other buttons may be visible depending on the function in question. These are described in the relevant sections.
20

Basic Setup Wizard
Basic Setup Wizard
The Basic Setup Wizard guides you step by step through the general configuration of your Gigaset WLAN Repeater 108. This includes the following settings:
u regional settings
u Operating Mode selection
u wireless network (WLAN)settings u local network (LAN)settings
ì Select Basic Setup Wizard on the start screen to start the configuration.
ì Click the Next > button.
21
Basic Setup Wizard
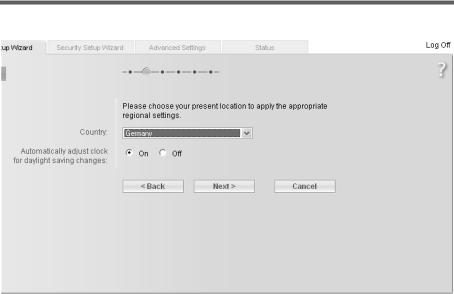
Regional Options
On this screen you can select your present location for the regional settings.
ìSelect the country where you are currently located from the list. You can set for the clock to change automatically to summer time and/or to the time zone as you wish.
ìSelect the required option and/or select the time zone for your location.
ìClick the Next > button.
22
Basic Setup Wizard
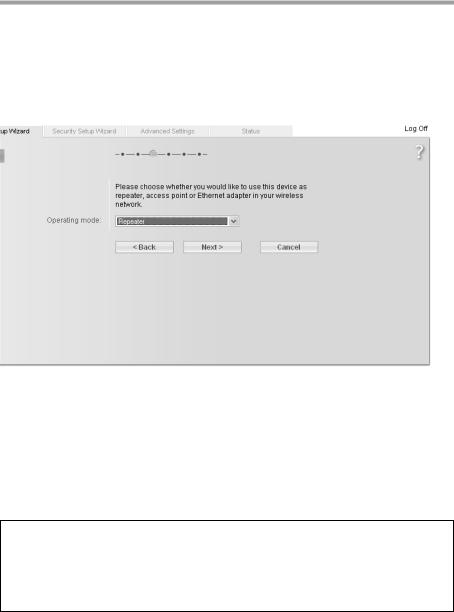
Operating Mode selection
You can operate the Gigaset WLAN Repeater 108 in the following modes: u Repeater or access point (see page 24)
u Ethernet Adapter (see page 30)
In the factory setting, the Gigaset WLAN Repeater 108 is configured as a repeater. You can find more information about the operating modes in the chapter "Possible uses" on page 5.
ìIf you wish to change the default settings, select the desired Operating Mode from the selection menu.
ìClick on Next >.
The basic settings for the Repeater and access point operating modes are described in the next section, the basic settings for the Ethernet adapter Operating Mode can be found on page 30.
If you change the Operating Mode, you will be prompted to restart the device after completing the basic settings.
Please note:
The Gigaset WLAN Repeater 108 can be used as an access point. However, if it is configured as a repeater or Ethernet adapter and the term access point is used in this context in this user guide, a different device, such as a Router Gigaset SE551WLAN dsl/cable or another Gigaset WLAN Repeater 108 configured as an access point is intended.
23
Basic Setup Wizard
Basic settings for the Repeater and
Access point Operating Mode
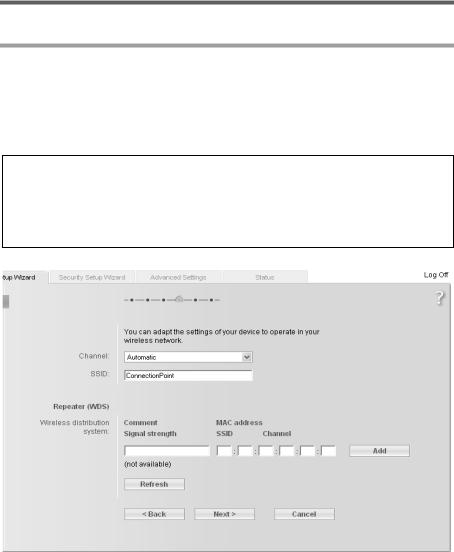
Settings for the wireless network
Your Gigaset WLAN Repeater 108 allows you to roam your network. Roaming provides optimum connection quality and uninterrupted data traffic while you move around within the range of your network. Your PC automatically sets up a connection to the access point with the strongest signal without interrupting data traffic. The precondition for roaming is setting the same radio channel, the same SSID and the same
IP subnet on all the network components.
Please note:
The network adapter of the PC you want to use to configure your Gigaset WLAN Repeater 108 should be set to obtain its IP address automatically (see also page 93). If you use static IP addresses in your network, the IP address of your PCs must be in the same subnet as the IP address of your Gigaset WLAN Repeater 108 (see
page 100).
The screenshot shows the setting options for Repeater operating mode; in access point operating mode, only Channel and SSID are displayed.
24

Basic Setup Wizard
Channel
ìIn Repeater Operating Mode you must set the channel of the access point for which you wish to increase the range with the repeater.
ìIn Access point Operating Mode select the Automatic option.
Note:
If the basic settings for the channel are not displayed on this screen, Super G is preset as the transmission mode for the device (see chapter "Settings for the wireless network" on page 24). In this case, the channel is set automatically.
SSID
The SSID (Service Set Identifier) defines your wireless network.
Please remember that using the same SSID for several access points and repeaters means that you cannot influence which access point your PC will use to set up a connection. This may cause problems if you wish to connect to a particular device for configuration, and it has not been properly integrated into the rest of the network. You may not be able to reach it as your PC automatically sets up a connection with the strongest access point. In this case, move to the immediate vicinity of the device you want to connect to, or connect your PC directly to the device in question by means of an Ethernet cable.
ìIf you want to use roaming, enter the same SSID as the one used by the access point you select.
In Access point operating mode, enter the SSID that you wish to use for your wireless network.
Make a note of this SSID, you also need to enter it into the network adaptors of the PCs of your wireless network.
Repeater (WDS) (is only displayed in repeater Operating Mode)
You can enter access points for which you wish to extend the range of the wireless network. If a connection to the access point exists, the Signal strength, the SSID and the Channel are displayed. If you wish to use the repeater, the WDS function must be activated on the access point. To do this, please refer to your access point's user guide.
ìEnter the MAC address of the access point or select an access point from the list of available access points by clicking on Add.
The MAC address of an access point in the Gigaset product range is shown on the nameplate on the underside of the unit.
ìEnter a name for the access point in the Description field. This name will assist you to identify the various devices more easily. The SSID is the default setting.
ìClick on Refresh to update the display.
ìClick on Next >.
25
Basic Setup Wizard
Note:
If carrying out the first configuration and if you have encrypted the data with one of the WPA standards, you can only select one access point. More than one access point is only possible with WEP encryption (page 38).
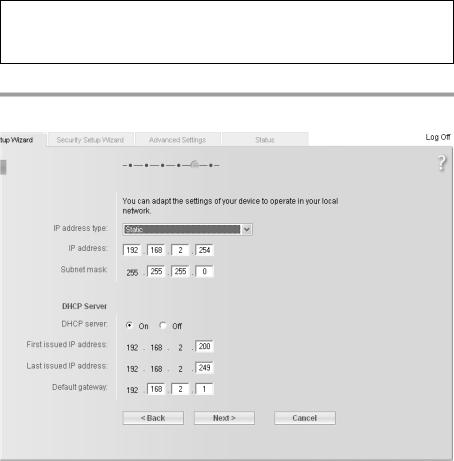
Local network settings
In the next step, you will see the screen for the basic settings of your local network.
ìIn IP address type, specify whether the Gigaset WLAN Repeater 108 should obtain its IP address automatically from an external DHCP server in the network or not.
–If you want to use a static IP address for your Gigaset WLAN Repeater 108 (factory setting for the IP address is 192.168.2.254), select the Static option and enter the IP address and subnet mask in the fields underneath. Make sure that the IP address you assign complies with the conventions for private IP addresses described on page 100.
–Normally you do not have to change the option for the IP address type. However, if your Gigaset WLAN Repeater 108 shall obtain its IP address automatically from a DHCP server in your network, please select the Obtained automatically option.
26

Basic Setup Wizard
Please note:
uIf you choose the Obtained automatically option for your Gigaset WLAN Repeater 108, you may no longer be able to reach your configuration program as usual. The IP address you need to call up the program via your browser is assigned dynamically and can therefore change at any time. Therefore we advise you to assign a static IP address to the Gigaset WLAN Repeater 108.
The Obtained automatically option should only be used in exceptional circumstances.
uYou may be able to obtain information about the currently assigned IP address from the logbook of the DHCP server from which your Gigaset WLAN Repeater 108 obtains its IP address. To do this, you may need the MAC address of your Gigaset WLAN Repeater 108, which you can find on the label on the underside of the device. Then enter the IP address shown in the logbook in the browser's address line to launch the configuration program. If you still cannot open the configuration program using this method, you will have to reset your
Gigaset WLAN Repeater 108 to the factory settings by using the reset button (see page 11). Your device will now have the old IP address 192.168.2.254 again and the DHCP server is activated.
If you have assigned a static IP address for your Gigaset WLAN Repeater 108, you can decide whether to use the Gigaset WLAN Repeater 108's integrated DHCP server.
Depending on the configuration of your network, it may be better to deactivate the Gigaset WLAN Repeater 108's integrated DHCP server.
ìTo do this, select the Off option for the DHCP server. However, this is only necessary, if
–another DHCP server is already being used in your network.
–you are using more than one Gigaset WLAN Repeater 108 in the same network. In this case, please switch off the DHCP server on all other repeaters. Make sure you change the IP addresses of the other Gigaset WLAN Repeater 108 (follow the example on page 28).
–the IP addresses in your network are static, i.e. you have manually assigned a static IP address to every network component.
Note:
If you opt for automatic address assignment for the connected PCs, make sure that the DHCP server of your existing access point has been activated. The devices connected via the Gigaset WLAN Repeater 108 will then use it automatically.
27
Basic Setup Wizard
If your network does not have a DHCP server yet, then you can use the DHCP server integrated in your Gigaset WLAN Repeater 108 to assign the IP addresses of the connected devices automatically.
ìIn this case, select the On option for the DHCP server.
ìIf you have activated the DHCP server integrated in your Gigaset WLAN Repeater 108, you should also check the following settings and make any changes that are necessary.
–The First issued IP address and Last issued IP address entries define the range of IP addresses that your Gigaset WLAN Repeater 108 should use to automatically assign IP addresses to PCs.
–In the Default gateway field, enter the IP address of your router that is to be used to connect your PCs to the Internet (e.g. 192.168.2.1).
Example of LAN settings with two repeaters
If you want to use several Gigaset WLAN Repeater 108 in the same network, make sure you assign different IP addresses to each of them. Use an address block that is within the selected subnet but not in the address block of the addresses automatically assigned by the DHCP server in your network. Switch off both associated DHCP servers.
For two repeaters in the same network, you could, for example, assign u the IP address 192.168.2.210 for Gigaset WLAN Repeater 108 A, u the IP address 192.168.2.240 for Gigaset WLAN Repeater 108 B.
Gigaset WLAN Repeater 108 A |
|
|
((( |
))) |
((( |
|
|
|
))) |
|
|
Internet |
|
|
((( |
))) |
|
))) |
|
|
Gigaset WLAN Repeater 108 B |
|
|
|
|
((( |
ì Once you have completed the settings for your local network, click on Next >. |
||
28 |
|
|
 Loading...