


User guide
Behind-the-Ear-Instruments
|
PRISMA 2 |
|
PRISMA 2 D SP |
|
|
||
|
PRISMA 2 P |
|
|
|
|
|
|
|
|
|
PRISMA 2
Siemens Hearing Solutions

A friendly guide to your new Siemens hearing instruments
Congratulations!
You have decided in favour of hearing instruments from Siemens. You have taken an important step towards being able to hear and understand better once again.
Your new hearing instruments will be your constant companions from now on. With these technically perfected hearing instruments you profit from our many years research and experience in microelectronics. Soon it will be easy for you to hear again. Good hearing is an important requirement for your physical well being. With your new hearing instruments, which will accompany you daily, you will again enjoy taking an active part in the world of speech and music.
And as with any constant companion, you’ll need some time at first to get used to handling your hearing instruments. With a little patience, we trust that your new hearing experience will be all the more pleasant for you.
For this purpose we are providing you with this brief user guide for your hearing instruments it should contribute to deepening your friendship with your new partners in the matter of better hearing. We want to help you to handle your hearing instruments correctly, so that they will become an important part of your life.
Wishing you much success,
Your Siemens Team
2

The best way to use your new hearing instruments
In this brief guide you will find instructions for inserting, placing and adjusting your hearing instruments. There are also tips and information on correct handling, cleaning, care and battery changing. And naturally information about how you can solve some failures yourself if you cannot visit a hearing instrument specialist immediately.
One important note: Your hearing success depends largely on how well your instruments fit in the ears and how carefully you maintain and handle them.
This is your |
Contents: |
|
|
|
|
|
|
|
|
Instrument |
|
|
|
|
|
|
|
|
|
|
PRISMA 2/PRISMA 2 P |
Page 5 |
2/2 P |
|
|
|
|
|
|
|
PRISMA 2 D SP |
Page 13 |
2 D SP |
|
|
|
|
|
|
Applicable to all PRISMA 2 instruments |
|
All |
||
How to insert your ear mould |
Page 24 |
|
|
|
|
|
|
|
|
Handling batteries |
Page 26 |
|
|
|
|
|
|
|
|
Notes for cleaning and care |
Page 27 |
|
|
|
|
|
|
|
|
The best way to handle your hearing instruments |
Page 29 |
|
|
|
|
|
|
|
|
How to solve some failures yourself |
Page 30 |
|
|
|
|
|
|
|
|
Hearing training made easy |
Page 32 |
|
|
|
|
|
|
|
|
3
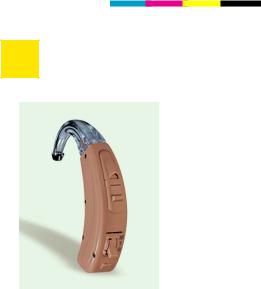
PRISMA 2/PRISMA 2 P
|
|
|
|
|
|
Description of the PRISMA 2/PRISMA 2 P |
|
|
|
|
|
hearing instruments |
Page |
6 |
|
|
|
Battery changing |
Page |
7 |
|
2/2 P |
|
Safety notes for batteries |
Page |
8 |
|
|
|
|
|
||||
|
|
|
|
|
|
How to switch your instrument on/off |
Page |
8 |
|
|
|
|
|
|
|
|
|
Program button |
Page |
9 |
|
|
|
|
|
|
|
||
Children’s safety device |
Page 10 |
|
|||
|
|
|
|
||
Audio input |
Page 11 |
|
|||
|
|
|
|
|
|
Applicable to all PRISMA 2 instruments |
|
|
|
|
|
How to insert your ear mould |
Page 24 |
|
|||
|
|
|
|
||
Handling Batteries |
Page 26 |
|
|||
|
|
|
|
||
Notes for cleaning and care |
Page 27 |
|
|||
|
|
|
|
||
The best way to handle your hearing instruments |
Page 29 |
|
|||
How to solve some failures yourself |
Page 30 |
|
|||
Hearing training made easy |
Page 32 |
|
|
||
5
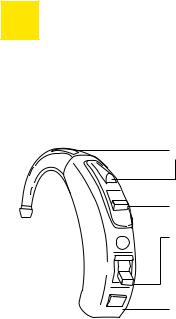
Description of the PRISMA 2, PRISMA 2 P hearing instrument
Microphone opening
Program button
Selection of operating mode
M = hearing via microphone
T = induction coil switched on
O = Off
Battery compartment with lock
For your instrument you will need BatteryType 13.
6

Battery changing
▼ ▼
▼
Open the |
|
|
battery |
|
|
compartment |
|
|
Insert the |
|
|
battery |
|
|
Close the |
|
|
battery |
2/2 P |
|
compartment |
||
|
When inserting the battery please pay attention to the plus side on the battery.
The plus (+) side of the battery is always the smooth side. You can recognise the minus (–) side by the coloured ring.
You should always keep spare batteries at hand.
If you feel you cannot change the battery yourself, ask someone to help you: a family member, friend or your hearing instrument specialist.
7
Safety notes for batteries
WARNING
Keep batteries away from children!
Batteries must not be swallowed.
Remove the batteries when the instrument is not in use over a prolonged period. Replace leaking batteries without delay.
Do not throw away your dead batteries!
Return them to your hearing instrument specialist for proper, environmentally conscious disposal.
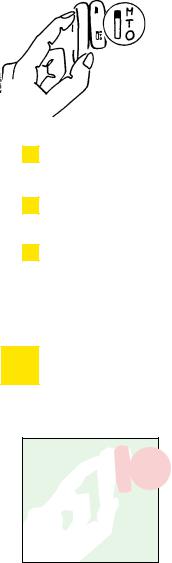
How to switch your instrument on /off
Set the switch to position M
The hearing instrument is ready for use without any further adjustment. Even if the sound level changes, your instrument is always adjusted correctly according to your personal needs. Thus soft sounds aren’t lost and loud sounds aren’t amplified or are amplified only insignificantly.
8
Program button
You can adapt to a changed hearing situation by lightly pressing the program button. For instance, you are better able to understand the person you’re talking to even in disturbing background noise.
You simply press the button to choose between two programs.
Your acoustician can adapt the two programs exactly to
your individual needs. In this way it is possible to take 2/2 P account of different microphone characteristics.
A beep indicates which hearing program is selected.
One beep is when changing to microphone program “1” or to “T” setting. Two beeps is when changing to microphone program “2”.
If required, your hearing instrument specialist can switch the beeps off.
9
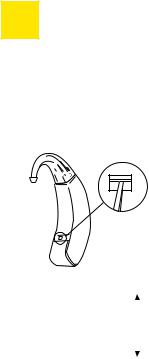
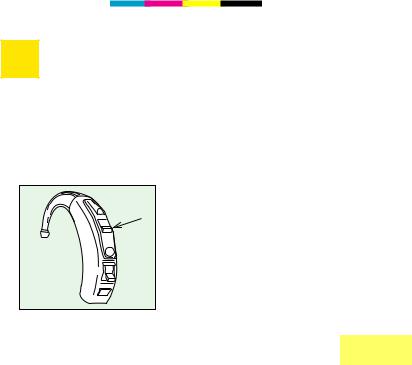
Children’s safety device
|
|
|
Your instrument is equipped |
|
|
|
|
with a “children’s safety |
|
|
|
|
device“. This is intended to |
|
|
|
|
prevent the unintentional |
|
|
|
|
removal of batteries from their |
|
|
|
|
compartment, such as by small |
|
|
|
|
children.This safety device is on |
|
|
|
|
the inner side of the hearing |
|
|
|
|
instrument. Please use a tool |
|
|
|
|
suited to the purpose to open |
|
|
|
|
||
unlock |
or close the safety device. |
|||
|
|
|
Pushing the slide towards the |
|
|
|
|
||
|
|
|
battery compartment locks the |
|
|
|
|
battery compartment; pushing |
|
|
|
|
the slide towards the ear hook |
|
|
|
|
unlocks the battery compart- |
|
lock |
||||
ment so that it can be opened. |
||||
10
Audio input
Your hearing instrument has an audio input.This enables the connection between hearing instrument and accessories. In this way you can understand better in certain hearing situations.Take care that before you use the audio input you pull off the protective foil.
The audio shoe connects the audio cable with your instrument. Plug the audio shoe on to the hearing instrument (Fig. 1 and Fig 2).
Remove the audio shoe from the hearing instrument (Fig. 3).
2/2 P
|
|
|
|
Fig. 3 |
Fig. 1 |
|
Fig. 2 |
||
|
||||
|
||||
|
||||
|
||||
Safety note for instruments with audio input
The audio input can only be connected to power supplied devices if they fulfil at least the safety provisions of
IEC 65 / DIN VDE 0860.
11
 Loading...