


 Loading...
Cisco Desktop Collaboration Experience DX600 Series User Guide,
Release 10.0(1)
First Published: April 23, 2013
Last Modified: December 06, 2013
Americas Headquarters
Cisco Systems, Inc. 170 West Tasman Drive
San Jose, CA 95134-1706 USA http://www.cisco.com Tel: 408 526-4000
800 553-NETS (6387) Fax: 408 527-0883
Text Part Number: OL-28931-01
THE SPECIFICATIONS AND INFORMATION REGARDING THE PRODUCTS IN THIS MANUAL ARE SUBJECT TO CHANGE WITHOUT NOTICE. ALL STATEMENTS, INFORMATION, AND RECOMMENDATIONS IN THIS MANUAL ARE BELIEVED TO BE ACCURATE BUT ARE PRESENTED WITHOUT WARRANTY OF ANY KIND, EXPRESS OR IMPLIED. USERS MUST TAKE FULL RESPONSIBILITY FOR THEIR APPLICATION OF ANY PRODUCTS.
THE SOFTWARE LICENSE AND LIMITED WARRANTY FOR THE ACCOMPANYING PRODUCT ARE SET FORTH IN THE INFORMATION PACKET THAT SHIPPED WITH THE PRODUCT AND ARE INCORPORATED HEREIN BY THIS REFERENCE. IF YOU ARE UNABLE TO LOCATE THE SOFTWARE LICENSE OR LIMITED WARRANTY, CONTACT YOUR CISCO REPRESENTATIVE FOR A COPY.
The following information is for FCC compliance of Class A devices: This equipment has been tested and found to comply with the limits for a Class A digital device, pursuant to part 15 of the FCC rules. These limits are designed to provide reasonable protection against harmful interference when the equipment is operated in a commercial environment. This equipment generates, uses, and can radiate radio-frequency energy and, if not installed and used in accordance with the instruction manual, may cause harmful interference to radio communications. Operation of this equipment in a residential area is likely to cause harmful interference, in which case users will be required to correct the interference at their own expense.
The following information is for FCC compliance of Class B devices: This equipment has been tested and found to comply with the limits for a Class B digital device, pursuant to part 15 of the FCC rules. These limits are designed to provide reasonable protection against harmful interference in a residential installation. This equipment generates, uses and can radiate radio frequency energy and, if not installed and used in accordance with the instructions, may cause harmful interference to radio communications. However, there is no guarantee that interference will not occur in a particular installation. If the equipment causes interference to radio or television reception, which can be determined by turning the equipment off and on, users are encouraged to try to correct the interference by using one or more of the following measures:
•
•
•
•
Reorient or relocate the receiving antenna.
Increase the separation between the equipment and receiver.
Connect the equipment into an outlet on a circuit different from that to which the receiver is connected.
Consult the dealer or an experienced radio/TV technician for help.
Modifications to this product not authorized by Cisco could void the FCC approval and negate your authority to operate the product
The Cisco implementation of TCP header compression is an adaptation of a program developed by the University of California, Berkeley (UCB) as part of UCB’s public domain version of the UNIX operating system. All rights reserved. Copyright © 1981, Regents of the University of California.
NOTWITHSTANDING ANY OTHER WARRANTY HEREIN, ALL DOCUMENT FILES AND SOFTWARE OF THESE SUPPLIERS ARE PROVIDED "AS IS" WITH ALL FAULTS. CISCO AND THE ABOVE-NAMED SUPPLIERS DISCLAIM ALL WARRANTIES, EXPRESSED OR IMPLIED, INCLUDING, WITHOUT LIMITATION, THOSE OF MERCHANTABILITY, FITNESS FOR A PARTICULAR PURPOSE AND NONINFRINGEMENT OR ARISING FROM A COURSE OF DEALING, USAGE, OR TRADE PRACTICE.
IN NO EVENT SHALL CISCO OR ITS SUPPLIERS BE LIABLE FOR ANY INDIRECT, SPECIAL, CONSEQUENTIAL, OR INCIDENTAL DAMAGES, INCLUDING, WITHOUT LIMITATION, LOST PROFITS OR LOSS OR DAMAGE TO DATA ARISING OUT OF THE USE OR INABILITY TO USE THIS MANUAL, EVEN IF CISCO OR ITS SUPPLIERS HAVE BEEN ADVISED OF THE POSSIBILITY OF SUCH DAMAGES.
Any Internet Protocol (IP) addresses and phone numbers used in this document are not intended to be actual addresses and phone numbers. Any examples, command display output, network topology diagrams, and other figures included in the document are shown for illustrative purposes only. Any use of actual IP addresses or phone numbers in illustrative content is unintentional and coincidental.
Cisco and the Cisco logo are trademarks or registered trademarks of Cisco and/or its affiliates in the U.S. and other countries. To view a list of Cisco trademarks, go to this URL: http:// www.cisco.com/go/trademarks. Third-party trademarks mentioned are the property of their respective owners. The use of the word partner does not imply a partnership relationship between Cisco and any other company. (1110R)
 The Bluetooth word mark and logo are registered trademarks owned by Bluetooth SIG, Inc., and any use of such marks by Cisco Systems, Inc., is under license.
Google, Google Play, Android and certain other marks are trademarks of Google Inc.
The terms HDMI and HDMI High-Definition Multimedia Interface, and the HDMI Logo are trademarks or registered trademarks of HDMI Licensing LLC in the United States and other countries.
© 2013 Cisco Systems, Inc. All rights reserved.

C H A P T E R 1
C O N T E N T S
Phone features 1
Buttons and hardware 1
Cisco Desktop Collaboration Experience DX650 buttons and hardware 1
Phone cable installation 3
Hookswitch clip removal 3
TAPS registration 4
Handset 4
Headset 4
Headset support 5
Audio quality 5
3.5 mm headsets 5
Wireless headset 5
Speakerphone 5
AutoAnswer with headset or speakerphone 6
Camera 6
Phone cable lock 7
Setup Assistant 7
Set up applications 7
Android 8
Gestures 8
Lock screen 8
Unlock screen 9
Place emergency call from Lock screen 9
Add PIN 9
Add password 10
Reset lost PIN or password 10
Awake to Phone application 10
Cisco Extension Mobility 10
Cisco Desktop Collaboration Experience DX600 Series User Guide, Release 10.0(1)
OL-28931-01 |
iii |

Contents
C H A P T E R 2
Sign In to Extension Mobility from Lock screen 11
Sign in to Extension Mobility from Settings 11
Sign Out of Extension Mobility from Lock screen 11
Sign Out of Extension Mobility from Settings 12
Set screen timeout 12
Home screen 12
Status bar 12
Navigation icons 13
Applications menu 13
Work spaces 13
Navigate work spaces 13
Widgets 13
Set up home screen 14
Add application icon to home screen 14
Add widget to home screen 14
Move widget or icon 15
Remove widget or icon 15
Change wallpaper 15
Quick Contact Badge 15
Share menu 16
On-screen keyboard 16
Energy savings 16
Cleaning 17
Calling tasks 19
Common call tasks 19
Answer call 19
Disconnect call 20
Hold and resume 21
Put call on hold 22
Remove call from hold on different line 22
Mute 22
Mute or unmute call 22
Place call 23
Place call with headset 23
|
Cisco Desktop Collaboration Experience DX600 Series User Guide, Release 10.0(1) |
iv |
OL-28931-01 |

Contents
Place call with speakerphone |
23 |
|
|
|
Place call when another call is active 23 |
|
|
||
Redial number 24 |
|
|
|
|
Call history 24 |
|
|
|
|
Add contact from call history |
24 |
|
|
|
Video calls 24 |
|
|
|
|
Video call control bar 24 |
|
|
|
|
Stop your video transmission |
25 |
|
|
|
Automatic video transmission |
25 |
|
|
|
Stop automatic video transmission 25 |
|
|
||
Adjust video exposure 25 |
|
|
|
|
Set video bandwidth 26 |
|
|
|
|
Self-video 26 |
|
|
|
|
Show self-video 26 |
|
|
|
|
Visual Voicemail 26 |
|
|
|
|
Listen to voice message |
26 |
|
|
|
View voice message details 27 |
|
|
||
Reply to voice message |
27 |
|
|
|
Forward voice message |
27 |
|
|
|
Delete voice message 27 |
|
|
|
|
Advanced call tasks 27 |
|
|
|
|
Active call movement 28 |
|
|
|
|
Switch active call from desk phone to mobile phone |
28 |
|||
Switch active call from mobile phone to desk phone |
28 |
|||
Switch active call from mobile phone to desk phone that shares same line 28 |
||||
Business calls with single phone number 29 |
|
|
||
Mobile Connect and Mobile Voice Access 29 |
|
|||
Put call picked up on mobile phone on hold |
30 |
|
||
Connect to Mobile Voice Access 30 |
|
|
||
Turn on Mobile Connect from mobile phone |
30 |
|
||
Turn off Mobile Connect from mobile phone |
31 |
|
||
Turn on or off Mobile Connect access to all remote destinations from desk phone 31 |
||||
Use Mobile Voice Access to call from mobile phone |
31 |
|||
Conference calls 32 |
|
|
|
|
Ad hoc conference 32 |
|
|
|
|
Cisco Desktop Collaboration Experience DX600 Series User Guide, Release 10.0(1) |
||||
OL-28931-01 |
|
|
|
v |

Contents
Call participants to create conference 32
Add contacts to conference 32
Join conference 33
Join together existing calls on single phone line 33
Join together existing calls on multiple phone lines 33
Barge conference 33
Barge call on shared line to create conference 34
Meet Me conference 34
Start Meet Me conference 34
Join Meet Me conference 34
Conference participants list 35
Control conference with participants list 35
Call forward 35
Set up and cancel Call Forward All from phone 36
Set up or cancel call forwarding 36
Call Park 36
Store and retrieve active call with Call Park 37
Direct and store active call at Directed Call Park number 37
Retrieve parked call from Directed Call Park number 37
Direct, store, and retrieve active call at Assisted Directed Call Park number 38
Call Pickup 38
Answer call ringing on another extension within Call Pickup group 38
Answer call ringing on another extension outside Call Pickup group 39
Answer call ringing on another extension in group or in associated group 39
Answer call ringing on particular extension 39
Call transfer 39
Transfer call without talking to transfer recipient 40
Talk to transfer recipient before transferring call 40
Call transfer to voicemail 40
Send active, ringing, or held call to voicemail 41
Dial from corporate directory on personal computer with Cisco Web Dialer 41
Notify when busy or ringing extension available 41
Dial from corporate directory on phone 42
Dial from favorites 42
Dial from recent contacts 42
|
Cisco Desktop Collaboration Experience DX600 Series User Guide, Release 10.0(1) |
vi |
OL-28931-01 |

Contents
C H A P T E R 3
Do Not Disturb 42
Turn DND on and off 43
Set up DND settings 43
Hunt groups 43
Sign in and out of hunt groups 44
Intercom calls 44
Place intercom call to preconfigured intercom number 45
Place intercom call to any intercom number 45
Receive intercom call 45
Line and call definitions 45
Line and call icons 46
Multiple calls 46
Switch between calls on one line 47
Switch between calls on different lines 47
Switch from active call to answer ringing call 47
Remove call from hold on current line 47
Place call while another call is active 48
Secure calls 48
Shared lines 50
Remote-in-use icon 50
Call information and Barge 50
Barge, cBarge, and shared lines 50
Single-button and multitouch Barge 50
Barge features 51
Privacy and shared lines 51
Prevent and allow others to view or barge calls on shared line 52
Speed Dial 52
Make call with speed-dial button 52
Make call with on-hook abbreviated dial 53
Suspicious call trace 53
Notify system administrator about suspicious or harassing call 53
Phone customization and settings 55
Change ringtone 55
Add custom ringtone 55
Cisco Desktop Collaboration Experience DX600 Series User Guide, Release 10.0(1)
OL-28931-01 |
vii |

Contents
C H A P T E R 4
Adjust phone ringer volume 56
Change phone screen brightness 56
Networks 56
Wired network connection 56
Connect to wired network 57
Share wired network connection with computer 57
Connect to wireless network 57
Connect to hidden wireless network 58
Edit wireless network 58
Delete wireless network 58
Supported wireless security 59
Web proxy 59
Add web proxy 59
Edit web proxy 60
Delete web proxy 60
TFTP 60
Connect to TFTP Server 61
AnyConnect VPN 61
AutoNetDetect 61
Password persistence 61
Add VPN connection profile 62
Edit VPN connection profile 62
Connect to VPN 63
Disconnect from VPN 63
Delete VPN connection profile 64
Optimize video call experience over VPN 64
User Options web pages 65
User Options web pages actions 65
Log in and out of User Options web pages 65
Select device from User Options web pages 66
Select configuration option 66
Features and services setup on web 66
Speed Dial setup on web 66
Set up speed-dial buttons 67
|
Cisco Desktop Collaboration Experience DX600 Series User Guide, Release 10.0(1) |
viii |
OL-28931-01 |

Contents
C H A P T E R 5
Set up Abbreviated Dialing codes 67
Phone services setup on web 67
Subscribe to service 68
Search for services 68
Change or end services 68
Change service name 69
User settings on web 69
Change browser password 69
Change PIN 70
Change User Options web pages language setting 70
Change phone display language 70
Line settings on web 70
Set up call forward for each line 71
Change voice message indicator setting for each line 71
Change audible voice message indicator setting for each line 72
Change or create line text label that appears on phone screen 72
Set up phone and access list for Mobile Connect 72
Create access list 73
Add new remote destination 73
Cisco Web Dialer 74
Use Web Dialer with User Options directory 74
Use Web Dialer with another online corporate directory 75
Log out of Web Dialer 75
Set up, view, or change Web Dialer preferences 75
Applications 77
Calendar 77
Calendar account 77
Add calendar event 78
Edit event 78
Delete event 78
Start scheduled WebEx meeting 79
Join scheduled WebEx meeting 79
Settings 79
Hide declined events 79
Cisco Desktop Collaboration Experience DX600 Series User Guide, Release 10.0(1)
OL-28931-01 |
ix |

Contents
Set alerts and notifications 79
Select ringtone 80
Edit vibrate settings 80
Set default reminder time 80
Calendar widget 80
Contacts 80
Contact details 81
View recent activity 81
Add contact 81
Edit contact 81
Remove contact 82
Join contacts 82
Share contact 82
Favorites 82
Mark contact as favorite 83
Groups 83
Add group 83
Delete group 83
Add contact to group 84
Edit group 84
Search 84
Search your contacts 85
Import contacts 85
Export contacts 85
Set display options 86
Availability 86
Email 86
Inbox 86
Refresh inbox 86
Sort mailbox 87
Search email messages 87
Send email message 87
Save email message draft 88
Reply to email message 88
Forward email message 88
|
Cisco Desktop Collaboration Experience DX600 Series User Guide, Release 10.0(1) |
x |
OL-28931-01 |
Contents
Add attachment to email message 88
Add CC or BCC recipient 89
Delete email message 89
Delete multiple email messages 89
Delete folder 89
Move email message 90
Mark email message as favorite 90
Mark multiple email messages as favorites 90
Mark email message as new 90
Mark multiple email messages as new 91
Search email messages |
91 |
|
|
|
||
Set sorting options |
91 |
|
|
|
|
|
Add signature to email messages |
92 |
|||||
Digitally signed email messages |
92 |
|||||
Set email check frequency |
92 |
|
|
|||
Reset email account password |
92 |
|
||||
Select ringtone 93 |
|
|
|
|
|
|
Edit vibrate settings |
93 |
|
|
|
|
|
Jabber IM 93 |
|
|
|
|
|
|
Jabber IM account |
93 |
|
|
|
|
|
Add Jabber IM account 93 |
|
|
||||
Automatic sign-in |
94 |
|
|
|
||
Availability 94 |
|
|
|
|
|
|
Add custom status |
94 |
|
|
|
||
Delete custom status |
95 |
|
|
|||
Contacts 95 |
|
|
|
|
|
|
Add chat contact |
95 |
|
|
|
||
Contact requests |
95 |
|
|
|
||
View contact requests |
96 |
|||||
Remove chat contact |
96 |
|
|
|||
Show offline contacts |
96 |
|
|
|||
Unsynced contacts |
96 |
|
|
|||
Add unsynced contact to chat contacts 97 |
||||||
Conversations 97 |
|
|
|
|
|
|
Start conversation |
97 |
|
|
|
||
Cisco Desktop Collaboration Experience DX600 Series User Guide, Release 10.0(1) |
||||||
OL-28931-01 |
|
|
|
|
|
xi |

Contents
C H A P T E R 6
Emoticons 97
Insert emoticon into conversation 97
End conversation 97
Search 98
Start conversation with search result 98
Settings 98
Enable audio and vibration notifications 98
Enable status bar notifications 98
Set profile photo 99
Set your ringtone 99
Sign out of Jabber IM 99
WebEx 99
Sign in to WebEx 100
Sign in to WebEx with single sign-on 100
Start instant WebEx meeting 101
Schedule new WebEx meeting 101
Start scheduled WebEx meeting 101
Join scheduled WebEx meeting 101
Join WebEx meeting by meeting number 101
View participant list 102
Chat with participant 102
Chat with everyone 102
Invite more participants to WebEx meeting 102
Invite more participants during WebEx meeting 103
Show video during WebEx meeting 103
WebEx widget 103
More applications 103
Auto-update applications 103
UCM App 104
Remove application 104
Accessibility 105
Accessibility features 105
Hard of hearing accessibility features 107
Vision-impaired and blind accessibility features 109
|
Cisco Desktop Collaboration Experience DX600 Series User Guide, Release 10.0(1) |
xii |
OL-28931-01 |

Contents
C H A P T E R 7
Change font size 111
Change screen brightness 111
Enable screen lock sound 111
Enable spoken passwords 112
Enable TalkBack 112
Explore by Touch 112
Explore by Touch gestures 113
Enable Explore by Touch 114
Enable touch sounds 114
Mobility-impaired accessibility features 114
Change touch and hold delay 115
Enable web scripts 115
Accessories 117
Bluetooth 117
Enable Bluetooth 117
Scan for Bluetooth device 118
Pair Bluetooth device 118
Unpair Bluetooth device 118
Share files 118
View received files 119
Make phone discoverable 119
Set Bluetooth device name 119
External monitor 119
Connect external monitor 120
Switch display mode 120
Mouse panning 120
Set monitor orientation 120
Launch application on external monitor 121
Autolaunch application to external monitor 121
Move application to external monitor 121
Move application to phone screen 121
HDCP support 122
Virtual desktop infrastructure 122
External camera 123
Cisco Desktop Collaboration Experience DX600 Series User Guide, Release 10.0(1)
OL-28931-01 |
xiii |

Contents
Close self view 123
Move video to phone display 124
Switch view mode for video calls 124
Swap camera views 124
USB keyboard and mouse 124
VDI shortcuts 125
VDI keyboard shortcuts 125
VDI mouse actions 125
USB memory stick 125
USB-powered hub 125
USB console cable 125
C H A P T E R 8
Product safety, security, and related information 127
Safety and performance information 127
Power outage 127
Emergency response notification 127
Emergency response notification for phone 128
Emergency response notification for VPN 128
External devices 128
Headset safety 129
Bluetooth wireless headset performance 129
FCC compliance statements 129
FCC part 15.21 statement 129
FCC receivers and class B digital statement 130
CE mark 130
Cryptographic information 130
Data backup 130
Back up data 131
Problem Report Tool 131
Report problem 131
Additional information 131
Obtaining documentation and submitting service request 132
|
Cisco Desktop Collaboration Experience DX600 Series User Guide, Release 10.0(1) |
xiv |
OL-28931-01 |

C H A P T E R 1
Phone features
This chapter outlines the features of the Cisco Desktop Collaboration Experience DX600 Series phones.
• |
Buttons and hardware, |
page 1 |
|
• |
Setup Assistant, |
page |
7 |
• |
Android, page 8 |
|
|
• |
Energy savings, |
page |
16 |
• |
Cleaning, page |
17 |
|
Buttons and hardware
This section describes the phone buttons and hardware.
Cisco Desktop Collaboration Experience DX650 buttons and hardware
This figure identifies the important parts of the phone.
Cisco Desktop Collaboration Experience DX600 Series User Guide, Release 10.0(1)
OL-28931-01 |
1 |

Phone features
Cisco Desktop Collaboration Experience DX650 buttons and hardware
Table 1: Phone buttons and hardware
|
Item |
1 |
Privacy shutter slide switch |
2 |
Camera |
3 |
Phone screen |
4 |
Keypad |
5 |
microSD card slot |
6 |
Lock button |
|
|
7 |
Transfer button |
|
|
8 |
End call button |
|
|
9 |
Hold button |
|
|
10 |
Conference button |
|
|
11 |
Volume button |
|
 Description
Slide the switch to open or close the camera shutter.
 Front-facing camera for video calls.
Shows phone features.
 Allows you to dial phone numbers. Allows you to connect a microSD card.
Locks the phone screen, restarts the phone, or turns the phone on and off.
Transfers a call.
Ends a call.
Places a call on hold, or resumes a held call.
Creates a conference call.
Controls the handset, headset, and speakerphone volume (off-hook) and the ringer volume (on-hook).
|
Cisco Desktop Collaboration Experience DX600 Series User Guide, Release 10.0(1) |
2 |
OL-28931-01 |
Phone features
Phone cable installation
 Item
Item
12
Speaker button
13
Stop Video button
14
Headset button
15
Mute button
 16
16  Handset with light strip
 Description
Toggles the speakerphone on or off. When the speakerphone is on, the button is lit.
Toggles video on or off. When video is stopped, the button is lit.
Toggles the headset on or off. When the headset is on, the button is lit.
Toggles the microphone on or off. When the microphone is muted, the button is lit.
 Indicates an incoming call or new voice message.
Phone cable installation
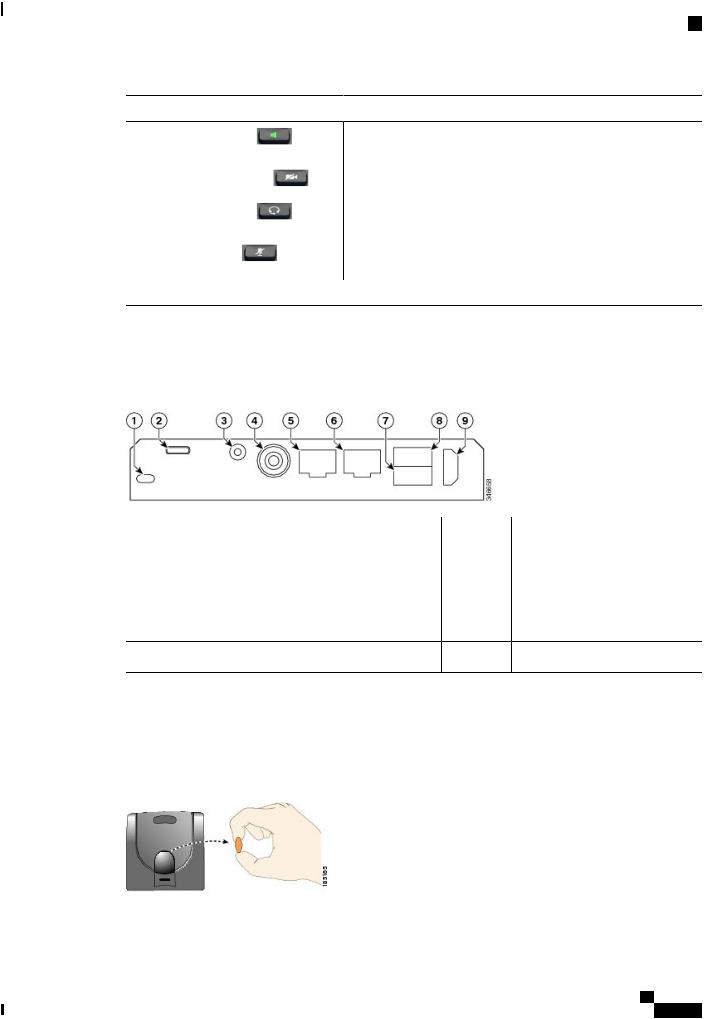
See the following figure and table to connect your phone.
1 |
Kensington Security Slot |
6 |
Computer port |
2 |
microUSB port |
7 |
Auxiliary port |
3 |
Line in/out port |
8 |
USB port |
4 |
Power port |
9 |
HDMI® port |
5Network port
Hookswitch clip removal
Some phones ship with a clip to secure the hookswitch. Before you use your phone, remove the hookswitch clip (if present) from the cradle area. With the clip removed, the hookswitch lifts slightly when you pick up the handset.
Cisco Desktop Collaboration Experience DX600 Series User Guide, Release 10.0(1)
OL-28931-01 |
3 |

Phone features
TAPS registration
TAPS registration
Tool for Auto-Registered Phones Support (TAPS) is used either for a new phone or to replace an existing phone. To register with TAPS, pick up the handset, enter the TAPS extension that your system administrator provides, and follow the voice prompts. You may need to enter your entire extension, including the area code. After your phone displays a confirmation message, hang up. The phone restarts.
Handset
The following table describes how to use the handset.
If you want to... |
Then... |
|
|
|
Use the handset |
Lift it to go off-hook; replace it in the cradle to go on-hook. |
|||
|
The ringing line is selected automatically. Contact your system |
|||
|
administrator for the options to select the primary line each time. |
|||
Switch to the speakerphone or |
Press |
or |
, then hang up the handset. |
|
headset during a call |
||||
|
|
|
||
Adjust the volume level for a call |
Press |
|
during a call or after invoking a dial tone. |
|
Headset
You can use a wired headset with your phone. You can also use a wireless headset with the wireless headset remote hookswitch control feature.
You can use a headset with all the controls on your phone, including  and
and  .
.
However, if you use a wireless headset, refer to the wireless headset documentation for instructions.
If you want to... |
Then... |
|
Toggle headset mode on and off |
Press |
. |
|
||
Switch to a handset |
Lift the handset. |
|
Adjust the volume level for a call |
Press |
during a call or after invoking a dial tone. |
|
||
If you use AutoAnswer, see AutoAnswer with headset or speakerphone, on page 6.
|
Cisco Desktop Collaboration Experience DX600 Series User Guide, Release 10.0(1) |
4 |
OL-28931-01 |

Phone features
Speakerphone
Headset support
Although Cisco performs limited internal testing of third-party headsets for use with the Cisco DX600 Series phones, Cisco does not certify or support products from headset (or handset) vendors.
Cisco recommends the use of good-quality headsets that are screened against unwanted radio frequency (RF) and audio frequency (AF) signals. Depending on the quality of the headsets and their proximity to other devices such as mobile phones and two-way radios, some audio noise or echo may still occur. An audible hum or buzz may be heard by either the remote party or by both you and the remote party. A range of outside sources can cause humming or buzzing sounds : for example, electric lights, electric motors, or large PC monitors.
Note In some cases, use of a local power cube or power injector may reduce or eliminate hum.
Because of the environmental and hardware inconsistencies in the locations where Cisco DX600 Series phones are deployed no single headset solution is optimal for all environments.
Cisco recommends that customers test headsets in their intended environment to determine performance before they make a purchasing decision and deploy on a large scale.
Audio quality
Beyond physical, mechanical, and technical performance, the audio portion of a headset must sound good to the user and to the party on the far end. Sound quality is subjective and Cisco cannot guarantee the performance of any headsets. However, a variety of headsets from leading headset manufacturers perform well with Cisco DX600 Series phones. For details, see the headset documentation.
3.5 mm headsets
You can plug a 3.5 mm headset into the headset port at the back of your phone.
Some headsets may have hardware incompatibilities with the phone, including pinout, microphone voltage, and device control functionality. Headsets with an incompatible or nonexistent microphone generally can be used with the phone built-in microphone for voice calls.
Wireless headset
Cisco DX600 Series phones support wireless headsets. Refer to the wireless headset documentation for information about using the wireless headset remote features. Also, check with your system administrator to be sure that your phone can use a wireless headset with the wireless headset remote hookswitch control feature.
Speakerphone
If the handset is in its cradle and  is not lit, many actions that you take to dial a number or answer a call trigger speakerphone mode automatically.
Speakerphone is unavailable while headphones, or a headset with an incompatible microphone, are plugged in.
Cisco Desktop Collaboration Experience DX600 Series User Guide, Release 10.0(1)
OL-28931-01 |
5 |

Phone features
AutoAnswer with headset or speakerphone
If you want to... |
Then... |
|
Toggle speakerphone mode on or off |
Press |
. |
Switch to a handset |
Lift the handset. |
|
Adjust the volume level for a call |
Press |
during a call or after invoking a dial tone. |
|
||
AutoAnswer with headset or speakerphone
When AutoAnswer is enabled, your phone answers incoming calls automatically after a few rings. Your system administrator configures AutoAnswer to use either the speakerphone or a headset. You may want to use AutoAnswer if you receive a high volume of incoming calls.
 If you...
Use AutoAnswer with a headset
Use AutoAnswer with the speakerphone
 Then...
Keep headset mode active (in other words, keep  lit), even when you are not on a call.
To keep headset mode active, perform the following actions:
•Press EndCall to hang up.
•Press New Call or Dial to place new calls.
If your phone is set up to use AutoAnswer in headset mode, calls are automatically answered only if  is lit.
Otherwise, calls ring normally and you must answer them manually.
Keep the handset in the cradle and headset mode inactive ( unlit).
Otherwise, calls ring normally and you must answer them manually.
Note AutoAnswer is disabled when the Do Not Disturb feature is active.
Camera
Slide the privacy shutter slide switch to open or close the camera shutter.
The camera can only be used by one application at a time. If you launch another application that requires use of the camera while you are on a video call, that application may crash.
While an external camera is connected, it becomes the default camera for the phone application. Other applications continue to use the internal camera.
|
Cisco Desktop Collaboration Experience DX600 Series User Guide, Release 10.0(1) |
6 |
OL-28931-01 |
Phone features
Phone cable lock
Related Topics
External camera, on page 123
Video calls, on page 24
Phone cable lock
You can secure the phone to a desktop with a laptop cable lock. The lock connects to the security slot on the back of the phone, and the cable can be secured to a desktop.
The security slot can accommodate a lock that is up to 20 mm wide. Compatible laptop cable locks include the Kensington laptop cable lock and laptop cable locks from other manufacturers that can fit into the security slot on the back of the phone.
Setup Assistant
Use the Setup Assistant to set up the following:
•Jabber IM
•WebEx
•Visual Voicemail
The Setup Assistant runs automatically the first time that you use your Cisco DX600 Series phone. If you choose not to use the Setup Assistant, you can set up these applications through the Settings application. Launch the Settings application from the Applications menu.
Note Some users find it easier to enter complex passwords with a standard keyboard, rather than the onscreen keyboard. For information about using a standard keyboard with your phone, see USB keyboard and mouse, on page 124.
Set up applications
Procedure
Step 1 Tap Email and follow the on-screen instructions.
Step 2 Tap Jabber IM and follow the on-screen instructions.
Step 3 Tap WebEx and follow the on-screen instructions.
Step 4 Tap Voice Messages and follow the on-screen instructions.
Cisco Desktop Collaboration Experience DX600 Series User Guide, Release 10.0(1)
OL-28931-01 |
7 |

Phone features
Android
Related Topics
Email, on page 86
Jabber IM, on page 93
WebEx, on page 99
Android
This section describes the basic Android™ features on your phone.
Gestures
Android includes some basic gestures.
Gesture |
Action |
|
Tap |
Use your fingertip to press the touchscreen. |
|
|
Note |
Using other objects can damage the display. Be aware that |
|
|
tapping a phone number can cause the phone to dial the number. |
Tap and hold |
Long press. |
|
Swipe |
Tap and move. |
|
Drag |
Tap and hold, then move. |
|
Double-tap |
Two taps in quick succession. |
|
Pinch open |
Tap with two fingers, then move your fingers apart. |
|
Pinch close |
Tap with two fingers, then move your fingers together. |
|
Lock screen
The Lock screen is displayed when the phone is locked (inactive).
The Lock screen displays the date and time, the number of unread email messages, the number of recently missed calls, the number of new voice messages, and the number of upcoming events for the next 24 hours.
Note The number of unread email messages, and the number of upcoming events, are displayed only if you have configured a Microsoft Exchange account.
Use a PIN or password to unlock your phone. Your PIN or password is stored on the phone, and it is not the same as a PIN or password for any other service.
|
Cisco Desktop Collaboration Experience DX600 Series User Guide, Release 10.0(1) |
8 |
OL-28931-01 |

Phone features
Lock screen
You can set the amount of time that your phone can be inactive before the screen locks. Your system administrator may disable the screen lock during your work hours.
By default, the home screen is displayed when you unlock your phone. You can configure your phone to unlock to the phone application.
Related Topics
Awake to Phone application, on page 10
Unlock screen
Procedure
Step 1 Enter your PIN.
Step 2 Press # or tap Unlock.
Place emergency call from Lock screen
Procedure
Tap Emergency call.
Add PIN
Procedure
Step 1 When you are prompted to set a PIN or password, tap Ok.
Step 2 Tap PIN.
Step 3 Enter a PIN and tap Continue. Your PIN must be at least four digits.
Step 4 Enter your PIN again and tap OK to confirm your PIN.
Cisco Desktop Collaboration Experience DX600 Series User Guide, Release 10.0(1)
OL-28931-01 |
9 |

Phone features
Lock screen
Add password
Procedure
Step 1 When you are prompted to set a PIN or password, tap Ok.
Step 2 Tap Password.
Step 3 Enter a password and tap Continue. Your password must be at least four characters.
Step 4 Enter your password again and tap OK to confirm your password.
Reset lost PIN or password
Procedure
Step 1 Tap Forgot PIN or Forgot Password.
Step 2 Select a Cisco Unified Communications Manager or Google™ account and enter your credentials. You can only select an active account.
Step 3 Reset your PIN or password. Your phone is now unlocked and your new PIN or password is ready to use.
Awake to Phone application
Procedure
Step 1
Tap .
Step 2 Tap Settings.
Step 3 Tap Security.
Step 4 Tap Default App.
Step 5 Select Awake to phone app.
Cisco Extension Mobility
Cisco Extension Mobility allows you to configure any Cisco DX600 Series phone as your own temporarily. After you sign in to Extension Mobility, the phone adopts your user profile, including your phone lines, features, established services, and web-based settings. Your system administrator must configure Extension Mobility for you, otherwise Extension Mobility is not available on your phone.
The Extension Mobility Change PIN feature allows you to change your PIN from the Settings application.
|
Cisco Desktop Collaboration Experience DX600 Series User Guide, Release 10.0(1) |
10 |
OL-28931-01 |

Phone features
Lock screen
Tips
•Extension Mobility automatically signs you out after a certain amount of time. Your system administrator establishes this time limit.
•Changes that you make to your Extension Mobility profile from your Cisco Unified Communications Manager User Options web pages take effect immediately if you are signed in to Extension Mobility on the phone; otherwise, changes take effect the next time you sign in.
•Changes that you make to the phone from your User Options web pages take effect immediately if you are signed out of Extension Mobility; otherwise, changes take effect after you sign out.
•Local settings that your phone controls are not maintained in your Extension Mobility profile.
•The data and applications of other users are not available to you when you sign in to Extension Mobility.
•Your phone deletes unused data after a certain length of time.
Sign In to Extension Mobility from Lock screen
Procedure
Step 1 Tap Sign In As New User.
Step 2 Enter your user ID and PIN, provided by your system administrator.
Step 3 If prompted, select a device profile.
Sign in to Extension Mobility from Settings
Procedure
Step 1
Tap .
Step 2 Tap Settings.
Step 3 Tap Extension Mobility.
Step 4 Tap Sign In.
Step 5 Enter your user ID and PIN.
Step 6 Tap Submit.
Sign Out of Extension Mobility from Lock screen
Procedure
Tap Sign Out.
Cisco Desktop Collaboration Experience DX600 Series User Guide, Release 10.0(1)
OL-28931-01 |
11 |
Phone features
Home screen
Sign Out of Extension Mobility from Settings
Procedure
Step 1
Tap .
Step 2 Tap Settings.
Step 3 Tap Extension Mobility.
Step 4 Tap Sign Out.
Set screen timeout
Procedure
Step 1
Tap .
Step 2 Tap Settings.
Step 3 Tap Security.
Step 4 Tap Automatically Lock.
Step 5 Select the length of time that your phone can be inactive before the screen locks. Note that your security settings may limit your screen timeout choices.
Home screen
The home screen uses a landscape orientation. Place widgets and shortcuts anywhere on the home screen.
Status bar
The status bar is at the bottom of the screen. The status bar includes:
•Navigation icons
•Notification icons for applications such as the phone, email, and Jabber IM
•Status icons for network connections
Tap a notification icon or status icon to see more detailed information.
|
Cisco Desktop Collaboration Experience DX600 Series User Guide, Release 10.0(1) |
12 |
OL-28931-01 |

Phone features
Home screen
Navigation icons
Table 2: Navigation icons |
|
Back |
Tap Back to go to the previous page or application., or to dismiss the |
|
on-screen keyboard. |
Home |
Tap Home to view the home screen. |
Phone |
Tap Phone to launch the phone application. |
Recents |
Tap Recents to view the list of recently used applications. |
Applications menu
Tap  to display the full collection of installed applications.
Work spaces
Multiple work spaces are available for you to set up. Each work space holds a variety of widgets and shortcuts in any configuration.
Navigate work spaces
Procedure
Swipe left or right on an open space on the home screen to go to the work space to the left or to the right.
Widgets
Widgets are small applications that you can place on the home screen. Widgets provide at-a-glance information and some functions from full applications.
The following table describes some of the widgets that your phone includes:
Table 3: Widgets |
|
Calendar |
Display upcoming events. |
Contacts |
Display an icon for one of your contacts. Tap the icon |
|
to open the Quick Contact Badge for that contact. |
Digital clock |
Display a digital clock. |
Cisco Desktop Collaboration Experience DX600 Series User Guide, Release 10.0(1)
OL-28931-01 |
13 |

Phone features
Home screen
Direct Dial |
Display an icon for one of your contacts. Tap the icon |
|
to call that contact. |
Display recent email messages. |
|
Favorites |
Display your favorite contacts. |
Phone |
Display all recent calls, missed calls, messages, or |
|
speed dials. |
Phone features |
Toggle these features on or off: Forward All, Privacy, |
|
Do Not Disturb, Mobility and Self-View. |
WebEx |
Display upcoming WebEx meetings. |
Set up home screen
Add applications, widgets, and folders, or change your wallpaper to set up your home screen.
Add application icon to home screen
Procedure
Step 1
Tap .
Step 2 Tap and hold an application.
Step 3 Drag the application icon to an empty space on any of the home screen work spaces.
Add widget to home screen
Procedure
Step 1
Tap .
Step 2 Tap Widgets.
Step 3 Tap and hold a widget.
Step 4 Drag the widget to an empty space on any of the home screen work spaces.
|
Cisco Desktop Collaboration Experience DX600 Series User Guide, Release 10.0(1) |
14 |
OL-28931-01 |

Phone features
Quick Contact Badge
Move widget or icon
Procedure
Drag the widget or icon to an empty space on the home screen. Drag a widget or icon to either side of the screen to place the widget or icon on another work space.
Remove widget or icon
Procedure
Step 1 Tap and hold the widget or icon.
Step 2 Drag the widget or icon up to Remove. The widget or icon is deleted and Remove disappears.
Change wallpaper
Procedure
Step 1 Tap and hold an open space on the home screen.
Step 2 Tap Wallpapers.
Step 3 Select a wallpaper.
Quick Contact Badge
The Quick Contact Badge allows you to communicate with your contacts from within several applications and in a variety of ways. Use the Quick Contact Badge to place a call, send an email message, send an instant message (IM), or start a WebEx meeting.
Note Other options may be available on the Quick Contact Badge, depending on which applications you have installed.
Tap a contact icon to open the Quick Contact Badge.
The following image shows the Quick Contact Badge:
Cisco Desktop Collaboration Experience DX600 Series User Guide, Release 10.0(1)
OL-28931-01 |
15 |

Phone features
Share menu
Share menu
Some content, such as URLs, contacts, and photos, can be shared with Bluetooth, email, Jabber IM, and other applications through the Share menu. In any application that supports the Share menu, tap Share to view the sharing options.
On-screen keyboard
An on-screen keyboard pops up automatically when you select a text input field.
Energy savings
Your phone supports the Cisco EnergyWise program. Your system administrator may set up sleep (power down) and wake (power up) times for your phone to save energy.
If your phone is scheduled to sleep, the Lock button begins to blink 10 minutes before the scheduled sleep time.. If your system administrator enables audible alert, you hear your ringtone play. The ringtone plays according to the following schedule:
•At 10 minutes before power down, the ringtone plays four times.
•At 7 minutes before power down, the ringtone plays four times.
•At 4 minutes before power down, the ringtone plays four times.
•At 30 seconds before power down, the ringtone plays 15 times or until the phone powers down.
If your phone is inactive (idle) at the sleep time, a message reminds you that your phone is going to power down. To keep the phone active, tap the screen or press any key on the phone.
If your phone is active (for example, on a call), your phone waits until it has been inactive for a period of time before it notifies you of the pending power shutdown. Before the shutdown happens, a message reminds you that your phone is going to power down.
At the scheduled time, your phone powers up. To wake up the phone before the scheduled time, press  .
.
Wake and sleep times are linked to the configured days that you normally work. If your requirements change (for example, your work hours or work days change), contact your system administrator to adjust your phone settings.
For more information about EnergyWise and your phone, contact your system administrator.
|
Cisco Desktop Collaboration Experience DX600 Series User Guide, Release 10.0(1) |
16 |
OL-28931-01 |
Loading...