


 Loading...
REVIEW DRAFT - CISCO CONFIDENTIAL
Cisco IP Phone 8841, 8851, and 8861 User Guide for Cisco Unified Communications Manager 10.5
First Published: January 25, 2014
Last Modified: May 05, 2014
Americas Headquarters
Cisco Systems, Inc. 170 West Tasman Drive
San Jose, CA 95134-1706 USA http://www.cisco.com Tel: 408 526-4000
800 553-NETS (6387) Fax: 408 527-0883
THE SPECIFICATIONS AND INFORMATION REGARDING THE PRODUCTS IN THIS MANUAL ARE SUBJECT TO CHANGE WITHOUT NOTICE. ALL STATEMENTS, INFORMATION, AND RECOMMENDATIONS IN THIS MANUAL ARE BELIEVED TO BE ACCURATE BUT ARE PRESENTED WITHOUT WARRANTY OF ANY KIND, EXPRESS OR IMPLIED. USERS MUST TAKE FULL RESPONSIBILITY FOR THEIR APPLICATION OF ANY PRODUCTS.
THE SOFTWARE LICENSE AND LIMITED WARRANTY FOR THE ACCOMPANYING PRODUCT ARE SET FORTH IN THE INFORMATION PACKET THAT SHIPPED WITH THE PRODUCT AND ARE INCORPORATED HEREIN BY THIS REFERENCE. IF YOU ARE UNABLE TO LOCATE THE SOFTWARE LICENSE OR LIMITED WARRANTY, CONTACT YOUR CISCO REPRESENTATIVE FOR A COPY.
The following information is for FCC compliance of Class A devices: This equipment has been tested and found to comply with the limits for a Class A digital device, pursuant to part 15 of the FCC rules. These limits are designed to provide reasonable protection against harmful interference when the equipment is operated in a commercial environment. This equipment generates, uses, and can radiate radio-frequency energy and, if not installed and used in accordance with the instruction manual, may cause harmful interference to radio communications. Operation of this equipment in a residential area is likely to cause harmful interference, in which case users will be required to correct the interference at their own expense.
The following information is for FCC compliance of Class B devices: This equipment has been tested and found to comply with the limits for a Class B digital device, pursuant to part 15 of the FCC rules. These limits are designed to provide reasonable protection against harmful interference in a residential installation. This equipment generates, uses and can radiate radio frequency energy and, if not installed and used in accordance with the instructions, may cause harmful interference to radio communications. However, there is no guarantee that interference will not occur in a particular installation. If the equipment causes interference to radio or television reception, which can be determined by turning the equipment off and on, users are encouraged to try to correct the interference by using one or more of the following measures:
•
•
•
•
Reorient or relocate the receiving antenna.
Increase the separation between the equipment and receiver.
Connect the equipment into an outlet on a circuit different from that to which the receiver is connected.
Consult the dealer or an experienced radio/TV technician for help.
Modifications to this product not authorized by Cisco could void the FCC approval and negate your authority to operate the product
The Cisco implementation of TCP header compression is an adaptation of a program developed by the University of California, Berkeley (UCB) as part of UCB’s public domain version of the UNIX operating system. All rights reserved. Copyright © 1981, Regents of the University of California.
NOTWITHSTANDING ANY OTHER WARRANTY HEREIN, ALL DOCUMENT FILES AND SOFTWARE OF THESE SUPPLIERS ARE PROVIDED "AS IS" WITH ALL FAULTS. CISCO AND THE ABOVE-NAMED SUPPLIERS DISCLAIM ALL WARRANTIES, EXPRESSED OR IMPLIED, INCLUDING, WITHOUT LIMITATION, THOSE OF MERCHANTABILITY, FITNESS FOR A PARTICULAR PURPOSE AND NONINFRINGEMENT OR ARISING FROM A COURSE OF DEALING, USAGE, OR TRADE PRACTICE.
IN NO EVENT SHALL CISCO OR ITS SUPPLIERS BE LIABLE FOR ANY INDIRECT, SPECIAL, CONSEQUENTIAL, OR INCIDENTAL DAMAGES, INCLUDING, WITHOUT LIMITATION, LOST PROFITS OR LOSS OR DAMAGE TO DATA ARISING OUT OF THE USE OR INABILITY TO USE THIS MANUAL, EVEN IF CISCO OR ITS SUPPLIERS HAVE BEEN ADVISED OF THE POSSIBILITY OF SUCH DAMAGES.
Any Internet Protocol (IP) addresses and phone numbers used in this document are not intended to be actual addresses and phone numbers. Any examples, command display output, network topology diagrams, and other figures included in the document are shown for illustrative purposes only. Any use of actual IP addresses or phone numbers in illustrative content is unintentional and coincidental.
Cisco and the Cisco logo are trademarks or registered trademarks of Cisco and/or its affiliates in the U.S. and other countries. To view a list of Cisco trademarks, go to this URL: http:// www.cisco.com/go/trademarks. Third-party trademarks mentioned are the property of their respective owners. The use of the word partner does not imply a partnership relationship between Cisco and any other company. (1110R)
© 2014 Cisco Systems, Inc. All rights reserved.

C O N T E N T S
C H A P T E R 1 |
Getting Started 1 |
Accessibility Features 1
Cisco IP Phone 8841 1
Phone Connections 1
Buttons and Hardware 2
Cisco IP Phone 8851 6
Phone Connections 6
Buttons and Hardware 7
Cisco IP Phone 8861 10
Phone Connections 10
Buttons and Hardware 12
Power Save and Power Save Plus 15
Power Save 15
Power Save Plus 15
Additional Information 16
C H A P T E R |
2 |
Phone Setup 17 |
|
|
Connect Footstand 17 |
|
|
Adjust Handset Rest 18 |
|
|
Secure Phone with Cable Lock 18 |
|
|
Basic Operations 21 |
C H A P T E R |
3 |
Clean Phone Display 21
Make Calls 22
Predial Number 22
Place Call Using Speakerphone 22
Place Call Using Headset 23
Release Call and Start Another Call 23
Cisco IP Phone 8841, 8851, and 8861 User Guide for Cisco Unified Communications Manager 10.5
iii

Contents
REVIEW DRAFT - CISCO CONFIDENTIAL
Dial International Number 23
Redial Number 24
Navigate and Select Items 24
View All Calls on Phone 25
Answer Calls 25
Answer Oldest Call First 26
Call Pickup 26
Answer Call Using PickUp 27
Answer Call Using Group PickUp and Phone Number 28
Answer Call Using Group PickUp and Group PickUp Number 28
Answer Call Using Other PickUp 29
Automatically Answer Calls 29
Respond to Call Waiting Notification 30
Manage Calls 30
Divert Call 30
Transfer Call to Another Number 31
Toggle Between Calls Before Completing Transfer 31
Monitor and Record Calls 31
Call Forward 32
Forward All Calls 32
Mute Phone 33
Hold Calls 33
Swap Between Active and Held Calls 33
Put Call on Hold by Answering New Call 33
Respond to Hold Reversion Notification 34
Determine If Shared Line Is On Hold 34
Remote Hold 34
Set Up Call Back Notification 34
Call Park 34
Park and Retrieve Call Using Call Park 35
Park Call Using Assisted Directed Call Park 36
Park Call Using Manual Directed Call Park 36
Manage Intercom Calls 37
Place Dedicated Intercom Call 37
Place Dialable Intercom Call 37
Cisco IP Phone 8841, 8851, and 8861 User Guide for Cisco Unified Communications Manager 10.5
iv

Contents
REVIEW DRAFT - CISCO CONFIDENTIAL
C H A P T E R 4
C H A P T E R 5
Receive Intercom Call 38
View Phone Information 38
Sign In to Cisco Unified Communications Self Care Portal 39
Contacts 41
Corporate Directory 41
Search and Dial Contact 41
Search and Dial Contact While On Call 42
Personal Directory |
42 |
|
|
|
Sign In and Out of Personal Directory |
43 |
|||
Add Personal Directory Entry from Phone 43 |
||||
Search for Entry in Personal Directory |
43 |
|||
Dial Number from Personal Directory |
44 |
|||
Edit Personal Directory Entry |
44 |
|
|
|
Delete Personal Directory Entry |
45 |
|
||
Fast Dial 45 |
|
|
|
|
Place Call With Fast Dial Button |
45 |
|
||
Fast-Dial Codes with Personal Directory |
45 |
|||
Assign Fast Dial Codes to Personal Directory Entry 46 |
||||
Place Call Using Fast Dial Codes |
46 |
|
||
Delete Fast Dial Code 46 |
|
|
|
|
Cisco WebDialer 47 |
|
|
|
|
Use Cisco WebDialer with Another Online Corporate Directory 47 |
||||
Change Cisco WebDialer Preferences |
47 |
|||
Sign Out of Cisco WebDialer |
48 |
|
|
|
Call History 49 |
|
|
|
|
Call History Overview 49 |
|
|
|
|
View Call History |
51 |
|
|
|
View Call Record Details 51 |
|
|
|
|
Filter Call History |
51 |
|
|
|
Dial From Call History 52 |
|
|
|
|
Edit Phone Number 52 |
|
|
|
|
Clear Call History |
53 |
|
|
|
Delete Call Record |
53 |
|
|
|
Cisco IP Phone 8841, 8851, and 8861 User Guide for Cisco Unified Communications Manager 10.5
v

Contents
C H A P T E R 6
C H A P T E R 7
REVIEW DRAFT - CISCO CONFIDENTIAL
Voicemail 55 |
|
|
|
Access Voicemail 55 |
|
|
|
Check for Voice Messages |
55 |
|
|
Listen to Voice Messages |
56 |
|
|
Visual Voicemail 56 |
|
|
|
Advanced Calling Features 57 |
|
|
|
Conference 57 |
|
|
|
Add Third Party to Conference |
58 |
||
Join Calls into Conference |
58 |
|
|
Swap Between Calls Before Completing Conference 58 |
|||
View Conference Participants 59 |
|||
Remove Conference Participants 59 |
|||
Meet Me Conference 59 |
|
|
|
Host Meet Me Conference |
60 |
|
|
Join Meet Me Conference |
60 |
|
|
Speed Dial 60 |
|
|
|
Place Call with Speed-Dial Button 61 |
|||
Use Speed-Dial Code On Hook |
61 |
||
Use Speed-Dial Code Off Hook |
61 |
||
Pause in Speed Dial 61 |
|
|
|
Do Not Disturb 62 |
|
|
|
Turn DND On and Off |
63 |
|
|
Malicious Call Identification |
63 |
|
|
Trace Suspicious Call 63 |
|
|
|
Extension Mobility 63 |
|
|
|
Enable Extension Mobility |
64 |
|
|
Mobile Connect 64 |
|
|
|
Enable Mobile Connect |
65 |
|
|
Turn Mobile Connect On or Off for All Remote Destinations from Desk Phone 65
Switch Desk Phone Call to Mobile Phone 65
Switch Mobile Call to Desk Phone 66
Hand Off Call from Mobile Phone to Desk Phone 66
Line Status 66
Cisco IP Phone 8841, 8851, and 8861 User Guide for Cisco Unified Communications Manager 10.5
vi

Contents
REVIEW DRAFT - CISCO CONFIDENTIAL
Line Status Indicators 66
Custom Line Filters 67
Add Line Filter 68
Select Active Line Filter 68
Delete Line Filter 69
Duplicate Line Filter 69
Edit Line Filter 69
Rename Line Filter 70
Hunt Groups 70
Sign In and Out of Hunt Group 70
Display Queue Statistics 71
Barge 71
Set Up Barge Alert 71
Add Yourself to Call on Shared Line 72
Enable Privacy on Shared Line 72
Toggle Prompt for Barge 72
Dismiss Barge Alert Prompt Window 73
Call Chaperone 73
Record Chaperoned Call 73
Uniform Resource Identifier Dialing 74
Intelligent Proximity 75
Pair a Mobile Device 75
Mobile Device Autoconnect 76
Switch Connected Mobile Devices 76
Unpair a Mobile Device 76
Answer Mobile Call 76
Decline Mobile Call 76
Place Mobile Call 77
Mobile Audio Playout via Bluetooth 77
Adjust Mobile Device Volume 77
Mobile Contacts and Mobile Call History Sharing 77
Sync Bluetooth Contacts 77
Save Bluetooth Contacts 78
C H A P T E R 8
Advanced Operations 79
Cisco IP Phone 8841, 8851, and 8861 User Guide for Cisco Unified Communications Manager 10.5
vii

Contents
REVIEW DRAFT - CISCO CONFIDENTIAL
|
|
Applications 79 |
|
|
|
|
|
|
View Active Applications |
79 |
|
||
|
|
Switch to Active Applications |
80 |
|||
|
|
Close Active Applications |
80 |
|
||
|
|
Call Functions |
80 |
|
|
|
|
|
Agent Greeting |
80 |
|
|
|
|
|
Alert Calls |
81 |
|
|
|
|
|
Actionable Incoming Call Alert 81 |
||||
|
|
Answer 81 |
|
|
|
|
|
|
Client Matter Code 81 |
|
|
||
|
|
Forced Authorization Code 82 |
|
|||
|
|
Secure and Nonsecure Indication Tones 82 |
||||
|
|
Shared Lines 82 |
|
|
||
|
|
Feature Buttons and Softkey |
83 |
|
||
|
|
Survivable Remote Site Telephony Overview 84 |
||||
|
|
User Preferences 89 |
|
|
|
|
C H A P T E R |
9 |
|
|
|
|
|
|
|
Adjust Phone Screen Brightness |
89 |
|||
|
|
Adjust Headset Sidetone 90 |
|
|
||
|
|
Change Ringtone |
90 |
|
|
|
|
|
Change Wallpaper |
91 |
|
|
|
|
|
Change Font Size |
91 |
|
|
|
|
|
Charge Your Mobile Device |
92 |
|
||
|
|
Phone Services |
93 |
|
|
|
|
|
Line Settings 94 |
|
|
|
|
|
|
Accessories 95 |
|
|
|
|
C H A P T E R |
1 0 |
|
|
|
|
|
|
|
Accessory List |
95 |
|
|
|
|
|
View Accessories List 96 |
|
|
||
|
|
View Accessories Details 96 |
|
|
||
|
|
USB Devices 97 |
|
|
|
|
|
|
Set Up Wideband for Analog Headset 97 |
||||
|
|
Bluetooth Headsets 97 |
|
|
||
|
|
Add Bluetooth Accessory |
99 |
|
||
|
|
Connect Bluetooth Accessory |
99 |
|||
Cisco IP Phone 8841, 8851, and 8861 User Guide for Cisco Unified Communications Manager 10.5
viii

Contents
REVIEW DRAFT - CISCO CONFIDENTIAL
C H A P T E R 1 1
C H A P T E R 1 2
C H A P T E R 1 3
Turn On Bluetooth 99
Disconnect Bluetooth Accessory 100
Delete Bluetooth Accessory 100
USB Headsets 101
Frequently Asked Questions 103
Why Can't I See All Active Calls on My Phone? 103
How Do I Redirect an Incoming Call? 104
How Do I Silence a Ringing Call If I'm On a Call? 104
How Do I Resume a Call That is On Hold? 104
What Is the Difference Between Buttons on the Left and Those on the Right of the Screen? 105
Why Do Softkeys Keep Changing? 105
What Is the Best Way to Look at Calls When I Have a Shared Line or Multiple Lines? 105
What Should I Do If I Accidentally Press a Button While on a Call? 106
How Do I Check Missed Calls? 106
How Do I Exit from a Running Application? 106
How Do I Connect Two Calls and then Drop from the Line Myself? 107
What Does the Swap Softkey Do? 107
How Do I Cancel a Conference or Transfer After I Start It? 107
How Can I Combine Two Calls Into a Single Conference Call? 108
Why Does My Phone Not Wake Up? 108
What Do Four Rings in Succession Mean? 108
Troubleshooting 109
Missing Alert Calls Button 109
Missing All Calls Button 109
Cannot Sign In to Personal Directory 110
Cannot Access Self Care Portal 110
Security Error Message 110
Report Phone Problems 111
Documentation, Service Requests, and Additional Information 111
Product Safety and Security 113
Safety and Performance Information 113
Power Outage 113
Cisco IP Phone 8841, 8851, and 8861 User Guide for Cisco Unified Communications Manager 10.5
ix

Contents
C H A P T E R 1 4
REVIEW DRAFT - CISCO CONFIDENTIAL
External Devices 113
Bluetooth Wireless Headset Performance 114
Power Information 114
FCC Compliance Statements 114
FCC Part 15.21 Statement 114
FCC RF Radiation Exposure Statement 114
FCC Receivers and Class B Digital Statement 115
Cisco Product Security Overview 115
Warranty 117
Cisco One-Year Limited Hardware Warranty Terms 117
Cisco IP Phone 8841, 8851, and 8861 User Guide for Cisco Unified Communications Manager 10.5
x
C H A P T E R 1
Getting Started
• |
Accessibility Features, page 1 |
• |
Cisco IP Phone 8841, page 1 |
• |
Cisco IP Phone 8851, page 6 |
• |
Cisco IP Phone 8861, page 10 |
• |
Power Save and Power Save Plus, page 15 |
• |
Additional Information, page 16 |
Accessibility Features
The Cisco IP Phones 8841, 8851, and 8861 provide accessibility features for the vision impaired, the blind, and the hearing and mobility impaired.
For detailed information about the accessibility features on these phones, see Accessibility Features for the Cisco IP Phone 8841, 8851, and 8861.
 Draft comment: Need to update link once Accessbility Features Guide doc is posted.
You can also find more information about accessibility at this Cisco website:
http://www.cisco.com/web/about/responsibility/accessibility/index.html
Cisco IP Phone 8841
The following sections describe attributes of the Cisco IP Phone 8841.
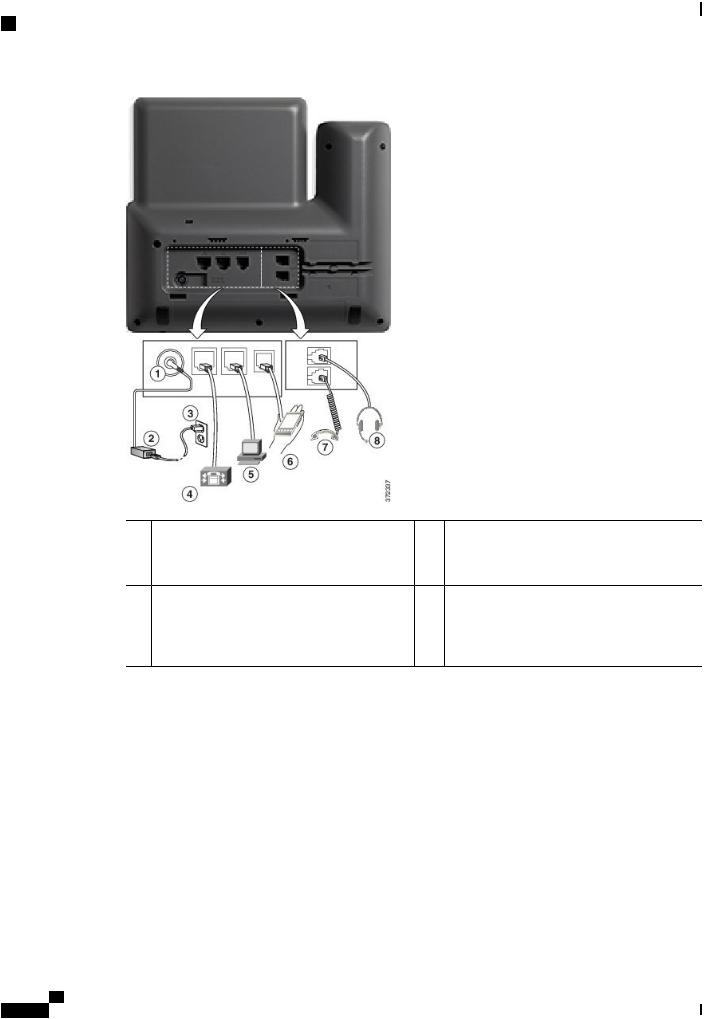
Phone Connections
Connect your phone to the corporate IP telephony network, using the following diagram.
Cisco IP Phone 8841, 8851, and 8861 User Guide for Cisco Unified Communications Manager 10.5
1
Getting Started
Buttons and Hardware
REVIEW DRAFT - CISCO CONFIDENTIAL
1 |
DC adaptor port (DC48V). |
5 |
Access port (10/100/1000 PC) connection. |
2 |
AC-to-DC power supply (optional). |
6 |
Auxiliary port. |
3 |
AC power wall plug (optional). |
7 |
Handset connection. |
4 |
Network port (10/100/1000 SW) connection. |
8 |
Analog headset connection (optional). |
|
IEEE 802.3at power enabled. |
|
|
Buttons and Hardware
Your phone provides quick access to your phone lines, features, and call sessions:
•Programmable feature buttons (left side): Use to view calls on a line or access features such as Speed Dial or All Calls. (These buttons are also called feature buttons.)
•Session buttons (right side): Use to perform tasks such as answering a call, resuming a held call, or (when not being used for an active call) initiating phone functions such as displaying missed calls. Each call on your phone is associated with a session button.
Cisco IP Phone 8841, 8851, and 8861 User Guide for Cisco Unified Communications Manager 10.5
2

Getting Started
Buttons and Hardware
REVIEW DRAFT - CISCO CONFIDENTIAL
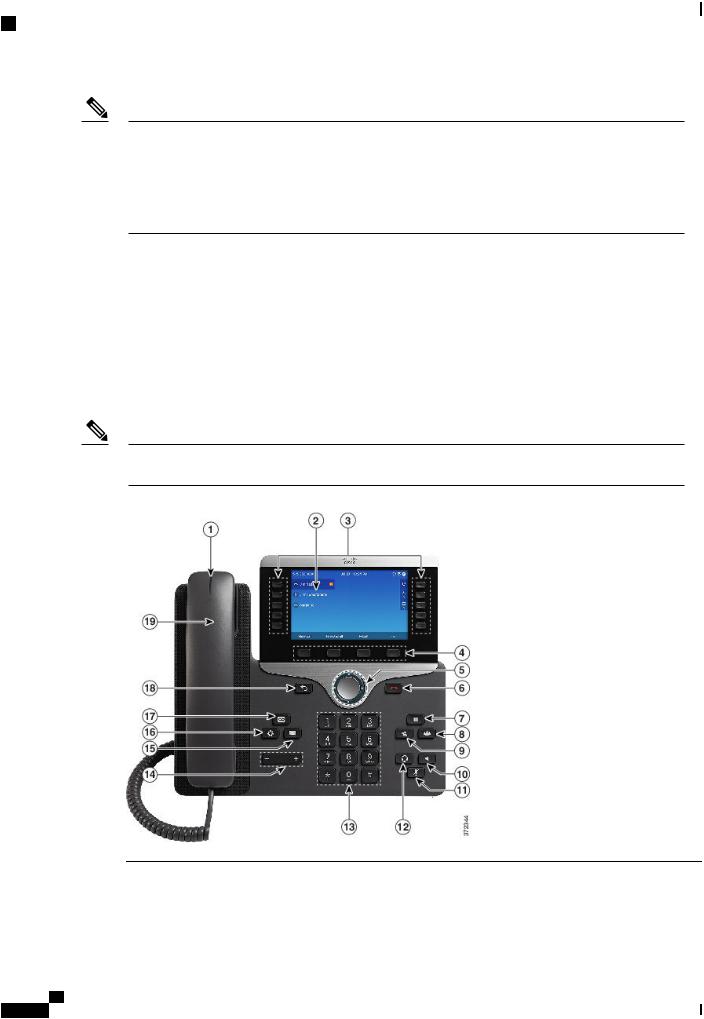
Note If you are using a locale that reads right to left, such as Arabic, the line button and session button locations are swapped.
1 |
Handset light strip |
Indicates an incoming call (flashing red) or new voice message (steady |
|
|
red). |
2 |
Phone screen |
Shows information about your phone such as directory number, active |
|
|
call and line status, softkey options, speed dials, placed calls, and phone |
|
|
menu listings. |
Cisco IP Phone 8841, 8851, and 8861 User Guide for Cisco Unified Communications Manager 10.5
3

Buttons and Hardware
3
4
5
6
7
8
Getting Started
REVIEW DRAFT - CISCO CONFIDENTIAL
Programmable feature buttons
Softkey buttons
Navigation cluster and Select button 
Release Button
Hold/Resume button 
Depending on how your system administrator sets up the phone, programmable feature buttons (on each side of the phone screen) provide access to:
•Phone lines and intercom lines
•Speed-dial numbers (speed-dial buttons, including the Line Status speed-dial features)
•Web-based services (for example, a Personal Address Book button)
•Call features (for example, a Privacy button)
Buttons illuminate to indicate status:
•Green, steady: Active call or two-way intercom call
•Green, flashing: Held call
•Amber, steady: Privacy in use, one-way intercom call, DND active, or logged into Hunt Group
•Amber, flashing: Incoming call or reverting call
•Red, steady: Remote line in use (shared line or Line Status)
•Red, flashing: Remote line on hold
Depending on how your system administrator sets up the phone, enable softkey options displayed on your phone screen.
The Navigation cluster and Select button allows you to scroll through menus, highlight items and select the highlighted item.
Ends a connected call or session.
Places an active call on hold and resumes the held call.
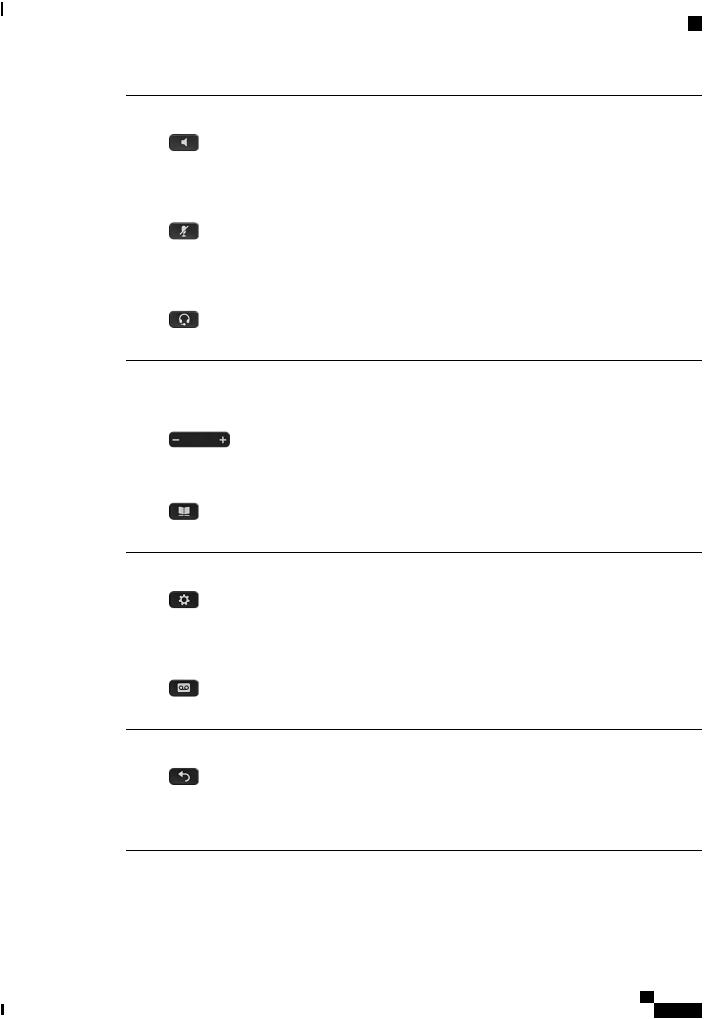
Conference button |
Creates a conference call. |
9 |
Transfer button |
Transfers a call. |
Cisco IP Phone 8841, 8851, and 8861 User Guide for Cisco Unified Communications Manager 10.5
4
Getting Started
|
|
Buttons and Hardware |
|
REVIEW DRAFT - CISCO CONFIDENTIAL |
|
10 |
Speakerphone button |
Toggles the speakerphone on or off. When the speakerphone is on, the |
|
|
button is lit. |
11 |
Mute button |
Toggles the microphone on or off. When the microphone is muted, the |
|
|
button is lit. |
12 |
Headset button |
Toggles the headset on or off. When the headset is on, the button is lit. |
13 |
Keypad |
Allows you to dial phone numbers, enter letters, and select menu items |
|
|
(by entering the item number). |
14 |
Volume button |
Controls the handset, headset, and speakerphone volume (off hook) and |
|
|
the ringer volume (on hook). |
15 |
Contacts button |
Opens or closes the Directories menu. Use the Contacts button to access |
|
|
personal and corporate directories. |
16 |
Applications button |
Opens or closes the Applications menu. Use the Applications button to |
|
|
access call history, user preferences, phone settings, and phone model |
|
|
information. |
17 |
Messages button |
Autodials your voice messaging system (varies by system). |
18 |
Back button |
Returns to the previous screen or menu. |
19 |
Handset |
Phone handset. |
Cisco IP Phone 8841, 8851, and 8861 User Guide for Cisco Unified Communications Manager 10.5
5

Getting Started
Cisco IP Phone 8851
REVIEW DRAFT - CISCO CONFIDENTIAL
Cisco IP Phone 8851
The following sections describe attributes of the Cisco IP Phone 8851.
Phone Connections
Connect your phone to the corporate IP telephony network, using the following diagram.
1 |
DC adaptor port (DC48V). |
5 |
Access port (10/100/1000 PC) connection. |
2 |
AC-to-DC power supply (optional). |
6 |
Auxiliary port. |
3 |
AC power wall plug (optional). |
7 |
Handset connection. |
4 |
Network port (10/100/1000 SW) connection. |
8 |
Analog headset connection (optional). |
|
IEEE 802.3at power enabled. |
|
|
Cisco IP Phone 8841, 8851, and 8861 User Guide for Cisco Unified Communications Manager 10.5
6

Getting Started
Buttons and Hardware
REVIEW DRAFT - CISCO CONFIDENTIAL
Note Each USB port supports a maximum of five supported and nonsupported devices that are connected to the phone. Each device connected to the phone is included in the maximum device count. For example, your phone can support five USB devices. Many third-party USB products count as multiple USB devices, forexample,adevicecontainingUSBhubandheadsetcancountastwoUSBdevices. Formoreinformation, see the USB device documentation.
Buttons and Hardware
Your phone provides quick access to your phone lines, features, and call sessions:
•Programmable feature buttons (left side): Use to view calls on a line or access features such as Speed Dial or All Calls. These buttons are also called feature buttons.
•Session buttons (right side): Use to perform tasks such as answering a call, resuming a held call, or (when not being used for an active call) initiating phone functions such as displaying missed calls. Each call on your phone is associated with a session button.
Note If you are using a locale that reads right to left, such as Arabic, the line button and session button locations are swapped.
1 |
Handset light strip |
Indicates an incoming call (flashing red) or new voice message (steady |
|
|
red). |
Cisco IP Phone 8841, 8851, and 8861 User Guide for Cisco Unified Communications Manager 10.5
7

Buttons and Hardware
2
3
4
5
6
7
Getting Started
REVIEW DRAFT - CISCO CONFIDENTIAL
Phone screen |
Shows information about your phone such as directory number, active |
|
call and line status, softkey options, speed dials, placed calls, and phone |
|
menu listings. |
Programmable feature buttons
Softkey buttons
Navigation cluster and Select button 
Release Button
Hold/Resume button 
Depending on how your system administrator sets up the phone, programmable feature buttons (on each side of the phone screen) provide access to:
•Phone lines and intercom lines
•Speed-dial numbers (speed-dial buttons, including the Line Status speed-dial features)
•Web-based services (for example, a Personal Address Book button)
•Call features (for example, a Privacy button)
Buttons illuminate to indicate status:
•Green, steady: Active call or two-way intercom call
•Green, flashing: Held call
•Amber, steady: Privacy in use, one-way intercom call, DND active, or logged into Hunt Group
•Amber, flashing: Incoming call or reverting call
•Red, steady: Remote line in use (shared line or Line Status)
•Red, flashing: Remote line on hold
Depending on how your system administrator sets up the phone, enable softkey options displayed on your phone screen.
The Navigation cluster and Select button allows you to scroll through menus, highlight items and select the highlighted item.
Ends a connected call or session.
Places an active call on hold and resumes the held call.
8 |
Conference button |
Creates a conference call. |
Cisco IP Phone 8841, 8851, and 8861 User Guide for Cisco Unified Communications Manager 10.5
8

Getting Started
|
|
Buttons and Hardware |
|
REVIEW DRAFT - CISCO CONFIDENTIAL |
|
9 |
Transfer button |
Transfers a call. |
10 |
Speakerphone button |
Toggles the speakerphone on or off. When the speakerphone is on, the |
|
|
button is lit. |
11 |
Mute button |
Toggles the microphone on or off. When the microphone is muted, the |
|
|
button is lit. |
12 |
Headset button |
Toggles the headset on or off. When the headset is on, the button is lit. |
13 |
Keypad |
Allows you to dial phone numbers, enter letters, and select menu items |
|
|
(by entering the item number). |
14 |
Volume button |
Controls the handset, headset, and speakerphone volume (off hook) and |
|
|
the ringer volume (on hook). |
15 |
Contacts button |
Opens or closes the Directories menu. Use the Contacts button to access |
|
|
personal and corporate directories. |
16 |
Applications button |
Opens or closes the Applications menu. Use the Applications button to |
|
|
access call history, user preferences, phone settings, and phone model |
|
|
information. |
17 |
Messages button |
Autodials your voice messaging system (varies by system). |
18 |
Back button |
Returns to the previous screen or menu. |
Cisco IP Phone 8841, 8851, and 8861 User Guide for Cisco Unified Communications Manager 10.5
9

Getting Started
Cisco IP Phone 8861
REVIEW DRAFT - CISCO CONFIDENTIAL
19 Handset Phone handset.
Cisco IP Phone 8861
The following sections describe attributes of the Cisco IP Phone 8861.
Phone Connections
Connect your phone to the corporate IP telephony network, using the following diagram.
 Draft comment: image will be updated to display Cisco IP Phones 8841, 8851, and 8861
Cisco IP Phone 8841, 8851, and 8861 User Guide for Cisco Unified Communications Manager 10.5
10

Getting Started
Phone Connections
REVIEW DRAFT - CISCO CONFIDENTIAL
1 |
DC adaptor port (DC48V). |
5 |
Access port (10/100/1000 PC) connection. |
2 |
AC-to-DC power supply (optional). |
6 |
Auxiliary port. |
3 |
AC power wall plug (optional). |
7 |
Handset connection. |
4 |
Network port (10/100/1000 SW) connection. |
8 |
Analog headset connection (optional). |
|
IEEE 802.3at power enabled. |
|
|
Cisco IP Phone 8841, 8851, and 8861 User Guide for Cisco Unified Communications Manager 10.5
11
Getting Started
Buttons and Hardware
REVIEW DRAFT - CISCO CONFIDENTIAL
Note Each USB port supports the connection of up to five supported and nonsupported devices. Each device connected to the phone is included in the maximum device count. For example, your phone can support five USB devices (such as four standard USB devices and one hub) on the side port and five additional standard USB devices on the back port. Many third-party USB products count as multiple USB devices, forexample,adevicecontainingUSBhubandheadsetcancountastwoUSBdevices. Formoreinformation, see the USB device documentation.
Buttons and Hardware
Your phone provides quick access to your phone lines, features, and call sessions:
•Use the feature buttons (on the left) to view calls on a line or access features such as Speed Dial or All Calls.
•Use the call session buttons (on the right) to perform tasks such as making a call, answering a call, or resuming a held call. Each call on your phone is associated with a session button.
Note If you are using a locale that reads right to left, such as Arabic, the line button and session button locations are swapped.
1 |
Handset light strip |
Indicates an incoming call (flashing red) or new voice message (steady |
|
|
red). |
Cisco IP Phone 8841, 8851, and 8861 User Guide for Cisco Unified Communications Manager 10.5
12

Getting Started
Buttons and Hardware
REVIEW DRAFT - CISCO CONFIDENTIAL
2 |
Phone screen |
Shows information about your phone such as directory number, active |
|
|
call and line status, softkey options, speed dials, placed calls, and phone |
|
|
menu listings. |
3 |
Programmable feature |
Depending on how your system administrator sets up the phone, |
|
buttons |
programmable feature buttons (on each side of the phone screen) provide |
|
|
access to: |
• Phone lines and intercom lines
• Speed-dial numbers (speed-dial buttons, including the Line Status speed-dial features)
• Web-based services (for example, a Personal Address Book button)
• Call features (for example, a Privacy button)
Buttons illuminate to indicate status:
•Green, steady: Active call or two-way intercom call
•Green, flashing: Held call
•Amber, steady: Privacy in use, one-way intercom call, DND active, or logged into Hunt Group
•Amber, flashing: Incoming call or reverting call
•Red, steady: Remote line in use (shared line or Line Status)
•Red, flashing: Remote line on hold
4 |
Softkey buttons |
Depending on how your system administrator sets up the phone, enable |
|
|
softkey options displayed on your phone screen. |
5 |
Navigation cluster and |
The Navigation cluster and Select button allows you to scroll through |
|
Select button |
menus, highlight items and select the highlighted item. |
|
|
|
6 |
Release Button |
Ends a connected call or session. |
7 |
Hold/Resume button |
Places an active call on hold and resumes the held call. |
8 |
Conference button |
Creates a conference call. |
Cisco IP Phone 8841, 8851, and 8861 User Guide for Cisco Unified Communications Manager 10.5
13

|
|
Getting Started |
Buttons and Hardware |
|
|
|
REVIEW DRAFT - CISCO CONFIDENTIAL |
|
9 |
Transfer button |
Transfers a call. |
10 |
Speakerphone button |
Toggles the speakerphone on or off. When the speakerphone is on, the |
|
|
button is lit. |
11 |
Mute button |
Toggles the microphone on or off. When the microphone is muted, the |
|
|
button is lit. |
12 |
Headset button |
Toggles the headset on or off. When the headset is on, the button is lit. |
13 |
Keypad |
Allows you to dial phone numbers, enter letters, and select menu items |
|
|
(by entering the item number). |
14 |
Volume button |
Controls the handset, headset, and speakerphone volume (off hook) and |
|
|
the ringer volume (on hook). |
15 |
Contacts button |
Opens or closes the Directories menu. Use the Contacts button to access |
|
|
personal and corporate directories. |
16 |
Applications button |
Opens or closes the Applications menu. Use the Applications button to |
|
|
access call history, user preferences, phone settings, and phone model |
|
|
information. |
17 |
Messages button |
Autodials your voice messaging system (varies by system). |
18 |
Back button |
Returns to the previous screen or menu. |
Cisco IP Phone 8841, 8851, and 8861 User Guide for Cisco Unified Communications Manager 10.5
14

Getting Started
Power Save and Power Save Plus
REVIEW DRAFT - CISCO CONFIDENTIAL
19 |
Handset |
Phone handset. |
Power Save and Power Save Plus
There are two levels of energy-saving modes that your system administrator can set up:
•Power Save—The phone display goes blank when not in use for a period of time, reducing the power requirements.
•Power Save Plus—The phone display goes blank, turning the phone off and on at predetermined times. The power to the phone is significantly reduced.
Power Save
Depending on how your system administrator set up your phone, the phone display may go into a power-save mode (the phone screen appears blank and the Select button is lit white).
To turn on the phone display, press any button, touch the blank phone screen, or pick up the handset.
Power Save Plus
Your Cisco IP Phone supports the Cisco EnergyWise (EW) program, also known as Power Save Plus. Your system administrator sets up sleep (power down) and wake (power up) times for your phone to save energy. If your phone goes into the Power Save Plus mode, the Select button is lit white.
Ten minutes before the scheduled sleep time, the Select button lights up and you receive a message that your phone will power off at a specific time. If enabled by your system administrator, you also hear your ringtone play. The ringtone plays according to the following schedule:
•At 10 minutes before power off, the ringtone plays four times
•At 7 minutes before power off, the ringtone plays four times
•At 4 minutes before power off, the ringtone plays four times
•At 30 seconds before power off, the ring tone plays 15 times or until the phone powers off
If your phone is inactive (idle) at the sleep time, you see a message to remind you that your phone is about to power down. To keep the phone active, you need to press OK in the message or any key on the phone. If you do not press the button or any key, your phone powers down.
If your phone is active (for example, on a call), your phone waits until it has been inactive for a period of time before telling you of the pending power shutdown. Before the shutdown happens, you see a message to remind you that your phone is about to power off.
After your phone goes to sleep, press Select to wake up your phone. After the phone is inactive for a period of time, a message displays to alert you that the phone is about to power down. At the configured wake time, your phone powers up.
Cisco IP Phone 8841, 8851, and 8861 User Guide for Cisco Unified Communications Manager 10.5
15

Getting Started
Additional Information
REVIEW DRAFT - CISCO CONFIDENTIAL
Wake and sleep times are also linked to the configured days that you normally work. If your requirements change (for example, your work hours or work days change), contact your system administrator to have your phone reconfigured.
For more information about EnergyWise and your phone, contact your system administrator.
Additional Information
You can access the Cisco website at this URL: http://www.cisco.com/
Within the Cisco website, you can find the following information:
•Cisco IP Phone 8841, 8851, and 8861 quick reference cards, quick start guides, and end-user guides: http://rtp-aspw-ccms1.cisco.com/astoria/_id_00000013UKF720YZ_CISCO!supkumar#
•Licensing information: http://rtp-aspw-ccms1.cisco.com/astoria/_id_00000013UKF720YZ_CISCO!supkumar#
•Cisco international websites:
Allows access to international Cisco websites from www.cisco.com by clicking the Worldwide [change] link at the top of the web page.
Cisco IP Phone 8841, 8851, and 8861 User Guide for Cisco Unified Communications Manager 10.5
16

C H A P T E R 2
Phone Setup
• Connect Footstand, page 17
• Adjust Handset Rest, page 18
• Secure Phone with Cable Lock, page 18
Connect Footstand
If your phone is placed on a table or desk, connect the footstand to the back of the phone. Your phone includes an adjustable footstand. When placing the phone on a desktop surface, you can adjust the tilt height to several different angles 35 degrees to 50 degrees.
Note Adjusting the footstand to the required angle may require more force than you expect.
Procedure
Step 1 Insert the connectors into the slots provided.
Step 2 Press the footstand until the connectors snap into place.
Cisco IP Phone 8841, 8851, and 8861 User Guide for Cisco Unified Communications Manager 10.5
17

Phone Setup
Adjust Handset Rest
REVIEW DRAFT - CISCO CONFIDENTIAL
Adjust Handset Rest
If your phone is wall-mounted, you may need to adjust the handset rest to ensure that the receiver does not slip out of the cradle.
Procedure
Step 1 Remove the handset from the cradle and pull the plastic tab from the handset rest.
Step 2 Rotate the tab 180 degrees.
Step 3 Hold the tab between two fingers, with the corner notches facing you.
Step 4 Line up the tab with the slot in the cradle and press the tab evenly into the slot. An extension protrudes from the top of the rotated tab.
Step 5 Return the handset to the handset rest.
Secure Phone with Cable Lock
You can secure the phone to a desktop by using a laptop cable lock. The lock connects to the antitheft security connector on the back of the phone and the cable can be secured to a desktop.
Cisco IP Phone 8841, 8851, and 8861 User Guide for Cisco Unified Communications Manager 10.5
18

Phone Setup
Secure Phone with Cable Lock
REVIEW DRAFT - CISCO CONFIDENTIAL
The security slot can accommodate a lock up to 20 mm wide. Compatible laptop cable locks include the Kensington laptop cable lock and laptop cable locks from other manufacturers that can fit into the security slot on the back of the phone.
Procedure
Step 1 Wrap the looped end of the cable lock and wrap it around object to which you want to secure your phone.
Step 2 Pass the lock through the looped end of the cable.
Step 3 Unlock the cable lock.
Note There are two kinds of cable locks: keyed and combination. Depending on what type of lock you have, unlock it by using the key or the correct combination.
Step 4 Press and hold the locking button to align the locking teeth.
Step 5 Insert the cable lock into the lock slot of your phone and release the locking button.
Step 6 Lock the cable lock.
Note For keyed locks, turn the key 90 degrees in the clockwise direction and pull the key out of the lock. For combination locks, rotate the lock 90 degrees and then scramble the combination.
Cisco IP Phone 8841, 8851, and 8861 User Guide for Cisco Unified Communications Manager 10.5
19

Phone Setup
Secure Phone with Cable Lock
REVIEW DRAFT - CISCO CONFIDENTIAL
Cisco IP Phone 8841, 8851, and 8861 User Guide for Cisco Unified Communications Manager 10.5
20
Loading...