


ZYWALL USG 100
Table of contents
 Loading...
ZyWALL USG 100/200 Series
Unified Security Gateway
Quick Start Guide
Version 2.10
3/2008
Edition 1
DEFAULT LOGIN
LAN Port P4
LAN IP Address http://192.168.1.1
User Name admin
Password 1234
CONTENTS
ENGLISH 2
DEUTSCH 9
ESPAÑOL 16
FRANÇAIS 23
ITALIANO 30
РУССКИЙ 37
简体中文
繁體中文 52
45
Copyright © 2008. All rights reserved.

ENGLISH
1 Checking the Package Contents
Your package should
include one of each
of the following:
• ZyWALL
•Power cord
• Rack-mounting kit
• RJ-45 Ethernet cable
• RS-232 console Y-cable
• Printed Quick Start Guide
• Compact disk (CD)
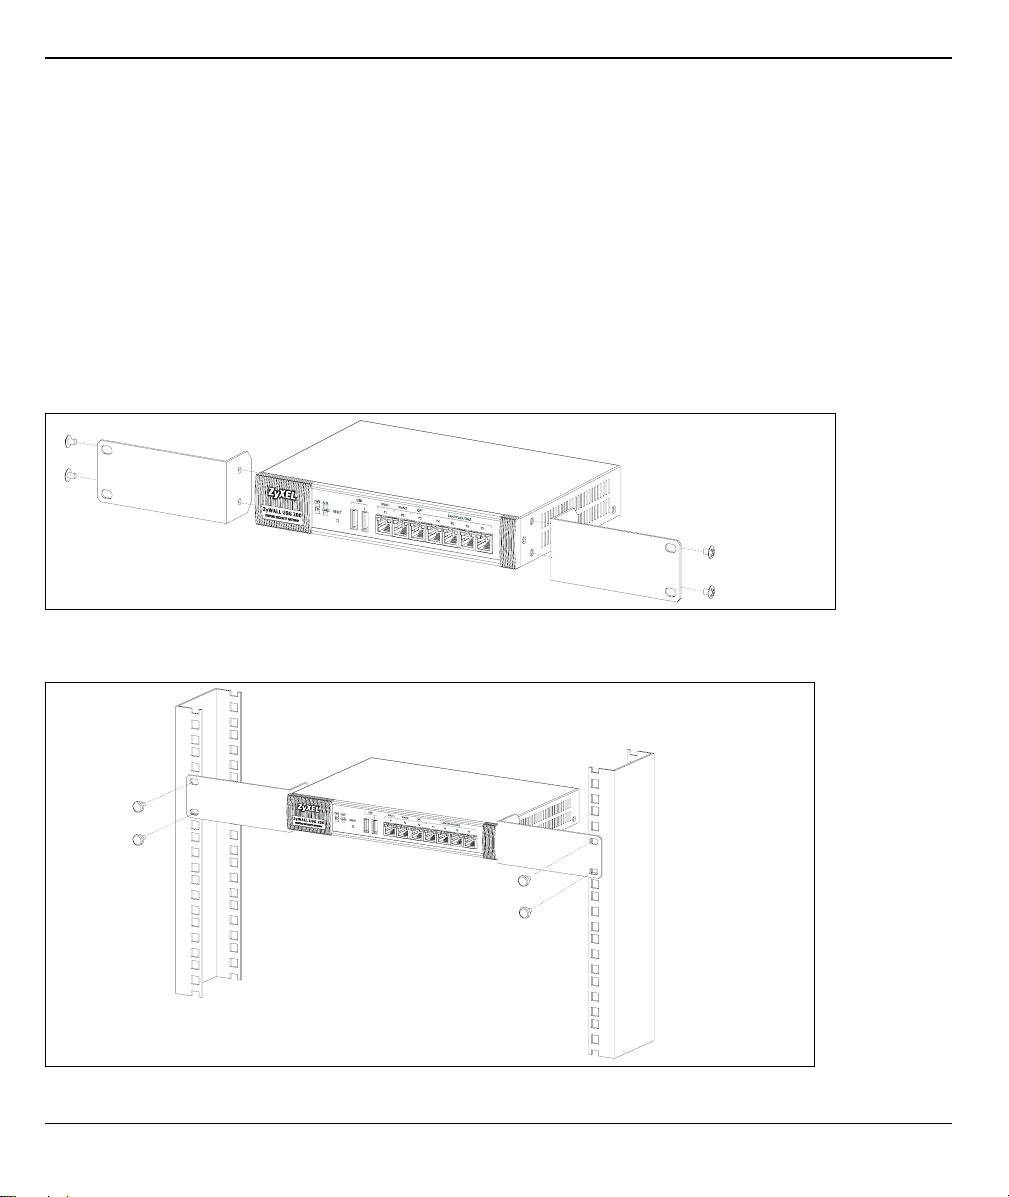
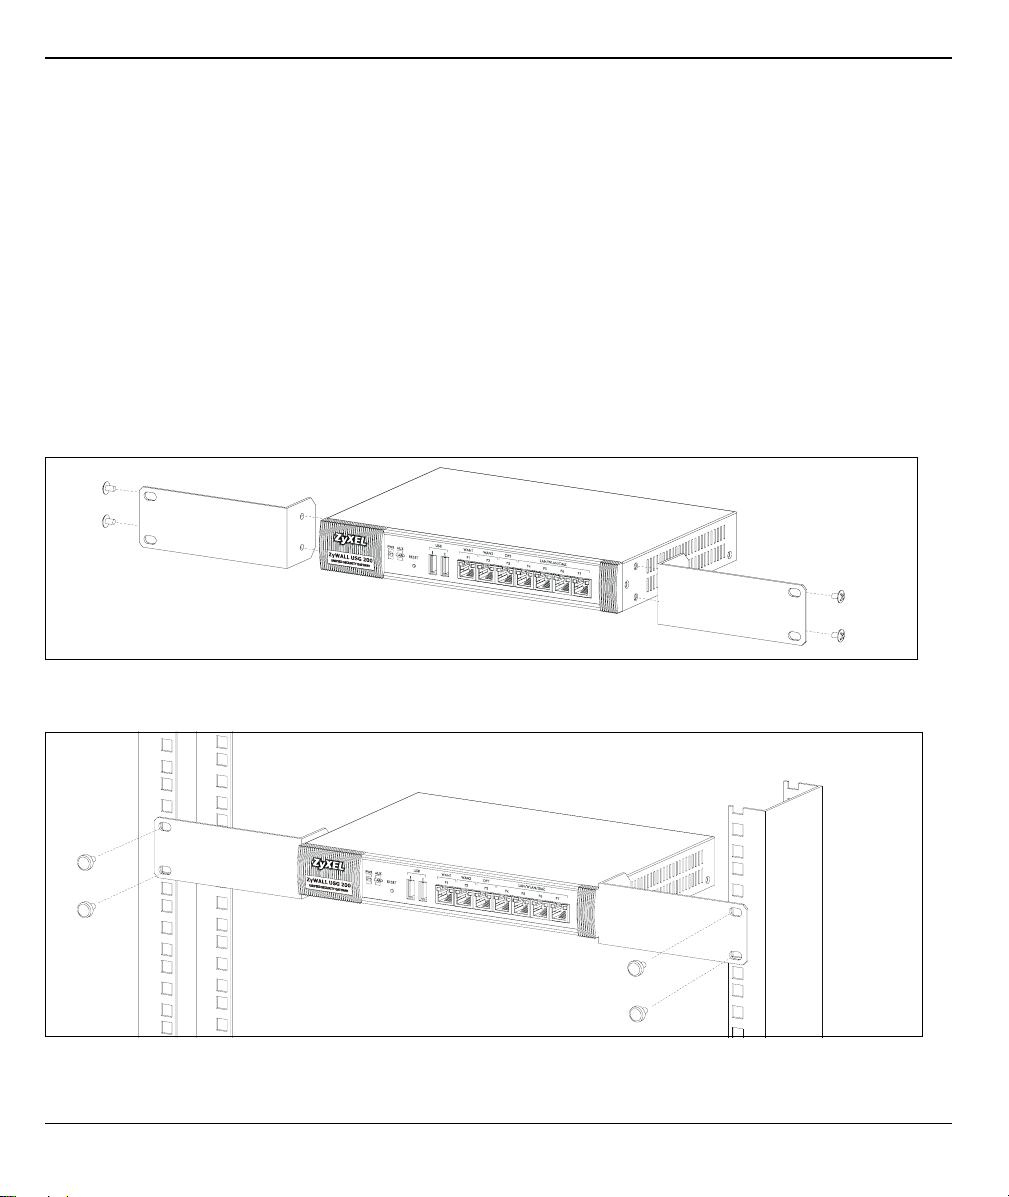
2 Rack-mounted Installation
Mount the ZyWALL in a 19-inch rack or place it on a sturdy, flat surface.
Note: Leave 10 cm of clearance at the sides and 20 cm in the rear.
1 Align one bracket with the holes on one side of the ZyWALL and secure it with the included bracket
screws. Similarly, attach the other bracket.
2 After attaching both mounting brackets, position the ZyWALL in the rack by lining up the holes in the
brackets with the appropriate holes on the rack. Secure the ZyWALL to the rack with the rack-mounting
screws.
2
ENGLISH
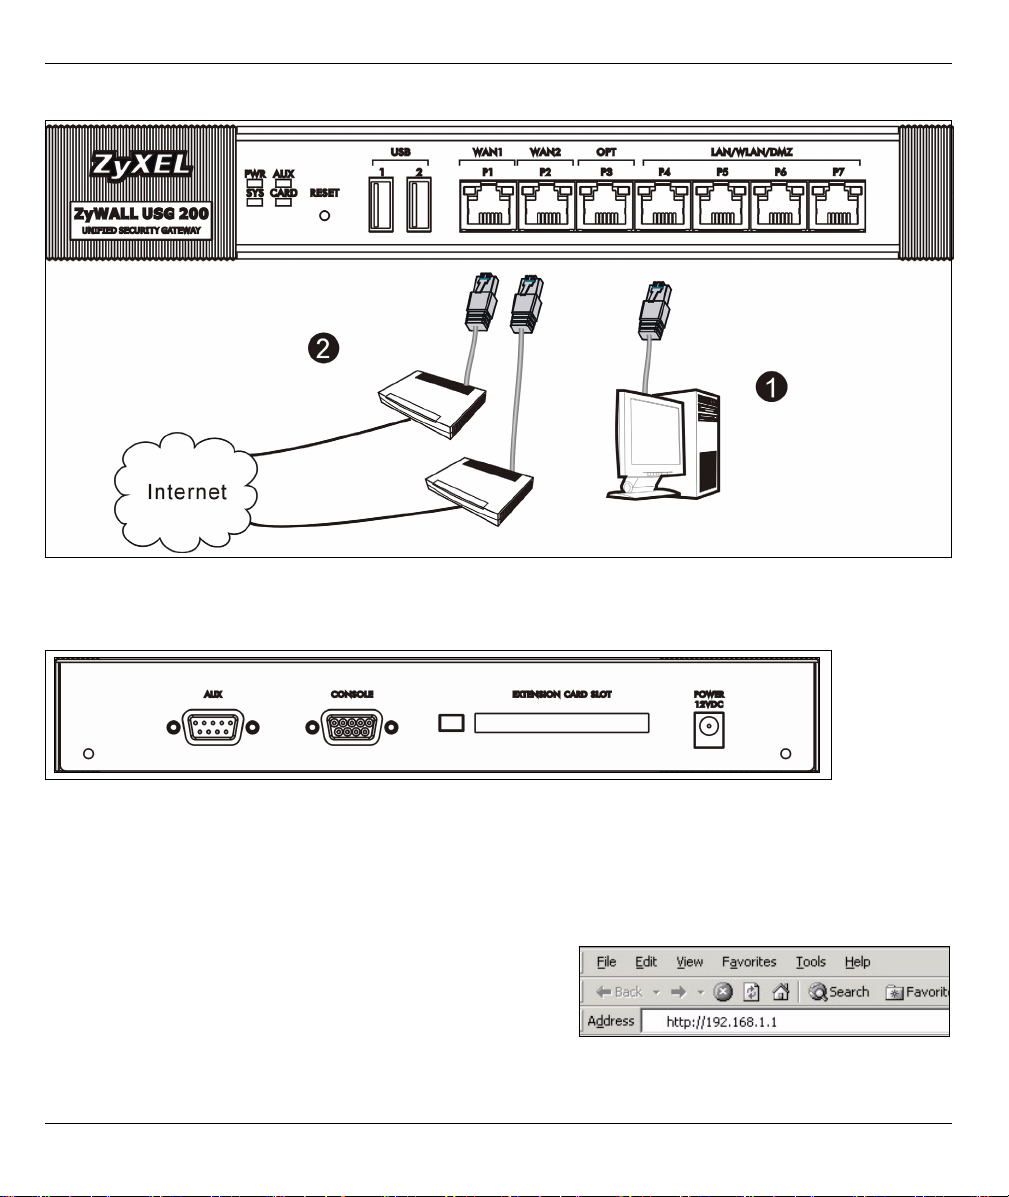
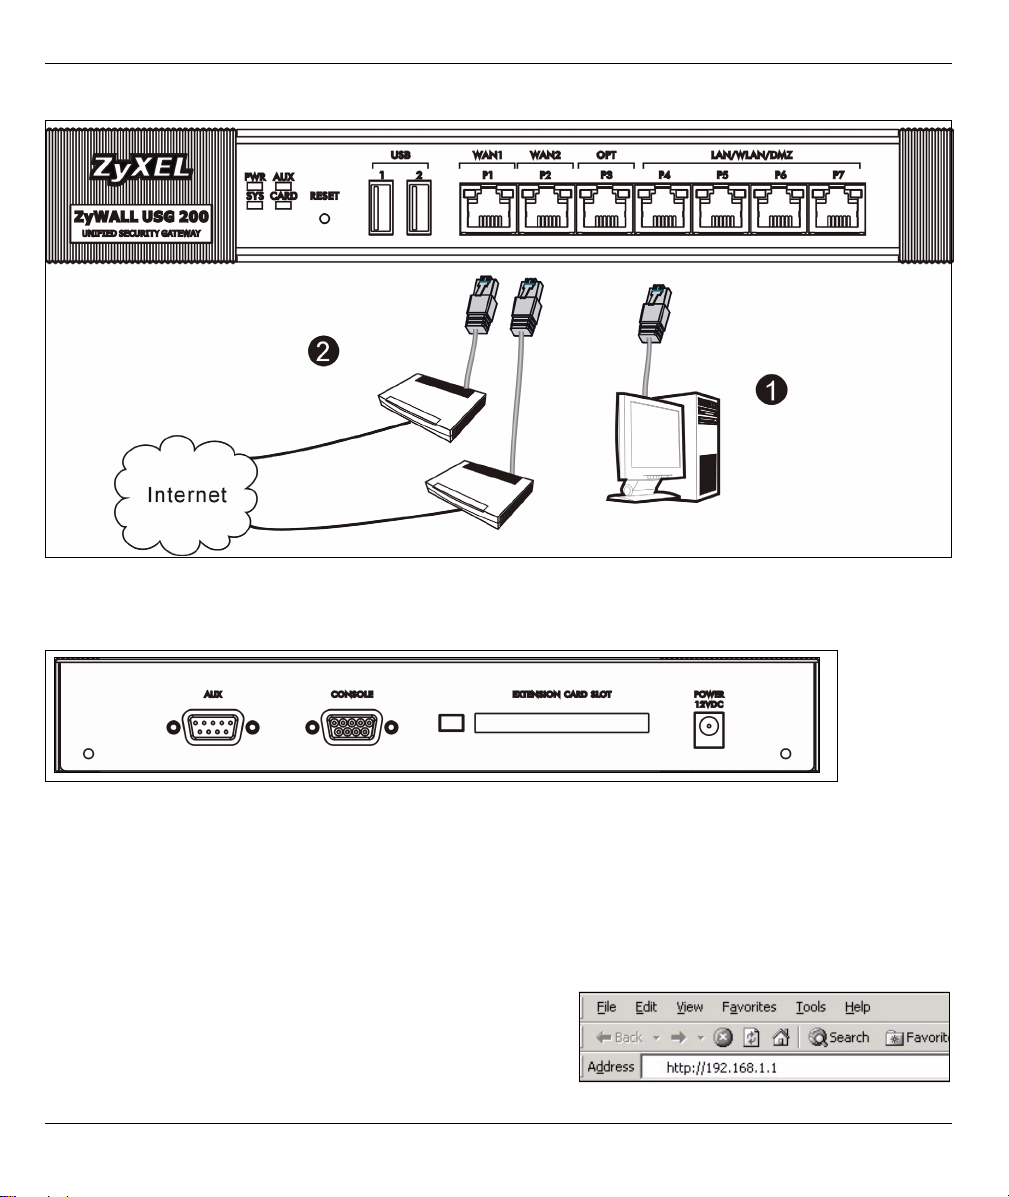
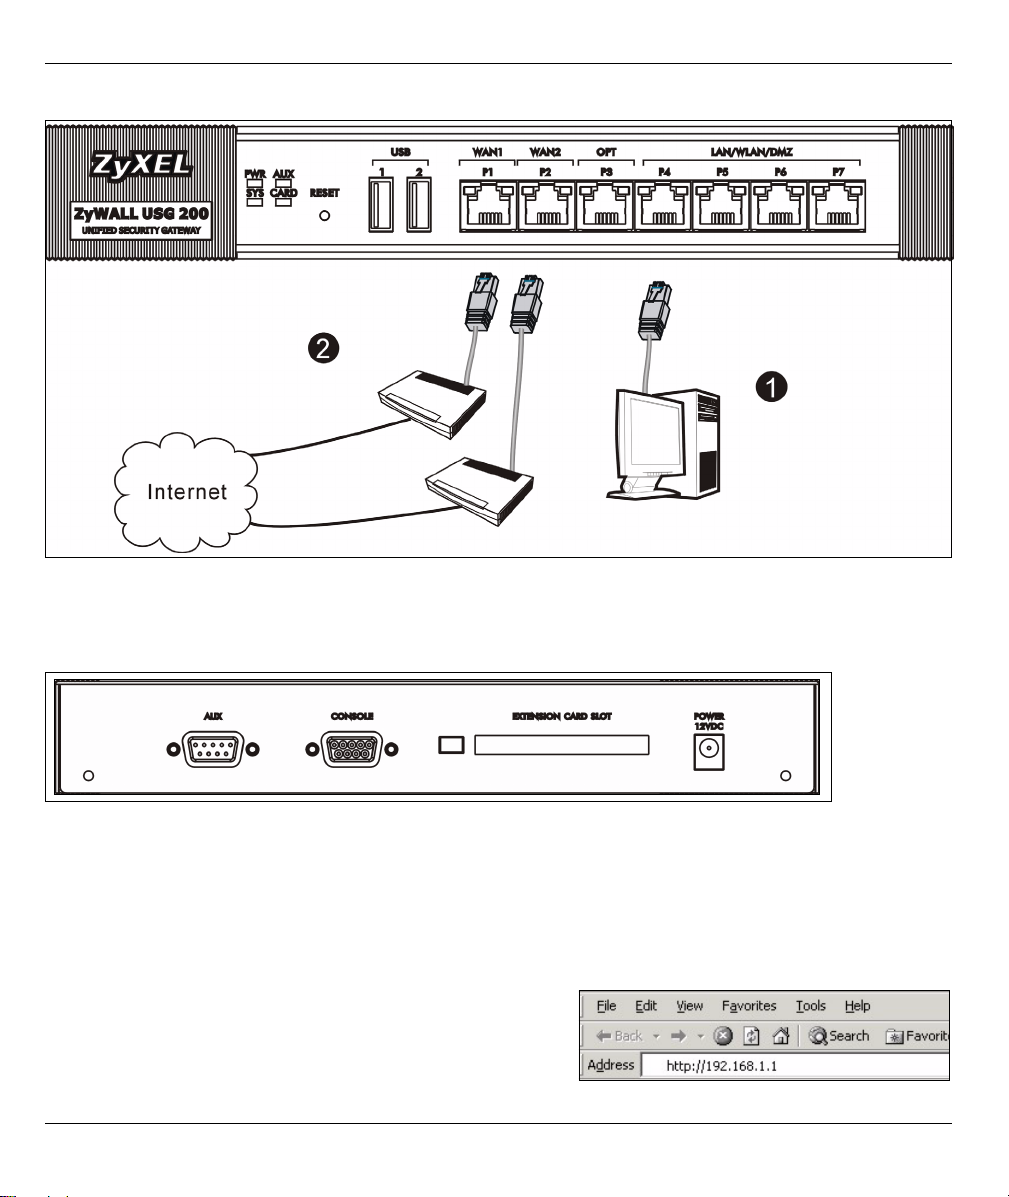
3 Connecting the Hardware
1 It is recommended that you configure the ZyWALL before using it to protect your network. Use an Ethernet
cable to connect a computer to port P4.
2 Use another Ethernet cable(s) to connect port 2 and/or port 3 to an Ethernet jack with Internet access.
3 Use the included power adaptor to connect the power socket (on the rear panel) to a power outlet.
4 Look at the front panel. The PWR light turns on. The SYS light blinks during system testing and
initialization and then stays on when the system is ready.
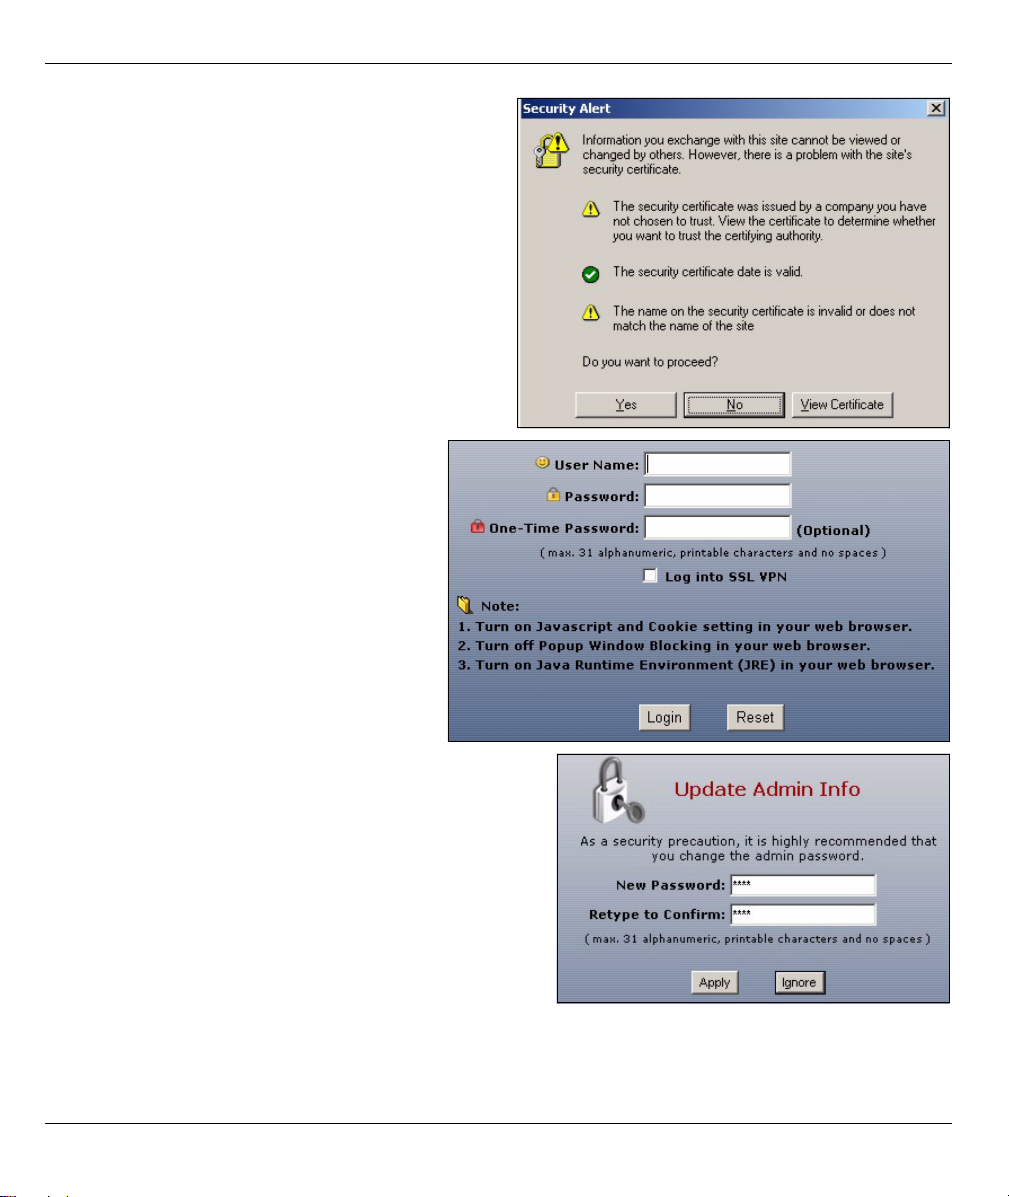
4 Web Login
1 Launch your web browser and go to http://192.168.1.1 (the
ZyWALL automatically redirects you to https://192.168.1.1).
3

ENGLISH
2 Click Yes to proceed if you get a security alert or
certificate screen.
3 Enter admin as the user name and 1234 as
the password. Click Login.
4 It is strongly recommended that you change the
password. Type and retype a new password, and click
Apply.
4

ENGLISH
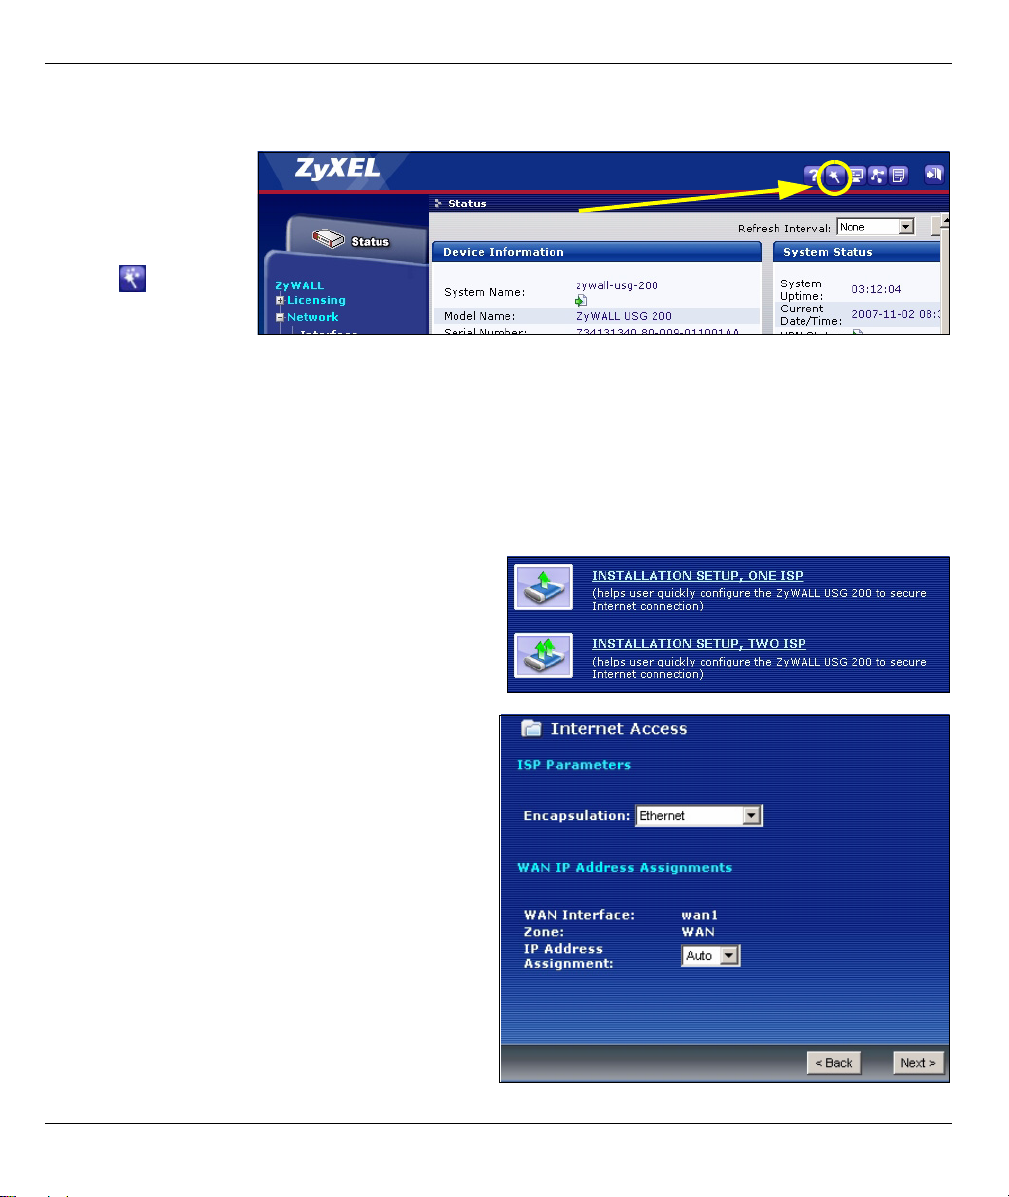
5 Installation Setup Wizard
The Status screen
opens. Click the Wizard
icon in the upper
right corner.
Use an installation setup wizard to connect to the Internet and register the ZyWALL and/or activate trial
services, like IDP and content filter.
Note: Use the installation wizard only for initial configuration starting from the default configuration.
Changes you make in the installation wizard may not be applied if you have already changed the
ZyWALL’s configuration.
• INSTALLATION SETUP, ONE ISP sets up a sin-
gle Internet connection for wan1.
• INSTALLATION SETUP, TWO ISP sets up Inter-
net connections for wan1 and wan2.
The wizard screens vary depending on the encapsulation
type you use. Refer to information provided by your ISP
and the web help screens to know what to enter in each
field. You can leave fields blank if you don’t have that
information.
5
ENGLISH
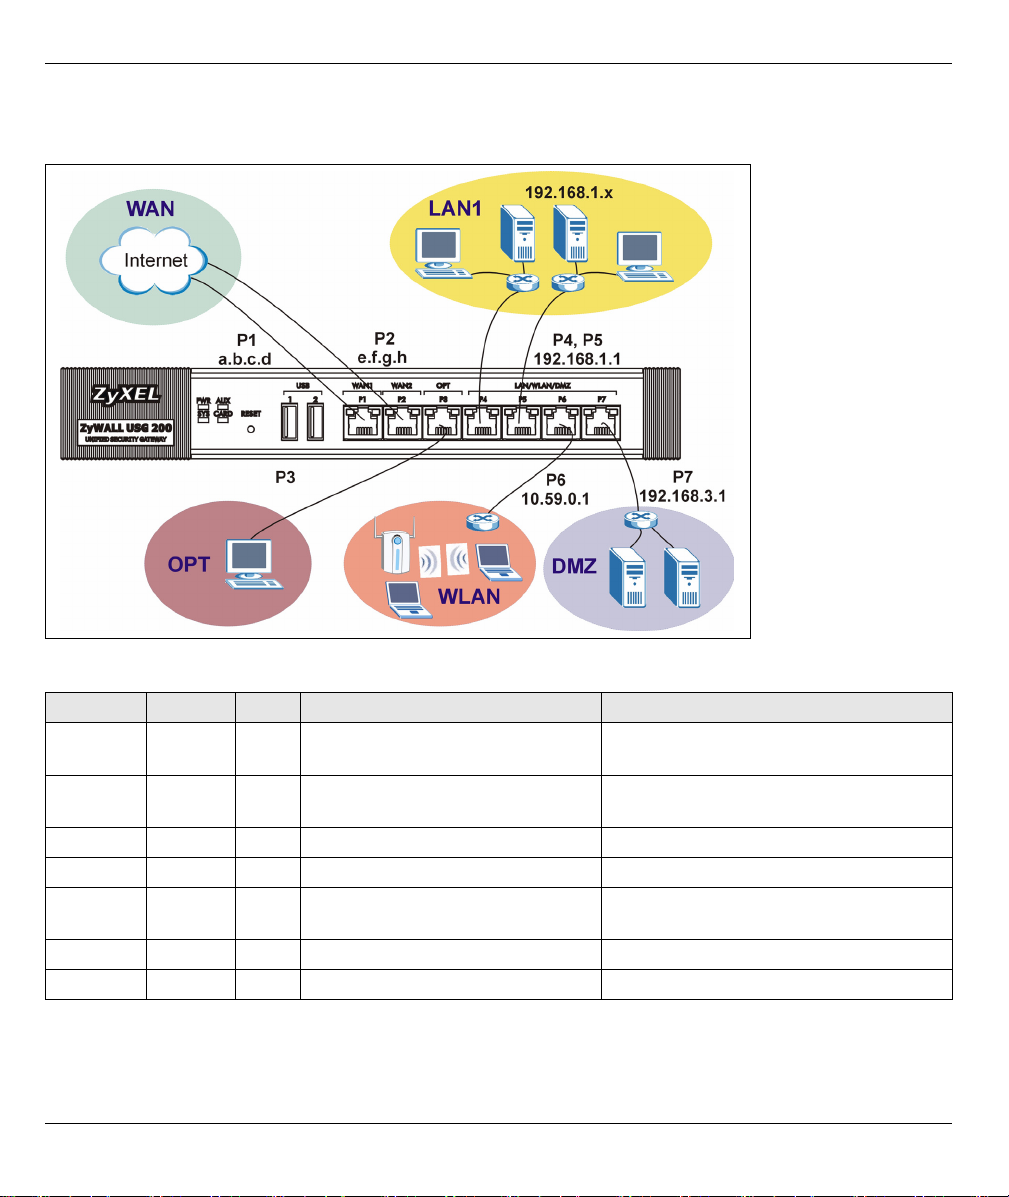
6 Default Settings and Port Details
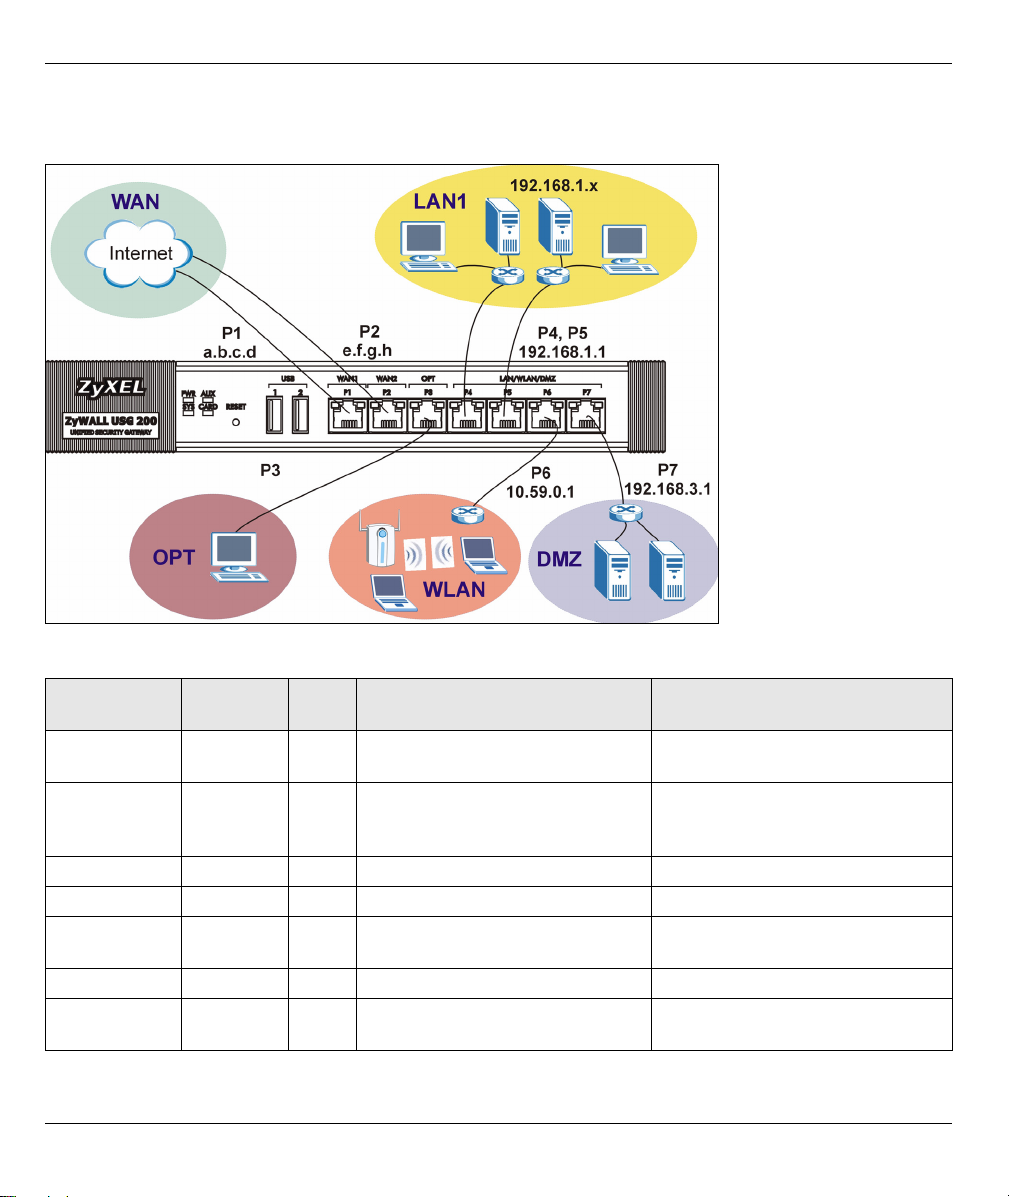
The ZyWALL is configured for the following network topology by default. (ZyWALL USG 200)
ZyWALL USG 200
Port Interface Zone IP Address and DHCP Settings Suggested Use With Default Settings
P1, P2 wan1,
wan2
P3 opt OPT None, DHCP server disabled Third WAN, additional LAN, WLAN, or
P4, P5 lan1 LAN1 192.168.1.1, DHCP server enabled Protected LAN
P6 ext-wlan WLAN 10.59.0.1, DHCP server enabled Wireless access points
P7 dmz DMZ 192.168.3.1, DHCP server disabled Public servers (such as web, e-mail and
AUX aux None None Auxiliary modem
CONSOLE n/a None None Local management
WAN DHCP clients Connections to the Internet
DMZ port or a separate network.
FTP)
6

ENGLISH
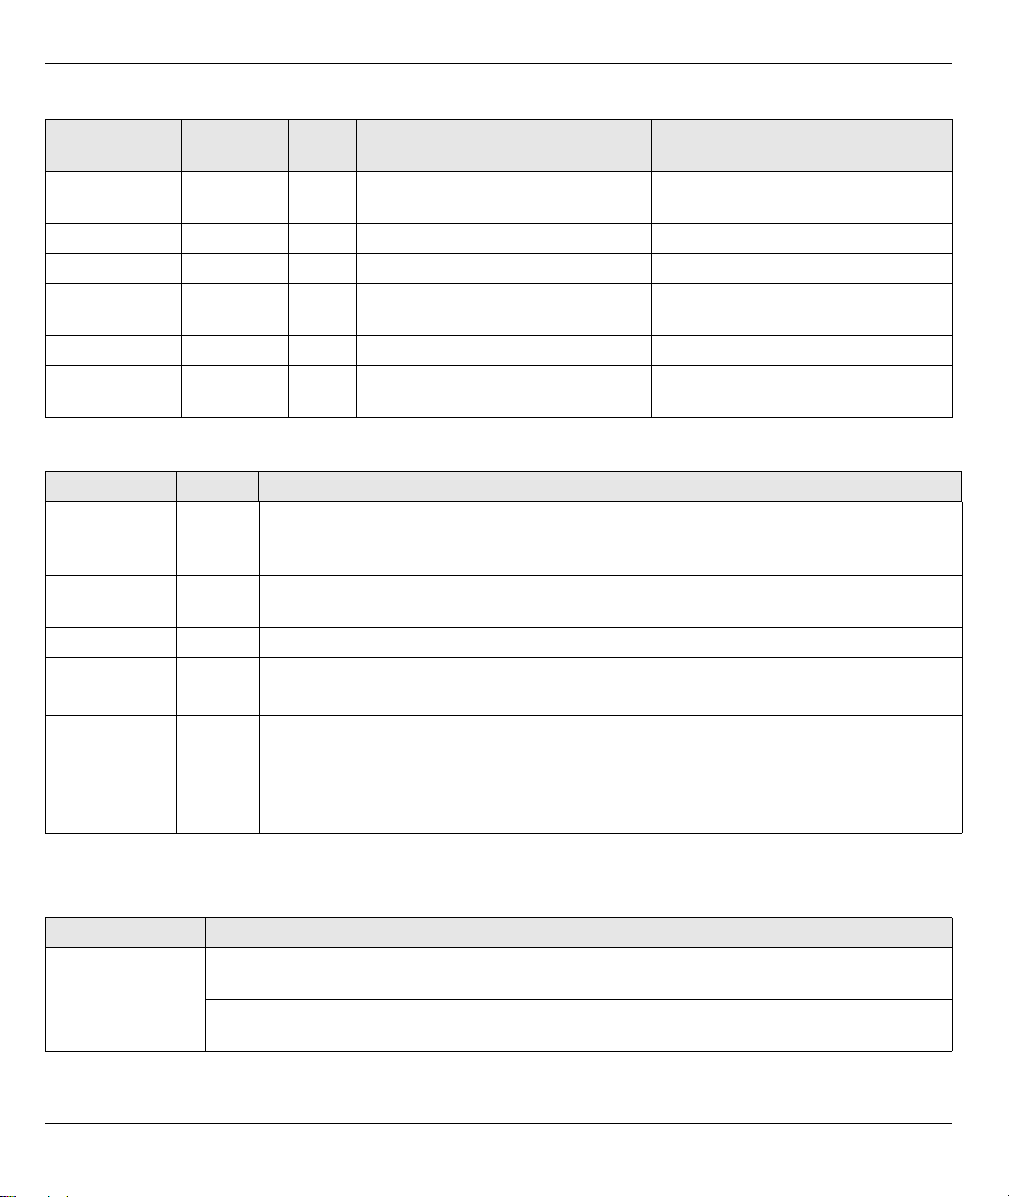
ZyWALL USG 100
Port Interface Zone IP Address and DHCP Settings Suggested Use With Default Settings
P1, P2 wan1,
wan2
P3, P4, P5 lan1 LAN1 192.168.1.1, DHCP server enabled Protected LAN.
P6 ext-wlan WLAN 10.59.0.1, DHCP server enabled Wireless access points
P7 dmz DMZ 192.168.3.1, DHCP server enabled Public servers (such as web, e-mail and
AUX aux None None Auxiliary modem
CONSOLE n/a None None Local management
Label Type Description
USB USB Connect a (USB) 3G wireless card to access the Internet through a 3G network. At
P1~P7 RJ-45 Use 8-wire Category 5e or above Ethernet cables to connect routers, switches,
AUX RS-232 Use an RS-232 console cable to connect dial backup/dial-in modem.
CONSOLE RS-232 Use an RS-232 console cable to connect a local computer for command-based
EXTENSION
CARD SLOT
PCMCIA Insert a wireless LAN card to use the wireless LAN feature. At the time of writing, you
WAN DHCP clients Connections to the Internet
FTP)
the time of writing, you can use the Huawei E220.
computers, routers, access points, and so on.
management.
can use ZyXEL’s G-170S wireless card. You can optionally insert a 3G wireless card to
access the Internet wirelessly via a 3G network. At the time of writing, you can use a
Sierra Wireless AC850 or AC860 3G wireless card.
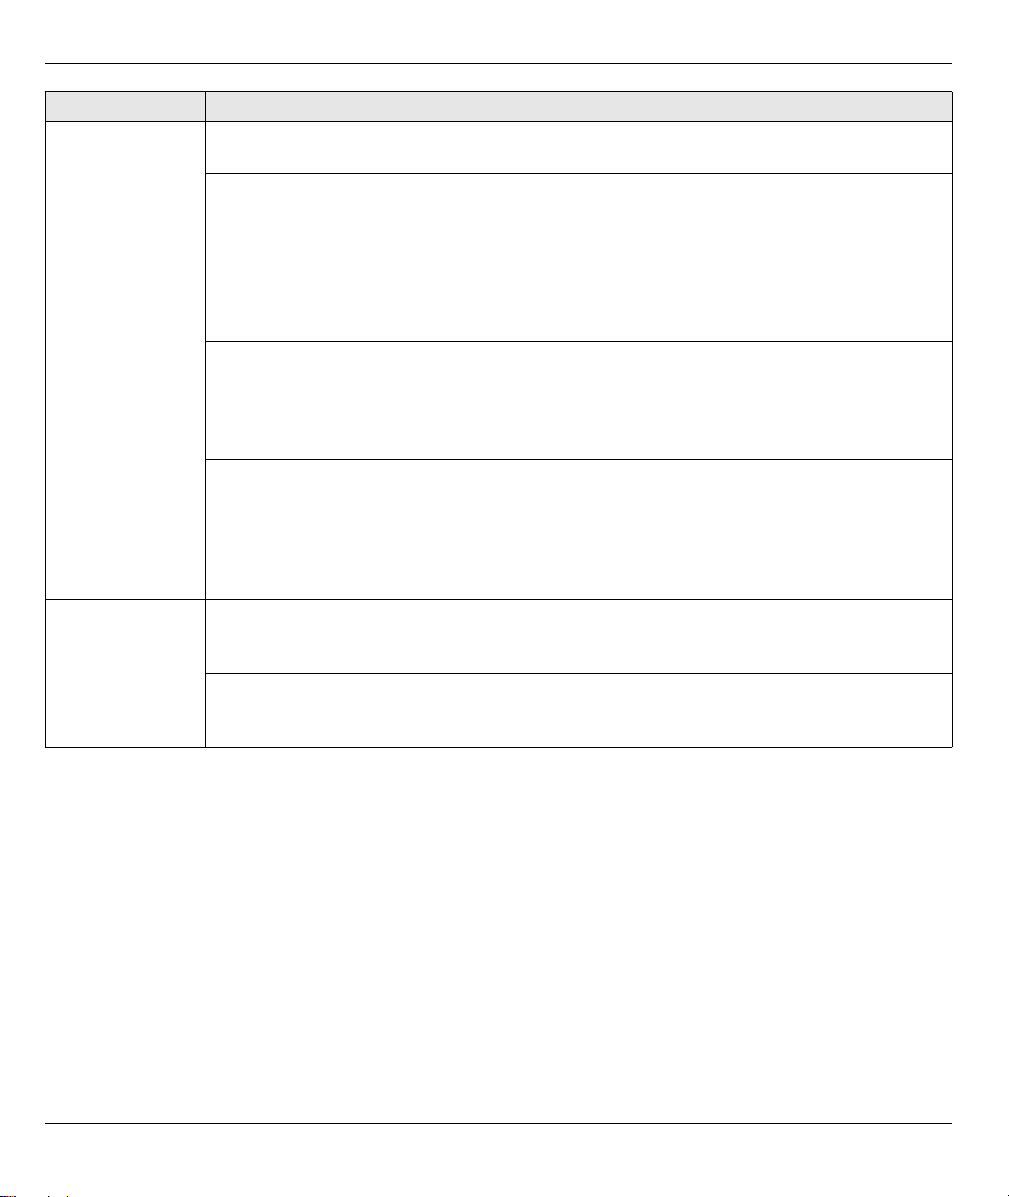
7 Troubleshooting
Problem Corrective Action
None of the LEDs
turn on.
Make sure that you have the power cord connected to the ZyWALL and plugged in to an
appropriate power source. Make sure you have the ZyWALL turned on. Check all cable
connections.
If the LEDs still do not turn on, you may have a hardware problem. In this case, you should
contact your local vendor.
7
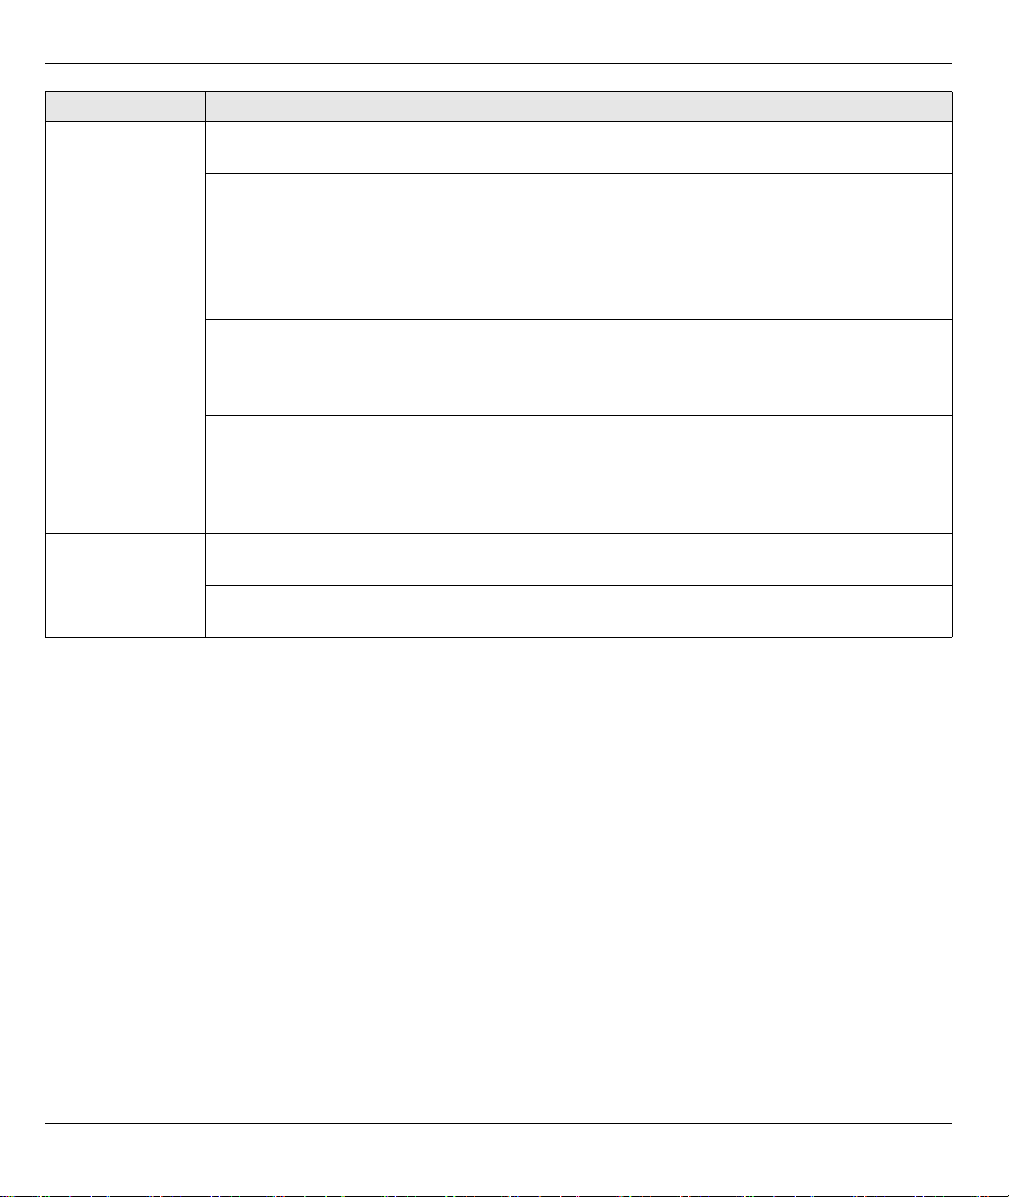
Problem Corrective Action
Cannot access
the ZyWALL from
the LAN.
Cannot access
the Internet.
Check the cable connection between the ZyWALL and your computer or switch. Refer to
section 3 for details.
Ping the ZyWALL from a LAN computer. Make sure your computer’s Ethernet card is
installed and functioning properly. Also make sure that its IP address is in the same subnet as
the ZyWALL’s.
In the computer, click Start, (All) Programs, Accessories and then Command Prompt. In
the Command Prompt window, type "ping" followed by the ZyWALL’s LAN IP address
(192.168.1.1 is the default) and then press [ENTER]. The ZyWALL should reply.
If you’ve forgotten the ZyWALL’s password, use the RESET button. Press the button in for
about 5 seconds (or until the PWR LED starts to blink), then release it. It returns the ZyWALL
to the factory defaults (password is 1234, LAN IP address 192.168.1.1 etc.; see your User’s
Guide for details).
If you’ve forgotten the ZyWALL’s IP address, you can use the commands through the
console port to check it. Connect your computer to the CONSOLE port using a console
cable. Your computer should have a terminal emulation communications program (such as
HyperTerminal) set to VT100 terminal emulation, no parity, 8 data bits, 1 stop bit, no flow
control and 115200 bps port speed.
Check the ZyWALL’s connection to the Ethernet jack with Internet access. Make sure the
Internet gateway device (such as a DSL modem) is working properly.
Check the WAN port’s status in the Status screen. Use the installation setup wizard again
and make sure that you enter the correct settings.
ENGLISH
8 Procedure to View a Product’s Certification(s)
1 Go to www.zyxel.com.
2 Select your product from the drop-down list box on the ZyXEL home page to go to that product's page.
3 Select the certification you wish to view from this page.
8
1 Prüfen des Packungsinhalts
DEUTSCH
Prüfen Sie ob alle
Teile vorhanden
sind:
• ZyWALL
• Netzkabel
• Rackmontage-Zubehör
• RJ-45-Ethernetkabel
• Y-Kabel für RS-232-Konsole
• Kurzanleitung in Druckform
•CD
2 Rackmontage
Montieren Sie die ZyWALL in einem 19"-Rack oder stellen Sie es auf eine stabile Unterlage.
Hinweis: Lassen Sie seitlich 10 cm und hinten 20 cm Platz.
1 Richten Sie eine Halterung an den Löchern an der Seite der ZyWALL aus und schrauben Sie sie mit den
mitgelieferten Montageschrauben fest. Verfahren Sie ebenso mit der zweiten Halterung.
2 Wenn Sie beide Montagehalterungen befestigt haben, richten Sie die ZyWALL so im Rack aus, dass die
entsprechenden Schraublöcher übereinander stehen. Befestigen Sie die ZyWALL mit den
Befestigungsschrauben am Rack.
.
9
DEUTSCH
3 Anschließen der Hardware
1 Es wird empfohlen, die ZyWALL zu konfigurieren, bevor Sie diese in Ihrem Netzwerk einsetzen. Schließen
Sie einen Computer mit einem Ethernetkabel an
2 Schließen Sie an Port 2 und/oder Port 3 Ihren Router mit Internetzugriff an.
Port P4 an.
3 Schließen Sie den mitgelieferten Netzadapter an den Netzanschluss (an der Rückseite des Geräts) und an
eine Netzsteckdose an.
4 Betrachten Sie das vordere Bedienfeld. Die PWR-LED beginnt zu leuchten. Die SYS-LED blinkt während
des Systemtests und der Initialisierung, und sie leuchtet, wenn der Test abgeschlossen und das System
bereit ist.
4 Anmelden im Internet
1 Starten Sie Ihren Internetbrowser und rufen Sie die Seite
http://192.168.1.1 auf (der ZyWALL leitet Sie automatisch
zur Seite https://192.168.1.1 weiter).
10
2 Wenn eine Sicherheitswarnung oder ein
Zertifikatsfenster erscheint, klicken Sie auf Ja, um
fortzufahren.
3 Geben Sie als Benutzername admin und
als Kennwort 1234 ein. Klicken Sie auf
Login.
DEUTSCH
4 Es wird dringend empfohlen, das Kennwort zu ändern.
Geben Sie zweimal das neue Kennwort ein, und klicken
Sie auf Apply (Übernehmen).
11
DEUTSCH
5 Installationsassistent
Das Fenster Status
(Status) wird angezeigt.
Klicken Sie in der
rechten oberen Ecke
auf das Assistent-
Symbol .
Stellen Sie mit dem Installationsassistenten eine Verbindung zum Internet her und registrieren Sie die
ZyWALL und/oder aktivieren Sie Testdienste wie IDP oder den Content-Filter.
Hinweis: Verwenden Sie den Setup-Assistenten beginnend mit der Standardkonfiguration nur für die
Erstkonfiguration.
Änderungen, die Sie mit dem Installationsassistenten vornehmen, werden nicht übernommen,
wenn Sie bereits die Konfiguration des ZyWALL geändert haben.
•Mit INSTALLATION SETUP, ONE ISP wird eine ein-
zelne Internetverbindung für wan1 eingerichtet.
•Mit INSTALLATION SETUP, TWO ISP wird eine
Internetverbindung für wan1 und wan2 eingerichtet.
Das zweite Fenster des Assistenten hängt davon ab,
welche Einstellung Sie bei "Encapsulation" gewählt
haben. In den Handbüchern Ihres Internetprovider
und auf dessen Online-Hilfeseiten erfahren Sie, was
in die einzelnen Felder eingegeben werden muss.
Wenn Ihnen bestimmte Daten nicht vorliegen,
wenden Sie sich bitte an Ihren Internetprovider.
12
DEUTSCH
6 Standardeinstellungen und Anschlussdetails
Der ZyWALL ist standardmäßig für die folgende Netzwerktopologie konfiguriert. (ZyWALL USG 200)
ZyWALL USG 200
Anschluss anschluss Zone
P1, P2 wan1,
wan2
P3 opt OPT Keine, DHCP-Server deaktiviert Drittes WAN, zusätzliches LAN,
P4, P5 lan1 LAN1 192.168.1.1, DHCP-Server aktiviert Geschütztes LAN
P6 ext-wlan WLAN 10.59.0.1, DHCP-Server aktiviert Wireless Access Points
P7 dmz DMZ 192.168.3.1, DHCP-Server
AUX aux Keine Keine Hilfsmodem
CONSOLE
(KONSOLE)
n. V. Keine Keine Lokale Verwaltung
WAN DHCP-Clients Verbindungen zum Internet
IP-Adressse und DHCPEinstellungen
deaktiviert
13
Empfohlene Verwendung mit
Standardeinstellungen
WLAN oder DMZ-Port oder
separates Netzwerk.
Öffentliche Server (z. B. Internet, EMail und FTP)
DEUTSCH
ZyWALL USG 100
Anschluss anschluss Zone
P1, P2 wan1,
wan2
P3, P4, P5 lan1 LAN1 192.168.1.1, DHCP-Server aktiviert Geschütztes LAN
P6 ext-wlan WLAN 10.59.0.1, DHCP-Server aktiviert Wireless Access Points
P7 dmz DMZ 192.168.3.1, DHCP-Server
AUX aux Keine Keine Hilfsmodem
CONSOLE
(KONSOLE)
Bezeichnung Typ Beschreibung
USB USB Schließen Sie ein 3G-Wireless-Card (USB) an, um über ein 3G-Netzwerk auf das
P1~P7 RJ-45 Schließen Sie mit einem 8-poligen Ethernet-Kabel der Kategorie 5e oder höher Router,
AUX RS-232 Schließen Sie mit einem RS-232-Konsolenkabel ein Dial-Backup/Dial-In-Modem an.
CONSOLE
(KONSOLE)
EXTENSION
CARD SLOT
n. V. Keine Keine Lokale Verwaltung
RS-232 Schließen Sie mit einem RS-232-Konsolenkabel einen lokalen Computer für ein
PCMCIA Setzen Sie eine Wireless-LAN-Karte ein, um die Wireless-LAN-Funktion zu nutzen.
WAN DHCP-Clients Verbindungen zum Internet
Internet zuzugreifen. Zum Zeitpunkt der Drucklegung können Sie das Modell Huawei
E220 verwendet werden.
Switches, Computer, Zugriffspunkte usw. an.
befehlsgestütztes Management an.
Zum Zeitpunkt der Drucklegung können Sie die Wireless-Card G-170S von ZyXEL
verwenden. Sie können alternativ eine 3G-Wireless-Card einsetzen, um über ein 3GNetzwerk auf das Internet zuzugreifen. Zum Zeitpunkt der Drucklegung können Sie
eine Wireless-Card Sierra Wireless AC850 oder AC860 3G verwenden.
IP-Adressse und DHCPEinstellungen
deaktiviert
Empfohlene Verwendung mit
Standardeinstellungen
Öffentliche Server (z. B. Internet, EMail und FTP)
7 Problembeseitigung
Problem Lösungsmöglichkeit
Es leuchtet keine
der LEDAnzeigen.
Prüfen Sie die Stromversorgung der ZyWALL. Stellen Sie sicher, dass die ZyWALL
eingeschaltet ist.
Wenn die LED-Anzeigen auch dann nicht leuchten, besteht möglicherweise ein Problem mit
der Hardware. In diesem Fall sollten Sie sich an Ihren Händler wenden.
14
Problem Lösungsmöglichkeit
Vom LAN kann
nicht auf den
ZyWALL
zugegriffen
werden.
Es ist kein Zugriff
auf das Internet
möglich.
Prüfen Sie die Kabelverbindung zwischen der ZyWALL und Ihrem Computer oder Switch.
Eine ausführliche Beschreibung finden Sie in Abschnitt 3.
Versuchen Sie die ZyWALL mit einem Ping vom LAN-Computer aus zu erreichen. Stellen Sie
sicher, dass die Ethernetkarte des Computers installiert ist und einwandfrei funktioniert.
Stellen Sie sicher, dass sich die IP-Adresse im selben Subnetz befindet wie die ZyWALL.
Klicken Sie am Computer auf Start, (Alle) Programme, Zubehör und dann
Eingabeaufforderung. Geben Sie im Fenster der Eingabeaufforderung "ping" und die
LAN IP-Adresse des ZyWALL (192.168.1.1 ist die Standardadresse) ein, und drücken Sie auf
[ENTER]. Die ZyWALL muß den Ping beantworten.
Wenn Sie das Kennwort für den ZyWALL vergessen haben, drücken Sie auf die RESET-
Taste. Drücken Sie etwa 5 Sekunden lang auf die Taste (oder so lange, bis die PWR-LED
blinkt). Lassen Sie die Taste dann wieder los. Auf diese Weise werden alle Einstellungen des
ZyWALL auf seine Standardwerte zurückgesetzt (das Kennwort ist 1234, die LAN-IPAdresse 192.168.1.1 usw.; Detailinformationen hierzu finden Sie im Benutzerhandbuch).
Wenn Sie die IP-Adresse des ZyWALL vergessen haben, können Sie sie mit den
entsprechenden Befehlen über den Konsolenanschluss ermitteln. Schließen Sie Ihren
Computer mit einem Konsolenkabel an den Anschluss CONSOLE an. Ihr Computer muss
über ein Terminalemulationsprogramm (z. B. HyperTerminal) verfügen, das folgendermassen
eingestellt ist: Terminalemulation VT100, keine Parität, 8 Datenbits, 1 Stoppbit, keine
Flusskontrolle, Portgeschwindigkeit 115200 bps.
Überprüfen Sie die Verbindung zwischen dem WAN Interface der ZyWALL und Ihrem Router
zum Internet. Stellen Sie sicher, dass das Gerät für den Internetzugriff (zum Beispiel ein
DSL-Modem) einwandfrei funktioniert.
Prüfen Sie im Fenster Status den Status des WAN-Ports. Führen Sie noch einmal den
Installationsassistenten aus, um sicherzustellen, dass Sie die richtigen Einstellungen
eingegeben haben.
DEUTSCH
8 Schritte zum Ansehen von Produktzertifizierung(en)
1 Besuchen Sie www.zyxel.com.
2 Wählen Sie auf der ZyXEL-Homepage aus der Liste Ihr Produkt aus.
3 Wählen Sie auf dieser Seite Ihre gewünschte Zertifizierung aus.
15
ESPAÑOL
1 Comprobación del contenido del paquete
Su paquete debería
incluir cada uno de
los siguientes
elementos:
• ZyWALL
• Cable de alimentación
• Kit para montaje
en rack
• Cable Ethernet RJ-45
• Cable en Y de consola
RS-232
• Guía de inicio rápido de
instalación
•CD
2 Instalación en un rack
Monte el ZyWALL en un rack de 19 pulgadas o colóquelo sobre una superficie resistente y plana.
Nota: Deje 10 cm de espacio por los lados y 20 cm por detrás.
1 Alinee un soporte con los agujeros de un lado del ZyWALL y fíjelo con los tornillos del soporte incluidos.
Igualmente, fije el otro soporte.
2 Tras fijar ambos soportes de montaje, coloque el ZyWALL en el rack alineando los agujeros de los
soportes con los agujeros apropiados en el rack. Fije el ZyWALL al rack con los tornillos de montaje en
rack.
16
ESPAÑOL
3 Conectar el hardware
1 Se recomienda que configure el ZyWALL antes de usarlo para proteger su red. Utilice un cable Ethernet
para conectar un ordenador al puerto P4.
2 Utilice otro(s) cable(s) Ethernet para conectar el puerto 2 y/o el puerto 3 a una clavija Ethernet con acceso
a Internet.
3 Utilice el adaptador de alimentación incluido para conectar el zócalo de alimentación (en el panel
posterior) a una toma de corriente.
4 Mire al panel frontal. La luz PWR se encenderá. La luz SYS parpadeará durante la prueba del sistema y
la inicialización y luego se mantendrá encendida cuando el sistema esté listo.
4 Acceso a la Web
1 Abra su navegador y vaya a http://192.168.1.1 (el ZyWALL
le llevará automáticamente a https://192.168.1.1).
17

2 Haga clic en Sí para continuar si se abre una
pantalla de alerta de seguridad o certificado.
3 Escriba admin como nombre de usuario y
1234 como contraseña. Haga clic en Login
(Entrar).
ESPAÑOL
4 Se recomienda que cambie la contraseña. Escriba y
vuelva a escribir la nueva contraseña y haga clic en
Apply (Aplicar).
18
Loading...