

Page 1
Operation Manual
© ZOOM Corporation
Reproduction of this manual, in whole or in part, by any means, is prohibited.
Page 2
W
W
W
W
W
USAGE AND SAFETY PRECAUTIONS
In this manual, symbols are used to highlight warnings and
cautions for you to read so that accidents can be prevented. The
meanings of these symbols are as follows:
This symbol indicates explanations about extremely
dangerous matters. If users ignore this symbol and
handle the device incorrectly, serious injury or death
Caution
could result.
This symbol indicates explanations about dangerous
matters. If users ignore this symbol and handle the
device incorrectly, bodily injury and damage to the
arning
equipment could result.
Please observe the following safety tips and precautions to
ensure hazard-free use of the PS-04.
Power requirements
Since power consumption of this unit is fairly high, we
recommend the use of an AC adapter whenever possible.
Caution
When powering the unit from batteries, use only alkaline
types.
[AC adapter operation]
• Be sure to use only an AC adapter which supplies 9 V
DC, 300 mA and is equipped with a "center minus"
plug (Zoom AD-0006). The use of an adapter other than
the specified type may damage the unit and pose a
safety hazard.
• Connect the AC adapter only to an AC outlet that
supplies the rated voltage required by the adapter.
• When disconnecting the AC adapter from the AC outlet,
always grasp the adapter itself and do not pull at the
cable.
• When not using the unit for an extended period,
disconnect the AC adapter from the AC outlet.
[Battery operation]
• Use four conventional IEC R6 (size AA) batteries
(alkaline).
• The PS-04 cannot be used for recharging.
Pay close attention to the labelling of the battery to
make sure you choose the correct type.
• When not using the unit for an extended period, remove
the batteries from the unit.
• If battery leakage has occurred, wipe the battery
compartment and the battery terminals carefully to
remove all remnants of battery fluid.
• While using the unit, the battery compartment cover
should be closed.
Environment
Avoid using your PS-04 in environments where it will be
exposed to:
arning
• Extreme temperature
• High humidity or moisture
• Excessive dust or sand
• Excessive vibration or shock
Handling
Since the PS-04 is a precision electronic device, avoid
applying excessive force to the switches and buttons.
arning
Also take care not to drop the unit, and do not subject it
to shock or excessive pressure.
Alterations
Never open the case of the PS-04 or attempt to modify the
product in any way since this can result in damage to the
arning
unit.
Connecting cables and input and output jacks
You should always turn off the power to the PS-04 and all
other equipment before connecting or disconnecting any
arning
cables. Also make sure to disconnect all cables and the
AC adapter before moving the PS-04.
Usage Precautions
• Electrical interference
For safety considerations, the PS-04 has been designed to
provide maximum protection against the emission of
electromagnetic radiation from inside the device, and protection
from external interference. However, equipment that is very
susceptible to interference or that emits powerful
electromagnetic waves should not be placed near the PS-04, as
the possibility of interference cannot be ruled out entirely.
With any type of digital control device, the PS-04 included,
electromagnetic interference can cause malfunctioning and can
corrupt or destroy data. Care should be taken to minimize the
risk of damage.
• Cleaning
Use a soft, dry cloth to clean the PS-04. If necessary, slightly
moisten the cloth. Do not use abrasive cleanser, wax, or solvents
(such as paint thinner or cleaning alcohol), since these may dull
the finish or damage the surface.
Please keep this manual in a convenient place for future
reference.
SmartMedia is a trademark of Toshiba Corporation.
2 ZOOM PS-04
Page 3

Contents
USAGE AND SAFETY PRECAUTIONS....... 2
Introduction ................................................ 5
Getting to Know the PS-04........................ 6
PS-04 configuration ............................... 6
Recorder section ........................................... 6
Effects section ............................................... 6
Rhythm section ............................................. 6
Mixer section ................................................ 7
Operation modes of the PS-04 .............. 7
Names and Functions of Parts ................. 8
Top view ................................................ 8
Front view .............................................. 9
Rear view ............................................... 9
Side view ............................................... 9
Getting Connected .................................. 10
About SmartMedia .................................. 10
Operating the Unit on Batteries ............. 11
Power On/Off ........................................... 11
Power-on ..................................................... 11
Power-off .................................................... 11
Listening to the Demo Song ................... 12
Let's Record ............................................ 13
Quick Guide ............................................. 15
Step 1:
Preparations before recording ............. 15
1-1 Creating a new project .......................... 15
1-2 Selecting a rhythm pattern to use ......... 17
Step 2: Recording the first track .......... 19
2-1 Selecting the input source ..................... 19
2-2 Applying the insert effect ..................... 21
2-3 Selecting a track and starting to
record .................................................... 22
Step 3: Overdubbing ............................24
3-1 Adjusting input sensitivity and setting
the insert effect ..................................... 24
3-2 Selecting the track to record ................. 24
Step 4: Mixing ...................................... 26
4-1 Muting the input signal/rhythm
sound ..................................................... 26
4-2 Adjusting level/panning/EQ ................. 26
4-3 Applying the send/return effect ............ 28
Step 5: Mixdown ................................. 30
5-1 Applying the mastering effect ............... 30
5-2 Mixdown (bounce) preparations ........... 31
5-3 Carrying out mixdown (bounce) ........... 32
5-4 Playing the bounced tracks ................... 33
Reference [Recorder] .............................. 36
AUDIO mode screens .......................... 36
V-takes ................................................ 36
About V-takes ............................................. 36
Switching V-takes ....................................... 36
Moving to a desired location in the song
(Locate/Marker function) ..................... 37
Specifying time or measures ....................... 37
Setting a mark in a song .............................. 38
Locating a mark .......................................... 38
Deleting a mark ........................................... 38
Playing back the same passage
repeatedly (A-B Repeat function) ........ 39
Re-recording only a specified part
(Punch-in/out function) ........................ 40
Using manual punch-in/out ......................... 40
Using auto punch-in/out .............................. 41
Combining multiple tracks on another
track (Bounce function) ....................... 42
Making settings for the bounce target
track(s) ........................................................ 42
Selecting the bounce target V-take ............. 43
Carrying out bounce recording .................... 43
Changing the precount
operation ............................................. 44
Checking the grade setting of a
project ................................................. 45
Reference [Track Editing] ....................... 46
Editing a range of data ........................ 46
Basic steps for range editing ....................... 46
Copying a specified range of data ............... 47
Moving a specified range of data ................ 48
Erasing a specified range of data ................ 49
Trimming a specified range of data ............ 49
Editing using V-takes ........................... 50
Basic steps for V-take editing ..................... 50
Deleting a V-take ........................................ 51
Copying a V-take ........................................ 51
Exchanging V-takes .................................... 52
Reference [Mixer] .................................... 53
About the PS-04 mixer ........................ 53
ZOOM PS-04 3
Page 4

Contents
Assigning input signals to tracks ......... 53
Selecting the input source ........................... 53
Selecting the recording track(s) .................. 55
Mixing the playback sound from
tracks ................................................... 56
Making adjustments for each track
signal (track parameters) ..................... 56
Linking tracks (stereo link) ................... 58
Reference [Rhythm] ................................ 59
About the rhythm section .................... 59
Explanation of some important
terms .................................................... 59
PATTERN mode/SONG mode ................... 59
Pattern/song ................................................. 59
Drum track/bass track ................................. 60
Drum kit/bass program ................................ 60
PATTERN mode operation .................. 60
PATTERN mode screens ............................ 60
Selecting a pattern for playback .................. 60
Changing the tempo .................................... 61
Playing drum/bass sounds manually ........... 62
Creating a pattern ........................................ 63
Copying a pattern ........................................ 68
Deleting a pattern ........................................ 69
Changing the pattern parameters
(pattern edit) ................................................ 69
Setting PATTERN mode operation
(pattern utility) ............................................ 71
SONG mode operation ........................ 73
SONG mode screens ................................... 73
Creating a song ............................................ 73
Editing a song .............................................. 81
Clearing a song ............................................ 83
Importing pattern/song information from
another project ............................................. 83
Reference [Effects] ................................. 84
About the effects ................................. 84
Insert effect .................................................. 84
Send/return effect ........................................ 85
EFFECT mode screens ................................ 86
Basic steps for using the insert
effect .................................................... 86
Selecting the insert effect patch .................. 86
Editing an insert effect patch ....................... 87
Storing an insert effect patch ....................... 89
Changing an insert effect patch name ......... 90
Basic steps for using the send/return
effect .................................................... 90
Selecting the send/return effect
patch ............................................................ 90
Editing a send/return effect patch ............... 90
Storing a send/return effect patch ............... 91
Changing a send/return effect patch
name ............................................................ 91
Using the tuner function ...................... 92
Using the chromatic tuner ........................... 92
Using other tuning types ............................. 93
Reference [System] ................................. 95
SYSTEM mode screen ........................ 95
About projects ..................................... 95
Basic steps for handling projects ................ 95
Selecting a project ...................................... 96
Creating a new project ................................ 96
Copying a project ........................................ 96
Deleting a project ........................................ 97
Protecting a project ..................................... 97
Checking the remaining recording
time ............................................................. 97
Changing the name of a project .................. 98
Changing the operation of the level
meters ................................................. 98
Setting the built-in mic gain ................ 99
Turning the backlight on and off ......... 99
Formatting a SmartMedia card ......... 100
Specifications ........................................ 101
Troubleshooting .................................... 102
Problems during playback ................ 102
Problems during recording ................ 102
Problems with effects ........................ 103
Problems with rhythm section ........... 103
Other problems ..................................103
Appendix ................................................ 104
Effect Parameters .............................. 104
Insert effect ............................................... 104
Send effect ................................................ 113
Rhythm patterns................................. 114
Effect patches ................................... 116
Insert effect ............................................... 116
Drum kits/Bass programs ................. 120
Compatibility with PS-02 and
MRS-4 ............................................... 121
PS-02 ........................................................ 121
MRS-4 ...................................................... 121
Files on SmartMedia card ................. 121
INDEX ..................................................... 122
4 ZOOM PS-04
Page 5

Introduction
Thank you for selecting the ZOOM PS-04 Palmtop Studio (simply called the " PS-04 " in this manual).
The PS-04 is a fascinating product with the following features.
• Four great functions in one compact unit
Weighing in at a mere 160 grams, the PS-04 combines a SmartMedia recorder, mixer, multi-effect
device, and drum/bass machine in a single pocket-size body. Whenever and wherever inspiration
strikes, the PS-04 is ready to help you create and record your very own sound.
• 4-track recorder with bounce capability
The recorder allows simultaneous playback of four tracks and simultaneous recording on two
tracks. Each track has ten virtual takes (V-takes). While playing back all four tracks, you can
bounce the combined sound onto two empty V-takes. A host of functions lets you process and edit
audio data after recording.
• Full-featured mixer section
The integrated mixer makes it simple to adjust level, Hi/Lo EQ, panning, and effect send level for
the audio tracks and drum/bass tracks to create the stereo mix. The input signal can also be sent
directly to the stereo mix.
• Two versatile effect streams
The PS-04 provides insert effects that can be applied to the input or output, and send/return effects
that are used via the mixer send/return loop. The insert effect provides a mastering effect function
for processing the stereo mix. This is great for adjusting the sound and dynamics during mixdown.
• Rhythm section provides solid backing
Realistic PCM sources produce drum and bass sounds in a variety of more than 500 patterns. By
combining patterns and programming the chord progression, you can create the accompaniment
for an entire song.
• Flexible tuner function
The built-in tuner can be used not only for standard chromatic tuning but also for 7-string guitar,
5-string bass and other unconventional tuning applications.
In order to get the most out of this sophisticated product, please read this manual carefully
before use.
We recommend that you keep the manual at hand for future reference.
ZOOM PS-04 5
Page 6
Getting to Know the PS-04
PS-04 configuration
The PS-04 can be thought of as having four main sections, namely recorder, effects, mixer, and rhythm.
These are explained below.
■
Recorder section
The recorder in the PS-04 has 4 separate audio tracks (a
track is a separate portion for recording audio data). Up to 2
tracks can be recorded simultaneously, and up to 4 tracks
can be played back simultaneously. The tracks are
numbered 1 – 4, and each of these tracks has 10 virtual
tracks (so-called V-takes). When performing recording or
playback, you can select one of these V-takes. For
example, you could record a difficult guitar solo onto
multiple V-takes, and then compare them later to select the
best take.
■
Effects section
The PS-04 has two types of effects: insert effects and send/return effects. The insert effect, as its name
implies, can be inserted at a selected point in the signal path. It consists of a number of single effects
connected in series, such as compressor, amp simulator, chorus, etc. It can be used for effect processing
of the input signal during recording or for the stereo mix during mixdown.
The send/return effect is routed through the built-in mixer and applies to all tracks. Reverb, delay, or
chorus can be selected for this effect. The intensity of the send/return effect for each track can be
adjusted with the send level parameter (the higher the value, the stronger the effect).
V-takes
1
2
3
4
5
6
7
8
9
10
Tracks
1
Currently selected V-takes
23
4
■
Rhythm section
The PS-04 has an integrated rhythm machine
that always operates in sync with the recorder.
Drum sounds and bass sounds from a PCM
source are used to form accompaniment
patterns. The PS-04 has over 500 patterns built
in, and 346 patterns are already
preprogrammed. Of course, you can also edit
existing patterns or create your own patterns
from scratch.
By lining up the patterns in the desired order
and specifying parameters such as chord
progression, tempo, and beat, you can create
the rhythm accompaniment for an entire song.
Recorder
Track 1
Track 2
Track 3
Track 4
Rhythm section
Rhythm
Rhythm Rhythm
To mixer
6 ZOOM PS-04
Page 7
[INPUT] jack
[LINE IN] jack
Built-in mic
■
Mixer section
Using the mixer functions built into the
PS-04, you can adjust the level, panning,
EQ, and other parameters for audio tracks
1- 4 and the drum / bass track to produce
the final stereo mix.
Input
Insert
effect
Recorder
Track 1
Track 2
Track 3
Track 4
Bass track
Drum track
Rhythm
section
Send/return
effect
Operation modes of the PS-04
123 4DRUM BASS
Insert
effect
Operation modes of the PS-04
The PS-04 has the following four operation modes. You can see which mode is
currently active by the light on/off status of the [EFFECT], [RHYTHM], and
[SYSTEM] keys on the panel.
AUDIO mode
●
This is the mode for recording and playing back audio. The PS-04 is always in this
mode after power-on and after you quit one of the other modes. In this mode, the
indicators of the [EFFECT], [RHYTHM], and [SYSTEM] keys are all out.
EFFECT mode
●
In this mode, you select patches for the insert effect and send/return effect, edit parameters, and perform
other effect related functions. To switch to this mode from any other mode, press the [EFFECT] key so
that the indicator lights up.
●
RHYTHM mode
In this mode, you control the various rhythm functions. To switch to this mode from any other mode,
press the [RHYTHM] key so that the indicator lights up.
The rhythm functions of the PS-04 are further divided into PATTERN mode for repeatedly playing
patterns, and SONG mode for playing the rhythm accompaniment to an entire song. By repeatedly
pressing the [RHYTHM] key, you can switch between these two modes.
●
SYSTEM mode
This mode is used to create new projects and to make settings that affect operation of the entire PS-04.
To switch to this mode from any other mode, press the [SYSTEM] key so that the indicator lights up.
Mixer
[OUTPUT] jack
ZOOM PS-04 7
Page 8
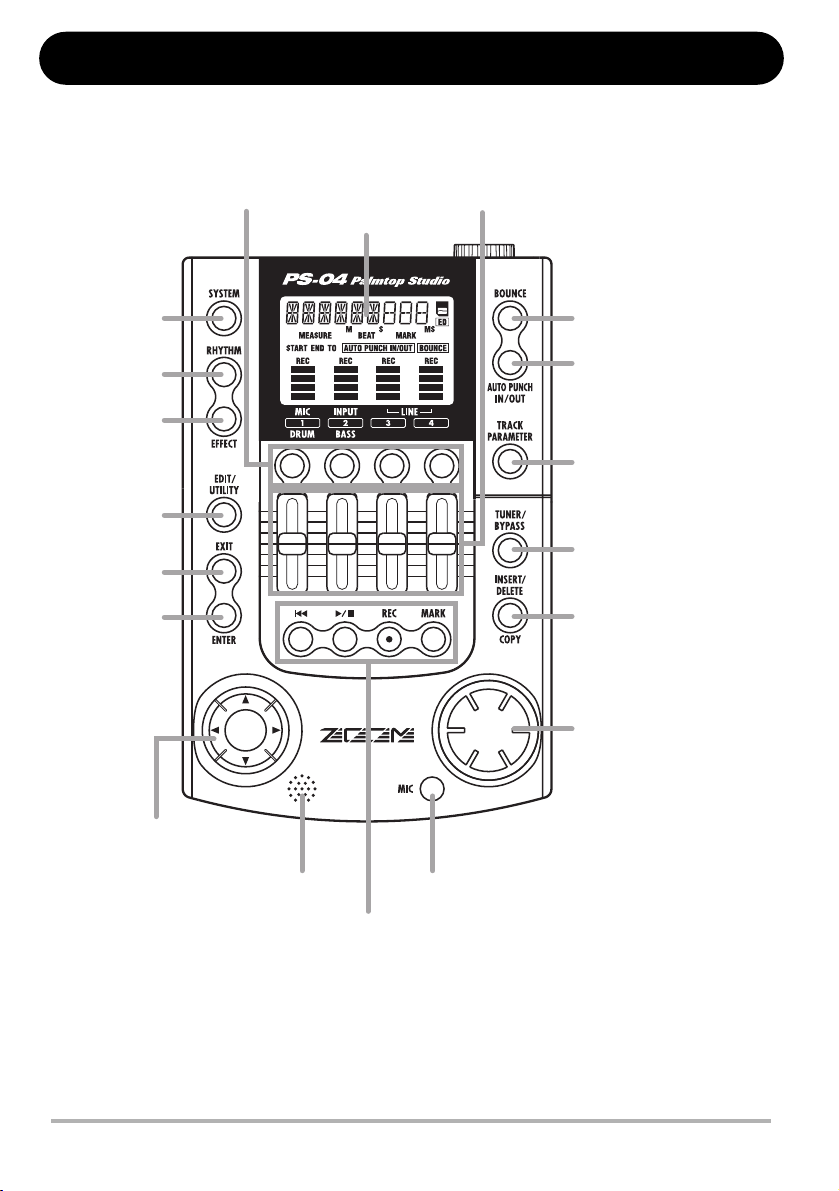
Top view
Names and Functions of Parts
[SYSTEM] key
[RHYTHM] key
[EFFECT] key
[EDIT/
UTILITY] key
[EXIT] key
[ENTER] key
Status keys 1 - 4
Faders 1 - 4
Display
[BOUNCE] key
[AUTO PUNCH IN/
OUT] key
[TRACK PARAMETER] key
[TUNER/BYPASS] key
[INSERT/DELETE
(COPY)] key
Dial
Cursor [E]/[R]/[Q]/[W] keys
Built-in mic
[U] key, [R/P]]key, [REC] key, [MARK] key
[MIC] key
8 ZOOM PS-04
Page 9
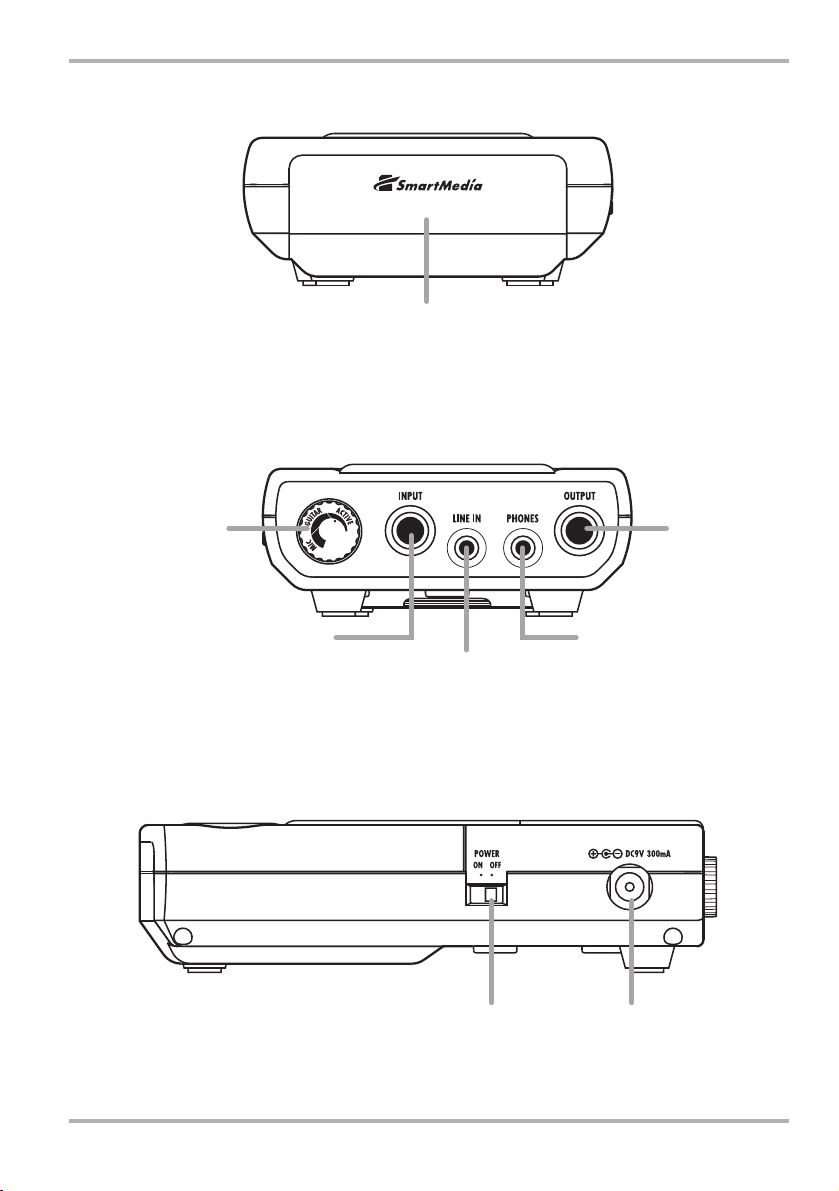
Front view
Rear view
Card slot
Front view
[INPUT LEVEL] knob
Side view
[INPUT] jack
[OUTPUT] jack
[PHONES] jack
[LINE IN] jack
[ON/OFF switch] [DC9V] jack
ZOOM PS-04 9
Page 10

Getting Connected
Synthesizer
Bass
Guitar
Connect a stereo device with line level
output such as a synthesizer or CD
player to the [LINE IN] jack.
PS-04 side panel
Connect a guitar, bass
guitar or other instrument
to the [INPUT] jack.
PS-04 rear panel
AC adapter
To power the PS-04 from an AC outlet, be sure
to use only the AC adapter ZOOM AD-0006
(available separately). Using any other AC
adapter will lead to damage.
About SmartMedia
To use the PS-04, a SmartMedia card is required. Before turning
on the power, insert the supplied SmartMedia card into the card
slot, as shown in the illustration.
When inserting the card, push it fully into the slot.
Monitoring system
To monitor with headphones,
connect them to the
[PHONES] jack. This jack
carries the same signal as the
[OUTPUT] jack.
Headphones
CD player
Card slot
N
OTE
• If you insert the SmartMedia card with the wrong orientation or
upside down, it will not go all the way in. Trying to push the
card in by force may damage it.
• Do not insert or remove the SmartMedia card while power is
turned on. Otherwise data loss may occur.
• Generic SmartMedia cards with a capacity from 16 MB to 128 MB (drive voltage 3.3 V)
may be used in the PS-04.
• To use a SmartMedia card that has already been formatted in a computer or a digital
camera, be sure to first format it once more in the PS-04 (→ p. 100).
SmartMedia
10 ZOOM PS-04
Page 11

Operating the Unit on Batteries
The PS-04 can be operated on battery power. Purchase the
correct batteries and insert them as described below.
1.
Turn the PS-04 over and open the cover of
the battery compartment.
2.
Insert four IEC R6 (size AA) batteries into
the compartment. (Use alkaline batteries.)
3.
Close the cover of the battery compartment.
N
OTE
When the PS-04 is operating on battery
power and the batteries are getting low, the indication "BATT" will appear on the display.
Replace all four batteries with fresh ones as soon as possible.
Bottom of PS-04
Power On/Off
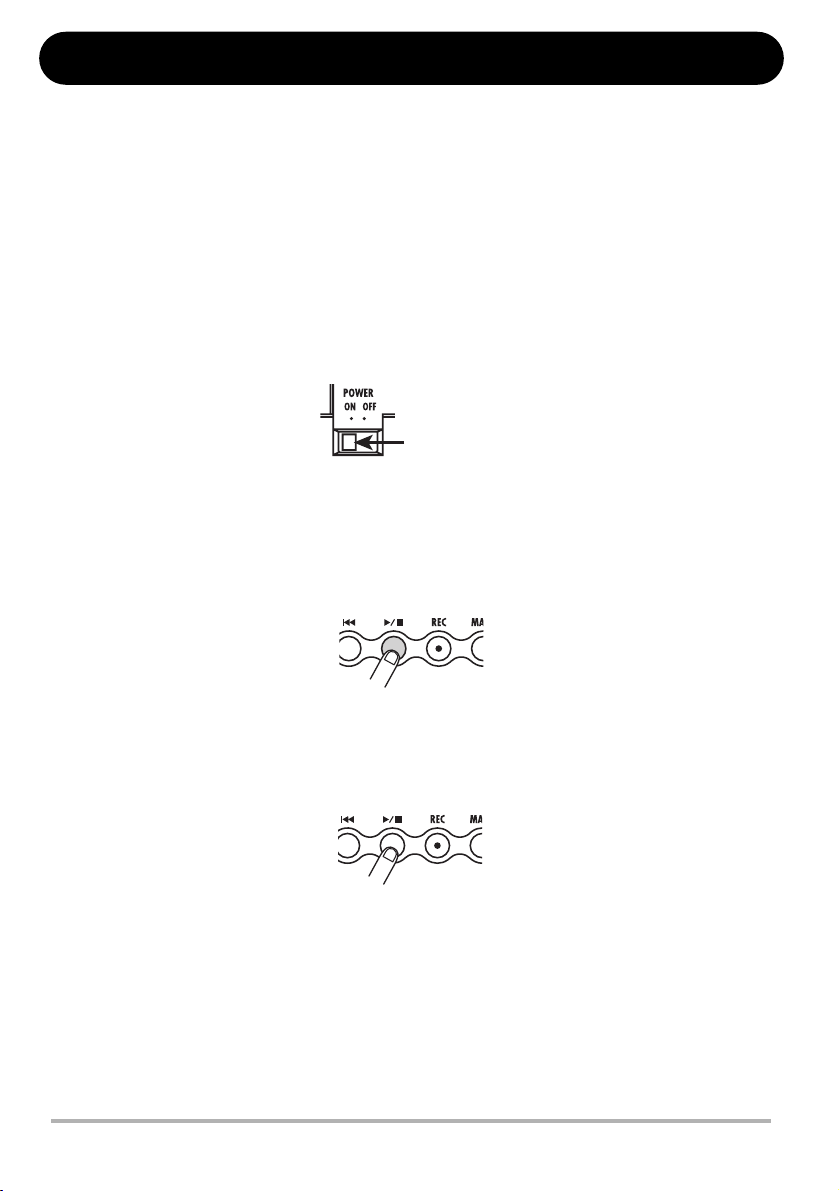
To turn the PS-04 on and off, proceed as follows.
■
Power-on
1.
Verify that power to the PS-04 and all connected equipment is off.
The volume controls of the connected instrument, PS-04, and the monitoring
system should be turned fully down.
2.
Insert the SmartMedia card into the card slot (➔ p. 10).
3.
Set the [ON/OFF] switch on the side panel of the PS-04
to "ON".
The indication "PS-04" appears on the display and the PS-04 starts up.
4.
Turn power to the connected instrument and the
monitoring system on in that order.
Battery
compartment
cover
PS-04 side panel
[ON/OFF] switch
IEC R6 (size AA)
battery x 4
Battery
compartment
■
Power-off
5.
Turn power to the monitoring system and the connected
instrument off in that order.
6.
Set the [ON/OFF] switch on the side panel of the PS-04 to "OFF".
The indication "GOODBYE" is briefly shown on the display and the PS-04 is shut down.
N
OTE
Never turn the PS-04 off by disconnecting the AC adapter. Otherwise data loss may occur.
C
aution
When using the AC adapter, always use the [ON/OFF] switch on the side panel of the
PS-04 to turn power on and off. Be especially careful when the card access indicator is lit.
Disconnecting the AC adapter in such a case may lead to fatal data loss.
ZOOM PS-04 11
Page 12
Listening to the Demo Song
This section shows how to play the demo song stored on the supplied SmartMedia card.
N
OTE
The demo song is write-protected. During playback you can change the level, panning,
and other parameters, but you cannot store the changed settings.
1.
Connect the monitoring system and the PS-04, and insert the supplied
SmartMedia card into the PS-04.
Before switching the power on, turn the volume control of the monitoring system down.
2.
Set the [ON/OFF] switch on the side panel of the PS-04 to "ON".
[ON/OFF] switch
Project information saved on the SmartMedia card is automatically loaded. When the supplied
SmartMedia card has been inserted, the demo song project will be loaded.
3.
Press the [R/P] key.
The key lights up and playback of the demo song starts.
4.
To stop playback, press the [R/P] key once more.
The key goes out, and the recorder stops.
H
INT
If desired, you can use the faders 1 – 4 during playback to adjust the level of audio tracks
1 – 4. To adjust the level of the drum or bass track, press the [RHYTHM] key and then use
faders 1 and 2.
12 ZOOM PS-04
Page 13

Let's Record
OOOOOO
INPUT
-PEAK-
This section shows how to record a guitar connected to the [INPUT] jack.
1.
Connect the guitar to the [INPUT] jack.
2.
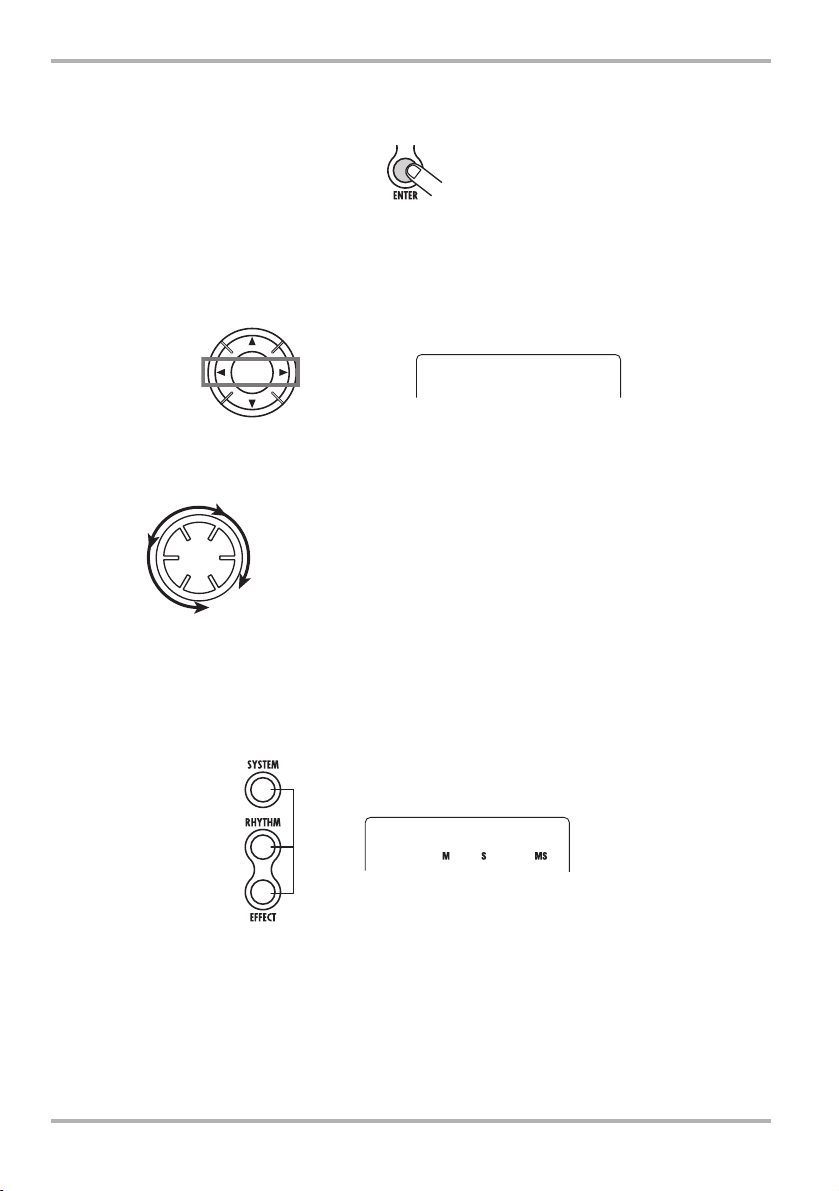
Press the [SYSTEM] key and then the [ENTER] key.
The indication "SELECT" appears on the display.
3.
Use the cursor left/right keys to bring up the indication "NEW" on the display,
and press the [ENTER] key twice.
The following indication appears on the display, and the PS-04 is ready for recording.
OOOOOO
4.
Press the [TRACK PARAMETER] key.
When you press the [TRACK PARAMETER] key for the first time, the indication "INPUT SEL"
is shown for a few seconds, and then the indication "INPUT" appears.
000
INPUT
H
INT
In the default condition, the [INPUT] jack is selected as input source. To record a
synthesizer or other device connected to the [LINE IN] jack, or to record from the built-in
mic, switch the input source to the respective setting (→ p. 53).
5.
While playing your guitar, adjust the input sensitivity by turning the [INPUT
LEVEL] knob on the rear panel of the PS-04.
If the indication "-PEAK-" appears on the display, the input signal will be distorted. Turn the
[INPUT LEVEL] knob down.
-PEAK-
ZOOM PS-04 13
Page 14

Let's Record
RECLVL
6.
To adjust the track recording level, operate fader 2.
While this screen is shown, you can use fader 2 to adjust the recording level for the signal from the
[INPUT] jack. When the adjustment is complete, press the [EXIT] key.
RECLVL
H
INT
If the topmost segment (rectangular block) of the level meter comes on when you play your
guitar loud, reduce the recording level setting.
7.
Use the status keys to select the recording destination track.
Above the level meter, the indication "REC" appears for the track that has been set to recording
standby.
8.
To start recording, hold down the [REC] key and press the [R/P] key.
A precount of 4 clicks is heard, and recording starts. Play your guitar to record.
100
9.
To stop recording, press the[R/P] key once more.
The [REC] key and [R/P] key goes out.
10.
To check the recording, press the [U] key and then press the [R/P] key.
11.
To cancel the recording standby condition, press the status key 1 again so that
the "REC" indication goes out.
14 ZOOM PS-04
Page 15

Quick Guide
PROJEC
This section explains some of the basic operation steps of the PS-04. You will learn how to make
preparations for recording, how to record tracks, do overdubs, use the mixer, and create the final stereo mix.
The explanation is divided into five major steps.
● Step 1: Preparations before recording
Establish connections, create a project, and make other preparations for recording.
● Step 2: Recording the first track
Record the first track while using the insert effect on the input signal.
● Step 3: Overdubbing
Record (overdub) the second and subsequent tracks while listening to the previously recorded
track.
● Step 4: Mixing
Adjust level, panning, and EQ for each track and use the send/return effect to create a stereo mix.
● Step 5: Mixdown
Bounce the finished stereo mix onto an empty pair of V-takes in the PS-04.
Step 1: Preparations before recording
1-1
Creating a new project
The PS-04 manages all information that is required to produce a song in units called "projects".
To perform a new recording with the PS-04, you first create a project.
1.
Connect the instrument from which to record and the monitoring system to the
PS-04 (➝ p. 10).
To monitor with headphones, connect them to the [PHONES] jack.
2.
Make sure that a SmartMedia card is inserted in the card slot. Then turn power
on in the order PS-04 ➝ monitoring system.
The PS-04 always comes on in AUDIO mode which serves for recording and playback. When the
PS-04 is turned on, it automatically loads the most recently used project from the SmartMedia
card.
3.
Press the [SYSTEM] key.
The [SYSTEM] key lights up and the PS-04 switches to SYSTEM mode. The display shows the
system menu which serves for controlling the project and making system-wide settings.
PROJEC
ZOOM PS-04 15
T
Page 16
Quick Guide
GRADE
OOOOOO
4.
5.
Verify that "PROJECT" is shown on the display, and then press the [ENTER]
key.
Use the cursor left/right keys to bring up the indication "NEW", and press the
[ENTER] key.
You can now select the audio data quality level (recording grade).
Cursor
left/right keys
6.
Use the dial to select one of the following two grade settings.
•HF (Hi-Fi)
Best sound quality setting (default)
•LG (Long)
Longer recording time setting. (Recording time is doubled compared to HF.)
7.
Press the [ENTER] key.
A new project is created, and this project is loaded automatically. The PS-04 returns to the AUDIO
mode and the [SYSTEM] key goes out. The current counter position is shown on the display. (This
is called the AUDIO mode top screen.)
All out
GRADE
OOOOOO
000
HF
N
OTE
• When you create a new project, the name "PROJxx" (where xx is the project number) is
automatically assigned.
• The project name can be changed if desired (
→ p. 98).
16 ZOOM PS-04
Page 17
Step 1: Preparations before recording
O8ST1
MTR44
1-2
Selecting a rhythm pattern to use
The PS-04 incorporates a rhythm function that always operates in sync with the recorder. This function
can automatically repeat patterns that are several measures in length and contain drum sounds (drum
kit) and bass sounds (bass program). It is also possible to use a combination of patterns to form a longer
rhythm accompaniment (song). In this example, we will choose a simple pattern to use as guide rhythm
during recording.
1.
Press the [RHYTHM] key.
The [RHYTHM] key lights up and the PS-04 switches to RHYTHM mode which lets you make
various rhythm related settings.
The rhythm function has two modes: PATTERN mode for repeatedly playing patterns, and SONG
mode for playing the rhythm accompaniment to an entire song. By repeatedly pressing the
[RHYTHM] key, you can switch between these modes.
When you first select RHYTHM mode, the PATTERN mode is active, and the name of the
currently selected pattern appears on the display.
Pattern name Pattern number
O8ST1
2.
Turn the dial to select the pattern you want to play.
The PS-04 has 511 pattern slots, of which 346 are preprogrammed. (The indication "EMPTY" is
shown instead of a pattern name for empty patterns.)
In this example, we will select pattern number 510 which plays a rim shot sound as a quarter note.
MTR44
3.
Press the [R/P] key.
The selected pattern starts to play, and the [RHYTHM] key flashes in sync with the current tempo.
While the pattern is playing, you can also switch to other patterns simply by turning the dial.
H
INT
Immediately after creating a new project, the pattern playback volume will be set to zero.
To hear the rhythm play, you must raise the drum/bass monitor level.
000
510
ZOOM PS-04 17
Page 18
Quick Guide
BPM=13
4.
5.
Operate faders 1 and 2 to adjust the playback volume of the pattern.
In RHYTHM mode, fader 1 controls the drum volume and fader 2 the bass volume. To monitor
only the drum track of the pattern, slide fader 2 fully down.
Fader 1 Fader 2
To change the tempo, operate faders 3 and 4.
The current tempo value (BPM) appears on the display. Fader 3 changes the setting in units of 10
BPM, and fader 4 in units of 0.1 BPM. The original display will return after a while when you
have finished using the faders. By pressing the status key 3 or 4, you can check the current tempo
setting.
Current tempo setting
BPM=13
Fader 3 or 4
N
OTE
• The tempo set here applies to all patterns.
• When recording while playing a pattern, you should set the tempo before starting to
record the audio track. If you change the tempo after recording the audio track, there will
be a mismatch between the recorded audio and the rhythm tempo.
6.
To stop playback, press the [R/P] key once more.
7.
Press the [EXIT] key to return to the AUDIO mode top screen.
To return from other modes to the AUDIO mode, the [EXIT] key is used.
H
INT
The PS-04 automatically saves your progress (settings and recorded contents) when you
switch to another project or turn power off. There is no need to perform any special
storage steps.
0*0
18 ZOOM PS-04
Page 19

Step 2: Recording the first track
INPUT
g
Step 2: Recording the first track
Specify the input source and the track on which to record, and start the recording process.
2-1
Selecting the input source
The PS-04 lets you select the [INPUT] jack, [LINE IN] jack, or built-in mic as input source for
recording on the audio tracks. First select the source and then adjust the recording level.
1.
From the AUDIO mode top screen, press the [TRACK PARAMETER] key.
The track parameter screen appears. This screen gives access to various input and track related
settings. The first time you call up the screen, input is selected as operation target, and the
currently selected input source is shown.
Currently selected input source
INPUT
During input source selection, the status keys and faders operate as follows.
Shows the currently
selected input source
Status key 2 selects
[INPUT] jack as input source
Status key 1 selects
built-in mic as input source.
Fader 1 adjusts recording
level for signal from built-in mic.
Fader 2 adjusts recording
level for signal from [INPUT] jack.
N
OTE
• The function of the faders depends on the currently selected screen of the PS-04.
• Switching to a different screen and moving a fader there will not affect the fader setting
of the previous screen, because fader settings are saved individually for each screen.
2.
Use the status keys 1 – 4 to select the input source.
Depending on which input source is selected, the display changes as follows. (The "REC"
indication for the source changes from flashing to constantly on.)
Faders 3/4 adjust recording level for
nal from [LINE IN] jack.
si
Status keys 3/4 select
[LINE IN] jack as input source.
ZOOM PS-04 19
Page 20
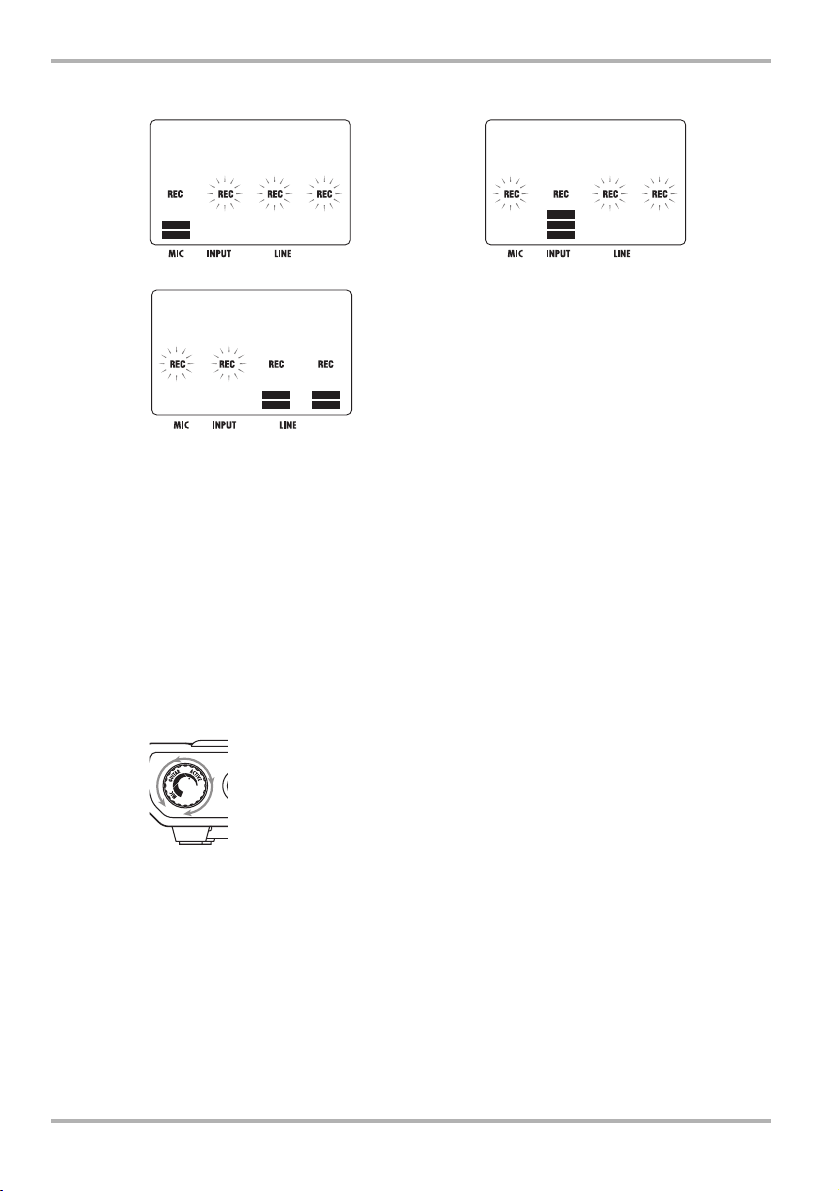
Quick Guide
INPUT
LINE
MIC
When built-in mic (status key 1) is selected When [INPUT] jack (status key 2) is selected
MIC
When [LINE IN] jack (status key 3 or 4) is selected
INPUT
LINE
H
INT
• When the built-in mic is selected as recording source, the [MIC] key lights up. You can
also select the built-in mic by pressing the [MIC] key from the AUDIO mode top screen.
(In this case, there is no need to call up the above track parameter screen.)
• If desired, you can also combine multiple input sources (
• When the built-in mic can be used, the [MIC] key is flashing.
• When the insert effect algorithm is "GUITAR/BASS", the built-in mic cannot be used
(except when the effect type "CABI" is selected on the PRE AMP/DRIVE module or when
it is turned off). In this case, the "REC" indication for the built-in mic is out.
3.
When the [INPUT] jack has been selected as input source, play the instrument
connected to the jack and adjust the input sensitivity by turning the [INPUT
LEVEL] knob on the rear panel of the PS-04.
→ p. 53).
When using the [INPUT] jack, adjusting the input sensitivity with the
[INPUT LEVEL] knob is necessary. Make the adjustment so that the sound is
not distorted when playing the instrument at maximum level. (If the
indication "-PEAK-" is shown on the display, signal distortion has occurred.)
H
INT
• When the built-in mic is selected as input source, two gain settings (on-mic/off-mic) are
available. The default is on-mic, but this can be changed if desired (
• When the [LINE IN] jack is selected as input source, adjust the output level of the source
equipment so that there is no distortion in the input stage of the PS-04.
4.
While playing the instrument, operate the fader for the input source to adjust
the recording level.
While one of the above screens is being shown, faders 1 – 4 can be used to adjust the recording
level for each recording source. When you move a fader, the current setting value is shown on the
display. A rough indication of the setting for each source is given by the level meter segments.
→ p. 99).
20 ZOOM PS-04
Page 21
Step 2: Recording the first track
RECLVL
STNDRD
When signal distortion occurs within the PS-04, the top segment
of the level meter stays on for a while. Reduce the fader setting in
such a case.
5.
When the setting is complete, press the [EXIT] key.
The AUDIO mode top screen returns.
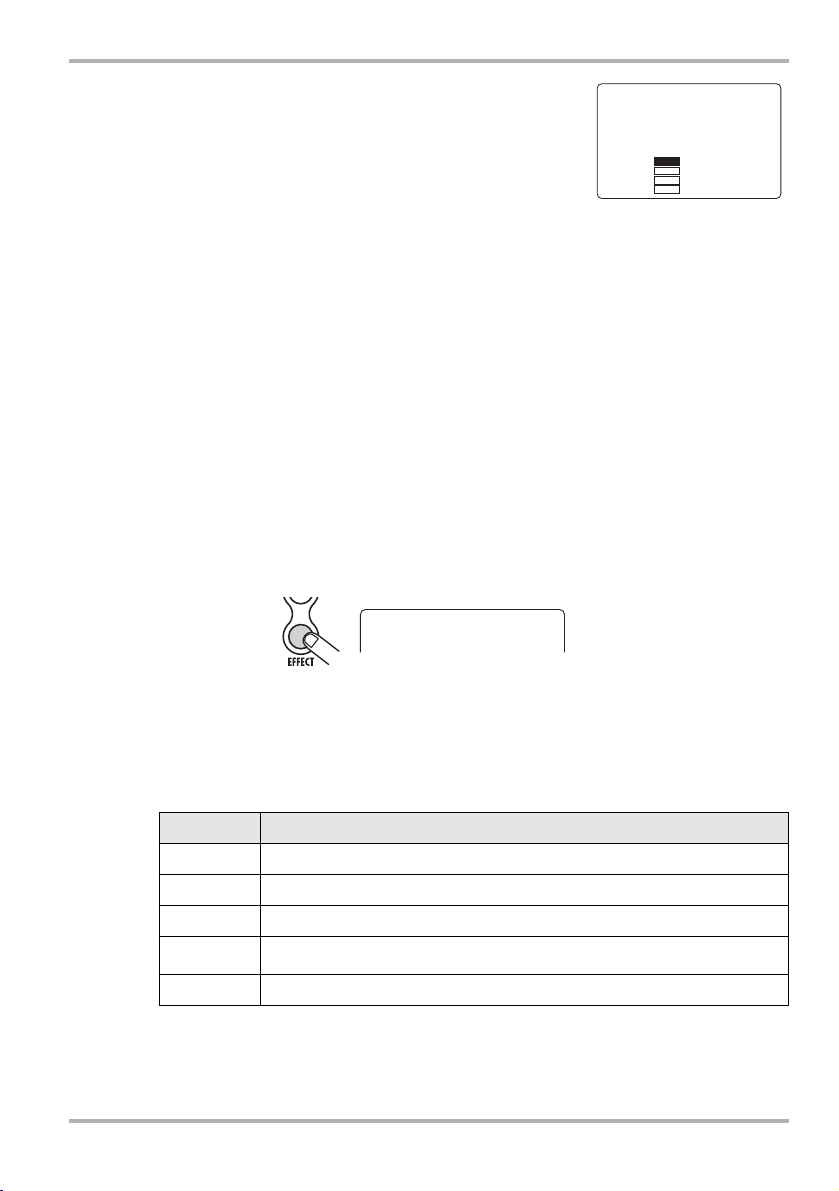
2-2
Applying the insert effect
The insert effect is applied to a specific point in the signal path. It consists of a number of single effects
connected in series, such as compressor, amp simulator, chorus, etc. Immediately after creating a new
project, an effect program (patch) optimized for clean guitar is selected. In this example, we will select
the patch to be used and apply the desired effect to the input signal.
H
INT
To record without going through the insert effect, press the [TUNER/BYPASS] key to
activate the bypass condition.
1.
From the AUDIO mode top screen, press the [EFFECT] key.
The [EFFECT] key lights up and the PS-04 switches to EFFECT mode. The display shows the
insert effect top screen which lets you make various settings for the insert effect.
STNDRD
0
RECLVL
100
ZOOM PS-04 21
2.
Use the cursor up/down keys to select the algorithm that you want to use.
An "algorithm" is a combination of single effects which the insert effect lets you use
simultaneously. The type of single effect and the insertion point are decided by the algorithm
selection. The following algorithms are available.
Algorithm Description
GUITAR/BASS
MIC
LINE
DUAL
MASTERING
N
OTE
The MASTERING algorithm is a special algorithm for producing the final stereo mix.
Because the insert effect is inserted directly before the [OUTPUT] jack, it cannot be used
for track recording.
An algorithm suitable for recording guitar/bass.
An algorithm suitable for vocals and other mic recordings.
An algorithm suitable mainly for recording stereo-output instruments such as a synthesizer.
An algorithm suitable for recording two entirely separate channels, with mono input x 2 and
mono output x 2.
An algorithm suitable for processing a stereo mix signal during mixdown.
Page 22

Quick Guide
VO-STD
Shortly after selecting an algorithm, the name of the patch (effect program) active in that algorithm
will be shown.
Patch name
VO-STD
3.
Turn the dial to select the patch.
For information on the various patches that are available, see the list in the last section (→ p.116)
of this documentation.
H
INT
• You can also edit a patch to change its sound or intensity (→ p. 87).
• The recording level may change, depending on the selected patch. If the signal after
effect processing sounds extremely distorted, adjust the patch level (insert effect output
level) (
→ p. 87).
4.
Press the [EXIT] key to return to the AUDIO mode top screen.
2-3
Selecting a track and starting to record
Select the track on which to record the signal processed by the insert effect. In this example, we will
select track 1 for recording.
1.
From the AUDIO mode top screen, press status key 1.
While the AUDIO mode top screen is shown, you can use status keys 1 – 4 to select a recording
track. When you press status key 1, track 1 goes into recording standby mode, and the
corresponding "REC" indication appears. In this condition, the input signal is sent to the track via
the insert effect.
H
INT
• If the [LINE IN] jack has been selected as input source and only track 1 was selected as
recording track, the left/right signal will be mixed and sent to the track as a mono signal.
• To record the signal from the [LINE IN] jack in stereo, or to retain a stereo effect
produced by the insert effect, set two tracks simultaneously to the recording standby
condition (→ p. 55).
0
2.
Use fader 1 to adjust the monitor level of the signal to record.
N
OTE
• When the recording track has been selected, the input signal will be sent to the stereo
mix via the corresponding track. By adjusting the fader for the respective track, you can
adjust the monitor level.
• If no recording track has been selected, the input signal will be sent directly to the stereo
mix. Adjusting faders 1 – 4 will have no effect on the monitor level.
22 ZOOM PS-04
Page 23
Step 2: Recording the first track
3.
To start recording, first press the [U] key to return the recorder to the
beginning, and then press the [
The [REC] key and [R/P] key light up. A precount of 4 clicks (1 measure) is heard. When the
precount is finished, recording starts. Play and record your instrument while listening to the guide
rhythm.
Move to start of recorder
H
INT
• The number of precount beats can be adjusted as desired (→ p. 44).
• If the input signal is distorted, refer to the step 2-1 to adjust the input sensitivity or the
recording level.
4.
To stop recording, press the [R/P] key once more.
The [REC] key and [R/P ] key go out, and recording stops. After recording, the indication
"WAIT" is briefly shown on the display.
N
OTE
• The duration of the "WAIT" interval depends on the length of the recording condition.
• Do not turn power off while "WAIT" is shown. Otherwise the recorded data may be lost,
and malfunction may occur.
5.
To check the recorded content, press the [U] key to return the recorder to the
start, and then press the [
The recorded content is played back, together with the pattern selected as guide rhythm.
H
INT
If desired, you can specify a point in minutes/seconds/milliseconds or in measures/beats
and go directly to that point (
→ p. 37).
R/P] key while holding down the [REC] key.
R/P]key.
6.
To stop playback, press the [R/P] key once more.
To redo the recording, repeat steps 3 – 4.
7.
Press the status key 1 so that the "REC" indication for track 1 disappears.
Track 1 is no longer in recording standby mode.
H
INT
• The recorded content can be edited (→ p. 46).
• If you switch the V-take, you can record on the same track while keeping the last
recording content (
→ p. 36).
ZOOM PS-04 23
Page 24

Quick Guide
Step 3: Overdubbing
While listening to track 1 recorded in step 2, now play and record another instrument on track 2.
Recording additional parts in this way is called "overdubbing".
3-1
Adjusting input sensitivity and setting the insert effect
As in step 2, select the input source and make the required insert effect settings.
1.
From the AUDIO mode top screen, press the [TRACK PARAMETER] key and
select the input source.
When using the [INPUT] jack, adjust the input sensitivity with the [INPUT LEVEL] knob.
2.
Operate the fader for the input source to adjust the recording level.
When these steps are completed, press the [EXIT] key to return to the AUDIO mode top screen.
3.
Press the [EFFECT] key and select the algorithm and patch in the same way as
for step 2.
When the patch is selected, press the [EXIT] key to return to the AUDIO mode top screen.
3-2
Selecting the track to record
While monitoring the playback sound of track 1, record the new instrument on track 2.
1.
From the AUDIO mode top screen, press status key 2.
Track 2 goes into recording standby mode.
2.
Use fader 2 to adjust the monitor level of the signal to record.
If required, use fader 1 while performing playback to adjust the monitor level balance between
tracks 1 and 2.
3.
To start recording, first press the [U] key to return the recorder to the start,
and then press the [
The [REC] key and [R/P] key light up and the click precount is heard. Play and record your
instrument while listening to the guide rhythm.
4.
To stop recording of track 2, press the [R/P] key once more.
The indication "WAIT" is briefly shown on the display, and then the PS-04 returns to the original
condition.
R/P] key while holding down the [REC] key.
24 ZOOM PS-04
Page 25

Step 3: Overdubbing
5.
To check the recorded content, press the [U] key to return the recorder to the
start, and then press the [
The recorded content of tracks 1 and 2 is played back, together with the guide rhythm. Adjust
faders 1 and 2 as necessary to control the level balance.
H
INT
To redo the recording, repeat steps 3 – 5. It is also possible to move to a point within the
recording and rerecord from there (→ p. 37). Automatic rerecording of a specified portion
is possible by using the auto punch-in/out function (
6.
To stop playback, press the [R/P] key once more.
7.
Press the status key 2 so that the "REC" indication for track 2 disappears.
Record more tracks in the same way.
R/P] key.
→ p. 41).
ZOOM PS-04 25
Page 26

Quick Guide
Step 4: Mixing
When recording of tracks 1 – 4 is finished, create the final stereo mix by adjusting the level, EQ
(equalizer), panning (stereo left/right position), send/return effect intensity and other track parameters.
4-1
Muting the input signal/rhythm sound
Mute the input signal and guide rhythm so that no unwanted content will be included in the final
recording.
1.
To mute the guide rhythm, press the [RHYTHM] key to switch to RHYTHM
mode and then slide faders 1 and 2 fully down.
When the setting is made, press the [EXIT] key to return to the AUDIO mode top screen.
H
INT
If desired, you can add drum and bass sounds to the mix. In this case, track parameters
(level, EQ, panning/balance, send/return effect intensity) can also be set for drum/bass.
2.
To mute the input, press the [TRACK PARAMETER] key from the AUDIO mode
top screen to bring up the input source display.
3.
Slide the fader for the currently selected input source fully down, and then
press the [EXIT] key.
The AUDIO mode top screen returns.
H
INT
The input signal can also be sent directly to the stereo mix.
4-2
Adjusting level/panning/EQ
Adjust level/panning/EQ for each track by setting the track parameters of the integrated mixer.
1.
To set the level balance of the tracks, adjust faders 1 – 4 from the AUDIO mode
top screen.
2.
To adjust panning and EQ for each track, press the [TRACK PARAMETER] key
and then use the cursor left/right keys or the status keys to select the track.
When track parameters are shown, the cursor left/right keys or the status keys can be used to select
the track.
The level meter for the currently selected track flashes.
26 ZOOM PS-04
Page 27
Step 4: Mixing
TRACK1
Currently selected track
TRACK1
3.
Use the cursor up/down keys to select the track parameter.
The respective track parameter is shown on the display. The available track parameters and their
setting range are shown in the table below.
Parameter Display indication Setting range Description
HI EQ ON/OFF
HI EQ GAIN
HI EQ
FREQUENCY
LO EQ ON/OFF
LO EQ GAIN
LO EQ
FREQUENCY
SEND ON/OFF
SEND LEVEL
PAN
FADER
STEREO LINK
V TAKE
REC LEVEL
EQ HI
HI G
HI F
EQ LO
LO G
LO F
SEND
SEND_L
PAN
FADER
S-LINK
TR X -Y
RECLVL
ON / OFF
-12 – 12
500 – 8000 (Hz)
ON / OFF
-12 – 12
63 – 2000 (Hz)
ON / OFF
0 – 100
L100 – 0 – R100
0 – 127
ON / OF
X=1 – 4
Y=1 – 10
0 – 127
Switches Hi EQ on and off.
Adjusts the Hi EQ boost/cut amount in the
range from -12 dB to +12 dB. This parameter
is shown only when Hi EQ is set to ON.
Selects the Hi EQ frequency for boost/cut.
This parameter is shown only when Hi EQ is
set to ON.
Switches Lo EQ on and off.
Adjusts the Lo EQ boost/cut amount in the
range from -12 dB to +12 dB. This parameter
is shown only when Lo EQ is set to ON.
Selects the Lo EQ frequency for boost/cut.
This parameter is shown only when Lo EQ is
set to ON.
Selects whether the signal of this track is
supplied to the send/return effect or not.
Adjusts the level of the signal supplied to the
send/return effect. This parameter is shown
only when SEND is set to ON.
Adjusts the panning (left/right stereo position) of the track signal. When the STEREO
LINK parameter is set to ON, this parameter
adjusts the left/right level balance.
Adjusts the current volume level.
Switches the stereo link function (for linking
the parameters of tracks 1/2 and 3/4) on and
off. (For details, see page 58.)
Selects the V-take for this track. (For details,
see page 36.) X is the track number and Y is
the V-take number.
Adjusts the recording level.
ZOOM PS-04 27
Page 28
Quick Guide
TIGHT
4.
Turn the dial to adjust the setting value.
4-3
Applying the send/return effect
The send/return effect is an effect that works on all tracks of the integrated mixer. Either reverb, delay,
or chorus can be selected for this effect. The illustration below shows the signal flow for the send/return
effect.
Send/return effect
[OUTPUT] jack
The intensity of the send/return effect can be adjusted individually for each track by setting the
send level (the level of the signal supplied to the send/return effect).
1.
Press the [EFFECT] key repeatedly to bring up the indication "SEND" on the
display.
The indication "SEND" is shown for a few seconds, and then the patch currently selected for the
send/return effect is shown. (This screen is called the send/return effect top screen.)
Send/return effect patch
TIGHT
H
INT
Repeatedly pressing the [EFFECT] key toggles between the insert effect top screen and
the send/return effect top screen.
2.
Turn the dial to select the patch.
The send/return effect has 40 patch slots, of which 30 are preprogrammed. For information on the
various patches that are available, see the list in the last section of this documentation (→ p. 119).
3.
When you have selected the patch, press the [EXIT] key to return to the AUDIO
mode top screen.
0
28 ZOOM PS-04
Page 29

N
SEND_L
OTE
In the default condition, the send level for each track is set to zero. Therefore simply
selecting a patch does not enable the send/return effect.
4.
From the AUDIO mode top screen, press the [TRACK PARAMETER] key and
then use the cursor left/right keys or the status keys to select the track.
5.
Use the cursor up/down keys to bring up the indication "SEND_Lxxx" (where
xxx is the setting value) on the display.
Send level setting
Step 4: Mixing
SEND_L
6.
While playing the recorded content, turn the dial to raise the send level for that
track.
7.
Adjust the send level for the other tracks in the same way.
8.
Press the [EXIT] key to return to the AUDIO mode top screen.
0
ZOOM PS-04 29
Page 30
Quick Guide
ROCK
Step 5: Mixdown
Normally, mixdown refers to the procedure of sending a completed stereo mix to an external master
recorder or similar. Here, we will use an empty pair of V-takes in the PS-04 instead of the external
recorder.
5-1
Applying the mastering effect
The MASTERING algorithm of the insert effect can be used to increase the sound pressure of the stereo
mix or emphasize a certain frequency range. The following shows how to process the stereo mix with
the MASTERING algorithm patches.
Mixer
Insert effect
1.
Press the [EFFECT] key repeatedly to bring up the insert effect top screen on
the display.
2.
Use the cursor up/down keys to select the MASTERING algorithm.
The indication "MASTERING" is shown for a few seconds, and then the patch currently selected
for the MASTERING algorithm is shown. When a patch of this algorithm is selected, the effect is
inserted immediately before the [OUTPUT] jack.
ROCK
3.
Turn the dial to select the patch while playing the recorded content.
For information on the various patches that are available, see the list in the last section of this
documentation (→ p. 119).
4.
When you have found the desired effect, press the [EXIT] key.
The AUDIO mode top screen returns.
[OUTPUT] jack
0
30 ZOOM PS-04
Page 31

5-2
V
TRKEDED
TR
Mixdown (bounce) preparations
The procedure of recording the signal mixed in the PS-04 (the signal as it appears at the [OUTPUT]
jack) onto one or two audio tracks is called "bounce". The following steps show how to change the
internal setting so that the mixed signal of audio tracks 1 – 4 can be bounced onto an unused pair of
V-takes.
1
2
3
4
-takes
5
6
7
8
9
10
1
Tracks
1.
From the AUDIO mode top screen, press the [EDIT/UTILITY] key.
The AUDIO mode utility menu for making various audio function settings appears.
23
4
Bounce
Step 5: Mixdown
TRK
2.
Use the cursor left/right keys to bring up the indication "BOUNCE" on the
display, and press the [ENTER] key.
A screen for selecting whether to play or mute the content of the bounce target tracks appears. The
default setting is "MUTE".
Current setting
TR
3.
Turn the dial to switch the setting to "PLAY".
This makes it possible to record on separate V-takes of the bounce target tracks while playing back
the contents of all four tracks.
4.
Use the cursor left/right keys to bring up the indication "TAKE" on the display.
In this condition, you can select the V-take to be used as bounce target.
ZOOM PS-04 31
M
IT
TE
Page 32

Quick Guide
TAKE
TAKE
In the default condition, the setting is "CR" (Current) which means that the currently selected
V-take is the bounce target. When bounce is carried out in this condition, the content of the bounce
source V-take will be erased. You must therefore specify a separate V-take as bounce target.
5.
Turn the dial to select the number of the V-take to be used as bounce target.
When you select a number, bounce will be carried out onto that V-take of the selected track. In this
example, select "10" (V-take 10).
6.
When the setting has been made, press the [EXIT] key twice to return to the
AUDIO mode top screen.
5-3
Carrying out mixdown (bounce)
Select tracks 1 and 2 to record the stereo mix.
1.
Press the [U] key to return the recorder to the start.
2.
While holding down status key 1, press status key 2, so that the "REC"
indication for tracks 1 and 2 is visible.
To record on two tracks simultaneously, press both status keys together to set the tracks to the
recording standby mode. Only tracks 1 and 2 or tracks 3 and 4 can be combined.
TAKE
TAKE
CR
10
3.
Press the [BOUNCE] key.
The bounce function is enabled, and the indication "BOUNCE" appears on the display. In this
condition, the stereo mix (the signal as it appears at the [OUTPUT] jack) will be sent to V-takes 10
of tracks 1 and 2.
32 ZOOM PS-04
Page 33

Step 5: Mixdown
OOOOOO
TR1-1-
OOOOOO
4.
To carry out mixdown, press the [R/P] key at the start of the recorder while
holding down the [REC] key.
When signal distortion occurs during bounce recording, press the [TUNER/BYPASS] key to
bypass the insert effect and check whether this removes the distortion.
● No distortion when insert effect is bypassed
Lower the patch level parameter for the insert effect (→ p. 87).
● Distortion still occurs when insert effect is bypassed
Slide fader 1– 4 down, or reduce EQ gain settings.
5.
When recording is completed, press the [R/P] key to stop the recorder.
6.
To cancel the bounce function, press the [BOUNCE] key once more.
The "BOUNCE" indication goes out. Press the status key to cancel the recording selection.
5-4
Playing the bounced tracks
You can select the V-takes of the bounce target tracks to play the bounced contents. At this time, you
must disable effects and track parameters so that they do not get doubled.
1.
From the AUDIO mode top screen, press the [TUNER/BYPASS] key.
The insert effect is bypassed.
000
BOUNCE
indication
ZOOM PS-04 33
2.
Press the [TRACK PARAMETER] key and use the cursor left/right keys or the
status keys to select one of the bounce target tracks.
TR
1
Page 34

Quick Guide
r
TR
3.
Use the cursor up/down keys to bring up the following screen.
This screen lets you select the V-take for the track.
Track number
V-take numbe
TR
1 -
4.
Turn the dial to select the number of the V-take that was selected as bounce
target (V-take 10 in the above example).
5.
Use the same procedure to select the V-take for the other track.
6.
Set the track parameters as follows, so that the sound of the bounce target
V-takes can be monitored without coloration.
Track parameter SEND HI-EQ LO-EQ PAN
Track 1
Track 2
7.
When the setting has been made, press the [EXIT] key to return to the AUDIO
mode top screen.
H
INT
If required, you can also link the parameters of the two tracks (→ p. 58).
8.
Raise the faders of the bounce target tracks, and slide the other faders fully
down.
OFF OFF OFF L100
OFF OFF OFF R100
1
H
INT
When the fader setting value is 100, the recording level and playback level are identical.
(The current fader value can be checked with the track parameter FADER.)
34 ZOOM PS-04
Page 35

Step 5: Mixdown
9.
Press the [U] key to return the recorder to the start, and press the [R/P] key.
The bounced content is played back. To stop playback, press the [R/P] key once more.
10.
When you are satisfied with the results, return to the PS-04 to the condition
before the bounce operation.
ZOOM PS-04 35
Page 36

Reference [Recorder]
OOOOOO
OO
1-
MARK
NEWPRJ
INPUT
This section explains the functions for audio recording and playback.
AUDIO mode screens
Immediately after turning the PS-04 on, the AUDIO
mode is automatically selected and the counter
showing the current position appears. This screen is
called the AUDIO mode top screen. It also appears
when you exit the EFFECT, RHYTHM, or
SYSTEM modes and return to AUDIO mode.
The cursor left/right keys can be used to switch the
display format for the top screen counter to one of
the following three formats: minutes/seconds/
milliseconds, measure/beat, marker.
Time display
O
000
1
00
01
W] key.
OOOOOO
Measure/beat display
OO
1-
Marker display
MARK
While the top screen is shown, pressing one of the
cursor up/down keys brings up the name and the
number of the currently selected project on the
display.
Project name Project number
NEWPRJ
To return to the top screen, press the [
V-takes
■
About V-takes
Each of the audio tracks 1 – 4 has ten virtual tracks
which are referred to as V-takes. At any time, one
of these V-takes is selected for recording or
playback. For example, you could record a difficult
guitar solo onto multiple V-takes, and then compare
them later to select the best take.
■
Switching V-takes
To select the V-take for each track, proceed as
follows.
1.
Make sure that the recorder is
stopped and the AUDIO mode top
screen is shown. Press the [TRACK
PARAMETER] key.
The track parameter screen is shown. On this
screen, you can make various settings for each
track. The first time you call up the screen, the
indication "INPUT SEL" appears, and then the
currently selected input source is shown.
INPUT
2.
Use the cursor left/right keys to
select the audio track for which you
want to switch the V-take.
The name of the selected track is briefly shown, and
then the track parameter and setting value are
shown.The level meter segment for that track is
flashing.
H
INT
Once the audio track has been selected, you
can also use the status keys to switch tracks.
36 ZOOM PS-04
Page 37

TR
TR
ACK2
HI
r
TR2-2-
TR
2-
OOOOOO
OO1-O1
ACK2
3.
Repeatedly press the cursor [W] key
to bring up the indication “TR x-y” on
the display (where x is the track
number and y the V-take number).
While this screen is shown, you can change the
V-take for the currently selected track.
Track number V-take numbe
TR
Currently selected track
4.
Turn the dial to select the desired
V-take number.
When you select an unrecorded V-take, the
indication “E” (for “Empty”) is shown to the right
of the V-take number.
TR
EQEQHI
1
2-
0FF
2E
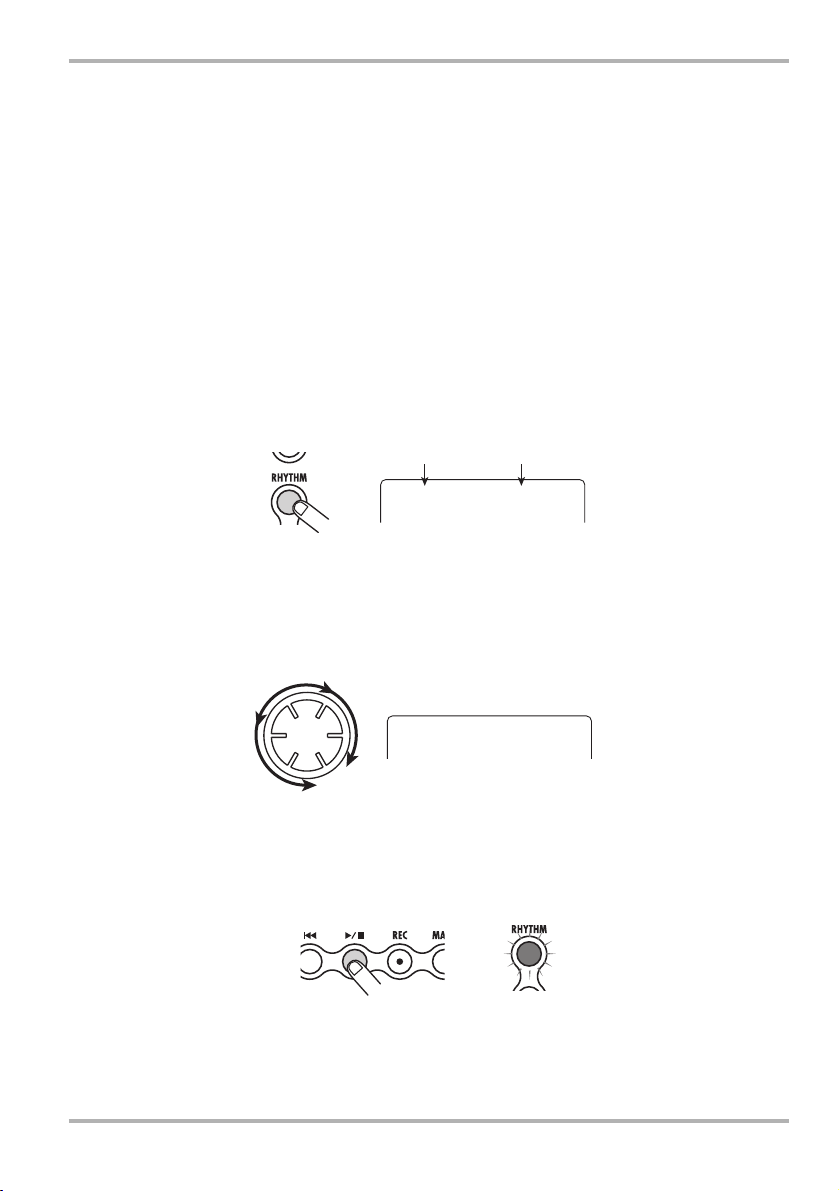
Moving to a desired location in the song (Locate/Marker function)
Moving to a desired location in
the song (Locate/Marker function)
This section describes how to jump to a point
specified in minutes/seconds/milliseconds or
measure/beat units (Locate function) and how to set
a mark at any desired point and jump to that point
(Marker function).
■
Specifying time or measures
You can specify a point in minutes/seconds/
milliseconds or measure/beat units, and move to
that point.
1.
From the AUDIO mode top screen,
set the counter display format to time
or measure/beat.
While the AUDIO mode top screen is shown, you
can control the numeric counter indication to go to
a point.
2.
Use the cursor left/right keys to
cause a display digit to flash.
The flashing digit is the one that can be adjusted.
Time display
OOOOOO
Measure/beat display
000
SecondsMinutes Milliseconds
OO1-O1
5.
6.
ZOOM PS-04 37
If required, use the status keys or
cursor left/right keys to change the
track, and then select the V-take for
that track.
Press the [EXIT] key to return to the
AUDIO mode top screen.
3.
Turn the dial to adjust the value of the
flashing digit.
When the value is changed, the recorder
immediately moves to the new point. By pressing
the [R/P] key, you can start playback from that
point.
H
INT
The numeric indication for measure/beat
display depends on the time signature and
tempo of the pattern/song selected in RHYTHM
mode. (For details, see page 59.)
Page 38

Reference [Recorder]
SET
MARK
MARK
MARK
■
Setting a mark in a song
By setting a mark anywhere in a project, you can
easily return to that point later. Up to 100 markers
can be set per project.
1.
From the AUDIO mode top screen,
move to the point where you want to
set a mark.
H
INT
A mark can be set either in the playback or stop
condition.
2.
Press the [MARK] key.
A mark is set at the current location, and the mark
number is shown on the display for a while.
SET
Newly added marks are automatically numbered in
the range from 01 to 99. (The mark number 00 is
always assigned to the beginning of the project.) If
you add a new mark between two existing marks,
all subsequent marks will be renumbered, as shown
below.
01
Mark number
At this screen, you can specify a mark to locate.
When the displayed marker number and the current
position match, the indication “MARK” is shown to
the left of the mark number.
Shown when current position is on the mark
MARK
3.
Turn the dial to select the number of
the mark to which you want to move.
When you select a mark number, the recorder
immediately moves to that position.
■
Deleting a mark
You can delete marks that are no longer needed.
1.
Display the AUDIO mode top screen
and switch the counter indication to
mark units.
2.
Turn the dial to select the number of
the mark you want to delete.
01
Mark number
00
00
Add a mark
01
02
01
02
03
03
04
Mark
number
Song
Mark
number
Song
■
Locating a mark
You can jump to any mark position (Locate
function).
1.
Display the AUDIO mode top screen.
2.
Use the cursor left/right keys to
switch the counter indication to mark
units.
38 ZOOM PS-04
MARK
N
OTE
If the current position does not match the mark
position, the mark cannot be deleted. When the
indication “MARK” is shown to the left of the
mark number, the displayed marker number
and the current position match.
3.
Press the [MARK] key.
The selected mark is deleted, and all subsequent
marks will be renumbered, as shown below.
MARK
D
03
EL
Page 39
Mark
TRKEDED
OOO115
OOO115
OOOO15
number
Song
00
01
02
Delete mark
03
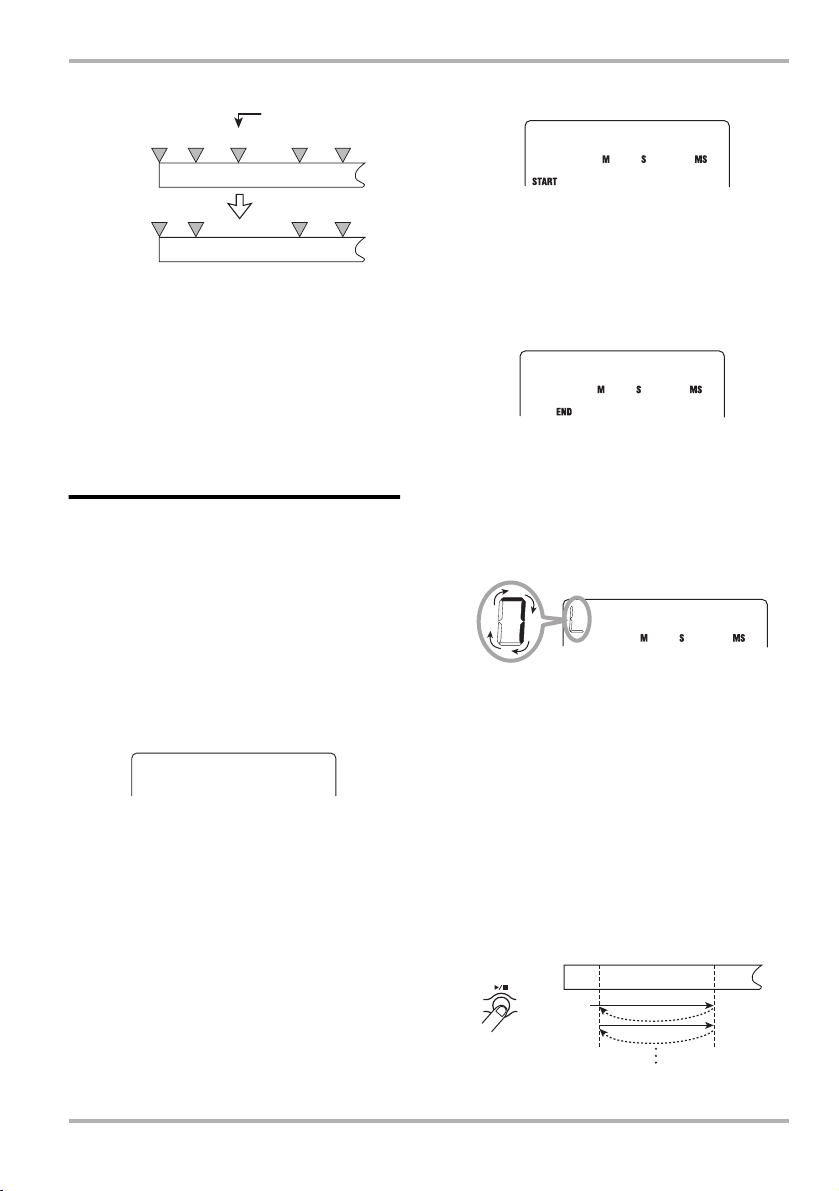
Playing back the same passage repeatedly (A-B Repeat function)
start point in measures/beats or using a mark.
04
OOO115
120
Mark
00
number
Song
N
OTE
• Once a mark has been deleted, it cannot be
restored.
• The mark at the beginning of a song (mark
number 00) cannot be deleted.
01
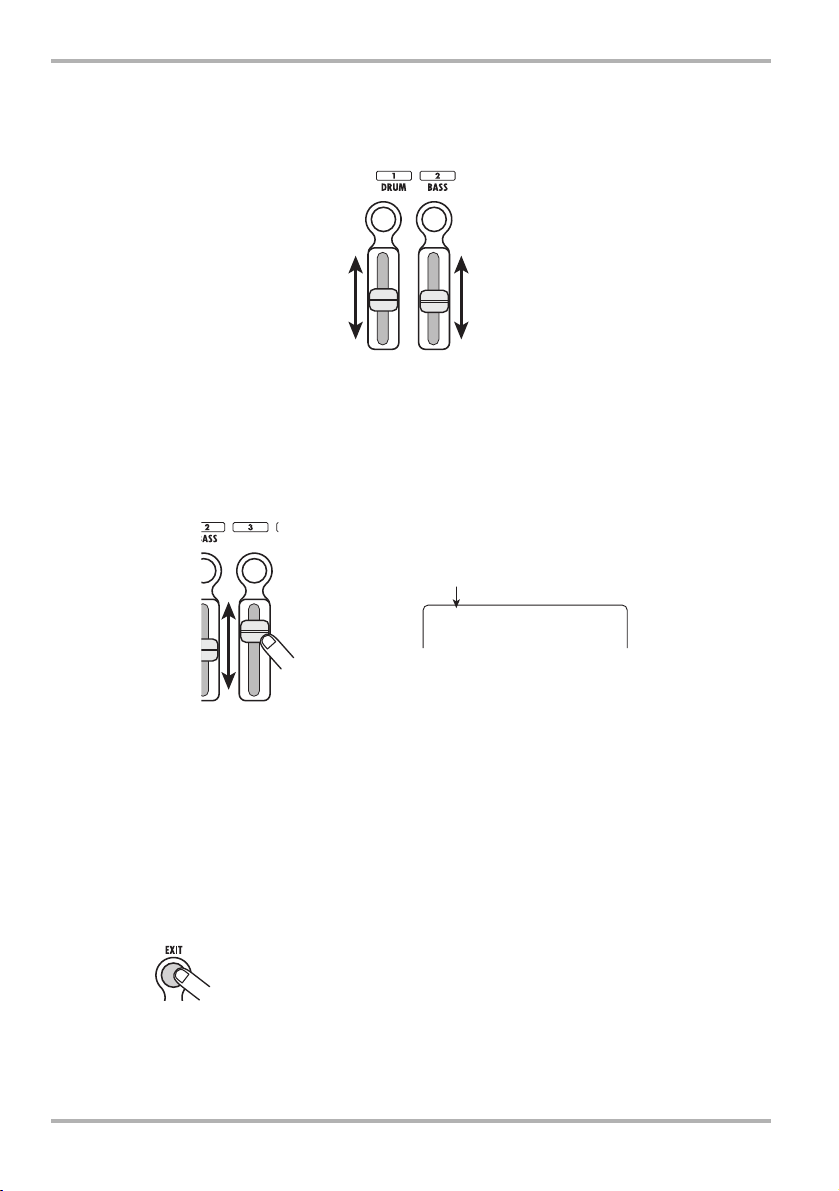
Playing back the same passage
02
03
4.
“END” is shown beneath the counter to indicate
that the end point (point B) can be set.
5.
repeatedly (A-B Repeat function)
The A-B repeat function becomes active. While the
A-B Repeat is a function that repeatedly plays back
a specified passage within a project. This is useful
to listen to the same part repeatedly, or perform
repeated recording.
1.
From the AUDIO mode top screen
and with the recorder stopped, press
the [EDIT/UTILITY] key.
The audio utility menu appears. This menu gives
access to track editing functions and A-B repeat.
TRK
IT
function is active, a rotating indication such as
shown below appears at the left edge of the counter.
H
Use the cursor left/right keys and the
dial to specify the start point, and
press the [ENTER] key.
OOO115
Specify the end point (point B) as in
step 3, and press the [ENTER] key.
OOOO15
INT
• When you set point B before point A, the
section B
• To redo the point A/B setting, perform steps
1 - 5 once more.
→ A will be repeated.
120
120
2.
Use the cursor left/right keys to bring
up the indication “A-B REPT” on the
display, and press the [ENTER] key.
The indication "REPEAT OF" appears on the
display. In this condition, the A-B repeat function is
not active.
3.
Turn the dial to change the indication
to ON, and press the [ENTER] key.
"START" is shown beneath the counter to indicate
that the start point (point A) can be set. By
switching the counter indication, you can set the
ZOOM PS-04 39
6.
To start repeat playback, press the
[
R/P] key.
Repeat playback begins. When the end point (point
B) is reached, the recorder jumps to the start point
(point A), and playback continues.
A B
Playback
Page 40

Reference [Recorder]
OOOO15OOOO15
120
7.
To stop repeat playback, press the
[
R/P] key once more.
Also after the recorder was stopped, you can play
the specified passage again for as long as the A-B
repeat function is not canceled.
8.
To cancel the A-B repeat function,
perform steps 1 and 2 once more and
set A-B repeat to OFF.
H
INT
It is also possible to combine repeat playback
with special functions such as auto punch-in/
out. For example, if you set points A and B
slightly outside the intended recording range,
the recorder will automatically return to point A
after auto punch-in/out is completed, and the
recorded content will be played, letting you
check the success of the procedure.
Re-recording only a specified
part (Punch-in/out function)
Punch-in/out is a function that lets you re-record
just a specified part of a previously recorded track.
The action of switching a currently-playing track to
record mode is called “punch-in”, and the action of
switching back from recording to playback is called
“punch-out”.
The PS-04 provides two ways to do this. You can
use the panel keys to punch-in/out manually
(“manual punch-in/out”), or you can have punch-in/
out occur automatically at previously specified
points (“auto punch-in/out”).
■
Using manual punch-in/out
This section describes how to perform manual
punch-in/out to re-record a part of a previously
recorded track, using the panel keys.
1.
From the AUDIO mode top screen,
repeatedly press the status key of the
track on which you want to perform
punch-in/out, until the “REC”
indication is visible.
If necessary, adjust the input sensitivity and
recording level for the instrument again.
2.
While playing the instrument to be
recorded, operate the fader of the
selected track to adjust the monitor
level.
3.
Move to a point several measures
before the intended punch-in point,
and press the [
recorder playback.
4.
When you come to the punch-in
point, press the [REC] key.
The key lights up and track recording begins from
that location (punch-in).
5.
When you come to the intended
punch-out point, press the [REC] key
once more.
The [REC] key goes out, and the PS-04 switches
from recording to playback (punch-out).
6.
Press the [R/P] key to stop recorder
playback.
After recording, the indication “WAIT” is briefly
shown on the display.
H
INT
The duration of the “WAIT” interval depends on
the recording condition.
7.
To check the newly recorded
content, move to the point of step 4,
and press the [
8.
If you are satisfied with the result,
press the status key for that track to
turn off the “REC” indication.
R/P] key to begin
R/P] key.
40 ZOOM PS-04
Page 41
Re-recording only a specified part (Punch-in/out function)
OOO36O
■
Using auto punch-in/out
This is a function that lets you specify beforehand
the region to be re-recorded, for automatic punchin/out.
1.
From the AUDIO mode top screen,
repeatedly press the status key of the
track on which you want to perform
punch-in/out, until the “REC”
indication is visible.
If necessary, adjust the input sensitivity and
recording level for the instrument again.
2.
While playing the instrument to be
recorded, operate the fader of the
selected track to adjust the monitor level.
3.
Move to the point where you want to
perform punch-in, and press the
[AUTO PUNCH IN/OUT] key.
The indication “AUTO PUNCH IN/OUT” flashes
in the middle of the display, and the current point is
set as the punch-in point.
OOO36O
4.
Move to the point where you want to
perform punch-out, and press the
[AUTO PUNCH-IN/OUT] key once more.
The indication “AUTO PUNCH IN/OUT” stops
flashing and stays constantly on. The current point
is set as the punch-out point.
H
INT
The auto punch-in/out setting can be made in
the playback or stop condition.
5.
Use the Locate function to move to a
point a few measures before the
punch-in point.
6.
To rehearse the auto punch-in/out
procedure, press only the [
048
R/P] key.
To actually perform auto punch-in/
out, hold down the [REC] key and
press the [
● If [R/P] key only was pressed (rehearsal)
When the punch-in point is reached, the track
selected for punch-in/out will be muted. At the
punch-out point, muting is canceled. (The input
signal can be monitored during this time.)
Track
● If [REC] key + [R/P] key was pressed
(actual function)
When the punch-in point is reached, recording will
begin automatically (punch-in). At the punch-out
point, recording will end automatically, and
playback will resume (punch-out).
Track
H
INT
For the section that is muted/recorded, the
"REC" indication stops flashing and stays
constantly on.
7.
When punch-in/out is completed,
press the [
goes out.
The indication “WAIT” is briefly shown on the
display.
8.
To check the newly recorded
content, press the [AUTO PUNCH IN/
OUT] key to cancel the auto punchin/out function. Then move to the
point of step 4 and press the [
key.
When you cancel the auto punch-in/out function so
that the indication goes out, the settings for the
punch-in and punch-out point are lost. To redo the
recording, repeat steps 3 - 7.
R/P] key.
Punch-out pointPunch-in point
Play PlayMute
Punch-out pointPunch-in point
Play Play
Record
R/P] key so that the key
R/P]
ZOOM PS-04 41
Page 42

Reference [Recorder]
V
TRTR M
TE
9.
If you are satisfied with the result,
press the status key for that track to
turn off the “REC” indication.
Combining multiple tracks on
another track (Bounce function)
“Bounce” is a function that mixes the contents of
audio track 1 – 4 and the drum/bass track, and
records them on one or two tracks. (This is
sometimes also called “ping-pong recording”.)
Even if all tracks 1 – 4 have all been recorded, you
can transfer the result to one or two empty V-takes.
By subsequently switching the V-takes, you can
then listen to the bounced content and perform
further recording. This technique also allows you to
perform mixdown entirely within the PS-04,
without using an external master recorder.
1
2
3
4
5
-takes
6
7
8
9
10
1
Tra cks
H
INT
• You can also mix input signals into the
bounce recording.
• If you select only one track as the bounce
destination, the signal mixed to mono will be
recorded.
234
Bounce
■
Making settings for the bounce
target track(s)
In the default condition of the PS-04, the bounce
destination recording track(s) will be muted. To
play back a track while you bounce-record on
another V-take of that track, use the following
procedure to change the internal setting so that the
recording track(s) will also play back.
1.
From the AUDIO mode top screen
and with the recorder stopped, press
the [EDIT/UTILITY] key.
The AUDIO mode utility menu appears.
2.
Use the cursor left/right keys to bring
up the indication “BOUNCE” on the
display, and press the [ENTER] key.
3.
Use the cursor left/right keys to bring
up the indication “TRACK” on the
display, and press the [ENTER] key.
The display changes as follows.
From this screen, you can select one of the
following two settings for the bounce target track.
• MUTE (Default)
The bounce target track(s) will be muted.
• PLAY
The bounce target track(s) will play back.
4.
Turn the dial to change the setting to
“PLAY”.
5.
Press the [EXIT] key repeatedly to
return to the AUDIO mode top
screen.
42 ZOOM PS-04
Page 43

■
TAKE
Selecting the bounce target
V-take
In the default condition of the PS-04, the result of
the bounce operation will be recorded on the V-take
that is currently selected for the recording track(s).
To play back a track while bouncing onto another
V-take of that track, you can use the following
procedure to change the recording destination Vtake.
1.
From the AUDIO mode top screen
and with the recorder stopped, press
the [EDIT/UTILITY] key.
The AUDIO mode utility menu appears.
2.
Use the cursor left/right keys to bring
up the indication “BOUNCE” on the
display, and press the [ENTER] key.
3.
Use the cursor left/right keys to bring
up the indication “TAKE” on the
display, and press the [ENTER] key.
The display changes as follows.
TAKE
From this screen, you can select one of the
following two settings for the bounce target V-take.
• CR (Default)
The bounce result will be recorded on the V-take
currently selected for the recording track.
•1 – 10
The bounce result will be recorded on the V-take
of the number you specify here.
4.
Turn the dial to select the bounce
target V-take.
5.
Press the [EXIT] key repeatedly to
return to the AUDIO mode top
screen.
CR
Combining multiple tracks on another track (Bounce function)
■
Carrying out bounce recording
In this example, we will bounce the contents of
audio tracks 1 – 4 onto V-takes 10 of tracks 1/2.
1.
Set the bounce target operation to
“PLAY” and select “10” as bounce
target V-take.
For details, see the preceding section.
2.
Repeatedly press the status key 1
until the “REC” indication is shown
for track 1. Then keep pressing the
key.
3.
While still holding down status key 1,
repeatedly press the status key 2
until the “REC” indication is shown
for track 2.
In this condition, the same signal as supplied at the
[OUTPUT] jack of the PS-04 is recorded on
V-takes 10 of tracks 1 and 2.
H
INT
• When performing bouncing in stereo, the left
channel of the bounce source is recorded on
the odd-numbered track and the right channel
on the even-numbered track.
• If desired, you can also add the drum/bass
track signal and the input signal to the
bounced mix.
ZOOM PS-04 43
Page 44

Reference [Recorder]
COUNTCOUNT
4
4.
Press the [BOUNCE] key.
The bounce function is enabled, and the indication
“BOUNCE” appears on the center right side of the
display.
5.
Play tracks 1 – 4 and adjust the level
balance between the tracks.
The settings for level balance, panning, and send/
return effect intensity all affect how the track is
recorded on the bounce target. During recording,
watch the level meter to make sure that there is no
signal clipping.
6.
Press the [U] key to return the
recorder to the start, and then hold
down the [REC] key and press the
[
R/P] key.
Both keys light up and bounce recording starts.
7.
When bounce recording is finished,
press the [
goes out.
The recorder stops.
8.
Switch the respective track to the
bounce target V-take and perform
playback to check the recording.
Turn down the faders for the other tracks to mute
their sound. When the bounced material was in
stereo, set the PAN parameter for track 1 to L100
and the PAN parameter for track 2 to R100, for
monitoring with correct stereo imaging. (For
information on how to make this setting, see page
56.)
To redo the bounce recording, repeat steps 5 – 8.
N
OTE
Also when you change the selected V-take, the
parameters set for that track will still be active.
To monitor the bounced recording correctly,
return the EQ and effect settings for the track to
the default condition.
R/P] key so that the key
display. When you are finished with the bounce
operation, return the operation settings and V-take
selection for the bounce target track to the original
condition.
Changing the precount
operation
In the default condition of a project, a 4-beat
precount is heard before recording starts. You can
change the duration and volume of the precount, if
desired.
1.
From the AUDIO mode top screen
and with the recorder stopped, press
the [EDIT/UTILITY] key.
The AUDIO mode utility menu appears.
2.
Use the cursor left/right keys to bring
up the indication “PRECOUNT” on
the display.
3.
Press the [ENTER] key.
The display changes as follows.
4.
To change the number of precount
beats, turn the dial and select one of
the following settings.
• OFF
No precount is heard.
• 1-8
1 – 8 precount beats are heard.
• SP
The following special precount is heard.
9.
To cancel the bounce function, press
the [BOUNCE] key once more.
The “BOUNCE” indication disappears from the
44 ZOOM PS-04
Page 45

Checking the grade setting of a project
COUNT
VOLUME
GRADE
5.
To change the volume of the
precount, use the cursor left/right
keys.
The following indication appears on the display.
VOLUME
6.
Turn the dial to adjust the precount
volume.
The setting range is 0 – 15.
7.
When the setting is complete, press
the [EXIT] key two times to return to
the AUDIO mode top screen.
When you next perform recording, the precount
will operate according to the chosen setting.
10
Checking the grade setting
of a project
To check the grade (sound quality) setting of the
currently active project, proceed as follows. This
procedure only allows you to check the setting, not
to change it.
1.
From the AUDIO mode top screen
and with the recorder stopped, press
the [EDIT/UTILITY] key.
The AUDIO mode utility menu appears.
2.
Use the cursor left/right keys to bring
up the indication “GRADE” on the
display.
• HI-FI
Recording grade set to Hi-Fi
• LONG
Recording grade set to Long
4.
When the check is finished, press the
[EXIT] key two times to return to the
AUDIO mode top screen.
3.
Press the [ENTER] key.
The recording grade setting for the currently active
project is shown as follows.
ZOOM PS-04 45
GRADE
Page 46
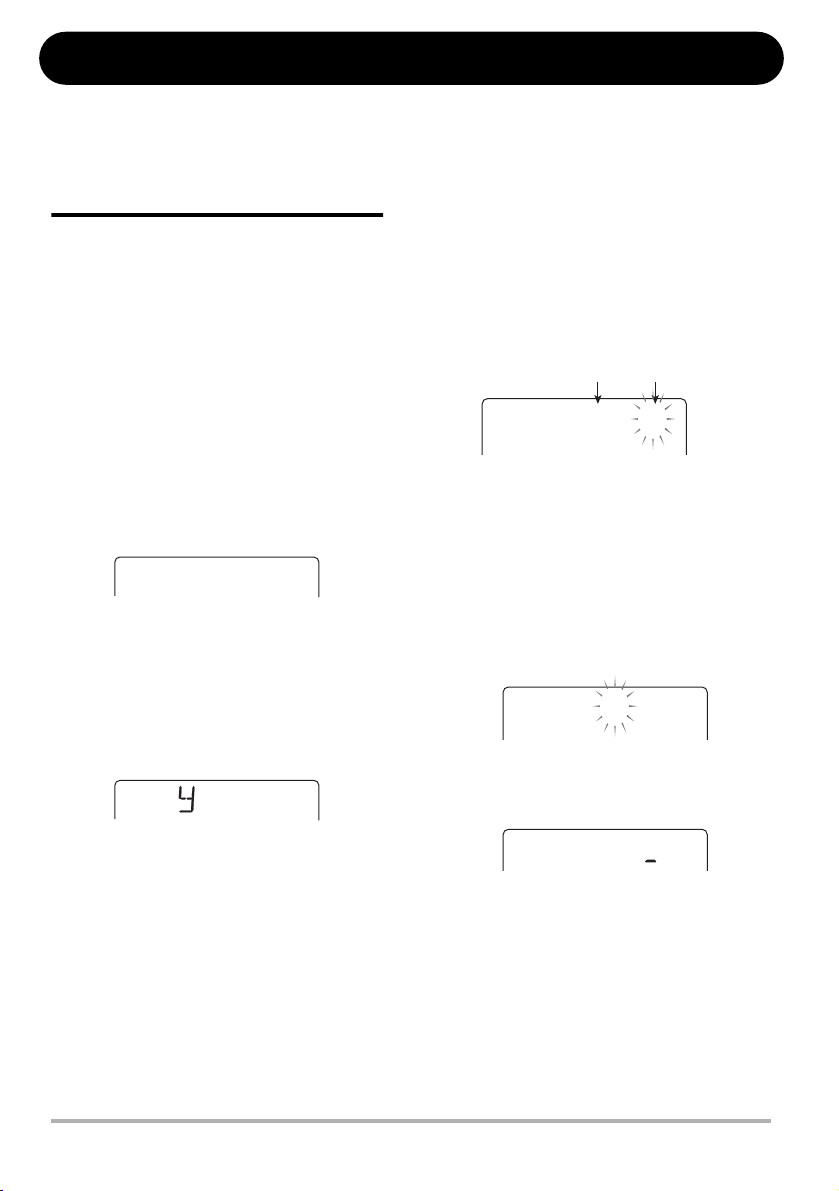
Reference [Track Editing]
TR
ED
COP
SRC
SRCSRC 4
-3
SRCSRC
TRTR
12
This section explains how to edit audio data contained on tracks 1 – 4. There are two major types of editing
functions: specifying a range for editing, and editing an entire V-take.
Editing a range of data
The procedure for specifying a range of a V-take
and then performing an action such as copying or
moving is explained below.
■
Basic steps for range editing
When performing editing for a specified range of
data, some steps are similar for each action. These
are as follows.
1.
From the AUDIO mode top screen
and with the recorder stopped, press
the [EDIT/UTILITY] key.
The audio utility menu appears.
TR
K
2.
Verify that “TRK EDIT” is shown on
the display, and press the [ENTER]
key.
The track edit menu appears. This menu gives
access to various editing commands for a specified
range.
ED
IT
COP
•Trim
Retain only a specified range of audio data and
erase the rest.
4.
Press the [ENTER] key.
The editing command is selected, and you can
specify the track/V-take for editing.
Track number V-take number
SRC
5.
Use the cursor left/right keys to
select the track/V-take for editing.
You can also select the track with the status keys
1 – 4. On this screen, also V-takes that are not
currently selected for tracks 1 – 4 can be selected
for editing. If you select a V-take including no
audio data, the symbol "E" (for "Empty") is shown
to the right of the number.
When track 4 is selected, turning the dial further to
the right bring up the following display.
-1
1
3.
Use the cursor left/right keys to select
one of the following commands.
• Copy
Copy a specified range of audio data.
• Move
Move a specified range of audio data.
• Erase
Erase a specified range of audio data.
46 ZOOM PS-04
“1_2” means that tracks 1 and 2 are selected as a
pair for simultaneous editing. Similarly, “3_4”
means that tracks 3 and 4 are selected as a pair. In
this case, the currently selected V-take for each
track will be the editing target.
6.
Press the [ENTER] key.
The subsequent steps will differ, depending on
which command was selected in step 3. See the
Page 47

sections for the respective commands.
OOOOOO
OOOOOO
DST
OOOOOO
7.
Press the [EXIT] key repeatedly to
return to the AUDIO mode top screen.
N
OTE
After performing an edit function and rewriting
the audio data on a track, the original data
cannot be restored. Use these functions with
care, to prevent inadvertently losing data.
■
Copying a specified range of data
You can copy the audio data of a specified range to
a specified position on a specified track/V-take.
This action will overwrite the existing data at the
destination location. The copy source data will be
unchanged.
Copy source track
Copy
Copy target track
1.
Refer to “Basic steps for range editing”
to select the copy source track/V-take,
and press the [ENTER] key.
The indication “START” appears, and you can
specify the copy start point.
OOOOOO
000
Editing a range of data
-2
2
000
OOOOOO
4.
Specify the copy end point using the
same procedure as in step 2.
5.
Press the [ENTER] key.
The display indication changes to “DST x-y”
(where x is the track number and y the V-take
number). This lets you specify the copy destination
track/V-take.
Track number V-take number
DST
N
OTE
• If you have selected a single track as copy
source, only a single track can be selected as
copy destination.
• If you have selected two adjacent tracks (1_2
or 3_4) as copy source, only two adjacent
tracks can be selected as copy destination. In
this case, the currently selected V-take for
each track becomes the editing target.
6.
Specify the copy destination track/
V-take in the same way as when
selecting the copy source track/
V-take, and press the [ENTER] key.
The indication “TO” appears, and you can specify
the start point.
2.
Use the cursor left/right keys to
move the flashing part of the counter,
and turn the dial to change the value.
You can also specify the point in measure/beat units
or as a mark. To do this, repeatedly press the cursor
left or right key to change the counter format. When
there are no audio data, the "*" symbol is shown.
3.
Press the [ENTER] key.
The indication “END” appears, and you can specify
the copy end point.
ZOOM PS-04 47
OOOOOO
7.
Specify the copy start point using the
same procedure as in step 2, and
press the [ENTER] key.
The indication “ENT/EXIT” appears on the display.
000
Page 48

Reference [Track Editing]
OOOOOO
OOOOOO
DST
OOOOOO
8.
To carry out the copy operation,
press the [ENTER] key once more.
When the copy process is finished, the track edit
menu appears again.
By pressing the [EXIT] key instead of the [ENTER]
key, you can cancel the operation and return to the
previous screen.
■
Moving a specified range of data
You can move the audio data of a specified range to
a specified position on a specified track. This action
will overwrite the existing data at the destination
location. The move source data will be erased.
Move source track
Move
Move target track
1.
Refer to “Basic steps for range editing”
to select the move source track/
V-take, and press the [ENTER] key.
The indication “START” appears, and you can
specify the move start point.
4.
Specify the move end point using the
same procedure as in step 2.
5.
Press the [ENTER] key.
The display indication changes to “DST x-y” (where
x is the track number and y the V-take number). This
lets you specify the move destination track/V-take.
Track number V-take number
DST
N
OTE
• If you have selected a single track as move
source, only a single track can be selected as
move destination.
• If you have selected two adjacent tracks (1_2
or 3_4) as move source, only two adjacent
tracks can be selected as move destination.
In this case, the currently selected V-take for
each track becomes the editing target.
6.
Specify the move destination track/
V-take in the same way as when
selecting the move source track/
V-take, and press the [ENTER] key.
The indication “TO” appears, and you can specify
the move destination start point.
-2
2
OOOOOO
2.
Use the cursor left/right keys to
move the flashing part of the counter,
and turn the dial to change the value.
You can also specify the point in measure/beat units
or as a mark. When there are no audio data, the "*"
symbol is shown.
3.
Press the [ENTER] key.
The indication “END” appears, and you can specify
the move end point.
OOOOOO
48 ZOOM PS-04
000
000
OOOOOO
7.
Specify the move start point using
the same procedure as in step 2, and
press the [ENTER] key.
The indication “ENT/EXIT” appears on the display.
8.
To carry out the move operation,
press the [ENTER] key once more.
When the move process is finished, the track edit
menu appears again.
By pressing the [EXIT] key instead of the [ENTER]
key, you can cancel the operation and return to the
previous screen.
000
Page 49

Editing a range of data
OOOOOO
OOOOOO
OOOOOO
■
Erasing a specified range of data
You can erase the audio data of a specified range
and return the range to the mute (non-recorded)
condition.
Erase
1.
Refer to “Basic steps for range
editing” to select the track/V-take
from which you want to erase data,
and press the [ENTER] key.
The indication “START” appears, and you can
specify the erase start point.
OOOOOO
2.
Use the cursor left/right keys to
move the flashing part of the counter,
and turn the dial to change the value.
You can also specify the point in measure/beat units
or as a mark. When there are no audio data, the "*"
symbol is shown.
3.
Press the [ENTER] key.
The indication “END” appears, and you can specify
the erase end point.
000
menu appears again.
By pressing the [EXIT] key instead of the [ENTER]
key, you can cancel the operation and return to the
previous screen.
■
Trimming a specified range of
data
You can erase the audio data of a specified range
and adjust the data start/end point (trimming). This
is useful for example to remove unwanted portions
at the start and end of a final mixdown created by
bouncing onto 2 tracks.
Tri m Tri m
N
OTE
When data before a specified section are erased
(trimmed), the remaining audio data will move up
by that amount. Therefore the timing may become
mismatched with regard to other tracks/V-takes.
1.
Refer to “Basic steps for range
editing” to select the track/V-take
from which you want to trim data,
and press the [ENTER] key.
The indication “START” appears, and you can
specify the start point for the range to be preserved
after trimming.
4.
Specify the erase end point using the
same procedure as in step 2.
5.
Press the [ENTER] key.
The indication “ENT/EXIT” appears on the display.
6.
To carry out the erase operation,
press the [ENTER] key once more.
When the erase process is finished, the track edit
ZOOM PS-04 49
OOOOOO
000
OOOOOO
2.
Use the cursor left/right keys to
move the flashing part of the counter,
and turn the dial to change the value.
You can also specify the point in measure/beat units
or as a mark. When there are no audio data, the "*"
symbol is shown.
All data before the point specified here will be
erased.
3.
Press the [ENTER] key.
The indication “END” appears, and you can specify
000
Page 50

Reference [Track Editing]
OOOOOO
TR
ACK2
HI
TRTR 2-2-
1
the end point for the range to be preserved after
trimming.
OOOOOO
4.
Specify the trimming end point using
the same procedure as in step 2.
All data after the point specified here will be
erased.
5.
Press the [ENTER] key.
The indication “ENT/EXIT” appears on the display.
6.
To carry out the trimming operation,
press the [ENTER] key once more.
When the trimming process is finished, the track
edit menu appears again.
By pressing the [EXIT] key instead of the [ENTER]
key, you can cancel the operation and return to the
previous screen.
000
Editing using V-takes
Recorded audio data can also be edited in V-take
units. You can for example exchange the data on
two V-takes, or delete a V-take that is no longer
needed.
■
Basic steps for V-take editing
When editing audio data in V-take units, some steps
are similar for each action. These are as follows.
1.
From the AUDIO mode top screen,
press the [TRACK PARAMETER] key.
The parameters for tracks 1 – 4 are shown.
H
INT
The parameters for tracks 1 – 4 can also be
controlled in EFFECT mode.
2.
Use the cursor left/right keys to
select the track which includes the
50 ZOOM PS-04
V-take that you want to edit.
The name of the selected track is briefly shown on
the display, and then the track parameters and
settings values are shown.
TR
ACK2
3.
Use the cursor up/down keys to
bring up the indication “TR x-y” on
the display (where x is the track
number and y the V-take number).
4.
Turn the dial to select the V-take for
editing.
You can also use the cursor left/right keys to switch
tracks while you are selecting a V-take.
H
INT
• It is also possible to select a V-take other than
the one currently selected for the track.
• When you select an unrecorded V-take, the
indication “E” (for “Empty”) is shown to the
right of the V-take number.
5.
Press the [INSERT/DELETE (COPY)]
key.
From this screen, you can select commands for
editing in V-take units by pressing the [INSERT/
DELETE(COPY)] key repeatedly. The following
commands are available. You can also use the
cursor left/right keys to select a command.
• DELETE
Erase the audio data on a specified V-take.
• COPY
Copy the audio data of a specified V-take to another
V-take.
EQEQHI
0FF
Page 51

COP
COP
DELETE
COPCOP
COP
• EXCHANGE
Exchange the audio data of a specified V-take with
the data of another V-take.
6.
Press the [ENTER] key.
The subsequent steps will differ, depending on
which command was selected. See the sections for
the respective commands.
7.
Press the [EXIT] key repeatedly to
return to the AUDIO mode top
screen.
■
Deleting a V-take
You can delete the audio data on a specified V-take.
The V-take is returned to the non-recorded
condition.
Delete
Editing using V-takes
■
Copying a V-take
You can copy the audio data of a specified V-take
to any other V-take. This action will overwrite any
existing data on the destination V-take. The data on
the copy source V-take will be unchanged.
Copy source track
Copy
Copy target track
1.
Refer to “Basic steps for V-take
editing” to select the track/V-take
which you want to copy, and bring up
the indication “COPY” on the display.
2.
Press the [ENTER] key.
The display indication changes as follows.
In this condition, you can select the copy
destination track/V-take.
1.
Refer to “Basic steps for V-take
editing” to select the track/V-take
which you want to delete, and bring
up the indication “DELETE” on the
display.
2.
Press the [ENTER] key.
The indication “ENT/EXIT” appears on the display.
3.
To carry out the delete operation,
press the [ENTER] key once more.
The V-take is returned to the blank condition, and
the track parameter menu returns.
By pressing the [EXIT] key instead of the [ENTER]
key, you can cancel the operation and return to the
previous screen.
ZOOM PS-04 51
DELETE
Copy destination
track number
COP
3.
Use the cursor left/right keys to
move the flashing part, and turn the
dial to select the track and V-take to
use as copy target.
4.
Press the [ENTER] key.
The indication “ENT/EXIT” appears on the display.
If there is a audio data on the copy target, the
indication "OVR WRITE" appears on the display.
5.
To carry out the copy operation,
press the [ENTER] key once more.
The copy process is carried out, and the track
-1
1
Copy destination
V-take number
Page 52

Reference [Track Editing]
EXCHAN
CHNG
parameter menu returns.
By pressing the [EXIT] key instead of the [ENTER]
key, you can cancel the operation and return to the
previous screen.
■
Exchanging V-takes
You can exchange the audio data of two specified
V-takes.
Exchange
1.
Refer to “Basic steps for V-take
editing” to select the source track/
V-take which you want to exchange,
and bring up the indication
“EXCHANGE” on the display.
EXCHAN
2.
Press the [ENTER] key.
The display indication changes as follows.
In this condition, you can select the exchange
destination track/V-take.
GE
5.
To carry out the exchange operation,
press the [ENTER] key once more.
The exchange process is carried out, and the track
parameter menu returns.
By pressing the [EXIT] key instead of the [ENTER]
key, you can cancel the operation and return to the
previous screen.
Exchange destination
Exchange destination
track number
CHNG
3.
Use the cursor left/right keys to
move the flashing part, and turn the
dial to select the track and V-take to
use as exchange target.
4.
Press the [ENTER] key.
The indication “ENT/EXIT” appears on the display.
52 ZOOM PS-04
V-take number
-1
1
Page 53

Reference [Mixer]
This section explains the functions and operation of the mixer built into the PS-04.
About the PS-04 mixer
The mixer in the PS-04 can be used to create a final
stereo output mix by adjusting parameters (level,
panning, EQ, send/return effect intensity etc.) for
the recorded tracks and mixing these with the drum
and bass track signals.
If required, the input signals from the [INPUT]
jack, [LINE IN] jack, or built-in mic can be added
directly to the stereo mix, and panning and send/
return effect intensity can also be adjusted
separately for these signals.
H
INT
• The input signals can only be directly added
to the mix when no track in recording standby
mode is selected. If there is a track in
recording standby mode, the input signal will
be sent to that track and the panning and
send/return effect settings for the input will be
inactive.
• The input signal and the signal immediately
before the [OUTPUT] jack can be processed
with the insert effect (
Input
→ p. 84).
At least one track set
to recording standby
Recorder
Track 1
Track 2
Track 3
Track 4
• The signal produced by the mixer can be
bounced to any track if desired (
→ p. 42).
Assigning input signals to tracks
This section explains how to select up to two input
signals and assign them to tracks for recording.
■
Selecting the input source
The PS-04 allows you to select up to two signals
(input sources) from the [INPUT] jack, built-in mic,
and the [LINE IN] jack, for sending to the recorder
tracks. If desired, you can also mix the signals from
[INPUT] jack and [LINE IN] jack onto a single
track, or record the signal from [INPUT] jack and
the built-in mic onto separate tracks. To select the
input source and set the recording level, proceed as
follows.
1.
From the AUDIO mode or EFFECT
mode top screen, press the [TRACK
PARAMETER] key.
Rhythm
Bass track
Drum track
No track set to
recording standby
Send/return
effect
INPUT
DRUM BASS
1234
Built-in mixer
[OUTPUT] jack
ZOOM PS-04 53
Page 54

Reference [Mixer]
MIC
RECLVL
The track parameter menu for making input and
track 1 – 4 settings appears.
2.
Use the cursor left/right keys to bring
up the indication “INPUT SEL” on the
display.
The indication “INPUT SEL” is briefly shown on
the display, and then the input source display
appears.
Currently selected input source
(built-in mic in this example)
MIC
H
INT
The “REC” indications on the display
correspond to the built-in mic, [INPUT] jack,
and [LINE IN] jack. When the indication is
constantly on, the source is selected (active).
Otherwise the indication is flashing.
3.
Use the status keys 1 – 4 to select the
input source.
To select a single input source, press one of the
status keys 1 – 4. To select two input sources, press
the status keys for the two sources simultaneously.
Possible input source combinations are listed in the
table below.
H
INT
• The [LINE IN] signal can be selected by
pressing only one of the status keys 3 or 4.
• When combining the [LINE IN] signal with
another input source, the L and R
components of the signal at the [LINE IN] jack
are mixed to produce a mono signal.
4.
When the [INPUT] jack was selected
as input source, play the instrument
and adjust the input sensitivity with
the [INPUT LEVEL] knob so that the
sound is not distorted when playing
the instrument at maximum level.
If the indication “-PEAK-” is shown on the display,
signal distortion has occurred.
5.
To adjust the recording level, play the
instrument and adjust the fader for
the selected input source.
While the input track parameter display is shown,
you can use faders 1 – 4 to adjust the recording
level for each source. You can check the current
level using the setting value shown on the display
and the level meter.
When two sources are selected, use the up/down
cursor keys to select either to be adjusted.
If signal distortion occurs, the topmost segment of
the level meter will stay on for a while. Use the
fader to reduce the recording level setting for that
source.
RECLVL
100
Status key Display
1 MIC
2 INPUT
3 or 4 LINE
1+2 MIC+INPUT
1 + 3 or 1 + 4 MIC+LINE
2 + 3 or 2 + 4 LIN+INPUT
Built-in mic
[INPUT] jack
[LINE IN] jack L [LINE IN] jack R
Built-in mic [INPUT] jack
Built-in mic [LINE IN] jack L + R
[LINE IN] jack L + R [INPUT] jack
Input source
Input 1 Input 2
54 ZOOM PS-04
Page 55

H
INT
The recording level of the signal from the [LINE
IN] jack can be adjusted with fader 3 or fader 4.
(The recording level is always linked for the L
and R channel.)
6.
Press the [EXIT] key to return to the
AUDIO mode or EFFECT mode top
screen.
■
Selecting the recording track(s)
Next, select the track(s) on which the input source
signal is to be recorded. Signal processing will be
different, depending on whether the input source is
mono (one signal) or stereo (2 signals), and whether
1 or 2 tracks are selected.
1.
Bring up the AUDIO mode top
screen.
On the AUDIO mode top screen, you can use status
keys 1 – 4 to activate/deactivate the recording
standby condition for tracks 1 – 4.
2.
To switch only one track to the
recording standby condition, press
the respective status key.
The “REC” indication appears above the level
meter for the track. This shows that the track is in
the recording standby condition.
Assigning input signals to tracks
Input source: mono
Input Track
Input source: stereo
Input 1
Input 2
3.
To switch two tracks to the recording
Recorder
Recorder
Track
standby condition, hold down the
status key for one track and then
press the status key for the other
track.
Only the combination of tracks 1 and 2 or 3 and 4
can be selected. When you press the status keys 1/2
or 3/4, the “REC” indication appears above the
level meter for the respective tracks. This shows
that the tracks are in the recording standby
condition.
If the currently selected input source is mono (1
signal), the same signal will be sent to both tracks.
If the source is stereo (2 signals), the signal from
input 1 will be sent to the odd-numbered track and
the signal from input 2 to the even-numbered track.
Recorder
Tra ck 1 or 3
Tra ck 2 or 4
Recorder
Tra ck 1 or 3
Tra ck 2 or 4
If the currently selected input source is mono
(1 signal), this signal will be sent as is to the track.
If the source is stereo (2 signals), the signals will be
mixed and then sent to the track.
Input source: mono
Input
Input source: stereo
Input 1
Input 2
H
INT
To deactivate the recording standby condition,
press the currently selected status key once
more.
ZOOM PS-04 55
Page 56

Reference [Mixer]
O8ST1
TRACK1TRACK1
Mixing the playback sound
from tracks
The level of the sound from audio tracks 1 – 4 and
the drum and bass track can be adjusted as follows.
1.
To adjust the level of audio tracks
1 – 4, bring up the AUDIO mode top
screen and use faders 1 – 4 while
performing playback with the
recorder.
When the PS-04 is in AUDIO mode, faders 1 – 4
are assigned to audio tracks 1 – 4. The level of each
track is shown by the respective level meter.
Audio track 1 – 4 signal level
2.
To adjust the drum track or bass
track signal level, press the
[RHYTHM] key to bring up the
RHYTHM mode top screen and then
use faders 1 and 2.
In RHYTHM mode, fader 1 is assigned to the drum
track and fader 2 is assigned to the bass track. The
level of the drum and bass track is shown by level
meter 1 and 2.
Making adjustments for
each track signal (track
parameters)
The mixer in the PS-04 allows adjustment of
various track parameters such as panning, EQ, and
send/return effect intensity. Parameters can be
adjusted for the audio tracks 1 – 4, drum track, bass
track, and input signals. The adjustment procedure
is described below.
1.
Depending on the track or input for
which you want to make the
adjustment, bring up the top screen
of the AUDIO mode or RHYTHM
mode, and press the [TRACK
PARAMETER] key.
When you press the [TRACK PARAMETER] key
in AUDIO mode, you can adjust parameters for
audio tracks 1 – 4 or the input sources. When you
press the [TRACK PARAMETER] key in
RHYTHM mode, you can adjust parameters for the
drum track and bass track.
2.
Use the cursor left/right keys to
select the track or input.
The track name is shown for a few seconds, and
then a parameter and its setting value appear.
H
O8ST1
Drum track signal level
56 ZOOM PS-04
Bass track signal level
000
INT
Once the audio track has been selected, you
can also use the status keys to switch tracks.
3.
Use the cursor up/down keys to
select the track parameter you want
to adjust.
The available track/input parameters are shown in
the table on the next page.
Page 57

Making adjustments for each track signal (track parameters)
Parameter
HI EQ ON/OFF
HI EQ GAIN
HI EQ
FREQUENCY
LO EQ ON/
OFF
LO EQ GAIN
LO EQ
FREQUENCY
SEND ON/OFF
SEND LEVEL
PAN
FADER
STEREO LINK
V TAKE
REC LEVEL
Display
indication
EQ HI
HI G
HI F
EQ LO
LO G
LO F
SEND
SEND_L
PAN
FADER
S-LINK
TR X - Y
RECLVL
Setting
range
ON / OFF
-12 – 12
500 – 8000
(Hz)
ON / OFF
-12 – 12
63 – 2000
(Hz)
ON / OFF
0 – 100
L100 – 0
– R100
0 – 127
ON / OF
X=1 – 4
Y=1 – 10
0 – 127
Description
Switches Hi EQ on and off.
Adjusts the Hi EQ boost/cut amount in
the range from -12 dB to +12 dB. This
parameter is shown only when Hi EQ is
set to ON.
Selects the Hi EQ frequency for boost/
cut. This parameter is shown only when
Hi EQ is set to ON.
Switches Lo EQ on and off.
Adjusts the Lo EQ boost/cut amount in
the range from -12 dB to +12 dB. This
parameter is shown only when Lo EQ is
set to ON.
Selects the Lo EQ frequency for boost/
cut. This parameter is shown only when
Lo EQ is set to ON.
Selects whether the signal of this track is
supplied to the send/return effect or not.
Adjusts the level of the signal supplied to
the send/return effect. This parameter is
shown only when SEND is set to ON.
Adjusts the panning (left/right stereo
position) of the track signal. When the
STEREO LINK parameter is set to ON,
this parameter adjusts the left/right level
balance.
Adjusts the current volume level.
Switches the stereo link function (for
linking the parameters of tracks 1/2 and
3/4) on and off. (For details, see page 58.)
Selects the V-take for this track. (For
details, see page 36.) X is the track
number and Y is the V-take number.
Adjusts the recording level.
Audio
Drum/bass
track
track
OO
OO
OO
OO
OO
OO
OOO
OOO
OOO
OO
O
O
Input
O
ZOOM PS-04 57
Page 58

Reference [Mixer]
S-LINK
S-LINKS-LINK
0N
4.
Turn the dial to change the setting
value of the parameter selected in
step 3.
5.
Repeat steps 3 and 4 to make all
desired settings.
By using the cursor left/right keys or the status keys
to switch tracks, you can set the parameters for
other tracks.
6.
Press the [EXIT] key to return to the
original screen.
The top screen of AUDIO mode or RHYTHM
mode appears again.
Linking tracks (stereo link)
Two adjacent tracks can be linked so that their
parameters (except V-take switching) are controlled
together. This is referred to as “stereo link”. The
function is handy for example when recording
stereo material.
N
OTE
The stereo link function is available only for
tracks 1/2 and 3/4, not for other track
combinations.
1.
From the AUDIO mode or EFFECT
mode top screen, press the [TRACK
PARAMETER] key.
The track parameter menu for making input and
track 1 – 4 settings appears.
2.
Use the cursor left/right keys to
select one of the two tracks you want
to stereo link, and repeatedly press
the cursor [
“S-LINK” is shown on the display.
W] key until the indication
H
INT
You can also use the status keys to select the
track.
3.
Turn the dial to set the stereo link
setting to ON.
If you select track 1 or 2, tracks 1 and 2 will be
stereo linked. If you select track 3 or 4, tracks 3 and
4 will be stereo linked.
The two linked tracks will operate as follows.
• The PAN parameter functions as a
BALANCE parameter that adjusts the
volume balance between the left and right
channels. (The setting is reset to 0 for both
tracks.)
• For parameters other than PAN and
V-TAKE, the setting for the odd-numbered
track will be duplicated on the even-
numbered track.
• When you change the parameter setting for
one track, the parameter of the other track
also changes accordingly. To bring the
even-numbered V-take on the display,
press the cursor [W] key while the odd-
numbered V-take is shown.
• When you operate the fader for the odd-
numbered track, the level for both tracks
changes. (The fader for the even-numbered
track has no effect.)
4.
To cancel the stereo link function, set
the stereo link parameter to OFF.
S-LINK
58 ZOOM PS-04
0F
Page 59

Reference [Rhythm]
This section explains the rhythm functions of the PS-04.
About the rhythm section
The rhythm section of the PS-04 uses built-in drum
and bass sounds to produce rhythm accompaniment
which can be played during recording and playback
of the audio tracks. For example, during recording
you might play a simple pattern that serves as a
metronome. Or you can add drum and bass
accompaniment to the recorded content of the audio
tracks and bounce the result onto a pair of V-takes.
Rhythm playback is possible in all modes except
the SYSTEM mode. However, to create or edit
rhythm patterns and to make rhythm related
settings, you must switch to RHYTHM mode by
pressing the [RHYTHM] key of the PS-04.
Explanation of some
important terms
Recorder
Track 1
Track 2
Track 3
Track 4
Rhythm
1234
Pattern Pattern
Drum track
Bass track
Drum track
Bass track
An arrangement of patterns in the desired playing
order using tempo, beat, and bass phrase (chord
type/root) information is called a song.
The PS-04 can have one song with up to 999
measures per project.
Some terms that are relevant for rhythm section
operation are explained below.
■
PATTERN mode/SONG mode
The rhythm section has two operation modes:
PATTERN mode for repeatedly playing drum/bass
patterns, and SONG mode for arranging and
playing rhythm patterns in a sequence that provides
the rhythm accompaniment to an entire song. The
initial mode when creating a new project is
PATTERN mode, but you can switch between
PATTERN mode and SONG mode by pressing the
[RHYTHM] key.
Song
Measure
number
123456
Pattern A Pattern E Pattern B
Drum track
Bass track
Am
Chord
Drum track
Bass track
Dm G
Pattern A
Pattern B
Pattern C
Pattern D
Pattern E
Drum tr
Bass tra
C
N
■
Pattern/song
A program containing from a few measures up to a
maximum of 99 measures of drum/bass sounds is
OTE
Patterns and songs are stored as part of a
project. You can also import all patterns or song
information from another project.
called a pattern. The PS-04 has a capacity for up to
511 patterns per project. 346 patterns are already
preprogrammed, allowing you to play a rhythm
simply by selecting a pattern.
ZOOM PS-04 59
Page 60
Reference [Rhythm]
O8ST1
O1-O1
DR
PAD
O8ST1
■
Drum track/bass track
The part that records drum sound patterns in the
PS-04 is called the drum track and the part that
records bass sound patterns the bass track. When
you create original patterns, you store playing
information on these two tracks.
■
Drum kit/bass program
A collection of drum sounds used for the drum
track is called a drum kit, and a collection of bass
sounds used for the bass track is called a bass
program.
Drum kits are made up of a combination of 16 drum
and percussion sounds, such as bass drum, snares,
etc. The PS-04 has seven different drum kits.
A bass program is a collection of bass sounds such
as electric bass or acoustic bass at different pitches
(2 octaves, 16 steps). The PS-04 offers a choice of
five bass programs.
The drum kit and bass program sounds can not only
be used in patterns or songs but can also be played
directly using the status keys 1 – 4 on the panel.
PATTERN mode operation
This section explains how to use PATTERN mode
to play, create, and edit patterns.
■
PATTERN mode screens
PATTERN mode has several screens. When you
press the [RHYTHM] key to switch to RHYTHM
mode, and when you switch the rhythm function
from SONG mode to PATTERN mode, the screen
for selecting a pattern always appears first. This is
called the PATTERN mode top screen.
● PATTERN mode top screen
O8ST1
When you press the cursor up or down key from the
PATTERN mode top screen, the following screens
appear.
000
● Locate screen
This shows the current position in the pattern in
measures and beats. While the rhythm is stopped, you
can use the cursor left/right keys and the dial to move
within the pattern in units of measures or beats.
O
O1-O1
● Rhythm pad screen
This screen shows information about the content of
the currently playing drum track/bass track. On this
screen, the on/off status of individual level meter
segments (rectangular blocks) shows the drum kit
or bass program sound activation status.
From this screen, you can use the status keys 1 – 4
to manually play the sounds of the drum kit or bass
program (→ p. 62).
DR
PAD
■
Selecting a pattern for playback
The PS-04 lets you select one of 511 patterns.
1.
While the recorder is stopped, press
the [RHYTHM] key several times to
bring up the PATTERN mode top
screen on the display.
Pattern name Pattern number
O8ST1
2.
Use the dial or the cursor left/right
keys to select a rhythm pattern to play.
Out of 511 possible patterns in a new project, 346
are preprogrammed. (For other patterns, the pattern
name indication shows “EMPTY”.)
If you use the dial while the pattern is playing, the
new pattern will start after the end of the current
pattern is reached. If you use the cursor left/right
keys while the pattern is playing, the new pattern
will start immediately.
P
P
000
60 ZOOM PS-04
Page 61

3.
O8ST1
O1-O1
O8ST1
BPM=12
Operate faders 1/2 to adjust the
volume of the drum/bass track.
In RHYTHM mode, fader 1 controls the drum track
and fader 2 controls the bass track signal level.
NOTE
Immediately after creating a new project, the
drum/bass signal level will be set to zero. To
hear the rhythm play, you must raise the drum/
bass track signal level.
4.
Press the [R/P] key.
The key lights up, and the recorder and the rhythm
pattern begin to play. (If there are recorded audio
tracks, the contents will be heard.)
The level meters on the display let you check the
signal level of the drum track and bass track.
PATTERN mode operation
7.
To stop the pattern, press the [R/P]
key once more.
The key goes out and playback stops.
■
Changing the tempo
You can adjust the pattern playback tempo as
follows.
1.
Press the [RHYTHM] key several
times to switch the PS-04 to
PATTERN mode.
The tempo can be set while the PS-04 is running or
stopped. The currently set tempo can be checked
while the [RHYTHM] key is flashing.
O8ST1
Drum track signal level
5.
Fine-adjust the drum/bass track
volume as necessary.
6.
To check the current position, press
the cursor [
The display changes to the Locate screen, and the
current position in the pattern is shown in measures
and beats.
Measure
H
INT
O
O1-O1
If you call up the Locate screen while the
pattern is stopped and select the unit with the
cursor left/right keys, you can use the dial to
move within the pattern.
Beat
000
Bass track signal level
Q] key.
"P" indicates
PATTERN mode
P
O8ST1
2.
Use faders 3 and 4 to adjust the
tempo.
In RHYTHM mode, faders 3 and 4 serve to control
the tempo in the range from 40 to 250 bpm (beats
per minute).
BPM=12
Shortly after adjusting the tempo, the display will
return automatically to the condition of step 1.
N
OTE
• The tempo set here applies to all patterns. If
you haven’t programmed the tempo
information in a song yet, the song will also be
played with this tempo setting.
• If you have recorded audio tracks 1 – 4 while
monitoring the pattern, and if you then change
the pattern tempo afterwards, there will be a
mismatch between the recorded audio tracks
and the rhythm tempo.
000
00
ZOOM PS-04 61
Page 62

Reference [Rhythm]
■
Playing drum/bass sounds
manually
The rhythm pad screen of the PATTERN mode
allows you to use the status keys 1 – 4 to manually
play drum or bass sounds.
After selecting a drum kit on the rhythm pad screen,
the 16 drum/percussion sounds are divided into
groups of 4 (these are called banks) and each sound
of a bank is assigned to status keys 1 – 4. You
therefore first select the bank which has the sound
you want, and then press the respective status key.
The illustration below shows how the drum/
percussion sounds are assigned to the banks.
Bank 4
Bank 3
Bank 2
Bank 1
D3
G2
D2
G1
E3
A2
E2
A1
F#3
B2
F#2
B1
G3
C3
G2
C2
When you select "E MIN2" (E Minor 2), bank 1
will contain E1, G1, B1, C2 and bank 2 will contain
E1, G1, B1, E2. Banks 3 and 4 are the same as
banks 1 and 2, but one octave higher.
When you select "E MAJ2" (E Major 2), the G1 and
C2 of "E MIN2" will become G#1 and C#2.
Bank 4
Bank 3
Bank 2
Bank 1
STICK
COWBELL
TOM 1
KICK
HIGH
BONGO
MUTE HIGH
CONGA
TOM 2
SNARE
LOW
BONGO
OPEN HIGH
CONGA
TOM 3
CLOSED
HI-HAT
RIDE
CYMBAL
LOW
CONGA
CRASH
CYMBAL
OPEN
HI-HAT
When a bass program is selected, the banks and
status keys are assigned different pitches. You
therefore first select the bank which has the pitch
you want, and then press the respective status key.
If desired, you can also select a different scale and
key, with different bank and status key
assignments. The illustration below shows how the
sounds are assigned when “E MIN” (E Minor) is
selected.
Bank 4
Bank 3
Bank 2
Bank 1
B2
E2
B1
E1
C3
F#2
C2
F#1
D3
G2
D2
G1
E3
A2
E2
A1
When “G MAJ” (G Major) is selected, the
arrangement is as follows.
To play a drum kit or bass program manually,
proceed as follows.
1.
Press the [RHYTHM] key several
times to switch the PS-04 to
PATTERN mode.
You should first choose the desired drum kit/bass
program as necessary. (For information on how to
select a drum kit/bass program, see page 70.)
2.
Press the cursor [W] key to bring up
the rhythm pad screen.
While this screen is shown, the status keys and
faders operate as follows.
• Status keys 1 – 4
Play the drum kit/bass program.
• Fader 3
Adjusts the velocity of the sound.
• Fader 4
Switches the bank.
H
INT
• You can also switch banks with the cursor up/
down keys.
• As on the top screen, faders 1 and 2 adjust
the drum kit/bass program level.
3.
Use the cursor left/right keys to
select DR (drum kit) or BS (bass
program).
62 ZOOM PS-04
Page 63

The currently selected type is shown on the left side
PAD
VELCTY
MIN
of the display.
Bank 4
C#3
PATTERN mode operation
D3
E3
F#3
Currently selected sound type
DRDRPAD
4.
Use fader 4 to select the bank to play.
The bank which can be played is shown on the
display.
5.
Press one of the status keys 1 – 4.
If a drum kit is selected, the drum sound assigned to
the key in the current bank is heard. If a bass
program is selected, the bass note assigned to the
key in the current bank is heard.
While the status key is being pressed, the
corresponding segment of the display lights up.
6.
To adjust play intensity, operate
fader 3.
There are three intensity (velocity) settings. The
setting value is shown for a few seconds, then the
display reverts to the previous condition.
VELCTY
7.
To change the bass program scale
and key, turn the dial.
When the dial is turned while the rhythm pad screen
is shown, the scale (Major/Major2/Minor/Minor2)
and key (12-tone) selection changes.
P
2
Scale
FFMIN
Key ("o" stands for #)
For example, when F# Minor is selected, the bank
and note arrangement is as follows.
Bank 3
Bank 2
Bank 1
8.
H
■
This section explains how to create original patterns
by recording your drum kit or bass program play in
an empty pattern slot.
There are two ways of creating a pattern: step input
where play is stopped and you enter the sounds one
by one, and real-time input where you record your
play using the status keys and faders.
F#2
C#2
F#1
To return to the PATTERN mode top
screen, press the cursor [
INT
During pattern recording, you can also select
the drum/percussion sound and bass note in
the same way.
Creating a pattern
G#2
D2
G#1
A2
E2
A1
B2
F#2
B1
Q] key.
Recording preparations
Empty patterns are set to 4/4 beat and 2 measures
by default. Before you start the input procedure, set
the desired time signature and measure
configuration as follows.
N
OTE
Once you have recorded a pattern, you cannot
change the time signature or the number of
measures. This setting must always be made
beforehand.
1.
Press the [RHYTHM] key several
times to bring up the PATTERN mode
top screen.
2.
Turn the dial to select an empty
pattern.
Empty patterns are indicated as “EMPTYxxx
(where xxx is the pattern number).
ZOOM PS-04 63
Page 64

Reference [Rhythm]
EMPTY
QUANTI
4/4
22
EMPTY
3.
Press the [EDIT/UTILITY] key.
The pattern utility menu for making PATTERN
mode settings appears.
QUANTI
4.
To set the time signature, use the
cursor left/right keys to bring up the
indication “TIMSIG” on the display,
and press the [ENTER] key.
The current time signature setting appears on the
display.
347
2E
4/4
N
OTE
When a “<>” is shown on both sides of the
setting value, the pattern has already been
recorded and the time signature has been set.
In this condition, the value cannot be changed.
5.
Turn the dial to make the setting, and
then press the [EXIT] key.
The time signature can be set in the range from 1/4
to 8/4.
6.
To set the number of measures, use
the cursor left/right keys to bring up
the indication “BARLEN” on the
display, and press the [ENTER] key.
The current bar length setting appears on the
display.
N
OTE
When a “<>” is shown on both sides of the
setting value, the pattern has already been
recorded and the bar length has been set. In
this condition, the value cannot be changed.
7.
Turn the dial to make the setting.
The bar length can be set in the range from 1 to 99.
8.
Press the [EXIT] key to return to the
PATTERN mode top screen.
Drum track step input
To perform step input, the PS-04 must be in stop
mode, so that you can enter the sounds one by one
in the order that they should be played. For drum
track step input, you specify the step width (interval
between sounds) and then specify a note or rest.
When you press the [R/P] key after pressing the
status key, the playing information is entered at this
point, and the input position advances by the
number of specified steps. When you press only the
[R/P] key, no playing information is entered and
the position advances by one step. In other words, a
rest is inserted (see illustration below).
Status key
[R/P] key
64 ZOOM PS-04
Page 65

H
DO1-O1
DO1-O1
DO1-O1DO1-O1
-12
DD
O1-OO1-O
1
-24
INT
The step length changes according to the
currently selected smallest note unit (quantize
setting). The default setting is a sixteenth note,
but this can be changed if desired (
1.
From the PATTERN mode top screen,
press the [REC] key.
The [REC] key lights up and step input becomes
possible. During step input, the current position is
shown in measures/beats/ticks (1/48 of a quarter note).
Track type
Measure
→ p. 71).
Beat Tick
PATTERN mode operation
4.
Press the [R/P] key.
The step position advances by a 16th note (12
ticks).
5.
To enter a rest, press only the [R/P]
key.
No playing information is entered, and the step
position advances by a 16th note.
DO1-O1
2.
Verify that “D” is shown in the left
corner of the display.
During step input, you can use the cursor left/right
keys to switch the track type. “D” stands for drum
track.
3.
To enter a note, use fader 4 to select
the bank which contains the desired
sound, and then press the status key
for that sound.
The note is entered, and the segment for that sound
comes on. For information on the sounds assigned
to banks and status keys, see the section "Playing
drum/bass sounds manually".
DO1-O1
H
INT
• The velocity setting can be changed with
fader 3. This information is also stored.
• If you hold down several status keys together,
multiple sounds are input at the same
position.
-00
-00
6.
Repeat steps 3 – 5 to enter the entire
rhythm pattern.
When you have reached the end of the pattern, the
recorder automatically returns to the first measure,
and you can enter other drum/percussion sounds.
7.
To erase a sound you have input,
press the [
to the position, and then hold down
the [INSERT/DELETE (COPY)] key
while pressing the respective status
key.
The sound corresponding to that status key is
erased.
8.
To end step input, press the [REC]
key so that the key goes out.
The PATTERN mode top screen returns. If you
press the [R/P] key in this condition, the pattern is
played and you can check your input.
H
INT
By performing the input procedure again, you
can add playing information to the track.
R/P] key repeatedly to go
ZOOM PS-04 65
Page 66

Reference [Rhythm]
DO1-O1
BO1-O1BO1-O1
-00
D=1/4D=1/4
Bass track step input
When performing step input for the bass track,
“sound duration” must be entered as an additional
item. Otherwise, the input procedure is similar, in
so far as the status keys and faders 3 and 4 are used
to enter notes and rests.
2.
Use the cursor left/right keys to
change the indication in the left
corner of the display to “B”.
“B” stands for bass track.
For example, also when the step length is constant,
the duration setting can be varied, resulting in sounds
of a different length (see illustration below).
H
INT
The step length changes according to the
currently selected smallest note unit (quantize
setting). The default setting is a sixteenth note,
but this can be changed if desired (
N
OTE
For the bass track, only one sound can be
produced at a time. If the sound duration is set
to a value longer than a step, the part extending
into the next step will be cut (the sound for that
step has priority).
1.
From the PATTERN mode top screen,
press the [REC] key.
The [REC] key lights up and step input becomes
possible.
Track type
Measure
DO1-O1
→ p. 71).
Beat Tick
-00
3.
If required, turn the dial to set the key
and scale.
For details, see the section "Playing drum/bass
sounds manually".
4.
To enter a note, use the cursor up/
down keys to select a duration value.
The display changes as follows to show the
duration of the note being entered.
The following duration settings are available.
8-5 . . . . 8 beats – 5 beats
4 . . . . . . Whole note
3 . . . . . . Dotted half note
2 . . . . . . Half note
3/2 . . . . . Dotted quarter note
1 . . . . . . Quarter note
3/4 . . . . . Dotted eighth note
1/2 . . . . . Eighth note
1/3 . . . . . Eighth triplet note
1/4 . . . . . Sixteenth note
1/6 . . . . . Sixteenth triplet note
Duration: quarter note Duration: eighth note
Status key
[R/P] key
Quantize setting: sixteenth note
66 ZOOM PS-04
Page 67

PATTERN mode operation
DO1-O1
1/8 . . . . . Thirty-second note
1/12 . . . . Thirty-second triplet note
1/16 . . . . Sixty-fourth note
1/24 . . . . Sixty-fourth triplet note
5.
Use fader 4 to select the bank which
contains the desired pitch, and then
press the respective status key.
H
INT
The velocity setting can be changed with fader
3. This will change the play intensity.
6.
Press the [R/P] key.
The step position advances by a 16th note (12
ticks). To enter a rest, skip steps 4 and 5 and simply
press the [R/P] key. This will enter a 16th rest.
7.
Repeatedly press the [R/P] key to
advance to the position where you
want to enter the next note. Then
repeat steps 4 – 6.
If the duration or bank is the same as for the
previously entered note, you do not need to specify
it again.
When you have reached the end of the pattern, the
recorder automatically returns to the first measure.
8.
To erase a sound you have input,
press the [
to that position. Hold down the
[INSERT/DELETE (COPY)] key and
press the respective status key.
The sound corresponding to the status key is erased.
9.
To end step input, press the [REC] key.
The key goes out and the PATTERN mode top
screen returns. If you press the [R/P] key in this
condition, the pattern is played and you can check
your input.
H
INT
By performing the input procedure again, you
can add playing information to the track.
R/P] key repeatedly to go
Drum/bass track real-time input
You can also enter drum kit and bass program
information with the status keys in real time, while
the pattern is running.
1.
Bring up the PATTERN mode rhythm
pad screen.
2.
Use the cursor left/right keys to
select the track for which you want to
perform input.
The left corner of the display shows “DR” when the
drum track is selected, and “BS” when the bass
track is selected.
3.
Select the bank which contains the
desired pitch/sound and press the
status keys to check the sound.
If required, set the key and scale for the bass
program.
For information on how to switch banks and set the
key and scale for the bass program, see the section
“Playing drum/bass sounds manually” (→ p. 62).
4.
Hold down the [REC] key and press
the [
R/P] key.
A precount of 4 clicks is heard. Recording begins
when the precount is finished.
Track type
Measure
DO1-O1
H
INT
Precount settings can be changed (→ p. 72).
5.
Use the status keys to play the drum
kit/bass program.
Your play timing is automatically matched to the
smallest note unit (default: sixteenth note) and
recorded on the selected track. For the bass track,
the duration for which the status key is pressed is
also recorded. When the pattern reaches the end, it
returns to the beginning and you can continue to
record.
Beat Tick
-00
ZOOM PS-04 67
Page 68

Reference [Rhythm]
COPCOP O
02
COP O
COPCOP 5
08E
O8ST1O8ST1
508
H
INT
The smallest note unit (quantize setting) can be
changed (→ p. 71).
6.
To pause the recording, press the
[REC] key.
The key flashes and the PS-04 switches to the
pattern playback mode. If you press a status key in
this condition, the result will not be recorded. This
is convenient to check the instrument sounds or
note pitches assigned to the keys, and to switch
banks and scales during input.
To return to the pattern recording mode, press the
[REC] key once more.
7.
If you have made a mistake, press the
[INSERT/DELETE (COPY)] key at a
point immediately before the
mistake.
While the key is being held down, all playing
information entered on the track is erased.
Snare
Kick
Erase
Snare
Kick
■
Copying a pattern
You can copy any pattern in a project to another
location.
1.
Press the [RHYTHM] key several
times to bring up the PATTERN mode
top screen.
2.
Turn the dial to select the copy
source pattern. Then press the
[INSERT/DELETE (COPY)] key.
The following indication appears. In this condition,
you can select the copy target.
3.
Turn the dial to select the pattern
number to be used as copy target.
H
INT
When you select an empty pattern, the
indication “E” (for “Empty”) is shown to the right
of the number.
4.
Press the [ENTER] key. The
indication "ENT/EXIT" appears on
the display.
5.
8.
When input is complete, press the
[
R/P] key.
The [REC] key and the [R/P] key go out, and the
PATTERN mode top screen returns.
To carry out the copy operation,
press the [ENTER] key. To cancel the
operation, press the [EXIT] key.
When you press the [ENTER] key, the PATTERN
mode top screen returns, with the copy target
pattern being selected.
68 ZOOM PS-04
Page 69

■
DELETE
EMPT
QUANTIQUANTI
2E
DRUMDRUM K
IT
Deleting a pattern
You can return any pattern in a project to the empty
condition.
1.
Press the [RHYTHM] key several
times to bring up the PATTERN mode
top screen.
2.
Turn the dial to select the pattern that
you want to delete. Then press the
[INSERT/DELETE (COPY)] key twice.
The following indication appears.
Pattern to be deleted
DELETE
3.
To carry out the delete operation,
press the [ENTER] key. To cancel the
operation, press the [EXIT] key.
When you press the [ENTER] key, the selected
pattern is returned to the empty condition and the
PATTERN mode top screen returns.
EMPT
N
OTE
Once a pattern has been deleted, it cannot be
restored. Use this function with care.
■
Changing the pattern
098
098
parameters (pattern edit)
Pattern parameters such as drum kit and bass
program used in a pattern, as well as bass phrase
chord type and root, etc. can be changed if desired.
Basic procedure for pattern editing
To change pattern specific parameters, proceed as
follows.
1.
Press the [RHYTHM] key several
times to bring up the PATTERN mode
top screen.
PATTERN mode operation
2.
Turn the dial to select the pattern,
and then press the [EDIT/UTILITY]
key.
The PATTERN mode utility menu appears. This
menu lets you not only perform pattern edit
functions but also make precount settings and load
patterns from external projects.
3.
Use the cursor left/right keys to bring
up the indication “PTN EDIT” on the
display, and press the [ENTER] key.
The pattern edit menu for setting pattern specific
parameters appears.
4.
Use the cursor left/right keys to
select the parameter you want to
adjust, and press the [ENTER] key to
confirm the selection.
The following parameters can be selected.
DRUM KIT . . . Select drum kit
BASS PRG . . . Select bass program
ORGROOT . . . Original root for pattern
ORGCHORD . . Original chord type for pattern
DRUM LVL . . . Drum kit level
BASS LVL . . . Bass program level
NAME . . . . . . . Pattern name
5.
Turn the dial to change the setting
value for the parameter selected in
step 4.
For details on each parameter, see the following
section. If required, press the [EXIT] key to return
one step and then select another parameter.
6.
Press the [EXIT] key several times to
return to the PATTERN mode top
screen.
ZOOM PS-04 69
Page 70

Reference [Rhythm]
LIVE
PICK
F
Current chord type
MAJORMAJOR
1O1O
Current volume setting
8BEAT
Select drum kit/bass program
Selecting the drum kit or bass program to be used
by the pattern.
Refer to “Basic procedure for pattern editing” and
bring up “DRUM KIT” or “BASS PRG” on the
display. When you press the [ENTER] key, the
display changes as follows.
● When “DRUM KIT” was selected
Kit name Kit number
LIVE
● When “BASS PRG” was selected
Program name Program number
PICK
By turning the dial in this condition, you can select
a new sound. For information on the various drum
kits and bass programs that are available, see the
list in the last section of this documentation.
0
1
● When “ORG CHORD” was selected
The root can be set from E to D# in semitone steps.
For the chord type, MAJOR or MINOR can be
selected. Make a suitable setting to match the bass
phrase recorded on the bass track.
H
INT
For patterns used only in PATTERN mode and
for patterns that do not use the bass track, the
chord type/root setting is not necessary.
Setting the drum/bass volume
You can set the volume level for the drum kit and
bass program. Refer to “Basic procedure for pattern
editing” and bring up “DRUM LVL” (for setting
the drum kit level) or “BASS LVL” (for setting the
bass track level) on the display. When you press the
[ENTER] key, the display changes as follows.
Setting the pattern specific chord
type/root
You can select the chord type and root to be used by
the bass track of the pattern. When creating a song,
the chord and root specified here will be used as the
basis for the bass track phrase, which changes
according to the chord progression specified for the
song.
Refer to “Basic procedure for pattern editing” and
bring up “ORG ROOT” (for setting the chord root)
or “ORG CHORD” (for setting the chord type) on
the display. When you press the [ENTER] key, the
display changes as follows.
● When “ORG ROOT” was selected
Current root ("o" stands for #)
F
70 ZOOM PS-04
Turn the dial to set the volume in the range from 1
to 15. (The default setting is 15.)
Changing the pattern name
You can assign a unique name to a pattern. Refer to
“Basic procedure for pattern editing” and bring up
“NAME” on the display. When you press the
[ENTER] key, the display changes as follows.
Character that can be adjusted
8BEAT
Use the cursor left/right keys to cause the character
that you want to change to flash. Then turn the dial
to select the character. (The name can be up to five
Page 71

PATTERN mode operation
QUANTI
Q=16
characters long.) You can also use the faders 1 – 3
to select a character. The faders are assigned to the
following character ranges.
Fader 1 . . . . . . Letters (A – Z)
Fader 2 . . . . . . Numerals (0 – 9)
Fader 3 . . . . . . Symbols (+, -, @, space)
■
Setting PATTERN mode
operation (pattern utility)
This section explains how to set the smallest unit
for pattern note input, control the precount function
for real-time input, and make other PATTERN
mode related settings.
Basic procedure for pattern utility
menu
To use the pattern utility menu, proceed as follows.
1.
Press the [RHYTHM] key several
times to switch the PS-04 to
PATTERN mode.
2.
Turn the dial to select the pattern to
play, and press the [EDIT/UTILITY]
key.
The pattern utility menu appears.
QUANTI
3.
Use the cursor left/right keys to
select one of the following items.
• QUANTIZE
Select the smallest note unit for real-time input
and step input.
• BARLEN
Set the number of measures for an empty pattern.
For a pattern that has already been programmed,
the number of measures is shown.
• TIMSIG
Set the time signature (number of beats) for an
empty pattern. For a pattern that has already been
2E
programmed, the number of beats is shown.
• COUNT
Set the precount for use during real-time input.
• CLICK VOL
Set the precount and click volume.
• IMPORT
Import song information and all patterns from
another project stored on a SmartMedia card
(→ p. 83).
• PTN EDIT
Bring up the pattern edit menu for changing
pattern specific parameters (→ p. 69).
4.
Press the [ENTER] key to call up the
setting value for the currently
selected item.
The subsequent steps will differ, depending on
which item was selected. See the sections for the
respective items.
5.
When all settings have been made,
press the [EXIT] key repeatedly to
return to the PATTERN mode top
screen.
Pressing the key once brings up the pattern utility
menu, and pressing the key once more brings up the
PATTERN mode top screen.
Setting the smallest note unit
(quantize setting)
To set the smallest note unit for real-time input and
step input, proceed as follows. Refer to “Basic
procedure for pattern utility” and bring up the
indication “QUANTIZE”. When you press the
[ENTER] key, the display changes as follows.
Quantize setting
Q=16
While this screen is shown, turning the dial will
change the setting. The following settings are
available.
4 . . . . . . . . . . . Quarter note
8 . . . . . . . . . . . Eighth note
ZOOM PS-04 71
Page 72

Reference [Rhythm]
4/4
12 . . . . . . . . . Eighth triplet note
16 (default) . . Sixteenth note
24 . . . . . . . . . Sixteenth triplet note
32 . . . . . . . . . Thirty-second note
Hi . . . . . . . . . . 1 tick (1/48 of quarter note)
H
INT
The quantize setting applies to the entire rhythm
section.
Displaying/changing the number
of measures in a pattern
To display or change the number of measures in the
currently selected pattern, proceed as follows. Refer
to “Basic procedure for pattern utility” and bring up
the indication “BARLEN”. When you press the
[ENTER] key, the display changes as follows.
Number of measures in the pattern
2
If a blank pattern is selected, you can turn the dial
and change the setting in the range from 1 to 99.
The default setting is 2.
N
OTE
When a "<>" is shown on both sides of the
setting value, the pattern has already been
recorded and the number of measures cannot
be changed.
Displaying/changing the time
signature of a pattern
To display or change the number of beats per
measure in the currently selected pattern, proceed
as follows. Refer to “Basic procedure for pattern
utility” and bring up the indication “TIMSIG”.
When you press the [ENTER] key, the display
changes as follows.
If a blank pattern is selected, you can turn the dial
and change the setting in the range from 1/4 to 8/4.
The default setting is 4/4.
N
OTE
When a “<>” is shown on both sides of the
setting value, the pattern has already been
recorded and the time signature has been set.
In this condition, the value cannot be changed.
Setting the precount
To change the setting of the precount used for realtime input, proceed as follows. Refer to “Basic
procedure for pattern utility” and bring up the
indication “COUNT”. When you press the
[ENTER] key, the display changes as follows.
Precount setting
4
By turning the dial, you can select one of the
following precount settings.
• OFF
No precount is heard.
• 1-8
1 – 8 precount beats are heard.
• SP
Use a special precount as described on page 44.
Changing the metronome volume
You can change the volume of the metronome that
is heard when you record a rhythm pattern in real
time. Refer to "Basic procedure of pattern utility" to
select "CLICK VOL" and press the [ENTER] key.
Then turn the dial to adjust the volume (OFF, 1-15).
Time signature of the pattern
4/4
72 ZOOM PS-04
Page 73

SONG mode operation
SONG
OO1-O
A
DRDR PADPAD
S
SONG mode operation
This section explains how to use SONG mode to
play, create, and edit a song.
■
SONG mode screens
SONG mode has several screens. When you press
the [RHYTHM] key to switch from PATTERN
mode to SONG mode, the currently playing pattern
number is always shown. This is called the SONG
mode top screen.
● SONG mode top screen
SONG
When you press the cursor up or down key from the
SONG mode top screen, the following screens appear.
● Locate screen
This shows the current position in the song in
measures and beats. While the PS-04 is stopped,
you can use this screen to move to another location
in the song.
OO1-O
001
S
1
screen (→ p. 62).
■
Creating a song
By arranging patterns in the desired order and
programming chord and tempo/time signature
information, you can create the rhythm
accompaniment for an entire song. The following
two methods are available for creating a song.
● Step input
With this method, you create rhythm patterns
one by one by specifying a pattern and the
number of measures. Input can be performed at
any point in the song. It is also possible to
switch to another pattern while the previous
pattern is still playing. This mode is suitable for
specifying patterns in detail.
● FAST (Formula Assisted Song Translator)
This method uses simple formulas to specify
rhythm pattern playback from start to end. The
result is written to the song in a single operation.
Because input midway through a song is not
possible with this method, it is most suitable for
cases where the configuration of the entire song has
been decided beforehand.
● Chord screen
This shows chord information (root and chord type)
for the current point. The indication changes as the
song plays.
● Rhythm pad screen
This screen shows information about the content of
the currently playing drum track/bass track (sound
and pitch). From this screen, you can use the status
keys 1 – 4 to manually play the sounds of the drum
kit or bass program. For more information, see the
description of the PATTERN mode rhythm pad
ZOOM PS-04 73
A
N
OTE
Immediately after creating a new project, the
drum track/bass track signal level will be set to
zero. Before creating or playing a song, you
must go into RHYTHM mode and adjust faders
1 and 2 to raise the monitor level of the tracks
to a suitable level.
Step input
With this method, you specify the pattern number
and the number of measures to enter patterns one by
one.
1.
Press the [RHYTHM] key repeatedly
to switch the rhythm section to
SONG mode.
Page 74

Reference [Rhythm]
OO1-
O1
INOOOX
INOO2X
INOO2XINOO2X
2
OO1-O1
OO3-O1OO3-O1
E0S
2.
Press the [REC] key.
As shown below, the display indication changes to
the current position. Step input for the song is now
possible.
Current measure
The indication “EOS” (End of Song) shows the
position where the song ends. For an empty song,
EOS will be located at the beginning. Therefore
nothing happens if you play the song. As you enter
information, the EOS position gets pushed further
and further out.
3.
You can now select the pattern number and the
number of measures to insert.
Number of pattern to insert
4.
Current beat
OO1-
Song
Press the [INSERT/DELETE (COPY)]
key.
E0S
O1
Current position
1 (measure number)
End of Song
Number of measures to insert
INOOOX
Turn the dial to select a pattern
number.
End-of-song
indication
4
6.
When you have selected a pattern,
press the [ENTER] key to confirm the
selection.
Pattern information is entered at the current point,
and the EOS position moves back by the specified
number of measures. The display returns to the
current position indication.
OO1-O1
Current position
1 (measure
number)
Song
H
INT
When the pattern entry was confirmed and the
current position screen returns, the indication
“EV” is shown. This indicates that some kind of
event information (pattern, chord, tempo, etc.)
has been entered at the current point.
7.
Use the cursor left/right keys to
move the position indication to the
EOS position.
At the current position screen, you can use the
cursor left/right keys to move in measure units, and
the dial to move in beat units. When you reach the
end of the song, the indication “EOS” appears.
23
PATTERN 002 End of Song
EV
INOO2X
5.
Use the cursor up/down keys to
select the number of measures to
insert, and press the [ENTER] key.
The display changes as follows. In this condition,
you can select the pattern to play for the inserted
measures.
74 ZOOM PS-04
4
1 (measure
number)
Song
H
INT
• If required, you can also switch the pattern
• The interval until the next pattern information
PATTERN 002
within a measure (in beat units).
entry point is longer than the pattern itself, the
pattern will be played repeatedly. If the
Current position
23
End of Song
Page 75

SONG mode operation
interval is shorter than the pattern itself, the
song will switch to the next pattern before the
current pattern has finished playing.
8.
Repeat steps 3 – 7 to enter all
required pattern information.
9.
When all required pattern
information has been entered, press
the [REC] key.
The [REC] key goes out and the PS-04 returns to
the SONG mode top screen. If you press the [R/P]
key, the created song will be played.
● To overwrite pattern information
To change a pattern that has already been input,
move to the input point and press the cursor [W]
key. The name of the pattern input at this point
appears on the display. Turn the dial to select a new
pattern.
Select pattern D
PATTERN A PATTERN B PATTERN C
PATTERN A PATTERN D PATTERN C
● To delete pattern information
Move to the point from which you want to delete
the information, and press the cursor [W] key. In
this condition, press the [EDIT/UTILITY] key. The
current information is deleted and the previous
pattern will remain active until the next input point.
Delete
PATTERN A PATTERN B PATTERN C
PATTERN A PATTERN C
● To delete a measure
During song input ([REC] key lit), press the
[INSERT/DELETE (COPY)] key three times.
Then press the [ENTER] key. The measure is
deleted.
Delete 1 measure
PATTERN A PATTERN B PATTERN D PATTERN C
PATTERN A PATTERN B PATTERN C
To add pattern information to a point where there
currently is none, move to the input point and press
the cursor [
W] key. The indication “←PTN”
appears on the display. Turn the dial to select a new
pattern.
● Inserting a pattern in a song
Move to the input point and perform steps 3 – 7.
The new pattern information is inserted at this
point, and subsequent patterns are shifted
backwards by the length of the inserted pattern.
Insert
PATTERN D
PATTERN A PATTERN B PATTERN C
PATTERN A PATTERN B
PATTERN D PATTERN C
ZOOM PS-04 75
Page 76
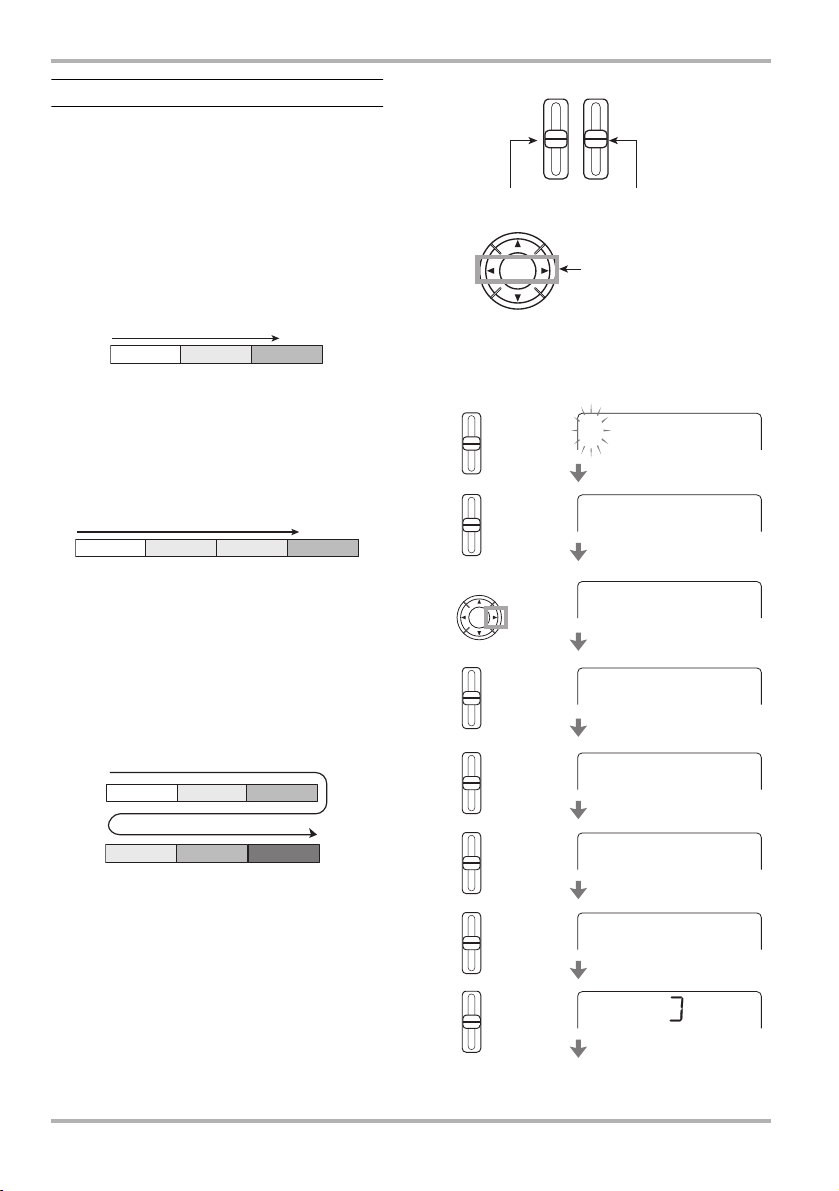
Reference [Rhythm]
O+
O+C
O+C1
O+C1+
O+C1+2
+C1+2
O+_
FAST input
The FAST (Formula Assisted Song Translator)
method uses simple formulas to specify rhythm
pattern playback from start to end. The basic rules
for combining patterns are described below.
● Lining up patterns
Use the “+” (plus) symbol to line up patterns. For
example, entering 0 + 1 + 2 will result in the
following play sequence.
Fader 1
Numeric input
Fader 2
Symbol input
Cursor left/right keys
or dial
Move input position
0 1 2
● Repeat patterns
Use the “x” (multiply) symbol to specify pattern
repetitions. “x” takes precedence over “+”. For
example, entering 0 + 1 x 2 + 2 will result in the
following play sequence.
0 1 1 2
● Repeat multiple patterns
Use the “(“ and “)” symbols (opening and closing
parentheses) to link a group of patterns for
repetition. Formulas enclosed in brackets take
precedence over other formulas. For example,
entering 0 + (1 + 2) x 2 + 3 will result in the
following play sequence.
10 2
1
The following keys and faders are used for FAST
input.
2 3
For example, to enter the formula 0 + (1 + 2) x 2,
proceed as follows.
Fader 1
Input "0"
Fader 2
Input "+"
Cursor [R] key
Move to
right
Fader 2
Input "("
Fader 1
Input "1"
Fader 2
Input "+"
Fader 1
Input "2"
O
O+
O+_
O+C
O+C1
O+C1+
O+C1+2
Fader 2
Input ")"
+C1+2
76 ZOOM PS-04
Page 77

Cursor [R] key
O
O+
O+C
O+C1
O+C1+
O+C1+2
1+2X2X2
+C1+2
C1+2
O+_
C1+2
_
Move to
right
Fader 2
Input "X"
Fader 1
Input "2"
C1+2
C1+2
1+2
_
X
H
INT
For FAST input, leading zeros are omitted. For
example, pattern 001 is shown as “1”, and
pattern 050 as “50”.
N
OTE
• The FAST method can only be used to write a
song in one go, from beginning to end.
Writing only a partial song is not possible.
• To edit a song that was written with the FAST
method, edit the formula and then write the
entire song again, or use step input.
1.
Press the [RHYTHM] key repeatedly
to switch the rhythm section to
SONG mode.
2.
Press the [EDIT/UTILITY] key.
The song utility menu for importing a song from
another project, transposing a song, etc. appears.
3.
Use the cursor left/right keys to bring
up the indication “FAST” on the
display, and press the [ENTER] key.
The display changes as follows, and numeric input
becomes possible.
SONG mode operation
4.
Use the cursor left/right keys and
faders 1 – 3 to enter the formula.
If you have made a mistake, correct it as follows.
● Inserting a number/formula
Use the cursor left/right keys to move to the
position and enter the new number/symbol.
● Deleting a number/formula
Use the cursor left/right keys to move to the
position where you want to delete a number/
symbol. Then press the [INSERT/DELETE
(COPY)] key
subsequent numbers and symbols are moved up.
5.
The pattern sequence for the song is written according
to the formula. Then the PS-04 returns to the condition
of step 2. By pressing the [EXIT] key to return to the
top screen and then pressing the
play the finished song to check the result.
H
INT
. The number/symbol is deleted, and
To write the song using the formula
that has been input, press the
[ENTER] key.
[R/P] key, you can
• Formulas entered with the FAST method are
saved for each project. If necessary, you can
repeat steps 1 – 5 to call up the formulas, edit
numbers or symbols, and write the song
again.
• There is no difference in the completed song
due to input method that was used, i.e. a
song will be the same, regardless of whether
it was created using step input or the FAST
method. A song written with the FAST method
can therefore be edited using step input.
_
ZOOM PS-04 77
Page 78

Reference [Rhythm]
OO1-
O1
--
AA ----
R
AA ----
C
AA M7M7
Entering chord progression data
This section explains how to add chord information
(root and chord type) to the song. Songs for which
chord information has been entered will play with
the bass phrase being transposed and transformed
according to the chord progression.
H
INT
• If the original root of the pattern and the root
entered for the song are different, the song
root will be used to transpose the bass phrase.
• If the original chord type of the pattern and
the chord type entered for the song are
different, the song chord type will be used to
transform the bass phrase. (Some phrases
may not be transformed.)
1.
Press the [RHYTHM] key repeatedly
to bring up the SONG mode top
screen.
2.
Press the [REC] key.
3.
If required, move to the point where
you want to enter the first chord.
In the example shown below, the song start position
is selected. The indication “EV” means that some
kind of event information (pattern, chord, tempo,
etc.) has already been entered at that point.
OO1-
4.
Use the cursor up/down keys to
bring up chord information (root +
chord type) on the display.
At a point where pattern information is input, the
chord information “E--” (root: E, chord type: no
transformation) is automatically assigned. "r"
indicates that the root can be specified.
Root Chord type
E --
O1
EV
R
H
INT
•When “--” (no transformation) is selected as
chord type, the bass phrase of the pattern is
played as is. (However, the entire phrase will still
be transposed according to the song root.)
• When no information is input at the current
point, the indication "
←CHORD" (for chord type) is shown.
"
5.
Turn the dial to select the root.
The root can be set in the range from E to D#.
6.
Press the cursor [W] key.
"C" indicates that the chord type can be specified
from this screen.
7.
Turn the dial to select the chord type.
The following settings are possible.
Display Meaning
--
No transformation
MAJ
7
7
M7
AUG
DIM
8.
Use the cursor [R] key to proceed to
the next measure where you want to
input chord information, and then
perform the procedure again.
At the chord information input screen, you can use
the cursor left/right keys to move the input point in
measure units. (To check the position, press the
cursor [Q] key repeatedly to bring up the current
position screen.)
←ROOT" (for root) or
Display Meaning
7SUS4
SUS4
75
6
6
9
M9
M7
78 ZOOM PS-04
Page 79

SONG mode operation
If required, you can change the chord information in
the middle of in a pattern and measure, as shown
below. To do this, return to the current position
screen, turn the dial to specify the current position in
measure/beat units, and then call up the chord
information input screen again.
Em
1
Measure
Beat
1 2341234
9.
Repeat steps 5 – 8 and enter the
Am
2
PATTERN A
Em
3
12 3 4 1 2 3 4
AmB7
4
PATTERN B
remaining chord information.
If you have made a mistake, or if you want to
change something, proceed as follows.
● Changing chord information
Move the current position to the point where you
want to make the change. Then press the cursor
[W] key repeatedly to bring up the chord
information input screen, and use the dial to change
the chord information.
● Erasing chord information
Move the current position to the point from where
you want to delete chord information. Then press
the cursor [W] key repeatedly to bring up the chord
information input screen, and press the [EDIT/
UTILITY] key. This returns the point to the
"←ROOT" or "←CHORD" condition (preceding
chord information is used).
10
.
To terminate the input, press the
[REC] key.
The [REC] key goes out, and the SONG mode top
screen returns. By pressing the [R/P] key, you can
play the finished song to check the result.
Entering other event information
A song consists of various event information
including pattern, chord, tempo, and beat. A song
can be thought of as a matrix like the one shown
below. When song input is activated ([REC] key is
lit), the cursor left/right keys and the dial can be
used to move the current position, and the cursor
up/down keys can be used to call up the desired
event for inputting a new event, or editing the event
information.
13245
Measure
Pattern
Beat
Root / Chord
Tempo
Drum track volume
Bass track volume
Drum kit
Bass program
PATTERN 001 PATTERN 020
4/4
D maj G min A7
BPM-135
10
10
STNDRD
FINGER SLAP
ZOOM PS-04 79
Page 80

Reference [Rhythm]
OO1-
O1
BPMBPM=1212
00
BPM
1.
Press the [RHYTHM] key repeatedly
to bring up the SONG mode top
screen.
2.
Press the [REC] key.
Event input and editing become possible, and the
current position screen appears. When the
indication “EV” is shown at right, some kind of
event information has been input for this point.
OO1-
3.
Use the cursor left/right keys
(measures) or the dial (beats) to
move to the point where you want to
enter new event information.
H
INT
The input position can only be specified in beat
units when the current position screen is
shown. To enter event information within a
measure at a certain beat, first specify the
position with the above screen. (However, the
time signature information input position can
only be specified in measure units.)
O1
EV
4.
Use the cursor [W] key to bring up
the input screen for the desired type
of event.
If event information has already been entered for
this point, the value is shown.
If no event information has been entered, the
display shows “←xxx” (where xxx is the event
name). This means that preceding event
information continues to be valid.
BPM
Event contents and display formats are as shown
below.
Event type
Pattern
Chord
Tempo
Drum kit
Bass program
Drum level
Bass level
Time signature
80 ZOOM PS-04
Display when no event
information is input
←
PTN
←
ROOT / ← CHORD
←
BPM
←
DRKIT
←
BSPRG
←
DRVOL
←
BSVOL
←
TIMSIG
Setting range Smallest input unit
000 – 510
See page 78
40.0 – 250.0
0 – 6 (See page 120 )
0 – 4 (See page 120 )
0 – 15
0 – 15
1/4 – 8/4
Measure/beat
Measure
Page 81

5.
COP
Turn the dial to enter the event
setting value.
6.
Enter information for other events in
the same way.
To enter more information for the same type of
event, use the cursor left/right keys to move the
current position in measure units while on the event
input screen, and then enter the information at the
new location. (To check the current position, press
the cursor [Q] key to return to the current position
screen.)
To specify the current position in beats, use the
cursor [Q] key to return to the current position
screen, turn the dial to go to the desired position,
and then call up the event input screen again.
SONG mode operation
■
Editing a song
This section explains how to edit a song that you
have created.
Copying a specific region of
measures
Part of a song can be specified as a range of
measures and copied to another location.
Copy
1234 6 785
PATTERN A PATTERN B
1234 6 789105
PATTERN A PATTERN B PATTERN B
PATTERN A PATTERN A
PATTERN A PATTERN A
If you have made a mistake, or if you want to
change something, proceed as follows.
● Changing event information
Move the current position to the point where you
want to make the change. Then use the cursor up/
down keys to bring up the event you want to
change, and use the dial to change the event setting
value.
● Erasing event information
Move the current position to the point where the
event to delete is input. Then use the cursor up/
down keys to bring up the event you want to delete,
and press the [EDIT/UTILITY] key.
7.
To terminate input, press the [REC]
key.
The [REC] key goes out and the SONG mode top
screen returns. By pressing the [R/P] key, you
can play the finished song to check the result.
Copy
1234
PATTERN A PATTERN B
1234 6 78
PATTERN A PATTERN B PATTERN A PATTERN B
1.
Press the [RHYTHM] key repeatedly
5
to bring up the SONG mode top
screen. Then press the [REC] key.
Song step input is enabled.
2.
Press the [INSERT/DELETE (COPY)]
key two times.
The following screen appears.
COP
3.
Turn the dial to select the copy
001
source start measure, and press the
[ENTER] key.
The indication “END” appears, and you can select
the copy end point.
ZOOM PS-04 81
Page 82

Reference [Rhythm]
COP
COP
TRANSPTRANSP
0SE
COP
4.
Turn the dial to select the copy
source end measure, and press the
[ENTER] key.
The indication “TO” appears, and you can select the
copy destination start point.
COP
5.
Turn the dial to select the copy
destination start measure.
6.
To carry out the copy operation,
press the [ENTER] key.
To cancel the operation, press the [EXIT] key.
H
INT
When you carry out the copy operation, the
song becomes longer by the number of copied
measures, and the EOS point is pushed back.
7.
To return to the SONG mode top
screen, press the [REC] key.
The [REC] key goes out.
008
002
Transposing the entire song
You can transpose the bass track of the rhythm song
in semitone units.
1.
Press the [RHYTHM] key repeatedly
to bring up the SONG mode top
screen.
2.
Press the [EDIT/UTILITY] key.
The SONG mode utility menu appears.
3.
Verify that the indication
“TRANSPOSE” is shown on the
display, and press the [ENTER] key.
The mode for transposing a song is enabled.
Transpose value
O
4.
Turn the dial to select the transpose
setting in semitone units (-6 to 0 to
+6).
The default setting is “0” (no transposing). When
you select for example +6, the song is transposed
up by 6 semitones.
5.
Press the [ENTER] key.
The indication "ENT/EXIT" appears on the display.
6.
To carry out the transpose operation,
press the [ENTER] key once more.
To cancel the operation, press the [EXIT] key.
When transposing is completed, the
"TRANSPOSE" display appears again.
H
INT
To return to the original condition, perform the
transpose action again.
82 ZOOM PS-04
Page 83

■
CLEAR
FROMFROM
03
Project number
Clearing a song
You can clear the entire contents of the song and
return it to the blank condition.
1.
Press the [RHYTHM] key repeatedly
to bring up the SONG mode top
screen.
2.
Press the [INSERT/DELETE (COPY)]
key.
The indication "CLEAR" appears on the display.
CLEAR
3.
Press the [ENTER] key.
The indication "ENT/EXIT" appears on the display.
4.
To carry out the clear operation,
press the [ENTER] key.
To cancel the operation, press the [EXIT] key.
SONG mode operation
■
Importing pattern/song
information from another project
You can import the song and all patterns from
another project stored on a SmartMedia card, for
use in the current project.
N
OTE
When the import operation is carried out, all the
patterns and song information in the current
project will be overwritten.
1.
Press the [RHYTHM] key to bring up
the SONG mode or PATTERN mode
top screen.
The pattern/song import operation can be carried
out in SONG mode or PATTERN mode.
2.
Press the [EDIT/UTILITY] key.
3.
Use the cursor left/right keys to bring
up the indication “IMPORT” on the
display, and press the [ENTER] key.
You can now select the number of the project from
which to import the song and patterns.
ZOOM PS-04 83
4.
Turn the dial to select the project
from which to import.
5.
Press the [ENTER] key.
The indication "ENT/EXIT" appears on the display.
6.
To carry out the import operation,
press the [ENTER] key once more.
When the import operation is completed, the
"IMPORT" indication returns.
Page 84

Reference [Effects]
This section explains how to use and edit the effects built into the PS-04.
■
About the effects
The PS-04 has two types of effects, “insert effects”
which are inserted at a specific point in the signal
path, and the send/return effects which are routed
through the built-in mixer and applies to all tracks.
The two types can be used simultaneously.
Algorithm Description Insert point
GUITAR / BASS
MIC
LINE
DUAL
MASTERING
This algorithm is suitable for guitar/bass recording.
This algorithm is suitable for mic recordings of vocals,
acoustic guitar, etc.
This algorithm is suitable for recording from devices with
line outputs, such as a synthesizer.
This algorithm has two entirely separate mono inputs and
outputs.
This algorithm is suitable for processing the final stereo mix.
Insert effect
The insert effect is a multi-effect that combines
various single effects such as compressor and amp
simulator. It can be inserted either directly after the
input or directly after the mixer stereo output.
A combination of single effects in the insert effect
is called an algorithm. The insert effect has five
types of algorithms, and the insert position changes
depending on the selected algorithm. The available
algorithms and insert positions are listed in the
following table.
Directly after input (1)
Directly after input (1)
Directly after input (1)
Directly after input (1)
Directly before [OUTPUT] jack (2)
[INPUT] jack
[LINE IN] jack
Built-in mic
Input
(1)
Track 1
Track 2
Track 3
Track 4
Bass track
Drum track
(2)
[OUTPUT] jack
84 ZOOM PS-04
Page 85

About the effects
Algorithm
GUITAR
MIC
LINE
MASTERING
DUAL
COMP
COMP/LIMITER
COMP/LIMITER ISOLATOR
MULTI COMP
COMP/LIMITER
COMP/LIMITER
Effect module arrangement
PRE AMP/DRIVE
MIC PRE
NORMALIZER
MIC PRE
MIC PRE
The single effects that make up the algorithm are
called “effect modules”. The available effect
module type and sequence differs for various
algorithms (see illustration above).
An effect module consists of the “effect type”
which determines the type of sound, and the effect
parameters which determine the intensity and
operation of the effect. Effect type and effect
parameter settings for a module are stored as a
“patch”.
For each algorithm, there are 20 – 60 patches. You
can not only call up and use preprogrammed
patches, but also edit effect parameters and store the
results as your own original patches.
The number of available patches per algorithm is
shown in the table below.
Algorithm
GUITAR/BASS
MIC
LINE
DUAL
MASTERING
H
INT
The effect input/output configuration differs for
the various algorithms. There are three
configurations: mono input/stereo output,
stereo input/stereo output, and mono input x 2/
mono output x 2.
Number of patches
(preprogrammed patches)
60 (50)
30 (20)
30 (20)
30 (20)
20 (15)
Input/output type
ZNR EQ
ZNR EQ
ZNR EQ
ZNR
ZNR
ZNREQEQ
■
DELAY/
EQ
MODULATION
DELAY/
MODULATION
DELAY/
MODULATION
DIMENSION
DOUBLING
Mono → Stereo
Stereo → Stereo
Mono x 2 → Mono x 2
Send/return effect
The send/return effect can be used together by all
tracks. It serves to add reverb, delay, or chorus to
the audio tracks and drum/bass tracks. The signal
from these tracks is sent to the effect circuitry
(send) and the effect sound is mixed back in just
before the [OUTPUT] jack (return).
The intensity of the send/return effect can be
adjusted by controlling the level of the signal sent
to the effect (send level).
[OUTPUT] jack
The send/return effect consists of the “effect type”
which determines the type of sound, and the effect
parameters which determine the intensity and
operation of the effect. These two components are
stored as a “patch”. The send/return effect can use
40 patches. In the default condition, 30 patches are
preprogrammed.
Send/
return
effect
ZOOM PS-04 85
Page 86

Reference [Effects]
STNDRD
LARGE
STNDRD
H
INT
The patches for the insert effect and send/
return effect are stored by project.
■
EFFECT mode screens
To make insert effect and send/return effect
settings, you must switch the PS-04 to EFFECT
mode by pressing the [EFFECT] key from the
AUDIO, RHYTHM, or SYSTEM mode. When you
switch to EFFECT mode, one of the following
screens will appear.
● Insert effect top screen
This screen lets you select the insert effect patch.
Immediately after the screen is displayed, the name
of the currently selected algorithm is shown briefly,
and then the patch name appears.
Basic steps for using the
insert effect
This section explains the steps for selecting an
insert effect patch and editing its contents.
■
Selecting the insert effect
patch
To switch the insert effect patch, proceed as
follows.
1.
Press the [EFFECT] key repeatedly to
bring up the insert effect top screen.
The currently selected patch is shown.
Patch name Patch number
STNDRD
● Send/return effect top screen
This screen lets you select the patch for the send/
return effect. Immediately after the screen is
displayed, the indication “SEND” is shown briefly,
and then the patch name appears.
LARGE
Pressing the [EFFECT] key while in EFFECT
mode toggles between the above two screens.
0
2
STNDRD
2.
Use the cursor up/down keys to
select the desired algorithm.
Shortly after selecting the algorithm, the patch
currently selected for that algorithm is shown.
N
OTE
The insert position of the insert effect will differ,
depending on the algorithm. (For details, see
page 84.)
3.
Turn the dial to select the patch.
When you select a new patch, its settings become
effective immediately.
H
INT
When the indication “EMPTY” is shown, you
have selected a blank patch. If such a patch is
selected, the insert effect will not be operating.
4.
To temporarily defeat the insert
effect, press the [TUNER/BYPASS]
key.
When you press the [TUNER/BYPASS] key in
EFFECT mode, the insert effect will be bypassed
and the built-in tuner function becomes active. (For
0
86 ZOOM PS-04
Page 87

information on the tuner function, see page 92.)
Patch name Patch number
STNDRDSTNDRD
0
When you press the [TUNER/BYPASS] key or the
[EXIT] key, the PS-04 returns to the condition of
step 2.
H
INT
If you press the [TUNER/BYPASS] key in a
mode other than the EFFECT mode, the
indication “BYPASS” is shown for a few
seconds, and the insert effect will be bypassed.
Pressing the [TUNER/BYPASS] key once more
restores the original condition.
Basic steps for using the insert effect
● Stereo track recording
Input 1
Input 1
Input 1
Input 2
Effect
(M→S)
Effect
(DUAL)
Effect
(S→S)
Tra ck 1 or 3
Tra ck 2 or 4
Tra ck 1 or 3
Tra ck 2 or 4
Tra ck 1 or 3
Tra ck 2 or 4
The signal path when using the insert effect
depends on the insert position and on the number of
channels (mono or stereo). Possible combinations
are shown below.
In the illustration, “M→S” means “mono input/
stereo output”, “S→S” means “stereo input/stereo
output”, and “DUAL” means “mono input x 2/
mono output x 2”.
● Insert position immediately after INPUT
● Mono track recording
Input 1
Input 1
Input 1
Input 2
Input 1
Input 1
Input 2
Input 1
Input 2
Effect
(M→S)
Effect
(DUAL)
Effect
(S→S)
Effect
(S→S)
Effect
(M→S)
Effect
(DUAL)
Tra ck
Tra ck
Tra ck
Tra ck
Tra ck
Tra ck
Input 1
Input 1
Input 2
Input 1
Input 2
● Insert position immediately after built-in
Effect
(S→S)
Effect
(M→S)
Effect
(DUAL)
Tra ck 1 or 3
Tra ck 2 or 4
Tra ck 1 or 3
Tra ck 2 or 4
Tra ck 1 or 3
Tra ck 2 or 4
mixer
L
R
■
Editing an insert effect patch
Effect
(S→S)
OUT (L)
OUT (R)
This section explains how to change effect type and
effect parameter settings of a patch, to create your
own original patches.
1.
Bring up the insert effect top screen.
2.
Select the algorithm as necessary,
and then turn the dial to select the
patch that you want to edit.
ZOOM PS-04 87
Page 88

Reference [Effects]
COMP
FLANGE
3.
Press the [EDIT/UTILITY] key.
The name of the effect module currently selected
for that patch is shown. (For modules that comprise
several effect types, the name of the currently
selected effect type is shown.)
Effect module name (or effect type name)
COMP
Effect parameter setting
H
INT
During effect editing, the level meters give a
rough indication of the parameter setting value.
4.
Use the cursor left/right keys to
select the effect module you want to
edit.
The effect modules are switched in sequence, as
shown below.
H
INT
Some effect types have a high number of effect
parameters, which are divided into 2 pages. For
some of these effect types, the indication at the
right of the display (P1/P2) shows the currently
displayed page.
5.
The effect type that is used can be
changed with the cursor up/down
keys.
This is possible only for effect modules that have
several effect types. (For details, see the list in the
last section of this documentation.)
For example, when changing the effect type of the
DELAY/MODULATION module to FLANGE, the
following indication appears.
Effect type name
FLANGE
Which effect parameters can be adjusted depends
on the effect type. Switching the effect type will
also switch the effect parameter accordingly.
type
DELAY/
MODULATION
CHORUS
DEPTH
RATE
MIX
FLANGER
DEPTH
RATE
FB
PHASER
POSITION
RATE
COLOR
Effect
module
Effect
Effect
parameters
H
INT
If you change any settings so that they are
different from the stored condition, the
indication “ED” (for “Edited”) will appear in the
top right of the display. The indication
disappears if you return the settings to the
original value.
6.
Use faders 1 – 4 to adjust the effect
parameters.
During effect editing, faders 1 – 4 are assigned to
various effect parameters. When you move a fader,
the respective parameter value is shown for a few
seconds on the display. The level meters give a
rough indication of the value. For a list of
parameters in each module/effect type, see page
104.
Module
COMP
PRE AMP
(Page 1) (Page 2) (Page 1) (Page 2)
EQ
88 ZOOM PS-04
DELAY/MODULATION TOTAL
PATC H
LEVEL/ZNR
PATC H
NAME
Page 89

DEPTH
Name of parameter being adjusted
-OFF-
STORE)
Parameter setting value
DEPTH
Rough indication of parameter
setting
H
INT
When you press the status keys 1 – 4, the value
of the corresponding effect parameter is shown.
In this condition, the dial can be used to adjust
the displayed parameter value. For fine
adjustment of settings, this method is
convenient.
7.
To switch the effect module between
on and off, call up the name of the
module (or the effect type) on the
display and press the [TUNER/
BYPASS] key.
When the effect module is off, the module name (or
effect type name) and the indication "-OFF-" are
shown alternately on the display.
4
Basic steps for using the insert effect
10.
To adjust the ZNR (Zoom Noise
Reduction) sensitivity, use the cursor
left/right keys to bring up the
indication “TOTAL” on the display,
and then operate fader 2.
Set this as high as possible without causing the
sound to be abruptly cut off when playing your
instrument.
11.
When the settings are complete,
press the [EXIT] key.
The insert effect top screen returns. If you switch to
another patch without first saving the edited patch,
all changes will be lost. See the next section for
information on how to store a patch.
■
Storing an insert effect patch
To retain an edited patch, proceed as follows.
1.
From the insert effect top screen,
press the [EDIT/UTILITY] key and
edit the patch.
2.
When patch editing is complete,
press the [INSERT/DELETE (COPY)]
key.
The store target patch number and the name of the
currently selected patch are shown alternately on
the display.
H
INT
The TOTAL module (ZNR/patch level) is always
on and cannot be set to off.
8.
Repeat steps 4 – 7 as necessary to
edit other modules.
9.
To adjust the patch level (the final
volume level of the patch), use the
cursor left/right keys to bring up the
indication “TOTAL” on the display,
and then operate fader 1.
The patch level setting range is 1 – 30.
ZOOM PS-04 89
-OFF-
STORE)
3.
Turn the dial to select the number in
which to store the patch.
4.
To carry out the store operation,
press the [ENTER] key.
The edited patch is stored, and the insert effect top
screen returns.
0
Page 90

Reference [Effects]
MS-DRV
RS-DRV
RS-DRV
Patch name Patch number
LARGELARGE
2
■
Changing an insert effect
patch name
The name of the currently selected insert effect
patch can be changed as follows.
1.
From the insert effect top screen,
select the patch whose name you
want to change, and press the [EDIT/
UTILITY] key.
2.
Repeatedly press one of the cursor
left/right keys to cause the first
character of the patch name to flash.
The flashing character can be changed.
MS-DRV
3.
Turn the dial to select a character.
For information on available characters, see page
71.
RS-DRV
H
INT
You can also use faders 1 - 3 for character
input.
4.
Use the cursor left/right keys to
move the flashing position.
Basic steps for using the
send/return effect
This section explains the steps for selecting a send/
return effect patch and editing its contents.
■
Selecting the send/return
effect patch
To switch the send/return effect patch, proceed as
follows.
1.
Press the [EFFECT] key repeatedly to
bring up the send/return effect top
screen.
The indication “SEND” is briefly shown on the
display, and then the name of the currently selected
patch appears.
2.
Turn the dial to select the patch.
When you select a new patch, its settings become
effective immediately.
H
INT
The intensity of the send/return effect can be
adjusted for each track as a track parameter
(
→ p. 56).
■
Editing a send/return effect
patch
RS-DRV
5.
Repeat steps 3 – 4 to complete the
new name for the patch.
6.
When the change is completed,
press the [ENTER] key.
The insert effect top screen returns. To retain the
entered name, store the patch.
90 ZOOM PS-04
This section explains how to alter a send/return
effect patch.
1.
Bring up the send/return effect top
screen. Then turn the dial to select
the patch that you want to edit.
2.
Press the [EDIT/UTILITY] key.
The patch can now be edited, and the name of the
effect type currently selected for that patch is
shown.
Page 91

Basic steps for using the send/return effect
HALL
ROOM
PREDLY
STORE)STORE)
2
Effect type name
HALL
3.
Use the cursor up/down keys to
select the effect type.
For details on effect types that can be selected for
the send/return effect, see the list in the last section
of this documentation.
ROOM
4.
Use faders 1 – 4 to adjust the
parameter setting value.
When you move a fader, the respective parameter
value is shown for a few seconds on the display.
The level meters give a rough indication of the
value. For a list of parameters that can be adjusted,
see the list in the last section of this documentation.
Effect parameter name
Parameter setting value
PREDLY
P1
PI
8
6.
When the settings are complete,
press the [EXIT] key.
The send/return effect top screen returns.
N
OTE
If you switch to another patch without first
saving the edited patch, all changes will be lost.
See the next section for information on how to
store a patch.
■
Storing a send/return effect
patch
To retain an edited patch, proceed as follows.
1.
From the send/return effect top
screen, press the [EDIT/UTILITY] key
and edit the patch.
2.
When patch editing is complete, press
the [INSERT/DELETE (COPY)] key.
The store target patch number and the name of the
currently selected patch are shown alternately on
the display.
H
INT
• When you press the status keys 1 – 4, the
• For send/return effects, parameters are shown
5.
Repeat the above procedure as
necessary to adjust other parameters.
ZOOM PS-04 91
Rough indication of parameter setting
value of the corresponding effect parameter is
shown. In this condition, the dial can be used
to adjust the displayed parameter value.
on two pages. (The currently shown page is
indicated by P1/P2. If necessary, use the
cursor left/right keys to select the page, and
then use the faders to make the adjustment.
3.
Turn the dial to select the number in
which to store the patch.
4.
To carry out the store operation,
press the [ENTER] key.
The edited patch is stored, and the send/return
effect top screen returns.
■
Changing a send/return effect
patch name
The name of the currently selected send/return
effect patch can be changed as follows.
1.
From the send/return effect top
screen, select the patch whose name
you want to change, and press the
[EDIT/UTILITY] key.
Page 92
Reference [Effects]
TIGHT
--
2.
Repeatedly press one of the cursor
left/right keys to cause the first
character of the patch name to flash.
TIGHT
3.
Turn the dial to select a character.
For information on available characters, see page
71.
H
INT
You can also use faders 1 - 3 for character
input.
4.
Use the cursor left/right keys to
move the flashing position.
5.
Repeat steps 3 – 4 to complete the
new name for the patch.
6.
When the change is completed,
press the [ENTER] key.
The send/return effect top screen returns. To retain
the entered name, store the patch.
0
Using the tuner function
The PS-04 incorporates a versatile tuner that can
also accommodate 7-string guitar and other
unconventional tunings. This section explains how
to use the tuner function.
■
Using the chromatic tuner
The chromatic tuner which can automatically detect
pitch in semitone steps operates as follows.
1.
Connect the instrument that you
want to tune to the [INPUT] jack, and
make sure that “INPUT” is selected
as input source.
H
INT
It is also possible to send the signal from the
built-in mic or the [LINE IN] jack to the tuner. In
this case, change the input source setting
accordingly.
2.
From one of the EFFECT mode
screens, press the [TUNER/BYPASS]
key.
Pressing the [TUNER/BYPASS] key in EFFECT
mode bypasses the insert effect and activates the
built-in tuner. When the tuner is activated for the
first time, the indication “CHROMATIC” is shown
for several seconds and the chromatic tuner is
chosen. During tuner operation, the indication
“CR” at the right of the display shows that this
tuner type is selected.
Currently selected tuner type
--
H
INT
By pressing the cursor left/right keys
repeatedly, you can switch the tuning type. For
details, see the next section.
3.
Play the open string you want to tune.
The pitch is automatically detected, and the display
92 ZOOM PS-04
CR
Page 93

Using the tuner function
440HZ
shows the amount by which the current pitch is
different from the correct pitch.
Detected note name (o stands for #)
D
4.
Tune the string until the “<>”
indication encloses the desired note.
5.
Tune the other strings in the same
way.
6.
To change the reference pitch of the
tuner, turn the dial during tuner
operation.
The current reference pitch is shown on the display.
The default setting is center A = 440 Hz. The pitch
can be changed from 435 to 445 Hz in 1-Hz steps.
C
Pitch is sharp
Correct pitch
Pitch is flat
The display reverts to the previous indication after a
while.
440HZ
H
INT
The reference pitch will be reset to A = 440 Hz
when the PS-04 is turned off and then on again.
7.
To quit the tuning function, press the
[EXIT] key.
The insert effect bypass condition is canceled, and
the previous display appears again.
■
Using other tuning types
The PS-04 allows various other tuning types
besides chromatic tuning, including special tuning
functions for guitar and bass. For these types it is
necessary to first select a string number and then
tune the strings one by one.
1.
Connect the instrument that you
want to tune to the [INPUT] jack, and
make sure that “INPUT” is selected
as input source.
2.
From one of the EFFECT mode
screens, press the [TUNER/BYPASS]
key, and then use the cursor left/right
keys to call up the desired tuner type.
The tuning types and string numbers are shown in
the table below.
Tuning type
String number/
ZOOM PS-04 93
note name
GUITAR
(GT)
6E 4E 6E 6D 6E 6D 6D
5A 3A 5A 5A 5B 5G 5A
4D 2D 4E 4D 4E 4D 4D
3G 1G 3A
2B 5B
1E 1E 1D 1E 1D 1D
7B
BASS
(BS)
OPEN-A
(OA)
2C
OPEN-D
(OD)
3F 3G
OPEN-E
2A 2B 2B 2A
(OE)
OPEN-G
(OG)
3G 3G
(D modal) (DA)
DADGAD
Page 94

Reference [Effects]
6E
For example, When you select the tuning type
“GT” (Guitar), the display shows the string number
and the target note.
String number/note name
6E
3.
Play the indicated string as an open
string, and perform tuning.
4.
Use the cursor up/down keys to
select other string numbers.
For example, when “GT” (Guitar) has been selected
as tuning type, pressing the cursor [W] key cycles
through the following string numbers.
6E → 5A → 4D → 3G → 2B → 1E → 7B → 6E ...
5.
Tune the other strings in the same
way.
6.
To quit the tuning function, press the
[EXIT] key.
The insert effect bypass condition is canceled, and
the previous display appears again.
H
INT
If required, you can change the reference pitch
used by the tuner. The default setting is A = 440
Hz. The procedure is the same as for the
chromatic tuner.
Tuning type
GT
94 ZOOM PS-04
Page 95

Reference [System]
PROJEC
PROJECPROJEC
T
SELECTSELECT
This section explains how to use the SYSTEM mode for managing projects and making settings that affect the
entire PS-04.
■
SYSTEM mode screen
When you press the [SYSTEM] key while the
recorder is stopped, the PS-04 enters the SYSTEM
mode which serves for managing projects and
making settings that affect the entire unit. The
system menu is shown.
PROJEC
H
INT
When you switch to SYSTEM mode from the
AUDIO, RHYTHM or EFFECT mode, the
contents of the current project are automatically
saved.
T
About projects
The PS-04 manages audio data and setting
information in units called projects. A project
comprises the following data.
• Audio data for all V-takes of tracks 1 – 4
• Number of V-take selected for tracks 1 – 4
• All track parameter settings
• All internal mixer settings
• All patterns used for drum track and bass
track
• Song contents for drum track and bass
track
• Effect patch settings
• Other system settings
N
OTE
All steps that you carry out with the PS-04
affect only the currently loaded project. It is not
possible to handle multiple projects
simultaneously.
Basic steps for handling projects
When handling projects, some steps are similar for
each action. These are as follows.
1.
With the recorder stopped, press the
[SYSTEM] key.
The PS-04 enters SYSTEM mode and the system
menu appears.
2.
Verify that the indication “PROJECT”
is shown on the display, and press
the [ENTER] key.
The project menu for performing various actions
related to projects appears.
3.
Use the cursor left/right keys to
select the desired item, and press the
[ENTER] key.
The project menu has the following options.
• SELECT
Select and load an existing project.
• NEW
Create a new project.
• COPY
Copy the currently loaded project.
• DELETE
Delete a specified project.
• PROTECT
Write-protect the currently loaded project.
• CAPACITY
Display the remaining recording time.
ZOOM PS-04 95
Page 96

Reference [System]
r
PROJO1
GRADEGRADE
HF
Recording grade
• NAME
Change the name of the currently loaded project.
The subsequent steps will differ, depending on
which option was selected. See the respective
sections below.
■
Selecting a project
You can select and load a project saved on
SmartMedia card as follows.
H
INT
When you turn power to the PS-04 on, the most
recently used project will be automatically
loaded.
1.
Refer to “Basic steps for handling
projects” and bring up the indication
“SELECT”. Then press the [ENTER]
key.
Project name
PROJO1
2.
Turn the dial to select the number of
the project you want to load.
3.
Press the [ENTER] key to load the
project.
When the loading process is finished, the AUDIO
mode top screen will be displayed.
Project numbe
01
H
INT
The recording grade can only be set for the
entire project.
2.
Turn the dial to select one of the
following recording grade settings.
• HF (Hi-Fi)
This setting gives priority to sound quality. A
16MB SmartMedia card provides about 7 minutes
of recording time, converted to a single track.
• LG (Long)
This setting gives priority to recording time. A
16MB SmartMedia card provides about 15 minutes
of recording time, converted to a single track.
3.
To create the project, press the
[ENTER] key. To cancel the
operation, press the [EXIT] key.
When you press the [ENTER] key, a new project is
created on the SmartMedia card, and that project is
loaded.
H
INT
• The newly created project is automatically
assigned the name “PROJxx” (where xx is the
project number).
• You can change the project name if desired
(→ p. 98).
■
Creating a new project
■
You can create a new project on the SmartMedia
card as follows.
1.
Refer to “Basic steps for handling
projects” and bring up the indication
“NEW”. Then press the [ENTER] key.
The display changes as follows. From this screen,
you can specify the recording grade (audio track
sound quality).
96 ZOOM PS-04
Copying a project
You can copy the contents of the currently loaded
project as follows.
1.
Refer to “Basic steps for handling
projects” and bring up the indication
“COPY”. Then press the [ENTER]
key.
The following screen appears.
Page 97

TO
03
Copy destination project number
PROJO1
PRTCT
TO
2.
Turn the dial to select the copy
destination project number, and
press the [ENTER] key.
The indication “ENT/EXIT” appears on the display.
3.
To carry out the copy operation,
press the [ENTER] key once more. To
cancel the operation, press the
[EXIT] key.
When you carry out the copy operation, the copy
destination project is loaded, and the AUDIO mode
top screen appears.
■
Deleting a project
You can delete a project from the SmartMedia card
as follows.
N
OTE
Once a project has been deleted, it cannot be
restored. Use this function with care, to avoid
losing a project that you want to keep.
1.
Refer to “Basic steps for handling
projects” and bring up the indication
“DELETE”. Then press the [ENTER] key.
The following screen appears.
Number of project to delete
PROJO1
2.
Turn the dial to select the project
number, and press the [ENTER] key.
The indication “ENT/EXIT” appears on the display.
3.
To carry out the delete operation,
press the [ENTER] key once more. To
cancel the operation, press the
[EXIT] key.
03
01
About projects
It is also possible to delete the currently loaded project.
In this case, the immediately preceding project will be
automatically loaded.
N
OTE
A project for which write-protect (see next
section) has been enabled cannot be deleted.
■
Protecting a project
You can write-protect the current project, so that its
contents cannot be changed.
A write-protected project can be played as usual,
and you can change any of the settings, but the
changes cannot be stored on the SmartMedia card.
It is highly recommended to use this function for
protecting a completed project from accidental
overwriting or erasure.
1.
Refer to “Basic steps for handling
projects” and bring up the indication
“PROTECT”. Then press the [ENTER] key.
The display changes as follows.
Protect on/off setting
PRTCT
2.
Turn the dial to change the setting to
“ON”.
Write-protection is enabled and you can no longer
store any changes to the current project. To turn off
write-protection, call up the above screen again and
change the setting to “OFF”.
3.
Press the [EXIT] key repeatedly to
return to the original screen.
Each press of the [EXIT] key goes back by one
screen.
■
Checking the remaining
0FF
recording time
To verify how much recording time is left on the
SmartMedia card, proceed as follows.
1.
Refer to “Basic steps for handling
ZOOM PS-04 97
Page 98

Reference [System]
OOO325
PROJO2
METER
projects” and bring up the indication
“CAPACITY”. Then press the
[ENTER] key.
The remaining recording time is shown, converted
to the duration of a mono track.
OOO325
H
INT
The time shown here changes depending on
the recording grade setting (
2.
To return to the original screen,
press the [EXIT] key repeatedly.
Each press of the [EXIT] key goes back by one
screen.
■
Changing the name of a project
You can change the name of the currently loaded
project.
1.
Refer to “Basic steps for handling
projects” and bring up the indication
“NAME”. Then press the [ENTER] key.
The display changes as follows.
636
→ p. 96).
4.
Repeat steps 2 and 3 until the name
is as desired.
5.
To return to the original screen,
press the [EXIT] key repeatedly.
Each press of the [EXIT] key goes back by one
screen.
Changing the operation of
the level meters
The signal level indicated by the level meters on the
display can be either the level before volume
adjustment (pre-fader level) or after volume
adjustment (post-fader level). To change the setting
proceed as follows.
1.
With the recorder stopped, press the
[SYSTEM] key.
The system menu appears.
2.
Use the cursor left/right keys to bring
up the indication “LVLMET” on the
display, and press the [ENTER] key.
The display changes as follows.
Current level meter display function
PROJO2
2.
Turn the dial to change the flashing
character.
3.
Use the cursor left/right keys to
move the flashing position, and then
turn the dial to select the character.
For information on available characters, see page
71.
H
INT
You can also use faders 1 – 3 to enter
characters and fader 4 to move the flashing
position.
98 ZOOM PS-04
3.
• POS (post-fader)
• PRE (pre-fader)
4.
Each press of the [EXIT] key goes back by one
screen.
METER
Turn the dial to select one of the
following settings.
The signal level after adjustment by the faders 1
– 4 is shown (default setting).
The signal level before volume adjustment is
shown.
To return to the original screen,
press the [EXIT] key repeatedly.
P0S
Page 99

Setting the built-in mic gain
GAIN
LIGHTLIGHT
0N
Setting the built-in mic gain
You can adjust the input sensitivity of the built-in
mic as follows.
1.
With the recorder stopped, press the
[SYSTEM] key.
The system menu appears.
2.
Use the cursor left/right keys to bring
up the indication “INT MIC” on the
display, and press the [ENTER] key.
The display changes as follows.
Current sensitivity setting
GAIN
3.
Turn the dial to select one of the
following settings.
• LO
This is the on-mic setting, suitable for close-up
vocal and acoustic guitar recording (default
setting).
• HI
This is the off-mic setting, suitable for example
to record an entire band in a studio.
4.
To return to the original screen,
press the [EXIT] key repeatedly.
Each press of the [EXIT] key goes back by one
screen.
H
INT
The input sensitivity setting is saved for each
project.
L0
Turning the backlight on
and off
You can set the display backlight of the PS-04 to on
or off as follows. If the PS-04 is powered from
batteries, setting the backlight to off will help
extend the life of the batteries.
1.
With the recorder stopped, press the
[SYSTEM] key.
The system menu appears.
2.
Use the cursor left/right keys to bring
up the indication “LCD” on the
display, and press the [ENTER] key.
The display changes as follows.
3.
Turn the dial to select either on or off.
The default setting is “on” (backlight activated).
4.
To return to the original screen,
press the [EXIT] key repeatedly.
Each press of the [EXIT] key goes back by one
screen.
ZOOM PS-04 99
Page 100

Reference [System]
FORMAT
Formatting a SmartMedia
card
The following procedure will format a SmartMedia
card inserted in the PS-04.
N
OTE
If a SmartMedia card that was not formatted in
the PS-04 is inserted, audio recording/playback
and saving of other data will not be possible.
Before using a new SmartMedia card, be sure
to format the card in the PS-04.
1.
Insert the new SmartMedia card and
turn power to the PS-04 on.
2.
Press the [SYSTEM] key.
The system menu appears.
3.
Use the cursor left/right keys to bring
up the indication “CARD” on the
display, and press the [ENTER] key.
The display changes as follows.
FORMAT
4.
To carry out the formatting
operation, press the [ENTER] key
twice.
When you press the key the first time, a
confirmation message appears. Pressing the key the
second time initiates actual formatting.
When formatting is complete, a new project is
created and loaded automatically.
By pressing the [EXIT] key instead of the [ENTER]
key, you can cancel the operation and return to the
previous screen.
100 ZOOM PS-04
 Loading...