

P4
Operation Manual
You must read the Usage and Safety Precautions before use.
© 2020 ZOOM CORPORATION
Copying or reprinting this manual in part or in whole without permission is prohibited.
Product names, registered trademarks and company names in this document are the property of their respective companies. All trademarks and regis-
tered trademarks in this document are for identification purposes only and are not intended to infringe on the copyrights of their respective owners.
Proper display is not possible on grayscale devices.

Notes about this Operation Manual
You might need this manual in the future. Always keep it in a place where you can access it easily.
The contents of this document and the specications of the product could be changed without notice.
®
Windows
•
iPadOS is a trademark or registered trademark of Apple Inc.
•
iOS is a trademark or registered trademark of Cisco Systems, Inc. in the USA and other countries and is
•
used under license.
The SD, SDHC and SDXC logos are trademarks.
•
Other product names, registered trademarks and company names in this document are the property of
•
their respective companies.
Note: All trademarks and registered trademarks in this document are for identication purposes only and
are not intended to infringe on the copyrights of their respective owners.
Recording from copyrighted sources, including CDs, records, tapes, live performances, video works and
broadcasts, without permission of the copyright holder for any purpose other than personal use is prohibited by law. Zoom Corporation will not assume any responsibility related to infringements of copyrights.
is a trademark and registered trademark of Microsoft® Corporation.
2

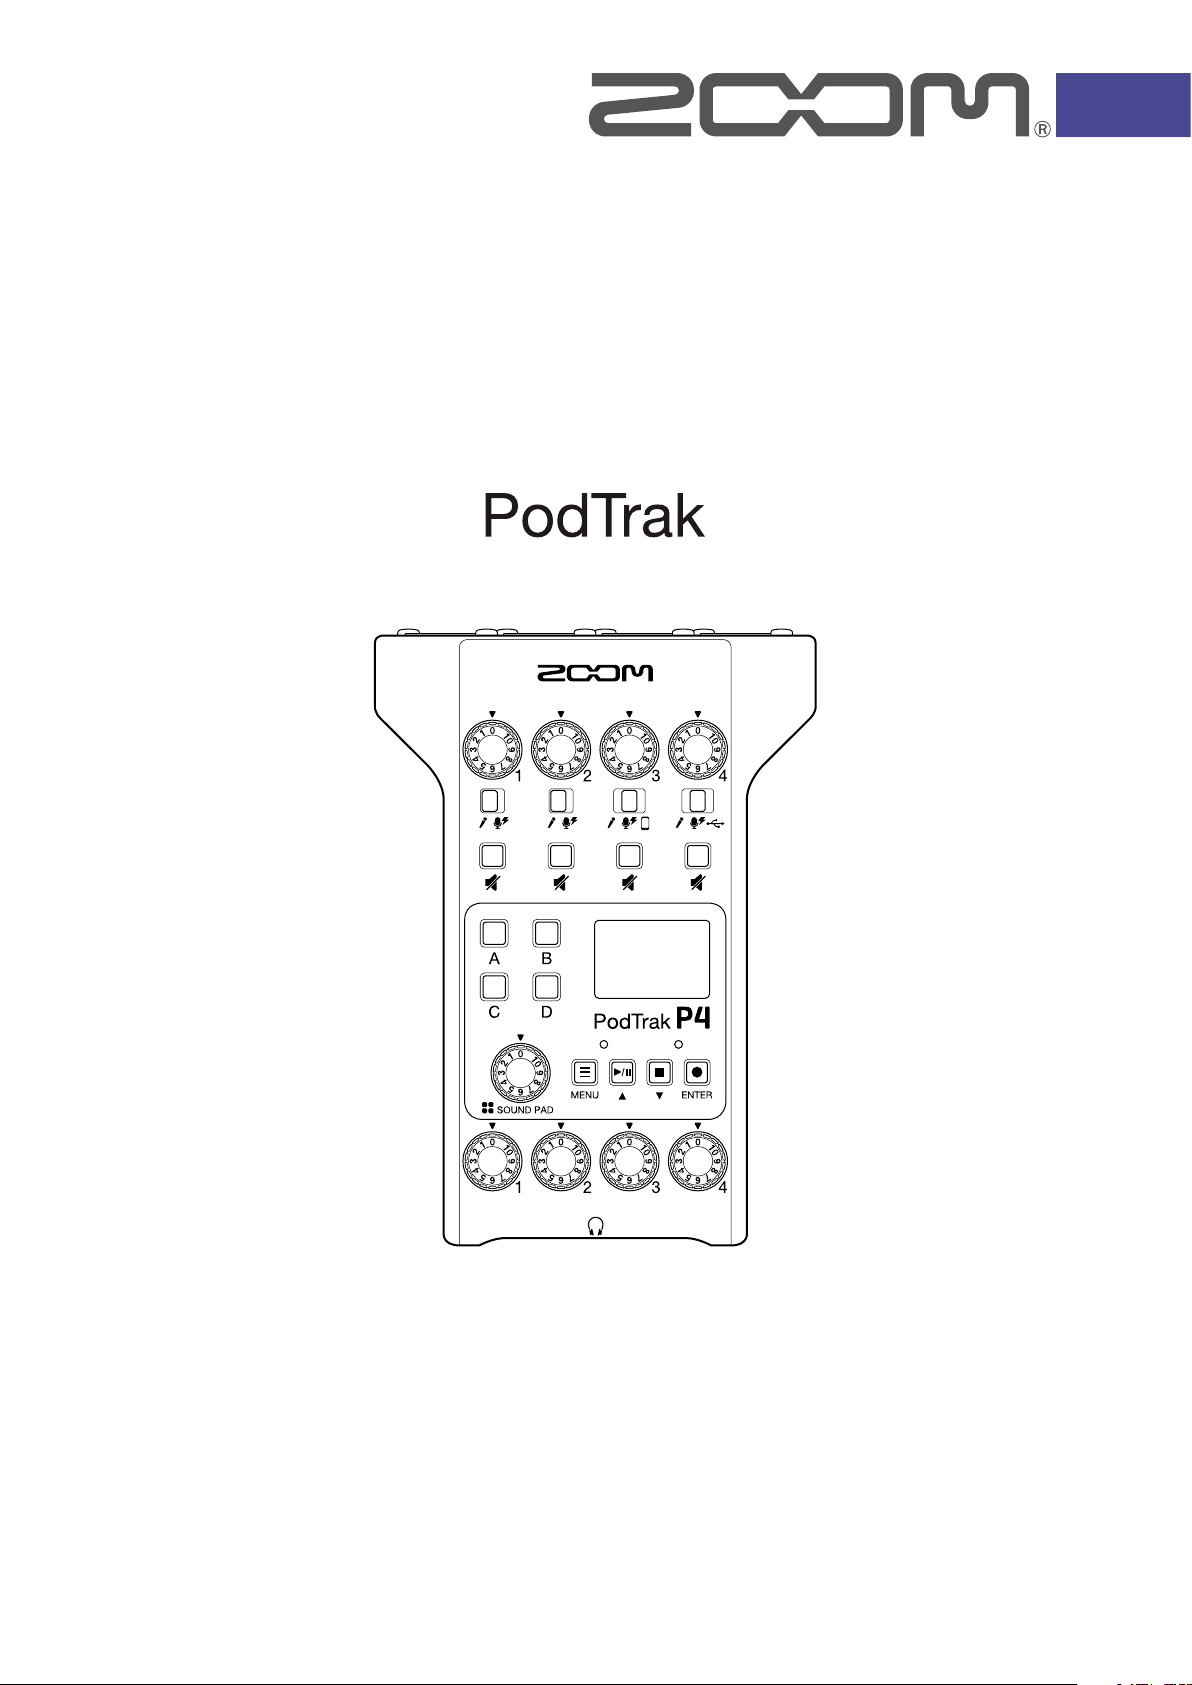
Introduction
Thank you very much for purchasing the ZOOM P4 PodTrak.
The
right away just by connecting mics and headphones. We also recommend the
compact combination of useful recording functions. We hope you enjoy recording episodes in bedrooms, on
café terraces and at all kinds of places.
Main features of the
is a multitrack recorder designed for podcasting. Even beginners can start recording high quality audio
P4
to veteran podcasters as a
P4
P4
Use your favorite mics for recording
The high-quality built-in mic preamps support not only dynamic mics but also condenser mics that require
phantom power (+48 V). Enjoy recording using your favorite mics.
Multitrack recorder supports recording up to four channels at the same time
The levels of the 4 mic inputs can be adjusted for the voices of the participants. The 4 headphone outputs allow
everyone participating to monitor the sound that is being recorded. In addition to a stereo le ready to be used
for podcasting, the recorded data includes separate les for the audio of each channel that can be utilized for
editing after recording.
Power options enable recording anywhere
In addition to using an AC adapter, the P4 can be powered by 2 AA batteries or a USB mobile battery, enabling
use outdoors and other places without power sources.
Remote recording
If all the podcasters cannot gather in one place or you want to invite guests who are far away, you can use
smartphones and computers to enable remote participation in recording. A Mix Minus function prevents
echoes from occurring in the audio of remote participants. By connecting an optional wireless adapter (BTA-2),
smartphones can be connected wirelessly to the
P4
.
Instant playback of jingles and recorded interviews
The SOUND PAD section has 4 buttons that can be used for real-time playback of audio les, including built-in
sounds. Make the most of this function to enhance your podcasts and live streams.
Live streaming
The 2-in/2-out USB audio interface functions of the P4 can be used for live streaming and recording with
computers, smartphones and tablets. Since it supports class compliant mode, installation of a dedicated driver
is not necessary.
Optional accessory pack
We have prepared an optional Podcast Mic Pack with related accessories, including a dynamic mics (ZDM-1)
and headphones (ZHP-1), along with software useful for editing on a computer after recording.
3

Contents
Notes about this Operation Manual
Introduction
Contents
Podcasting with the
overview
P4
Functions of parts �������������
Connection examples �����������
Use examples ��������������
Explanation of terms �����������
Signal ow ���������������
Home Screen overview ����������
Basic Menu Screen operations ������
Making preparations
Inserting SD cards ������������
Providing power �������������
Turning the power on ����������
Setting the date and time
(rst time starting up) ����������
Connecting
Connecting mics �������������
Connecting headphones ���������
Connecting smartphones ���������
Connecting a BTA-2 (dedicated wireless
adapter) �����������������
Connecting a computer, smartphone or tablet
by USB �����������������
Recording
����������������� 3
������������������ 4
����������� 5
P4
����������������� 6
������������ 14
���������������� 18
����������������� 23
������ 2
10
11
12
13
13
14
15
16
17
18
19
20
21
22
Transferring les to a computer, smartphone or
tablet
Using SOUND PAD functions
6
9
Using as an audio interface
Modifying the date and time
Setting the type of batteries used
Adjusting the display contrast
Setting the Auto Power Off function
Testing SD cards
Formatting SD cards
Restoring factory default settings
Updating the rmware
������������������� 31
Transferring les to a computer, smartphone
or tablet �����������������
folder and le structure ��������
P4
�������� 33
Assigning audio les to SOUND PAD
buttons �����������������
Playing SOUND PAD buttons �������
Setting playback methods for each
SOUND PAD ���������������
Adjusting the levels of each SOUND PAD �
��������� 38
Connecting a computer, smartphone or
tablet ������������������
Inputting USB audio return on channel 4 �
Setting USB Mix Minus ���������
�������� 41
������ 42
������� 43
�������������� 45
������������ 49
������ 50
����������� 51
31
32
33
34
35
37
38
39
40
����� 44
Adjusting input levels ����������
Making mic settings (Mic Settings) ����
Recording ����������������
Playing recordings
Playing recordings ������������
Selecting les and playing them �����
Changing the names of recorded les
Deleting les
������������� 26
���� 29
��������������� 30
23
24
25
26
27
Error message list
Troubleshooting
General �����������������
Audio interface �������������
Specications
4
������������� 52
�������������� 54
��������������� 56
54
55

Podcasting with the
●Preparation
Install an SD card in the P4, provide it power, and set the date and time.
●Connecting and checking
Connect microphones and headphones.
• By using a single mic for each person, levels can be adjusted to suit each voice,
enabling clear recording of all voices.
• Adjust the distance between the participants and their mics and set each of their
input levels according to their volumes so that they can be recorded at stable levels.
• Mute input channels that are not being used to prevent noise from being picked up.
• Headphones are necessary to not only conrm the inputs from the mics, but
also to hear the sounds of SOUND PAD playback and the voices of guests
participating remotely.
If a guest in a distant location is participating remotely in recording, connect the
1. Prepare and conrm
connections
to a computer, smartphone or tablet.
P4
• The smartphone connector is designed to prevent echo when used. When using
the USB port for this, turn on USB Mix Minus.
Conrm the levels and other settings of the SOUND PAD buttons, which can
be used for one-touch playback of background music, jingles and other sounds
during recording.
P4
2. Record
3. Publish
●Countermeasures for environmental noise in recording locations
• Attaching windscreens to mics can reduce noise caused by wind blowing.
Adjust the directions of mics so that they do not point toward other sources of
environmental noise.
• Touching mics and power cables during recording could result in handling noise
that sounds like crackling. Use mic stands and put cables in order beforehand.
Placing mic cables and power cables too close together can result in noise being
picked up.
Enabling the Lo Cut function in the
•
of vibration, wind and other noise picked up by mics.
Mic Settings menu can reduce the amount
P4
●Recording theme
To enable recording conversations at a good pace, conrm the content of the
discussion with the other participants and prepare reference materials and other
resources so that they are at hand.
●Speaking tips
Try to speak clearly while avoiding making sibilant (hissing s) and plosive (p and d)
sounds too loud.
●SOUND PAD buttons
Use these to add excitement to programs with jingles and effects.
●Publish
The File Transfer menu can be used to connect to a computer, smartphone or
tablet and transfer recorded les. Upload them to the podcasting service* or
server you are using.
*Services that provide servers for saving podcast les
●Editing before publish
Using audio mastering software, for example, to adjust periods of silence and to
add effects could enhance the podcast.
The les recorded for each channel by the
are perfect for mixing in a DAW.
P4
5
P4
overview
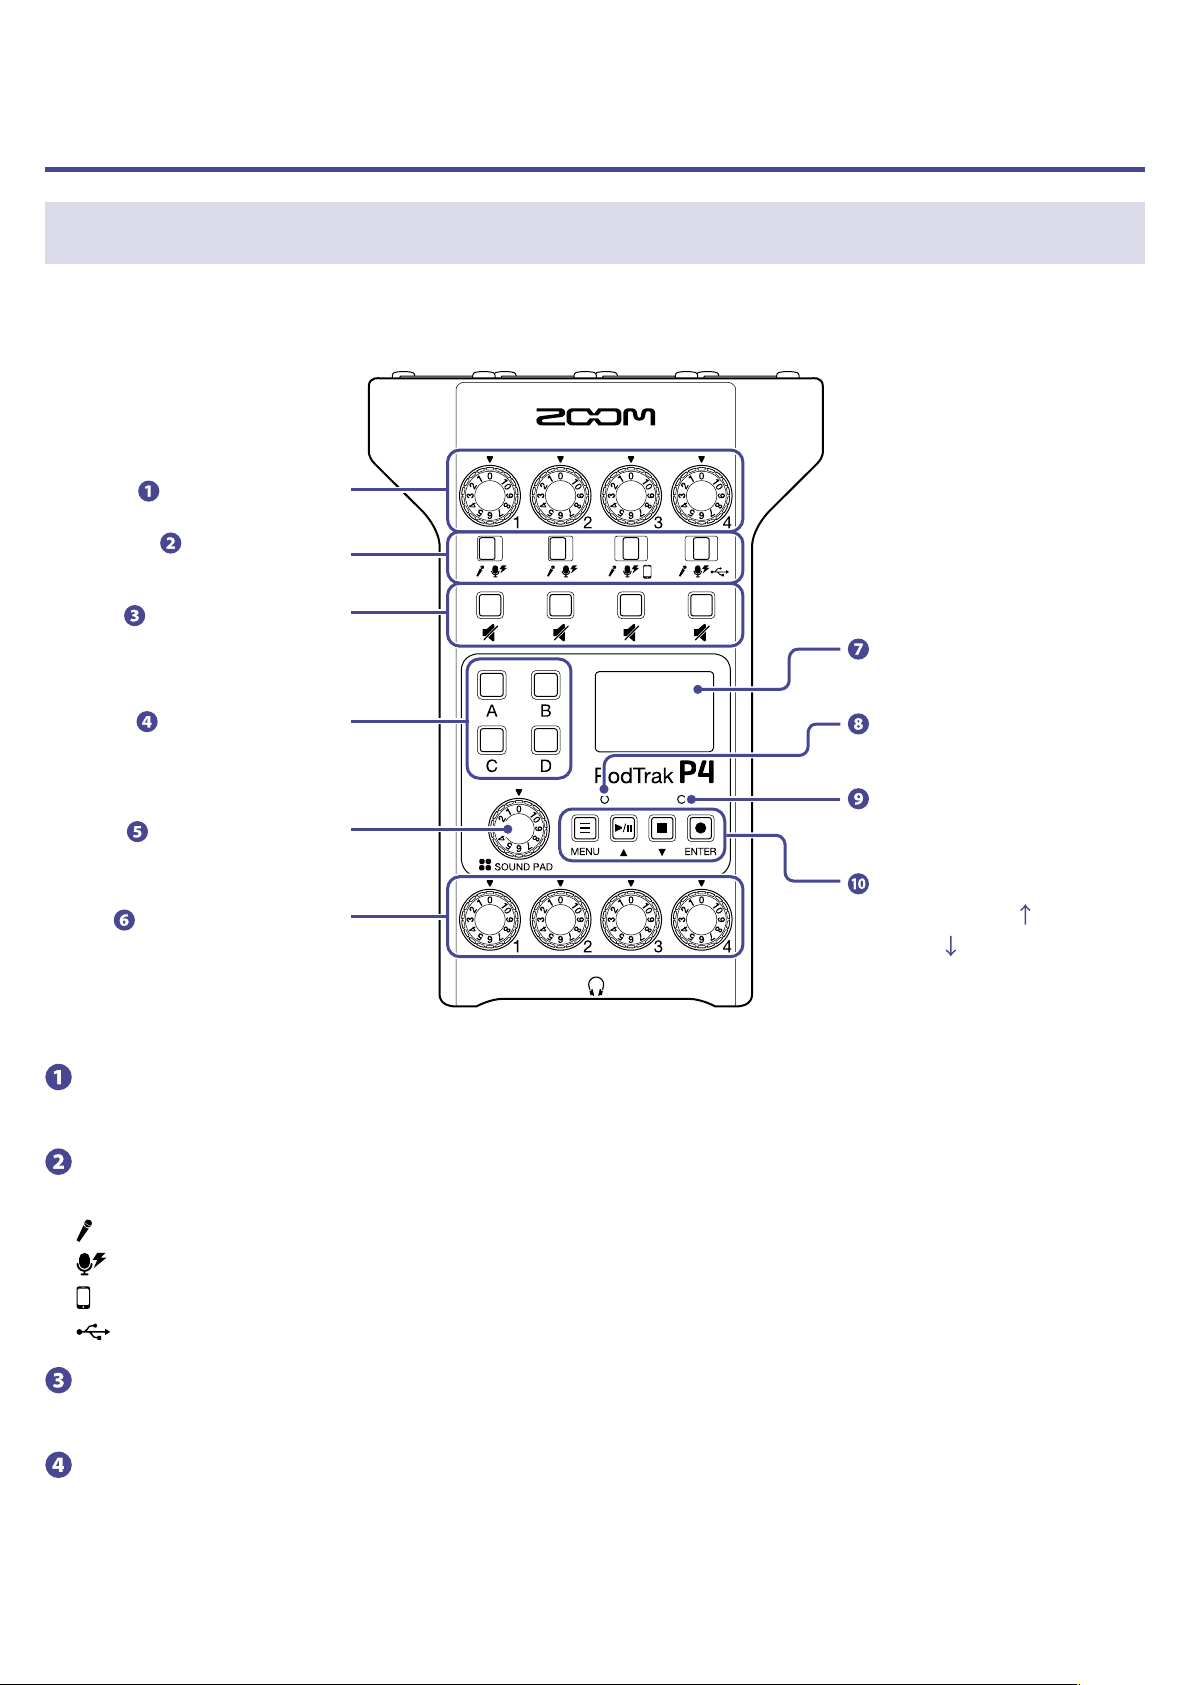
Functions of parts
■To p
INPUT knobs 1–4
INPUT SELECT
switches 1–4
MUTE buttons 1–4
Display
SOUND PAD A–D
SOUND PAD knob
PHONES knobs 1–4
INPUT knobs 1–4
Use to adjust input signal levels.
INPUT SELECT switches 1–4
Set these according to the connected equipment.
Dynamic mic
Condenser mic (supplies +48 V phantom power)
Smartphone, etc.
USB audio return signal output from computer, smartphone or tablet
PLAY indicator
REC indicator
MENU button
PLAY/PAUSE/
STOP/
REC/ENTER button
button
button
MUTE buttons 1–4
Use to mute (lit) and unmute (unlit) signals.
SOUND PAD A–D
Use these to play the sounds assigned to them.
6
SOUND PAD knob
Use to adjust SOUND PAD levels.
PHONES knobs 1–4
Use to adjust the volumes of signals output from PHONES jacks 1–4.
Display
This shows the recorder status and Menu Screen.
When the
seconds. Operating the unit will restore the display to its normal brightness.
PLAY indicator
This lights during playback and blinks when paused.
REC indicator
This lights during recording and blinks when recording is paused.
MENU button
Use to open the Menu Screen and to return to the previous screen.
PLAY/PAUSE/
Use to play/pause recorded les.
Use to move the cursor up on the Menu Screen.
STOP/
Use to stop recording/playback.
Use to move the cursor down on the Menu Screen.
REC/ENTER button
Use to start/stop recording.
Use to conrm a selection on the Menu Screen.
is running on battery power, the display will automatically dim if it is not operated for 15
P4
button
button
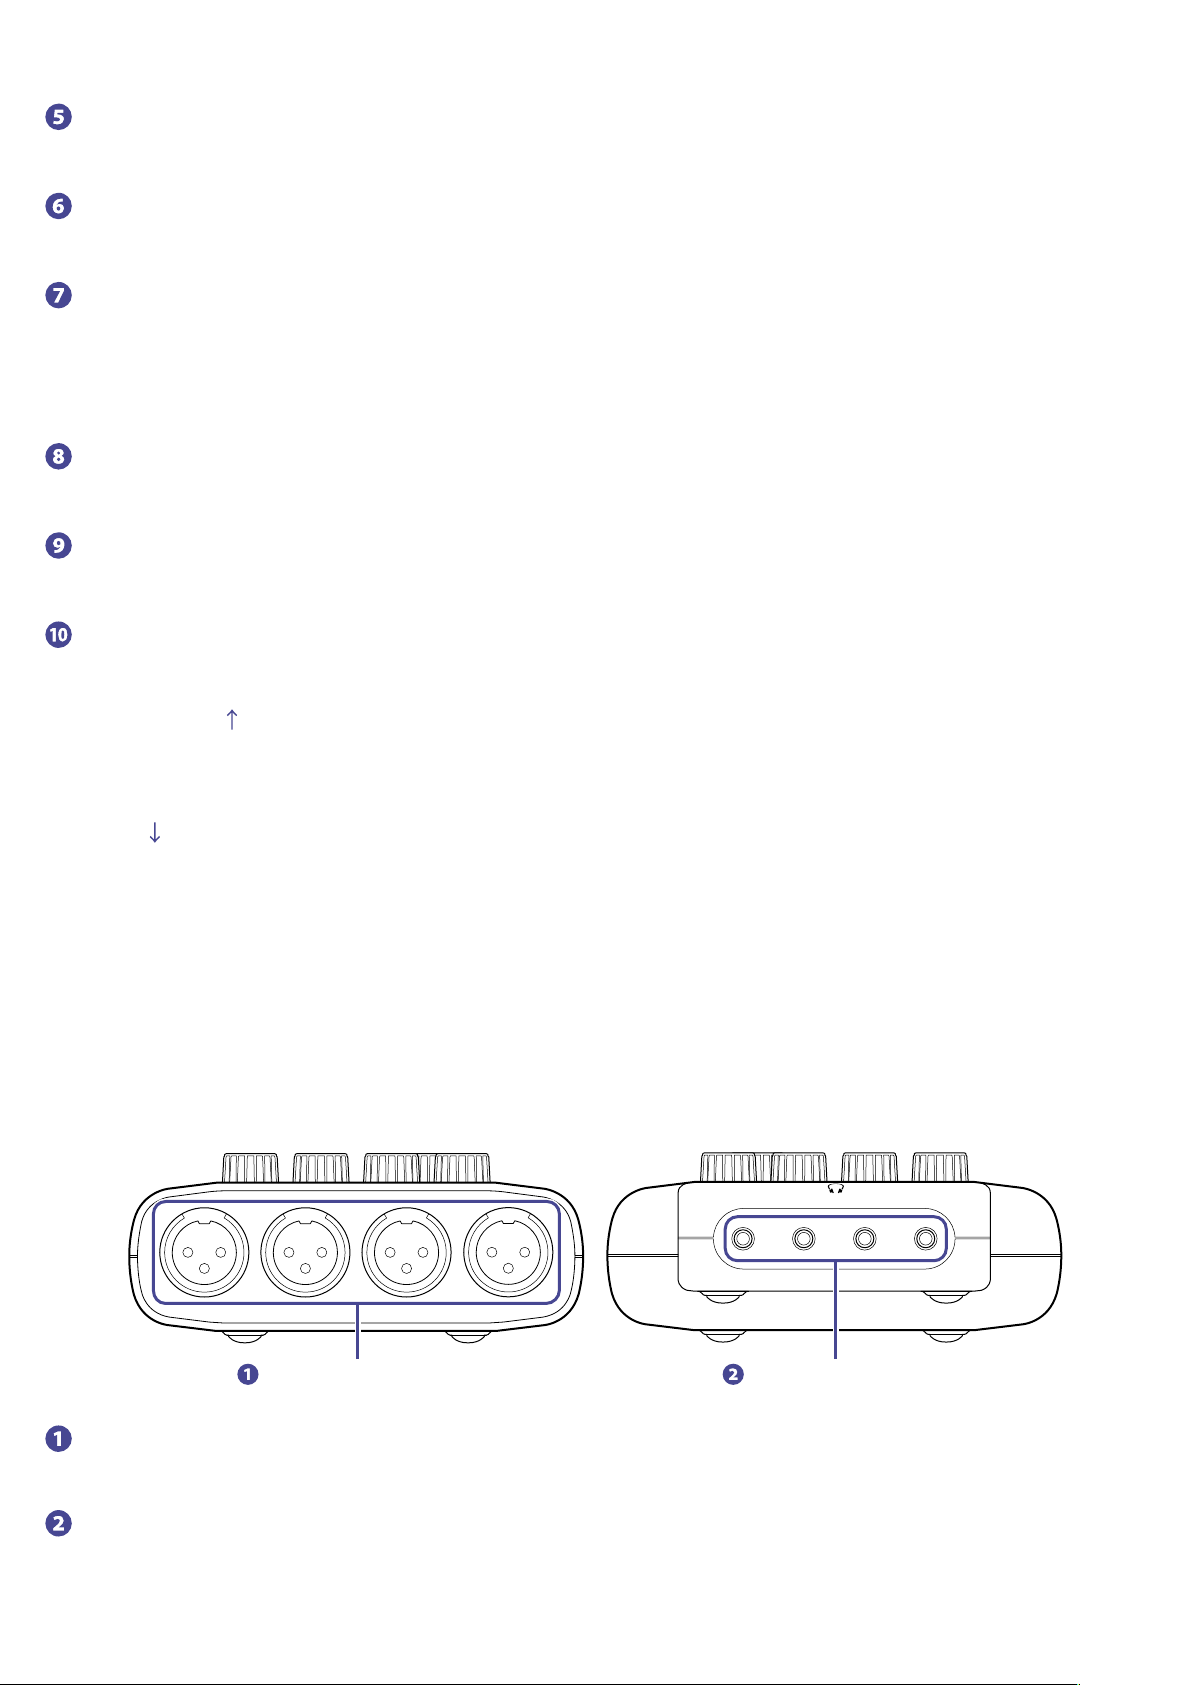
■Back/front
INPUT jacks 1–4 PHONES jacks 1–4
INPUT jacks 1–4
These input jacks have built-in mic preamps.
PHONES jacks 1–4
These output the signals adjusted by PHONES knobs 1–4.
7
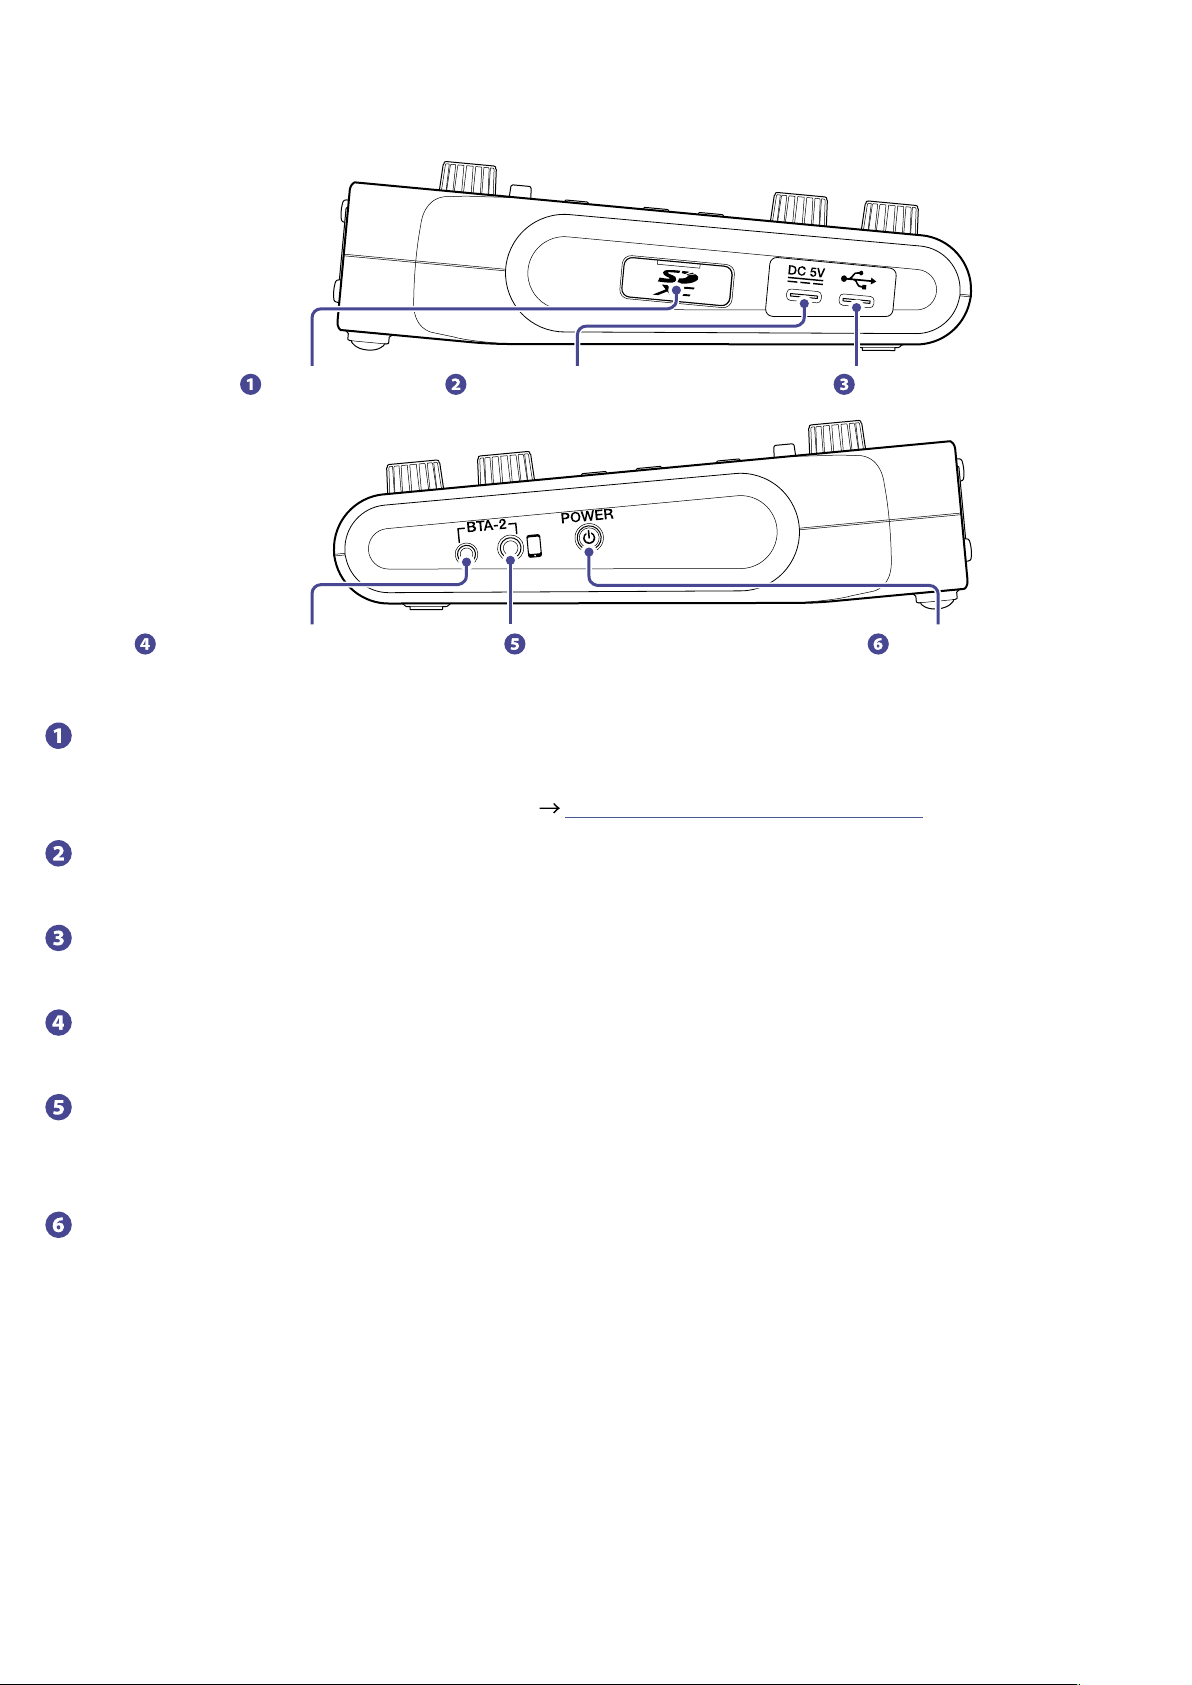
■Left/Right
BTA-2 power supply connector Smartphone connection jack Power switch
SD card slot Power supply USB port (Type-C) USB port (Type-C)
SD card slot
Cards that conform to SDHC and SDXC specications are supported.
Format the SD card with the
Power supply USB port (Type-C)
This power supply USB port is for connecting an AC adapter or portable battery.
USB port (Type-C)
This USB port is for connecting with a computer, smartphone or tablet.
BTA-2 power supply connector
Use this power supply connector when connecting a BTA-2 wireless adapter.
Smartphone connection jack
By using a 4-contact mini-plug cable, the signal from a smartphone can be input on channel 3 while the
signal mixed on the
Power switch
This turns the power on and off.
(excluding the channel 3 signal) is returned to the smartphone simultaneously.
P4
before use. ( “Formatting SD cards” on page 49)
P4
8
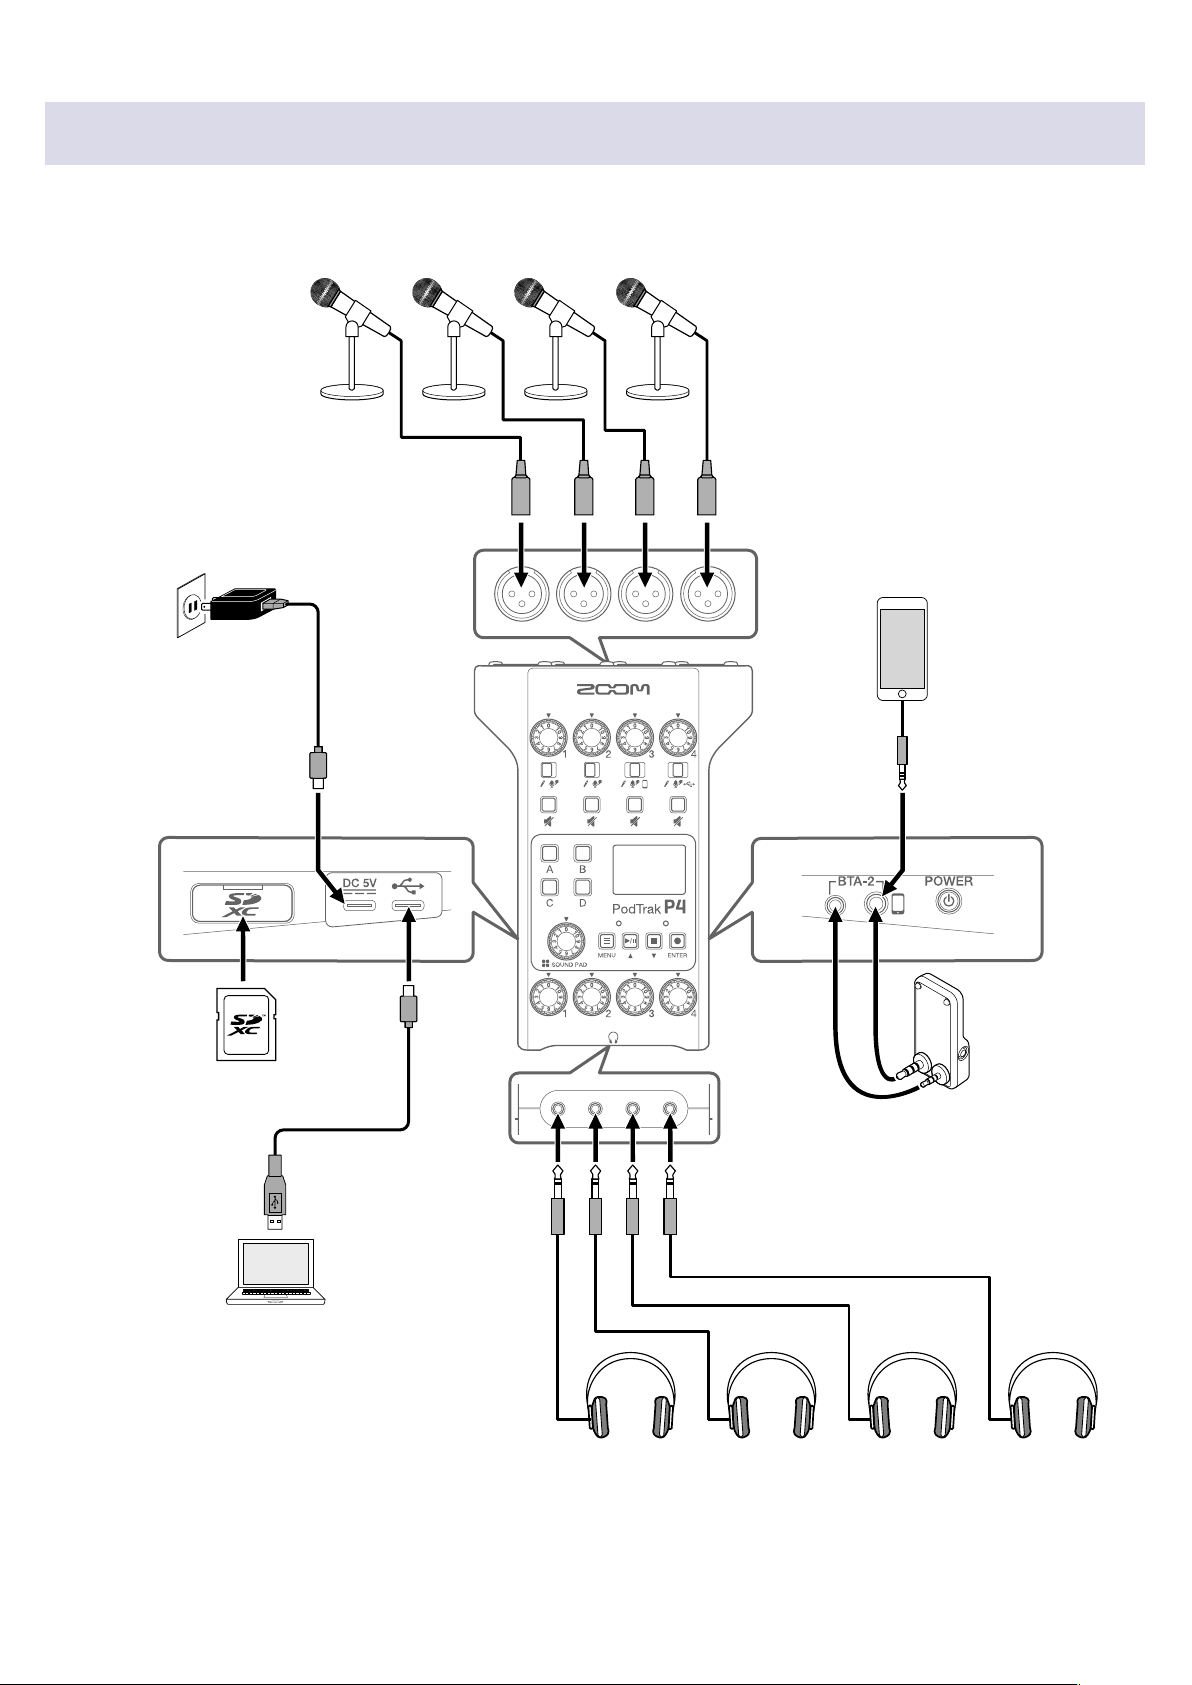
Connection examples
Mics
Dynamic and condenser mics
AC adapter
(ZOOM AD-17)
Smartphone
Guests can participate in
podcasts by phone.
USB Type-C
port
USB Type-C
port
SD card
Computer, smartphone or tablet
Wireless adapter (ZOOM BTA-2)
This enables wireless connection
to smartphones and tablets.
Using the audio interface function,
audio can be shared with a computer,
smartphone or tablet, and recordings on
the SD card can be transferred for editing.
This might not be usable with some
communication apps.
Headphones
9
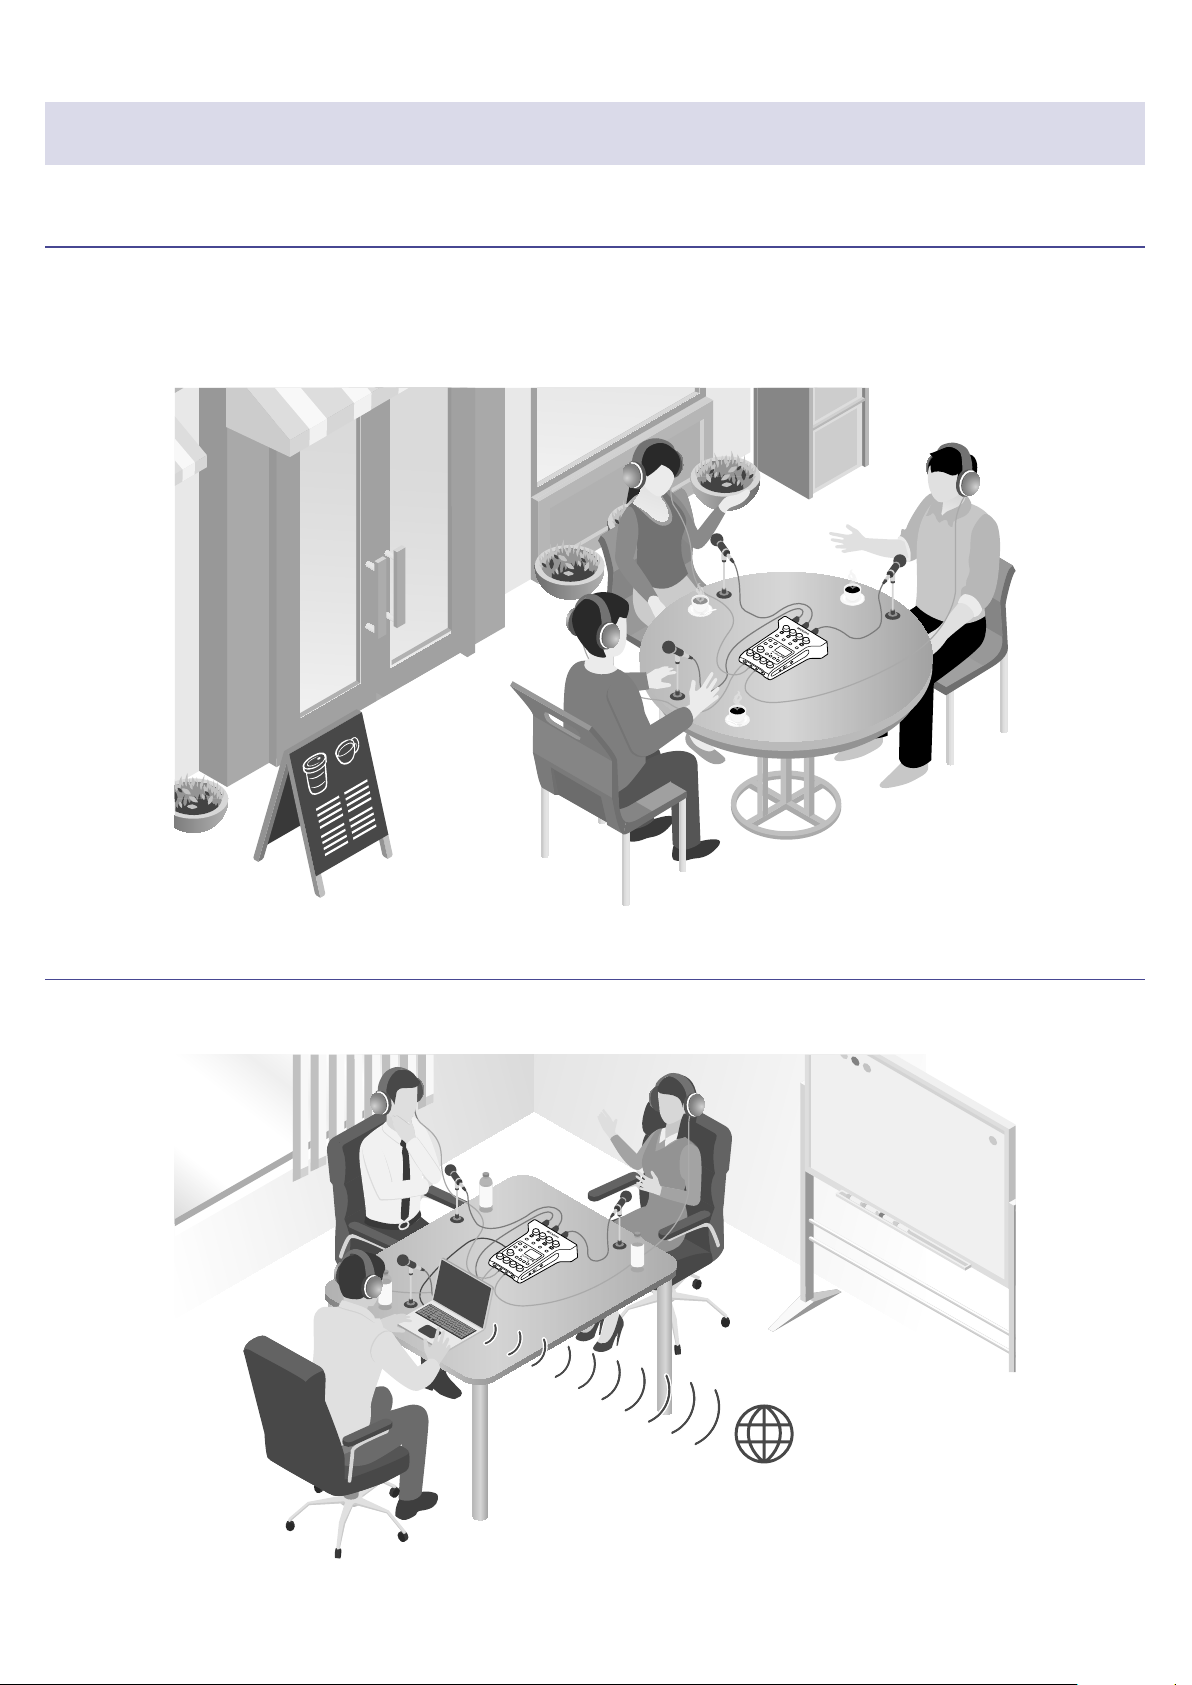
Use examples
Using on location
By using the P4 with batteries or a portable battery, audio can be recorded on location. The recorded
audio is saved on an SD card and can be transferred to a computer, smartphone or tablet for editing and
distribution.
Using for live streaming
By connecting a P4 to a computer, smartphone or tablet, you can use it to stream audio in real time.
Internet
10

Explanation of terms
Audio interface
The P4 enables sounds from mics and instruments, for example, to be input to a computer, smartphone
or tablet. It can also output sounds from that device to speakers and headphones.
USB audio return
When the
or tablet. Background music can be played from the connected device.
is connected as an audio interface, this is the signal output from the computer, smartphone
P4
SOUND PAD buttons
Audio les can be assigned to these. Press one to play the assigned le. These are convenient to play
opening and closing music, jingles, and interviews that have been recorded in advance.
USB Mix Minus
When using the P4 as an audio interface, this can prevent feedback to a person participating in a call
through the connected device.
Podcasting
This is one way to share audio les publicly on the Internet. Podcasters make contents and distribute
them via the Internet so people can listen easily on smartphones, computers and other devices.
Dynamic mic
This type of mic does not require phantom power and is strong and durable.
Condenser mic
This type of mic usually has high sensitivity and can capture audio with high quality. Phantom power
supply is necessary for use.
11

Signal ow
Channel 1
Channel 2
Channel 3
Channel 4
INPUT 1
INPUT 2
INPUT 3
INPUT 4
Signal ow
Lo Cut Limiter
Lo Cut Limiter
Lo Cut Limiter
Lo Cut Limiter
MUTE
TRACK 1
MUTE
TRACK 2
MUTE
TRACK 3
MUTE
TRACK 4
SOUND PAD
L/R
Smartphone
connection jack
USB port
Input sound. Channels 1 and 2 can be used to input sound from mics. Channel 3 can be used to input sound
from a mic or smartphone. Channel 4 can be used to input sound from a mic or the USB audio return.
Adjust the input levels of each channel.
Make settings for mic inputs on each channel. Lo Cut cuts unnecessary low frequencies, and Limiter
suppresses input levels that are too high. Lo Cut and Limiter are only applied to sounds from mic input.
Mute/unmute channels. Inputs not being used can be muted.
Play SOUND PAD sounds and adjust their levels.
Separate recording les are made for each channel and the SOUND PAD sounds.
A recording le is made for podcasting. This combines all channels and the SOUND PAD sounds (through the
master channel) into a stereo le.
Monitor the sound of the recording for podcasting through headphones. The volume can be adjusted separately
for each pair of headphones.
A mix of all channels is output to the connected smartphone. The sound from the connected smartphone
itself, however, is not sent back to it.
A mix of all channels is output to the computer, smartphone or tablet connected by USB. When the USB Mix
Minus setting ( page 40) is On, the sound input through channel 4 (the USB audio return) is not included.
12
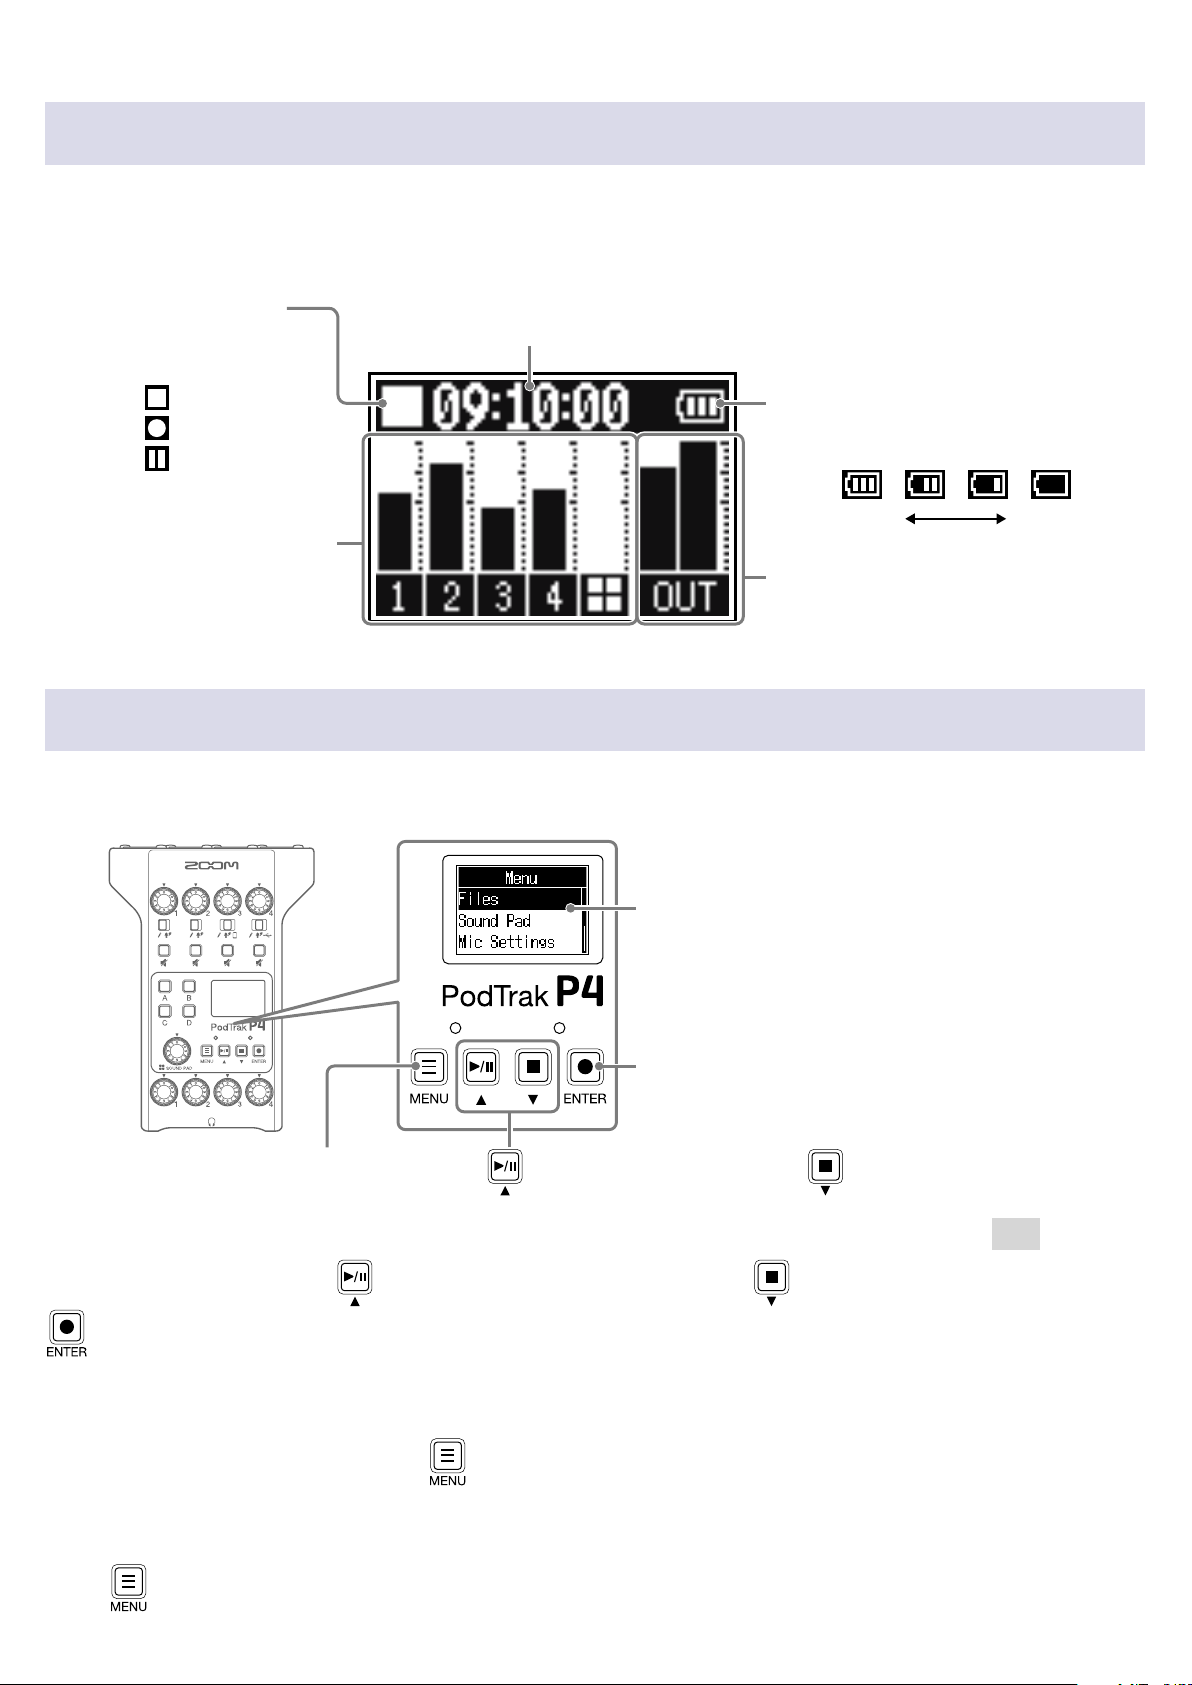
Home Screen overview
This screen appears on the display when the P4 power is turned on.
This shows the
Status icon
This shows the
recording status.
Stopped
Recording
Paused
Channel names and level meters
These show the names of the
channels and their current input
levels.
conditions, including recording status and input levels.
P4
Time display
This shows either the current elapsed recording time or the available
recording time.
Remaining battery charge
When the remaining battery charge
becomes low, replace the batteries or
connect an AC adapter or portable battery.
Full Empty
Master level meters
These show the output
signal levels.
Basic Menu Screen operations
Use the Menu Screen to make settings, including for recording and the SOUND PAD buttons.
Menu Screen
This shows Menu items.
A scroll bar appears at the right edge if
there are more items than can be shown
on the display.
This conrms selections.
This opens the Menu Screen.
Use
to select the item above and to select the item below.
In this Operation Manual, Menu item names are shown with a gray background. (Example: Files)
On the Menu Screen, press
to select the item above, and press to select the item below. Press
to conrm the selected item.
■Returning to the Home Screen
To return to the Home Screen, press repeatedly until it appears.
■Returning to the previous screen
Press to return to the previous screen.
13
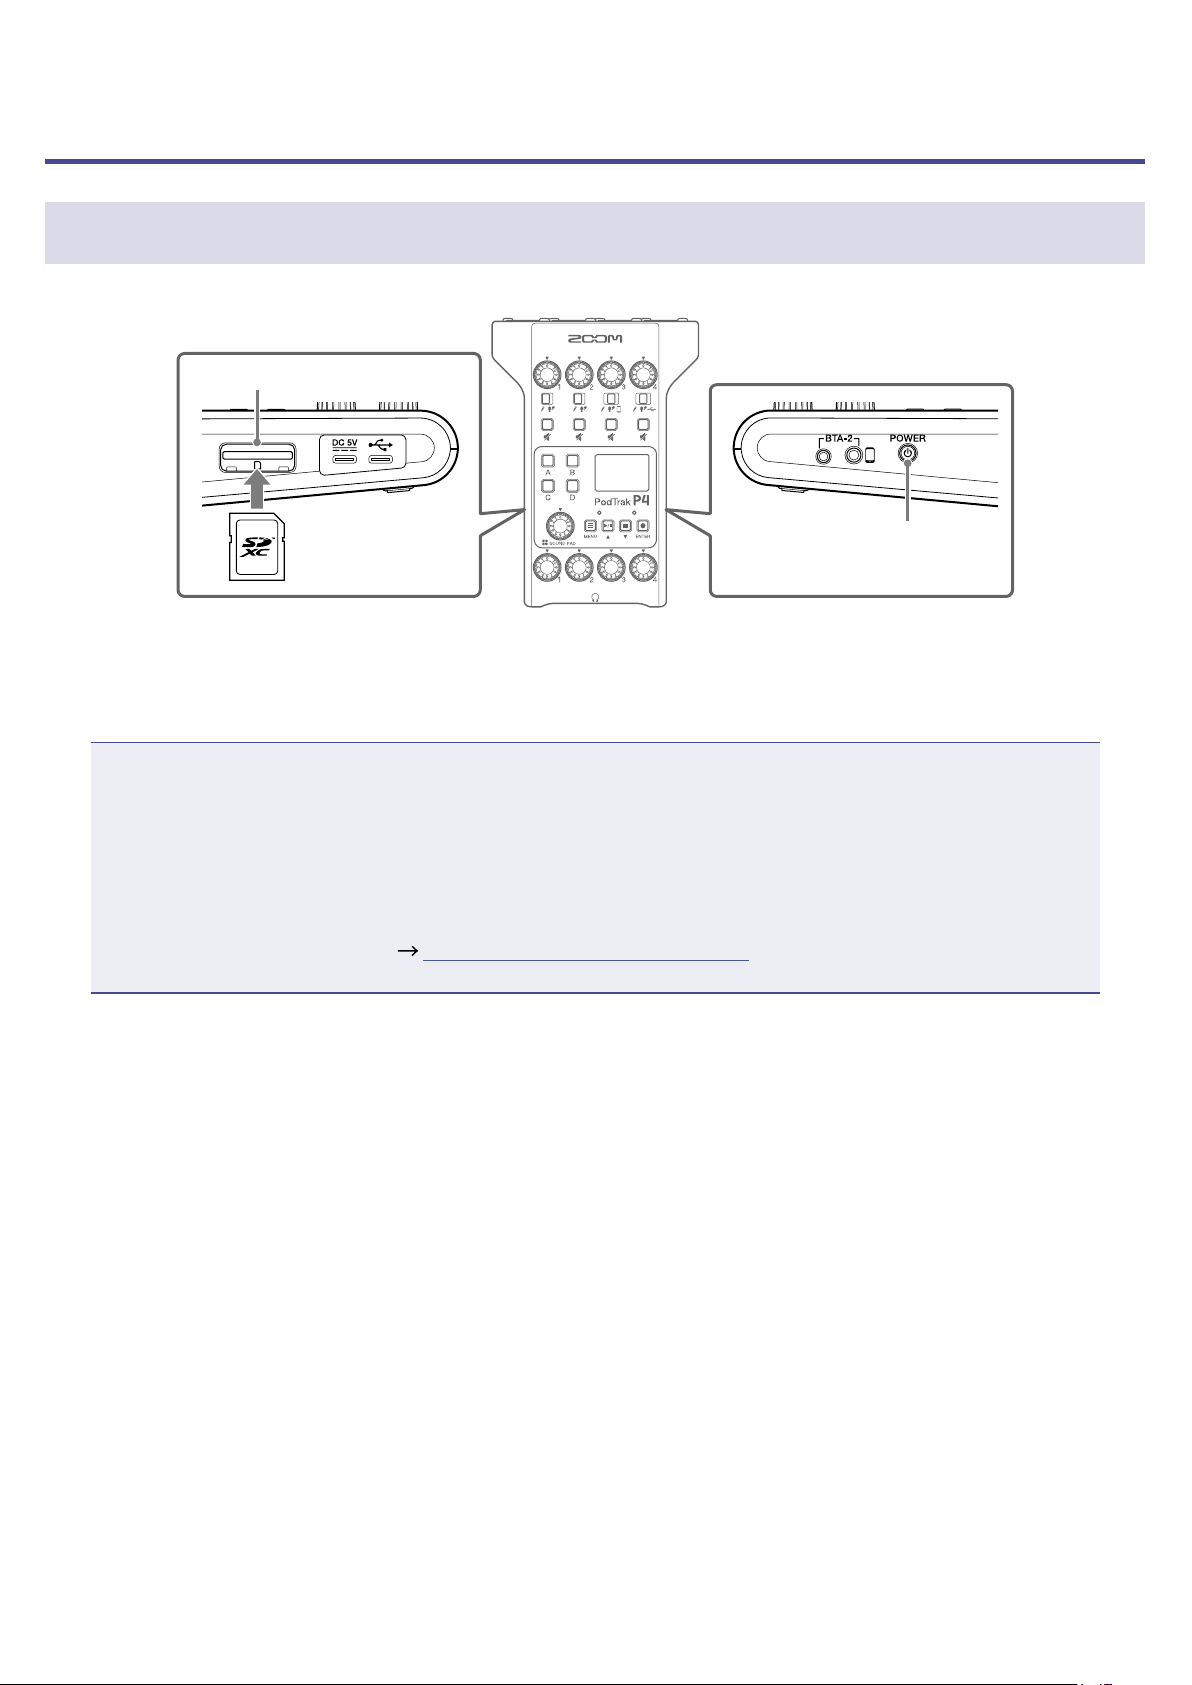
Making preparations
Inserting SD cards
SD card slot
POWER switch
With the power off, open the SD card slot cover, and insert an SD card all the way into the slot.
1.
To remove an SD card, push it further into the slot and then pull it out.
NOTE
•Cards that conform to SDHC and SDXC specications are supported.
•Disable write-protection on the SD card before inserting it.
•Inserting or removing an SD card while the power is on could result in data loss.
•When inserting an SD card, be sure to insert the correct end with the top side up as shown.
•If an SD card is not loaded, recording and playback are not possible.
•Before using SD cards that have just been purchased or that have been formatted on a computer, they
must be formatted by the
( “Formatting SD cards” on page 49).
P4
14
Providing power
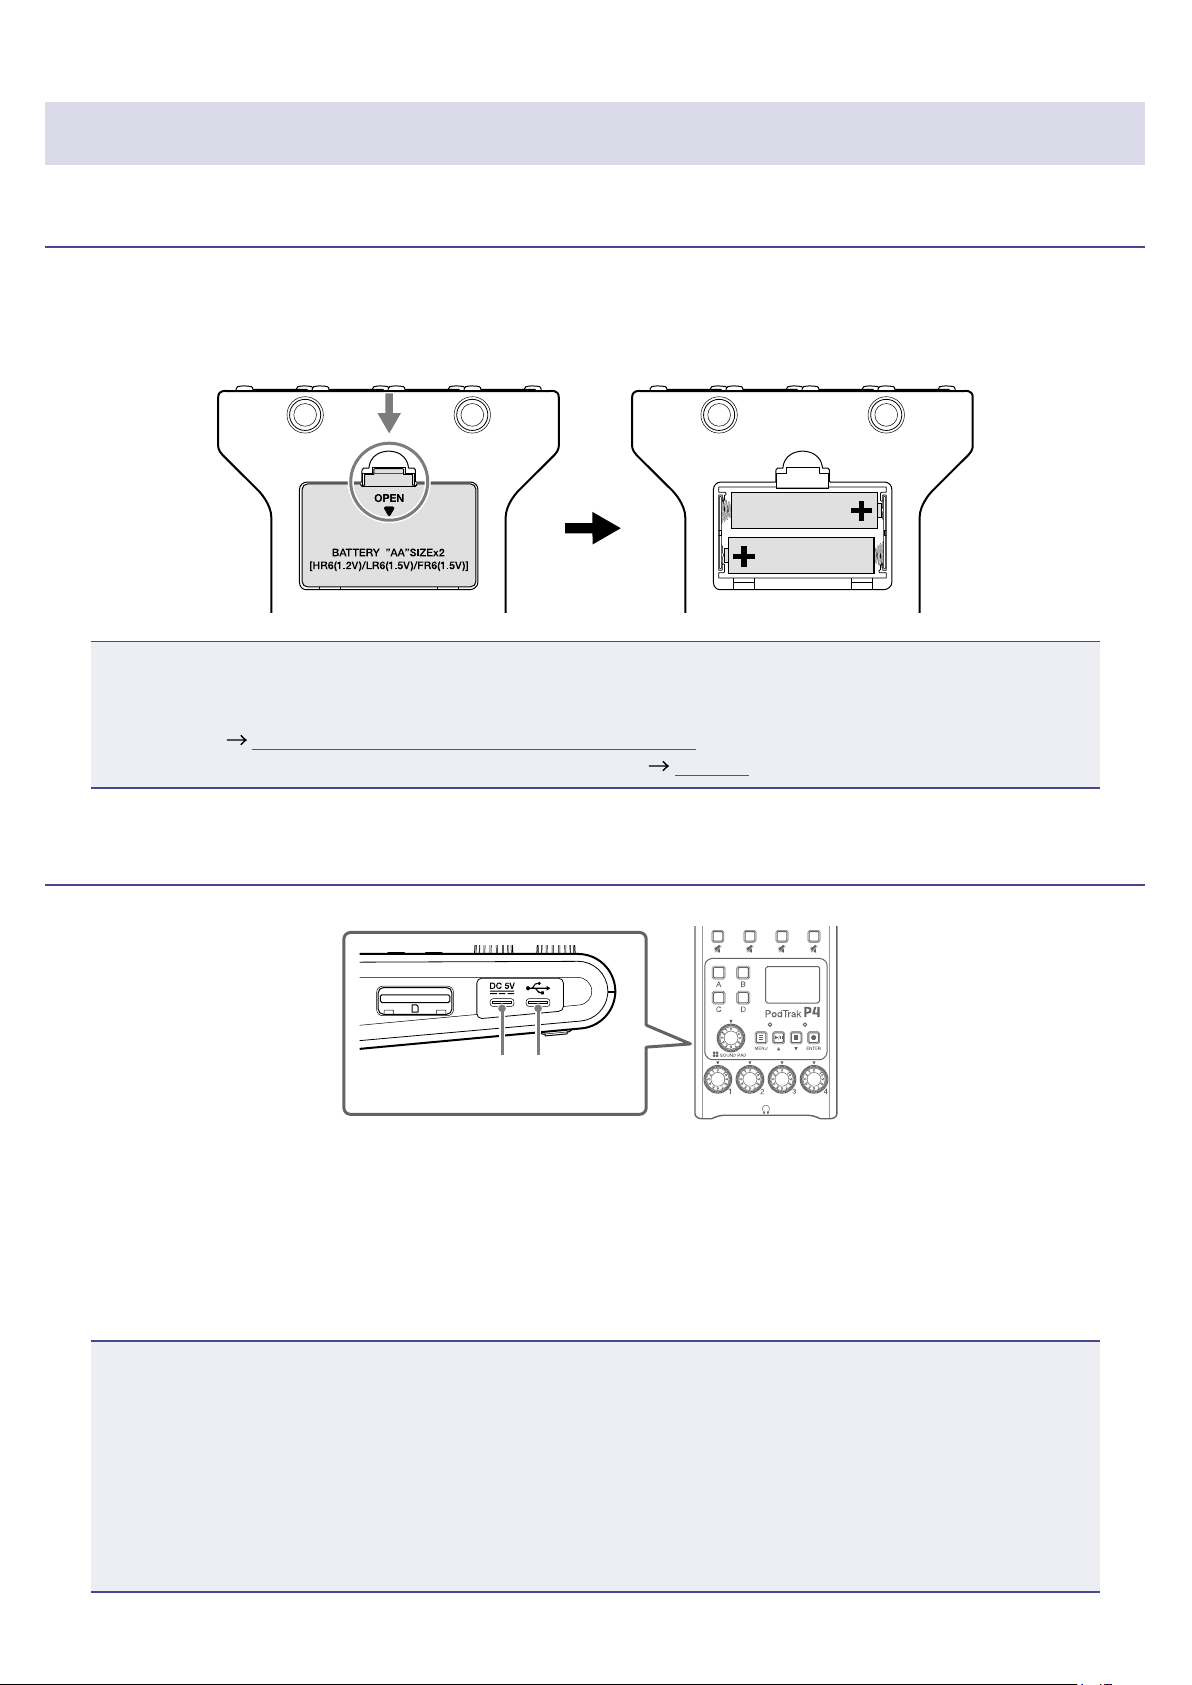
Installing batteries
To run the P4 on battery power, open the battery compartment cover on the bottom and install two AA
batteries.
Open while pressing down.
NOTE
•Use only one type of battery (alkaline, NiMH or lithium) at a time.
•Set the type of battery used correctly so that the amount of remaining battery charge can be shown
accurately. ( “Setting the type of batteries used” on page 42)
•The battery charge can be checked on the Home Screen ( page 13).
Other power sources
Power supply USB
port (Type-C)
■Using the power supply USB port (Type-C)
Connect the dedicated AC adapter (AD-17) or a mobile battery to the power supply USB port (Type-C).
■Using the USB port (Type-C)
By connecting this USB port (Type-C) to a computer, the P4 can be operated on USB bus power.
NOTE
By connecting this USB port to a computer before turning the power on, the
•
USB bus power.
•After turning the power on, if the USB cable connected to the USB port (Type-C) is disconnected and
reconnected, the P4 cannot be operated on USB bus power until it is restarted, even if connected to a
computer.
If a smartphone or tablet is connected to this USB port, depending on the device, turning the P4 power
•
on might not be possible. In this case, connect an AC adapter or mobile battery to the USB port, or
install batteries in the battery compartment on the bottom of the unit to use it.
USB port
(Type-C)
can be operated on
P4
15

Turning the power on
Press until “ZOOM” appears on the display.
1.
This turns the power on and opens the Home Screen.
POWER switch
The rst time the power is turned on after purchase and after the P4 has been restored to its factory
default state, set the date and time when the Set Date/Time setting screen opens. (
and time (rst time starting up)” on page 17)
NOTE
The power will automatically turn off if it is not used for 10 hours. To keep the power on at all times,
disable the automatic power saving function. ( “Setting the Auto Power Off function” on page 44)
“Setting the date
Turning the power off
Press until “Goodbye! See You!” appears on the display.
1.
NOTE
When the power is turned off, the current settings are saved on the
HINT
When the power is turned on, it will start up in the state it was in when last turned off.
P4
.
16
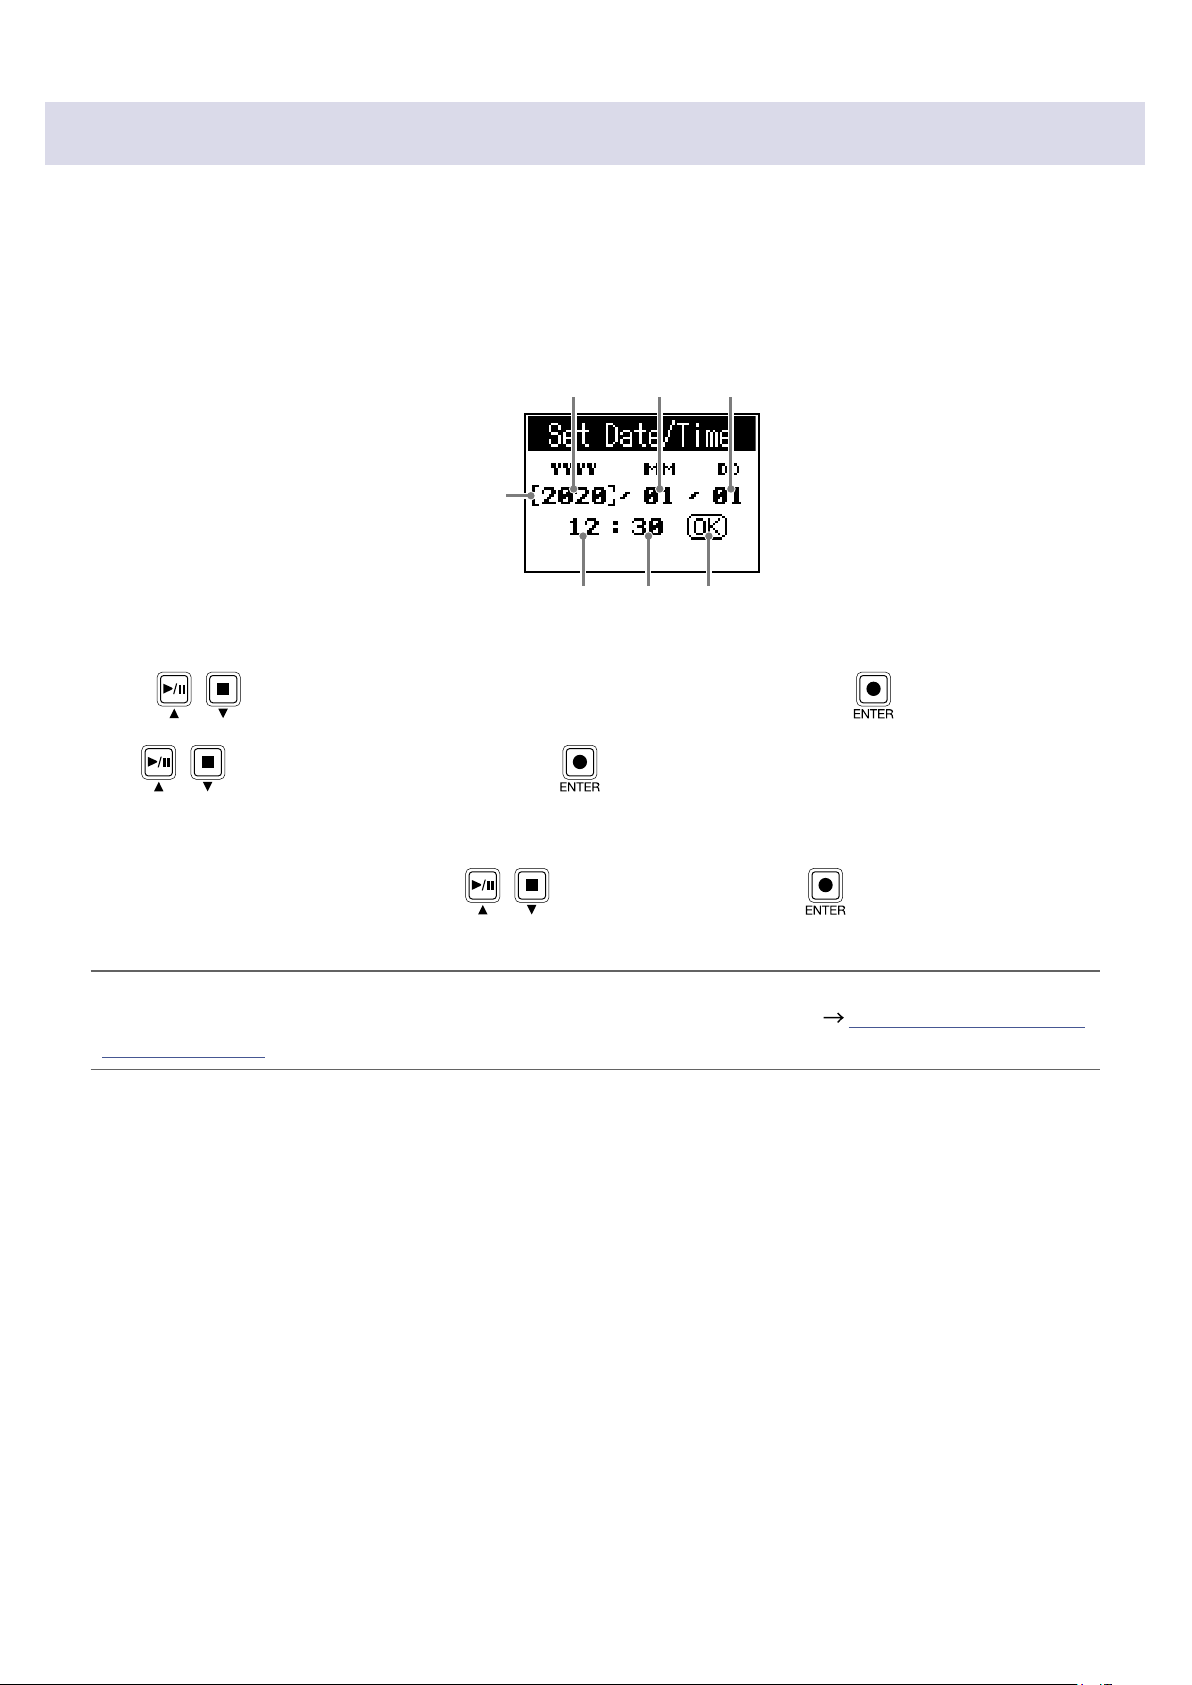
Setting the date and time (rst time starting up)
The rst time the power is turned on after purchase, set the date and time when the Set Date/Time setting
screen opens.
The date and time are stored in recorded les, and the recording start date/time is used in the le name.
Having the correct date and time set is helpful when looking for les, for example, by allowing contents to
be determined by names.
Year Month Day
Cursor
Hour Minute OK
Press / to move the cursor to the item you want to set, and press .
1.
Use / to change the value, and press to conrm.
2.
Repeat steps 1 and 2 to set the date and time.
3.
After setting the date and time, use / to select OK, and press .
4.
This conrms the set date and time and reopens the Home Screen.
HINT
The date and time setting can also be changed later from the Menu Screen. ( “Modifying the date and
time” on page 41)
17
Connecting
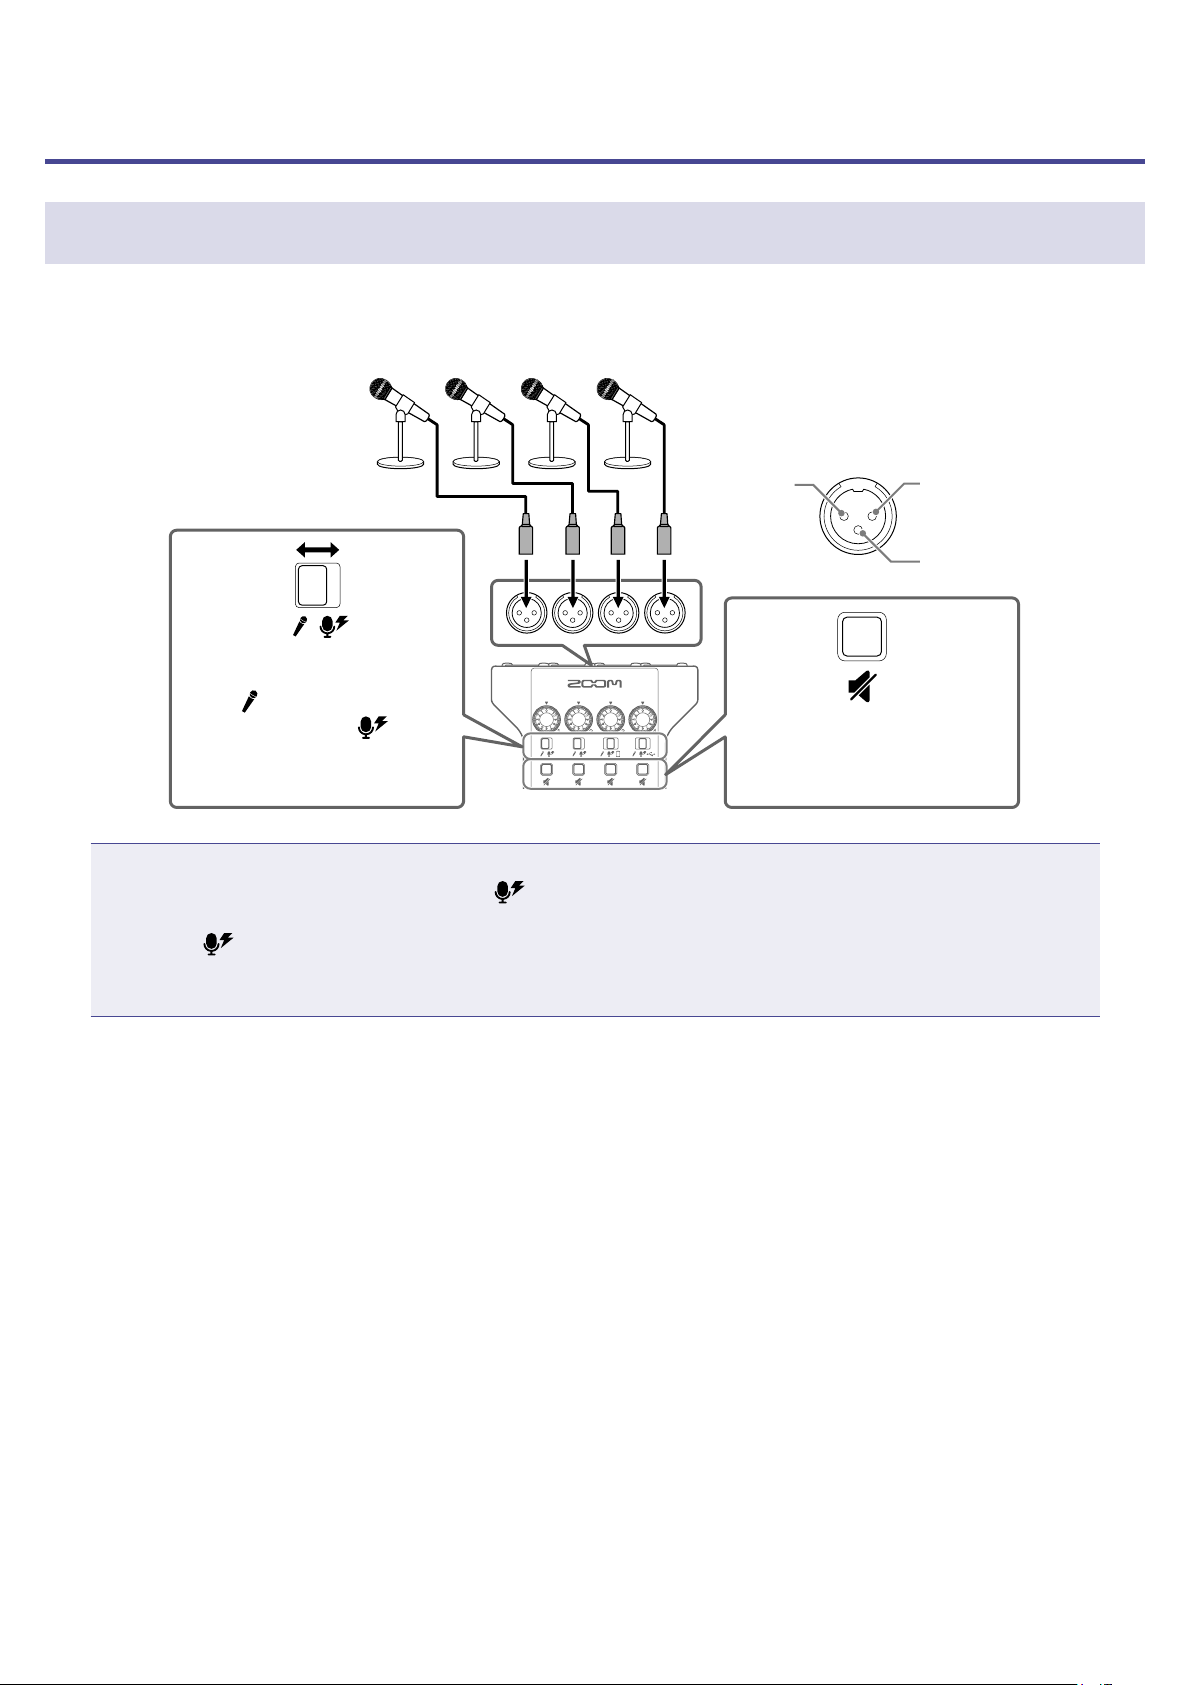
Connecting mics
Connect mics to capture sound. Up to 4 mics can be connected.
INPUT SELECT switches 1–4
Dynamic and condenser mics
Use mic cables (with XLR
connectors) to connect them to
INPUT jacks 1–4.
2: HOT 1: GND
3: COLD
Set to
dynamic mic or to
using a condenser mic.
NOTE
•When an INPUT SELECT switch is set to
When connecting to a device that is not compatible with phantom power, do not set the INPUT SELECT
switch to . Doing so could damage the device.
•During recording, operating the INPUT SELECT switch will not change the phantom power supply
setting. The change will be applied after recording completes.
when using a
when
MUTE buttons 1–4
Press to mute inputs.
These light when muted.
, +48 V phantom power is supplied to that INPUT jack.
18

Connecting headphones
Connect headphones to check the sound. The PHONES 1–4 jacks output the master channel sound.
Up to 4 pairs of headphones can be connected.
Lower
PHONES knobs 1–4
Use these to adjust
headphone volumes.
Raise
Headphones
Connect to PHONES jacks 1–4.
19

Connecting smartphones
The following operations are possible when a smartphone is connected to the smartphone connection
jack.
•When podcasting, the voice of a guest participating by phone can be input on channel 3. By using a
4-contact mini-plug cable, a signal can be input from a smartphone and a mono signal can be sent
back to it simultaneously. Since this output signal does not include the sound from channel 3, guests
participating by phone will not have an echo.
•Music played back on a smartphone can be input on channel 3.
INPUT SELECT switch 3
Set to
.
Audio
signal from
phone
participant
4-contact mini-plug
Tip: Left channel (from smartphone)
Ring 1: Right channel (from smartphone)
Ring 2: Ground
Sleeve: mono mix (from
4-contact miniplug cable
Master output
signal
(excludes audio
signal from phone
participant)
)
P4
20

Connecting a BTA-2 (dedicated wireless adapter)
By connecting a BTA-2, audio can be input through the smartphone connection jack via Bluetooth.
LED
Pairing
switch
Connecting
Pairing must be conducted the rst time connecting.
While the P4 power is off, connect the BTA-2 to the smartphone connection jack and the BTA-2 power
1.
supply connector.
BTA-2
Turn the P4 power on ( “Turning the power on” on page 16).
2.
The LED lights white when power is being supplied to the BTA-2.
If a smartphone has already been paired, it will automatically be connected at this time.
Press and hold the pairing switch until the BTA-2 LED blinks white.
3.
This puts the BTA-2 into connection standby.
Conduct connection procedures on the smartphone.
4.
The LED will light blue when connection completes.
NOTE
When connecting to a smartphone using a BTA-2, set INPUT SELECT switch 3 to
.
Disconnecting
Conduct disconnection procedures on the smartphone.
1.
This disconnects it.
The P4 power should be off when disconnecting a BTA-2.
2.
21

Connecting a computer, smartphone or tablet by USB
The following operations are possible when a computer, smartphone or tablet is connected to the USB
port (Type-C).
•Using the audio interface function ( page 38), music, interviews and other audio from a computer,
smartphone or tablet can be input through channel 4. Sound input through the
with SOUND PAD buttons can also be sent back to that device and streamed live directly.
•Recording les on SD cards can also be transferred to a computer for editing. (
computer, smartphone or tablet” on page 31)
USB Type-C
port
INPUT SELECT switch 4
Set this to when you
want to input sound from a
computer or other device.
and sounds played
P4
“Transferring les to a
NOTE
Use a Lightning to USB Camera Adapter (or Lightning to USB 3 Camera Adapter) to connect to an iOS/
iPadOS device with a lighting connector.
22

Recording
Adjusting input levels
Adjust input levels so that the volumes of the mics being recorded neither cause distortion nor are too
low.
Lower
INPUT knobs 1–4
Use to adjust input levels.
Input levels are shown on the display. While balancing the mix of the channels, adjust their levels so that
they are between −12 dBFS −6 dBFS.
Level
HINT
•The level increases when the mic and the speaker’s mouth are close and decreases when they are far
apart. When recording, maintain the same distance between the mic and the speaker’s mouth that was
used when the input level was adjusted. (The standard distance between mic and mouth is 10–20 cm.)
•If smartphone or USB audio return signals are being input (INPUT SELECT switches set to
those channels will be in stereo and stereo level meters will be shown.
Raise
−6 dBFS
−12 dBFS
or ),
23

Making mic settings (Mic Settings)
The Lo Cut and Limiter functions can be turned on/off for each input.
By default, they are on.
Press .
1.
This opens the Menu Screen.
Use / to select Mic Settings, and press .
2.
Use / to select the setting, and press .
3.
• Lo Cut: This can cut low frequencies to reduce the sound of air conditioning, wind, vocal pops and
other noise.
• Limiter: This can prevent distortion by reducing input signals that have excessively high levels.
Use / to select the mic (Mic 1–Mic 4) to set, and press .
4.
Pressing
The Lo Cut or Limiter setting is on for the mics that have check marks.
toggles the setting on and off.
24

Recording
The input signals of each channel, the sounds (stereo) played by pressing SOUND PAD buttons, and the
master channel signal (stereo) can be recorded simultaneously as separate les to the SD card.
Recording/recording paused: elapsed recording time
Recording stopped: available recording time
REC indicator
Press when the Home Screen is open.
1.
Recording will start and the REC indicator will light red.
Press
resume recording.
Press or .
2.
Recording will stop.
HINT
•When the channel 3 INPUT SELECT switch is set to
•If you do not want to record a channel or you want to turn its input off temporarily, press to mute
it.
•Recorded les will be named with the date and time when recording started.
•See “P4 folder and le structure” on page 32 for the location where recorded les are saved.
when recording to pause recording. (The REC indicator will blink). Press again to
or the channel 4 INPUT SELECT switch is set to
, those channels will record in stereo.
25

Playing recordings
Playing recordings
Recorded les can be played back.
Playback le name
Elapsed playback timePLAY indicator
Press when the Home Screen is open.
1.
The most recently recorded le will start playing, the Playback Screen will open on the display, and
the PLAY indicator will light green.
HINT
To select a le and play it back, see “Selecting les and playing them” on page 27.
Operations during playback
Function Operation
Pause
Search backward
Press
Press and hold
to start/pause playback alternately.
.
Search forward
Skip to beginning
Stopping playback
Press and hold
Press
Press
to return to the le beginning.
or to stop playback.
.
26

Selecting les and playing them
Files that have been recorded by the P4 or that are saved on the SD card can be selected and played.
Press .
1.
This opens the Menu Screen.
Use / to select Files, and press .
2.
Use / to select the le you want to play, and press .
3.
Use / to select Play, and press .
4.
This opens the Playback Screen on the display and starts playback of the selected le.
During playback, the PLAY indicator will light green.
See “Operations during playback” on page 26 for operations during playback.
27

Selecting les not supported by the
When a le that is not supported by the P4 is selected on the Files Screen, one of the following messages
will be shown on the display.
File selected that cannot be played by the
■
If one of the above pop-up messages appears, the selected le cannot be played by the P4. Select a
different le.
File selected that can be converted by the
■
P4
P4
P4
If one of the above pop-up messages appears, the selected le can be converted by the P4 and then
played. Select Execute to start conversion. The converted le will appear on the Files Screen.
28

Changing the names of recorded les
The names of les recorded by the P4 can be changed.
Press .
1.
This opens the Menu Screen.
Use / to select Files, and press .
2.
Use / to select the le with the name you want to change, and press .
3.
Use / to select Rename, and press .
4.
Change the le name in the le name input area.
5.
File name input area
Cursor
Change character type.
Delete character. Move the character input position.
• / : Move cursor left/right
Character input position
Input characters.
Conrm le name.
•
: Conrm
29

Deleting les
You can delete les that you do not need.
Press .
1.
This opens the Menu Screen.
Use / to select Files, and press .
2.
Use / to select the le you want to delete, and press .
3.
Use / to select Delete, and press .
4.
Use / to select Execute, and press .
5.
The selected File will be deleted, and the Files Screen will reopen.
Select Cancel to cancel deletion.
30

Transferring les to a computer, smartphone or
tablet
The input signals of each channel, the sounds played by pressing the SOUND PAD buttons and the
master channel signal are recorded into separate les. Various editing functions can be used on them
after recording by transferring them to a computer or other device. For example, their mix balance can be
adjusted, effects can be added, and lengths can be changed.
Transferring les to a computer, smartphone or tablet
Recorded les can be transferred to computers, smartphones and tablets.
Press .
1.
This opens the Menu Screen.
Use / to select File Transfer, and press .
2.
This opens the File Transfer Screen.
Use a USB cable to connect the P4 with a computer, smartphone or tablet ( “Connecting a
3.
computer, smartphone or tablet by USB” on page 22).
Use the computer to transfer the necessary les.
4.
NOTE
When the File Transfer Screen is open, other functions and buttons cannot be used.
31

folder and le structure
P4
When recording with the P4, folders and les are created on SD cards in the following manner.
Root
2020_0101_0000.WAV
2020_0101_0010.WAV
2020_0101_0024.WAV
These les can be used for podcasting.
(Stereo le for podcasting)
A folder with the same name as the stereo le
for podcasting will be created that will contain
recording les for each track.
P4_Multitrack 2020_0101_0000
2020_0101_0010
MIC1.WAV
MIC2.WAV
MIC3.WAV
or
PHONE.WAV
(Mono le recording of signals from INPUT 1)
(Mono le recording of signals from INPUT 2)
(Mono le recording of signals from INPUT 3)
(Stereo le recording of signals from smartphone connection jack)
P4_Settings
2020_0101_0024
P4SETTING.ZST
(
settings le)
P4
MIC4.WAV
or
USB.WAV
SOUND_PAD.WAV
(Mono le recording of signals from INPUT 4)
(Stereo le recording of signals from USB)
(Stereo le recording of SOUND PAD signals)
These are separate les for each channel and the
SOUND PAD sounds. These can be edited on a
computer or other device.
32

Using SOUND PAD functions
Audio les can be assigned to the SOUND PAD buttons. Press one to play the assigned le. These
are convenient to play opening and closing music, jingles, and interviews that have been recorded in
advance.
The level and playback method can be set for each pad.
Assigning audio les to SOUND PAD buttons
Built-in sounds and audio les saved on an SD card can be assigned to SOUND PAD buttons.
Use a computer beforehand to store the audio le on the card in any directory other than the
P4_Multitrack and P4_Settings folders. ( “Transferring les to a computer, smartphone or tablet” on
page 31)
The following audio le types are supported.
•File format: WAV
•Sample rate: 44.1 kHz
•Bit rate: 16-bit
NOTE
A pop-up will appear if an unsupported audio le type is selected. In this case, see “Selecting les not
supported by the P4” on page 28.
Press .
1.
This opens the Menu Screen.
Use / to select Sound Pad, and press .
2.
Use / (or press SOUND PAD , , or ) to select the SOUND PAD (A–D) for audio
3.
le assignment, and press
.
33

Use / to select Sound Assign, and press .
4.
The built-in sound sources and the audio les stored on the SD card are shown in the list.
Use / to select the audio le to assign, and press .
5.
This assigns the selected le to the SOUND PAD selected in step 3.
Playing SOUND PAD buttons
Press , , or .
1.
SOUND PAD buttons
SOUND PAD knob
This plays the audio le assigned to the pressed SOUND PAD.
When a SOUND PAD button is played, the le name will be shown on the display for two seconds
after playback starts.
When a SOUND PAD is playing back, that button will blink.
Turn to adjust the level.
2.
34

Setting playback methods for each SOUND PAD
The sound playback method used when each SOUND PAD is pressed can be set.
Press .
1.
This opens the Menu Screen.
Use / to select Sound Pad, and press .
2.
Use / (or press SOUND PAD , , or ) to select the SOUND PAD (A–D) for
3.
playback mode setting, and press
Use / to select Play Mode, and press .
4.
.
35

Use / to select the setting, and press .
5.
Setting Explanation
One Shot
Pause
Loop
Hold
Each press plays the le once from beginning to end.
This is useful for playing jingle and effect sounds, for example.
Each press alternately plays and pauses. Playback stops at the end of the le.
Press and hold (for 2 seconds) when paused to return to the beginning of the le.
This is useful for interrupting to add commentary during SOUND PAD playback.
Each press alternately plays and stops. Playback will loop until stopped.
This is useful for playing background music, for example.
While pressing, loop playback will continue. When released, playback will stop.
This is useful for playing effects at will for the desired lengths of time.
36

Adjusting the levels of each SOUND PAD
The playback levels can be adjusted separately for each SOUND PAD.
If the SOUND PAD levels differ signicantly, they can be made more consistent.
Press .
1.
This opens the Menu Screen.
Use / to select Sound Pad, and press .
2.
Use / (or press SOUND PAD , , or ) to select the SOUND PAD (A–D) for level
3.
adjustment, and press
Use / to select Level, and press .
4.
Use / to adjust the level, and press .
5.
.
Levels can be set from -48dB – +10dB (in 30 steps).
37

Using as an audio interface
The P4 can be used as a 2-in/2-out audio interface.
The following operations are possible by using the audio interface functions.
Internet
Music playing or call audio on a computer, smartphone or tablet can be input on channel 4 of the P4.
Audio input to the P4 and audio played using SOUND PAD buttons can be sent to a computer or other
device connected to the Internet and streamed in real time.
Connecting a computer, smartphone or tablet
Use a USB cable to connect the USB port (Type-C) to the computer, smartphone or tablet.
1.
USB Type-C
port
NOTE
Use a Lightning to USB Camera Adapter (or Lightning to USB 3 Camera Adapter) to connect to an iOS/
iPadOS device with a lighting connector.
Select the P4 as the input and output device on the connected computer or other device.
2.
NOTE
“ZOOM P4 Audio” will appear on the computer.
38

Inputting USB audio return on channel 4
RaiseLower
INPUT knob 4
INPUT SELECT switch 4
Set to .
1.
This sets the USB audio return as the signal input on channel 4.
Turn to adjust the level.
2.
39

Setting USB Mix Minus
When using the P4 as an audio interface, this can prevent feedback to a person participating in a call
through the connected device.
Press .
1.
This opens the Menu Screen.
Use / to select Settings, and press .
2.
Use / to select USB Mix Minus, and press .
3.
Use / to select the setting, and press .
4.
Setting Explanation
Off
On Sound from USB input is not output by USB.
Sound from USB input is also output by USB.
40

Modifying the date and time
The date and time are stored in recorded les, and the recording start date/time is used in the le name.
Having the correct date and time set is helpful when looking for les, for example, by allowing contents to
be determined by names.
Press .
1.
This opens the Menu Screen.
Use / to select Settings, and press .
2.
Use / to select Set Date/Time and press .
3.
Setting the date and time.
4.
Year Month Day
Cursor
Hour Minute OK
Press / to move the cursor to set, and press .
1.
Use / to change the value, and press to conrm.
2.
Repeat steps 1 and 2 to set the date and time.
3.
After setting the date and time, use / to select OK, and press .
4.
Conrm the set date and time.
41

Setting the type of batteries used
Set the type of battery used correctly so that the amount of remaining battery charge can be shown
accurately.
Press .
1.
This opens the Menu Screen.
Use / to select Settings, and press .
2.
Use / to select Battery, and press .
3.
Use / to select the setting, and press .
4.
Setting Explanation
Alkaline Alkaline batteries
Ni-MH Nickel-metal hydride batteries
Lithium Lithium batteries
42

Adjusting the display contrast
Adjust the contrast if the display is difcult to read because it appears too light or dark.
Press .
1.
This opens the Menu Screen.
Use / to select Settings, and press .
2.
Use / to select LCD Contrast, and press .
3.
Use / to select the setting value, and press .
4.
HINT
This can be set from 1 to 10.
43

Setting the Auto Power Off function
The power will automatically turn off if the P4 is unused for 10 hours.
To keep the power on at all times, set the Auto Power Off function to Off.
Press .
1.
This opens the Menu Screen.
Use / to select Settings, and press .
2.
Use / to select Auto Power Off, and press .
3.
Use / to select the setting, and press .
4.
Setting Explanation
On The power will automatically turn off if it is not used for 10 hours.
Off The power will not turn off automatically.
44

Testing SD cards
SD cards can be tested to conrm whether they can be used with the P4.
A basic test can be done quickly, while a full test examines the entire SD card.
Conducting a quick test
Press .
1.
This opens the Menu Screen.
Use / to select Settings, and press .
2.
Use / to select SD Card, and press .
3.
Use / to select Card Test, and press .
4.
45

Use / to select Quick Test, and press .
5.
Use / to select Execute, and press .
6.
The card performance test will start. The test should take about 30 seconds.
The result of the test will be shown when it completes.
NOTE
Even if a performance test result is “Pass”, there is no guarantee that writing errors will not occur. This
information is just to provide guidance.
HINT
Press to cancel a test while it is being executed.
46

Conducting a full test
Press .
1.
This opens the Menu Screen.
Use / to select Settings, and press .
2.
Use / to select SD Card, and press .
3.
Use / to select Card Test, and press .
4.
47

Use / to select Full Test, and press .
5.
The amount of time required will be shown.
Use / to select Execute, and press .
6.
The card performance test will start.
The result of the test will be shown when it completes.
If the access rate MAX reaches 100%, the card will fail (NG).
NOTE
Even if a performance test result is “Pass”, there is no guarantee that writing errors will not occur. This
information is just to provide guidance.
HINT
Press to cancel a test while it is being executed.
48

Formatting SD cards
Format SD cards for the P4 to maximize their performance.
Before using SD cards that have just been purchased or that have been formatted on a computer, they
must be formatted by the
assigned to SOUND PAD buttons, on it.
Press .
1.
This opens the Menu Screen.
Use / to select Settings, and press .
2.
Use / to select SD Card, and press .
3.
. Be aware that formatting an SD card will delete all data, including les
P4
Use / to select Format, and press .
4.
Use / to select Execute, and press .
5.
This formats the card.
49

Restoring factory default settings
The P4 can be restored to its factory default settings.
Press .
1.
This opens the Menu Screen.
Use / to select Settings, and press .
2.
Use / to select Factory Reset, and press .
3.
Use / to select Execute, and press .
4.
This restores the P4 to its factory default settings, and its power turns off.
NOTE
A factory reset will overwrite all settings to their factory defaults. Be certain before using this function.
50

Updating the rmware
The P4 rmware can be updated to the latest version.
Files for the latest rmware updates can be downloaded from the ZOOM website (www.zoom.co.jp).
Follow the instructions in the “P4 Firmware Update Guide” on the
download page.
P4
51

Error message list
This is a list of error messages that could pop up on the display. Respond as described below when
necessary.
Pop-up message Explanation
Read Only!
Choose 16-bit or 24-bit File!
Choose Mono or Stereo File!
Choose 44.1kHz or 48kHz File!
Choose WAV or MP3 File!
File Convert. 48kHz->44.1kHz
File Convert. 24-bit->16-bit
File Convert. MP3->WAV
Invalid File!
Card Full!
File Name Already Exists!
Input File Name!
Character Limit Reached!
Card Error!
No Card!
Invalid Card!
Card Protected!
Low Battery!
Date/Time Reset!
The le is set to be read only.
Use a computer to unlock the read only status of the le.
Select a le that is 16-bit or 24-bit.
The P4 does not support playback or conversion of the le.
Select a mono or stereo le.
The P4 does not support playback or conversion of the le.
Select a le that has a 44.1 kHz or 48 kHz sample rate.
The P4 does not support playback or conversion of the le.
Select a le that uses WAV or MP3 format.
The P4 does not support playback or conversion of the le.
This le requires sample rate conversion.
Convert to a le that is supported by the P4.
This le requires bit rate conversion.
Convert to a le that is supported by the P4.
This le requires le format conversion.
Convert to a le that is supported by the P4.
This le is damaged or invalid.
Select a good le.
The SD card has no more open space.
Delete unnecessary les ( “Deleting les” on page 30), or use a different
SD card.
A le with the same name already exists.
Change the le name. ( “Changing the names of recorded les” on page
29)
Input the le name.
Input the le name. ( “Changing the names of recorded les” on page 29)
The maximum number of characters has been exceeded.
Reduce the number of characters.
An error occurred with the SD card.
See “Troubleshooting” on page 54.
No SD card is loaded.
Load an SD card.
The SD card is invalid.
Load an SD card that is supported by the P4. ( “Troubleshooting” on page
54)
SD card write-protection is enabled.
Disable write-protection.
The remaining battery charge has become low.
Install new batteries or supply power by connecting an AC adapter, mobile
battery or computer, for example. ( “Providing power” on page 15)
The date and time setting has been reset.
Set the date and time again. ( “Modifying the date and time” on page 41)
52

Pop-up message Explanation
No Last Recorded File!
File Full!
Now Recording!
Write Error!
No File!
File Assigned To Sound Pad
Missing!
Sound Pad Files Will Be Erased!
Setting Changes After
Recording!
Low Power! Please Power Off.
The latest recording le is not available.
This appears if the most recently recorded le does not exist when is
pressed on the Home Screen.
The maximum number of les on an SD card has been reached.
Delete unnecessary les ( “Deleting les” on page 30), or use a different
SD card.
This operation is disabled during recording.
During recording, the power cannot be turned off and the Menu Screen cannot
be opened.
An error writing to the SD card.
See “Troubleshooting” on page 54.
No le is available.
This appears when Files is selected on the Menu Screen if the SD card has no
les.
A le assigned to a SOUND PAD cannot be found.
Assign a le to the SOUND PAD. ( “Assigning audio les to SOUND PAD
buttons” on page 33)
Formatting will erase les assigned to SOUND PAD.
This appears when starting to format an SD card if it contains les assigned to
SOUND PAD buttons.
Phantom power setting changes will be applied after recording completes.
This appears when the INPUT SELECT switch is changed during recording.
The remaining battery charge is insufcient. Turn the power off.
Turn the power off and install new batteries or supply power by connecting an
AC adapter, mobile battery or computer, for example. ( “Providing power”
on page 15)
53

Troubleshooting
General
There is no sound or output is very quiet
•Check headphone connections and volumes. ( “Connecting headphones” on page 19)
•Check mic connections. (
•When using condenser mics, set the INPUT SELECT switches to
•Conrm that
•Turn the INPUT knobs for each channel to raise their levels, and conrm that their level meters are
moving. (
is unlit.
“Adjusting input levels” on page 23)
“Connecting mics” on page 18)
. ( “Connecting mics” on page 18)
Recorded audio is too loud, too quiet or silent
•When using condenser mics, set the INPUT SELECT switches to . ( “Connecting mics” on page 18)
•Use the channel input knobs to adjust their levels. (
•Conrm that the REC indicators are lit red.
“Adjusting input levels” on page 23)
Recording is not possible
•Conrm that the REC indicators are lit red.
•Conrm that the SD card has open space.
Proper recording is not possible/Stopping recording takes too much
time
•SD cards can become worn out. Speed can decrease after repeated writing and erasing.
•Formatting the card with the
•If formatting an SD card does not improve this, we recommend replacing the card. Please check the list
of cards that have been conrmed to work on the ZOOM website.
NOTE
This is not a guarantee of specic SD card recording performance for SDHC/SDXC cards that have been
conrmed to work. This list is provided as a guideline to help nd suitable cards.
might improve this. ( “Formatting SD cards” on page 49)
P4
Playback sound cannot be heard or is quiet
•Turn the PHONES knobs to adjust their volumes. ( “Connecting headphones” on page 19)
54

Audio les cannot be assigned to SOUND PAD buttons
•Check the format of the audio le to be assigned. ( “Assigning audio les to SOUND PAD buttons” on
page 33)
•If the audio le is stored on an SD card, store it in a directory outside the P4_Multitrack and P4_Settings
folders on the card.
SOUND PAD functions cannot be used
•Check the SOUND PAD levels. ( “Playing SOUND PAD buttons” on page 34)
•Conrm that les are assigned. (
“Assigning audio les to SOUND PAD buttons” on page 33)
Audio interface
Cannot select the
cannot use it as an interface)
•Conrm that the P4 is connected to the computer correctly. ( “Connecting a computer, smartphone or
tablet by USB” on page 22)
•Quit all the software that is connected to the
•Connect the
hub.
directly to a USB port on the computer or other device. Do not connect it through a USB
P4
Sound skips during playback or recording
from a computer, smartphone or tablet (or
P4
, and turn the P4 off and on again.
P4
•If the audio buffer size of the software being used can be adjusted, increase the buffer size.
•Connect the
hub.
•Turn off power saving settings (including sleep functions) on the computer or other device.
directly to a USB port on the computer or other device. Do not connect it through a USB
P4
Cannot play or record
•Conrm that the P4 is connected to the computer correctly. ( “Connecting a computer, smartphone or
tablet by USB” on page 22)
•Conrm that the
•Conrm that
•Set INPUT SELECT switch 4 to
•Quit all the software that is connected to the
to the
P4
P4
.
is selected in the settings of the computer being used.
P4
is set for input and output in the software that you are using.
.
, and disconnect and reconnect the USB cable connected
P4
55

Specications
Number
of input
and output
channels
Connectors MIC Type XLR jack (2: HOT)
Number of input channels 4 (mono/stereo)
Number of output channels 1 (headphone × 4)
Input gain -∞ – +70 dB
Input impedance XLR: 3 kΩ
Maximum input
level
Phantom power +48 V
Smartphone
connection jack
Headphones Type 3.5 mm stereo mini
USB USB Type-C (audio interface and mass storage functions)
Type TRRS mini jack (4-contact; TIP: L, RING: R, RING: GND, SLEEVE: MIC)
Input impedance 3 kΩ
Maximum input
level
Maximum output
level
Output impedance 10 Ω
0 dBu (at 0 dBFS)
+3 dBu
20 mW + 20 mW (32 Ω load)
Note: Use a USB cable that supports data transfer. USB bus power is
supported.
DC 5 V USB Type-C (for power supply)
Recorder Format WAV 44.1 kHz, 16-bit, mono/stereo
Recording media 4 GB – 32 GB SDHC-compliant cards (Class 10 or higher)
Audio interface 44.1 kHz, 16-bit, 2-in/2-out
Frequency response -1.0 dB: 20 Hz – 20 kHz (at 44.1 kHz sampling rate)
Equivalent input noise -124 dBu or less (IHF-A) with +70 dB/150 Ω input
Display LCD with backlight (96×64 resolution)
Power supply 2 AA batteries (alkaline, nickel-metal hydride or lithium)
Estimated continuous operation time using batteries Recording 44.1 kHz/16-bit 4ch audio to an SD card (+48 V OFF,
Power consumption 5 W
External dimensions 112 mm (W) × 155 mm (D) × 47 mm (H)
64 GB – 512 GB SDXC-compliant cards (Class 10 or higher)
• We recommend nickel-metal hydride batteries for the P4.
AC adapter (ZOOM AD-17): DC 5 V/1 A (supports USB bus power)
headphones into 63 Ω load)
Alkaline batteries: about 4 hours
NiMH batteries (1900 mAh): about 4.5 hours
Lithium batteries: about 9 hours
• The above values are approximate.
• Continuous battery operation times were determined using in-house
testing methods. They will vary greatly according to use conditions.
Weight (unit only) 290 g
Note: 0 dBu = 0.775 V
56

ZOOM CORPORATION
4-4-3 Kanda-surugadai, Chiyoda-ku, Tokyo 101-0062 Japan
www.zoom.co.jp
Z2I-4008-01
 Loading...