

Page 1
Propaq® M Service Manual
9650-0804-01 Rev. ADecember 2010
Page 2

ZOLL is a registered trademark, and SurePower is a trademark of ZOLL Medic al Corp orat ion. Propaq is a
registered trademark of Welch Allyn, Inc. Nellcor is a trademark of Covidien. Oridion, Microstream, and
FilterLine are registered trademarks of Oridion Systems, Ltd. All other trademarks and registered trad emarks
are property of their respective owners.
Copyright © 2010
ZOLL Medical Corporation. All rights reserved.
Page 3

Table of Contents
Preface
Overview................................................................................................................................ 1
Safety Considerations............................................................................................................2
Additional Reference Material................................................................................................2
Conventions...........................................................................................................................3
Service Policy Warranty.........................................................................................................3
Technical Service...................................................................................................................3
Technical Service for International Customers ...................................................................... 4
Chapter 1 Maintenance Tests
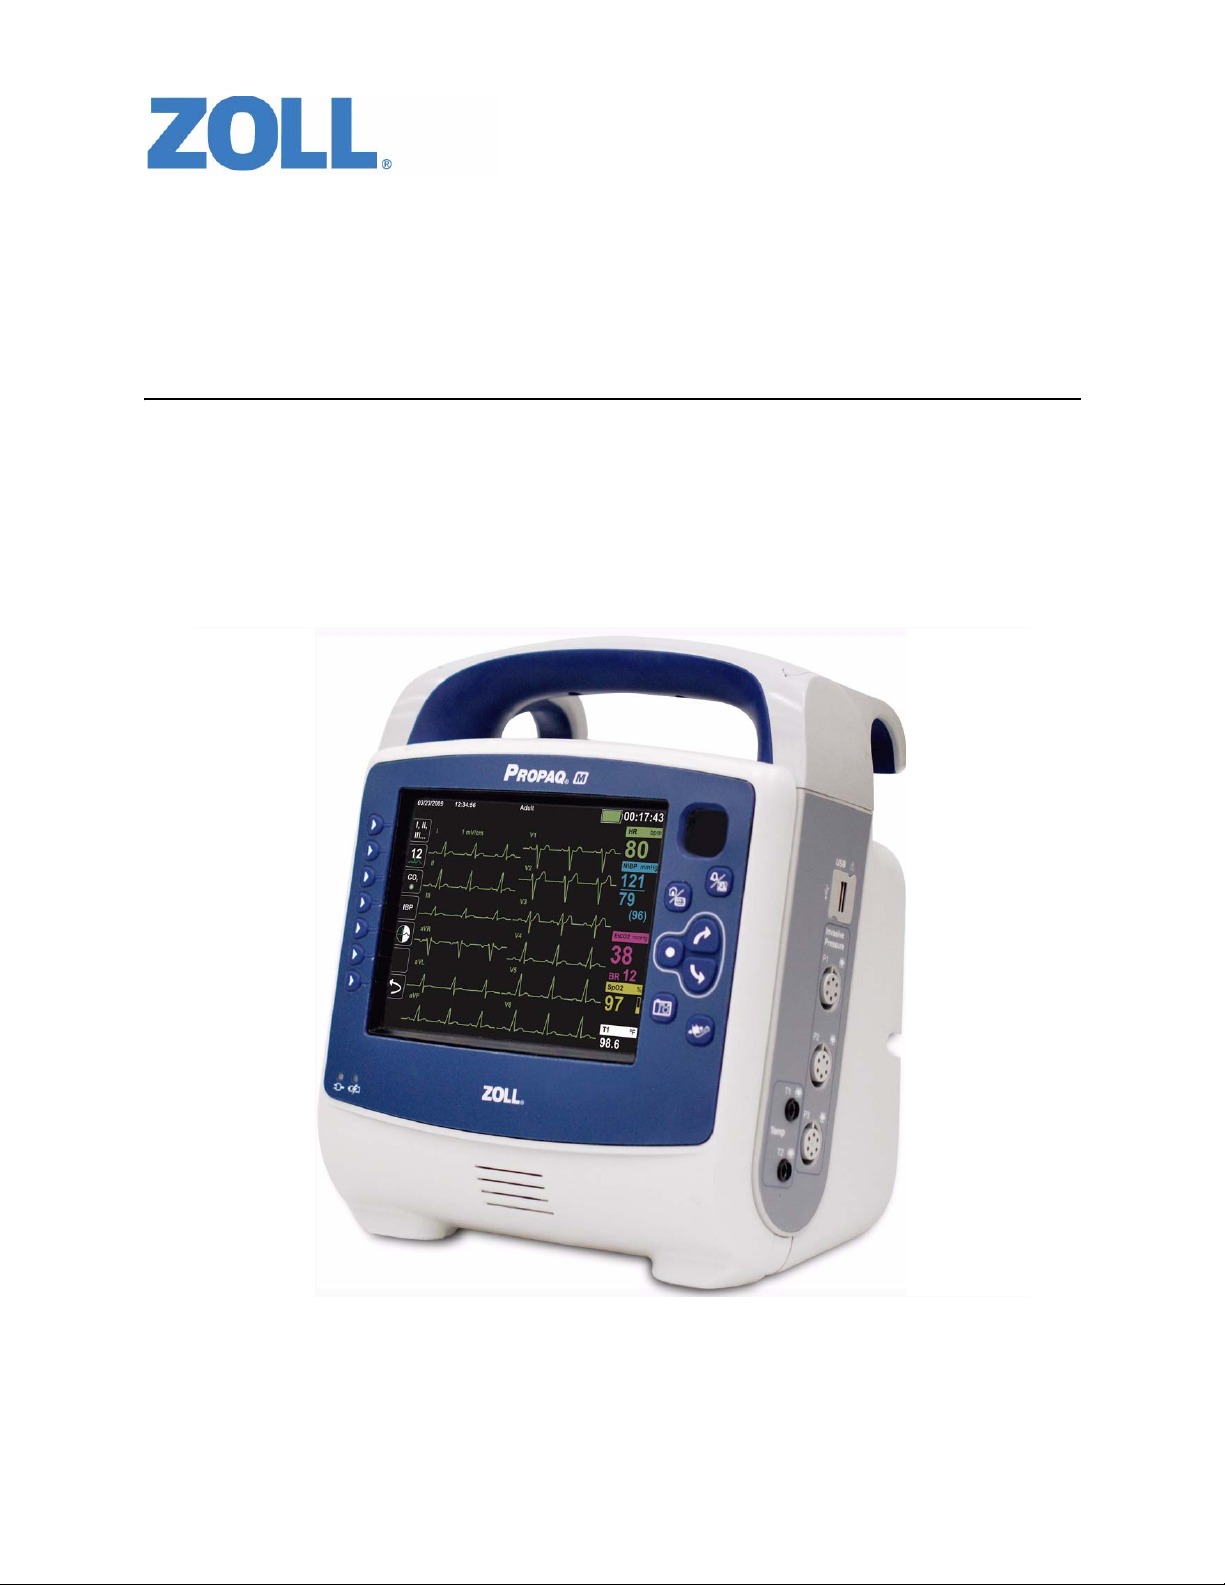
Propaq M Overview...............................................................................................................5
Calibration and Calibration Checks .......................................................................................7
NIBP Valve, Pump, and Tubing Integrity Tests .....................................................................11
Operational Tests................................................................................................................. 14
Functional V erification Tests ................................................................................................ 21
Ch a p t e r 2 Troubleshooting
Overview..............................................................................................................................33
Propaq M Error Messages................................................................................................... 33
Chapter 3 Disassembly Procedures
Overview..............................................................................................................................41
Required Equipment............................................................................................................ 41
Safety Precautions...............................................................................................................42
Modules ...............................................................................................................................42
Removing the Handle..........................................................................................................43
Disassembling the Main Unit...............................................................................................44
Removing the Front Enclosure Module ............................................................................... 47
Removing the Display Module............................................................................................. 49
Removing the EtCO2 and NIBP Modules............................................................................51
Removing the Monitor Board and SpO2 Modules ............................................................... 55
Chapter 4 Life Cycle Counters
Overview..............................................................................................................................57
9650-0804-01 Rev. A ZOLL Propaq M Service Manual i
Page 4

TABLE OF CONTENTS
Ch a p t e r 5 Replacement Parts
Overview..............................................................................................................................59
Replacement Parts..............................................................................................................60
Ch a p t e r 6 Functional Description
Overview..............................................................................................................................63
Appendix A
Overview..............................................................................................................................67
Propaq M Electrical Hardware Interconnect Diagram.......................................................... 68
Propaq M Signal and Power Interconnect Schematic.......................................................... 69
Appendix B
Overview..............................................................................................................................71
ii 9650-0804-01 Rev. A
Page 5

Overview
Preface—Contains safety warnings and an overview of the manual’s contents. Be sure to
review this section thoroughly before attempting to use or service the Propaq M unit.
Preface
ZOLL® Medical Corporation’s Propaq® M Service Manual is intended for the trained
biomedical technician whose responsibility is to identify malfunctions and/o r make repairs at
the subassembly level. The Propaq M Service Manual has six main sections and two
appendixes.
Chapter 1—Maintenance Tests describes the Annual Calibration Tests for NIBP and EtCO
modules, Functional Tests that need to be run when a module has been repaired, and
Operational Tests that need to be performed at regular intervals to augment the automatic
testing the Propaq M does to ensure readiness.
Chapter 2—Troubleshooting provides a listing of error messages to help the service
technician detect faults and repair them.
Chapter 3—Disassembly Procedures describes step-by-step procedures for removing
subassemblies from the Propaq M unit.
Chapter 4—Life Cycle Counters describes step-by-step procedures for setting life cycle
counters after replacing modules in the Propaq M unit.
Chapter 5—Replacement Parts List displays a complete list of ZOLL part numbers for field
replaceable parts available for the Propaq M unit, allowing the service person to identify and
order replacement parts from ZOLL.
9650-0804-01 Rev. A ZOLL Propaq M Service Manual 1
2
Page 6

PREFACE
Chapter 6—Functional Description provides technical descriptions for the Propaq M major
subassembly modules.
Appendix A—Propaq M Electrical Hardware Interconnect Diagram and Propaq M Signal and
Power Interconnect Schematic.
Appendix B—Contains simulators and settings that may be used to assess the performance of
the NIBP module.
Safety Considerations
The following section describes general warnings and safety considerations for operators and
patients. Service technicians should review the safety considerations prior to servicing any
equipment and read the manual carefully before attempting to disassemble the unit. Only
qualified personnel should service the Propaq M unit.
Federal (U.S.A.) law restricts this unit for use by or on the order of a physician.
Safety and effectiveness data submitted by ZOLL Medical Corporation to the Food and Drug
Administration (FDA) under section 510(K) of the Medical Device Act to obtain approval to
market is based upon the use of ZOLL accessories such as patient cables and batteries.
Only qualified personnel should disassemble the Propaq M unit.
Do not discharge a battery pack except in a ZOLL SurePower
Do not use the Propaq M in the presence of flammable agents (such as gasoline), oxygen-rich
atmospheres, or flammable anesthetics. Using the unit near the site of a gasoline spill may
cause an explosion.
Do not use the unit near or within puddles of water.
Additional Reference Material
In addition to this guide, there is a Propaq M Operator’s Guide which is a comprehensive
reference work that describes all the user tasks needed to operate the Propaq M.
TM
Charging Station.
2 9650-0804-01 Rev. A
Page 7

Conventions
Conventions
WARNING! Warning statements describe conditions or actions that can result in personal injury or death.
Caution Caution statements describe conditions or actions that can result in damage to the unit.
Note: Notes contain additional information on using the monitor.
Service Policy Warranty
In North America: Consult your purchasing agreement for terms and conditions associated with
your warranty. Outside of North America, consult ZOLL authorized representative.
In order to maintain this warranty, the instructions and procedures contained in this manual
must be strictly followed. For additional information, please call the ZOLL Technical Service
Department 1-800-348-9011 in North America.
Technical Service
If the ZOLL Propaq M unit requires service, contact the ZOLL Technical Service Department:
Telephone: 1-978-421-96 55; 1-800-348-9011
Fax 1-978-421-0010
Have the following information available for the Technical Service representative:
• Unit serial number.
• Description of the problem.
• Department where equipment is used.
• Sample chart recorder strips or electronic log files documenting the problem, if applicable.
• Purchase Order to allow tracking of loan equipment.
• Purchase Order for a unit with an expired warranty.
If the unit needs to be sent to ZOLL Medical Corporation, obtain a service request number
(SR#) from the T e chn ic al Service representative. Return the unit in its original container to:
ZOLL Medical Corporation
269 Mill Road
Chelmsford, Massachusetts 01824-4105
Attn: Technical Service Department (SR#)
Telephone: 1-800-348-9011; 1-978-421-9655 FAX: 978-421-0010
9650-0804-01 Rev. A ZOLL Propaq M Service Manual 3
Page 8

PREFACE
Technical Service for International Customers
International customers should return the unit in its origin al co nt ain er to the neare s t aut hor ize d
ZOLL Medical Corporation Service Center. To locate an authorized service center, contact the
International Sales Department at ZOLL Medical at the above address.
4 9650-0804-01 Rev. A
Page 9

Propaq M Overview
This chapter includes step-by-step procedures for the following types of maintena nc e tests:
• Calibration and Calibration Checks
• NIBP Valve, Pump, and Tubing Integrity Tests
• Operational Tests
• Functional Verification Tests
At a minimum, a trained biomedical technician must perform a CO
calibration check once per year. A CO
verify the CO
The Troubleshooting chapter in this manual may recommend performing one of more of the
NIBP valve, pump, and tubing integrity tests to help identify and correct potential issues with
the NIBP valve, pump, and/or tubing.
It is necessary to perform Functional Verification Tests after a module is repaired to en sure that
the functions of the Propaq M unit work properly.
calibration.
2
Chapter 1
Maintenance Tests
calibration and an NIBP
calibration check may be performed at any time to
2
2
Because the Propaq M units must be maintained ready for immediate use, it is important for
users to conduct the Operator’s Shift Checklist procedure at the beginning of every shift. This
procedure can be completed in a few minutes and requires no additional test equipment. (See
the ZOLL Propaq M Operator’s Guide for the Operator’s Shift Checklist.) It is highly
recommended that the Operational Tests be performed at regular intervals to augment the
automatic testing the Propaq M does to ensure readiness.
9650-0804-01 Rev. A ZOLL Propaq M Service Manual 5
Page 10

CHAPTER 1MAINTENANCE TESTS
This chapter describes the following maintenance tests:
Calibration and Calibration Checks
• NIBP Calibration Check
• CO
Calibration Procedure
2
• CO
Calibration Check
2
NIBP Valve, Pump, and Tubing Integrity Tests
• Leak Test
• Deflation Test
• Inflation Test
Operational Tests
• Physical Inspection of the Unit
• Keypad Test
• LED Test
• LCD Test
• RFU Indicator Test
• Audio Test
• Battery Test
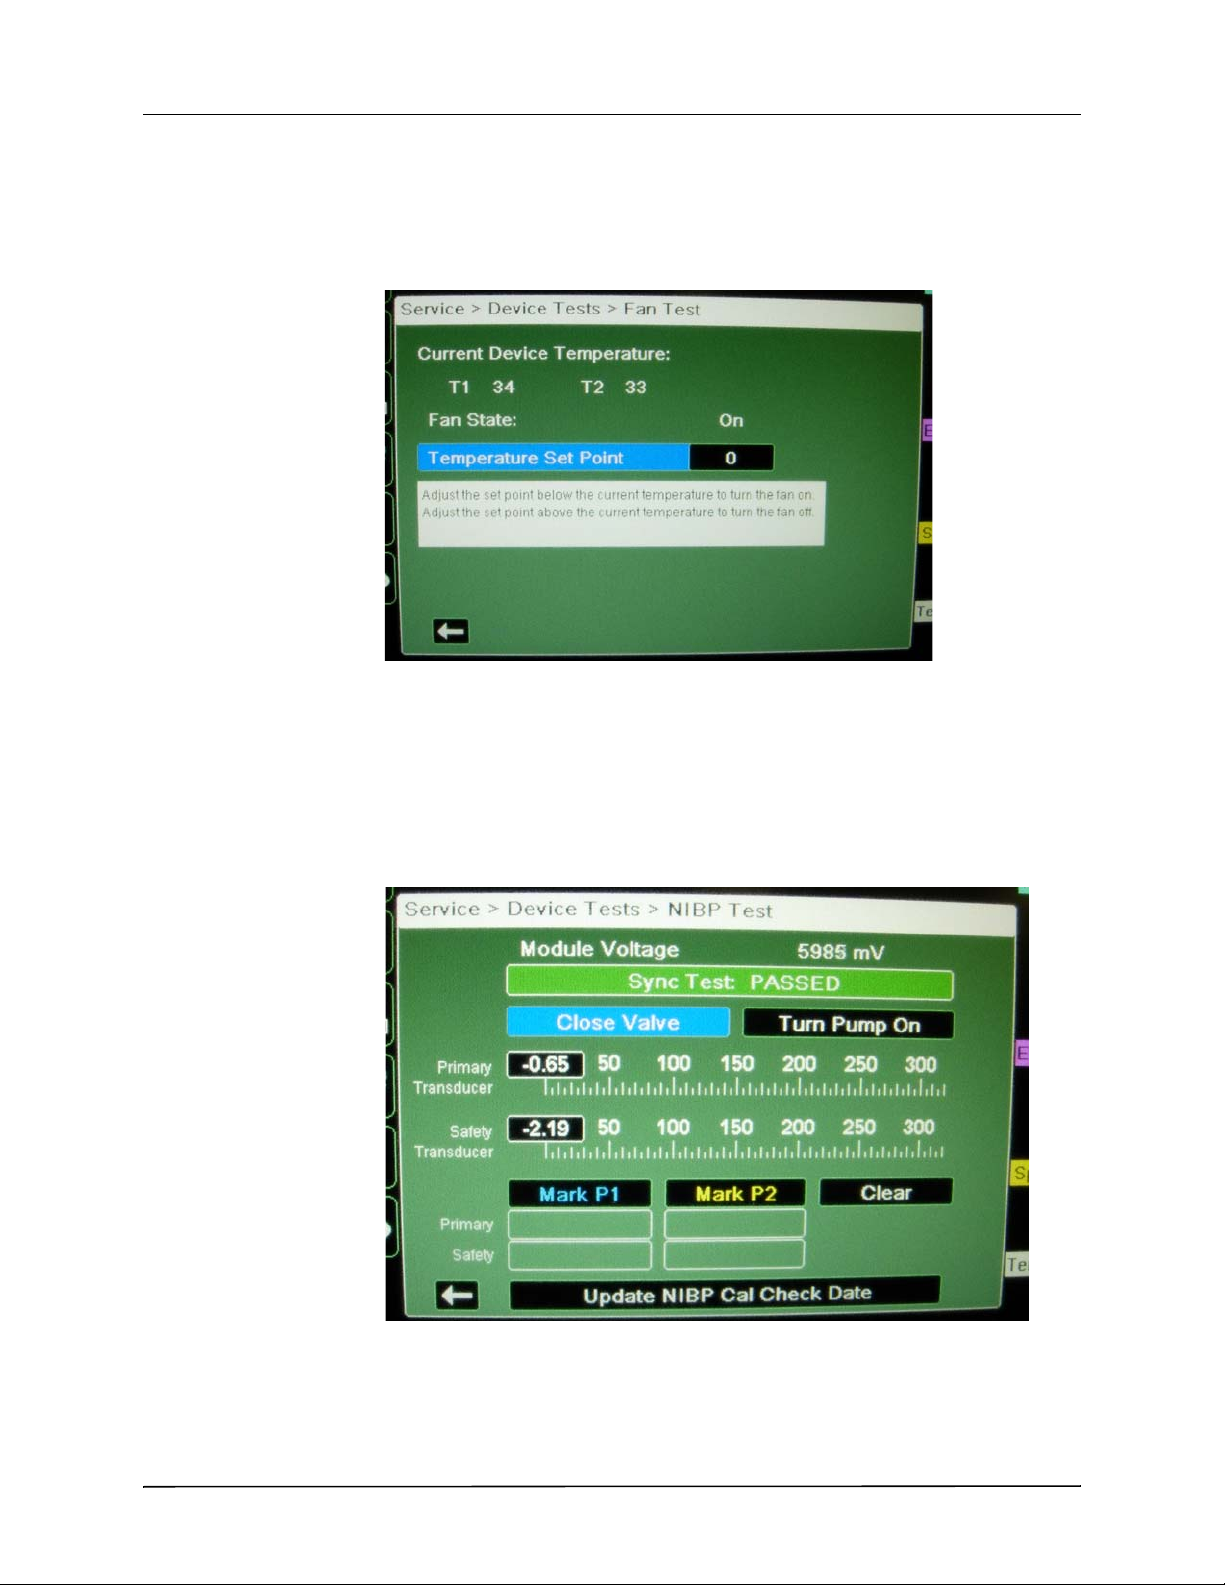
• Fan Test
• NIBP Test
Functional Verification Tests
• Leads Test
• Heart Rate Display Test
• Heart Rate Alarm Test
• Leakage Current Test
• SpO
• EtCO
• IBP Monitor Test
• NIBP Monitor Test
• Temperature T est
Monitor Test
2
Monitor Test
2
6 9650-0804-01 Rev. A
Page 11

Calibration and Calibration Checks
Calibration and Calibration Checks
NIBP Calibration Check
Equipment Single lumen BP hose, a 500 cc volume, and a calibrated manometer or pressure gauge
(< = 1mmHg accuracy). If a 500 cc volume is not available, an Adult BP cuf f wrapped around a
rigid cylinder (such as a glass jar) will suffice.
Note: This test is to be performed for the following target pressures: 50 +/- 5 mmHg,
150 +/- 5 mmHg, and 250 +/- 5 mmHg.
Procedure
1. Power on the Propaq M.
2. Connect the Propaq M to the single lumen hose and the 500 cc volume. Alternatively , replace
the 500 cc volume with a standard Adult cu ff wrapped around a rigid cylinder , such as a glass
jar. Connect a calibrated manometer to the air line using a T-fitting.
3. On the Propaq M, do the following to ent er the NIBP Test control panel:
• Press the Setup quick access key ().
• Use the navigation keys to select Supervisor>Service>Device Tests>NIBP Test.
4. From the Propaq M NIBP Test control panel, use the navigation keys to select:
• Close Valve
• Turn Pump On
5. Monitor the pressure reported by the external pressure standard.
6. Once the pressure reaches the target pressure of 50 +/- 5 mmHg, use the navigation keys to
select Turn Pump Off.
7. Allow the system to stabilize for at least 10 seconds.
8. Record the pressure reported by the external pressure standard as P
9. Record the pressures reported by the primary and safety transducers (displayed in the NIBP
Test control panel) as P
10.Calculate the absolute pressure differences between the applied pressure (P
and Ps, respectively
p
.
a
) and each of the
a
transducer pressures.
• P
d-Primary
• P
d-safety
11. From the NIBP Test control panel, select Open Valve to release the pressure
12.Repeat steps 3 to 11 to test for the remaining target pressures of 150 +/ - 5 mmHg and 25 0 +/
= abs(Pa-Pp)
= abs(Pa-PS)
- 5 mmHg.
13.Once complete, use the navigation keys to select Update NIBP Cal Check Date to save the
date of the most recent calibration check.
9650-0804-01 Rev. A ZOLL Propaq M Service Manual 7
Page 12

CHAPTER 1MAINTENANCE TESTS
Acceptable Results
The unit passes the test if P
d-Primary
is less than or equal to 3.0 mmHg and P
d-Safety
is less than
or equal to 4.0 mmHg for all three target pressures.
Corrective Action
If readings fail to meet the required accuracy, the NIBP module requires replacement or factory
analysis and realignment.
8 9650-0804-01 Rev. A
Page 13

Calibration and Calibration Checks
CO2 Calibration Procedure (required for annual calibration)
Equipment 5% CO
Products, PN 4653ORF-BD)
Procedure
1. On the Pr opaq M, do the following to enter the CO2 Calibration control panel:
• Press the CO
• Use the navigation keys to select Supervisor>Service>Diagnostic>CO
2. Connect the Propaq M to the 5% CO
with the calibration kit.
3. From the CO
4. Activate the calibration gas flow by pressing the top valve on the cal ibration gas canister .
5. Continue to apply the calibration gas until the status in the CO
displays: CALIBRATION GAS CAN BE REMOVED.
• When the calibration is complete, the status in the CO
6. To verify calibration, perform the CO
Acceptable Results
The status in the CO
Perform the above calibration check procedure to verify CO2 accuracy .
calibration gas cylinder with CO2 sample line (kit available from Scott Medical
2
CO
CO
2
quick access key ().
2
Calibration Menu, select Calibration.
2
displays: CALIBRATION DONE - OK OR CALIBRATION DONE - ERROR.
Calibration control panel displays: CALIBRATION DONE - OK.
2
2
>Calibration.
2
calibration gas cylinder using the sample line included
2
Calibration control panel
2
Calibration control panel
2
Calibration Check Procedure on page 10.
2
The calibration date will be updated upon exiting the CO2 T est control panel.
Corrective Action
If an error is reported, refer to the table below for possible causes.
If readings fail to meet the required accuracy, the CO
module requires replacement or factory
2
analysis and realignment.
The following table describes possible calibration errors and likely causes.
Table 1-1. Calibration Errors
Error Message Cause
No gas or wrong gas
concentration
No stable gas flow and
The concentration of supplied gas is not close to the expected
value.
The gas sample is not stable, i.e. due to leak or noise.
Calibration failure
Measurement error Occlusion detection during known gas sampling.
Measurement error Sample line disconnection during gas sampling.
AZ fail The Auto Zero that is part of the calibration process failed.
Calibration aborted by
Calibration mode canceled during gas sampling.
user
9650-0804-01 Rev. A ZOLL Propaq M Service Manual 9
Page 14

CHAPTER 1MAINTENANCE TESTS
CO2 Calibration Check Procedure
Equipment 5% CO
Products, PN 4653ORF-BD)
Procedure
1. On the Pr opaq M, do the following to enter the CO2 Calibration control panel:
• Press the CO
• Use the navigation keys to select Supervisor>Service>Diagnostic>CO
2. Connect the Propaq M to the 5% CO
with the calibration kit.
3. From the CO
4. Activate the calibration gas flow by pressing the top valve on the cal ibration gas canister .
5. Continue to apply the calibration gas until the status in the CO
displays: CALIBRATION GAS CAN BE REMOVED.
• When the calibration check is complete, the status in the CO
• When the calibration check completes successfully, the measured gas value displays in
Acceptable Results
The message displays: VERIFICATION DONE - OK.
calibration gas cylinder with CO2 sample line (kit available from Scott Medical
2
CO
CO
2
quick access key ().
2
Calibration control panel, select Verify Calibration.
2
displays: VERIFICATION DONE - OK OR VERIFICATION DONE - ERROR.
2
>Calibration.
2
calibration gas cylinder using the sample line included
2
Calibration control panel
2
Calibration control panel
2
the CO2 Calibration control panel.
The measured gas reading passes if it is between 4.8 and 5.2 (Vol%).
Corrective Action
If an error is reported, refer to Table 1-1 on page 9 for possible causes.
If the measured gas reading is outside the acceptable range, or if calibration is due, complete
the “CO2 Calibration Procedure (required for annual calibration)” on page 9.
10 9650-0804-01 Rev. A
Page 15

NIBP Valve, Pump, and Tubing Integrity Tests
NIBP Valve, Pump, and Tubing Integrity Tests
NIBP Leak Test
Equipment Single lumen BP hose, a 500 cc volume, and a calibrated manometer.
Note: If a 500 cc volume is not available, an Adult BP cuff wrapped around a rigid cylinder
(such as a glass jar) will suffice
Procedure
1. Power on th e Propaq M.
2. Connect the Propaq M to the single lumen hose and the 100 cc volume. Alternatively , replace
the 100 cc volume with a standard Adult cu ff wrapped around a rigid cylinder , such as a glass
jar. If available, connect a calibrated manometer to the air line using a T-fitting.
3. On the Propaq M, do the following to ent er the NIBP Test control panel:
• Press the Setup quick access key ().
• Use the navigation keys to select Supervisor>Service>Device Tests>NIBP Test.
4. From the Propaq M NIBP Test control panel, use the navigation keys to select:
• Close Valve
• Turn Pump On
5. Monitor the pressure reported by NIBP Test control panel or the external pressure standard.
6. Select Turn Pump Off as soon as the pressure reaches the target pressure of 250 +/- 5 mmHg.
7. Allow the system to stabilize for 10 seconds.
8. Select Mark P1 to mark the starting pressure. If available, measure the starting pressure
reported by the external pressure standard. Record the starting pressure as P
9. Wait 15 seconds.
10..Select Mark P2 to mark the ending pressure. If available, measure the ending pressure
reported by the external pressure standard. Record the ending pressure as P
11. From the NIBP Test control panel, select Open Valve to release the pressure.
12.Calculate the leak rate: L = (P
- Pe) / (15 seconds).
s
.
S
.
E
Note: If using the pressure reported in the NIBP Test control panel, calculate the Leak Rate
using the Primary transducer pressures.
Acceptable Results
The unit passes the test if the system leaks less than 5 mmHg over the 15-second time interval
(Leak Rate is less than 1/3).
9650-0804-01 Rev. A ZOLL Propaq M Service Manual 11
Page 16

CHAPTER 1MAINTENANCE TESTS
Corrective Action
If the unit fails the test, the most likely cause is damaged or disconnected inter nal t ubing. The
device needs to be disassembled to replace or reattach t he appropri ate segment of NIBP tu bing.
The NIBP valves should also be inspected.
12 9650-0804-01 Rev. A
Page 17

NIBP Valve, Pump, and Tubing Integrity Tests
NIBP Deflation Test
Equipment Single lumen BP hose, a 500 cc volume, a timer, and a calibrated manometer (optional).
Note: Note: If a 500 cc volume is not available, an Adult BP cuff wrapped around a rigid
cylinder (such as a glass jar) will suffice.
Procedure
1. Power on th e Propaq M.
2. Connect the Propaq M to the single lumen hose and the 500 cc volume. Alternatively , replace
the 500 cc volume with a standard Adult cu ff wrapped around a rigid cylinder , such as a glass
jar. If available, connect a calibrated manometer to the air line using a T-fitting.
3. On the Propaq M, do the following to ent er the NIBP Test control panel:
• Press the Setup quick access key ( ).
• Use the navigation keys to select Supervisor>Service>Device Tests>NIBP Test.
4. From the Propaq M NIBP Test control panel, use the navigation keys to select:
• Close Valve
• Turn Pump On
5. Monitor the pressure reported by the NIBP Test control panel or the external pressure
standard.
6. Select Turn Pump Off as soon as the pressure reaches the target pressure of 265 +/- 5 mmHg.
7. Allow the system to stabilize for 5 seconds.
8. Use the navigation keys to select Open Valve and immediately start the timer.
9. Stop the timer as soon as pressure drops below 15 mmHg.
10.Record the Deflation Time as T
Acceptable Results
.
D
The unit passes the test if the time to release pressure from 2 65 +/- 5 mmHg to 15 mmHg is l ess
than 10 seconds.
Corrective Action
If the unit fails the test, the most likely cause is kinked or obstructed internal tubing, or
obstructed filter. The device needs to be disassembled to replace or reposition the appropriate
segment of NIBP tubing.
9650-0804-01 Rev. A ZOLL Propaq M Service Manual 13
Page 18

CHAPTER 1MAINTENANCE TESTS
NIBP Inflation Test
Equipment Single lumen BP hose, a 250 cc volume, a timer, and a calibrated manometer (optional).
Procedure
1. Power on th e Propaq M.
2. Connect the Propaq M to the single lumen hose and the 250 cc volume. If available, connect
a calibrated manometer to the air line using a T- fitting.
3. In the Propaq M, do the following to enter the NIBP Test control panel:
4. Press the Setup quick access key ( ).
5. Use the navigation keys to select Supervisor>Service>Device Tests>NIBP Test.
6. Wait 10 seconds to allow the system to vent any residual pressure.
7. Verify that the pressure reported by the NIBP Test control panel or the external pressure
standard system is less than 5 mmHg.
8. From the NIBP Test control panel, use the navigation keys to select Close Valve.
9. Select Turn Pump On and immediately start the timer.
10.Stop the timer as soon as pressure exceeds 210 mmHg.
11. Select Turn Pump Off, then Open Valve.
12.Record the Inflation Time as T
.
I
Note: Note: The pump will automatically turn off if pressure ex ceeds 3 10 mmHg during this
test.
Acceptable Results
The unit passes the test if the time to increase pressure to 210 mmHg is less than 7 seconds.
Corrective Action
If the unit fails the test, the most likely cause is a faulty pump or a kinked internal hose. The
device needs to be disassembled to replace the pump or reposition the appropriate segment of
NIBP tubing.
14 9650-0804-01 Rev. A
Page 19

Operational Tests
The Propaq M comes equipped with routine operational tests that can be performed
periodically. With the exception of the Physical Inspection of the Unit test, these tests contain
instructions within them provide guidance during the tests.
Physical Inspection of the Unit
Tools Needed None
Test Setup None
Observe this... Pass/Fail
Housing
1.
Is the unit clean and undamaged?
Operational Tests
oo
2. Does the unit show signs of excessive wear?
3. Does the handle work properly?
4. Does the recorder drawer open and close properly?
5. Are input connectors clean and undamaged?
6. Are there any cracks in the housing?
7. Do the front panel or selector switches have any damage or cracks?
8. Are there any loose housing parts?
Cables
12.
Are all cables free of cracks, cuts, exposed or broken wires?
13. Are all bend/strain reliefs undamaged and free of excessive cable wear?
Battery
14.
Is the Propaq battery fully charged?
15. Is the battery seated in the battery well correctly?
16. Is battery housing free of cracks and damage?
oo
oo
oo
oo
oo
oo
oo
oo
oo
oo
oo
oo
17. Are connectors free of damage and excessive wear?
9650-0804-01 Rev. A ZOLL Propaq M Service Manual 15
oo
Page 20
CHAPTER 1MAINTENANCE TESTS
Accessing the Operational Tests
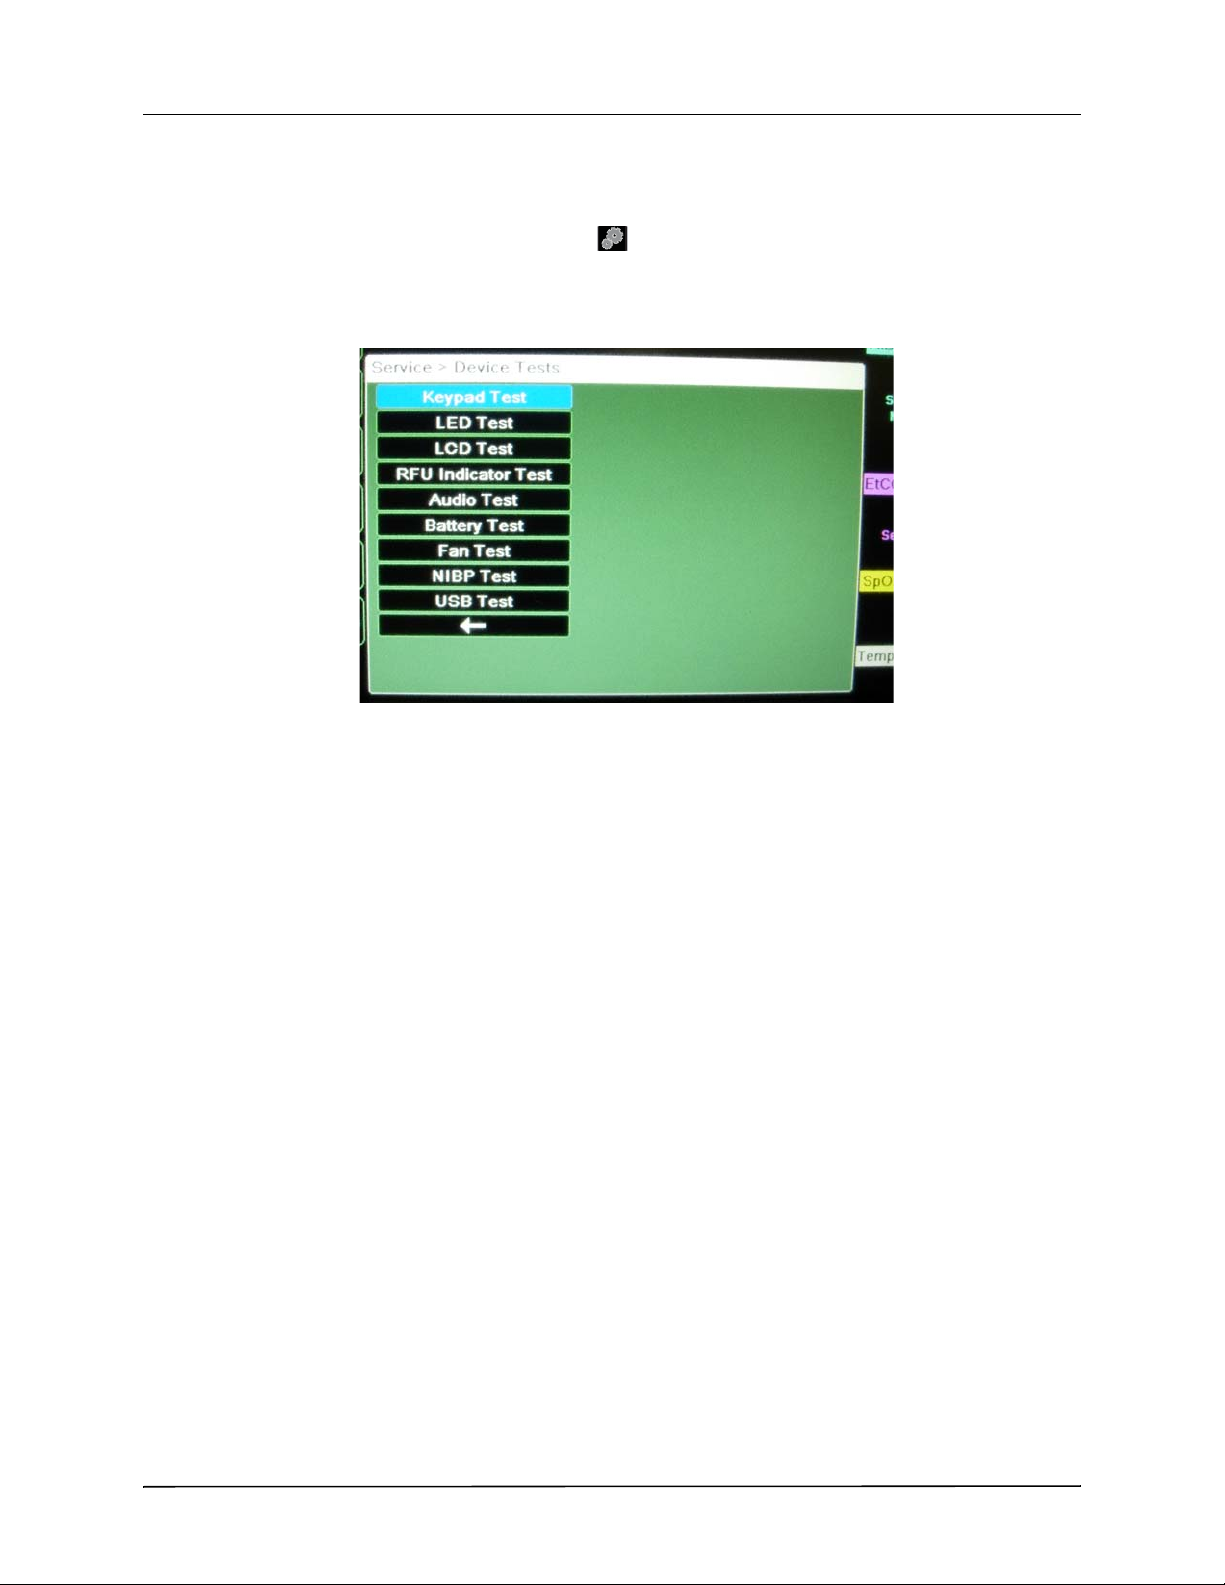
The operational tests on the unit can be accessed by doing the following:
1. Press the Setup quick access key ().
2. Use the navigation keys to select Supervisor>Service>Device Tests. The operational tests
are displayed. Use the navigation keys to select one of the tests.
16 9650-0804-01 Rev. A
Page 21
Operational Tests
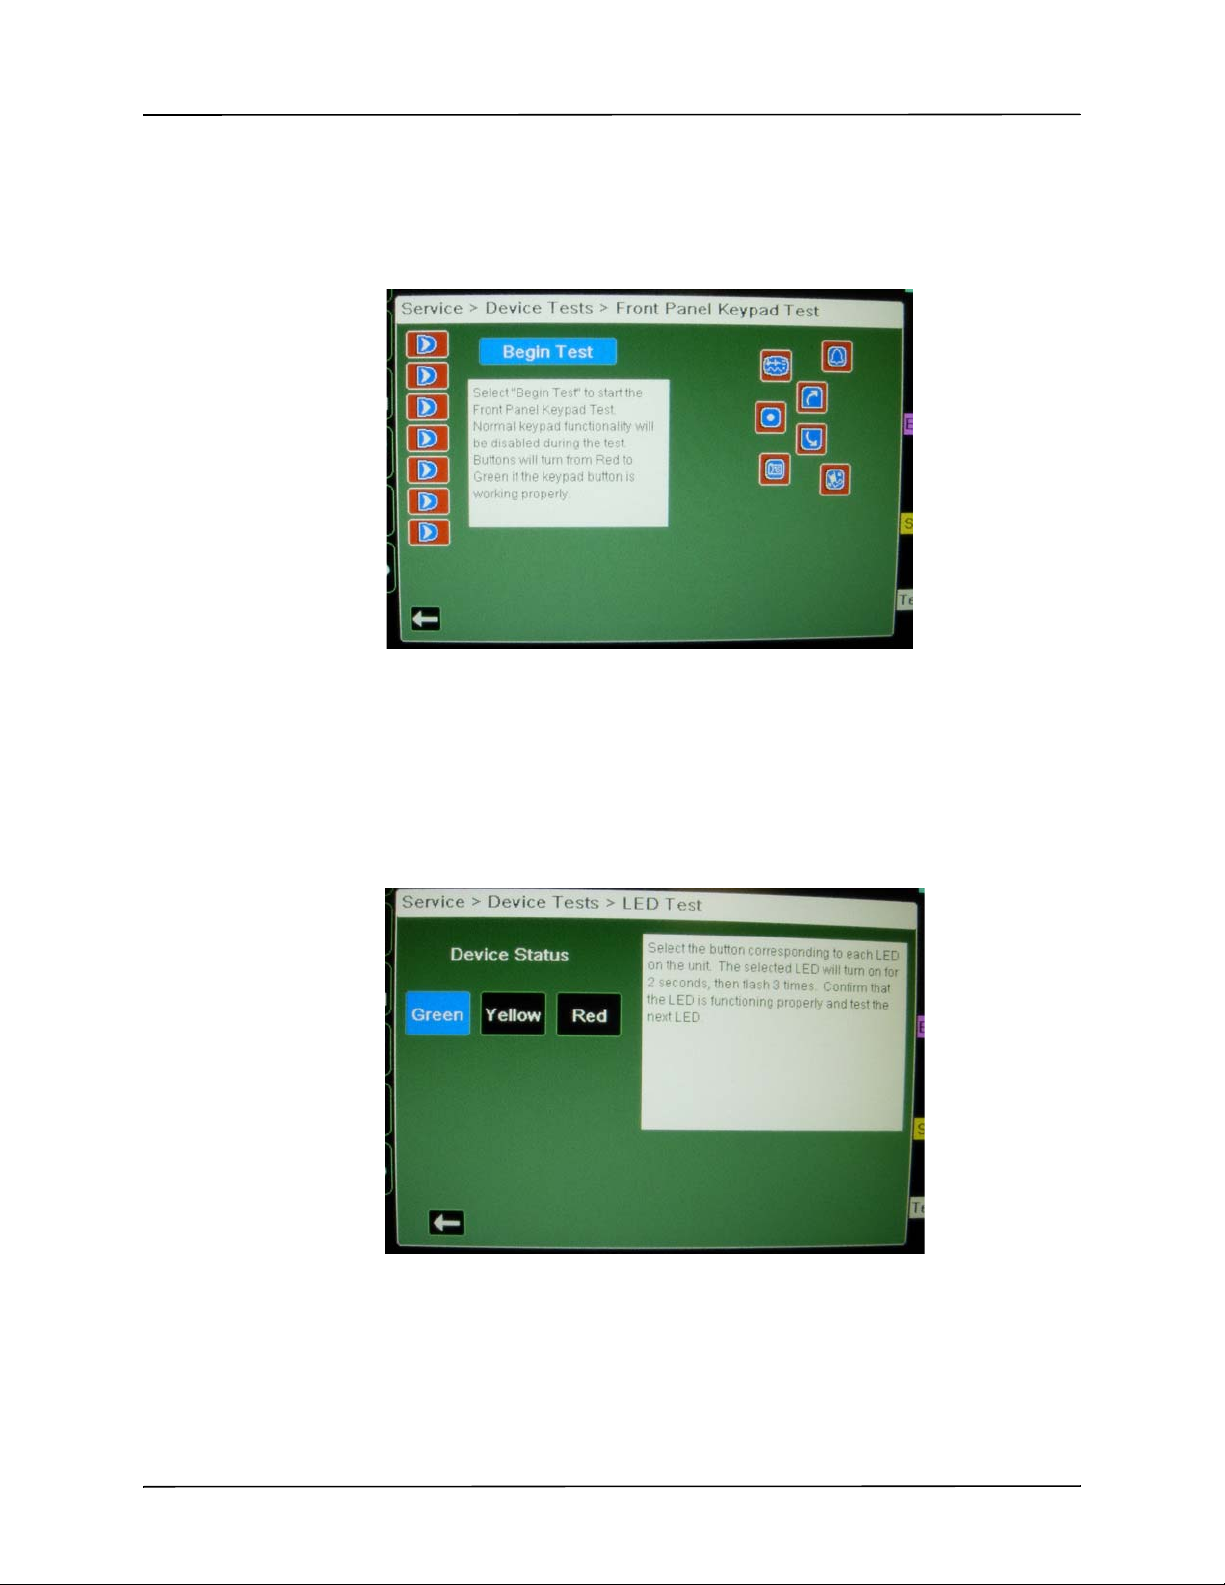
Keypad Test
This test checks all the front panel buttons on the unit to make sure they are working correctly.
Follow the instructions and use the navigation keys to move around the display and make
selections.
LED Test
This test checks all the Light Emitting Diodes in the unit to make sure they are working
correctly.
Follow the instructions and use the navigation keys to move around the display and make
selections.
9650-0804-01 Rev. A ZOLL Propaq M Service Manual 17
Page 22
CHAPTER 1MAINTENANCE TESTS
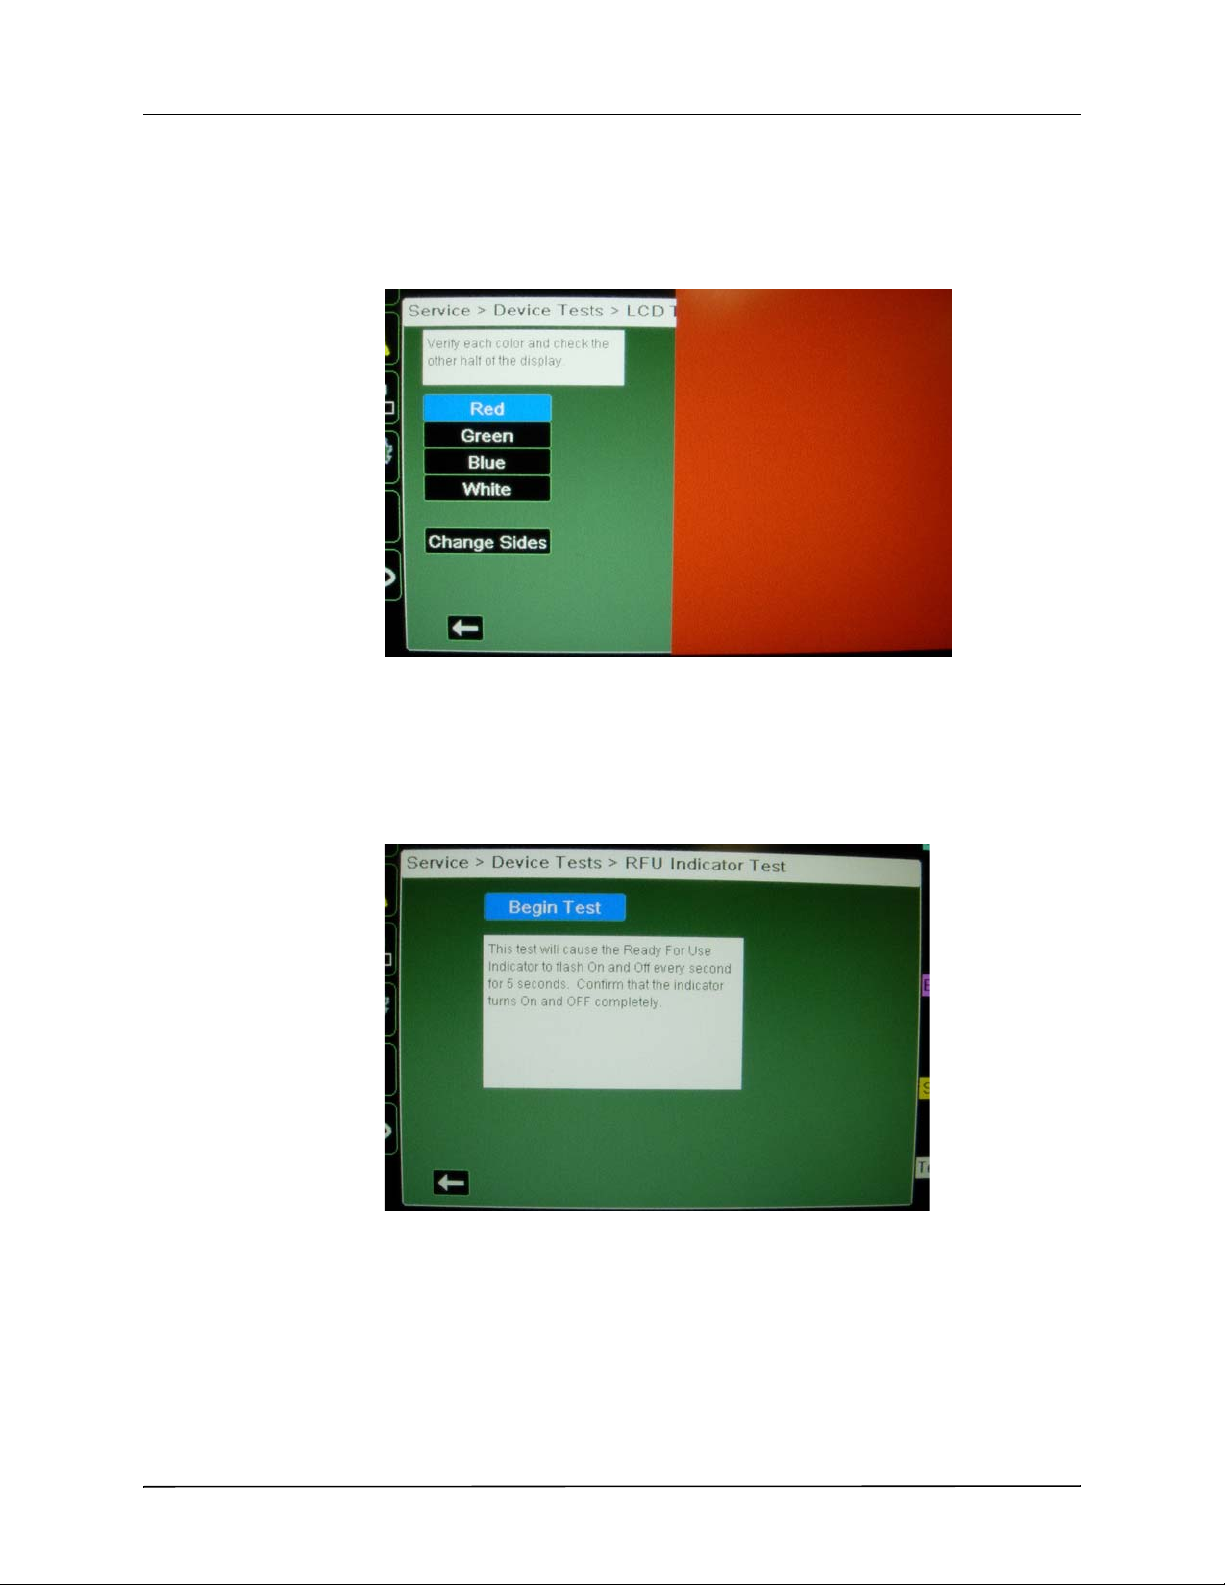
LCD Test
This test checks the colors of the Liquid Crystal Display on the unit.
Follow the instructions and use the navigation keys to move around the display and make
selections.
RFU Indicator Test
This test checks the Ready For Use Indicator on the unit to make sure it is working correctly.
Follow the instructions shown on the display.
18 9650-0804-01 Rev. A
Page 23

Operational Tests
Audio Test
This test checks the audio tones on the unit to make sure they are working correctly.
Follow the instructions and use the navigation keys to move around the display and make
selections.
Battery Test
This test checks the battery to make sure it is working correctly.
Follow the instructions on the display.
9650-0804-01 Rev. A ZOLL Propaq M Service Manual 19
Page 24
CHAPTER 1MAINTENANCE TESTS
Fan Test
This test checks the fan in the unit to make sure it is working correctly.
Follow the instructions and use the navigation keys to move around the display and make
selections.
NIBP Test
This allows the operator to perform various checks of the NIBP module to make sure it is
working correctly.
Follow the instructions in the NIBP Calibration Check proce dure and other procedures ou tlined
in this manual. Use the navigation keys to move around the display and make selections as
required to execute the procedures.
20 9650-0804-01 Rev. A
Page 25

Operational Tests
USB Test
This test checks the USB capability in the unit to make sure it is working correctly.
Follow the instructions and use the navigation keys to move around the display and make
selections.
9650-0804-01 Rev. A ZOLL Propaq M Service Manual 21
Page 26

CHAPTER 1MAINTENANCE TESTS
Functional Verification Tests
Before You Begin the Functional Verification Tests
• Assemble the tools listed in following section, “Equipment You Need to Perform the
Functional Verification Tests.”
• Keep an extra fully charged Propaq M battery available.
• Schedule an hour to conduct the entire maintenance test.
• Perform the tests in the order presented.
• Perform all the steps of each test procedure.
• Complete all the steps of the procedure before evaluating the test results.
Equipment You Need to Perform the Functional Verification Tests
For testing purposes, you can substitute an equivalent device.
• Fluke Impulse 7000DP Analyzer, or equivalent, with appropriate interface adapter
(Dynatech Nevada Inc. part number 3010-0378)
• IBP/Temp Simulator, or equivalent
• NIBP Simulator
• Single or dual lumen NIBP hose
• Adult NIBP cuff and a rigid cylinder to wrap it around
• 5% CO
• ECG Simulator; 12 Lead Simulator for 12 Lead test (e.g., Symbio CS1201)
calibration gas cylinder with CO2 sample line (kit available from Scott Medical
2
Products, PN 4653ORF-BD)
Accessories You Need for the Propaq M Options Functional Verification
Tests
• 3-lead, 5-lead and 12-lead ECG cables. (12-lead cable needed if 12-lead option is
installed.)
• NIBP cuff and hose
• IBP cable
• SpO
• EtCO
• Paddles
• Battery
• Auxiliary power source
cable and sensor
2
cable and sensor
2
22 9650-0804-01 Rev. A
Page 27

Functional Verification Tests
Leads Test
Tools Needed 3-lead, 5-lead, and 12-lead cables
Test each cable separately.
Test Setup Connect the lead wires appropriate to each test to the Fluke Impulse 7000DP Analyzer or
equivalent.
Do this... Observe this... Pass/Fail
1. Press the power switch to turn on the
Propaq M.
2. Disconnect one lead from the
simulator.
3. Reconnect the lead. Repeat step 2
with the remaining leads.
4. Repeat steps 2 and 3 for 5 lead and 12
lead cables.
No ECG LEAD FAULT message
displayed.
The ECG LEAD F AULT message displays
within 3 seconds (if configured).
Wait for ECG LEAD FAULT message to
clear from the display (if configured).
Note: If heart rate alarm sounds, on the
Propaq M:
• Press the Next quick access key
( ) key to access the second
set of quick access keys.
• Press the Alarm quick access key
().
• Press the Alarm Suspend key
().
oo
oo
oo
oo
9650-0804-01 Rev. A ZOLL Propaq M Service Manual 23
Page 28

CHAPTER 1MAINTENANCE TESTS
Heart Rate Display Test
Tools Needed ECG simulator
ECG Cable (3-lead, 5-lead or 12-lead)
Test Setup Press the power switch to turn on the Propaq M. Press Lead quick access key until II displays.
Connect the ECG leads to the ECG simulator.
Connect the ECG cable to the unit.
Do this... Observe this... Pass/Fail
1. Set the ECG Simulator to 120BPM. The Heart Rate disp l a ys as 120 +/- 4 bpm
oo
24 9650-0804-01 Rev. A
Page 29

Heart Rate Alarm Test
I, II,
III...
Tools Needed ECG simulator
Do this... Observe this... Pass/Fail
Functional Verification Tests
1.
Press the power button on the
Propaq M to turn the unit on.
Connect the ECG leads to the
simulator
BPM and press the Leads quick
access key
unit and select lead II.
2. On the Propaq M:
. Set the simulator to 120
() on the Propaq M
• Press the Next quick
ECG
access key ( ) key to
access the second set of
quick access keys.
• Press the Alarm quick
access key ().
• Press the Limits softkey.
3. On the Propaq M, select HR/PR
Alarm in the Alarm Settings menu
and use the navigation keys to do
the following:
• Set the Upper Limit Enable
to ON.
• Set the Lower Limit
Enable to ON.
• Set the Lower limit to 30.
• Set the Upper limit to 150.
Use the navigation keys to exit the
Alarm Settings menu.
4. On the Propaq M, press the Alarm
Suspend key ( ).
II displays next to the Leads quick
access key.
The Alarm Settings menu displays.
The red alarm suspension timer
displays at the top of the next to the
message area.
oo
oo
5.
Remove a lead wire from the
simulator.
6. On the Propaq M, press the Alarm
Suspend key ( ).
7.
Reattach ECG Lead wire to
simulator.
Set simulator to 20 BPM or lower.
8. On the Propaq M, press the Alarm
Suspend key ( ).
ECG
ECG
he ECG LEAD FAULT message
T
displays.
The Alarm Suspend key flashes
The ECG LEAD FAULT message no
longer displays.
Heart Rate Value is highlighted and
the alarm tone sounds. The HR/PR
LOW ALARM message displays.
The Alarm Suspend key flashes.
.
The
red alarm suspension timer displays
at the top of the screen next to the
oo
oo
oo
message area.
9. Set the simulator to 120 BPM.
9650-0804-01 Rev. A ZOLL Propaq M Service Manual 25
Page 30

CHAPTER 1MAINTENANCE TESTS
Do this... Observe this... Pass/Fail
10. On the Propaq M, press the Alarm
Suspend key ( ).
10. Set simulator to 160 BPM or higher.
11.
On the Propaq M, press
Silence/Reset button ( )
the Alarm
.
Alarm is enabled. The alarm suspend
key flashes. The alarm suspension
timer disappears.
Heart Rate Value is highlighted and
the alarm tone sounds. The HR/PR
HIGH ALARM message displays.
Alarm is suspended for 90 seconds.
The alarm suspension timer appears
in black.
oo
oo
oo
26 9650-0804-01 Rev. A
Page 31

SpO2 Test
Functional Verification Tests
Tools Needed SpO
Test Setup Disconnect any ECG cable or IBP probes from the Propaq M.
Simulator: Fluke Index 2 or equivalent, NellcorTM SpO2 finger probe
2
Do This... Observe This... Pass/Fail
1.
Power on the Propaq M without the
sensor attached.
2.
Connect the
3.
Set the simulator to 70%
Attach the
4.
Set the simulator to 80%
SpO
sensor to the Propaq M. Verify that SpO2 numeric
2
SpO
sensor to the simulator.
2
SpO
SpO
SpO
and 60 PPM.
2
and 60 PPM.
2
Verify that the SpO2 numeric
2
displays INITIALIZING , changes
to SEARCHING, then goes blank.
displays SEARCHING.
Verify that after a brief period of
initialization, the
displays an
67% and 73%.
Verify that the displayed pulse
rate reads 60 +/- 3 bpm.
Verify that after a brief period of
initialization, the
displays an
77% and 83%.
Verify that the displayed pulse
rate reads 60 +/- 3 bpm.
SpO
SpO
value between
2
SpO
SpO
value between
2
numeric
2
numeric
2
oo
oo
oo
oo
5.
Set the simulator to 90%
SpO
and 60 PPM.
2
Verify that after a brief period of
SpO
initialization, the
displays an
87% and 93%.
Verify that the displayed pulse
rate reads 60 +/- 3 bpm.
SpO
numeric
2
value between
2
oo
oo
9650-0804-01 Rev. A ZOLL Propaq M Service Manual 27
Page 32

CHAPTER 1MAINTENANCE TESTS
EtCO2 Test
Tools Needed CO
Test Setup None
2
1. On Propaq M, install the airway adapter
2.
3. On Propaq M, gently blow into the airway
sampling line airway adapter
Do this... Observe this... Pass/Fail
set and sampling line in the connector at
the side of the unit.
CO
CO
2
Press the
CO
2
activate the CO
quick access key () to
trace.
2
2
adapter set while observing the display.
The CO
The CO2 waveform changes on the
display.
trace is on the display.
2
oo
oo
28 9650-0804-01 Rev. A
Page 33

Functional Verification Tests
IBP Test
Tools Needed IBP patient simulator (with accuracy better than +/- 1 mmHg), or equivalent
Setup Connect the test cables to IBP patient simulator.
Do This... Observe This... Pass/Fail
1. Connect the IBP patient simulator to the
Propaq P1 channel.
2. Set the IBP patient simulator to 0 mmHg.
3. On the Propaq M, press > IBP.
4. On the Propaq M, Press > P1->0<-. Display of 0/0(+/-2) in the P1 box
at the bottom of the display (P1 is
zeroed).
The waveform for channel 1 is
present.
5. Set the IBP patient simulator to 200
mmHg (or as close to 200 mmHg as your
simulator allows).
6. Repeat steps 1 through 5 of this procedure
for P2 and P3 channels.
Display of 200/200(+/-5) in the P1
box at the bottom of the display as
xxx/yyy where yyy=diastolic (P1
diastolic pressure is 200 (+/-5)).
oo
oo
oo
9650-0804-01 Rev. A ZOLL Propaq M Service Manual 29
Page 34

CHAPTER 1MAINTENANCE TESTS
NIBP Test
Tools Needed NIBP simulator, single or dual lumen hose, adult, NIBP cuff, rigid cylinder
Test Setup Connect the Propaq M to the NIBP simulator using the single or dual lumen hose. Wrap the
NIBP cuff around a rigid cylinder, such as a glass jar.
Note: Refer to Appendix B for information on simulators and settings that you may use to
assess the performance of the NIBP module.
Do This... Observe This... Pass/Fail
1. On the Propaq M, ensure the patient mode
is set to Adult.
2. Set the simulator to the 80/50 simulator
preset.
3. Take a manual reading. Confirm that the NIBP measurement
reported is within +/- 10 mmHg of
the expected simulator performance.
4. Set the simulator to the 120/80 simulator
preset.
5. Take a manual reading. Confirm that the NIBP measurement
reported is within +/- 10 mmHg of
the expected simulator performance.
6. Set the simulator to the 200/150 si mulato r
preset.
7. Take a manual reading. Confirm that the NIBP measurement
reported is within +/- 10 mmHg of
the expected simulator performance.
oo
oo
oo
30 9650-0804-01 Rev. A
Page 35

Temperature Test
Tools Needed IBP Temp Simulator, or equivalent
Test Setup None
Do this... Observe This... Pass/Fail
1. Connect the temperature simulator to the
Propaq M T1 channel.
Functional Verification Tests
2. On the IBP Temp Simulator, Select 98.6
Degree F (36 Degree C) or a setting as close
as possible as your simulator allows.
3. Repeat steps 1 and 2 of this procedure for the
T2 channel.
The displayed temperature value is
within 0.2 F or 0.1 C of the
simulator setting.
oo
9650-0804-01 Rev. A ZOLL Propaq M Service Manual 31
Page 36

CHAPTER 1MAINTENANCE TESTS
32 9650-0804-01 Rev. A
Page 37

Overview
This chapter contains a list of error messages that users may see if the unit is not operating
properly.
If the errors you encounter are not listed below, call ZOLL Medical Corporation’s Technical
Service Department for further assistance. (See “Technical Service” on page 3 for contact
information.)
Propaq M Error Messages
The following is a list of the Propaq M error messages that may appear on your display. The
“Technical Action” column describes what you as a technician can do to correct the situation.
Chapter 2
T roubleshooting
Error Message Explanation Technical Action
SW SHUTDOWN
WARNING
HW SHUTDOWN Voltage threshold exceeded
9650-0804-01 Rev. A ZOLL Propaq M Service Manual 33
Indication that the battery
has reached the software
shutdown capacity.
the minimum working
threshold of the device.
There is no warning.
Charge the battery.
Charge the battery.
Page 38

CHAPTER 2TROUBLESHOOTING
Error Message Explanation Technical Action
QUICK ACCESS SW 1
SHORT
QUICK ACCESS SW 2
SHORT
QUICK ACCESS SW 3
SHORT
QUICK ACCESS SW 4
SHORT
QUICK ACCESS SW 5
SHORT
QUICK ACCESS SW 6
SHORT
QUICK ACCESS SW 7
SHORT
SCREEN CYCLE SHORT Display/home key is stuck. Replace the front panel.
ALARM SILENCE SHORT Alarm Silence/Reset key is
Quick access key 1 is stuck. Replace the front panel.
Quick access key 2 is stuck. Replace the front panel.
Quick access key 3 is stuck. Replace the front panel.
Quick access key 4 is stuck. Replace the front panel.
Quick access key 5 is stuck. Replace the front panel.
Quick access key 6 is stuck. Replace the front panel.
Quick access key 7 is stuck. Replace the front panel.
Replace the front panel.
stuck.
NAV PAD UP SHORT Up/Clockwise Navigation
key is stuck.
NAV PAD SELECT SHORT Select key is stuck. Replace the front panel.
NAV PAD DOWN SHORT Down/Counterclockwise
Navigation key is stuck.
SNAPSHOT SHORT Snapshot key is stuck. Replace the front panel.
ECG DEVICE FAILURE ECG software detected a
problem with the ECG data
that is most likely a hardware
issue.
TEMP DEVICE FAILURE Temp software detected a
problem with the
temperature data that is
most likely a hardware issue.
TEMP PROBE1 SHORTED An A/D value was detected
that indicated the probe was
shorted.
Replace the front panel.
Replace the front panel.
Replace the main board.
Replace the main board.
Replace the temperature
probe or adapter cable. If
problem persists, replace
the right side panel.
34 9650-0804-01 Rev. A
Page 39

Propaq M Error Messages
Error Message Explanation Technical Action
TEMP PROBE2 SHORTED An A/D value was detected
that indicated the probe was
shorted.
TEMP1 CIRCUIT FAILURE The software detected an
out-of-range A/D converter.
TEMP2 CIRCUIT FAILURE The software detected an
out-of-range A/D converter.
IBP DEVICE FAILURE IBP software detected a
problem with the IBP data
that is most likely a hardware
issue.
IBP PROBE1 SHORTED An A/D value was detected
that indicated the probe was
shorted.
IBP PROBE2 SHORTED An A/D value was detected
that indicated the probe was
shorted.
Replace the temperature
probe or adapter cable. If
problem persists, replace
the right side panel.
Remove probe, power
cycle. If problem persists,
replace main board.
Remove probe, power
cycle. If problem persists,
replace main board.
Replace the main board.
Replace the IBP probe. If
problem persists, replace
the right side panel.
Replace the IBP probe. If
problem persists, replace
the right side panel.
IBP PROBE3 SHORTED An A/D value was detected
that indicated the probe was
shorted.
IBP PROBE1 CIRCUIT
FAILURE
An unsupported probe was
inserted or there is a circuit
problem.
IBP PROBE2 CIRCUIT
FAILURE
An unsupported probe was
inserted or there is a circuit
problem.
IBP PROBE3 CIRCUIT
FAILURE
An unsupported probe was
inserted or there is a circuit
problem.
SPO2 DEVICE FAILURE Communication failure or
device malfunction.
Replace the IBP probe. If
problem persists, replace
the right side panel.
Unplug probe, power cycle.
If problem persists, replace
main board.
Unplug probe, power cycle.
If problem persists, replace
main board.
Unplug probe, power cycle.
If problem persists, replace
main board.
Check SpO
2
communication cables. If
problem persists, replace
the SpO
module.
2
9650-0804-01 Rev. A ZOLL Propaq M Service Manual 35
Page 40

CHAPTER 2TROUBLESHOOTING
Error Message Explanation Technical Action
NIBP MONITORING
FAILURE
NIBP COMMUNICATION
FAILURE
NIBP CALIBRATION
CHECK DUE
One of the following issues
occurred:
• A failure was reported by
the NIBP module.
• The two transducers are
not aligned. They are
either not calibrated,
there is a transducer
failure, or there is a
kinked tube.
• A calibration problem was
reported by the NIBP
module.
There is a communication
problem with the NIBP
module.
Annual calibration check is
due.
If problem persists, replace
the NIBP module.
Ensure that the J32
connection is secure. If
error persists, replace the
NIBP module.
Perform the NIBP
Calibration Check
procedure in Chapter 1,
"Calibration and Calibration
Checks".
NIBP KINKED HOSE The cuff inflation was too
rapid. There may be kinked
tubing or another air
obstruction.
NIBP MAX PRESSURE
Pressure limit exceeded. If problem persists, do the
EXCEEDED
Check the external NIBP
hose for kinks. If problem
persists, check the routing
of the NIBP tubing inside
the device.
following:
• Check the calibration via
the NIBP Calibration
Check procedure in
Chapter 1, "Calibration
and Calibration
Checks".
• Check the routing of the
NIBP tubing inside the
device for kinks or
obstructions.
If the NIBP module is out of
calibration, replace the
NIBP module.
36 9650-0804-01 Rev. A
Page 41

Propaq M Error Messages
Error Message Explanation Technical Action
NIBP AIR LEAK Major air leak or could not
reach target pressure.
Attempt to identify
problems with the hose
and/or cuff by doing the
following:
• Check the hose
connection to the
device. Make sure that
the hose is tightly
screwed onto the NIBP
connector.
• Ensure that the cuff is
appropriately wrapped
and is not too loose.
• Inspect the cuff and
hose for leaks. Inspect
the O-ring on the NIBP
hose connector.
Consider replacing the
cuff and/or hose.
If the problem persists,
perform one of the following
procedures in Chapter 1,
"NIBP Valve, Pump, and
Tubing Integrity Tests":
• NIBP Leak Test
• NIBP Inflation Test
Inspect internal NIBP
tubing for leaks.
NIBP EQUIPMENT CHECK Device is unable to obtain a
reading.
NIBP WEAK PULSE Too few pulses are detected
during the reading attempt.
NIBP TEMP OUT OF
RANGE
Module temperature is out of
its specified operating range.
NIBP ARTIFA CT Unable to determine blood
pressure. Check
connections; restrict patient
movement.
Check the hose and cuff
connections. If problem
persists, perform one or
more of the following
procedures outlined in
Chapter 1, "NIBP Valve,
Pump, and Tubing Integrity
Tests":
• NIBP Leak Test
• NIBP Deflation Test
• NIBP Inflation Test
Tighten the cu ff and ensure
appropriate placement.
Move the device to a cooler
or warmer environment.
Attempt to identify and
eliminate the source of
artifact. If problem persists,
replace the NIBP module.
9650-0804-01 Rev. A ZOLL Propaq M Service Manual 37
Page 42

CHAPTER 2TROUBLESHOOTING
Error Message Explanation Technical Action
NIBP NEONATAL
DETECTED
Device thinks a neonate cuff
is connected. If no neonate
cuff is connected, tubing
may be damaged or kinked.
Verify that neonate cuff is
not connected. If problem
persists, check the routing
of the NIBP tubing inside
the device.
NIBP LOW VOLTAGE Insufficient voltage is
supplied to the NIBP
module.
Check the module voltage
in the NIBP Test screen.
Inspect the unit or water
ingress. If evidence of
water ingress is found,
allow the water to
evaporate while periodically
checking the module
voltage. If problem persists,
replace the NIBP module.
SPO2 COM ERROR CODE Communication error. Check communication
cables. If problem persists,
SPO2 SENSOR FAILURE Defective sensor or sensor
replace the SpO
Replace the SpO
module.
2
sensor.
2
error.
SPO2 UNKNOWN
Recovery error . Replace the SpO
sensor.
2
RECOVERY NUM
CO2 DEVICE FAILURE Malfunction or device failure. Replace the CO
module.
2
CO2 COM ERROR CODE Communication failure. Check communication
cables. If problem persists,
CO2 BAROMETRIC OUT
OF RANGE
Altitude is too high for
module.
replace the CO
Bring device into specified
altitude range. If problem
module.
2
persists, replace the CO
module.
CO2 CAL REMINDER Calibration reminder. Calibrate the CO
module
2
soon.
CO2 CAL REQUIRED Calibration due. Calibrate the CO
module.
2
CO2 CHECK FLOW Exhaust port blocked. Check for exhaust port
occlusion. If problem
persists, replace the CO
module.
2
2
38 9650-0804-01 Rev. A
Page 43

Propaq M Error Messages
Error Message Explanation Technical Action
CO2 GAS INPUT
OCCLUSION
CO2 inlet blocked.
Replace FilterLine
problem persists, check for
CO
inlet occlusion. If still
2
®
. If
persists, replace the CO
module.
CO2 MAINTENANCE
REMINDER
CO2 MAINTENANCE
Periodic maintenance
Replace CO
reminder.
Periodic Maintenance due. Replace CO
module soon.
2
module.
2
REQUIRED
CO2 NO FILTERLINE No filterline is detected. If FilterLine is connected
and problem persists,
replace FilterLine. If still
persists, replace the CO
module.
CO2 CAL FAILURE Calibration failed. Retry calibration or
continue with old
calibration. Replace the
CO
module.
2
2
2
9650-0804-01 Rev. A ZOLL Propaq M Service Manual 39
Page 44

CHAPTER 2TROUBLESHOOTING
40 9650-0804-01 Rev. A
Page 45

Overview
This chapter provides instructions on how to disassemble and reassemble the Propaq M unit,
and includes the following sections:
• Required Equipment
• Safety Precautions
• Modules
• Handle Disassembly
• Main Unit Disassembly
• Front Enclosure Disassembly
• Display Disassembly
• NIBP and EtCO
• Monitor Board and SpO
Chapter 3
Disassembly Procedures
Disassembly
2
Disassembly
2
Required Equipment
• No. 1 Phillips screwdriver with torque capability
• No. 2 Phillips screwdriver with torque capability
• Exacto-knife
• Orange wooden stick. (Available from H.A. Stiles: 1-800-447-8537)
• 90° dental pick
• Needle nose pliers
• 6 mm socket wrench
• 26 mm socket wrench
• Kapton tape
• 3M copper adhesive tape, or equivalent
9650-0804-01 Rev. A ZOLL Propaq M Service Manual 41
Page 46

CHAPTER 3DISASSEMBLY PROCEDURES
• 1/2” nut driver
• Large diagonal cutters
• Strong glue, such as Loctite 420 or equivalent
• Loctite needle tip dispenser
Safety Precautions
• Only properly trained technicians should service the unit.
• Make sure you take the necessary precautions when working with static sensitive units. For
example, you must wear a conductive wrist strap (which touches your skin) connected to a
grounding mat and to the earth ground.
Modules
The Propaq M unit contains the following six (6) modules or assemblies:
• Front Enclosure
• Display
• NIBP
• EtCO
• Monitor Board
• SpO
These modules can be purchased as replacement parts from the ZOLL Technical Support
Department. See Chapter 5, "Replacement Parts" for information on ordering replacement
parts.
(Oridion®)
2
2
42 9650-0804-01 Rev. A
Page 47

Removing the Handle
screw
covers
screws
Tools Required
• #1 Phillips screwdriver with torque capability
• Orange (wooden) stick
Setup
• This procedure should be conducted on a static mat.
• Wear a wrist strap to ground during the procedure.
To reinstall the handle assembly, reverse the steps.
Handle Disassembly
1 Using an orange stick, lift the screw covers
off the handle in two locations.
Removing the Handle
2 Remove four (4) screws (2 on each handle)
and remove the handle.
Note: During reassembly, torque screws to
8 in-lbs.
9650-0804-01 Rev. A ZOLL Propaq M Service Manual 43
Page 48

Disassembling the Main Unit
Tool Required
• # 1 Phillips screwdriver with torque capability
• orange (wooden) stick
Setup
• This procedure should be conducted on a static mat.
• Wear a wrist strap to ground during the procedure.
• Complete “Removing the Handle” on page 43 before performing this procedure.
To reassemble the main unit, reverse the steps.
Main Unit Disassembly
1 Place tape on the top of the unit (near the
front of the display) in the illustrated area.
2 Gently place unit screen so the display
screen is facing down.
3 Remove ten (10) screws: four (4) on the
top, four (4) on the bottom, and two (2) in
the middle in the illustrated areas. Take
care to keep the two parts of the unit
together.
Note: During reassembly , torque screws to
6 in-lbs.
4 While holding the two parts of the unit
together, place the unit vertically on the mat
(feet down).
5 Separate the top part of the unit by creating
a small gap, and remove any screws that
are in the way.
44 9650-0804-01 Rev. A
Page 49

6 Disconnect the battery communication
battery
cable
p
two power
cables
NIBP
hoses
cable (yellow, orange, brown, red)
connector from the monitor board.
7 Disconnect the termination board from the
monitor board.
Disassembling the Main Unit
8 Disconnect the two power cable
connectors (battery (black) and AUX
(white)).
9 Use an orange stick to release the tabs on
either side of silver ZIF connector between
the dock connector and the monitor board.
Note: Release one side at a time.
10 Separate the two parts of the unit.
9650-0804-01 Rev. A ZOLL Propaq M Service Manual 45
Page 50

11 Disconnect the NIBP tube from the rear
NIBP
hoses
NIBP tube
case.
46 9650-0804-01 Rev. A
Page 51

Removing the Front Enclosure Module
grounding
screw
multi-wire
cable
Removing the Front Enclosure Module
Tools Required
• #2 Phillips screwdriver with torque capability
• Orange (wooden) stick
Setup
• This procedure should be conducted on a static mat.
• Wear a wrist strap to ground during the procedure.
• Complete these procedures in the following order before performing this procedure:
1. “Removing the Handle” on page 43
2. “Disassembling the Main Unit” on page 44
To reinstall the front enclosure module, reverse the steps.
Front Enclosure Disassembly
1 Remove tape from the top of the unit.
2 Separate monitor front enclosure.
3 Pivot top up with cables still connected.
4 Remove grounding screw as shown in the
illustration.
Note: During reassembly, torque screw to 6
in-lbs.
5 Disconnect the front panel multi-wire cable
in the area illustrated.
9650-0804-01 Rev. A ZOLL Propaq M Service Manual 47
Page 52

6 Remove the ZIF (Zero Insertion Force) flex
cable using an orange stick.
48 9650-0804-01 Rev. A
Page 53

Removing the Display Module
hex standoff
Removing the Display Module
Tools Required
• #1 Phillips screwdriver with torque capability
• 3M copper adhesive tape
• 6mm socket wrench
Setup
• This procedure should be conducted on a static mat.
• Wear a wrist strap to ground during the procedure.
• Complete these procedures in the following order before performing this procedure:
1. “Disassembling the Main Unit” on page 44
2. “Removing the Front Enclosure Module” on page 47
To reinstall the display module, reverse the steps.
Display Disassembly
1 Place the back of the unit down on the mat
so that the display screen is facing up.
2 Remove the six (6) screws from the front of
the casting in the areas illustrated.
Note: During reassembly, torque screws to
6 in-lbs.
3 Flip the unit over and remove the screw in
the area illustrated.
4 Remove the hex standoff located
underneath the screw you just removed.
Note: During reassembly, torque to
6 in-lbs.
9650-0804-01 Rev. A ZOLL Propaq M Service Manual 49
Page 54

5 Flip the unit back over so the display
boot
copper tape
cable connectors
Kapton tape
screen is facing up.
6 Lift the casting up while pushing down on
the rubber boot that runs around the edge
of the LCD screen.
7 Remove the copper tape from the casting.
Note: During reassembly, apply new
copper tape for grounding.
8 Disconnect the LCD display cable
connectors from the back of the LCD
screen to release it.
50 9650-0804-01 Rev. A
9 Remove the Kapton tape from the display
cable.
Page 55

Removing the EtCO2 and NIBP Modules
Removing the EtCO2 and NIBP Modules
Tool Required
• # 1 Phillips screwdriver with torque capability
• orange (wooden) stick
Setup
• This procedure should be conducted on a static mat.
• Wear a wrist strap to ground during the procedure.
• Complete these procedures in the following order before performing this procedure:
1. “Removing the Handle” on page 43
2. “Disassembling the Main Unit” on page 44
3. “Removing the Front Enclosure Module” on page 47
Note: After replacing the EtCO2 and/or NIBP modules, see Chapter 4, "Resetting Life Cycle
Counters" to reset the life cycle counters for the module(s) that you have replaced.
To assemble the EtCO2 and/or NIBP modules, reverse the steps.
EtCO2 and/or NIBP Disassembly
1 Remove the right side panel (containing
temperature, IBP, and USB connectors) by
removing four (4) screws from inside the
unit.
Note: During reassembly , torque screws to
6 in-lbs.
2 Remove three (3) screws from underneath
and outside the unit.
Note: During reassembly , torque screws to
6 in-lbs.
9650-0804-01 Rev. A ZOLL Propaq M Service Manual 51
Page 56

3 Disconnect multi-wire IBP cable with ferrite
multi-wire IBP cable
in the area illustrated.
4 Cut the tie wrap to the IBP cable in the area
shown with the orange stick.
Note: During reassembly, secure a new tie
wrap to the IBP cable.
5 Disconnect the USB flex cable from ZIF
connector in the area illustrated.
6 Lay front end of separated unit down with
opened side facing up.
7 Disconnect the black EtCO
tube
2
connector from the air vent.
8 Remove four (4) screws in the areas
illustrated to release the silver EtCO
module.
Note: During reassembly , torque screws to
6 in-lbs.
2
52 9650-0804-01 Rev. A
Page 57

Removing the EtCO2 and NIBP Modules
tie wrap
9 Remove five (5) screws and washers from
the NIBP unit to release it.
Note: During reassembly , torque screws to
6 in-lbs.
10 Cut the tie wrap to the ferrite.
11 Remove multi-wire EtCO
cable with
2
ferrite.
12 Disconnect the brow n SpO
flex cable as
2
shown.
13 Disconnect the NIBP tubing from the side
panel in the area illustrated.
9650-0804-01 Rev. A ZOLL Propaq M Service Manual 53
Page 58

14 Remove the NIBP module from the uni t.
EtCo2 connector
before removal
EtCo2 connector
after removal
EtCO2 connector after removal
15 Tilt side panel to access the EtCO
2
connector and use an orange stick release
the tabs and remove the EtCO
connector.
2
16 Remove the EtCO2 module fro m the unit.
17 Remove three (3) screws from the outside
of the left side panel in the areas illustrated.
Note: During reassembly , torque screws to
6 in-lbs.
18 Remove four (4) screws from the inside top
of the left side panel in the areas illustrated
and carefully pull out side panel.
Note: During reassembly , torque screws to
6 in-lbs.
54 9650-0804-01 Rev. A
19 Remove ECG ZIF connector in the area
illustrated.
20 Remove the left side panel from the unit.
Page 59

Removing the Monitor Board and SpO2 Modules
shield
Removing the Monitor Board and SpO2 Modules
Tool Required
• # 1 Phillips screwdriver with torque capability
Setup
• This procedure should be conducted on a static mat.
• Wear a wrist strap to ground during the procedure.
• Complete these procedures in the following order before performing this procedure:
1. “Removing the Handle” on page 43
2. “Disassembling the Main Unit” on page 44
3. “Removing the Front Enclosure Module” on page 47
4. “Removing the Display Module” on page 49
5. “Removing the EtCO2 and NIBP Modules” on page 51
Note: After replacing the Monitor Board and/or SpO
Life Cycle Counters" to reset the life cycle counter for the module.
To reinstall the monitor board and/or SpO2 modules, reverse the steps.
modules, see Chapter 4, "Resetting
2
Monitor Board and/or SpO2 Disassembly
1 Remove the EtCO2 anti-conductive shield
that lies on top of the unit.
2 Remove six (6) screws to release the
monitor board in the areas illustrated.
Note: During reassembly , torque screws to
6 in-lbs.
9650-0804-01 Rev. A ZOLL Propaq M Service Manual 55
Page 60

3 Lift the monitor board to expose the
multi-wire LCD cable on the back side of
monitor board and disconnect it.
4 Remove three (3) screws and washers
from the NIBP unit.
Note: During reassembly , torque screws to
6 in-lbs.
5 Lift the SpO2 unit straight up to disconnect
it from the monitor board and remove it
from the unit.
6 Lift out the monitor board.
56 9650-0804-01 Rev. A
Page 61

Life Cycle Counters
Overview
This chapter contains instructions for setting life cycle counters on the Propaq M. The Propaq
M tracks various life cycle counters for specific modules installed in the device. When
replacing modules in the unit, it is important to reset the life cycle counters. Once you have
reset the appropriate life cycle counter(s), see “Functional Verification Tests” on page 1-22 to
perform the functional verification tests to ensure that the functions of the Propaq M unit work
properly.
Note: Only reset the life cycle counters for the modules that you have replaced.
Resetting Life Cycle Counters
Chapter 4
NIBP
On the Propaq M, do the following:
1. Press the Setup quick access key ( ).
2. Use the navigation keys to select Supervisor>Service>Diagnostic>NIBP>Cycle/Error
Counts.
3. Select Reset Counters. Select Yes when prompted to confirm the reset.
See “Functional Verification Tests” on page 1-22 to perform the functional verification tests.
9650-0804-01 Rev. A ZOLL Propaq M Service Manual 57
Page 62

CHAPTER 4LIFE CYCLE COUNTERS
CO2
On the Propaq M, do the following:
1. Press the Setup quick access key ( ).
2. Use the navigation keys to select Supervisor>Service>Diagnostic>CO2>Service Codes.
3. Select Reset CRC Counter. Select Yes when prom pted to confirm the reset.
See “Functional Verification Tests” on page 1-22 to perform the functional verification tests.
SpO2
On the Propaq M, do the following:
1. Press the Setup quick access key ( ).
2. Use the navigation keys to select Supervisor>Service>Diagnostic>SpO2>Error Counts.
3. Select Reset CRC Counter. Select Yes when prom pted to confirm the reset.
See “Functional Verification Tests” on page 1-22 to perform the functional verification tests.
58 9650-0804-01 Rev. A
Page 63

Overview
This section contains a listing of the replacement parts available for the ZOLL Propaq M
devices.
Replacement parts may be ordered through an authorized ZOLL distributor or directly from
ZOLL Medical Corporation. The prices for parts are available from ZOLL Medical
Corporation’s Technical Service Department.
When ordering parts, please provide the following information:
• Propaq M device model and serial number
• Field replaceable part number
• Description of the replacement assembly
To order by mail from ZOLL Medical Corporation, address your request to:
Chapter 5
Replacement Parts
ZOLL Medical Corporation
269 Mill Road
Chelmsford, MA. 01824-4105
Attention: Technical Service Department
1-978-421-9655; 1-800-348-9011; Fax: 1-978-421-0010
9650-0804-01 Rev. A ZOLL Propaq M Service Manual 59
Page 64

CHAPTER 5REPLACEMENT PARTS
Replacement Parts
PART NUMBER QUANTITY DESCRIPTION
705519 1 Handle Top
705517 1 Handle Bottom
705510 4 Screw
0162-0263 4 Screw Mount
705523 1 Left Cap, Handle
705524 1 Right Cap, Handle
1017-0005-01 1 Front Panel Assembly
403889 1 Panel I/O Left
402359 1 Panel I/O Right
705099-99 1 Back Housing
708494-99 1 Middle Housing
9301-0225 1 Dock Connector Assembly
403888 1 Power Assembly Cable
403871 1 Assy Battery Connection
704992 1 Cover, Filter Recess
1017-0160-01 1 Assy, Filter, NIBP
7772-0002-01 1 Front Enclosure Assembly
7772-0003-01 1 Display Assembly
7772-0004-01 1 NIBP Assembly
60 9650-0804-01 Rev. A
Page 65

PART NUMBER QUANTITY DESCRIPTION
7772-0005-01 1 Oridion Assembly
7772-0006-01 1 Monitor Board Assembly
Replacement Parts
7772-0009-01 1 SpO
Assembly
2
9650-0804-01 Rev. A ZOLL Propaq M Service Manual 61
Page 66

CHAPTER 5REPLACEMENT PARTS
62 9650-0804-01 Rev. A
Page 67

Overview
This chapter contains functional descriptions of the components contained in the Propaq M and
the Propaq M options.
Circuit Distribution
The Propaq M unit consists of one key PCB assembly, the Monitor Board, as well as a few
modules and assemblies: the Front Panel Keypad assembly, Status LCD Board, Dock
Connector Board, and Display. The NIBP, CO2, and SpO2 circuitry reside on modules that
connect to the Monitor Board.
Chapter 6
Functional Description
Monitor Board
The Monitor board integrates the analog circuitry and interface circu itry for patient parameters,
a digital processing section as well as user interface controls, audio control, and power circuitry
for the entire system and charging circuitry for the battery. The Propaq M system relies on a
centralized dual processor engine for its computing needs. The Main Processor (MP) serves as
the primary user interface engine and provides connectivity needs, while the Patient Processor
(PP) controls the patient monitoring function. An additional power controller micro-controller
(PC) controls the power sequencing, and battery/charger interface.
9650-0804-01 Rev. A ZOLL Propaq M Service Manual 63
Page 68

CHAPTER 6FUNCTIONAL DESCRIPTION
Main Processor (MP)
The MP section controls the user interface, connectivity needs, as well as data logging,
printing, and general system control. It consists of the CPU, program memory Flash and
SDRAM, Communication with modules/circuits: USB Client, USB Host, Debug Ports
(JT AG,Serial), Storage memory for 24 hour disclosure data, Internal VGA display and interface
circuit, LED indicators, Key Pad, and Audio circuit. The MP also controls the real-time clock
and interface to the power controller processor, battery and charger.
Patient Processor (PP)
The Patient processor circuitry supports the data acquisition, signal processing and
conditioning, analysis and control algorithms required for the physiological senso rs. It consists
of the processor, program memory Flash and SDRAM as well as interface circuitry to
physiological sensor modules/circuit s .
Power Controller (PC)
The Power Controller (PC) micro-controller controls the power sequencing to turn the dev ic e
on and off when the power switch is pressed. It also communicates to the battery charger and
battery via a serial SPI bus. Additionally, the PC controls the Status LCD and communicates
battery and charger status to the MP.
ECG 3/5 or 12 Lead Circuitry
Propaq M supports 3/5 lead and 12 lead ECG acquisition. Analog circuitry provides signal
conditioned data through an A/D converter to the PP. All of the signal processing, lead
derivation, fault detection is performed by the PP. The ECG circuitry utilizes a CPLD for
control of analog circuitry and transmission of data to the PP across an isolation barrier. A
common connector is used to receive 3/5 Lead ECG cables with a 12 Lead ECG extension. The
ECG signals from the external connector on the left side panel are connected to the monitor
board through a flex cable to J28.
Impedance Respiration
Propaq M provides the circuitry for impedance respiration measurements in 3/5 and 12 lead
configurations. This circuitry provides a low-current 72kHz AC signal across leads I and II of
the ECG cable. The signal is passed through a synchronous demodulat or and decoded by the PP
through the ECG CPLD.
Blood Pressure NIBP
The Propaq M NIBP circuitry resided on module that connects to the Monitor board through
J32. The PP communicates to the NIBP module via a bi-directional, serial bus. The NIBP
module supports both dual lumen and single lumen cuffs. The NIBP pump and valve hoses are
connected to the cuff con nector on t he left side pa nel and to th e filter on the rear e nclosure. The
pump and valve are connected to the NIBP module by short, 2-wire cables.
Invasive Blood Pressure (IBP)
Propaq M supports up to 3 IBP measurement channels. The IBP circuitry supports AAMI
BP-22 transducers (5uV/V/mmHg). The PP communicates directly to the IBP ADC over an
isolated serial bus through the FPGA. The IBP probes connect to the monitor board through
the IBP/Temp wire harness which connects to J33 of the Monitor board.
64 9650-0804-01 Rev. A
Page 69

Overview
SPO2 Module
Propaq M supports the Nellcor NELL-3 OEM Module that mounts to the Monitor board and
communicates through J36 and J40. The SpO
barrier using a UART on the PP. Signals from the probe are routed to the SpO
a flex cable that connects to J41 of the Monitor board.
module communicates across an isolation
2
module through
2
End tidal CO2 (CO2)
Propaq M supports an Oridion Microstream® CO2 module. The CO2 module mounts to the
Monitor board and communicates to the board through a cable connected to J50. Serial
communications from the monitor board is implemented via a UART on the PP. The CO
module obtains gas samples from the sampling lines through tubing and a 3-wire cable
connected to the left side panel.
2
Thermometry
Propaq M supports two simultaneous temperature measurements. YSI400/YSI700 series
probes are used to make temperature measurements. Data is communicated to the PP from the
Temperature ADC via and isolated SPI bus through the FPGA. The Temperature probes
connect to the monitor board through the IBP/Temp wire harness which connects to J33 of the
Monitor board.
Power Circuitry, Battery Charger, DC-DC converters
Power circuitry for all subsystems reside on the Monitor Board. Auxiliary Power and Battery
Power are automatically switched to provide constant current, the unit draws current from
auxiliary power when present. There is a smart battery charging circuit that will charge the
battery when Auxiliary power is present. Switching mode DC-DC converters are utilized to
make internal 6V, 5V, 3.3V, 1.8V and processor core voltages. Regulators are used to provide
regulated supply voltages with low dropout for low current consumption circuits. Each of the
isolated modules, Temp/IBP, ECG, SpO2 have independent power supplies. Isolated power
supplies are designed for isolating Patient Applied Parts. The MP via the FPGA GPIO has the
ability to shut down voltage rails or power to individual patient parameters. Power from the
battery connects to the Monitor board through J29. Auxiliary powe r connects to the Monitor
board through J31.
USB Host Port
Propaq M Monitor Board incorporates one USB Host ver 1.1 port. The port uses the USB
controller built into the PXA270 Main processor. Full speed of 12 Mbps and Low speed
1.5Mbps are supported. The Host port supports a U S B flash memory stic k for d ata ex po rt . The
USB host connector is in the right side panel and connects to the Monitor board through J44.
Lithium Ion Battery
The portable Propaq M device is powered by a removable Lithium Ion bat tery pack. This
battery pack incorporates protection circuitry and "smart battery" circuitry. The battery power
is routed from the 2-pin connector on the rear of the device to J29 of the Monitor board. The
Power Controller communicates to the smart circuitry on the battery through the 4 spring
contacts connected to J34 on the Monitor board.
9650-0804-01 Rev. A ZOLL Propaq M Service Manual 65
Page 70

CHAPTER 6FUNCTIONAL DESCRIPTION
66 9650-0804-01 Rev. A
Page 71

Overview
This appendix includes the following diagrams:
• Propaq M Electrical Hardware Interconnect Dia gr a m
• Propaq M Signal and Power Interconnect Schematic
Appendix A
9650-0804-01 Rev. A ZOLL Propaq M Service Manual 67
Page 72

Propaq M Electrical Hardware Interconnect Diagram
68 9650-0804-01 Rev. A
Page 73

Propaq M Signal and Power Interconnect Schematic
Propaq M Signal and Power Interconnect Schematic
9650-0804-01 Rev. A ZOLL Propaq M Service Manual 69
Page 74

70 9650-0804-01 Rev. A
Page 75

Appendix B
Overview
This appendix includes simulators and settings that may be used to assess the performance of the NIBP module.
Readings should be obtained within +/- 10 mmHg of the expected measurement result. The following simulators are used in this chapter:
• Bio-Tek Instruments BP Pump
• Bio-Tek Instruments BP Pump2
• DNI Nevada CuffLink
• Clinical Dynamics Smart Arm
NIBP Simulator Performance
FastBP
A dual lumen hose is required for FastBP.When you use FastBP, the reading is obtained during cuff inflation.
StepBP
StepBP is compatible with both single and dual lumen hoses.When you use StepBP, the reading is obtained
during step deflation.
9650-0804-01 Rev. A ZOLL Propaq M Service Manual 71
Page 76

Bio-Tek Instruments BP Pump
Adult/Pediatric Mode
FastBP StepBP
Simulator
Setting
200/150 198 151 200 149
120/80 120 83 116 84
80/50 83 54 77 53
Neonate Mode
Simulator
Setting
60/30 56 26
35/15 31 12
Expected
Systolic
Expected
Systolic
Expected
Diastolic
NeoBP
Expected
Diastolic
Expected
Systolic
Expected
Diastolic
Bio-Tek Instruments BP Pump2
Adult/Pediatric Mode
FastBP StepBP
Simulator
Setting
200/150 202 157 201 146
120/80 118 80 116 82
80/50 86 51 77 55
Neonate Mode
Simulator
Setting
80/50 78 46
60/30 57 31
35/15 31 12
Expected
Systolic
Expected
Systolic
Expected
Diastolic
NeoBP
Expected
Diastolic
Expected
Systolic
Expected
Diastolic
72 9650-0804-01 Rev. A
Page 77

DNI Nevada CuffLink
Adult/Pediatric Mode
FastBP StepBP
Simulator
Setting
200/150 210 152 201 138
120/80 116 77 124 80
80/50 87 49 90 50
Expected
Systolic
Expected
Diastolic
Expected
Systolic
Clinical Dynamics Smart Arm
Adult/Pediatric Mode
FastBP StepBP
Simulator
Setting
200/150 192 152 194 136
120/80 124 79 122 80
80/50 85 42 80 49
Expected
Systolic
Expected
Diastolic
Expected
Systolic
Overview
Expected
Diastolic
Expected
Diastolic
Neonate Mode
NeoBP
Simulator
Setting
80/50 77 48
60/30 57 32
35/15 31 13
Expected
Systolic
Expected
Diastolic
9650-0804-01 Rev. A ZOLL Propaq M Service Manual 73
Page 78

74 9650-0804-01 Rev. A
 Loading...